Category Archives: iOS Solution

How to Set icon list and color of Reminders app on iOS 13

The Reminders app has updated in iOS 13, Reminders app available on iOS 13, iPadOS and macOS. While iOS 13 and macOS Catalina didn’t bring a share sheet to Apple’s Mail app, you can now share text from an email into the Reminders app, and the app will associate the tasks with the email so you can easily pull it back up when you go to work on the task. You can do the same thing with websites, maps, etc.

Also Read:

* How to Recover iPhone Lost Data after iOS 13 Update

* How to Optimize iOS 13/12 Performance to Speed Up Slow iPhone

* How to Recover Deleted Reminders from iPhone

The Reminders app has a lot of feature upgrades and visual optimizations. Now you can customize the style of Reminders app with 60 different icons and 12 colors. There are 720 sorting methods to make the “Reminders” more personalized and satisfy different users.

How to change the icon and color of the Reminders on iPhone and iPad?

●Go to “Reminders”;

● To view the list, click on “…” in the top right corner;

● Select “Name and Appearance”;

● Can choose from 12 colors and 60 charts;

● Click Finish.

Customize Reminders app on iOS 13

Change the color of the Reminders on iPhone iOS 13

Customize Reminders app on iPhone 11

We can also edit icons and colors from the list view for all list views:

● Click “Edit”;

● Click the “i” icon next to the list you want to customize;

● Select new colors and icons;

● Click “Finish”.

Set Reminders colors on iOS 13

When you’re done, click Finish and you can follow the same steps to customize the icons and colors of all your lists.

Edit icons of Reminders app on iOS 13

Read More

How to Fix iPhone Stuck in Recovery Mode After iOS 13 Update

Recover Lost Data from iPhone 11/XS/XR/X/8 after Factory Reset

How to Transfer Data from iPhone to iPhone 11/11 Pro

How to Transfer Data from Samsung to iPhone 11 and iPhone 11 Pro/Max

6 Ways to Backup iPhone/iPad Data before iOS 15/iOS 14 Update

Summary
Before update to iOS 15/iPadOS 15/iPadOS 14, you must to backup your iPhone/iPad/iPod data to PC or Mac, as you may encounter some unexpected stuck errors. This article will offer top 6 solutions on how to back up data from iPhone/iPad/iPod(touch) to computer before iOS 15/iPadOS 15 upgrade.

iOS 15 and iPadOS 15, Apple’s latest iPhone and iPad mobile operating system is coming soon. As a rule of thumb, every release of iOS (including iOS 15) offers a range of updates and new features on a range of older iPhones and iPads. Normally, you won’t have problems during the iOS 15 software upgrade process. As the saying goes, prevention is better than cure. Before downloading and installing the update, make sure you have backed up your iPhone or iPad, as you may experience some unexpected stuck errors, resulting in data loss. Your iPhone may be stuck on the Apple logo, recovery mode, restart loop and cannot be recovered. Therefore, we strongly recommend you to make a full backup of iPhone/iPad in advance. This article provides top 6 solutions to backup iPhone and iPad data before upgrading to iOS 15 or iPadOS 15, perhaps one of which is what you want.

Part 1: Backup iPhone/iPad with iTunes

When it comes to making backup for iOS device, iTunes is the most common tool. The process is simple:

1. Plug your iPhone or iPad into your Mac or PC.
2. Launch iTunes and choose the iPhone icon in the upper-left corner.
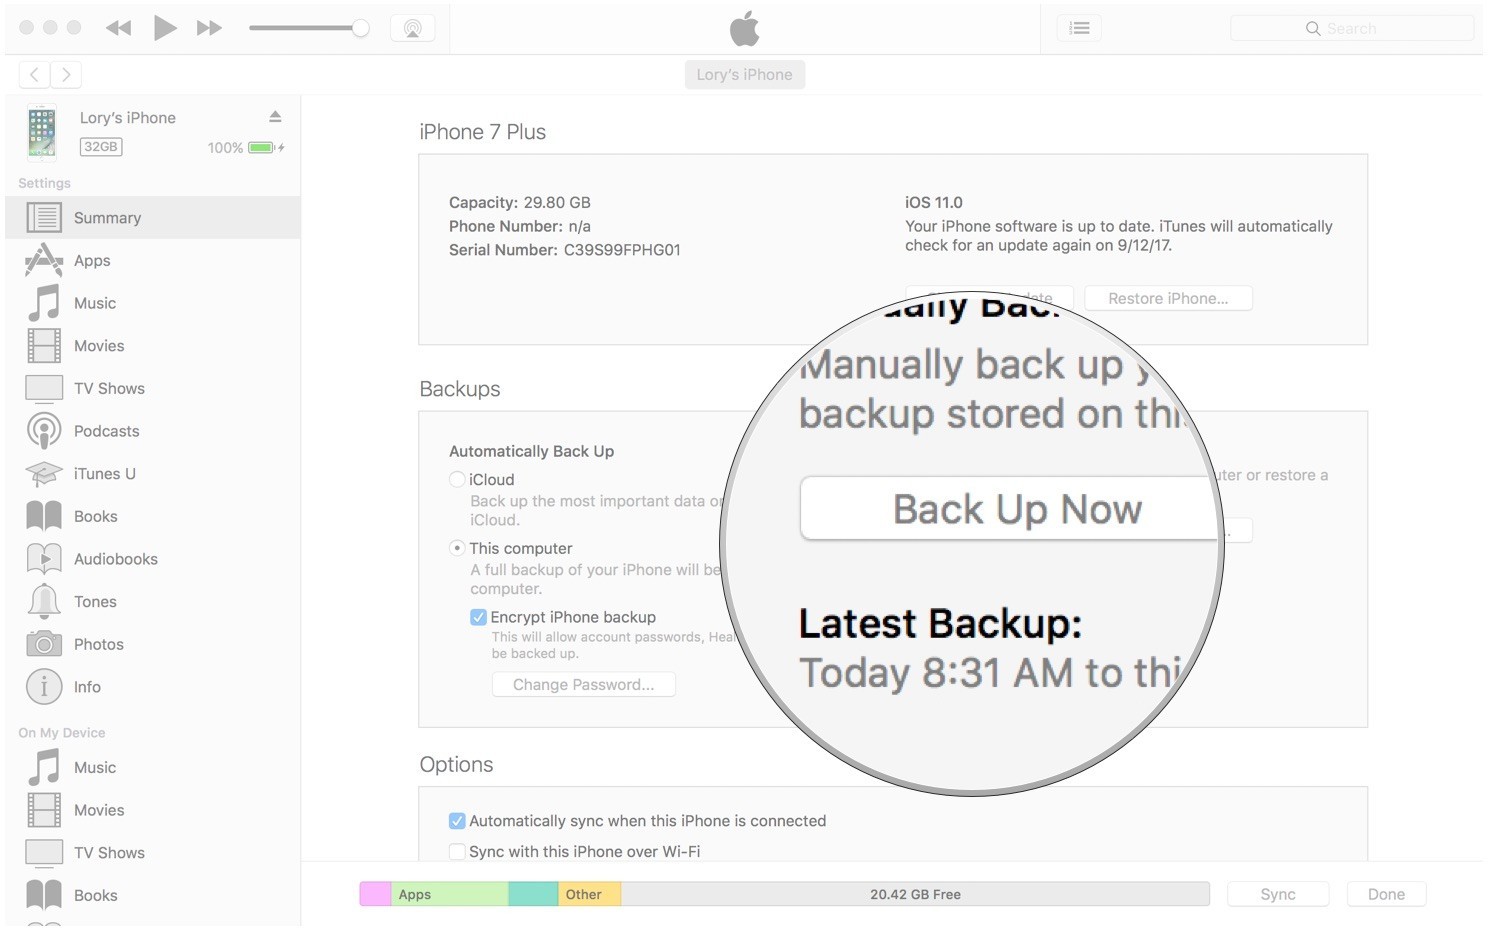
3. Click the Summary tab and scroll down to the Backups section.
4. Click the Back Up Now button and wait for the backup to complete.
5. To verify that the backup worked, open iTunes Preferences and select the Devices tab. If the backup was successful, you’ll see it listed there.

iphone-backup-itunes-mac

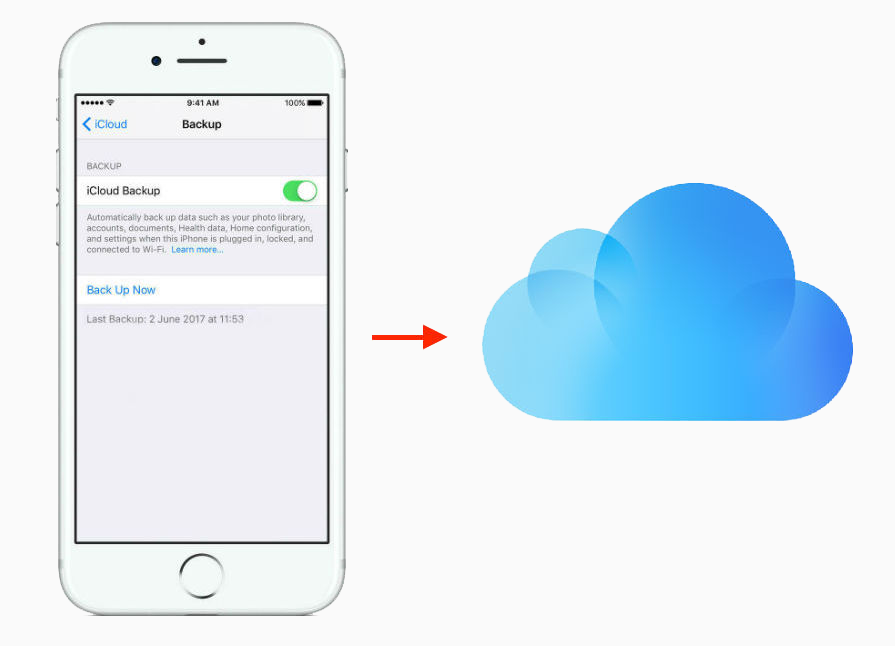
Part 2: Backup iPhone/iPad with iCloud

Apple provides 5 GB for free cloud storage for every Apple ID. So, you can leverage these 5 GB to regularly back up your iPhone data. It’s simple to perform this over the Wi-Fi network: Navigate to Settings > Your profile > iCloud > iCloud Backup > Back Up Now.

how-to-backup-restore-iphone-ipa

Part 3: Backup iPhone/iPad via iOS Toolkit – Backup & Restore

iOS Toolkit – Backup & Restore assists you to backup and export iOS device data directly to your computer. Here is a list of features for this iOS Toolkit – Backup & Restore program:

1-click to backup iPhone/iPad data to a computer.
Selectively backs up iPhone data to any Windows or Mac.
Directly backup Social apps on from iPhone/iPad, such as WhatsApp, LINE, Kik, Viber.
Restore data to device from iTunes and iCloud backup.
Export what you want from the backup to your computer.
No data loss on devices during the restore.
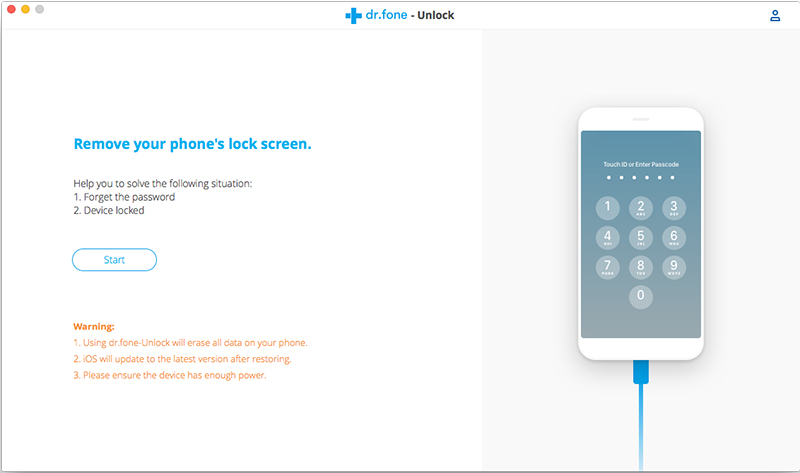
Add useful features, such as Recover, Switch, Repair, Erase, Unlock and so on.
Support iPhone XS/XR/8/7/SE/6/6 Plus/6s/6s Plus, etc.
Fully compatible with Windows 10/8/7 or Mac 10.14/10.13/10.12/10.11.

d_win d_mac
d_win d_mac

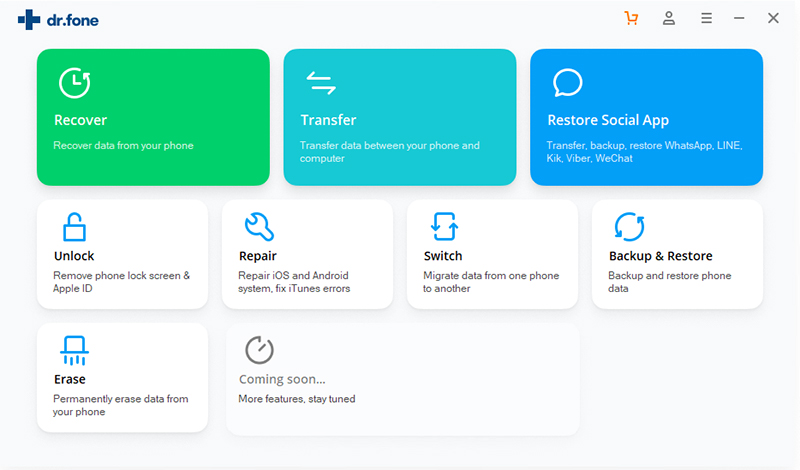
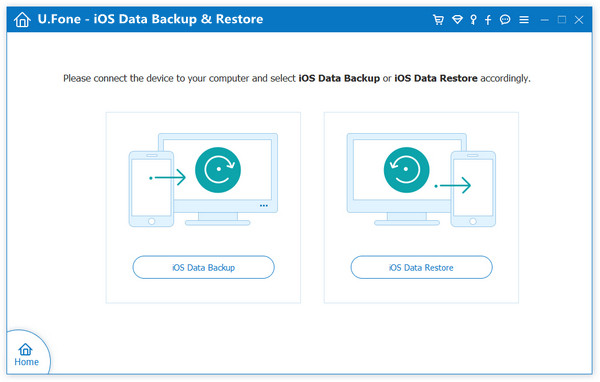
Step 1. Run iOS Toolkit – iOS Backup & Restore on your computer and you will see its functional section on the window.

Step 2. Choose “Backup & Restore“, connect your iPhone or iPad via USB cable, then click “Backup” button, a list of all supported file types will be displayed.

Step 3. Select data types you like to backup and hit the “Backup” button. Your selected data will be backed up from iPhone to your desktop or laptop instantly.

iTunes music to Android transfer

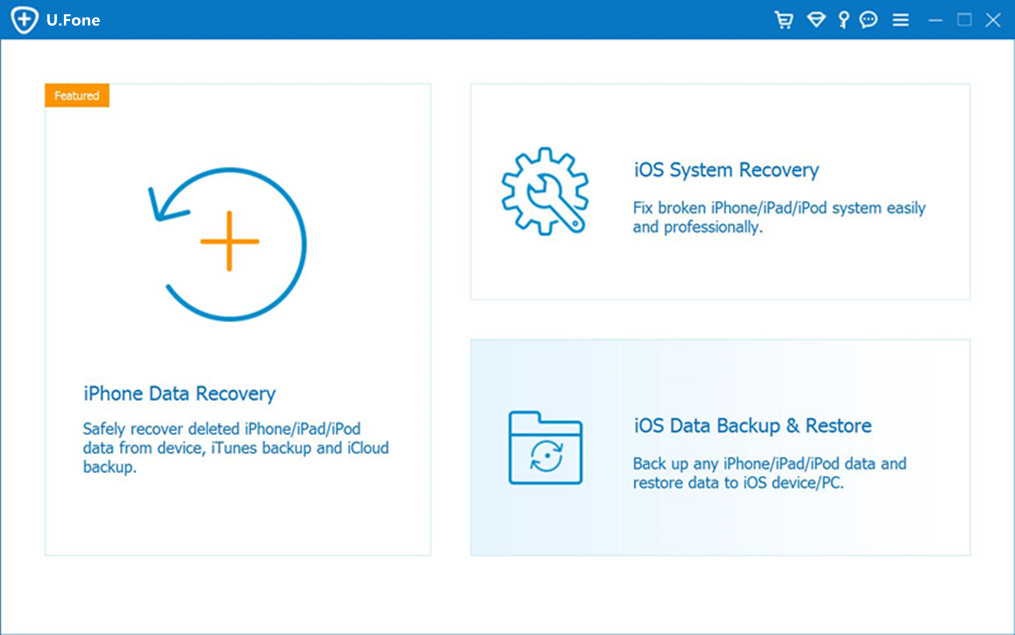
Part 4: Backup iPhone/iPad by U.Fone iOS Data Recovery

U.Fone iOS Toolkit – iOS Data Backup & Restore is also a one-stop tool for backing up and restoring data on your iPhone and iPad devices. It allows you to back up all your data with one click or select specific data for backup. The following are the specific features of this tool.

Back up any iPhone/iPad data and restore data iOS device easily.
Safely recover deleted files from iPhone and iPad.
Offer 3 recovery modes for iPhone data recovery.
Fix iOS system to normal without any data loss.
Preview data before restoring.
More than 25 data types are supported for backup, like contacts, photos, app data, messages, call history, calendars, voice memos, reminders, etc.
Support IM apps, including WhatsApp, Viber, LINE, Kik, etc.

d_win d_mac
d_win d_mac

Step 1. Open U.Fone iOS Toolkit – iOS Data Backup & Restore and connect your iPhone to PC. Select “iOS Data Backup & Restore” from its home screen.

Step 2. Select the “iOS Data Backup” then tick the boxes beside each file types you want to back up with.

Step 3. U.Fone iOS Toolkit – iOS Data Backup & Restore will start back up your iOS data. When the backup is done, it will display the name and the size of the backup file.

unfone-ios-backup-restore-connect

Part 5: Backup iPhone/iPad by iPhone Data Exporter

iPhone Backup Exporter is a desktop software which helps you to extract data from iTunes and iCloud backup files to computer without any issue.

Main Features:

Flexibly export your data from iPhone/iPad/iPod touch.
Export 18+ types of data, like contacts, messages, photos, music, videos, calendars and more.
Preview data before transfer to get exactly what you need.
Check iTunes backup without restoring it to iOS devices.
Access iCloud data on your own computer at any time.
Extract only the data you need instead of restoring the whole backup.
Compatible with all iOS versions and devices including iOS 13 and
iPhone Xs (Max).

d_win d_mac
d_win d_mac

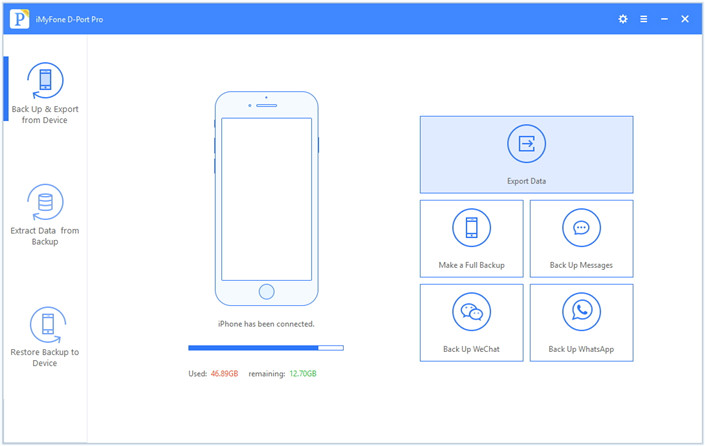
Step 1. Run iPhone Data Exporter, choose “Export from iOS Device” given at the left panel.

Step 2. Connect iPhone/iPad to PC then select the file types you need to export.

Step 3. Click on “Back Up” and wait for the notification of the completion of process.

export iphone data option

Part 6: Backup iPhone/iPad Using Phone Transfer

Phone Transfer a great handy tool designed to backup your iPhone/iPad with ease. It supports backing up 12 different types of files, including photos, contacts, SMS messages, Notes, Ebooks, call logs, music, videos, etc, and you are allowed to restore the data whenever you want. Let’s see what Phone Transfer can help you with:

One click backup data on your iPhone/iPad/iPod touch, Android phone, or Nokia (Symbian) phone to PC.
Transfer data from iPhone, Android, iOS, iTunes, iCloud to anywhere without any loss.
Easily transfer diverse types of files, including contacts, messages, apps, call logs, photos, videos, etc.
Works perfectly with Apple, Samsung, HTC, LG, Sony, Google, HUAWEI, Motorola, ZTE, and more smartphones and tablets.
Fully compatible with major providers like AT&T, Verizon, Sprint and T-Mobile.
Permanently erase your old Android phone data.

d_win d_mac
d_win d_mac

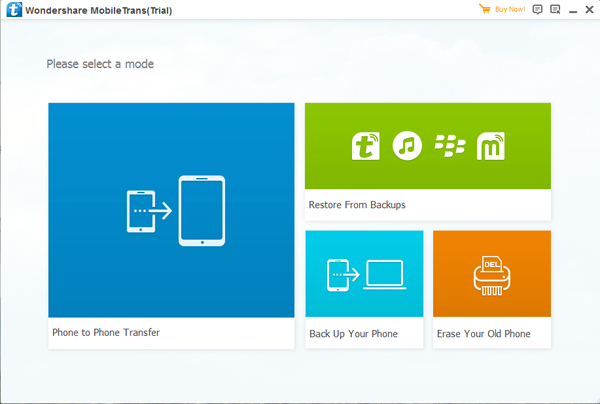
Step 1. Run Phone Transfer on your Windows PC or Mac.

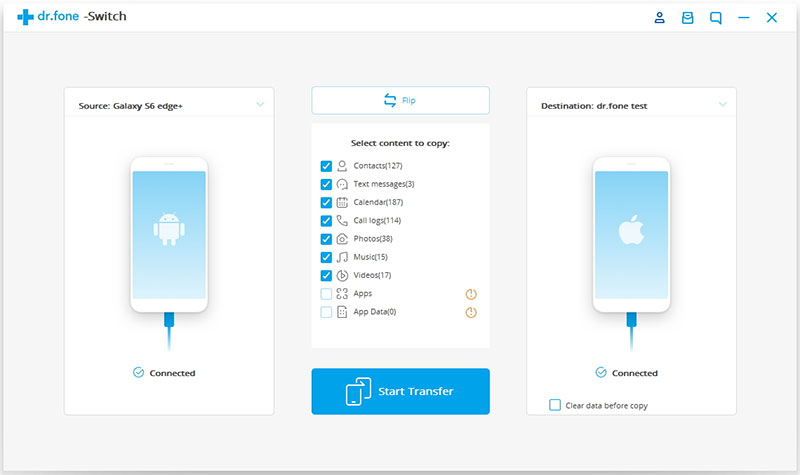
Step 2. Select “Back Up Your Phone” in the homepage and connect your iPhone/iPad to the computer.

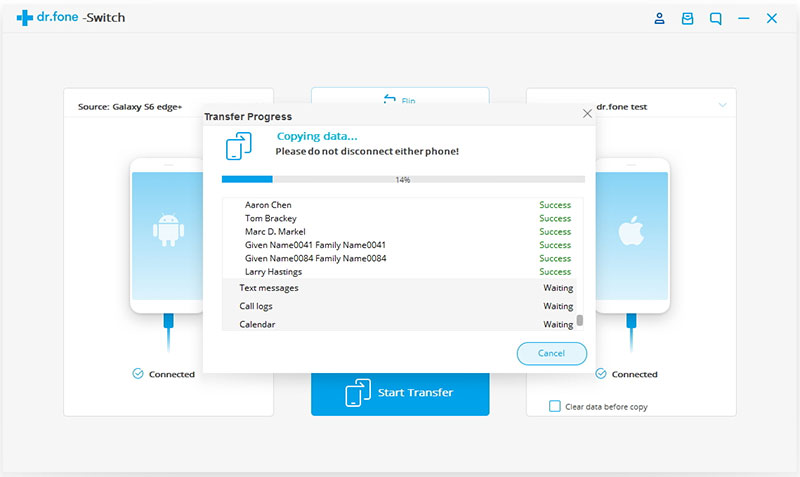
Step 3. All transferable data on your device are displayed. Check those what you wanted, and click on “Start Transfer” to back up them to your computer.

backup mode

Related Articles:

How to Restore iPhone Photos after iOS 12/iOS 13 Update

How to Recover Lost Data on iPhone/iPad after iOS 13/12 Update

Safely Backup iPhone/iPad/iPod Data before iOS 12 Update

Backup & Restore iPhone Data before iOS 11 Update(iOS 10.3)

Install IPSW File on iPhone iPad with/without iTunes

Backup iPhone/iPad Data

Factory Reset Locked/Disabled iPhone without iTunes

[Summary]: Looking for a way to reset locked or disabled iPhone without iTunes, but don’t know how? This guide explains the 4 different ways to factory reset your disabled or locked iPhone without using iTunes app.

To prevent others from accessing and protecting our private information, almost all iPhone users want to set a password on their device. Some people may even change their passwords regularly to ensure security. If you have locked your iPhone but don’t remember your password or for some reason your device has been disabled, you won’t be able to use the iPhone, let alone access any of its data.

If you are looking for a way to reset the locked/disabled iPhone, including iPhone XS, iPhone XS Max, iPhone XR, iPhone X, iPhone 8/8 Plus, iPhone 7/7 Plus, iPhone SE, iPhone 6/6 Plus, iPhone 6s/ 6s Plus, iPhone 5s, etc., then you will get help. This guide is intended to share 4 ways to give these people who want to factory reset their locked/disabled iPhone without iTunes. Let’s get started.

CONTENTS

Part 1. Factory Reset Locked/Disabled iPhone Using iOS Unlock

iOS ToolKit – iOS Unlock can easily unlock your iOS device without hassle when you enter your iPhone passcode for several times and your iPhone gets locked. The unlock feature in iOS Toolkit can efficiently unlock your iPhone if Find My iPhone/iPad is turned off.

KEY FEATURES

Easily remove iPhone lock screen without the passcode.
Fix disabled iPhone without iTunes.
Fix “iPhone is disabled, connect to itunes” issues.
Bypass passcode with 4 digits, 6 digits, Touch ID and Face ID on iPhone/iPad.
Works for all models of iPhone, iPad and iPod touch.
Fully compatible with the latest iOS 12.New icon.

d_win d_mac

step 1. Install and run the iOS Toolkit – Unlock

Check the version that is right for you to download, then install and launch the iOS Toolkit – Unlock. On the welcome screen, select the “Unlock” option to activate the process.

iPhone Lock Screen Removal

Step 2. Connect iPhone to Mac/PC

Now, using a USB/lightning cable, connect the iPhone to the system and wait for a while because the app will automatically recognize it. Then click the “Start” button.

connect screen-locked iPhone to pc

Step 3. Put the device into DFU mode

When the device is detected, it will display the interface that needs to activate the iPhone DFU mode. Follow the instructions.

get your iPhone into DFU mode

Step 4. Check iPhone Information

If the detect finishes, the software will display the model of your device. If there is something wrong, you can select again from the list. Make sure that you have provided the right information before clicking the “Download” button.

Confirm locked iPhone information

Step 5. Start to Unlock iPhone without iTunes

The app will automatically download the relevant firmware updates for your device. It may take a while to complete the download. Then click the “Unlock Now” button.

Download iPhone Firmware Package

Since the data on the device is deleted after unlocking, you are asked to enter the confirmation code 000000 from the on-screen command to activate the unlock function. Then touch “Unlock” immediately.

Your disabled iPhone has been unlocked without iTunes successfully. Your device will now be brand new.

Unlock iPhone Locked Screen

d_win d_mac

Part 2. Factory Reset Locked/Disabled iPhone by Find My iPhone

Find My iPhone can be used to locate a lost iPhone as well as to lock the device to prevent unwanted access to personal data, and can be used to factory reset locked iPhone. In order to make use of this feature, you must have previously activated the “Find my iPhone” feature on your iPhone before it got locked.

Step 1. Launch find my iPhone app from another different iPhone.

Step 2. Log in with your own Apple ID and password.

Step 3. Click on the name of your iPhone or iPad that you want to reset.

find-my-iphone-device-1

Step 4. Click on the “Erase iPhone” option and confirm your selection. Then it will remotely factory reset the locked iPhone for wiping everything on the device.
Step 5. Wait for a while as the “Find My iPhone” feature will remotely erase your iOS device. Needless to say, it will also disable its lock.

find-my-iphone-device-2

Part 3. Factory Reset Locked/Disabled iPhone on iCloud.com

Restoring from iCloud backup will erase all data and settings (including the screen password) on your device. Here’s how to do it.

Note: If you have already stored some important files that have not been backed up to iCloud, then it is best to try other alternatives.

Step 1. Enter anyone browser to visit iCloud.com, then log in with the same Apple ID used on the disabled iPhone.

Step 2. Navigate to Settings > Select Restore and choose a backup that contains all of your data > click Restore. At the end, you will get a brand new device, but the iCloud backup file will cover all your data, which means that new data born after this backup will disappear.

Part 4. Factory Reset Locked/Disabled iPhone via Siri (iOS 8 – 12)

Most users still don’t know if your device is running iOS 8.0 to iOS 12, you can use Siri to unlock a disabled iPhone. Here’s how to bypass the iPhone lock screen without a password via Siri.

Step 1. Press and hold the Home button for a few seconds to activate Siri on your iPhone.

Step 2. Ask Siri “Siri, what time is it?” Then Siri will show the local time.

Step 3. Tap on the clock icon and then tap on “+” to add a new clock.

add-another-clock

Step 4.Simply type anything you want and tap on the “Select all” option. Here you need to target the “Share” option.

Step 5. In the pop-up options, select “Message” to open a new message window.

share-with-messages

Step 6.Type anything you want in the receiver bar and then tap on “+” to create a new contact.

Step 7. It will open a new window. Click here to click the “Create new contact” button.

Step 8. On the Add new contact screen, choose to add a photo and tap on the “Add Photo” option.

add-contacts-photos

Step 9. This will open the photo gallery. From here, you can visit any album.

access-albums

Step 10. Don’t select an image, just press the Home button to exit the interface. This will open the iPhone’s home screen.

unlock-disabled-iphone-via-siri

Reset Disabled iPhone without iTunes

Transfer Data from Old iPhone/Android to iPhone XR/XS/XS Max

[Summary]: Bought an new iPhone Xs? Go to learn this guide to transfer contacts, SMS, music, photos, videos and other data from old iPhone and Android phone like Samsung, HTC, Huawei, Sony, Moto, Google Pixel to the new iPhone XS, iPhone XS Max and iPhone XR via Phone Switch with easy steps.

Don’t Miss: Move to iOS App: Swtich Android to iPhone

Don’t Miss: iPhone Manager: Transfer Music/Photos/Video to iPhone X/Xs

News about iPhone XS and iPhone XS Max

Last year’s iPhone X brought the biggest evolution in a decade, so what changes will the iPhone bring this year? Today, Apple held an autumn new product launch at the Jobs Theatre in the Apple Park campus, officially releasing the iPhone XS and iPhone XS Max. The iPhone XS is an upgraded version of the iPhone X that uses the iPhone X 5.8-inch OLED screen with a resolution of 2436×1125. iPhone XS Max is a large screen upgrade of iPhone X. Although the overall shape still uses the design of iPhone X, the screen is increased from 5.8 inches to 6.5 inches of iPhone X. It can be said that it is the largest iPhone in history. Close to the iPhone 8 Plus. Of course, as the screen increases, the specifications are also improved. The screen resolution of the iPhone XS Max is increased to 2688×1242, which is still an OLED material.

transfer data to iphone xs

In terms of price, iPhone XS and iPhone XS Max continue the previous high-priced strategy, with 64GB, 256GB, 512GB three versions, iPhone XS 999 US dollars, and iPhone XS Max is the most expensive iPhone in history, and the most expensive in history. The iPhone model, the 64GB version starts at $1099, pre-Order on September 14.

There are some features of the new iPhone models attract the user’s attention. However, data transfer is always a problem for most people. Here is the question: How to transfer data from old phone to new iPhone XS and iPhone XS Max?

Question: How to Transfer Data to iPhone XS/XS Max?

How to transfer data from Samsung to iPhone Xs Max?
Hi. I got a problem and want some help. Is there any way to transfer data from my old Android Samsung phone to iPhone XS Max? I heard that there are some tool available for transferring data between two phones directly. Any suggestions? Thanks so much!

How to sync data from iPhone 6s to iPhone Xs?
Someone can help me sync contacts and text messages from iPhone 6s to new iPhone Xs without iTunes? It’s very difficult to do syncing between two iPhones by iTunes, I need a third-party iPhone to iPhone transfer tool to switch contacts, SMS and songs from old iPhone 6s to the new iPhone Xs.

Normally, people will backup data from the old phone on the computer or some cloud service, then restoring the backed up to the new iPhone. That sounds so complicated and time-costing. In fact, here is an better solution for you who want to import data to the new iPhone. Did you get a new iPhone model and now you want to migrate all of your data and stuff from an old phone to the new iPhone? It’s easy to migrate everything from an old phone to a brand new iPhone and sync all of your data with you. What is it? That’s Phone Switch.

CONTENTS: Switch Data from Any Old Phone to NEW iPhone XS(Max)

Let Phone Switch help you transfer everything from old iPhone to the new iPhone XS, iPhone XS Max and iPhone XR quickly. It supports to transfer various types of contents such as contacts, SMS, call logs, photos, videos, music, calendar, apps, apps data between two mobile devices. It is a famous software designed for switching files between two phones based on iOS OS, Android OS, Symbian OS, or Windows OS. Besides to transfer data between two mobile devices, it features with phone data backup & restore. Phone Switch compatibles with all iOS models like iPhone XR and iPhone XS(Max); iPhone 8(Plus); iPhone 7 (Plus); iPhone 6 (Plus); etc,.

d_win d_mac

Transfer Contacts,SMS,Photos,Videos from Android to iPhone XS(Max)

Step 1. Run Program and Connect Two Phones to the Computer
To begin with, run Phone Switch on the computer, select “Switch” among the 8 options.

Android to iPhone XS/XR transfer

Connect both of the old phone and new iPhone to the computer. The program will detect the two phones soon.

To import data from phone to iPhone, the old phone as the source device should be on the left and the new iPhone as the target device should be on the right.

Note: You can click the “Flip” button to exchange the position of two phones.

Step 2. Select Files and Start to Transfer
In this step, please switch your Android phone in the left side as source device, the new iPhone XS in right side as target devices. Then select the file types contain the data you would like to transfer, here contacts, photos, messages, call logs, music, videos, calendar, apps, apps data are available for selecting.

select files to transfer

Step 3. Transfer Data from Android Phone to iPhone XS
Simply click on “Start Transfer” to begin the transfer. Please keep the connection between the devices and the computer until the process is end.

switch data from Android to iPhone XS

Finally, all the selected files will be transferred to the target phone(new iPhone) successfully take you just a few minutes. All of your Android data be moved to your new iPhone XS, you will find it on the iPhone XS and using them!

Android to iPhone XS transfer completed

1-Click to Transfer Data from iPhone to iPhone XS

Tips: If you want to transfer files from iPhone to iPhone, please connect both two iPhones to the computer, then launching the Phone Switch on your computer, after your old iPhone and new iPhone XS detects by the Phone Switch – iOS Toolkit program, then making sure your iPhone XS in the right side as a target device which you want to sync data to…Then, select the file types you want to move, finally click the “Start Transfer” button begin to sync data from old iPhone to iPhone XS. Only few minutes, your old iPhone’s data by synced to iPhone X, this program supports transfer data from iOS 11 to iOS 12 devices; sync data between iOS 11 devices or iOS 12 devices for iPhone, iPad and iPod.

transfer iPhone data to iPhone XS

Free download the Phone Toolkit – Phone Switch for Windows or Mac and try to transfer files to your new iPhone directly.

d_win d_mac

Related Articles:

Transfer iPhone Data to iPhone XS/XS Max/XR

Transfer Samsung Data to iPhone XS/XS Max/XR

Transfer Content from Previous Phone to New iPhone 8/X/XS

How to Recover Deleted Data from iPhone

How to Transfer iTunes Music to iPhone

How to Transfer iTunes Videos to iPhone

How to Backup & Restore iPhone

Transfer Data to iPhone XS/XR

Transfer Data to iPhone XS

Transfer iPhone Contacts SMS Data to iPhone XS/XS Max/XR

[Summary]: Don’t know how to transfer contacts and text messages from old iPhone to iPhone X, iPhone XS, iPhone XS Max and iPhone XR without iTunes? Download the iPhone to iPhone transfer software and follow this to sync data including contacts, phone numbers, email, SMS, iMessages, text messages from iPhone 8/7/6S/6(Plus) to iPhone X/XR/Xs(Max)/XR quickly.

I am ready to upgrade my phone to new iPhone XS Max. However, a trouble thing suffer from me is how to switch contacts from iPhone 8 to iPhone XS Max with one click? I need an efficient plan with easy steps. Thanks for your advice.

There’s only a few weeks to go until the 2018 iPhone (likely to be called the iPhone Xs/XS Max) is expected be announced. Wondering what Apple might have for us? According to the rumor, there are three new models will be release, insist of iPhone Xs, iPhone Xs Max, iPhone XR. Ready to get it in your pocket? However, you may encounter a headache problem when you have the new brand iPhone by then, which is how to transfer data from old iPhone to the new one, especially contacts, messags, notes, calendars, songs, applications or others.

In this article, we mainly talk about transferring data between two iPhone with the most simple and safe way. When you have finished working through this tutorial your new iPhone will look exactly the same as your old iPhone: Apps ordered in the same way, and stored in the same folders; photos will appear in your Photos app; old text messages will appear in your Messages app; all your Contacts will be available to you; and so on. The only difference will be the way your iPhone looks and how fast it is! What we want to recommend for you is a terrific tool – Mobile Sync.

Sync iPhone Data to New iPhone via Mobile Sync

Mobile Sync is a professional iOS data transfer & manager software, which is the best tool designed for syncing iOS data between iOS device and PC, transfer files between two iOS devices directly. Mobile Sync is an iTunes alternative, manage and sync iOS data in an easy way, provides you with an effective solution to sync iPhone data to iPhone 9/iPhone X Plus/iPhone SE2 with easy steps. The types of transferable files including videos, music, photos, contacts, SMS and others. What’s more, it features with ringtone maker and HEIC to JPEG/PNG converter. Mobile Sync works perfectly with all iOS models and supports all iOS system.

d_win d_mac

How to Sync Contacts, SMS from iPhone to iPhone XS?

Step 1. Connect Two iPhone to PC
First of all, launch Mobile Sync on the computer, connect both of old iPhone the new iPhone to the computer at the same time with its USB cables.

mobile sync home page

Step 2. Select Data to Transfer
Click the files contain the data you need to transfer. Click data type on the left and select specific iOS files on the preview window.

select data to transfer

Step 3. Begin to Sync Data to iPhone XS
You could preview all select data under the files name, then click “Export to Device” on the menu bar. The program will begin to sync all selected data from the old iPhone to the new one.

sync iPhone data to new iPhone

d_win d_mac

Related Articles:

Transfer Samsung Data to iPhone 9/iPhone X Plus/iPhone SE2

Transfer Android Data to iPhone 9/iPhone X Plus/iPhone SE2

Transfer Content from Previous Phone to New iPhone 8/X

How to Recover Deleted Data from iPhone

How to Transfer iTunes Music to iPhone

How to Transfer iTunes Videos to iPhone

How to Backup & Restore iPhone

Transfer SMS Contacts to iPhone XS

Transfer iPhone Data to NEW iPhone

Transfer Contacts SMS Photos from Android to iPhone XR/Xs(Max)

[Summery]: Don’t know how to move Android to iPhone XS? Read this post to learn how to transfer/switch/copy data including contacts, text messags, photos, videos and music from Android to iPhone XR/Xs(Max)/X and iPhone 8/7/6S/6(Plus) without iTunes.

Since the new models of iPhone (iPhone XS, iPhone XS Max and iPhone XR) are going to release on the market, it attractive many people, especially a part of Android users who are planning to switch data from Android to iPhone. Want to transfer from Android phone like Samsung, Huawei, HTC, Moto, Google Pixel to new iPhone Xs? That’s really nice. However, I guess that it may worry you a lot for how to transfer data from Android to iPhone. Actually, it is not as so hard as you think to switch files between Android and iPhone. There are some ways available for you to transfer content between Android and iPhone though it based on different OS system, making it for you migrate all your important data safely. Here we offer the best one for you to finish the transfer with only one click.

Transfer Data SMS Contacts Photos fro iPhone XS Directly

Suffer greatly from the slow speed to transfer Android data to iPhone and want a better way? Here is a powerful Android to iPhone XS transferPhone Switch, which helps you transfer data from Android to iPhone XS(Max)/iPhone XR with one click. All in all, it is a smart data transfer tool designed for switching data between two mobile devices among Android device, iOS device, Symbian device and Windows device. The types of transferable files including contacts, photos, messages, call logs, music, videos, calendar, apps, apps data. It features with phone data backup & restore function. Almost all brands of mobile phone are supported by this tool, like Samsung, Google Pixel, Lenovo, LG, HTC, Motorola, Huawei, Xiaomi, Vivo, OPPO, etc,.

d_win d_mac

Simple Steps to Transfer Contacts, SMS from Android Samsung to iPhone XS/XS Max/XR

Step 1. Run Program and Connect Samsung and iPhone XS to the Computer
To get started, run Phone Switch on the computer, select “Switch” among the 8 options. Connect both of the Samsung Galaxy S9/S8/S7/S6/Note 8/Note 6/Note 4,etc. and new iPhone XS to the computer. The program will detect the two phones soon.

Android Samsung to iPhone XS transfer

To import data from Android to iPhone, Android as the source device should be on the left and iPhone as the target device should be on the right.

Note: You can click the “Flip” button to exchange the position of two phones.

Step 2. Select Files and Start to Transfer
Select the file types contain the data you would like to transfer, contacts, photos, messages, call logs, music, videos, calendar, apps, apps data are available for selecting.

select files to transfer

Step 3. Transfer Data from Samsung Galaxy to iPhone XS(Max)
Simply click on “Start Transfer” to begin the transfer. Please don’t disconnect the devices until the process is end.

switch data from Samsung to iPhone XS

At last, all the selected files will be transferred to the target phone (new iPhone XS) successfully in just a few minutes. Then you could check the data on the new device freely.

transferred completed

d_win d_mac

Related Articles:

Transfer Data from Samsung to iPhone XS, iPhone XS Max and iPhone XR

Transfer Content from Previous Phone to iPhone 8/X

How to Recover Deleted Data from iPhone

How to Transfer iTunes Music to iPhone

How to Transfer iTunes Videos to iPhone

How to Backup & Restore iPhone

Manage & Transfer Files for iPhone

Transfer Android Data to iPhone XS

How to Fix Various iOS Issues on iPhone/iPad

Summery: No matter your iPhone/iPad get into the normal state due to any causes, we will do a great help for you, to fix various iOS issues on iPhone/iPad via this excellent iOS Fix & Data Recovery.

Hi, please help. My iPhone stuck in the Recovery Mode and I try some ways but still can’t get it out of this mode. Any ideas for suggestion?

My iPad stuck at the black screen for unknown reasons. How to fix iOS system to normal on iPad without data loss? I haven’t backup all the data recently.

iOS system is the best mobile operating system in the world. For most people, they prefer using Apple iPhone than Android phone since iOS system is advanced and humanized. Nevertheless, sometimes iPhone, iPad may come across trouble, for example, get into the abnormal state. iOS device stuck in the Recovery Mode, stuck at black/white screen, stuck in Apple logo, are the most common iOS errors that happen on device. These issues will happen on iOS device after performing device to a new iOS version, doing the iOS jailbreak or other physical damaged. You should use the Recovery Mode to fix these iOS errors on device. However, for most system issues, you need to repair iOS system to restore the device completely.

Fix iOS System without Data Loss

iOS Fix & Data Recovery is the processional iOS system recovery tool that helps fix various iOS issues on iPhone/iPad within 10 minutes. It can fix all types of iOS errors, like stuck in the Recovery Mode, stuck at black/white screen, stuck in Apple logo, frozen screen, water damaged, etc,. More importantly, the entire fixing process will not lead to any data loss on device. It is safe, effective and efficient. iOS Fix & Data Recovery is capable of fixing iOS system to normal with three modes: Standard Mode; Exit Recovery Mode; Advanced Mode. Additionally, this all-in-one program enables you to recover iOS data for four modes, which are Smart Recovery; Recover from iOS Device; Recover from iTunes Backup; Recover from iCloud Backup.

The “Fix iOS System” solution can do a great help for someone whose device is stuck on various iOS issues. You will see the program offers three modes to fix various iOS issues. You can choose the “Standard Mode” to fix common iOS issues like device being stuck on white screen/black screen/Apple logo/DFU mode, restarting loops, bricked iOS devices, freezing screen, not turning on and more. It can be used to repair iOS device stuck on Recovery Mode with one click only. What’s more, you can use Advanced Mode if the Standard Mode cannot fix the iOS issues or you forget the password of your device.

d_win d_mac

Notice:

A.The iOS device will be updated to the latest iOS version after fixing via iOS Fix & Data Recovery;
B.Any Jailbroken device will be restored to the default mode after fixing via iOS Fix & Data Recovery;
C.It will be unlocked your phone without password after fixing via iOS Fix & Data Recovery.

Way 1. Fix iOS Issues without Data Loss using Standard Mode

Launch the iOS Fix & Data Recovery on the computer and click on “Fix iOS System” in the home page. Before choosing the mode, connect your device to the program via a USB cable. And then you will see the three modes under “iOS System Recovery” selection.

ios system recovery

Select the “Standard Mode” and the program will prompt you to enter DFU Mode/Recovery Mode to start the fixing process.

Step 1. Get iOS Device to DFU Mode/Recovery Mode
How to Get Device into DFU Mode:

Click “Start” button and the program will start to count down. Press and hold Sleep/Wake button and Home button simultaneously for 8-10 seconds. Then continue holding the Home button for about 5 seconds.

get iphone into the standard mode

If your device can’t enter into the DFU Mode, you can put it into the Recovery Mode to start the fixing.

How to Put Device to Recovery Mode:

Press and hold the Sleep/Wake and Home buttons at the same time. Don’t release the buttons when you see the Apple logo. Keep holding both buttons until you see the icon “Connect to iTunes” on your device.

put iphone into the recovery mode

Step 2. Download the Firmware for Fixing iOS Device
Once you have entered device into the DFU Mode or Recovery Mode successfully, you will need to download the new firmware for your device. The program will detect your device automatically and provides you with the latest iOS version suited for downloading it. You just need to click on “Download” to begin the downloading.

download firmware for iphone standard mode

Note: if the program can’t detect your device model, you can manually choose the model of your device to download the firmware.

Step 3. Fix System with Downloaded and Verified Firmware
After downloading the firmware, just click “Start to Fix” to verify the firmware and the program will start to fix your iOS automatically after that. Once the fixing process is finished, please check whether your device can start. If the device can’t start, please try again.

finished fixing system

If the fixing failed, you can retry the “Standard Mode” or use the “Advanced Mode” to fix the iOS issue.

d_win d_mac

Way 2. One Click to Exit Recovery Mode on iDevice

In the main window, connect your device to the computer, and then choose “Exit Recovery Mode” option.

Step 1. One Click to Start the Process
Simply clicking “Exit” button, the program will start getting out your iDevice of the Recovery Mode immediately.

exit recovery mode finished

Step 2. Wait until the Process Finishes
It will take seconds to exit the device of the Recovery Mode. After that, you device will start successfully.

exit recovery mode home page

Note: If your device can’t start after the fixing, please try again or use the “Standard mode” to exit the Recovery mode.

d_win d_mac

Way 3. Use Advanced Mode to Reinstall iOS System Completely

If the Standard Mode can’t fix the iOS issue on your device, you can try “Advanced Mode“. Just click “Advanced Mode” from the main window and the process is same with “Standard Mode“. Please pay attention that the “Advanced Mode” will reinstall iOS completely and erase all data from your device, please do this cautiously.

Step 1. Get iOS Device to DFU Mode/Recovery Mode
Please follow the instruction to get iOS device to DFU Mode or Recovery Mode.

get iphone to advanced mode

Step 2. Download the Firmware for Fixing Device
Once you have entered device into the Advanced Mode successfully, you will need to download the new firmware for your device. The program will detect your device automatically and provides you with the latest iOS version suited for downloading it. You just need to click on “Download” to begin the downloading.

download firmware advance mode

Step 3. Fix iOS System with Downloaded and Verified Firmware
Once the fixing process is finished, please check whether your device can start. If the device can’t start, it may be some hardware problems, you can try it again or send it to the local Apple repair store.

finished fixing system advanced mode

Tips:

For Mac users, please duplicate and install iOS Fix & Data Recovery in your Applications folder instead of double clicking the software after saving it on your Mac.

d_win d_mac

More iOS System Recovery Tutorials:

How to Repair iOS System Issues without Data Loss

How to Fix iTunes Connect Issue without Data Loss

How to Fix iPhone Stuck in Reboot Loop without Losing Data

How to Fix iPhone Stuck in Recovery Mode

Download and Install iOS 12 on iPhone without Data Loss

Restore Data from iPhone when Stuck in Recovery Mode

Fix Various iOS Issues on iPhone

iOS Data Recovery

Recover Your iPhone iPad Lost Data
Now, Even without Backups

Compatible with iOS 11 & iPhone X/8 (Plus)

Recover Lost Data Now

How to Selectively Restore iPhone Data from iCloud Backup

Summery: Lost iPhone data and searching the ways to restore iCloud backup to iPhone? Check this post and get all the solutions to extract data from iCloud backup. Hope it will do a favor for you guys.

I deleted all my contacts on my iPhone 8 carelessly. Fortunately I had a backup in iCloud. But I was prompt to restore the whole iCloud backup file when I try to directly restore from iCloud. Is there any way to restore content from iCloud without wiping any data on my device?

Your iPhone contains a lot of valuable information that you don’t want to lose. But all the time, data loss can occur in our life. You can lose data on your iPhone through accidental deletion, virus attack, iOS update, iOS jailbreak or any other causes. If any of the unfortunate situation happens, you must need to restore deleted data on iPhone. If you already have an iCloud backup of your device, you should be commended to restore data with the iCloud backup on your device. The importance of backup cannot be overstated especially because of just how easy it is to lose some of the data on your device. This page is going to talk about some solutions to restore iCloud backup to iPhone, you can take the suitable one depend on your situation.

Part A: Restore iCloud Data by Restoring Your iPhone

Here are the steps to retrieve iCloud data by using restore and reset “Erase all content and settings”.

Step 1. Open the “Settings” on your iPhone.
Step 2. Click on “General” and then “Reset” and choose “Erase all Contents and settings”.
Step 3. Flow the instructions on the Set up screen and then choose “Restore from iCloud Backup”.
Step 4. Sign in with your Apple ID and then select the backup file to restore the data.

restore iphone from icloud  backup

Shortcoming: This solution will wipe all previous data on the device, and it can’t selective data to restore from iCloud backup instead of the whole file. If you want to restore iCloud data without losing any original data, please try the second solution.

Part B: Extract Data from iCloud Backup without iCloud

Is there a way to restore iCloud backup without losing previous iPhone data? The answer depends on who you ask. If you ask someone from local Apple store, the answer will be “No”. Selectively restore iCloud backup is out of the question if you use the official restoration process — it is all or nothing. If you ask us, the answer will be “Yes”. U.Fone iOS ToolkitiOS Data Recovery will be super helpful. This program basically take the iCloud backup file and choose the exact content that you want. Waste no more time and get to know of it.

U.Fone iOS ToolkitiOS Data Recovery enables you to preview your iCloud backup files before performing the recovery. You can selectively restore any data from iCloud to computer without iCloud, including contacts, messages, call logs, photos, videos, calendars, notes, WhatsApp, apps, etc,. What’s more, it dose not require “Reset” on your iOS device and would not erase any data on your phone. In addition, it can help to extract data from iTunes backup, recover data from iPhone without backup. Compatible with all iOS devices and all iOS system.

d_win d_mac

Highlights of iOS Data Recovery:
-Recover up to 16+ iOS data from iCloud backup.
-Preview and selectively recover what you want from iPhone, iTunes, or iCloud backup.
Recover iOS data without wiping any original data.
-Safely backup & restore iOS data on the computer.
-Fix any iOS system errors without data loss.

Extract Data from iCloud Backup without Wiping Original Data

U.Fone iOS Toolkit – iOS Data Recovery provides you with three recovery modes,  to manage your iOS data on the computer safely. In the homepage of program, you can see these three options are available: iPhone Data Recovery; iOS System Recovery; iOS Data Backup & Restore.

ios data recovery home page
Step 1. Run Program and Select Recovery Mode
Download and run iOS Data Recovery on the computer. For iOS data recovery, you should select the biggest one “iPhone Data Recovery” in the home page of the program. Then select “Recover from iCloud Backup File” recovery mode.

Step 2. Log into your iCloud Account
Log in your iCloud account by entering the iCloud ID.

log in icloud

Step 3. Download and Extract the iCloud Backup File
Once you’ve logged in, a list of backup files will be under your iCloud account. Select the iCloud backup file that you want to extract from. Then click on the “Download” button to go on.

choose icloud backup

When it’s complete, click the “Scan Downloaded” button to extract data from the selected iCloud backup file.

Step 4. Preview and Recover Data from iCloud Backup File
Once the scan process is finished, you can preview data in the scan out list, and recover any selected data to the computer by clicking “Recover” button.

recover data from icloud

d_win d_mac

Related Articles:

How to Recover Deleted or Lost Data from iPhone/iPad/iPod

How to Recover iPhone Data from iCloud Backup

How to Recover Data/Files/Information from an iCloud Backup

How to Recover iPhone Data from iTunes Backup

How to Restore iPhone Data from iTunes/iCloud Backup

How to Recover Deleted Data from iPhone Directly without Backup

How to Back Up and Restore Your iPhone Safely

How to Extract Data from iCloud Backup

How to Recover iPhone Data from iTunes Backup

Summery: How to freely extract data from iTunes backup after losing iPhone data? Here are some tips on how to recover iPhone data from iTunes backup with iOS Data Recovery, which could restore deleted contacts, SMS, photos, videos, call history, WhatsApp and more iOS data from iTunes backup selectively.

I want to only recover my lost data from my iTunes backup instead of the whole iTunes backup files. Syncing iTunes to do the restore will overwrite all my iOS data. How to recover iPhone data from iTunes backup files selectively without overwriting my previous data?

It is a good habit for everyone to have regular backup for an iPhone, iPad and iPod. Some people like to backup device with iTunes syncing, some of them like to backup device with iCloud syncing, others like to backup via third-party tools. In this case, you can extract the iPhone data from backup after your device is lost/damaged or just losing data under different data loss situations. However, recover iPhone data from iTunes directly will sync all backup files to your device by overwriting the previous data. What’s more, you can’t recover any data from the iTunes backup file selectively instead of the whole file. Which is no convenient enough. In this page, we will show you a complete guide to recover iPhone files from iTunes backup without iTunes.

Part 1: How to Restore iPhone Data with iTunes Backup

Step 1. Launch iTunes and connect your iPhone to the computer.
Step 2. In iTunes, click on your device, which appears in the upper-left corner.
Step 3. Select “Restore Backup…” under Backups section on the right panel.

restore itunes backup

Your iPhone will show “Restore in Progress” on the screen, and iTunes will show a progress bar of the restore process. Be patient to wait for the progress bar to finish, and for the restart to complete before you try to use or disconnect the device. After it finished, all of your lost data would be recovered on your iPhone.

Cons: This solution not support to restore iPhone data of selected data from the iTunes backup file instead of the whole file, and the restored data will overwrite your previous data on iPhone. Besides, iTunes doesn’t support to preview backups before the recovery. To restore iPhone data from iTunes backup perfectly, you should turn to the second solution in the follow section we are going to talk about.

Part 2: Restore iPhone Data from iTunes Backup without iTunes

With a variety of iOS backup data extracting features, many iPhone backup extractor tools allow you to restore your lost information. Indeed, it is not an easy job to find the iTunes backup location for most users because iTunes won’t tell you where the backup will be stored when you create backup manually. So you are not able to extract any iPhone data from iTunes backup on the computer without the help of some professional tools. However, there actually are some kind of iPhone backup viewer or iPhone backup extractor which has a powerful function to preview and extract selective data from iTunes backup. For example, U.Fone iOS ToolkitiOS Data Recovery is one of the iTunes backup extractor you’re looking for.

iOS Data Recovery could be the best iPhone backup extractor if you’re facing a severe iOS data deletion or corruption disaster. It’s fully capable of extracting iPhone data from iTunes backup without iTunes, up to 16+ different types of iOS files. Selectively preview and choose data types you want, and import them directly to iPhone or to the computer. In addition, it is more than one iPhone backup extractor, it can also export iPhone data from iCloud backup and recover deleted data from iPhone directly.

d_win d_mac

U.Fone iOS Toolkit – iOS Data Recovery Main Features:
– Focus on recovering up to more than 16+ different types of iOS files, such as contacts, messages, photos, videos, call history, WhatsApp and apps, etc,.
– Recover your important files with three safe ways: recover from iTunes backup; recover from iCloud backup; recover from iOS device directly.
Preview the files in thumbnail before recovery so that you can selectively extract data.
– Recover iOS data after losing data for any data loss causes.
Recover backup files without overwriting the previous data on device.
-Backup & restore iOS data safely.
-Fix iOS system to normal without data loss.

Restore iPhone Data via iTunes Backup without iTunes

U.Fone iOS Toolkit – iOS Data Recovery offers three recovery modes for you to manage your iOS data on the computer safely. In the homepage of program, you can see these three options are available: iPhone Data Recovery; iOS System Recovery; iOS Data Backup & Restore.

ios data recovery home page
Step 1. Run Program and Select Recovery Mode
Download and run iOS Data Recovery on the computer. For iOS data recovery, you should select the biggest one “iPhone Data Recovery” in the home page of the program. Then select “Recover from iTunes Backup File” recovery mode.

Note: Please don’t connect and sync your device with iTunes after you lost iPhone data, to prevent lost data from being overwritten.

Step 2. Scan Data from iTunes Backup File
Once you enter the iTunes recovery mode,  choose the right device backup file and click “Start Scan“.

scan itunes backup

Step 3. Preview and Extract Data from iTunes Backup File
After scanning, all the content in the iTunes backup has been displayed. All of them can be previewed and checked by program. After the preview, check those you want to extract and click “Recover” to save them on the computer.

restore iPhone data from iTunes backup

d_win d_mac

Related Articles:

How to Recover Deleted or Lost Data from iPhone/iPad/iPod

How to Recover Contacts Only from iTunes Backup File

How to Recover Photos Only from iTunes Backup File

How to Restore iPhone Data from iTunes/iCloud Backup

How to Recover iPhone Data from iCloud Backup

How to Recover Deleted Data from iPhone Directly without Backup

How to Back Up and Restore Your iPhone Safely

Extract iPhone Data from iTunes Backup

iOS 12 IPSW Download Link for iPhone

[Summary]: This page provides iOS 12.0 beta 4/beta 3/beta 2/beta 1 IPSW direct download links for iPhone users to free download, and teach users how to install iOS 12 IPSW File on iPhone X/8/7/6S/6/se/5s with/without iTunes.

People also read:

* How to Downgrade iOS 12 to iOS 11.4 without Losing Data

* Fix a Locked/Disabled iPhone and Retrieve Data Back

ios 12 ipsw download links and install on iphone

Apple has just released a new beta version of iOS 12 – iOS 12 beta 4, which contains lots of new features and improve system stability. Apple users can download and install it right now by either downloading the IPSW file and installing it with iTunes or updating over the air on your iPhone/iPad/iPod device after installing the OTA profile below.

Before download iOS 12 IPSW and install it on your device, please check if your devices supports iOS 12:

iPhone: iPhone 5s, iPhone 6, iPhone 6 Plus, iPhone 6S, iPhone 6S Plus, iPhone SE, iPhone 7, iPhone 7 Plus, iPhone 8, iPhone 8 Plus, iPhone X

iPad: iPad Air, iPad Mini 2, iPad Mini 3, iPad Mini 4, iPad Air 2, iPad 9.7-inch (2017), iPad Pro 9.7-inch, iPad Pro 12.9-inch (1st generation)
iPad Pro 12.9-inch (2nd generation), iPad Pro 10.5-inch, iPad 9.7-inch (2018)

iPod touch: iPod touch 6

Before upgrading to iOS 12, you must to backup your iPhone to computer attempting to update, in order to avoiding data lossing during installing it with iTunes or updating over the air.
In additional, you can use this iOS System Recovery to install iOS 12 IPSW on iPhone without data lossing.
Here is the guide will teach you how to update iPhone to iOS 12 without data loss

In this page, we provides IPSW direct download links & over the Air Profile. Currently, you can download iOS 12.0 beta 4/beta 3/beta 2/beta 1 for free.

Part 1: Download iOS 12.0 beta 4 Firmware File for iPhone

iOS 12.0 beta 4 IPSW Direct Download Links for iPhone X

iOS 12.0 beta 4 IPSW Direct Download Links for iPhone 8

iOS 12.0 beta 4 IPSW Direct Download Links for iPhone 8 Plus

iOS 12.0 beta 4 IPSW Direct Download Links for iPhone 7

iOS 12.0 beta 4 IPSW Direct Download Links for iPhone 7 Plus

iOS 12.0 beta 4 IPSW Direct Download Links for iPhone 6s

iOS 12.0 beta 4 IPSW Direct Download Links for iPhone 6s Plus

iOS 12.0 beta 4 IPSW Direct Download Links for iPhone 6

iOS 12.0 beta 4 IPSW Direct Download Links for iPhone 6 Plus

iOS 12.0 beta 4 IPSW Direct Download Links for iPhone SE

iOS 12.0 beta 4 IPSW Direct Download Links for iPhone 5s

Part 2: Download iOS 12.0 beta 3 Firmware File for iPhone

iOS 12.0 beta 3 IPSW Direct Download Links for iPhone X

iOS 12.0 beta 3 IPSW Direct Download Links for iPhone 8

iOS 12.0 beta 3 IPSW Direct Download Links for iPhone 8 Plus

iOS 12.0 beta 3 IPSW Direct Download Links for iPhone 7

iOS 12.0 beta 3 IPSW Direct Download Links for iPhone 7 Plus

iOS 12.0 beta 3 IPSW Direct Download Links for iPhone 6s

iOS 12.0 beta 3 IPSW Direct Download Links for iPhone 6s Plus

iOS 12.0 beta 3 IPSW Direct Download Links for iPhone 6
iOS 12.0 beta 3 IPSW Direct Download Links for iPhone 6 Plus

iOS 12.0 beta 3 IPSW Direct Download Links for iPhone SE

iOS 12.0 beta 3 IPSW Direct Download Links for iPhone 5s

Part 3: Download iOS 12.0 beta 2 Firmware File for iPhone

iOS 12.0 beta 2 IPSW Direct Download Links for iPhone X

iOS 12.0 beta 2 IPSW Direct Download Links for iPhone 8
iOS 12.0 beta 2 IPSW Direct Download Links for iPhone 8 Plus

iOS 12.0 beta 2 IPSW Direct Download Links for iPhone 7

iOS 12.0 beta 2 IPSW Direct Download Links for iPhone 7 Plus

iOS 12.0 beta 2 IPSW Direct Download Links for iPhone 6s

iOS 12.0 beta 2 IPSW Direct Download Links for iPhone 6s Plus

iOS 12.0 beta 2 IPSW Direct Download Links for iPhone 6

iOS 12.0 beta 2 IPSW Direct Download Links for iPhone 6 Plus

iOS 12.0 beta 2 IPSW Direct Download Links for iPhone SE

iOS 12.0 beta 2 IPSW Direct Download Links for iPhone 5s

Part 4: Download iOS 12.0 beta 1 Firmware File for iPhone

iOS 12.0 beta 1 IPSW Direct Download Links for iPhone X

iOS 12.0 beta 1 IPSW Direct Download Links for iPhone 8

iOS 12.0 beta 1 IPSW Direct Download Links for iPhone 8 Plus

iOS 12.0 beta 1 IPSW Direct Download Links for iPhone 7

iOS 12.0 beta 1 IPSW Direct Download Links for iPhone 7 Plus

iOS 12.0 beta 1 IPSW Direct Download Links for iPhone 6s

iOS 12.0 beta 1 IPSW Direct Download Links for iPhone 6s Plus

iOS 12.0 beta 1 IPSW Direct Download Links for iPhone 6

iOS 12.0 beta 1 IPSW Direct Download Links for iPhone 6 Plus

iOS 12.0 beta 1 IPSW Direct Download Links for iPhone SE

iOS 12.0 beta 1 IPSW Direct Download Links for iPhone 5s

Two Free Ways to Install iOS 12 on iPhone, iPod touch or iPad without UDID Activation

Way 1: Download the iOS 12 IPSW File and Installing it with iTunes

Step 1. Download the latest iOS 12 beta IPSW from the links above.
Step 2. Plug your device into your computer and open iTunes
Step 3. Backup your data before attempting to update.
Step 4. Select your device from the lefthand menu of iTunes.
Step 5. Hold down Shift (Windows) or Alt/Option (Mac). While doing this, click the ‘Update’ button. You will then be prompted to select the IPSW file you wish to update to. Select the iOS 12 IPSW you downloaded before.
Your device will now begin to update to iOS 12.

Way 2: Download the iOS 12 IPSW File and Installing it over the air on your device

This methods teach you how to update to iOS 12 over the air on your device after installing the OTA profile, you need to download the below IPSW files on the device.

Step 1. Navigate to the iOS 12 beta download page linked below on your iPhone, iPod touch or iPad using Safari.
Step 2. Scroll down to ‘Over the Air Profile’ and select the iOS link. On the next page, click ‘Download’
Step 3. You will be prompted to install the ‘iOS Beta Software Profile’. Tap ‘Install’ three times to install the profile on your device, then reboot your device to make sure the profile takes effect.
Once your device has rebooted, open the Settings app and navigate to General>Software Update. In here you should see iOS 12 Beta.
Tap on ‘Download & Install’. iOS 12 beta will now begin to download and install on your iPhone, iPod touch or iPad.

If you never make your iPhone back, the iOS 12 installing process via iTunes will erase all data and settings, so you should backup everything from iPhone to computer at first.

How to Install IPSW File on iPhone with or without iTunes

Related Articles

How to Fix a Disabled iPhone without Data Loss

Extract and Backup Data from Locked/Disabled iPhone

Recover Lost Data on iPhone/iPad after iOS 12 Update

Recover Lost Photos on iPhone/iPad after iOS 12 Update

Fix iPhone Stuck in Recovery Mode afer iOS 12 Update

How to Fix iPhone Stuck on Black Screen after iOS 12 Update