All posts by DHZ

Transfer WhatsApp Messages from iPhone to Galaxy S10/Fold

[Summary]: WhatsApp is great app and most of its users want to transfer WhatsApp data when they switched to a new device. Here you can move WhatsApp messages from old iPhone to Galaxy S10 and Galaxy Fold in a simple click using Phone Switch app.

WhatsApp is one of the most popular social applications that uses an internet connection to send message images, audio and video to other people. It allows users stay in touch with people around the world in such a very useful way and what’s more, it is almost free. WhatsApp is one of the most popular social apps that use an internet connection to send message images, audio and video to others. It allows users to stay in touch with people around the world in a very useful way and, more importantly, it’s almost free. Anyone who updates from the old iPhone 5/5s/6/6s/SE/7/8 to the latest Samsung Galaxy S10 and Galaxy Fold, a higher-spec model which is the first to adopt Samsung’s Infinity-O display, an in-display fingerprint scanner, a triple-camera setup and 5G support, he/she certainly does not want to miss the WhatsApp data, such as photos, videos, text messages, attachments.

If you want to move all WhatsApp chats and media attachments from an iPhone to newest Samsung Galaxy S10/S10 Plus or Samsung Galaxy Fold, regardless of all the complex factors, the easiest and safest way is to use the iOS Toolkit – Restore Social App. Giving only the best results, this program uses various algorithms to transfer data between smartphones safely. With it, you enable to transfer WhatsApp chats from iPhone to Samsung Galaxy S10/Galaxy Fold, or from iPhone to iPhone X/XS, from iPhone to Android/iOS & iOS/Android & Android, and Android & iOS. Besides, you are able to securely take backups & restore WhatsApp data on your Samsung Galaxy S10/S9/S8/Note 9.

It works on both Windows and Mac versions. Please download it and have a try.

d_win d_mac

Key Features of iOS Toolkit – Restore Social App:

Transfer WhatsApp messages and attachements from iPhone to Samsung Galaxy S10/S10+.
Move WhatsApp chats between iPhone/iPod/iPad and Android devices.
Easily backup or export WhatsApp data from Android/iOS to PC.
Back up all of your WhatsApp/WeChat/Kik/LINE/Viber chat history with 1-click.
Preview the backup of social app content and restore the only data that you need.
Support all models of Android phones, iPhone, iPad & iPod touch. Compatible with latest iOS 12 and Android 9.0.

Easy Guide to Sync WhatsApp Data from iPhone to Galaxy S10 or Galaxy Fold

Step 1. Install iOS Toolkit – Restore Social App on Mac/PC

Download and install iOS Toolkit – Restore Social App on to your Mac computer or Windows PC. Launch it and then select “Restore Social App” for Windows users, “Backup&Restore” for Mac users.

ios toolkit

Step 2. Locate to WhatsApp Section

Next, connect both devices to your computer using USB cables. The program should detect the devices. Go to WhatsApp tab and from the options provided choose “Transfer WhatsApp messages.”

whatsapp backup restore

Then the program will then activate each device’s connection. Make sure that the destination device is your Samsung Galaxy S10, if not then click “Flip”.

ios whatsapp transfer

Step 3. Transfer WhatsApp Messages from iPhone to S10

Simply click on “Transfer” to begin the process, then on the notification that appears, click “Yes” to imitate the process.

confirm to transfer whatsapp

d_win d_mac

Related Article

Solutions to Backup and Restore Android Phone/Tablet

How to Transfer/Backup Android Data to Computer

How to Backup/Restore App Data on Android Phone

Backup Files on Android Phone or Tablet(Contacts,Photos,SMS)

Move WhatsApp from iPhone to Galaxy S10

How to Recover Deleted Data from iPhone XS/X/8/7/6S/6 on Mac

[Summary]: Need an Mac iPhone Data Recovery to recover lost and deleted files from iPhone. Try U.Fone iPhone Data Recovery(Mac) to recover deleted photos, SMS, contacts, call history, notes, videos, ect. from iPhone/iPad/iPod on Mac freely, as well as retrieve data from iTunes backup and iCloud backup on Mac.

How to recover deleted SMS from iPhone on MacBook Pro?
“I accidentally deleted some important messages in iPhone X. I using MacBook Pro, how do I recover deleted text messages from iPhone X on MacBook Pro?”

How to Recover Lost Photos from iPhone on MacBook Air?
After update my iPhone 8 Plus to iOS 12, I don’t know what happened, photos not saving to camera roll ios 12, photos missing after iOS 12 Update? How to fix photos disappeared from iPhone after iOS 12 upgrading?

How to Recover Deleted Contacts from iPhone XS on Mac?
“I used to store a lot of female friends’ contacts and photos on iPhone XS. Yesterday, I quarrelled with my girlfriend, she deleted all the contacts and picures in my iPhone, any iPhone data recovery for Mac to recover deleted contacts and photos from iPhone XS? Thank you!”

We’ve all experienced that horrible stomach-churning pang ofr dread when we delete a file that we didn’t mean to delete. A lot of reasons can cause you to lose iPhone data, updates, jailbreaks, accidental deletions, water damage, factory resets… If you lose all of this, it’s really a nightmare. The bad news is that iPhone albums can save photos and videos deleted within 30 days, but other apps don’t have undelete feature. The good news is that these deleted files have not really disappeared from your iPhone, their location is marked blank and waiting to be overwritten by new data. Therefore, as long as you make sure they are not replaced by new data, it is possible to recover deleted iPhone files on your Mac, including iPhone 5S/SE/6(Plus)/6S(Plus)/7(Plus)/8(Plus)/X, and the latest iPhone XS/XS Max/XR running on iOS 12. This is why you are advised to stop using the device immediately once data loss occurs.

What if you don’t have a handy backup? What should you do to recover lost data from iPhone on Mac? This article will show you a best solution to get back deleted data and files on iPhone without backup.

Things You’ll Need To Recover iPhone Lost Data on Mac (iOS 12 Supported)

Before beginning the recovery process, ensure that you have the following things ready:

– Your iPhone
– A USB cable
– MacOS computer
– U.Fone iPhone Data Recovery for Mac

U.Fone iPhone Data Recovery for Mac is a recovery program that is efficient on retrieving deleted or lost data from iPhone on Mac without backup. It is available to recover lost photos, contacts, notes, reminders, call history, calendar, Safari bookmarks and many other data from iPhone XS/XS Max/XR/X/8/8 Plus/7/7 Plus/SE/6s/6/5s/5c/5/4S, both lost and existent files are visible. Not only that, U.Fone iPhone Data Recovery (Mac) provides you with 3 quick and simple ways to get it all back on your iOS device: Recover from iOS device directly, restore from iTunes backup or iCloud backup without erasing existing contents.

Download the trial from here and try to retrieve the lost data from iPhone on Mac:

d_win d_mac

Mac machine: iPhone Data Recovery Mac version supported MacBook, MacBook Air, MacBook Pro, iMac, iMac Pro.

Operating System: Works well with Mac OS X 10.6, 10.7, 10.8, 10.9, 10.10, 10.11, 10.12 and the latest macos mojave.

iOS: iOS 11, iOS 10, iOS 9 and supported the latest iOS 12, such as iPhone XS Max, iPhone XS, iPhone XR, iPhone X; iPad and iPod(touch) as well.

U.Fone iPhone Data Recovery (Mac) – Recover Anything You Lost

– Recover data from iOS device, iTunes backup and iCloud backup on Mac.
– Recover contacts, SMS, notes, call logs, photos, video, Whatsapp/Kik/Line(Messages & Attachments), etc.
– Allow previewing and selectively recovering lost data.
– Works for many common scenarios, such as Deletion, Virus Attack, Locked/Disabled Device, iOS Downgrade/Update/Jailbreak, System Failure, Factory Reset, Device Broken/Damaged, iPhone Lost/Stolen,
– Fully compatible with iPhone XS/XS Max/XR and iOS 12.

A Step Guide to Preview and Recover iPhone Data without Backup

Step 1. Launch iPhone Data Recovery for Mac
Start by launching the iPhone Data Recovery(Mac) on your Mac, then click “iPhone Data Recovery” function, this function can help you recover data from iPhone/iPad/iPod, iTunes backup and iCloud backup.

ufone iphone data recovery for mac

If you want to directly recover lost and deleted data from iPhone, please select “Recover from iOS Device” option.

recover data from iPhone directly

Step 2. Connect iPhone device to Mac
Using a USB cable to connect your iPhone with the Mac, , you need to “Trust” on your iPhone for the program scanning the device, the program will detect it automatically.

trust on iphone

Step 3. Select Data Type to Scan
After your iPhone device connected to MacBook successfully, then select the types of file you want to recover, including:
Messages & Contacts – “Messages”, “Messages Attachments”, “Contacts”, “Call History”, “Voicemail”, “WhatsApp messages”, “WhatsApp Attachments”, “Notes”, “Calendar”, “Reminders”

Media Files – “Camera Roll”, “Photo Stream”, “Photo Library”, “App Photos”, “App Videos”, “App Audios”

Memos & Others – “Voice Memos”, “Safari Bookmarks”, “Safari History” and “App Documents”

You can select the specific data type(s) you want to get back, or “Select All” to recover, then click on “Start Scan” button, your device will be scanned directly.

select files to recover

As you can see, the program is analyzing your device, please keep connecting your iPhone to MacBook and waiting patiently.

analyzing iphone

Step 4. Scan iPhone to Find All Data
After analyzing the device complete, the program begin scanning your iPhone device to find all deleted/lost/missing and existing data. During the scanning process, it may take you some times, it depending on the large file size on your iPhone.

Scaning Lost and Deleted Contacts from iPhone on Mac

scan lost contacts from iPhone

Scaning Lost and Deleted Messages from iPhone on Mac

scan lost SMS from iPhone

Scaning Deleted and Lost Camera Roll, Photos, Images from iPhone on Mac

scan deleted camera roll from iPhone

Tips: If you found the files you need, you can click “Stop” button to finally the scanning process.

Step 5. Preview the Scaned Results
After scanning, the software will display all files that can be recovered under categories, you can preview all scanned files before decide to recover them.

preview iphone deleted photos

You can also double-click one pictures to preview before recovering it.

preview deleted photos on iPhone

If you want to show deleted/lost files only, please switch to “Show Deleted Only” in the upper left corner of the interface.

show deleted iphone photos

Step 6. Recover iPhone Files and Save Onto MacBook

Select the files you want to recover from iPhone and just click the “Recover” button start to recovering data from iPhone and save onto your MacBook.

recover iphone photos on Mac

Step 7. Save iPhone Lost Data on MacBook
Only few minutes, all your seleted contents will be restored and save onto the MacBook.

save iphone deleted files on Mac

Free download iPhone Data Recovery for Mac and try to scan your iPhone lost data on Mac computer.

d_win d_mac

Related Article

Top 5 Best iPhone Data Recovery Software Review

How to Recover iPhone Lost Files after iOS Update on Mac

How to Recover Deleted Contacts on iPhone XS/XS Max/XR

How to Recover Deleted Photos from iPhone/Android/PC/Mac?

How to Restore Deleted Call Logs from iPhone 8/7/6S/6

Mac iPhone Data Recovery

Factory Reset Locked/Disabled iPhone without iTunes

[Summary]: Looking for a way to reset locked or disabled iPhone without iTunes, but don’t know how? This guide explains the 4 different ways to factory reset your disabled or locked iPhone without using iTunes app.

To prevent others from accessing and protecting our private information, almost all iPhone users want to set a password on their device. Some people may even change their passwords regularly to ensure security. If you have locked your iPhone but don’t remember your password or for some reason your device has been disabled, you won’t be able to use the iPhone, let alone access any of its data.

If you are looking for a way to reset the locked/disabled iPhone, including iPhone XS, iPhone XS Max, iPhone XR, iPhone X, iPhone 8/8 Plus, iPhone 7/7 Plus, iPhone SE, iPhone 6/6 Plus, iPhone 6s/ 6s Plus, iPhone 5s, etc., then you will get help. This guide is intended to share 4 ways to give these people who want to factory reset their locked/disabled iPhone without iTunes. Let’s get started.

CONTENTS

Part 1. Factory Reset Locked/Disabled iPhone Using iOS Unlock

iOS ToolKit – iOS Unlock can easily unlock your iOS device without hassle when you enter your iPhone passcode for several times and your iPhone gets locked. The unlock feature in iOS Toolkit can efficiently unlock your iPhone if Find My iPhone/iPad is turned off.

KEY FEATURES

Easily remove iPhone lock screen without the passcode.
Fix disabled iPhone without iTunes.
Fix “iPhone is disabled, connect to itunes” issues.
Bypass passcode with 4 digits, 6 digits, Touch ID and Face ID on iPhone/iPad.
Works for all models of iPhone, iPad and iPod touch.
Fully compatible with the latest iOS 12.New icon.

d_win d_mac

step 1. Install and run the iOS Toolkit – Unlock

Check the version that is right for you to download, then install and launch the iOS Toolkit – Unlock. On the welcome screen, select the “Unlock” option to activate the process.

iPhone Lock Screen Removal

Step 2. Connect iPhone to Mac/PC

Now, using a USB/lightning cable, connect the iPhone to the system and wait for a while because the app will automatically recognize it. Then click the “Start” button.

connect screen-locked iPhone to pc

Step 3. Put the device into DFU mode

When the device is detected, it will display the interface that needs to activate the iPhone DFU mode. Follow the instructions.

get your iPhone into DFU mode

Step 4. Check iPhone Information

If the detect finishes, the software will display the model of your device. If there is something wrong, you can select again from the list. Make sure that you have provided the right information before clicking the “Download” button.

Confirm locked iPhone information

Step 5. Start to Unlock iPhone without iTunes

The app will automatically download the relevant firmware updates for your device. It may take a while to complete the download. Then click the “Unlock Now” button.

Download iPhone Firmware Package

Since the data on the device is deleted after unlocking, you are asked to enter the confirmation code 000000 from the on-screen command to activate the unlock function. Then touch “Unlock” immediately.

Your disabled iPhone has been unlocked without iTunes successfully. Your device will now be brand new.

Unlock iPhone Locked Screen

d_win d_mac

Part 2. Factory Reset Locked/Disabled iPhone by Find My iPhone

Find My iPhone can be used to locate a lost iPhone as well as to lock the device to prevent unwanted access to personal data, and can be used to factory reset locked iPhone. In order to make use of this feature, you must have previously activated the “Find my iPhone” feature on your iPhone before it got locked.

Step 1. Launch find my iPhone app from another different iPhone.

Step 2. Log in with your own Apple ID and password.

Step 3. Click on the name of your iPhone or iPad that you want to reset.

find-my-iphone-device-1

Step 4. Click on the “Erase iPhone” option and confirm your selection. Then it will remotely factory reset the locked iPhone for wiping everything on the device.
Step 5. Wait for a while as the “Find My iPhone” feature will remotely erase your iOS device. Needless to say, it will also disable its lock.

find-my-iphone-device-2

Part 3. Factory Reset Locked/Disabled iPhone on iCloud.com

Restoring from iCloud backup will erase all data and settings (including the screen password) on your device. Here’s how to do it.

Note: If you have already stored some important files that have not been backed up to iCloud, then it is best to try other alternatives.

Step 1. Enter anyone browser to visit iCloud.com, then log in with the same Apple ID used on the disabled iPhone.

Step 2. Navigate to Settings > Select Restore and choose a backup that contains all of your data > click Restore. At the end, you will get a brand new device, but the iCloud backup file will cover all your data, which means that new data born after this backup will disappear.

Part 4. Factory Reset Locked/Disabled iPhone via Siri (iOS 8 – 12)

Most users still don’t know if your device is running iOS 8.0 to iOS 12, you can use Siri to unlock a disabled iPhone. Here’s how to bypass the iPhone lock screen without a password via Siri.

Step 1. Press and hold the Home button for a few seconds to activate Siri on your iPhone.

Step 2. Ask Siri “Siri, what time is it?” Then Siri will show the local time.

Step 3. Tap on the clock icon and then tap on “+” to add a new clock.

add-another-clock

Step 4.Simply type anything you want and tap on the “Select all” option. Here you need to target the “Share” option.

Step 5. In the pop-up options, select “Message” to open a new message window.

share-with-messages

Step 6.Type anything you want in the receiver bar and then tap on “+” to create a new contact.

Step 7. It will open a new window. Click here to click the “Create new contact” button.

Step 8. On the Add new contact screen, choose to add a photo and tap on the “Add Photo” option.

add-contacts-photos

Step 9. This will open the photo gallery. From here, you can visit any album.

access-albums

Step 10. Don’t select an image, just press the Home button to exit the interface. This will open the iPhone’s home screen.

unlock-disabled-iphone-via-siri

Reset Disabled iPhone without iTunes

How to Copy Contacts from iPhone to Samsung Galaxy S10/Fold

[Summary]: When you upgrade iPhone to Samsung Galaxy S10 or S10+, you will be troubled how to copy contacts from iPhone to Samsung phone or Vice Versa, here is a step-by-step guide showing you how to transfer data contacts from iPhone to Galaxy S10/S10+/S10e and vice versa, you can also sync contacts from iPhone to the new Samsung Galaxy Fold phone.

Are you also attracted to the latest Samsung Galaxy S10 flagship phone and Galaxy Fold? If you are tired of the iOS system and want to jump to the Samsung Galaxy S10/Fold, contacts are one of the most important data, and you certainly don’t want to discard them. However, iOS and Android are not compatible with each other, and it is difficult to copy contacts from iPhone to new Samsung phones.

Manually entering contacts on the Samsung Galaxy S10 is extremely time-consuming, and I believe you don’t want this to be the only way. To complete the task easily and safely, you need help of a third party phone to phone transfer program. Here is my recommendation – iOS Toolkit – Phone Switch, which is designed to transfer contacts and other data type from iPhone to Samsung Galaxy S10 directly in just one click.

Safely Transfer Data from iPhone to Galaxy S10/Fold and Vice Versa

Phone Switch is an all-round yet easy-to-use data transfer app, which allows you to to transfer contacts between iPhone and Samsung Galaxy S10. Besides contacts, you can also use the program for transferring text messages, music, photos, video, calendar, call history, documents or Ebooks. This phone transfer software works well with various operating system, such as Android, iOS, Symbian, Windows and BlackBerry.

We now provide you free trial version of both Phone Switch Windows version and Mac version, please download either version according to system of your computer.

d_win d_mac
d_win d_mac

Support Devices: iPhone XS/XS Max/X/8/7/6S/6/5S, Samsung Galaxy Fold, Samsung Galaxy S10/S9/S8/S7/S6/S5, Samsung Galaxy Note 9/Note 8/Note 5/Note 3, HTC U11/M10, LG G5/G4/G3, Sony XA/XZ, Moto Z/X/G, OnePlus, Lenovo, Xiaomi and other.

Tutorial: How to Transfer Contacts from iPhone to Galaxy 10 or Galaxy Fold

Step 1. Run Phone Switch on PC or Mac

iOS Toolkit – Phone Switch is available on Windows and Mac OS X. When installation is over, double click desktop shortcut to launch the program and select “Switch” to get started from the main screen.

select switch mode

Step 2. Connect iPhone and Galaxy S10 to Computer

Next, use 2 USB cables to connect your old iPhone and Samsung Galaxy S10 to the same computer. Once the two phones are well connected to computer, their names should be displayed on the main screen. Your old iPhone should be detected as Source phone on the left side and SAMSUNG Galaxy S10 is the destination phone. If the position was wrong, then click “Flip” button to switch positions.

transfer iphone contacts to samsung galaxy s10

Tip: You should enable USB debugging on your Samsung Android phone so that it can be detected by the software. As for your iPhone, you should make sure iTunes is installed on the computer.

Step 3. Transfer iPhone Contacts to Galaxy S10 in One Click

There are a couple of content that can be copied from iPhone to Samsung. Select Contacts and other contents you want to sync, then simply click on “Start Transfer” button. You can see how the process goes with the progress bar. After this, all selected items will be synced to Samsung Galaxy S10 automatically.

sync iphone contacts to samsung galaxy s10

Tips: If you have got the new Samsung Galaxy Fold, please follow the same steps to transfer contacts, SMS, music, photos, videos from iPhone to Galaxy Fold in 1 click. If you want to transfer WhatsApp messages from iPhone to Galaxy S10/Fold, please learn this guide about how to move iPhone WhatsApp to Galaxy S10.

d_win d_mac
d_win d_mac

Related Articles

How to Sync Files from iPhone to Samsung Galaxy S10

How to Transfer Contacts & SMS from Android to Galaxy S10

How to Transfer Data from Old Samsung to S10 in 3 Ways

Transfer Data from Android to Samsung Galaxy S10 in Two Ways

Transfer Data Contacts from Android to iPhone X/XS(Max)/XR

Copy iPhone Contacts to Galaxy S10

How to Transfer Data from iPhone to Samsung Galaxy S10/S10+/S10e

[Summary]: Want to sync iPhone data to Galaxy S10? This article teach you a easy & quickly way to transfer data including contacts, SMS, photos, music, videos and more from iPhone to Samsung Galaxy S10, you can also transfer data from iPhone to Galaxy Fold, as well.

Samsung released the new Galaxy S10 series (S10/S10+/S10e and S10 5G) and Samsung Galaxy Fold, the Samsung Galaxy S11 will be released on February 2020. The new Samsung S10 features a 6.1″ (15.49 cm) display with a screen resolution of 1440 x 2960 pixels and runs on Android v9.0 (Pie) operating system. When we just switched from an iPhone to Samsung Galaxy S10, there are data on the old phone that need to be copied or moved to our new phone so that we don’t lose our old data such as pictures, videos, apps, photos, SMS, etc.

To transfer all data types such as contacts, messages, music, videos, photos, call logs, apps and more from iPhone to new Samsung Galaxy S10 effectively, this article will provide you a simplified guide on sync iPhone files to Samsung Galaxy S10/S10+ by using a powerful phone tool.

The Tool You’ll Need to Copy iPhone Data to Galaxy S10/S10+ in 1 Click

iOS ToolkitPhone Switch is a professional software that is used for data transfer between devices. The “data” mentioned here consist of music, videos, photos, text messages, contacts, call history, documents, app and app data and so forth. With it, you can transfer data between iOS and Android devices flawlessly, such as transfer data from Samsung to Samsung Galaxy S10, copy iPhone contacts to Samsung Galaxy S10, sync data from Samsung Galaxy to iPhone XS(Max)/X, etc. The main features you can access include:

  • Transfer data between iPhone and Samsung Galaxy phone directly.
  • Transfer iCloud and iTunes backup to Android devices easily.
  • Supports backing up Android, iPhone to Mac or Windows PC.
  • Transfer call logs, contacts, messages, calendars, music, photos, and videos.
  • Compatible with almost all iPhones and Android devices.
  • This iPhone to Android transfer tool could be used in the Samsung company’s upcoming Galaxy S11 series phones.

Three easy steps are enough for you to finish transferring. Free download and install the Phone Switch on your Mac or Windows computer first.

d_win d_mac
d_win d_mac

How to Transfer Files from iPhone to Samsung Galaxy S10

Step 1. Run Phone Switch on Your Computer

Run the Phone Switch on your computer, and select “Switch” among the modules.

select switch mode

Step 2. Connect Old iPhone and Samsung Phones to PC

On the next window, you are required to connect both your iPhone and Galaxy S10 (Plus) handset to the computer. Just grab the two included USB cables to do this. Once done, your devices can be detected successfully. Your iPhone should be detected as a Source device and then displayed on the left side of the window, however, the new Samsung Galaxy S10 should be named as the Destination phone being displayed on your right side.

select iphone data to transfer

Note: If your devices aren’t in the correct positions, then click the “Flip” button to switch them.

Step 3. Transfer Data from iPhone to Galaxy S10

As you can see, many of transferable data types are listed in the middle. Now select the content you would like to copy from the iPhone to Samsung Galaxy S10 by ticking the box next to the data type. It’s worth noting that Call logs and Apps options are grey out for compatible issue between iOS and Android. When you’ve selected the data types that you want to be transferred, click on “Start Transfer“. And when the process bar reaches the end, press “OK” to finish the process.

sync iphone data to samsung galaxy s10

d_win d_mac
d_win d_mac

Related Articles

How to Transfer WhatsApp Messages from iPhone to Galaxy S11/S11+/S11e

How to Transfer All Files from Old Samsung Phone to Galaxy S10

How to Transfer Contacts & SMS from Android to Galaxy S10

How to Transfer Data from Old Samsung to S10 in 3 Ways

Transfer iPhone Data to Samsung Galaxy Note 8/5/4/3

How to Sync iPhone Photos with Samsung Galaxy S9

Copy Data from iPhone to Galaxy S10

How to Recover Lost Data from iPhone?

Summary
Do you lost or deleted data from iPhone? This tutorial recommend an effective iPhone data recovery, helping you recover iPhone data, including text messages, contacts, photos, videos, notes, WhatsApp messages, WhatsApp messages and other App data.

Accidental delete files on your iPhone? Lost iPhone data due after factory reset? Photos disappeared and missing from iPhone after iOS 13 update or jailbreak? Lost contacts and messages on iPhone 11/XS Max/X/8/7/6s/6/5s due to accidental deletion? Your iPhone is broken or locked by a forgotten passcode? Don’t worry, here is a professional iPhone Data Recovery software, it not only helps you recover lost data from iPhone/iPad/iPod(touch), but also able to recover data from iTunes and iCloud, no matter how you lost them.

Four iPhone Data Recovery Solutions

How to Recover iPhone Lost Data?

iPhone Data Recovery for Windows and U.Fone iPhone Data Recovery for Mac, both is designed to recover lost and deleted data from iPhone XS Max/ iPhone XR, iPhone XS, iPhone X, iPhone 8/7/6S/6/5/SE/4S/4, iPad & iPod touch, regardless of whether you have backup files. If you have backup iPhone data to iTunes or iCloud, the iPhone Data Recovery also can help you extract and recover data from iTunes/iCloud backups easily. After recover lost iPhone data and save onto the computer, you can use this iPhone Transfer to import the retrieved files from computer to iPhone for view or use.

  • 3 iPhone Data Recovery Modes: recover data from iOS device, iTunes backup and iClound bacup.
  • Restore 12 types of data, including photos, videos, SMS, contacts, call history.
  • Recover App data, such as WhatsApp, Viber, WeChat, Kik, Line, etc.
  • Recover iOS data due to accidental delete, formatted, damaged or various.
  • Fix iOS to normal and get your iPhone back to normal.
  • Backup and restore data on iPhone
  • Totally compatible with all iOS versions, including the latest iOS 13, iPhone 11 Pro(Max)

Download the iPhone Data Recovery for Windows or Mac and try to recover your lost iPhone data in four recovery modes.

d_win d_mac
d_win d_mac

Safely and Professionally iOS Data Recovery to Recover Lost Data from iPhone, iPad and iPod in Four Recovery Modes

Method 1: Recover Lost and Deleted Data from iPhone via Smart Recovery Mode

If you don’t know how you lost data, you can use this smart recovery mode to find and recover your iPhone data easily.

Step 1. Run the iPhone Data Recovery and Select Smart Recovery Mode
First of all, please download and launch the iPhone Data Recovery, then click “Smart Recovery” tab, click the button “Start”.

smart iphone data recovery

Step 2. Connect iPhone to PC or Mac(Optional)
Then, use a USB cable to connect your iPhone device with the PC or Mac computer. This method helps you directly scan your iPhone device and recover the lost data. If the program swith to “Recover Data from iTunes” or “Recover Data from iCloud” modes, you don’t need to connect the device to computer.

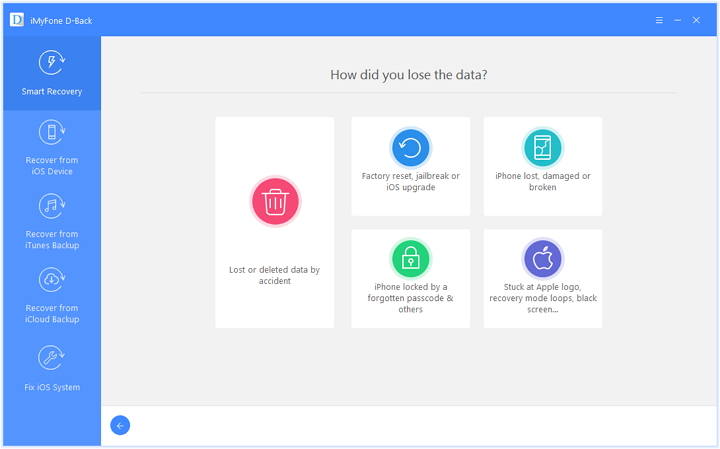
Step 3. Choose How You Lost iPhone Data
Next, you need to choose the situation on how you lost your data for subsequent scan and recovery.

Select Loss Situation

Step 4. Scan and Recover Your Lost Data
Next, all scan and search work will be completed by the iPhone recovery software itself. The program can analyze and recover your data from iOS device, iTunes backup or iCloud backup. The following procedures are similar to “Recover from iOS Device/iTunes Backup/iCloud Backup” tabs. With a few easy steps, you can restore your iPhone data.

If you know for sure where you could find the data, you can also start scanning from iOS Device/iTunes Backup/iCloud Backup tabs respectively. Please keep reading the below guide about how to directly recover data from iPhone devices, how to restore data from iTunes, and how to download and extract iPhone data from iCloud.

Method 2: Recover Data from iPhone Directly

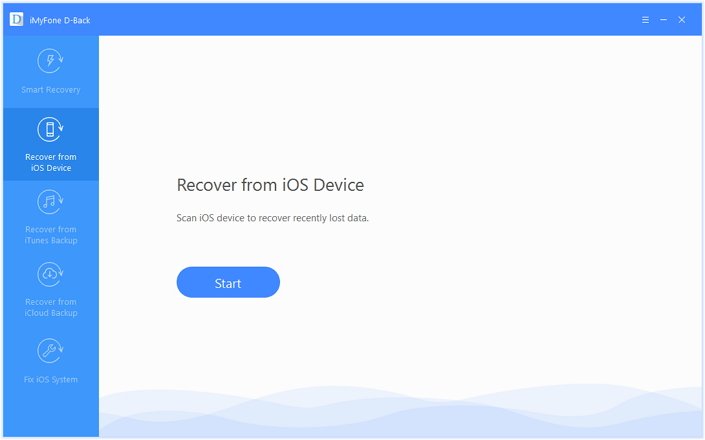
Step 1. Run iPhone Data Recovery and Select “Recover from iOS Device” Mode
After running the program, then click the “Recover from iOS Device” tab. Click on “Start”.

Recover Data from iOS Device

Step 2. Connect iPhone to Computer
Connect your iPhone to your computer, the program successfully detects your iDevice, click “Next” to proceed.

connect your iPhone to computer

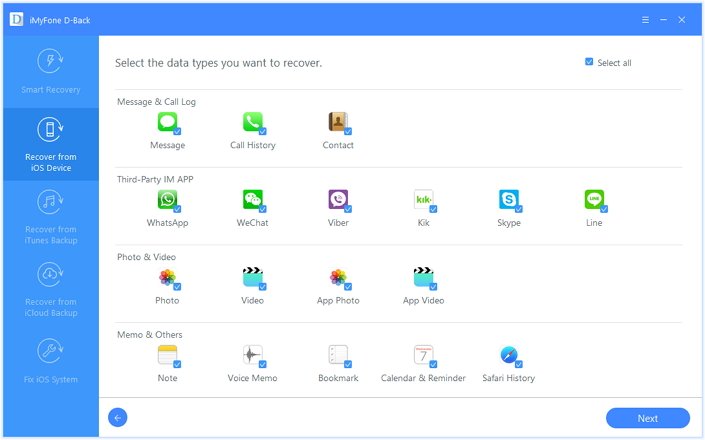
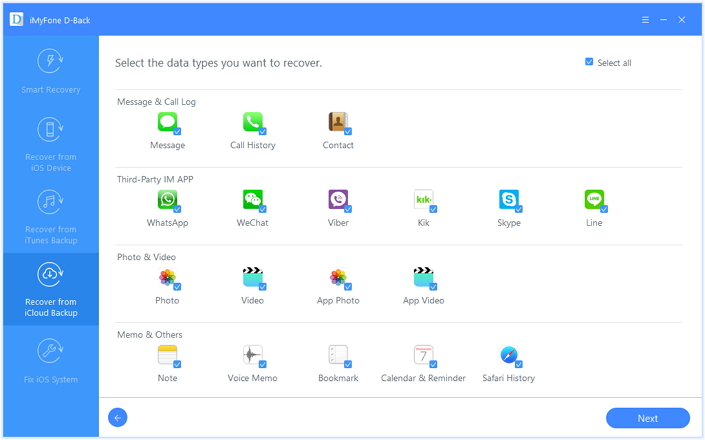
Step 3. Select the Types of Files to Recover
Now, select the types of files that you want to get back, including photos, contacts, videos, messages, notes, Safari bookmarks, call history and other files.

select data types to scan and recover

Step 4. Start to Scan your iPhone for Lost Data
After that, click “Scan”. The program will start to scan the deleted files from your iPhone device.

scan iphone lost data

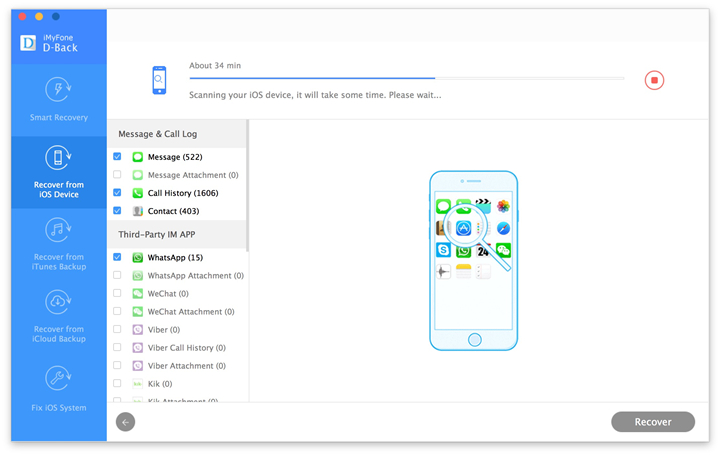
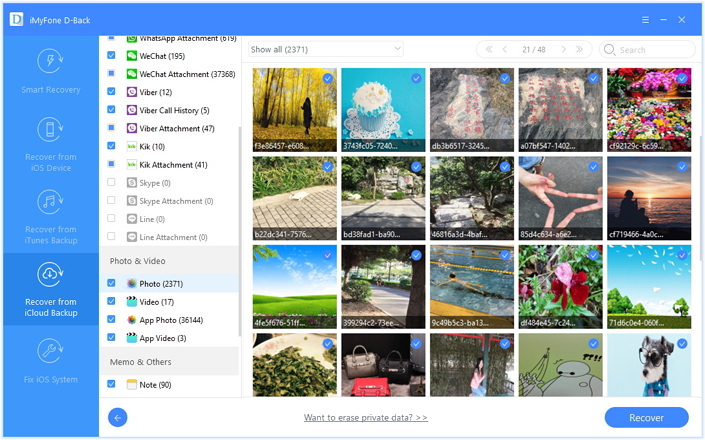
Step 5. Preview and Recover Data from iPhone Directly
After the scan is finished, all recoverable data will be clearly organized as the picture below shows. Click each tab to check all files, or only preview the deleted items by choosing “Show only the deleted files”. Select the files which you want to recover, and then click “Recover” at the bottom right corner.

recover iPhone photos

A pop-up window will display to let you choose the location to store the recovered files and it will take only a few minutes to finish the recovery.

Method 3: Recover iPhone Data from iTunes Backups

If you connect iPhone device with iTunes, the iTunes will automatically backs up your iPhone data, but those backed up contents is a specific file, so you can view it unless using a third-party tool. The iPhone Data Recovery also can help you extract iPhone backed data from iTunes easily. Let’s teach you how to restore iPhone data from iTunes backups via iPhone data recovery software.

Note: You don’t need to connect your iPhone device to the computer via this recovery mode.

Step 1. Choose and Scan from iTunes Backup
Run the iPhone Data Recovery software, then click “Start” from the “Recover from iTunes Backup” tab.

iTunes data recovery

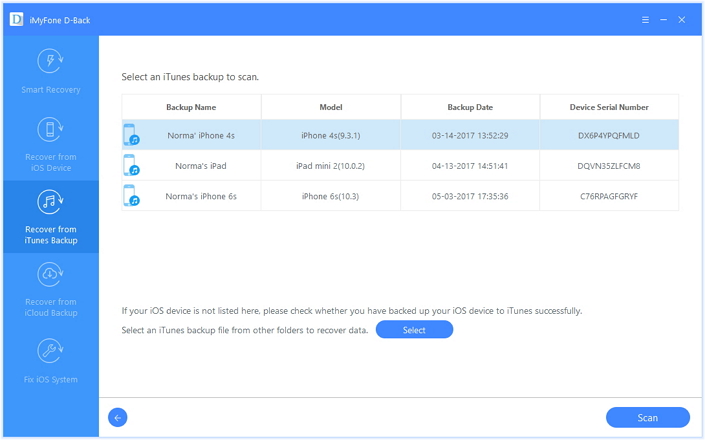
Step 2. Choose the iTunes Backup History
Then choose the exacted iTunes backup from which you want to get back and click “Next”. If you choose an encrypted iTunes backup, you will need to enter the password for iTunes encryption.

Select iTunes Backup

Step 3. Select File Types and Scan from iTunes Backups
Select the file types you need and click “Scan” button. Please wait a moment while it scans.

choose data type to recover from iTunes

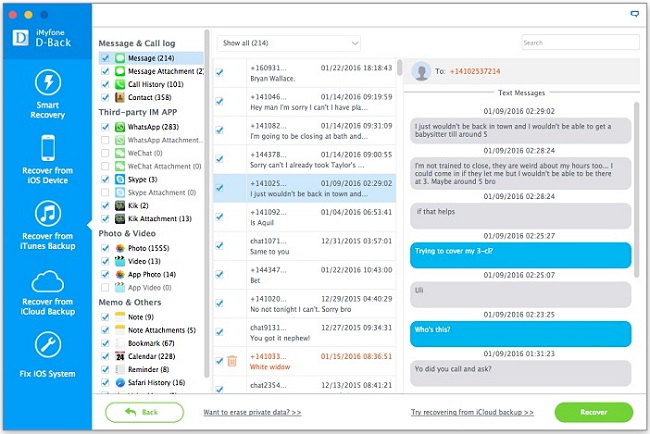
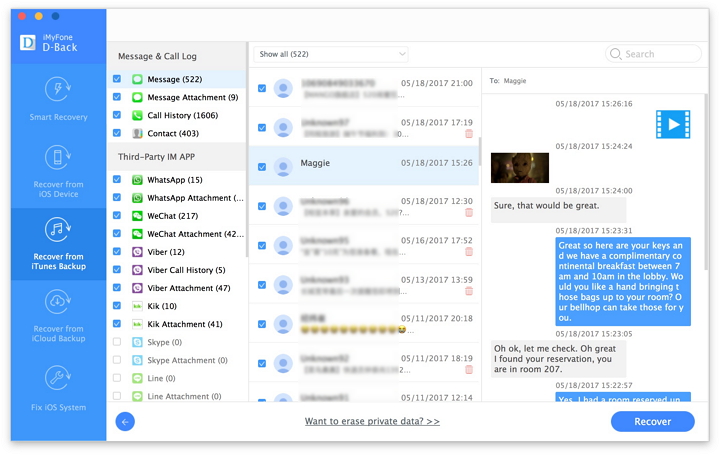
Step 4. Preview and Recover Data from iTunes Backup
The search results will be showed on the interface clearly. Browse them according to your needs; or “Only show the deleted files”, and select the exact ones you need. Then click “Recover” button to extract iPhone backups and save them onto the computer.

recover SMS from itunes

Method 4: Recover Lost iPhone Data from iCloud Backup

In default, Video, Photo, Contacts, SMS, Note option is turned on in iCloud settings for backup data to iCloud automatically. If your iPhone was stolen, lost, water-damaged or broken. However, if you had backup iPhone to iCloud before, then this is iCloud recovery mode is the beset choice for you. The iPhone Data Recovery can help you download the backup file from iCloud, then extract/recover photos, contacts, text messages, notes and more from iCloud and save onto the computer for you. Let’s teach you how to recover lost/broken/damaged iPhone data from iCloud backups via iPhone data recovery software.

Step 1. Run iPhone Data Recovery and Click “Recover from iCloud Backup” Mode
After launching the iPhone data recovery software on PC or Mac, then click “Recover from iCloud Backup” tab and click “Start” button.

icloud data recovery

Step 2. Log In iCloud Account
Then, please log in iCloud Account to ready to download Your iCloud backup files.

login iCloud account

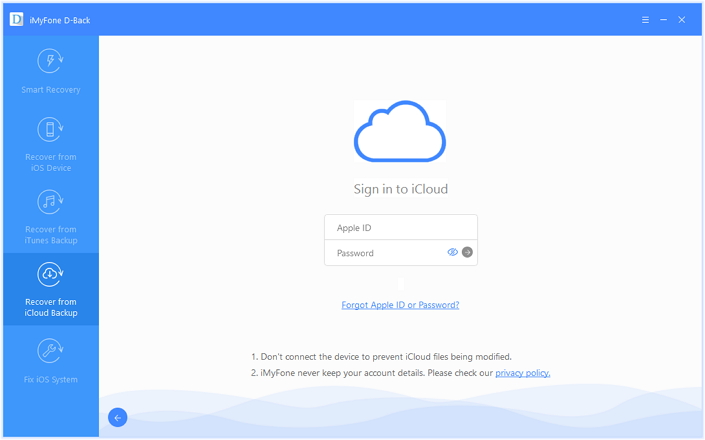
Tips: Please be assured that we will never keep a record of your iCloud account info or content.

Step 3. Choose a Backup History to Download
The program will find all iCloud backup files in your account; then, select the iCloud backup you would like to recover data from. Click “Next” on the lower right corner.

Select iCloud Backup History to Recover

Step 4. Select File Types to Recover
Select the files you wish to recover and then click “Scan”. It will take a few minutes for the program to download and scan your iCloud backup files.

Select iCloud Backup Data to Recover

Step 5. Preview and Recover iPhone Lost Data from iCloud Backup
When the download is completed. iPhone Data Recovery will extract all the data from the file, such as videos, photos, contacts. Also, you can preview the file one by one to make sure it’s the right one you are looking for. Finally, click ‘Recover ‘ button to save the selected files to computer.

recover iPhone lost photos from icloud

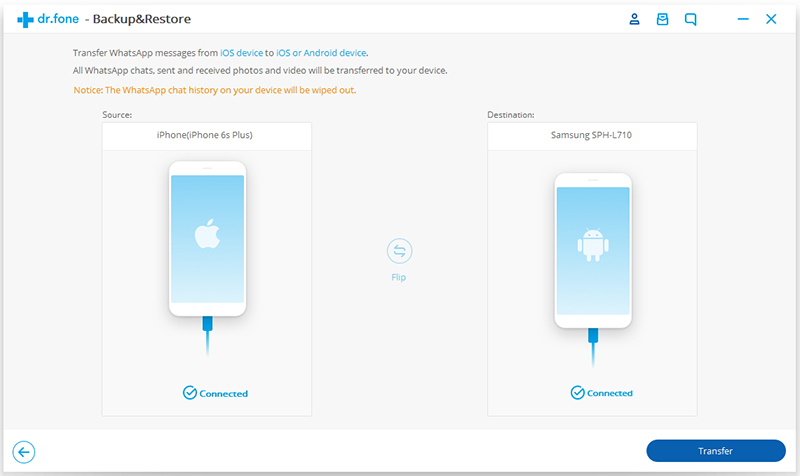
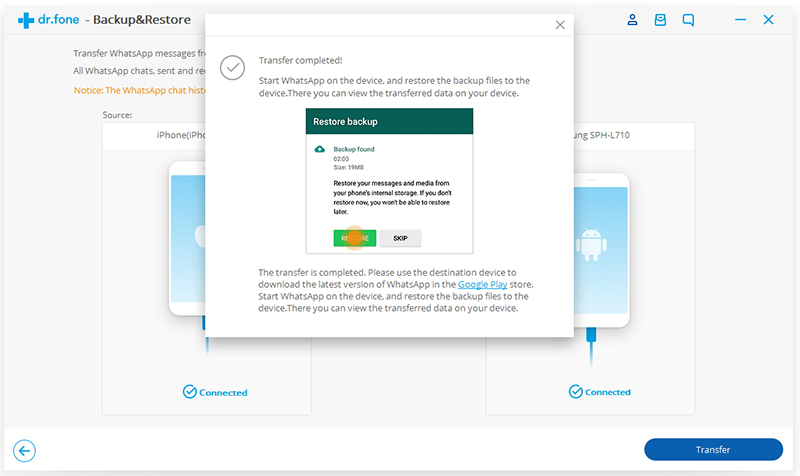
Recover Text Messages, iMessages, WhatsApp messages and more from iCloud

recover text messages from icloud

Last, choose a location on your computer to store the recovered data. Please wait while the iPhone data recovery software is recovering your lost data. Only few minutes, your files have been successfully recovered and save onto the computer. If you want to transfer the retrieved files to iOS devices, you can use this iPhone Manager, which allows you put media and text files such as contacts, photos, videos, music from computer to iPhone/iPad/iPod directly.

Download the trial version of iPhone Data Recovery for Windows or iPhone Data Recovery for Mac and try to recover your iPhone lost data.

d_win d_mac
d_win d_mac

iPhone Data Recovery is highly reliable and it offers 30-day money-back guarantee after you have purchased the software. If you are not satisfied with how it performs, you can return it and your money will be refunded. There is 24-hour support service and if ever you encounter any problems while using the product, you can contact the support team to ask for help.

Avoid Data Loss: Backup iPhone Regularly

The best way to avoiding data losing on iPhone is to backup iPhone with iTunes. Every time you connect your iPhone to computer and launching the iTunes for syncing, the iTunes program automatically backs up your iPhone data. This is a free method to make your device return to its previous working order without data loss after experiencing technical issues. You can make it just by restoring your iPhone with iTunes. In additional, you can also use a best iTunes alternatives to backup and restore your iPhone data easily, this iOS Data Backup & Restore tool or U.Fone iOS Backup & Restore tool, both is designed to selectively back up and restore iPhone/iPad/iPod touch.

– Back up only Photos, Videos, Music, Call Logs, Notes and more.
– Back up only Contacts, SMS, WhatsApp, or WeChat and more.
– Restore only Contacts, SMS, WhatsApp, or WeChat from iTunes/iCloud backup without data loss on target device.
– View and export 18+ types of data from iTunes/iCloud backup or iOS device.
– Compatible with all iOS versions and devices including iOS 12 and iPhone XS(Max)

backup iphone data

Recover iPhone Data

iOS Data Recovery Recover Your iPhone iPad Lost Data
Now, Even without Backups

Compatible with iOS 13 & iPhone 11(Pro)

Recover Lost Data Now

Wipe all Personal Data and Erase Deleted Files on iPhone XS (Max)/XR/X

[Summary]: Wondering how to wipe out personal data or deleted files on iPhone X or iPhone XS? This article is going to show you a perfectly secure way to permanently erase data from iPhone XS(Max)/XR/X without any possibility of information leakages.

“I want to sell my iPhone XS, but there is some personal data on the phone, I am worried that this data can still be retrieved after the iPhone is factory restored. How can I wipe all personal data permanently before selling?” ASK Louise.

Some friends have the same situation as Louis. My friend introduced me to a software, iPhone Data Eraser, which perfectly erases personal data for me, such as contacts, messages, call logs, notes, emails, History and so on. In order to let you better understand this software, I will give a more detailed introduction as below.

Since deleting and restoring to factory default settings can not really delete the data on iPhone, what I want to recommend here is using the iPhone Data Eraser, which helps you permanently delete everything on iPhone/iPad or iPod, such as contacts, text messages, call logs, emails, account info, passwords, videos, photos, documents, etc. Besides, it adds a security feature that completely erases deleted files and you should note that after erasing your iPhone,no one can recover data back,after wiping,the data is lost permanently.

Why Choose iPhone Data Eraser:

– It allows you to clean up the garbage content so as to make your device working as quickly as a new one: delete and compress photos, remove junk or temporary files, delete large files and manage apps.
– It helps you erase all your data stored on iPhone, iPod or iPad within several clicks.
– It can erase your private data in completely, like photos, videos, contacts and messages, call logs, etc.
– The deleted files are actually not deleted, they are just invisible. This iPhone Data Easer makes your deleted files actually deleted.
– File types supported to erase: Call History, Messages, Photo & Video, Contacts, Cookis & History, Keyboard Cache, Note & Reminder, etc.

d_win d_mac

Part 1: Deleted Private Data on iPhone XS(Max)/XR/X

Step 1.Connect your iPhone XS with computer
The most important thing is download the iPhone Data Eraser,then launch it and connect your iPhone XS with a cable.
launch iphone data recovery
Step 2.Select the mode–Erase Private Data
After connect with your PC/Mac successfully,you need to select the right mode-Erase Private Data,which can keep your private data completely gone.Then click the button “Scan” to scan your iPhone XS.

guide-win-16

Step 3. Select File Types to Delete

As you can see,  you are able to erase all kinds of private data including your WhatsApp chat history, messages, call histories, contacts, notes and much more. Now select the files you want to remove permanently.

select data to delete

Step 4. Select Security Level and Confirm

Next you should type “delete” into the box to confirm. Actually you can change the security level no matter which you need, you can click the link to change the level. Before that,please read the security level settings carefully.

confirm deletion

security level

Step 4.Erase now
After you manually type “delete” into the box to confirm your action, click the “Erase Now” button to erase all private data on your device.
permanently delete private data
Notice:Because the iPhone Data Eraser delete the data is permanently.Make sure you have backup the data you need before the erase action.

Part 2: Erase Deleted Files on iPhone XS(Max)/XR/X

In fact, deleted files are not really removed, unless you use tools to erase deleted files on your iPhone, hackers and other third parties can still recover those deleted files. The Erase Deleted Files feature of iPhone Data Eraser can help you wipe the deleted iPhone/iPad files permanently and make sure that they are no longer accessible or recoverable.

Step 1. Connect iPhone XS to PC

Launch iPhone Data Recovery software then use a USB cable to connect your iPhone XS(Max)/XR/X to the computer.

launch iphone data recovery

Next, choose the Erase Deleted Files tab, and click “Scan” and then the tool will begin scanning your iPhone device and list all deleted files.

guide-win-10 erase deleted files option

Step 2. Selected Deleted Files

Soon, the program successfully found all the deleted files and displayed them in the window. You can preview and select the content you want to erase completely, click the “Erase Now” button.

select deleted files

select data to delete

Step 3. Select Security Level and Confirm

Before erasing, the program will ask you to type delete to confirm the command.

confirm deletion

In addition, you should notice the Security Level, click on it, and you are free to choose the security level from low-medium-high. Please read the security level settings carefully before you make a decision.

security level

Step 4. Permanently Erase Deleted Files on iPhone

Now click on the “Erase Now” button to erase all data on your iPhone.

erase deleted data on iphone xs

d_win d_mac

Related Articles

4 Ways to Erase iPhone Data and Settings

Methods to Recover iPhone Lost Contacts after Factory Reset

How to Erase Private Data from iPhone/iPad Permanently

Ways Erase Deleted Data from iPhone without Recovery

How to Permanently Delete Call History on iPhone

Deleted iPhone XS Data Permanently

Transfer All Files from Old Samsung Phone to Galaxy S10/Fold

[Summary]: How to transfer all files from your old Samsung Galaxy S/Note/J to a new Galaxy S10/S10+/Galaxy Fold quickly and seamlessly? In this article, we have provided an in-depth tutorial to setup Galaxy S10 and S10+.

Samsung has been providing better products Galaxy S10 and Galaxy Fold to users over the years. Launched in February 2019, the Samsung Galaxy S10 features a 6.1-inch touchscreen with a resolution of 1440 pixels by 2960 pixels. Happy launch day, new Samsung Galaxy S10 and or S10+ owners! Now that you have your brand-new device, you must want to transfer data, especially photos, contacts and videos from your old Samsung Galaxy mobile to the new Samsung device.

This article is intended to help some Samsung users who want to upgrade their phones to the new Galaxy S10 or S10+ and then transfer the old Samsung data to the new Samsung device. And it will act as a guide, giving you 4 different and efficient ways to sync all types of data from an old Samsung to Galaxy S10/S10+, including contacts, text messages, pictures&photos, videos, call logs, audio, whatsApp messages, calendars, documents and much more.

Can’t Miss:

* How to Bypass Android Lock Screen Password without Google Account

* How to Recover Deleted Data on Galaxy S9/S9+

CONTENTS

Part 1. Transfer Data from Samsung to Samsung with One Click

To copy all data types from one mobile phone to the other, Android ToolkitPhone Switch software is definitely a great helper to move files between Samsung phones in one click. First of all, this program supports to copy almost everything, including contacts, SMS, photos, videos, books, call logs, music, apps, WhatsApp chats, audio, etc., Secondly, it is easy to use and you need only 3 simple steps to transfer everything simultaneously. More importantly, it is compatible with all popular mobile phones, including the latest Samsung S10/S10+, and cross-platform supported.

Some Highlights of Phone Switch Software:

It supports to copy music, photos, contacts, text messages, movies, books, call log, calendar, apps and etc. between two devices.
It enables to sync iTunes/iCloud backup to Android phone.
It moves data between devices with different operating systems, i.e iOS to Android.
It can be used to transfer data from Android to Windows/Mac computer, from computer to Android.
All you data will be 100% safe during the process.

d_win d_mac

Support all Samsung device like Samsung Galaxy Fold, Samsung Galaxy S10/S10+/S10e/S10 5G, Galaxy S9+/S9/S8+/S8/S7/S6/S5/S4, Samsung Galaxy Note 9/8/7/5/4, Samsung j8/j7/j6/j5/j3, Samsung Galaxy A9/A8/A7/A5 and etc.

Step 1. Launch Phone Switch Software

Download and install the iSkysoft Toolbox on your computer. Launch it and you will see its primary interface as follows. To start with, please choose “Switch” option.

phone switch on pc

Step 2. Connect Samsung Phones

Next, keep your Samsung devices connected with your PC. Then your device can be automatically detected by the program, please make sure your old Samsung phone is detected as Source device. To change how the source or destination device is placed, just tap on “Flip” on the screen.

connect two samsung phones

Step 3. Copy Data from Samsung to Samsung Galaxy S10

Phone Switch will detect the two phones and show all the transferable content in the middle, such as contacts, text messages, calendar, call logs, photos and so on. Select the data you want to transfer and then tap on “Start Transfer”.

sync data from old samsung to galaxy s10

d_win d_mac

Part 2. Transfer Samsung Data Using Samsung Smart Switch

Smart Switch makes it very easy for you to move data from one Android/iOS to a Samsung Galaxy mobile phone. So, you can use it to copy data from Samsung to Samsung Galaxy S10/S10+. Please download the Smart Switch app on your both devices first and try to do it:

Step 1. Firstly, install and run the Smart Switch app on both devices.

Step 2. On your Samsung Galaxy S10, choose Wireless > Receive and you will be asked to select your old phone model. On your old Samsung phone, tap Wireless > Send > Connect, and it will search for the new Galaxy S10 automatically.

transfer-data-from-samsung-to-samsung transfer-data-from-samsung-to-samsung-3 transfer-data-from-samsung-to-samsung-4

Or you can connect to S10 via the PIN code shown on the phone screen.
transfer-data-from-samsung-to-samsung-5

Step 3. Once the devices have communicated with one another, you will then be able to select the types of data you would like to transfer and then simply click “Send“.

transfer-data-from-samsung-to-samsung-6

Part 3. Transfer Data from Samsung to Samsung Using NFC

NFC is a feature that allows users to pay for goods, share data and automate certain tasks easily. If your Samsung devices have built-in NFC, you can also choose to use NFC to transfer data from old Samsung phone to Galaxy S10 or S10 +.

Step 1. Turn on NFC on both Samsung devices: Go to Settings > More Settings> NFC and then toggle the switch on.

Step 2. Then make the two devices back to back and you should feel the device vibrate or hear the sound confirming that the devices are now connected. You will also need to set up a Wi-Fi direct connection to allow copying data.

transfer-data-from-samsung-to-samsung-9

Step 3. Now you are able to select data type you want to transfer, such as contacts, calendar, S Notes, Pictures, Music(DRM free), Videos and Documents.

Step 4. Simply click “Transfer” on the device and then click “OK” to confirm the device you want to send content to.

transfer-data-from-samsung-to-samsung-10

Related Articles

Transfer Data from Android to Samsung Galaxy S10 in Two Ways

How to Transfer Contacts & SMS from Android to Galaxy S10

How to Transfer Everything from Samsung to Samsung Galaxy Note 8

How to Transfer/Switch/Migrate Samsung Data to HTC 10

Transfer Data from Samsung to S10

How to Transfer Data from Android to Samsung Galaxy S10/S10+

[Summary]: We’ll give you two simple and effective methods to transfer data including contacts, text messages, photos, videos, call logs, music, apps, bookmarks, calendar from all Android phone to Samsung Galaxy S10/S10+/S10e/S10 5G, as well as switching iPhone data to the new Galaxy Fold.

This tutorial is aimed at people who have just switched from an Android device to a new Samsung mobile phone and want to find a shortcut to transfer all data from the original device to the new one. The two methods offered here cover most Android phone users, such as Xiaomi, Huawei, old Samsung, LG, Nokia, Oppo, Vivo, etc. In addition, various data types like contacts, text messages (SMS), calendars, photos, Music, videos, call logs, apps and more can be easily transferred from one device to another regardless of the device’s operating system. How to do it? Let’s figure it out together.

You May Also Like:
* How to Recover Samsung Files When Forgotten the Password

* Transfer WhatsApp Messages from iPhone to Galaxy S10 and Galaxy Fold

CONTENTS

Method 1: One-Click to Sync Android Phone Data to Samsung Galaxy S10

After our comprehensive consideration, the most recommended way is to use such a professional and efficient software: Android ToolkitPhone Switch Software. This tool works on both Windows and Mac and helps you effortlessly transfer all kinds of files you need from an old Android phone to a new Samsung Galaxy S10/ S10+ with one click. As a good assistant, whether you need to copy individual data or all types of data, it can be done perfectly. Contacts, messages, call history, gallary, videos, calendar, audio, and applications are well transferred from Android to Android, Android to computer, or computer to Android, even iOS to Android. Not only Samsung Galaxy S10, it is also fully compatible with other Samsung devices like Galaxy S9 + / S9 / S8 + / S8 / S7 / S6 / S5 / S4, Samsung Galaxy Note 8 / Note 5 / Note 4, Samsung J3 / J3 Pro, Samsung Galaxy A9 / A8 / A7 / A5, etc. Let’s see how this tool gives us a hand regarding data transferring.

You can click the following button to download the Windows or Mac version on your computer first.

d_win d_mac

Step 1. Open Phone Switch on PC

After downloading and installing, you need to open Phone Switch software with your computer. On the home page, you can find all the features it supports. Here locate “Switch” feature to start.

phone switch on pc

Step 2. Connect Both Android Phones to PC

Next, please connect both of your Android phones to the computer. You should enable USB debugging mode on Android devices to allow program connect them, of course you can also connect Android device via WiFi network. To transfer data from Android to Samsung Galaxy S10, make sure your old Android phone listed on the left while your Galaxy S10/S10+ on the right. Or you can change the position by clicking “Flip” button.

connect android and samsung galaxy s10

Step 3. Copy Desired Data from Android to Samsung Galaxy S10

After connected both phones successfully, Phone Switch program would load all your data on devices automatically. Then simply check your desired items on the middle panel (Camera Roll, Photo Library, Audio, Video, Contacts, Messages Chats, Call History, Application, Bookmarks), and click on “Start Transfer” button to start the transfer process. After a while, all your desired data would be synced from old Android phone to Samsung Galaxy S10 successfully.

sync data from android to s10

d_win d_mac

Method 2: Transfer Android Files to S10/S10+ with Samsung Smart Switch

Smart Switch, as a new released application by Samsung, allows you to transfer files from an old Android device to Samsung Galaxy S10/S10+. With it, you can switch apps, SMS, call history, calendar, video, music, etc. from Android, iOS, BlackBerry or Windows Mobile devices to Samsung phones seamlessly. The following are the specific steps.

Step 1. Install the Samsung Smart Switch app on the two devices from Google play store or Samsung store.

Step 2. Place your two Android phones close together (within 8 inches) and run the Smart Switch app on both phones.

Step 3. On your new Samsung Galaxy S10, select Wireless > Receive, then it will ask you to select your old device model.

Step 4. On the old Android device, choose Wireless > Send > Connect, it will use high-frequency audio to search for your Galaxy S10/S10+, or you can use the PIN code displayed to connect to Galaxy S10, then you can simply select your desired data to copy.

Step 5. Finally, tap on “SEND” option on old Android device to begin the file transfer. On your Samsung Galaxy S10, remember to choose the “RECEIVE” option to receive contents from old device.

android-to-s10

Related Articles

How to Transfer Contacts & SMS from Android to Galaxy S10

How to Transfer Music from iTunes to Galaxy S10/S10+

How to enjoy Apple Music on Samsung Galaxy S10/S10+

How to Transfer Data from Android to iPhone

Android to Galaxy S10 Transfer

How to Transfer Contacts & SMS from Android to Samsung Galaxy S10

[Summary]: Contacts and SMS are one of the most important data on your mobile, if you are going to switch phones to Samsung Galaxy S10 from old Android devices, this tutorial will teach you how to transfer contacts and text messages from Android phones to Samsung Galaxy S10.

“How can I transfer contacts & SMS data from Android to my new Samsung Galaxy S10? I can’t complete the synchronization of contacts and text messages, if it’s just a simple copy and paste function. They are very important to me. Do you have any good solutions to copy Android data to Samsung phone?”

The speed of mobile phone update is increasing, and various well-known mobile phone companies provide a wealth of choices, like LG, Sony, Samsung, Apple, Huawei, etc. In any case, these companies’ phones will appeal to you to purchase. The amazing Samsung Galaxy S10 has been released. Contacts and text messages are one of the most important file data, and they always keep the phone numbers and communication content of your friends, family, colleagues, etc. Transfer contacts and text messages should be the most important thing on your to-do list after you make a switch from old Android phone to new Samsung Galaxy S10. So how to make it? In this article, we will show you the easier method to copy contacts and SMS from Android to Samsung Galaxy S10 with one click.

Android ToolkitPhone Switch is suitable for more than 6,000 smartphones and tablets, including Apple, Samsung, Huawei, OPPO, Sony, HTC, Google, LG, Motorola, ZTE, etc. And you enable to sync contacts and SMS securely and reliably between Android phones. You can also use this toolkit to sync data from different mobile platforms, iOS and Android.

MAIN FEATURES OF ANDROID TOOLKIT – PHONE SWITCH

– Transfer call logs, contacts, pictures, videos, apps, photos, SMS, etc. between phones with ease.
– Works well with all Android phone such as HTC, LG, HUAWEI, Acer, Samsung, Motorola, ZTE, Sony and more other Android models.
– Support cross-platform data transfer, such as transferring data from Android to iPhone, iPad.
– Thing can be done with 3 simple steps: Connect phones-select data-start transferring.

Now, please use Android Toolkit – Phone Switch to transfer your contacts phone numbers and messages from Android to Samsung Galaxy S10 with simple steps below.

d_win d_mac

Guide to Copy Data from Android to Samsung Galaxy S10

Step 1. Run Phone Switch on PC

Firstly, free download the Phone Switch software on your computer. Run it and you will see different modules in the maintenance then select the “Switch” module to get started.

phone switch on pc

Step 2. Connect Android and Galaxy S10 to PC

Next, use 2 USB cables to connect your Android phone and Galaxy S10 to the same computer. The program will detect your devices respectively. If you want to copy Android data to Samsung Galaxy S10, please make sure your Android phone is detected as Source phone on your left, and the new Galaxy S10 must be detected as Destination phone on your right. If you connect the wrong side, you can use the “Flip” button to swap their positions.

connect android and samsung galaxy s10

Tip: If you want to clear your target phone, you can select the “Clear data before copying” option.

Step 3. Start Copying Contacts, SMS from Android to Galaxy S10

In this section, you will see the contacts, text messages, photos, videos, music, call logs, documents, etc. displayed in the middle of the window. To select a contact, SMS file type or other content that you need to transfer, then simply click “Start Transfer” to start copying contacts and text messages from Android to Samsung Galaxy S10 directly. Just wait a few moments to complete the transfer and verify the data later.

sync contacts and SMS from android to s10

d_win d_mac

Related Articles

How to Transfer Music from iTunes to Galaxy S10/S10+

How to Transfer Music from iTunes to Galaxy S9/S9+/X

How to Restore Lost Contacts from Samsung Galaxy S10

how to Transfer Contacts & SMS from Samsung to Huawei Mate 20(Pro)

Transfer Android Files to Galaxy S10