“Hi. I downloaded some Yutube videos on the Mac, now I want to export it to the iPhone 8. How? I wonder is there any easy ways to get it done? I’ll appreciate your suggestions, thanks!”
iPhone only supports certain types of video files such as MP4, M4V and MOV files. Thus, if you want to transfer videos from Mac to iPhone for an enjoyment, you will need to convert your videos to iPhone-compatible formats. In most of the situations, iTunes will do the conversion stuffs for you, but sync videos with iTunes will cover the old data on your device. In this case you will probably need some professional tool to give you a hand. And the post will show you the best ways to transfer videos from computer to iPhone 8/7/6S without data loss.
Part 1: How to Sync Videos from Mac with iPhone via iTunes
Step 1.Add Videos from Computer to iTunes
Run iTunes on your Mac. Then, click “File” in top left corner of the screen and in the drop-down list. Choose either “Add File to Library” (adding one video to iTunes) or “Add Folder to Library” (adding all videos in one folder to iTunes) to add videos to iTunes.
Step 2.Prepare to Add Video to iPhone
Connect your iPhone with Mac via the USB cable, click on cell phone icon appearing beside Content Menu to enter your iPhone.
Step 3.Sync Video from iTunes to iPhone
Click “Movies” under “Settings” on the left sidebar and tick “Sync Movies” appearing on the main window. Select what you want from videos listed below “Movies” or you can also tick the checkbox “Automatically include movies” to allow iTunes to select videos for you, either selecting all movies or most recent watched/unwatched videos. After choosing the right videos, click “Apply” underneath the window, iTunes will then start transferring videos that you want to your iPhone.
Part 2: How to Export Videos from Mac to iPhone via iOS Manager
The best ways to export videos from Mac to iPhone without data loss is with the help of iOS Manager, which is an amazing data manager for iOS device without iTunes. It allows you to transfer almost any video from Mac to iPhone with fast transferring speed. iOS Manager enables to convert videos to an iOS supported format automatically while you transfer files from the computer to your iPhone/iPad/iPod. What’s more, iOS Manager empowers to transfer several types of files between iOS device and computer, between iOS device and iTunes, between iOS device and Android device. The transferable data including videos, music, photos, apps, contacts and SMS.
Step 1. Download and install iOS Manager for Mac After downloading iOS Manager on the computer, install it on your Mac. To transfer videos from Mac to iPhone, connect your iPhone with your Mac via a USB cable.
Step 2. Transfer Videos from Mac to iPhone
You can see there is a Videos option on the top. Click it to see the video control panel. In the window, you can see the tab “+Add“.
A new window will pop up, browse your videos. Click Open to transfer videos from Mac to iPhone directly. The whole process of transferring videos from Mac to iPhone with program only takes a few seconds.
You can see the video on your iPhone now.
If the video you’re transferring to your iPhone is not supported by your iPhone, then there is a pop up telling you to convert them first. Just click Convert. After the conversion, the video will be transferred to your iPhone instantly.
“How to transfer photos from the computer to my iPhone 8 without iTunes? I need to sync the photos with my new device in a simple way. Thank you very much.”
One of the most frequently asked questions from iOS users is about how to transfer photos from computer to iPhone without iTunes. When it comes to transferring photos from computer to iPhone, there is no doubt that the first solution come to our mind is iTunes. However, when syncing photos from iTunes with iPhone, all the previous photos, music, ringtones, iBooks and other media files you synced to your iPhone will be recovered. In this article, we will show you how to import photos from computer to iPhone without iTunes.
Part 1: Transfer Photos from Computer to iPhone via iOS Manager
iOS Manager has been specifically designed to import photos from computer to iPhone 8/7/6S/6/5S/5 directly. iOS Manager is a best data manage tools for iOS device, helps to transfer & manage data for iPhone, even iPad on the computer freely, including photos, videos, music, contacts, SMS, apps. With using iOS Manager, you could easily transfer data between iOS device and computer, transfer data between iOS device and iTunes, transfer data among iOS device and Android device.
Step 1. Run iOS Manager on the Computer
Download, install and launch the iOS Manager program, connect your iPhone to the computer and then wait for detecting.
Step 2. Select Photos to Import to iPhone
Click the “Photos” on the top. You will see a new interface, then click “+Add” and select “Add File” or “Add folder” to add photo from computer to iPhone easily.
Step 3. Transfer Photos from Computer to iPhone Directly
From the file explorer which appears, now you need to select the photos and transfer them to the device to finish the process.
Part 2: Transfer Photos from Computer to iPhone via Google Photos
Google photos are a normal way to transfer photos from computer to iPhone 8/7/6S/6/5S/5. It was created by Google company.
Requirements:
– iPhone
-Active internet connection
– Laptop or PC
Step 1. From the URL the user needs to access the main page:
Step 2. Click the upload icon, from the dialogue box which appears, the user needs to upload the photos to the service using the system:
Step 3. Launched the Google photos app on the iPhone and tap the left menu:
Step 4. Tab then the collections where the user can see all the photos to complete the process in full:
An Excellent Photos Transfer for iOS
In this extra part we recommend an excellent iOS photos transfer for you, which called Mobile Sync. It is capable of transfer photos from computer to iPhone 8/7/6S with one-click. Mobie Sync is an all-in-one iOS data manage tool for sync iOS files between iPhone/iPad/iPod and computer; transfer data between iOS devices; transfer iOS files to computer; add files from computer to iOS device; extra features with ringtone maker and HEIC converter. It is compatibles with all iOS models, including iPhone X, iPhone 8(Plus), iPhone 7(Plus), iPhone 6S(Plus), iPhone 6(Plus), iPhone SE, iPhone 5C/5S/5; iPad and iPod.
“I just bought Galaxy S8 not even a week. As usual, I was chatting on Messenger, everything froze. No buttons responded to anything in my case. Even charge didn’t show any light. It seem like a dead phone. Now I want to use my contacts, how can I get the contacts back and shift to the iPhone 6s?” Gayle asked.
There are many people may experienced a sudden death of the phone for no reason. In fact, things happen cause there is a reason. Maybe your phone was attacked by virus or short circuit. When your Samsung phone meet problem like suddenly black/blank screen, stuck in Samsung logo/download mode or other situation, what will you do to restore the data from the broken Samsung? And how to transfer it to iPhone?
Actually, there is a easy and simple way can help. Download the Broken Samsung Data Recovery and Phone Data Transfer can solved the question. Broken Samsung Data Recovery is a powerful data extraction. It design for user to restore data from a broken Samsung phone with broken screen, black/blank screen, or stuck in Samsung logo/recovery mode/start screen, looping on restart,etc. It can recover many kinds of the files like contacts, SMS, videos, photo, music, call history, WhatsApp message and more. With help of Broken Samsung Data Recovery, you can extract contacts from broken Samsung easily. It was totally compatible with Samsung Galaxy S7/S6/S5/S4/S3, Galaxy Note 5/Note 4/Note 3/Note 2 and Galaxy Tab.
Tip: The recovery system function only suitable for Samsung phone, if your phone is HTC, Motorola, LG, Sony, Huawei, ZTE, Google Nexus, Google Pixel, ZTE, Xiaomi, Sharp, Windows phone, you can use this software to backup data when the phone is normal.
Part One: Recover Contacts from Broken Samsung to Computer
Step 1. Run the Program and Connect Broken S8 to Computer
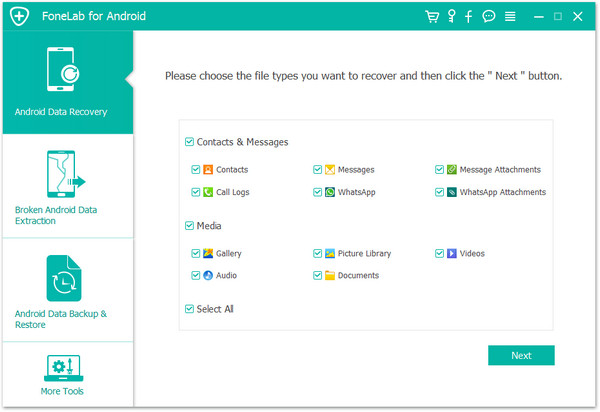
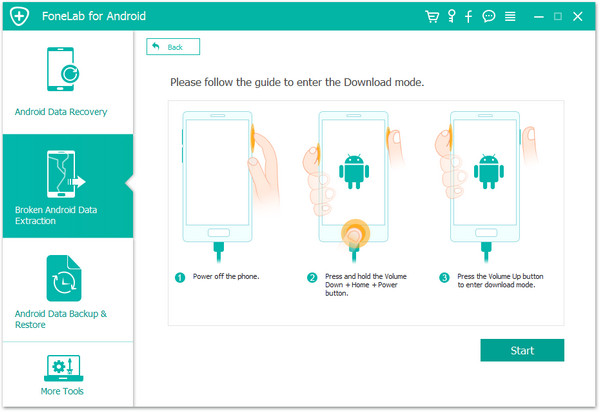
Install and run the Broken Samsung Data Recovery on your computer. Then connect your Samsung Galaxy S8 to computer. Find “Broken Android Phone Data Extraction”, and click “Start” to go on.
Next, choose “Contacts” and click the “Next”.
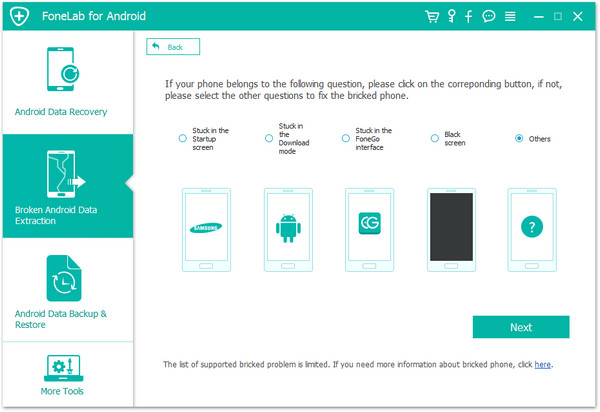
Step 2.Choose the Phone Fault Type
At first, you need to select a phone fault type of your broken. Here, select “Black Screen” option to the next.
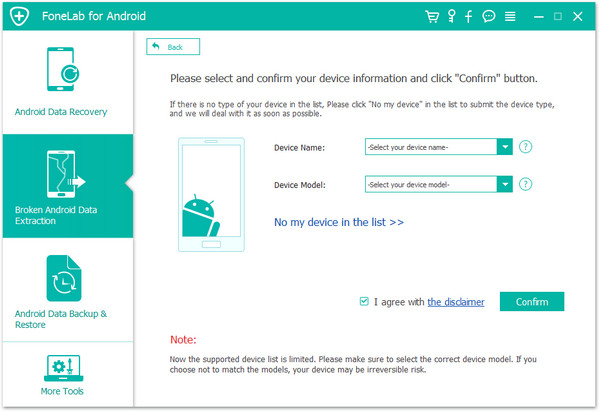
After that you need to select the name and model information of your device and make sure it is correct.
Step 3.Enter Broken Samsung S8 into Download Mode
Then, get your broken Android into download mode by following the instructions on the program: Power off the phone > Press and hold “Volume down”, “Home” and “Power” button on the phone > Press “Volume up” button to enter download mode.
Step 4. Start to Fix Broken Samsung S8 to Normal
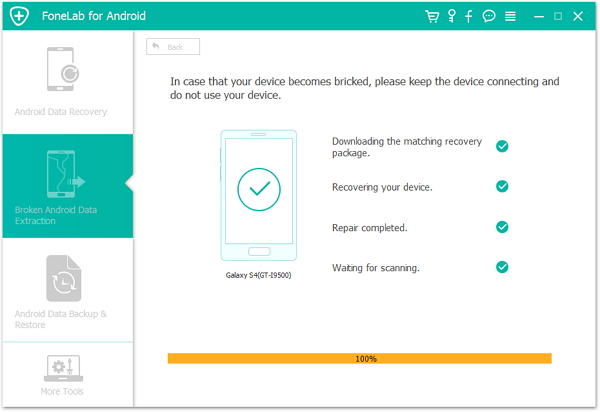
After entering into download mode, the program will download recovery package, and it begin to fix the Broken Samsung S8, it will take some minutes.
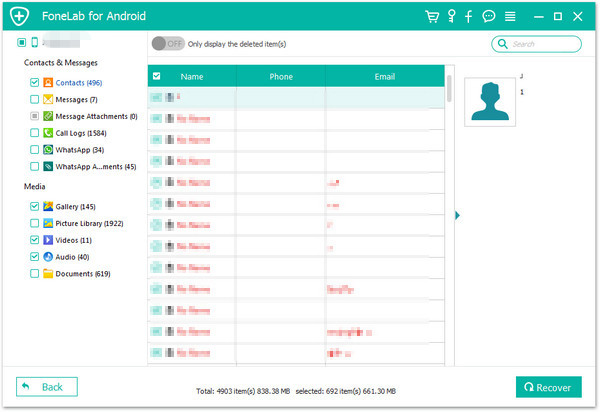
Step 5. Recover Contacts from Broken Samsung Galaxy S8 to Computer
You are able to preview on your data after the repairing. Select “Contacts” and click “Recover”, then the contacts will save on your computer.
Part Two: Transfer Contacts to iPhone7/7 Plus/6s
Phone Data Transfer can assist you to transfer data including contacts, photos, music, SMS, and more from computer to Android/iPhone, or phone to phone even not the same operating system. With the help of this program, you can transfer contacts from computer to mobile device with one click. At the meanwhile, users can use it to manage your data on your phone. It is suitable for almost Android phone with Android 7.0 and iPhone with 10.3.
Step 1. Connect your iPhone 7/7 Plus/6s to Computer
Installing and running the program, then connect your iPhone 7/7 Plus/6s to computer. You can see the interface.
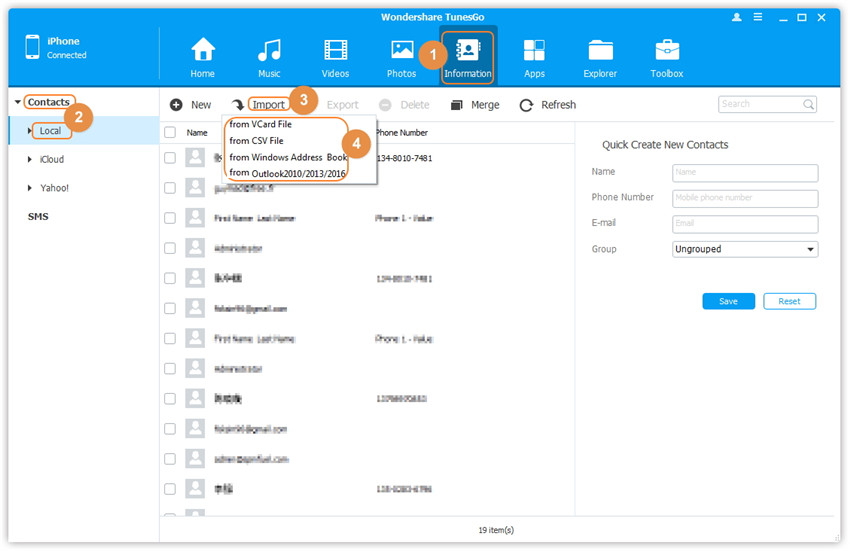
Step 2. Preview and Import Contacts to the iPhone 7/7 Plus/6
Click Information at the top of the the main interface, you’re expected to enter Contacts > Local by default. Select the file type you want import, then waiting for some minutes, the contacts can be on the iPhone 7/7Plus/6s.
“I try to transfer the photos from computer to my iPhone 8 in normal way but it failed. I am not sure what’s wrong with it. Can anyone give me some advice?”
“I have got a new iPhone X,now I want to import pictures from computer to iPhone X,any third-part tool helps me add photos to my new iPhone X without iTunes?”
There are actually a couple of effective ways that you can use to upload your photos to iPhone 8. One important thing to remember is that, unfortunately you can’t just plug your iPhone in and start copying photos to computer. This ‘limitation’ often takes new iPhone users by surprise as they expect the iPhone works like a USB drive. Recently we got a lot of report that iPhone 8 users can’t be able to let the computer access the device and can’t do anything on it to make the computer detect it. This post is aim to fix the similar issues, help to transfer photos to iPhone 8 normally.
Import Photos to iPhone 8 and iPhone X Smoothly
iOS Manager can fix your problem, it is useful for transferring & managing data for iOS devices efficiently. With the help of iOS Manager, you are allowed to transfer photos to iPhone 8/X without hassle. iOS Manager enables to transfer photos between computer and iPhone, transfer photos between iOS/Android device and iPhone. What’s more, this program supports to transfer & manage videos and music for iOS device. Not only iPhone 8, all the functions of iOS Manager is applicable to all models of iOS devices, such as iPhone 7, iPhone 6S/6/5S/5, iPad & iPod.
Part 1: Transfer Photos to iPhone 8/X with iOS Manager
Step 1. Run iOS Manager and Connect iPhone 8
Launch iOS Manager and connect your iPhone 8 to the computer.
Method 1:Transfer Photos by Tapping Buttons
Step 2. Add Photos from Computer to iPhone 8
Click “Photos” icon at the top of the main interface, then select the specific option “Photo Library“. Please note that “Camera Roll”, “Photo Stream” and “Photo Shared” are not available to add photos.
Later, click “Add” and then select “Add File” or “Add Folder” to add photos from your computer. If you only want to select some photos, then click “Add File“, and then hold down “Shift” or “Ctrl” key to choose multiple photos; if you want to transfer all the photos in one folder, then click “Add Folder“. After that, click “Open” to import the selected photos. Here we only add photos to iPhone 8 by clicking “Add File” for example.
Method 2:Transfer Photos by Drag and Drop
Step 2. Find Photos on Computer
Find and open the photo folder on your computer which includes the photos that you wish to transfer to iPhone 8.
Step 3. Export the Photos to iPhone 8 by Drag and Drop
Click “Photos” icon on the main interface of iOS Manager, then go to the “Photo Library” window. Drag and drop the selected photos from your computer to the “Photo Library” window of iOS Manager.
Note: With the two methods above, you can also select to add photos to one of the photo albums under “Photo Library”.
Part 2: Transfer Photos to iPhone 8/X with E-mail
Another available way of transferring photos to iPhone 8 from Mac/PC is by emailing the photo to myself as an attachment. This method is in my opinion the simplest and probably the quickest way of doing it.The only thing to consider is that it only works well if you want to just send a small number of photos. This is due to a limitation that email providers (e.g. Gmail, Hotmail, Yahoo) have imposed on the size of an attachment that can sent in one email.
“I have a question. How to only sync the videos from iTunes to iPhone 8 directly? The iTunes sync itself just offer a solution to sync all data at one time. Any good points?”
We know almost everything about Apple substantially redesigned iPhone 8: the massive, elongated display, wireless charging, vertically aligned dual camera and price increase. If you have got a new iPhone 8, and wanna sync favorite videos from iTunes with the previous iPhone after you set up your new device. iTunes automatically backup will sync all data with your new device instead of selecting. So how to copy the videos from iTunes to your new iPhone only?
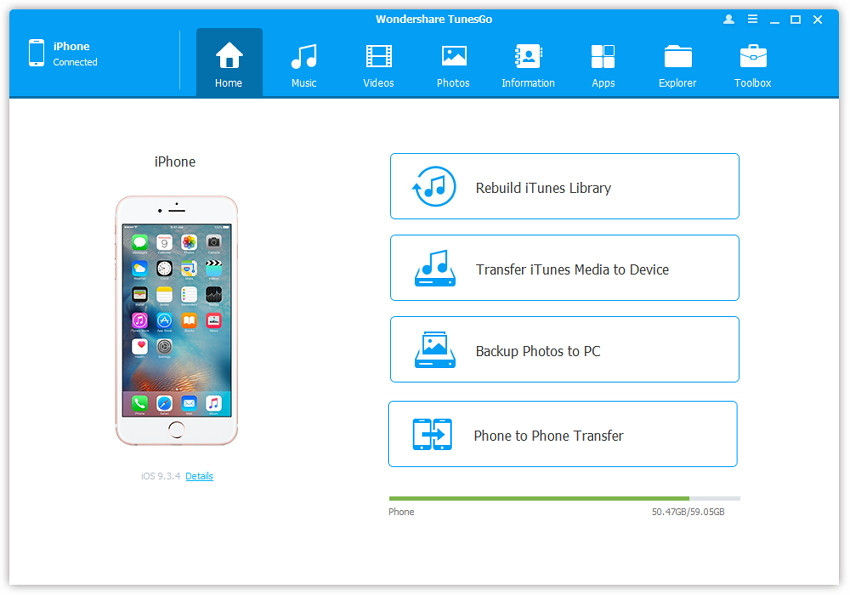
Sync iTunes Media Files with iPhone 8/iPhone X
You should try this iOS Manager, which is an excellent data manage tool for transferring & managing data for iOS device on computer safely, including videos, photos, music, contacts, SMS, apps. With the help of iOS Manager, you could sync iTunes videos to iPhone 8/iPhone X with one click. What can this program do for you? To transfer files between iOS device and computer, transfer files between iOS device and iTunes, transfer files among iOS & Android device. iOS Manager works well for all iOS devices, such as, iPhone X, iPhone 8, iPhone 7, iPhone 6S/6, iPhone 5S/5, iPad and iPod.
Part 1: How to Transfer Videos from iTunes to iPhone 8/iPhone X
iOS Manager offers two solutions to transfer videos from iTunes to iPhone 8/iPhone X, Movies, Music Videos, TV Shows, iTunes U and Podcasts are supported.
Method 1: Transfer Videos from iTunes to iPhone 8/iPhone X With 1-Click File Transfer
Step 1. Run iOS Manager and Connect iPhone 8/iPhone X
Run iOS Manager and connect your iPhone 8/iPhone X to the computer. Then click “Transfer iTunes Media to Device” mode on the main interface.
Step 2. Select Files to Transfer
iOS Manager will detect all the media files in iTunes and show them by list on the pop-up window. By default, the entire library has been checked. But you could uncheck the items that you don’t want to transfer to your iPhone.
Step 3. Transfer Media Files to iPhone 8/iPhone X
Click Transfer to start transferring selected files to your iPhone and then click “OK” to complete the process.
Note: iOS Manager enables to automatically detect the duplicates and only transfer the exclusive contents from iTunes to iPhone 8/iPhone X.
Method 2: Transfer Videos from iTunes to iPhone 8/iPhone X With Toolbox
Step 1. Run iOS Manager and Connect iPhone 8/iPhone X
Launch iOS Manager and connect your iPhone 8/iPhone X to the computer. Then go to Toolbox > Transfer iTunes Media to Device on the Toolbox interface.
Step 2. Select Files to Transfer
iOS Manager will detect all the media files in iTunes and show them by list on the pop-up window. By default, the entire library has been checked. But you can uncheck the items that you won’t transfer to your iPhone.
Step 3. Transfer Media Files to your iPhone 8/iPhone X
Click “Transfer” to start transferring selected files to your iPhone 8/iPhone X and then click “OK” to complete the process.
Note: iOS Manager enables to automatically detect the duplicates and only transfer the exclusive files from iTunes to iPhone 8/iPhone X.
Part 2: How to Transfer Videos from Computer to iPhone 8/iPhone X
Step 1. Run iOS Manager and Connect iPhone 8/iPhone X
Launch iOS Manager and connect iPhone 8/iPhone X to the computer.
iOS Manager offers two solutions to transfer videos from computer to iPhone 8/iPhone X, Movies, Music Videos, TV Shows, iTunes U and Podcasts are supported.
Method 1: Transfer Videos from Computer to iPhone 8/iPhone X Using Buttons
Step 2. Find Video Type on iPhone 8/iPhone X
Click “Videos” icon at the top of the main interface. Select a specific option Movies/Music Videos/Home Videos/TV Shows/iTunes U/Podcasts to transfer( “Movies” is the default option).
Step 3. Select and Add Videos from PC/Mac to iPhone 8/iPhone X
Click “Add” and then select “Add File” or “Add Folder“.
Note: If you need to select a few videos, then click “Add File“, and then hold down Shift or Ctrl key to choose multiple videos; if you want to transfer all the videos in one folder, then click “Add Folder”.
From the pop-up window, browse and choose the target video(s) from your computer. And click “Open”. Then, the selected videos will be imported to the iPhone 8/iPhone X.
Method 2: Transfer Videos from Computer to iPhone 8/iPhone X by Drag and Drop
Step 2. Find Videos on your PC/Mac
Find and open the video folder on your PC or Mac which includes the videos that you wish to transfer to your iPhone 8/iPhone X.
Step 3. Export the Videos to iPhone 8/iPhone X by Drag and Drop
Click “Videos” icon on the main interface of iOS Manager, it will go to the Movies window by default, Music Videos, TV Shows, iTunes U and Podcasts are available here too. Drag and drop the selected videos from your computer to the Movies window of iOS Manager.
Supersized smartphones is clearly the trend of 2017: massive new displays crammed inside phones with super skinny bezels. And the iPhone 8 looks set to make the biggest leap of them all. A dramatic shift from the 4.7-inch iPhone 7 to a 5.8-inch on iPhone 8. This 1.1-inch increase is larger even than Samsung’s jump from 2016’s Galaxy S7 and Galaxy S7 Edge to the new ‘Infinity Displays’ on the Galaxy S8 and Galaxy S8 Plus.
When you get a new iPhone 8 and you should do something then enjoy using the new device. Backup iPhone data , keep a copy of your information in case your device is ever replaced, lost, or damaged. Backup iPhone data with iTunes may be overwrite your old data saved on iTunes. So how to backup iPhone without iTunes? This post will show you the best ways to backup and restore iPhone 8 on computer without iTunes, and selectively.
Backup & Restore iPhone 8 Safely on Computer
iOS Backup & Restore can do you a favor, help to backup and restore data for iPhone 8 safely without iTunes. The supported data including contacts, SMS/iMessages, photos, videos, notes, call logs, Apps data and other personal documents. iOS Backup & Restore enables to backup iPhone data to computer, restore backup from computer to iPhone as well. iOS Backup & Restore offers full support for iPhone 7/6S/6/SE/5C/5C/5/4S/4, iPad Pro, iPad Air, iPad mini, iPod Touch and other iOS devices.
How to Backup and Restore iPhone 8 on Computer
Step 1. Run the Program on Computer and Connect iPhone 8 to Computer
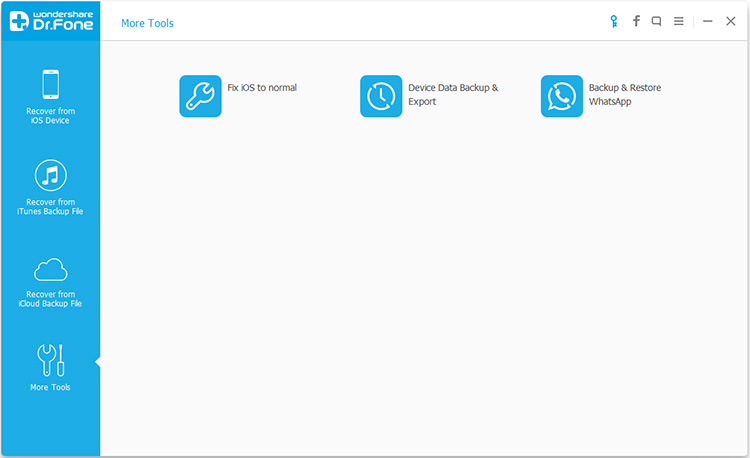
After runing iOS Backup & Restore on the computer, click on “More Tools”option in main page of this program, select “iOS Data Backup & Export”option from the tool list. Then connect your iPhone 8 to the computer using USB cable. By default, the program will automatically detect your iPhone soon.
Note:If you have used iOS Backup & Restore to backup your device privously, you can click on “To view the previous backup file” to view the previous backup files list.
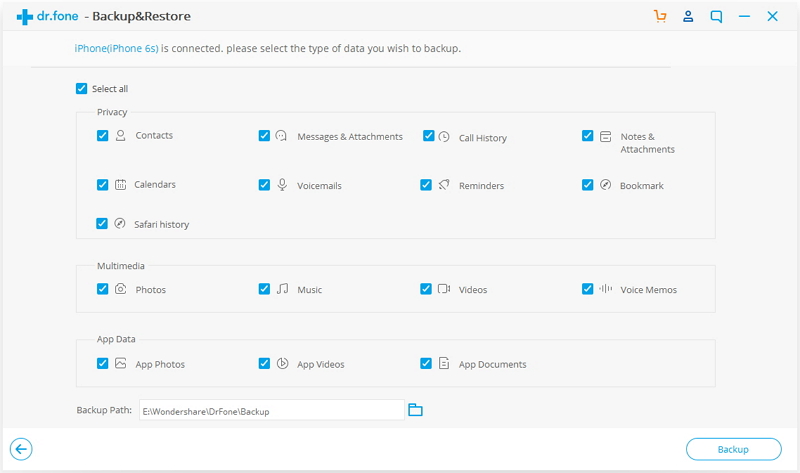
Step 2.Select File Types to Backup from iPhone 8
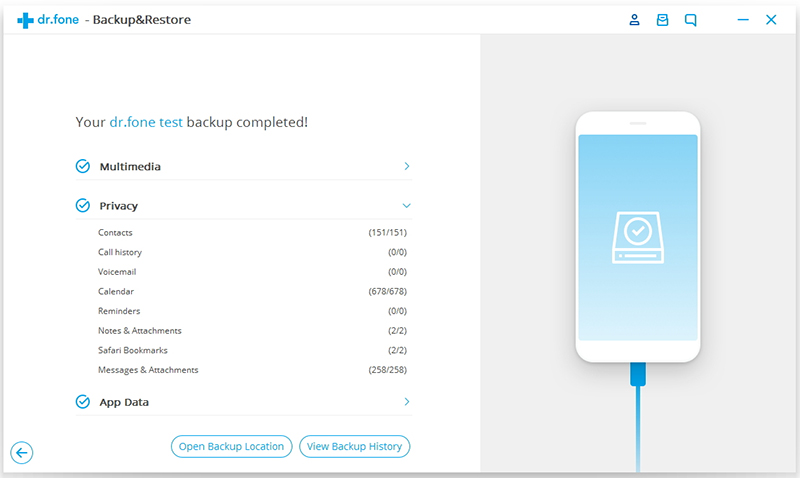
When your iPhone is connected successfully, iOS Backup & Restore will detect the file types on your device automatically. Then iOS Backup & Restore will display all the supported data, like Photos & Videos, Messages & Call Logs, Contacts, Memos and other data. You can select the file types to backup. One or more are allows. Then click on “Backup”button.
It only will take a few minutes on the whole backup process, depending on the data storage on your iPhone 8.
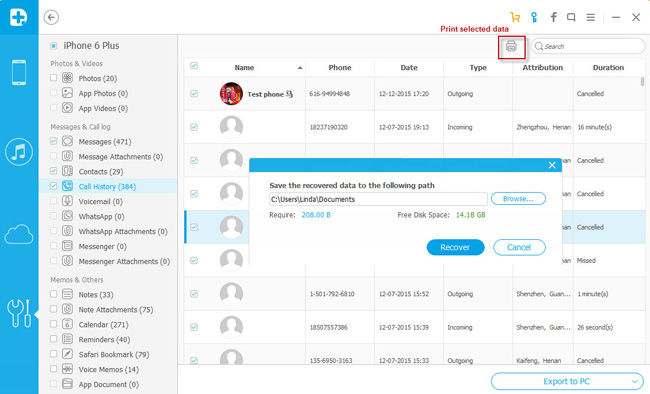
Step 3. Restore Backup Files for iPhone 8
After you select the files to backup by checking the box, please click “Export to PC “button to export the files to computer. When you click “Export to PC”, you will have two options: Only Export this file type and Export all the selected file types. Then you can choose the backup file save path on the popup window to successfully export your iPhone data.
Done. You have backed up your iPhone 8 data to the computer.
Backup & Restore iPhone Tool – Mobile Sync
Mobile Sync is a professional iOS data transfer software, it is designed for syncing data between iPhone/iPad/iPod and Computer. With the help of this program, you can backup & restore iPhone 8 on the computer safely. The iOS data sync job can be done with easy steps: Launch Mobile Sync and then connect your iOS device to it with USB cable; select specific iOS files on the preview window; start the transferring. Only three simple steps, you can finish the iOS data sync job. Mobile Sync is an all-in-one iOS data manage tool for sync iOS files between iPhone/iPad/iPod and computer: transfer data between iOS devices; extract features with ringtone maker and HEIC converter. It is recommended that you download the free trial version to sync iOS files with ease.
“I wanna perform iOS 11 downgrade on my iPhone 7, but I heard that downgrade iOS system may lead to data loss. It is true? How can I backup iPhone data before the downgrade?”
Especially for iOS users, both you and I, who are hoping to get a taste of what’s the newest iOS system of Apple each year. And for this year, it gets pretty special with the new iOS 11. So if you’re thinking of making the update to iOS 11, then just hold on for a few minutes because the iOS 11 is not as great as you think and instead it is packed with bugs and errors. Some iOS users compained that iOS 11 is not so good and prefer to use the old iOS 10 so they performed the iOS downgrade job on device. However, before you beginning the downgrade task you’d better to backup your iOS device, to protect your personal data, avoid losing data during or after iOS 11 downgrade. Here we will show you how to backup iPhone data before iOS 11 downgrade on computer safely with two solutions.
Part 1: Backup iPhone Data before iOS 11 Downgrade with iOS Backup & Restore
iOS ToolKit – iOS Backup & Restore is capable of backup iPhone data on computer before iOS 11 downgrade completely, as well as restoring data from backup to iPhone directly. This outstanding data backup & restore program is useful for backup and restore various files on iOS devices, like contacts, messages, photos, videos, notes, call logs and other personal documents. It offers full support for iPhone 7, iPhone 6 and 6S, 6 Plus and 6S Plus, iPhone SE, iPhone 5S/5C/5/4S/4 and iPad, iPod. It works with all iOS versions, including iOS 11 and lower.
Step 1.Run the iOS Backup & Restore Program and Connect iPhone to the Computer
After runing iOS Backup & Restore on computer, click on “More Tools”from the left column, select “Device Data Backup & Export”option from the tool list. Then use the USB cable to connect your iPhone to computer. By default, iOS Backup & Restore will automatically detect your iPhone soon.
Tip:If you have used iOS Backup & Restore to backup your device previously, you can click on “To view the previous backup file” to view the previous backup files list.
Step 2.Select File Types to Backup from iPhone
When your iPhone is connected successfully, iOS Backup & Restore will detect the file types on your device automatically and you can select what file types to backup. Then click on “Backup”.
The whole backup process will take a few minutes, depending on the data storage on your device. Then iOS Backup & Restore will display all the supported data, like Photos & Videos, Messages & Call Logs, Contacts, Memos and other data.
Part 2: Backup iPhone Data before iOS 11 Downgrade with iOS Manager
Another backup tool here are recommended for you is iOS Manager, which is a terrific program use to manage & transfer data for iOS device, photos, music, videos, apps and more are included. iOS Manager allows to backup data from iPhone to computer before iOS 11 downgrade. What’s more, this program enables to transfer iTunes media to iOS device with one click, transfer files between iOS device, transfer files between iOS device and Android device. Almost all iOS devices are compatible with iOS Manager, insist of iPhone 7, iPhone 6 and 6S, 6 Plus and 6S Plus, iPhone SE, iPhone 5S/5C/5/4S/4 and iPad, iPod. It works with all iOS versions, including iOS 11 and lower.
Here we will take the photos for example to expain how to backup iPhone data on computer via iOS Manager:
Step 1. Run iOS Manager and Connect iPhone to the Computer
Step 2. Backup iPhone Photos to the Computer
Click Backup Photos to Mac on the main interface. From the pop-up window, browse and select the destination folder for photos, click Save to start the backup.
Step 3. Export Photos to Mac
Click Open Folder to see the exported photos on the selected path of your computer, or click Finish to close the dialog.
[Summary]: When update iPhone to iOS 12 or downgrade from iOS 12 to iOS 11.4/11.3/11.2, the bricked iPhone may stuck in recovery mode/Apple logo/blue screen, etc. Don’t worry, learn this guide you will know how to fix iPhone X/8/7/7 Plus/6s/6 Plus/5s stuck on recovery mode after iOS 11/iOS 12 update/downgrade.
“I want some help. My iPhone X stuck in the Recovery Mode after performing iOS 12 beta downgrade on it, now I can’t do any operation on it even power it on. Any simple ways to get it out of the recovery mode without data loss? Thanks a lot.”
Install iOS 12 Beta on iPhone but feel it unsatisfied? Downgrade iOS 12 to iOS 11.4 on iPhone but failed? iPhone stuck in Recovery Mode after iOS 12 upgrade and can’t fix it? If you may meet with various issues when iOS 12/11 update or downgrade, you can take a glance at this tutorial, it provides you a perfect solution to fix your device which stuck in Recovery Mode after iOS system update or downgrade. Note: If the iOS downgrade goes wrong then it might brick your device. Therefore, it is always recommended to backup your data before performing the iOS system operation.
Part 1: Fix iPhone Stuck in Recovery Mode with Force Restart
The first solution to fix iPhone stuck in Recovery Mode after iOS 11 downgrade is force restart your device. A force restart can break the current power cycle and reboot your device to normal.
How to fix iPhone stuck in Recovery Mode after iOS 11 downgrade with force restart:
Press and hold the Sleep/wake button and the Home button (Volume Down button on iPhone 7/7 Plus) at the same time. Keep holding the buttons at least 10 seconds and release the buttons when the Apple logo appears.
Part 2: Restore iPhone to Normal State with iTunes
The second way to restore iPhone system to normal after iOS 11 downgrade is using iTunes.
Step 1. Firstly, launch iTunes on your computer and make sure it is updated.
Step 2. Now, put your phone into Recovery Mode. If you are using an iPhone 6 or the older generation device, then press the Home button on your device. Now, connect your device to a USB cable and keep holding the Home button. Let go of it as you would get an iTunes symbol on your device’s screen.
Step 3. You can also put an iPhone 7 into Recovery Mode using the same way as well. Though instead of the Home button, you need to press the Volume Down button for a while and connect it to your system. It will display the symbol of iTunes after turning on the Recovery Mode.
Step 4. The problem would be recognized by iTunes and it will display the following pop-up message. To fix your phone, click on the “Restore” button and wait for a while as iTunes would restore your device. Done.
Note: Get iPhone out of Recovery mode via force reset and iTunes restoring may be lead to data loss from device, your iPhone data will be gone and your device will be restore to the factory restore resetting status. Instead of restoring iPhone with wiping data, here is two other better solutions are strongly recommended for you, to fix iPhone stuck in Recovery Mode using iOS Tookit- iOS System Recovery and U.Fone iOS System Recovery without losing any data on iPhone.
Part 3: Fix iPhone Stuck in Recovery Mode with U.Fone – iOS System Recovery
The fourth way to fix iPhone stuck in Recovery Mode after iOS 11/12 upgrade or downgrade is using U.Fone iOS System Recovery. It’s also an excellent program to fix iPhone stuck issues without data loss, such as, iPhone stuck in Recovery Mode, iPhone stuck at Apple logo screen, iPhone stuck at black screen of death, etc,. All iPhone are applicable to the program, including iPhone Xs(Max)/XR, iPhone X, iPhone 8/8 Plus, Phone 7/7 Plus, iPhone 6s/6(Plus), iPhone 5s/5, iPad and iPod.
More Recovery Features of U.Fone for iOS
– Recover Lost or Deleted Data on iPhone, iPad, iPod touch, Easy!
– Recover from devices/iTunes backup/iCloud backup, or via smart recovery.
– Recover WhatsApp, photos, text messages, contacts, notes, etc.
– Fix your iOS system to normal from various iOS issues without data loss
– Supports all iOS versions and devices including iOS 12 beta/11. 4 and iPhone XS/XS Max.
– Supports recover deleted and lost data from iPhone XS(Max).
Step 1.Run the iOS System Recovery on the Computer
Firstly,please download and run iOS System Recovery on the computer,you will get the windows as below.
Step 2.Connect iPhone and Select Fixing Mode
Select the “iOS System Recovery”mode in the primary window under “More tools“.Connect your iPhone to the computer via USB cable. After a few seconds,the iPhone will be detection by program and display it on its screen. Now, click on the button “Start“.
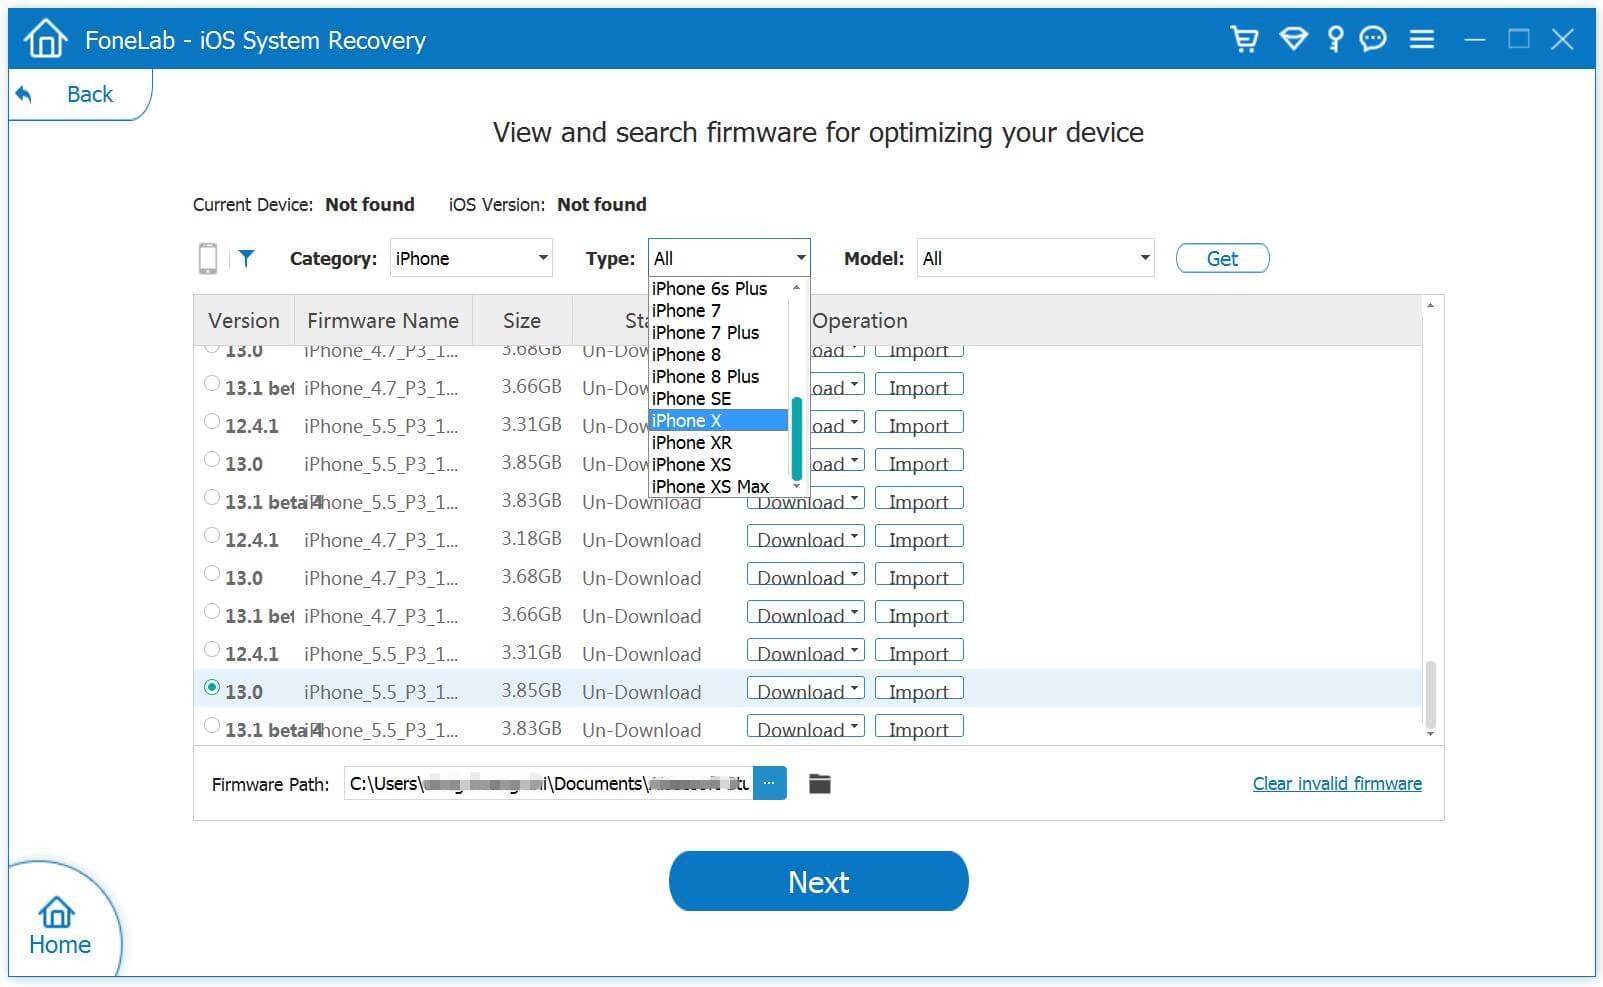
Step 3. Select the iPhone Model and Latest Version of the iOS System
Now you should select the iPhone model and iOS system version which fit your device.Then click “Repair” to enter the next step.
Step 4.Download the Latest iOS Firmware for iPhone
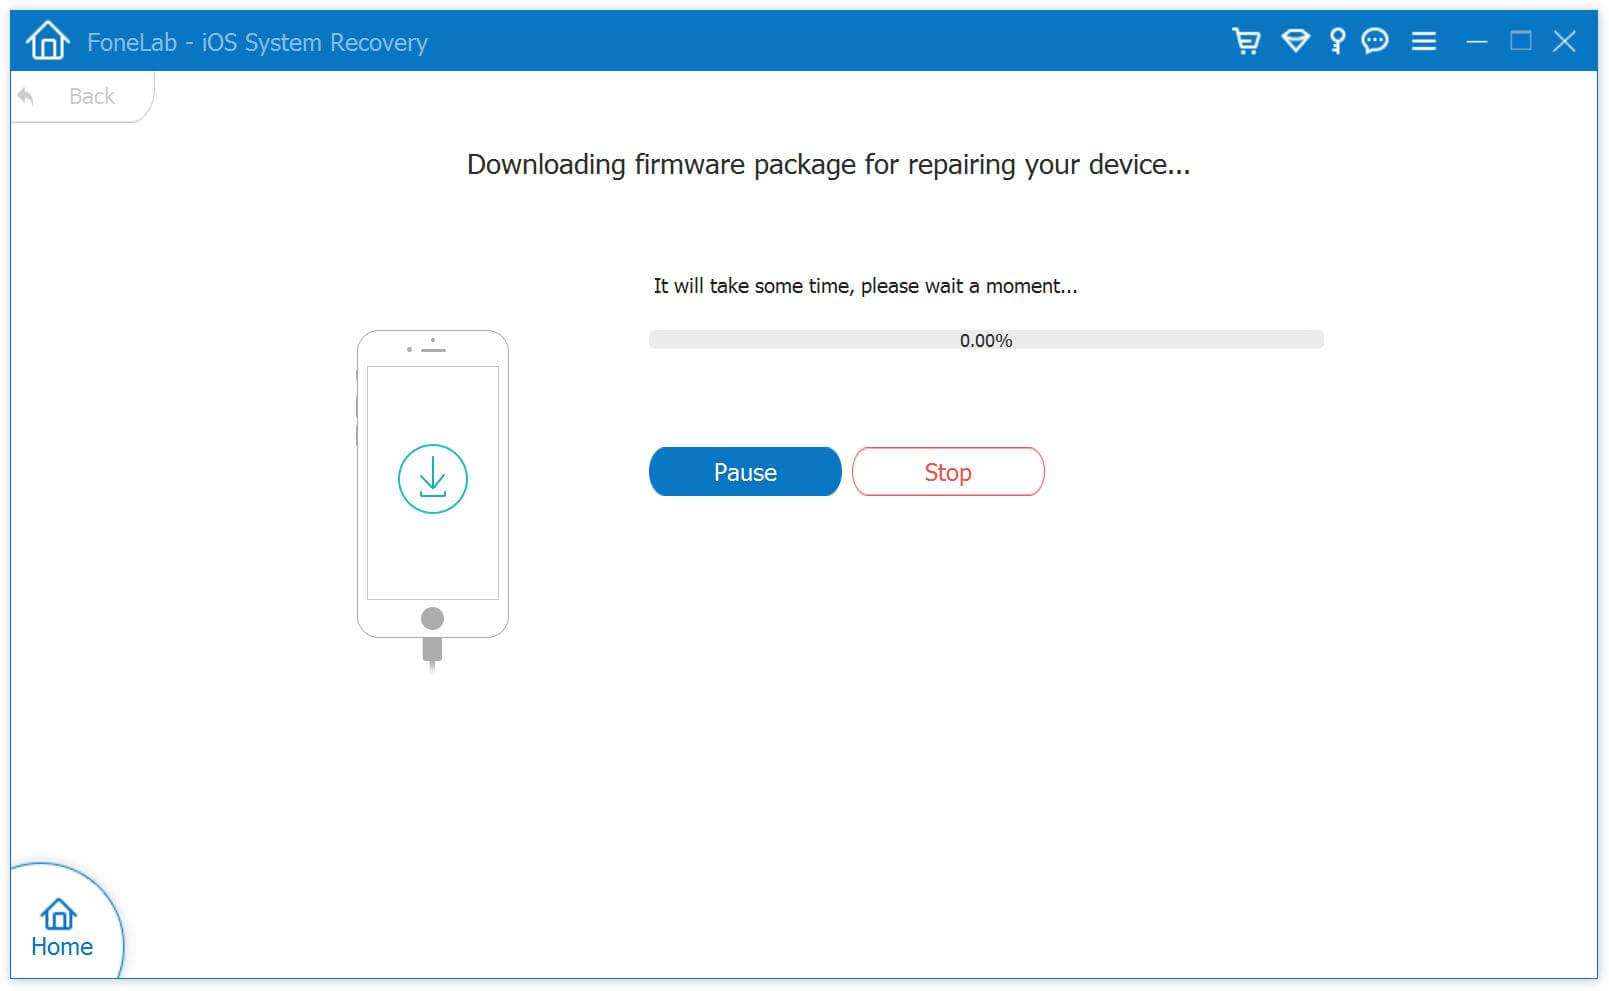
iOS System Recovery tool will download the latest iOS firmware for restoring you device,you will see that the program is offering you the latest version of the iOS to download,it will display the progress of the download process as shown in the picture below. Please keep your iPhone and the computer connection.
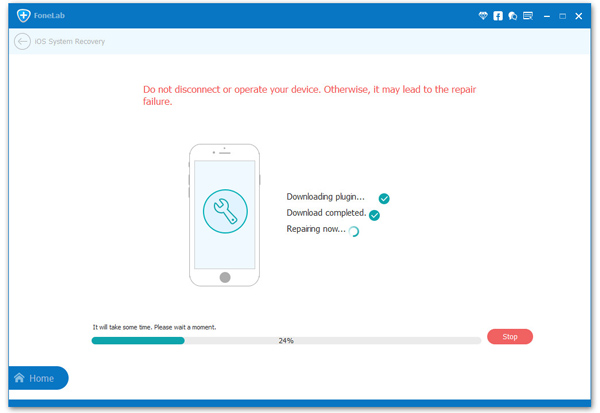
Step 5.Fixing iPhone Stuck in Recovery Mode to Normal
When the program is finished downloading the latest firmware for your iPhone, it will continue to fix the abnormal iPhone without 10 minutes.
Done.Now you can restart the device normally.
Free download the U.Fone- iOS System Recovery:
Part 4: Fix iPhone Stuck in Recovery Mode with iOS Tookit – Repair
iOS Tookit – Repair is an ideal tool which used for fix iPhone stuck in Recovery Mode after iOS 11 or iOS 12 downgrade without data loss. Besides, this famous program supports to fix any iPhone stuck issues like iPhone stuck at black screen of death, iPhone stuck on Apple logo, frozen iPhone, etc,. It is a highly advanced and extremely secure way to fix your iOS device, help to restore your device to normal status efficiently. All iOS device are compatible with iOS System Recovery, including iPhone X, iPhone 8/8 Plus, iPhone 7 Plus, iPhone 7, iPhone 6s/6, iPhone 5s/5, iPad and iPod.
Step 1. Run iOS System Recovery
Install iOS System Recovery on your Mac or Windows computer. From the home page screen, click on the option of “Repair”.
Step 2. Connect iPhone to the Computer
Connect your iOS device and let the program detect it automatically. Click on the “Start” button to initiate the recovery process.
Step 3. Get iPhone into DFU Mode
You would be asked to put your device into the DFU mode (Device Firmware Update). It can be done by pressing the Power and Home button at the same time for at least ten seconds. Afterward, let go of the Power button while still holding the Home button. This will put your device into the DFU mode.
Step 4. Download Firmware for Repairing iPhone
On the next screen, the program will provide the correct information of your device. This would include its device number, model, iOS version, and more. You would be required to downgrade from iOS 11 to iOS 10 to fix this issue. Once you are done, click on the “Download” button to continue.
This will initiate the downloading operation. Make sure you have a stable internet connection to fast-forward this process.
Step 5. Start Restoring iPhone System to Normal
Once the downloading of the related firmware would be completed, the program will start to fix your iOS device automatically. Wait for a while and make sure that your phone is not disconnected during the process.
In the end, your phone would be restarted the ideal way (in the normal mode). If your iPhone are fixing failed with the result, then you can repeat the process by clicking on the “Try Again” button.
“My iPhone 6s stuck on the Apple logo after I downgrade iOS 11 to iOS 10.3. This is a birthday gift from my grandpa, it also has many important photo inside. How can i do for this problem? I don’t want to switch this iPhone 6s.”
The new iOS 11 have many attractive features, but the official version has not yet appeared. The iOS 11 Beta is a tested version in order to find out the imperfect of the new iOS system, and you can find out where is not compatible with the device while running this version. But someone may curious on the new system and they update to iOS 11. Final, they find that the running speed of their iPhone is slow down, some Apps they can’t use no longer. They start to downgrade… No matter how good prepared you are, there will always be wrong situations when you downgrade your iPhone. The most common problem is stuck on Apple logo. How can we fix iOS 11 downgrading stuck on Apple logo issue?
Fix iPhone Stuck on Apple Logo Issue- iOS 11 Downgrade
Here we recommend you use iOS System Recovery to solve the problem. This professional software can fix many issue when iOS 10 to iOS 11 downgrade, like stuck in recovery mode, white Apple logo, black screen, looping on start, etc. It can fix iPhone stuck on Apple Logo without data loss. The software is suitable for all models of iPhone, iPad and iPod touch and fully compatible with the latest iOS 10.3. What’s more, it also have the function that recover data including contact, call log, photo, video, etc, data backup and restore, third-party Apps backup and restore, screen recorder and data erase.
Part 1: Fix iOS 11 Downgrading Stuck on Apple Logo Issue via iOS Toolkit – iOS System Recovery
Once your iPhone has been through the problem above, you just download the iOS Toolkit – iOS System Recovery, and follow the steps below.
Step 1. Launch the Problem and Connect Your iPhone
Connect your iPhone after launch the problem, then click “Start” to the next page.
Step 2. Get Your iPhone into DFU Mode
Please follow the steps below to let your iPhone into the DFU Mode(Device Firmware Update)
1.Hold the Power button and the Home button at the same time.
2.Release the Power button while still holding the Home button.
Note:if your iPhone is iPhone 7/ 7 Plus, you just need to press the Volume Down button instead of the Home button, and other is the same.
Step 3. Choose the Information of your iPhone
Choose the correct device name, number, model, iOS version. Once you are done, click “Download” and continue.
Step 4. Download the Firmware Package for Bricked iPhone
After put your bricked iPhone into DFU mode,the program start download the matching firmware package for the iPhone
Step 5. Start to Fix the iPhone on Apple Logo Screen after iOS 11 Downgrade
After downloading the firmware package, the application will start to fix your iPhone. Wait for some minutes, and make sure that your phone will not disconnected during the process.
When the fix process is done, you iPhone will restart automatically. If you are not satisfied, you can click on “Try again” button.
Free download the iOS Toolkit – iOS System Recovery for Windows or Mac and try to fix your iPhone to normal:
After follow the simple step above, you overcome the iOS 11 downgrade stuck on Apple logo. Fix almost every issue on your iPhone with the best iOS System Recovery software and use your device without any constraint.
Part 2: Fix iOS 11 Downgrading Stuck on Apple Logo Issue with Hard Resetting Device
Hard resetting the device should always be the normal solution whenever an issue occurs on the iPhone. To perform the method, carefully read and follow the steps.
For iPhone 6 and former devices: To begin with, push the two buttons altogether which are “Home” and “Sleep/Wake” buttons and hold them as long as you see the Apple logo on iPhone appeares. Release once the logo occurs.
For iPhone 7 and 7 Plus: The process is similar to the above except just one button. Here, you need to push the “Sleep/Wake” and “Volume Down” button until Apple logo occurs.
“Yesterday,I have install iOS 11 on my iPhone 7,I don’t know what happen,during the upgrading processing,my iPhone 7 stuck on Apple logo for a long time and it turns bricked,how can I fix iPhone 7 at Apple logo screen and downgrade from iOS 11 beta to iOS 10.3 without data loss?Thank you!” — Asked by Junna
“My iPhone 6S doesn’t turn on after update to iOS 11,I know if I perform a factory setting by iTunes. Though, while doing so, it will erase all data and personal information,is there any third-party iOS system restore tool to fix bricked iPhone with iOS 11?” — Asked by Suela
“iOS 11 Software update failed and my iPhone 6 stuck in recovery mode with iTunes logo screen,any way to fix iOS 11 Beta update failed error without data loss?I want to fix my bricked iPhone 6 to normal after upgrading to iOS 11 failed” –Asked by Cindy
The Apple company has released the iOS 11 beta 1, many iPhone and iPad users upgrading their devices to iOS 11 Beta version,but some users facing iOS 11 Beta update problems,for example iPhone stucking in recovery mode, white Apple logo, black screen, looping on start, etc.Don’t worry,today we will teach you how to fix bricked iPhone to normal without data loss with the help of iOS System Recovery desktop tool.
When your iPhone or iPad stuck in recovery mode, black screen, DFU mode, connecting iTunes logo or white Apple logo, things like that, the general method of recovery for your iPhone/iPad is an iTunes restore.But if you use iTunes to restore the devices,it will erase your iPhone iPad data.
Fix iPhone Gets Bricked after iOS 11 Update
However,the iOS System Recovery is designed to fix any kinds of iOS 11/10 system issues and get iPhone back to normal without data loss.After failed update to iOS 11 and your devices gets bricked,you can use this iOS System Recovery to fix iPhone/iPad/iPod to normal by yourself within less than 10 minutes, and won’t lose any data. All iOS devices are supported by program, including iPhone 7/7S, iPhone 6S/6, iPhone 5S/5, iPad and iPod.
iOS System Recovery Key Features:
Fix your iOS system issues to normal at home, no data loss at all.
-Fix iPhone/iPad stuck in recovery mode loop or iTunes logo.
-Fix iPhone/iPad can’t get out of DFU mode.
-Fix iPhone/iPad turns into white Apple logo screen/white screen of death.
-Fix iPhone/iPad becomes black screen, red or blue screen.
-Fix iPhone/iPad restarts endlessly.
-Fix iPhone/iPad appears frozen and doesn’t respond at all.
-Fix iPhone/iPad won’t slide to unlock or slide to power off.
-Fix iPhone/iPad keep looping on the Apple logo.
-Fix Fixes other iPhone error and iTunes errors, such as iTunes error 4013, error 14, iTunes error 27,iTunes error 9 and more.
–Recover lost data from iPhone iPad after iOS 11 update, downgrade, factory reset,etc,.
-Works for all models of iPhone, iPad and iPod touch.
How to Fix Bricked iPhone to Normal after iOS 11 Update
Launch the iOS Toolkit – iOS System Recovery on your Windows or Mac,you can see the main interface as below,and then click “System Recovery”.
Step 1.Connect the Bricked iPhone to Computer
After running the program on the computer,then connect your bricked iPhone device to the computer and wait for the program to recognize it. Once it is done, click on the “Start” button to proceed.
Step 2.Enter the Bricked iPhone into DFU Mode
In order to download the matching firmware package for the iPhone to fix it,you need to put your iPhone device to the DFU (Device Firmware Update) mode. Please follow the easy steps to get your iPhone to DFU mode:
1)Hold the Power and Home button at the same time for at least 10 seconds.
2)Let go of the Power button while holding the Home button till your device would enter the DFU mode.
Step 3.Select Device Model,Number and iOS Version
After get your bricked device into DFU mode, then select your device number, model, iOS version(iOS 10.3), and more in the software interface. The program will help you to downgrade from iOS 11 to iOS 10 to fix this issue,and then click on the “Download” button to continue.
Step 4.Begin to Download Firmware Package for iPhone
After put your bricked iPhone into DFU mode,the program start download the matching firmware package (iOS 10.3 IPSW firmware package) for the iPhone.
Note:Please keep connecting the device to the computer during the program download the essential firmware of your device.
Step 5.Fix Bricked iPhone to Normal
When the firmware package downloaded complete,the software will use the essential firmware of your device to fix it to normal,during the fixing process,not data lost at all.
Step 6. Restart iPhone to Normal Mode
Well done!Your bricked iPhone be fixed and turn to normal without data loss.If you don’t get desired results, then you can click on the “Try again” button to repeat the process to fix it.
Free download the iOS System Recovery and try to repair your bricked iPhone to normal after iOS 11 update:
The iOS Toolkit – iOS System Recovery not only can help you fix iPhone/iPad stuck in recovery mode, white Apple logo, black screen, looping on start, etc.while iOS 11/10 update,but also the iOS Toolkit – iOS Data Recovery feature allows you recover lost photos, contacts, text messages, notes, videos, music, call logs, WhatsApp and other data from iPhone with iOS update or downgrade.