Category Archives: iOS Solution

How to Transfer Files Between iPhone/iPad/iPod and Computer

If you use your iPhone iPad or iPod touch device for a long time, certainly, it contains all of your valuable files like messages, contacts, iBooks, notes, photos, music, and videos. Unfortunately, you find it hard to avoid data loss. When you search on Google, you will find quite a few examples of data loss, such as inadvertently press the “delete” button, restore iOS deivce to factory settings, iOS 11.4/iOS 12 update error, jailbreak failure and so on. No one wants to lose any files from their iOS device but has no backup made before.

Besides, storage is kind of limited for any iOS user and moving files to PC or Mac from iPhone/iPad/iPod is also a good way to free up the storage space. And you can also transfer various data from computer to iOS device at any time. To help you transfer various types of files between iPhone/iPad/iPod and computer, we prepare you this quick tutorial.

iOS ToolKit iOS Transfer is an iOS file management utility for all iOS devices from the latest iPhone X, iPhone 8/8 Plus to the old iPhone 3G. It can help you export/transfer iPhone/iPad/iPod data to a Mac or a computer effortlessly and you are able to sync data from a PC to any iOS device. Only a few mouse clicks needed and the entire process can be done in a minutes.

d_win d_mac

What’s the Area of Work for This iOS Transfer Software:

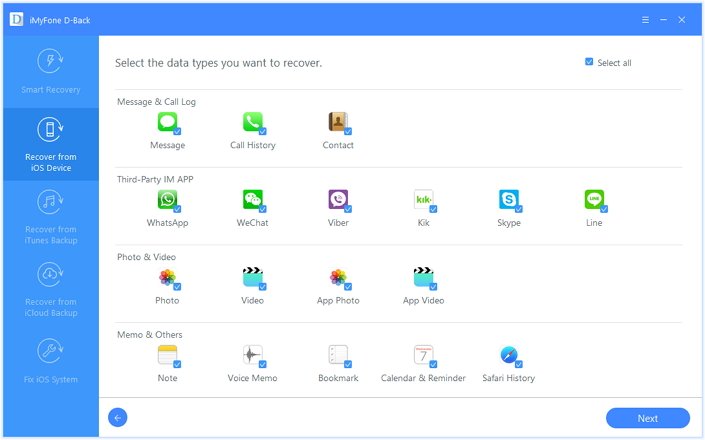
Transfer contacts, SMS, photos, music, video, and more on iPhone/iPad/iPod.
Manage your data by exporting, adding, deleting, etc.
Easily transfer iOS device media to iTunes or transfer iTunes media to iOS device.
Sync data between iPhone, iPad, iPod and computers.
Fully compatible with the latest iOS 11.

To start with, you should download and install the iOS Transfer on your Mac or computer. Run it and its main page is shown below. No matter you transfer photos, video or music files between iPhone/iPad/iPod and PC, you can finish it in simple steps.

iOS toolKit main page

Part 1: How to Export Photos/Video/Music from iOS to Computer

Step 1. Connect iPhone/iPad/iPod Touch to PC

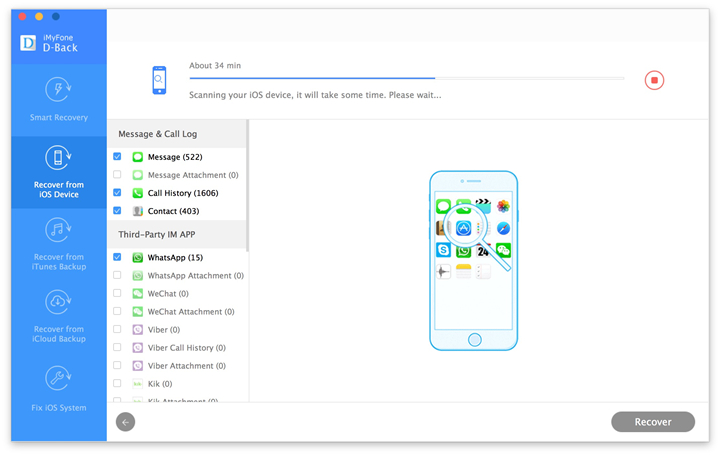
Connect the iPhone/iPad/iPod Touch device to PC and the software will detect it then display it as shown below.

ios transfer main page

Step 2. Export Photos/Video/Music from iOS to Computer

When the connection is successful, go to Music/ Videos/ Photos tab at the top of the toolkit. The procedure for transferring these media files is the same. Here, taking Music as an example, go to the Music tab and you’ll see all the music files listed on the right side of the window.

Select the music files you would like to save from iPhone/iPad/iPod touch to computer, note that iTunes U/Podcasts/Ringtone/Audiobooks is available to select here too. You enable to export music files to computer local storage, as well as iTunes library. Click “Export“.

transfer media files to computer width=

Choose an export folder on your computer. Then click “”OK“” to start the export process. All selected music files will be quickly exported to PC / iTunes.

export music from iphone to computer

d_win d_mac

Part 2: How to Import Photos/Video/Music from Computer to iOS

Step 1. Connect iPhone/iPad/iPod Touch to Computer

Connect your iOS device to computer and the software will detect your device then display it as shown below.

ios transfer main page

Step 2. Import Photos/Video/Music from Computer to iOS

Similarly, the steps to transfer media files from PC to iPhone/iPad/iPod are the same. As for transferring music, go to “Music” tab, all music songs on your iDevice are displayed on the window.

select music songs

Next, click the Add Music icon at the top. You can choose to add a music file or add all the music files to a folder.

add music

Select the music files and click “OK“. All selected music songs will be added to your iOS device in a matter of minutes.

import music from computer to ios device

Download iOS Toolkit – iOS Data Transfer and try to transfer files between iPhone, iPad, iPod and computer, you can also manage your iOS files on PC or Mac.

d_win d_mac

A Superior Data Manager for iPhone/iPad/iPod

If you want to transfer data between iPhone/iPad/iPod and the computer, you could try another excellent tool, which is called Mobile Sync. It’s an iTunes alternative, iOS data manage and iOS data sync tool provides you with an easy solution.The types of transferable files not only videos, music, photos; but also contacts, SMS and others. Moreover, this tool features with Ringtone Maker & HEIC to JPEG/PNG Converter. Mobile Sync compatibles with all iOS models, insist of iPhone X, iPhone 8(Plus), iPhone 7(Plus), iPhone 6S(Plus), iPhone 6(Plus), iPhone SE, iPhone 5S/5C/5; iPad and iPod.

Main Features of Mobile Sync:
-Transfer Data between iOS Devices
-Transfer iOS Files to Computer
-Add Files from Computer
-Ringtone Maker
-HEIC Converter

mobile sync home page

import files from ios device to pc

Related Articles:

How to Transfer Media Files between iTunes and iPhone/iPad/iPod

Export/Backup/Transfer Data from iPhone 7/6S/6 to Computer

How to Transfer Media Files Between iTunes and iPhone/iPad/iPod

How to Transfer/Import Photos from Computer to iPhone 8/7/6S

Transfer Files between iOS and PC

How to Backup and Restore Text Messages from iPhone on Mac

[Summary]:Worry about your important text messages is lost?Backing up SMS from iPhone to a Mac computer regularly is the best way to protect iPhone messages from losing. This article will show you how to transfer SMS from iPhone to MacBook Air, MacBook Pro, iMac without iTunes.Then you can restore backup files to your iPhone X/8/7/6S/6(plus),etc. for using and reading again.

I want to update my iPhone to iOS 11.2,but I want to transfer my text message from iPhone 7 to Mac at first.How can I backup my iPhone SMS to Macbook Pro without data losing?

““I want to restore my iPhone to factory reseting,before that I need to backup SMS from iPhone to Macbook Air,is is possible to backup SMS and restore to iPhone after factory reset?””

Text messages on the iPhone are a quick and easy way to communicate with family, friends and colleagues in this fast-growing society. The text on your iPhone contains important information from your customers, your boss, your dear, your family, etc. It may be one of the most valuable files on your device.Thus,backing up your iPhone as a regular habit is a great way to prevent data loss by unexpected virus attack, improper operation, files deleted or lost.In the other hand, sync you files to computer before factory reset, iOS update, jailbreaking so that you would not worry about SMS lost anymore. However, iTunes can not help us to select one file type we want to transfer from iPhone to Mac,which will result in missing some files or backing up data you do not need.

But don’t worry, here’s a powerful tool can help you transfer SMS from iPhone to Mac more efficiently without iTunes.

U.Fone iOS Data Backup & Restore(Mac) as a wonderful software is designed to iPhone owner who want to back up all data (photos, video, contacts, text messages, iMessages, call logs, WhatsApp messages, Notes, Calendar, Reminder, App pictures & videos,etc.) from your iPhone to the Mac. It supports recover deleted messages from iPhone(include iPhone X/8/7/6S/6/5) to computer(windows or Mac).A software you deserve to choose because it can:

-Preview the relevant contents of the backup file in detail
-Avoid losing new stored data when you backup files.
-Supports all iPhone models running iOS, including the latest versions of iOS and iPhone X.
-Guarantee no data loss during the backup and restore process.
-Compatible with Mac OS 10.13/10.12/ 10.11 / 10.10 / 10.9 / 10.8 / 10.7

Now there is the trial version of U.Fone iOS Data Backup & Restore for you to download on your Windows PC or Mac.

d_win d_mac

We will show some pictures to help you understand the process, and there will be tips during the text instructions.

Part 1:Backup Text Messages from iPhone to Mac without iTunes

Step 1.Launch the U.Fone iOS Data Backup & Restore(Mac)

Download the U.Fone iOS Data Backup & Restore(Mac) from third party company to your Mac.After it is installed successfully.

iPhone SMS backup restore

Then choose “iOS Data Backup & Restore” button and then locate on “iOS Data Backup”.You should tick it to go on the next step.

back up iPhone SMS to Mac

Step 2.Connect Your Device to Mac

Please connect your iPhone X/8/7/6S/6 to Mac and the program will pop up the following interface:

transfer iPhone SMS to Mac

There are two options on the screen: Standard backup and Encrypted backup. You can tick “Standard backup” if you don’t need to encrypt the text message,then click Start button to enter the process.

export iPhone SMS to Mac

Note:The “Encrypted backup” button is designed for those who want to encrypt their data,and if you choose it ,you should set the password.

Step 3. Backup SMS Messages

Then you can see many data are supported, including Messages, Notes, Contacts, Call History and more, will be showed on the window.If you just want to backup your iPhone messages, you can only select “Messages” item and click “Next” to start backing up your SMS.

transfer iPhone contacts to Mac

Now the U.Fone iOS Data Backup & Restore(Mac) is backing up your SMS,please be patient until it is finished.

d_win d_mac

Note:You can easily check out the backup information after the backup is finished.The information include backup time, backup size, device name and so on.

Part 2: Restore Text Messages to iPhone X/8/7/6S/6/5S/5,etc. on Mac

If you want to easily retrieve important SMS, check out this tutorial for details, as shown below.

Step 1.Choose iOS Data Restore Option

Different from the first part, you need to run the toolkit and choose “iOS Data Restore” Option instead of “iOS Data Backup” .

iPhone messages backup restore

Step 2. Select A Backup

As you see,all backups will be set out on the screen,then you can select a backup type you would like to transfer.

restore iPhone text messages to iPhone

Step 3. Choose SMS to Restore to Computer or iPhone

You just need to tick “Messages” item to check and preview in detail. Mark those you need and save them on your Mac then choose to tap on “Restore to Mac” option. .

transfer contacts from mac to iPhone

Note: if you want to restore backup data to a computer,just click “Restore” and go on.

restore SMS to iPhone from Mac

Now, download U.Fone iOS Data Backup & Restore(Mac) to backup your SMS files or get your deleted SMS back!

d_win d_mac

More about U.Fone iOS Data Backup & Restore(Mac)

Back up your iPhone / iPad / iPod quickly and securely

iOS data backup and recovery lets you quickly and securely make iOS backups from your iPhone / iPad / iPod. It overcame the shortcomings of backing up new data would cover old backups and, in addition, encrypting backups based on your needs. Compared with iTunes, iOS Data Backup & Restore can be your best iOS data management tool.

Restore backup data to iOS devices or Windows / Mac computer

You can selectively retrieve data to your iPhone / iPad / iPod or Windows or Mac PC as needed. If you want to restore your iOS data to your computer, various kinds of files such as contacts, photos, messages, call history, memos, etc. can be transfered to your computer without any hassle. If you need to restore iOS data to the device, you can get the current contact and notes.

Related Article

How to Recover Lost SMS from iPhone 8

How to Export iPhone Data to Computer

How to Export iTunes Data to Computer

How to Download and Extract Data from iCloud to Computer

How to Backup and Restore iPhone Contacts on Mac

Have you ever wondered if your iPhone is accidentally lost or if iOS updates are wrong,however, you do not save your phone number from iPhone to Mac in advance.Once you have found the contacts disappear, you will have a huge impact on your life , isn’t it?

Learn to back up contacts is definitely a good habit ! Many people choose to back up and restore their files using iTunes or iCloud, but you should know that iTunes can not back up your data selectively and your original data may be replaced by the new data you backup. Is it possible to simply back up and restore iPhone contents without using iTunes?If you do not have iTunes installed on your computer and do not want to recover data from iTunes or iCloud, you can try to use alternative software from third-party company.

U.Fone iOS Data Backup & Restore can be a perfect program for you to backup and restore iPhone contacts on MacBook Air, MacBook Pro, iMac. All file types can be transferred to your computer as a backup, such as photos, messages, contacts, whatsapp messages, call logs, and more.This powerful tool can overcome iCloud’s flaws:

-Allows you to select the data you needs to be backed up.
-Preview the iPhone backup before restoring.
-Restore the backup to your iPhone without data losing.
-A iPhone backup software available on Mac OS and Win systems.

d_win d_mac

It supports iOS systems such as iPhone 5/6/7/8 / X or iPad / iPod to help you back up your data quickly and securely.The tool can also be applied to Mac OS 10.13/10.12/ 10.11 / 10.10 / 10.9 / 10.8 / 10.7.

Part 1: Backup Contacts from iPhone 5/6/SS/7/8/X to Mac

Step 1. Launch U.Fone iOS Data Backup & Restore

Firstly, please install the program to you computer (windows or Mac).Run it and there are some options for you to select on the screen.

iPhone contacts backup restore

Choose “iOS Data Backup & Restore” feature from the interface.Click “iOS Data Backupstar” to start the backup process.

unfone-ios-backup-restore-connect

Step 2. Connect Your iPhone to Mac

Now you should connect you iPhone to computer and wait a minute. There are two backup for you to select: Standard backup and Encrypted backup. Tick “Standard backup” then click “Start” button .

backup iPhone contacts to Mac

Tip:Of course you can choose Encrypted backup if you need. If you tick the Encrypted backup button, you will need to enter the password you created when you want to restore the backup.

Step 3.Select Contacts to Backup

As you see, there are many different kinds of data types shown on the screen.Just click the contacts you need and check the files you would like to backup.Then press “Next” button.

ufone-select-file-type

Step 4.Back Up is Finished

Now you just wait a few minutes until the backup process completed.

transfer iPhone contacts to Mac

After the backup is completed ,the program will jump to the next interface automatically, where you can see all the information about the backup data, including backup time, backup size, device name and so on.

export iPhone contacts to Mac

Part 2:Restore Backup Contacts to iPhone from Mac

In this part,if you want to take out your backup contacts,you must retrieve backup contacts from iPhone to Mac.The U.Fone iOS Data Backup & Restore can selectively restore your backup data to your iPhone / iPad / iPod or Mac/PC when you needed.

d_win d_mac

Step 1.Choose iOS Data Restore Option

Run the program and select “iOS Data Restore” on the screen of this feature in “iOS Data Backup & Restore”.

iPhone data backup restore

Step 2. Click A Backup

There are various backups displayed on the page and you should select the “Contacts” button you want to restore.

restore iPhone data

Step 3. Restore your contacts to Computer or Device

Now you are able to preview the detailed backup contacts. Choose items that you want to restore.

transfer contacts from mac to iPhone

On the next step you should choose to tap on “Restore to Device” or “Restore to PC” option as long as you have finished.

restore contacts to Mac

Step 4. Start Restoring Contacts from Backup

The last step is very easy.Just click “OK” after the contacts restore process is complete.

restore contacts to iPhone from Mac

Now you can download the trial version- U.Fone iOS Data Backup & Restore of iOS Data Backup & Restore for Mac or Windows. Try to backup your iPhone data to Mac without data losing.

d_win d_mac

Related Articles

How to Transfer Data from iPhone to Computer

How to Export Data from iTunes to Computer

How to Export Data from iCloud to Computer

How to Recover Lost Data from iPhone

How to Backup iPhone Data to Mac without iTunes

As we know, backup our iPhone data to computer before factory reset, iOS update, jailbreaking is very important.Avoiding your iPhone get lost or stolen, virus attack, improper operation, files deleted or lost by accidentally,you must back up your iPhone data to MacBook Air, MacBook Pro, iMac regularly.

Backing up your iPhone’s data with iTunes is easy, but one of the drawbacks of iTunes is that you can not back up files selectively. For example, when you need to back up iPhone photos to a Mac, it does not allow you to selectively back up only the photos you need. There are many ways to back up your iPhone data to Mac except iTunes, but not every one is useful and easy to use. So, this will result in you missing some files or backing up data you do not need. But don’t worry, here’s a powerful tool to help you back up your iPhone Data to Mac without iTunes more efficiently without iTunes.

U.Fone iOS Data Backup & Restore(Mac) is designed to back up all content (photos, video, contacts, text messages, call logs, WhatsApp messages, Notes, Calendar, Reminder, App pictures & videos,etc.) from your iPhone to the Mac. Not only does it perfectly support the iOS operating system, it also allows you to select only the data you need to back it up; you can preview the iPhone backup before restoring; you can restore the backup to your iPhone without deleting your current data.This U.Fone iOS Data Backup & Restore is a better tool than iTunes for backing up iPhone data to the Mac.Why it’s a best iTunes alternative to backup & restore your iPhone/iPad/iPod data?Because:

-One click to transfer everything from iOS devices to Windows/Mac PC without iTunes.
-After make your iPhone backup,you can preview and use those data on Mac,before restoring data without hassle.
-Selectively restore the backup to your iPhone/iPad/iPod or PC/Mac computer.
-No data loss on your iPhone during the backup and restore process.
-Supported All iOS Devices,including iPhone X, iPhone 8 Plus/8, iPhone 7 Plus/7, iPhone SE, iPhone 6s/6s/6, iPhone 5s/5c/5, iPhone 4s/4, iPad Pro, iPad Air, iPad Mini, iPod touch,etc.

d_win d_mac

The tool is compatible with Mac OS 10.13/10.12/ 10.11 / 10.10 / 10.9 / 10.8 / 10.7.

Here we will attach some pictures to help you understand the tutorial, and there will be tips during the text instructions.

Part 1:How to Backup iPhone Data to Mac without iTunes

Step 1. Download U.Fone iOS Data Backup & Restore
Launch the U.Fone iOS Data Backup & Restore on your computer until the download is successful.

backup restore tool main page

Then you should select“iOS Data Backup & Restore” icon from the interface.

select backup restore option

Step 2. Connect Your iPhone to Mac
In this section you should connect your iPhone 5/6/SS/7/8/X to PC (Windows or Mac). There are two options on the screen: Standard backup and Encrypted backup. If you intend to protect the data on your iDevice, here you can to click “Encrypted Backup” which will require you to set a password for the backup.Otherwise you can tick Standard backup. Now you should click “Start” button to start the backup process.

connect iphone to computer

Step 3. Choose Data to Backup
The data you can deal with is showed on the screen and you can see many data types are supported.Now you are able to select data to back up.Then click “Next”and wait a few minutes.

select file type

Step 4. Back Up is Finished
Wait for a moment, the software is backing up your data.

backup iphone data

As long as the backup is done, you can see the name and the size of the backup file.

view backup files

Now everything you want to back up has been saved on your computer, you can check the data you have backed up on the Mac whenever you need it.

d_win d_mac

Part 2: How to Restore Backup Data to iPhone on Mac

After you have finished backing up the data and wanting to retrieve backup data to iPhone on Mac, you need to transfer the data to your computer. U.Fone iOS Data Backup & Restore can restore your backup data from your iPhone to Mac. Once installed, you can selectively restore your backup data to your iPhone / iPad / iPod on Windows or Mac PC when you needed.

d_win d_mac

The usage method is very simple, you only need the following several steps.

Step 1.Run the Program and Choose iOS Data Restore Option
In this part you can see two options —“iOS Data Backup”and“iOS Data Restore” on the screen,then you should select “iOS Data Restore”in order to restore you data.

restore backup to iphone option

Step 2. Select A Backup
There are many backup files on the list.You should choose a certain one you want to restore.

select a backup to restore

Step 3. Choose Files to Restore
Next the program will analyze the backup data automatically and then you can preview all the files. Once you have confirmed the data, select the items you want to restore, such as contacts, messages, photos, videos, etc.

Choose Contacts from Backup

restore backed up contacts

Choose Pictures from Backup Files

choose pictures to restore

Choose “Restore to Device” or “Restore to PC” option.

select restore option

Note: you can save the restored file to the path below, click “Restore” and go on.

confirm to restore

Step 4. Start Restoring Files from Backup
The data is being restored now and just wait a moment until it is completed, you can check the detailed information on the screen. Click “OK” to finish this process.

restored completed

Free download the U.Fone iOS Data Backup & Restore for Mac or Windows and try to backup your iPhone data to Mac without data losing.

d_win d_mac

Related Articles:

Recover Data from iPhone, iPad and iPod
This guide teach you three ways to recover lost or deleted contacts, messages, photos, notes, etc. from iPhone/iPad/iPod.

Manage and Transfer Files on iPhone
Transfer data between iPhone, iPad and iPod and PC or from iOS to iOS/iTunes,sync music, playist from iTunes to iOS, backup music from iPhone/iPod to iTunes library.

Transfer Data from between iPhone and Android
When you have got a new iPhone Xor new Samsung S8,this tutorial will teach you a easy way to transfer data between Android and iPhone, from Android to Andorid, iOS to iPhone directly.

Transfer WhatsApp Messages from iPhone to Samsung
Lots of WhatsApp chat history stored in your old iPhone and want to transfer them to your new Samsung Galaxy S8,S7,S6 or Note 8?Learning this guide to move WhatsApp messages from iPhone to Android without data loss.

How to Transfer Music from iPhone/iPad/iPod to iTunes Library

[Summary]:iPhone to iTunes Transfer can not only can help you transfer music from iPhone 8/X/7/6s/6/5s/SE/5/4s to iTunes on your Windows or Mac computer,but also allows you easy to rebuild your iTunes library with one click.

I want some help. I need to backup music from my iPhone 8 to the iTunes library. I want to sync all the favorite songs from my phone to the iTunes playlist in case I need to restore in one day. Which way is the most simple and reliable one? Thanks for your suggestions.

transfer iPhone music to iTunes library

Sometimes you need to transfer music from iPhone, iPad, iPod to iTunes for backup, or you need to import music from iOS device to iTunes and then syncing the songs with another device from backed up, you should rebuild the iTunes library. Moreover, when your PC/ Mac suffers from a system crash or you own a new PC/Mac, you also need to rebuild the entire iTunes library from your iPhone/iPad/iPod, including Music, Movies, iTunes U, Audiobooks, Podcasts, TV Shows, Music Videos, Home Videos and Playlists. No matter for what situations, you need to get a perfect solution help to transfer files from iOS device to iTunes library. To help you solve this issue, here we highly recommend a powerful program for you – iOS Data Manager.

Backup Music from iPhone/iPad/iPod to iTunes Library

iOS Data Manager1-Click Rebuild iTunes Library can do a great help for you, help to transfer music from iPhone/iPad/iPod to iTunes library. Not only music, but also other media files are supported, including Movies, iTunes U, Audiobooks, Podcasts, TV Shows, Music Videos, Home Videos and Playlists. What’s more, iOS Data Manager has other useful features: 1-Click Backup Photos to PC/Mac, 1-Click Transfer iTunes Media to Device, 1-Click Phone to Phone Transfer. To sum up, it’s an all-in-one data manager program for iOS device, transfer & manage music, videos, photos, contacts, SMS, apps on the computer with easy steps. Work well on all iOS models, including iPhone X, iPhone 8, iPhone 7, iPhone 6S/6, iPhone 5S/5; iPad, iPod touch.

d_win d_mac

How to Rebuild iTunes Library with One Click

Step 1. Run iOS Data Manager on the Computer
Run iOS Data Manager and connect your iOS device to the computer. Click “Rebuild iTunes Library” icon on the main interface of program.

1 click rebuild itunes library home page

Step 2. Scan Media Files on iOS Device
From the new pop-up window, click “Start” button to start scanning media files on the device. Then, iOS Data Manager will detect all the exclusive media files which are not existing in iTunes and show them by list on the next page.

click start to begin

Step 3. Transfer Media File from Device to iTunes Library
Select media types to copy to iTunes (by default, all items have been checked). If you need to transfer music file, you should click “Music” option. (If you don’t want to transfer some of the media types, please uncheck them.) Then, click “Start” to start transferring and click “OK” to complete the process.

select media files to transfer

transferred completed

Done. Now the iTunes library has been rebuild.

d_win d_mac

Video Guide on Transfer Music from iPhone/iPod/iPod to iTunes to rebuild your entire iTunes library.

Related Articles:

How to Transfer Music from Computer to iPhone

How to Transfer Music from iPhone to Mac without iTunes

How to Transfer Music (Apple Music) to iPhone

How to Export Files from iPhone to Computer

How to Manage iPhone Files on Computer

Recover iPhone Data when Touch ID Not Working after iOS 11 Update

Summery: Are you having trouble getting your iPhone data when the device is abnormal, for example, the touch ID not working after iOS 11 update? Well, the issue that iPhone could not be restored is common and it is really frustrating. Let’s figure out this issue and learn how to restore data from iPhone when touch ID not working after iOS 11 update.

iOS 11 has released several months ago. Some of the iOS device users are not lucky enough to get the latest iOS 11 on device smoothly. Some of them reported that the iPhone got something wrong after installing iOS 11 on device. They encounter one or the other problems while updating or after the installation of the iOS 11. If you are also one of those unlucky users whose iPhone touch ID is not working, try the following solution and get rid of the problem. Firstly, we will introduce some tips to you, to fix iPhone touch ID not working after iOS 11 update, in the next section we will recommend the best tool that help to restore iPhone data in this bad case.

Part 1: How to Fix iPhone Touch ID Not Working after iOS 11 Update

A.Clean the Home Button
A primary and basic thing to do is to make sure that your Home button is clean. Check if it has any kind of moisture. Also, check your hands as well for any sweat. Take a clean cloth and wipe both your hands and the Home button. Dry them and now use touch ID and see if it starts working or not.

B.Force Restart Your Device
If cleaning didn’t support you, force restart is the another option to try. Keep pressing the “Sleep/Wake” and “Home” buttons simultaneously for nearly 10 seconds and release when you see the white Apple logo. These instructions are for the owners of iPhone 6s and previous models. For the owners of iPhone 7 and 7 Plus, make sure to press “Sleep/Wake” and “Volume Down” button. The rest process is same.

hard reset iphone

C.Turn Touch ID Off and Back On
You can try this way to fix iPhone touch ID not working when the others didn’t work.

The steps are:
-Tap “Settings” > “Touch ID and Passcode” and enter your passcode.
-Toggle off iPhone Unlock, App Pay and iTunes & App Store.
-Reboot your iPhone and repeat first step.
-Now toggle on the same you turned off in step 2.
-Tap on “Add a Fingerprint” now and insert a new finger.

delete a fingerprint

Part 2: How to Recover Data when iPhone Touch ID Not Working

When your iPhone touch ID is not working and you’ve tried the solutions above, but they are all of no help. There could be a software issue with your iPhone. What you need is a powerful data recovery program called iOS Data Recovery. Which is a fantastic tool that can help to recover data from iPhone when touch ID not working directly after iOS 11 update. It also enable you to recovery data on your iOS devices with iTunes/iCloud backup files. In addition, it can be used to restore deleted data from iOS devices after losing data under any data loss situations, such as, contacts, text messages, photos, videos, notes, WhatsApp data, call history, etc,. All iOS device models are applicable to iOS Data Recovery, for instance, iPhone X/8/7/6S/6, iPad and iPod.

d_win d_mac

Step 1. Download and Run the iOS Data Recovery on Computer
After running the program on the computer,you can see there are three key features in this program– “iPhone Data Recovery”, “iOS System Recovery”, “iOS Data Backup & Restore”.To recover  data from iPhone when touch ID not working after iOS 11 update,please click “iPhone Data Recovery” option.

run ios data recovery

Step 2. Connect iPhone to Computer
Now connect your abnormal iPhone device to the computer via a USB cable,and waiting for the program detect your device.

connect iOS 11 device to computer

Step 3.Scan All Data from Your iPhone
Click “Start Scan” button to begin scanning your iPhone device for all existent and deleted data on it.

scan iphone data after ios 11 update

Step 4.Preview and Recover Data from iPhone
Once scanning your iPhone device complete,all the existent and deleted data will display for you. Check and preview the data you need to restore and then clicking “Recover” to save the selected data on the computer.

recover iPhone data in iOS 11

Free download the iOS Data Recovery and try to recover data from iOS 11 device:

d_win d_mac

More Guides you may be Interested in:

How to Recover Data when iPhone Won’t Slide to Unlock

How to Recover Data when iPhone Stuck at Black Screen of Death

How to Recover Data from Broken iPhone

How to Fix iPhone System to Normal after iOS 11 Update

How to Fix Bricked iPhone after iOS 11 Update

How to Recover Data from Broken/Dead iPhone after iOS 11 Update

My iPhone is dead after I updated it to the newest iOS 11.2.1. Now I can’t do anything on the abnormal device even check any data on it. I have no backed up of my phone. Any recommendations to recover data from the dead iPhone directly?

iOS 11, released on September 19, introduces major design changes, new app features. After early signs of hope, five days later a flurry of familiar negative feedback has hit Apple iOS 11.2.1. Terrible battery life is again front and centre for iPhone and iPad owners after upgrading to iOS 11.2.1 with some devices lasting just minutes in a full charge. It’s a mess and the sooner Apple gets off this iOS 11 rush-and-release strategy the better.

Though iOS 11 is the newest OS system for iOS device, the report said that iOS 11 will cause a lot of issues occur on iOS device, like bricked/dead device, the battery problem, etc,. Did your iPhone get bricked? Did your iPhone is dead? This happens to a lot of iPhone users after iOS 11 update. My friend Amy just got back from a vacation with over 1000 photos taken on her trip. She was wondering is there any way to extract the data from dead iPhone after iOS 11 update. If you are in trouble with this similar issues, here we will give you some helpful methods to fix it.

Part 1: Check if the iPhone is Synced with iTunes or iCloud

Most of people won’t back up their iPhone via iTunes frequently, since you may need to manually back up your data to computer using iTunes. Unlike iTunes, iCloud will automatically back up your device each day through network, if the following conditions are met:

-You have turned on iCloud Backup in Settings > iCloud > iCloud Backup.
-You have connected your device to a power source and to a Wi-Fi network.
-You still have available space in iCloud.

Check whether there is a latest backup on iTunes that could contain the photos you want. If you had turned on iCloud, the photos could also be backed up to iCloud.

latest-iphone-backups

Note: However, restoring the backup file may erase all data and settings on your old iPhone and you cannot choose to recover just photos.In the next section, we will introduce you to an useful program that will help you selectively recover photos from the broken/dead iPhone directly without backup after iOS 11 update.

Part 2: Recover Data from Broken/Dead iPhone Directly after iOS 11 Update

iOS Data Recovery program is a professional data recovery tool for iPhone/iPad/iPod. With the help of iOS Data Recovery, you can easily recover data from broken/dead iPhone after iOS 11 update. It provide three recovery modes to you, directly from device without backup, recover from iTunes backup, recover from iCloud backup. The types of recoverable files including photos, videos, contacts, text messages, notes, call logs, calendar, WhatsApp messages, etc,. iOS Data Recovery not only allow to restore data on broken/dead device, but also enable to recover deleted data on normal device under any data loss circumstances, such as, deleted by mistake, iOS system update, iOS system jailbreak, restore device to factory reset, and more. Compatible all iOS models, like iPhone X/8/7/6S/6, iPad and iPod.

d_win d_mac

Step 1.Select iOS Data Recovery Mode and Connect iPhone to Computer
First of all, please run the iOS Data Recovery on the computer. Connect your broken/dead iPhone to the computer. In the main interface of program, you can see there are four recovery modes: “Smart Recovery”, “Recover from iOS Device”, “Recover from iTunes Backup” and “Recover from iCloud Backup”.If you want to recover iPhone data without backups,please select “Recover from iOS Device” mode,and then connect your iPhone to computer via USB cable. Proceed by clicking the “Start” button.

iOS Data Recovery home page

Step 2.Select Files to Scan by Software
In the next window, select the files contain the data you want, then clicking “Next” button to go on.

select file to recover

Step 3.Scan Data from Broken/Dead iPhone 
Now the program will begin to scan the data from your broken/dead iPhone.

scan iphone and search data

Step 4.Preview and Restore Data from Dead/Broken iPhone
The recoverable files will be shown in the interface of software when the scanning is completed. You can mark the necessary files, or check deleted files by selecting “Show only deleted files” option. Press the “Recover” button to recover selected data from iPhone directly.

recover data from dead iPhone directly

d_win d_mac

Related Articles:

How to Recover Data from Broken iPhone

How to Recover Lost Data from Dropped Broken iPhone

How to Recover Data from Water Damaged iPhone

How to Recover Photos from Broken/Dead iPhone

How to Restore iPhone System to Normal

How to Recover Deleted Call History from iPhone X

Summary: iPhone will record the incoming call, outgoing call, and missed call automatically, we can check the call history in the call list on device, including the date and documents. It may cause inconvenience when you lost call logs on iPhone. So are there any ways to restore the deleted call history on iPhone X or other iPhone models? Of course yes, just read this guide to learn how to recover deleted call logs from iPhone X with 5 different ways.

Have you accidentally deleted some call history from iPhone X? It will lead to a big problem occur when there are some unsaved phone numbers on the call logs list that you lost. If you have a backup, all you need to do is restoring the device from backup. But if you don’t have a backup, or you don’t want to restore the whole backup, you should find another better solution. Here we will offer a perfect solutions for you, to restore the deleted call history from iPhone X even without backup.

Restore Deleted Call History from iPhone X

Fortunately, there are some useful data recovery tools will give you a great help to restore deleted data on iPhone, here iPhone Data Recovery is the best one that we suggest you to use. As its name, iPhone Data Recovery enable to restore deleted files on iPhone for three recovery modes: directly recover from iPhone without backup, recover from iTunes backup, recover from iCloud backup. The recoverable types of files including call history, contacts, text messages, photos, videos, notes, WhatsApp data, and more. With using iPhone Data Recovery, you can easily restore deleted call history from iPhone X with/without backup. iPhone Data Recovery works for all data losing circumstances, such as, deleted accidentally, iOS system update, iOS system jailbreak, restore device to factory reset, etc,. Compatible with all iOS devices, like iPhone X, iPhone 8, iPhone 7, iPhone 6S/6, iPad and iPod.

d_win d_mac

Part 1: How to Restore Deleted Call History from iPhone X Directly

Step 1.Run Software and Select Recovery Mode
First of all, please run the software on the computer. From the main interface, select “Recover from iOS Device” option. Proceed by clicking the “Start” button.

iphone data recovery mode

Step 2.Select Call History File to Scan
In the next window, select “Call History”. Before clicking “Next” button, connect the iPhone X to the computer.

select call logs file to recover

Step 3.Scan Data on iPhone X
Once the program detects the phone, press the “Scan” button to begin scanning.

scan data on iPhone

Step 4.Preview and Recover Deleted Call Logs from iPhone X
The recoverable “Call History” is available in the interface after scanning is complete. You can mark the necessary files, or check deleted files by selecting “Show only deleted files” option. Press the “Recover” button to recover selected call logs from iPhone X.

recover deleted call logs from iPhone X

d_win d_mac

Part 2: Restore Deleted Call History on iPhone X with iTunes Backup

Step 1.Run Software and Select Recovery Mode
If you have done iTunes backup before, you will see the backup files listed once you running iPhone Data Recovery and then click the second mode”Recover from iTunes Backup” option. Choose the backup file you want in the iTunes backup files list and click “Scan”.

iPhone data recovery home page

Step 2.Preview and Recover Deleted Call Logs from iTunes Backup
It will be taken to scan your iTunes backup files. And you are allowed to preview all the content in backup file. Choose the files contain the deleted call logs data you want and click “Recover” to begin the recovery. Then save the selected data to the computer.

recover call log from iTunes

d_win d_mac

Part 3: Restore Deleted Call History with iCloud Backup

Step 1.Sign in your iCloud Account to Login
Run the iPhone Data Recovery Program on computer and choose “Recover from iCloud Backup” mode. Enter your ID and Password to get your backup.

sign in icloud account

Step 2.Select the Backup File from iCloud
The program can help you selectively recover the data from iCloud backups,including call logs, photos, App photos, videos, notes, contacts, SMS, iMessages and more, please select the file types you need.

select call log file to scan

Step 3.Download iCloud Backup File
Click “Download” button to download the selected backup file from iCloud, and move on to the next step.

download icloud file

Step 4.Preview and Recover Call Logs from iCloud Backup
After the download process is completed, the program will scan and analyze the downloaded data,then it will search the results and list to you,to recover previous iPhone backed up data from iCloud,please select the files you need and preview them before recovery, for call logs recovery, you should click “Call History” and then click “Recover” button,the program will save the selected on the computer.

recover call log from iCloud

d_win d_mac

Part 4: Restore Deleted Call History from iTunes Backup via Phone Transfer

The second tool here we want to suggest you to use  is this Phone Transfer tool, which is an all-in-one data transfer and management program. It enable you to extract iTunes backup files to iPhone X and other iOS device or computer, as well as iCloud files. Additionally, this program is famous for transferring files between two mobile devices based iOS system, Android system or Symbian system.

Free Download Phone Transfer:

d_win d_mac

Step 1.Run Program and Select Mode
Firstly run Phone Transfer on computer, then just clicking “iTunes” under “Restore from Backups” option in the primary window of the program.

restore from backups

Step 2. Extract Backup File from iTunes Backup
Select the “Call logs” file to transfer from your iTunes backup, then clicking “Start Transfer“. Then it will be restored to your computer or iPhone X, even other iOS device.

restore iTunes files

d_win d_mac

Part 5: Restore Deleted Call History from iCloud Backup via Phone Transfer

Step 1.Run Program and Select Mode
After running Phone Transfer on computer, click on “iCloud” under “Restore from Backups” option in the primary window of the program.

restore from backups

Step 2. Extract Call Log File from iCloud Backup
Sign in iCloud account and select the “Call Logs” file to extract from iCloud backup.

Step 3. Restore Backed Up File to Computer
Download the iCloud files by clicking “Start Transfer” to save it on the computer or your iPhone X, even other iOS device.

extract call logs from iCloud backup file

d_win d_mac

Part 6: How to Backup Call History for iPhone X

U.Fone iOS Data Backup & Restore is your perfect choice to backup call logs for iPhone X safely. It enables you to make an iOS backup from your iPhone/iPad/iPod quickly and safely. All types of data can be transferred to your computer as a backup, such as, call logs, photos, messages, contacts, WhatsApp messages, documents, etc,. Comparing to iTunes and iCloud, it is a better tool to backup iPhone data on computer because:

  1. You can select the needed data to backup;
  2. You are allowed to preview iPhone backup before restore;
  3. You enable to restore backup to iPhone without erasing your current data.

unfone ios backup restore

Free Download U.Fone iOS Data Backup & Restore:

d_win d_mac

More iPhone X Tutorials You can Check:

How to Recover Deleted Data from iPhone X

How to Transfer Android Data to iPhone X

How to Transfer iPhone Files to iPhone X

How to Backup & Restore iPhone X on the Computer Safely

How to Transfer Videos/Music/Photos to iPhone X

How to Manage Files for iPhone X on the Computer

Recover Deleted Call History from iPhone X

How to Recover Data from Lost/Stolen iPhone

I lost my iPhone this week, my phone was stolen by thief when I was shopping. Is it possible to restore the iPhone data from the iTunes or iCloud backup? Thanks.

You may like:

* How to Back Up and Restore Your iPhone Without iTunes

* Transfer Everything from iPhone to iPhone X

There are different cases of accidents will occur that cause to lost iPhone in daily. For example, your device is stolen or lost by accident carelessly. Losing iPhone will not lead to lose hugely, but is it not the same when you lose the personal data that stored on the lost/stolen device. The contacts, messages, photos and other files saved on our iPhone contain a lot of personal information. No one hope to lost data from the lost/stolen iPhone under any situations. Fortunately, restore data from backup can avoid losing data or leaking information from the lost/stolen iPhone. In the follow section, we will through you the steps on how to restore data from lost/stolen iPhone X/8/7/6S/6 with 2 helpful solutions.

Restore Lost/Stolen iPhone Data from Backup File

iPhone Data Recovery is one of the best data recovery for iPhone, enable to restore data on iPhone with three modes. As long as you have the backup files, it help to restore data from lost/stolen iPhone from iTunes or iCloud backup selectively. In addition, iPhone Data Recovery allow to recover data from iPhone directly without backup. The recoverable kinds of iPhone data including contacts, messages, photos, videos, notes, WhatsApp history, and other apps data. iPhone Data Recovery can be used to recover data on any iOS devices, such as, iPhone X, iPhone 8, iPhone 7, iPhone 6S/6, iPad and iPod.

d_win d_mac

Part 1: Restore Data from Lost/Stolen iPhone with iTunes Backup

Step 1.Run Program and Select iTunes Recovery Mode
After running the iPhone Data Recovery on your Windows computer or Mac,then click “Recover from iTunes Backup” recovery mode option. Then clicking “Next” to go on.

itunes recovery mode

Step 2.Select File Types to Recover
You will find a list of different file types which can be restored. Choose the file types you want to restore, then clicking “Next“.

select file to recover

Step 3.Scan and Download iTunes Backup File
Now, the program will scan and show the available iTunes backup files on your computer. You will find a list of backup files. Then click on the “Scan” button begin scanning and downloading the backup file which contain the data you want to restore.

select itunes backup file to download

Step 4. Preview and Restore iPhone Data in iTunes Backup
After downloading and extract the backed up contents from iTunes,you will see the different files in the backup. The last step,please select the ones you want to get back before recovering,and then save them on your computer by click “Recover” button.

recover iPhone data from iTunes

d_win d_mac

Part 2: Restore Data from Lost/Stolen iPhone with iCloud Backup

Step 1.Run Program and Select iCloud Recovery Mode
After running the iPhone Data Recovery on your Windows computer or Mac,then click “Recover from iCloud Backup” recovery mode option. Then clicking “Next” to go on.

iCloud recovery mode

Step 2.Select Files to Recover from iCloud Backup
To download and extract data from your iCloud backups,please choose the file types which you contain the data you want and click on “Next“.

select file to recover

Step 3.Access your iCloud Account
In this step,please sign in your iCloud account.

login icloud account

Once logged in, you will be in a position to view your backup files. Click on the “Next” option after selecting the backup file contain the data you need to restore.

download icloud file

Step 4.Preview and Recover Data from iCloud Backup
You can choose the data you want,such as, contacts, photos, SMS or other data,then click “Recover” button and save the selected data on computer.

recover iPhone data from icloud

d_win d_mac

Related Articles:

How to Recover Data from Frozen/Bricked iPhone

How to Recover Lost Data on iPhone X/8/7/6S/6

How to Recover Data from Broken iPhone X/8/7/6S/6

How to Recover Data from Water Damaged iPhone

How to Restore iPhone System to Normal

How to Fix Bricked iPhone after iOS 11 Update

How to Manage iPhone X/8/7/6S/6 on Computer

How to Recover Data from Frozen/Bricked iPhone

My iPhone is bricked after I updated it to the new iOS 11 system. Is there any way to restore the data from my frozen iPhone? I need a safe and reliable solution to complete it. Thanks advanced.

iOS 11, the latest iOS system for iOS devices, has been released to the public for several months ago.However, some users faced quite a few problems on the iOS 11 update such as getting freezing or getting bricked. If your iOS device unfortunately get stuck on iOS 11 installation and need to recover data from your frozen device, here we list the best solution for your reference. Moreover, no matter your device get frozen/bricked due to any causes, iOS system update or others, you can use this solution to extra data on the unusual device as well.

List of other cases of frozen/bricked iPhone:
A: iPhone get black screen of death
B: iPhone get white screen of death
C: iPhone stuck at Apple logo screen
D: iPhone stuck in the Recovery Mode
E: iPhone get bricked when you are using the device suddenly
F: More others.

Extract Data on Frozen/Bricked iPhone

To recover data from frozen/bricked iPhone, you can consider using this iPhone Data Recovery. It enable to restore data from iPhone/iPad/iPod due to any data loss circumstances. With the help of iPhone Data Recovery, you can easily recover data on frozen/bricked iPhone for three recovery modes: directly recover from iPhone, recover from iTunes backup, recover from iCloud backup. It support to extract data from any kinds of damaged iPhone, including iPhone get black/white screen of death, iPhone stuck at Apple logo screen, iPhone stuck in the Recovery Mode, and others. Compatible with all models of iPhone, such as, iPhone X, iPhone 8, iPhone 7, iPhone 6S/6, iPhone 5S/5.

d_win d_mac

Part 1: How to Restore Data from Frozen/Bricked iPhone Directly

Step 1.Connect iPhone and Scan it
Firstly, run iPhone Data Recovery on computer.Then connect your frozen/bricked iPhone to computer.When your iPhone is detected,there are three recovery modes for you: “Recover from iOS Device“, “Recover from iTunes Backup” and “Recover from iCloud Backup”.Choose the first one.

iphone data recovery

Select the files that contain the data you need to recover from, then clicking “Next“. The program will scan data from your device.

scan data from iPhone

scan iphone and search data

Note:Not only the existing data,iPhone Data Recovery also can scan out lost data (deleted data) from your iPhone.

Step 2.Preview and Recover Data from Frozen/Bricked iPhone
After scanning your iPhone device is completed,you can preview all data found on it one by one in the scan result.Such as Contacts, Messages, Camera Roll, Photo Stream, Notes, Call History, Calendar, Reminders, Voice Memos and Safari Bookmark.Then choose the items you want to recover,and click on the “Recover” button to save them all on your computer with one click.

directly recover data from frozen iphone

d_win d_mac

Part 2: How to Restore Data on Frozen/Bricked iPhone with iTunes Backup

Step 1.Select Recovery Mode
Run the iPhone Data Recovery on computer and click “Recover from iTunes Backup” on the top of the program’s window.

Step 2.Select and Scan the iTunes Backup File
Choose the one iTunes backup file for your iPhone and click “Start Scan”.

select itunes backup files to download

Step 3. Preview and Restore Data on Frozen/Bricked iPhone from iTunes Backup
The scan only takes you a few seconds. All the contents from the backup file will be displayed in details,including contacts, SMS, photos, notes, videos and more.Select the items and check it before recover them, and click the “Recover” button to extract the selected data on computer depend on your need.

restore iphone data from itunes backup

d_win d_mac

Part 3: How to Fix Frozen/Bricked iPhone System to Normal

iOS System Recovery empower to fix iPhone system to normal, fix frozen/bricked iPhone to normal without data loss. It can fix various iOS system issues without any professional skills, including iPhone get black/white screen of death, iPhone stuck at Apple logo screen, iPhone stuck in the Recovery Mode, and others. Compatible with all models of iPhone, iPad and iPod touch. Fully compatible with the latest iOS 11.

Free Download iOS System Recovery:

d_win d_mac

Step 1.Run the iOS System Recovery on PC or Mac
Click the link as given above and download iOS System Recovery on computer,you can get the windows as below.

ios system recovery home page

Step 2.Connect Frozen/Bricked iPhone to Computer
Select the option of “iOS System Recovery” from the primary window of program under “Mote tools” option. Secondly,use the USB cable to connect your iPhone to the computer . After a few seconds,the iPhone will be detection by program and display it on its screen. Now, click on the button”Start”.

connect iphone

Step 3. Select your iPhone Model and Latest Version of the iOS System
Select the model and iOS system which fit your iPhone, actually the program will detect it and provide to you with the selection. Click the button “Repair” to go to the next screen.

select iphone model and ios system

Step 4.Download the Latest iOS Firmware for Frozen/Bricked iPhone
iOS System Recovery tool will download the latest iOS firmware for fixing you phone,keep your iPhone and computer connection.

download the firmware for bricked iPhone

Step 5.Fixing the Frozen/Bricked iPhone to Normal 
Once iPhone System Recovery tool has finished downloading the latest firmware for your iPhone, it will continue to fix the bricked iPhone without 10 minutes,the iOS fixing and keeping the status displaying as shown below.

fix frozen iphone to normal

After finishing all the steps,your iPhone has been restored to normal and turn to a unbricked device,now you can restart the device as usual.

d_win d_mac

Related Articles:

How to Restore iPhone System to Normal

How to Recover Data from Broken iPhone 8/7/6S/6

How to Recover Data from Water Damaged iPhone

How to Fix Bricked iPhone after iOS 11 Update

How to Fix an iPhone Stuck on Apple Logo