By Selena KomezUpdated on September 12, 2018
[Summary]: Look for a way to transfer data to new iPhone X/Xs/Xs Max/XR? Read this guide to learn how to transfer everything from old phone to new iPhone X/Xs (Max) smoothly and quickly, no matter you use an iPhone, Android, Windows Phone, Symbian Nokia or BlackBerry mobile phone before.
Apple held a press conference at the Steve Jobs Theater in Apple Park, and officially launched the new iPhone Xs series of smartphones: iPhone Xs and iPhone Xs Max. The two models are 5.8 inches and 6.5 inches, equipped with A12 chips, offering a new gold color, and a powerful neural network engine to provide a breakthrough camera, and the dual card dual standby function has finally been realized. The iPhone Xs’ screen is the same as the iPhone X, which is the 5.8-inch Super Retina super retina display with a resolution of 2436×1125 pixels, a total screen pixel of 2.7 million pixels and a pixel density of 458ppi. Apple claims that this is the highest pixel density on iOS devices, and the overall size is the same as the size of the iPhone 8 Plus.
Apple official released the new iPhone Xs, iPhone Xs Max and iPhone XR today. The new iPhone X, iPhone 8 and iPhone 8 Plus were released in September of last year. When you get a new iPhone, how can you transfer music, photos, contacts, and more data from old phone to new iPhone easily? You’ll find how to sync data to iPhone Xs solution you need in this article to upgrade to new iPhone XR and iPhone XS(Max), no matter you use iPhone, Android phone, Nokia, BlackBerry or Windows phone before.
This article is going to show you the reliable solutions to transfer your old data to new iPhone 8/9/X/XR/Xs(Max). I’d like to share five complete guides to switch data to iPhone XR and iPhone Xs (Max) without complicated steps.
“How to transfer data to a new iPhone XS? I have pre-ordered a new iPhone XS on the Apple official website. Now one question confuse me is that how to transfer data from my Samsung Galaxy S7 to the new iPhone Xs directly? Any good recommendations?”
You can use Phone Transfer or Phone Switch without any limitation on the transfer or management feature you can use, on the files types you can transfer or on the number of items you can import. That’s what Phone Transfer really is. With this program, you can transfer files between Android, Symbian Nokia, Windows Phone and the new iPhone XS/XS Max/XR all at once. Or you can selectively transfer one type like transferring photos to new iPhone Xs from the old mobile phone. The transferable types of data including contacts, text messages, photos, videos, music, call logs, calendars, apps.
Free download Phone Toolkit -Switch for Windows or Mac:
More Features of Phone Switch:
Phone Transfer: 1-Click Phone Transfer
-Transfer contacts, text messages, photos, videos, music, call logs, notes, bookmarks and other file types between devices directly.
-Transfer data from iPhone, Android, Windows Phone, Symbian Nokia, BlackBerry, etc,. to anywhere without data loss. Support 6000+ devices.
-Restore backup from Blackberry 7/10, iTunes, iCloud, OneDrive, Kies to your phone.
-Fully compatible with iOS 11/12 and Android 8.0.
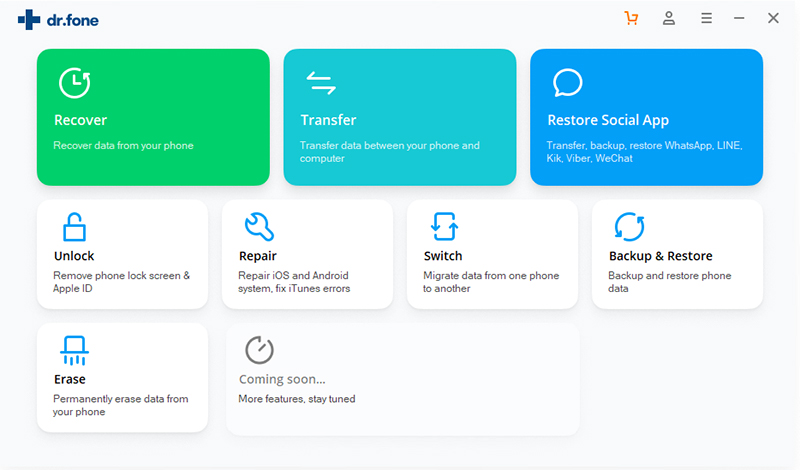
Step 1.Run Program and Connect Devices
– Run Phone Transfer program on your computer.
– Choose “Phone to Phone Transfer” mode.
– Connect Symbian Nokia/Windows phone and iPhone X to the computer with the USB cables and wait for detecting.
– Ensure Symbian Nokia/Windows phone and iPhone X is respectively set as Source and Destination.If not, click the “Flip” button and exchange their place.
Step 2.Choose File to Transfer
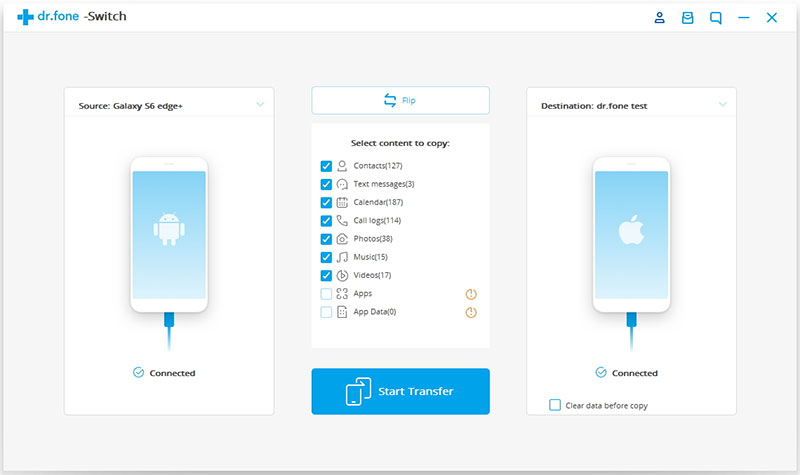
Now you are allowed to select the files to transfer from Symbian Nokia/Windows phone to iPhone X:contacts,text messages,photos,videos,call logs,calendars,music,apps are available;just click it and then tap “Start Transfer“.(You can click more than one file to transfer at the same time.)
Step 3.Transfer Data from Symbian Nokia/Windows phone to iPhone X
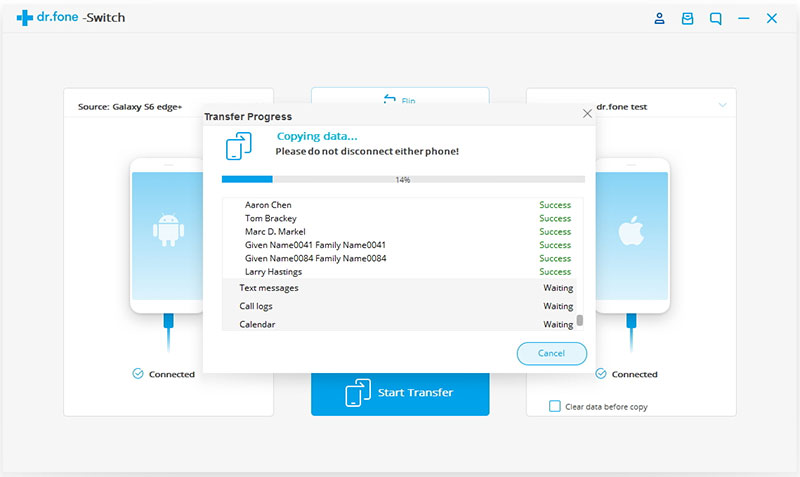
Once you clicking the “Start Transfer” button,the program will begin to the data transfer process automatically.It will finish in minutes,please wait for a moment.
We will back up the data to iTunes regularly, it’s a good habit to have an iTunes backup of your iPhone/iPad/iPod, no matter you would like to restore data to new device or transfer files to a new device. If you use iTunes to restore the backups to device, it will erase your exiting data, but with the help of iOS Data Backup & Restore, which is a part of iOS Toolkit, it will help you selectively restore iTunes backup content to iPhone, iPad and iPod without affecting the existing data on the device.
Step 1. Connect your iPhone/iPad to Computer
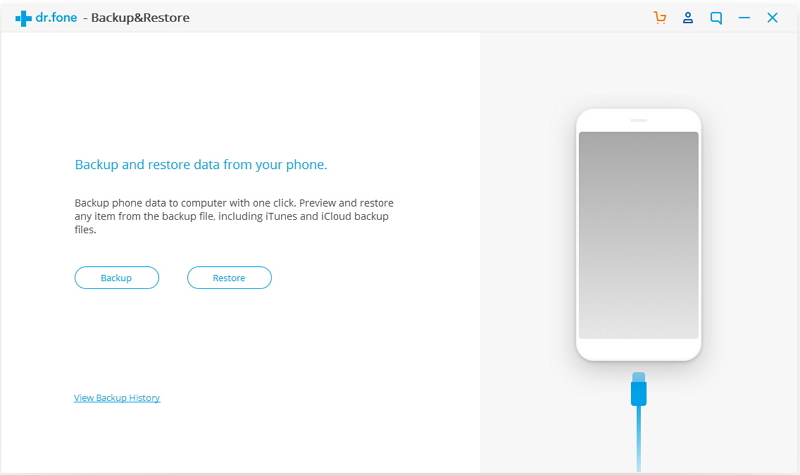
Download and install iOS Toolkit on your computer. Launch the program and select “Backup & Resotre” among all the tools.

Step 2.Connect iPhone X to Computer
Connect your iPhone/iPad to the computer using a lightening cable. Then click “Restore” on the program, and click “Restore from iTunes Backup” option.
Step 3. Analysis iTunes Backup File
On the left column, select Restore from iTunes Backup. The iOS Toolkit will list all iTunes backup files from the default iTunes backup location. Select the iTunes backup file and click on View or Next button.
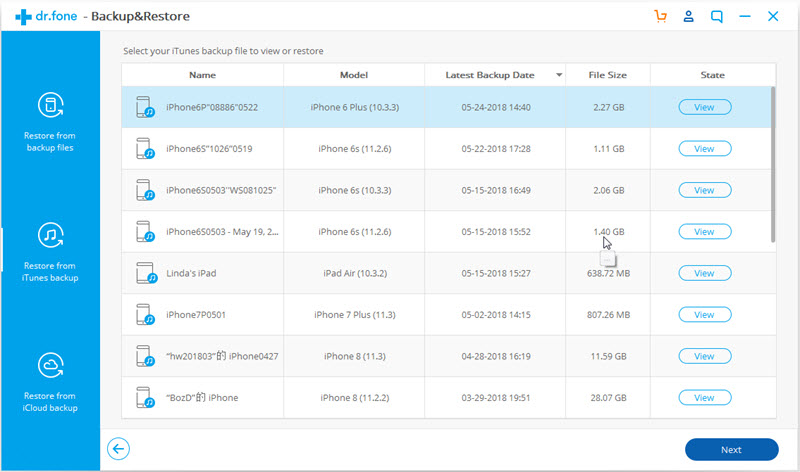
Step 4. Preview and Restore iTunes backup to iPhone X/Xs (Plus)
dr.fone will extract all content from iTunes backup file and display them in different data types.
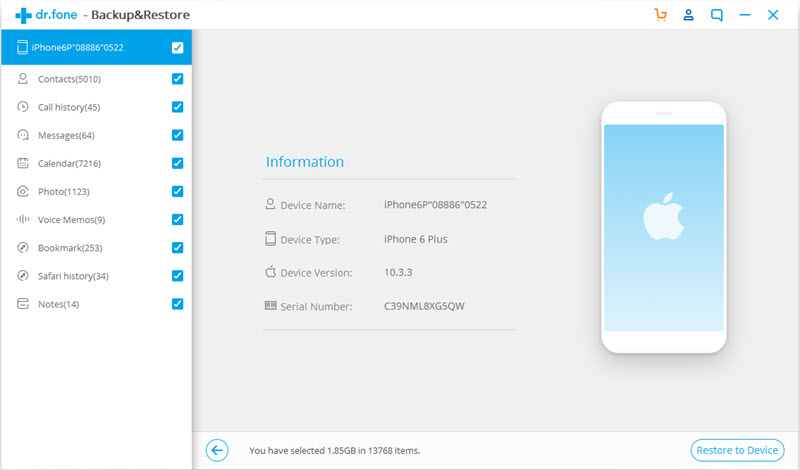
You can then go through all data types and select the ones you need, click on “Restore to Device” to restore the backup file to your iPhone X/Xs (Plus).
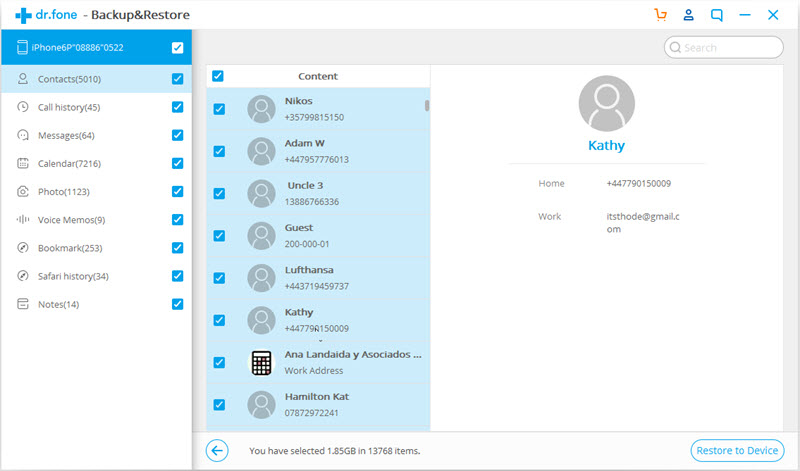
If you have backup data from old iPhone to iCloud before, how you can selectively restore iCloud backups to new iPhone without erase the existing data? We can only restore the whole iCloud backup during the iOS device setup process. If you want to selectively restore any file types from iCloud backup to iPhone X/Xs (Plus) without affecting the existing data, iOS Toolkit – iOS Data Backup & Restore function can help you easily restore iCloud backups to new iPhone X/Xs (Plus).
Step 1. Download and Run iOS Toolkit – Backup & Restore
Download and iOS Toolkit on your computer. Launch the program and select “Backup & Resotre” among all the tools.

Step 2. Connect your iPhone X to Computer
Connect your iPhone X to the computer using a lightening cable. Then click “Restore” on the program, and click “Restore from iCloud Backup” feature.

Step 2. Sign in your iCloud credentials
On the left column, select Restore from iCloud Backup. Then sign in your iCloud accont.
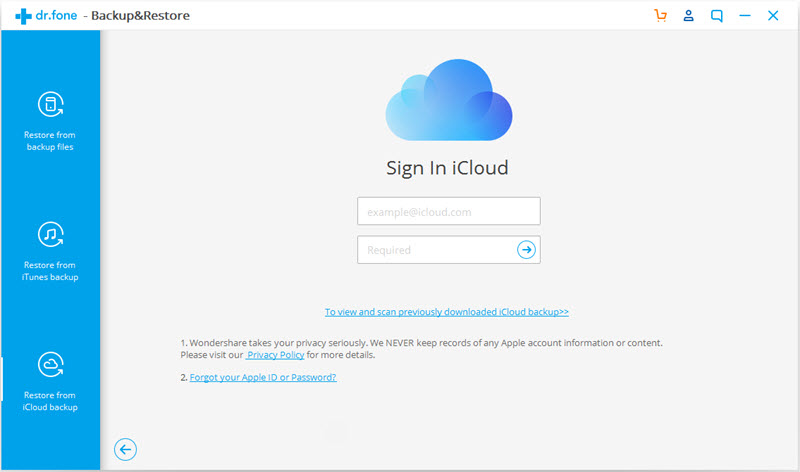
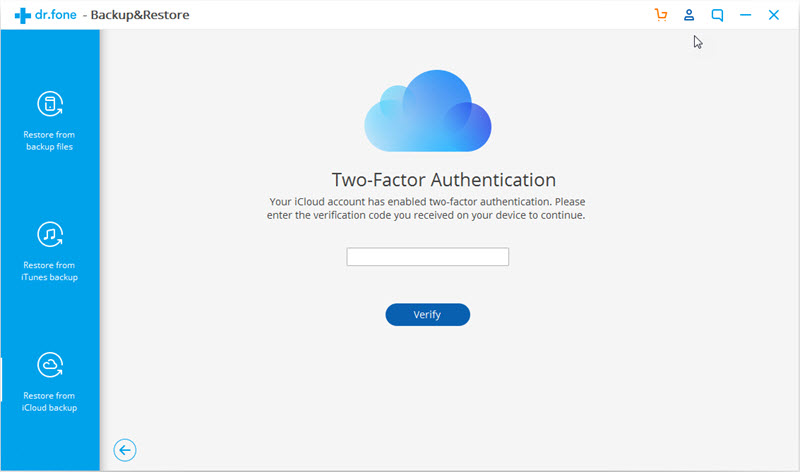
If you have turned on two-factor authentication for your iCloud account, you will receive a verification code. Enter the verification code on dr.fone and click Verify.
Step 3. Download Backups from iCloud
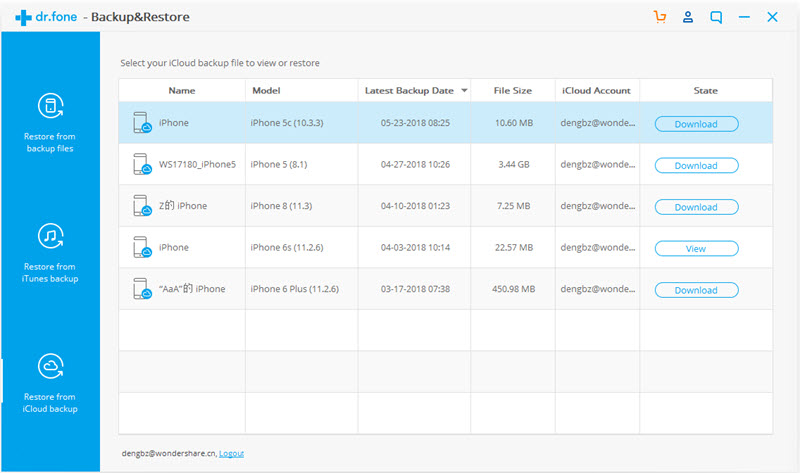
Once you sign in your iCloud account successfully, dr.fone will display all the backup files on your iCloud account. Click the “Download” button to download the backup file.
Step 4. Preview and Restore iCloud backup to iPhone X/Xs (Plus)
After the backup file is downloaded successfully, the program will display all iCloud backup data in different categories. You can preview each iCloud backup data and select the ones you would like to restore.
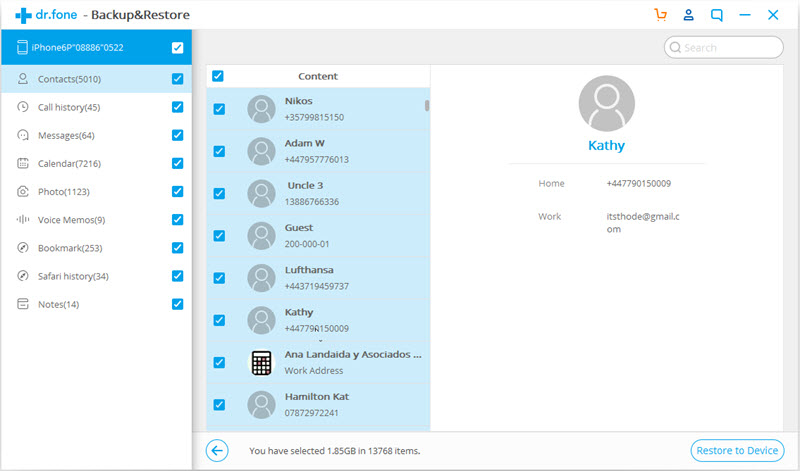
Then click “Restore to Device” to restore iCloud backup to iPhone X/Xs (Plus) selectively. Currently the ios Toolkit supports to restore Messages, Contacts, Call history, Calendar, Photo, Voice Memos, Notes, Bookmarks, Safari history from iCloud backup to your iPhone X and iPhone Xs (Plus).
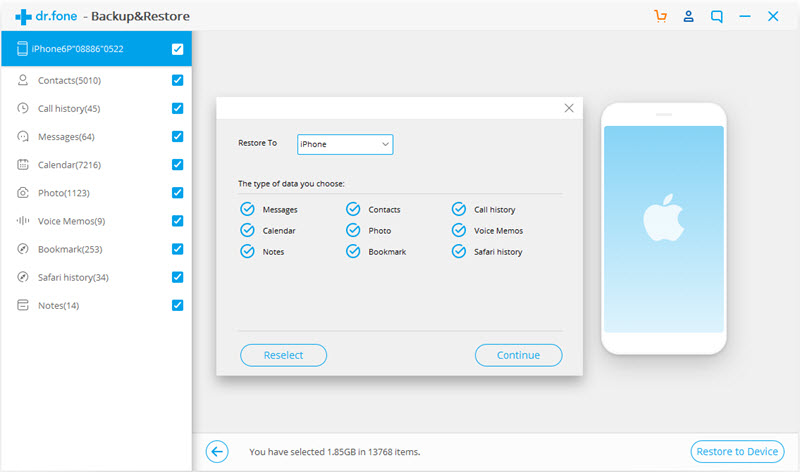
Note:You can use the “Clear data before copy” feature if you need to wipe the previous data on your device.
Download iOS Toolkit – Phone Switch for free and have a try now!
Moreover, Phone Transfer enables to transfer files to any device or backup files to PC/Mac which you can retrieve data from later. You can use it to backup data from mobile device to the computer, restore backup to the mobile device on the computer. Additionally, Phone Transfer empowers to restore backup from Blackberry, iTunes, iCloud, OneDrive, Kies to iPhone X with easy steps.
Step 1. Run Program and Choose “BlackBerry” to Restore the backup
First of all, run Phone Transfer on the computer and connect your iPhone Xs to the computer. Then in the primary window, click “Restore from Backups“, and then select “BlackBerry” from the options displayed.
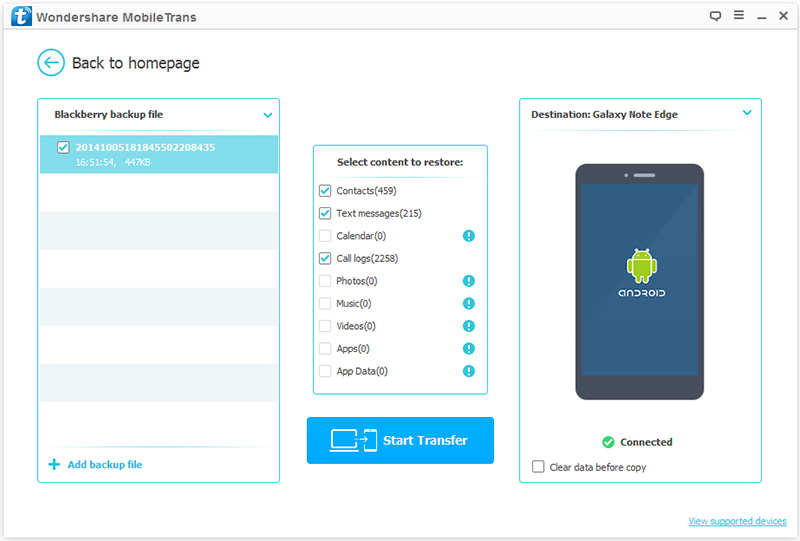
Step 2. Restore BlackBerry Backup to iPhone XS
From the left side, choose your BlackBerry backup file and then select the content to restore. You only need to check the box before the file types. If you want to replace your device’s content, you can do it by checking the “Clear data before copy” box.
Now, click “Start Transfer” to begin the process after all steps above. Then you only need to keep your device connected through the entire process, and the program will do all for you automatically.
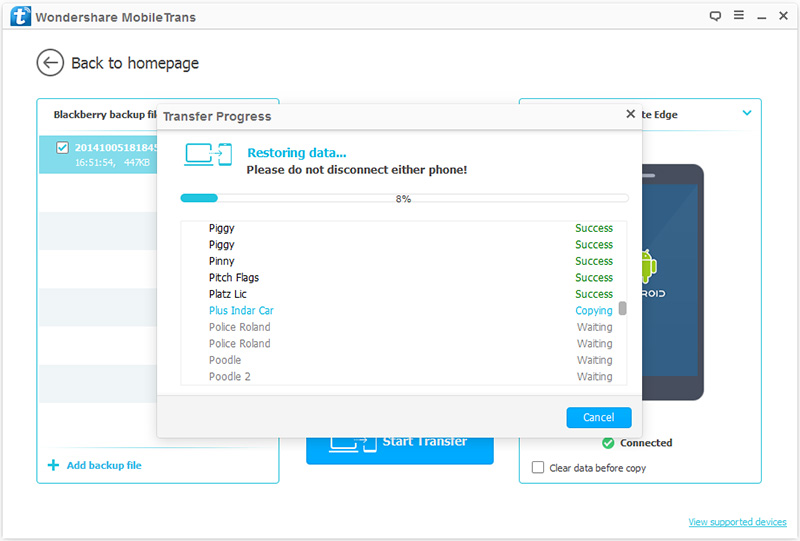
Step 1. Run Program and Choose “Kies” to Restore the Backup
First of all, run Phone Transfer on the computer and connect your iPhone X to the computer.Then in the primary window, lick “Restore From Backups“, and choose “Kies” in the options presented.
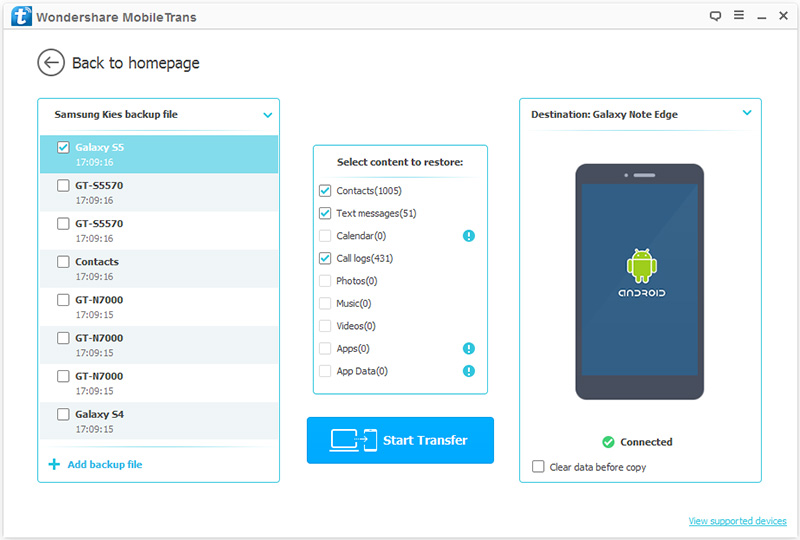
Step 2. Restore Kies Backup to your iPhone XS
Select the file you would like to transfer from the available backup files on the left. In case you don’t see the file you would like to transfer, click on “Add Backup File” for additional options.
Click on “Start Transfer” to begin the process. Keep the phones connected through the process. You can also decide to erase the destination device before copying any files. If you want to do this; simply check the “Clear data before copy” box below the destination phone.
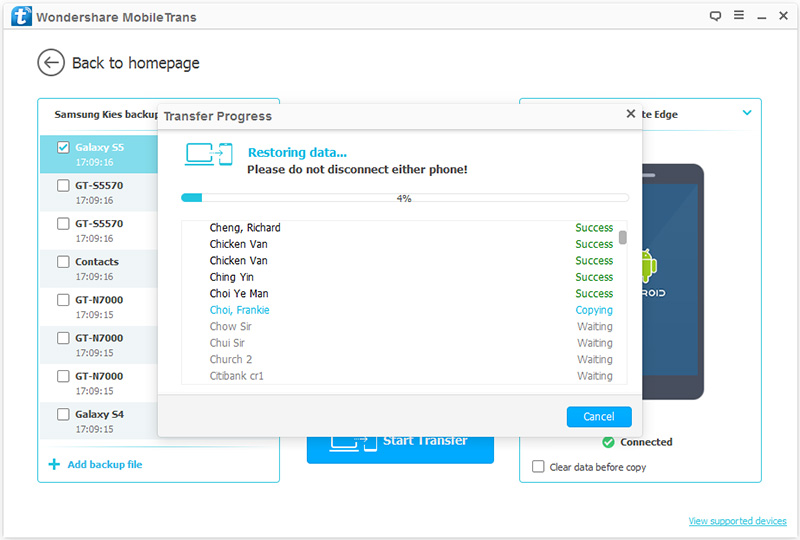
How to Transfer Videos/Music/Photos to iPhone 8 and iPhone X/Xs (Max)
How to Import Videos to iPhone 8/X/Xs (Max) without iTunes
How to Transfer Samsung Data to iPhone 8/X/Xs (Max)
How to Backup iPhone X/iPhone 8 Contacts
How to Backup & Restore iPhone X/Xs (Max) on Computer Safely
How to Backup & Restore iPhone 8/8 Plus
Prompt: you need to log in before you can comment.
No account yet. Please click here to register.
No comment yet. Say something...