By Selena KomezUpdated on January 19, 2018
As we know, backup our iPhone data to computer before factory reset, iOS update, jailbreaking is very important.Avoiding your iPhone get lost or stolen, virus attack, improper operation, files deleted or lost by accidentally,you must back up your iPhone data to MacBook Air, MacBook Pro, iMac regularly.
Backing up your iPhone’s data with iTunes is easy, but one of the drawbacks of iTunes is that you can not back up files selectively. For example, when you need to back up iPhone photos to a Mac, it does not allow you to selectively back up only the photos you need. There are many ways to back up your iPhone data to Mac except iTunes, but not every one is useful and easy to use. So, this will result in you missing some files or backing up data you do not need. But don’t worry, here’s a powerful tool to help you back up your iPhone Data to Mac without iTunes more efficiently without iTunes.
U.Fone iOS Data Backup & Restore(Mac) is designed to back up all content (photos, video, contacts, text messages, call logs, WhatsApp messages, Notes, Calendar, Reminder, App pictures & videos,etc.) from your iPhone to the Mac. Not only does it perfectly support the iOS operating system, it also allows you to select only the data you need to back it up; you can preview the iPhone backup before restoring; you can restore the backup to your iPhone without deleting your current data.This U.Fone iOS Data Backup & Restore is a better tool than iTunes for backing up iPhone data to the Mac.Why it’s a best iTunes alternative to backup & restore your iPhone/iPad/iPod data?Because:
-One click to transfer everything from iOS devices to Windows/Mac PC without iTunes.
-After make your iPhone backup,you can preview and use those data on Mac,before restoring data without hassle.
-Selectively restore the backup to your iPhone/iPad/iPod or PC/Mac computer.
-No data loss on your iPhone during the backup and restore process.
-Supported All iOS Devices,including iPhone X, iPhone 8 Plus/8, iPhone 7 Plus/7, iPhone SE, iPhone 6s/6s/6, iPhone 5s/5c/5, iPhone 4s/4, iPad Pro, iPad Air, iPad Mini, iPod touch,etc.
The tool is compatible with Mac OS 10.13/10.12/ 10.11 / 10.10 / 10.9 / 10.8 / 10.7.
Here we will attach some pictures to help you understand the tutorial, and there will be tips during the text instructions.
Step 1. Download U.Fone iOS Data Backup & Restore
Launch the U.Fone iOS Data Backup & Restore on your computer until the download is successful.

Then you should select“iOS Data Backup & Restore” icon from the interface.

Step 2. Connect Your iPhone to Mac
In this section you should connect your iPhone 5/6/SS/7/8/X to PC (Windows or Mac). There are two options on the screen: Standard backup and Encrypted backup. If you intend to protect the data on your iDevice, here you can to click “Encrypted Backup” which will require you to set a password for the backup.Otherwise you can tick Standard backup. Now you should click “Start” button to start the backup process.

Step 3. Choose Data to Backup
The data you can deal with is showed on the screen and you can see many data types are supported.Now you are able to select data to back up.Then click “Next”and wait a few minutes.

Step 4. Back Up is Finished
Wait for a moment, the software is backing up your data.

As long as the backup is done, you can see the name and the size of the backup file.

Now everything you want to back up has been saved on your computer, you can check the data you have backed up on the Mac whenever you need it.
After you have finished backing up the data and wanting to retrieve backup data to iPhone on Mac, you need to transfer the data to your computer. U.Fone iOS Data Backup & Restore can restore your backup data from your iPhone to Mac. Once installed, you can selectively restore your backup data to your iPhone / iPad / iPod on Windows or Mac PC when you needed.
The usage method is very simple, you only need the following several steps.
Step 1.Run the Program and Choose iOS Data Restore Option
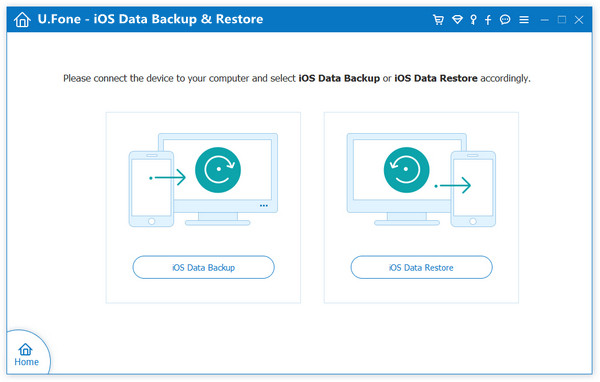
In this part you can see two options —“iOS Data Backup”and“iOS Data Restore” on the screen,then you should select “iOS Data Restore”in order to restore you data.

Step 2. Select A Backup
There are many backup files on the list.You should choose a certain one you want to restore.

Step 3. Choose Files to Restore
Next the program will analyze the backup data automatically and then you can preview all the files. Once you have confirmed the data, select the items you want to restore, such as contacts, messages, photos, videos, etc.
Choose Contacts from Backup

Choose Pictures from Backup Files

Choose “Restore to Device” or “Restore to PC” option.

Note: you can save the restored file to the path below, click “Restore” and go on.

Step 4. Start Restoring Files from Backup
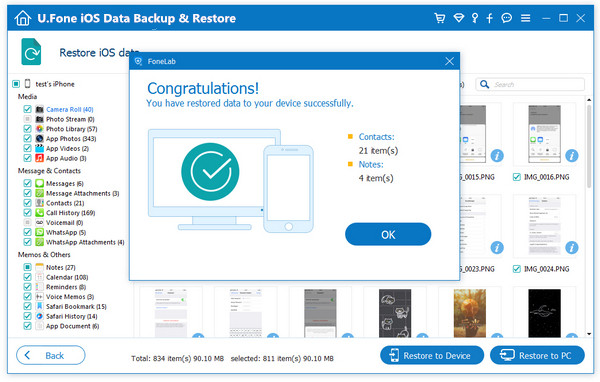
The data is being restored now and just wait a moment until it is completed, you can check the detailed information on the screen. Click “OK” to finish this process.

Free download the U.Fone iOS Data Backup & Restore for Mac or Windows and try to backup your iPhone data to Mac without data losing.
Related Articles:
Recover Data from iPhone, iPad and iPod
This guide teach you three ways to recover lost or deleted contacts, messages, photos, notes, etc. from iPhone/iPad/iPod.
Manage and Transfer Files on iPhone
Transfer data between iPhone, iPad and iPod and PC or from iOS to iOS/iTunes,sync music, playist from iTunes to iOS, backup music from iPhone/iPod to iTunes library.
Transfer Data from between iPhone and Android
When you have got a new iPhone Xor new Samsung S8,this tutorial will teach you a easy way to transfer data between Android and iPhone, from Android to Andorid, iOS to iPhone directly.
Transfer WhatsApp Messages from iPhone to Samsung
Lots of WhatsApp chat history stored in your old iPhone and want to transfer them to your new Samsung Galaxy S8,S7,S6 or Note 8?Learning this guide to move WhatsApp messages from iPhone to Android without data loss.
Prompt: you need to log in before you can comment.
No account yet. Please click here to register.

No comment yet. Say something...