Category Archives: iOS Data Recovery

How to Recover Deleted Voice Memo from iPhone

“I deleted the voice memos from my iPhone 6 by pressing the deleted button accidently.Now I am searching the best ways to get back these impressive voice files in urgent.BTW,I haven’t backup the lost voice files.Anyone give me some available ways?Thx.”-Luca

In daily life you may have a habit of making the voice memo on iPhone to do the record or in remembrance of something important for you anywhere anytime.For example make the voice memo from your darling so that you can play it when you miss him.However,there will always be something that out of your expectation happen in your life.You may delete these voice files by mistaken operation.Perhaps,you lost them after the iOS update on your iPhone.It’s really a pity that you can’t get back the meaningful voice memos.You might ask:Can I restore the deleted voice memo from iPhone with some special ways?If yes,how can I recover?For most people,they never know how the regular backup is necessary for iPhone users until they lost data on their phone.Here is the solution come for you to recover deleted voice memo from iPhone without backup.

recover-iphone-voice-memos

Recover Deleted Voice Memo from iPhone without Backup

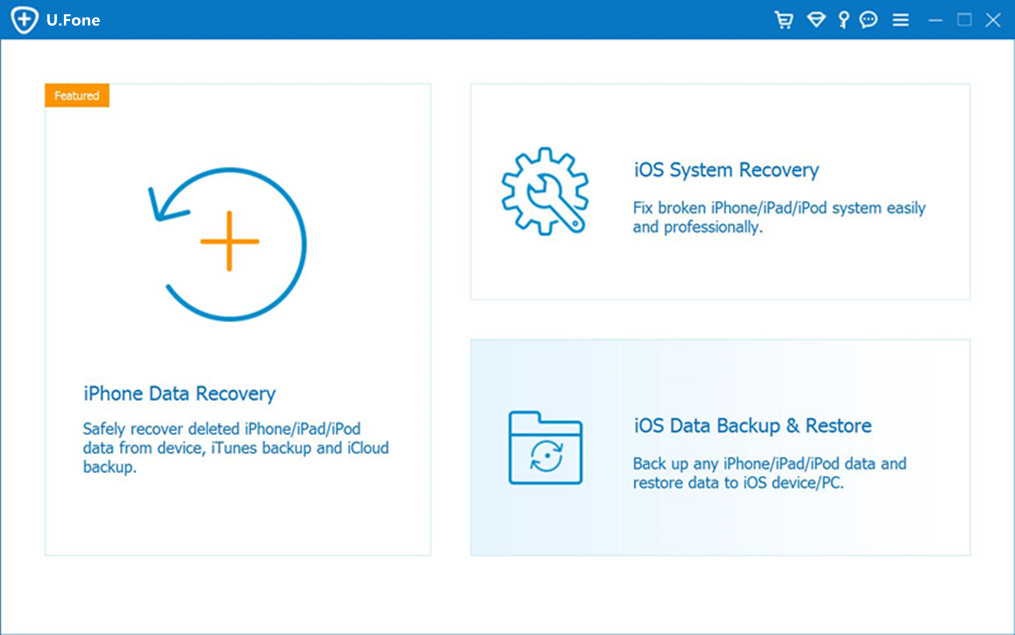
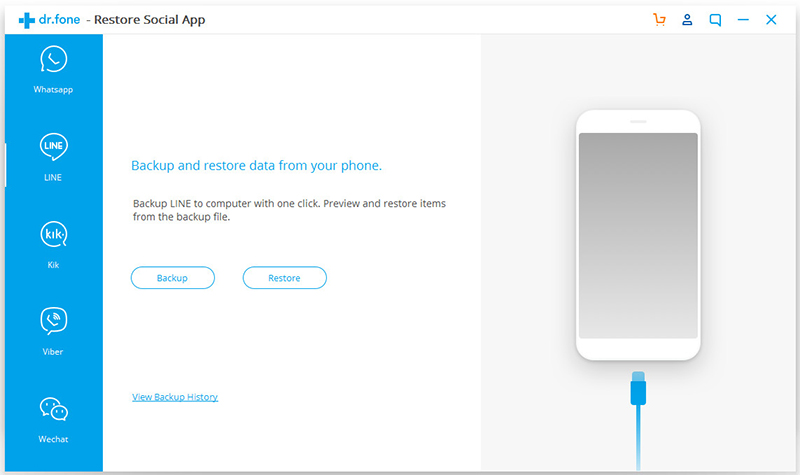
iPhone Data Recovery is a superior data recovery for recovering deleted data on iPhone/iPad/iPod completely,it’s able to restore deleted voice memos from iPhone without backup.Except voice memo,iPhone Data Recovery enables to recover various of deleted data,including contacts,photos,videos,messaging,call logs,documents,WhatsApp messages & attachments,etc,.iPhone Data Recovery empowers to recover deleted data on iOS device for three different modes:directly recover from device,recover from iTunes backup,recover from iCloud backup.Most of iOS device are applicable to iPhone Data Recovery,such as iPhone 7,iPhone 6S(Plus),iPhone 6(Plus),iPhone 5S/5C/5,iPad,iPod.

d_win d_mac

How to Directly Restore Deleted Voice Memo from iPhone without Backup

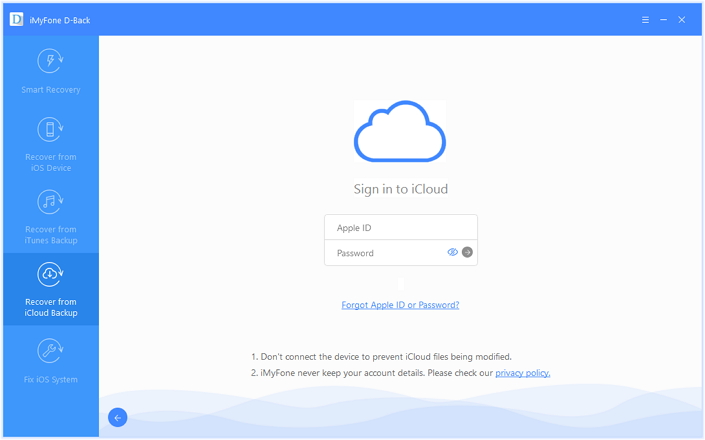
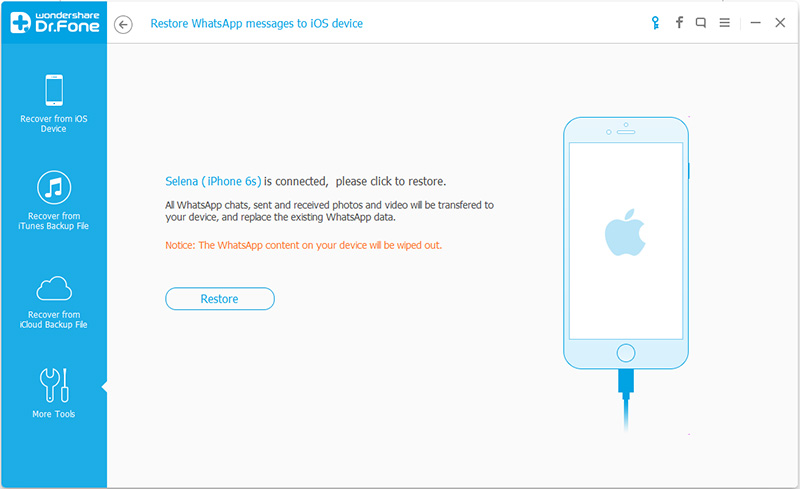
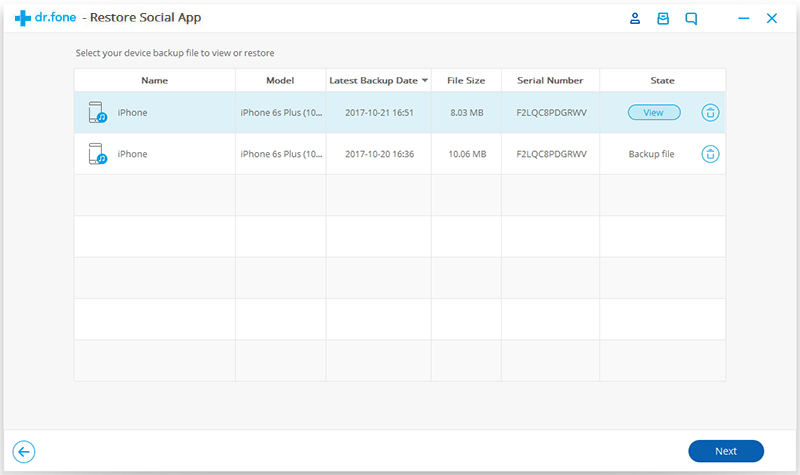
The iPhone Data Recovery provides the contains several data recovery modes,including “Recover from iOS Device”,”Recover from iTunes Backup”,”Recover from iCloud Backup”,”Smart Recovery”.The “Smart Recovery”help to recover data when you don’t know which is your data loss circumstance.

If you don’t know choose which recovery mode to get back lost data ,we suggest you click the “Smart Recovery” feature to choose How You Lost Your Data,which will improve the rate of data recovery.

smart iphone data recovery

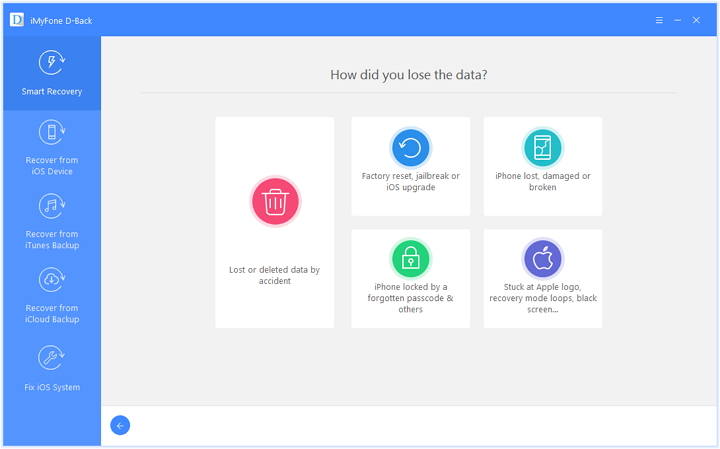
Tips:This recovery mode allows you to scan your device directly to find all the lost files, or restore lost data from your lost/broken/inaccessible device.

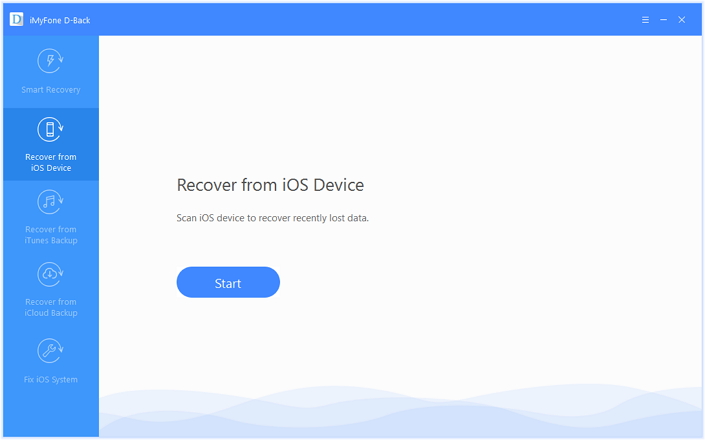
Step 1.Run Program and Connect iPhone to the  Computer
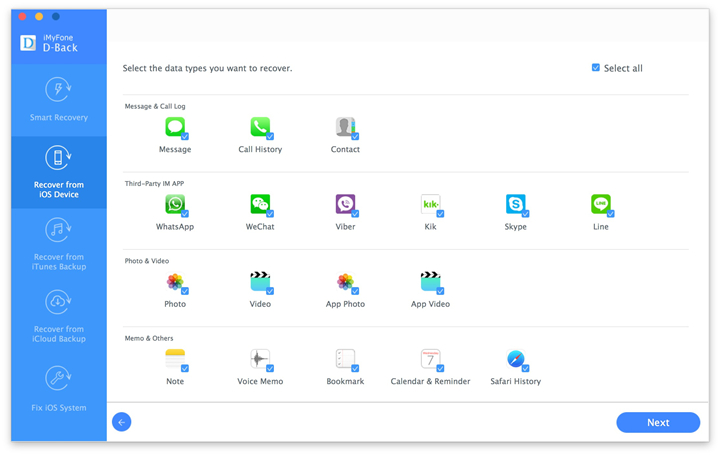
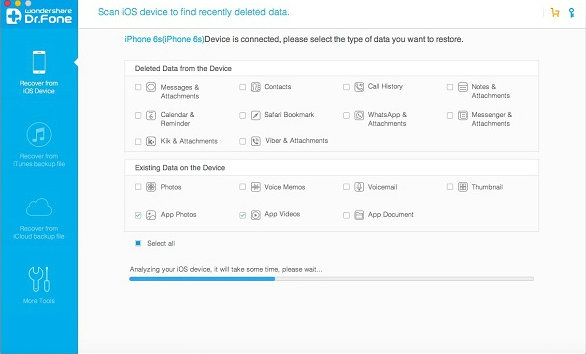
Firstly install and run iPhone Data Recovery on computer.Select the “Recover from iOS Device” mode.

connect iphone with computer

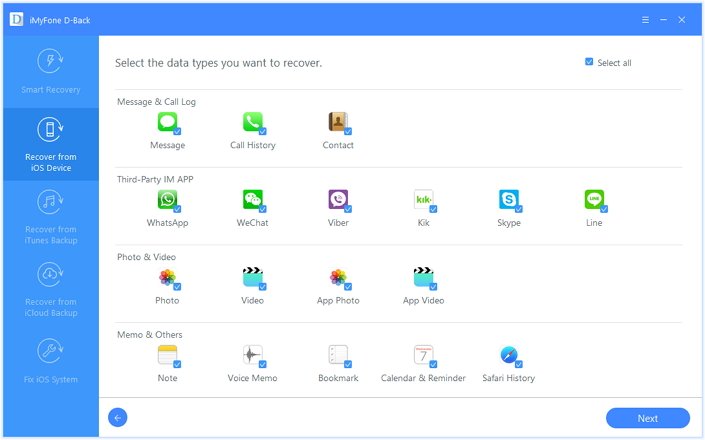
Step 2.Select Deleted File to Scan by Program
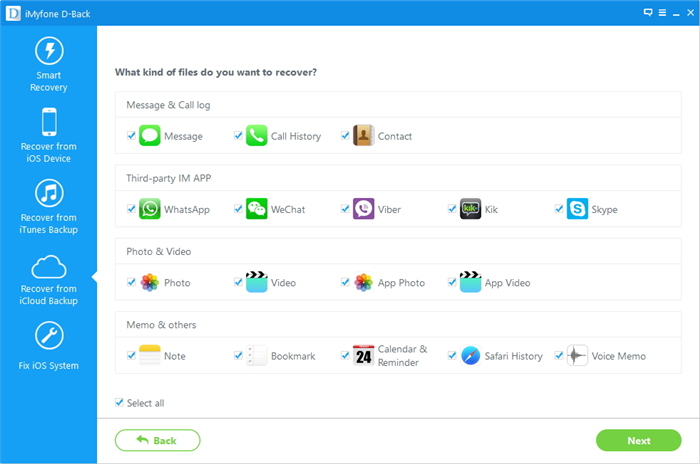
Now you should select the “Voice Memos” to be scanned by program,then connect iPhone to the computer.You are allow to select more than one files to be scanned by program,then click “next”.

select file to recover

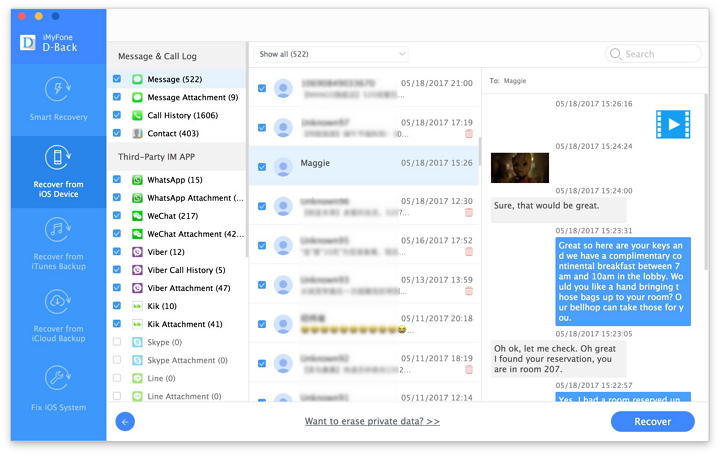
Click “Scan” to search for your deleted data,then the program begins scanning your device automatically for lost/deleted data.

scan iphone and search lost data

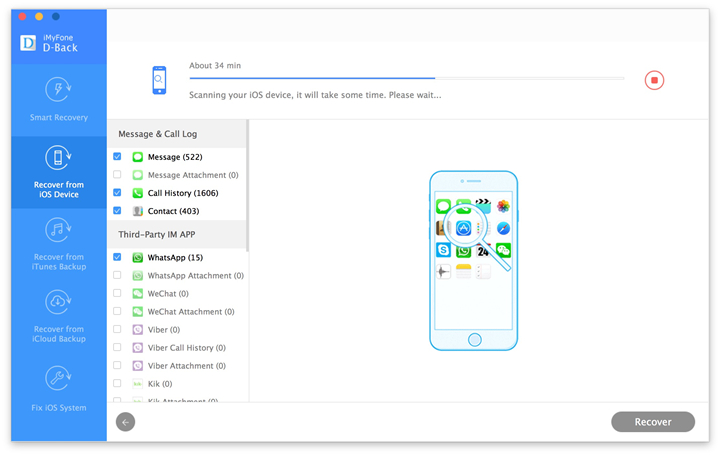
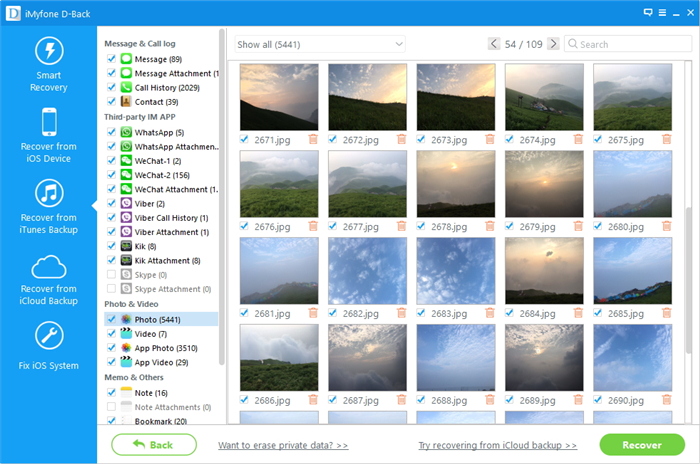
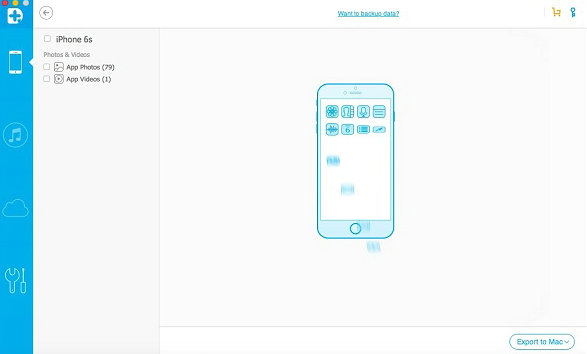
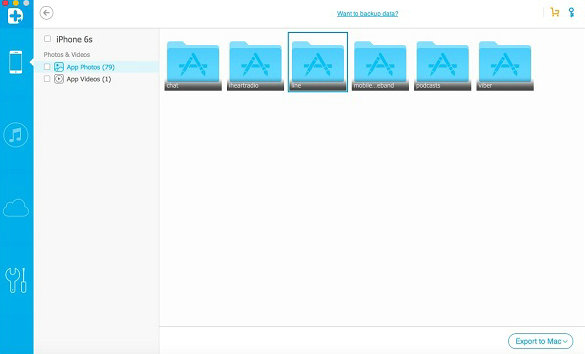
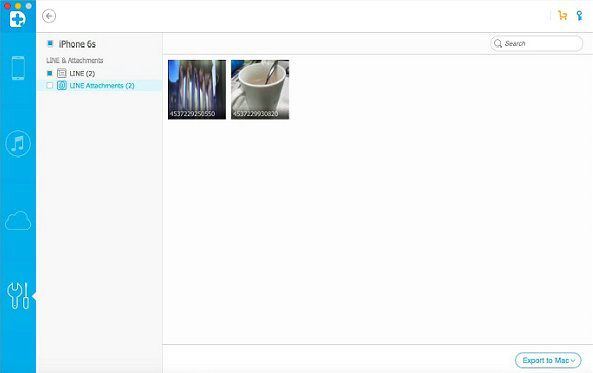
Step 3.Preview and Recover Voice Memos from iPhone without Backup
When the scanning is completed,you could preview and recover deleted voice memos from iPhone without backup.Select the data you want and click “Recover” to save the selected data on computer.

directly recover deleted voice memo from iphone

d_win d_mac

Related Article:

How to Recover Deleted Data from iPhone

How to Recover Deleted Contacts from iPhone

How to Recover Deleted SMS from iPhone

How to Recover Deleted Notes from iPhone

How to Recover Data from iPhone that Won’t Turn on

“My iPhone 6S is something wrong,I am crazy about it.Last night I turn it off when I went to sleep.This morning I waked up and try to turn it on but failed.Now I am urgent to get the messages which sent from my partner,or it will make a big loss for my business.Please help!”-Carson

Most iPhone users have ever encountered the circumstance that iPhone won’t turn on.Now we are going to conclude the causes of iPhone can’t power on as usual.

The Common Cases that Lead to iPhone won’t Turn on:
1.iPhone is simply frozen in power-off or sleep mode.In which case,it fails to switch itself on or wake itself up when you initiate it.
2.It is possible that your phone’s battery is out of charge.
3.The operating system or an installed software is corrupted.The tell-tale sign if this is that if you manage to switch on your phone,it freezes or crash soon after.
4.The hardware error for example the power button of iPhone is broken.

Recover Files from iPhone which won’t Turn on

If you don’t have a choice yet,here is my recommendation: iOS System&Data Recovery,which is a data recovery for restoring iOS system to normal and recovering data from iPhone completely.It isn’t be easier than using iOS System&Data Recovery to recover files from iPhone that won’t turn on,the recoverable files including contacts,messages,photos,videos,apps & apps data,calendars,notes,documents and more.iOS System&Data Recovery works well for repairing iOS system issues such as iPhone can’t turn on as usual,iPhone stuck in Recovery Mode,iPhone stuck at Apple logo screen,etc,.

d_win d_mac

How to Recover Data when iPhone Won’t Turn on

Step 1.Run Program and Select System Recovery Selection
Launch and run iOS System & Data Recovery and click on the “iOS System Recovery” function from “More Tools” in the program main page. Connect your iPhone to the computer via USB cable. The program would detect your iPhone soon. Click “Start” to initiate the process.

ios system recovery main page

Click the “Start” button to begin the fixing process.

connect iphone to the program

Step 2.Select and Download Firmware for iPhone
You should download the firmware which match your iPhone to fix the abnormal system of it.iOS System & Data Recovery will detect the model of your iPhone, suggest the best iOS version for your iPhone to download.

select iphone model

Click on “Download” and wait until the program finishes downloading and installing it on your iPhone.

download firmware for iphone

Step 3.Fix iPhone that can’t Turn on
When the download is completed, the program will begin to restore device to normal state with only a few minutes.

fix iphone won't turn on

Step 4.Switch Data Recovery Mode to Get Back Lost Data
Now your iPhone have returned to the normal state.Now you could recover data from device with the help of iOS System& Data Recovery. Switch to “iPhone Data Recovery”.

iPhone data recovery

Choose “Recover from iOS Device” mode in the main page of program to switch to data recovery mode.

iPhone data recovery

Step 5.Select Files Types for Scanning
Select the files types for scanning on iPhone.The data you can select including contacts,messaging,photos,videos,call logs,notes,documents and so forth.

select and scan iPhone lost data

Click on the “Start Scan” button to begin to scan your iPhone for lost/deleted or existing data. The program will take a little time to complete the scanning. While it is finished, you will be able to see recoverable data in a list.

Step 6.Preview and Recover Data from iPhone
You could preview each file contains, click on the file name to see what it is.Select the data you need and then recover to your device or computer.

select and scan iPhone lost data

After selecting all that you need, click the “Recover” button. To recover it directly to your iPhone, click on “Restore to device” and if you’d like to recover them to your computer, you can just click on “Export to PC”.

d_win d_mac

Related Article

How to Recover Data when iPhone Won’t Slide to Unlock

How to Recover Data when iPhone Stuck at Black Screen of Death

How to Recover Data when iPhone Stuck on Apple Logo

How to Recover Data from iPhone in Recovery Mode

How to Restore iPhone System to Normal

How to Recover Data when iPhone Won’t Slide to Unlock

“My iPhone get wrong after I updated iOS 10 on it,it stuck at “Slide to Unlock” screen,now I can’t use it as usual.I try to power it off but it still unresponsive.Now I just want to extract the client number from my iPhone,which relate to my business.How?”-Ling ling

It’s not an uncommon issue that the slide to unlock feature does not work on iPhone. Recently a part of iPhone users have reported that it’s very slow to respond to unlock iPhone screen or the slide bar is totally unresponsive.That’s means iPhone freezes on the lock screen.There are many reasons can cause an unresponsive lock screen of iPhone.Perhaps the sensors there are dead.Bumps and liquids can sometimes break the touchscreen in parallel stripes across the display.Or it is possible that device get the software error and lead to iPhone won’t slide to unlock,due to the iOS update or iOS jailbreak.

Recover Files when iPhone Won’t Slide to Unlock

You can stop feeling frustrating when you get the iOS System&Data Recovery.With iOS System&Data Recovery,you are able to fix iPhone won’t slide to unlock and restore data from iPhone without data loss.iOS System&Data Recovery perfectly help to fix with various iOS system issues like stuck in Recovery Mode,white Apple logo, black screen, looping on start, etc,.You can get your iPhone back to normal state without data loss in minutes with this powerful tool.What’s more,iOS System&Data Recovery allow to recover deleted data from iPhone after losing data under any circumstances.It’s a multi-function data recovery.All models of iOS devices are compatible with this program,including iPhone 7(Plus),iPhone 6S(Plus),iPhone 6(Plus),iPhone 5S/5C/5,iPad Air,iPad Pro,iPad Mini,and so on.

d_win d_mac

How to Recover Files when iPhone Won’t Slide to Unlock

Step 1.Run Program and Select iOS System Recovery Option
Launch iOS System & Data Recovery and click on the “iOS System Recovery” tab from “More Tools” in the program main page. Connect your iPhone to the computer via USB cable. The program would detect your iPhone soon. Click “Start” to initiate the process.

ios system recovery main page

fix iphone won't slide to unlock

Step 2.Download and Select Firmware for iPhone
You should download the suitable firmware for your iPhone to fix the device.iOS System & Data Recovery will detect the model of your iPhone, suggest which iOS version that is best for your iPhone for you to download.

download ios firmware package

Click on “Download” and wait until the program finishes downloading and installing it on your iPhone.

download the firmware for iphone

Step 3.Fix your iPhone can’t Slide to Unlock
When the download is completed, the program will continue to restore your iPhone to normal. It will take you only a few minutes.

fix iphone won't slide to unlock

fix iphone won't slide to unlock

Step 4.Switch Recovery Mode for Data Recovery
Your iPhone have get out of the stuck of “Slide to unlock” screen.Now you should recover data from device with the help of iOS System& Data Recovery.Please switch to data recovery mode.Choose “Recover from iOS Device” mode in the main page of program.

Step 5.Select Files Types for Scanning
Select the files types for scanning on iPhone.The data you can select including contacts,messaging,photos,videos,call logs,notes,documents and so on.

scan data on iphone

Click on the “Start Scan” button to begin to scan your iPhone for lost/deleted or existing data. The program will take several minutes to complete. While it is finished, you will be able to see recoverable data in a list. If you found a specific data that you want during this process, just click “Pause” to stop the process.

Step 6.Preview and Recover Data from iPhone
You should be able to see a list of retrievable items after the program has finished scanning your iPhone.There are several filter options to help you find data that you want. To have a look at what each file contains, click on the file name to see what it is.

restore data from iphone

Once you have identified the data that you want to recover, check on the boxes next to the filenames. After selecting all that you need, click the “Recover” button. To recover it directly to your iPhone, click on “Restore to device” and if you’d like to recover them to your computer, you can just click on “Export to PC”.

d_win d_mac

Related Article:

How to Recover Data from iPhone in Recovery Mode

How to Recover Data when iPhone Stuck on Apple Logo

How to Recover Data when iPhone Stuck at Black Screen of Death

How to Restore iPhone System to Normal

How to Recover Deleted or Lost Data from iPhone 7/7 Plus

[Summary]: Don’t worry when you lost contacts, messages, photos, music or videos etc data on your iPhone. Here we’ll offer you 3 effective methods to help you restore lost data from iPhone 7/ iPhone 8/ iPhone X/ iPhone XS/ XR directly; restore from iCloud backups or iTunes backups. Follow and find the best solution to recover your iPhone 7 lost data now.

Part 1:The Most Common Causes of Losing Data on iPhone

1.Deletion Mistaken
The most common cases of losing data on iPhone 7 is deleting files by mistaken without having any backup available.Most iPhone users delete photos,messaging,contacts,etc,.from iPhone by pressing the wrong button.

2.iOS Update or iOS Jailbreak
Many users may have encountered the data loss during/after iOS update or iOS jailbreak, especially the failed one would cause data loss of your iPhone.Moreover,the failure iOS system operating may lead to iOS system error on your device,such as stuck in Recovery Mode,stuck at “connect to iTunes” screen,stuck at Apple logo screen or stuck at black screen,etc,.

3.More other Occasion of Data Loss
For example the Hardware or System Malfunctions. According to a survey of data loss’s causes, more than two-fifth of users lose data because of hardware or system malfunctions.It is a common cause of data loss on iPhone 8/7/6S/6/SE.Absolutely, the hardware or system malfunctions can be shown in many forms, such as electrical failure, head crash, controller failure,etc,.

iTunes and iCloud can help you backup iPhone data to locals and cloud, if you want backed up your iPhone with iTunes and iCloud. Below are the most common free way to restore iPhone 7(Plus) lost data.

First Free Way: Free restore iPhone lost data from iTunes backup

If you have backed up iPhone data to iTunes before, you can follow the below simple steps to free restore lost from iTunes backup:

1. Launch iTunes on PC or Mac that you used to backup iPhone data;
2. Using an Apple USB cable to connect iPhone to the computer.
Follow the onscreen steps to enter iPhone 7 pass-code or to trust This Computer.
3. Click the iPhone ico when it appears in iTunes.
4. Choose Restore Backup in iTunes and look at the date and size of each backup and select the most relevant.
5. Click Restore and start to restore data back to your iPhone from iTunes backups.

restore iPhone data from itunes

Second Free Way: Free iPhone lost data from iCloud backup

If you have synced iPhone data to iCloud for backup before, learn this guide to download, extract or restore the iCloud backups to iPhone with ease:

1. Please go to Settings > General > Reset on iPhone 7 (Plus).
2. Tap “Erase all content and settings” and then “Erase Now“. It will erase all data on your iPhone and reset to factory settings.
3. When it comes to the Apps & Data screen, tap Restore from iCloud Backup, then sign in to iCloud account.
4. Tap to “Choose backup,” then choose from a list of available archives you made in iCloud.

You iCloud backups will restore to iPhone. When it done, you can find the lost data on your iPhone 7 (Plus) again.

Part 2: Best iPhone Data Recovery – Recover Lost Data on iPhone Completely

Thankfully, this iPhone Data Recovery makes the data recovery task becomes so easy.With the help of iPhone Data Recovery,you can simply restore lost data on iPhone 7/8/XS/XR with three recovery modes. This iPhone data recovery can help your recover lost files on iPhone 7/7 Plus with only a few clicks in minutes, including contacts, text messages, photos, videos, notes, call logs, WhatsApp messages & attachments,and more.

d_win d_mac
d_win d_mac

Highlight the Features of iPhone Data Recovery:

  • 3 iPhone data recovery modes: Directly recover from iPhone, restore from iTunes backup files, and restore from iCloud backup files.
  • Recover various of data such as photos, video, contacts, messages, notes, app & app data,etc,.
  • Backup iOS data to computer safely.
  • Fix iOS system issues,for instance,stuck in Recovery Mode,stuck at “connect to iTunes” screen,stuck at Apple logo screen or stuck at black screen,etc,.
  • Preview before recovery,selectively restore what you want on device.
  • Compatible with latest iOS 12.3

Part 3:Directly Recover Lost Data from iPhone 7 and iPhone 7 Plus

Step 1.Launch iPhone Data Recovery and Connect iPhone
Downloaded iPhone Data Recovery on your computer,launch it. Then and select “Recover from iOS Devices“, and connect iPhone to your PC/Mac with the USB cable.

connect iphone to computer

Step 2.Scan Lost Files from iPhone
Click “Start Scan” to begin scanning your lost iPhone 7 data after selecting the data need to scan.For example,to scan lost photos,you should click “Photos”.

scan data on iphone 7

Note: Make sure the USB cable is well connected in the whole process.

Step 3.Preview and Recover Lost Data from iPhone 7
Now you could choose the detail data you want to recover after previewing that,mark you want click “Recover” button on the lower right corner of the interface.Then select to save the recovered data to the computer or your device.

recover data on iphone 7

Note: This mode fits the situation if you didn’t backup your iPhone before losing files.If you have backed up your device,you can choose the second or the third mode mentioned below.

Part 4:Recover Lost iPhone Data from iTunes Backups

Step 1.Choose the iTunes Backup File and Scan
Launch iPhone Data Recovery and choose the second mode “Recover from iTunes Backup“. Connect iPhone 7 with computer.Choose the backup file you want and click “Start Scan”.

scan itunes files

Step 2.Preview and Restore Lost Data from iTunes
A few seconds will be taken to scan your iTunes backup files.And you are allowed to preview all the content from the backup files.Choose the files you want and click “Recover” to complete the recovery.Then save the data to the computer or device.

recover iphone data from itunes

Part 5:Recover iPhone Lost Data from iCloud Backups

Step 1.Choose the iCloud Recovery Mode and Log into iCloud Account
Choose “Recover from iCloud Backup File” after launching iPhone Data Recovery. Then,sign in your iCloud account.

log in icloud account

Step 2.Choose the iCloud Backup File and Download
You would see the iCloud backup files that you backed up with this account listed.Choose the one you want to recover and click “Download” to download the backup file.

choose icould files and download

Step 3.Preview and Restore Lost Data from iCloud Backup
When the backup file is downloaded,preview them one by one and then save to either the computer or your device.

recover iphone data from icloud files

recover iphone data from icloud files

d_win d_mac
d_win d_mac

Related iPhone Data Tutorial

How to Recover Lost Data on iPhone 7/6S

How to Recover Deleted Data from iPhone 7/6S/6/SE

How to Recover Lost Contacts on iPhone 7/6S/6

How to Backup and Restore Data on iPhone 7

How to Recover Data from iPhone in Recovery Mode

“Hi,my iPhone 6S was suddenly get into the Recovery Mode when I connect it to computer via USB one day,then iTunes prompt me that restore the device to factory reset.However,I am afraid of doing it because I haven’t backup the contacts,photos and more other data on my iPhone.Are there any ways to restore my personal data from the iPhone which stuck in Recovery Mode?Please let me know ASAP.” – Sharon

Nowadays since iPhone play an important role in daily life that people like to use it to sent SMS,take photos,or many other personal actions.The panic is understandable when finding their device somehow stuck in recovery mode. If we can’t handle it properly, all precious content, like photos and messages will be erased.Here is the available way to fix your abnormal iPhone and restore data from iPhone which stuck in recovery mode.They also work for iPad and iPod.

Part 1: Fix iPhone in Recovery Mode without Data Loss

Now here is a software that our strongly recommend for you-iOS System & Data Recovery, that claims to fix iPhone stuck in recovery mode without losing data and return it to normal state when this happens.More importantly,this software help to fix several iPhone system abnormal situations,such as iPhone stuck in Apple logo,iPhone stuck at “connect to iTunes” screen,iPhone stuck in DFU mode,etc,.

Focus on the Features of iOS System & Data Recovery:
-Fix with various iOS system issues like Recovery Mode, white Apple logo, black screen, looping on start, etc,.
-Restore iPhone system to normal state without data loss.
-Work for all models of iPhone, iPad and iPod touch.
-Fully compatible with Windows 10 or Mac 10.11, iOS 10 or lower.

d_win d_mac

Step 1.Run Program and Select iOS System Recovery Option
Launch iOS System & Data Recovery and click on the “iOS System Recovery” tab from “More Tools” on the software interface. Connect your iPhone to computer via USB cable. The software should detect your iPhone soon. Click “Start” to initiate the process.

iOS System Recovery

fix iphone stuck in recovery mode

Step 2.Download and Select Firmware for iPhone
You will need to download the right firmware for your iPhone to fix the device.iOS System & Data Recovery should be able to recognize the model of your iPhone, suggest which iOS version that is best for your iPhone for you to download.

select your iPhone model

Click on “Download” and wait until the software finishes downloading and installing it to your iPhone.

download the firmware for iPhone

Step 3.Fix your iPhone Stuck in Recovery Mode
Once download is complete, the software will continue to repair your iPhone, get it out of Recovery Mode. It should take a few minutes. The software will restart you iPhone to normal mode.

fix iphone stuck in recovery mode

d_win d_mac

Part 2: Restore Data from iPhone which Stuck in Recovery Mode

The best solution that help to restore data from your iPhone which stuck in recovery mode is using iPhone Data Recovery.With this wonderful software,you are able to restore data from iPhone which stuck in recovery mode,such as contacts,messages,photos,videos,call logs,notes,calendars,WhatsApp messages & attachments,etc,.

What’s More about iOS System & Data Recovery Feature You should Know:
-Recover data from iPhone in Recovery Mode fastly and easily.
-Recover photos, videos, contacts, messages, notes, call logs, and more types of data.
-Recover data from iPhone which get into different stuck:iPhone stuck in Apple logo,iPhone stuck at “connect to iTunes” screen,iPhone stuck in DFU mode,so on.
-Compatible with latest iOS devices.
-Preview and selectively recover what you want from iPhone stuck in Recovery Mode.

d_win d_mac

Step 1.Run Software and Connect iPhone with Computer
Launch the software on your computer.Connect your iPhone to your Mac or PC with an USB cable. It should be able to automatically detect your iPhone and have the “Recover from iOS Device” tab active in the window.

scan data on iphone

Tips: Before running iOS System & Data Recovery, you are supposed to download the latest version of iTunes. To avoid the automatically sync, don’t launch iTunes when running iOS System & Data Recovery.

Step 2.Scan iPhone Data
Click on the “Start Scan” button to start scanning your iPhone for lost/deleted or existing data. The software will take several minutes to complete. While it is end, you will be able to see retrievable data in a list. If you found a specific data that you want during this process, just click “Pause” to stop the process.

restore data from iphone stuck in recovery mode

Step 3.Preview and Recover Data from iPhone in Recovery Mode
You should be able to see a list of retrievable items after the software has finished scanning your iPhone.There are several filter options to help you find data that you want. To have a look at what each file contains, click on the file name to see what it is.

restore data from iphone stuck in recovery mode

Once you have identified the data that you want to recover, check on the boxes next to the filenames. After selecting all that you need, click the “Recover” button. To recover it directly to your iPhone, click on “Restore to device” and if you’d like to recover them to your computer, you can just click on “Export to PC”.

d_win d_mac

Related Articles:

How to Restore iPhone System to Normal after iOS 10 Update

How to Enter & Exit iPhone Recovery Mode

How to Restore iPhone System to Normal

How to Get iPhone 7/SE/6S/6/5S/5 out of Recovery Mode

How to Manage iPhone on the Computer

Restore iPhone Data in Recovery Mode

iOS Data Recovery

Recover Your iPhone iPad Lost Data
Now, Even without Backups

Compatible with iOS 11 & iPhone X/8 (Plus)

Recover Lost Data Now

Get Missing Pictures,Videos Back from iPhone with iOS 10 Update

“Help!My videos stored on my iPhone camera roll were disappear after iOS 10 date.What’s going on?It was confused me a lot indeed.How can I restore the lost media file from my iOS 10 iPhone?Please answer me as quick as possible.Thanks a lot!”Tina Ho

As the iOS 10 version was officially released around the world,many Apple users can’t wait to update their device system to the latest iOS 10 since to experience a variety of enhancements and refinements of it,including a smarter Siri, battery life improvements, split-view multitasking for iPad, media support in Notes app, and more. After updating device to iOS 10,some users reported that the some of the photos and videos in Camera Roll are missing.If you’re an iPhone/iPad user who have encountered the same situation that lost media files on iOS device due to iOS 10 update,this post is good for you.

Get Back Deleted Photos,Videos, Muisc from iPhone with iOS 10 Update

iOS 10 Data Recovery is an all-round recovery program customized for iDevice users to recover deleted media files from iPhone after iOS 10 update,also works well for iPad and iPod touch.It empowers you to restore deleted photos,videos,audio,songs and more media files on iOS 10 device,In addition,this powerful support to recover iOS device deleted contacts, messages,notes,call logs,apps data(WhatsApp/Viber/Kik).Suppose that you’re still looking for the functional and reliable recovery software to get back your lost data, this iOS 10 Data Recovery program meets your special attention.Compatible iOS device with program including iPhone 7,iPhone SE,iPhone 6S/6,iPhone 5S/5C/5,iPad Air,iPad Pro,iPad Mini,iPad 4/3/2,etc,.

d_win d_mac

Part 1:Directly Recover Deleted Photos,Videos from iPhone after Updating to iOS 10

Step 1.Connect iPhone with Computer
Launch iOS 10 Data Recovery on your computer.Use the USB cable that comes with your iOS device to connect your iPhone to computer.By default,iOS 10 Data Recovery will detect your iPhone automatically and show you the window for “Recover from iOS Device”.

recover iphone media file after ios 10 update

Tips:Before running iOS 10 Data Recovery,you’re supposed to download the latest version of iTunes.To avoid the automatically sync,don’t launch iTunes when running iOS 10 Data Recovery.I suggest you disable the automatical syncing in iTunes beforehand: launch iTunes > Preferences > Devices, check “Prevent iPods, iPhones, and iPads from syncing automatically”.

Step 2.Scan iPhone for Deleted Data on it
Click the media file to scan.Then simply click the “Start Scan” button to let this program scan your iPhone to scan for deleted data.The scanning process may last a few minutes.During the scanning process,if you see that the data you’re looking for is there,then you can click the “Pause” button to stop the process.

recover iphone media file after ios 10 update

Step 3.Preview the Scanned Data
The scan will take you some time.Once it’s completed,you can see a scan result generated by the program.Data both lost and existing on your device are displayed in categories. To filter out the deleted data on your iPhone, you can swipe the option “Only display the deleted items” to ON.By clicking the file type in the left side, you can preview the found data.And you can see there is a search box on the top right of the window.You can search for a specific file by typing a keyword in the search box.

Step 4.Recover Deleted Media File from iPhone
When you find the data you need,just check and mark in front of the box to select them.After that,click the “Recover” button at the bottom right of the window.By default, the recovered data will be saved to your computer.(As for text messages, iMessage, contacts, or notes, when you click Recover, a pop-up will ask you to “Recover to Computer” or “Recover to Device”.)

recover iphone media file after iOS 10 update

d_win d_mac

Part 2:Restore iPhone Deleted Photos,Videos from iTunes after Upgrading to iOS 10

Step 1.Choose Recovery Mode
Launch iOS 10 Data Recovery and click “Recover from iTunes Backup File” mode.After that,the program will detect all iTunes backup files on this computer and display them in the window.You can confirm which one is the one you need according to the date it has been created.

Step 2.Scan Data from iTunes Backup File
Choose the iTunes backup file that contains the data you want to recover and click “Start Scan”.It will take a few minutes to extract all data from the iTunes backup file.Please be patient.

recover iphone media file after ios 10 update itunes backup

Step 3.Preview and Restore Deleted Media File from iTunes Backup
After a few seconds,all data in the backup file will be extracted and displayed in categories.You are allow to preview them one by one before recovery.Then you can selectively mark and recover those you want by pressing the “Recover” button at the bottom.

recover iphone media file after ios 10 update itunes backup

Tips:you can see there is a search box in the result window,you can type in the name of a file to search desire data for it.

d_win d_mac

Part 3:Recover Deleted Media File on iPhone after iOS 10 Update via iCloud Backups

Step 1.Choose Recovery Mode
After running iOS 10 Data Recovery,choose the recovery mode of “Recover from iCloud Backup Files” in the main page of program.Then you’ll see the window below.Enter your iCloud account and password to login.iOS 10 Data Recovery promise to protect your privacy seriously.

recover iphone media file after ios 10 update icloud backup

Step 2.Download iCloud Backup File
When you logged into iCloud,the program will find all iCloud backup files in your account.Choose the one where you’re going to recover data and click on the “Download” button.

recover iphone media file after ios 10 update icloud backup

And then in the pop-up page,you should choose the type of files you would like to download.It will reduce the time of downloading the iCloud backup file.After that, you can scan the iCloud content now.Click on the “Scan” button to begin.It will take you a little time to scan.

recover iphone media file after ios 10 update icloud backup

Step 3.Preview and Restore Deleted Media File from iCloud Backup File
The scan will be complete in a few minutes.Once it stops,you are allow to preview almost all data in your iCloud backup file,like contacts, messages, photos, and more.Check them one by one and tick the item you want.Then click on the “Recover to Computer” or “Recover to device” button to save them on your computer or your iPhone with one click.

recover iphone media file after ios 10 update icloud backup

d_win d_mac

Related Article:

2 Ways to Recover Deleted Photos from iPhone and iPad

How to Restore iPhone Photos after iOS 10 Update

3 Ways to Recover Lost Photos from iPhone after iOS 9/iOS 10 Update

How to Recover iPhone/iPad Data after iOS 10 Update

How to Restore Lost Photos from iPhone after iOS 10 Jailbreak

How to Safely Backup iPhone/iPad before iOS 10 Update

How to Mirror and Record iPhone/iPad Screen on Computer

Have you ever wanted to show off your iPhone/iPad game on the big screen, record a demo for your video blog, or record a tutorial of how to use an app more vividly? Outputting – and recording – the screen activity of an iPhone or iPad is not as difficult as you think.

iOS Screen Recorder

It’s sad there’s no free way to do this; but for good quality recordings and incredibly simple operation without any physical cables required, I have to recommend highly for your– iOS Screen Recorder is definitely worth it, it enables audio and video recording of your iPhone/iPad,allow you to enjoy big screen recording and mirroring from your iOS device.Capture your device screen with frames for a realistic feel, or record just the screen for a more direct approach. Anything you do on your iOS device(including jailbroken device) can be recorded and saved for later viewing.Support iPhone,iPad that runs iOS 7.1 to iOS 10.

d_win d_mac

What iOS Screen Recorder Can Help to Do:
1.Share your device screen in computer or projector wirelessly anywhere,for example the classroom or meeting room.

2.Stream audio, play movies, music on big screen, share photos with friends and family,for more big screen gaming experience.

3.Give you the freedom direct your presentations how you really want to.

4.With recording and high quality mirroring app developers can easily showcase projects, create demos and tutorials.

5.Presenters, educators and game players can easily record the live content on their mobile devices to the computer for replay & sharing.

How to Capture Gameplay on iPhone 7/6S/6/5S

Firstly,run iOS Screen Recorder on your computer and click “More Tools” on the left option of the homepage.Here you can see a list of features like below:

ios mirror

Step 1.Connect iOS Device and Computer with the same Wi-Fi network
In order to make your computer and iPhone/iPad connect with the same network,please set Wi-Fi on your computer and connect the Wi-Fi on your device.If your computer is connecting Wi-Fi,then just connect the same Wi-Fi on your device.Then click “iOS Screen Recorder” option, it will pop up the box of iOS Screen Recorder.

connect iphone with ios screen recorder

Step 2.Enable iOS Screen Recorder
For iOS 7,iOS 8 and iOS 9:
Swipe up and click “AirPlay”.Then choose “Dr.Fone” and enable “Mirroring”.

enable dr.fone mirroring

For iOS 10:
Swipe up and tap on “AirPlay Mirroring”.Here you should select “Dr.Fone” and enable “Mirroring”.

enable ios mirror recorder

Step 3.Start to Capture and Record iOS Screen
Here are two buttons at the bottom of the screen on your computer.You can click the left circle button to start to record your iPhone/iPad,and click the right square one to display a full screen.If you want to exit full screen mode,just click the square button or press ESC on your keyboard.You can stop recording your device by clicking the circle button.iOS Screen Recorder will lead you to the folder where saved the record video file at the same time.

ios mirror 2

iOS Screen Recorder help to mirror your iOS device to your computer or projector wirelessly,record mobile games, videos and more on the computer easily.Download it and try to enjoy the iOS mirror tip right now.

d_win d_mac

Read more:

How to Sync Videos from Computer to iPhone 7

How to Rip and Convert DVD Movies for iPhone/iPad

The Best Way to Optimize iPhone For Best Performance

How to Transfer WhatsApp Messages to iPhone 11/XS/XR/X/8/7

“I am a user switched from an iPhone 7 to the new iPhone 11. I would like to continue with my WhatsApp old chats on the new phone.So my question is there any ways to transfer WhatsApp messages from my old iPhone to the new one? Has anyone else dealt with this problem?” -Nancy Gu

Have the same problem as this buddy? Old conversions don’t automatically come with you when you switch to the new mobile device.Luckily, we’ll try to provide you an convenient way to transfer WhatsApp chats from iPhone to iPhone 7. Hope to make your switch a pleasant experience.The following guide is applied for transferring WhatsApp data from iPhone SE/6S(Plus)/6(Plus)/5S/5C/5/4S to 11/XS/XR/X/8/7 efficiently.

Restore Social App – iOS WhatsApp Transfer is a part of iOS Toolkit, which is recommend for you to fix WhatsApp chat history transfer issue between iOS device,you can use it to easily transfer WhatsApp messages from old iPhone to new iPhone 11/XS/XR/X/8/7,including WhatsApp text,photos,videos and attachments.What’s more,this program support to backup and restore WhatsApp data on mobile phones efficiently.Export WhatsApp messages and WhatsApp message attachments to computer and restore the backup to device.Besides,allow to transfer WhatsApp messages to Android devices with simple steps.

d_win d_mac
d_win d_mac

Part 1:Transfer WhatsApp Messages between iPhone with iCloud Backup

Step 1.Connect your old iPhone to a Wi-Fi network.

Step 2. In iOS 8 or later, tap Settings > iCloud > Backup.

Step 3. Tap iCloud Backup to turn it on.

Step 4. Tap Back Up Now. Wait till the backup process is finished. (It may be take you a little while.)

sync whatsapp with icloud

Step 5. Make sure the backup finished by tapping Settings > iCloud > Storage > Manage Storage. The backup you just made should appear with the correct date and backup size.

Step 6. Start your iPhone 7 and restore it from the iCloud Backup your just have created. After that your messages will be available in WhatsApp installed to the target iPhone.

Note: If you have some data on your new iPhone, when you choose “Restore from iCloud Backup” from the old iPhone, you’ll lose the existing data on the new one. Therefore, before restoring the target iPhone from backup, I strongly recommend you to backup photos, music, videos, contacts, etc. to your computer first.(Extra tips:How to backup iPhone data to computer)However,how to transfer WhatsApp history between iPhone without recovered?Just go on to read please.

Part 2:Transfer WhatsApp Messages from Old iPhone to iPhone 7 with iOS WhatsApp Transfer

Step 1.Connect Device to Computer
To transfer WhatsApp messages from old iPhone to iPhone 7,you should click “Transfer WhatsApp messages” under the “More Tools” option of iOS WhatsApp Transfer tool.Then connect your iOS devices to the computer.Once the program detects them, you will get the window as follows.

 iPhone 7 WhatsApp data transfer

Transfer WhatsApp messages from iOS device to iOS device:

transfer-whatsapp-to-iphone-7

Step 2.Transfer WhatsApp Messages between iPhone
Click “Transfer” to begin the WhatsApp message transfer process.Since the transfer process here will erase existing WhatsApp messages from the destination device,you need to click “Yes” to confirm this action if you want to move forward.

transfer whatsapp chat history to iphone 7

Then the transfer process starts.

Wait until the WhatsApp messages transfer task is completed.During the transfer process,you just need to keep your devices are connected well.When you see the window below,you can disconnect your device and view the transferred data on your iPhone 7.

transfe whatsapp messages to iphone 7

d_win d_mac
d_win d_mac

Part 3:Backup WhatsApp Messages from iPhone 7 to Computer

Step 1.Connect iPhone 7 to Computer
To backup WhatsApp messages from iPhone 7 to computer,you should choose “Backup WhatsApp messages” under the “More Tools”option of iOS WhatsApp Transfer, tool.Get your iPhone 7connected to the computer.Then you’ll see the window of the program as follows.

whatsapp-transfer-tool

backup-iphone-7-whatsapp-computer

Step 2.Backup iPhone 7 WhatsApp Messages to Computer
Once your device is detected,you should click “Backup” to start the process.

backup-iphone-7-whatsapp-computer

When the backup begins,wait a little while.The program will finish the process automatically.When you’re told that the backup is completed, you will see the window below.Here, you can click “View it” to check the backup file.

view-whatsapp-backup

Step 3.View the Backup File and Export Data Selectively
Choose the backup file that you want to view if there are more than one backup file listed.

view-whatsapp-backup

Then you will see all the details.Choose any item you want to export to your computer.

export-whatsapp-to-computer

d_win d_mac
d_win d_mac

Part 4:Restore WhatsApp Messages to iPhone 7 from Backups

Step 1.Connect iPhone 7 to Computer
To restore WhatsApp messages to your iPhone 7,you need to choose “Restore WhatsApp messages to iOS device” under the “More Tools” option of iOS WhatsApp Transfer tool.Get your iPhone 7 connected to the computer.Then you’ll see all your backup files listed.

whatsapp-transfer-tool

restore-whatsapp-from-backup

Step 2.Restore WhatsApp Message Backup to iPhone 7
You should choose a backup file and click “Next” to directly restore it to your iPhone 7 as follows.

restore-whatsapp-to-iphone-7from-backup

Or you can choose to view the backup file first,and then selectively choose what you want to restore it to your device by clicking “Restore to device”.

restore-whatsapp-to-iphone-7from-backup

d_win d_mac
d_win d_mac

Related Article:

How to Backup,Restore and Transfer WhatsApp Messages on iPhone 7

How to Transfer Everything from Old iPhone to iPhone 7

How to Transfer WhatsApp Chat History from iPhone to Samsung Galaxy

How to Backup and Restore Contacts,SMS,WhatsApp Messages on iPhone 7

How to Restore LINE Photos & Videos on iPhone

Line is an useful chat application that use for free to send text,photos,videos,audios to others on mobile device.It’s a little bit trouble if someone accidentally deleted the LINE chat history, especially the Line photos and videos.But later request a restore is not as simple as you think, because LINE won’t store any deleted data and files.Once the Line messages got deleted, that are completely removed from the LINE app.

line-app

How to Undelete Line Photos & Videos from iPhone

It’s really no more easier than restoring Line photos & videos on iPhone with iOS Data Backup & Restore Tool,Line messages,audios,contacts,call logs are supported additionally.What’s more,iOS Data Backup & Restore Tool allow to backup Line data(chat history) with attachments from iOS device to computer without data loss.
Here list the applicable iOS device:iPhone 7,iPhone SE,iPhone 6S(Plus),iPhone 6(Plus),iPhone 5S/5C/5,iPad Air,iPad Pro,iPad Mini,etc,.

d_win d_mac

Part 1. Restore Line Photos & Videos on iPhone without Backup

If you have a backup copy your iOS Line chat history, it is very easy for you to restore the data on iPhone or other iDevice.But if you don’t, you can try the first solution to begin restore with iOS Data Back & Restore Tool.

Step 1.Connect iPhone to Computer
First of all,please install the program and launch it on computer.Then select “Recover from iOS Device” on the left pane and connect your device to computer via USB cable that is matched.Now you should go to your device and tap “Trust” on the pop-up window so that the data can be accessed.

Step 2.Choose the Data Types to Restore
When your iPhone is connected successfully,you can see the interface that shows different data types on your device.Here need to choose “App Photos” and “App Videos” and start to scan the LINE data.

choose-line-file-to-scan

Tips:
1. You are allow to recover the deleted data as well as restore existing data to computer. But please notice that the two different types of data recovery support different data types. You can check it on the interface of the program above.
2. For LINE chat history, you couldn’t find the data type on the page. But just choose “App Photos”, “App Videos” or “App Document” and the program can access the App data like LINE, Viber and so on.

Step 3.Preview the LINE Chat History and Export to Computer
The scanning may cost you a little while, please wait for a moment. Once the scanning is done, you can preview the App data.

line-data-recovery-preview

Just click “App Photos > line” to check the photos from LINE chat history. And now you are allow to view the videos in the same way. Please select the photos and videos you wanna restore and click “Export to Mac” or “Export to PC”.

line-data-recovery-export

Step 4.View the Exported Photos and Videos
You are allow to check the exported data on your computer now.

view-line-recovered-data

d_win d_mac

Part 2. Recover Line Photos & Videos on iPhone from Backup

Step 1.Run Program and Connect iPhone to Computer
Please click “More Tools” and connect your iPhone to computer via USB cable.

restore-line-photo-video

Step 2.View the Previous Backup Data
Once your device has been connected, you can see the interface above. Please click “To view the previous backup file” in blue. Now you can see the backup history. Choose the history you need to restore and click “View”.

view-line-backup-file

Note: You are allow to check the details of the backup history including name, model, latest backup data, and file size on the page. It would be easier for you to find out the one you want to restore.

Step 3.Restore the LINE Photos & Video
You can check the Line chat history here. Choose “LINE Attachments” and you can see all the photos and videos are show on the page. Select the ones you wanna restore and click “Export to Mac” or “Export to PC”.

restore-line-photos-videos

As you see, iOS Data Back & Restore Tool support to almost all the data types like contacts, messages, call history, photos, and App data on iOS device.Just download it right now and try to undelete your data on device.

d_win d_mac

Related Article:

How to Backup and Restore Line Chat History

How to Backup and Restore iOS Kik Messages

How to Backup and Restore iOS Viber Messages

How to Backup and Restore iOS WhatsApp Messages