All posts by DHZ

Compare Motorola Razr 2019 vs Samsung Galaxy Fold

The screen of the Motorola Razr smartphone is a 6.2-inch, 21: 9 OLED panel structure, equipped with a Snapdragon 710 processor, a 16-megapixel main camera, and a front-facing camera of 5 megapixels.

Also read:

How to Transfer Data from Samsung to Galaxy Fold

How to Recover Deleted Data on Samsung Galaxy Fold

American IT media CNET reported the comparison of the main functions of the Galaxy Fold and Motorola Razr.

Compare Motorola Razr 2019 vs Samsung Galaxy Fold

Designed by Motorola Razr, more practical

CNET claims that the Razr folding screen mobile phone is more close to the “mobile phone” design than the folding and unfolding method on both sides like a book. In addition, unlike thicker bezels and rounded notchs, the positions of Razr’s camera, bezels, buttons, etc. are more familiar to users.

The Galaxy Fold has a 7.3-inch screen, while the Razr has a 6.2-inch screen, which is relatively small. Therefore, compared to the Galaxy Fold, the Razr has become a tablet and is closer to a smartphone. It is a product that can still be put into a pocket after being unfolded.

Compare Motorola Razr 2019 vs Samsung Galaxy Fold

Folding up and down, the folding traces are relatively inconspicuous

Because the Razr folding screen phone is vertically folded up and down, compared to the Galaxy Fold, the folded part is about 2.8 inches less. Of course, Razr can still see the trace of the folding, but compared to the Galaxy Fold, it is not so obvious.

Samsung Galaxy Fold, you can do more in small screen

Motorola Razr folding screen mobile phone, external auxiliary screen, can provide signal or battery status, and support notification function, can carry out limited functions such as selfie, video call, music playback.

The Samsung Galaxy Fold’s outside auxiliary screen can basically run all Android software, so it can also be traversed when folded.

Razr’s durability is still in doubt

Compare Motorola Razr 2019 vs Samsung Galaxy Fold

CNET said that if you look at the Razr folding screen phone carefully, there are some physical factors in question. Although the hinge design is very good, because some devices are exposed to the inside and outside of the phone, there may be some debris or dust infiltration.

In addition, the Razr phone has some fingernail-shaped grooves, and the screen is separated from the frame, so dust will flow in. The durability of the protective film on the surface of plastic OLEDs has yet to be confirmed.

At Samsung Electronics’ Galaxy Fold, some people had torn off the screen protector in the early stage and had screen damage, and foreign matter had penetrated into the hinge to cause problems. Afterwards, Samsung Electronics directly extended the protective film to the position of the frame, so that users could not easily remove it, and redesigned the chain.

Video experience

Motorola Razr mobile phone has a “chin” on the bottom, so when watching videos in horizontal screen, you can grab the chin, very convenient. However, CNET claims that Motorola’s screen ratio is a 21: 9 ratio called cinema vision, which cannot be balanced for all videos. In addition, when watching videos in the vertical screen state, the screen is too narrow, which is very inconvenient, and you can only get a better experience by watching it horizontally.

Razr camera design structure is backward

The Galaxy Fold is equipped with six high-performance cameras, while the Razr has only one main camera with 16 megapixels and the front camera has only 5 megapixels. This is for video calls.

What about the battery of the Razr folding screen phone?

Compare Motorola Razr 2019 vs Samsung Galaxy Fold

Motorola claims that the battery of the Razr folding screen phone can last for one day, but CNET has questioned the actual battery life. The reason is that the Razr battery has only 2,500mAh capacity. The reference battery performance is not so good. The battery capacity of the Google Pixel 4 phone also reached 2,800mAh, which is higher than the Razr battery.

In addition, the battery of the folding screen mobile phone is disassembled into two. This can form a stable balance when holding a device, but the battery as a whole is more efficient than two batteries. So from the perspective of the Galaxy Fold, a 4,380mAh battery is less efficient than a battery of the same overall capacity.

Galaxy Fold is more excellent in other performance

In addition to the camera, Samsung Electronics’ Galaxy Fold offers a wider screen, a high-performance processor Snapdragon 855, and wireless charging. Supporting 5G in South Korea and the United Kingdom, the internal RAM capacity is also more than twice that of Razr.

Related Articles

How to Recover Photos, Messages, Contacts, WhatsApp on Motorola Phone

Backup and Restore your Android on Computer

How to Erase Data on Android Phone before Selling

How to Recover Deleted Data on Samsung Galaxy Note 10/Note 10+

[Summary]: Deleted data on Samsung Galaxy Note 10? Don’t worry, here is an effective method to recover photos, SMS, contacts, call logs, videos, WhatsApp data and documents from Samsung Galaxy Note 10 or Note 10+.

Samsung Galaxy Note 10 & Note 10+, Samsung Galaxy S10/S10+/S10e is Samsung’s flagship smartphone in 2019, which compete with iPhone 11 Pro, iPhone XS/XR/X, Huawei Mate 30 Pro, P30 Pro, OnePlus 7T PRO, Xiaomi MI 9T PRO, Google Pixel 4XL and other top smart phones. Then the brand new Samsung Galaxy Note 10 or Note 10+ might be a good choice for you, since they both have some amazing cameras as well as feature all the necessities for a flagship smartphone.

Samsung Galaxy Note 10, with a screen size of 6.3 inches, and a 3,500mAh battery inside, this is a phone that you can get some serious work done on. There’s also some excellent audio capability packed in here, with Dolby Atmos and UHQ upscaling included. Whichever part of the Note 10 you look at, it ends up impressing. What really makes the Note 10 stand out on this best Android phones list, though, is that superb S Pen stylus. It’s been improved and upgraded once more this year with a huge 10-hour battery life and new Air Gestures feature, the latter allowing you to control your phone by using the stylus like a wand. Everything from the playback of videos and music tracks, to the browsing of websites, and onto the control of the phone’s camera can now be undertaken with a flick of the wrist.

Lost or Deleted Data on Samsung Galaxy Note 10/Note 10+?

However, there are many other reasons could cause data loss, like virus attack, OS update, accidental deletion etc. If you are the one who are suffering from the trouble of data loss as mentioned above, then you might be at stake with your new Samsung Galaxy Note10 or Note10 Pro. As your smartphone is precious to you, so is the data in it. To help you get rid of this trouble, we will be telling you about a few Samsung Galaxy Note 10/Note 10+ Data Recovery software and apps that help you to recover deleted files from Samsung Android internal memory without any hassle.

Before we get into what is going on, we will have to cover some tips on Samsung Note 10 data recovery:

As a matter of fact, they were not really gone from your Samsung phone, but marked as useless and hidden on device, which could be overwritten by the new data. Don’t use your Samsung phone once data lost, as the deleted data may be overwritten by new content, because the data is still on the device and you can get them back with the help of Android Data Recovery tool. To avoid overwritten the deleted data, you had better stop using your phone and try to recover your lost files ASAP.

U.Fone Android Data Recovery: A Samsung Galaxy Note 10/Note 10+ Data Recovery

Thanks to Android open nature, you are able to easily recover deleted files from your Samsung Galaxy Note 10/Note 10+ by using a 3rd Android Data Recovery software.

This Android Data Recovery is a good helper for you to recover your deleted data from Samsung Galaxy Note 10/Note 10+, Galaxy Note 9/Note 8/Note 5/Note 4, etc. It can recover all kinds of files, including photos, contacts, SMS, videos, audios, call history, WhatsApp chat history, documents and other files from Samsung phones, as well as recovering lost data from Android SD card. This Android Data Recovery supports multiple Android phones and tablets, like Samsung Galaxy J Series, S Series, Note Series, Y Series, Huawei, LG, HTC, Sony, Google Pixel, Nexus, OnePlus, Motorola, Xiaomi, Redmi, Oppo, Meitu, Windows Phone, Sharp phones and so on.

The Broken Android Data Extraction can help you recover Samsung lost data due to different issues, like accidentally deletion ,broken device, water damaged, virus attack, or have its system crashed, it also enables you fix Android OS to normal if your phone gets bricked.

After rooting your Android devices, this Android data recovery can help you recover data from any Android devices. In addition, the software provides the feature to display all deleted and existed information in detail, you can check them one by one to make sure those deleted data still store in the phone, not completely removed or overwritten by new files, then you can mark all deleted call logs, contacts and SMS you need and selectively restore and save them to computer for printing, or you can restore the contacts, photos, videos and other files back to Android devices for view or use.

In addition to the above functions, you also can use it to extract data from broken Samsung Galaxy Note 5/Note 4/Note 3/Galaxy S6/S5/S4 or fix your phone issues like frozen, crashed, black-screen, virus-attack, screen-locked, get the phone back to normal.

What’s more, the Android Toolkit also can help you backup and restore data on your Samsung Galaxy Note 10/Note 10+, including SMS, contacts, call logs, WhatsApp data, pictures, videos, audios and documents.

Now you can download the trial version to get your Android lost data back.

d_win d_mac
d_win d_mac

How to Restore Deleted Data from Samsung Galaxy Note 10/Note 10+?

Step 1: Connect Samsung Note 10 to computer
After installing the software properly on your computer, open it and you will get an easy-to-navigate interface with three tabs on. Since you’re going to recover deleted files from Android internal storage or memory card, go with the mode labeled “Android Data Recovery” and move on.

Samsung Galaxy Note 10/Note 10+ Data Recovery

Then, connect your Samsung Note 10 to computer using a USB cable.

Step 2: Enable USB Debugging to scan your phone
Once detected, the program will present you with simple instructions to turn on USB Debugging Mode on your phone. If you’ve done this before, skip to Step 3.

For more details, you can also refer to How to Enable USB Debugging Mode on Android.

usb debugging Samsung Galaxy Note 10

Step 3: Choose Types of Data to Recover
In next window, you’ll be prompted to select which types of data you want this Android file recovery software to search. please pick only the types you wish to recover, so we can speeds up the scan process.

Click the Next to go on.

choose data types to recover

Step 4: Go to root permission for a complete scan
The program will check the device information and perform a basic scan of the device. If it can’t find the files you need, it’s suggested that you root the phone to access to the full Android system. (You can unroot the device after the recovery task.)

To do so, click the Rooting Tools button at the lower right position. At this point, you will be taken to an external website to download a free Android rooting tool — KingoRoot to root the Samsung Galaxy Note 10.

[Also Read: How to Safely Root and Unroot an Android Device with KingoRoot ]

root Samsung Galaxy Note 10

After you’re rooted, this Android Data Recovery software will begin running a deep scan of your Android’s phone memory and SD card to search for the deleted Stuff. Please be patient.

Step 5: Preview and recover deleted files from Galaxy Note 10
When the scan is done, you can preview and sort the list of data files accordingly on the screen.

You can toggle the button to ON position on the top of the screen to display only the deleted items. It also offers an advanced search option in the upper right corner to help you quickly locate what you want from the results.

recover deleted data from Samsung Galaxy Note 10

To get back the deleted data files from Samsung Note 10, just check the boxes next to items you want and then hit “Recover” button.

d_win d_mac
d_win d_mac

Well done, you have recover data from Samsung Galaxy Note 10, all files saved onto your computer, if you want to import the files to your Note 10 for using again, you can use this Android Transfer tool to transfer them to your phone easily.
Also read: How to Import Files from Computer to Samsung Galaxy Note 10/9/8

Related Article

How to Recover Deleted Photos on Samsung Galaxy Note 10/Note 10+

How to Recover Deleted Files from Samsung Galaxy Note 10

How to Transfer Data from iPhone to Galaxy Note 10/Note 10+

How to Recover Photos, Messages, Contacts, WhatsApp on Motorola Moto G7

[Summary]: Looking for ways to recover deleted data from Motorola Moto G8, G7, G6, G5, G4, G3 or other mobile phones? Here is a Motorola data recovery app that can help you recover deleted photos, messages, call logs, contacts, WhatsApp messages and documents from Motorola Moto series.

Which is the most most affordable and reliable Android phones of 2019? Motorola Moto G7, OnePlus 7 Pro, Google Pixel 3A, Samsung Galaxy S10E, Samsung Galaxy Note 10 Plus, all is a good choice; which is the best Android phone right now? Of course, these are the best Android phones of 2019: SAMSUNG GALAXY S10 PLUS, HUAWEI P30 PRO, HUAWEI Mate 30 PRO, ONEPLUS 7T PRO, SAMSUNG GALAXY NOTE 10, XIAOMI MI 9T PRO, HUAWEI MATE 20 PRO, GOOGLE PIXEL 4, NOKIA 9 PUREVIEW, SONY XPERIA 5, HTC U12+ and XIAOMI MI NOTE 10.

The exciting thing for any prospective shopper right now for a quality Android phone is that, thanks to the Black Friday sales, there are plenty of awesome handsets currently retailing for truly bargain price points. If you make sure you do your homework properly and shop smart, chances are you’ll be able to narrow down the perfect Android phone for you. If you want to buy a cost-effective Android phones, I recommend Motorola Moto G7, which is one of the most affordable and reliable Android smart phone, though G7’s single speaker doesn’t offer the greatest sound, and it takes mediocre low-light photos and video, the G7 has dual rear cameras, an enduring battery life and a sleek design, it also charges really quickly, the Motorola Moto G7 with 64GB Memory may about cost $299.99 on US.

When you have got Motorola Moto G7, you may often take photos with it’s dual rear cameras, but when you deleted photos on Moto G7 by accidentally, or lost contacts, SMS, call logs and other data after factory reset Moto G7. However, it faces the same data loss issues as other Android phones. So, how to recover deleted data from Motorola phone has become one of the most concerned topics.

This does not require much technical expertise to recover data from Motorola Moto G7, G6, G5 or other Android phones . Below, we’ll cover the easiest way, and you can easily recover deleted and lost data on Motorola G series phone.

Is it Possible to Recover Deleted Data from Moto G7

When you deleted files on your Moto G7, G6, G5, G4, G3, the Android OS only removed the pointers to the files and marks the memory space containing the files as blank and available for use. In other words, the deleted data does not erased permanentl. Actually, the deleted data are still on the phone memory, until it overwrite and replace with other data. With the help of a professional Moto data recovery tool, it is entirely possible to recover deleted files from Motorola mobile phone.

Motorola Data Recovery Solution: Recover Deleted Data on Motorola series

This Android Data Recovery is a powerful Motorola data recovery app. With it, users can recover deleted or lost contacts, call logs, messages, photos, videos, audios, WhatsApp messages and What’sApp cal logs, etc., from Moto G7, G6, G5 as well as other Android phones quickly. What’s more, this Android data recovery tool is highly reliable and really easy to use. You can view the step-by-step guide below to learn how to use this Android Data Recovery to recover deleted data from your Motorola Moto G7.

d_win d_mac
d_win d_mac

Guide: Process for Motorola Moto G7 Data Recovery

Step 1: Run the Android Toolkit
Download the utility with appropriate version on any PC (or Mac) firstly, install it.

Open up the software, and in its main interface, choose “Android Data Recovery” mode.

Android SMS Recovery

Step 2: Connect Moto G7 and allow USB Debugging on it
Plug your Moto G7 into computer. Tap “Allow” when prompted on the phone.

Then you’ll need to have USB debugging mode enabled on your Moto G7 to grant your access to it. You can turn to this article for help: How to Enable USB Debugging Mode on Android Device. If you have done this before, skip to next step.

usb debugging OnePlus 7T/7T Pro

Step 3: Choose types of data files to scan
On the next interface, choose what you’d like to scan for the lost files in the Moto G7 storage. For this case, check the “Contacts”, “Text Messages”, “WhatsApp Messages”, “Picture Library”, “Gallery”, “Call Logs”, “Documents” option and click the Next button to proceed.

Restore Moto G7 Delete Data Files

Now the tool starts to analyze the phone and then scan it for all your files.

You should be prompted to root the device for a deep analysis of the lost stuff. To do this, press “Rooting Tools” button and get KingoRoot app on a browser webpage.

Read “How to root and unroot an Android Device” for full tutorial.

root Moto G7

Once rooted, the program continues scanning Moto G7. This will take some minutes.

Step 4: Preview and Recover Lost Data from Moto G7
When the scan completes, the app shows a tidy interface with a clearly organized menu of content types that you can view, and if you switch on “Only display the deleted items”, you’ll get to what you’re looking for.

recover deleted phoots on Moto G7

Select the contents you are going to retrieve, and click “Recover” button on the bottom right.

Recover Lost Data on Moto G7

A dialog will open. From there, choose a folder on the computer as the recovery destination.

After that, press Recover button to get back the files and save them locally. Done!

d_win d_mac
d_win d_mac

How to Put iPhone 11/11 Pro, iPhone XR/XS/X into Recovery Mode

[Summary]: Want to put the iPhone XS, XR, XS Max, or iPhone X into recovery mode or DFU mode to restore with iTunes or macOS Finder (for Catalina and later), or to fix ios system to normal? This article teach you how to enter recovery mode or exit recovery mode on iPhone XR, XS, XS Max, iPhone X, iPhone 8/8 Plus.

Sometimes you may put your iPhone into Recovery Mode to effectively restore the device, fix iPhone stuck on Apple logo screen/black screen of death, remove iPhone screen passcode(unlock iPhone) and fix various ios system error.

If your iPhone XS, XR, XS Max or X is stuck on the Apple logo for an extended amount of time and does not boot, is stuck on the iTunes logo with a USB cable, or if the computer is not recognizing the iPhone. When in Recovery Mode, the iPhone XS, XR, XS Max, or X can be restored directly with iTunes or macOS Finder (for Catalina and later), but it will erase all iOS data and settings when your using iTunes/macOS Finder to restore the devices.
Also read: How to fix iOS to normal without data loss

How to put an iPhone XR, iPhone XS, iPhone XS Max, or iPhone X into recovery mode? This article teach you how to enter or exit recovery mode on iOS 13 devices, If you have an older iPhone, then follow the instructions for putting older iPhone models into Recovery Mode instead.

enter recovery mode on iphone xs, iPhone 11 pro

What to do before putting iOS 13 devices into recovery mode

1. A Apple USB cable
2. A computer with the latest version of iTunes, or MacOS Catalina or later
3. Update iTunes to the latest version before attempting to use Recovery Mode.
4. Backup your iPhone data, because using recovery mode or attempting to restore without a backup can result in permanent erase your data.

How to Put iPhone XR, XS, XS Max, X, 8, 8 Plus into Recovery Mode

Backup your iPhone data before beginning. Failure to have an available backup may lead to permanent data loss from the iPhone.

Step 1. Connect the iPhone XR, iPhone XS, iPhone XS Max, or iPhone X to a computer with a USB cable
Step 2. Open iTunes on the computer (Mac or Windows, or in macOS Catalina open Finder)
Step 3. Press and release Volume Up on the iPhone
Step 4. Press and release Volume Down on the iPhone
Step 5. Press and continue holding the Power button until the iPhone XR, XS, XS Max, X is in recovery mode

Put iPhone 11/11 Pro, iPhone XR/XS/X into Recovery Mode

iTunes (or Finder) will show an alert stating an iPhone has been found in Recovery Mode
After the iPhone has entered into Recovery Mode, you can update the iPhone XR, XS, XS Max, X with the latest available iOS release, or restore with iTunes (or Finder) as usual either with a backup or by setting the device up as new.

An iPhone in recovery mode can also be restored by using IPSW if needed, as long as the IPSW file is actively being signed by Apple and matches the specific iPhone XR, XS, XS Max, X model. You may find iOS IPSW files here for the latest iOS versions.

How to Exit Recovery Mode on iPhone XR, XS, XS Max, X

Exiting Recovery Mode happens automatically once the iPhone is restored or updated, but you can also exit recovery mode without restoring by issuing a force reboot to the iPhone XR, XS, XS Max, X as follows:

Step 1. Disconnect the iPhone XR, XS, XS Max, X from the computer
Step 2. Press and release the Volume Up button on iPhone
Step 3. Press and release the Volume Down button on iPhone
Step 4. Press and hold the Power button on iPhone, continue to hold until you see the  Apple logo appear on iPhone screen
Step 5. Exiting Recovery Mode will return the iPhone to whatever the prior state was before it was placed into recovery mode in the first place. If the iPhone was stuck on the ‘connect to iTunes’ screen anyway, then it won’t boot back into the normal home screen or lock screen.

All other iPhone (and iPad) models can also enter into recovery mode is needed for troubleshooting purposes, but the steps to do so differ per device.

Additionally, DFU mode is available for when Recovery Mode is not working to restore a device. DFU mode is a lower level restore mechanism but is rarely needed.

Looking for a safe way to fix your system problem? Please keep reading the below effective guide, you need to free download an iOS system recovery to repair your iPhone software problem.

Repair All iPhone Problems with iOS System Recovery(No Data Loss)

If you’re having trouble with your iPhone or iPad – for example: iPhone Stuck in Recovery Mode, iPhone Stuck in Spinning Circle, iPhone Stuck on Apple Logo, White Screen of Death, Black Screen of Death, iPhone Frozen, iPhone Boot Loop, iPhone Won’t Turn On, iPhone Restore Failure, iPhone Update Failure, or you can’t get it out of recovery mode – this reliable iOS system recovery software is exactly what you need.

This iOS System Recovery is expert at fixing your iPhone/iPad/iPod touch device when you cannot enter the system in normal way and compared with iTunes, the iPhone fix tool can repair with various iOS system issues like white Apple logo, boot loop, recovery mode, DFU mode, etc. Besides, it can fix your iOS system without data loss. What’s more, it also can help you downgrade iOS without iTunes through downloading and installing IPSW firmware, no data loss at all.

Main Features of iOS System Recovery

  • Enter & Exit Recovery Mode With One Click, No Data Loss
  • Fix 50+ iOS System Problems without Data Loss
  • Factory Reset iPhone/iPad without iTunes/Password – Unlock iPhone
  • Supports all iOS versions and devices including the latest iOS 13 devices
  • Works well with Windows and Mac computer

d_win d_mac
d_win d_mac

How to Fix iPhone Stuck in DFU Mode

Step 1: Launch the iOS Toolkit on PC or Mac
Run the software on your computer and connect your iPhone to the computer via a USB cable.

connect iPhone to computer

Step 2: Click “iOS System Recovery”
You’ll see there are three main functions: iPhone Data Recovery, iOS System Recovery , iOS Data Backup & Restore. To fix the iPhone stuck in DFU mode, click the More tools and click “iOS System Recovery“.

launch iOS System Recovery

The iOS System Recovery can hep you fix iPhone stuck on recovery mode, headphones mode, DFU mode, etc. Then, hit the “Start” button at the lower right corner to go on.

select iOS Mode issues option

Step 4: Choose a Repair Mode
You then will get into a new window, like the screenshot below. Please select “Standard Mode” or “Advanced Mode” to fix your iPhone device, then click “Confirm” to go on.
“Standard Mode” – Fix your device with this mode, all data on your device will not be lost.
“Advanced Mode” – Fix your device with this mode, it will erase all data on your device.
Suggest that you go to the advanced mode only if the standard mode fails.

iPhone fixing mode

Step 5: Enter Recovery Mode
If your iPhone stuck on recovery mode, please skip this step. At this point, follow the instructions on the window to put your iPhone into recovery mode, you also can follow the below instructions to enter recovery mode on iPhone 11/11 Pro, iPhone XR/XS/X, iPhone 8 and iPhone 8 Plus.

put iPhone into DFU mode

Step 6: Select Firmware to Download
Select a suitable ios firmware package and start to download.

Select Firmware - iOS 13/12/11/10

Step 7: Download Firmware Package for Repair your iPhone
The software start downloading firmware package and fix your iPhone device.

Download Firmware - IPSW files

Step 8: Repair the iPhone in Recovery mode or DFU mode
After downloading firmware package completed, then just click the “Repair” button at the lower right corner. The software starts the process of restoring your iPhone.

fix iPhone stuck in recovery mode

When it’s done, your iPhone will boot up automatically and get back to normal.

d_win d_mac
d_win d_mac

Conclusion

This powerful iOS Toolkit is not only able to fix iPhone stuck on recovery mode or DFU mode, but also allows you recover lost and deleted data from your iPhone/iPad/iPod touch, such as messages, photos, video, contacts, and more. Even better, you can backup your iPhone data to your computer or external hard drive to in case your iPhone is lost, damaged or stolen.

Your May Want to Know

How to Fix iPhone Stuck in Recovery Mode After iOS 13 Update

How to Fix an iPhone iPad Stuck on Apple Logo

How to Recover Lost Data from iPhone after iOS 13 Update

How to Recover Deleted Data on iPhone 11/11 Pro

Repair iPhone on Recovery Mode

How to Unlock Huawei, Xiaomi, Lenovo, Motorola, and OnePlus: Forgot Password (Pattern/PIN Code)

[Summary]: Forgot your phone screen password, Pattern or PIN code? Don’t worry, this article shows you the best and most effective way to remove screen password(Pattern/PIN code) on Samsung, LG, Huawei, Motorola, Xiaomi, Lenovo and OnePlus.

You may want to know:

* How to Unlock Samsung Phone

* How to Unlock LG phone

My Huawei P20 was locked due to I abandon it for more that 6 months, I want to use it again, but I forgot the screen password, how to unlock Huawei phone locked screen without password?

I got a send-hand Motorola mobile phone, but the phone is locked and I don’t know the lock screen passcode, how to unlock Motorola phone password without factory reset?

I forgot my Samsung phone’s pattern, PIN or password, how to bypass Samsung lock screen without reset?

How do i unlock my LG phone if i forgot the pattern? Is it possible to unlock a LG phone without data loss?

You may encounter the above issues, may people search in Google to find an effective solution to unlock their phone when forgot password , pattern or PIN, if you forgot password (pattern/PIN code) on Android phone, you can unlock your phone screen password with a third-party Android Unlock tool.

Currently, there are various brands of Android phones, if you forgot the phone passcode and want to remove lock screen password, for different Android phones, the methods to remove the phone screen passsword varies. Here, we teach you the most simple and effective way to bypass the forgotten screen passsword.

Unlock Samsung/ LG/ Huawei/ Xiaomi/ Lenovo/ Motorola/ OnePlus Password, PIN, Pattern Lock

The Android Unlock tool is a part of Android Toolkit, this Android Lock Screen Removal enables you to unlock Huawei, Xiaomi, Lenovo, Motorola, and OnePlus phone screen passcode in 5 minutes, but it will delete your data on those Android smart phones. What’s more, it also can unlock Samsung and LG phone without data loss, such as LG G2, G3, G4, Samsung Galaxy S/Note/Tab series, etc.

More Features:

  • Remove pattern, PIN, password and fingerprint on Android phone;
  • Unlock Android phone if you forgot the screen passcode;
  • Unlock an Android phone with locked screen;
  • Unlock a broken screen Android phone;
  • Unlock Samsung and LG phones, no data loss at all;
  • Unlock Huawei, Xiaomi, Lenovo, Motorola, and OnePlus phone, data erased;
  • Supports all major carriers like AT&T, T-Mobile, Verizon, Sprint, etc;
  • Supports recover the text messages, contacts, photos, videos, documents, audio, WhatsApp messages from Android devices.

d_win d_mac
d_win d_mac

How to Unlock your Huawei, Xiaomi, Lenovo, Motorola and OnePlus smartphone

Step 1. Launch Android Toolkit
To get started, launch the Android Toolkit and simply click on “Unlock”.

samsung lock screen removal

Step 2. Connect your Android Phone to Computer
To remove screen passwords, pins and pattern lock of your Android phone. Just connect your phone and click on the Start button to begin the process.

connect android to computer

Step 3. Enable the Download Mode on your device
To do this follow the simple instructions to get your Android smartphone into the Download Mode.

1. Power off your Samsung smartphone.
2. Press the home button + volume down button + the power button at the same time.
3. Press the volume up button to enter the download mode.
Step 3: Simply download the recovery package.

enter download mode lock samsung

Step 4. Download Recovery Package
Once your phone goes into the download mode, it will start downloading the recovery package. You have to wait until it is fully completed.

downloading recovery package

Step 5. Start Unlocking Android Lock Screen
Your phone will not have any lock screen password as soon as the recovery download package is completed. This process won’t hurt any data on your Samsung and LG device, except for Huawei, Xiaomi, Lenovo, Motorola, and OnePlus smartphone. Once this whole process is done then you can access your phone without entering any type of password or pattern lock.

remove android screen passcode

Free download the Android Toolkit – Android Unlock to remove pattern, PIN, password & fingerprints of your Android phone.

d_win d_mac
d_win d_mac

Conclusion

This Android Lock Screen Unlock tool can remove passcodes of pattern, PIN, password and fingerprint during install the recovery package, your phone will restart after the downloaded recovery package installed completed, then you are able to reset your phone and access it.

Please note that: For Samsung or LG smart phone, you can use this Android unlock tool to remove the lock screen password, it won’t erase your data of Samsung or LG device, but for Huawei, Xiaomi, Lenovo, LG, Samsung, Motorola, OnePlus other Android devices, it will delete your data. However, you can try to recover lost data on Android.

Above solutions can help you perform Unlock Android and regain control over your Android device. If you want to unlock iPhone/iPad/iPod Touch, UkeySoft Unlock is a wonderful product and should be used and recommended by iOS users. Since it supports all iOS devices, you can use UkeySoft Unlock to remove screen passcode and Apple ID on iPhone, iPad, and other iDevices as well.
Also read: How to unlock iPhone/iPad/iPod touch

How to Reset Locked/Disable iPhone iPad without Passcode

[Summary]: Your iPhone/iPad locked or even disabled? Don’t worry, this tutorial shows you how to reset your locked iPhone or iPad without passcode.

Hi, I got a second-hand iPhone 7, but it is showing a message saying: “iPhone is disabled – connect to iTunes”, how to unlock a iPhone without passcode?

iphone is disabled locked

Your iPhone was locked but you forgot the passcode? When you enter the wrong passcode on your iPhone more that 6 times continuously, you will get a message pop up on your iPhone: “iPhone is disabled, try again in 1 minute”. Once you forgot the passcode of your iPhone, how to unlock your disable iPhone? How to reset locked iPhone without passcode? Let’s learn how to reset your screen locked iPhone.

How to Reset Locked iPhone without Passcode – iOS 13 Device Supported

When you forgot your iPhone/iPad lock screen password or you locked the device after too many wrong attempts. Don’t worry, this iOS Toolkit – Unlock (iOS) can help you to unlock iPhone screen lock without knowing passcode, it also enables you unlock your Apple ID with a few clicks, the software supports iPhone XS (Max) / iPhone XR / iPhone X / 8 (Plus)/ iPhone 7(Plus)/ iPhone6s(Plus), iPhone SE and the latest iOS 13 version.

Free download iOS Toolkit – Unlock (iOS) and try to reset your disable iPhone on Windows/Mac computer.

d_win d_mac
d_win d_mac

Steps to Reset a Locked iPhone (without Password)

Step 1. Launch the iOS Toolkit on PC or Mac
Please download, install and run the iOS Toolkit on your computer and click “Unlock” among all the tools.

ios locked screen removal

Step 2. Connect your iPhone to Computer
Connect your iPhone device to the computer with a USB cable. Then click “Unlock iOS Screen” on the program.

unlock iOS and Android

Tips: The software also can help you unlock Android phone with few steps.

Step 3. Put iPhone into Recovery mode or DFU mode
The software need to download the iOS firmware package to unlock your iPhone, since your iPhone is disable and lock, you need to boot iPhone in recovery mode or DFU mode firstly, then the software will helps you download firmware package. Please follow the instructions to put your iPhone into recovery mode or DFU mode.

Choose your device model “Other iDevice,” “iPhone 7/7 Plus” or “iPhone 8 or Later” on the top bar. Then follow the instruction on how to put your device into DFU mode.

Put iPhone into dfu mode

Step 4. Confirm your iPhone Model and System Version
When your iPhone stuck in DFU mode, the software will display the iPhone device information, then select the latest iOS version that your iPhone supported from the dropdown lists. Then click “Download” the download the iOS firmware package for your iPhone.

Put iPhone into dfu mode

Step 5. Start to Unlock and Reset your Disable iPhone
After the firmware is downloaded successfully, click “Unlock Now” to start remove passcode from your disable iPhone, this software will reset your iPhone during unlocking process.

unlock Disable iPhone

Step 6. Restart Your iPhone
After unlocking your iPhone successfully, it will take a few minutes to restart your device, you need to re-set up your device and then access the system.

remove passcode from disable iPhone

Note: It will erase the data on your iPhone/iPad during unlocking process. Honestly there is no solution to unlock iPhone/iPad without data loss for the moment in the market. So, we recommend you backup your iPhone/iPad data to computer regularly.

d_win d_mac
d_win d_mac

Unlock Disable iPhone

How to Recover Deleted Files on Huawei Mate 30/P30(Pro)

[Summary]: Want to recover photos, contacts, messages, WhatsApp messages and video from Huawei Mate series or Huawei P series mobile phone? You can free download Huawei data recovery software and recover deleted photos, pictures, videos, music, SMS, contacts, call logs, WhatsApp data back.

This year, Huawei released the Huawei P30 series Huawei Mate 30 series smartphones. The Huawei P30 Pro is equipped with the Lycra four cameras, making it the best camera mobile phone in the world. Recently, Huawei released the Huawei Mate 30 Pro, which equipped with the Kirin 990 processor, Mate 30 Pro not only improved the camera, but also equipped with a frameless screen, which has also changed greatly in design, and also supports dual-mode 5G group. Net, in the 5G aspect of the overall leading competitors. The camera capabilities of the two mobile phones are very powerful. The Huawei P30 Pro is 40 million Leica four cameras, and the Mate 30 Pro comes with a dual 40 million Leica four camera. At present, the two Android mobile phones ranked fourth in the DXO rankings for Huawei P30Pro, with a score of 116; Mate 30 Pro ranked first with a score of 121. In fact, the gap is not very large, and daily use does not reflect the difference, both two Android smart phones are top camera phones.

You may want to know:

How to transfer WhatsApp from iPhone to Huawei Mate 30/P30(Pro)

How transfer iOS/Android data to Huawei P30/P30 Pro

CONTENTS

If you have got an new Huawei Mate 30 or P30 and like to use the built-in camera to take pictures and videos, you may have stored a large number of pictures and videos in the device’s photo library. Although Huawei Mate 30 Pro and Huawei P30 Pro are top Android smart phones, when the mobile phone is used for a long time, the Android OS will become slower and slower, because the Android system is an open source mobile phone system, and some garbage software is automatically installed in the mobile phone. If you stored a large numbers of files on the phone internal memory, your phone will run more slower, you may deleted some photos, videos and other large files to free up some space on your Huawei phone. Unfortunately, if you deleted the photos and videos mistakenly, how to recover deleted photos & videos on Huawei Mate 30/P30(Pro)? Once you lost contacts, messages, call logs after factory reset Huawei Mate 30/P30(Pro), how can you restore lost data from Huawei phone? Sometimes, you may deleted WhatsApp messages by careless, is it possible to recover lost WhatsApp messages from Huawei Mate 30/P30(Pro)?

Losing Android data is an annoying thing, but don’t panic. This article will teach you how to recover lost and deleted data from Huawei phone. We’ll be showing you how to recover deleted photos on Huawei Mate 30, Mate 30 Pro, Mate 30 5G, Huawei P30, P30 Pro with few simple ways.

Method 1: Recover deleted photos and videos from Google Photos app

Google Photos app is build-in most Android device, which allow users easily to sync photos and videos to Google Cloud for backup. If you have back up photos and videos from Huawei device to Google Photos app, if you haven’t delete them, you can recover deleted photos & video within 60 days. Let’s shows you how to restore deleted photos & videos from Google Photos app to Huawei phone directly.

Step 1. Open the Google Photos app google photo app on your Huawei phone.
Step 2. At the top left, tap Menu menu and then Trash trash.
Step 3. Touch and hold the photo or video you want to recover.
Step 4. At the bottom, tap Restore.

restore huawei photos from google photos app

The photo or video will be restored to your Huawei phone:
Now, you can find the restored pictures and videos
In your phone’s gallery app
In your Google Photos library
In any albums it was in

Note: If the item is not in your trash, it means your backed up photos & videos has been deleted permanently. In addition, if you haven’t synced your photos & videos to Google Photos app, you can’t recover them from Google Photos app.

Don’t worry, you still have chance to recover deleted photos and videos from Huawei phone without any backup, as well as messages, contacts, call logs, WhatsApp messages and other documents. Let’s shows you an effective method to recover deleted files from Huawei Mate 30, Mate 30 Pro, Mate 30 5G, Huawei P30, P30 Pro by using Huawei data recovery software.

Method 2: Recover Deleted Data from Huawei Mate 30/P30(Pro) Internal Memory

Actually, you can still recover the deleted data from your Huawei phone so long as they are not overwritten by new data, if those deleted/lost data haven’t be overwrote and haven’t covered by the new data, you can directly to retrieve deleted data before they are overwritten. Since those deleted data are stored in a hidden folder of your phone memory, which can’t be accessed by regular file explorer, only after rooting your Android phone, then using a professional Huawei data recovery software to gain access to the deleted data and recover them back.

The Android Data Recovery can help you Android data lost due to deletion, upgrade, formatting, or some other issues. It not only can help you recover recover deleted photos, videos, audios, WhatsApp, text messages, contacts, call logs and documents from Huawei Mate 30/P30(Pro) after rooting, but also allows you recover deleted data from microSD card.

Features:

  • Recover lost data by scanning your Huawei phone directly.
  • Preview and selectively recover what you want from your Huawei phone.
  • Recover WhatsApp Messages,Messages & Contacts & Photos & Videos & Audio & Document.
  • Fix bricked Android phone to normal.
  • Extract data from Samsung phone with broken scree, black screen, locked screen, etc./li>
  • Backup data from Huawei phone to computer, and restore them to other Android devices.
  • Supports 6000+ Android Device Models & Various Android OS, including Huawei Mate 30/P30.

d_win d_mac
d_win d_mac

How to Recover Deleted Photos from Huawei Mate 30(Pro) and Huawei P30(Pro)

Step 1: Run Android Toolkit and Connect Huawei Mate 30 or P30
To recover photos from Huawei Mate 30, connect the Huawei phone to computer through a USB cable and launch the program. Then go with the “Android Data Recovery” mode on the interface.

Huawei Mate 30/P30 data Recovery

Step 2: Allow USB Debugging mode on the Huawei Mate 30
Once connected, you’ll be required to open USB debugging mode on the device. Follow the on-screen instructions to enable it.
Related Article: How to switch on USB Debugging mode on Android device.

usb debugging Huawei Mate 30 or P30

Operating procedure on your Huawei Mate 30 handset: Open Settings > About phone > Build number, tap it for 7 times to enable the Developer options. Then go back to Settings > Developer options, and scroll down the screen until you find the USB debugging switch, toggle it to ON position.

Step 3: Select Type of Data to Scan
Then, choose the type of data you’re looking to recover. In this example, check “Gallery” and “Picture Library” and click Next button.

recover photos on Huawei Mate 30

Step 4: Root Huawei Mate 30 for Deep Scanning Lost Photos
At this stage, you have to root the Huawei phone phone so that the software can go deeper into the memory and scan the lost photos. To do this, click “Rooting Tools” button to download a tool named KingoRoot and let it root your phone.

For more information, please consult the article: how to safely root and unroot an Android device.

Tips: Please don’t worry, you also can get your phone back to unroot status after getting the data back.

root Huawei Mate 30

Then, please click “Retry” button after you phone has been rooted successfully. The Android data recovery start scanning Huawei smartphone deeply for lost and deleted photos, it will last for 15-20 minutes approximately, please be patient.

Step 5: Recover deleted photos from Huawei phone gallery and picture library
After the scan, all found pictures appear on the window. You can click them one by one to view the pictures.

Next, check the boxes next to each photo you want to recover from Huawei phone, and click “Recover” button to get deleted pictures back from Huawei Mate 30.

recover deleted phoots on Huawei Mate 30

In the pop-up window, choose an output folder to save the photos on the computer, only few minutes, all of your lost photos will be saved onto the computer.

Step 6: Import the Recovered Photos and Videos to Huawei Phone
If you want to transfer those recovered pictures, videos, music and contacts to Huawei phone for viewing or using, we recommend you use this iOS & Android Manager tool to import files from computer to your Huawei phone, this useful phone manager tool also can help you backup Android data to computer.
Also read: Transfer Music, Video, Photos to HUAWEI Mate 30/30 Pro

transfer photos to huawei mate 30

Free download the Android Toolkit – Android Data Recovery and try to recover your Huawei data.

d_win d_mac
d_win d_mac

How to Transfer WhatsApp Messages from iPhone to Huawei Mate 30/30 Pro

[Summary]: Want to copy WhatsApp messages from iPhone to new Huawei Mate 30? Here 3 ways to transfer WhatsApp messages from iPhone or Android phone to a Huawei Mate 30 or Huawei Mate 30 Pro or Huawei Mate 30 5G.

WhatsApp is the most online chat app available on both iPhone and Android smartphones. With over a billion downloads, when you have got an new Huawei Mate 30, Samsung Galaxy S10, iPhone 11 Pro or other top smart phones, you may install WhatsApp app on your phone to share messages, images and audio messages with others. If you used iPhone and have already switch to Android phone, how to transfer WhatsApp messages from iPhone to Android phone?

transfer whatsapp messages from iphone to huawei mate 30

This article main teach you how to transfer WhatsApp chat history/messages from iPhone to Huawei Mate 30 by using a 3rd iPhone WhatsApp to Android transfer tool, if you want to transfer WhatsApp messages from Android phone to Huawei Mate 30(Pro), you also can use this useful WhatsApp backup, restore & transfer tool to backup WhatsApp data and restore them to your Huawei Mate 30(Pro).
Also read: How to Transfer WhatsApp Messages from Android to Android

The WhatsApp transfer, backup & restore is a part of iOS Toolkit – Restore Social App, which can help you transfer WhatsApp messages from iPhone/iPad/Android to Huawei Mate 30/30 Pro directly, and backup WhatsApp messages, images, videos and audio to PC/Mac in 1 click, after creating a backup files, you can easily to restore WhatsApp backup to new iPhone or Android phone. So, when you have got an new Huawei Mate 30/Mate 30 Pro, Huawei Mate 20/Mate 20 Pro, Huawei Mate 30/30 Pro, Huawei P20/P20 Pro, etc. You can easily transfer WhatsApp messages from old iPhone to Huawei Android phone, as well as backing up iPhone/Android WhatsApp data and restoring them to Huawei phone easily.

More Functions:

  • Backup WhatsApp messages from Android/iPhone/iPad/iPod Touch to computers.
  • Restore those backed up WhatsApp data to iPhone, iPad, iPod touch and Android.
  • 1 Click to transfer WhatsApp messages from iPhone to iPhone, iPhone to Android.
  • Backup your LINE/Viber/Kik/Wechat messages to computer and restore to new phones.
  • Compatible with Windows 10/8/7/XP and the latest macOS 10.15.
  • Works well with iOS 13 and Android 9

d_win d_mac
d_win d_mac

Part 1: Transfer WhatsApp Messages from iPhone to Huawei Mate 30/30 Pro

First of all, please free download and launch the After Phone Toolkit on your computer, then select “Restore Social App” option from the tool list.

iOS WhatsApp backup, restore, transfer

If you want to transfer WhatsApp messages, or backup & restore WhatsApp data, please click the WhatsApp tab and click “Transfer WhatsApp Messages”.

Backup WhatsApp messages

Step 1. Connect iPhone and Huawei Mate 30 to Computer
Then connect your iPhone devices or Huawei Mate 30 to the computer. Once the program detects them, you will get the window as follows.

transfer iPhone WhatsApp messages to Android

Tips: To transfer WhatsApp chat history from iPhone to Huawei phone, please set the iPhone on left as source device and Huawei Mate 30 on the right side as target device, you can click “Flip” button to switch them.

Step 2. Confirm to Move WhatsApp Messages from iPhone to Huawei Mate 30
Just click “Transfer” to button start to transfer WhatsApp message from old iPhone to Huawei Mate 30, the software will pop up a messages for you to confirm this transferring action, just click “Yes” to confirm this action if you still want to move from iPhone to Android.

Move WhatsApp Messages from iPhone to Huawei Mate 30

Tips: During the transfer processing, it will erase existing WhatsApp messages from the destination device(Huawei Mate 30), please keep connecting both two devices during transferring process.

transfer WhatsApp Messages from iPhone to Huawei Mate 30

Step 3. iPhone WhatsApp Moved to Huawei Mate 30 Complete
When you see the window below, you can disconnect your device and view the transferred WhatsApp messages on your Huawei Mate 30.

copy WhatsApp Messages from iPhone to Huawei Mate 30

Part 2: Backup WhatsApp Messages and WhatsApp Attachments from iPhone to Computer

Step 1. Connect iPhone to Computer
After launching the Phone Toolkit and go to Restore Social App – WhatsApp manager section, to backup WhatsApp messages from iPhone to your computer, you need to choose “Backup WhatsApp messages“, then connect your iPhone to computer via USB cable.

backup iPhone WhatsApp Messages

Step 2. Scan iPhone WhatsApp Data and Backup to Computer
Once your iPhone device is recognized, then click “Backup” button, the software will start scan all WhatsApp data and backup the to computer automatically.

backup iPhone WhatsApp Messages

Step 3. Backup iPhone WhatsApp Data Complete
Only few minutes, the software backed up your WhatsApp messages and WhatsApp attachments complete, you will see the window below. Here, you can click “View it” to check the backup file if you want.

iPhone WhatsApp Messages backup

You can view the backup WhatsApp data, the software also allows you export them to your computer or restore to your Android or iOS device. Let’s shows you how to restore WhatsApp backup to Huawei Mate 30.

view WhatsApp Messages

Part 3: Restore WhatsApp Messages Backup to Huawei Mate 30

Step 1. Connect Huawei Mate 30 to Computer
To restore WhatsApp messages to your Huawei Mate 30, you need to choose “Restore WhatsApp messages to Android device“. Then connect your Huawei Mate 30 to computer via USB cable, then you’ll see all your WhatsApp data backup history.

restore WhatsApp Messages to Android

Step 2. View WhatsApp Messages(Option)
Then, you can click “View” button to to view the backup file before restoring, and then selectively choose what you want to restore it to your Huawei Mate 30.

view WhatsApp Messages

Step 3. Start to Restore WhatsApp Message backup to Huawei Mate 30
Or you can choose a backup history and click “Next” to directly restore it to your Huawei Mate 30.

restore WhatsApp Messages to Android

Free download the Phone Toolkit and try to transfer WhatsApp messages from iPhone to Huawei Mate 30 and other smart phone directly.

d_win d_mac
d_win d_mac

The End: This article shows you how to transfer WhatsApp chat history from iPhone to Huawei Mate 30 / Mate 30 Pro effortlessly, you also can backup WhatsApp data to computer and then restore them to your Huawei Mate 30 / Mate 30 Pro and other Android/iOS devices.

How to Transfer Music from iTunes to HUAWEI Mate 30/30 Pro

[Summary]: How to transfer iTunes music to Huawei Mate 30/30 Pro? In this article, we will show you how to transfer music, playlist from iTunes to Huawei Mate 30/30 Pro and Mate 30 5G version with iTunes to Huawei Transfer tool.

itunes music to huawei mate 30 pro

CONTENTS

Huawei P30 / P30 Pro and Mate 30 5G versions are available in the market. Huawei Mate30 series 5G version is one of the few mobile phones on the market that supports SA/NSA 5G dual mode. Huawei Mate30 series 5G version is equipped with Huawei’s self-developed Kirin 990 5G processor. It uses 7nm+ EUV process technology to integrate 5G baseband into SoC chip for the first time, which not only ensures 5G signal reception stability, but also reduces the external baseband. Power consumption burden.

For the camera, Huawei Mate 30 is equipped with a movie-grade camera, which has amazing data reading and writing and transmission capabilities. It can not only realize high-definition 1920 frames/s data output, but also quickly transfer captured data to its baseband chip. Kirin 990; In addition, Kirin 990 built-in self-developed ISP, support huge computational complexity of ultra-high frame rate, using post-AI motion estimation and motion compensation and frame interpolation algorithm, can achieve 7680 frames on the basis of 1920 frames / s / s super slow motion, so you can easily achieve rich photographic effects without the need for tens of thousands of professional equipment.

With Huawei Mate 30(Pro) or Mate 30 5G, you can enjoy streaming music or movies online smoothly, many users play songs with Apple Music, Spotify, Amazon Music Unlimited, Pandora on mobile phone. Especially Apple Music users, when you have upgraded from an iPhone to an new Android phone, like Huawei Mate 30, Huawei P30, Samsung Galaxy S10, Note 10,  how can you transfer the iTunes purchased media contents like Apple Music, Movies and audiobooks to Android phone?

How to Transfer iTunes Music to HUAWEI Mate 30 Pro on Windows 10 PC?
I have downloaded lots of songs from iTunes store on computer, I want to transfer those downloaded music from iTunes to Huawei Mate 30 Pro, but how to transfer iTunes music to HUAWEI Mate 30 Pro?

How to Transfer Apple Music from iTunes to HUAWEI Mate 30 Pro on macOS 10.15?
I often use Apple Music app and iTunes to enjoy songs on iPhone or MacBook Pro, yesterday, I purchased a new Huawei Mate 30 Pro, but I can’t install Apple Music app on Huawei Mate 30, then I downloaded Apple Music songs on iTunes and try to transfer them to Huawei phone, but iTunes prompt a messages “Apple Music AAC File can’t transfer”, I want to know how to sync Apple Music from iTunes to Android phone? I have update my MacBook Pro to macOS Catalina, all previously downloaded songs and playlists still on Apple Music library.

2 Ways to Transfer Music from iTunes to Huawei Mate 30/Mate 30 Pro and Mate 30 5G

Want to play iTunes music on your new Android phone? So here we would like to show you the two methods on how to transfer iTunes music, playlists to Huawei Mate 30/Mate 30 Pro, you can play Apple Music on Huawei Mate 30 offline.

Method 1: Directly Transfer Music or Playlists from iTunes to Huawei Mate 30 Pro with iTunes Music to Huawei Transfer

As you know, iTunes only can recognize iOS device and it can’t recognize Android device. You can’t directly sync iTunes music to Android phone or tablet, and you not allowed copy Apple Music from iTunes library to other external hard drive.

Here an iTunes to Android Transfer can help you, this function is a part of Android Toolkit – Android Transfer (Mac & Win), you can easily transfer all music and playlists from iTunes to Huawei Mate 30, Huawei Mate 30 Pro and Huawei Mate 30 5G effortlessly.

More Features:

  • Transfer iTunes Music to P/Mate/Honor/Nova/G/Y/Ascend in 1 Click.
  • Transfer files between Huawei phone and computer, including contacts, photos, music, SMS, and more.
  • Manage, export/import your music, photos, videos, contacts, SMS, Apps etc.
  • Transfer media files between iTunes and Huawei phone(vice versa) – Except the DRM-ed Apple Music songs and iTunes M4V movies, please read the below Method 2 to remove DRM from Apple Music and iTunes movies at first).
  • Manage your Huawei Mate 30/30 Pro on computer.
  • Fully compatible with Android 9.0.

Download the Android Toolkit – Android Transfer and start to transfer iTunes music to Android devices.

d_win d_mac
d_win d_mac

How to Transfer iTunes Music and Playlist to Huawei Mate 30 Pro

Step 1. Launch the Android Toolkit on PC or Mac
To start with, download the Android Toolkit and click the “Transfer” module and connect your Huawei Mate 30 Pro to computer. The software will automatically detect your Huawei Mate 30 Pro and display its snapshot.

launch Android toolkit

Step 2. Click “Transfer iTunes Media to Device”
To sync music from iTunes library to Huawei Mate 30 Pro, please click on “Transfer iTunes Media to Device”.

iTunes Music to Android Transfer

Step 3. Scan iTunes Media
The software will start scanning the iTunes media on your library, the software will show you all transferable data after scanning complete, including Music, Music Video, Movies, Home Videos, Podcasts, 90’s Music, Classical Music. You can simply select the playlists of your choice or check the “Entire library” option as well.

scan iTunes music

Step 4. Start Transfer iTunes Music to Huawei Mate 30 Pro
After selecting media files you want to transfer, click on the “Transfer” button. The software will automatically transfer music from iTunes library to Huawei phone.

Transfer iTunes Music to Huawei Mate 30 Pro

This: This application provides a one-click solution to transfer iTunes music to Huawei Mate 30 and other Android devices. If you want, you can also backup music from Android to iTunes as well or manage your device data easily using this powerful Android Toolkit.

Free download Android Toolkit – Android Transfer and start to sync iTunes media files to your Android devices.

d_win d_mac
d_win d_mac

Note: For macOS Catalina(macOS 10.15) or above, since the macOS Catalina system splits iTunes into three applications: Apple Music, Podcast, and Apple TV, the media files provided by iTunes can also be found in new applications. If you can’t directly transfer iTunes music to Android on macOS Catalina, please export iTunes songs to MP3 firstly, then import them to your Android devices.

Useful Tips: Apple Music, iTunes Movies and TV shows added DRM-protected, if you have subscribed to Apple Music and downloaded a lot of songs for offline listening on iTunes. However, you can’t transfer the downloaded Apple Music songs or iTunes movies to Android devices, so you need to remove the DRM from Apple Music songs and iTunes M4V movies. Below tutorial, we will teach you how to remove iTunes DRM for playing Apple Music and iTunes M4V movies on Huawei Mate 30.

Method 2: Remove Apple Music DRM for Offline Playing on Huawei Mate 30 Pro

Apple Music is a popular music streaming service with 50 million songs. It allows you to stream anything in the collection on all Mac, Windows, iPhone, iPad, Android, etc. But, if you cancel Apple Music subscription, all downloaded songs will become not playable, in order to keep Apple Music songs Huawei Mate 30 forever, you should use an Apple Music Converter to remove the DRM from Apple Music and convert the to DRM-free MP3, M4A, etc.

UkeySoft Apple Music Converter is a professional Apple Music DRM removal tool, it can help you remove DRM from Apple Music songs and convert M4P songs to MP3, M4A, etc. What’s more, this Apple Music converter also enables you convert iTunes M4P songs, iTunes M4P/M4B Audiobooks, Audible AA/AAX Audiobooks and iTunes Podcasts to MP3, M4A, AU, FLAC, AAC, AC3, AIFF, M4A, M4R, and MKA.

More Features:

  • Remove DRM from Apple Music songs, playlist and albums;
  • Convert Apple Music and iTunes audio to MP3, M4A;
  • Extract audio from iTunes videos, movies and TV shows;
  • Preserve ID tags and metadata information to output files;
  • 16X faster speed to unlock audio DRM protection;
  • Set Apple Music as phone ringtone(iPhone and Android phone);
  • Play Apple Music on anywhere you want, such as Android devices, MP3 player, iOS devices, etc.

Free download the Apple Music Convert and start to remove DRM from Apple Music files.

d_win d_mac
d_win d_mac

Tips: If you want to watch iTunes movies on Huawei Mate 30 Pro, you can use this UkeySoft M4V Converter to remove DRM from iTunes purchased and rented movies, TV shows and music videos, then import the output video files to your Huawei phone for offline watching.

Guide: Convert iTunes Songs to MP3 and Transfer to Huawei Mate 30 Pro

Step 1. Launch UkeySoft Apple Music Converter
Download, install and run the Apple Music Convert on your Windows/Mac computer, the iTunes application/Apple Music app will be launched automatically, it will loads all you Apple Music songs and playlists, together with iTunes songs, movies, TV shows, audiobooks, etc.

apple music converter

Note: Please don’t exit iTunes or play any files with the iTunes during conversion.

Step 2. Select Apple Music Songs to Convert
Then, please select Music on the left column and sort all songs by Type, you will find all songs from Apple Music are marked as Apple Music AAC audio file, which added DRM protection. Don’t worry, just select songs or playlist you want, the Apple Music Convert can help you remove the DRM protected during conversion.

select apple music

Step 3. Select Huawei Mate 30 Supported Audio Formats
In this step, please select MP3 as output format, because Huawei devices and most mobile devices supported MP3 audio format. You can also choose other output format (M4A, AC3, AAC, AIFF, AU, FLAC, M4R or MKA), and customize output song bitrate, sample rate, name format if you like.

select output format

Step 4. Start Converting Apple Music to MP3
Click “Convert” button to convert the selected Apple Music songs and iTunes M4P songs to MP3, you will get MP3 files after conversion.

conert apple music files

Step 5. Import the Converted Apple Music Songs to Huawei Mate 30 Pro
To transfer the output songs to your Huawei Mate 30 Pro, please connect your phone to computer with a USB cable, then open your phone folder and find the music folder after detected successfully, now you can directly copy the DRM-free Apple Music songs to the music folder.
Or, you can use this Android Transfer to transfer music, videos and photos from PC/Mac to Huawei Mate 30 Pro directly.
Also read: How to import music to Huawei Mate 30/Mate 30 Pro

import music to to Huawei Mate 30 Pro

Free download the Apple Music Converter to keep Apple Music songs forever.

d_win d_mac
d_win d_mac

These two solutions give you ability to easily transfer music from iTunes to you Huawei Mate 30/Mate 30 Pro. The Android Toolkit – Android Transfer also can help you transfer music to Huawei Mate 30/Mate 30 Pro from PC/Mac/Android/iOS devices, and the Apple Music Converter can help you remove DRM from Apple Music and export music from iTunes to computer, it will convert Apple Music songs as local files, which is the best way to keep Apple Music forever.

Simply download and have a try above two application. If any issue on your mobile phone, please contact us via FaceBook, we will give you the best solution.

Transfer Music, Video, Photos to HUAWEI Mate 30/30 Pro

[Summary]: Want to play music and videos on your new Huawei Mate 30? Here guide you to transfer music, videos and photos from Mac/PC/Android/iOS devices to Huawei Mate 30/30 Pro and Huawei Mate 30 5G. You can also learn how to convert and transfer Apple Music, iTunes songs & movies to HUAWEI Mate 30/30 Pro for offline playing.

transfer files to huawei mate 30 pro

CONTENTS

The HUAWEI Mate 30 Series 5G version is equipped with the Kirin 990 5G, which uses the 7nm+ EUV chip process technology to integrate the 5G Modem into the SoC chip for the first time. It integrates 10.3 billion transistors on a nail-sized chip, with more transistors and more functions. Complete and complex.

The HUAWEI Mate 30 Series 5G version adopts a full-scenario antenna design. The 21 antennas of the fuselage contain 14 5G antennas 4, ensuring a stable and high-speed signal connection when the user uses the vertical screen and the horizontal screen. In addition, HUAWEI Mate 30 series 5G version supports 5G+4G dual card dual standby and dual VoLTE, that is, two card slots support 5G network, one supports 4G network, one card can access the Internet, and the other card can answer normally. call. The HUAWEI Mate 30 Pro 5G supports 5G networks in multiple frequency bands such as N79, N78, N77, N41, N28, N3, and N1. In terms of battery life, HUAWEI Mate 30 Pro 5G is equipped with 4500mAh large battery 5, HUAWEI Mate 30 5G is equipped with 4200mAh large battery 5, and both support 40W Huawei wired super fast charging and 27W Huawei wireless super fast charging. Passed TÜV Rheinland safety certification, charging is fast and safe.

5G speed, very fast. The peak download rate is 2.3Gbps3. In theory, you can download a high-definition movie in a few seconds, and enjoy ultra-low latency cloud games, VR applications, 4K video live broadcasts, clear and smooth, such as on-site. You can online enjoy movies, videos and music on Huawei Mate 30 5G, as smooth as playing a movie/audio locally, you can download a large files in seconds. If lots of your favorite videos, movies, music and photos stored on computer, previous mobile phone or iTunes, when you have got an new Huawei Mate 30, Mate 30 Pro or Mate 30 5G, how you can import photos, videos and music to Huawei Mate 30?

Actually, we can download music from Amazon Music, Apple Music, Spotify, etc. If you want to play previous music playlist, downloaded/created video and photos on Huawei Mate 30, you can use a third-party Huawei M30/Mate 30 Files Transfer tool, which can helps you transfer music, videos, photos from PC/Mac and other iOS/Android device to your Huawei Mate 30/30 Pro and Mate 30 5G at ease.

Android Transfer – One Stop Solution to Transfer Files to Huawei Mate 30/Mate 30 Pro

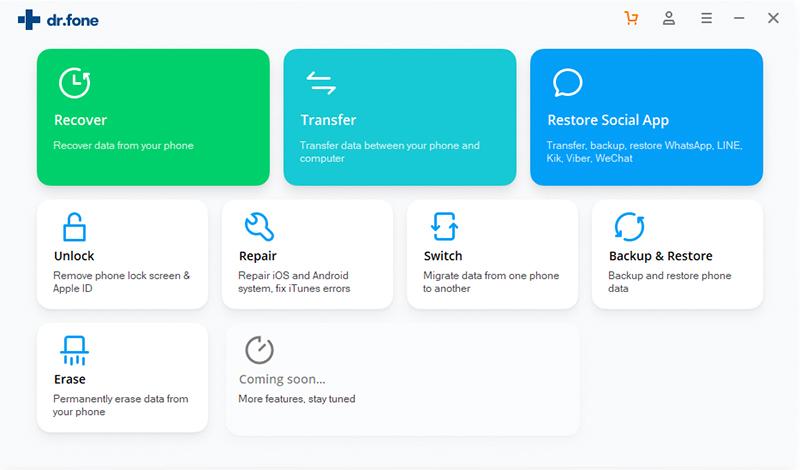
This iOS & Android Manager tool is your must-have mobile phone manager tool, it works on Windows and Mac computer, it provides one-stop solution for you to take full control of your Huawei Mate 30/30 Pro and other iOS/Android device. When you have got an new Huawei Mate 30, you can use this Android manager tool to transfer and backup messages, contacts, photos, music, videos, and more on your Huawei Mate 30.

More Features:

  • Import your music, photos, videos, contacts from computer to Huawei Mate 30/Mate 30 Pro easily;
  • Backup music, photos, videos, contacts, SMS etc. from Huawei Mate 30/Mate 30 Pro to computer;
  • Manage contacts on computer, deduplicate Contacts easily;
  • Root your Huawei Mate 30/Mate 30 Pro to take full control of your device;
  • Transfer from iPhone or Android phone to Huawei Mate 30/Mate 30 Pro, including music, photos, videos, contacts, SMS;
  • App Manager – Install, uninstall, import or backup Apps in batch;
  • Gif Maker – create Gif from photos, motion photos, videos;
  • Transfer Music between iTunes and Huawei Mate 30/Mate 30 Pro – Sync iTunes Music to Huawei or transfer music from Huawei to iTunes;
  • Fully compatible with 3000+ Android devices (Android 2.2 – Android 9.0) from Huawei, Samsung, OnePlus, LG, HTC, Oppo, Motorola, Sony, Google Pixel, Xiaomi, Android Nokia, SHARP, Panasonic, NEC, Kyocera, Coolpad, PANTECH, RIM, Vivo, Lenovo, etc.

d_win d_mac
d_win d_mac

Let’s learn how to import music, videos and photos to Huawei Mate 30/Mate 30 Pro from PC, Mac, iTunes library, Android devices, iPhone, iPad and other iOS devices.

Part 1: Import Music, Video, Photos to Huawei Mate 30/Mate 30 Pro from PC or Mac

Step 1. Launch the iOS & Android Manager tool and connect your Huawei Mate 30 to computer via USB cable.

huawei file manager transfer

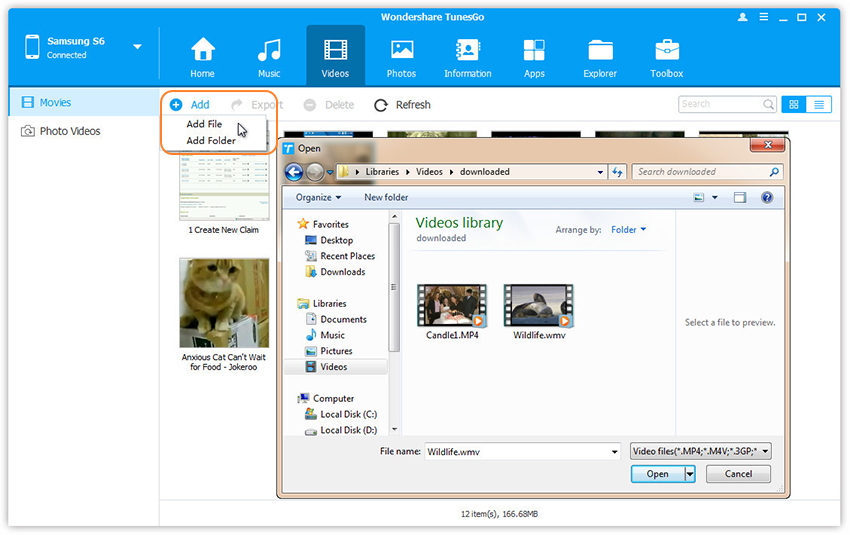
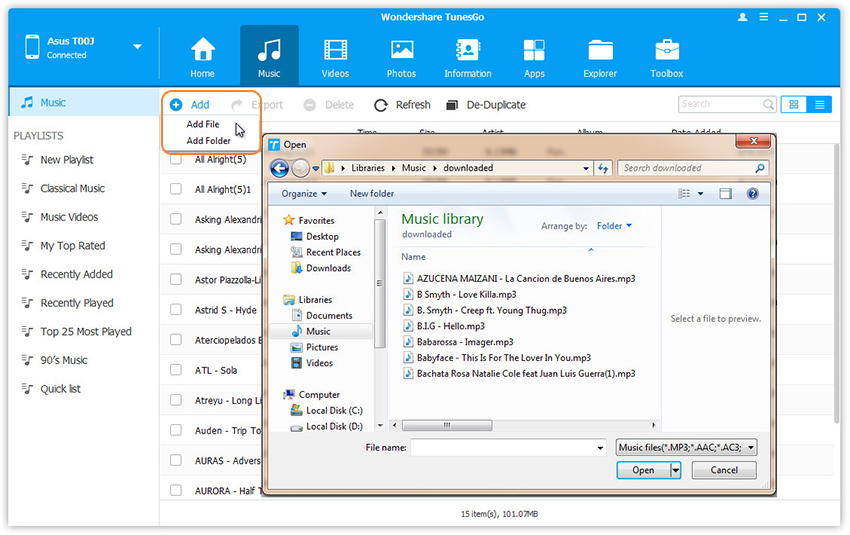
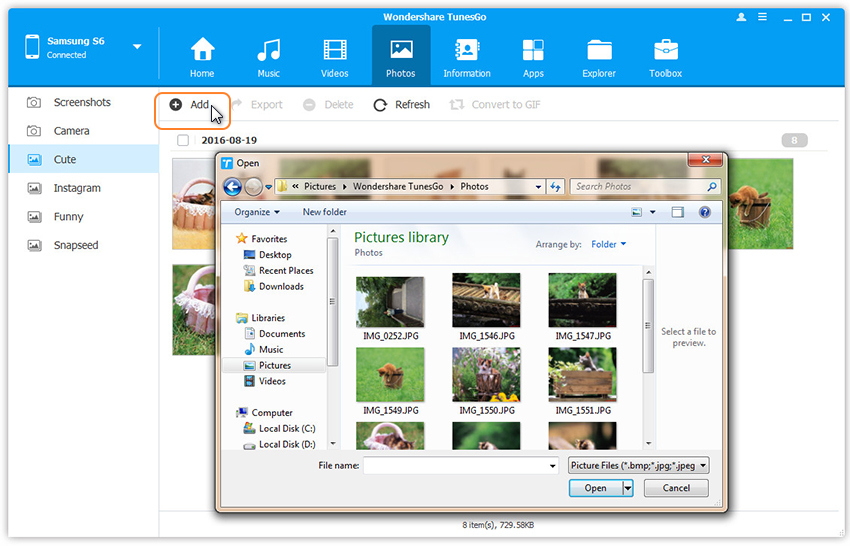
Step 2. Go to the “Music”, “Videos” and “Photos” tab .Once your media loads, click Add > Add File or Add Folder button and select the music, videos, photos files to directly import them to your Huawei Mate 30.

Import Video to Huawei Mate 30/Mate 30 Pro

Add Video to Huawei Mate 30

Import Music to Huawei Mate 30/Mate 30 Pro

Add Music to Huawei Mate 30

Import Photos to Huawei Mate 30/Mate 30 Pro

Add Music to Huawei Mate 30

Part 2: Import Music, Video, Photos to Huawei Mate 30/Mate 30 Pro from Android

Step 1. Launch the iOS & Android Manager and Choose ‘Phone to Phone transfer’ feature, then connect both two Android devices to PC using USB cables, both two Android phone will be detected, you need to select the old Android phone as source device from the upper left corner.

android to android data transfer

Step 2. Set the target device i.e. you new Huawei Mate 30. Choose the target device from the drop-down list, which is the new Huawei Mate 30. You can then go ahead and click Next.

Step 3. By rule, all content on your old Android device that can be transferred are selected, including photos, videos, music, contacts and playlist, please select types of data to transfer.
Also read: How to transfer data from Android to Huawei

select and transfer android data to huawei mate 30

Step 4. Then, ‘click Transfer’ button, the software will help you transfer all the selected data to your new Huawei Mate 30, DO NOT disconnect either device.

transfer android data to huawei mate 30

Part 3: Import Music, Video, Photos to Huawei Mate 30/Mate 30 Pro from iPhone/iPad/iPod

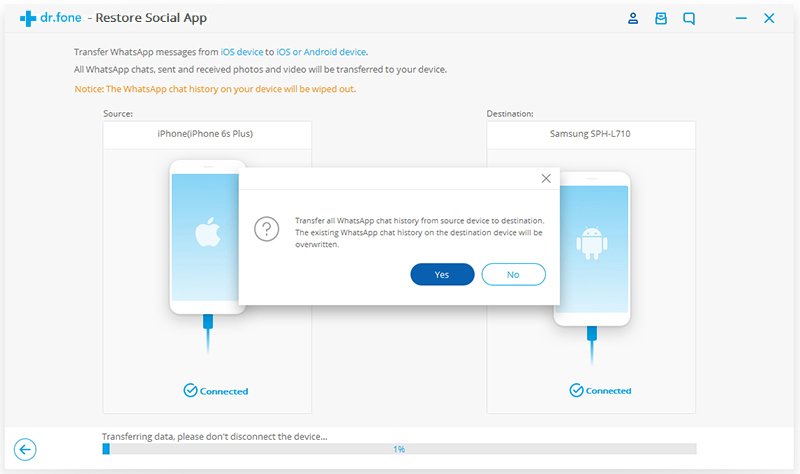
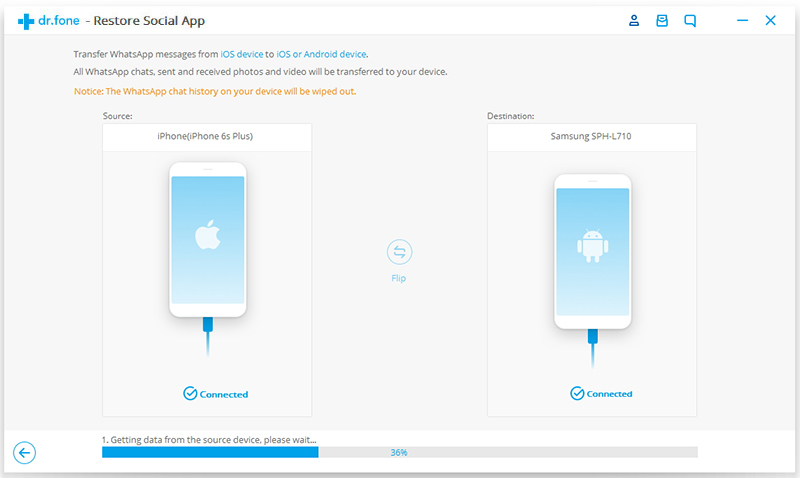
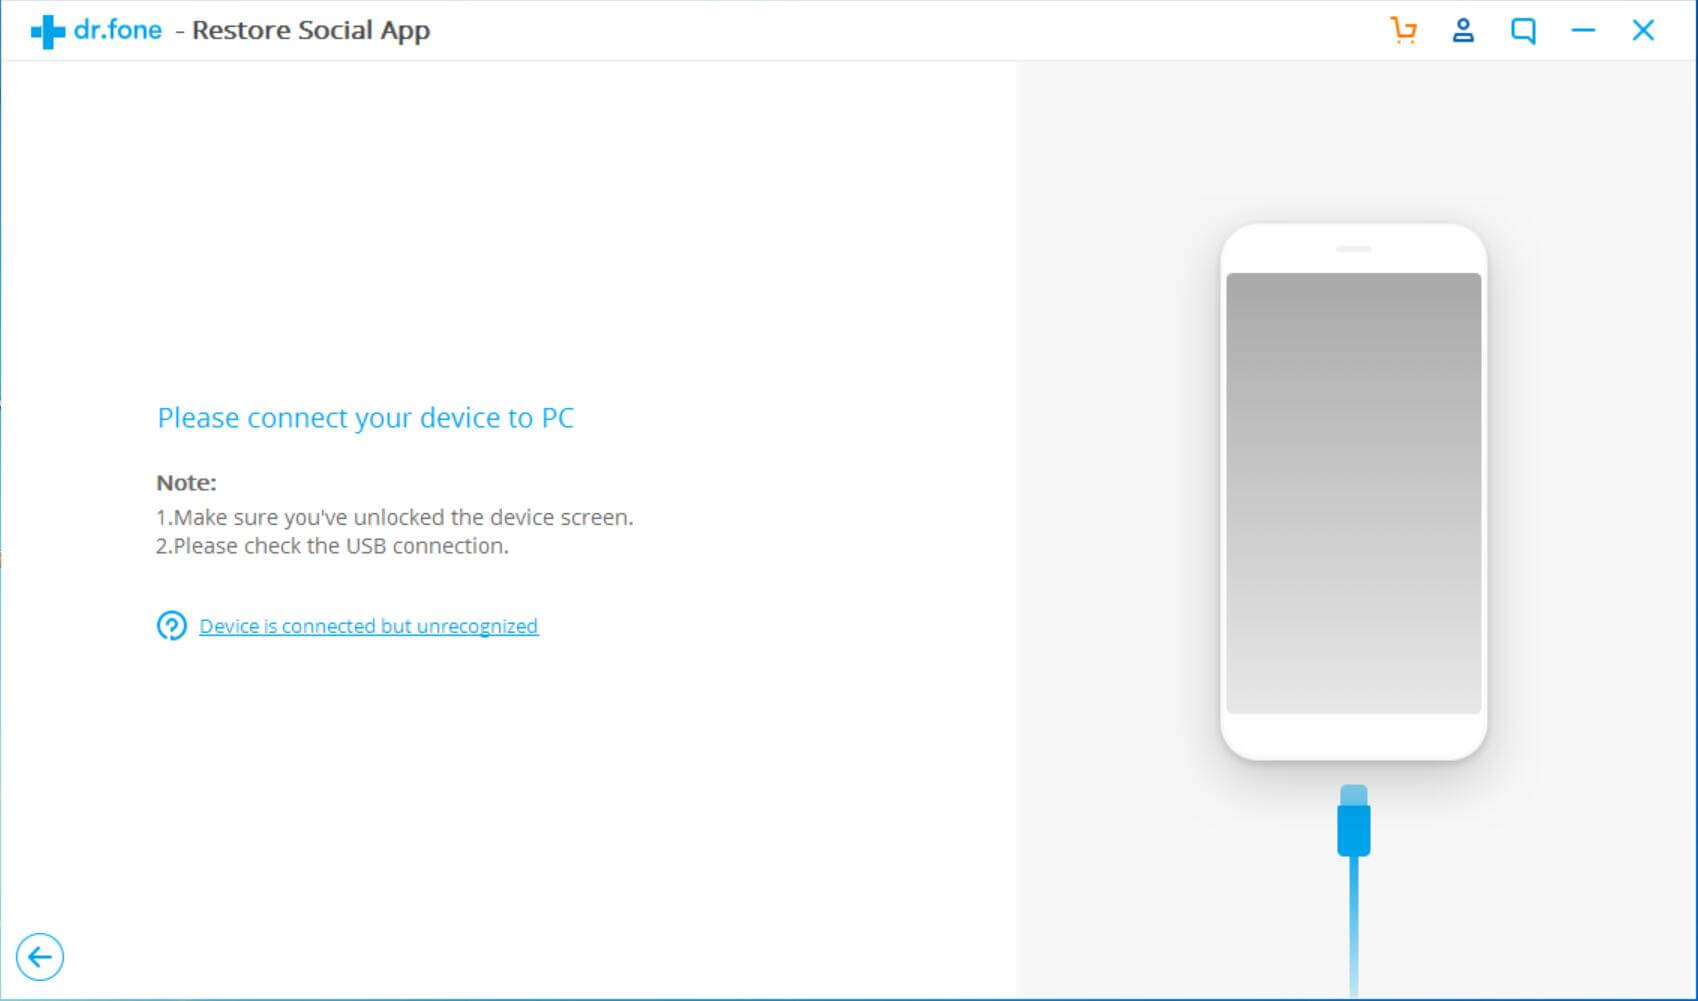
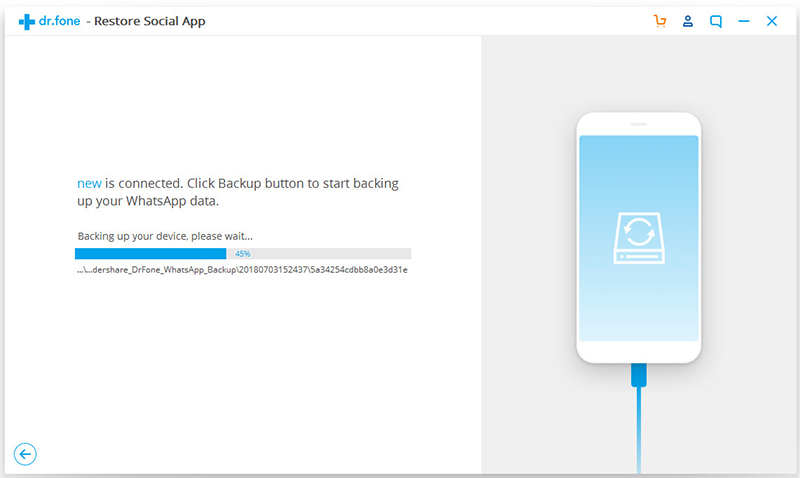
Step 1. To transfer media files and contacts from iPhone to Huawei Mate 30, launch the iOS & Android Manager too and click “Phone to Phone Transfer” option on the main interface, then connect your iPhone and Huawei Mate 30 with the computer.

iPhone to android data transfer

Step 2. Set Huawei Mate 30 as the target device to which you want to transfer videos, photos, music and contacts from the pop-up window, and click Next.

iPhone data to Huawei Mate 30 transfer

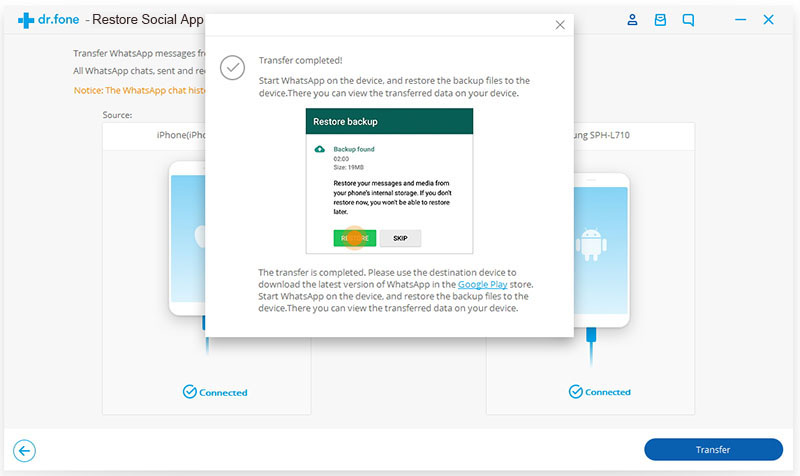
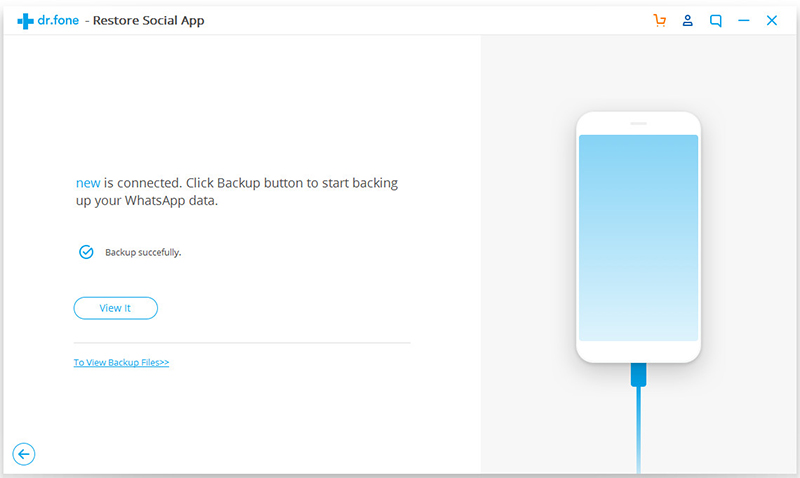
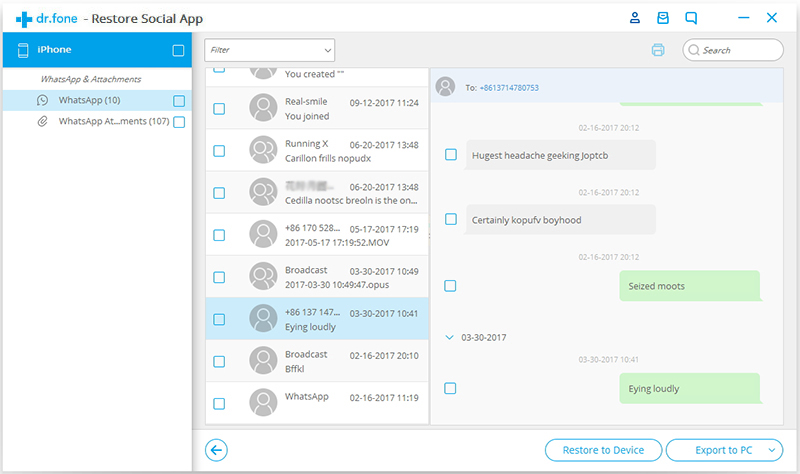
Step 3. Then, select photos, videos, music, playlist and contacts, and then click on “Transfer”. button to import files from iPhone to Huawei Mate 30, when the transfer is over, click “OK” and disconnect the two devices.
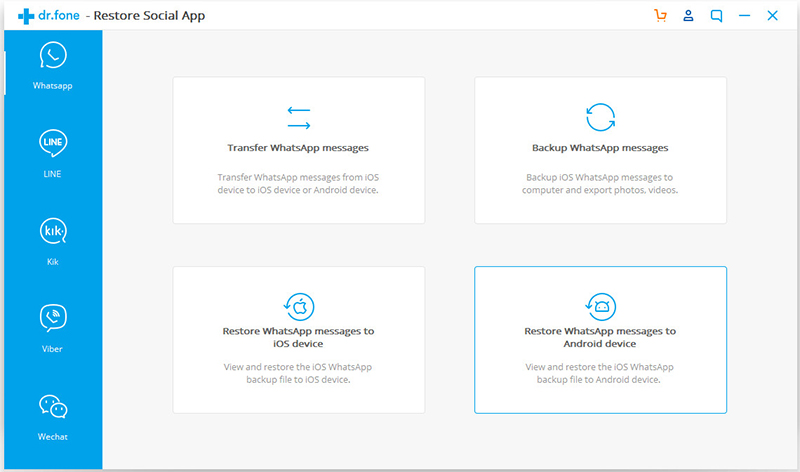
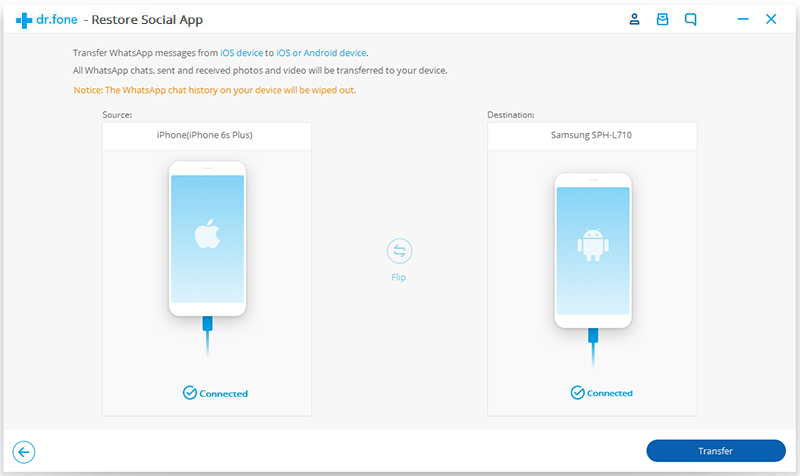
Also read: How to Transfer WhatsApp Messages from iPhone to Huawei

copy iPhone data to Huawei Mate 30

Tips: You also can select and transfer pictures from iPhone to Huawei Mate 30 individually.

transfer iPhone photos to Huawei Mate 30 transfer

Part 4: Transfer Music, Movies from iTunes to Huawei Mate 30/Mate 30 Pro

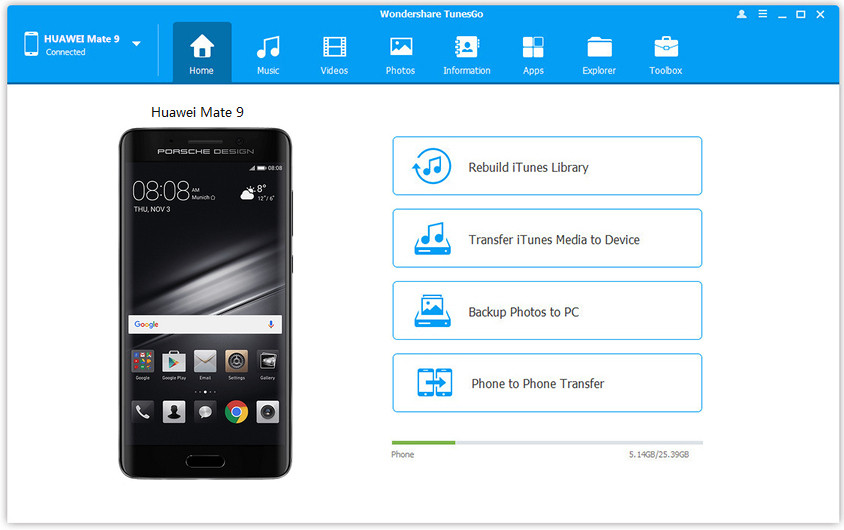
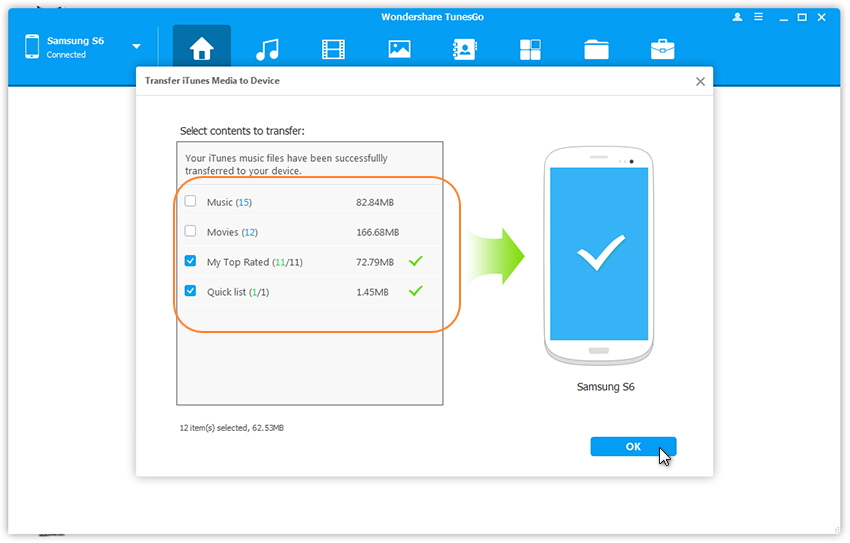
Step 1. Launch the iOS & Android Manager and click “Transfer iTunes Media to Device”, then  connect the Huawei Mate 30 to the computer. Establish the connection using the USB cable provided by Huawei to avoid disruption during transferring process.

transfer iTunes to Huawei Mate 30

Step 2. The software start scanning the iTunes library and it will display the media according to their categories such as movies, songs, podcasts, and others.

Step 3. As you are trying to move only music and movies from iTunes to Huawei Mate 30, you can uncheck all other categories except Music and Movies, then just click“Transfer” button begin transferring songs and movies from iTunes library to your Huawei Mate 30.

transfer iTunes music video to Huawei Mate 30

Step 4. After transferring complete, the software will display successful completion message, please click the “OK” button to end the operation and discount your phone.

transfer music from iTunes to Huawei Mate 30

Download the iOS & Android Manager and try to import files to Huawei Mate 30:

d_win d_mac
d_win d_mac

Note: This iTunes to Android transfer tool doesn’t transfer Apple Music from iTunes to Android/iOS devices, since the downloaded songs is Apple Music AAC files, all Apple Music tracks added DRM protection, Apple inc not allow us transfer the downloaded Apple Music to other devices.

If you want to transfer Apple Music to Android device, iPod Nano, iPhone, iPad, iPod Touch, MP3 player, PS4, etc. What you need to do is to remove DRM from Apple Music and convert them to MP3 format, let’s teach you how to convert Apple Music to MP3 for offline playing on Huawei Mate 30 and more Android devices, please keep reading the below tutorial.

Part 5: Convert Apple Music to MP3 for Offline Play on Huawei Mate 30/Mate 30 Pro

Want to keep Apple Music songs forever on your Android phone? Looking for the best way to play Apple Music on Android tablet, MP3 player, iPod nano? This part teach you how to convert Apple Music to MP3 for offline listening on any devices.

UkeySoft Apple Music Converter is such an Apple Music to MP3 converter and Apple Music DRM removal, which allows you to easily convert Apple Music songs and iTunes M4P songs to MP3 on Mac/Windows computer. What’s more, it also can help you remove DRM from Apple Music songs, iTunes M4P songs, M4P/M4B Audiobooks and Audible AA/AAX Audiobooks and output DRM-free audio format, such as MP3, M4A, AAC, AC3, FLAC, AIFF, AU, M4R, and MKA.

Download the UkeySoft Apple Music Converter and install in on Windows or Mac computer:

d_win d_mac
d_win d_mac

Guide: How to Convert Apple Music to Huawei Mate 30/Mate 30 Pro

Step 1. Launch iTunes application or Apple Music app on computer, then just add Apple Music songs, albums or playlists to iTunes library or Apple Music app library without downloading them, because it features iTunes-like interface and loads all your iTunes library or Apple Music library automatically.

add apple music to library

Tips: Exit the iTunes application or Apple Music app after adding songs to the library.

Step 2. Launch UkeySoft Apple Music Converter, it will launch iTunes/Apple Music app automatically and load all your added Apple Music tracks.

apple music converter

Step 3. Select all Apple Music songs you want to convert to MP3, you can also search songs you want through the top search box.

select apple music

Step 4. Because Huawei Mate 30 and most Android devices, iOS devices, MP3 player supported MP3 audio format, we recommend you choose MP3 as output format. This Apple Music converter also can help you convert M4P Apple Music tracks to M4A, AC3, AAC, AIFF, AU, FLAC, M4R and MKA.

select output format

Step 5. Last step, just click “Convert” button to convert selected Apple Music songs/playlist/albums to MP3 format.

conert apple music files

Note: During conversion, iTunes plays the Apple Music tracks in the background (muted), so you’d better not using iTunes before the conversion is finished.
Please make sure your computer is connected to Internet so iTunes can play the Apple Music songs uninterruptedly.

Step 6. Finally, click “Explore Output File” to quickly locate the output Apple Music songs, you will get the DRM-free Apple Music songs, which save on the computer folder as local files.

apple music mp3 files

Step 7. To transfer the converted Apple Music songs to Huawei Mate 30/Mate 30 Pro or other Android/iOS devices, please return to the part 1, the iOS & Android Manger will help you import the output Apple Music songs to your device quickly.

Download the Apple Music to MP3 Converter and try to convert Apple Music and iTunes songs to Huawei Mate 30:

d_win d_mac
d_win d_mac

For Spotify Music users: You can use this Spotify Music to MP3 Converter to free download MP3s from Spotify, then transfer the downloaded Spotify songs, playlist and albums to your new Huawei P30, or set the downloaded songs as phone’s rington.

Useful Tips: If you want to iTunes M4V movies on Huawei Mate 30/Mate 30 Pro, you need to remove DRM from iTunes movies, because Movies and TV shows purchased from iTunes Store are also DRM-protected. We recommend you use UkeySoft M4V Converter to remove DRM from iTunes movies and TV shows and convert M4V to MP4, then transfer the converted iTunes movies to your Android device for offline watching.