By Selena KomezUpdated on March 07, 2023
“I have updated my iPhone to iOS 16 recently, but I have lost some of my data, including photos and contacts, is there any way to recover lost data on my iPhone? Please help.”
As a passionate iPhone user, you probably look forward to iOS updates that promise to enhance your device’s security and performance. However, the excitement of upgrading can quickly turn into frustration when you find that your photos, videos, contacts, and apps have lost from your iPhone. Unfortunately, data loss after an iOS update is not uncommon, even with Apple’s commitment to improving data security with each new iOS version. Technical issues can arise during the update process, causing you to lose valuable data.
While recovering your data using iTunes or iCloud backup is an option, it may not always be successful. In response to this issue, we’ve put together a comprehensive guide to help you recover your lost data after iOS 16 update. By following our step-by-step instructions, you can increase your chances of successfully restoring your data and getting your iPhone back to its previous state. So keep reading for 3 helpful ways to recover your iPhone lost data after iOS 16 update.
CONTENTS
To recover lost data on your iPhone after updating to iOS 16, follow these steps if you backed up your device with iTunes beforehand:
Step 1. Use a USB cable to connect your iPhone to your computer and open iTunes.
Step 2. Click on your device when it appears in iTunes.
Step 3. Select “Summary” and then click “Restore Backup”.
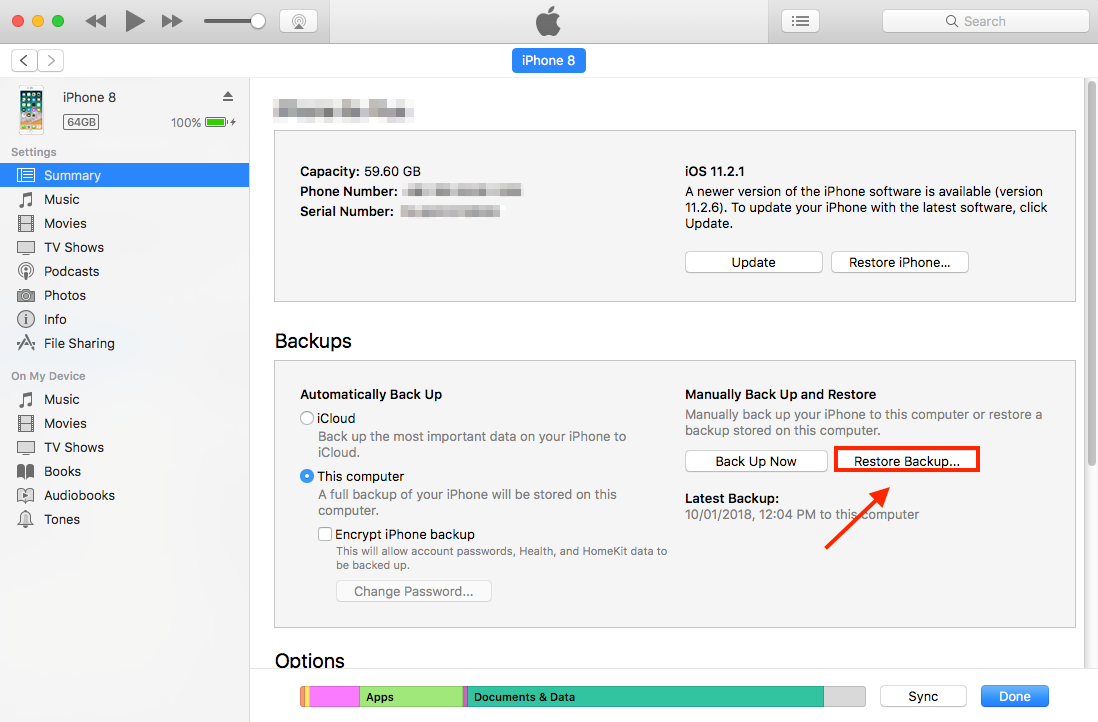
Step 4. After clicking “Restore Backup” in the previous step, you will be shown a list of available backups. Look for the backup made before the iOS 16 upgrade and select it. If you don’t have a backup from before the upgrade, choose the most recent backup available and click “Restore.”
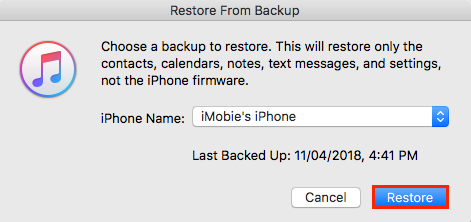
If you choose to restore from iTunes, be aware that it will overwrite all existing data on your iPhone. This may not be ideal if your backup is incomplete or outdated. Consider using an alternative way to recover your data without risking any loss.
If you created an iCloud backup of your iPhone before updating it to iOS 16, you can use the following steps to recover lost data from iCloud backup:
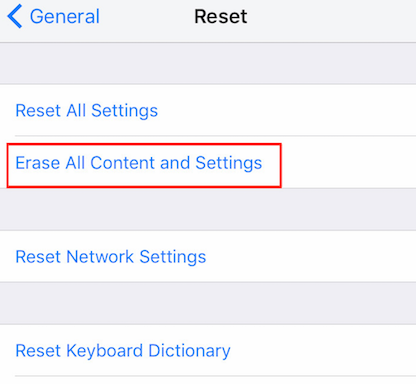
Step 1. Navigate to Settings > General > Reset > Erase All Content and Settings on your iPhone. Enter your password to reset your iPhone to its factory settings.
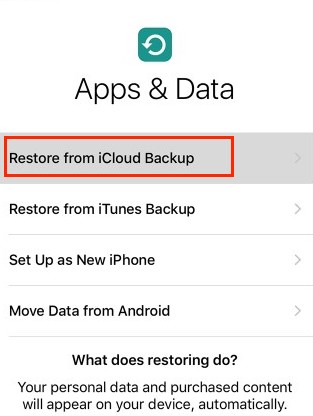
Step 2. Set up your iPhone, and on the “Apps & Data” screen, select “Restore from iCloud Backup.”
Step 3. Sign in to your iCloud account and choose the backup you created before the update. Then, tap “Restore” and wait for the recovery process to finish.
In case you don’t have any iTunes or iCloud backup to restore lost data after an iOS update, don’t worry. There is still hope to recover your lost data. This method is designed to assist you in recovering lost data after an iOS update without a backup. What you need is a reliable and efficient iOS data recovery tool, iPhone Data Recovery.
U.Fone iPhone Data Recovery is a software program designed for Windows and Mac computers that can help recover lost or deleted data from iPhone devices. It can retrieve a wide range of data types including photos, videos, contacts, messages, call history, notes, calendars, and more. The software can work on iPhone devices with different iOS versions, including the latest iOS 16. It can recover data lost due to various reasons such as accidental deletion, device damage, system crash, iOS upgrade failure, and more.
Key Features of U.Fone iPhone Data Recovery
Step 1. Run the Software and Select Mode
Download and install U.Fone iOS Data Recovery on your computer, then launch it and Select “iPhone Data Recovery”.
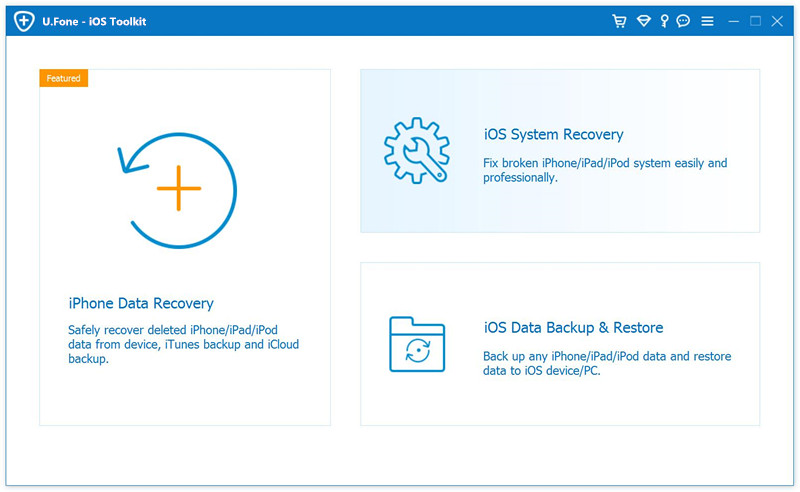
Step 2. Select Recovery Mode
Connect your iPhone to the computer with a USB cable, select “Recover from iOS Device” mode to recover lost data from iPhone. You can also recover from iTunes/iCloud with this recovery tool.
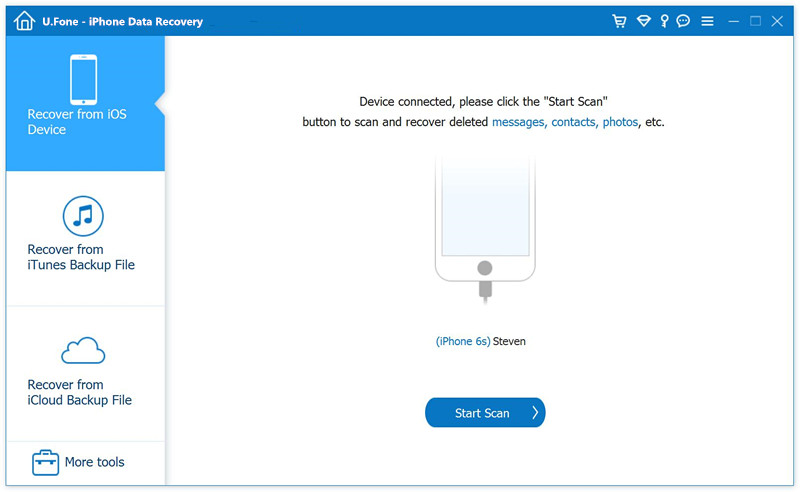
Step 3. Scan and Analyze Data on Device
Click “Start Scan” to initiate the scanning and analysis of data on your iPhone, which includes both lost and existing data.
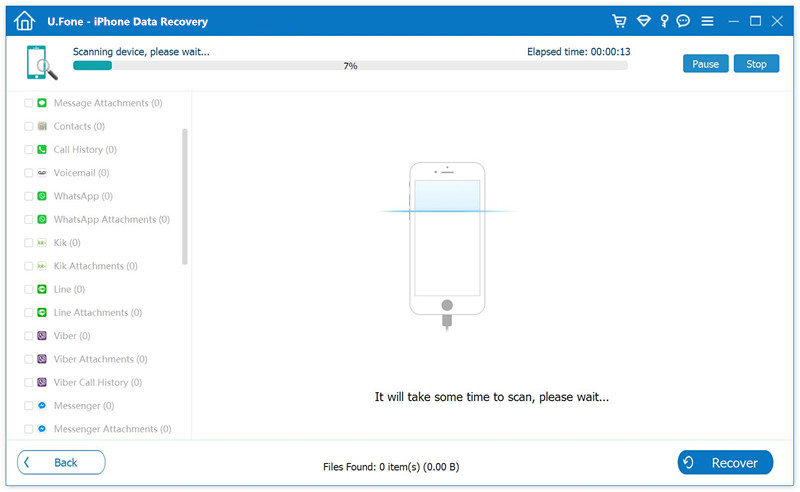
If you only wish to recover deleted data, you can toggle on the “Only display the deleted item(s)” option, and the scanning results will only show the deleted data.
Step 4. Recover Lost Data from iPhone
When the scan is done, preview and select the data you want to recover, simply click on the “Recover” button to initiate the recovery process. The software will automatically export and save the data to your computer’s output folder.
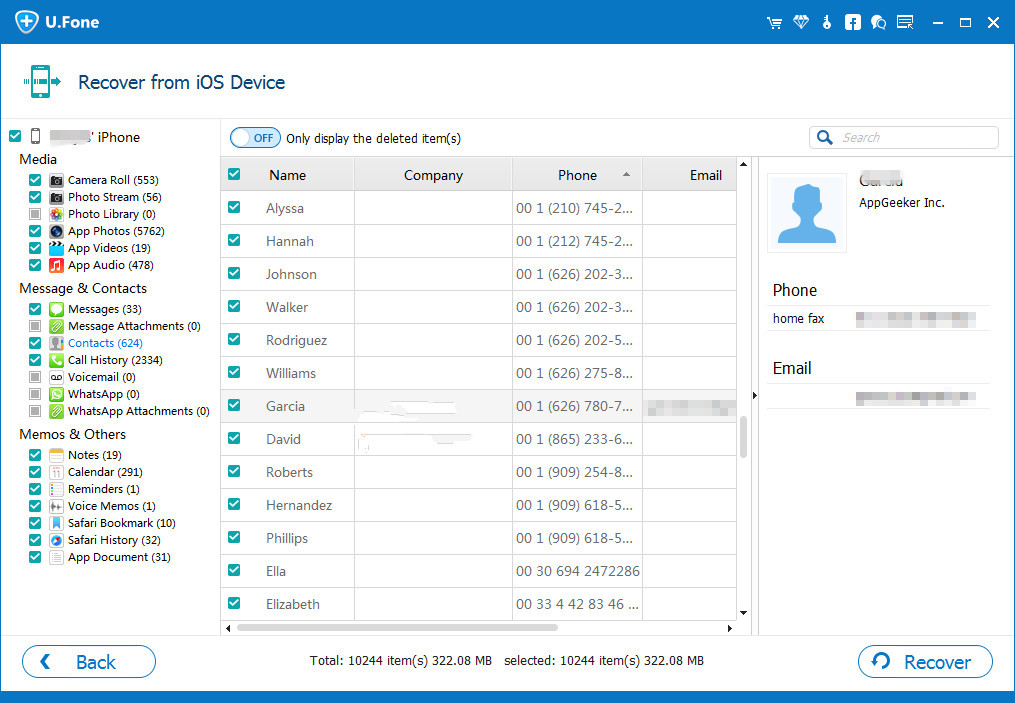
Step 5. Transfer Data from Computer to iPhone
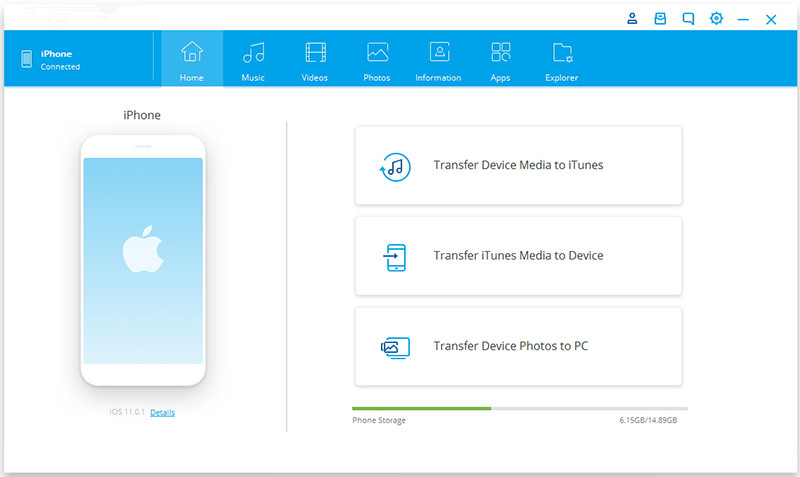
All the lost data are now saved on your computer, to restored all the lost data on your iPhone, you can use an iOS Transfer tool to transfer the recovered lost data back.
Prompt: you need to log in before you can comment.
No account yet. Please click here to register.
By Selena KomezUpdated on April 17, 2020
Accidental delete files on your iPhone? Lost iPhone data due after factory reset? Photos disappeared and missing from iPhone after iOS 13 update or jailbreak? Lost contacts and messages on iPhone 11/XS Max/X/8/7/6s/6/5s due to accidental deletion? Your iPhone is broken or locked by a forgotten passcode? Don’t worry, here is a professional iPhone Data Recovery software, it not only helps you recover lost data from iPhone/iPad/iPod(touch), but also able to recover data from iTunes and iCloud, no matter how you lost them.
iPhone Data Recovery for Windows and U.Fone iPhone Data Recovery for Mac, both is designed to recover lost and deleted data from iPhone XS Max/ iPhone XR, iPhone XS, iPhone X, iPhone 8/7/6S/6/5/SE/4S/4, iPad & iPod touch, regardless of whether you have backup files. If you have backup iPhone data to iTunes or iCloud, the iPhone Data Recovery also can help you extract and recover data from iTunes/iCloud backups easily. After recover lost iPhone data and save onto the computer, you can use this iPhone Transfer to import the retrieved files from computer to iPhone for view or use.
Download the iPhone Data Recovery for Windows or Mac and try to recover your lost iPhone data in four recovery modes.
Safely and Professionally iOS Data Recovery to Recover Lost Data from iPhone, iPad and iPod in Four Recovery Modes
If you don’t know how you lost data, you can use this smart recovery mode to find and recover your iPhone data easily.
Step 1. Run the iPhone Data Recovery and Select Smart Recovery Mode
First of all, please download and launch the iPhone Data Recovery, then click “Smart Recovery” tab, click the button “Start”.

Step 2. Connect iPhone to PC or Mac(Optional)
Then, use a USB cable to connect your iPhone device with the PC or Mac computer. This method helps you directly scan your iPhone device and recover the lost data. If the program swith to “Recover Data from iTunes” or “Recover Data from iCloud” modes, you don’t need to connect the device to computer.
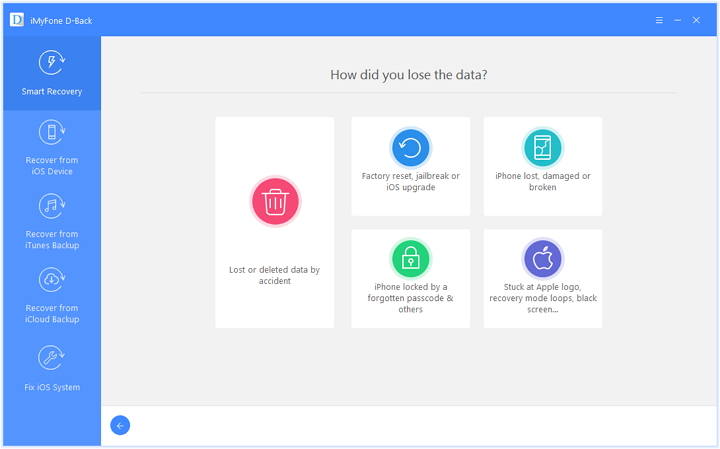
Step 3. Choose How You Lost iPhone Data
Next, you need to choose the situation on how you lost your data for subsequent scan and recovery.
Step 4. Scan and Recover Your Lost Data
Next, all scan and search work will be completed by the iPhone recovery software itself. The program can analyze and recover your data from iOS device, iTunes backup or iCloud backup. The following procedures are similar to “Recover from iOS Device/iTunes Backup/iCloud Backup” tabs. With a few easy steps, you can restore your iPhone data.
If you know for sure where you could find the data, you can also start scanning from iOS Device/iTunes Backup/iCloud Backup tabs respectively. Please keep reading the below guide about how to directly recover data from iPhone devices, how to restore data from iTunes, and how to download and extract iPhone data from iCloud.
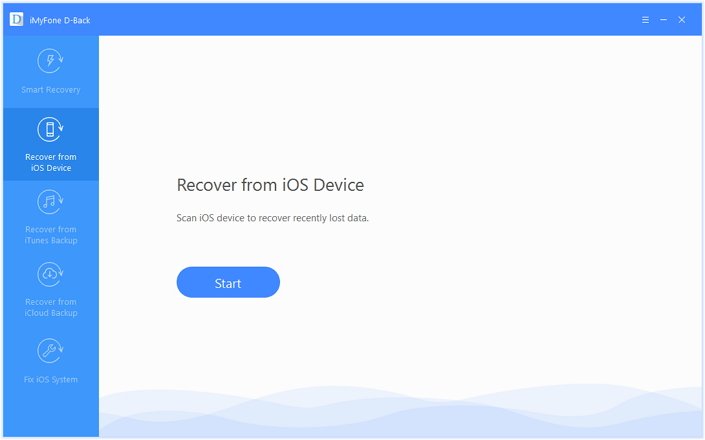
Step 1. Run iPhone Data Recovery and Select “Recover from iOS Device” Mode
After running the program, then click the “Recover from iOS Device” tab. Click on “Start”.
Step 2. Connect iPhone to Computer
Connect your iPhone to your computer, the program successfully detects your iDevice, click “Next” to proceed.

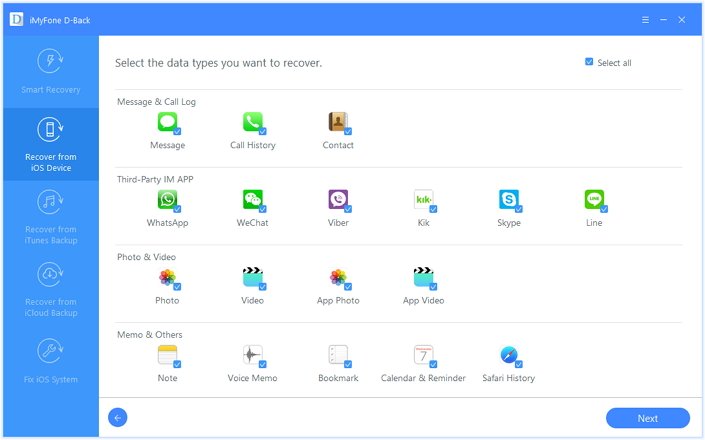
Step 3. Select the Types of Files to Recover
Now, select the types of files that you want to get back, including photos, contacts, videos, messages, notes, Safari bookmarks, call history and other files.
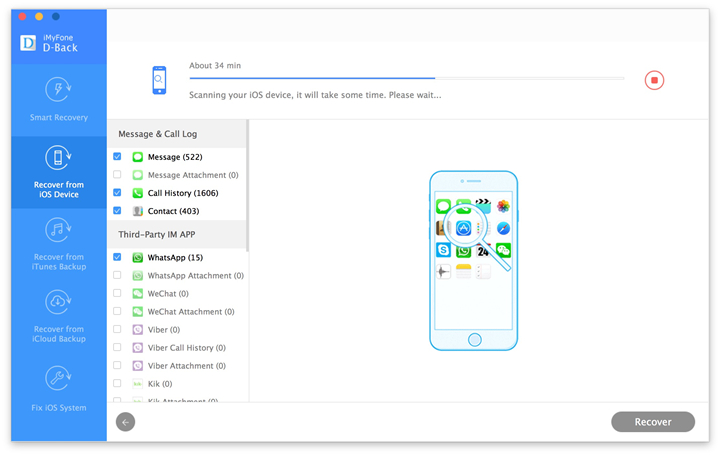
Step 4. Start to Scan your iPhone for Lost Data
After that, click “Scan”. The program will start to scan the deleted files from your iPhone device.
Step 5. Preview and Recover Data from iPhone Directly
After the scan is finished, all recoverable data will be clearly organized as the picture below shows. Click each tab to check all files, or only preview the deleted items by choosing “Show only the deleted files”. Select the files which you want to recover, and then click “Recover” at the bottom right corner.

A pop-up window will display to let you choose the location to store the recovered files and it will take only a few minutes to finish the recovery.
If you connect iPhone device with iTunes, the iTunes will automatically backs up your iPhone data, but those backed up contents is a specific file, so you can view it unless using a third-party tool. The iPhone Data Recovery also can help you extract iPhone backed data from iTunes easily. Let’s teach you how to restore iPhone data from iTunes backups via iPhone data recovery software.
Note: You don’t need to connect your iPhone device to the computer via this recovery mode.
Step 1. Choose and Scan from iTunes Backup
Run the iPhone Data Recovery software, then click “Start” from the “Recover from iTunes Backup” tab.

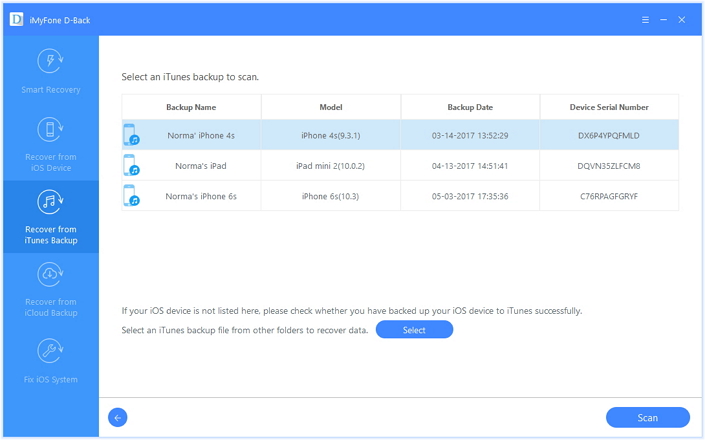
Step 2. Choose the iTunes Backup History
Then choose the exacted iTunes backup from which you want to get back and click “Next”. If you choose an encrypted iTunes backup, you will need to enter the password for iTunes encryption.
Step 3. Select File Types and Scan from iTunes Backups
Select the file types you need and click “Scan” button. Please wait a moment while it scans.

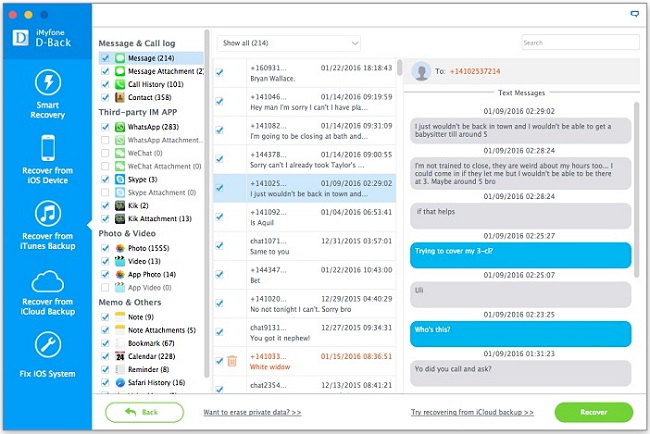
Step 4. Preview and Recover Data from iTunes Backup
The search results will be showed on the interface clearly. Browse them according to your needs; or “Only show the deleted files”, and select the exact ones you need. Then click “Recover” button to extract iPhone backups and save them onto the computer.
In default, Video, Photo, Contacts, SMS, Note option is turned on in iCloud settings for backup data to iCloud automatically. If your iPhone was stolen, lost, water-damaged or broken. However, if you had backup iPhone to iCloud before, then this is iCloud recovery mode is the beset choice for you. The iPhone Data Recovery can help you download the backup file from iCloud, then extract/recover photos, contacts, text messages, notes and more from iCloud and save onto the computer for you. Let’s teach you how to recover lost/broken/damaged iPhone data from iCloud backups via iPhone data recovery software.
Step 1. Run iPhone Data Recovery and Click “Recover from iCloud Backup” Mode
After launching the iPhone data recovery software on PC or Mac, then click “Recover from iCloud Backup” tab and click “Start” button.

Step 2. Log In iCloud Account
Then, please log in iCloud Account to ready to download Your iCloud backup files.
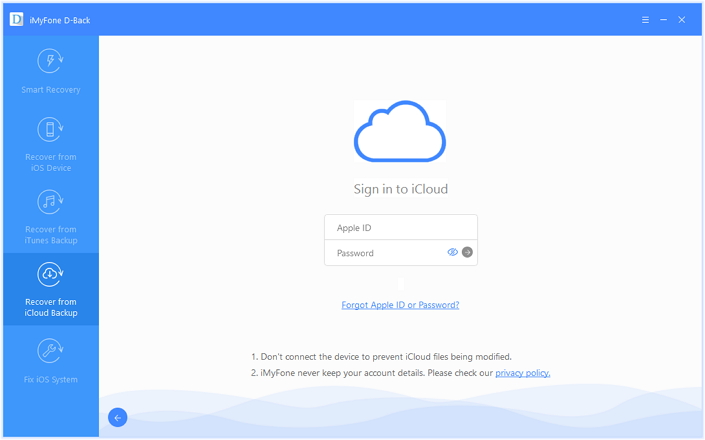
Tips: Please be assured that we will never keep a record of your iCloud account info or content.
Step 3. Choose a Backup History to Download
The program will find all iCloud backup files in your account; then, select the iCloud backup you would like to recover data from. Click “Next” on the lower right corner.
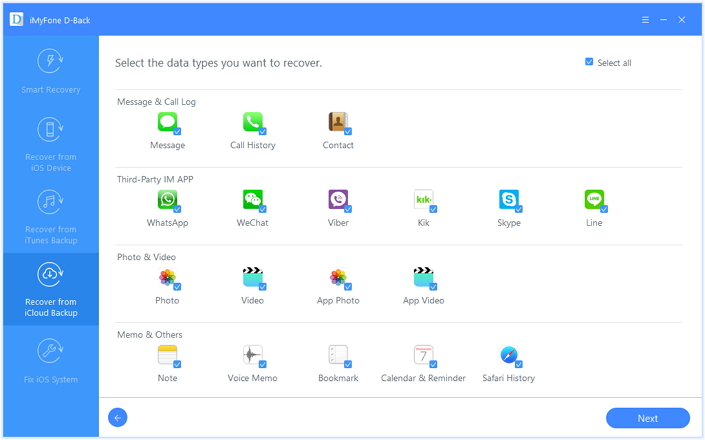
Step 4. Select File Types to Recover
Select the files you wish to recover and then click “Scan”. It will take a few minutes for the program to download and scan your iCloud backup files.

Step 5. Preview and Recover iPhone Lost Data from iCloud Backup
When the download is completed. iPhone Data Recovery will extract all the data from the file, such as videos, photos, contacts. Also, you can preview the file one by one to make sure it’s the right one you are looking for. Finally, click ‘Recover ‘ button to save the selected files to computer.
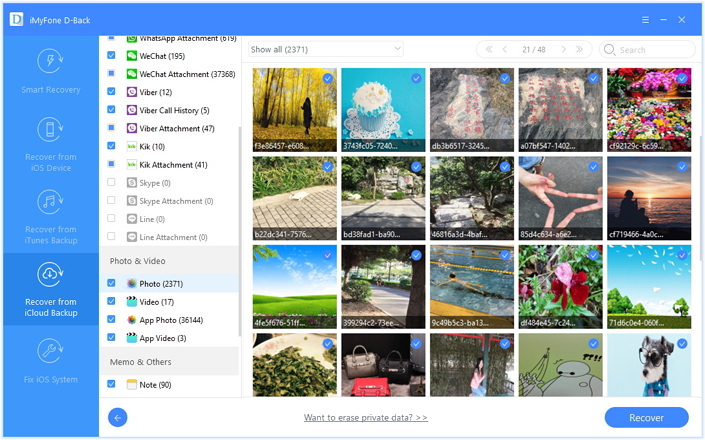
Recover Text Messages, iMessages, WhatsApp messages and more from iCloud
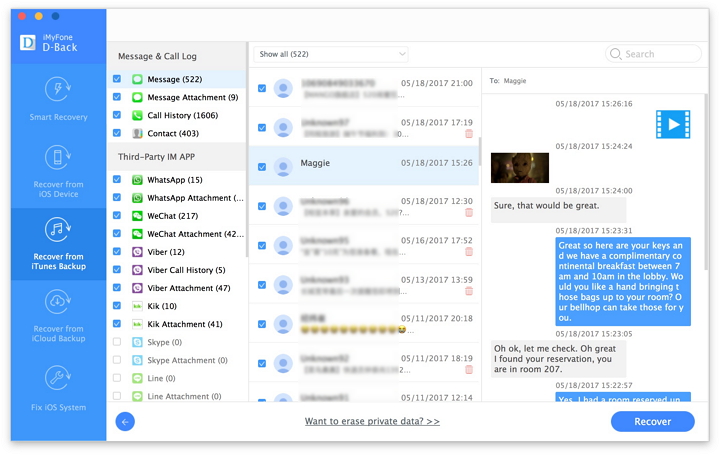
Last, choose a location on your computer to store the recovered data. Please wait while the iPhone data recovery software is recovering your lost data. Only few minutes, your files have been successfully recovered and save onto the computer. If you want to transfer the retrieved files to iOS devices, you can use this iPhone Manager, which allows you put media and text files such as contacts, photos, videos, music from computer to iPhone/iPad/iPod directly.
Download the trial version of iPhone Data Recovery for Windows or iPhone Data Recovery for Mac and try to recover your iPhone lost data.
iPhone Data Recovery is highly reliable and it offers 30-day money-back guarantee after you have purchased the software. If you are not satisfied with how it performs, you can return it and your money will be refunded. There is 24-hour support service and if ever you encounter any problems while using the product, you can contact the support team to ask for help.
The best way to avoiding data losing on iPhone is to backup iPhone with iTunes. Every time you connect your iPhone to computer and launching the iTunes for syncing, the iTunes program automatically backs up your iPhone data. This is a free method to make your device return to its previous working order without data loss after experiencing technical issues. You can make it just by restoring your iPhone with iTunes. In additional, you can also use a best iTunes alternatives to backup and restore your iPhone data easily, this iOS Data Backup & Restore tool or U.Fone iOS Backup & Restore tool, both is designed to selectively back up and restore iPhone/iPad/iPod touch.
– Back up only Photos, Videos, Music, Call Logs, Notes and more.
– Back up only Contacts, SMS, WhatsApp, or WeChat and more.
– Restore only Contacts, SMS, WhatsApp, or WeChat from iTunes/iCloud backup without data loss on target device.
– View and export 18+ types of data from iTunes/iCloud backup or iOS device.
– Compatible with all iOS versions and devices including iOS 12 and iPhone XS(Max)


Compatible with iOS 13 & iPhone 11(Pro)
Prompt: you need to log in before you can comment.
No account yet. Please click here to register.
