By Selena KomezUpdated on March 31, 2023
“I mistakenly deleted some important photos from the ‘Recently Deleted’ folder in my iPhone 14 Pro’s Photos app. Is it possible to recover these deleted photos?”
Thanks to advances in smartphone technology, taking photos with the camera on your iPhone 14 is easier than ever before. However, accidental deletion of these precious photos can happen with just a single tap on the screen, leaving you in despair if the photos were not backed up. The good news is that there are various ways to recover permanently deleted photos from your iPhone 14, even if you thought they were lost forever. Whether you have a backup or not, you can recover your deleted photos and save them from being lost forever.
If you’re in a situation where you’ve accidentally deleted an important photo from your iPhone 14, don’t worry. In this guide, you’ll discover everything you need to know about recovering your deleted photos from iPhone 14/14 Plus/14 Pro/14 Pro Max, including methods for recovering them with or without a backup.
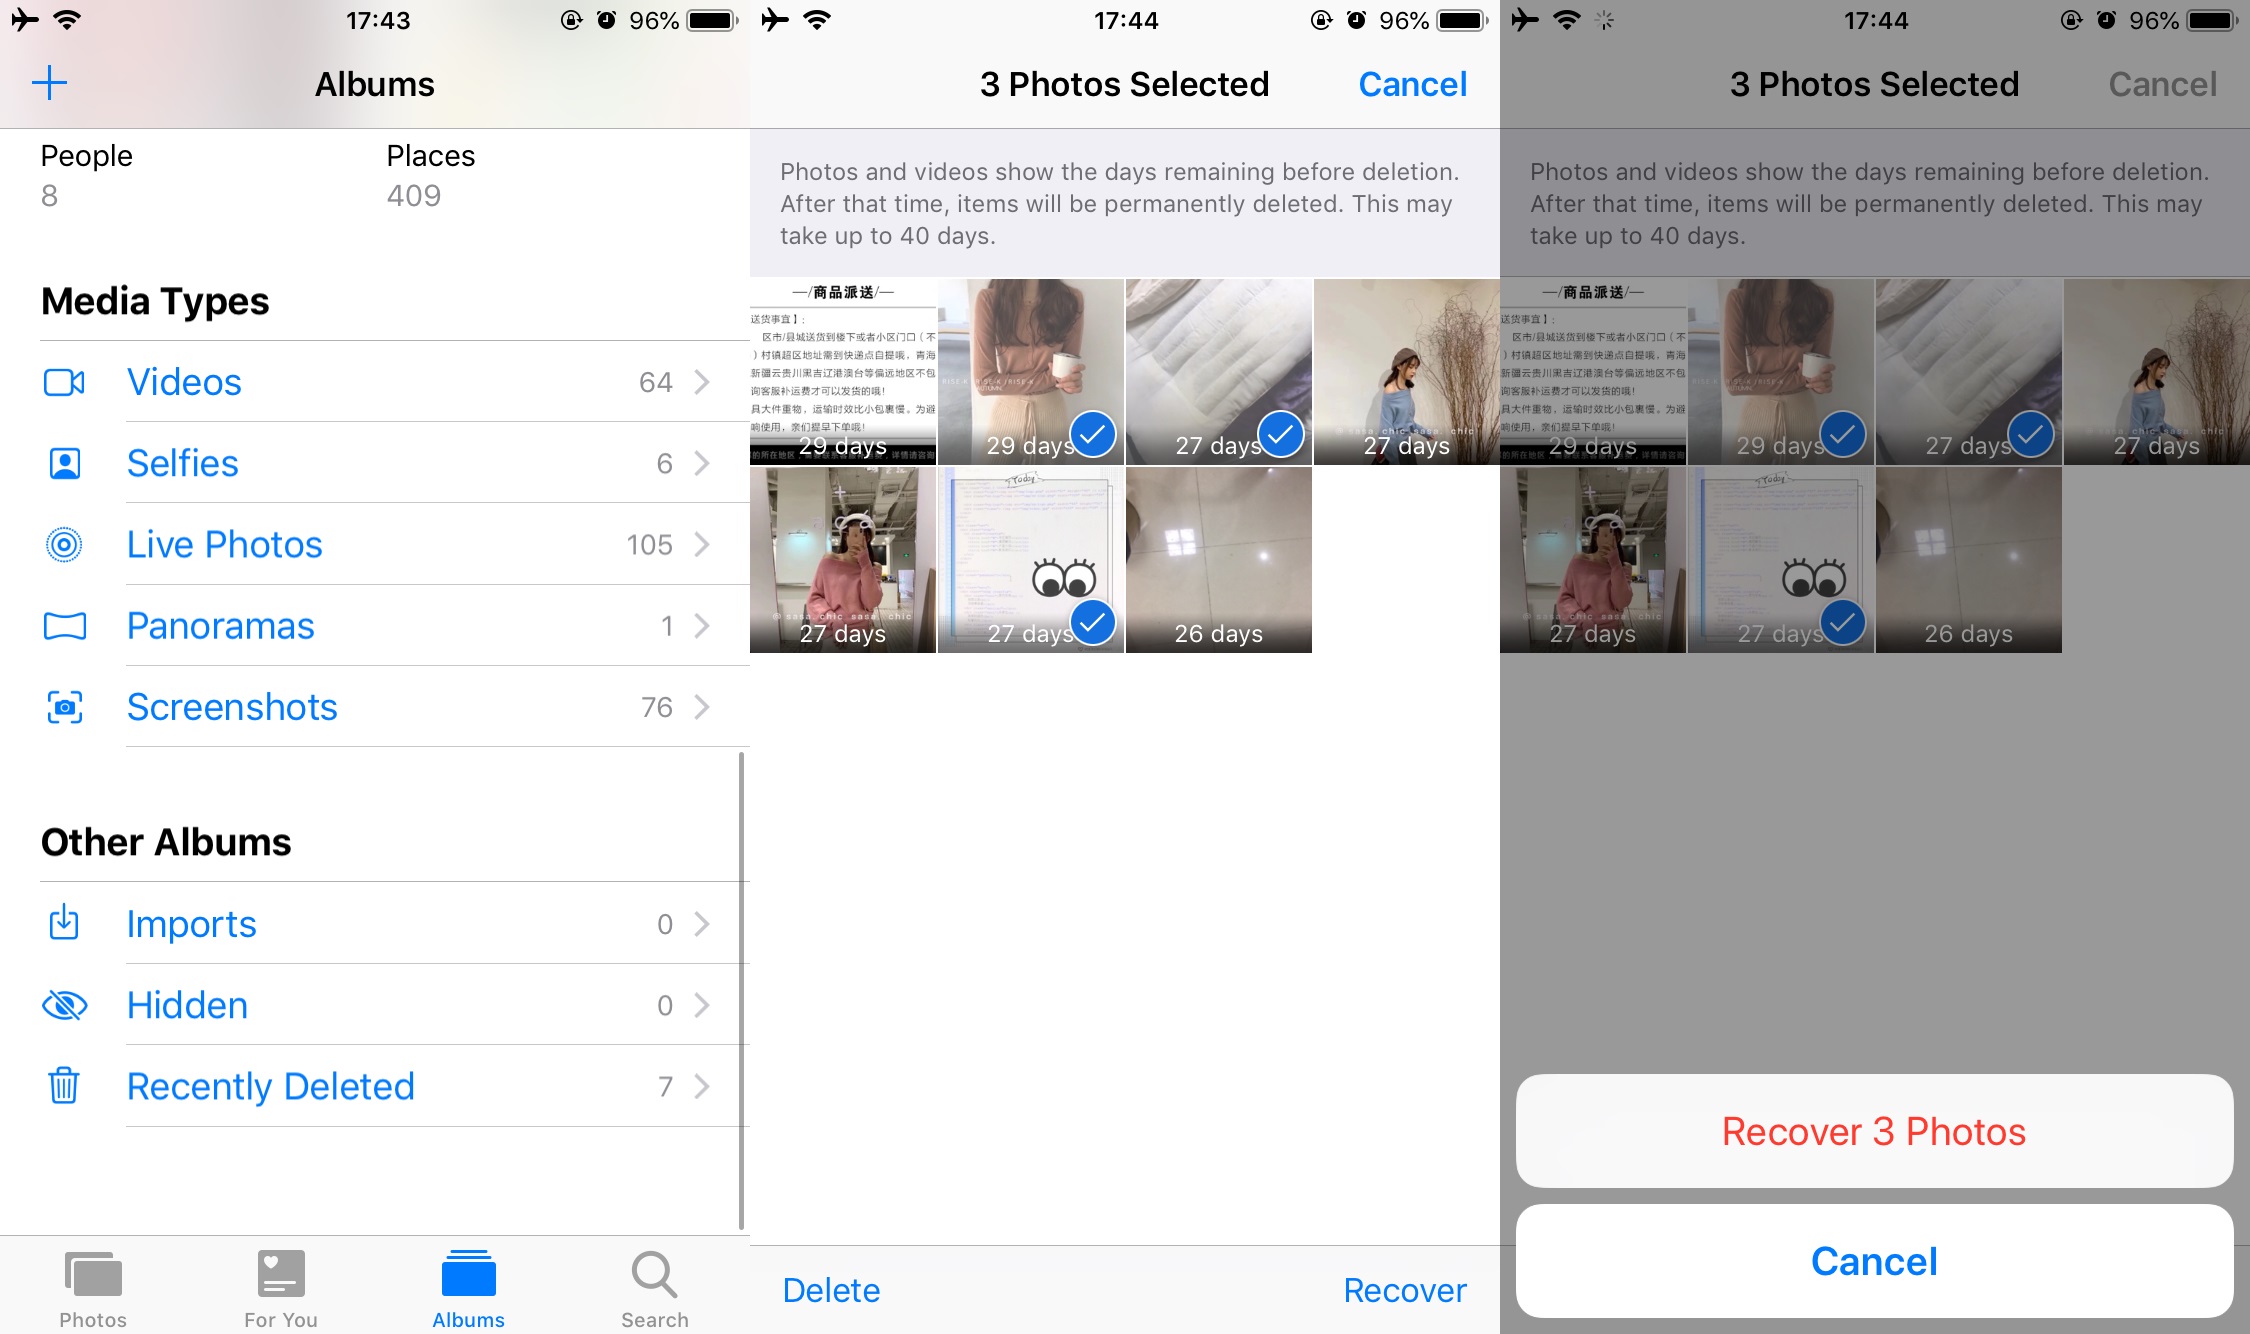
Fortunately, if you haven’t permanently deleted your photos, you can easily recover them from the Recently Deleted folder within 30 days. Follow these simple steps to retrieve your photos:
Step 1. Open the Photos app on your iPhone.
Step 2. Tap on the Recently Deleted folder.
Step 3. Select the photos you want to recover by tapping on them, or tap ‘Select’ in the upper-right corner to select all.
Step 4. Tap on ‘Recover All’ or select the individual photos you want to recover, and then tap ‘Recover’ to restore them to your iPhone’s photo gallery.
Recovering deleted photos on your iPhone 14 is a straightforward process. However, if it’s been more than 30 days since you deleted the photos, you won’t be able to retrieve them from the ‘Recently Deleted’ feature in the Photos app. In this case, your best option is to use a specialized photo recovery program to recover the deleted photos directly from your iPhone 14’s memory, without the need for a backup.
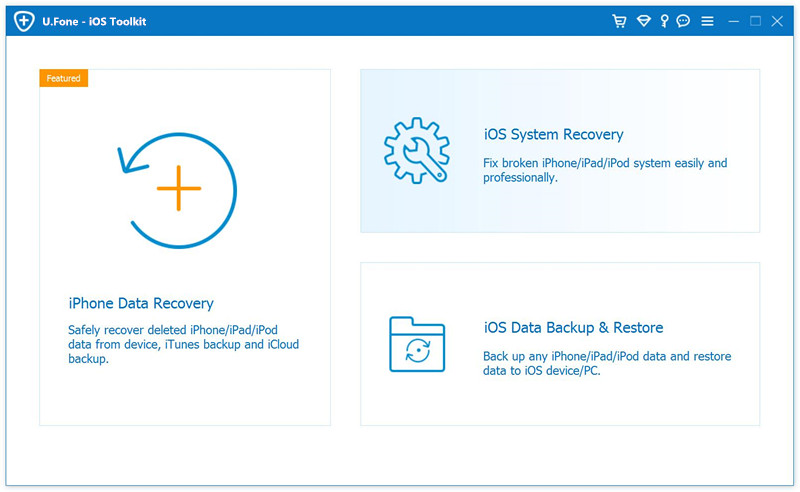
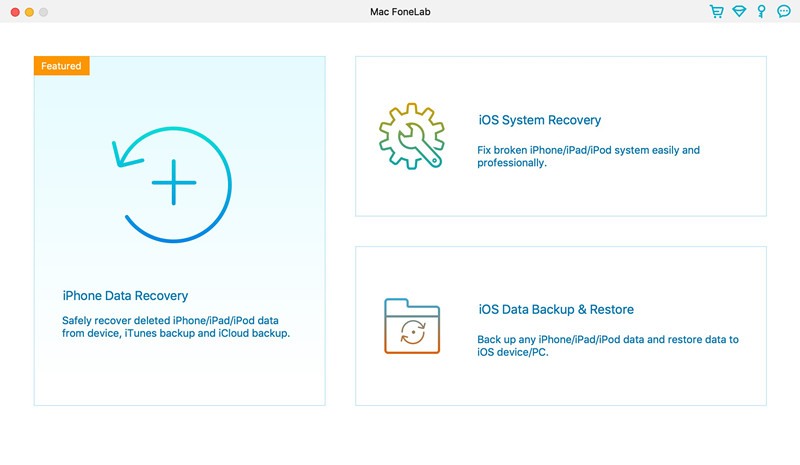
Among the available tools for recovering deleted photos on iPhone 14, iPhone Data Recovery stands out as an excellent option. Its advanced algorithms enable deep scans of the device’s memory, making it possible to recover not only photos but also other types of data, such as messages, contacts, notes, and call history. In addition, this iPhone photo recovery software provides the ability to retrieve images from iTunes and iCloud backups, making it a versatile tool.
More Features of iPhone Data Recovery


Step 1. Download and Launch the Software
After downloading and installing iPhone Data Recovery on your computer, you can launch the program. The software’s main interface provides you with three primary functions, among which you can select “iPhone Data Recovery” from the list.
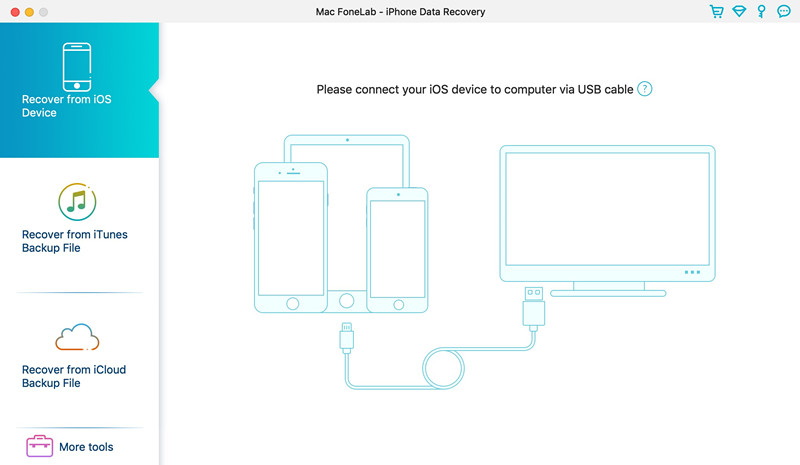
Step 2. Connect Your iPhone to Your Computer
Choose the “Recover from iOS Device” option to retrieve lost photos directly from your iPhone. Then connect your iPhone to your computer with an Apple USB cable.
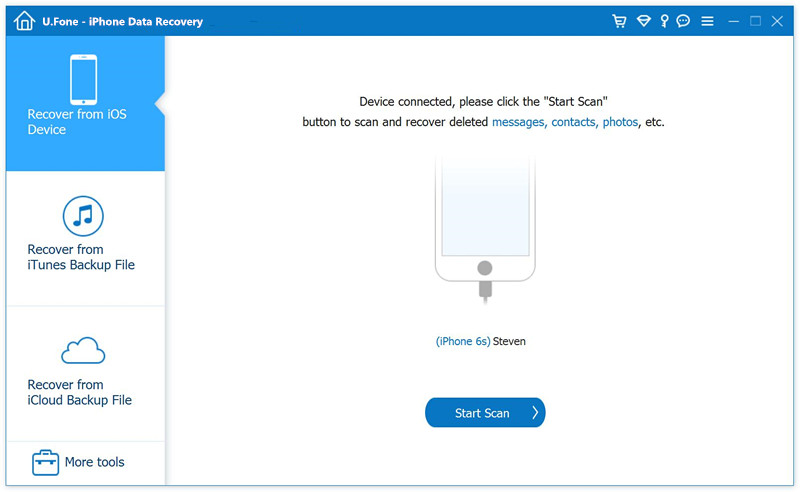
Step 3. Scan and Analyze Data on iPhone
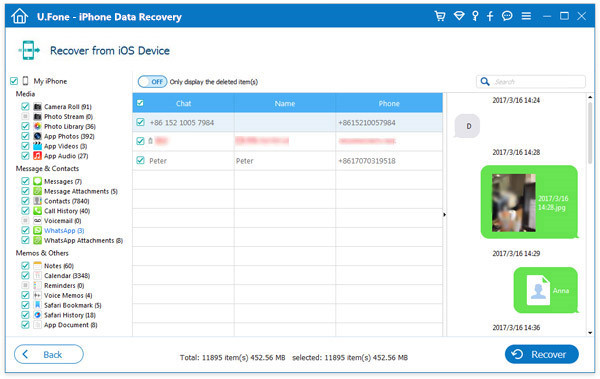
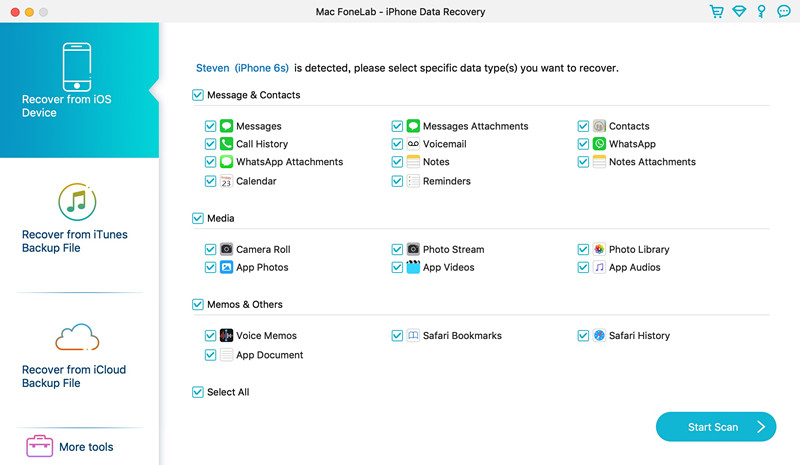
Once your iPhone is connected to the computer, click on the “Start Scan” button to begin scanning for lost data. The program will then proceed to analyze all of the files and data on your iPhone. After the scan is completed, the program will display all of the data and files that were found on your iPhone.

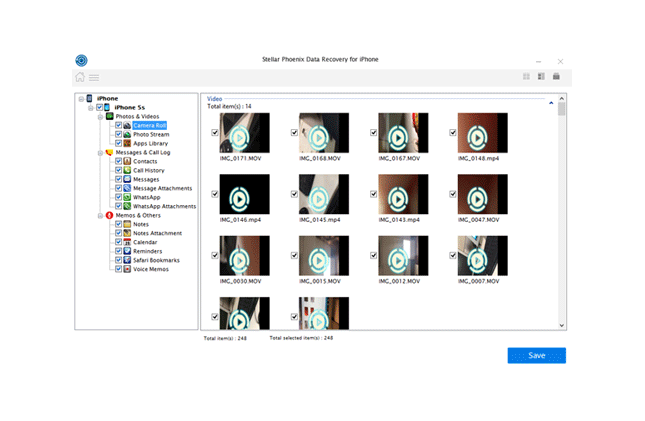
Step 4. Choose and Preview the Desired Photos
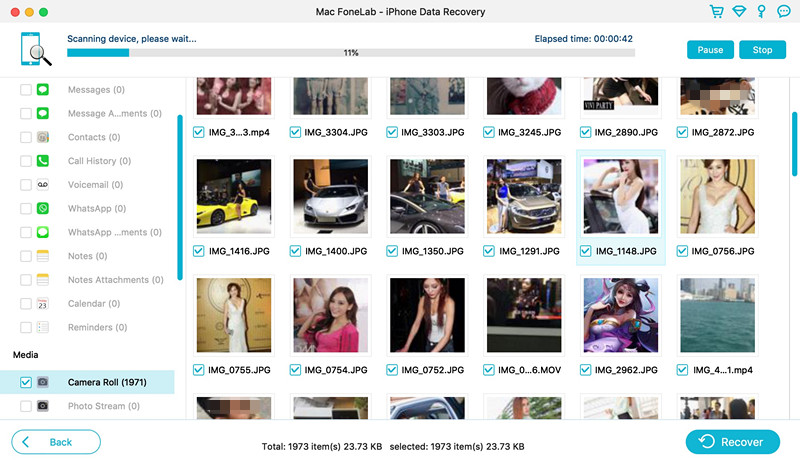
Navigate to the left-hand side of the interface and select the specific photo categories you want to recover, such as “Camera Roll”, “Photo Stream”, “Photo Library”, “App Photos”, “App Videos”. Once selected, the recoverable photos and videos will be displayed on the right-hand side of the interface, where you can preview them. Simply choose the ones you want to recover.
Step 5. Start to Recover Photos on iPhone
Select the photos you want to recover and click on the “Recover” button to start the recovery process. The software will then retrieve the chosen photos and save them to your computer. Be sure to pick a safe location to store the recovered files.
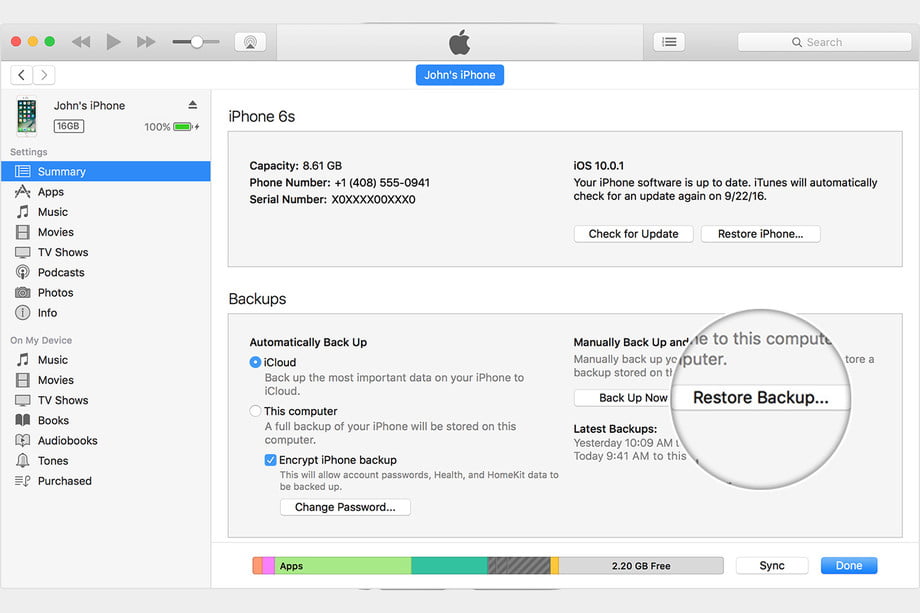
A viable option to recover photos from an iTunes backup is to perform a selective restore of the backup. By doing so, you can recover specific photos from the backup without losing any other data on your iPhone. Keep in mind that if you perform a full restore, it will erase all the data on your iPhone and replace it with the backup, including the newly taken photos that you might not want to lose.
Step 1. Launch iTunes on your computer and connect your iPhone 14 to it using a USB cable.
Step 2. Click on the iPhone icon, then navigate to the “Summary” tab in the Settings section.
Step 3. Under the “Backups” section, click on “Restore Backup” and select the most recent backup.
Step 4. Wait for the backup to restore, and then check if the deleted photos have been recovered on your iPhone.
Losing important photos from your iPhone 14 can be a frustrating experience, but fortunately, there are various ways to recover them. You can try recovering the deleted photos from your Recently Deleted album, iTunes backup, or use third-party data recovery tools such as iPhone Data Recovery. With these methods, you can easily retrieve your lost photos from your iPhone 14/14 Plus/14 Pro/14 Pro Max, regardless of the cause of the loss.
Prompt: you need to log in before you can comment.
No account yet. Please click here to register.
 (No Ratings Yet)
By Selena KomezUpdated on March 03, 2023
“I accidentally deleted some important photos from my iPhone 12 Pro Max. I really need to get them back and I was wondering if you could provide some guidance on how to recover deleted photos from iPhone 12. Any help would be greatly appreciated. Thank you.”
As previously mentioned above, the sudden disappearance of our iPhone photos can be a nightmare. Whether due to accidental deletion or other unforeseen events such as a failed jailbreak, iOS update issues, iTunes sync errors, or even viruses, losing precious photos is devastating.
So, where exactly do the deleted photos on our iPhone go? Is there a way to recover deleted photo from iPhone? In this article, we will provide you with a comprehensive guide on iPhone photo recovery. whether they have been recently deleted or permanently erased. Whether or not you have an iPhone backup, We will share the ways to recover your lost photos from iPhone, including iPhone 14/13/12/11/X/8/7/6. Keep reading to learn everything you need to know about iPhone photo recovery and how to retrieve your deleted photos from iPhone 12/12 Pro/12 Pro Max.
Have you accidentally deleted important photos from your iPhone? The good news is that they are not necessarily gone forever. In fact, Apple has included a feature in iOS devices since iOS 8 to assist in recovering recently deleted photos.
If you are using iOS 8 or a later version of iOS, you can easily locate recently deleted photos by accessing the Recently Deleted album in the Photos app. This album stores all your deleted photos for up to 30 days, you will have enough time to restore them to your iPhone’s Camera Roll or other photo albums.
CONTENTS
If you’re planning to recover your deleted photos from iPhone using the “Recently Deleted” feature, there are a few things to keep in mind:
To retrieve deleted photos from iPhone using the “Recently Deleted” feature, follow these steps:
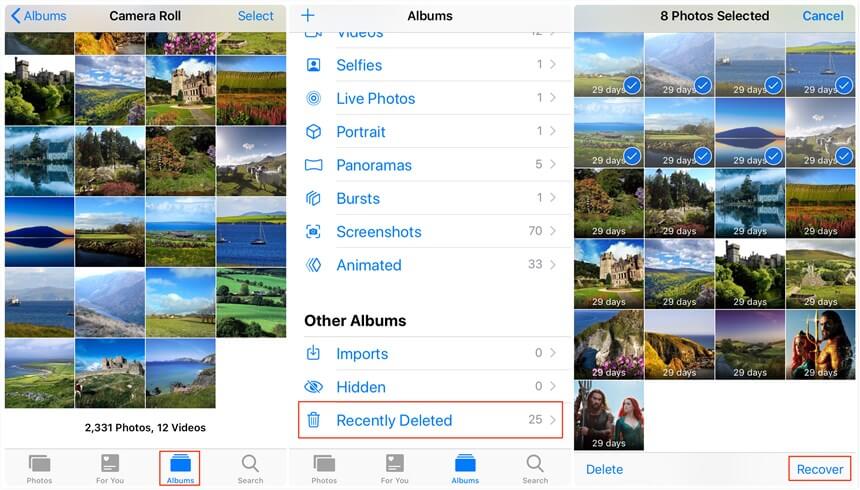
Step 1. Open the Photos app on your iPhone.
Step 2. Tap on “Albums” and scroll down to find the “Recently Deleted” album.
Step 3. Open the “Recently Deleted” album and preview the recently deleted photos.
Step 4. Select the photos you want to recover by tapping on “Select.”
Step 5. Tap on “Recover” in the bottom right corner to restore the selected photos.
If you have already checked your Recently Deleted album and don’t have any backup files, you can still recover deleted photos from your iPhone using a third-party data recovery tool. One such tool is U.Fone iPhone Data Recover, which can help you recover deleted photos even if you don’t have a backup.
U.Fone iPhone Data Recovery is a program designed for recovering lost or deleted data from iPhones, iPads, and iPods. It is developed by U.Fone, a software company that specializes in iOS data recovery solutions. The software supports the recovery of various types of data, including photos, videos, contacts, messages, notes, and more. U.Fone iPhone Data Recovery is compatible with both Windows and Mac operating systems and can be used with all models of iPhones, iPads, and iPods.
Great Features of U.Fone iPhone Data Recovery
Step 1. Download and Run the Software
Firstly, you need to download and install U.Fone iOS Data Recovery on your Mac or Windows computer. Once the installation process is complete, launch the program. The main interface displays three primary functions, select “iPhone Data Recovery” from the list.
Step 2. Connect Your iPhone to Your Computer
To recover lost photos directly from your iPhone, select the “Recover from iOS Device” option. Then, use an Apple USB cable to connect your iPhone to your PC or Mac.
Step 3. Scan and Analyze Data on iPhone
After connecting your iPhone to the computer, click on the “Start Scan” button to initiate the scanning process. The tool will then start to analyze your iPhone’s data and files. Once the scan is completed, all of your iPhone’s data and files will be displayed on the interface.
Step 4. Choose and Preview the Desired Photos
On the left side, select the photo categories you want to recover, such as “Camera Roll”, “Photo Stream”, “Photo Library”, “App Photos”, “App Videos”. Then, you can preview the recoverable photos and videos on the right side. Choose the ones you want to recover.
Step 5. Start to Recover Photos on iPhone
Click on the “Recover” button to begin the recovery process. The software will restore the selected photos and save them to your computer. Make sure to choose a secure location to store the recovered files.
If you have backed up your iPhone using iTunes, you can recover your deleted photos on your iPhone 12 with ease by following these simple steps:
Step 1. Launch iTunes on your Mac/PC.
Step 2. Connect your iPhone to your computer using a USB cable.
Step 3. Once your iPhone is detected, click on the phone icon in the top left corner of iTunes.
Step 4. Navigate to the “Summary” section, and under “Backups”, click “Restore Backup.”
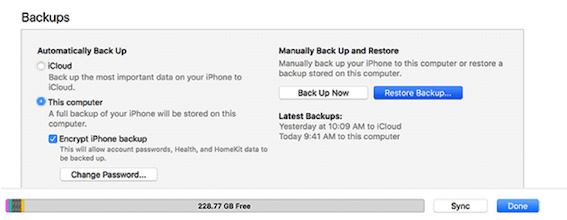
Step 5. If you have multiple backups, select the latest backup to restore. After a few minutes, your lost photos will be restored successfully.
After following the steps in this guide on how to recover deleted photos from iPhone, you may have been able to successfully retrieve your lost photos, and it is crucial to regularly back up your iPhone photos and other content to avoid encountering similar problems in the future. Also, you have better choice by using U.Fone iPhone, which helps you recover various types of lost data from iPhone even without backup. Do not hesitate to downloading the software to assist you with your recovery endeavors.
Prompt: you need to log in before you can comment.
No account yet. Please click here to register.
(No Ratings Yet)By Selena KomezUpdated on November 28, 2022
“I mistaken deleted some important work meeting photos and videos in my iPhone device, what worse is that all the deleted data saved in the ‘Recently Deleted’ box have been removed. Can I recover them with a quick way? How? Please send me your ideas. Thanks advanced.”
If you made a accidental deletion on photos and videos from iPhone, you can simply return them from the “Recently Deleted” box. Select target items and tap on “Recover”, you will get all the deleted data. But it only works when you manually delete photos or videos less than 30 days. If you can’t find the data in the Photos app on device, they are likely to be lost permanently. General speaking, the experience of losing important photos and videos from iPhone is not a special case for iPhone users. In addition to accidental deletion, you may lose valuable data from device due to failed iOS upgrade, device crashes, and others. Can you recover permanently deleted photos and videos from iPhone? YES, fortunately! Recovering deleted photos/videos from iPhone is as easy as recovering iPhone deleted contacts/SMS and other types of iOS data, and the ways are similar.
Tips:
Once you realize that your photos/videos are lost, don’t sync your iPhone with iTunes/iCloud anymore. Otherwise, the backup file will be updated and can’t be regained forever. Also don’t use your device to avoid data be overwritten.
Let’s start with the simplest situation. Provided that your videos were personally captured using the iPhone built-in Camera app, then you can go to check the “Recently Deleted” album in Photos app after you manually deleted photos or videos. You’re allowed to get deleted media files restored within 30 days, after which the automatic removal process should begin. To restore recently deleted photos/videos on an iPhone, check these steps and follow it to do:
Step 1. Open Photos app on your iPhone.
Step 2. Go to Album tab.
Step 3. Scroll down to tap “Recently Deleted” Album.
Step 4. Tap “Select” option in the upper right corner, then choose the items that you want to restore.
Step 5. Tap “Recover”.

The deleted items will be restored to Camera Roll on your iPhone.
It’s luckily to recover data from iPhone “Recently Deleted” Box if the items haven’t been removed, however, how to restore permanently deleted photos/videos from iPhone even without backup? Suppose none of the backups are accessible, just get the help of a specialized iPhone data recovery software. It is the safest and simplest way to get back your permanently deleted photos and videos from iPhone directly without backup.
Thanks to U.Fone iOS Toolkit – iOS Data Recovery, you will do the iPhone media files restore job effectively and efficiently. iOS Data Recovery is capable of recovering 22 or more file types which include media files like photos and videos. Through the deep scan on your device using this tool, you can easily find and recover deleted photos and videos from iPhone without backup. What’s more, this professional software provider is definitely trusted and relied on by users to recover permanently deleted photos, videos, messages, contacts and more files on the iPhone/iPad.
It can be used to restore iOS data after losing them under in any cases, like permanently deleted, iOS update, device crashed, etc,. With a great value set of having 3 modes including recover data from iOS device without backup, extract data from iTunes backup, extract data from iCloud backup; it is an ideal tool help to get back your precious iOS data. It has been noted that it has the Highest Data Recovery Rate in the market. This software supports a wide range of iOS devices and iOS platforms: from iPad to iPad Pro, all iPhone versions that run on iOS 7 up to latest iOS 16.


Step 1. Download, Install and Run iOS Data Recovery
Download, install and run the U.Fone iOS Toolkit – iOS Data Recovery on the computer and select “iPhone Data Recovery” in the home interface.
Step 2. Choose Data Recovery Mode
Then it will show you 4 mode, including “Recover from iOS Device”, “Recover from iTunes Backup File”, “Recover from iCloud Backup File” & “More tools” . Select “Recover from iOS Device” mode so that you can recover deleted photos/videos from iPhone directly without backup.
Then, get your iPhone plugged into the computer and wait for the connection with the data recovery tool.
Step 3. Choose iPhone Items to Recover
In this step, you should select the type of data you want to recover. Under “Media” option, please select “Camera Roll”, “Photo Stream”, “Photo Library”, “App Photos”, “App Videos”, “App Audios” section, then click “Start Scan” button.
Step 4. Scan Media Files from iPhone
It will start scanning your iPhone immediately. Wait patiently until the scanning process ends.
Step 5. Preview and Recover iPhone Photos/Videos
Once the scanning finishes, you can preview the photos or videos which have been scanned out. Just select the items you want to recover. Then click on “Recover” button.

All the recovered files will be saved as JPG/JPEG/TIFF/GIF/PNG/BMP formats.
Prompt: you need to log in before you can comment.
No account yet. Please click here to register.
(No Ratings Yet)