Category Archives: Phone Management

How to Listen to Apple Music via Web Player without iTunes

How can I listen to Apple Music through a browser? Are there any way to enjoy Apple Music on Web Player without iTunes?

Apple Music, as one of the largest and most popular streaming music services in the world, is favored by most music lovers thanks to its great user experience and big music library. However, unlike Spotify Music, Apple Music doesn’t provide a web player for subscribers to listen to Apple Music tracks via web browser on computer. It’s inconvenient for people who don’t like to listen to Apple Music via iTunes. So you may wonder if there’s any way to listen to Apple music through a browser without iTunes. Absolutely YES. Although there’s no Apple Music web player for you to play Apple Music directly via browser, you can do this with only a few clicks.. The following passages will show you the solution.

Why We can’t Play Apple Music via Web Player
Since Apple Music tracks are encoded in M4P format with Apple FairPlay DRM protection. The majority of media players, including web browsers, Windows Media Player, VLC or QuickTime are unable to process the protected M4P format, except Apple’s own app such as iTunes. Though you can’t play Apple Music on web player directly, but there are so many tools that can remove DRM from Apple Music. In other words, once the DRM is cracked from Apple Music streams, you can easily play the songs on any player as you like.

Remove DRM from Apple Music for Playing on Web Player

One of the most effective solutions is Apple Music Converter. Thanks to its ability to strip DRM from Apple Music songs and convert M4P format to DRM-free losslessly, you can freely listen to any Apple Music track on web player without iTunes. It’s an all-in-one smart Apple Music DRM removal solution that can completely remove DRM lock from any offline Apple Music M4P songs and convert the Apple Music to DRM-free MP3, AAC, WAV, FLAC, etc,. that are compatible with most web players and other media players. After the conversion, you can play back the converted Apple Music on any compatible mobile device without iTunes. Besides, this powerful Apple Music Converter will keep the original audio quality for you during the conversion, the conversion up to 16x speed.

d_win d_mac

How to Play Apple Music on Web Player without iTunes

Step 1.Run Apple Music Converter on Computer and Load Apple Music
Run Apple Music Converter on your computer and load Apple Music offline M4P tracks.

select music to convert

You’ll find iTunes opens automatically. Simply click the top “add” icon to load the offline Apple Music songs from the iTunes library. Select the ones you want to convert to add the files to program.

Step 2.Choose Output Format

setting the parameter

Click the Format panel on the program and you’ll be prompted with a window where you can select the output audio format including MP3, AAC, WAV, FLAC, M4A and more. You can also adjust the audio quality such as codec, channel, sample rate, bit rate, etc. as you like.

Step 3.Remove DRM from Apple Music

remove DRM from Apple music

Now when everything is ready, click “Convert” button to strip DRM from Apple Music and convert them to DRM-free format.

After that, you can find the non-DRM music files in the converted folder. Then you are supposed to copy any of them to the web player for playback on computer without iTunes.

d_win d_mac

More Apple Music Guides

How to Remove DRM Lock from Apple Music Streams

How to Play Apple Music on MP3 Player

How to Play Apple Music on Samsung Galaxy

How to Play Apple Music on iPod Nano and iPod Shuffle

How to Set Apple Music Tracks as iPhone Ringtone

How to Convert iTunes M4V Videos/Movies to MP4

How Can we Play Apple Music Songs on Xbox One

Apple Music app is not available on Xbox One, how can we play Apple Music songs on Xbox One without limits? Can you give me some advice? I need a simple solution. Thanks a lot.

Add background music has been one of the most-requested for Xbox fan features. In July, 2016, background music came to Xbox One finally. With supported music apps, you are now able to play music in the background of Xbox One. No matter listen to music while you are playing games or browse the internet, background music can provide the soundtrack to your Xbox experience. What suffer from most of Xbox One user? Actually, Xbox One is not in the list of supported services of Apple Music, since Apple Music is DRM-protected, it means that you can’t play Apple Music on any non-Apple device. Here brings a new question – that’s how to stream Apple Music on Xbox One.

Why Can’t We Directly Stream Apple Music to Xbox One
A.Apple Music songs are encrypted with DRM protection. That’s to say, you can’t stream Apple Music songs to Xbox One for listening like streaming common MP3 songs.
B. There is no official Apple Music app or iTunes for Xbox One.

If you are one of them who want to enjoy Apple Music on Xbox One, the only way is to remove DRM from Apple Music, convert Apple Music to Xbox One supported format. Before we started, you should know what the format supported by Xbox One. Supported Formats of Xbox One: 3GP audio, AAC, ADTS, MP3, WAV, WMA, WMA Lossless, WMA Pro, WMA Voice.

Remove DRM Protection from Apple Music for Xbox One

Once we know the supported audio format supported of Xbox one, we should get a music converter tool called Apple Music Converter that is capable of removing DRM protection from Apple Music for Xbox One, converting Apple Music to Xbox One with compatible formats, such as MP3.It allows you to strip DRM from Apple Music, M4P songs and iTunes/Audible Audiobook, convert them to common audio format with up to 16x speed. The converted music will be output with its original quality. What’s more, when the conversion is finished, you could transfer the converted music files for offline playing on any compatible devices, like Android device, iOS device, computer, PSP, MP3 player and Xbox One.

d_win d_mac

How to Stream Apple Music to Xbox One

Step 1. Launch Apple Music Converter
Launch Apple Music Converter and iTunes will be automatically opened to load all your media file. Then you can choose a relevant playlist and select the Apple Music tracks that you want to sync to Xbox One.

select music to convert

Step 2. Choose MP3 as the Output Format
Open the “Playlist” and then choose the Apple Music you want to play on Xbox One.Then select “MP3” as the output format of the converted music files. Here you can also setting other parameter of the converted music files, like the conversion speed and conversion quality.

setting the parameter

Step 3. Convert Apple Music to MP3
Ready? Simply click “Convert” to start conversion and then wait for the conversion finished. When the conversion is finished, you can click “Explore Output File” to find the converted Apple Music in MP3 format under destination folder.

remove DRM from Apple music

d_win d_mac

Step 4. Stream Apple Music to Xbox One via a USB Cable

1. Install the Xbox Media Player App from the Xbox Sore.

2. Connect the USB drive with your computer and copy converted Apple Music onto it.

3. Then eject it from your computer and connect it to one of the USB ports on your Xbox One.

4. Open the Media Player app and you’ll see your connected drive as an option. Select the drive and you can browse all the media files on it and play them, control the playback with your Xbox controller.

Done. Now you can freely enjoy Apple Music as the background music on Xbox One while you are playing games or browse the internet using it. Sounds so great?

More Apple Music Guides

How to Stream DRM-free Apple Music to Samsung Galaxy

How to Play Apple Music on iPod Nano and iPod Shuffle

How to Set Apple Music Tracks as iPhone Ringtone

How to Play Apple Music on MP3 Player

How to Copy Apple Music Songs and iTunes Playlist to USB Stick

How to Convert iTunes M4V Videos/Movies to MP4

How to Play iTunes M4P Files without iTunes

How to play M4P music songs without iTunes successfully? I want to play back iTunes music in anywhere even without Internet condition. Is there any way to make it true?

Apple Music is a hot streaming music service for iOS users, for which all the songs on Apple Music are DRM-protected. The DRM protection prevents you from listening to these audio files on any portable devices that aren’t linked to your iTunes or Apple Music account. Moreover, Once we cancel the subscription of Apple Music, we won’t be able to access to all of the songs. If you want to make M4P files available without iTunes, to remove DRM protection and convert them to other formats is most feasible. After the conversion, you can play back the converted iTunes music files without iTunes even after canceling the subscription.

Remove DRM from iTunes Music

For the best M4P DRM Removal, I recommend Apple Music Converter. This software is designed to legally remove DRM from M4P Music, Apple Music and Audiobooks, and convert purchased iTunes M4P music to the most frequently used audio formats like MP3, AAC, M4A, MKA, AU, M4R, AC3, and etc. After that, you can play M4P songs on any compatible audio players without iTunes; such as, iOS device, Android device, PSP, MP3 player, computer, etc,. The output songs will be keep with its high audio quality.

d_win d_mac

Main Features of Apple Music Converter:
-Remove DRM from iTunes M4P music;
-Convert M4P files, Apple Music files to MP3/AA3/FLAC/M4A;
-Convert iTunes music at 16X faster speed with lossless quality.
-Available in Mac and Windows version.

How to Remove M4P Files for Playing without iTunes

Step 1. Run Apple Music Converter
To get started, you need to download, install and launch Apple Music Converter on computer. Then, iTunes will be opened automatically and it will load all iTunes music files to you.

Step 2. Select iTunes Music Songs to Convert
After running the program on the computer, you will see it will load iTunes playlists in the home page of program. Now, click “Library” or “Music” in the left side and select the DRM-protected M4P files. Note: The program supports batch conversion.

Add iTunes Music to convert

Step 3. Customize Output Format
You can select MP3, M4A, M4R, AC3, FLAC, etc. as the output format. They are all DRM-free. Just select the one you need. Moreover, you can specify the location for saving the converted iTunes music songs.

select format to Convert

Step 4. Remove DRM from M4P iTunes Music
In the last step, click “Start Convert” button to start stripping DRM from M4P and converting M4P to MP3. When the process is finished, you can copy the converted files to any media player or any device for playback.

remove DRM from iTunes music

Now you will have all the output DRM-free files saved in the location you specified. All the selected iTunes music have been converted to the free music files without DRM restriction. You can play the music songs without iTunes freely.

d_win d_mac

Related Articles:

How to Listen to Apple Music without iTunes

How to Listen to Apple Music Offline

How to Record Apple Music M4P Streams as MP3

How to Convert the iTunes Videos to MP3 Files

How to Remove DRM from Apple Music Completely

How to Convert iTunes M4V Videos to MP4

How to View HEIC Photos on Android

I got a new Android phone as the new years gift. How to sync the iOS 11 photos from my iPhone 8 with the Android device? Any way to view the HEIC photos on the new phone easily? Please let me know if you have ideas. Thanks.

HEIC is a special format of iOS 11 photos, we just can view the HEIC photos on iOS 11 device.Taking HEIC photos can save storage on iOS device, in the meanwhile, keeping the high quality of photos. HEIF format is said to be on half size and better quality as compared to the same JPEG file. Ever since the introduction of HEIF format with iOS 11, the iOS users have started worrying about the compatibility of this new file format with the Android devices and other platforms. If you want to view HEIC photos on Android, you have to consider employing an HEIC photos converter. In this post, we will show you the best efficient way to convert HEIC photos to JPEG for freely view on Android.

Convert HEIC Photos to JPEG for Android

If you are looking for an useful converter to selectively convert HEIF photos to Android device and view it in JPEG format, then the HEIC Photos to JPG Converter tool is that you need. This helpful photos converter tool is designed for converting iOS 11 photos with HEIC format to normal JPEG format files, then you can view the converted photos on any device without limits, like Android device, computer, and other compatible device. It provides you with two modes for converting, including Convert Single Photo/Convert Photos in Batch. What’s more, it can adjust photos quality without damaging to the quality of converted JPEG files.

d_win d_mac

How to View HEIC Photos to JPEG on Android

Step 1. Install Program on Computer
Download and install the HEIC Photos to JPG Converter and launch it on computer.

Step 2. Select the Conversion Mode
Select the conversion mode that suit you either convert single photo or convert photos to batch.

select the conversion mode

Step 3. Select Photos to Convert
Click on “Select files” to select the files you want to convert.

Step 4. Select the Quality of Converted Photos
Click on “Convert” and then select the photo quality.

select the photos quality

Step 5. Select the Target Folder
Select the target folder to save the converted photos.

Step 6. Start to Convert Photos from HEIC to JPEG
Simply click “Convert” to start the conversion.

Step 7. View the Converted Photos on Computer
Now you can view the converted JPEG photos in the folder on computer when you are done.

d_win d_mac

Step 8. Transfer Photos from Computer to Android for Free Viewing
In the last step, import the photos from computer to your Android device for viewing freely via Android Manager.

Related Articles:

How to Open HEIC Files on Computer

How to Convert HEIC to JPG Windows

How to Convert iOS 11 Photos from HEIC to JPG

4 Ways to Transfer Photos from Computer to Mobile Phone

How to Transfer Photos between Computer and Samsung

How to Manage Files on Android

How to Open HEIC Files on Computer

How to view the iOS 11 photos on my computer like the regulars photos?
How to view the HEIC photos on Android device normally?

HEIC is known as HEIF (High-Efficiency Image Format) built on the HVEC video technology which enables it to be able to produce sequence images. HEIC is a new image format that allows users take high-quality pictures on their devices while saving storage. It is common to apple devices running on iOS 11 and above. With HEIC, people can take a lot of pictures without having to worry about space.

HEIC Photos Can be Open in iOS 11 or MacOS High Sierra (10.13)
Apple has announced the iOS 11 to a new modern file system which makes use of a new image file format that can cause problems for Windows users. The new HEIC format photos files is compatible with the iOS 11, and it is designed to save storage space on your iDevice. It can be also open in MacOS High Sierra (10.13) and allows for the automatic transfer of photos and videos.

HEIC Photos Cannot be Open in Android, Windows, MacOS Sierra (10.12) or Lower
Although HEIC is a significant improvement for iPhone with limited storage, it does not support any Android devices. It is also not compatible with Windows computer, however, HEIC photos can be viewed with the some wonderful programs.

Convert HEIC Photos for Viewing on Computer

If you want to open and view HEIC photos files on computer normally, this HEIC/HEIF Photos to JPG Converter is your best option. It is special designed for HEIC photos management. There are two modes available to meet all your needs: Convert Single Photo/Convert Photos in Batch. With the help of HEIC/HEIF Photos to JPG Converter, you can simply convert HEIC photos to JPEG files without quality loss. After the conversion, you can view the converted photos on others non-iOS 11 device, like computer, Android device, and other compatible device.

d_win d_mac

Keys Features of HEIC/HEIF Photos to JPG Converter:
-Two modes to convert HEIC photos to JPEG.
-No damage to the quality of converted JPEG(can also adjust photo quality).
-Convert faster than online converters.
-Directly drop the HEIC photos to the converter or select files.

How to View HEIC Files on Computer

Step 1. Install Program on Computer
Download and install the HEIC/HEIF Photos to JPG Converter and launch it on computer.

Step 2. Select the Conversion Mode
Select the conversion mode that suit you either convert single photo or convert photos to batch.

select the conversion mode

Step 3. Select Photos to Convert
Click on “Select files” to select the files you want to convert.

Step 4. Select the Quality of Converted Photos
Click on “Convert” and then select the photo quality.

select the photos quality

Step 5. Select the Target Folder
Select the target folder to save the converted photos.

Step 6. Start to Convert Photos from HEIC to JPEG
Simply click “Convert” to begin the conversion.

Step 7. View the Converted Photos on Computer
Now you can view the converted JPEG photos freely in the folder on computer when you are done.

d_win d_mac

Related Articles:

How to Convert HEIC to JPG Windows

How to Convert iOS 11 Photos from HEIC to JPG

4 Ways to Transfer Photos from Computer to Mobile Phone

How to Transfer Photos from Computer to iPhone

How to Transfer Photos from Computer to iPod

How to Transfer Photos between Computer and Samsung

How to Manage Files on iPhone X/8/7/6S/6

How to Convert iOS 11 Photos from HEIC to JPG

Today, Apple releases iOS 11, the new operating system update for iPhones, iPads, and iPods. In iOS 11 or later, the iPhone camera will save its photos in HEIC format, and videos in HVEC (h.265) format. Pictures created with HEIF (High Efficiency Image Format, HEIF images have a .heic file extension) take up less space than JPEGs and can even up to half the size per image.

However, the HEIF/HEIC formats are currently not supported on all iOS device, an Android phone or Windows PC. Currently the newest iPhone camera models support this feature, like iPhone X, iPhone 8/8 Plus, and iPhone 7/7 Plus.

“I’ve captured a lot of precious moments with iPhone 8, and now I want to watch them on my Windows PC. I understand that they support different formats of photos, what’s the solution to it?”

Well, it can be a problem when you share its original image file(in iOS 11) to an Android or even your laptop/computer running on Windows 10/8.1/8//7/Vista/XP. You should convert HEIC/HEIF files from iOS 11 devices into JPG(JPEG) format and you could view your high quality pictures on any device or Windows PC or Mac. This article will guide you how to do it. The simplest way to do this is to use the amazing HEIC/HEIF photos to JPG converter – HEIC/HEIF Photos to JPG Converter app. It can be used to convert iOS 11 photos from HEIC/HEIF to JPG without losing image quality. This app supports iPhone X, 8/8 Plus, 7/7 Plus, 6s/6s Plus, etc. running on iOS 11/11.2.1.

d_win d_mac

The Easiest Way to Convert HEIC/HEIF Files to JPG

Step 1. Launch HEIC Converter on Computer

Download and install HEIC Converter on your Windows PC. Then connect your iPhone to the computer using a USB cable.

Step 2. Choose A Conversion Mode

Please choose “Convert Single Photo” mode or “Convert Photos in Batch” mode from the home interface, then click “Start” to begin the process.

select the conversion mode

Step 3. Select Files & Safely Convert HEIC/HEIF Files to JPG

Click the “+” button and select the HEIC photos from your computer or connected iPhone device, or you can also directly drop HEIC file there.

convert heic photos to jpg

Click “Convert”, the software will start to convert your iOS 11 photos from HEIC to JPG/JPEG. You can select the destination folder to save your converted image and then preview the images in the folder when you are done.

d_win d_mac

Related Articles:

How to Convert HEIC to JPG Windows

Transfer/Import Photos from Computer to iPhone 8/7/6S

Restore Deleted iPhone Photos after iOS 10.3 Jailbreak

How to Copy/Transfer Photos from iPhone to Google Pixel

Transfer/Switch/Copy iPhone Photos to Samsung Galaxy S8

How to Convert HEIC to JPG Windows

I need to transfer the iOS 11 photos from backed up on the computer to my old iPhone 6. However, the photos format not compatible with it. Any ideas to convert the photos from HEIC to JPG? Any tricks to fix it?

HEIC is a new image format that used by default on new photos in iOS 11. When you take photos on iPhone 7 or newer models, you will get a high-quality photos with HEIC. It just as only at half of the file size compare with JPG photos, without any loss of quality, which can help you save storage on device while saving photos. Though HEIC is newly adopted, the incompatibility is inevitable. You may need a more common format, like JPG. For example, you need to convert the HEIC photos to JPG to save on non-iOS 11 device, you need to view the HEIC photos on devices that run on Windows, Android etc,. In these cases, you should convert HEIC to JPG windows. Here are the best way to convert iOS 11 HEIC photos to JPG files.

Transfer HEIC Photos to JPEG Files

HEIC/HEIF Photos to JPG Converter is a terrific program designed for convert Apple’s latest iOS 11 images from HEIC/HEIF to JPG with ease. This powerful program is capable of converting all the HEIF/HEIC photos to JPEG with its original quality. HEIC/HEIF Photos to JPG Converter enable to convert HEIC photos on computer or in iOS 11 that you don’t need to transfer HEIC photos to PC first. After the conversion, you can view the converted JPG photos on different compatible mobile devices. The photos conversion is easy and simple, you can convert HEIC photos one at a time, or in batch.

d_win d_mac

Steps to Convert HEIC to JPG Windows

Step 1. Install HEIC/HEIF Photos to JPG Converter on Computer
Download and install the HEIC/HEIF Photos to JPG Converter and launch it on computer.

Step 2. Select the Conversion Mode
Select the function that suit you either convert single photo or convert photos to batch.

select the conversion mode

Step 3. Select Photos to Convert
Click on “Select files” to pick out the files you want to convert.

Step 4. Select the Quality of Converted Photos
Click on “Convert” and then select the photo quality.

select the photos quality

Step 5. Select the Target Folder
Select the target folder to save the converted photos.

Step 6. Begin to Convert Photos from HEIC to JPG
Finally, click “Convert” to begin the process and then preview the converted photos in the folder when you are done.

d_win d_mac

Related Articles:

4 Ways to Transfer Photos from Computer to Mobile Phone

How to Transfer Photos from Computer to iPhone

How to Transfer Photos from Computer to iPod

How to Transfer Photos between Computer and Samsung

How to Manage Files on iPhone X/8/7/6S/6

How to Convert Apple Music to Google Pixel

[Summary]:Looking for a way to stream Apple Music to Google Pixel/ Pixel 2XL for offline listening even canceling Apple Music subscription service?This aritcle main teach you a easy way to convert Apple Music and local iTunes M4P music songs to MP3 for enjoying on Google Pixel phone without Apple Music App.

People also like to read:

* How to Remove DRM from iTunes Movies and Watch on Android

* How to Convert DVD/Video to MP4

As we all know that the Apple Music and iTunes M4P songs not compatible with Google Pixel,in order to listening iTunes Music & Apple Music on Pixel phone,you must to remove DRM from Apple Music and convert M4P to MP3 for listening on Google Pixel/ 2XL.In additional,if you want to listen to iTunes Music on Google Pixel phone,you can use a iTunes for Android tool – iTunes to Android Transfer to transfer iTunes Music to Google Pixel/ 2 XL.

convert apple music to google pixel

Here,the Apple Music Converter is an Apple Music DRM removal tool, iTunes Audiobook Converter and iTunes M4P to MP3 Converter, which not only can help you remove DRM from Apple Music/iTunes Music,but also enables you convert iTunes M4P Music, Apple Music songs to MP3, M4A, etc.After converting Apple Music to MP3 complete,you can enjoying Apple Music on many other popular media devices, including Google Pixel/2(XL), Samsung Galaxy S8/S7/S6/Note 8/Note 5, HTC, Huawei Mate/P, MP3 player, iPod nano/shuffle/classic and chromecast.Let’s show you the tutorial to convert Apple Music M4P songs to DRM-free MP3 for Google Pixel.

d_win d_mac

Tutorial: How to Convert and Transfer Apple Music to Google Pixel 2 / 2 XL

Step 1. Launch Apple Music Converter for Windows or Mac

First of all, download and install Apple Music Converter on your Windows or Mac computer.After that,the iTunes program will be opened at the same time automatically.

The program will launch iTunes automatically and load all your iTunes media together with playlists, so you just need to tick the checkbox before the file you want to remove DRM and convert to MP3. For Apple Music songs, you don’t need to download them to your computer first.

Convert Apple Music to Google Pixel

Step 2. Add Apple Music Tracks

Click the playlist in the left column, then you can add iTunes’s songs, albums or playlists to the program that you want to convert. The program supports batch conversion so you can choose a few Playlists, or select a few songs.

Add Apple Music

Note: If you cannot find the music you want to convert, you can search it. And please make sure that you have downloaded and saved the Apple Music tracks you want on computer.

Step 3. Select MP3 as Output Format

Then,choose MP3 as output format for Google Pixel phone,because most Android phone  compatible with MP3 format.In this part,you can see the Apple Music Converter supports 8 output formats: MP3, M4A, AC3, AIFF, AU, FLAC, M4R and MKA. Just choose MP3 as output format.

select Apple Music to Convert

In addition, you can also specify the location for saving output MP3 files. as well as select audio quality from low, normal, high or set bitrate, sample rate according to your needs.

Step 4. Start Convert Apple Music to DRM-free MP3

Just click the “Convert” button and the Apple Music to MP3 conversion starts, the program will immediately pop up the conversion window.

convert Apple Music to MP3

Once complete, you can click the “Explore output File” button to get the converted DRM free Apple Music or iTunes songs in .MP3 format on computer.

explore Apple Music in MP3 format

Step 5. Transfer Converted MP3 Apple Music/iTunes Music to Google Pixel

Well done! You have successfully converting Apple Music and iTunes Music from M4P to MP3 and saved on the computer,in order to stream converted Apple Music to Google Pixel/2 XL for offline listening,this Android Manager tool could helps you import converted Apple Music from computer to Google Pixel phone.

1.Run the Android Manager tool and connect your Google Pixel to computer via USB calbe
2.Click “Music” and transfer converted Apple Music to Google Pixel phone from computer.

transfer Apple Music to Google Pixel

3.Enjoy Apple Music on Google Pixel 2 / 2XL without Apple Music App

Free download the Apple Music Converter and try to convert Apple Music to MP3 for offline listen on Google Pixel and other Android devices:

d_win d_mac

Final Thoughts

Personally, as an Google Pixel owner, I love this Apple Music Converter much. It is a sad truth that Apple Music not compatible with Google Pixel,and iTunes won’t sync Apple Music songs. and iTunes music to Android phone.But Apple Music Converter and iTunes Music to Android Transfer,both helps us to convert Apple Music to MP3 and make it playable on non-Apple devices,like Android phone,MP3 player, PSP, Zune, MP3 player, mobile phones, etc.

Useful Tips: Movies and TV shows purchased from iTunes Store are also DRM-protected. Do you want to watch iTunes video on Google Pixel phone?
What you need to do is removing DRM from iTunes movies and TV shows and convert M4V to MP4 for watching on Android phone like Google Pixel, Samsung Galaxy, HUAWEI Mate/P, Sony, Motorola,etc.try iTunes M4V Converter.

Related Article

Apple Music DRM Removal – Remove DRM from Apple Music

M4P to MP3 Converter – How to Convert M4P to MP3 on Mac

M4P to M4A Converter – Convert M4P to M4A

Apple Music to MP3 Converter – Convert Apple Music to MP3

Remove DRM and Convert iTunes M4V Videos to MP4

How to Play Apple Music after Canceling Subscription

Since Apple music is launched in 2015, it become one of the best streaming subscription services among different music dervices. Apple Music files are protected with DRM copyright protection, which prevent you from burning the Apple music to a CD or listening on device after canceling the subscription.

You may ever met this situation: Your 3-month free trial duration of Apple music expired and you were not willing to continue your subscription. What really frustrated you was that the songs you purchased and downloaded the free trial were no longer playable. So there are some Apple music fans ask that is it possible to play Apple music after canceling subscription. “How to play Apple music without subscription?”, “How to play Apple music for free?”, “How to play Apple music for offline playing?”. To help you fix this issue, Apple Music Converter come here for you. If you need to play Apple music after canceling subscription, please read the step-by-step guide below patiently.

Convert Apple Music to MP3 for Free Playing

Apple Music Converter is an music converter that can remove the DRM protection from Apple music songs and convert Apple music songs (M4P format) to MP3 or other free-DRM format with its original quality, which is a universally playable audio format. After the conversion, you can play the converted Apple music after canceling subscription. What’s more, you can play back the converted Apple music on any compatible audio players offline without limitation, including iPod, iPhone, Android devices, MP3 player, other smartphone and more devices. The conversion is up to 16x speed.

d_win d_mac

The main features of Apple Music Converter are listed as follow:
-Convert Apple music to free-DRM format;
-Convert Apple music with up to 16x speed;
-Convert Apple music with its original quality;
-Allow to play back the converted Apple music on any compatible audio players without limitation;
-Compatible with many audio players, including iPod, iPhone, Android devices, MP3 player, other smartphone and more devices.

How to Convert Apple Music for Free Playing

Step 1. Download and Run Apple Music Converter on Computer
Firstly, download and run the Apple Music Converter on the Computer.

launch apple music converter

Step 2. Select Apple Music Files to Convert
Once running the program on the computer, it will load the whole iTunes playlists in the main interface of program. Click on “Library” and select the Apple music that you want to convert. You can choose a few songs even the whole music library as this program supports batch conversion.

select Apple music or playlist

Step 3. Setting MP3 as the Output Format
Go to “Output Settings” then “Output Format” option, choose the output format for converted music files, for example, MP3, M4A, MKA, AIFF, FLAC, etc,. In this case, you should choose “MP3” option. In addition, you can specify the location for saving the converted Apple music tracks.

Select Output Format - MP3

Step 4. Convert Apple Music to MP3 for Free Playing
Click on “Start Convert” button and the program will immediately pop up the conversion window, begin to convert Apple music to MP3 for free playing after canceling the subscription. Wait for minutes until the conversion is end.

convert Apple Music to MP3

At last, you will have all the output MP3 files saved in the location of computer you specified. Now you can play the converted Apple music for free on any compatible audio device without limitation after canceling the subscription.

Browse the converted Apple music files by clicking “Open Output File”:

find the converted Apple Music in MP3 for listening offline

d_win d_mac

Related Articles:

How to Download Apple Music and Playlist for offline listening

How to Convert DRM-Protected Apple Music to MP3

How to Keep iTunes Music Songs Forever

How to Rip Apple Music For Free

How to Record Apple Music M4P Streams as MP3

How to Convert Protected Apple Music to MP3 for iPhone

How to Convert DRM Protected iTunes M4V Videos to MP4

How to Watch iTunes Movies on Samsung Galaxy Note 8

[Summary]:Have bought the Samsung Galaxy Note 8 and have no idea of how to play iTunes movies on Galaxy Note 8?Looking for a way to put the iTunes M4V videos on Galaxy Note 8 for playing? This tutorial will guide you the best way to remove DRM from iTunes movies and watching them on Galaxy Note 8/S8/S7 with the most powerful iTunes M4V Converter & DRM removal tool.

watch itunes movie on samsung galaxy note 8

You may like:

* How to Burn Videos/Movies to a DVD

* How to Burn Videos to Blu-ray

How Can I Play iTunes Movies on Samsung Galaxy Note 8?

Any way to play iTunes M4V movies on Android devices?I purchased movies from iTunes store by my iPhone 6S,I have bought an new Samsung Galaxy Note 8 for a while. Now I have a problem that how can I convert iTunes movies from M4V to MP4 and playing on my Galaxy Note 8.Any good ideas helps me

Samsung Galaxy Note 8 is Samsung’s flagship phone released on August 23, 2017, and is the first dual-camera smart phone released by Samsung. Samsung Galaxy Note 8 with 6.3-inch Quad HD + Super AMOLED full-color curved screen, 6GB +64 GB memory combination start. Samsung Galaxy Note 8 measurements for the 162.5 x 74.8 x 8.6 mm, weight 195g, with IP68 waterproof level, while S Pen also supports IP68 waterproof rating; specific data, the S Pen tip is 0.7mm, which has a 5.8 mm width and length of 108mm, pressure-sensitive level reached 4096.

When you have got a new Samsung Galaxy Note 8,it must be a great experience to enjoy iTunes movies and iTunes Music, Apple Music on Samsung Galaxy Note 8. But as we all know, unlike the MP3 audio files,the iTunes music, iTunes movies is M4P and M4V format proteced by DRM encryption, thus they can’t be played on non-Apple devices,so you not allowed play iTunes movies and music on Samsung Galaxy Note/S,unless removing the DRM protection from iTunes media files. However,any way to play iTunes M4V movies on Samsung Galaxy Note 8? Don’t worry,this tutorial will guide you the easiest and fastest way to convert iTunes movies to MP4 and play iTunes movies on Samsung Galaxy Note 8 with iTunes M4V Converter.

iTunes Movies, TV shows – Buy once, Enjoy Life

iTunes M4V Converter(Mac) and iTunes M4V Converter(Windows) both can help you convert M4V videos to popular video formats, including MP4, MOV, AVI and etc, at fast speed with 100% lossless quality. Because the Samsung Galaxy Note 8 supports playing MP4 video format,you can use this iTunes M4V to MP4 Converter to remove the DRM from iTunes movies and convert iTunes movies to MP4 for watching on Samsung Galaxy Note 8,as well as Samsung Galaxy S8/S8 Plus, S7/S7 Edge, S6/S6 Edge and other non-Apple devices.Let’s learn the fast way to remove the DRM protection of Rental & Purchased iTunes videos, get the DRM-Free MP4 and input them to Galaxy Note 8 for watching at any time anywhere.

Buy once,enjoying your rental & purchased iTunes media for free forever!

d_win d_mac

Features of iTunes M4V Converter:

-Remove DRM from iTunes purchased and rented movies, TV shows and music videos
-Convert the DRM M4V videos to DRM-free MP4 format
-Convert iTunes DRM-protected M4V videos to lossless DRM-free MP4
-Convert M4V videos to MP4 for playing on any non-Apple devices
-Enjoy all your iTunes video rentals or purchases on any devices you like, Android smartphone, tablets, TV, MP4 player, car media player, Xbox, PS4, etc.
-Retain all audio track & subtitles including AC3 Dolby 5.1, Closed Captioning, Audio Descriptions
-Remove iTunes video DRM with 30x speed.
-Output 1080P HD with 100% original quality.
-Keep 100% original quality.

Part 1: Guide to Convert iTunes M4V Movies to MP4 for Playing on Galaxy Note 8

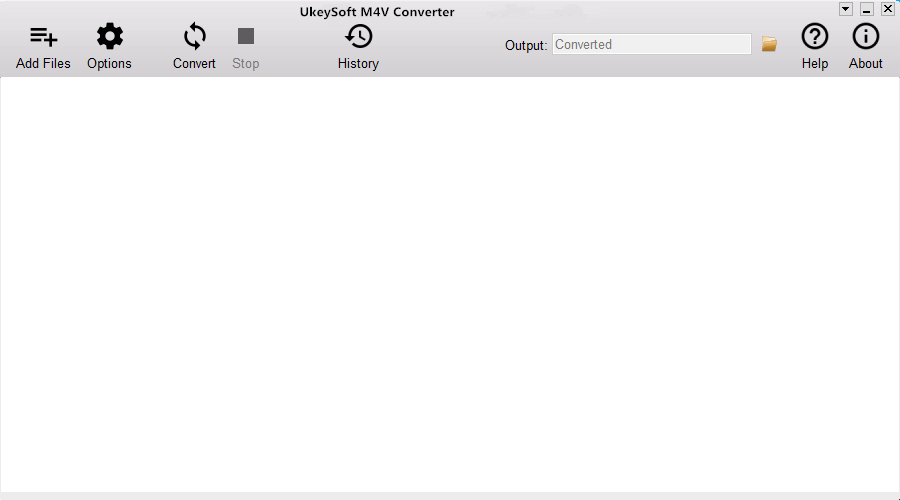
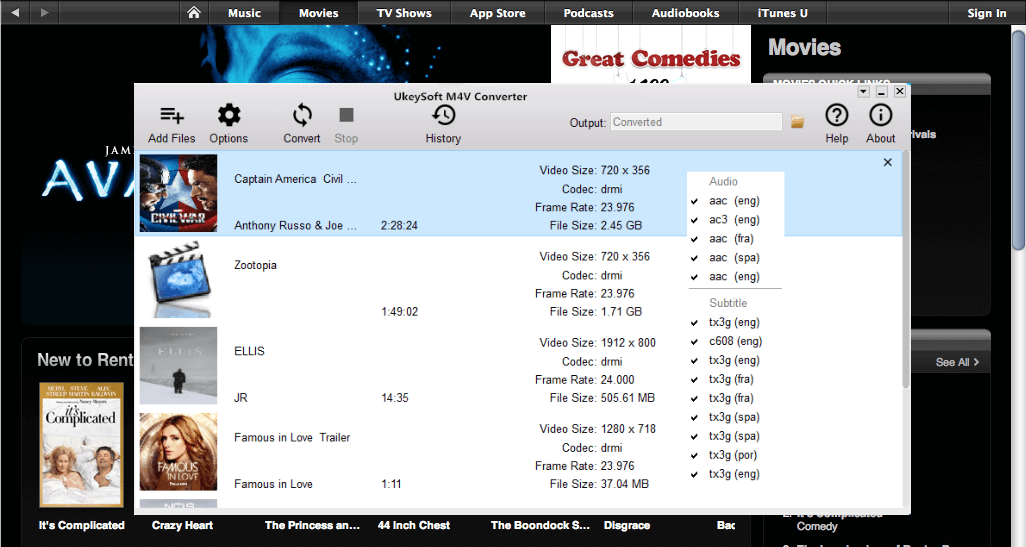
Step 1.Download and Run iTunes M4V Converter
Want to play iTunes movies on Samsung Galaxy Note 8?You must to remove DRM from iTunes videos and convert them to DRM-free MP4,you need to download and install iTunes M4V Converter on your Mac or Windows computer.

d_win d_mac

After running it on the computer and you will get following interface,at this time,iTunes will be run automatically.

iTunes M4V to MP4 Converter

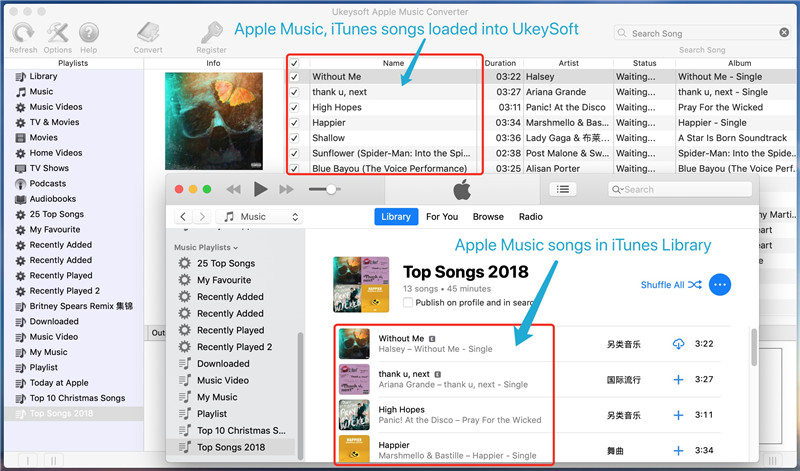
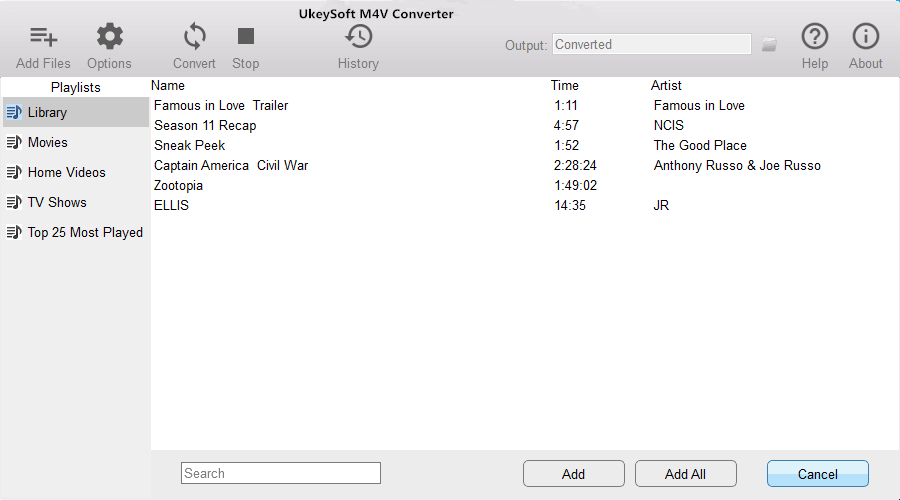
Step 2.Add iTunes Movies,TV shows to the Program
In this step,you need to add the iTunes videos to the software,please click “add files” icon and you will see all your iTunes movies and TV shows. Choose the ones you want to remove DRM and convert to MP4 from.

add iTunes movies, TV shows

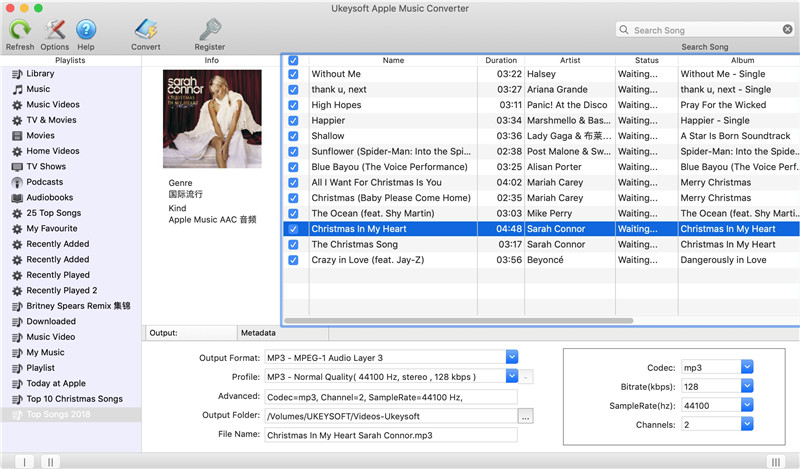
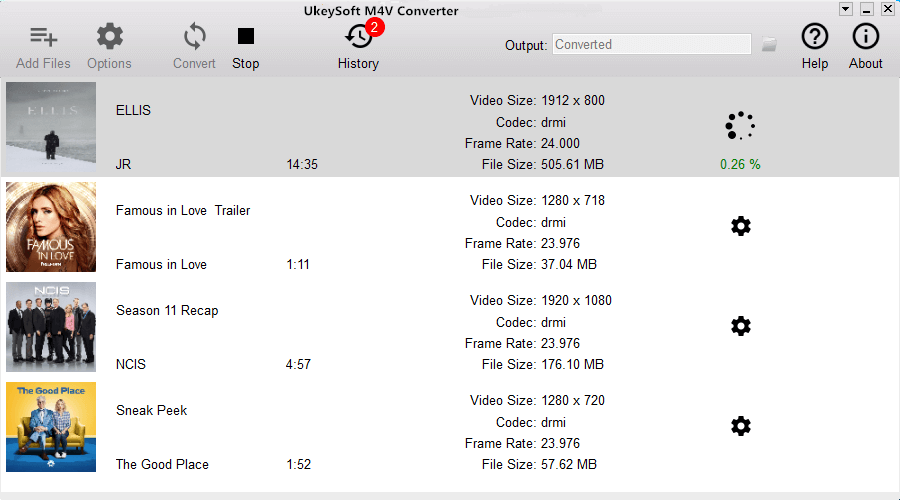
Step 3.Customize Output Settings – MP4
Then,please select MP4 as output videos format,you can also select other output formats (MOV, AVI, etc).It will be saved to Documents/Boilsoft iTunes DRM Media Converter/Converted by default. You can click the drop-down icon on the top right corner of the interface or click options button to change the path.

select MP4 as output format

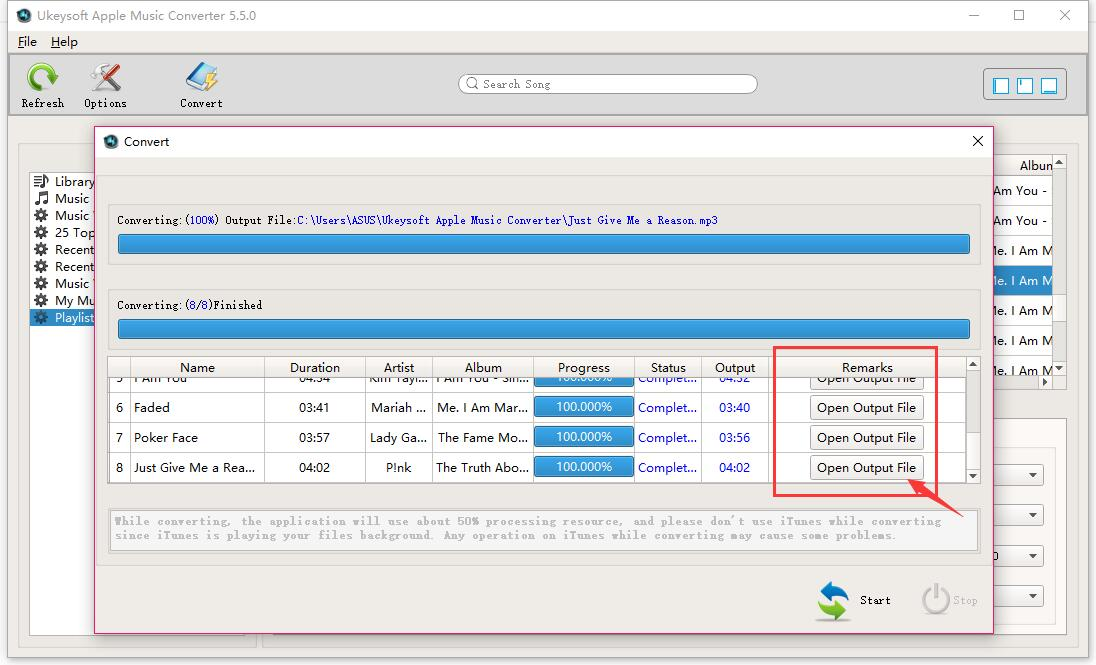
Step 4.Start Removing DRM and Converting iTunes Movies to MP4
Finally,just click “Convert button to start removing DRM from selected videos, and soon all added M4V iTunes videos, movies and TV shows be converted and output as DRM-free MP4 videos,only few minutes,all converted iTunes videos saved on your computer as MP4 format.If you want to play converted iTunes movies on Samsung Galaxy Note 8,please learning the below guide to import iTunes videos to Galaxy Note 8 easily.

convert iTunes movies to MP4

If you want to unlock the time limitation of iTunes movies, you can free download the full version of iTunes M4V to MP4 Converter for Mac and Windows and have a try now!

d_win d_mac

Tips: If you want to listen to Apple Music and iTunes Music on your Samsung Galaxy Note 8 and other non-Apple devices,you can using this Apple Music Converter,which can help you remove DRM from MP4 and convert Apple Music/iTunes Music to MP3.

Part 2: Transfer Converted iTunes Movies(MP4) to Samsung Galaxy Note 8

Above guide you have make iTunes videos as DRM-free MP4 files,now you can use this iOS Android Manager to import the converted iTunes movies to Samsung Galaxy Note 8.The Phone Manager & Transfer not only can help you transfer videos, music, photos from computer to Samsung Galaxy Note 8/Note 5/Note 4/S8/S7/S6/S5,etc.But also allows you transfer music from iTunes to Samsung Galaxy and other Android devices easily.In additional,it enables you transfer contacts, messages, photos, videos, music between two devices(iOS & Android).

Free download the iOS Android Manager for Mac and Windows:

d_win d_mac

Phone Media Manager Features:

-Transfer Videos between Android and Computer
-Transfer Videos between Android and iTunes,so you can transfer iTunes videos to Samsung easily.
-Transfer Videos Between iPhone/iPad/iPod/Android
-Delete Videos on Android
-Transfer Music between Android and Computer
-Transfer Music between Android and iTunes
-Transfer Music Between iDevices and Android Devices
-Transfer Photos between Android and Computer
-Transfer Photos Between iPhone/iPad/iPod/Android Devices
-Delete Photos on Android
-Convert Photos on Android to GIF
-Capture Android Screen(Only for Windows Version)
-Backup your music, photos, videos, contacts, SMS, Apps etc. to computer and restore them easily.
-Fully compatible with 3000+ Android devices (Android 2.2 – Android 8.0) from Samsung, Google Pixel, LG, HTC, Huawei, Motorola, Sony etc.

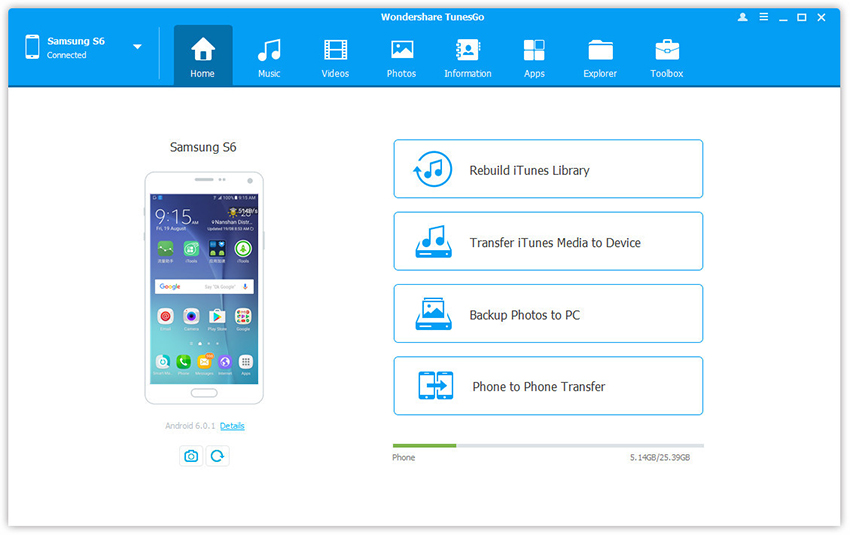
Step 1.Run the Program and Connect Note 8 to Computer
Download and run the iOS Android Manager on your computer and then connect your Galaxy Note 8 to PC. Your Samsung Note 8 device will be recognized and displayed in the primary window.

samsung galaxy note 8 video transfer

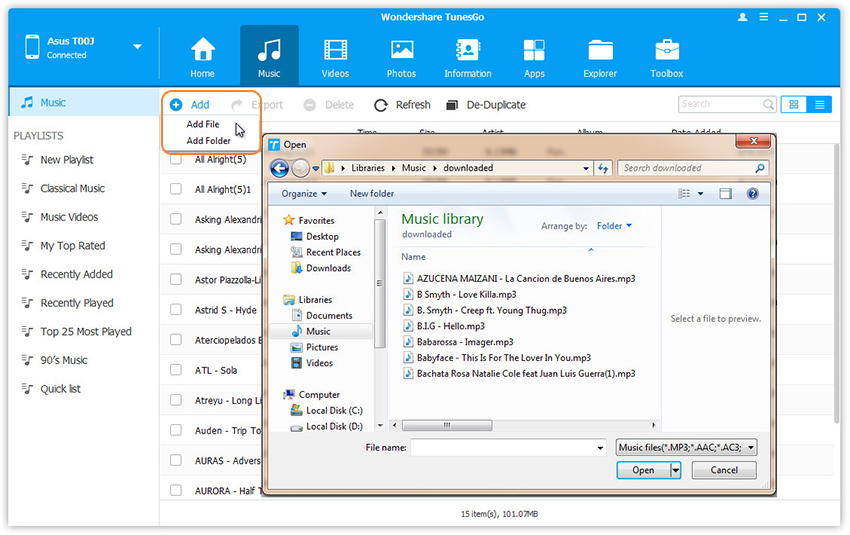
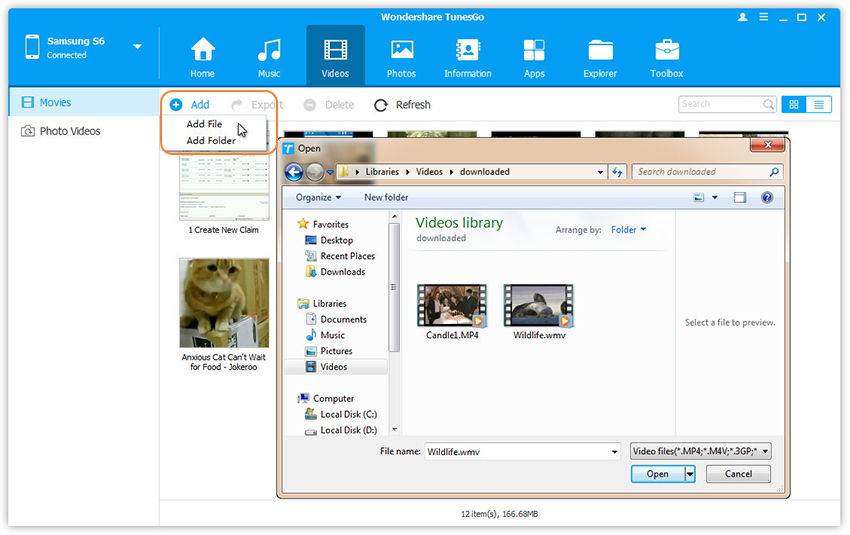
Step 2.Select Videos and Transfer to Samsung Note 8 from Computer
To import converted iTunes videos in MP4 format,please click the “Videos” tab and waiting for your media loads into the program, click “Add > Add File or Add Folder” to import your converted iTunes movies, TV shows, MP4 files from your computer to Samsung Galaxy Note 8.

add video to samsung galaxy note 8

Step 3.Play iTunes Movies on Samsung Galaxy Note 8
Only few minutes,all iTunes MP4 videos imported can be watched on your Samsung Galaxy Note 8 with the built-in player.

play itunes movies on samsung galaxy note 8,S8

Free download the iOS Android Manager and try to transfer media files from computer/iTunes/old phone to your Samsung Galaxy Note 8 on Windows/Mac computer:

d_win d_mac

Related Articles:

How to Transfer Any Video to Samsung Galaxy Note 8

How to Play iTunes Movie on Samsung Galaxy S8

How to Sync iTunes Music to Samsung Galaxy Note 8

How to Stream Apple Music on Samsung Galaxy Note 8

How to Listen iTunes Music on Samsung Galaxy Note 8

Watch iTunes Movies on Galaxy Note 8