Category Archives: Mobile Transfer

How to Transfer Android File to Pixel

Over the next few days, you’re going to hear a lot of spin about “Google phones” and how the Google Pixel and Google Pixel XL smartphones, which are presumably being announced at an event in San Francisco in 4th Oct, are “made by Google”.Google could very well create a solely Google-branded phone, entirely engineered by Google, with the help of a manufacturing partner that likes to sit in the background and just follow orders, like Apple does with Foxconn. And then it could sell that phone, everywhere, aggressively, making itself one of the leading high-end smartphone firms in the world.

Are you interested in this new Google Pixel phone?Or planning to buy one new Pixel but confuse that how to transfer file from Android?This article is written to offer you Android users the simple ways to transfer data between Android,especially transfer files between Android and Pixel phone.

Part 1:Transfer Data between Android and Pixel with Quick Switch Adapter

With the help of Quick Switch Adapter, you can transfer all your data from old Android phone to the new Google Pixel phone.The procedure is quite simple; all you need is your old Android phone and the latest Google Pixel(XL);and not to forget,keep that Quick Switch Adapter.

quick switch adapter switch Androidt o Pixel phone

Step 1.If you are moving data from your old Android phone to the Pixel smartphone, the new phone should automatically sign you in to your Google Account.If this doesn’t happen, enter your password.

Step 2.After signing in to your Google Account, you can select which data you want to move to the new Google Pixel phone; users always like to transfer data like contacts,SMS, photos, videos, music, calendars, and more.

Please note that the Quick Switch Adapter supports devices like Nexus 5, 6, 5X, 6P running Android 5.0 and later; and most Android devices running on Android 5.0 and later versions.

Finally,complete the set-up and start exploring your new Pixel even as the transfer process is on.

While the process is on, please keep the battery status of your Pixel phone which should be charged to at least 50% before connecting.

Once everything is done, start using the new Pixel(XL) freely.

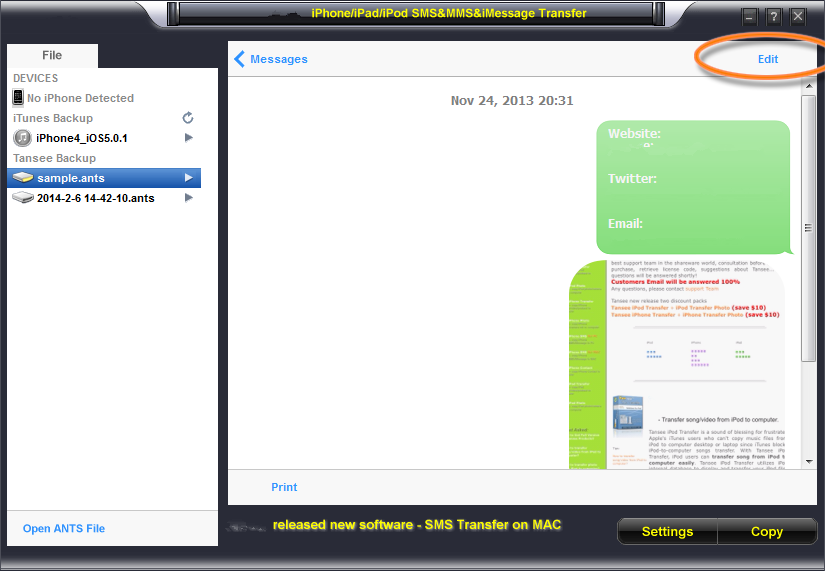
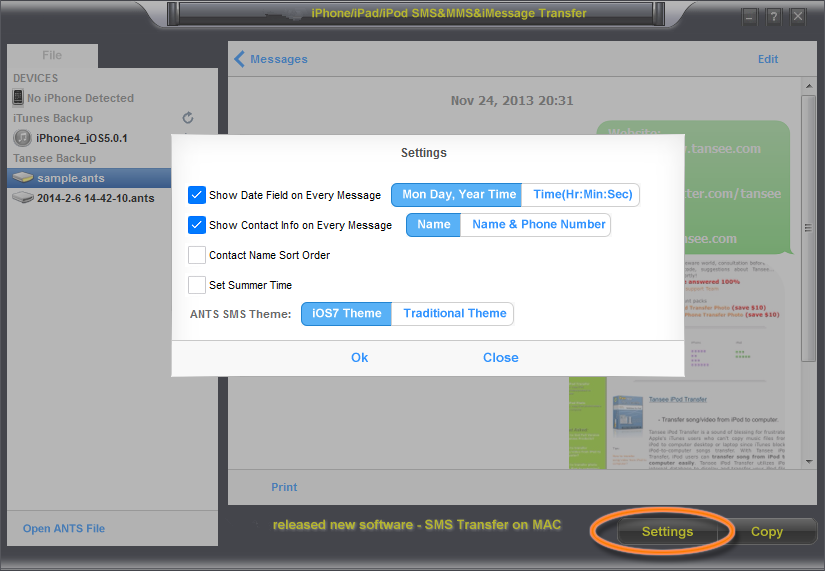
Part 2:Transfer Data between Android and Google Pixel with Phone Transfer

In the part 1 we had introduce the method that to transfer data between Android and Pixel via the Quick Switch Adapter.However,the Quick Switch Adapter is not support to transfer all kinds of files,you can learn more in the part 2 following.

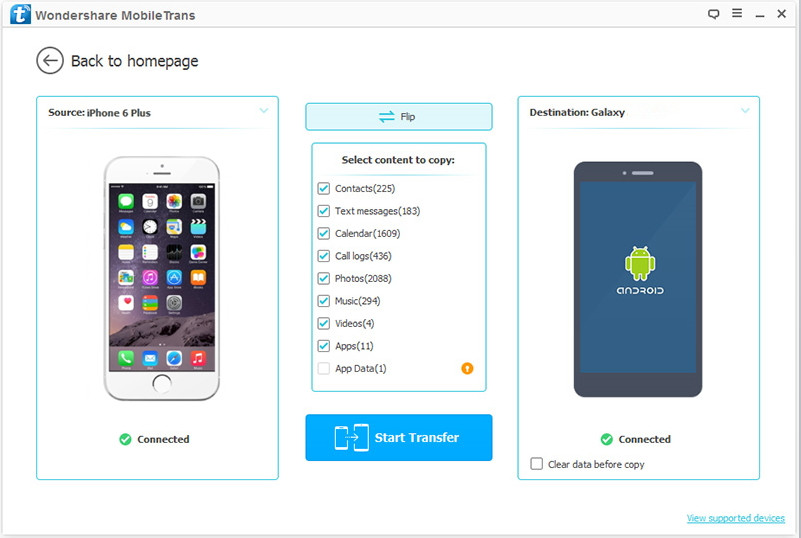
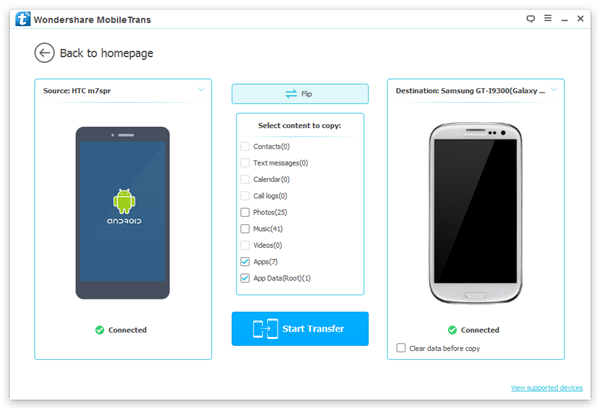
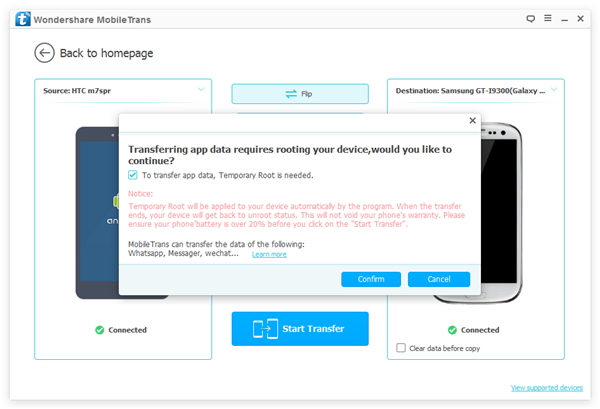
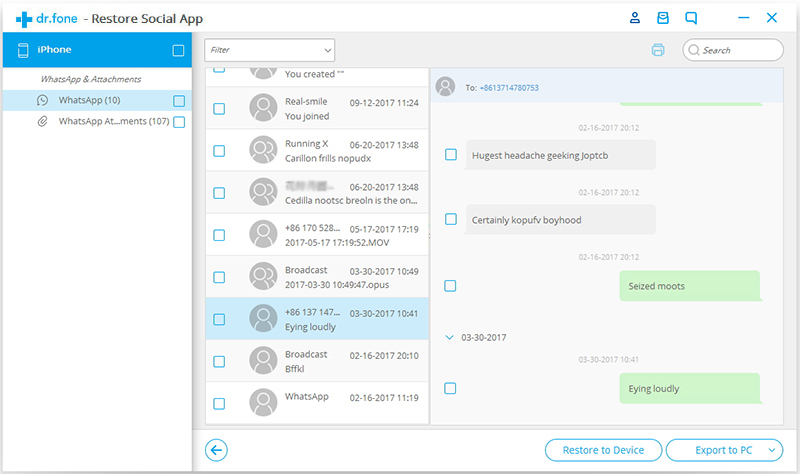
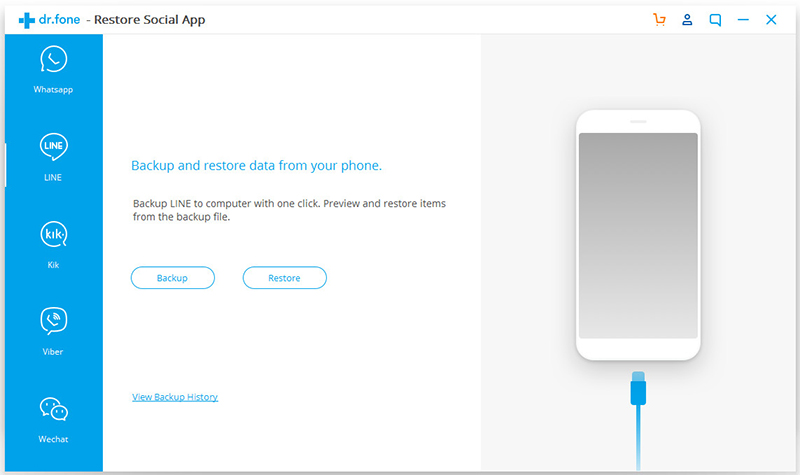
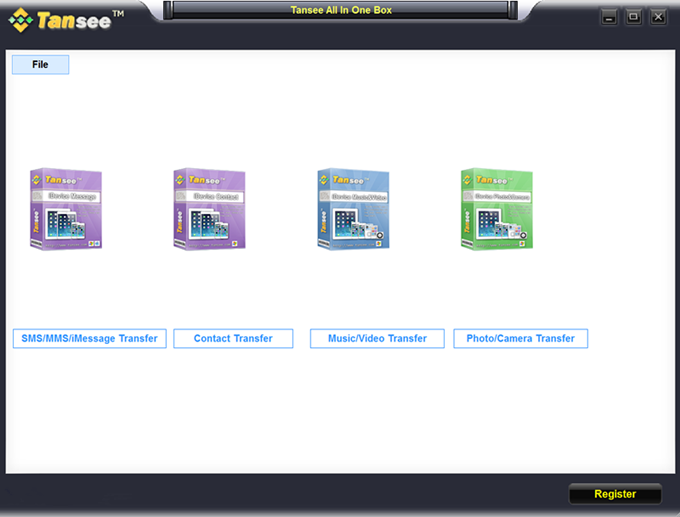
With Phone Transfer,you are allow to transfer data from Android to Pixel without limitation,contacts,text messages,photos,videos,call logs,music,calendars,apps(WhatsApp,Line,Viber,Kik),apps data(text,videos,attachments) are included.As for the compatible platforms,in addition to Android OS,BlackBerry, iPhone,Symbian and Windows Phone are supported as well.Besides,Phone Transfer available for backing up data from device to computer,restore backup to device completely.The compatible Android brands device such as Samsung,HTC,Motorola,Lenovo,Sony, Huawei,ZTE,etc.

d_win d_mac

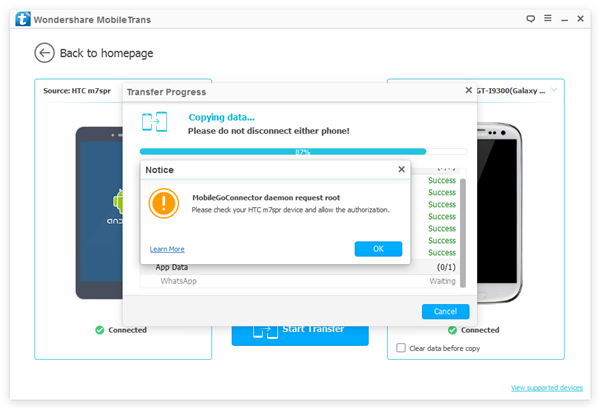
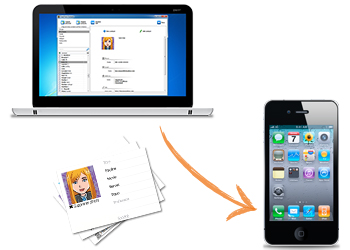
Step 1.Download and Run the Phone Transfer
Download and install the Phone Transfer tool and then run it on your computer. Then on the popped-up window, directly choose the “Phone to Phone Transfer” mode.

android to google pixel transfer main page

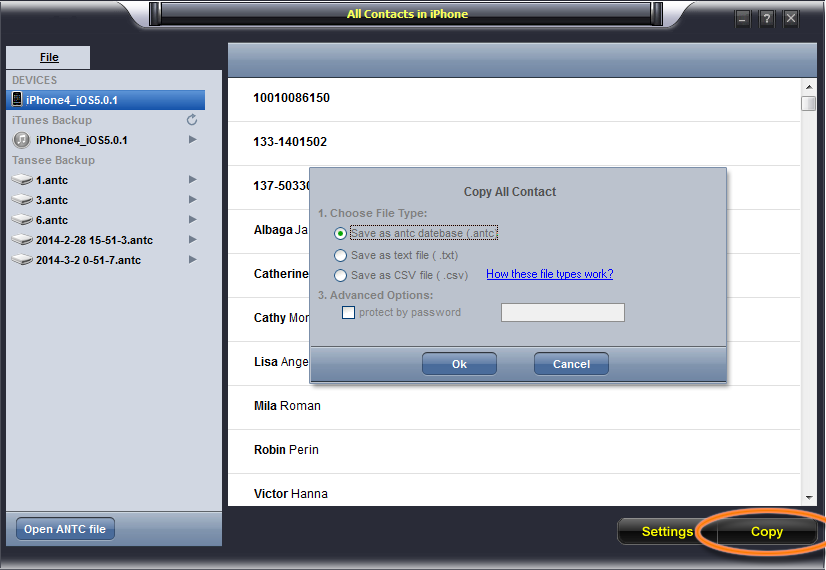
Step 2. Select Data and Begin to Copy Android Data to Pixel Phone
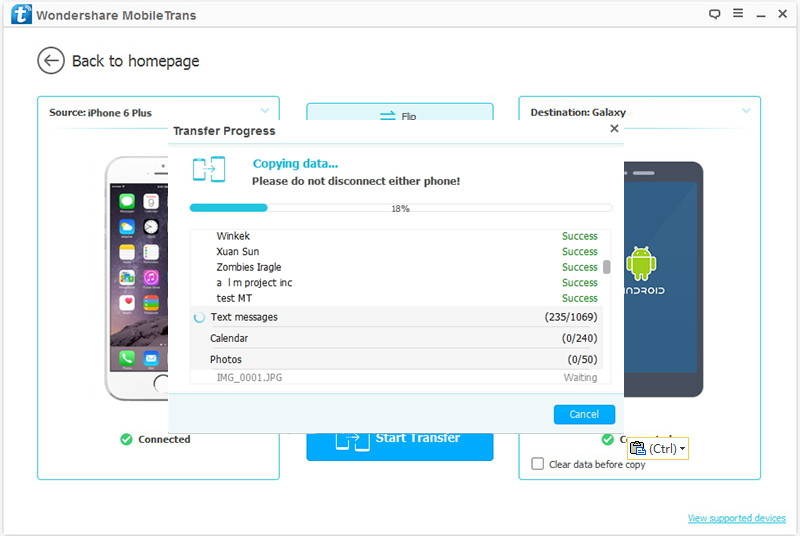
Connect the Android phones to the computer via USB cables and then the program will detect them accordingly.After that, you’ll see the data transferrable in the middle menu as the following window shows. Mark the option of the data such as the “Contacts“, and then click the transferring icons “Start Copy” to start to transfer data from Android to Google Pixel phone.

transfer android data to google pixel phone

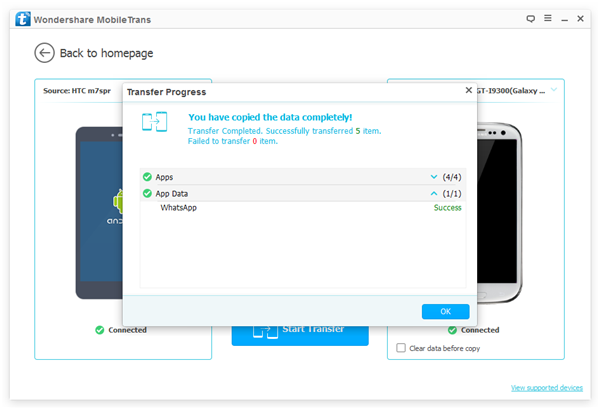
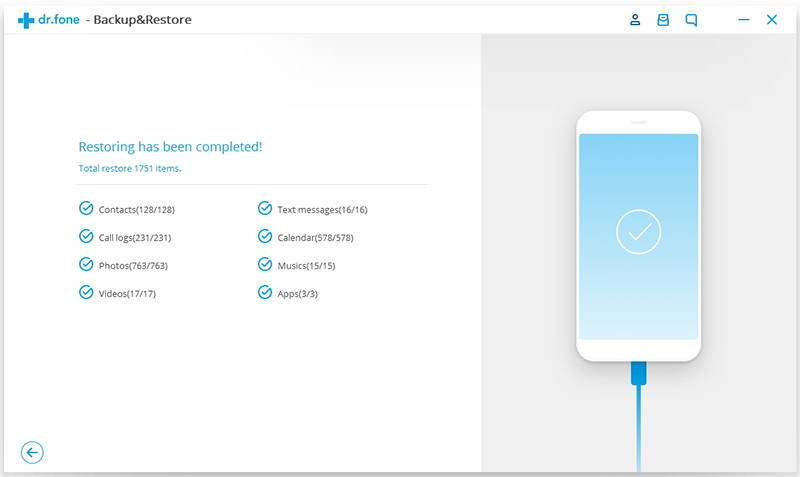
Begin transfer everything from Android to Google Pixel phone.

move android data to google pixel phone

Free download the Phone Transfer and try to switch your Android contents to Google pixel with 1 click.

d_win d_mac

Related Article:

How to Transfer Samsung Data to Pixel

How to Transfer iPhone Data to Pixel

How to Backup and Restore your Android on Computer

How to Transfer Samsung Data to Google Pixel and Pixel 2

[Summary]:Looking for a way to switch files from Samsung to Google Pixel/XL or Google Pixel 2/2 XL? This article teach you how to move everything like contacts, text messages, music, videos and photos from Samsung Android to Google Pixel/Pixel 2 easily and freely.

Upgrading to a brand-new Android phone, like the newest Google brand-Pixel(Pixel 2 XL) is really exciting.But here is a problem.Your old Android handset for example the Samsung device is loaded with your personal data,including contacts, text messages, music, photos, videos, documents, etc,.Then how to upgrade to a new Android phone and switch everything with you?Actually,it’s quite simple if you follow the simple tutorial in the passages below.

transfer Samsung S7 to Google Pixel and Pixel 2

File Transfer from Samsung Android to Google Pixel/Pixel 2 XL

Currently,many Android provide the function that switch data between mobile device to make data transfer much easier, such as Samsung Smart Switch, HTC Transfer Tool, LG Backup, Sony Xperia Transfer, Motorola Migrate, etc.All these phone transfer tool to transfer data are free and you can choose the suitable one to manage the transition.However, the shortcoming with these free Android file transfer apps is that they are exclusive for their own brand devices.How to transfer Samsung file to the newest Google Pixel/2 in minutes?

Here comes Samsung to Google Pixel Transfer and Phone Manager software for you all guys who wanna complete the data transfer task.Phone Transfer support to transfer Samsung data to Pixel perfectly,such as contacts,SMS,photos,videos,call logs,music,calendars,apps(WhatsApp,Line,Kik),apps data.Phone Transfer help to freely transfer data between Android device,iOS device,Symbian device and Blackberry.Additionally,this powerful program enable to backup data from mobile device to computer,restore data to device from backup.Let’s see how it works in detail.

d_win d_mac

One Click to Transfer Data from an Android Samsung phone to a Google Pixel/2(XL)

Step 1.Connect Samsung Galaxy and Google Pixel phone to Computer
First of all, connect these two mobile phone to at the same time, then launch the program on your PC. Here, you should select the mode of “Phone to Phone Transfer” and click “Start” button to enter next step.

transfer Samsung data to Google Pixel XL

Step 2.Select Data Type to Transfer
After selecting the transfer mode you need, the program will automatically detect the devices that have been linked to the computer, and displayed them in the source and destination area randomly. If you think your phone have been located in the wrong place, you should click “Flip” button to exchange them easily.

switch Samsung to Google Pixel

Now, you can select the content you like to copy then hit “Start Transfer” button to begin the process.You can check it in the program directly.

move everything from Samsung Galaxy to Google Pixel/Pixel 2 XL

Wait for a little while, all selected file on your Samsung will be moved to Pixel completely.Cool, right? If you have the same needs here,for example transferring data from iPhone to Google Pixel/Pixel 2,you can use this Phone Transfer program to finish the data transfer effectively.

d_win d_mac

Related Article

How to Recover Deleted or Lost Data from Google Pixel

How to Transfer Android File to Google Pixel/2(XL)

How to Backup and Restore your Android on Computer

How to Transfer Data from iPhone to Google Pixel

Focus the Power of New Pixel Phone
We got to see two new phones, a new virtual reality headset, a tiny puck-sized router, a 4K-ready Chromecast, and pricing and availability for the new Google Home speaker. For Google — which tends not to have big, splashy events outside its I/O developer conference every May — today marked its most significant hardware push in years.

As the Pixel and Pixel XL are released in 4th,Oct on the market,some of you may want to catch a good opportunity to switch from iOS to Android.Interestingly,when we talk to prospect switchers, the question that we get the most is how to go from iPhone to Android without losing the data?Despite the fact that these two mobile device are running two different systems,there are multiple ways to transfer your data from one device to another. And please trust me,it is a piece of cake if you select the suitable way.Fortunately,we have some step-by-step solutions for you.

Phone Transfer,a professional transfer tool to transfer data from iPhone to Pixel,including contacts,SMS,call logs,photos,videos,calendar,music and apps.What’s more,Phone Transfer allow to switch data between iPhone,Android,Nokia (Symbian), Windows Phone and BlackBerry with one click.It is able to help you back up device data to computer and restore the backup from PC quickly and safely.

d_win d_mac

How to Switch Files from iPhone to Google Pixel

Step 1.Run Program and Connect Two Phone to Computer
Firstly,please run Phone Transfer and connect iPhone and Pixel to computer,then select the “Phone to Phone Transfer” mode in the main page.

transfer iphone data to pixel

Step 2.Select File Type for Transferring
Now you should select the file type to transfer,here contacts,photos,videos,music,text messages,call logs,calendars,apps are available.You can select one or more than one file to transfer between iPhone and Pixel.To switch iPhone data to Pixel,the iPhone should be on the left and the Pixel should be on the right.You are allow to click “Flip” to exchange the position of them.

transfer iphone data to pixel

Step 3.Start the Data Transfer Process
Once selecting all file you need to transfer,you could begin the transfer anytime if you already ready,just simply click “Start Copy” to begin the data transfer.

transfer iphone data to pixel

d_win d_mac

Related Article:

How to Transfer Samsung Data to Pixel

How to Transfer Android File to Pixel

How to Backup and Restore your Android on Computer

How to Transfer WhatsApp Messages between Android

“Recently I had switched to the Samsung Galaxy S7 phone,I have thousands of chatting messages, photo, video, and audio attachments on my WhatsApp app of the old Android.I am now asking for help that getting the best solution to transfer WhatsApp messages between Android.Thanks a lot.”-Alvin Lin

WhatsApp,a social app most mobile device users use for chatting in daily life,is equally important as some built-in apps on Android.When updating from an old Android to a new one,you may need to transfer WhatsApp chat conversation between Android phones so that you can keep them on your new Android.However,there are lots of transfer tools in the market which don’t supporting transfer app data.Lately, a friend was faced with the same problem, which inspired me to write the tutorial and help others like him out there striving to transfer WhatsApp messages between Android in easy way.

Part 1:Transfer WhatsApp Messages between Android via Phone Transfer

Phone Transfer is good at transferring data between two Android devices and it is worthy of trusting,completely transfer WhatsApp messages between Android,including all WhatsApp data,such as WhatsApp text,WhatsApp photos,WhatsApp videos.Except WhatsApp app,Phone Transfer help to transfer contacts,SMS,photos,videos,music,call logs,apps,apps data,calendars between Android device with once click.Various of Android device are applicable to this program,for example Samsung,HTC,LG,Motorola,ZTE,Huawei,Xiaomi,etc,.Sounds so great.Isn’t it?Just download it and have a try right now.

Free download Phone Transfer:

d_win d_mac
d_win d_mac

Step 1.Launch Phone Transfer on Computer
Firstly, download and install Phone Transfer on computer,and launch it.Then you will see and interface as below.Select the “Phone to Phone Transfer” mode.

phone transfer main page

Step 2.Connect Android Phones to Computer
Connect your Android devices to the computer, and wait until the program detects your devices.Once detected, both Androids will display in the interface as follow. Make sure that the devices are in the right position.For example,if you want to transfer LG WhatsApp messages to Samsung phone,just put the LG phone in the Source section and the Samsung in the Destination section.(The “Flip” button in the middle can be used to change their places.)

transfer-whatsapp-android
Step 3.Select App Data to Transfer
Click “App” and “App Data”,click “Start Transfer” and a message prompt “Transferring app data requires…” will show up asking you to confirm the action to root your device.Select “To transfer app data…” > “Confirm” > “Start Transfer” to continue. Do not select the “Clear data before copy” option during the process.

transfer-whatsapp-between-android

When the program is in the middle of transferring app data, a notice will pop up and ask you to authorize again to let the program to root your device. Click “OK” to move on.

root-android-before-whatsapp-transfer

Step 4.Transfer WhatsApp Messages between Android
After that,the program will automatically transfer all apps and app data from your Android phone to another. When it is completed,you will get the prompt that “You have copied the data completely!”,and then tap on “OK” to end the process.

successfully-transfer-whatsapp-android
Free download Phone Transfer:

d_win d_mac
d_win d_mac

Part 2:Backup WhatsApp Messages from Android to Computer

Android Toolkit – Restore Social App – an useful App data manager, which is your best choice to backup WhatsApp messages(text,sticker,photo,voice and video messages) from Android to computer,and completely restore WhatsApp messages to Android from backup.Not only the WhatsApp chat history are supported to backup and restore,but also the other applications data,such as SCR Pro,AASTOCKS.Almost all brands of Android are supported,such as Samsung,HTC,LG,Lenovo,Motorola and more.

Free download Android Backup & Restore:

d_win d_mac
d_win d_mac

Step 1.Run Android Backup & Restore and Connect Android to Computer
Please run Android Backup & Restore on computer,connect Android with computer and enable debugging on Android.Click “More Tools” in the homepage of program.Then,continue with “Backup” button under “Backup & Restore” option ,select “WhatsApp” of “Application” and “Application data”.

android backup restore

Step 2.Backup Android WhatsApp Messages to Computer
Clicking the “Backup” button,then the program will begin the backup process.When the processing bar shows you the ending of backing up,you are allow to view on the backup history of the app.Note:Although you can’t see the details about the WhatsApp data but you can know the size of it.

backup android whatspp data

Part 3:Restore WhatsApp Messages to New Android from Backup

Note:Here you are allow to restore the WhatsApp backup file to the previous backup Android or another Android device.

Step 1.Run Android Backup & Restore and Connect Android to Computer
First of all,run Android Backup & Restore on computer,connect Android with computer and enable debugging on Android.Click “More Tools” in the homepage of program.Then,continue with “Restore” button under “Backup & Restore” option.

android backup restore

Step 2.Extract and Restore WahtsApp Backup File for Android
Now you will see all backup files of your Android device,choose one you want to check and click on the “View” button.

view android backup

Step 3.Restore Backup File on New Android
When the scan stops,you should click “Restore” to restore the backedup file contain your wanted WhatsApp messages to your new Android.

restore whatsapp backup android

Free download Android Backup & Restore:

d_win d_mac
d_win d_mac

Related Article:

How to Transfer WhatsApp Chat History from iPhone to Samsung Galaxy

How to Transfer WhatsApp Messages from Android to iPhone

How to Backup & Restore Samsung WhatsApp History on Computer

How to Restore WhatsApp Messages Backup to Android Devices

How to Backup/Restore App Data on Android Phone

How to Transfer WhatsApp Messages from Android to iPhone

How to transfer WhasApp messages from Android Samsung to iPhone XS?
I often chat online by WhatsApp app on my previous Samsung Galaxy S7, now I have got an new iPhone XS, is it possible to move WhatsApp messages from Galaxy S7 to iPhone XS without Move to iOS app?” – Suerong

How to transfer WhatsApp chat history from Android Huawei to iPhone X?
“I just bought the new iPhone X last day for its bright features,I am so glad to switch from my old Android phone to the new one.However,what actually disturb me is that I am wondering how to transfer the WhatsApp messages from Huawei P10 to iPhone.I search the ways on the Internet but I find no best answer.So I ask you guys for help.” -Winnie Tung

WhatsApp is a messaging App that provide the convenient way of communication for people around the world.It allows you to send messages, photos, videos instantly for each other. It is no doubt that there are many Android users and iPhone users who are using this app in daily life.A part of people encounter the problem that can’t
successfully transfer the WhatsApp messages between mobile device,the most common situation is between the Android phone and iPhone.In this article,we will show you a available way on how to transfer WhatsApp messages from Android to iPhone without complicated steps.

Backup Android WhatsApp Messages to Computer

The top Android WhatsApp data backup tool is called – Android Backup & Restore,it’s such a professional manager tool which is specifically design for backup WhatsApp messages from Android to computer,perfectly help to sync Android WhatsApp messages,WhatsApp photos,WhatsApp videos and attachments to computer.In addition,this program enable to backup & restore data on Android,including contacts,gallery,videos,notes,call logs,messages,calendars,Application,Application data(WhatsApp,Viber,Line,Kik),etc,.

Free download Phone Tookit – Backup & Restore and try to backup your Android data, including WhatsApp messages, photos and videos.

d_win d_mac

Restore WhatsApp Messages Backup to iPhone

To restore WhatsApp messages from backup to iPhone,you are strongly recommend this wonderful tool- iOS WhatsApp Transfer, Backup & Restoretool,empower to restore WhatsApp messages from backup to iPhone completely,the WhatsApp text,photos,videos,attachments are included.What’s more,this program support to safely backup iOS WhatsApp messages to computer.Almost all models of iPhone are applicable to iOS WhatsApp Transfer tool,such as iPhone XS, iPhone X, iPhone 8, iPhone 7,iPhone SE,iPhone 6S(Plus),iPhone 6(Plus),iPhone 5S/5C/5.

Part 1:How to Sync Android WhatsApp Messages to Computer

Step 1.Run Android Backup & Restore and Connect Android to Computer
Please run Android Backup & Restore on computer,connect Android with computer and then allowing enable the debugging on Android.Click “More Tools” in the homepage of program.Then,continue with “Backup” button under “Backup & Restore” option,select “WhatsApp” of “Application” and “Application data”.

backup android whatsapp to computer

backup android whatsapp to computer

Step 2.Backup WhatsApp Messages on Android
Once clicking the “Backup” button,program will start the backup process.When you are prompt that the backup task is completed,you can move to view on the backup history.Although you can’t see the details about the WhatsApp data but you can know the size of it.

backup android whatsapp to computer

d_win d_mac

Part 2:How to Restore WhatsApp Messages from Backups to iPhone

Step 1.Run iOS WhatsApp Transfer and Connect iPhone to Computer
To restore WhatsApp messages from backup to iPhone,you should choose “Restore WhatsApp messages to iOS device” under the “More Tools” option of iOS WhatsApp Transfer tool.Get your iPhone connected to the computer.Then you’ll see all your backup files listed.

restore whatsapp backup to iphone

restore whatsapp backup to iphone

Step 2.Restore WhatsApp Message Backup to iPhone
You should choose a backup file and click “Next” to directly restore it to your iPhone as follows.

restore whatsapp backup to iphone

Or you can choose to view the backup file first,and then selectively choose what you want to restore it to your device by clicking “Restore to device”.

restore whatsapp backup to iphone

d_win d_mac

Related Article:

How to Transfer WhatsApp Chat History from iPhone to Samsung Galaxy

How to Restore WhatsApp Messages Backup to Android Devices

How to Backup,Restore and Transfer WhatsApp Messages on iPhone

Transfer Videos from PC/Mac to iPhone(iPhone XS/XS Max/XR Included)

Are you excited about updating to iPhone XS Max? Then be bother to export your fantastic videos from computer to the new device? Searching the simple ways to transfer media file to iPhone X without iTunes but still no best answer? Take it easy,here you came to the right place, we are going to offer you the most effective solution, which will perfectly solve your problems in just a coffee time.

You should get the approachable tutorials on how to transfer videos between computer and iPhone with iOS Transfer,including Movies, Music Videos, Home Videos, TV Shows, iTunes U and Podcasts.You can fully enjoy movies or videos on your iOS devices anytime anywhere.With this program, you are able to manage your media files on iPhone/iPad/iPod freely.iOS Transfer allow to sync videos,music,contacts,SMS from computer to iPhone 7 in a simple click.To sum up,transfer music, photos, videos and playlists from iPhone, iPad& iPod to iTunes Library& PC and vice versa, manage iOS device music, photos, contacts and SMS easily. iPhone X/XS/XS Max/XR, iPhone 8(Plus), iPhone 7,iPhone 6S(Plus),iPhone 6(Plus),iPhone SE,iPhone 5S/5C/5,iPad,iPod are applicable for iOS Transfer.

Features of iOS Transfer:
-Transfer Videos from Computer to iPhone/iPad/iPod
-Transfer Videos from iPhone/iPad/iPod to Computer
-Transfer Videos from iPhone/iPad/iPod to iTunes Library
-Transfer Videos from iTunes Library to iPhone/iPad/iPod
-Transfer Videos Between iPhone/iPad/iPod/Android Devices
-Delete Videos on iPhone/iPad/iPod

d_win d_mac

Part 1:How to Sync Videos from Computer to iPhone 7

Step 1. Launch iOS Transfer and connect iPhone 7 with the Computer

iOS Transfer main page

Method 1: Transfer Videos Using Buttons

Step 2. Find video type on iPhone 7
Click Videos icon at the top of the main interface. Select a specific option Movies/Music Videos/Home Videos/TV Shows/iTunes U/Podcasts to transfer( “Movies” is the default option).

select videos to transfer

Step 3. Select and Add Videos from PC/Mac to iPhone 7
Later, click Add and then select Add File or Add Folder.
Note: If you need to select a few videos,then click Add File, and then hold down Shift or Ctrl key to choose multiple videos; if you want to transfer all the videos in one folder, then click Add Folder.

select Add File or Add Folder

From the pop-up window, browse and choose the target video(s) from your computer. And click Open. Then, the selected videos will be imported to the iPhone 7.

open the video older

Method 2: Transfer Videos by Drag and Drop

Step 2. Find videos on your PC/Mac
Find and open the video folder on your PC or Mac which includes the videos that you wish to transfer to your iPhone 7.

Find videos on computer

Step 3. Export the Videos to iPhone 7 by Drag and Drop
Click Videos icon on the main interface of iOS Transfer,it will go to the Movies window by default, Music Videos, TV Shows, iTunes U and Podcasts are available here too. Drag and drop the selected videos from your computer to the Movies window of iOS Transfer.

Export videos to iPhone 7 by Drag and Drop

d_win d_mac

Part 2:How to Transfer Videos from iPhone 7 to Computer

Step 1. Launch iOS Transfer and connect your iPhone 7 with the computer.

iOS Transfer main page

Step 2. Export videos from iPhone 7 to computer
a. Click Videos icon at the top of the main interface, then select a specific option Movies/Music Videos/Home Videos/TV Shows/iTunes U/Podcasts to transfer( “Movies” is the default option). Later, select the videos (Note: Hold down Ctrl or Shift Key to select multiple videos) you want to transfer to the computer, and click Export > Export to PC.

select videos to transfer

Note: Here you can right-click on the selected videos and then select Export > Export to PC as well.

export video to pc
b. Browse and choose the target folder on the computer to export. And click OK to start the export process.

click ok to confirm

Step 3. Export videos to computer completely
Click Open Folder to see the exported files on the computer or click OK to close the dialog.

export video completed

view transferred videos

d_win d_mac

Part 3:How to Transfer Videos from iTunes to iPhone 7

iOS Transfer provides two solutions to transfer videos from iTunes to iPhone 7, include Movies, Music Videos, TV Shows, iTunes U and Podcasts.

Method 1: With 1-Click File Transfer

Step 1. Launch iOS Transfer and connect your iPhone 7 with the computer.Then click Transfer iTunes Media to Device icon on the main interface.

ios transfer main page

Step 2. iOS Transfer will detect all the media files in iTunes and show them by list on the pop-up window. By default, the entire library has been checked. But you can uncheck some items that you won’t transfer to your iPhone.

select transfer videos to iphone 7

Step 3. Transfer media contents to iPhone 7
Click Transfer to start transferring selected files to your iPhone and then click OK to complete the process.
Note: iOS Transfer enables to automatically detect the duplicates and only transfer the exclusive contents from iTunes to iPhone 7.

click transfer button

transfer music to iphone 7

Method 2: With Toolbox

Step 1. Launch iOS Transfer and connect your iPhone 7 with the computer. Then go to Toolbox > Transfer iTunes Media to Device on the Toolbox interface.

tool box main page
Step 2. iOS Transfer will detect all the media files in iTunes and show them by list on the pop-up window. By default, the entire library has been checked. But you can uncheck some items that you won’t transfer to your iPhone.

select video file transfer

Step 3. Transfer media files to your iPhone 7
Click Transfer to start transferring selected files to your iPhone 7 and then click OK to complete the process.
Note: iOS Transfer enables to automatically detect the duplicates and only transfer the exclusive files from iTunes to iPhone 7.

click transfer to begin

transfer itunes videos to iphone 7 complete

d_win d_mac

A Media File Transfer for iPhone 7

Another iOS media file manage here we strongly suggest you use is Mobile Sync. It is the best tool for sync iOS data between iOS device and computer, it has several features like PC to iOS Transfer, iOS to iOS Transfer, add files to iOS, or vice versa. Mobile Sync is a professional iOS data manage & transfer software, it is designed for syncing data between iPhone/iPad/iPod and computer. With the help of Mobile Sync, you can efficiently transfer videos from the computer to iPhone 7 easily. The iOS data sync job can be done with easy steps: Launch Mobile Sync and then connect your iOS device to it with USB cable; select specific iOS files on the preview window; start the transferring. Only three simple steps, you can finish the iOS data sync job.

mobile sync home page

Related Article:

How to Transfer Music from Computer to iPhone 7

How to Transfer Photos from Computer to Mobile Phone

How to Transfer Video from Computer to Samsung

How to Transfer Music from Android to iPhone/iPad/iPod

Transfer Videos from Computer to iPhone 7

Comparison Between Android N And iOS 9

While many of us are still waiting for Android Marshmallow, Google’s engineers aren’t taking a break: the next version of Android, Android N, is nearly here. How does it compare to Apple’s iOS, which has reached version 9.3? There’s only one way to find out: read the comparison between Android N and iOS 9.

Yet as the two big producers of mobile operating systems, Apple and Google, continue their fight to outdo one another, it is particularly noticeable that the latest version of Android N borrows some functionality from its big competitor. Quite a few features, as it happens. So here is a rundown of the feature set in Android N that may be somewhat familiar to users of Apple devices.

Part 1:Differences Between Android N And iOS 9

Android N vs iOS 9: interface
Android N is likely to undergo a lot of interface changes between now and Fall, but we’re already seeing some key differences between it and Android Marshmallow. The notifications area has been completely redesigned and now enables you to respond to messages from within notifications, and there’s a new multi-window mode, which didn’t quite make the cut for Android M. Google also says it’s been working on Project Svelte to make Android feel smooth on older devices, but details of that haven’t been announced yet.

The last major redesign of iOS was years ago, with the controversial iOS 7. It’s not quite as garish as iOS 7 was and the new 3D touch adds extra functionality to (some) app icons, but there are still some shockingly bad interface elements such as the horrible, horrible Music app. iOS 9.3 does get one key new UI feature, though: Night Shift, which can automatically chance the color balance to minimize bright screens’ effects on your sleep.

Android N vs iOS 9: Google Now vs Siri
We’ve yet to see any significant changes in Google Now on Android N, but even if Google only tweaks the edges it’s still ahead of Apple’s Siri for us. Maybe it’s our accent but we find Google’s voice recognition much more accurate than Apple’s, so Siri’s usefulness suffers as a result. Being able to shout “hey Siri!” and issue commands is something we’re glad Apple copied; it’s just a shame that Siri seems to think everything else we say is “blargle argle garble”. Siri also remains far behind Google Now in the usefulness stakes.

Android N vs iOS 9: security and privacy
As ever, Apple and Google are coming at this from different directions. Apple goes for the Father Knows Best model, where apps are only allowed from the Apple app store and even the FBI doesn’t get to decrypt users’ iPhone. Google, on the other hand, wants to be open, so there are always security risks from malicious apps and third-party app stores. One thing we’re hoping to see in Android N is the Smart Lock for Passwords feature, which actually debuted in Marshmallow: that version doesn’t work with many apps yet, so we’re hoping Google promotes it more for Android N app developers.

security and privacy

Android N vs iOS 9: battery
Android’s kicking Apple’s backside in the battery stakes: only the enormous iPhone 6s really delivers the goods battery-wise for power users, whereas the Doze mode introduced in Android Marshmallow massively increased battery life in Android devices of all sizes. Android N doubles down on Doze, with an improved energy saving mode that kicks in any time the screen is off. That should make Android last even longer – hopefully without impairing notifications and usability.

battery

Android N vs iOS 9: mobile payments
Apple’s way ahead here, with Apple Pay embraced by banks all over the world. Google’s payment system has been revamped and rebranded – it’s Android Pay now – but at the time of writing it hasn’t launched in markets such as the UK. When it does, we’d expect the same retailers that support Apple Pay to support Android Pay too.

Android N vs iOS 9: early verdict
We’re not just comparing apples and oranges here; Android N is so far away that we’re comparing ripe apples with orange trees that haven’t borne fruit yet. Android N is already looking interesting, but we haven’t seen its best bits yet.

As with iOS 8 and Android M, both Android N and iOS 9 are improved versions of existing OSes: they’re better than their predecessors but in an evolutionary sense, not an “OMG they’ve changed everything!” sense. We think Android has the edge in some key areas – battery life and voice recognition in particular – and that Apple offers a more elegant but also more strictly controlled experience. As ever the choice between the rival OSes will largely come down to personal preference, so Android users are likely to gravitate to Android N while iOS users will tend to stick to iOS kit.

What do you think? Is there anything Google should learn from Apple or vice-versa? Let us know by leaving a message or the comments below.

Read more:

The New Features of iOS 10

iOS 9.3.3 :The Things You Need to Know

How to Recover Lost Data after Android 7.0 N Upgrade

How to Recover Lost Data after iOS 9 Upgrade

How to Backup and Restore Line Chat History on iPhone iPad

[Summary]: Looking for a way to backup Line messages from iPhone to computer? This article teach you how to backup and LINE chats history, pictures and videos from iPhone and iPad to Windows or Mac comptuer, you can also restore Line backups file to iPhone, iPad easily.

“Hello,I used the iPhone 5 for 2 years,recently I am planning to buy the new iPhone SE,but now I stuck in the trouble.How can I restore my phone Line chat history to my new iPhone?Anybody give me some suggestion?Thanks a lot.”-Beverly

Line app

LINE is available for a variety of smartphone devices and mobile devices(iPhone/iPad,Android, Windows Phone,BlackBerry, and Nokia) and even your PC.As a LINE messenger user,you may want to backup and restore your LINE chat history on mobile device, switching it to a new device or just as a backup in case the data is lost under any circumstances for example deleted accidentally.It may seem an impossible task to restore the data and the latest LINE chat history on device.What’s more even worse,where the history is deleted automatically when there is a login detected on another device,which means the data would be lost forever if there is no backup performed.

How to Backup and Restore Line Messages on iPhone

If you are the iPhone/iPad users are you looking for an apposite way to backup Line chat history from iOS device to computer and keep them safe? iOS ToolKit – Restore Social App –  iOS Line Backup & Restore Tool, which provides a simple and effective solution to backup Line chat messages with attachments from iPhone/iPad to PC in only a few clicks. All these Line chat messages will be saved in a readable database on computer,the Line text,video messages,photos are included.In addition,this program also help to restore backed up Line messages from computer to iOS device freely.Here list the applicable iOS device: iPhone XS(Max), iPhone XR, iPhone X, iPhone 8(Plus), iPhone 7,iPhone SE,iPhone 6S(Plus),iPhone 6(Plus),iPhone 5S/5C/5,iPad Air,iPad Pro,iPad Mini,etc,.

d_win d_mac
d_win d_mac

Part 1:How to Backup Line Chat History from iPhone to Computer

Step 1.Run Program and Connect iPhone to the computer
Firstly,launch the iOS Line Backup & Restore Tool on computer and select “Restore Social App” on main interface,you will see a list of tools as follows: Select “iOS LINE Backup & Restore” from the tool list.Then connect your iPhone to the computer with an USB cable.The excellent program will automatically detect your device very soon.

line-backup-restore-tools

backup-line-messages

Step 2.Backup iPhone LINE Data to Computer
When your phone is detected by iOS Line Backup&Restore Tool,you are allow to click “Backup” to begin the data backup process.

backup-iphone-line-messages

Once the backup process is complete,you should click “View it” to preview your LINE backup files.

Part 2:How to Restore Backed up Line Chat History from Computer to iPhone

Step 1.Run Program and Connect iPhone to the computer
Firstly,launch the iOS Line Backup & Restore Tool on computer and select “More Tools” on the left side of the interface,you will see a list of tools as follows:Select “iOS LINE Backup & Restore” from the tool list.Then connect your iPhone to the computer with an USB cable.The excellent program will automatically detect your device very soon.

line-backup-restore-tools

backup-line-messages

Step 2.View and Extract LINE Backup Files
To check the LINE backup files,you should click “To view the previous backup file >>” on the first screen.Here you will see a list of LINE backup files,choose the one you want and tap on “View”.

view-line-backup-file

Step 3.Preview to Restore/Export LINE Backup
Once the scanning is finished,you are allow to preview all LINE chats history including attachments,and then restore or export the backed up by clicking “Restore to Device” or “Export to PC”.

preview-line-backup-data

Note:Currently,iOS Line Backup&Restore Tool allow you to restore or export the whole Line data.You can’t do it selectively.

If you would like to roll back, please restart iOS Line Backup&Restore Tool, open the preview window and click “Undo the Restore” to proceed. Please be noted that you could only undo the latest restore.

restore-line-data-backup

iOS Toolkit perfectly help to backup and restore iOS Line chat history on computer. More than 3,000s of satisfied users. Easy to use software and no technical knowledge required.Just download and have a try right now.

d_win d_mac
d_win d_mac

Related Article:

How to Backup and Restore iOS Kik Messages

How to Backup and Restore iOS Viber Messages

How to Backup and Restore iOS WhatsApp Messages

How to Backup and Restore Contacts/SMS/WhatsApp Messages on iPhone

How to Restore Deleted SMS/iMessages/MMS on iPhone

How to Transfer SMS/MMS/iMessage from iPhone/iPad/iPod to Computer

Backup & Restore Line Messages

How to Transfer SMS&MMS&iMessage from iPhone/iPad/iPod to Computer

“Lots of iPhone users have the same trouble that is they can’t backup the SMS to anywhere when the SMS box is full,then they have to delete all of them to prevent iPhone rejecting new SMS receiving.Who can introduce an useful tool for backing up iPhone SMS to computer?THS”Tolbert

Not only iPhone,but also iPad/iPod have been one of the more popular device choices for sending messages a very long time. Very rarely does an individual who purchases an iPhone come to regret that they did so.Unfortunately,there are certain limitations on iDevice.Transferring iPhone/iPad/iPod SMS&MMS&iMessage in suitable format to a computer seems next to impossible.

Backup iPhone messages on computer so you can easily transfer and restore the backup messages to your iPhone, a new iPhone or just protect your privacy after backing up and delete it before selling the phone.Even if your iPhone was ever lost,damaged or stolen,your messages are still safe.iPhone messages transfer tool helps you keep a safe messages backup on your computer, just in case anything might happen or just free up space on device.Have you ever encounter a similar situation?Are you eager to know how to transfer messages from iPhone to PC for backup or any other purpose?If yes,then your request will probably end here.We are going to give you a step-by-step process on how to transfer SMS&MMS&iMessage from iPhone/iPad/iPod to PC and manage them on it easily.

How to Backup iPhone Messages to Computer

It’s really simple to back up iPhone SMS&MMS&iMessage to computer with iPhone/iPad/iPod SMS&MMS&iMessage Transfer.Back up all kinds of messages complete with emoji,web links and attachments:photos,videos and contact files.With this excellent program,you are allow to freely transfer SMS&MMS&iMessage from device to computer in easy steps.In addition,iPhone/iPad/iPod SMS&MMS&iMessage Transfer enable to retrieve deleted messages on iPhone/iPad/iPod.

Download the iPhone/iPad/iPod SMS&MMS&iMessage Transfer for free:

d_win d_mac

If you want to backup all files from iPhone/iPad/iPod to comptuer,you can free download the iPhone Message + Contact + Music&Video + Photo&Camera Transfer below:

d_win

Let’s focus on the full features of iPhone/iPad/iPod SMS&MMS&iMessage Transfer:

-Backup SMS&iMessage &MMS(Photos&Video & Audio) from iPhone/iPad/iPod to computer.
-Print SMS&MMS&iMessage out and list the messages by date and “sender” and “receiver”.
-Restore deleted messages directly from iPhone/iPad/iPod without iTunes backup.
-Restore deleted messages by extracting iTunes backup files (Photos&Videos &Audios ).
-Support all models of iPhone(iPhone 7,iPhone SE,iPhone 6S(Plus),iPhone 6(Plus),iPhone 5S/5C/5, iPhone 4S/4.
-Support all models of iPad(iPad Pro,iPad Air,iPad Mini,iPad 4/3/2).
-Support all models of iPod Touch.
– Support to iOS 10 or lower.
– Print SMS&MMS& iMessage (HTML & JPG & TEXT & MHT file) .
– Support Group Message.
– Edit SMS&MMS&iMessage(ANTS file only).
-Password protection (ANTS file only).

How to Sync SMS&MMS&iMessage from iPhone to Computer

Step 1.Download and Install iPhone/iPad/iPod SMS&MMS&iMessage Transfer on PC
Download,install iPhone/iPad/iPod SMS&MMS&iMessage Transfer on computer.Note:Please install the latest version of iTunes on PC at the same time,make sure iTunes successfully detect your iPhone.

Step 2.Run iPhone/iPad/iPod SMS&MMS&iMessage Transfer on PC
Connect iPhone to computer,and then all the messages will be displayed automatically.(Please wait.If you have lots of apps or photos in messages,it will take longer time to read data on iPhone)

Step 3.Backup Messages from iPhone
Click the button “Copy” which can be found at the bottom of the screen.You are allow to choose to save your all iPhone SMS&MMS&iMessages to PC in TEXT or ANTS format.You can set password to protect your messages database for personal privacy by choosing .ants format.

backup-iphone-sms-main

backup-iphone-sms-step1

Click the single contact,iPhone/iPad/iPod SMS&MMS&iMessage Transfer will display all messages with the messages that come from this single person.And you are allow to choose to copy all messages to computer in Text or MHT format.

Print Tips:
A:Click the button “Print” which can be found at the bottom of the screen.
B:Save SMS&MMS&iMessage as .mht file format. And open the .mht file by IE,click “tools”-“internet options”-“advanced”-check “print background colors and images”,and print .mht file.

backup-iphone-sms-step2

iPhone/iPad/iPod SMS&MMS&iMessage Transfer can automatically read and display all your backup message on iTunes.

iphone-message-itunes-backup-step3

Edit Messages:Open ants file,and click Edit.
Click the single contact,and then click Edit.

backup-iphone-sms-step4

Note:Advanced Settings:

backup-iphone-sms-step5

iPhone/iPad/iPod SMS&MMS&iMessage Transfer offers all solutions for all serious iPhone/iPad/iPod users.It not only supports iDevice messages to computer transfer&export,but also enables iDevice users to retrieve deleted messages from backup to device or even to a new device.No other iPhone/iPad/iPod data manager software does more.Auto-scans your iPhone/iPad/iPod,and auto-indexes.You can easily and quickly backup and restore SMS/MMS/iMessage on iPhone/iPad/iPod with this outstanding program.

Free download the iPhone/iPad/iPod SMS&MMS&iMessage Transfer and try to backup your iPhone messages:

d_win d_mac

Free download the iPhone Message + Contact + Music&Video + Photo&Camera Transfer to backup all iPhone data to computer:

d_win

iPhone to Computer Transfer main interface:

transfer iphone data to computer

Related Article:

How to Backup Contacts from iPhone to Computer

How to Backup and Restore Contacts/SMS/WhatsApp Messages on iPhone

How to Backup,Restore and Transfer WhatsApp Messages

How to Backup iPhone/iPad Data

How to Backup Contacts from iPhone to Computer

Summary
Do you want to backup contacts from iPhone to computer? This article tells you a simple way for you to transfer contacts from iPhone to computer, after backing up contacts, you can also restore them back to your iPhone for using.

Almost all iPhone user have a habit to record the phone number,E-mail or even the house address on contacts list on iPhone.However,things always comes when you are not ready.This tutorial is for iPhone users to transfer iPhone contacts to computer in case lossing. Sometimes, you may lost contacts when these circumstances happen:

Reasons for Contacts Loss

-Accidental deletion;
-Restore iPhone to factory resetting;
-Device formatting;
-iOS upgrade/iOS jailbreak,
-iOS System Crash;
-iPhone get broken/water damaged;
-iPhone was stolen;
-Attacked by virus;
-Other.

iPhone users are relay on backing up contacts via Internet service accounts,like Outlook, Exchange,Yahoo and Gmail,etc,.However,not all things are perfect enough as you imagine.You’re looking for some better methods for how to backup iPhone contacts without iTunes?When you input “How to back up iPhone contacts” in Google search,there comes millions of methods recommended.

backup iphone contacts

iPhone/iPad/iPod Contact Transfer is an easy and high efficient iOS backup program,which helps to backup and restore iPhone contacts on computer completely,enable to retrieve deleted contacts by extracting iTunes backup files on computer.It is easier and more convenient than backing up iPhone contacts via Internet service accounts.Let’s see the features list of iPhone/iPad/iPod Contact Transfer:

Download the iPhone/iPad/iPod Contact Transfer for free:

d_win d_mac
d_win d_mac

iPhone/iPad/iPod Contact Transfer Features:

– Backup contacts on iPhone/iPad/iPod to Windows computer.
– Export full screen of iPhone/iPad/iPod contact.
– Retrieve deleted contacts directly from iPhone/iPad/iPod.
– Retrieve deleted contacts by extracting iTunes backup files to Windows computer.
– View contacts in Text file format (.txt) or ANTC file format (.antc) on PC.
– Password protection support (ANTC file).

Just follow the simple step-by-step instructions given below to learn how to backup and restore iPhone contacts with iPhone/iPad/iPod Contact Transfer.

Part 1:Backup iPhone Contacts on Computer with iPhone/iPad/iPod Contact Transfer

Step 1.Download and Run Program on Computer
Download,install and run iPhone/iPad/iPod Contact Transfer on computer.Please install the latest version of iTunes,make sure iTunes can read your iPhone.

Then connect iPhone to your computer via an USB cable,and then all the messages will be displayed automatically the iTunes contacts included.(If it is reading data,please wait a little while.That might because you have lots of contacts,it will take longer time to read your phone data.)

run iPhone/iPad/iPod Contact Transfer
Step 2.Copy the iPhone Contacts to Computer
Please click the button “Copy”,then you are allow to choose to save your all iPhone Contact including the contact photo to your PC in Text or ANTC format.

copy iphone contacts to pc

iPhone/iPad/iPod Contact Transfer will begin to automatically read and display all your backup contact from iTunes.

display iTunes backup contact

Part 2:Restore Contact from CSV file to iPhone with iPhone/iPad/iPod Contact Transfer

Step 1.Backup iPhone Contacts
Backup all your contacts from iPhone to computer as .csv file format using iPhone/iPad/iPod Contact Transfer.

Step 2.Run iPhone/iPad/iPod Contact Transfer on Computer
Please run iPhone/iPad/iPod Contact Transfer on your computer.

Step 3.Import Contacts to Address Book
Click on Start-All Programs-Accessories,click to open Address Book. In Address Book,click File- Import -Other Address Book…,select “Text File (Comma Separated Values)”,click Import,then browser the CSV file,click Next,map the fields you wish to import,click finish.

When it is finish,you had import the contacts to your Windows Address Book.

Step 4.Sync Contacts from Address Book to iTunes
Run iTunes,connect iPhone with computer,click to select the iPhone on iTunes,choose Info tab, in Contact section,check “Sync contacts with Window Address Book”,click apply.

When it is complete,all contacts have been transferred to your iPhone.

Part 3:Restore Contact from CSV file to Outlook with iPhone/iPad/iPod Contact Transfer

Step 1.Backup iPhone Contacts
Backup all your contacts from iPhone to computer as .csv file format using iPhone/iPad/iPod Contact Transfer.

Step 2.Run iPhone/iPad/iPod Contact Transfer on Computer
Please run iPhone/iPad/iPod Contact Transfer on your computer.

Step 3.Import Contacts to Windows Address Book
Click on Start -All Programs -Accessories, click to open Address Book. In Address Book, click File-Import-Other Address Book…,select “Text File (Comma Separated Values)”,click Import, then browser the CSV file, click Next, map the fields you wish to import, click finish.

After all this, you had import the contacts to your Windows Address Book.

Step 4.Sync Contacts from Address Book to Outlook
Open Outlook;Open the File menu;Choose “Import and Export”;In the “Import and Export Wizard” dialog box choose “Import Internet email and address”,then choose “OUTLOOK EXPRESS 4.X 5.X 6.X”,click “Next”.

When it is complete,all contacts have been transferred to Outlook.

iPhone/iPad/iPod Contact Transfer is simple to install and easy to operate with a user friendly interface.You can easily and quickly backup and restore your contact from your iOS device on PC.iPhone/iPad/iPod Contact Transfer step by step user guide available.Just follow the steps above,easy sync iPhone/iPad/iPod contact on computer in just a coffee time.

Free download the iPhone/iPad/iPod Contact Transfer and try to backup your iPhone contacts:

d_win d_mac
d_win d_mac

Read More:

How to Move Contacts from old iPhone to iPhone 7/6S/6/SE

How to Transfer Contacts from iPhone to Samsung Galaxy

How to Backup iPhone/iPad Data

How to Backup and Restore Files on iPhone 7/SE/6S/6/5S

How to Backup and Restore Contacts/SMS/WhatsApp Messages on iPhone

How to Recover Deleted Contacts from iPhone 6(Plus)/6S (Plus)