All posts by DHZ

TunesBank Apple Music Converter Review: Get Apple Music Free Forever

Summary
TunesBank has launched a brand new Apple Music Converter designed to convert Apple Music songs to MP3 and other formats at an amazing speed. With it, you can keep Apple Music for free forever without subscription.

Apple Music brings your music together. With a subscription account, you can access more than 70 million songs, a series of playlists, and radio and music recommendations. Is it possible to get Apple Music free after trial? Under the DRM layer, most users find to transfer Apple Music to any other devices for offline playback, such as iPod nano, iPod shuffle, Apple Watch, Kindle Fire, MP3 players, Xbox, Zune, PS4/PS3/PSP and even Sony Walkman, Android phone, etc. To make matters worse, even if they have downloaded Apple Music songs to the device, once users stop paying for the service, they will immediately lose all access to these downloaded songs. In other words, no one can keep Apple Music tracks forever unless DRM is removed from Apple Music.

TunesBank announced that the Apple Music Converter for Windows and Mac operating systems is now officially online. TunesBank Apple Music Converter can unlock Apple’s FairPlay DRM protection and convert Apple Music to DRM-free MP3, AC3, M4A, AIFF, FLAC, etc., with 100% lossless quality and the original ID3 tags kept. Compared with the general Apple Music Converter, TunesBank is faster, the software can be downloaded and convert music with 10X faster conversion speed for Windows PC and 5X faster for Mac computers. With batch conversion feature, you can download Apple Music tracks individually or whole playlists in batches. After getting DRM-free Apple Music MP3 files, you can keep Apple Music playable forever even if the subscription has been canceled.

d_win d_mac
d_win d_mac

Main Features of TunesBank Apple Music Converter:

  • Unlock DRM from Apple Music.
  • Convert M4P songs to DRM-free MP3, M4A, FLAC, WAV and other formats.
  • Convert Apple Music songs on Windows at up to 10X faster speed and 5X faster on Mac.
  • Play Apple Music songs on MP3 players, iPod nano/shuffle, Xbox, Zune, Apple Watch, Kindle Fire, etc.
  • Transfer Apple Music to USB drive, burn Apple Music to CD easily.
  • Get Apple Music free forever after canceling subscription.
  • 100% lossless quality and support batch conversion.
  • Preserve original ID3 tags in the output MP3 or M4A files.
  • Upload Apple Music to iTunes, Google Drive, One Drive, etc.

How to Get Apple Music For Free Forever with TunesBank Apple Music Converter

Step 1. Download TunesBank Apple Music Converter
First, click the link to download the Apple Music Converter from TunesBank’s official website and install it on your Windows or Mac computer.

Download TunesBank Apple Music Converter for Mac

Download TunesBank Apple Music Converter for Windows

After installation, launch the TunesBank program, and iTunes will be opened automatically.

apple-music-added

Tip: You will get a 30-day free trial which only allows you to convert the first 3 minutes of each song. You are able to download unlimited Apple music files after purchasing the software.

Step 2. Add Songs to TunesBank
Start TunesBank and you will see a simple interface. As shown in the screenshot, all Apple Music tracks, playlists and albums in the iTunes library will be automatically synchronized to the TunesBank converter.

To add songs to TunesBank, select “Playlist” or “Music” from the left panel, and then check the box next to the song. You can convert multiple Apple music songs and playlists at the same time thanks to the batch conversion feature.

select-apple-music

Step 3. Choose Output Format
TunesBank supports converting Apple Music to MP3, FLAC, AAC, WAV and other formats. Among them, MP3 is the most widely used audio format. What’s more, all ID3 tags and metadata will be kept intact in the output file.

select-output-format-mp3

Step 4. Convert Apple Music to MP3 to Keep Forever
Click the “Convert” button in the lower right corner, TunesBank starts converting and recording Apple Music to DRM-free MP3, M4A, FLAC and other formats.

converting-apple-music-mp3

After successfully converting the songs, you can click the “View Output File” button to access the converted songs.

get-apple-music-mp3

Now that you have downloaded Apple Music songs to your computer, it’s time to get Apple Music free even after the 90-day free trial or subscription expires with the help of TunesBank Apple Music Converter.

d_win d_mac
d_win d_mac

How to download videos from YouTube, Facebook, and more

[Summary]: Do you want to download video for offline watching on computer or playback on mobile devices like iPhone, iPad, Android and MP4 player? Check out these free way to download video from Web sites like YouTube Facebook, and Vimeo.

Sometimes, you may want to download video to keep it forever or offline playback, YouTube is the largest, most popular video hosting platform and the 2nd largest search engine, and Facebook is the most popular social media platform today. YouTube, Instagram and WeChat follow, with more than a billion users. Tumblr and TikTok come next, with over half a billion users. We can find and watch videos on YouTube, Vimeo, Facebook, Twitter and more video platforms or social platforms.

video downloader

Whether you consume most of your videos on YouTube or another service like Vimeo, downloading a favorite video for offline viewing or personal use has probably crossed your mind.

Before download videos from the video hosting platforms or social media platform, note that policies for the many video Web sites vary, so review those policies and move forward at your own risk. Distributing copyrighted material without authorization is illegal in the United States and many other countries. CBS Interactive does not encourage or condone the illegal duplication or distribution of copyrighted content. Before copying or distributing any content online, make sure you have the legal right to do so.

Today, we recommend you the best video download tool, it let you download video from just about any video-sharing site, you can download video and audios from 1000+ hot sites, including YouTube, Facebook, Vimeo, Instagram, Vevo, Dailymotion, Vine, Tumblr, Veoh, Twitter, Facebook, Instagram, Bilibili, TED, CNN, etc.

4kFinder Video Downloader can download videos from YouTube and 10,000 other sites, it can save videos, playlists, channels in HD- MP4, MP3 and M4A.This is likely the fastest way to download any video from the Web: YouTube, Facebook, DailyMotion, Megavideo, Tumblr, Vimeo and more, you can enjoy the offline video without restriction.

d_win d_mac
d_win d_mac

Download Videos from 1000+ Sites

Download online videos easily from YouTube, Facebook, Vimeo and adult sites. The list is consistently updated! Get clips, videos, films, TV shows, series, movies, how-to’s, gameplays, cartoons, reviews, etc. from the Internet. 4kFinder Video Downloader supports 4K & HD quality video clips.
Support 1000+ Popular Sites: YouTube, Facebook, Dailymotion, Instagram, SoundCloud, Dailymotion, Vimeo, Twitter, Vevo, Tumblr, LiveLeak, Twitch, Niconico, TED Talks, CNN, Naver, V LIVE, NASA, ESPN and more.

Download Videos from any sites

Download 4K & 8K Videos

Download YouTube files in original quality, without re-encoding.
Select quality from the list provided by the program:
4K, 1440p, 1080p, 720p, 480p, 360p, 240p, 180p.

Download 8k and 4k Videos

Save Videos and Music to Computer

Download YouTube content for free to watch offline: videos, playlists, channels, charts, embedded visuals. Download heavy 4K, Full HD, HD files fast & easily. YouTube Video Downloader will show you a file size before saving it. Save up to 500 YouTube clips all at once! To find and download online music, try the Free YouTube to MP3 Converter.

convert YouTube to MP3

Download Full Playlists from YouTube

You can download any playlists, channels, favorites from YouTube freely,batch download feature allows you download up to 100 files at once.

Download Playlists from YouTube

How to Download Online Videos with 4kFinder?

Step 1. Copy the URL of the video you want to download, head to 4kFinder, and paste it in the bar in main interface. Then click “Analyze” to the right of that bar.

Copy video link from YouTube

Step 2. It will load for a few seconds and pop up a new windows, you’ll have the option to download the video in MP4(video), or MP3(audio), if you want to download video and audio at the same time, select MP4 and MP3 option.

output format

Step 3. Click “Download” button start to save video/audio on computer.

Download videos

Step 4. You can find the downloaded video under “Finished“, and open the videos to watch.

get video files

About Video Download software for Desktop

As a third and final option, you may download a program for your Mac or Windows computer dedicated to downloading Web video. For Mac, check out 4kFinder for Mac. Windows users can try 4kFinder for Windows. Both programs have gotten solid reviews and work as advertised, it provides you the quick and easy way to save videos for offline playing! The video quality can achieve 8K and the audio quality can achieve 256kbps. The 4kFinder offers trial version, everyone can free download videos and audios in 15 days.

d_win d_mac
d_win d_mac

Related Articles

How to Transfer Videos to iPhone and iPad

How to Transfer Videos/Music/Photos to iPhone

How to Transfer Video Files Between Android and Computer

Transfer Music, Video, Photos to Samsung Galaxy

UkeySoft FoneFix Review Pros, Cons, Features & Alternatives

Summary
This review introduces features, pros and cons of UkeySoft FoneFix iOS system recovery software, and its alternatives, helping you fix various iOS/iPadOS/tvOS system issues and get your iDevice back to normal.

What is UkeySoft FoneFix?

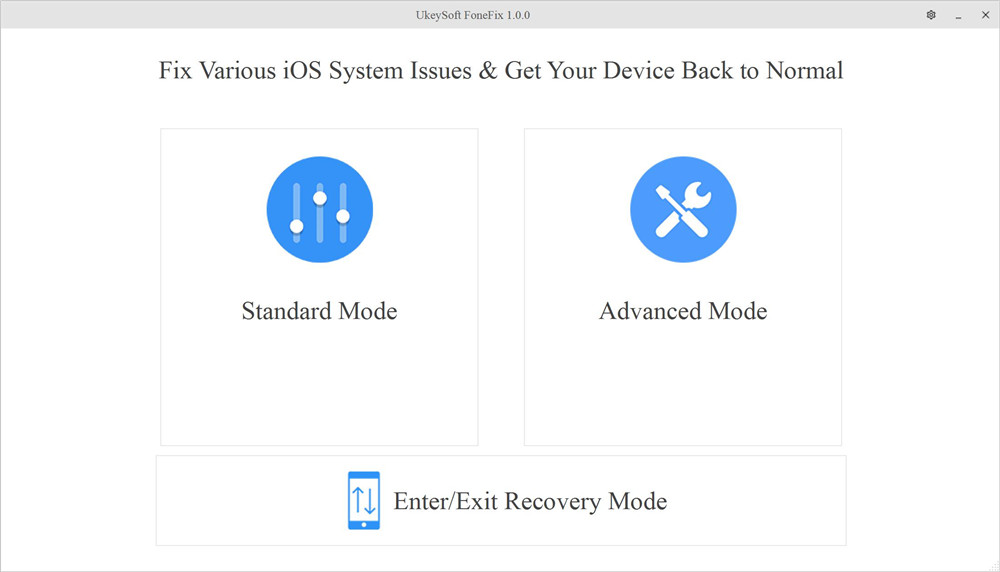
If you are an Apple user, when you use iOS devices such as iPad and iPhone, you may encounter many challenges, such as the iPhone stuck verifying update while upgrading iOS system, iPhone stuck in recovery mode or DFU mode, iPhone keeps restarting, iPad bricked, white Apple logo, disabled screen, blue screen, white screen, etc. UkeySoft FoneFix gives a hand to fix various iOS issues and get your iDevice back to normal. It comes with three modes: Standard Mode, Advanced Mode and Enter/Exit Recovery Mode.

Ukeysoft Fonefix

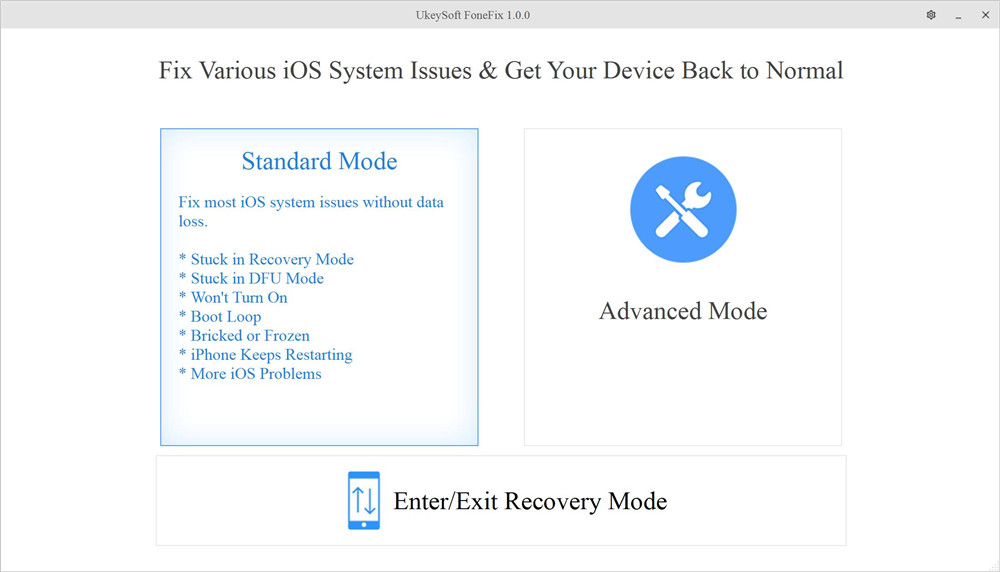
Standard Mode helps to solve the common iOS/iPadOS/tvOS issues mentioned above without any data loss, as as well as frozen iPhone, iPhone won’t turn on, etc. If this mode does not work, the Advanced Mode will come in handy. Advanced Mode can easily restore your iPhone or iPad to factory settings without iTunes or password, but it will erase all data and files on the iPhone. In addition, it enables you to enter and exit recovery mode by one click. Next we will present a tutorial on these modes of operation in the text.

Is UkeySoft FoneFix Safe?

UkeySoft Inc. is a software development company, and its products enjoy a good reputation on major websites. Its developers promise that the software is 100% safe and reliable. After testing, it was found that FoneFix has no malware, adware or viruses. According to the survey, its users are satisfied with the security of this program. Therefore, no need to worry about data leakage on iPhone or iPad when using this software to fix iOS system issues. In the Standard Mode, your iPhone data will not be deleted, but Advanced Mode may do that.

Main Features of UkeySoft FoneFix:

  • Easy to use, all-in-one tool, no technique required.
  • Fix various common and serious iOS problems.
  • Get your iOS/iPadOS/tvOS back to normal with 2 modes.
  • Repair iOS problems without data loss in a few clicks.
  • Enter or exit recovery mode on iDevice by one click.
  • Downgrade your iOS to the previous without jailbreak.
  • Get your iDevice out of recovery mode, Apple logo, black screen, etc.
  • Runs smoothly on both Windows and Mac system.
  • Compatible with all iOS devices and versions including iOS 14 and iPhone 12.

Is UkeySoft FoneFix Free?

No, this is a paid software, but the price is very reasonable. Its free version allows you to use for basic work, such as downloading the firmware package. Better yet, you can quickly enter and exit the recovery mode by one-click, this function is free! However, if you want to use the Standard Mode and Advanced Mode to restore you device to normal, you need to purchase its full version. Personal license for one PC/Mac is $49.95, and Family License for up to 5 PC/Mac is $79.95. After purchasing, you will get its lifetime free upgrade and support.

How Can UkeySoft FoneFix Help You?

After knowing something information about UkeySoft FoneFix iOS System Recovery, you may want to know how it can help you fix iOS system issues to normal. For example, get iPhone out of DFU Mode, fix iPhone stuck in Recovery Mode, fix iPhone stuck on verifying update, etc. You can use 3 modes to fix iPhone stuck on tecovery mode/Apple logo/boot loop, etc.

1. Standard Mode

As mentioned above, the standard mode solves most of the issues on iOS devices. Let us use it to fix iPhone stuck in DFU mode, Apple logo, etc. step by step.

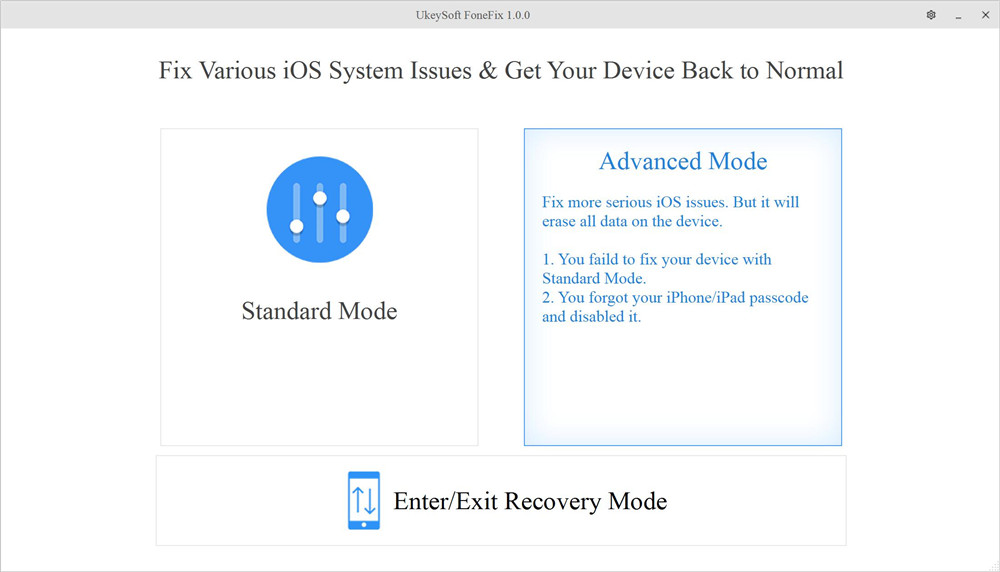
Step 1. Download and install the software on the computer desktop, then launch it. Connect your iPhone or iPad or iPod touch to the computer via Apple USB cable. And then select “Standard Mode” option.

select standard mode

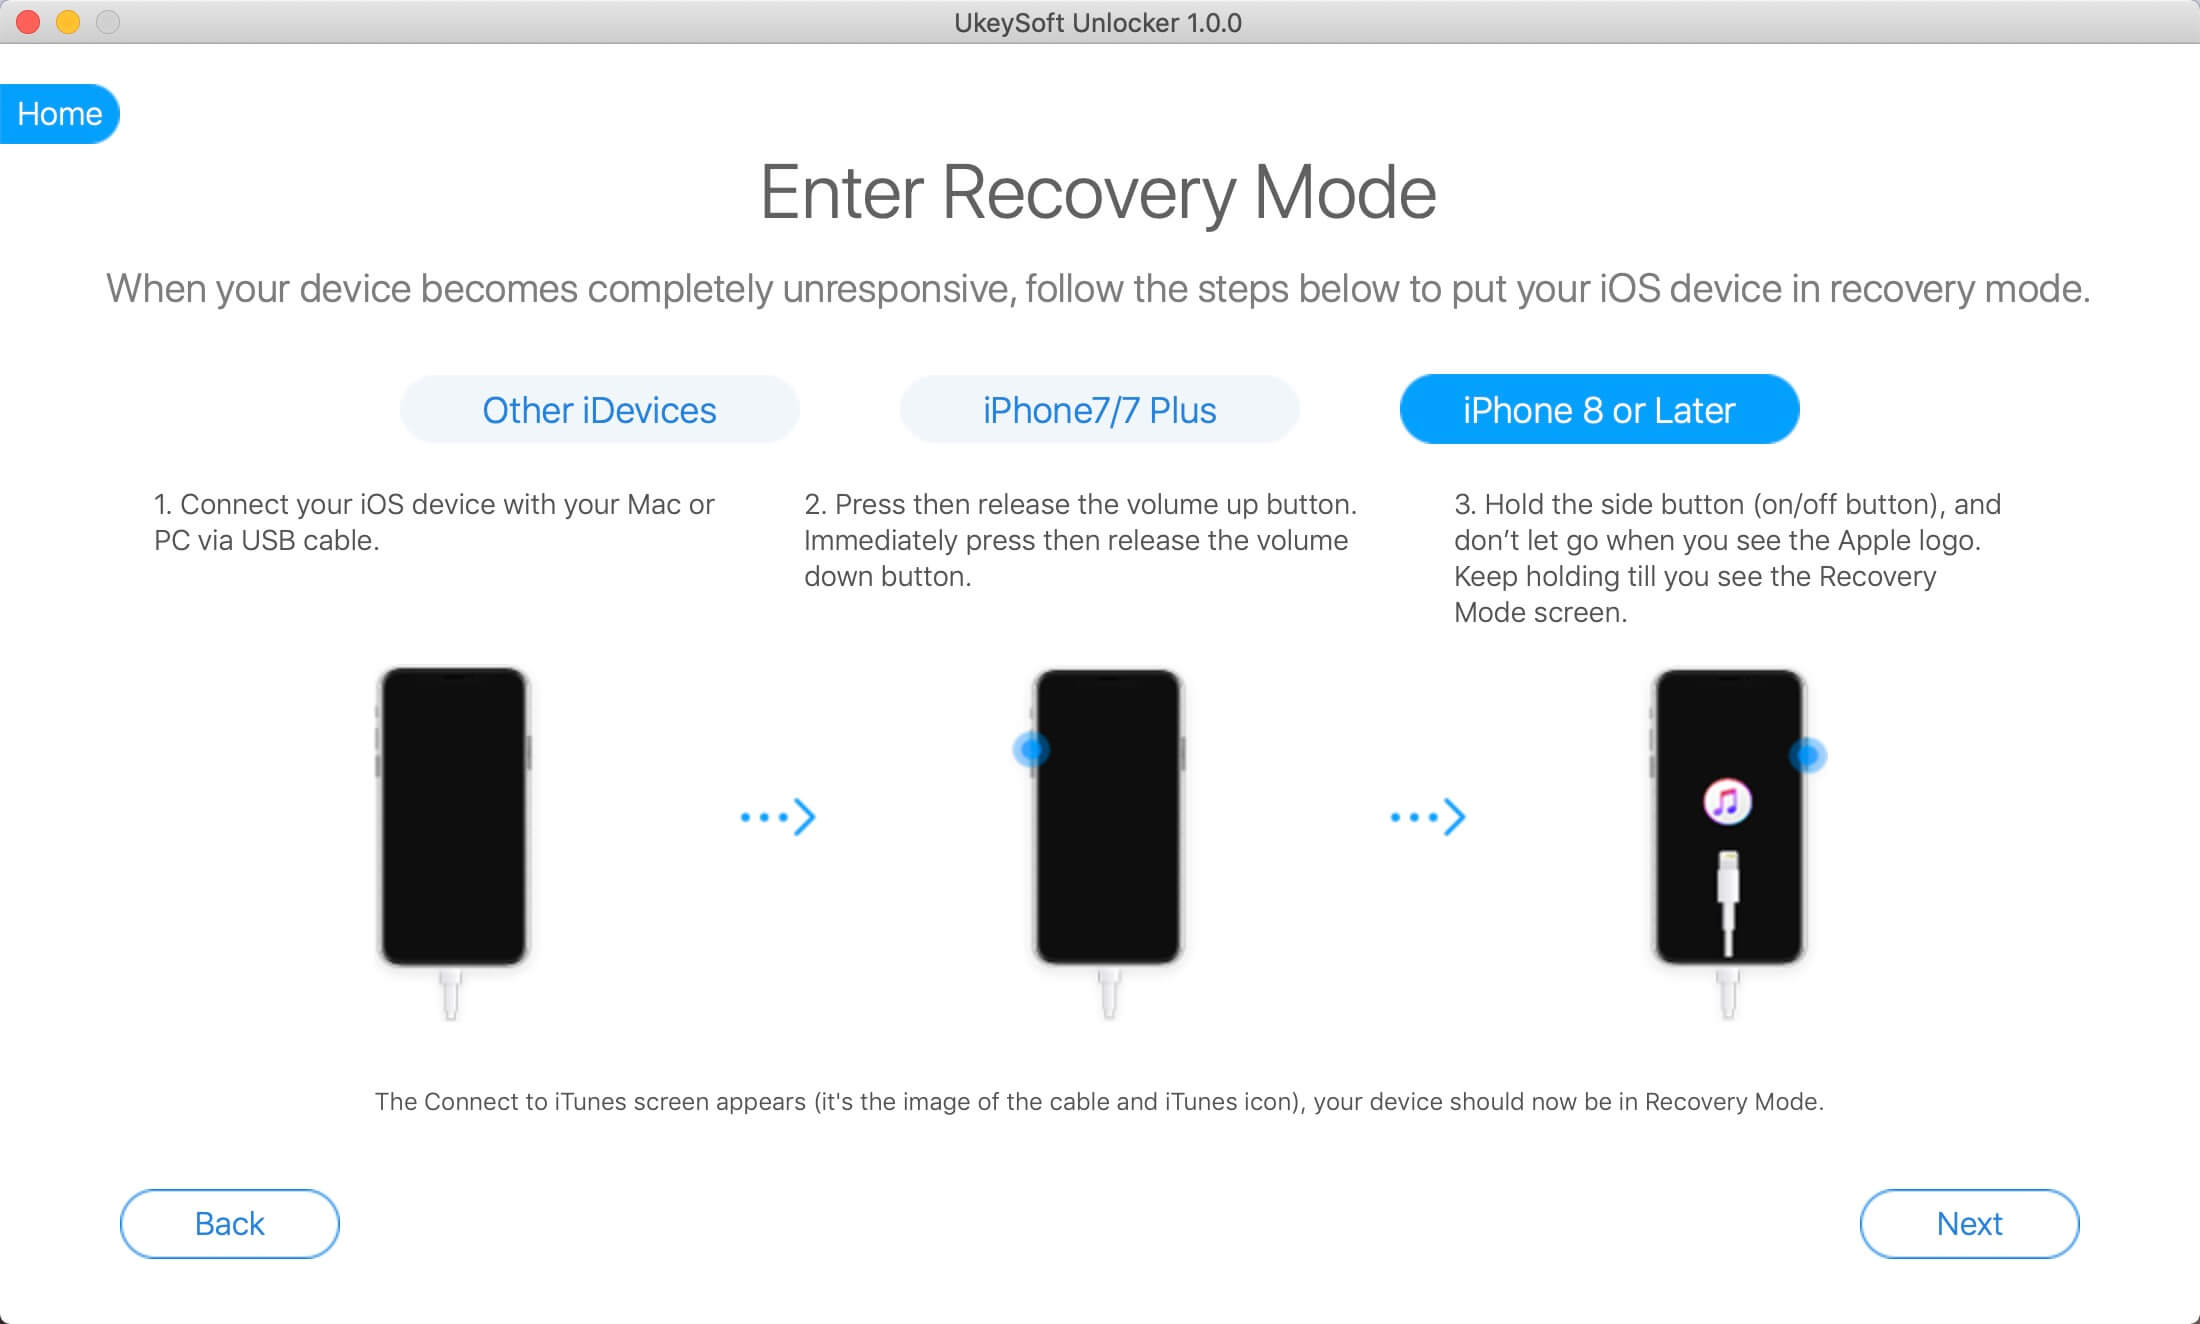
Step 2. Follow the instructions on the screen to put your iPhone into recovery mode and click the “Next” button.

enter recovery mode

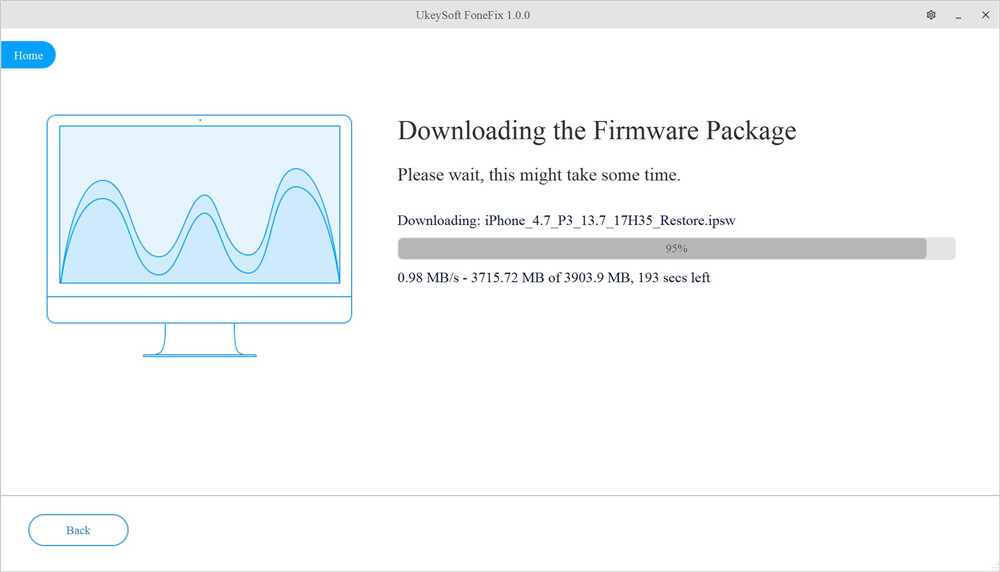
Step 3. Next, the program will automatically detect your device, click “Download” to download the firmware package for your device.

download firmware package

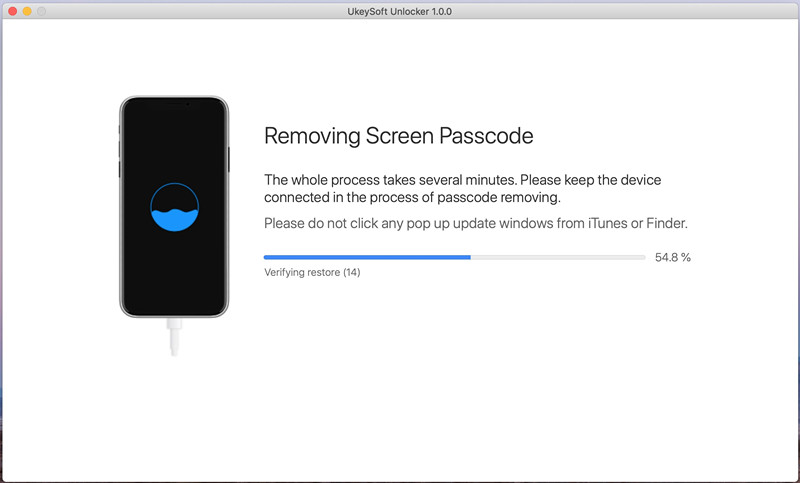
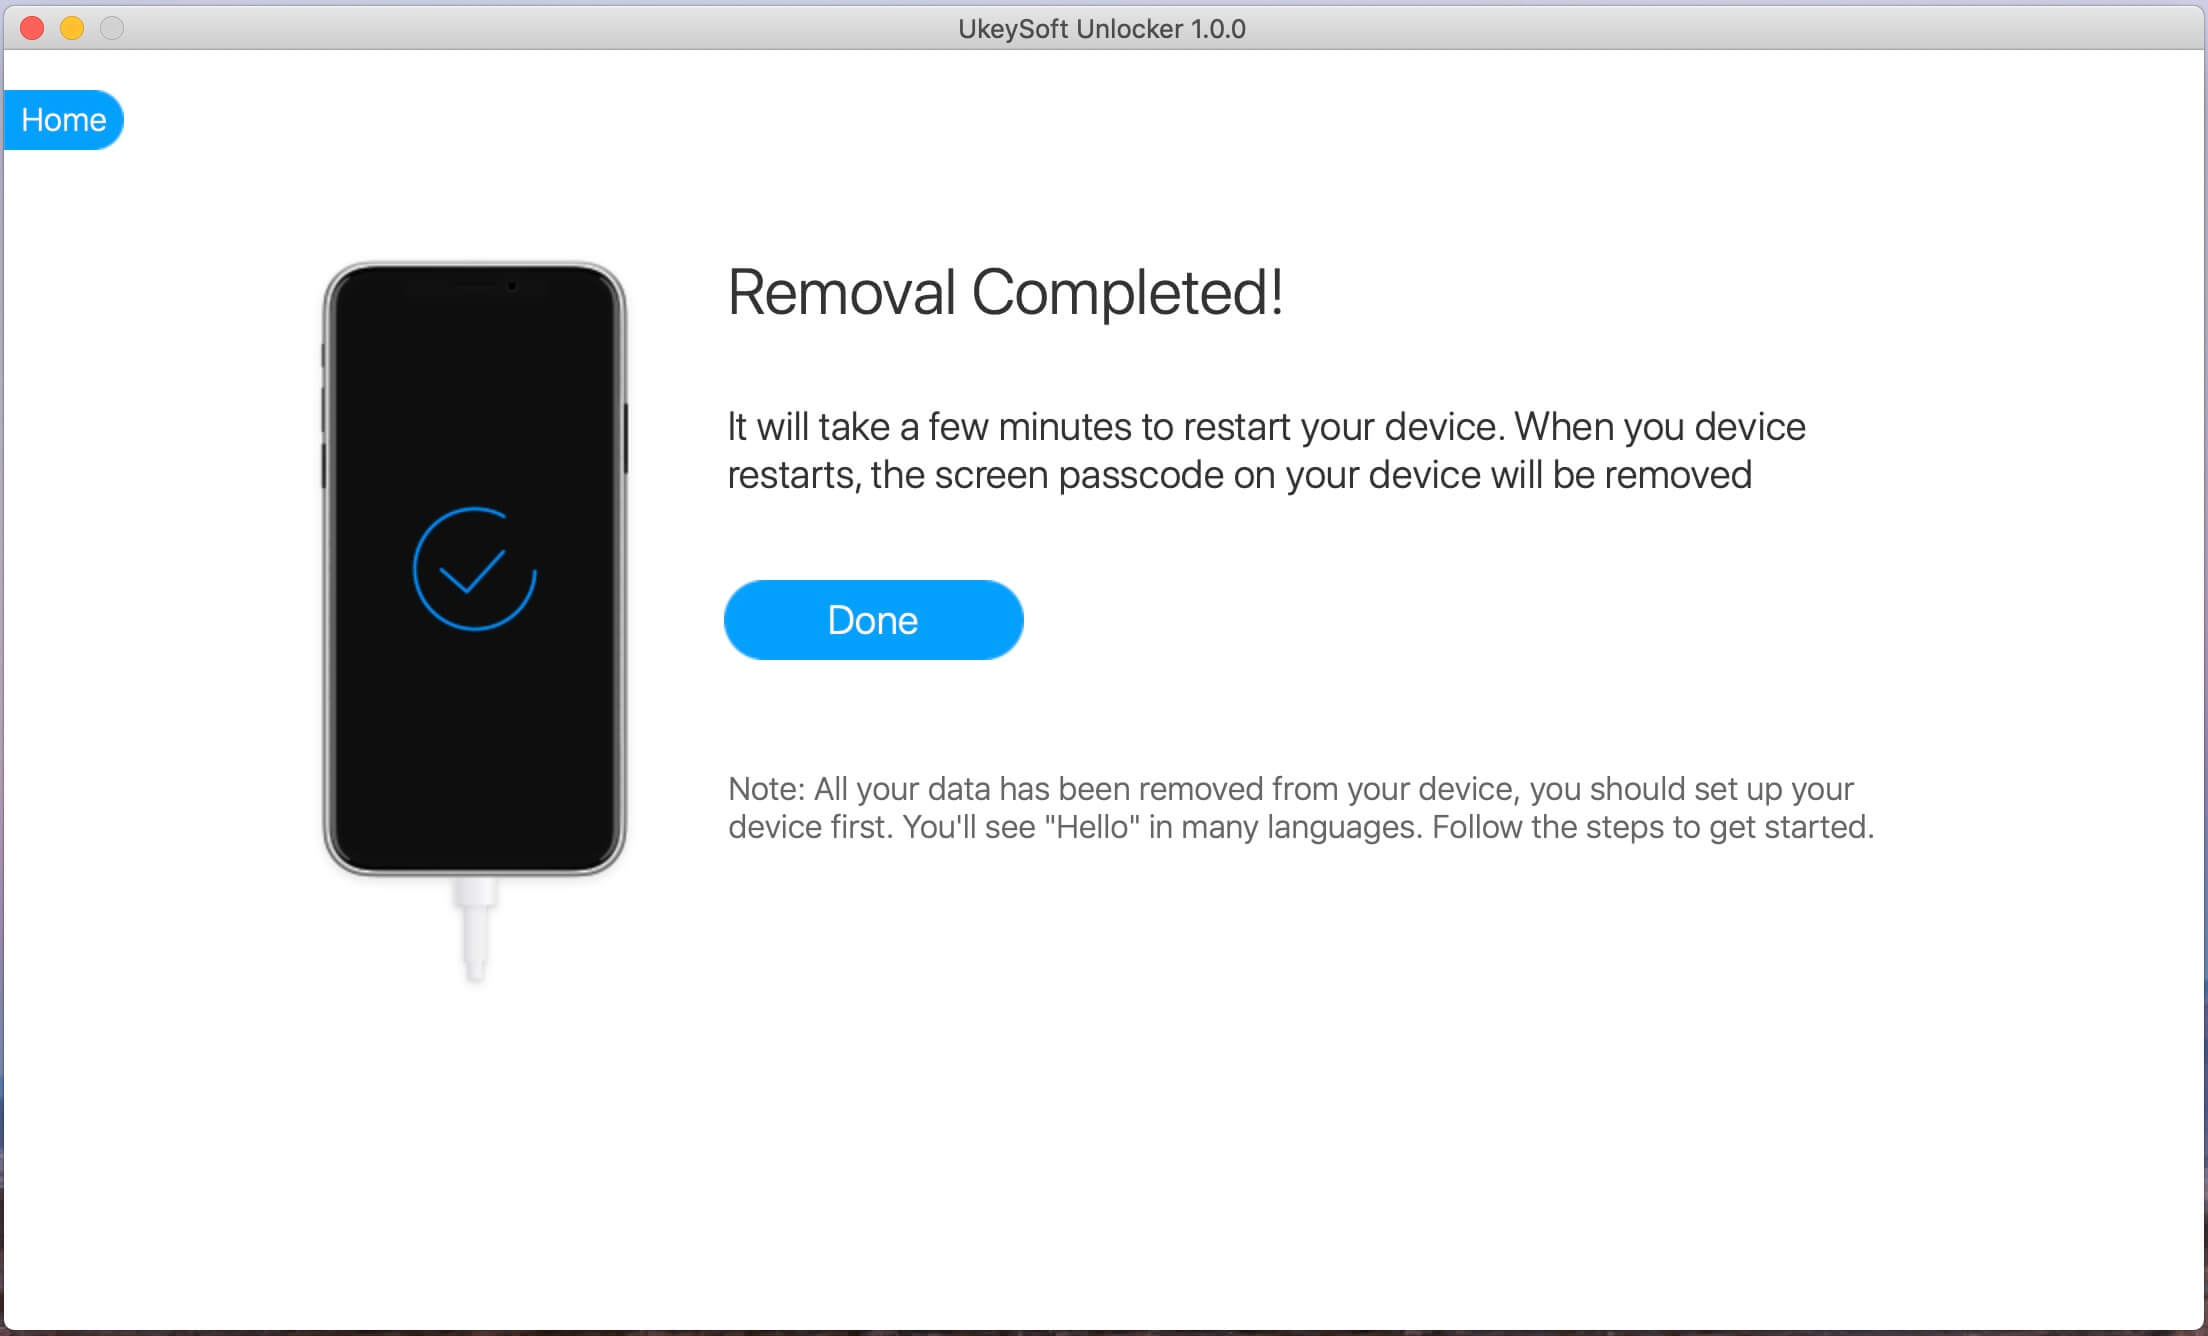
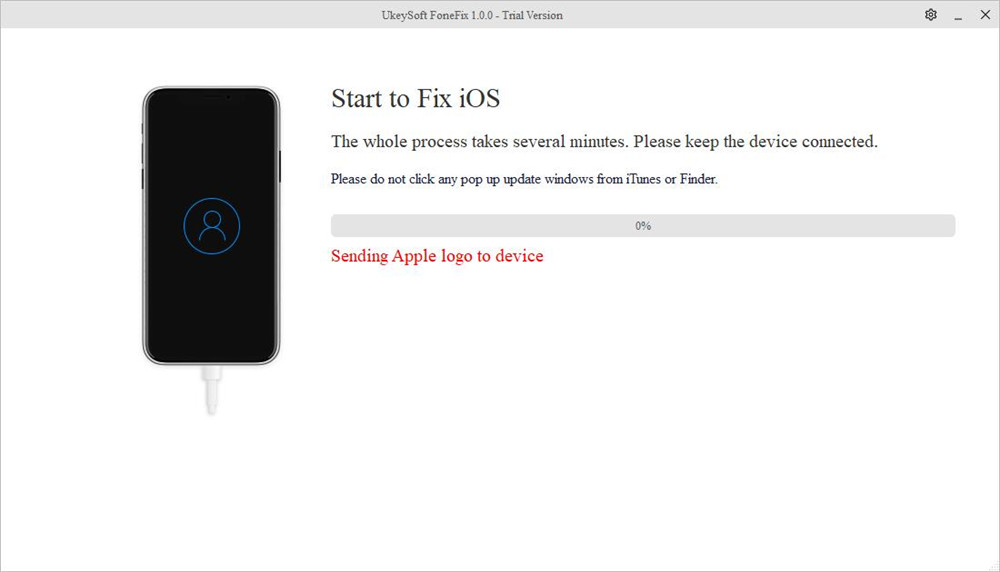
Step 4. After that, click “Start” to repair your iPhone to normal and wait for the process to complete.

fix ios system to normal

2. Advanced Mode

When the Standard Mode cannot fix your iPhone problem, the Advanced Mode will come in handy. The process is the same as the above Standard Mode, but in step 1 above, please select “Advanced Mode”. Using Advanced Mode to repair the device may cause data loss, so it is best to back up your data before using this mode.

select advanced mode

3.Enter or Exit Recovery Mode

When the home button or other buttons of your device are broken, UkeySoft FoneFix’s one-click enter or exit recovery mode function allows you to quickly enter or exit the recovery mode on iPhone/iPad/iPod touch/Apple TV! It is worth mentioning that you can use this feature for free!

How to Enter Recovery Mode:

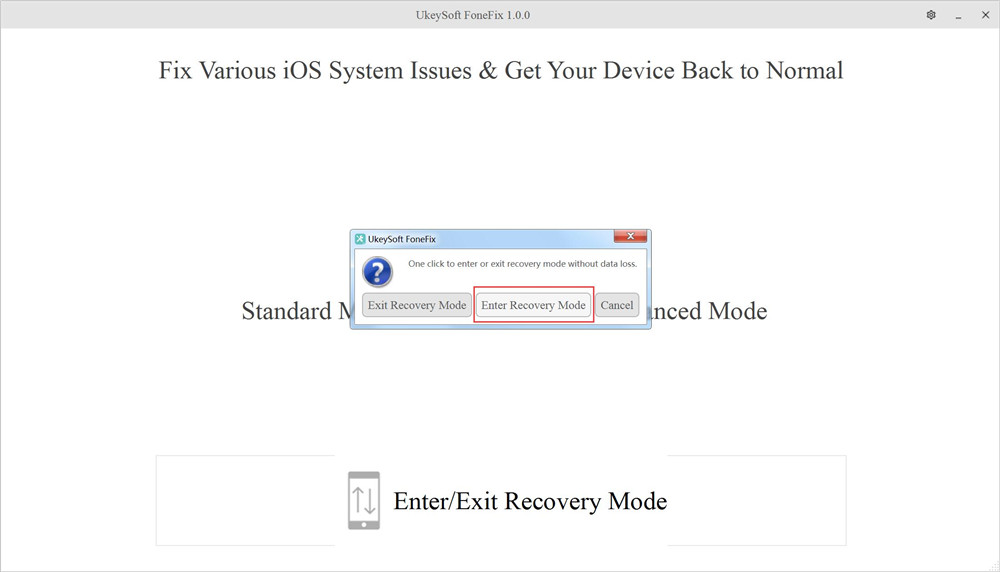
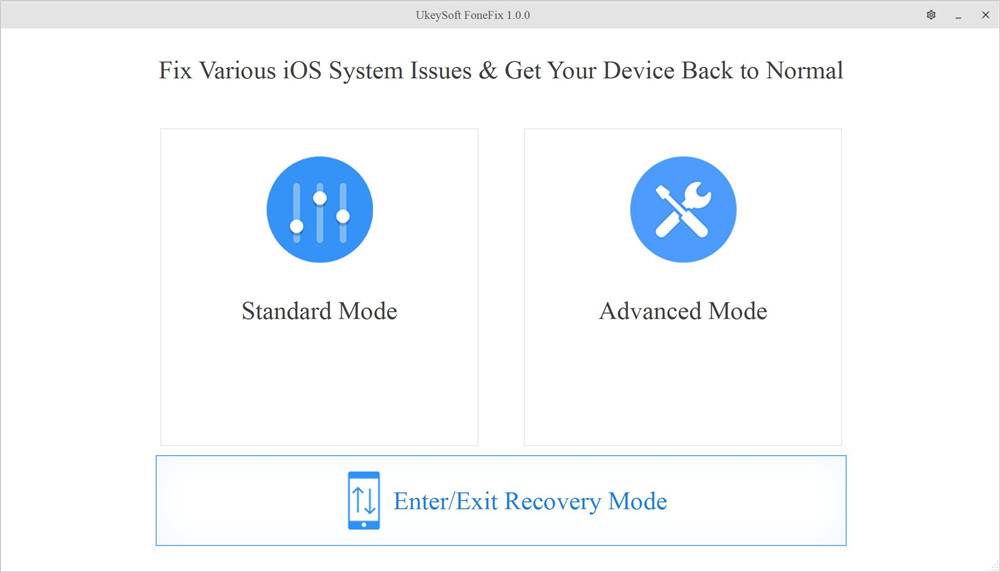
Step 1. Install and launch UkeySoft FoneFix on your computer. Select Enter/Exit Recovery Mode on the home screen of UkeySoft.

select enter or exit recovery mode

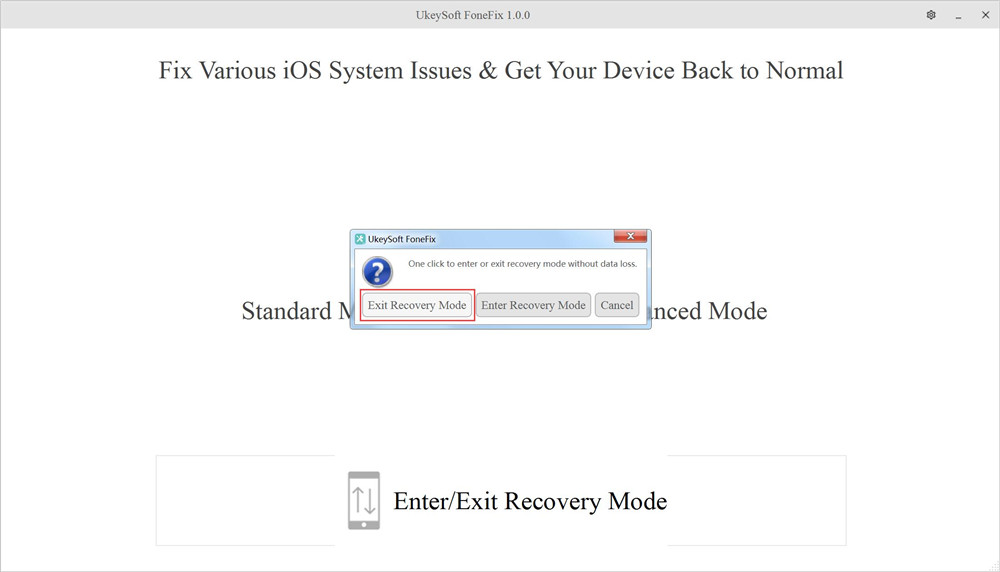
Step 2. Connect your iPhone or iPad to computer, click Enter Recovery Mode option. After a few minutes, when you see iTunes logo on the screen of your device, it means your device enter Recovery Mode successfully.

enter recovery mode

How to Exit Recovery Mode:

Step 1. Launch UkeySoft FoneFix and select Enter/Exit Recovery Mode on the Home page.

select enter or exit recovery mode

Step 2. Connect your iPhone to the computer via USB cable, and click the Exit Recovery Mode button. After the process is complete, your device will restart and return to its normal state.

exit recovery mode

Where to Download UkeySoft FoneFix?

You can go to the official page of UkeySoft FoneFix and download the app. You are free to try its free version to know if it meets your requirements before purchasing it.

Pros:

  • User-friendly interface, easy to use, reliable.
  • Fix various iOS system issues without data loss.
  • Enter and exit recovery mode totally free.
  • Restore iOS / iPadOS / tvOS to normal at home.
  • Advanced Mode can unlock disabled iPhone without passcode/iTunes.
  • Support the latest iOS 14 and iPhone 12.
  • Works perfectly on Windows and Mac and all iOS device.

Cons:

  • Not free, features are limited in free trial version.
  • The Advanced Mode will erase all iOS data.
  • It takes some time to load the firmware.

Why We Recommend UkeySoft FoneFix iOS System Recovery?

When reading this article, you might think that I am just writing about the advantages and attractive aspects of this software. Furthermore, you will undoubtedly find that there are many iOS system rrecovery tools on the market. Actually, the UkeySoft FoneFix evaluation is conducted after extensive testing of all the most basic functions and operating specifications. We hope UkeySoft FoneFix can help you easily solve all kinds of iOS errors and meet your needs. The following are the factors we tested FoneFix:

1. Compatibility
An excellent iOS system recovery tool should have wide compatibility. UkeySoft FoneFix is ideal for compatibility with all iOS/iPadOS/tvOS devices and all iOS versions. It is fully compatible with Windows and MacOS systems, including Windows XP, 7, 8, 8.1, 10 and macOS 10.15 / 10.14/ 10.13 / 10.12 / 10.11/ 10.10 and older.

2.Easy to use
An excellent application also includes user-friendliness. Simple steps, no technical requirements, any user can use, these are the characteristics of popular iOS system recovery tools. In order to simplify the work for customers, UkeySoft FoneFix has designed a simple user interface so that users can successfully handle the tool.

3. Cost
Everyone wants a free and safe iOS system recovery tool, but in fact all tools are paid. Many free tools will insert advertisements and even carry viruses. Although it costs $49.95 to enjoy all the features of FoneFix, in my opinion, this tool can bring you a great functions. In addition, the price of the dr.fone repair tool listed below is $69.95. In contrast, UkeySoft FoneFix is more worth trying!

4. Support
This UkeySoft FoneFix review will be incomplete if I do not speak on the support before you purchase it. With the paid version(Personal License/ Family License), you can enjoy lifetime free upgrade and support.

Alternatives to UkeySoft FoneFix

Everyone has different requirements for iOS system recovery tools. If you think UkeySoft FoneFix is not your ideal tool, you can try to learn about its alternatives. The following article will list some different iOS system recovery software designed to help you repair Apple devices and get your device back to normal.

1. U.Fone iOS System Recovery

You can also rely on U.Fone iOS System Recovery software to repair your iPhone/iPad/iPod touch/Apple TV system error. It is known for its simple operation, high efficiency and complete compatibility. With using it, you can fix all kinds of iOS abnormal issues, like iPhone stuck in the Recovery Mode, iPhone stuck at black screen; bring your iPhone back to normal state with only 10 minutes. In addition, U.Fone iOS System Recovery has been designed so it won’t affect any of the existing data on your device.

d_win d_mac
d_win d_mac

restore iPhone system to normal

Pros:

  • Repair your iOS system issues at home
  • Fix iPhone/iPad frozen in recovery mode, white Apple logo, black screen, looping on start, etc.
  • 100% workable, no data loss.
  • Support the latest iOS 14 version and iOS device.

Cons:

  • Not free.
  • Cannot enter or exit recovery mode with one click.
  • Takes up a relatively large space.

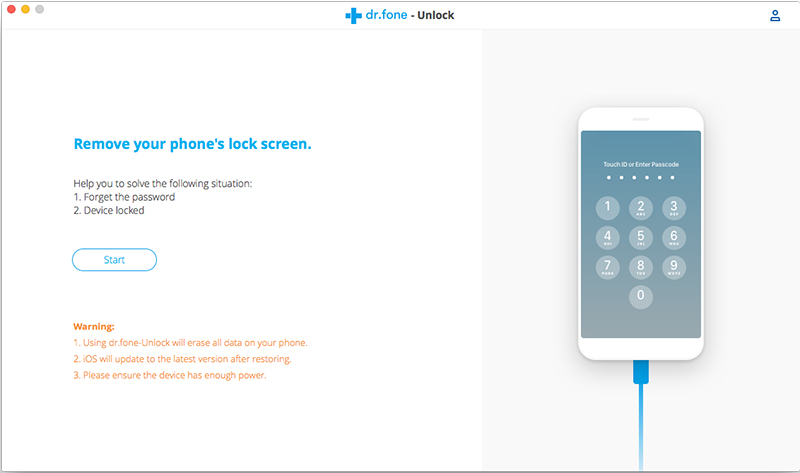
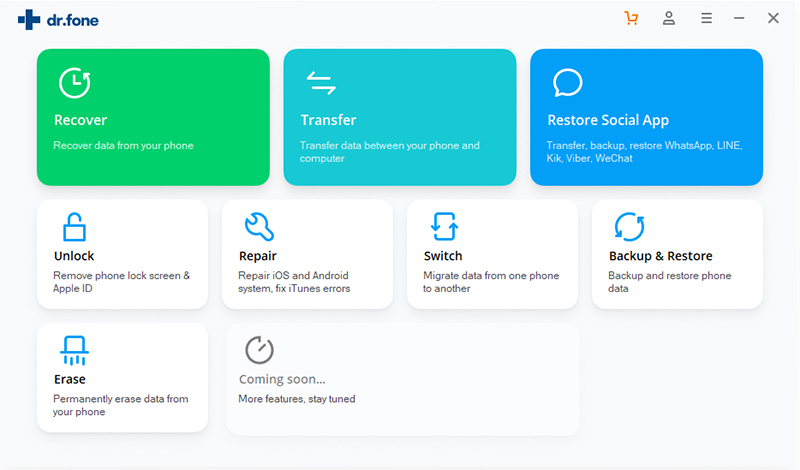
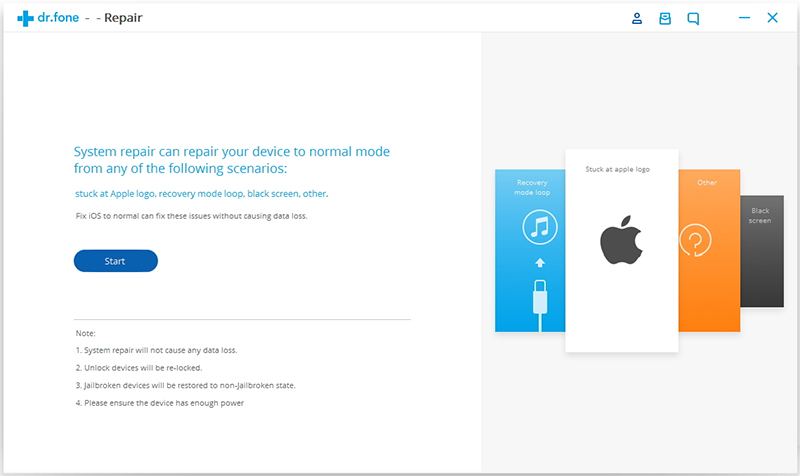
2. Dr.Fone – System Repair

Dr.Fone – System Repair is also a professional iOS repair tool, which claims to be able to repair most iOS device to a normal state and save your data safely. It is suitable for all models of iPhone, iPad and iPod touch, and is widely compatible with various iOS versions. If your iPhone fails to respond, displays a white Apple logo, restarts endlessly, etc., you can use Dr. fone to fix your device system issues.

d_win d_mac

ios-system-recovery-01

Pros:

  • Rescue the iOS system in various situations.
  • Protect your data safe during the repair process.
  • Available on all iPhone / iPad / iPod touch.

Cons:

  • Expensive, $59.95 for one year, Lifetime License is $69.95, Business License is $399.00.
  • Cannot enter or exit recovery mode for free.
  • The Advanced Mode will erase all iOS data.

3. Tenorshare ReiBoot

Tenorshare ReiBoot is a well-designed iOS repair tool that helps you repair various iOS system problems with no data loss. Like UkeySoft FoneFix, it can also repair frozen screens, white/black screens, Apple logos, iPhone in recovery mode, etc. Similarly, Tenorshare ReiBoot also comes with one-click enter/exit recovery mode. In addition, it can also let you factory reset your iPhone/iPad/iPod touch without iTunes.

Pros:

  • Free enter/exit recovery mode in one click.
  • Keep your data while rescuing iOS system.
  • Compatible with all iOS device and iOS version.

Cons:

  • Not free, $39.95 for one year, while Lifetime License is $49.95.
  • The Advanced Mode will erase all data on the iOS device.
  • Not very stable, the program may sometimes crash.

Conclusion
I hope this UkeySoft FoneFix review can help you solve various iOS system issues. Everyone has different problems with iOS, and their selection criteria for system recovery tools depends on their price, functions, advantages or disadvantages, etc. In my opinion, UkeySoft FoneFix is worth a try, it lets you get rid of various iOS/iPadOS/tvOS system issues, such as iPhone stuck on verifying update problem, DFU mode, recovery mode, Apple logo, blue screen, frozen iPhone, headphone mode, Apple TV Issues, etc. If you follow the guide carefully, you can easily get your iPhone back to normal! It’s 100% safe!

Top 5 iPhone and iPad Lock Screen Removal Review

Summary
If you need to remove passcode from locked/disabled iPhone and iPad, the article reviews best 5 iPhone lock screen removal tool for Windows & Mac to unlock iPhone/ iPad without passcode.

There are many situations why you need to remove iPhone passcode. You have forgotten iPhone passcode because you haven’ used your old iPhone for a long time, you got a second-hand iPhone on Amazon which it’s locked with passcode, iPhone screen broken and you can’t enter the passcode, iPhone stuck on recovery mode/ DFU mode, your iPhone is locked/ disalbed, or screen prompts “iPhone is disabled, connect to iTunes”. Whatever the reasons, you need a iPhone unlocker to help you remove passcode from iPhone & iPad. Here the article will introduce five iPhone lock screen removal and analyze their merits and shortcomings to help you choose the best one.

best iphone unlocker

Top 5 iPhone Unlocker Review – Which One to Choose?

Is there an effective way to remove iPhone passcode and access it? The answer is absolute “Yes”. What you need is a professional iPhone passcode removal software.

The article reviews 5 best iPhone lock screen removal software for Windows & Mac to remove 4-digit/6-digit passcode, Touch ID & Face ID from iPhone, as well as iPad and iPod(touch).

No.1: UkeySoft Unlocker

UkeySoft Unlocker is a professional and simple iPhone passcode removal tool and Apple ID unlocker app, it allows you to remove all types of iPhone/iPad passcodes in a few minutes, including 4-digit /6-digit passcode, Touch ID or Face ID. Besides, this iPhone unlocking tool enables you remove Apple ID if you forgot Apple ID or password, which means that if Find My [device] is off, the software can unlock Apple ID from any iOS devices. What’s more, you can unlock Apple ID without data loss.

UkeySoft Unlocker can be used for unlimited iOS devices for lifetime. Also, it provides free updates and technical support. Free download is available on the Mac computer.

ukeysoft iPhone unlocker

Pros:

  • Highest iPhone unlocking success rate in the industry;
  • Remove password from iPhone, iPad or iPod touch;
  • Unlock disabled/locked iPhone without iTunes;
  • Remove 4 types of lock screen passcode: 4-digit, 6-digit, Touch ID and Face ID;
  • Support unlock iPhone with broken screen or black screen;
  • Bypass or remove iCloud activation lock;
  • Fix iPhone stuck on recovery mode/ DFU mode/ Apple logo, and unlock it quickly.
  • Unlock Apple ID from any activated iOS devices, no data loss.
  • No technical skills required. Everyone can unlock it at home;
  • 100% clean & safe and easy-to-use;
  • The software works smoothly;
  • Compatible with the latest iOS 13 and the new iPhone 11/XS series.

Cons:

  • Only can unlock the activated device;
  • Erase all data and settings when erase passcode;
  • Cannot remove Apple ID if Find My [device] is enabled.

d_win d_mac
d_win d_mac

Availability: $59.95 with free trial of and Mac version only.

No.2: iMyFone LockWiper

iMyFone LockWiper is the second best iPhone unlocking tool, which offers Windows and Mac version. This iPhone unlocking software not only can unlock iPhone/iPad passcode, but also can remove Apple ID without password. What’s more, it is possible to recover the iPhone screen time password to bypass the restrictions with this tool. Of course, you can free download on Windows or Mac computer to unlock the iPhone.

iMyFone iPhone unlocker

Pros:

  • Remove passcode from a locked, disabled, broken screen iPhone/iPad;
  • Bypass Screen Time or Restrictions passcode, no data loss;
  • Delete Apple ID without entering the password;
  • Unlock iPhone/iPad when you forget your passcode;

Cons:

  • No free;
  • Wipe everything after unlocking iPhone passcode;
  • It will takes long time for downloading firmware package;
  • Unable to remove Apple ID if you can’t access your device settings;

d_win d_mac

Availability: $59.95 with free trial of Windows and Mac version.

No.3: Dr.Fone – Unlock (iOS)

Dr.Fone – Unlock (iOS) is a part of its software package,it not only can remove screen passwords from iPhone and iPad, but also can remove Android lock screen, such as Samsung, LG, Huawei, Xiaomi, Lenovo, Motorola, and OnePlus.If you forget the passcode on your iPhone/iPad, this iOS unlocker tool can help you unlock iPhone with forgot passcode quickly, it can also remove the Apple ID and iCloud activation password on iPhone, no data loss at all. But this software is large, you need to takes long time to download it large installation package, because Dr.Fone includes full mobile phone solution: phone data recovery, phone transfer, backup & restore, screen unlock, system repair, data eraser, etc. This software compatible with almost all iOS and Android devices.

Dr.Fone iPhone unlocker

Pros:

  • Unlock an iPhone if you forgotten the lock screen passcode;
  • Remove pattern, PIN, password & fingerprints from iOS devices;
  • Save your iPhone quickly from the disabled/locked state;
  • Works for all models of iPhone, iPad, and iPod touch;
  • Fully compatible with the latest iOS 13;
  • Unlock some Samsung phone and LG phones without data loss;

Cons:

  • The software takes up a lot of space;
  • The software runs slowly that others;
  • The price is very expensive.

d_win d_mac
d_win d_mac

Availability: $139.95 for full Toolkit with free trial of Windows and Mac version.

No.4: Tenorshare 4uKey

Tenorshare 4uKey is a new iPhone passcode removal tool that is developed with only two functions: unlock lock screen passcode and unlock Apple ID. This iPhone passcode unlocking tool can remove 4-digit /6-digit passcode, custom numeric code, alphanumeric passcode, Touch ID or Face ID. You can download it on the Windows PC and try to remove iPhone passcode, but it will wipe all data from iPhone.

Tenorshare iPhone unlocker

Pros:

  • Remove passcode from disabled iPhone or iPad;
  • Remove Apple ID from an activated iPhone or iPad;
  • Unlock iPhone/iPad without iTunes or iCloud;
  • Fully Compatible with the latest iOS/iPadOS 13.5.

Cons:

  • No free;
  • Only offers Windows version;
  • Cannot download the firmware package on some country/region;
  • Erase all contents after Apple ID removal.

No.5: iSunshare iPhone Passcode Genius

iSunshare iPhone Passcode Genius is a iPhone Unlocking tool, it’s interface looks like as iMyFone LockWiper, this software name is difficult to remember, if you forgot the lock screen passcode or Face ID/ Touch ID disable, it can help them to unlock iPhone. Three are three main functions: remove the screen lock password, remove Apple ID and remove screen time passcode.I have test this iPhone passcode removal software, it will takes long time to unlock passcode, iOS 11.4 and above is not supported when Find my iPhone is turned on.

iSunshare iPhone unlocker

Pros:

  • Three main functions;
  • Remove iPhone screen passcode and restriction passcode;
  • Delete Apple ID from iPhone if Find My iPhone is disable;
  • Bypass screen time passcode with no data loss;
  • The software works smoothly.

Cons:

  • No free;
  • Only offers Windows version;
  • Cumbersome operation steps.

Conclusion

Your choice is up to what you need to unlock. If you need to unlock iPhone passcode and Apple ID, UkeySoft Unlocker would be the best choice, which is professional to unlock the iPhone, iPad and iPod touch. You can unlock iPhone, iPad lock screen with a few clicks with this powerful iPhone passcode removal tool. If you want to remove Apple ID from all activated iPhone or iPad, you can choose iMyFone LockWiper, but make sure Find My Device is turned off before. If your computer has enough storage space, you can try Dr.Fone, it not only can unlock iOS devices, but also can fix ios system, recover lost data, transfer data, backup and restore data. If you want to save money to remove iPhone passcode and unlock Apple ID, I recommend UkeySoft iPhone Unlocker, because its price is affordable for anyone. What’s more, it also also can help you remove iCloud activation lock iPhone/ iPad by removing the Apple ID safely. In addition, please remember that you cannot unlock iPhone with iTunes, since the iTunes will erase all data and bring iPhone into recovery mode for long time, you need to use a professional iOS unlocker tool.

How to Remove Apple ID from iPhone/iPad

Summary
Forgot Apple ID password and want to remove Apple ID from iPhone/iPad without password? Check out this article to find the simple solution to delete Apple ID from iPhone/iPad without password.

I forgot Apple ID password, so I cannot quit up and use another Apple ID, how to remove the Apple ID from iPhone, then I able to login with another Apple ID to use Apple’s service.

I bought a second-hand iPhone 7 from Amazon but there is an existing Apple ID used on it. How to remove the Apple ID from iPhone 7 without the password? Please help!

If you want to sell your old iPhone, you must to erase all data, settings and Apple ID, this not only prevents your important data leakage, but also let the buyer login with their Apple ID or create a new Apple ID conveniently.However, if things didn’t turn out to be that way and you have an iPhone with someone else’s Apple ID on it, you will wonder how to remove Apple ID from iPhone without password.
Also read: Permanently erase data from iPhone before selling

Remove Apple ID in Various Situations

  • Forgot your Apple ID password;
  • Bought a second-hand iPhone online which someone else’s Apple ID on it;
  • Bought a second-hand iPhone, but iCloud activation lock iPhone;
  • Remove Apple ID and data permanently before selling your iPhone;
  • Change to a different Apple ID or create a new one;
  • Avoiding previous owner track your second-hand iPhone via previous Apple ID.

So if you forgot Apple ID or iCloud gets iPhone locked somehow,you cannot full use of every single feature on your iPhone. Then, how do you erase Apple ID without password? Here is a guide about how to remove Apple ID without password from your iPhone 11/11 Pro/11 Pro Max/Xs/Xs Max/XR/X/SE/8/7/6S, etc. You need to remove Apple ID without password with a third-party Apple ID unlocker tool.

A Secure and Professional Apple ID Removal Tool

If you looking for a easy & safe method to remove Apple Music, you can use a professional iOS unlock tool to remove Apple ID from iPhone without password. Below we recommend you a useful Apple ID removal tool and teach you how to deleted Apple ID from iPhone without password.

UkeySoft Unlocker is a professional iPhone locked screen removal tool and Apple ID removal tool, it can help you remove Apple ID without password on iPhone 6, 6S, 7, 7S, 8, 8 Plus, 9, X, XR, Xs, Xs Max, iPhone 11, iPhone 11 Pro, etc.

UkeySoft iPhone Unlocker can help you:

  • Remove Apple ID from iPhone without password in 1 minutes.
  • Unlock iPhone/iPad lock screen in different situations.
  • Compatible with all iOS devices and all types of lock screen.
  • Unlock iPhone passcode at home, no need any technical skill.
  • Unlock iPhone with broken screen or back screen.
  • Remove icloud activation lock without password.

d_win d_mac
d_win d_mac

Note: This software only supports to remove Apple ID from an activated iPhone/iPad/iPod. In addition, your device must have been set up already and you can access your device settings.

1. If Find My [device] is off, all devices are supported to unlock Apple ID.

2. If Find My [device] is enabled, devices running from iOS 10.2 to 11.4 are supported to unlock without data loss.

3. If Find My [device] is enabled, devices running on iOS 12 and later versions are not supported.

Guide: Remove Apple ID without Password on iPhone

Go through the following guide to see how to remove Apple ID from iPhone without password under the help of UkeySoft Unlocker.

Step 1. Download, Install and Launch UkeySoft Unlocker
Download and install UkeySoft Unlocker on your computer. Launch it and choose “Unlock Apple ID” from the primary interface.

apple id unlocker

Step 2. Connect your iPhone to the computer
To delete Apple ID without a password, you need to connect your iPhone device to the computer.

Connect iPhone to PC

Step 3. Enter screen password and trust this computer
Turn to your iPhone and you will see a pop up dialog asking you whether to trust this computer. Just choose “Trust” so that the software can continue to analyze your iPhone device.

allow iphone connect with pc

Step 4. Start to Remove Apple ID from iPhone
After the operations above, your iPhone will be connected to the program successfully. Now, you will be popped up with a warning window, reminding you that only one device is connected to your computer, click “Next” button to go on.

remove Apple ID

Confirm your device information and click “Start” button start to removing Apple ID and Apple ID password.

start remove Apple ID

start remove Apple ID

Step 5. Apple ID be Removed Successfully
When the Apple ID removing process is completed, your iPhone device will restart automatically. Then, unlock your iPhone and open “Setting”, you can check whether the Apple ID on your iPhone has been removed successfully. If it fails, you can try again.

Apple ID removed

Therefore, we kindly suggest you to backup your iPhone data before going to further step.

Words in The End

After reading the above content, you will know how to remove Apple ID account from iPhone/iPad without password. It’s easy to use, you can unlock Apple ID at home and no need to ask professional help, you can easily delete Apple ID account from iPhone without password. Of course, if you forget screen passcode on iPhone, you can also use this iPhone unlock tool to unlock iPhone without password, anyone can use it!

That’s all, I think this iPhone unlocking software is worth to try, please click the below download button to free download the trial version and start to unlock Apple ID without password.

d_win d_mac
d_win d_mac

How to Remove the Passcode on iPhone with UkeySoft Unlocker

Summary
How to remove the Passcode on any iPhone? This article recommend you the best iPhone passcode removal tool, helping you remove the passcode on iPhone X or later, iPhone SE (2nd generation), iPhone 7, iPhone 7 Plus, iPhone 8, and iPhone 8 Plus.

Forgot iPhone passcode, how to remove the passcode on iPhone 7?

My iPhone X screen is broken and I can’t enter the passcode, how to remove passcode on iPhone with broken screen?

iPhone is disabled, connect to iTunes, how to unlock a disabled iPhone without entering passcode?

iphone is disabled

If you forgot the passcode on your iPhone, or your iPhone is disabled, you will get a messages that your “iPhone is disabled, try again in 1 minute”, if you type the wrong passcode again, a message says that your “iPhone is disabled, try again in 5 minute”. Do you really forgot the lock screen passcode on iPhone? Don’t worry, you can bypass iPhone/iPad screen lock without passcode, what you need is a professional iPhone locked screen removal tool.

iPhone Passcode Removal Tool

Forgot your iPhone passcode? Bought a second-hand iPhone but it’s screen locked with passcode? Got a second-hand iPhone which it’s iCloud locked? iPhone is disabled/ locked? iPhone screen is broken and can’t enter the passcode? Don’t worry, UkeySoft iPhone Unlocking software can help you unlock iPhone screen passcode and unlock Apple ID easily.

UkeySoft Unlocker is one of the most useful and reliable iPhone unlocker tool, it can help you remove passcode on iPhone 11, iPhone 11 Pro(Max), iPhone XS, iPhone XR, iPhone X, iPhone SE, iPhone 8/8 Plus, iPhone 7, iPhone 7 Plus and older. If you forgot the passcode on your iPhone or iPad, the iPhone unlocker tool will help you remove passcode from your iPhone/iPad in 5 minutes.

More Things UkeySoft Unlocker can Does:

  • Unlock iPhone/iPad screen lock without passcode;
  • Remove 4-digit/6-digit passcode, Touch ID & Face ID;
  • Remove Apple ID on iPhone/iPad/iPod without password;
  • Remove Apple ID to remove iCloud activation lock without password;
  • Remove iCloud Activation lock on iPhone/iPad/iPod to access your locked iPhone;
  • Support Any Scenario: second-Hand, forget activation lock, broken screen;
  • Compatible with all iOS versions and iPhone 11 Pro

d_win d_mac
d_win d_mac

Tips: Honestly there is no solution to unlock iPhone/iPad lock screen without data loss for the moment in the market.

Guide: How to Remove the Passcode on an Disabled iPhone

Step 1. Launch UkeySoft iPhone Unlocker on Computer
Click the above download button to download the trial version of UkeySoft Unlocker, then install and launch it, you will get below main interface, please click “Unlock Screen Passcode”.

unlock iPhone

Step 2. Connect iPhone to Computer
Connect your iPhone device to the computer using a lightening cable.

Unlock Screen Passcode

Step 3. Put iPhone/iPad in Recovery or DFU mode
Since your iPhone is locked and the computer cannot detect it, you need to boot it in Recovery or DFU mode by following the on-screen instructions. If you don’t know how to get iPhone into recovery mode, go to learn how to put iPhone into recovery mode.

put iPhone into recovery mode

Step 4. Confirm iOS device information and download Firmware Package
After the device is in recovery mode, the iPhone unlocker software will display the device information, such as Device Model and Firmware Version. If the information is correct, click the “Download” button to download the matching firmware of your iPhone device.

confirm iphone information

The software start downloading the matching firmware for your iPhone device.

download firmware package for iPhone

Step 5. Start to Remove iPhone Screen Lock Passcode
After the firmware is downloaded completed, click “Start” button go to new step, the software will pop up a new windows to prompt you that “All data on your iPhone will be erased after removing the passcode”. If you are sure to delete all files and settings, just click “Unlock Now” to start remove passcode on your iPhone.

Remove iPhone Screen Passcode if forgotten passcode

Just in a few minutes, your iPhone screen lock passcode will be removed successfully. Please note this unlocking process will also erase the data and settings on your iPhone.

remove passcode on iPhone

remove passcode on iphone completed

After removing iPhone passcode successfully, the iPhone will restart and you will see Hello startup screen. Please set up your iPhone to access it without passcode.

d_win d_mac
d_win d_mac

How to Transfer Files from PC to iPad

Summary
Do you want to transfer files from PC to iPad for viewing or using? This article shows you a great solution to import files from computer to iPad, including music, photos, videos and more, you also can backup files from iPad to PC directly.

How to transfer music, videos and photos from PC to iPad Pro? I have got an new iPad, but I don’t know how to import songs and videos to iPad. Is there any iPad manager tool for PC?

It is easy to copy, import files from PC to a USB flash drive or SD card, but if you want to transfer files from computer to iPad, you need to use a professional PC to iPad transfer tool, because it is limited data transfer across platforms – iOS and Windows 10/8/7/XP.

Many iPad users want to import photos, songs, videos and more to iPad for enjoy freely. As we all know, we can sync files to iPad, iPhone or iPod with iTunes, but it’s very tedious to sync data with iTunes, and it will take a lot of time. Worse, you will lose your iPad data. Is there any safely and quickly way to transfer files from PC to iPad without using iTunes?

Best PC to iPad Transfer Tool

If you looking for an easy-to used iPad transfer tool to solve this problem, you can transfer this iOS Transfer tool, this iPad transfer & manager tool can help you transfer photos, music, movies and more from computer to your iPad, and vice versa.

  • Easily transfer files between iPad and PC, including music, videos, photos and more files.
  • Transfer photos, videos, music, contacts, messages, apps data, call logs etc.between iPad and iPhone.
  • Transfer files between iPhone/iPad/iPod and Android devices.
  • Create ringtone for your iPhone.
  • Fully compatible with the latest iOS 13.
  • Fully compatible with Windows 10 and Mac 10.15.

d_win d_mac
d_win d_mac

This iOS transfer works well with all iPad models:

  • iPad, iPad 2, iPad 3, iPad 4, iPad 9.7in (2017), iPad 9.7in (2018), iPad 10.2in (2019)
  • iPad Air, iPad Air 2, iPad Air (2019)
  • iPad mini, iPad mini 2 with Retina display, iPad mini 3, iPad mini 4, iPad mini (2019)
  • iPad Pro 12.9in (2015), iPad Pro 9.7in (2016), iPad Pro 10.5in (2017), iPad Pro 12.9in (2017), iPad 11in (2018), iPad 12.9in (2018)

How to Transfer Files from Computer to iPad

To get start, download this iOS manager program on your computer. Here, Let’s take the Windows version as a example to check out transferring music from PC to iPad in easy steps below.

Step 1. Download and Launch Phone Toolkit
To start the process, download and run the Phone Toolkit on your PC, after that, choose the “Transfer” module from the software main window.

iPad to PC transfer

Step 2. Connect iPad to PC
Now, connect your iPad to your computer using a digital cable. If you are connecting your iPad to a computer for the first time, then the popup windows will appear on your iPad for “Trust this computer. So, tap on “Trust”.

iPad file transfer

Step 3. Tap Music
After that, tap on the files that you want to transfer to your iPad, you can choose “Music”, “Videos”, “Photos”, “Information” and “App”. In this case, in order to import songs to iPad, please tap “Music” option.

transfer music to iPad without itunes

Step 4. Add Music or Music Folder
Now, click on the “Add” icon to add those songs that you want to transfer from computer to iPad.

Add Music to iPad

Tips: In this step, you can also transfer music from one phone to another, or transfer music from iPhone to PC.

Step 5. Start to Transfer Music from PC to iPad
The browser window will appear. Select the desired music files from your computer and finally, tap on “Ok”. Within a few minutes, your selected music files will be transferred to your iPad from the computer.

Transfer Music from PC to iPad

Note: Currently, the Mac version doesn’t support transferring contacts from Computer to iPad.

That’s all the guides about how to add photos, videos and music to iPad.

000

More information about iOS Manager program

This iOS Manager is a part of iOS Toolkit, it not only enables you to transfer files from computer to iPad/iPhone/iPod, but also can help you your files on iPhone, iPod & iPad easily:

  • Directly transfer data between iOS devices: Transfer music, photos, contacts, SMS and more between iPhone, iPad and iPod touch.
  • Best iTunes Alternatives to make your life easier: Also transfer files from PC & iTunes to your iPhone, iPod, iPad.
  • Convert music & video: Automatically convert to iPad/iPhone/iPod – compatible formats during transfer.
  • Directly transfer photos between Apple devices and PC: Drag photos to your iDevice or save to your PC to print & share.
  • Manage your iPhone contacts easily: Manage contacts: Edit, import, remove duplicates & more.
  • Backup sms and contacts from iPhone to PC.
  • Create a ringtone for your iPhone.
  • Create gif animation with your iPhone/iPad photos.

d_win d_mac
d_win d_mac

How to Transfer Data from LG to Samsung Phone

Summary
Do you want to transfer data from LG to Samsung Galaxy phone? This article teach you how to transfer SMS, call logs, contacts, photos, songs and videos from LG to Samsung with one click.

If you purchased a new Samsung phone or upgrade from LG phone to Samsung Galaxy S20/S10/S9/Note 10, etc, you may have a need to transfer data from LG to Samsung. Since these those important data including text messages, contacts, photos, videos, call logs, WhatsApp data store in your old LG phone.

How to transfer all data from LG to Samsung in a simple way? Don’ panic! You can transfer Everything from LG to Samsung or another Android phone with the help of Phone Transfer tool.

Best LG to Samsung Transfer Apps on computer

Phone Transfer, as a professional and useful LG to Samsung transfer tool, it enables you not only transfer messages, but also cope pictures, songs, videos, contacts, WhatsApp messages, call logs and apps from LG to Samsung within one click. It allows you to transfer your data among Android, iOS and Symbian, which supports more than 800 devices including HTC, iPhone 11 Pro(Max), Samsung, LG, Sony, Google Pixel, Windows phone and Nokia.

Now, download and install the program on your computer and follow the steps.

d_win d_mac
d_win d_mac

Transfer Data from LG to Samsung in 3 Steps

Step 1.Launch Phone Transfer
First, you need to install the Phone Transfer software on your computer. After installing and launching the software. Then, select “Phone Transfer” option from the software dashboard.

LG to Samsung Transfer

Step 2.Connect Two Phones with the Computer
Connect your LG phone and Samsung phone to the computer.Once they are connected, the program will detect them automatically as “Source” and “Destination”. You support to change the places of the two phones by clicking “Flip” button.

transfer lg to samsung

Thereafter, choose the file that you want to transfer and click on the “Start” button.

Step 3. Start Transferring Data from LG to Samsung
Within a few minutes, your selected data will be transferred or copied to the Samsung phone.

transfer data from lg to samsung

What’s More about Phone Transfer

Phone Transfer enables you to transfer contacts, photos, messages, videos and more from Android to Android, Android to iPhone, iPhone to Android and iPhone to iPhone automatically and securely, it works well with all Android, iOS & Windows mobile devices. Here, you can learn more feature of this powerful Phone Transfer tool.

  • Transfer data between Android, iOS and Windows phone.
  • Transfer contacts, photos, music, videos, canlenda, voice mail and more from one phone to another.
  • Transfer WhatsApp messages from iPhone to Android, backup and restore WhatsApp data.
  • Compatible with 6000+ mobile phones including iPhone, Smasung, LG, Google Pixel, OnePlus, HTC, Huawei, Xiaomi and more.
  • Work with Android 9.0 and iOS 13.

d_win d_mac
d_win d_mac

How to Transfer Apps from Android to Android Phone

Summary
Have bought an new Android phone and want to transfer Apps and App data from Android to new one? Here, a step-by-step guide on how to transfer Apps from Android phone to new Android directly with the help of Android App Transfer tool.

You may have download and install lots of apps on your Android phone, if you have got a new Android phone like Samsung Galaxy S20/S10/Note 10, Huawei P40/P30/Mate 30, Sony, Google Pixel, OnePlus, etc. You may want to transfer your wonderful app resource to the new Android phone. However, how to transfer apps from one Android phone to another Android? This article will teach you a easy method to transfer apps between Android phones efficiently, what you need is a third-party Android App transfer tool called Phone Transfer.

Android Apps Android Transfer

Phone Transfer is a popular Android to Android transfer tool, it not only can help people transfer apps between Android phones, but also allows you to transfer SMS, call logs, contacts, photos, songs and videos from Android to Android with one click. What’s more, “WhatsApp Transfer” is a new feature of Phone Transfer, it can help you transfer WhatsApp messages between Android and iPhone easily.

Key Features:

  • Transfer contacts, photos, music, videos, SMS and other file types from one phone to another.
  • Transfer WhatsApp from phone to phone, backup WhatsApp and more social apps to computer and restore.
  • Backup all data from your android or iOS devices to PC/Mac to avoid data loss.
  • Restore backup files to a phone, including iTunes and its backup.
  • Full compatible with Windows and Mac OS

Download the free trial version of Phone Transfer on your computer to have a try.

d_win d_mac
d_win d_mac

How to Transfer Apps from Android to Android

Step 1. Install and launch the Phone Transfer
After installing the Phone Transfer on your computer, launch it, you will come to the primary window as follow. You should select “Phone to Phone Transfer”, click “Start” to go on.

transfer data to android

Step 2. Connect your Android phones to the computer
Connect your Android devices to the same computer simultaneously via USB cables. Moblie Transfer program will detect both phones automatically as soon as they are connected. They will be detected as two places of “Source” and “Destination”. If you want to change the position of Source phone and destination phone, click “Flip” button.
Note: You can check the box “Clear data before copy” to empty your Android phone before transferring, just in case of duplication.

transfer data to android

Step 3. Transfer Apps from Android device to Android
Apart from apps, you are able to transfer text messages, photos, videos, contacts and music from one Android to anther. If you just need to copy apps, you need to uncheck the boxes of other data. Then click “Start Copy” to let the program to sync your apps. Please remember to keep both of the phones connected well during the transferring period. When the transfer progress is finish, click “OK” button to end it.

transfer app from android to android

Free download the Phone Transfer and start to transfer data between two phones.

d_win d_mac
d_win d_mac

Confusion

Wit the help of Phone Transfer, you can easily transfer data between two phones, including Android, iPhone, iPad, iPod, Windows phone and more. If you want to backup and restore data, this software also helps you easily to backup contacts, text messages, photos, videos, etc. from Android to computer.

How to Recover Deleted Videos on Android Phone

Summary
If you deleted or lost important videos on Android phone, this article teach you how to recover deleted videos from Android phone, such as Samsung, HTC, Motorola, LG, Sony, Google Pixel, Huawei, OnePlus, etc.

Does anyone recommend me an effective Android video recovery software? I want to recover deleted videos from Samsung Galaxy S7, is it possible to recover deleted videos on Android phone?

Is it possible to retrieve deleted videos from Android phone? I can’t find the deleted videos on recycle bin, which is the best Android video recovery software that can helps me recover deleted videos on Huawei P30? Thanks.

In recent years, Android smartphones have performed very well in shooting applications, most top Android smart phones comes with two or more HD cameras, such as Samsung Galaxy S20 Pro, Galaxy S10+, Galaxy Note 10 Plus, Huawei Mate 30 Pro, Huawei P40/P30 Pro, OnePlus 7 Pro, Oppo, Find X2 Pro, Sony, Motorola, etc. Many users like to use their Android phone to take photos and videos instead of digital camera. You may offer taking photos and shooting videos to record precious moment in the daily life, such as friend’s birthday party, baby’s birthday party, wedding day recordings, our business videos, graduation, etc. However, accidents happen sometimes. If you deleted videos on Android phone/tablet by accidentally, it may annoy you a lots.

You can directly restore your video from the Recycle bin of the Android phone before it is deleted permanently. If you can’t find the deleted video in that recycle bin, you will need to use professional Android video recovery software to get it back, this guide teach you how to recover deleted videos from Android phone easily.

A Security and Effective Android Video Recovery software

To retrieve deleted and lost videos from Android devices, you can use this professional Android Video Recovery tool, it not only can help you recover lost photos and videos from Android devices, but also enables you recover deleted sms, contacts, whatsApp and more from Android phone easily. Not matter you files lost due to mistaken deletion, factory reset, system crash, forgotten password, flashing ROM, rooting, ect, it can hep you quickly scan the Android device and shows the scanned result for you to preview and selectively recover them at once.

More Features:

  • Recover Video, Photo, Audio and Documents from Android internal storage or SD card inside of Android devices.
  • Recover text contents from Android, including Contacts, Messages, Call history, WhatsApp message & attachment, WhatsApp messages & attachment, etc.
  • Recover videos and other data from broken Samsung phones.
  • Supports recover data from Samsung, HTC, Motorola, LG, Sony, Google Pixel, Huawei, OnePlus and other brands of Android devices.
  • Highest mobile phone data recovery rate in the industry.

d_win d_mac
d_win d_mac

Supported Brands: Samsung, Huawei, LG, Sony Xperia, Google Pixel, Motorola, ZTE, OnePlus, Xiaomi, Redmi, OPPO, VIVO, ASUS, HTC, and more.

Now, read on the tutorial to learn how to recover deleted videos on Android phone. You can follow the similar way to recovery other types of file as well.

Kind Tips: Want to download HD videos from YouTube? 4kFinder Online YouTube Downloader is the ultimate one-click downloader that can easily download YouTube HD videos to MP4 format without quality loss. 4kFinder supports batch download and faster download speed. With its help, you can play YouTube videos offline on any HD media player. Other than YouTube, it also supports Facebook, Twitter, Dailymotion, Bilibili, NicoNico and many other sites.

How to Recover Deleted Videos from Android Phone

Step 1: Connect Android phone to computer
To recover deleted files from Android internal storage, please free download the Android Toolkit and go with the mode labeled “Android Data Recovery“.

Android Video Recovery

Then, connect your Android phone to computer using a USB cable.

Step 2: Enable USB Debugging to access data
Once detected, the program will present you with simple instructions to turn on USB Debugging Mode on your phone. If you’ve done this before, skip to Step 3.

For more details, you can also refer to How to Enable USB Debugging Mode on Android.

put on USB debugging

Step 3: Choose Video to Scan
For this case that you want to recover deleted videos from Android, please select “Video” you want this Android data recovery software to search. please pick only the types you wish to recover, so we can speeds up the scan process. Click the Next to go on.

choose videos to recover

Step 4: Gain root permission for a complete scan
The program will check the device information and perform a basic scan of the device. If it can’t find the files you need, it’s suggested that you root the phone to access to the full Android system. (You can unroot the device after the recovery task.)

To do so, click the Rooting Tools button at the lower right position. At this point, you will be taken to an external website to download a free Android rooting tool — KingoRoot to root the device.

[Also Read: How to Safely Root and Unroot an Android Device with KingoRoot ]

root the android phone

After you’re rooted, this Android Data Recovery software will begin running a deep scan of your Android’s phone memory and SD card to search for the deleted Stuff. Please be patient.

Step 5: Preview and recover deleted videos from Android
When the scan is done, you can preview and sort the list of data files accordingly on the screen.

You can toggle the button to ON position on the top of the screen to display only the deleted items. It also offers an advanced search option in the upper right corner to help you quickly locate what you want from the results.

recover deleted videos from Android

To get back the deleted data files from Android phone, just check the boxes next to items you want and then hit “Recover” button.

In opening dialog, you can click on “…” icon in the Output Folder field to specify the destination directory on your computer or just use the default folder for saving the recovered video files

The above is all the steps of Android video recovery.You can recover all types of data from your Android device including contacts, photos, sms, call history, WhatsApp messages and many others. Download it and have a try!

d_win d_mac
d_win d_mac

Video Guide on How to Recover Video Files from Android

Now, you have restored the deleted videos and save them onto computer, you can use this Android Transfer tool to transfer them into your Android phone so to continue using them again. In addition, this Android Transfer tool also can help you backup videos, photos, music, contacts and messages from Android to computer. In order to avoiding data loss again, we suggest you backup your Android data to computer regularly.