[Overview]: In this post we are going to provide an easy and efficient Samsung Galaxy S8/S8 + photos recovery solution to help you find and recover deleted photos from Galaxy S8/S8+ with or without backup.
“Hi buddy. I lost some photos from my Galaxy S8 after I try to root it, tried some Android data recovery or similar apps, but failed to recover the deleted data. Do you guys know any tool can really help to restore deleted photos from my Samsung phone? Thanks advanced.”
CONTENTS
Mobile camera enables us to record our life anytime and anywhere. Beautiful scenery, happy moments with family and friends, novelties on the trips, etc,. can be well stored in our phones. Have you ever experienced accidental lost photos on your Samsung Galaxy S8 phone under different data loss circumstances? For example, rooting your phone, deletion carelessly, performing factory reset restoring, virus attacked, etc,. After losing photos on device, many people will ask is it possible to find the deleted photos on Samsung phone. Absolutely, if you get the help of professional program.
Why the deleted photos on Samsung phone can be find? People supposed that once the photos are deleted, the photos will gone permanently. In fact, the wiped photos are still stored in the phone internal memory. It just become invisible. However, the photos will be truly deleted when new data is written to covered it. Recovery of photos can be done before the deleted photos is not overwritten. How to find deleted photos from Samsung Galaxy S8? To do this, you need an excellent data recovery program.
Part 1: Restore Photos from Samsung Phone’s Local Backup
As we all know that the Samsung Galaxy S8 has built-in backup feature, so users can easy backup all data to internal storage or to external memory. So if your photos are saved on SD card then its easy to rescue pictures from it via local backup.
Steps-by-step guide on how to restore photos from Samsung phone’s local backup
Step 1: Go to Settings > Backup > Backup & restore > File restore & management
Step 2: Here you have to choose backup file that you want to restore
Step 3: At last, tap on Restore option and wait until they are recovered

NOTE: If you reset your Samsung Galaxy S8, it will erase all data and files from Android phone’s internal memory, making sure your Android data won’t wiped after facory reseting, we recommend you shuld to save all your files on Android SD card. If you never backed up data to Android local backup, or if you failed to recover photos from Android local backup, please follow the below steps to recover deleted pictures from Android internal storage or external memory card via Android Data Recovery and Data Recovery software.
Recover Photos from Samsung Galaxy S8/S8+ Internal Storage
This Samsung Galaxy S8/S8+ Photo Recovery – U.Fone Android Data Recovery is a perfect data recovery software that will help you to restore deleted/lost data from Android device without backup. It enables you to scan and recover deleted/lost/disappeared/missing/erased/wiped photos from Samsung Galaxy S8 and s8+. Besides to photos, it can also recover several kinds of Android data, including videos, contacts, text messages, call history, WhatsApp chat history, documents, apps data and more. Any data loss cases are supported, including incorrect operation, restoring factory settings, damaged or broken phone, flashing ROM, rooting, etc,.


Supported Samsung Phones and other Android Models:
Samsung Galaxy S10/S10+/S10 5G, Samsung Galaxy S9/S9 +, Samsung Galaxy S8/S8 +, Samsung Galaxy S7/S7 +, Samsung Galaxy S6/S6 +, Samsung Galaxy S5, Samsung Galaxy S4.
Samsung Galaxy Note X, Samsung Galaxy Note 9, Samsung Galaxy Note 8, Samsung Galaxy Note 5, Samsung Galaxy Note 4; etc,.
Samsung Galaxy Fold and more Android devices.
Part 2: Recover Deleted Photos from Galaxy S8/S8+ via Android Data Recovery
First of all, please free download and launch the Android Toolkit on the computer, we offers Windows version and Mac version. This guide shows you how to recover deleted pictures from Galaxy S8 on Windows PC, you can also follow the same steps to retrieve lost photos from Android phone on Mac.
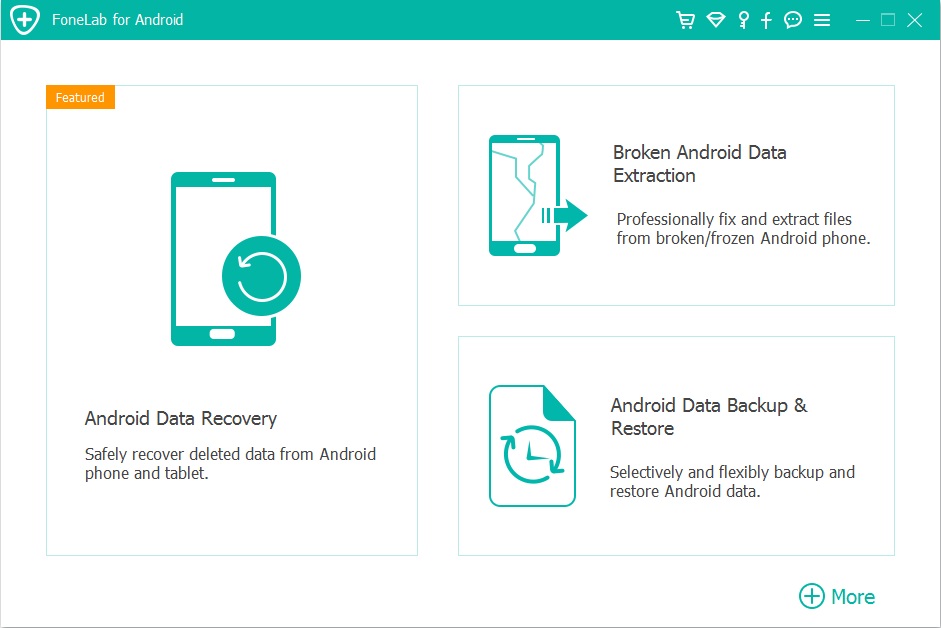
To begin with, run U.Fone Android Data Recovery on the computer. There are three modes for selection: Android Data Recovery, Android Data Backup & Restore, Broken Android Data Extraction. Click “Android Data Recovery” in the home page of program.

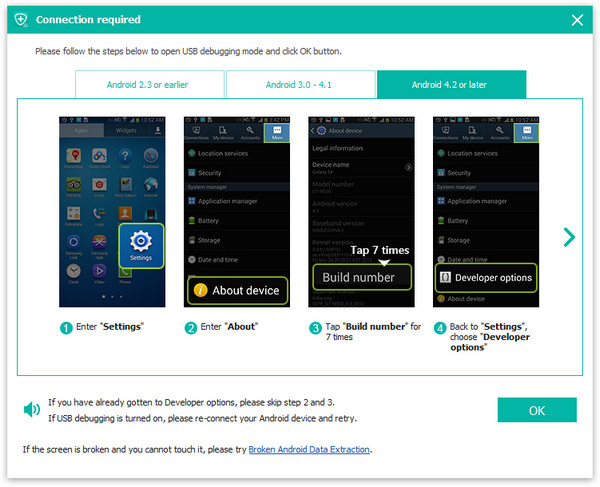
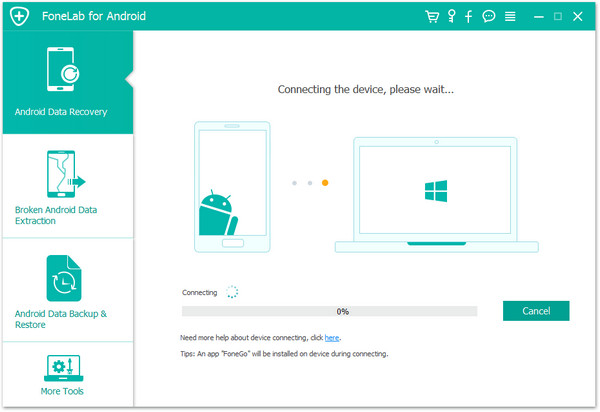
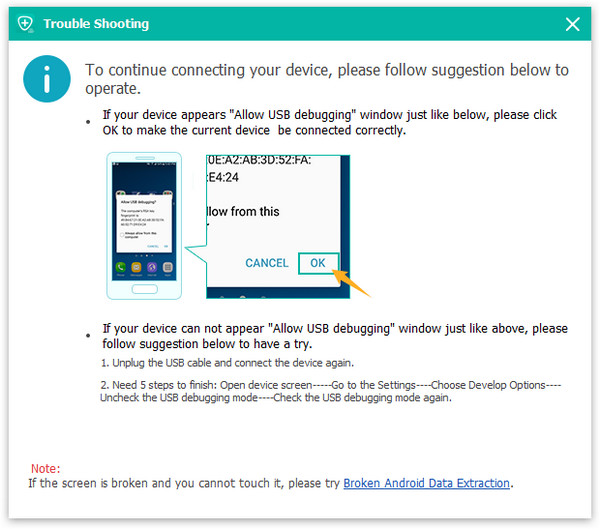
Step 1. Connect Samsung Phone to Computer
Connect your Samsung Galaxy S8/S8 + to the computer with a USB cable, enable the USB debugging on your phone.
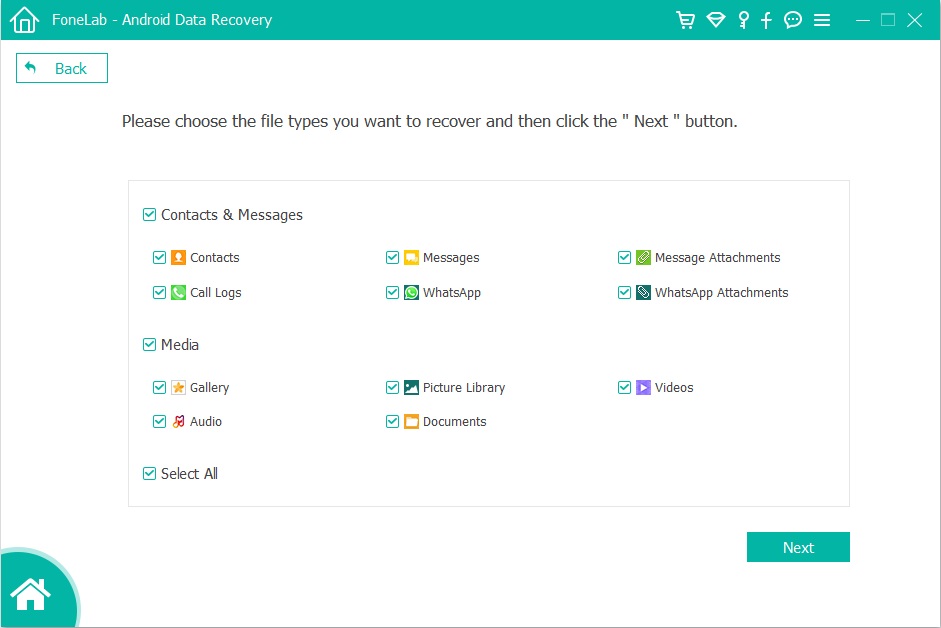
Step 2. Select Photo File to Scan on Samsung
When your phone is connected with the computer, you can see all the data types that can be restored, including gallery, text messages, contacts, etc,. For photos recovery, click “Gallery”. Then click “Next”.
Step 3. Allow Scan the Samsung Galaxy S8
When the following window shows up, if you get a superuser authorization appearing on your Samsung phone for allow scanning the device, click “Allow” to go on.
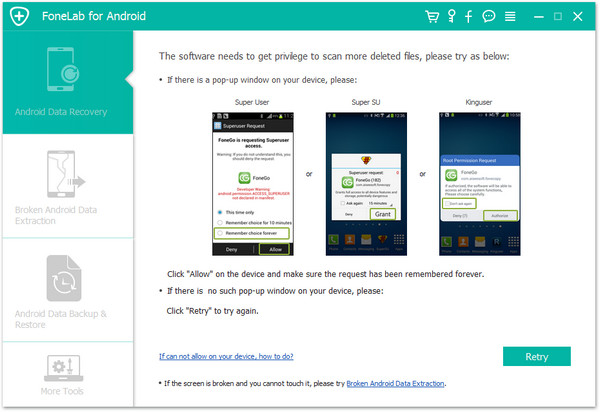
Now the program will scan and find the deleted photos from Samsung phone.
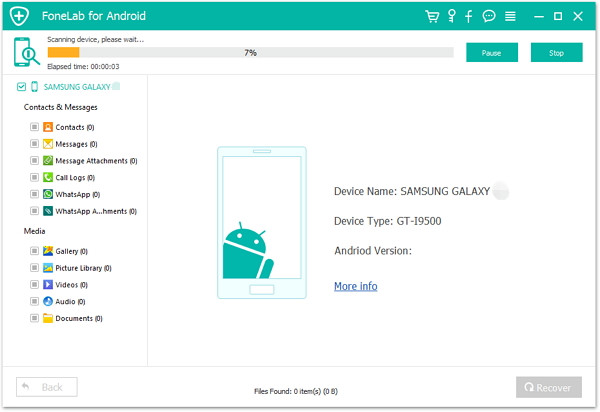
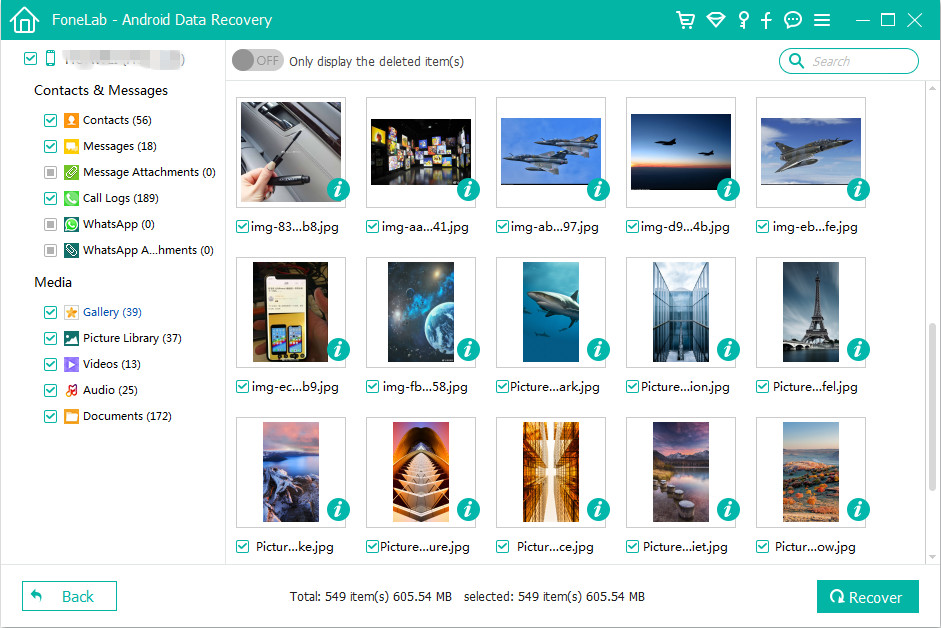
Step 4. Find and Recover Deleted Photos from Samsung
When the scan is finishes, all disappeared data will be find and list, you are allowed to preview the deleted photos one by one under “Gallery” file. Lastly, clicking “Recover” to save all the selected photos on the computer.
Part 3: Retrieve Lost Photos from Samsung SD Card via Data Recovery
If you saved the pictures, videos, documents and other files on Android phone’s SD card, if you lost files due to SD card formatted, accidental deletion, card error, system crash, virus inflection, power failure, black screen broken screen, device damaged etc. Don’t worry, you still have chance to recover lost data from Android SD card with the help of a professional Data Recovery for Windows or Data Recovery for Mac.
U.Fone Data Recovery is powerful memory card photo recovery software, it is developed to recover deleted or lost photos, videos, music and other files from Android SD card or other Micro memory card, if your lost previously stored pictures on Galaxy S8’s SD card, please remove the SD card and insert it into your computer, just using this data recovery software to scan and recover lost/deleted/formatted photos from SD card, it can recover detect pictures in .jpg, .png, .gif, .bmp, .webp, .tiff format and more. In addition, U.Fone Data Recovery also supports recover lost photos, videos from recycle bin, hard drive, USB flash drive, digital camera, Drone camera and camcorders.
Works well with almost brands of memory card and USB devices: Kingston, PNY, SanDisk, Samsung, Lexar, Transcend, PQI, Sony and more.
Simple Steps to Retrieve Lost Photos from Android SD Card
Step 1. Launch U.Fone Data Recovery and Select Recovery Mode
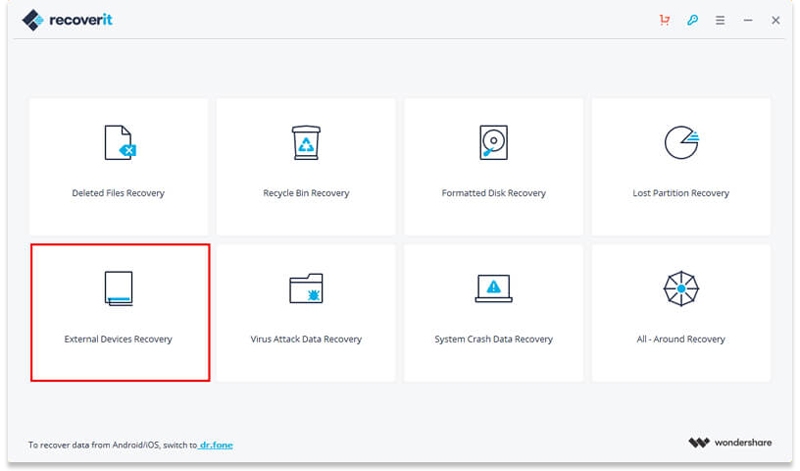
In order to recover deleted photos from SD card of your Galaxy S8 or S8+, please free download the Data Recovery for Windows or Data Recovery for Mac, and then click “External Devices Recovery” mode among the main interface.
Step 2. Put the SD Card in the Card Reader and Plug it into the Computer
Please remove the SD card from your Samsung Galaxy S8, then put the SD Card in the card reader and plug it into the computer. Once your SD card is detected connecting, select it under “Memory Card” and click “Next” to continue.

Note: To retrieve deleted pictures on Android SD card, please check whether it can be recognized by the computer. If not, try it again.
Step 3. Scanning Photos from Android SD Card
Once you click on the “Start” button, the Data Recovery software will scan the connected and selected SD card all around. It will find all the lost and inaccessible photos from the Android SD card.

Note: During the scanning process, please don’t unmount the SD card.
Step 4. Preview and Recover Lost/Deleted Photos from SD Card
After the scan completed, all recoverable pictures will be listed on the left by file types. You can preview the specific files and click “Recover” to get your lost data back, only few minutes, all select the photos be saved on a safe location of your computer.

By following the simple click-through process, your can easily perform Android photo recovery on an SD card in a Windows computer or Mac computer. You can also follow the same steps to recover deleted videos, audios and documents from memory card. Please download the trial version and try to recover deleted and lost photos from Android phone’s SD card.
Transfer the Retrieved Photos from Computer to Galaxy S8/S8+
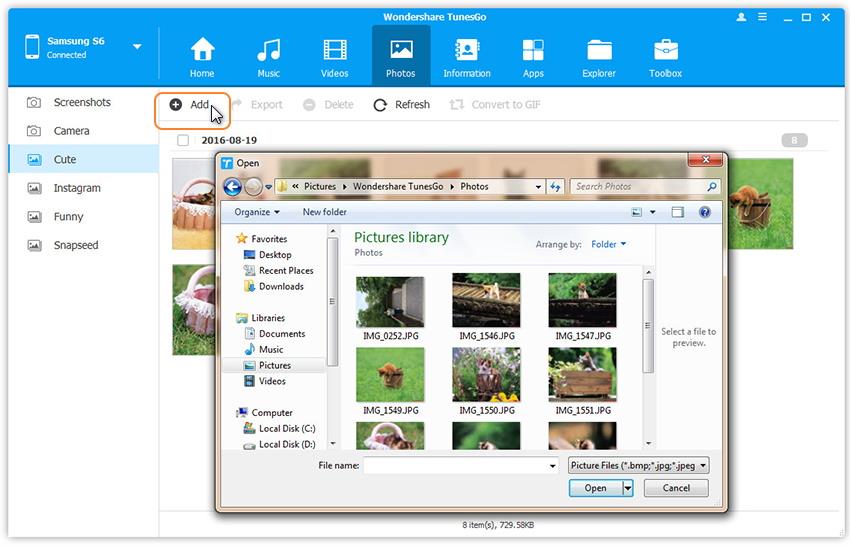
No matter you using Android data recovery software or general data recovery software to recover photos from Android phone’s built-in storage or it’s SD card, all retrieved data be save on the computer. After recovering photos and save onto the computer, if you want to view or use the retrieved photos on your phone again, you can use this iOS & Android Manager to import photos from PC/Mac to Samsung Galaxy S8/S8+, this userful phone manager tool also can help you transfer photos, videos, music to Samsung Galaxy S8/S9/S10(+) from computer, other Android/iOS devices, as well as transfer music from iTunes to Galaxy S8.
Learn this guide: Transfer Files to Samsung Galaxy S9/S9+

Add Photos from PC/Mac to Galaxy S8
Related Articles for Samsung Galaxy S8 users
How to Recover Deleted Files on Samsung Galaxy S8/S8+
How to Recover Disappeared Contacts on Samsung Galaxy S8/S8+
How to Recover Disappeared Pictures on Samsung Galaxy S8/S8+
Manage and Transfer Photos/Videos/Music to Samsung Galaxy S8/S8+
How to Transfer Data from Samsung Phone to Samsung Galaxy S8/S8+
How to Transfer Data from iPhone to Samsung Galaxy S8/S8+
Recover Photos from Galaxy S8/S8+