All posts by DHZ

How to Recover Deleted Data from Android Mobile Phone

Summary: A complete solution for Android data recovery without root is available for you here. If you want to recover deleted data from Android, Android ToolKitAndroid Data Recovery makes it possible for you to perform Android data recovery without root simply. Do your data recovery now!

Last night I accidentally deleted some important family photograph from my Samsung carelessly. I am suffering from the pain of my stupidity and need to know if there are any ways to restore that photo without rooting my phone. I have not any backup of Samsung Kis or Google account.

android toolkit data recovery

With the development of Android data recovery technology, people are well protected from deleting data due to different of data loss causes(accidental deletion, Android OS update, Android OS root, factory reset restoring, etc,), as most Android data recovery software in the market should be able to perform data recovery for Android. However, most of these Android data recovery require your Android has been rooted first. People explain their worries eagerly that once their phone is rooted, root Android may lead to hardware failure or OS errors on device. Here come the problem. What’s the probable way to do the Android data recovery but don’t root the phone? There are two solutions that you may have a try.

Part 1: Why Most Android Data Recovery Program Need Root Device

You may have try a lot of ways to do the data recovery task for Android, some may be need to get the help of Android data recovery program. To make it work, most of them require a root access on the device. Because the application needs to perform a low-level interaction with the device while performing the recovery operation using most of Android data recovery programs. It also include an interaction with the hardware(storage unit) of device.

To prevent an Android device from getting any virus attack and restrict customization, Android has made certain restrictions. For instance, most of the devices follow an MTP protocol. According to the protocol, users can’t have an advanced level interaction with the device. Though, in order to restore deleted Android data, an application would be required to do the same. In result, most of Android data recovery programs demand a root access to the device. To solve this issue, people search the solution on the Internet to restore Android data without root, luckily, in this post we will show you two methods to fix this without hassle.

Part 2: Recover Deleted Android Data without Root via Google Account

Google account is used to backup & restore Android with a convenient way. Google Drive provides you the free 15 GB storage for backing up Android files. Once you accidentally delete or lose Android files, you could recover the deleted Android files from Google drive without rooting your device. Before you recover deleted Android data, you had better make sure you have backed up your Android data with “Auto Backup” and “Music Manager” to Google Drive with your Google account.

Back up Android Data to Google Account
Google Drive can back up contacts to Google using your Google account. You could sync photos and video through “Google Photos” to Drive, upload music from “Music Manager” to Drive, and upload other files with “Auto Backup” to drive.

Restore Android Data from Google Account
Log in your Google Drive on the web, navigate “Trash” to find the deleted files > Click “Restore” to retrieve them to your Google Drive. For recovering your deleted files from Android on Google Drive, there are two situations for your reference.

Situation A: If you have another one Android phone, then you could add your Google account on that phone, and restore all your backup files from Google Drive. The backup files include, contacts, photos, videos, settings, calendars, etc,.

Situation B: If you just need to restore your deleted files on your original Android phone, then you need to log off your Google account, and then add this Google account again. When you add the Google account, it will ask you if you are willing to sync Google Drive data to your Android, just take the positive answer.

For recovering your deleted Android music, you should follow the above two situations to make it from “Music Manager”. In conclusion, you could recover your deleted files without rooting your Android via Google account. The shortcoming of recover Android data using Google account is: you are not allowed to recover some Android data selectively instead of the whole file. Here we suggest you try the better solution in the next section.

Part 3: Recover Deleted Android Data without Root via Android Data Recovery

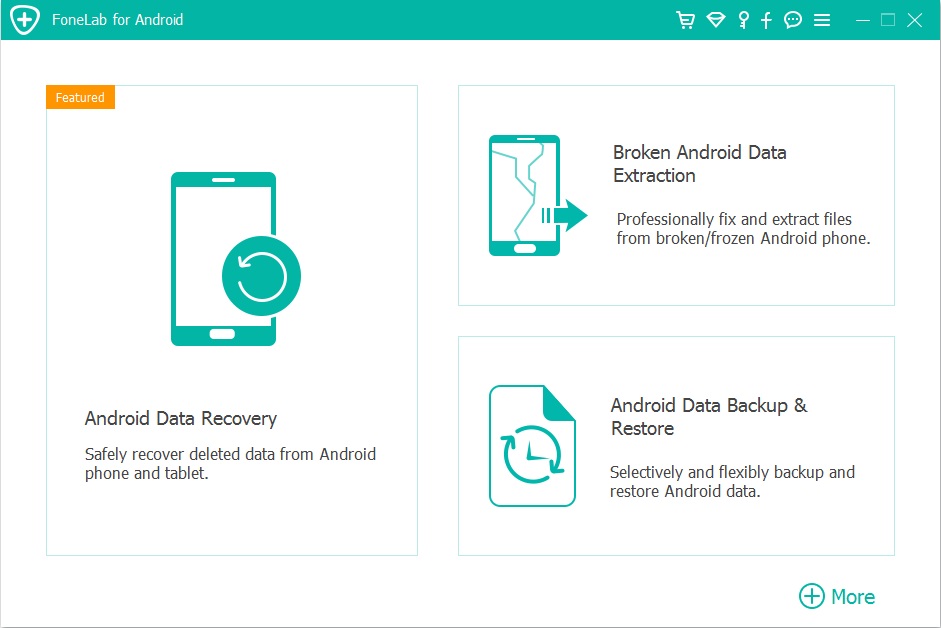
To recover deleted Android data without root, you are suggested to use Android ToolKitAndroid Data Recovery. With this remarkable data recovery tool, you could directly recover deleted data from Android without root, including contacts, text messages, gallery, videos, call logs, documents, audios, WhatsApp data and more. It enables you to restore data for any data loss cases, like accidental deletion, Android OS update, Android OS root, factory reset restoring, etc,. Recover Android data by scanning your Android phone & tablet directly. More importantly, preview before selectively recover everything from Android phone & tablet. Supports 6000+ Android device models and all Android OS even Android 8.0.

d_win d_mac
d_win d_mac

More Features of Android ToolKit:
-Android SD card recovery, broken Android data recovery.
– Root Android without data loss.
-Backup & restore Android data safely.
-Switch files between Android and iOS devices.
– Transfer & Android files between Android and computer.
-Unlock Android lock screen without password.
-Erase data from Android permanently.

It has a user-friendly interface and provides an extremely secure way to recover your deleted Android files. The amazing Android Data Recovery can help to do all Android data recovery tasks:
-Recover deleted data from Samsung phone without root, such as, Galaxy S9/S8/S7/S6, Note 9/8/5/4.
-Recover deleted data from Huawei phone without root, such as, Mate RS, Mate 10/9/8, P10/9/8.
-Recover deleted data from Google phone without root, such as, Pixel 2(XL), Pixel (XL), Nexus 7/6/5, Honor 10/9/8/7.
-Recover deleted data from Vivo phone without root, such as, Xplay6, Xplay5, Xplay 3S, Xplay.

How to Recover Deleted Files from Android without Root

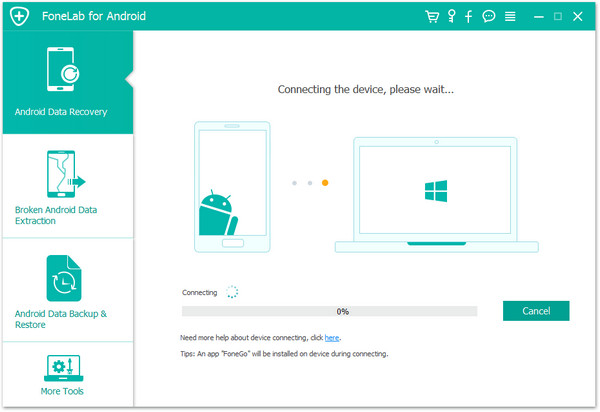
Step 1. Run Program and Connect Android Phone
To start with, run Android ToolKit – Android Data Recovery on the computer, and select “Recover” option.

android toolkit home page

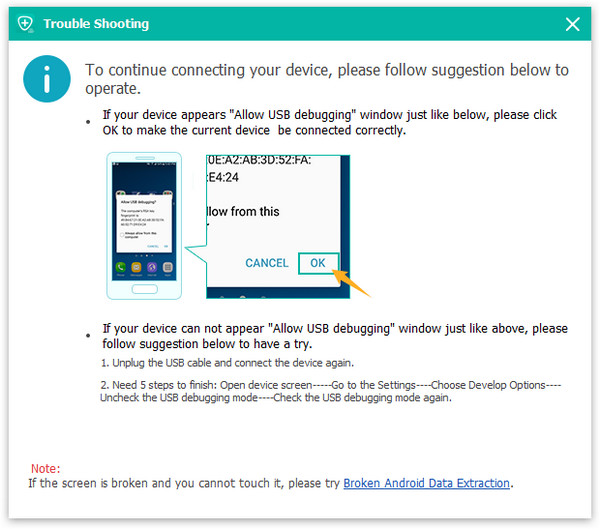
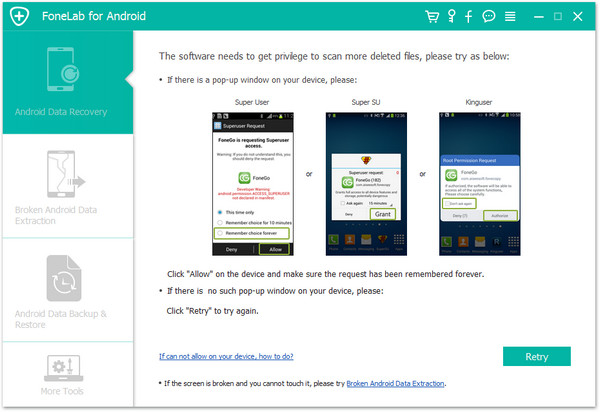
Connect your Android phone to the computer using a USB cable. Please make sure you have enabled USB debugging on your Android phone. When your device is detected, you will see the screen as follows.

select files to recover

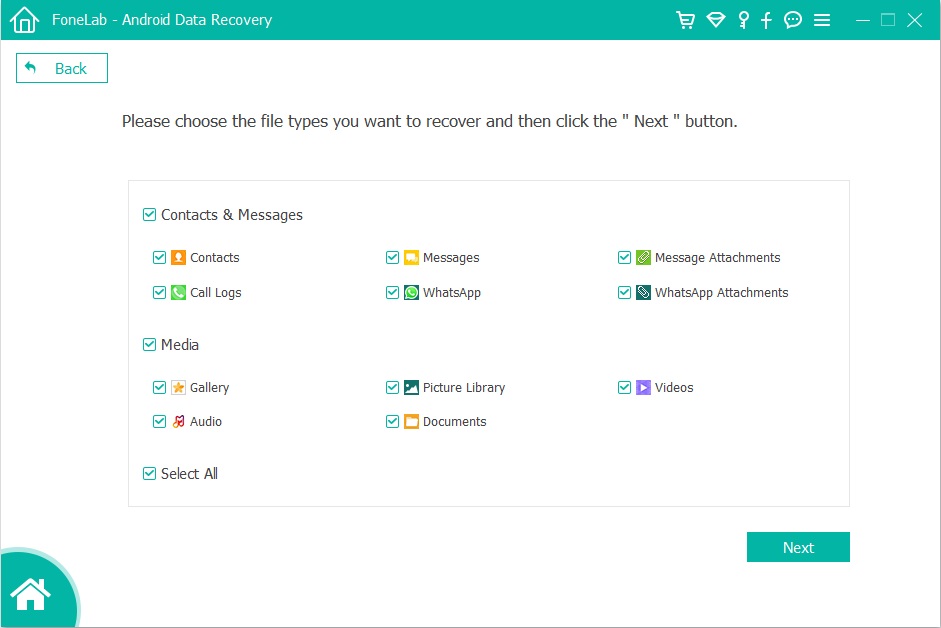
Step 2. Select the File Contain the Data you want to Recover for Scanning
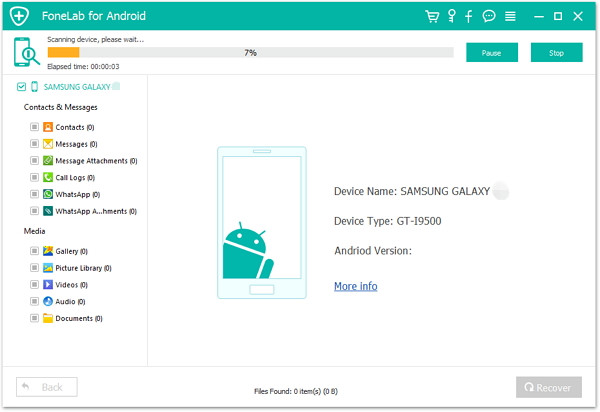
After the phone is connected successfully, it will display all the data types of recoverable files . By default, it has checked all the file types. You can uncheck the type of data that you don’t need.

Here it will offer two options: Scan for deleted files and Scan for all files. Scan for all files will take longer time, but will scan for files more deeply. Select the scan mode.

select scan mode

And then click “Next” to let it scan and analyze the data from your phone.

analyzing Android

This scanning process will take you a few minutes. Just be patient.

scanning device

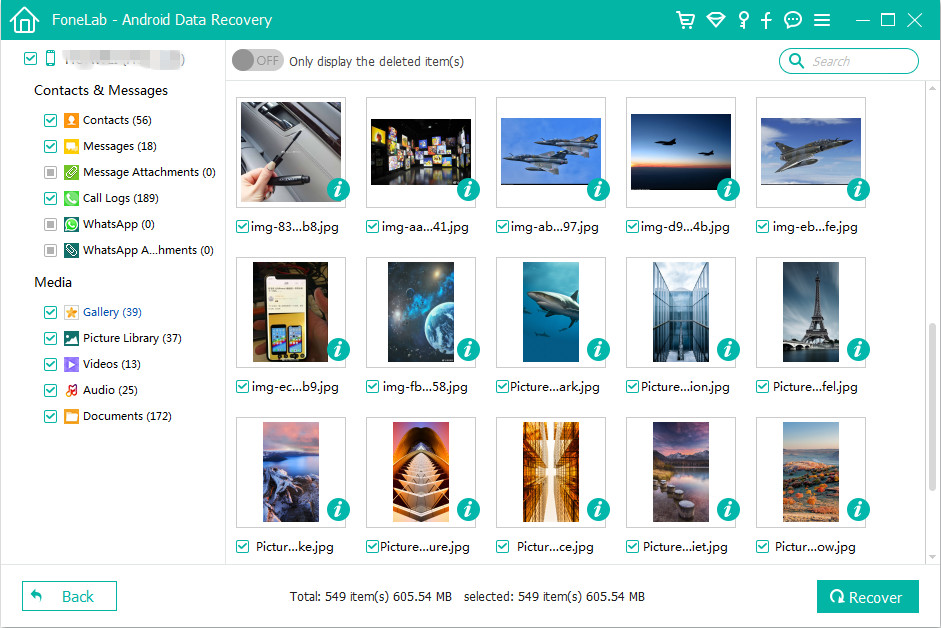
Step 3. Preview and Recover Deleted Data from Android
When the scan is done, you are allowed to preview the found data one by one in the scan result list. Check the items you want and click “Recover” to save the selected data on your computer as the recovery.

recover deleted from android without root

d_win d_mac
d_win d_mac

More Android Data Recovery Tips:

How to Recover Deleted Photos on Android

How to Restore Lost Data from Rooting Android

How to Recover Lost Data from Android SD Card

How to Transfer iPhone Data to Samsung/Android

How to Backup & Restore Android Safely

How to Manage Android on Computer

Recover Deleted Android Data

How to Transfer iTunes Videos to USB Drive

I try to copy the movies I purchased from iTunes library to a USB flash drive but failed. Any ideas to sync the iTunes videos to USB with ease?

I want to transfer an iTunes movie to USB so that I can watch the movie on my LG TV. But it seems impossible to complete this successfully. What’s wrong with it?

USB is a common storage device to save files with different formats, which makes our life more convenient. However, many people confuse that why he can’t directly transfer iTunes videos to USB drive, just like the common audio files. Although USB has no limitation to the format of preserved files, you must be aware of that the iTunes videos are protected by FairPlay DRM which is developed by Apple Inc.

iTunes Videos can’t be Recognized for USB Drive
With this DRM restriction, the iTunes videos cannot be copied, and it can only be played with Apple authorized devices. DRM-protected of iTunes files prevent you from copying any iTunes media files to USB drive and other non-Apple devices for playback. Therefore, USB drive will not recognize the DRM-protected iTunes videos properly. Currently the only way to make the iTunes DRM videos readable by USB is to remove DRM protection from iTunes videos before transferring it to the USB drive.

Remove DRM Protection from iTunes Videos

In this case, iTunes Video DRM Removal will do a favor for you. It’s one of the best iTunes media DRM removal tools to help you bypass DRM restriction from iTunes videos, to make you transfer DRM-free iTunes videos to USB flash drive successfully. While removing the DRM, this excellent software will convert the iTunes movies from M4V to MP4 format with nearly 100% original quality preserved, as well as the 30X fast speed. Supports iTunes purchased or rented movies, TV shows, music videos and any other M4V videos downloaded from iTunes. When the conversion is finish, you could save the converted iTunes videos as local common audio files, stream it to any storage device for offline playing without subscription.

d_win d_mac

How to Copy iTunes Videos to USB Drive

Step 1.Add DRM-Protected iTunes Videos
After launching iTunes Video DRM Removal on the computer, And then launch it. iTunes will be launched automatically at the same time.

run itunes media drm removal

The program will load all videos from your iTunes Library, including music Video, movies and TV shows. Click “Add Files” button to select the videos you want to remove DRM from, and click “Add“. (You can add more than one video at once.)

add itunes videos

Step 2. Choose Output Path, Audio Tracks & Subtitles
When the iTunes videos are loaded successfully, you can select the output folder, audio tracks and subtitles before removing the DRM protection form iTunes videos.

movie audio tracks subtitles

Note: The program will keep all audio tracks and subtitles from the original M4V movies to output MP4 movies, including Dolby AC3 5.1, AD, CC. Click the gear icon to uncheck the ones you don’t need.

Step 3. Remove DRM from iTunes Videos
Click “Convert” button to convert iTunes M4V videos to MP4 without quality loss by removing DRM from it.

remove DRM from iTunes movies

d_win d_mac

Step 4.Transfer Converted iTunes Videos to USB Drive
After conversion, go to the customized output folder to find the converted MP4 iTunes videos and you are free to move all the converted videos to USB flash drive.

More iTunes Videos Conversion Tutorials:

How to Remove DRM from iTunes M4V Videos

How to Convert iTunes Videos from M4V to MP4 on Mac

How to Convert DRM Protected iTunes M4V Videos to MP4

How to Convert Apple Music to MP3

How to Transfer Apple Music to USB Drive

Transfer iTunes Videos to USB Drive

How to Unlock DRM from iTunes Movies on Mac

Summery: Want to get a helpful solution to unlock DRM-protected from iTunes movies for freely owning? In this post, we will show you a recommended way to convert iTunes movies to common MP4 file by removing DRM from it completely on Mac.

People in contemporary who are iTunes movies lovers ask the questions as follows.
Can my iTunes M4V videos be watched after I canceling the subscription?
I have purchased lots of iTunes M4V videos, how can I copy the videos to my iPhone for offline playing?
Can I play iTunes M4V movies on my Android phone?

In fact, there are numbers of ways to copy iTunes movies on the computer, so that you can play the iTunes movies for entertainment without subscription, you can copy it to storage device for offline playing without DRM restriction. For example, you can use a video recorder tool to record the screen when you playback the video on iTunes. The recorded video will be save as local video files. However, in this case, the quality of the output videos may not be kept as well as that of the original movies. Is there any way to unlock DRM from iTunes movies without losing its audio quality? Definitely!

Unlock DRM from iTunes Movies with iTunes Media DRM Removal

You need a better solution to unlock DRM of iTunes movies completely. What you want is to remove DRM from iTunes M4V videos and get non-protected videos without any quality loss. iTunes Media DRM Removal for Mac supports to directly remove DRM from iTunes purchased or rented movies, TV shows, music videos and any other M4V videos downloaded from iTunes Store. It allows you to produce a video with your mother language or your favorite language for setting the subtitles and audio tracks. Moreover, this program losslessly convert iTunes M4V to unprotected MP4 videos with original video quality kept. Besides, the converting speed can be 30X faster than any other iTunes video converters.

d_win d_mac

How to Remove DRM from iTunes Movies on Mac

Step 1. Launch iTunes Media DRM Removal for Mac
Download and install iTunes Media DRM Removal for Mac on the Mac computer. And then launch it. iTunes will be launched automatically at the same time.

run itunes media drm removal

Step 2. Add iTunes Videos to Conversion List
The program will load all videos from your iTunes Library, including music Video, movies and TV shows. Click “Add Files” button to select the videos you want to remove DRM from, and click “Add“. (You can add more than one video at one time if you need.)

add itunes videos

Note: The program will keep all audio tracks and subtitles from the original M4V movies to output MP4 movies, including Dolby AC3 5.1, AD, CC. Click the gear icon to uncheck the ones you don’t need.

movie audio tracks subtitles

Step 3. Remove DRM from iTunes Movies without Quality Loss
Click “Convert” button to remove DRM from the selected movies without data loss, and convert iTunes M4V to MP4 with high speed.

remove DRM from iTunes movies

After conversion, you will find iTunes movies that are successfully converted by iTunes Media DRM Removal on Mac. Now enjoy them anywhere and anytime you want!

d_win d_mac

More iTunes Videos Conversion Tutorials:

How to Remove DRM from iTunes M4V Videos

How to Convert iTunes Videos from M4V to MP4 on Mac

How to Convert DRM Protected iTunes M4V Videos to MP4

How to Convert iTunes M4V Movies to MP4 Easily on Mac

How to Remove DRM from Apple Music Completely

Remove DRM from iTunes Movies on Mac

How to Sync iTunes Audiobooks to MP3 Player

Summary: It’s really amazing to listen to audiobooks in the spare time. But sometimes you may want to convert the iTunes audiobooks to MP3 for playing more conveniently. Here you are told how to download and convert iTunes audiobooks to MP3 and syncing to MP3 player.

Can I transfer my favorite iTunes audiobooks to MP3 player? It doesn’t seem to work when I simply copy & paste the audiobooks files. I’d like to listen to these audiobooks when I am doing excise outside. Any ideas?

MP3 player, also known as digital audio player or portable media player is welcomed widely since it was born. After years of its evolvement, most MP3 players can not only play music files, but also play audiobooks, and other kinds of audio files. Listen to audiobooks with MP3 player can make your life more conveniently and simply. You can play the loved audiobooks in anywhere else anytime. If you want to play iTunes audiobooks on MP3 player, you should convert the DRM-protected audiobooks to MP3/M4A by removing DRM from it. This will need a special converter to make it. A friendly reminder is that simply renaming the extension may cause irreparable damage to the original file.

Why Need to Remove DRM from iTunes Audiobooks
You should beware of the fact that the audiobook files downloaded from either iTunes or other website are protected by Digital Rights Management, commonly known as DRM, because of which all the iTunes audiobooks are restricted to be played on selected media devices that are approved by Apple and Audible. Normal MP3 player are not among the supported list. That’s why you can’t directly copy iTunes audiobooks to MP3 player for playback. Fortunately, that doesn’t mean there’s no way out. You can still listen to those DRM-locked audiobooks on MP3 player devices if some DRM removal tools are applied, such as this one we’ll recommend – iTunes audio converter.

Remove DRM from iTunes Audiobooks for MP3 Player

iTunes Audio Converter is powerful of removing the most advanced audio encoding technology from audio files. It can help to convert iTunes audiobooks to MP3, then you can listen to the audiobooks without DRM restriction on MP3 player after syncing. After this, you could check the converted audiobooks with DRM-free format as common audio files. Besides to MP3 format, this program enable you to convert audiobooks to M4A, AAC, WAV, WMA, etc,. Moreover, iTunes Audio Converter could be used to convert Apple music/iTunes music to DRM-free files for playing without limits. The output audio files will be saved with its original quality at 16x fast conversion speed.

d_win d_mac

How to Import iTunes Audiobooks to MP3 Player

Step 1. Add iTunes Audiobooks to Program
To start with, run iTunes Audio Converter on the computer. All iTunes files will be shown automatically on the interface, including audiobooks, music, movies, TV shows, etc,. You can click “Add to Library” under “File” selection to import purchased audiobooks from iTunes library. Select the audiobooks you want to remove DRM from.

add iTunes audiobooks

Note: iTunes Audio Converter supports to convert Audible audiobooks, Apple Music and iTunes music to DRM-free format.

Step 2. Settings Output Format
Click “Output” button of the interface, a new settings window will pop up. In this case, set MP3 as output format, you are allow to adjust the output quality and other parameter. The output path is changeable if you need.

adjust output settings

Step 3. Convert iTunes Audiobooks to MP3
Simply click “Start Convert” button to begin converting iTunes aduiobooks to MP3 by removing DRM from it.

remove DRM from iTunes audiobooks

d_win d_mac

Step 4. Transfer Audiobooks to MP3 player
When the conversion is done. You can copy and paste them or drag & drop the converted audiobooks from the computer to MP3 player, just do it in the way you prefer. Enjoy!

More Audiobooks Conversion Guides:

The Best Way to Remove DRM from iTunes Audiobooks

How to Remove DRM from iTunes Audiobooks on Mac

How to Convert M4B iTunes Audiobooks to MP3

How to Convert Audiobooks from AAC to MP3

How to Transfer Audiobooks to iP

How to Transfer Audiobooks to iPhone

How to Transfer Audiobooks to Android

Import iTunes Audiobooks to MP3 Player

How to Sync iTunes Audiobooks to iPod as MP3 Files

Summery: Audiobook is basically a recording of the text that can be read as a audio file. If you have your favorite collection of audiobooks, then you can sync it to iPod so that you can enjoy them more convenient. Below given is the best way on how to sync audiobooks to iPod as MP3 files.

Listening to iTunes audiobooks on iOS devices has been a wonderful experience to relax and acquire new knowledge everywhere in the fast-paced society nowadays. It can free your eyes and help to immerse yourself into the audio world. Apart from the iTunes audiobooks, some audiobooks fans also like to sync audiobooks to other different device for listening, for example, iPod. However, audiobooks are made of DRM protection, so you will need to remove DRM from audiobooks to play it as common audio files. If you are new to auiobooks or you are interested in listening to audiobooks on iPod, you can follow me in this article to find out the helpful way to play audiobooks on iPod as MP3 files.

With these audiobook players, audiobooks users can listen to different audiobooks from multiple media sources, but sometimes there maybe still problems. Take the iTunes audiobooks users for example, they might face the problem such as can’t listen to audiobooks whenever some errors occurred on the iBooks app or Apple Music on iPod, and it would not be so convenient to switch between different players. Someone may think if there is a way to remove the DRM restriction from iTunes audibooks for listening conveniently. Considering that iBooks instability and incompatibility with iPod models like iPod Shuffle/Nano, converting audiobooks to MP3 format files and transferring them to iPod would be the perfect way. If you are one who want to convert iTunes audiobooks to DRM-free files for syncing to iPod, iTunes Audio Converter is recommended for you.

Removing DRM from iTunes Audiobooks for iPod

iTunes Audio Converter is capable of removing DRM from iTunes M4A, M4B audiobooks, convert audiobooks to MP3 without quality lossless. Other formats are available for audiobooks conversion, like M4A, AAC, WAV, WMA. Thus, you can sync iTunes audiobooks for playing them on iPod or other players like the common audio files. Besides, it can also convert iTunes purchased songs and Apple Music to MP3/AC3/AIFF/FLAC/M4A or more formats with 16x fast speed. After the conversion, you could transfer the converted DRM-free audiobooks to any device for playing back freely, such as, iOS device, Android device, MP3 players and other commonly used media players. ID tags and metadata will be saved to output files. Batch conversion allows you to convert entire audiobooks collection.

d_win d_mac

How to Import iTunes Audiobooks to iPod

Step 1. Add iTunes Audiobooks to Program
Launch iTunes Audio Converter on the computer. When you run it, all your iTunes files will be shown automatically on the interface, including audiobooks, music, movies, TV shows, etc,.You can click “Add to Library” under “File” selection to import purchased audiobooks from iTunes library. Select the audiobooks you want to remove DRM from.

Besides, iTunes Audio Converter also supports converting Audible audiobooks, iTunes music and Apple Music tracks to DRM-free format.

add iTunes audiobooks

Step 2. Choose Output Format
Click “Output” button of the interface, a new settings window will pop up. You can set “MP3″ as output format, and adjust the output quality. In addition, the output path is also changeable if required.

adjust output settings

Step 3. Start Converting DRM-ed iTunes Audiobooks to MP3
Click “Start Convert” button to start converting iTunes aduiobooks to MP3 by removing DRM from it. When the conversion is completed, you can browse the DRM-free audiobooks.

remove DRM from iTunes audiobooks

d_win d_mac

Step 4. Transfer the Converted iTunes Audiobooks to iPod
Now, connect your iPod to computer with a USB cable, then you can transfer the converted iTunes audiobooks to iPod. After that, you can play iTunes audiobooks on your iPod conveniently. On the other hand, you can sync the converted audiobooks to iPod using iOS Transfer, it is an all-in-one data manager tool for iOS device, help to transfer files between iOS device and the computer easily.

Free Download iOS Transfer:

d_win d_mac

ios transfer main page

More Audiobooks Conversion Guides:

The Best Way to Remove DRM from iTunes Audiobooks

How to Remove DRM from iTunes Audiobooks on Mac

How to Convert M4B iTunes Audiobooks to MP3

How to Convert Audiobooks from AAC to MP3

How to Convert iTunes and Amazon Audiobooks to M4A

How to Transfer Audiobooks to iPhone

How to Transfer Audiobooks to Android

Sync iTunes Audiobooks to iPod

How to Play iTunes Audiobooks on Windows Media Player

Summary: If you want to import and play iTunes audiobooks on Windows Media Player, you could check this post for reference. It will share a helpful tutorial to bypass DRM from iTunes audiobooks and then you could import it to Windows Media Player for playing.

Users who use the computer are familiar with Windows Media Player(WMP), a system-provided media player provided by Windows, which are available on both Windows computer and Windows smartphone as well as tablets. Windows Media Player allows you to play several types of media files, such as videos, music, pictures and the recorded TV shows; and it has a lot of features like media file playback, library management, disc burning, ripping and streaming, etc,. If you have some loved digital media contents (media files) from different sources, then it is a good way to import them to Windows Media Player for playing. After importing, you will get quick access to all your media files in one place and play it conveniently.

However, sometimes you may encounter the error that the files are corrupted or not supported when importing media files to Windows Media Player, for example, the iTunes audiobooks. That is mainly because these audiobooks files are encrpyted by DRM protection. What is DRM protection? DRM restriction is a special format of media files for iTunes audiobooks, iTunes music, iTunes videos and Apple Music. It prevent you downloading it without subscription or paying, and avoid you using these media files for illegal use. If you want to read iTunes audiobooks via Windows Media Player, the only is converting audiobooks to MP3 like the common audio files, then syncing it to Windows Media Player for playing.

Removing DRM from iTunes Audiobooks for Syncing to Windows Media Player

UkeySoft Apple Music Converter also is an Audiobooks Converter is used for bypassing the DRM from iTunes audiobooks by converting it to MP3 or other DRM-free formats, so that you could transfer the converted audiobooks and play the converted audiobooks on Windows Media Player. It is powerful to convert DRM-protected music files to MP3, M4A, AAC, WAV, WMA, etc,. without quality loss. The software also supports the conversion of music tracks, like iTunes music and Apple Music. And the entire operation just costs you a few minutes with fast speed. When the conversion is done, you will get all the DRM-free converted media files as local files, like the common files for playing without limits.

d_win d_mac

How to Sync iTunes Audiobooks to Windows Media Player

Step 1. Run UkeySoft Apple Music Converter on Computer
Install and run UkeySoft Apple Music Converter on computer. When you run it, all your iTunes files will be shown automatically on the interface, including audiobooks, music, movies, TV shows, and so on.

run iTunes Audio DRM Removal

Step 2. Select Audiobooks to Remove DRM from
Click “Audiobooks” on the left column and you will see all your audiobooks on the right side. Then, click the checkbox before the audiobooks you want to remove DRM from.

Step 3. Setting Output Settings
In the “Output” section, select the output format, customize output file profile, choose an output folder. Here MP3 and M4A are suggested output format.

adjust output settings

Step 4. Remove DRM from iTunes Audiobooks
Click “Start Convert” to begin removing DRM from iTunes audiobooks.

remove DRM from iTunes audiobooks

d_win d_mac

Step 5. Transfer Audiobooks to Windows Media Playlist
Finally, transfer the converted audiobooks to Window Media Player and make it a list so that you can listen to audiobooks with this Window Media Player.

play audiobooks on windows media player

Now you have learned how to sync your iTunes audiobooks to Windows Media Player by Audiobooks Converter. Hope you will enjoy the unblocked audiobooks listening journey from here.

More Audiobooks Conversion Guides:

The Best Way to Remove DRM from iTunes Audiobooks

How to Remove DRM from iTunes Audiobooks on Mac

How to Convert M4B iTunes Audiobooks to MP3

How to Convert Audiobooks from AAC to MP3

How to Convert iTunes and Amazon Audiobooks to M4A

How to Transfer Audiobooks to iPhone

How to Transfer Audiobooks to Android

Convert iTunes Audiobooks to MP3

How to Remove DRM from iTunes Audiobooks on Mac

Summary: Have you ever bought audiobooks from iTunes Store but found it is impossible to play them on Android phone or MP3 players? If you get these case, you are likely to be bypassed by Apple’s FairPlay DRM protection. This guide is going to show you how to remove DRM restriction from iTunes audiobooks on Mac.

I wanna remove the DRM-protected from iTunes audiobooks on Mac, how to do this job without any trouble? I want to sync the audiobooks on my Android phone for reading without limits.

As we know, audiobooks is made with DRM technology, audiobooks purchased from iTunes, Audible or other channels are always restricted to play on specific media players only. Audiobooks purchased from iTunes Store are DRM protected M4B/M4P and it can only be played via iTunes on authorized computers and devices. It means that you can’t transfer audiobooks to other MP3 players for syncing. In order to freely enjoy iTunes DRM-ed audiobooks on as many devices as it should be, you should bypass the DRM restriction from audiobooks. To remove these limitations, you need iTunes audio DRM removal software to remove DRM from iTunes audiobooks and output DRM-free MP3, M4A, etc,. Then the audiobooks files that can be played anywhere.

Bypass DRM from iTunes Audiobooks on Mac

You can make use of iTunes Audio DRM Removal for Mac(iTunes Audio Converter), to remove DRM from iTunes audiobooks on Mac. This software allows you to strip DRM off from iTunes and Audible audiobooks at 16X faster speed. At the same time, converting audiobooks from M4B, AA or AAX to DRM-free formats without quality loss, such as MP3, M4A, AAC, and more. After that, the converted audiobooks are playable on iOS device, Android device, MP3 players and other commonly used media players without limits. In addition, this iTunes Audio Converter enable to to convert iTunes music and Apple music to DRM-free files by removing DRM from it completely, then you can enjoy the converted DRM-free audio freely and conveniently.

d_win d_mac

Main Features of iTunes Audio DRM Removal for Mac:
-Remove DRM from iTunes audiobooks at up to 16X recording speeds.
-Convert M4B/AA/AAX audiobooks to MP3, M4A, AAC, WAV, WMA, etc,.
-ID tags and metadata will be saved to output files.
-Batch conversion allows you to convert entire audiobooks collection.

How to Bypass DRM from iTunes Audiobooks on Mac

Step 1. Install iTunes Audio DRM Removal for Mac
Click the button above the get the trial version of the program. Then, install it on your Mac computer. When you run it, all your iTunes files will be shown automatically on the interface, including audiobooks, music, movies, TV shows, etc,.

run iTunes Audio DRM Removal

Step 2. Select Audiobooks You Want to Remove DRM
Click “Audiobooks” on the left column and you will see all your audiobooks on the right side. Then, click the checkbox before the audiobooks you want to remove DRM from.

Step 3. Customize Output Settings
In the “Output” section, you can select the output format, customize output file profile, choose an output folder. MP3 and M4A are suggested output format.

adjust output settings

Step 4. Remove DRM from iTunes Audiobooks
Click “Start Convert” to start removing DRM from iTunes audiobooks.

remove DRM from iTunes audiobooks

After conversion, you can enjoy iTunes audiobooks on any devices and any audiobooks players without limits.

d_win d_mac

More Audiobooks Conversion Articles:

The Best Way to Remove DRM from iTunes Audiobooks

How to Convert AAX Audiobooks to MP3

How to Convert M4B iTunes Audiobooks to MP3

How to Convert Audiobooks from AAC to MP3

How to Convert iTunes and Amazon Audiobooks to M4A

How to Transfer Audiobooks to iPhone

How to Transfer Audiobooks to Android

Remove DRM from iTunes Audiobooks on Mac

How to Recover Lost Data from Google Pixel 3

[Summary]: Want to recover lost data from Pixel 3/3 XL? Check this article to get the reliable Google Pixel data recovery solution to recover photos, contacts, SMS messages, WhatsApp messages, call logs, documents and more from Pixel 3(XL).

Google may release a family of devices for its third-generation smartphones. Google Pixel 3 is the smartphone pure Android users and camera enthusiasts are looking forward to in 2018 simply because the Pixel 2 and Pixel 2 XL were so good. It may launch in three flavors, with leaks describing the inevitable Google Pixel 3, a screen-refined Google Pixel 3 XL and a cheaper Pixel phone. The three three phones are rumored to launch on October 4, 2018. What we will see in the new Google Pixel models? Smaller bezels, customizable active edge, camera app improvements, a return of the headphone jack, wireless charging, screen improvements, better water resistance and features. Let’s wait for it to be announced later.

Are you a Google Pixel mobile phone user? Do you use your phone to store important data for your personal and business use? If you do, then, perhaps, you have experienced accidentally deleting data from your mobile, something that you find frustrating and difficult to lose. Yes. Many users of mobile phones such as Google Pixel users have enjoyed using their phones and have found it the best storage device for their pictures, text messages, videos, audio files, contact list, WhatsApp messages, and even games. However, data you need for business or for personal communications get lost can be accessible to you anytime and anywhere. Accident always happen without your permits, if you are searching a solvable way to recover lost data from Google Pixel 3 phone, you could take this tutorial for reference.

Recover Lost Data from Google Pixel 3 and Pixel 3 XL

U.Fone Android Data Recovery has the most advanced techniques to restore data on your Android device regardless of any reason of data loss, like accidental deletion, Android OS update, Android root, factory reset restoring, etc,. It comes with advanced feature which allow you to restore lost data from Google Pixel 3/Google Pixel 2/Google Pixel and Google Pixel 3A/3A XL. Restoring photos, videos, contacts, text messages, notes, call logs, WhatsApp messages, document and more types of files with easy steps. Compatible with all Android OS versions and supports all types of devices like Google, LG, Motorola, Lenovo, Samsung, Sony, etc,. More importantly, it allows you preview before recovery and has an easy to use interface. 100% read only program, safe, secure and easy to use.

d_win d_mac
d_win d_mac

Steps To Recover Deleted Data from Google Pixel 3

Step 1.Run Program and Connect Google Pixel Phone
In the first step, please run U.Fone Android Data Recovery on the computer, connect your Google Pixel phone to the computer. It will detect your phone automatically soon. In the home page of program click “Android Data Recovery” option, it will lead you to the next step.

Android ToolKit home page

connect Google Pixel 3 phone

Step 2.Enable USB Debugging on Google Pixel Phone
Now follow the instruction to allow enable the USB debugging mode on your phone. If you have already did it, you will see a pop-up window on the screen, mark “Always” and click “OK“.

allow to detect Google Pixel 3

Step 3.Select Files to Scan
Once finishing enabling USB debugging on the phone, different types of files can be chose to be scan here. If you want to restore all types of data, you can click “Select All” to have all your phone data scanned.

select files to scan

Step 4.Allow to Scan and Analyze Data on Google Pixel Phone
A new screen will appear on your phone to ask you if you allow the program to scan your phone. Tap “Allow” to enable the program to analyze your phone for deleted data.

allow to scan Google Pixel phone

The program will begin to scan the data from Google Pixel phone. The scanning process will take you some time. When the scanning is end, you will see a list of recoverable files, including the gallery, contacts, and other data, you could preview them one by one before recovery.

scan deleted Google Pixel data

Step 5.Recover Lost Data from Google Pixel Phone
In the last step, select the data you want under the files name to restore them to your computer by clicking “Recover“.

recover lost data from Google Pixel 3
d_win d_mac
d_win d_mac

Related Google Pixel Data Recovery Guides:

How to Recover Deleted Data from Google Pixel

How to Recover Deleted Photos on Google Pixel

How to Transfer iPhone Data to Google Pixel

How to Transfer Samsung Data to Google Pixel

How to Transfer Android File to Google Pixel

How to Backup and Restore Google Pixel

How to Manage Google Pixel on Computer

Recover Lost Data from Google Pixel 3

Android Data Recovery

Recover Your Lost Data from Android
Now, Even Device Broken

Compatible with Android 8.0 Oreo/7.0, etc.

Recover Lost Data Now

How to Sync iTunes Audiobooks to Android

I downloaded some audiobooks in iTunes library, is there any way to sync the audiobooks to my Android phone so that I can listen to the audiobooks without limits.

Reading audiobooks is one of the most interesting and exciting experiences. Audiobooks brings great convenience to who can’t read or who enjoy learning something through listening. Audiobooks is a new mode to read for people instead of traditional books. With audiobooks, you don’t need to carry books. Besides, you can listen to audibooks in anywhere at anytime. People may choose different tools to listen to the audiobooks under different situations. For example, you may listen to the audiobooks with your Android phone when you are in the bus or subway.

Audiobooks from iTunes store are in M4P or M4B format that is limited to play on Apple devices. Unfortunately, Android devices are incompatible with M4P and M4B files but unprotected MP3 files. It seems difficult to transfer audiobooks from iTunes to Android device since Apple has a special DRM that makes it impossible to do the transferring manually. So is there any ways to solve this problem? Absolutely. All you need is turning to powerful audiobooks converter app for help. In the follow passages, we are going to share with you this amazing app that enable you to perform the transferring iTunes audiobooks to Android, after converting iTunes audiosbooks to MP3 file by removing DRM restriction.

Remove DRM from Audiobooks for Android

To remove DRM protection from audiobooks and play purchased or authorized audiobooks on Android device, Audiobooks Converter(iTunes Audio Converter) is the must-have app. This program is well known for its up to 16X converting speed and multiple output formats including MP3, M4A, AAC, WAV, WMA, etc, – find the one that suits best. After the conversion, you could sync the converted iTunes audiobooks to Android for playing as the common audio files. What’s more, this program can help to convert iTunes music and Apple music to DRM-free files by removing DRM from it completely, then you can enjoy the DRM-protected audio without limits.

d_win d_mac

How to Sync iTunes Audiobooks to Android

Step 1. Run Software on the Computer
Download and run the Audiobooks Converter on the computer. At the same time, iTunes will run automatically. All your iTunes files will be shown automatically on the interface, including audiobooks, music, movies, TV show, etc,. Click “Audiobooks” option and you will see all your audiobooks downloaded in iTunes will be list.

run iTunes Audio Converter

Step 2. Select Audiobooks for Conversion
Audiobook Converter grabs all audiobooks in your iTunes folder and shows them in the interface, select the audiobooks you want to remove DRM from. In the output settings, you could set the output format, customize output file profile, choose output folder, etc,. For syncing the audiobooks to Android, you could select “MP3” output format.

adjust output settings

Step 3. Convert Audiobooks to MP3 by Removing DRM Restriction
Click “Start Convert ” button to begin the audiobooks conversion. When the process is end, you will get DRM-free MP3 audiobooks.

remove DRM from audiobooks

d_win d_mac

Step 4. Transfer Audiobooks to Android
Finally, you should transfer the converted audiobooks to Android via a USB cable or Android Transfer. When this completes, you can read your favorite audiobooks with Android without limits.

android transfer main page

Free Download Android Transfer:

d_win d_mac

More Audiobooks Conversion Articles:

The Best Way to Remove DRM from iTunes Audiobooks

How to Convert AAX Audiobooks to MP3

How to Convert M4B iTunes Audiobooks to MP3

How to Convert Audiobooks from AAC to MP3

How to Convert iTunes and Amazon Audiobooks to M4A

How to Transfer Audiobooks to iPhone

Download iTunes Audiobooks to Android

How to Recover Deleted Data from Nokia 8 Sirocco

I got new Nokia smartphone, which excited me a lot. However something hapless happened last night. I delete some photos in the gallery on the phone carelessly. That really made me feel depressed. I heard that some professional data recovery software can help to restore the lost data. Is it true? Which one is better? Please send me your idea. Thanks a lot.

Nokia Company released a lot of new smartphone models, the outstanding one is Nokia 8 Sirocco, according to the report it is one of the best Android phones in 2018. The Nokia 8 Sirocco has a beautiful design and incredibly tough build-quality. It is crafted from a single stainless steel block and coated entirely in curved glass. It’s also incredibly slim at 7.5mm. It has a beautiful 1,440 x 2,560p P-OLED display that cascades over the side of the device like a Samsung Galaxy S9. In terms of performance, you’re basically looking at a Snapdragon 835 with 6GB of RAM in the Sirocco. That means that you should see significantly greater performance in gaming and multitasking on the Sirocco.

Accidentally deleted data from your Nokia 8 Sirocco? Mistakenly deleted precious photos and videos? What’s worse, haven’t backup? In daily life, Android users are troubled with data loss on their smartphone for many reasons such as accidental deletion, formatting, virus attacks, phone corruption and other accidents cases that can cause files to be lost. When encountering such a problem, people need to find a reliable Android file recovery solution to rescue their data. Here we want to notice you, stop using phone after the accidental deletion. It’s great. If you insist on using the phone, the deleted files will be overwritten by the new data, which makes recovery more difficult, even impossible. What software can help? U.Fone Android Data Recovery does.

Recover Deleted Data from Nokia 8 Sirocco

To guarantee a successful data recovery, you need this powerful and easy-to-use Android ToolKitU.Fone Android Data Recovery program. Being capable of deep scanning and recover deleted files from Android under any data loss circumstances. The program works extremely well for recover deleted data from Nokia 8 Sirocco. Contacts, text messages, gallery, videos, call logs, WhatsApp messages, documents and more types of Android files are recoverable. More importantly, Android ToolKit is an all-in-one Android data manager tool, help to solve all your Android problems without data loss. Compatible with almost all Android brands, up to 6000 Android models.

d_win d_mac

How to Recover Deleted Data from Nokia 8 Sirocco

Step 1.Run Program and Connect Nokia Phone
To start with, please run Android ToolKit – U.Fone Android Data Recovery on the computer, connect your Nokia phone to the computer. It will detect your phone automatically quickly. Click “Android Data Recovery” option in the home page, it will lead you to the next step.

Android ToolKit home page

connect Nokia phone

Step 2.Enable USB Debugging on Nokia Phone
Follow the instruction to unlock your phone. If you have already allowed the USB debugging mode, you will see a pop-up window on the screen, mark “Always” allow from this computer and click “OK“.

allow to detect Nokia phone

Step 3.Select Files to Recover
Once finishing enabling USB debugging on Nokia phone, different types of files can be chose to be scan here. If you want to restore all types of data, you can click”Select all” to have all your phone data scanned.

select files to scan

Step 4.Allow to Scan and Analyze Data on Nokia
In this step, a new screen will appear on your phone to ask you if you allow the program to scan your phone. Tap “Allow” to enable the program to analyze your phone for deleted data.

allow to scan Nokia phone

Step 5.Scan the Deleted Data of Nokia
The program will begin to scan the data from Nokia phone. The scanning process will take you some time. When the scanning is end, you will see a list of recoverable files, including the gallery, contacts, and other data, you could preview them one by one before recovery.

scan deleted Nokia data

Step 6.Recover Deleted Data from Nokia
Finally, select the data you want under the files name to restore them to your computer by clicking “Recover“.

recover deleted data from Nokia

d_win d_mac

Related Nokia Data Recovery Articles:

How to Recover Deleted Data from Nokia

How to Recover Deleted Photos from Nokia

How to Recover Deleted Contacts from Nokia

How to Transfer iTunes Music to Nokia

How to Transfer iTunes Videos to Nokia

How to Manage Android on Computer

Recover Deleted Data from Nokia 8 Sirocco

Android Data Recovery

Recover Your Lost Data from Android
Now, Even Device Broken

Compatible with Android 8.0 Oreo/7.0, etc.

Recover Lost Data Now