All posts by DHZ

How to Stream Spotify Music to Chromecast

[Summary]: Here we’ll guide you to cast Spotify Music to Chromecast so that you can easily play any Spotify Music track on smart speakers or other devices without Spotify premium subscription.

“I am a Spotify premium subscriber. But it appears I can’t cast the songs from Spotify Music to Google Chromecast. Did I miss anything? Can anyone help me to stream Spotify on chromecast Audio?”

spotify-music-on-chromecast

Chromecast has native support for Spotify Music, which means you can stream Spotify songs online from Chromecast. However, it only works if you spend $14.95 per month to subscribe to Spotify Premium membership. Well, for some users, monthly renewals are still stressful. Here, we’ve brought you another great alternative to downloading Spotify songs and casting Spotify music to Chromecast audio without Spotify premium subscriptions. The following is the complete guide – whether you are a premium user or a free user, you can easily stream Spotify music to Chromecast.

Part 1: Stream Spotify Music to Chromecast with Premium Account

Step 1. Insert Chromecast or Chromecast Audio to TV HDMI port or a speaker input port.

Step 2. Start the Spotify app on the same WiFi network as your Chromecast/Chromecast Audio.

Step 3. Select a track that you want to listen to. At the bottom of the screen, tap “Devices Available”.

Step 4. Select your Chromecast or Chromecast Audio from the devices listed. Then you’ll be able to stream Spotify music track to TV or speaker via Chromecast.

spotify-on-chromecast

Part 2: Play Spotify Music on Chromecast without Premium Subscriptions

Free users are not allowed to download Spotify music for offline listening. Since the DRM protection inserted, songs only can be played on Spotify app. In order to play Spotify music on Chromecast without premium subscriptions, the most important thing is to download Spotify music and remove DRM restriction from Spotify songs. If you’re a Spotify free user, or cancel the premium subscription but want to keep the Spotify tracks still playback on Chromecast, then you can try a powerful Spotify downloader and DRM remove tool – Spotify Music Converter.

UkeySoft Spotify Music Converter allows you enjoy Spotify music offline with free or premium account. It is designed to download Spotify songs, albums or playlists and convert to MP3, M4A, WAV or FLAC with 100% audio quality retained. Let’s take a look at its specific features:

Download Spotify songs, albums and playlists for offline listening.
Remove DRM from Spotify songs/albums/playlists.
Convert Spotify music to DRM-free MP3, M4A, WAV or FLAC.
Enjoy Spotify music offline without premium.
Get rid of protected Ogg Vorbis format when using Spotify Premium.
One click to burn Spotify music to CD.
Preserve ID3 tags(artwork, title, album, artist name) and 100% original quality.
5X faster conversion speed.

Free download Spotify Music Converter from here:

d_win d_mac

Step 1. Launch Spotify Music Converter

Please make sure you have installed Spotify app on your computer. Install and launch Spotify Music Converter on your Mac/Windows.

Spotify Music Converter home page

Step 2. Add Spotify Music Songs

You can drag&drop Spotify songs, albums or playlists to software directly. Or click “Add Files”, copy&paste the URL of the Spotify song, album or playlist to the left bottom area and then click “Add”.

add Spotify Music

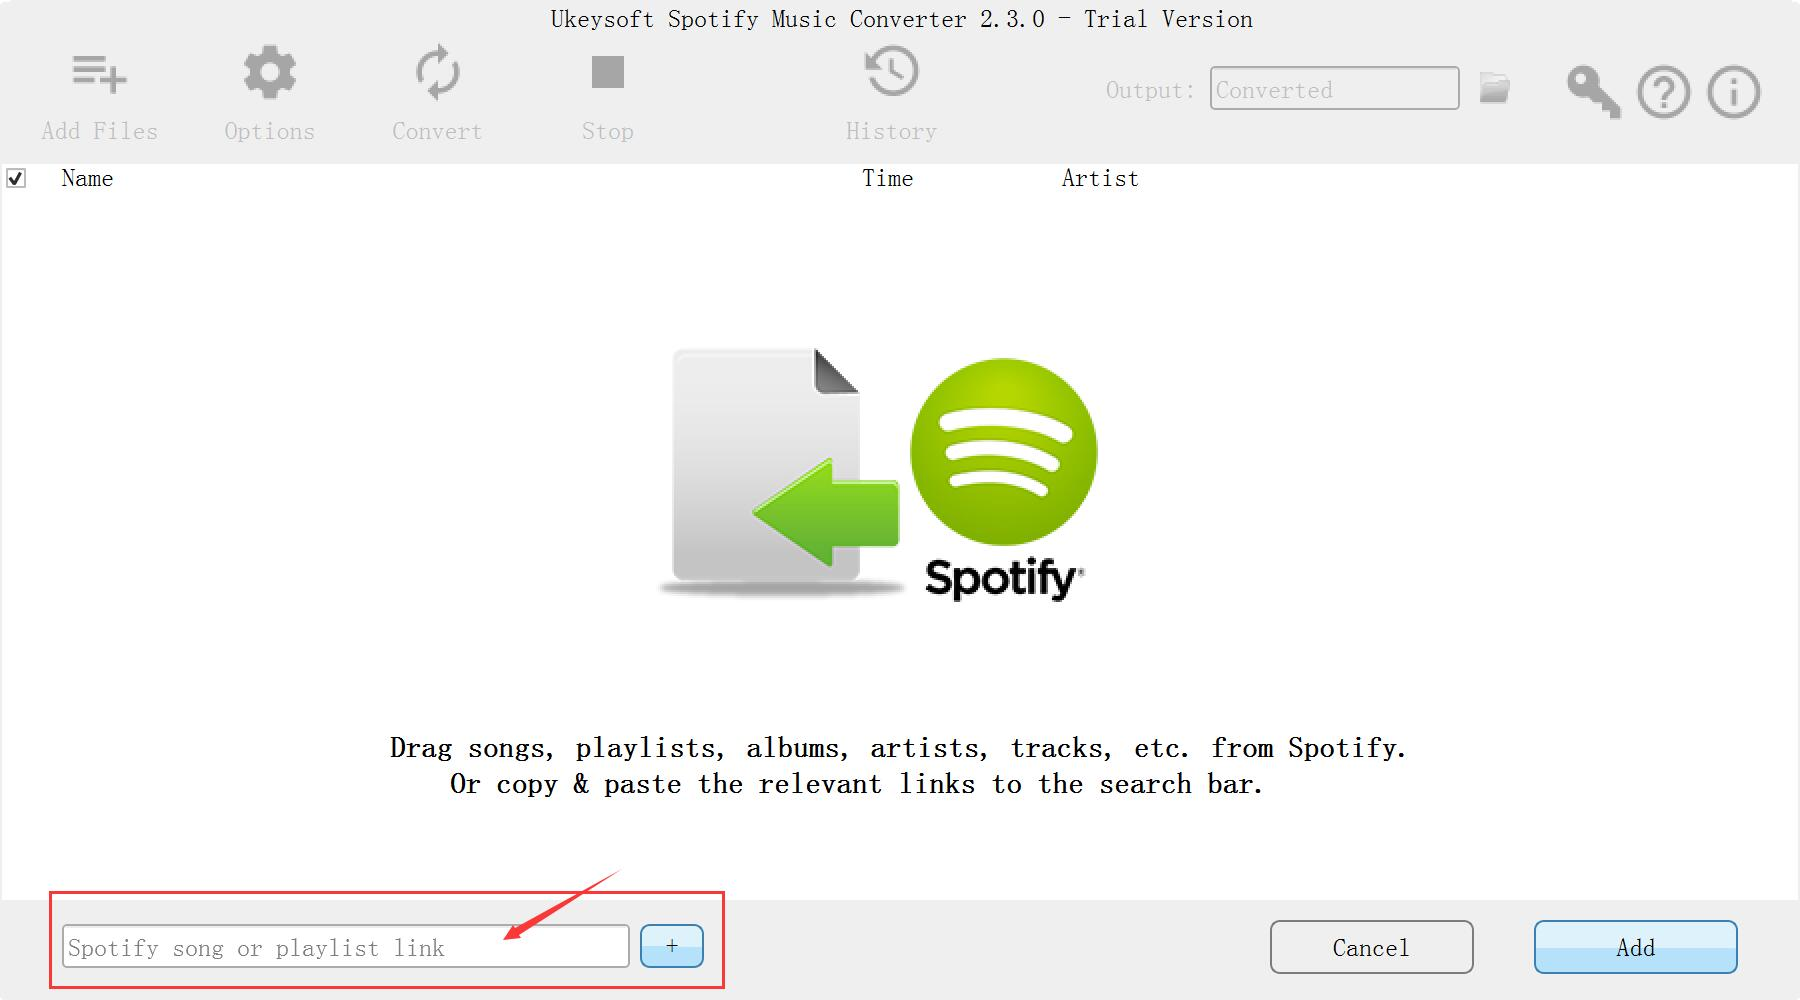
Tip: By default, all songs in a playlist or album are selected. You are free to uncheck the tracks you don’t want to convert. Then click “Add” to import all selected songs.

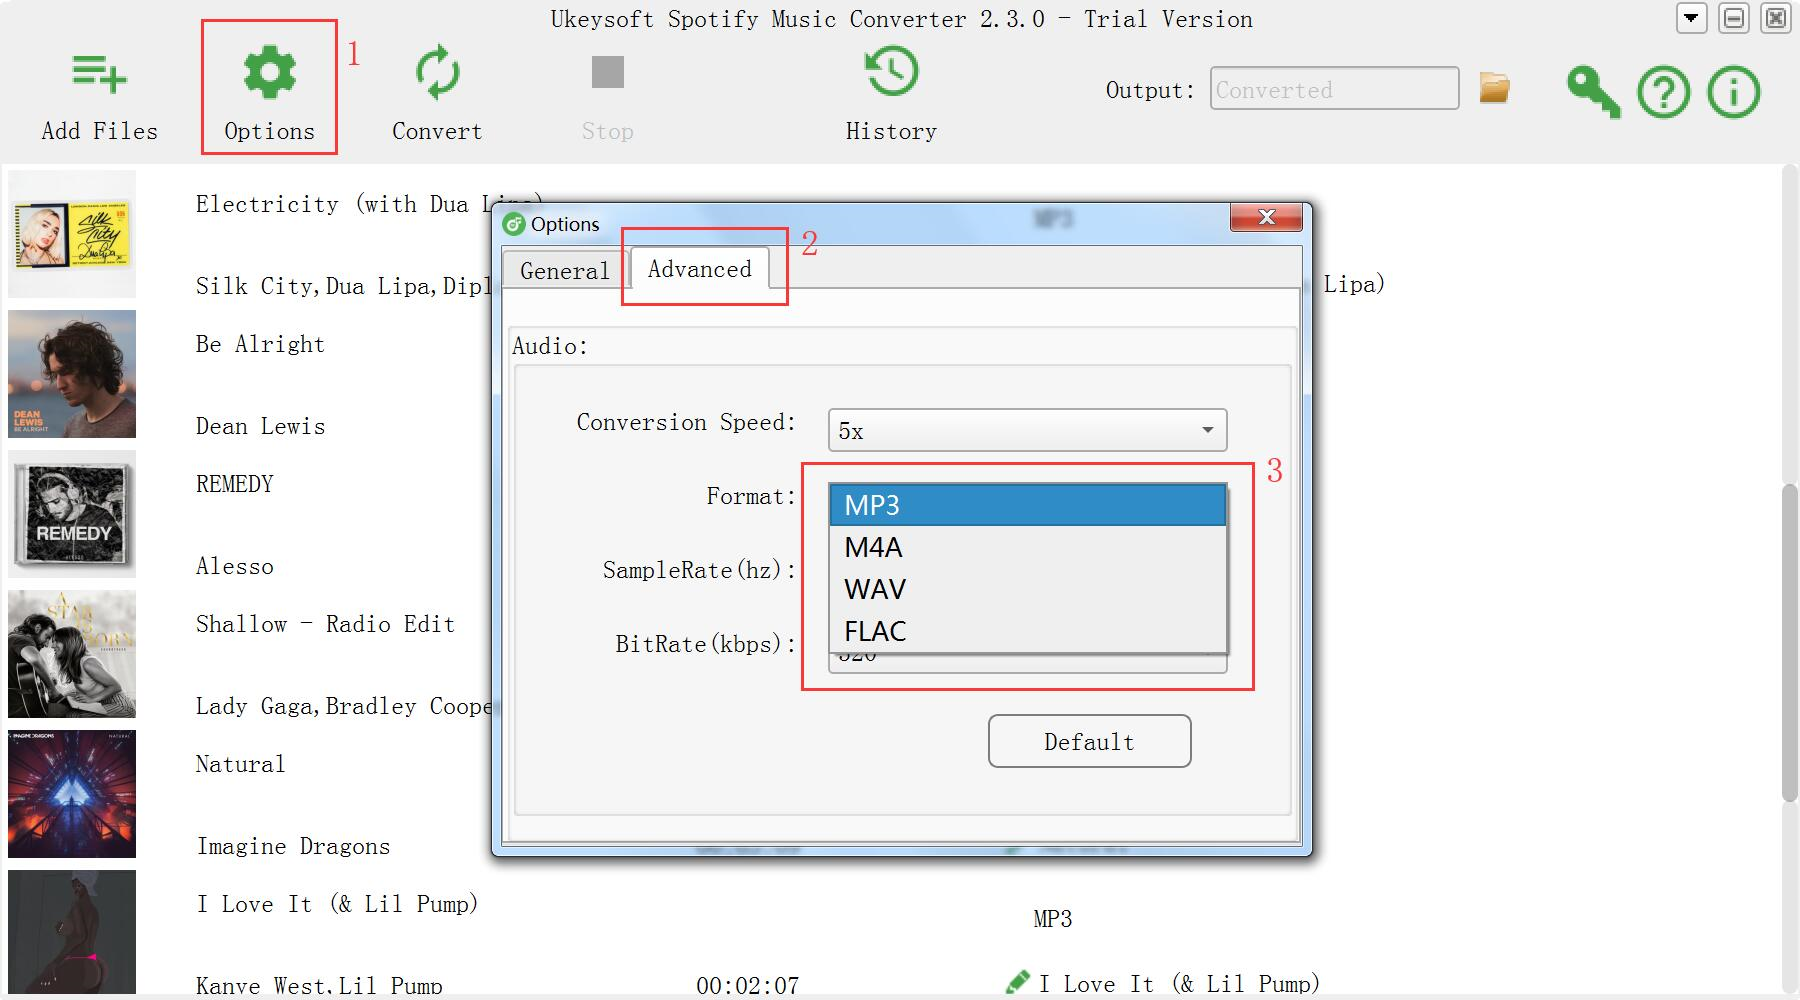
Step 3. Choose Output Format

The default output format is MP3. Currently it supports multiple output formats, including MP3, AAC, WAV, FLAC, M4A, and M4B. You can also adjust output audio quality, conversion speed and directory, etc. according to your own requirements.

choose mp3 format

Step 4. Start Converting

Click the “Convert” button to start converting the DRM-ed Spotify music to MP3.

convert Spotify Music to mp3

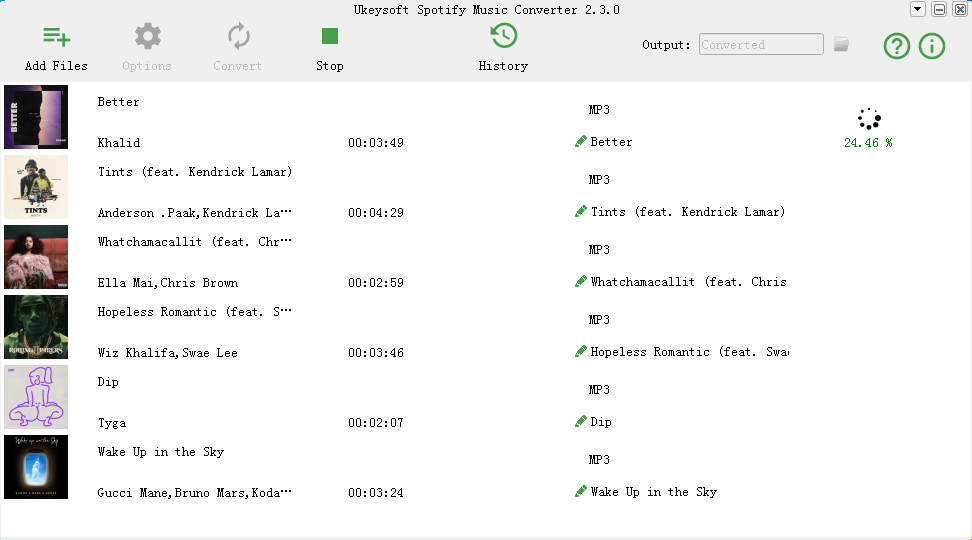
After recording, click the “History” button to quickly locate the DRM-free Spotify song.

view mp3 spotify music

Step 5. Stream the Converted Spotify Music on Chromecast

To play the converted Spotify music on Chromecast. Start Chrome and connect your computer and Chromecast device to the same wireless network. Use Chrome to go to Google Play Music (play.google.com/music). Click the song and then click Play. At the bottom of the screen next to the playback controls, click the Cast button . Under “Dress to,” select your Chromecast from the device list.

d_win d_mac

Related Guides:

How to Listen to Spotify Music without Subscription

How to Convert Spotify Music to MP3

How to Sync Spotify Music to iPod Touch/Nano/Shuffle

How to Remove DRM from Apple Music Completely

How to Set Spotify Music as Android Phone Ringtone

Stream Spotify Music to Chromecast

How to Recover Photos, Contacts, SMS, Videos from LG Phone

[Summary]: Looking for a powerful LG Data Recovery software to recover lost data (photos, contacts, text messages, videos, audios, notes, call logs, documents, etc.) from LG phone? U.Fone Android data recovery software can help you retrieve lost and deleted files from LG, HTC, Samsung, Sony phones & tablets.

lg data recovery

CONTENTS

LG phone is one of popular Android phone, currently LG V40, LG V35, LG V30/V30+, LG V20, LG G7/G6/G5/G4/G3/G2/G, LG K10 LTE, LG K9, LG K7, LG Q7+, LG Q6 Single and other models of LG phone are available on the market, if you use LG Android phone, you may stored many data such as photos, videos, music, text messages, contacts notes, memos, and WhatsApp messages on LG smartphone, but when you accidentally deleting files on LG phone; carelessly factory reset LG phone cause data loss; failed rooting, formatting SD card, or virus attacks cause lost contacts, messages, photos and other important data on LG Android phone. When you found data lost or deleted on LG phone, you may need to recover your lost data from LG phone at first, what you need is a professional LG Android Data Recovery software.

A Powerful LG Android Data Recovery

U.Fone Android Data Recovery is a powerful LG data recovery for users to recover data includes SMS, contacts, photos, videos, call logs, audio, WhatsApp messages, documents and more from your LG phone, no matter data lost in various data loss situations. It supports recover data from most LG phone, such as LG V40, V30, G6, V20 (AT&T, T-mobile, Sprint, LRA, Unlocked, U.S. Cellular, in Titan, Verizon Wireless), LG G5 (ACG), LG Stylo 2 Plus, LG K7, LG Tribute, LG X power, LG K10, LG Escape, LG Stylo, LG Classic, LG Rebel, LG Treasure, LG X style, LG Premier, LG Stylo, LG K3, LG Tribute, LG K7, LG K8, LG Optimus Zone, LG G4, LG Phoenix, LG Tribute, LG Wine, LG V10, Nexus 5X, LG Spree,and the latest LG phone. What’s more, the Android data recovery are supports recover files from multiple Android smart phones and tablets, including Samsung, Sony, HTC, Motorola, LG, Google Pixel, OnePlus, Oppo, Huawei, ZET, VIVO and more. In addition, you can Let’s teach you how to recover your LG lost contacts, SMS, pictures and videos with ease.

d_win d_mac
d_win d_mac

Recover Lost Contacts, Photos, SMS and Videos from LG Phone

Step 1: Download and Run Android Data Recovery
First of all, please download the Android data recovery on your computer and install it.

d_win d_mac
d_win d_mac

Open it and you will see there are 4 main function: “Android Data Recovery”, “Broken Android Data Recovery” and “Android Data Backup & Restore”. This guide shows you how to recover deleted files from LG phone’s internal storage or memory card, please click “Android Data Recovery” and move on.

Choose Android data recovery mode

Step 2: Connect LG Phone to Computer
Then, connect your LG phone to computer using a USB cable, the program will detect your phone automatically.

connect LG phone to PC

Step 3: Enable USB Debugging to access data
Once detected, the program will present you with simple instructions to turn on USB Debugging Mode on your phone. There are three options. Please choose the one for your LG phone’s Android OS.
1) For Android 2.3 or earlier: Enter “Settings” < Click “Applications” < Click “Development” < Check “USB debugging”
2) For Android 3.0 to 4.1: Enter “Settings” < Click “Developer options” < Check “USB debugging”
3) For Android 4.2 or newer: Enter “Settings” < Click “About Phone” < Tap “Build number” for several times until getting a note “You are under developer mode” < Back to “Settings” < Click “Developer options” < Check “USB debugging”

enable USB debugging on Android

If you’ve done this before, skip to Step 3.
For more detail guide to Enable USB Debugging Mode on Android.

Step 4: Choose File Types Your Need
In this step, please select which types of data you want to recover. In order to saving time during the recovery process, please select only the types you want to recover, so we can speeds up the scan process. You can also “select all” to get back your lost data at once, and then click “Next” button to let the program analyze the file on your device.

select LG phone's data to recover

Tips: Before recovering files from your LG phone, please make sure that your phone battery is more than 20% to enable the follow steps.

Step 5: Allow Analyze and Scan Files on LG Phone
In this step, you need to authorize and allow the software to scan your LG phone, it will prompt you turn back to your phone again to accept and tap on the “Allow” button to let the program scan your phone for lost messages, contacts, photos and video on your LG phone.

allow scan LG Android phone

Step 6: Gain Root Permission for a Deep Scan(Option)
The program will check the device information and perform a basic scan of the device. If it can’t find the files you need, it’s suggested that you root the phone to access to the full Android system. (You can unroot the device after the recovery task.)

To do so, click the Advanced Root button at the lower right position. At this point, you will be taken to an external website to download a free Android rooting tool — Android Root or KingoRoot to root the device.

[Also Read: How to Safely Root and Unroot an Android Device with KingoRoot ]

root lg phone

After you’re rooted, this Android Data Recovery software will begin running a deep scan of your LG phone’s memory and SD card to search for the deleted Stuff. Please be patient.

Step 7: Deep Scan your LG phone Complete
If you have rooted your phone above step 6, then the program will deep scan of your phone’s memory and SD card to search all deleted and exiting files. In this scanning process, please be patient, it depending on how many files and how much file is stored in your phone.

scan data from android

Step 8: Preview and Recover Deleted Data from LG Android Phone
After the scan, a list of recoverable files that have been found from your LG mobile phone will be shown. Moreover, there will be a preview window of files for you to preview the messages, contacts, and photos from Samsung device before recovery. You can choose the data you want and click “Recover” button to save them on your computer.

recover lost data from Android

Tips: You can toggle the button to ON position on the top of the screen to display only the deleted items. It also offers an advanced search option in the upper right corner to help you quickly locate what you want from the results.

Well done! You have restored lost and deleted files from LG phone, and you can find all the recovered files save onto the computer.

Contacts will be saved as VCF, CSV or HTML for your use.
Text Messages will be saved as CSV, HTML and attached images for you reading or printing.
Call Logs will be save as in HTML format and attached images for you browse.
The chat history, attached photos or video/audio on your WhatsApp app will be save on the computer.
Photos, Videos, Audios will be extract and save onto the computer and retain the original format and quality. Supported photos types: JPG, JPEG, TIFF, GIF, PNG, BMP; Video: MOV, M4V, MP4, AVI, 3GP; Audio: AAC, AIFF, M4A, MP3;
Documents including Word, Excel, PPT, PDF, HTML, Zip, RAR on your Android phone or SD card can be retrieved and save in the computer for you use.

Download the Android Data Recovery and try to retrieve lost data from your LG Android phone directly

d_win d_mac
d_win d_mac

Tips 1: Backup and Restore LG Phone

In additional, if you want to backup data from LG phone to computer, you can use this Android Toolkit’s build-in Android Data Backup & Restore function to back up and manage your Android data (SMS, contacts, photos, video and music) on the computer, the program not only helps you recover deleted files from Android, but also allows you back up the existing data on Android to computer without rooting your phone. For those deleted items, you could follow the above guide to back up to a Windows computer or Mac after scanning the deleted data from Android phone.
Further reading: how to backup and restore Android data

Tips 2: Transfer the Retrieved Files to Phone

Above steps, you have restore lost and deleted files from LG phone and save onto the computer, if you want to import the retrieved files back to your LG phone or other Android/iOS phone for using and viewing, you can use this Android Toolkit – Android Transfer to manage and transfer those restored data from computer to your phone.

transfer files to LG phone

Further reading:
How to transfer files from computer to Android
how to transfer data from Android to iPhone
how to transfer data from Android to Android
how to transfer data from Android to computer

More Software for Android LG Mobile Phone Recommend

Android Toolkit – This Android Toolkit provides a complete solution for all LG mobile phone users to solve all phone problems, like LG phone data recovery, transfer data to LG phone, LG data backup restore, Android root, erase data on LG permanently, etc.

Android Unlock – remove PIN, Password, Fingerprint & Pattern of locked screen on LG G2/G3/G4, ect.

Android Transfer – One-stop LG phone’s data management software for users to manage everything on PC or Mac computer.

Phone Transfer – Transfer files including contacts, text messages, photos, videos, music and more between Android LG phone and other mobile phones directly.

LG Data Recovery

How to Convert Spotify Music to AAC Format

[Summary]: If you’d like to convert Spotify music to AAC audio format for playing them on AAC compatible devices offline, Spotify Music Converter should be the best choice for you.

“I have subscribed Spotify premium to listen to streaming music offline. Now I am wondering if I can play my Spotify song in AAC format. Can anyone help me?”

As a successor to the MP3 format, AAC (Advanced Audio Coding) typically achieves better sound quality than MP3 at similar bit rates. AAC, with the file extension M4A, is becoming the most popular audio format. You might wish to convert Spotify music files to AAC format for playback on offline AAC compatible devices. However, like Apple Music, Spotify also adds DRM protection to streaming music, which prevents users from extracting AAC files from Spotify, so subscribers cannot get AAC audio from Spotify for playback. If you need to access Spotify Music after a 30-day free trial, you will need to pay $9.99 per month, which gives you a lot of permissions, such as offline listening, on-demand playback, no ads, and more. So, is there any way to rip AAC from Spotify?

View also: How to Convert Apple Music to MP3

convert-spotify-to-aac

UkeySoft Spotify Music Converter also is a Spotify Music to AAC Converter, which can help you convert Spotify music to AAC or other widely used formats. The Spotify music downloader tool is able to download and convert Spotify tracks, albums, artists and playlists to DRM-free AAC, MP3, WAV, FLAC, etc at up to 5X speed and the original audio quality and ID tags kept. The following is main feature of Spotify Music Converter:

– Remove DRM from Spotify Music.
– Download Spotify playlist freely with free or premium subscription.
– Batch convert Spotify audio files to free AAC/MP3/WAV/FLAC.
– The original audio quality and ID tags kept; 5X faster speed.
– 1-click to download and burn Spotify music to CD or share via Email.
– Customize output audio quality according to your needs.
– Transfer converted music files to MP3 or any AAC compatible devices.

d_win d_mac
d_win d_mac

Detailed Tutorial about How to Convert Spotify Music to AAC Format

Step 1. Launch Spotify Music Converter

Download and install the Spotify to AAC Converter first, then launch it. Please note that Spotify program will be automatically launched.

Spotify Music Converer Interface

Step 2. Add Spotify Songs, Albums or Playlists

You can directly drag songs, albums or playlists from Spotify to the program, or you can right-click on a song, an album or a playlist to copy the URL and paste the link in the search bar at the bottom of the program, then click + or Add button.

Add songs from Spotify to Spotify Music Converter

Step 3. Set “AAC” as Output Format

After adding audio files, set output format as AAC by clicking the Setting button on the top-right. You can also adjust output quality, conversion speed (1-5X) and output directory according to your needs.

Choose AAC Format

Step 4. Remove DRM & Convert Spotify Music to AAC

Once all settings are ready, please click the “Convert” button at the upper bar to launch the converting process. Spotify Music Converter will preserve all ID3 tags like song title, album, artist, artwork, etc.

convert spotify music

Then it supports batch conversion, so you don’t have to worry about the conversion time is too long. After conversion, you can click “History” button and open the output folder to locate the AAC files.

Now you can add the output AAC files to your iTunes library, sync to iPod Nano/Shuffle/Classic or copy to Sony Walkman or other MP3 players.

d_win d_mac
d_win d_mac

Related Guides:

Remove DRM and Convert Spotify Music to M4A

How to Convert Spotify Music to WAV

The Best Way to Remove DRM from Spotify Music

How to Download Spotify Music as MP3

How to Rip/Convert Spotify Music to FLAC

How to Play Spotify Music on MP3 Player

Convert Spotify Music to AAC

Recover Lost Messages on iPhone after iOS 12.1 Update

[Summary]: The article describes the method to recover lost text messages when they turn inaccessible and missing after iOS 12.1 update by using iPhone Data Recovery software.

iPhone Texts Disappeared after iOS 12.1 Update? Most iOS updates also bring with them a slew of newly discovered bugs including iPhone unresponsive, iPhone black screen, and other problems including the unfortunate and potentially devastating iPhone text messages disappeared. If you noticed that some or all messages disappeared from iPhone after an iOS update or other circumstances like accidentally deletion, formatting, factory restore, jailbroke failed, iPhone stuck or broken, but the storage still shows a large usage for Messages, it indicates that missing messages probably are not really gone and still exist on your iPhone. You enable to stop using your iDevice and use a data recovery software to extract lost text messages from iPhone directly or from iTunes/iCloud backup without erasing your original iPhone files.

Here I will recommend you a worthy iPhone data recovery software. Restoring iPhone will delete all existing contents on iPhone. An alternative way is using third-party tools like iPhone Data Recovery. It is specifically designed to help you recover lost data without affecting your device in any way. It means that you can easily restore lost messages on iPhone when backup is available, even no backup is available. iPhone text messages lost due to an iOS 12.1 update can be retrieved within a few clicks.

Key Features:

Recover up to 22 type of data including messages, contacts, photos, videos, notes, WeChat data, WhatsApp chat and more.
3 recovery modes available: directly recover from the device, from an iTunes Backup of an iCloud backup.
Recover easily in just 3 steps: Connect > Scan > Recover.
Perfectly compatible with iPhone XS/XS Max/XR/X/8/7/6S, iPad, iPod touch and the latest iOS12.1/12.

d_win d_mac

How to Undelete Texts on iPhone after iOS 12.1 Update

The “Smart Recovery”function of program provide different features to choose-to get back lost data on device,which will make the data recovery efficiently.You could select this recovery mode when you lost data from device under the unknown circumstances.

smart iphone data recovery

Step 1.Run iPhone Data Recovery on Computer
Launch iPhone Data Recovery in the first step,connect your iPhone to computer and select the recovery mode “Recover from iOS Device“.

connect iphone with computer

Step 2.Scan your iPhone for Lost iMessages, Text Messages
Started to scan your iPhone for lost messages after iOS 12.1 update.To recover SMS on iPhone,you should click”Message“.If you also wanna recover other data simultaneously,you can click more file types to scan,such as “Contacts”,”Call History”.

select file to scan

Click “Next” to search for your lost data,then the program will start to scan your device automatically for lost data.

scan iphone and search lost data

Step 3.Restore Text Messages from iPhone in iOS 12.1 Directly
When the scanning is finished,you can preview all data on your iPhone and then choose the text messages you want,just simply clicking “Recover” button.

recover lost sms directly from iphone

d_win d_mac

Related Articles:

How to Recover Lost iPhone Data after iOS 12 Update

How to Recover Lost iPhone Photos after iOS 12 Update

How to Recover Lost iPhone Contacts after iOS 12 Update

How to Backup and Restore Data on iPhone

How to Restore iPhone System to Normal

How to Play Apple Music on iPhone X/8/7/6S/6 for Free

How to Manage iPhone on Computer

Recover Lost Messages after iOS 12.1 Update

iOS Data Recovery

Recover Your iPhone iPad Lost Data
Now, Even without Backups

Compatible with iOS 11 & iPhone X/8 (Plus)

Recover Lost Data Now

How to Recover Deleted WeChat Messages from iPhone XS/XS Max

[Summary]:This tutorial introduces a powerful tool through which you can recover deleted WeChat message from iPhone XS/XS Max without backup and the latest iOS 12.1 is also supported.

“I usually use WeChat to set messages or photos to my friend and family, but my iPhone XS has no more memory space yesterday, then I cleared all the WeChat chat logs. Suddenly, I discover the most important message has been deleted without backup in WeChat. How to recover deleted WeChat messages from iPhone XS?Who can help me?” Ask by anxious Cherry.

recover deleted wechat messages on iphone

WeChat is popular used nowadays, we use the APP to send messages, share funny photos each other,chat with our workmates or family. However, you still can’t avoid any accident. You may accidentally delete WeChat messages without backup. How to recover delete WeChat message from iPhone XS? From this article, you will learn an useful method to get back the lost data. The first step you need to do is download the magical software—iPhone Data Recovery, which is an iOS data recovery software recover your lost/deleted data from your iOS devices, as well as retrieving deleted Wechat messages on iPhone XS, iPhone XS Max.

The key features of iPhone Data Recovery software
1.Supports the recovery of not only WeChat messages, but also other 20+ types of files, such as photos, videos, contacts, messages, call history, WhatsApp/Viber/Line data.
2.Applies four types of recovery modes to locate your deleted or lost data easily – Smart Recovery, Recover from iOS Device/Recover from iTunes/iCloud Backup.
3.Supports recovering data lost when: your iPhone is lost or damaged, a virus attacked your device, accidentally deletion, iPhone is locked by unknown passcode and more.
4.Compatible with almost all iOS devices and iOS versions including the latest iOS 12.1/12/11.

d_win d_mac

3 Steps to Recover Deleted WeChat Messages from iPhone XS/XS Max

Step 1: Connect the iPhone XS to PC/Mac

After installed the iPhone Data Recovery program, please connect the iPhone XS with your computer. Launch the iPhone Data Recovery software and select the “Recover from iOS Device”(without backup) feature to continue. Then the software will recognize and list your iPhone XS.

select recover from ios device mode

Step 2:Select the Data Type You Want to Recover

There are all the data tyes for you to choose to recover. Select “WeChat” as the type of data to recover, in addition you can also recover more data together, such photo, video, App Photo, message etc. Click on “Scan” .

select photos to recover

And then the program will take some time to scan your iPhone XS, the scanning times depends on how much data on your iPhone.

scan iphone and search lost data

Step 3: Preview and Recover Delete WeChat Messages from iPhone XS

After the scan is completed, you can see all the WeChat messages are resulted, they are all listed on the interface. You can easily preview all the message, both the deleted/lost one and the existing one. Selecting what you need to recover, then hit “Recover”, which is available on the bottom-right corner. In the pop-up that appears, choose a location where you want the recovered WeChat messages to be store. After a few seconds, the recovery process will be done.

recover wechat from iphone

iPhone XS deleted WeChat message recovery software – iPhone Data Recovery can help you easily and quickly get back & recover deleted/lost data from iPhone. It not only can help you get back all deleted WeChat message from iPhone XS, iTunes backup and iCloud backup, but also help you preview and recover from iTunes/iCloud backup directly without restoring.

d_win d_mac

Related Article

Recover Deleted WhatsApp Messages from iPhone XS/XS Max

How to Recover Deleted or Lost Data From iPhone XS/XS Max/XR

[Solved]Recover Deleted Text Messages on iPhone XS/XS Max/XR

Recover Deleted Photos Videos from iPhone XS/Max

Recover SMS from iPhone XS/XS Max/XR with or wirhout Backup

Recover WeChat Messages from iPhone XS

How to Recover Lost Photos on iPhone after iOS 12/iOS 13 Update

[Summary]: Want to recover lost photos on iOS 13/iOS 12 iPhone without backup? In this article, we provide you an effective method to recover deleted/lost pictures from iPhone XS/XR/X/8/7(Plus) after iOS 12.1.4 or iOS 13 update.

ios 13 data recovery to recover iphone photos

Photos Disappeared and Missing from iPhone X afer iOS 12 update
“Help! After I downloaded and installed iOS 12.1.4 on my iPhone X, all my iPhone photos are gone. Why? Is there any way to recover lost photos on iPhone X after updating to iOS 12.14?” – Peya

Lost photos after update iPhone XS to iOS 13 beta
After upgrading my iPhone XS to iOS 13 beata, I found photos disappeared after iOS 13 upgrading, is it possible to retrieve lost photos from iPhone X after iOS 13 update?

A handful of iPhone users have discovered their pictures have gone missing after updating iOS to the latest version – iOS 13. There are many reasons can cause iPhone lost data during the iOS 12.1 upgrade process, such as iOS update error, iPhone storage is not enough, app data is incompatible and more. Therefore, we should back up the iPhone device before updating.

Easily Retrieve Lost Photos from iPhone without Backup

If you this is your first time losing your iPhone data, especially if you don’t save your data somewhere else, you might want to seek methods to retrieve pictures from iPhone without backup.

iPhone Data Recovery software is one of the best iPhone data recovery software for you to restore deleted or lost photos from iPhone with iOS 13/iOS 12 update. Apart from iPhone photo recovery, it allows you to preview and recover deleted calendar events, messages, contacts, call history, Safari bookmarks, notes and reminders on Windows/Mac from iPhone and iPad by scanning your iDevice and listing all the marked and hidden files, no iTunes or iCloud backup copy is required. If you have synced your iPhone with iTunes and iCloud, you can also use iPhone Data Recovery to restore lost photos by extract from iTunes or iCloud backup without erasing the original data. Main features:

– Recover deleted or lost data on iPhone/iPad/iPod in iOS 12/iOS 13 devices, such as iPhone XS/X/XR/8/7 and the latest iPhone XI.
Recover lost photos from iPhone after iOS 13 update.
– Retrieve iPhone lost data in 3 recovery modes:iOS device, iTunes backup, iCloud backup.
– Recover lost data from iOS 12.1/iOS 13 due to iPhone crash, virus infection, jailbreak, etc.
– Recover all types of iOS data including messages, contacts, photos, videos, voice memos, WhatsApp messages, Wechat messages, notes, etc.

d_win d_mac
d_win d_mac

Recover Lost Photos on iPhone after iOS 12/iOS 13 Update

Step 1.Open iPhone Data Recovery Program
Launch the program on your computer after downloading and installing it. Then, connect your iPhone to the computer and you’ll see the pictures below. Select “Recover from iOS Device” recovery mode if you have not an iTunes or iCloud backup.

select recover from ios device mode

All recoverable files are shown on the screen, such as messages, photos, videos, contacts,etc. Select “Photo” you want to recover and click on “Next” button.

select photos to recover

Step 2.Begin Scanning your iPhone
The program will begin to scan your iPhone for all the deleted photos. The scan time depends on the amount of your data.

scan iphone and search lost data

Step 3.Preview and Restore Lost Photos from iPhone without Backup
When the scan completed, you will note that photos are fitly organized on the interface. You can then preview the deleted photos and select the ones that you need. At last, click “Recover” and choose a location for storage on your computer.

recover lost photos after ios 13 update

Besides, iPhone Data Recovery can also recover lost videos, text messages, contacts and more on iPhone, iPad and iPod Touch (iOS 12.1.4/12 and iOS 13 supported) with the similar process.

d_win d_mac
d_win d_mac

Related Article

Methods to Restore iPhone Photos after iOS 12 Update

Recover Deleted iPhone Photos after iOS 11 Jailbreak

[Solved]Photos Missing after Downgrade iOS 11 to iOS 10

How to Restore Lost Photos after Factory Reset iPhone/iPad

Recover Call Logs from iPhone/iPad after iOS 12 Update

Recover iPhone Photos after iOS 12 Update

How to Recover Lost Contacts after iOS 12/13 Update

[Summary]: Your contacts have been deleted, lost, disappeared or missing after iOS 13/iOS 12.1.4 update on your iPhone and looking for methods to get them back as soon as possible? This article will share you three best ways to recover lost contacts/phone numbers on iPhone after updating to iOS 12 or iOS 13.

recover contacts after ios 13 update

Three Best Way to Recover Lost Contacts from iPhone after iOS 12/13 Update

Apple’s official website has released the iOS 12.1.4 and iOS 13 will be release in 2019, when release an new iOS system, you may jump to the new system right away. However, some users complained that they lost important data such as Contacts after the iOS update. More and more users are eager to know how to recover lost data contacts after updating to iOS 12.1/iOS 13.

How to Recover Lost Contacts after iOS 12/13 Update?

As a professional iOS data recovery tool, iPhone Data Recovery offers you 3 modes to get back lost contacts and other files on iPhone, iPad, or iPod touch after iOS 12.1 upgrade.

3 recovery modes are offered for iPhone contact recovery: Recover from iOS Device, Recover from iTunes Backup, and Recover from iCloud Backup.
It scans your iPhone deeply and finds the lost or deleted contacts after iOS 12.1 or iOS 13 update.
You are enabled to preview lost iPhone contacts from iTunes/iCloud backup and selectively recover them without restoring,
It helps recover all types of iOS data, including contacts, text messages/iMessages, message attachments, photos, notes, whatsapp messages, call history, etc.
It recovers deleted iOS data in various circumstances, such as accidental deletion, phone formatting, factory reset, virus attack, inappropriate operation, unexpected error during iOS system upgrade and so forth.

d_win d_mac
d_win d_mac

Method 1. How to Recover iOS 13/12.1 Lost Contacts without Backup

Firstly, get the iPhone Data Recovery software installed on the computer. After running it, you will gain this main page as below. The software provides several recovery modes, where using Smart Recovery you can choose the appropriate recovery method based on the data loss situation.

smart iphone data recovery main page

Step 1.Connect iPhone with the Program

Connect your iPhone to the PC or Mac with an original USB cable. Then open the iPhone Data Recovery program and it will detect your device automatically. Select “Recover from iOS device“option to activate the process.

connect iphone with computer

Step 2.Scan Data on iPhone

Here you can see the complete info about your iPhone, and all the recoverable files. Then tick the “Contacts” option and click the “Next” button to start to scan the lost or deleted contacts on iPhone.

select contacts to recover

After that, the program begins scanning your iPhone for deleted or lost contacts.

scan iphone and search lost contacts

Step 3.Preview and Recover Lost Contacts from iPhone Directly

Wait a while until the scanning is completed. Next choose the “Contacts” item on the left column to preview the lost iPhone contacts. Simply click the “Recover” button to retrieve all selected contacts.

recover iphone contacts

Method 2. Recover Lost Contacts after iOS 13/12.1 Update with iTunes Backup

Once you have iTunes backup files, you can use iPhone Data Recovery to retrieve lost contacts on iPhone after iOS 12 upgrade by extracting from iTunes backup files.

Step 1.Choose and Extract the iTunes Backup

Open the program and then hit the “Recover from iTunes Backup” mode on the top menu bar. All your iTunes backup files will be shown in the list. You need to choose one backup file that may contain the missing contacts you want and click on “Scan”.

extract backup file from itunes

Step 2.Preview and Restore Contacts from iTunes Backup

When the scanning is done, all the recoverable contacts will be displayed. Tick all iPhone contacts you want to restore and then click the “Recover” button to get contacts back quickly.

restore iphone contacts from itunes backup

Method 3. Recover Lost Contacts after iOS 13/12.1 Update with iCloud Backup

Alternatively, you can use iPhone Data Recovery to recover iOS 12.1.3/iOS 13 missing contacts if you have iCloud backup before iOS 13 update.

Step 1.Run the Software and Log into iCloud

Launch the program on the computer and switch to the “Recover from iCloud Backup” recovery mode. Then enter your Apple ID and passcode to sign in the iCloud account.

sign in icloud account to login

Step 2.Download A Backup File and Scan

Once you signed in, you can see all iCloud backup files you have. Select the latest backup file and click the “Next” button to download and extract the iCloud backup file.

download icloud file

Step 3.Restore Missing iPhone Contacts via iCloud Backup

Wait until the download process is completed, all the recoverable contacts are listed. You are able to preview the contacts and tick all or the important ones you desire. Click the “Recover” button to export them to your computer.

recover iphone contacts from icloud backup

d_win d_mac
d_win d_mac

Related Article

Ways to Recover Contacts from iPhone after iOS 12 Update

Restore WhatsApp Data on iPhone/iPad after iOS 12 Update

Ways to Recover Lost iPhone Photos after iOS 11 Update

Restore Deleted App Data from iPhone after iOS 12 Update

Recover Call Logs from iPhone/iPad after iOS 12 Update

Recover Contacts after iOS 12.1 Update

How to Recover iPhone Lost Data after iOS 15/14 Update

Summary
How to recover iPhone lost data after iOS 15/14 update? This guide teach you how to recover lost contacts, iMessages, WhatsApp messages, videos, pictures, notes or safari bookmarks after iOS 15 update, you can get lost data back from iPhone/iPad/iPod after upgrading to iOS 15.

CONTENTS

Every iOS system updates, some bugs for iPhone/iPad user and data loss is one of the most headache issues. The most commonly seen problem is that iOS iOS 15 update failed or stuck due to an error occurred, verifying update loop, freezing on white apple logo or recovery mode. However, to recover iPhone lost data after iOS 15 update, you can connect the iPhone to computer and use a third-party iOS 15 Data Recovery to scan your iPhone on PC and Mac, which is the best iOS 15 Data Recovery?

Lost Data After iOS 15 or iOS 14.8 Update

“iOS 15 was just available, I immediately upgraded my iPhone 12 to iOS 15. It seems that everything went smoothly, but I found some data lost after the upgrade. They are crucial. Is there any suggestion to recover lost data contacts, SMS and photos from iPhone after iOS iOS 15 update?”

Contacts, photos, text messages, videos, notes disappeared after update to iOS 15 and stuck in Appple Logo screen, how to recover lost data from iPhone X after iOS 15 update, how to fix iPhone sutck in Apple Logo after iOS 15 upgrade?

In either case, you will not be able to access your device and extract contacts, messages, photos, videos, call logs, notes, calendars, whatsapp chat history and others from it. If you are also unlucky one who lost important iPhone data after updating to iOS 15/iOS 14.8, please read this article to learn how to recover lost data from iPhone with or without backup.

Recover Data from iPhone, iTunes, or iCloud after iOS 15 Update

To recover lost and deleted data from iOS 15/14 devices, you need to use an iOS 15 Data Recovery and iOS 14 Data Recovery software, here we will recommend you a powerful iOS 15/14data recovery for iPhone, iPad and iPod touch, you can recover lost files from iOS devices, iTunes and iCloud.

As a professional iOS 15 Data Recovery software, it offers you 3 modes to recover lost data on iPhone, iPad, or iPod touch after updating to iOS 14.8, iOS 14.7 or iOS 15. It scans your iPhone deeply and finds the lost or deleted files on iPhone if you have no backup made before. Or It enables you to view lost files on iTunes/iCloud backup and selectively recover them without erasing existing iPhone contents. Up to 26+ types of iPhone data including text messages/iMessages, message attachments, photos, notes, contacts, call history, etc. are recoverable. In addition, the program features with iOS Repair Tools that will fix your iPhone back to normal state when your iPhone stuck on Apple Logo or recovery mode/DFU mode during iOS 14/15 update.

Free Download iPhone Data Recovery on your Mac or Windows computer firstly:

d_win d_mac
d_win d_mac

– Highest iPhone/iPad/iPod data recovery rate in the industry.
– Recover data from iPhone, iPad, iPod(touch), iTunes and iCloud.
– Recover photos, videos, contacts, text messages, notes, call logs, WhatsApp messages and more.
– Fix iPhone stuck in recovery mode, Apple logo, black screen after iOS 13/iOS 12 update.
– Recover lost data from iPhone, iPad, iPod after jailbreaking.
– Compatible with latest iPhone XS (Max)/XR, iPhone X, iPhone 8 (Plus).
– Supports iOS 13/14 and the latest iOS 15 beta.

Way 1:How to Recover iPhone Lost Data after iOS 15/14 Update

If you are not sure about the iPhone’s data loss, we recommend that you click on the “Smart Recovery” feature to select “How You Lost Your Data”, which will help improve data recovery speed.

iOS 15 data recovery

Step 1.Connect iPhone with the Program

Connect iPhone with your computer after launching. Select “Recover from iOS device“option to activate the process.

connect iphone with computer

Step 2.Scan Data on iPhone

Select the files type you want to recover,click “Next” to continue.The program will start scanning data on your iOS 12.1 deivce. You just need to wait for the end of scanning and check for the scanning result.

select file to recover

Click “Scan” to search for your lost data,then the program begins scanning your iPhone for lost data.

scan iphone and search lost data

Step 3.Preview and Recover Lost Data from iPhone Directly

When the scan finishes,all found data will be list in categories.You can preview most of them then check whether they are what you want to recover or not. Then you can select detail data you need and click “Recover” to save them back to your computer or device.

recover iphone contacts

Way 2: Restore iPhone Lost Data from iTunes Backup after iOS 12/iOS 13 Update

Step 1.Choose and Extract the iTunes Backup

After running the iOS 15 Data Recovery program on computer,then switch to “Recover from iTunes Backup File” recovery mode,the program will detect all iTunes backup files existing on your computer and display for you,here you can see the screen shoot as below,vincluding Name, Last Backup DateSerial Number.

Select one iTunes backed up contents you want to get back and click on the “Scan” button to begin extracting the data from iTunes backup.The extracting process will cost you only 5 seconds.

extract backup file from itunes

Step 2.Preview and Restore Data from iTunes Backup

Now in the scan result presented by iPhone Data Recovery,when the scanning process is complete,you will have a complete list of files that are available for recovering,before restore them,you are allow to preview all recoverable data one by one in detail, such as contacts, text messages, photos,videos, notes, call log, WhatsApp messages and more.Select your desired data to restore from iTunes backup,then click on the “Recover” button to extract them.

restore iphone data from itunes backup

Way 3: Retrieve iPhone Lost Data from iCloud Backup after iOS 15/14 Update

Step 1.Select Recovery Mode and Log in iCloud ID

Run iPhone Data Recovery on computer,and switch “Recover from iCloud Backup” mode and sign in your iCloud account ID and password.

sign in icloud account to login

Step 2.Choose the Type of Files your Wanna Restore from iCloud Backup

In order to reduce downloading time, we recommend you to select specific files of your interest rather than downloading the entire file.

select the file types

Step 3.Select iCloud Backup File to Extract

Browse from the list and select the one from which you want to restore from your iCloud account.

download icloud file

Step 4.Retrieve Lost iPhone Files from iCloud Backup

Please wait until the download process is completed,after the selected files are downloaded, you can preview the contents that you have selected,including contacts, messages, videos, pictures, notes and more.To get the lost data back,just select to click “Recover to Devices” or “Recover to Computer”.

recover iphone data from icloud backup

d_win d_mac
d_win d_mac

Related Article

How to Recover Lost iPhone Data after iOS 15/14 Update

How to Recover Deleted iPhone Notes after iOS 15 Update

Ways to Recover Lost iPhone Photos after iOS 11 Update

Restore Deleted App Data from iPhone after iOS 15 Update

How to Recover Lost Data from iPhone after Factory Reset

Recover Data after iOS 15 Update

How to Transfer Data from Android to Axon 9 Pro

[Summary]: With the help of Phone Switch, you can you quickly move everything from your old Android phone to the new Axon 9 Pro handset, such as contacts, SMS, photos, videos, call logs and more.

ZTE Axon 9 Pro hands-on

The ZTE Axon 9 Pro is a phone with flagship specs including a Qualcomm Snapdragon 845 processor, a 6.2 inch, 2248 x 1080 pixel AMOLED display, 6GB of RAM, 128GB of storage, and dual rear cameras. Besides, it has a 12MP + 20MP dual rear camera system with support for optical image stabilization and has a 4,000 mAh battery, wireless charging support, 802.11ac WiFi, Bluetooth 5.0, NFC, Android 8.1 Oreo and USB Type-C.

“Is it possible to transfer Android data to Axon 9 Pro? I am an Android owner who is switching from HTC and needs a reliable solution to copy necessary data from HTC to Axon 9 Pro.”

If you’re moving between an Android phone and ZTE Axon 9 Pro smartphone then you’ll probably want to bring all of your conversations, contacts, text messages, photos and videos from WhatsApp as well. How to copy data from Android to Axon 9 Pro with a fast and safe way? Don’t worry. The best and very quick methods to transfer files from Android to Axon 9 Pro is to use Phone Switch software.

Phone Switch is a simple and straight-forward tool for iOS and Android users to copy data such as contacts, videos, messages, photos, music and other content from one device to another. With the help of Phone Switch software, you can:

Transfer data from Android to ZET Axon 9 Pro in just few steps.
Quickly move files such as text messages, contacts, photos, videos, music, calendar, call logs and more.
All data is transferable between Android, iOS, and Nokia.
Support Samsung, OnePlus, Google Pixel, Oppo, HTC LG, Sony, Huawei, ZTE, and iPhone XS/XS Max/XR/X/8/8 Plus/7/7 Plus/6s/6, etc.
Complete data transfer in 3 steps: Connect device – Select data – Start copying.
100% read-only program and easy to use.

d_win d_mac

User Guide: How to Transfer Data from Android to Axon 9 Pro

Step 1. Download Phone Switch on PC

Firstly, free download, install and launch Phone Switch on your computer and select “Switch” from the available option.

phone-toolkit-01

Step 2. Connect Both Devices to the Computer

Next connect your Android phone and Axon 9 Pro to the same computer. In this guide we have taken old Android phone as source device and ZTE Axon 9 Pro as destination device.

connect android and axon 9 pro

Tip: You can choose to swap the position by clicking the “Flip” button.

Step 3. Select File Types and Start to Transfer

From the given pane list, check the file types that you are going to transfer to Axon 9 Pro, including contacts, text messages, calendar, photos, videos, music, etc. Then simply click on “Start Transfer” button to begin the transfer process. Make sure that both the device is connected to your computer during the transfer process.

transfer data from android to axon pro 9

d_win d_mac

Related Article

Transfer Data from Android to Samsung Galaxy S6/S7/S5

How to Import Videos to iPhone 8/X/XS(Max)/XR without iTunes

How to Transfer/Switch iPhone Data to Android

How to Transfer/Import Android Data to Huawei P10

How to Transfer/Switch/Copy Android Data to OnePlus 3T

Transfer Data from Android to Axon 9 Pro

How to Extract Audio from iTunes Music Videos

[Summary]: What to do if you want to get the audio only from the iTunes videos? This tutorial tells you how to extract audio from iTunes music videos, movies, TV shows with no quality loss by Apple Music Converter.

“I am a music lover and hope someone can teach me how to quickly extract the audio I need from the movie somehow.”

If you are the music lover or language learner, or you are the one who likes to collect your favorite music in a movie or TV episodes, you may want to extract audio from a video file. But it is known that iTunes music video files come encrypted with DRM (digital rights management) protection, which keeps legally purchased music videos from being played on your MP3 player, PMP, and other unauthorized devices. So, how to rip audio from iTunes M4V videos?

View also:

Keep Apple Music Forever after Trial

Keep Spotify Music after Canceling Subscription

extract audio from itunes music videos

Extract MP3 Audio from iTunes M4V Videos

Now Apple Music Converter features a solution for this. It is a professional DRM removal program with deciphering technology to convert purchased or rented iTunes music video files to unprotected songs. You can use it to extract audio tracks from iTunes music videos by exporting the audios to common MP3, AAC, WMA, etc. with little quality loss, so as to TV shows and iTunes movies. And it stands out converting Apple Music, iTunes M4P songs, Audible AA/AAX audiobooks to MP3, M4A, etc. This Apple Music Converter supports you to:

Remove DRM protection from iTunes music videos, movies, TV shows.
Convert purchased and rental M4V music videos files.
Convert iTunes music videos to multiple audio formats like MP3, AAC, M4A, WMA, etc.
Extract audio tracks from iTunes videos with a few simple clicks.
Extract any audio files with super high quality and 16X faster speed

d_win d_mac

A Step-by-step Tutorial for Extracting Audio from iTunes Music Videos

Tip: Before extracting, you should make sure that you have added your iTunes music videos to iTunes library first.

add-music-video-to-itunes-library-1

Step 1. Open Apple Music Converter

Download the installation package above and install it on your Windows or Mac PC. Then, open it then iTunes will be launched automatically. This program will open the iTunes to load your iTunes media library.

extract-audio-from-itunes-videos-1

Step 2. Select iTunes Music Videos

All your iTunes library files will be imported to the different playlist category. Click on the “Music Videos” then you can choose the music video you want to extract audio from and click “Add” to load it to the converter.

Note: You can select several files for batch conversion.

extract-audio-from-itunes-videos-2

Step 3. Setup Your Output Format

You can choose the output format on the “Output Settings” section, such as P3/AAC/WAV. It is also able to customize the audio quality like codec, bitrate, sample rate, etc.

extract-audio-from-itunes-videos-3

At the same time, you are free to choose a conversion speed from 1X to 16X by clicking “Options – Preferences”. Generally 5X high-speed conversion output quality is the best.

extract-audio-from-itunes-videos-4

Step 4. Start to Extract Audio from iTunes Videos

Simply click on “Convert” button and Apple Music Converter begins to extract audio from iTunes music videos and save to the output folder as designed before on Mac.

extract-audio-from-itunes-videos-5

During the conversion process, please don’t click iTunes or don’t play music,videos via iTunes.

convert itunes m4v movies to mp3

When it is done, you can click “Open Output File” from the converted list to find all the audio files.

extract-audio-from-itunes-videos-6

d_win d_mac

Related Articles:

How to Convert iTunes Music to MP3

How to Convert M4V iTunes Videos to MP3

How to Record and Rip Apple Music for Free

]Transfer iTunes Music Songs for Playing in a Car

How to Convert Apple Music to MP3?

Extract Audio from iTunes Music Videos