All posts by DHZ

How to Recover Deleted Data on Asus ZenFone 6

[Summary]: Do you encountered terrible data loss problems on Asus ZenFone 6 or other Android phone? In this case, this article introduces you reliable Android data recovery software and shows you how to recover deleted files from Asus ZenFone 6 with simple steps.

Asus ZenFone 6 is one of the most popular Android smart phone in 2019, Asus ZenFone 6 as popular as Samsung Galaxy S10 Plus, Samsung Galaxy Note 10+, Huawei Mate 30 Pro, Huawei P30 Pro, OnePlus 7T, Google Pixel 3, Sony Xperia 1, Xiaomi Mi 9.
ZenFone 6 uses the Snapdragon 855 mobile platform and is available in 6+64GB, 6+128GB and 8+256GB versions, it is one of the most popular Android smart phone, the biggest highlight of ZenFone 6 is its camera, which uses a dual camera combination: 48 megapixels + 13 megapixels super wide angle, the front camera uses the current popular Sony IMX586, and the latter camera can support 125° viewing angle. According to the official, the structure can be rotated continuously for 100,000 times and can be used for five years with 28 rotations per day.

asus zenfone 6 data recovery

When do you need to recover data from Asus ZenFone 6 phone internal memory?

Sometimes, you may deleted photos, messages, contacts, WhatsApp on Asus ZenFone 6 by careless, you may ask when do you need to recover data from Asus ZenFone internal memory. Let’s talk about it. Most phones support SD card in the past, so that users can store their text messages, contacts, WhatsApp data, call logs in the internal memory and store the media files such as photos, videos, audio files on the card. But now more and more phones broke this rule. They just allow you to store all your data in the phone internal memory. If you deleted data on Android SD card, you can use a SD Card Data Recovery software to recover lost data from SD card easily, but if you accidentally deleted or lost your important data on Android internal memory, you may be interested in how to recover lost files from Asus ZenFone 6 internal memory. Today, we will recommend you an effective Asus ZenFone Data Recovery software to scan and recover deleted files from Asus ZenFone phone internal memory.

Asus ZenFone Data Recovery: Recover Deleted Data from Asus ZenFone 6 Directly

To recover deleted or lost data from your Asus ZenFone and other Android phone internal memory, we recommend you this Android Data Recovery software (Windows & Mac), which not only can help you recover deleted contacts, text messages, photos, videos, call logs, WhatsApp data, audios and documents from Asus ZenFone 6(ZS630KL), ZenFone 6 Edition 30, ZenFone 5Z(ZS620KL), ZenFone 5/4/4 Pro/3/2, but also allows you recover lost, deleted, formatted media files from Android SD card.

Now, download the utility and install it on your computer, then move to the following instructions to learn how to recover deleted photos on Asus ZenFone 6 and other Android phone. Also see: How to recover photos from iPhone.

d_win d_mac
d_win d_mac

How to Recover Deleted Photos from Asus ZenFone 6

Step 1: Run the program and plug Asus ZenFone 6 phone into computer
When you start this program, it brings up its main interface with an intuitive and clean design. There are three options available to complete different tasks. To restore the deleted photos on Asus ZenFone 6, click the “Android Data Recovery” module to proceed.

Xiaomi data Recovery

Go ahead and plug your Asus ZenFone 6 smartphone into the computer with a USB cable. This Asus ZenFone data recovery software supports all Asus ZenFone 6 models: ZS630KL, Edition 30, 5Z(ZS620KL), as well as other Asus ZenFone series.

Step 2: Allow USB Debugging mode on the Asus ZenFone 6 smartphone
Once connected, you’ll be required to open USB debugging mode on the device. Follow the on-screen instructions to enable it.
Related guide: How to enable USB debugging on Android device

usb debugging Xiaomi Mi 9

Operating procedure on your Asus ZenFone 6 handset: Open Settings > About phone > Build number, tap it for 7 times to enable the Developer options. Then go back to Settings > Developer options, and scroll down the screen until you find the USB debugging switch, toggle it to ON position.

Step 3: Choose Photos to Scan
Go ahead and choose which types of data you want to search for on the Asus ZenFone 6 phone.

recover lost photos from Asus ZenFone 6

In this example, we are going to retrieve deleted photoson Asus ZenFone 6, so place the checkmark next to the photos option in the window, and click the Next button at the bottom corner to proceed.

Step 4: Root the Asus ZenFone 6 phone to Deep Scan
When the next window appears as the screenshot shown below, press the Rooting Tools button at the bottom right corner. This will send you to a website that offers you a root tool option — KingoRoot. Just install it on your computer and run it, then go to your Asus ZenFone 6 phone and tap “Allow” to make sure that your device has granted the root permission.

root-asus-zeneone

Check out the article on How to Safely Root and Unroot an ZenFone 6.

Tip: Rooting the phone allows you to get deeper control over the device so that you can guarantee a high success rate of Android data recovery.

After you’re rooted, the software will start a deep scan of Asus ZenFone 6 smartphone automatically. Typically, this will take around 10-20 minutes. Wait patiently until the scan comes to the end.

Step 5: Preview and recover Photos on ZenFone 6
Once the scan is done, the program should sort all files it found in different categories on the left sidebar so you can locate them quickly and easily. You can have a preview of any files in the list.

In your case, put the mouse cursor on the “Gallery” and “Picture Library” category and click it, all photo be found and display in the middle section of the window. Highlight any of deleted photos  will show its detailed information on the very right section.

recover deleted phoots on ZenFone 6

If you want to preview the deleted photos only, toggle on the “Only display the deleted item(s)” switch on the center top place.

Now, tick the check boxes in front of each photos item to select photos that you wish to recover and then hit the “Recover” button in the right corner. A new dialog will appear letting you specify an exact location for the recovered photos

Now, download Android Data Recovery program to have a try!

d_win d_mac
d_win d_mac

How to Recover Photos, Messages, Contacts, WhatsApp on Xiaomi Mi 9

[Summary]: Data like photos, contacts, messages, videos, WhatsApp documents or audio files in XiaoMi phones got lost? Please follow this tutorial to recover your data from Xiaomi Mi 9 in a secure and simple way. You can free download Android data recovery software and recover deleted photos, pictures, videos, SMS, contacts, WhatsApp and music files back.

Want to recover your data from Xiaomi phone in a simple way? Accidentally deleted messages or contacts on your Xiaomi Mi 9? Lost contacts, SMS and photos after factory reset your Xiaomi phone? Or lost photos from the SD card on your Android device?

Can I Recover Deleted Data from Xiaomi Android Phone?

The deleted data still can be recovered with the aid of an Android data recovery software after rooting your Android phone.

Actually, as the deleted data still remain intact until that data is not overwritten by any new data, you can recover deleted files on Xiaomi phone directly. What you need to do is do not use your phone immediately after losing your data, or don’t take photos and video with your phone, since those deleted data are stored in a hidden folder of your phone memory, which can’t be accessed by regular file explorer. In order to accessing the deleted data on Android phone, you should know that only after rooting your Android phone, so an Android data recovery app gain access to the deleted data.

Xiaomi Data Recovery – Recover Lost and Deleted Data on Xiaomi and Redmi Android Phone

Android Data Recovery program can help you recover lost and deleted data from all Xiaomi Android phone, such as MI 9T Pro, Mi MIX Alpha, Mi 9 Lite, Mi 9 Lite, Mi 9 Lite, Mi 8 Pro, Mi Max 3, Mi A2, Mi A2 Lite, etc.

xiaomi

The Android data recovery also supports recover deleted data on Redmi, such as Redmi 8A, Redmi Note 8/8 Pro, Redmi 7A and more.

redmi

The Xiaomi data recovery can help you directly recover your WhatsApp messages, contacts, messages, call logs, photos, videos, documents from your Xiaomi phone, as well as recover media files and documents from the SD card on your Xiaomi phone. Let’s shows you the simple guide to recover deleted picture, contacts, SMS, video files from Xiaomi Mi 9.

Download the free and trial version of Android Data Recovery program:

d_win d_mac
d_win d_mac

How to Recover Deleted Files on Xiaomi Mi 9

Step 1: Run this Android Toolkit on Computer
After download, install and launch the program. You will be presented with a simple interface in which there are three modules for different tasks. To recover deleted data on Xiaomi phone or other Android phone, choose the “Android Data Recovery” option to proceed.

Xiaomi data Recovery

Step 2: Connect Xiaomi phone to computer and enable USB debugging
Connect your Xiaomi Mi 9 to the computer. A wizard will appear asking you to enable USB debugging on the Xiaomi phone. There are instructions on the screen that can guide you every step.
Xiaomi Mi 9: Go to “Settings” < “About Phone” < click “Build number” for several times until you get the note that You are under developer mode” < Back to “Settings” < Click “Developer options” < “USB debugging”
More details are included in this guide: how to enable the USB debugging on Android device.

usb debugging Xiaomi Mi 9

Step 3: Select File Types to Scan
In next window, you’re prompted to choose which file types you want to search for. The program has listed a number of file types it is able to recover all types of data, including contacts, messages, documents, WhatsApp messages, documents, videos, audios, etc. Generally, the more data types you have selected the longer scanning time it will take. If you only want to recover deleted photos on Xiaomi Mi 9, please select “Gallery” and “Picture Library” and click Next go to next step, and this Xiaomidata recovery app starts to work.

select data to scan

Step 4: Root for Deep Scan
When you arrive at the screen shown as below, a deep scan over the Xiaomi requires root permission. To do so, click the Advanced Root and download a program named KingoRoot, which can root your phone at a fast speed.

If you want to know more about the root process, check out the article on how to root and unroot an Android device with KingoRoot.

Root Xiaomi Mi 9

After rooting your phone, then click “Retry” button, the Android data recovery will deep scan over your Xiaomi phone. The process will take a few minutes (15 mins around). Please keep the connection between your phone and the machine stable while it’s running.

Step 5: Preview and Recover Lost Data from Xiaomi Mi 9
When the progress bar fills up completely, it presents all recoverable data files in the window, sorted by different categories: text messages, videos, contacts, WhatsApp messages, Gallery, Pictures Library, etc.

Before selecting the recovered files you wish to keep, you can have a preview of them one by one.

recover deleted phoots on Xiaomi Mi 9

Now, select the files you want to get back and click on the Recover button at the bottom corner. When a dialog pop-up, select a safe location to store your recovered data files on your computer.

xiaomi data recovered on PC

Step 6: Import the Recovered Files to Xiaomi Mi 9(Option)
Only few steps, you have recovered Xiaomi data and save them onto your computer, if you want to import the files back to your Xiaomi Mi 9 or other Android/iOS devices for viewing or using, you can use this iOS & Android Manager tool to transfer the recovered contacts, photos, videos, audios to your phone.
Also read: How to import files from PC/Mac to Android

import files to Xiaomi

Now, download Android Data Recovery program to have a try!

d_win d_mac
d_win d_mac

How to Recover Photos, Messages, Contacts, WhatsApp on OnePlus 7T/7T Pro

[Summary]: If you have deleted your important data from OnePlus 7/7 Pro and OnePlus 7T/7T Pro by mistake, learn this easy guide to recover lost or deleted data from OnePlus 7/7T(Pro) at ease, the recoverable data includes photos, contacts, text messages, videos, documents, audios, call logs and WhatsApp messages.

There are some common causes for the data deleted or lost on your OnePlus 7/7 Pro and OnePlus 7T/7T Pro.

  • Accidentally delete photos, text messages, contacts from your OnePlus phone.
  • Factory reset your OnePlus and cause data erased.
  • Failed transfer files from OnePlus to PC.
  • Forgotten screen lock PIN/password or pattern.
  • ROM flashing.
  • Virus or malware attack.
  • Failed root he OnePlus mobile phone.
  • Your One Plus phone stuck in White/black screen of death.
  • Unknown reason case Android OS system crashed.
  • Your phone’s SD card is formatted.
  • Water-damaged your OnePlus smart phone
  • Screen got broken, cracked and smashed.
  • And so on…

If you have deleted or lost files on your OnePlus Android phone by mistake and now you want to recover those missing data, then just relax! You can recover lost or deleted data from OnePlus phone, when you found some of data files has been somehow deleted, lost or disappeared, please do not take photo/video with your phone, do not import any new files to the phone, Turn off your mobile data or WiFi, in order to preventing the deleted/lost data are not overwritten by new data, then using a professional OnePlus Data Recovery software to recover deleted data on OnePlus 7T/7T Pro, OnePlus 7/7 Pro, One Plus 6/6T, OnePlus 5/5T, etc.

This doesn’t take much technical know-how to recover data files from OnePlus 7/7T (Pro). Below, we’ll go over the easiest methods to recover all data you’ve accidentally deleted or lost, with even less effort. We will teach you two methods to recover OnePlus7T/7T Pro deleted data with or without backup.

Method 1: Recover OnePlus7T/7T Pro Photos, Contacts And Other Data From Google Backup

OnePlus phone runs Android OS, the Google backup service available on most Android smart phone. Google offers Android data backup over the air, if you have backed up data from OnePlus 7T/7T Plus to Google Cloud, you no worry when losing the device or phone data is corrupted or lost.

If you’ve enabled “Auto back up” feature or manually backed data up in regular basis, try to restore the Google Cloud Backup to restore files to OnePlus7T/7T Pro smart phone:

android data restore from google backupb

Step 1: First go to ‘Setting’ and tap ‘Backup & Restore’ and on OnePlus 7T.

Step 2: Click on ‘Restore’ and then you sign in your Google account details. Login with the same email-id that you have given at the time of backup of your OnePlus 7T/7T Pro phone.

Step 3: Select the data you want to get back and tap it once.

Step 4: At last tap on ‘Restore’ and then wait till the restoration process complete.

When the restore process complete, your mobile will show a message “Restore Complete”. Now restart your OnePlus phone and you will see the lost/deleted data shows on your mobile again.

Note: This method is only for those users who synced their mobile with a Google account. But if you have forgot to back up your data, you should use a professional Android Data Recovery to recover deleted data on OnePlus phone without backup.

Method 2: OnePlus Data Recovery Utility Applied for OnePlus7T/7T Pro

If you haven’t backup your OnePlus 7T/7T Pro data and looking for a more effective solution to recover OnePlus 7T/7T Pro lost data. Don’t worry, please use a popular OnePlus 7T/7T Pro Data Recovery which is a suitable OnePlus 7T/7T Pro Files Recovery software.

This Android Data Recovery is special designed to recover files like photos, text messages, contacts, WhatsApp messages, call logs, audio, music, movies videos, photos, documents and other files from OnePlus 7T or 7T Pro phone. What’s more, the Android data recovery also allows you recover data from OnePlus phone’s SD card, no matter the data lost, deleted or formatted.

d_win d_mac
d_win d_mac

How to Recover Deleted Files on OnePlus7T/7T Pro

Step 1: Run Android Toolkit
After the installation of the Android Toolkit on your computer, run it and the main interface starts up. From the given task modes select “Android Data Recovery” tab to move on.

Then, connect your OnePlus7T smartphone to computer with a USB cable.

Android SMS Recovery

Once connected, it will prompt you to enable USB debugging mode on the device.
OnePlus 7T/7T Pro: Go to “Settings” < “About Phone” < click “Build number” for several times until you get the note that You are under developer mode” < Back to “Settings” < Click “Developer options” < “USB debugging”

usb debugging OnePlus 7T/7T Pro

You can turn to this article for help: How to Enable USB Debugging Mode on Android Device. If you have done this before, skip to next step.

Step 2: Select Types of Data to Scan
In the next window that opens, select what types of file you are trying to scan for deleted files. For this case, check the “Contacts”, “Text Messages”, “WhatsApp Messages”, “Picture Library”, “Gallery”, “Call Logs”, “Documents” option and click the Next button to proceed.

select files to scan

Tips: If you want to recover everything from OnePlus phone, just click “Select All” item and go to next step.

Step 3: Make deep Scan for deleted Data on OnePlus7T phone
At this stage, the program will check and analyze OnePlus7T phone. For a complete scan of the Moto storage, you will need to root the device to get full access priviledge.

To do this, click the Rooting Tools button and this should open an external website, from which you can download KingoRoot — a free and reliable rooting tool for Android device. After that, go to your OnePlus7T phone to confirm the root request when a prompt pops up.

root oneplus 7T

Also Read: How to Safely Root and Unroot an Android Device

Once rooted, then click “Retry” button, the program will start searching the entire memory of your OnePlus7T phone for the deleted contacts. It should take 15 minutes or around to complete.

Step 4: Recover Photos, Contacts, SMS and More on OnePlus7T
Once completed, you’re presented with a list of recoverable files, grouped by type. You can have a preview of the files in advance.

recover deleted phoots on OnePlust 7T/7T Pro

Next, go to “Contacts“, “Text Messages“, “Picture Library“, “WhatsApp”  section on the left sidebar, and select the data you want to get back.

recover deleted SMS on OnePlust 7T/7T Pro

Tip: There is a toggle labeled “Only display the deleted item(s)” sitting on the center top of the screen. Switching it to the ON position, you can only view the lost contacts instead of all in a lengthy list.

Now, click the “Recover” button in the lower right corner of the screen. This will open up a dialog box, prompting you to choose a location to save the recovered contacts on your computer.

OnePlus data recovered on PC

With all things done, hit the “Recover” button again to restore files from OnePlus7T.

When the process finishes, all the recovered data save on your computer, you can use this Android & iOS Manager tool to transfer the files from computer to your Android phone.

d_win d_mac
d_win d_mac

How to Recover Data on OnePlus, Samsung, Huawei, Xiaomi, Oppo, Sony, Motorola, LG, etc

[Summary]: This article shows you a simple way to recover photos, contacts, SMS, videos, WhatsApp from Android mobile phones. Try free Android Data Recovery to recover lost or deleted files from Android phone, free and safe download.

Help! I just deleted photos on my OnePlus 7T. My friends have told me that a software would do the trick. Is there any way I can grab a free trial of a OnePlus data recovery software?

After reset my Xiaomi Mi 9, I found all contacts, messages and photos are lost, is it possible to recover lost data from Xiaomi Mi 9 after factory reset?

I cleaning some useless apps, but another reason for deleting WhatsApp app, when I install the WhatsApp again, all chat history also deleted, how to recover deleted or lost WhatsApp messages on Samsung Galaxy S10?

android data recovery

What are the reasons for data loss from Android phone?

There can be several causes behind loss of data from Android phone and some of them include:

  • Accidentally or unintentionally deleting files
  • Files are deleted while transferring data from PC
  • While upgrading or downgrading system OS
  • Phone gets stolen or dropped somewhere
  • Phone stuck in black screen of death
  • The phone gets dropped from a height and it damages internally
  • Severe malware or virus attack
  • Phone stuck in Samsung logo screen or Android logo screen
  • Deleting apps is yet another reason for deleting files

There may be other reasons as well but mentioned above are the common ones experienced by mobile mobile phone user. You can accidentally delete important photos, messages, WhatsApp messages because of a wrong tap, sometimes you may lost contacts after a factory reset, system crash, Android update, rooting, etc.
Also read: How to Recover Deleted Data on iPhone

Can I Recover Deleted Files on Android Phone?

Deleted or lost files on your mobile phone? Don’t worry, when you found the data was missing, immediately stop accessing your mobile phone. Also, turn off your mobile data or WiFi so that new data don’t get saved in any way, please don’t import new data to the phone, and do not take photo with your phone, prevent new data from overwriting the old data, you still have chance to get back the deleted data, since those deleted data is hidden and moved to a special space, which can’t be accessed by regular file explorer, only after rooting your Android phone can an Android data recovery app gain access to the data. Therefore, although some software developer said then can recover deleted data from Android without rooting, it is actually impossible to get back the deleted data without rooting.

This article will show you everything about Data Recovery for Samsung, OnePlus, Xiaomi, Oppo, Huawei, Sony, Google Pixel, etc. Learn the best and effective ways to recover deleted data from OnePlus 7T,  Xiaomi Mi 9, Asus ZenFone 6, Google Pixel 3, Samsung Galaxy S10 Plus, Oppo Reno 10x Zoom, Huawei P30 Pro, Samsung Galaxy Note 10+, Huawei Mate 20 Pro, Sony Xperia 1 and other populart Android phones. After rooting the Android phone, you can easily to recover Android deleted data without any backup. The data includes contacts, photos, text messages, videos, documents, notes, audios, call logs, WhatsApp and many more.

Part 1: An Effective Android Data Recovery Software to Use

Android Data Recovery is a safely and powerful Android deleted/lost files recovery tool, which is special designed to recover your lost photos, videos, contacts and messages from all kinds of Android device, including Android phones and tablets, Samsung Galaxy S10/S9/S8/S7, Samsung Galaxy Note 10/Note 9/Note 8, OnePlus 7T/7T Pro, OnePlus 6T/6/5, Asus ZenFone 6, Zenfone Max Pro (M2)/M1, Zenfone 5z/3 Max/2, Google Pixel 4/3/2(XL), Oppo Reno 10x Zoom, OPPO A5 2020/F11 Pro/F11/A5s, Huawei P30 Pro/Huawei Mate 30/30 Pro, Huawei P20 Pro/Huawei Honor 7X/Huawei Mate SE/Huawei Mate 10 Lite/Huawei Honor 8X/Huawei P10 Plus, Sony Xperia 1, Sony Xperia XZ3/Sony Xperia L2/Sony Xperia XA2/Sony Xperia 10, LG, Redmi, HTC, Motorola, Nexus, Meitu, Windows Phone, Sharp phones and more Android smart phones.

The Android Data Recovery offers two effective recovery modes to get back the deleted data: Retrieve your contacts, messages, contacts, photos, videos, audios, call history, WhatsApp and documents from your Android devices, as well as recover photos/pictures/images and videos/movies from the SD card on your Android device.

Key Features:

  • Support to recover photos, videos, contacts, messages, messages Attachments, call history, audios, whatsApp, documents from Android phone or SD card.
  • Preview and selectively recover deleted data from Android phone before recovery.
  • Extract data from dead/broken Samsung internal storage, fix Android OS to normal, such as frozen, crashed, black-screen, virus-attack, screen-locked, easy to get your Samsung phone back to normal.
  • Recover data on broken screen or black screen Samsung phone, supported Galaxy S6/S5/S4/Note 5/Note 4/Note 3, etc.
  • Recover Android data lost due to mistaken deletion, factory reset, system crash, forgotten password, flashing ROM, rooting, ect.
  • Supported Android OS: Android 2.0 to Android 9
  • Supported computer OS: Windows 10/8.1/8/7/Vista/XP, 10.15 (macOS Catalina)10.14 (macOS Mojave), Mac OS X 10.13 (High Sierra), 10.12(macOS Sierra), 10.11(El Capitan), 10.10 (Yosemite), 10.9 (Mavericks), or 10.8

Now, download the free trial version of Android recovery tool to recover deleted data on Android phone.

d_win d_mac
d_win d_mac

Part 2: How to Recover Deleted Files from Samsung Galaxy S10/S10+/S10e

Let’s shows you how to retrieve deleted files on Samsung Galaxy S10 as example, you can also follow the same steps to recover lost data from almost all brands of Android smart phone after rooting.

With the Android data recovery software in hand, you can recover deleted data from internal storage of your Android, recover data from a broken Samsung phone, and recover deleted files from a SD card of your Android. Please free download the Android data recovery software on your Windows or Mac computer firstly.

d_win d_mac
d_win d_mac

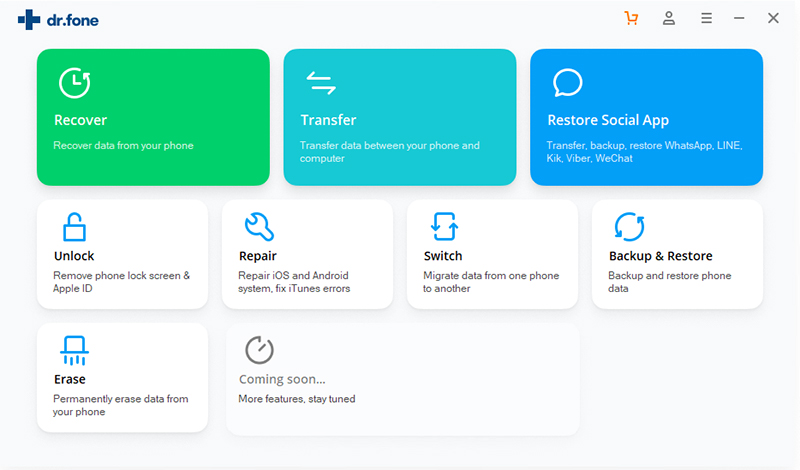
Step 1: Run the Android Toolkit on PC or Mac
Our software only can be used on computer, please download the trial version on your Windows or Mac computer firstly, install it.

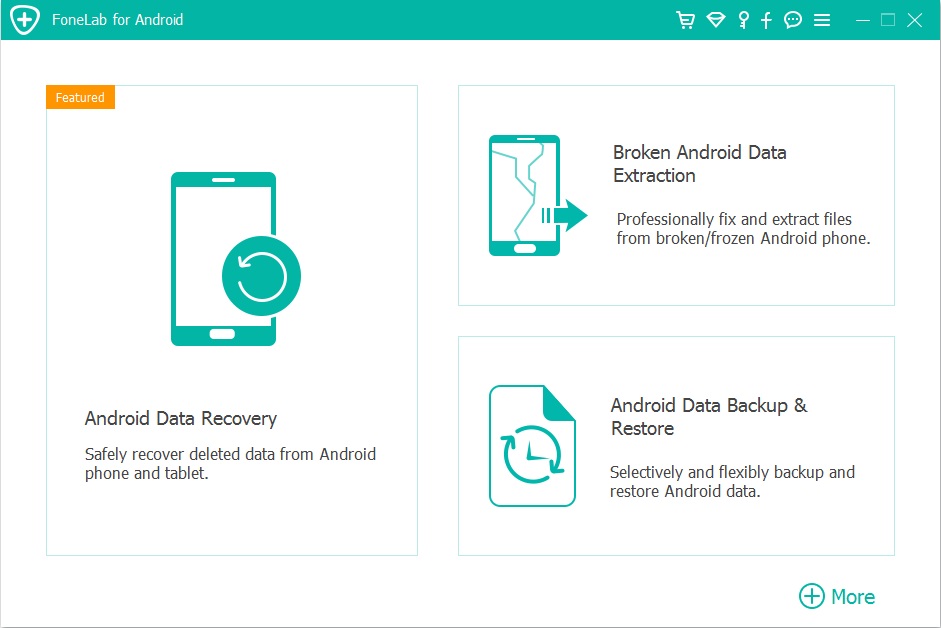
Launch the software, you can see it’s main interface, if you want to recover deleted files on Android phone, please click “Android Data Recovery” mode.

Android SMS Recovery

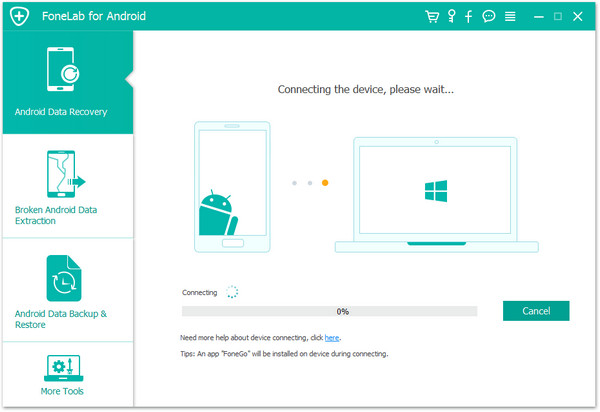
Step 2: Connect Samsung S10 and Enable USB Debugging on it
Plug Samsung Galaxy S10 into computer. Tap “Allow” when prompted on the phone.

Then you’ll need to have USB debugging mode enabled on your Samsung Galaxy S10 to grant your access to it. If your phone’s USB debugging has been enabled before, you can skip this step and move the step 3.

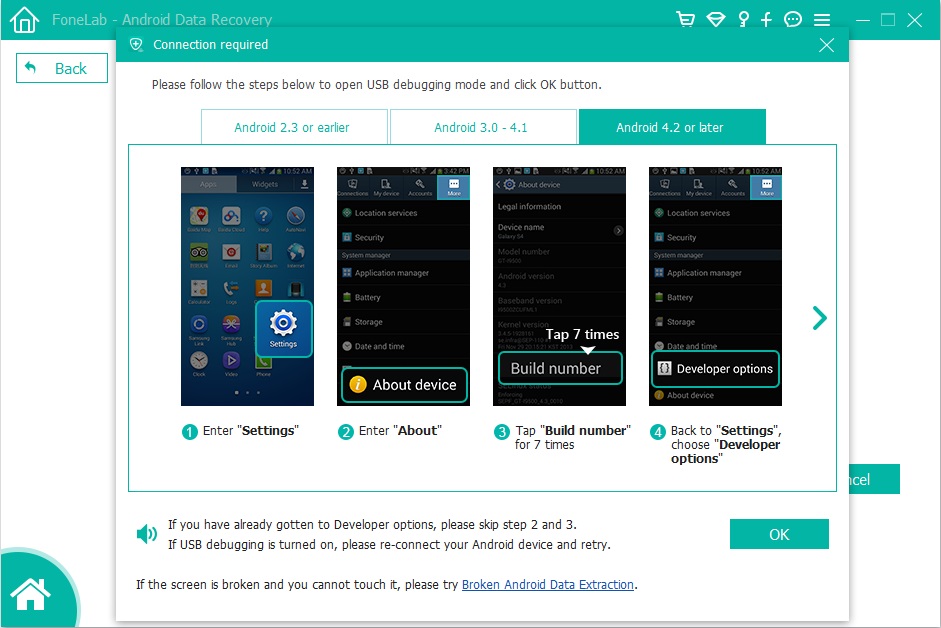
After connecting, you should check USB debugging on your Android to have it detected by the program. Choose the right way for your own device.
1) Android 2.3 or earlier: Go to “Settings” < “Applications” < “Development” < “USB debugging”
2) Android 3.0 to 4.1: Go to “Settings” < “Developer options” < “USB debugging”
3) Android 4.2 or newer: Go to “Settings” < “About Phone” < click “Build number” for several times until you get the note that You are under developer mode” < Back to “Settings” < Click “Developer options” < “USB debugging”
Also read: How to Enable USB debugging on Any Android Device

enable usb debugging

Step 3: Choose Data to Scan
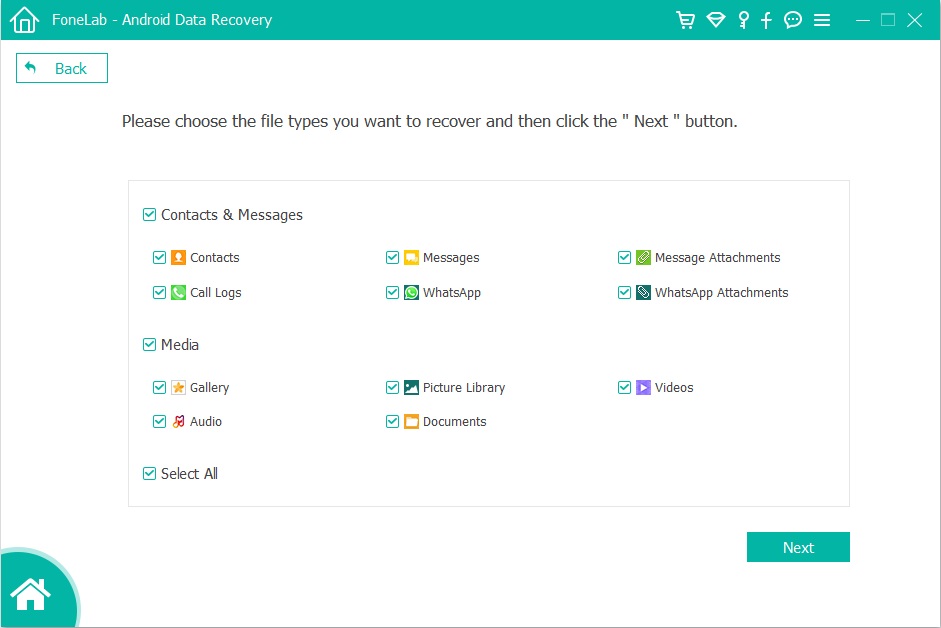
When your Samsung Galaxy S10 is connected and detected by the program, please choose what you’d like to scan for the deleted files in the Samsung S10 storage, such as photos, videos, contacts, SMS, WhatsApp messages. Then, you need to click “Next” button in the screen below to start analyzing it.

select data to scan

Note: Please ensure that your phone battery is more than 20% charged, so that you can get a smooth scan.

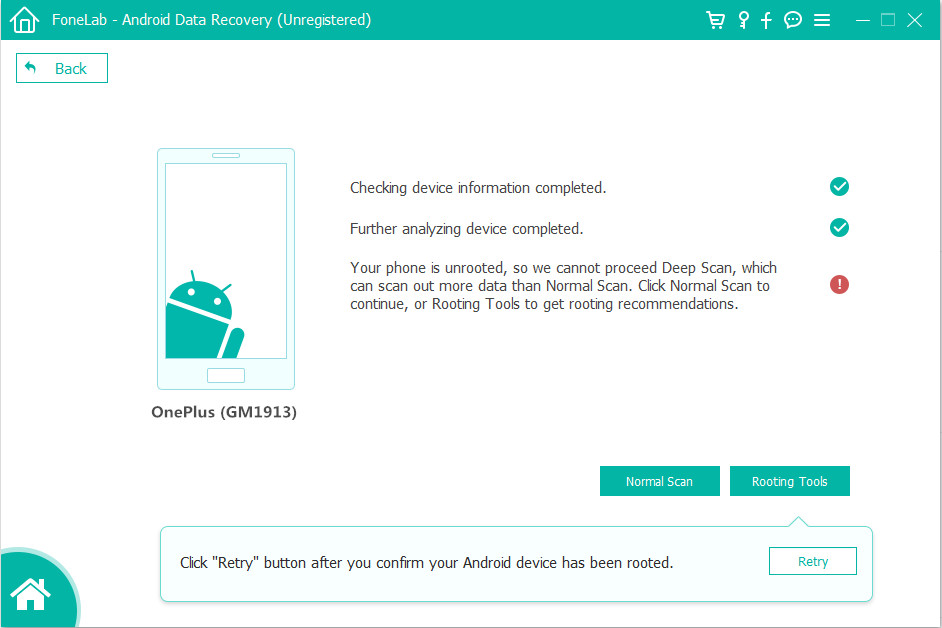
Step 4: Start Analyze the Samsung S10 and Scan Deleted Files
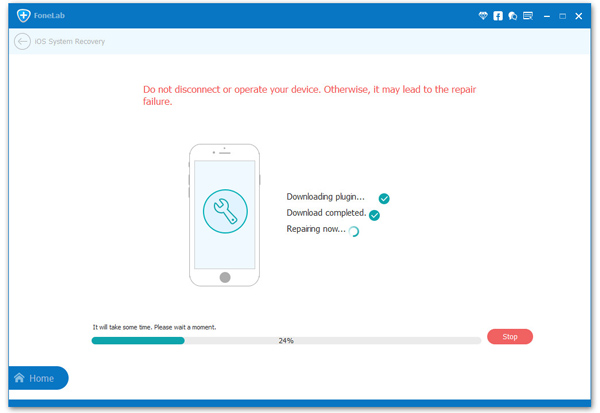
Now the Android data recovery software starts to analyze your Samsung Galaxy S10 and then scan all files from it.

If you want to deep scan more lost and deleted files from Samsung Galaxy S10, you should be prompted to root the device for a deep analysis of the lost stuff. To do this, click “Rooting Tools” button, it will pop up an website to you to download a popular Android Root tool, it named KingoRoot app, please download it on your computer, rooting your Samsung Galaxy S10 firstly.

root samsung s10

Tips: Please don’t worry, your phone will return to original unroot state after getting data back, you can also read “How to root and unroot an Android Device” for full tutorial.

Once rooted, click “Retry” button, the Android data recovery tool continues scanning your rooted Samsung S10. This will take some minutes, please keep connecting your phone with the computer and waiting patiently.

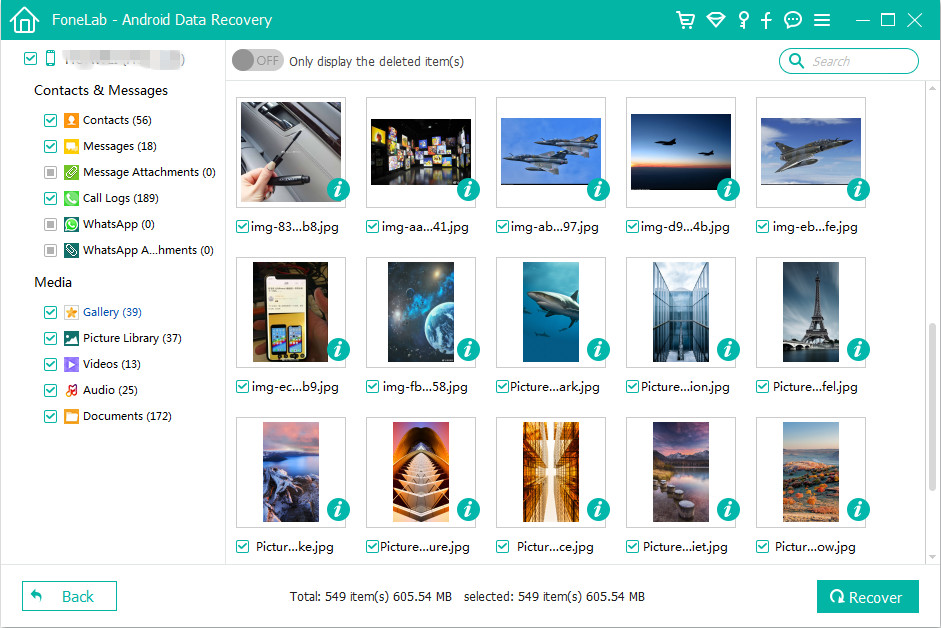
Step 5: Preview and Recover Data from Samsung Galaxy S10
After the scan, a list of recoverable files that have been found from your Samsung Galaxy S10 will be shown. Moreover, there will be a preview window of files for you to preview the text messages, contacts, photos, videos, WhatsApp, etc. from Samsung device before recovery, and if you switch on “Only display the deleted items”, you’ll see all deleted files.

recover deleted phoots on Android

Recover deleted text messages on Android

recover deleted SMS on Android

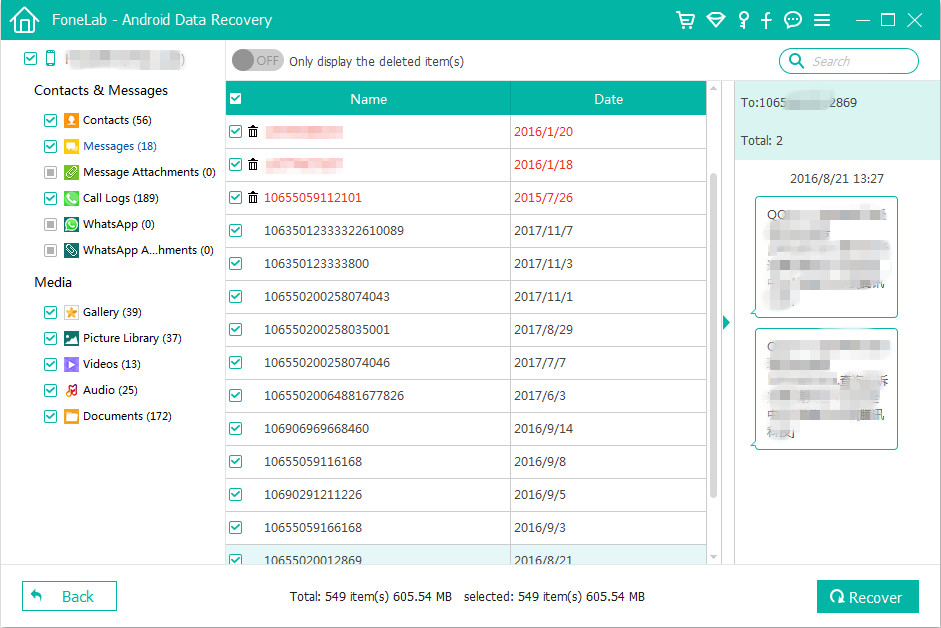
Finally, please click “Recover” button on the bottom right, then tool start to recover the files ans save them on computer safely.
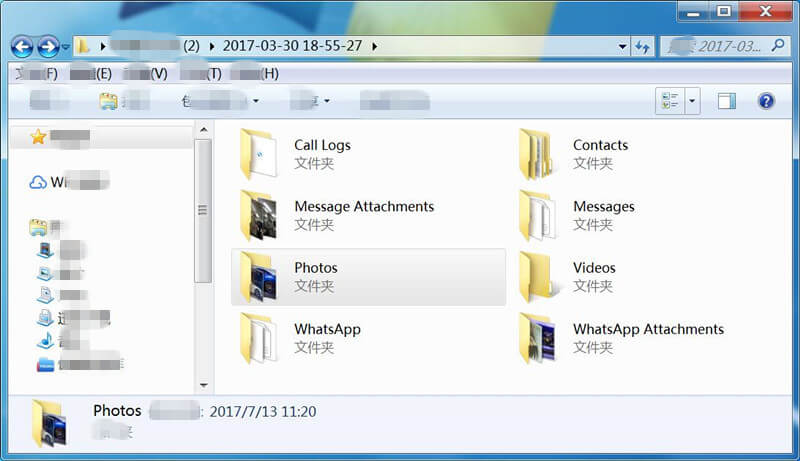
android data recovered on PC

Finished!

Download Android Toolkit – Android Data Recovery software to have a try now!

d_win d_mac
d_win d_mac

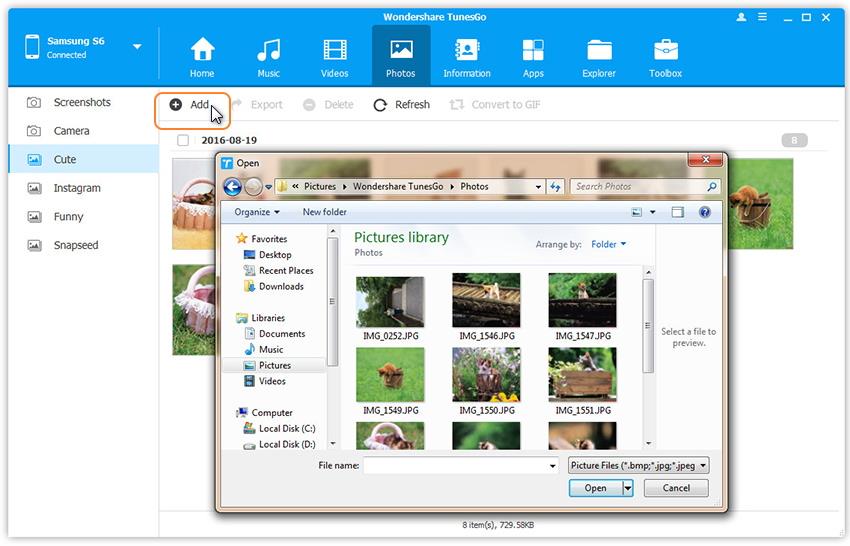
Step 6: Import the Recovered Files to Samsung S10 or Other Android Device(Option)
Well done, you have get back the deleted data from your Samsung Galaxy S10, you can also view or print the recovered text messages, contacts, call logs and WhatsApp messages on computer. If you want to transfer the recovered data to your Samsung S10 or other Android phone for viewing or using, we recommend you use this Android & iOS Manager tool to transfer the recovered photos, videos, music, contacts(CSV format) and text messages(CSV format) to Android phone.
Also read: How to Import Files to Samsung Galaxy S10

transfer files to Samsung S10

Part 3: Backup Up Android Data to Prevent Data Loss or Damage

To protect your important data from being deleted or erased again, it is a good idea to back up important Android data regularly so that you can have an extra copy of the important data in case they are deleted by mistake.

Currently, most mobile phone manufacturer has launched its own data backup service, including local backup and cloud backup, such as Samsung Cloud, Smart Switch, Samsung Kies, Huawei HiSuite, Huawei Cloud, Huawei backup & restore application, OnePlus Switch, Mi PC Suite, Xiaomi Cloud, OPPO Cloud, OPPO backup & restore application, Sony backup & restore application(Sony Xperia PC Companion) and Google backup service.

Google backup service is available for almost all Android smart phone, which is a great service for backing up Android data to Google Cloud. Once it’s backed up, there’s no worry when deleting files, or losing the device or phone data is damaged.

Method 1: Backup Data from Android to Google Cloud

Let’s learn how to back up Android data to Google account, including apps, app settings, contacts, photos & videos, call logs, Wi-Fi passwords, account data, and other files.

Step 1. Swipe up or down to get to the Apps screen on Samsung S10.
Step 2. Tap Settings > Accounts and backup > Backup and Restore.
Step 3. In Google Account section, sign in your Google account, then toggle on “Back up my data” as well as “Automatic Restore”.

To Back up SMS text messages from Android to Google Drive
Open Google Drive app, tap Settings > Google backup > SMS messages and enable SMS backup.

Method 2: 1-Click Backup Android Data to PC or Mac

The most safely place is your computer, so we recommend you backup data from Android phone to your computer.

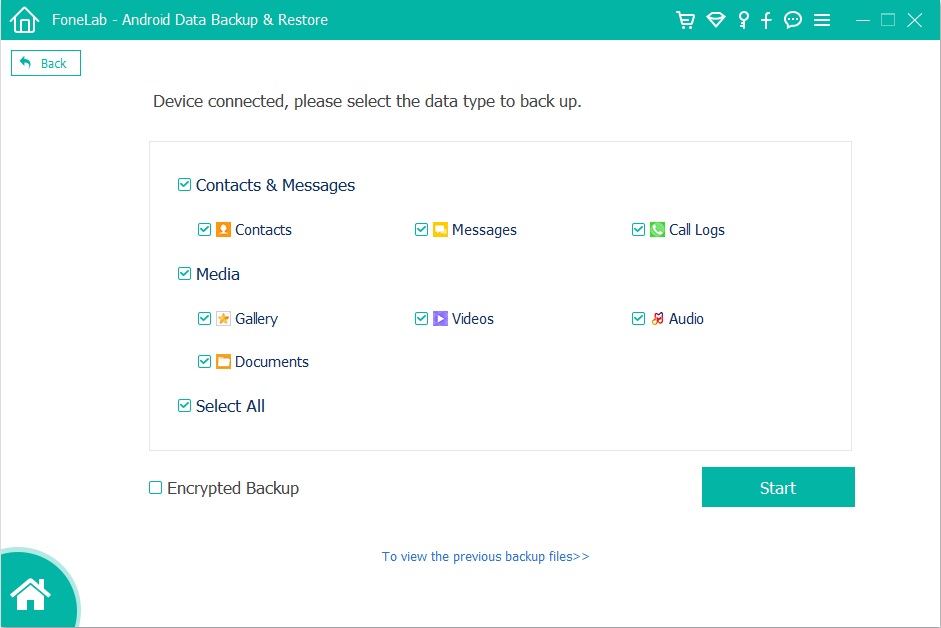
This Android Toolkit – Android Data Backup & Restore is special designed to back up your Android data safely and selectively, including WhatsApp messages, WhatsApp pictures & videos, contacts, messages, call logs, gallery, images, screenshot, videos, audio and documents. After creating a Android backup folder, you can set a password for protecting your important backup. In addition,  you can preview and select the data you want to restore, the tool allows you directly restore the backups to your Android device for further use.

android data backup restore

d_win d_mac
d_win d_mac

Conclusion

We hope that our Android Data Recovery software can help you recover data and contents lost or deleted on Android phone. You also can use this Android Toolkit to fix more phone’s issues: data recovery, data backup & restore, phone switch, Android unlock, WhatsApp data transfer, Kik/Viber/Line/WhatsApp/Wechat data backup & restore, etc. This Android Toolkit will helps you keep your Android phone at 100% performance.

How to Recover Deleted Screenshots From Android

[Summary]: If you have lost or deleted screenshots from your Android devices and want them back. Here is the best screenshot recovery software for Android to recover deleted screenshots and photos from Android phones and tablets without backup.

We often use screenshot feature when using a mobile phone. A screenshot is a file on an Android phone or tablet that provides you with the exact image displayed on the screen and saved as an image file on your Android device. These screenshots can be used in many ways, such as sharing, authentication, or any other purpose. It’s easy to take a screenshot, and these files are automatically saved in your Android phone gallery. As a result, many users may accidentally lose or delete screenshots on their Android devices while browsing photos.

“How can I recover my deleted screenshots? I deleted my screenshots from gallery by mistake. How to recover deleted screenshots on Android phone?”

After the screenshot disappears, you can try to insert your Android phone into your computer in MTP mode and look for missing screenshots via DCIM or the “Photos” folder. If it doesn’t work, you’ll need to retrieve the deleted screenshots from a third-party software.

Best Way to Retrieve Deleted Screenshots from Android

Accidental deletion is the most common cause of data loss. In addition, your screenshots can disappear due to other factors, such as formatting, restoring to factory settings, ROM flashing, Android OS update failed, water damaged, Android phone stolen or broken, phone stuck in recovery mode/blue screen of death, rooting and so forth. Whatever the reason, Android Data Recovery is your strong backing. With it, you can easily recover deleted/lost screenshots on Android. Moreover, Android Data Recovery is capable of retrieving all types of files including screenshots, text messages, calls history, contacts, whatsapp data, photos, videos, audio, document files and many other files from any Android phones and tablets. It supports images in .jpg, .png, .gif, .bmp, formats and more. And it is fully compatible with most of Android brands, such as Samsung Galaxy, HTC One, LG G, Sony Xperia, Huawei, Google Nexus, OPPO, Meizu, ZTE, Motorola, Xiaomi, Google Pixel and so on. And the latest Huawei Mate 30 & Mate 30 Pro, Samsung Galaxy S10 Plus and Galaxy S10 are also supported.

d_win d_mac
d_win d_mac

Key Features:

Recover deleted, lost, formatted screenshots from Android phone/tablet.
Support JPG/JPEG, PNG, BMP, GIF, WebP, TIFF screenshots files and many other image file formats.
Recover other files like photos, WhatsApp messages, documents, messages, contacts, videos, audio and more.
Scan Android files from internal memory as well as external SD card.
Preview recoverable data before final recovery.
Support Android devices including Samsung, HTC, Google Nexus, Lenovo, LG, Motorola, Huawei, Oppo, etc.
Fully compatible with Android OS 10/9/8/7/6/5/4 and older versions.

Step-by-step Guide to Recover Deleted/Lost Screenshots From Android

Step 1: Launch the Android Data Recovery on PC or Mac
Please click the above download button to download the application on the computer, install it, and then launch it. To do Android screenshot recovery, please click on “Android Data Recovery” to start.

android screenshot recovery

Step 2. Connect Your Android Phone to Computer
Then connect Android mobile phone to the computer via a USB cable.

connect android to computer

Step 3. Turn on USB Debugging
Enable USB debugging on your Android mobile phone for for full connection first, click Allow when prompted on the handset.
You can also learn how to enable USB debugging mode on your different Android OS.
1. Android 2.3 or earlier: Go to “Settings < Applications < Development < USB debugging”.
2. Android 3.0 to 4.1: Go to “Settings < Developer option < USB debugging”.
3. Android 4.2 or newer: Go to “Settings < About Phone < Build number” for several times until you get a note about “You are under developer mode”. Then, you should go back to “Settings < Developer options < USB debugging”.

enable usb debugging on android

Step 4. Select Gallery for Scanning
Once the Android device is detected, select “Gallery” and “Picture Library” on the Android Data Recovery and click “Next”.

select photos to scan and recovery

Step 5. Root for Deep Scanning Your Phone(Option)
If you just want to extract existing data from Android phone, please click “Normal Scan” option to go on, the application will shallow scan all existing files and shows the detail to you, this scanning mode will take less time.

If you want to recover more deleted and lost data, you need too root permission for a deep and complete scan to find more deleted and lost photos in the phone memory.
To root the phone, click “Rooting Tools” button, it will open a page for you to download KingoRoot tool to root your Android phone.
Please don’t worry, you can also get the device back to it’s original status after data recovery complete.
We also have the guide on this: How to root and unroot an Android device safely

root Samsung S10 to deep scan

After rooting the Samsung phone successfully, click “Retry” button after rooting. Then, the app analyzes your phone and deep scanning the deleted and lost photos from Android phone internal memory.

Step 6. Preview and Recover Deleted Screenshots on Android

After the completion of the scanning process, you can preview the recoverable files one by one. The program will find out your deleted screenshots from Android phone. When it is done, select the deleted screenshots and click “Recover”.

recover screenshot on android

d_win d_mac
d_win d_mac

Android Screenshot Recovery

How to Set icon list and color of Reminders app on iOS 13

The Reminders app has updated in iOS 13, Reminders app available on iOS 13, iPadOS and macOS. While iOS 13 and macOS Catalina didn’t bring a share sheet to Apple’s Mail app, you can now share text from an email into the Reminders app, and the app will associate the tasks with the email so you can easily pull it back up when you go to work on the task. You can do the same thing with websites, maps, etc.

Also Read:

* How to Recover iPhone Lost Data after iOS 13 Update

* How to Optimize iOS 13/12 Performance to Speed Up Slow iPhone

* How to Recover Deleted Reminders from iPhone

The Reminders app has a lot of feature upgrades and visual optimizations. Now you can customize the style of Reminders app with 60 different icons and 12 colors. There are 720 sorting methods to make the “Reminders” more personalized and satisfy different users.

How to change the icon and color of the Reminders on iPhone and iPad?

●Go to “Reminders”;

● To view the list, click on “…” in the top right corner;

● Select “Name and Appearance”;

● Can choose from 12 colors and 60 charts;

● Click Finish.

Customize Reminders app on iOS 13

Change the color of the Reminders on iPhone iOS 13

Customize Reminders app on iPhone 11

We can also edit icons and colors from the list view for all list views:

● Click “Edit”;

● Click the “i” icon next to the list you want to customize;

● Select new colors and icons;

● Click “Finish”.

Set Reminders colors on iOS 13

When you’re done, click Finish and you can follow the same steps to customize the icons and colors of all your lists.

Edit icons of Reminders app on iOS 13

Read More

How to Fix iPhone Stuck in Recovery Mode After iOS 13 Update

Recover Lost Data from iPhone 11/XS/XR/X/8 after Factory Reset

How to Transfer Data from iPhone to iPhone 11/11 Pro

How to Transfer Data from Samsung to iPhone 11 and iPhone 11 Pro/Max

Android SMS Recovery: Recover Deleted Text Messages on Android

Summary
How to recover deleted text messages from Android phone? This article teach you how to restore deleted SMS on Samsung Galaxy, Huawei, LG, HTC, Sony, Google Pixel, Nexus, OnePlus, Motorola, Xiaomi, Redmi, Oppo, Meitu, Windows Phone, Sharp phones and others.

Sometimes you may delete important text messages on Android mobile phone by accidentally, or you may lose all the messages after a factory resetting, rooting, flashing ROM, system crash, Android update, etc.

You May Like:

To recover deleted text messages on iPhone, go to Recover Deleted Text Messages on iPhone.

To extract text messages from the broken Samsung phone, check Recover Text Messages from a Broken Screen Samsung Phone.

If your Samsung phone sudden death with black screen, learn Fix your Samsung Phone and Recover Data.

U.Fone android data recovery

How to Recover Deleted Messages from Android?

Actually, the deleted text messages are moved to a hidden space of your phone memory, so the regular file explorer can’t access those deleted data. Therefore, you still have chance to recover the deleted text messages from your Android phone if those deleted data are not overwritten by new data.

Best solution: Android SMS Recovery

If you want to recover deleted messages from Android phone memory, you need to root your Android phone firstly, because root permission for a complete scan to find deleted or lost text messages in the phone memory by some professional Android SMS Recovery software.
Therefore, although there are Android data recovery software claiming that they can recover deleted data from Android phone without rooting, it is actually impossible to get back your deleted/lost data without rooting.

SMS (short message service) messages are more commonly known as text messages. Even though you may think that deleted text messages are gone for good, this isn’t necessarily so. Deleted SMS messages are stored in the Android itself, as well as on the network. But this isn’t permanent. Time is of the essence when retrieving deleted SMS messages on Android phone.

When a text message is deleted on the Android, it doesn’t disappear permanently. First, a copy of it is sent to the network provider. Next, the copy in your phone isn’t permanently deleted, but rather marked as “deleted” by the Android’s internal database. Even though you see the message as “deleted,” it has actually just been moved to a less accessible region of the phone’s memory. However, not even this is permanent, and the message will be automatically deleted later. The exact length of time that the Android will keep a deleted SMS in its memory can’t be precisely determined. However, it will vary, depending on one major factor.

What Should I Pay Attention to Before Recovering the Deleted SMS?

Actually, the deleted text messages still exist in your phone and can be recovered before being overwritten by the new data.

Important: Once you find that some important text messages are deleted or erased, please TURN OFF wireless/mobile data on your phone immediately and Do Not add new data to your phone, you’d better not use your phone to take new photos, create a new data, etc. The most safest measures is to put your Android phone in Airplane mode, then get an Android SMS recovery app to find and recover your deleted messages as soon as possible.

Android SMS Recovery Software: Recover Deleted Text Messages

This Android Data Recovery software not only can help you recover deleted SMS from Android phones, but also enables you recover deleted contacts, photos, videos, audio and WhatsApp messages from almost all Android devices, such as Samsung, Huawei, LG, Motorola, Xiaomi, Redmi, Oppo, HTC, Sony, Google Pixel, Nexus, OnePlus and others.
In addition, the Broken Android Data Extraction function can help you fix bricked, frozen, crashed, black-screen, virus-attack, screen-locked Android phone to normal, and extract text messages, contacts, call logs, photos, videos, audios, WhatsApp, etc. from frozen or broken Samsung phones/tablets.

Detail Features:

  • Directly recover deleted Text Messages and MMS from Android phone, retrieve the sent and received text messages, including the texts, contacts name, phone number, date;
  • Allow you view the deleted text messages before recovery, so that you can recover the deleted messages selectively;
  • Export the recovered messages as HTML, CSV format for you view or print on computer, it can also recover messages attached images;
  • Also can recover lost or deleted photos, videos, audio files, contacts, call history, WhatsApp messages, documents from Android phone and SD cards inside your Android device.
  • Extract SMS from Samsung phone when your Samsung phone’s screen-locked, broken screen, black screen, etc.
  • Recover data from dead/broken Samsung phone internal storage.
  • Fix Android OS to normal like frozen, crashed, black-screen, bank-screen, virus-attack, screen-locked, Samsung logo screen, system bricked, etc.
  • Best data recovery for Samsung Galaxy(e.g. Galaxy S10/S9/Note9/S8/S7/S6/Note 10/Note 9/Note 8), Huawei(e.g. Mate 30/Mate 20/P30/P20), LG, Sony, Google Nexus, OnePlus, HTC, Motorola, ASUS, , Xiaomi, Redmi, Oppo, Meizu and more, covering most Android brands;
  • Works well with all Android OS, including Android 7.0/8.0/9.0
  • Compatible with Windows 10/8/7 and macOS Catalina/macOS Mojave/macOS High Sierra.

It’s completely safe and reliable, please free download the Android Data Recovery software on your Windows PC or Mac and start to rescue your important data.

d_win d_mac
d_win d_mac

Tips: Our software can only be downloaded and used on computer, if you access via mobile phone, please share the page to your Facebook, Twitter or Linkedin, when you use the computer, you can get this page and download the software on computer to have a free trial.

Guide: How to Recover Deleted SMS Messages on Android

Step 1: Launch Android Toolkit on Computer
Download the Android Toolkit on the computer, install it, and then run it. You can see there are three main functions: “Android Data Recovery”, “Broken Android Data Extraction” and “Android Data Backup & Restore”.

To recover deleted messages on Android phone, please click on “Android Data Recovery” to continue.

Android SMS Recovery

Step 2: Turn on USB Debugging on Android
Connect your Android phone to the computer, and hook up Android phone to the program via USB. Click Allow when prompted on the handset.

Follow the steps on the screen to enable USB debugging mode on the phone for full connection. For example, if your phone (e.g. Galaxy S10/S9/Note9/S8/S7/S6/Note 10/Note 9/Note 8/HUAWEI Mate 20/P30/P20) is running Android 4.2 or newer (Android 7.0/8.0/9.0):

Enter “Settings” < Click “About Phone” < Tap “Build number” for several times until getting a note “You are under developer mode” < Back to “Settings” < Click “Developer options” < Check “USB debugging”

enable usb debugging

For Android 4.1 earlier, refer to the tutorial on how to enable USB debugging on Android.

Step 3: Choose “Messages” for scan and recovery
From the next panel, highlight the option for “Messages” and “Messages Attachments“, and press Next button.

select messages to scan and recovery

The app analyzes the Android phone, and will need root permission for a complete scan to find the deleted messages in the phone memory.

To do this, click Rooting Tools button. From the opening webpage, download KingoRoot tool to root the Android device.

We also have the guide on this: How to root and unroot an Android device

root Android to deep scan

Step 4: Recover Text Messages from Internal Memory on Android Phone
Once rooted, the software continues scanning the deleted data from Android phone. Leave it do its business.

When scanning completes, you should see the deleted and existing text messages on the window, if you only need to view the deleted text messages, please tap “Only display the deleted items” to ON, it will shows you the deleted messages as red font.

Recover deleted Text Messages on Android

You can view the deleted messages before recovery, then click the text messages you want to restore and then click the “Recover” button, all your missing text messages will be save onto your computer within few seconds.

The recovered messages will be saved in universal CSV and HTML format on your computer, both two formats for you easy to view or print.
If you want to view, edit or print the recovered messages, you can open the CSV file by using Microsoft Excel, WPS Office or in a text editor like Notepad and Text.

restored Android messages on pc

If just want to read the messages or print them, you can open the HTML file by some populart browser, such as Firefox, Google Chrome, Internet Explorer.

text messages exported from android

You can see the Android Data Recovery also can recover deleted photos from Android devices, all recovered photos will be saved on your computer.

restored android photos on pc

As well as recovering other types of Android data.

restored android data on pc

Free download the Android Data Recovery software to recover your text messages.

d_win d_mac
d_win d_mac

Back up Messages and Other Data from Android Phones to Computer

In daily life, it is difficult to avoid some accidents. If your mobile phone is stolen or lost, your important data can no longer be retrieved. Therefore, it is very necessary to back up your Android data regularly.

Another function on the Android Toolkit is Android Data Backup & Restore, it can help you backup messages, contacts, phone numbers, WhatsApp messages, call logs, gallery, videos, music and documents from Android to computer easily, you are able to set a password for protecting your important backup. In addition, if you want to get back the data, you can directly restore Android data to your Android phones easily.

android data backup

d_win d_mac
d_win d_mac

Above is the whole guide to recover deleted text messages from Android phone. If you deleted or lost messages, iMessages on iPhone, you can also learn this guide about how to recover deleted SMS from iPhone, iTunes and iCloud. If you want to backup your iPhone messages to computer, you can use this useful iPhone Data Backup & Restore software, which allows you backup messages, WhatsApp messages, Kik messages, Line messages, contacts, photos, videos, notes and more easily.

3 Methods to Recover Deleted Photos from Samsung Galaxy S/Note

Summary
Lost or deleted some important photos on Samsung phone? Here is a powerful Samsung Photo Recovery Tool, which helps you recover deleted photos from Samsung Galaxy S20/S10/S9/S8(Plus)/S7/S6(Edge) easily.

Lost photos, contacts and messages after factory reset Samsung phone? Deleted some important photos from your Samsung Galaxy phone by careless? Don’t worry! Actually, the lost or deleted photos still stored in your phone internal memory, these deleted data are just be hidden and stored in a special location, the deleted Samsung photo files can be recovered before being overwritten by the new data. When you deleted photos on Android device, you’d better not use your phone to take new photos, don’t add or transfer files to the phone, preventing the new data cover the deleted data, then looking for an effective method to recover the deleted photo files as soon as possible. Want to know how to recover deleted photos from Samsung Galaxy phone? This article teach you three effective methods to recover deleted and lost photos from Samsung Galaxy S20/S10/S9/S8/S7/S6/S5, as well as Galaxy Note 10/Note 9/Note 8/Note 5 and other Samsung smart phones.

samsung photo recovery

Method 1: Recover Recently Deleted Photos and Videos from Gallery Trash(Within 15 days)

For iPhone users: If you accidentally delete photos on iPhone(iOS 8 or higher iOS version), you can recover deleted photos and videos on Recently Deleted album in Photos App within 30 days, if these photos and videos were deleted more than 30 days, all will be automatically erased.
Also read: 4 ways to recover deleted photos on iPhone(iOS 13 included)

iPhone’s Recently Deleted Feature is very useful, when we accidentally delete photos, we can quickly retrieve photos in a short time. Contemporary, there is a similar Recently Deleted Feature on Samsung Galaxy smart phones, it named Trash (or Recycle Bin), which located in Gallery app.

If you delete a photo or video from Samsung Galaxy S10/S9/S8/S7 or other Samsung Galaxy phone, those deleted files will moved into the Trash, then these already deleted photos/videos are automatically permanently deleted after 15 days. However, you can recover all recently deleted photos & videos from Gallery Trash within 15 days. Let’s follow the below simple steps to restore recently deleted photos on Galaxy S10 & S10 Plus & S10e from Trash (or Recycle Bin):

Step 1. Open Gallery app.
Step 2. Tap Three dots on the top right of the screen.
Step 3. Select Trash option, then you can find all recently deleted pictures and videos.
Step 4. Select the photos or videos you want to get back.
Step 5. Finally, just tap Restore on the bottom.
All selected photos and videos will be back in the Gallery Album where they were in.

samsung cloud recycle bin photo recovery

Tips: Before restoring deleted photos and videos from Samsung via Trash (or Recycle Bin) folder, there are several things you need to know firstly:

1. Recently Deleted only helps you recover those what are deleted by you, but are not deleted permanently from your Samsung phone. In other words, this is limited to that you delete those photos from Gallery, and didn’t delete them from Trash (or Recycle Bin) folder.

2. Gallery Trash only keeps deleted photos for 15 days, once it gets the deadline, they will be removed from Gallery Trash folder automatically. So your photos were deleted from Samsung 30 days ago, they have been already deleted permanently. If you want to get back the deleted pictures and videos, please go to Gallery Trash folder to restore them as soon as possible.

Method 2: Recover Deleted Photos from Google Photos app(Within 60 days)

As well all know that most Samsung phones/tablets are running Google’s Android system, so there are many build-in Google service on Samsung Galaxy smartphones, Google Photos app, the Google Photos app is one of the app that we often use on Android devices, we can upload Samsung photos to Google Cloud for back by using Google Photos app.

If you have backed up your photos to the Google Photos app on Samsung phone, once your important photos are lost or deleted, you can restore the deleted photos from Google cloud over your Google account, since the deleted photos will kept on the trash for 60 days. Here is how to restore deleted pictures from Google Photos app:

Step 1. Open the Google Photos app on your Samsung phone and sign in your Google account.
Step 2. Tap Three dots on the upper left of the phone screen, and then tap “Trash” from the top-left menu.
Step 3. All the deleted photos will be display in details, then select the photos you want to get back
Step 4. Tap “Restore” to restore the deleted photos from Google Cloud, then you will find all recovered pictures back in Samsung Gallery app as well as Google Photos library.

restore samsung photos from google cloud

Also Read: Recover Deleted Photos & Videos on Android

Note: If you delete photos for more than 60 days, you can’t get back the deleted photos via this method, as well as the method 1. If you looking for an effective method to recover Samsung deleted/lost data, you should use a third-party Samsung Data Recovery software, which can help you directly scan and recover deleted photos, videos, contacts, messages, WhatsApp data and more from Samsung internal memory, or recovering formatted/lost/deleted/missing data from SD card. Let’s follow the below Samsung photo recovery solution, you can recover deleted photos from Samsung Galaxy without backup.

Method 3: Recover Deleted Photos from Samsung without Backup(Recommend)

If you failed to recover deleted photos from Gallery Trash and Google Photos app, just use an utility Samsung Files Recovery and connect your Samsung phone with the computer to scan, view and recover the deleted photos.

This Android Data Recovery not only can help you recover deleted photos, videos, contacts, messages, call logs, WhatsApp messages, music and documents from Samsung phone, but also allows you fix crashed, frozen or locked Samsung phone to normal and extract photos from broken Samsung Galaxy S6, S5, S4, Note 5, etc. The Android Data Recovery function works well with almost all Samsung phones, such as Samsung Galaxy Galaxy S10/S10+, Samsung Galaxy S9/S9+, Samsung Galaxy S8/S8+, Samsung Galaxy S7/S7 Edge, Samsung Galaxy S6/S6 Edge, Samsung Galaxy Note 10/Note 10+, Samsung Galaxy Note 9, Samsung Galaxy Note 8 and other and other brands of Android phones directly. Now, let’s see how to recover deleted photos on Samsung Galaxy S10 by using this powerful Android data recovery software.

d_win d_mac
d_win d_mac

How to Recover Deleted Photos from Samsung Galaxy S10/S10+

Currently, this Android Data Recovery supports below Samsung Galaxy S10 models, such as SM-G977P, SM-G975U, SM-G973U, SM-G977U, SM-G977T, SM-G970U, SM-G973F, SM-G970F, etc. The software helps you recover (extract) photos on Samsung Galaxy S10 (Plus) & S10e, it won’t hurt your phone’s data.

Step 1: Launch the Android Toolkit on PC or Mac
Please click the above download button to download the application on the computer, install it, and then run it. To recover Samsung lost or deleted data, please click on “Android Data Recovery” to continue.

Samsung Photo Recovery

Note: The application is only read and recover your Android data without any personal information leaking.

Step 2. Connect Your Samsung Galaxy S10 to Computer
Then connect Samsung Galaxy S10/S10+ to the computer via a USB cable.

connect Samsung to computer

Step 3. Turn on USB Debugging
Enable USB debugging on your Samsung Galaxy S10 for for full connection first, click Allow when prompted on the handset.
You can also learn how to enable USB debugging mode on your different Android OS.
1. Android 2.3 or earlier: Go to “Settings < Applications < Development < USB debugging”.
2. Android 3.0 to 4.1: Go to “Settings < Developer option < USB debugging”.
3. Android 4.2 or newer: Go to “Settings < About Phone < Build number” for several times until you get a note about “You are under developer mode”. Then, you should go back to “Settings < Developer options < USB debugging”.

enable usb debugging on huawei

Step 4. Select “Gallery” and “Picture Library” for Scanning
You can see the application can recover all types of data from Android devices, in order to saving time for scanning process, just select “Gallery” and “Picture Library” for scan and recovery if you only recover the deleted photos.

select photos to scan and recovery

Step 5. Root for Deep Scanning Your Phone(Option)
If you just want to extract existing data from Android phone, please click “Normal Scan” option to go on, the application will shallow scan all existing files and shows the detail to you, this scanning mode will take less time.

If you want to recover more deleted and lost data, you need too root permission for a deep and complete scan to find more deleted and lost photos in the phone memory.
To root the phone, click “Rooting Tools” button, it will open a page for you to download KingoRoot tool to root the Samsung Galaxy S10.
Please don’t worry, you can also get the device back to it’s original status after data recovery complete.
We also have the guide on this: How to root and unroot an Android device safely

root Samsung S10 to deep scan

After rooting the Samsung phone successfully, click “Retry” button after your confirm your Samsung Galaxy S10 has been rooted. Then, the app analyzes the phone and deep scanning the deleted and lost photos from Samsung Galaxy S10 internal memory.

Step 6. Preview and Recover Deleted Photos on Samsung Galaxy S10
When scanning completes, the application will shows you all recoverable photos, you can view the scanned pictures one by one before recovery them. After previewing the deleted photos, tap “Recover” to recover deleted photos on Samsung Galaxy S10 and them on the computer.

recover photos on samsung galaxy s10

During the recovery process, please keep your Samsung phone connected with the computer. Only few minutes, all of you lost/deleted photos be recovered and save on the computer.

Step 7. Transfer Files Back to Samsung Phone for Viewing and Using
Then, you can directly copy the photos to your phone’s folder or SD card for view on Samsung phone again. Here, we recommend you this powerful Android & iOS Manager tool, it can help you import photos, videos, music contacts from PC/Mac to Samsung Galaxy phone at ease, as well as transferring data between iOS and Android devices.
Also read: How to Manager Samsung Phone on Computer

add photos to samsung galaxy s10

Download the Android Toolkit – Android Data Recovery and start recovering deleted photos on your Samsung phone.

d_win d_mac
d_win d_mac

Tips 1: Recover Photos from Samsung Phone’s SD Card

Some people will set the SD card as a pictures and videos storage path instead of directly storing the in the phone internal memory. If you lost the photos on the corrupted card or your SD card is formatted, please stop using the memory card, then using a professional Data Recovery(Mac/Windows) to recover lost/deleted/formatted photos on SD card as soon as possible

Tips 2: Backup Photos and More Android Data Regularly

Although our Android Data Recovery software can help you recover deleted and lost data, once your phone is broken, damaged or lost, you will lost your important data forever. We strongly recommend you backup your Android data to computer regularly.

This Android Data Backup & Restore tool back up all types of files on your Android device, including contacts, messages, call logs, gallery, videos, audio and documents. After creating Android data backup on computer, you also can set a password for protecting your important backup. For the backup files, you can preview and select the data you want and restore them back to Android phone easily.

Samsung Photo Recovery

How to Transfer Music from iTunes to iPhone 11(Pro) with Ease

[Summary]: How to transfer music from iTunes library to iPhone iOS 13 without using iTunes itself? This article will recommend you the best iTunes alternative for Windows & Mac to sync music from iTunes to iPhone 11 and iPhone 11 Pro(Max) and even won’t erase your existing data.

iTunes is a great program for Apple users to download, store, manage, sync and play music. Because of this great cloud storing facility, Apple Music users can access massive songs, playlist and albums online, Apple users also can transfer data between iPhone, iPad, iPod touch, iPod Nano through iTunes backup & restore, although this process is a bit cumbersome, the iTunes is free. When you have got an new iPhone 11(Pro), you may want to transfer music, contacts, messages, notes, call logs from old iPhone to iPhone 11(Pro). Upgrading your iPhone? Here’s how to transfer data from old iPhone to new iPhone easily.

iTunes is already a “sign” for Apple in a sense. In just a few years, Apple Music subscribers use iTunes to downloading music and enjoy music online, the digital music era has never stopped, and iTunes’ core mission has been completed.

In the new macOS Catalina(macOS 10.15), the original concept of iTunes was completely removed, and Apple completely separated all of its important features. The macOS Catalina system splits iTunes into Apple Music, Podcast, and Apple TV apps, and the resources provided by iTunes can be found in new apps.

Where are your iTunes music gone after update to macOS Catalina?
1.Music that you’ve imported or purchased will be in the new Apple Music app.
2.The iTunes Store will still be available to buy music on Mac, iOS, PC, and Apple TV.
3.iPhone, iPad, and iPod backup, restore, and syncing will move to Finder.

apple music on MacOS catalina

However, you will get a messages “iTunes has been updated to focus on music, movies, TV shows, podcasts and audiobooks” on the new iTunes 12.7.

Because Apple removes the function to manage, ringtone and apps, but you still can use iTunes 12.7 to transfer music from iTunes library to iOS 13 devices. Let’s have a look the detail guide to transfer music from iTunes to iPhone 11.

Method 1: Transfer Music from iTunes Library to iPhone 11 via iTunes 12

Here are the steps for syncing your music from iTunes library to iPhone 11 by using iTunes 12, as well as the previous iTunes version.

Step 1. Launch iTunes 12 and connect your iPhone 11 to computer with a USB cable.
Step 2. The iTunes will detects your iPhone connected, then click on iPhone device tab on iTunes.
Step 3. Tap on the “Music” tab from the left sidebar.
Step 4. Click “Entire music library” or “Selected playlist, artists, albums and genres” option and check the songs you want to transfer.

transfer music from itunes to iPhone 11 via iTunes

Step 5. Then, click Apply to transfer the music from iTunes 12 to your iPhone 11.

use iTunes to transfer music from itunes to iPhone 11

Disadvantages of Using iTunes:

  • When you using iTunes to sync music, it will erase the existing songs on iPhone at the same time.
  • You can’t transfer songs you want selectively, just transfer all songs of your iTunes library.
  • You can only add music to iPhone from one iTunes library, or your iPhone will be erased.
  • You can’t directly import songs, videos and photos from computer to iPhone. You need to add the media files to iTunes library, and then syncing them to your iPhone, it will wastes a lot of time.
  • You can’t transfer the downloaded Apple Music songs to iPhone, if you want to transfer Apple Music to iPhone, iPad, iPod Touch or iPod Nano, you need to use an Apple Music Converter to remove DRM from Apple Music firstly, then using a third-party iPhone Music transfer to add the DRM-free Apple Music to iPhone/iPad/iPod.

Method 2: Transfer Music from iTunes 12 to iPhone 11 and More iOS 13 Devices (without iTunes)

Looking for a fast and reliable way on how to transfer music from iTunes to iPhone 11/11 Pro/XS/XR/X/8/7/6S/6(Plus)? It’s highly recommended that you use third-party software, here we recommend the iOS Toolkit – iOS Transfer, which not only can help you transfer music from iTunes to iPhone without erasing the existing songs on iPhone, but also can help you transfer music, videos, photos from iOS to iOS, Android to iOS, Android to Android. You can use this powerful iOS Toolkit to transfer music and videos from iPhone to iTunes, as well.

iOS Transfer Key Features:

  • Transfers and manages all data like photos, videos, music, messages, etc. on iPhone, iPad and iPod.
  • Transfer music and videos between iTunes and iOS or Android.
  • Works smoothly all iPhone (iPhone 11/11 Pro included), iPad, iPod touch, iPod Nano models, as well as iOS 13.
  • Backup your music, photos, videos, contacts, SMS, Apps etc. to computer and restore them easily.
  • Transfer contacts, SMS, music, photos, videos and more from Android/iOS to iPhone 11(Pro).
  • Compatible with Windows and Mac OS.

d_win d_mac
d_win d_mac

2 Steps to Transfer iTunes Music to iPhone 11(Pro)

Step 1. Launch iOS Toolkit on PC or Mac
Download, install and launch the iOS Toolkit on your computer, then click the ‘Transfer’ option go to iTunes to iPhone music transferring.

iOS Toolkit

Step 2. Connect iPhone 11 to Computer
Using a USB cable to connect your iPhone 11 with the computer, the software will detect it and shows your device’s information, then click ‘Transfer iTunes Media to Device’.

Transfer iTunes Media to iPhone 11

Step 3. Scan iTunes Library
The iOS Toolkit will start to scan your all media files of the iTunes library, then it will shows you your all the available files.

scan iTunes music

Step 4. Select Music and Transfer to iPhone 11(Pro)
The software will shows you all the scanned result, then choose the “Music” item that you wish to transfer. Finally, just click ‘Transfer’ button start transferring music from iTunes to iPhone 11.

Transfer iTunes Music to iPhone 11(Pro)

Please waiting, the software helps you sync iTunes music to your iPhone device within a few minutes, depending on how many files you’re transferring. After the transferring process complete, you can disconnect your iPhone with the computer, then you will find all iTunes music be transferred to your iPhone 11, now you can enjoy those music on iPhone 11 freely.

Free download the iOS Toolkit – iOS Transfer and start to transfer music to your new iPhone from iTunes, old iPhone, Android and PC/Mac.

d_win d_mac
d_win d_mac

Method 3: Export iTunes Songs to MP3/M4A and Transfer to iPhone 11(Pro)

Many Apple Music subscribers download songs for offline listening through iTunes on computer, but you can’t transfer the downloaded Apple Music songs to other devices, because the download Apple Music files is M4P format, and those added songs is “Apple Music AAC audio file”, when you try to use iTunes to convert the downloaded Apple Music songs, the iTunes will prompt you “the songs could not be converted because protected files cannot be converted to other formats.”

Apple Music is a streaming music service, when you subscribe the streaming music service, you can play online or download for offline listening on authorized device, but you now allowed to transfer the downloaded Apple Music songs to other devices. Because all Apple Music tracks are DRM protected, which restricts you from sharing, transferring or listening to downloaded Apple Music tracks after canceling subscription. To keep your downloaded Apple Music songs forever on your iPhone other devices, you should learn how to export Apple Music songs from iTunes to MP3 or M4A files and transfer them to your iPhone.

If you want to smoothly play iTunes music in MP3 player, iPod Nano, iPhone and more devices, you need to export iTunes songs to MP3 format firstly. I you have songs that downloaded from Apple Music or bought from iTunes Store, you can’t use iTunes to convert them to MP3 format due to the DRM protection.

Don’t worry, UkeySoft Apple Music Converter is special designed to remove DRM from Apple Music and iTunes M4P songs, then convert them to plain MP3, M4A, FLAC, AU, AAC, etc. You can download UkeySoft Apple Music Converter for a free try. It can convert and export all iTunes songs as MP3, M4A, FLAC or AAC formats with 100% lossless quality, then you can directly import those output MP3 files to your iPhone, iPad, iPod via iTunes or third-party iOS Transfer tool.

This method is the best way to keep Apple Music playable after canceling subscription, please free download the Apple Music Converter and start to get Apple Music for free.

d_win d_mac
d_win d_mac

  • Remove DRM from Apple Music to keep files forever;
  • Convert Apple Music songs, playlist and albums to MP3, M4A, etc.
  • Convert iTunes M4P music, audiobooks to MP3, M4A, etc.;
  • Export iTunes songs and audiobooks as MP3, M4A files;
  • Convert iTunes audio at 16X faster speed with lossless quality;
  • Keep ID3 Tags information after conversion;

Simple Steps to Convert Apple Music and Import Them to iPhone 11(Pro)

The Apple Music Converter can help you remove DRM iTunes M4P songs(purchased from iTunes Store before 2009), audiobooks, and Apple Music songs.

Step 1. Launch Apple Music Converter on Computer
Launch the Apple Music Converter, and iTunes will be launched automatically. For macOS 10.15, the Apple Music app will be launched and loads all Apple Music tracks.

Launch Apple Music Converter

Step 2. Select Apple Music Songs and iTunes Audio Files
Check songs, audiobooks or Apple Music playlists you want to convert.

Select Apple Music Songs

Step 3. Select MP3 or M4A as Output Format
Since the iPhone 11 and most iOS device supports MP3 and M4A audio files, please choose MP3 or M4A as output format. The software also can convert iTunes music to AAC, AC3, AIFF, AU, FLAC, M4R, and MKA.

Select MP3 or M4A as Output Format

Step 4. Start Convert Apple Music and iTunes M4P Songs
Click “Convert” button to start converting the selected songs to MP3/M4A.

Convert

After conversion, you can get all DRM-free audio files in the output folder.

get

Step 5. Transfer the MP3/M4A Files to iPhone via iOS Transfer
The converted Apple Music are saved onto the computer, all output songs is MP3 format, now you can transfer them to your new iPhone 11 and save on it forever. To import the converted Apple Music songs to iPhone, you can use the above iOS Transfer to transfer music from computer to iPhone 11/XS/XR/X.

import

Download the Apple Music Converter and start to get Apple Music for free.

d_win d_mac
d_win d_mac

Conclusion

As you can see, there are three easy ways you can to import music from iTunes to iPhone, iPad or iPod. While iTunes is considered rather powerful, but it will erase all existing data on iPhone after syncing by iTunes. We recommend the iOS Toolkit – iOS Transfer, it can help you transfer music from computer, iTunes, iOS and Android to iPhone directly, it won’t erase your data, but iOS Transfer can’t transfer the DRM-ed Apple Music tracks, so you need to use a third-party Apple Music Converter to remove DRM from Apple Music and convert them to MP3 or M4A, then using the iOS Toolkit – iOS Transfer to add the converted Apple Music songs to iPhone, iPad, iPod, Android devices.

How to Fix “iTunes Unable to Process Purchases at This Time” Issue

[Summary]: Did you get a message that “your iTunes unable to process purchases at this time”? Don’t worry, please log out of Apple ID, disconnect wifi, restart your iPhone/iPad, and log in again via cellular network. In this article, you can also learn how to Fix bugs on iOS 13 and optimize iOS system to enjoy better iOS performance.

Recently, many iPhone users said that their iPhone has repeatedly appeared bugs: “the iTunes Store is unable to process purchases at this time,Please try again later“, and some even reach the frequency every two minutes.

itunes store error

The reason: This bugs is appear on some iOS 13 and iPadOS devices. This may be a problem with the Apple server, some problem in the iTunes Store server. Apple has yet to explain the cause of the bug.

Solution 1: Uninstall the iTunes Store App
Starting with iOS 10, the iPhone already supports uninstalling the app that comes with the system.
For iOS 10, iOS 11 and iOS 12, just press and hold the icon, and when it shakes, click on the small fork in the upper left corner to uninstall.

For iOS 13 users, short press to pop up the App secondary menu, click “Reorder App”, you can also trigger the uninstalled animation.

Solution 2: Exit Apple ID and Restart your iPhone
To fix this bugs, please exit Apple ID, disconnect wifi, restart your iPhone/iPad, and log in again via cellular network.

Note: After exiting the Apple ID, it will cause a problem, the Apple service cannot be used, such as iCloud and Apple Music, because we need to log in to the Apple ID to use these Apple services.

Do not connect to Wi-Fi after restarting the phone. In the state of 4G network, log in to the Apple ID again, which is a simple method to solve the problem.

Of course, if you want to completely fix this bug, the most common method is to update the perfect system. This might be the time for you to exercise a little bit of patience for Apple’s iTunes Support to release a fix. You can always check out the Apple System Status website for server status.

About iOS 13 Bugs

Apple has released the latest version iOS 13 system, which has encountered many bugs. According to Apple’s official update instructions, the iOS 13 system has added users’ favorite dark mode and new privacy protection features, which has increased the speed of software opening and is known as the best system to date. However, a large number of users after upgrading the iOS 13.0 official version of the system reflect the camera can not be used, software flashback, mobile phone fever and mobile phone power consumption and other issues. Subsequently, Apple made an emergency deployment and released three official versions of the system in an 11-day period to update the bugs: iOS 13.1 was released on September 25 and iOS 13.1.1 was released on September 28. The official version, released in the early morning of October 1 iOS 13.1.2 official version. In addition, on October 3, Apple also released the iOS 13.2 Beta1 beta.

download install ios 13.2 beta on iphone

Apple gradually closed the old version of iOS system verification after releasing the iOS 13 system. In the early morning of October 8, Apple officially closed the iOS 13.1 system verification. This means that users will not be able to upgrade or downgrade to that system version. Previously, Apple closed the system verification of iOS12.4.1 and iOS13.0 on October 5, and skipped iOS13.1 and chose to disable the system verification of iOS13.1.1. At present, only the iOS13.1.2 version verification channel is enabled, that is to say, iPhone users with iOS 12.4.1 and previous versions can only upgrade iOS13.1.2 or iOS 13.2 Beta1 after upgrading, and will not be able to downgrade after the upgrade. Go to iOS 12.4.1.

ios 13 update history

From September 20th, Apple pushed the official version of iOS13.0 system. In just 19 days, Apple has pushed four official versions of iOS13.0, iOS13.1, iOS13.1.1, and iOS13.1.2, and closed these four system verifications for iOS12.4.1, iOS13.0, iOS13.1.1, and iOS13.1. The iOS 13 system has also been dubbed the most closed version of the system ever, iOS 13, iOS 13.1, iOS 13.1.1 is called the shortest-lived version update in Apple history.

Fix iPhone iPad iPod to Normal and Optimize iOS Performance

Some bugs on your iPhone and iPad? iPhone is stuck in Apple logo after iOS 13 update? iPhone stuck in headphone mode or DFU mode? iPhone stuck on recovery mode after iOS 13 update?  iPhone restarts endlessly? Or iPhone is frozen for unknown reasons? Even iPhone screen is locked? No matter what situation your iPhone is facing, you can fix iPhone to normal and optimize iOS performance to make your iPhone works better.

This iOS System Recovery not only can help you fix your iPhone/iPad to normal state, but also can help you optimize iOS 13/12/11 to enjoy better iOS performance. It compatible with the latest iOS 13 and iPodOS, like iPad Pro, iPad Air/mini, iPhone 11 Pro Max/11 Pro/11, iPhone XS/XS Max, iPhone XR/X, iPhone8/8 Plus, iPhone 7/7 Plus, iPhone SE, iPhone 6s/6s Plus, iPhone 5s/5s/5, iPhone 4S/4, iPod touch and more. Let’s teach you how to fix bugs on iPhone and optimize iOS performance.

d_win d_mac
d_win d_mac

How to Fix Optimize iOS 13/12 on iPhone

Step 1. Launch the iOS Toolkit on Computer
Click the above download button to download the iOS Toolkit on PC or Mac, then click the “iOS System Recovery”.

launch iOS System Recovery

Step 2. Connect iPhone to Computer
Then, connecting your iPhone with the computer via Apple USB cable, the software will detect it, and then click “Start” button to go on.

optimize iOS performance

Step 3. Select Fixing Mode
The standard mode installs iOS system by retaining device data. The advanced mode will erase data while installing firmware package or fixing the iOS system issues. Suggest that you go to the advanced mode only if the standard mode fails.

iOS optimize mode

Step 4. Click Optimize
If you want to make your iPhone works more better, please optimize iOS system by click “Optimize” option go to next step.

Optimize iOS System

Step 5. Select Firmware
The software will automatically detects your iPhone and displays available firmware package, please select the latest firmware package for your iPhone device. This iOS system recovery is easy to use and safe enough to install iOS firmware and avoid data loss.

Select Firmware - iOS 13/12/11/10

Step 6. Download Firmware Package
Begin downloading firmware package and install it to your iPhone, iPad or iPod Touch device.

Download iOS Firmware for iPhone, iPad, iPod Touch

Step 7. Install IPSW File and Optimize iOS System
After downloading the firmware package completed, the iOS System Recovery will verify the downloaded firmware package and install on your iPhone, no data loss at all.

Start to Optimize Your iPhone

After optimizing iOS system performance complete, your iPhone will restart again, you will find your iPhone runs more smoothly that before.

d_win d_mac
d_win d_mac

More Features:

There are three main function in iOS Toolkit: iOS Data Recovery, iOS System Recovery and iOS Data Backup & Restore, it can help you protect your iOS data and optimize your iPhone/iPad/iPod, making your iPhone runs more smoother.

iOS Data Recovery: Recover lost contacts, messages, notes, WhatsApp messages, safari history, photos and more data from iPhone/iPad/iPod, or from iTunes backups and iCloud backups.

iOS System Recovery: If your iPhone stuck on stuck in DFU mode, recovery mode, Apple logo, headphone mode, etc. This function can help you fix iPhone/iPad/iPod to normal state without data loss, as well as optimizing iOS performance.

iOS Data Backup & Restore: Backup and restore iOS data to your computer, or restore the bacups to iPhone, iPad and iPod touch selectively.

Fix iOS 13/12