By Selena KomezUpdated on July 25, 2017
After I updated my iPhone 6S to iOS 10 it was not in the good way.My iPhone was running slower and sometime it was suddenly get bricked for no reasons.How to Fix this trouble?-Daniel Tong
Why is my iPhone 6 get slower after installing iOS 10 ?Is it a conspiracy by Apple to convince users to buy the new iPhone 7 or iPhone 7 Plus?But I just wanna keep using my device until the next iPhone is released.So I’m asking help to fix the iPhone running slower with iOS 10 issue.-Sophia Huang

Do you often get the prompt that your iPhone storage is nearly full and suggest you clear up device to free up space on it?It is no a secret that your iPhone will eventually become slower after updating to iOS 10 on it for some time due to various reasons.This significant reduction in performance is likely to affect how you use your device if you do not act in time to solve it.You have probably realized that this unfortunate case often occurs when you decide to install a newly launched iOS upgrade version,for example the iOS 10 update.We have received a lost of the complained that came from iPhone users like the iPhone 6 and and iPhone 6S after iOS 10 update.Join us for a look at the complaints about a slow iPhone with iOS 10 and how you can try to fix slow iOS 10 performance without buying a new iPhone 7 or iPhone 7 Plus.This following passages is going to give you some advice of the top tips on how to fix iOS 10 iPhone running slower issue,to optimize iPhone performance and speed up iPhone after iOS 10 update.
This optimization technique is guaranteed to provide your iPhone,iPad,iPod Touch with the much-needed speed boost.Like doing a “Factory Reset” on device,restoring your iOS device’s settings will erase any of your data.Doing this reset will return all your device’s general settings to the state they were when you first bought it.Kindly note that you will be required to reset your Wi-Fi setting on device, create a new passcode and rejoin your previous WI-FI networks among other activities after doing this.
To do it, you can simply go to the settings of your iDevice,select the “General” option, tap on “Reset” option once prompted and then activate the “Reset All Settings” feature.
There are numerous benefits that can be realized when you keep your applications continuously up to date.However,it is recommended that you off this automatic updates feature and instead opt to manually update all your favorite applications. Leaving your applications to automatically update themselves is known to not only affect the battery life but also slow the performance of your iPhone/iPad/iPod Touch. Disable this unnecessary feature by selecting the “iTunes & App Store” option found in main settings on device and then turning off the “Automatic Download” feature,everything is OK.
Permanently erase data and setting from iPhone can help to remove the rubbish from iPhone and free up space of it.The conventional deletion can’t wipe the data from iPhone without restoring.After deleting iPhone data by tapping the “Delete”button,the deleted seem to gone,however,the deleted data still can be restored by the data recovery.
Here you should try this iOS Data Eraser,this program works well for permanently erase data and setting from iPhone to free up space on device after iOS 10 upgrade,including contacts,photos,SMS,call logs,videos,notes,document and more.The applicable iOS devices list here:iPhone 7,iPhone SE,iPhone 6S(Plus),iPhone 6(Plus),iPhone 5S/5C/5,iPad Pro,iPad Air and so on.iOS Data Eraser provide you four erase modes for selection,you are allow to delete all data from device,delete private data from device,erase the deleted data from device or optimize the performance on device.Read more tips about how to optimize iPhone for best performance.


You can still go back to iOS 9 for a limited time.This normally only lasts a week or more so if you are concerned,now is the time to downgrade your iPhone to iOS 9.You can go back to iOS 9.3.5,and wait for iOS 10.0.1 or iOS 10.1.
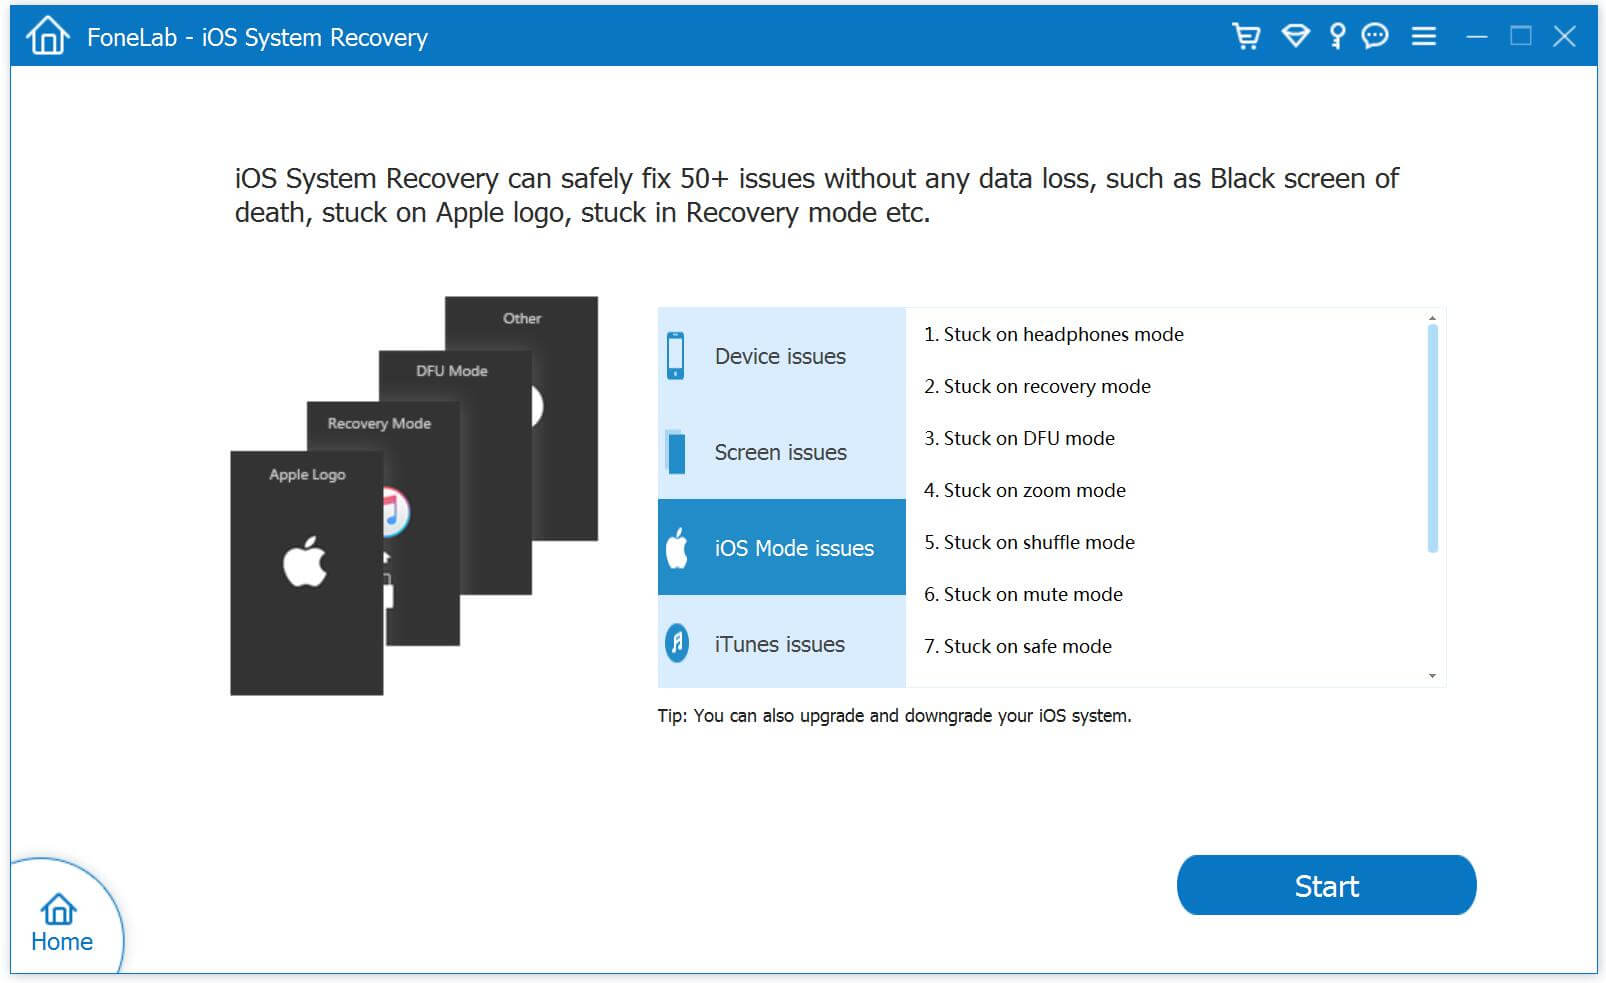
iOS System Recovery,which is a wonderful iOS data manager tool to restore iOS 10 to iOS 9 on iPhone without any data loss,perfectly help to downgrade your iPhone /iPad from iOS 10 back to iOS 9.3.5 smoothly.iOS 10 System Recovery rolls out the feature “Fix iOS to normal” for restoring iPhone system to normal after downgrading iOS 10 to iOS 9.3.5,making it easy for users to get iPhone,iPad out of white/black screen,recovery mode,Apple logo,connect to iTunes screen,etc;help to fix the issues on iOS device perform abnormally.
Step 1.Run the iOS 10 System Recovery and Connect iPhone to PC/Mac
Download and install iOS 10 System Recovery(Windows&Mac) on computer.When the installation is complete,connect your iPhone to computer with USB cable and launch the program.
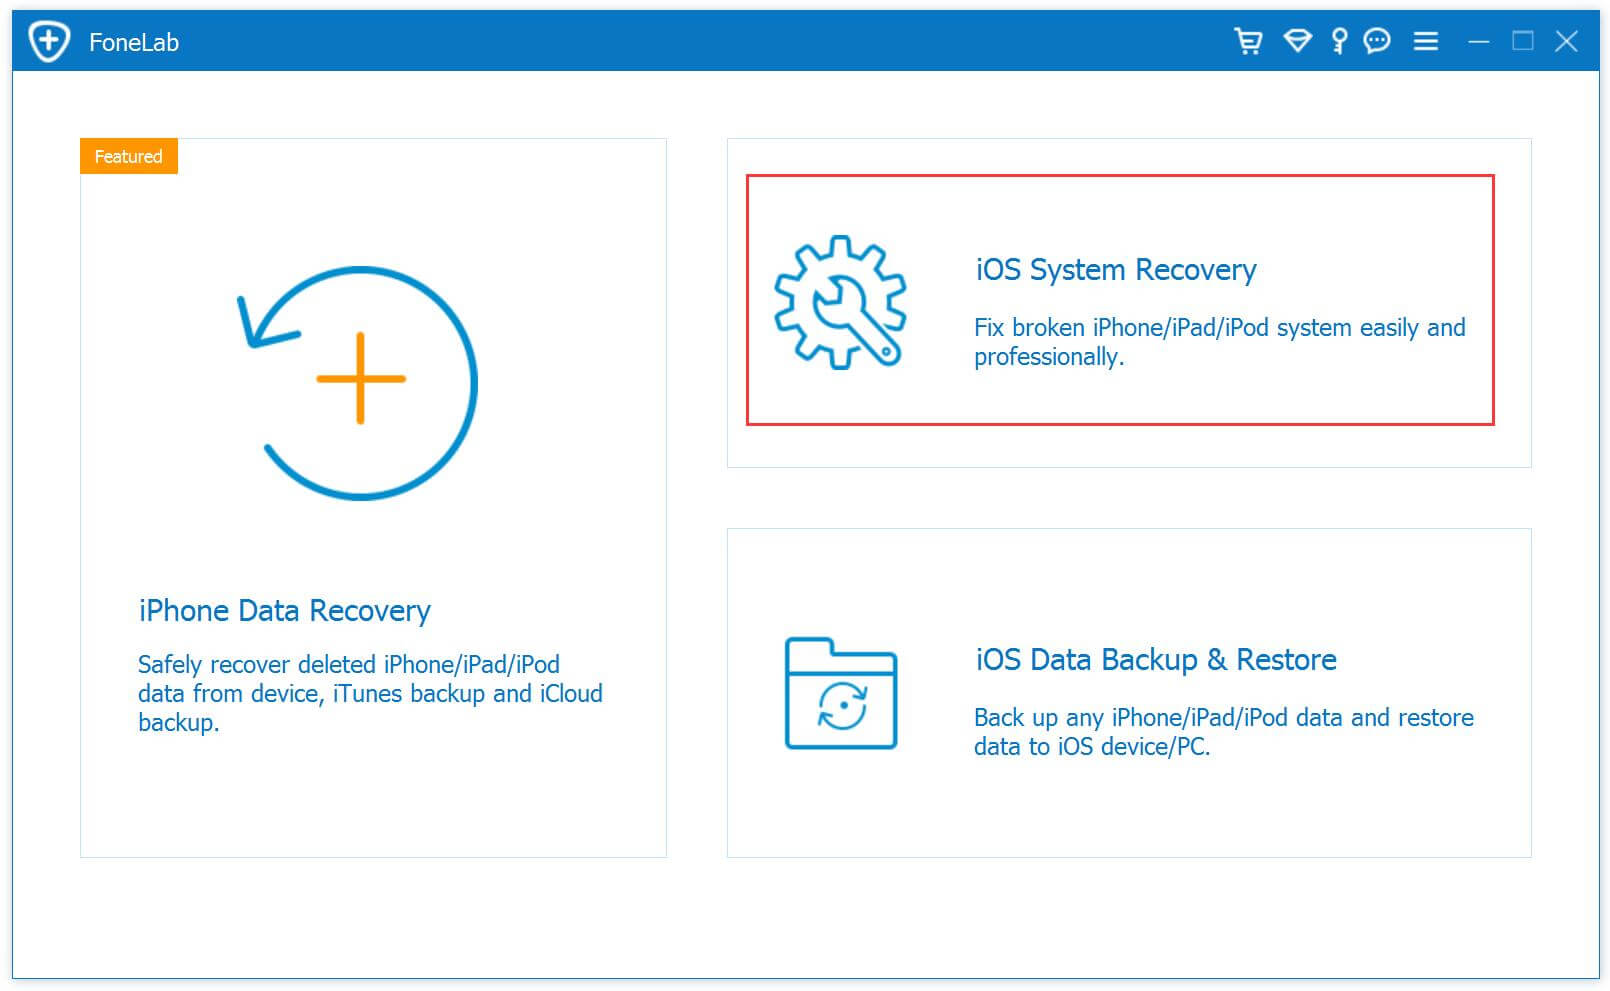
Step 2.Select “iOS System Recovery” Option
From the main window,please select “Fix iOS to Normal” located at the top right of the screen.Wait for iOS 10 System Recovery to detect your iPhone.Click “Start” once the device has been detected.
Step 3.Put iPhone into Recovery Mode
1)First, disconnect the cable. Shut down the iPhone
2)After the shutdown, press the “HOME” button to remain intact, connect your iPhone to Mac or Windows PC and make sure iTunes is running.
3)Release the HOME button,and you can see the “Connect to iTunes screen” on the iPhone,it means you have enter iPhone to recovery mode successfully.
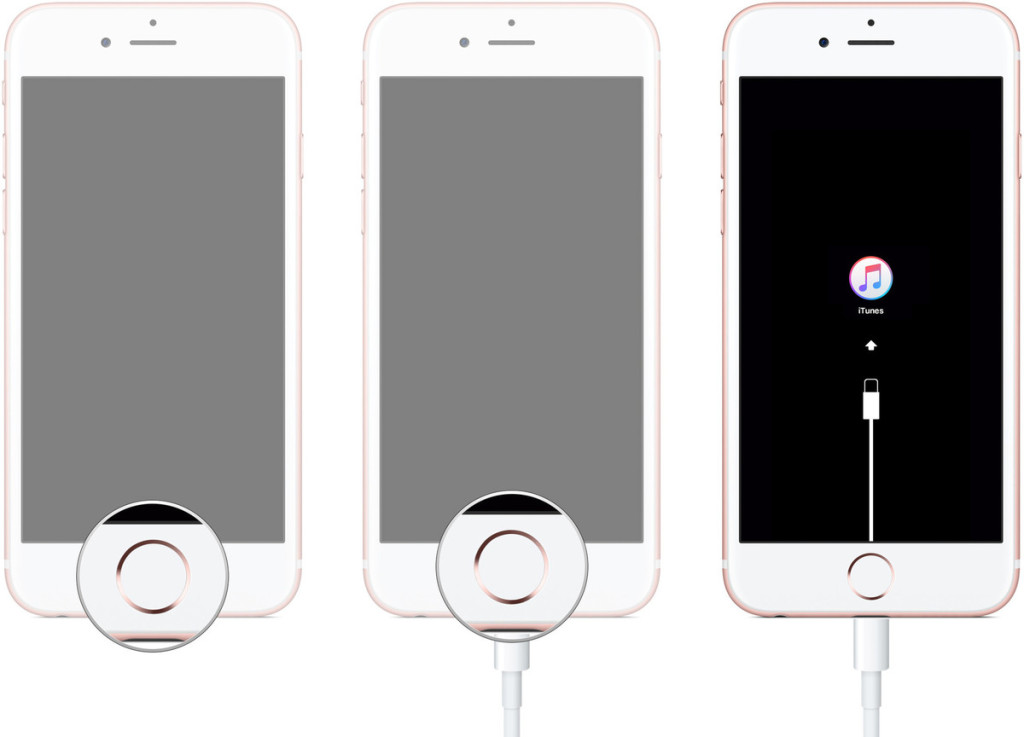
Tips: Run the iTunes software,at this point iTunes should display an alert saying it’s detected an iPhone in recovery mode, and will let you restore your iPhone device.
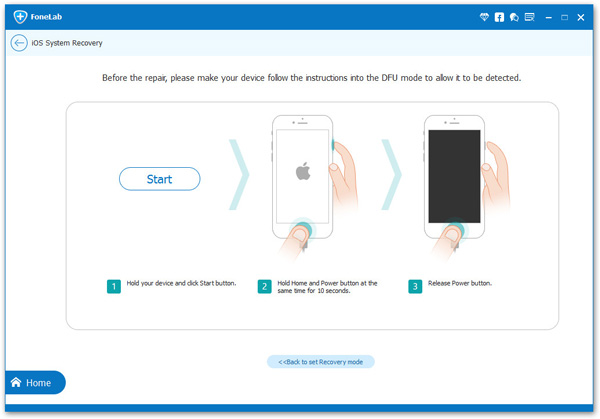
Othe way enter recovery mode:If you are unable to set the iPhone,iPad into recovery mode,please learn as below tutorial to enter DFU mode.
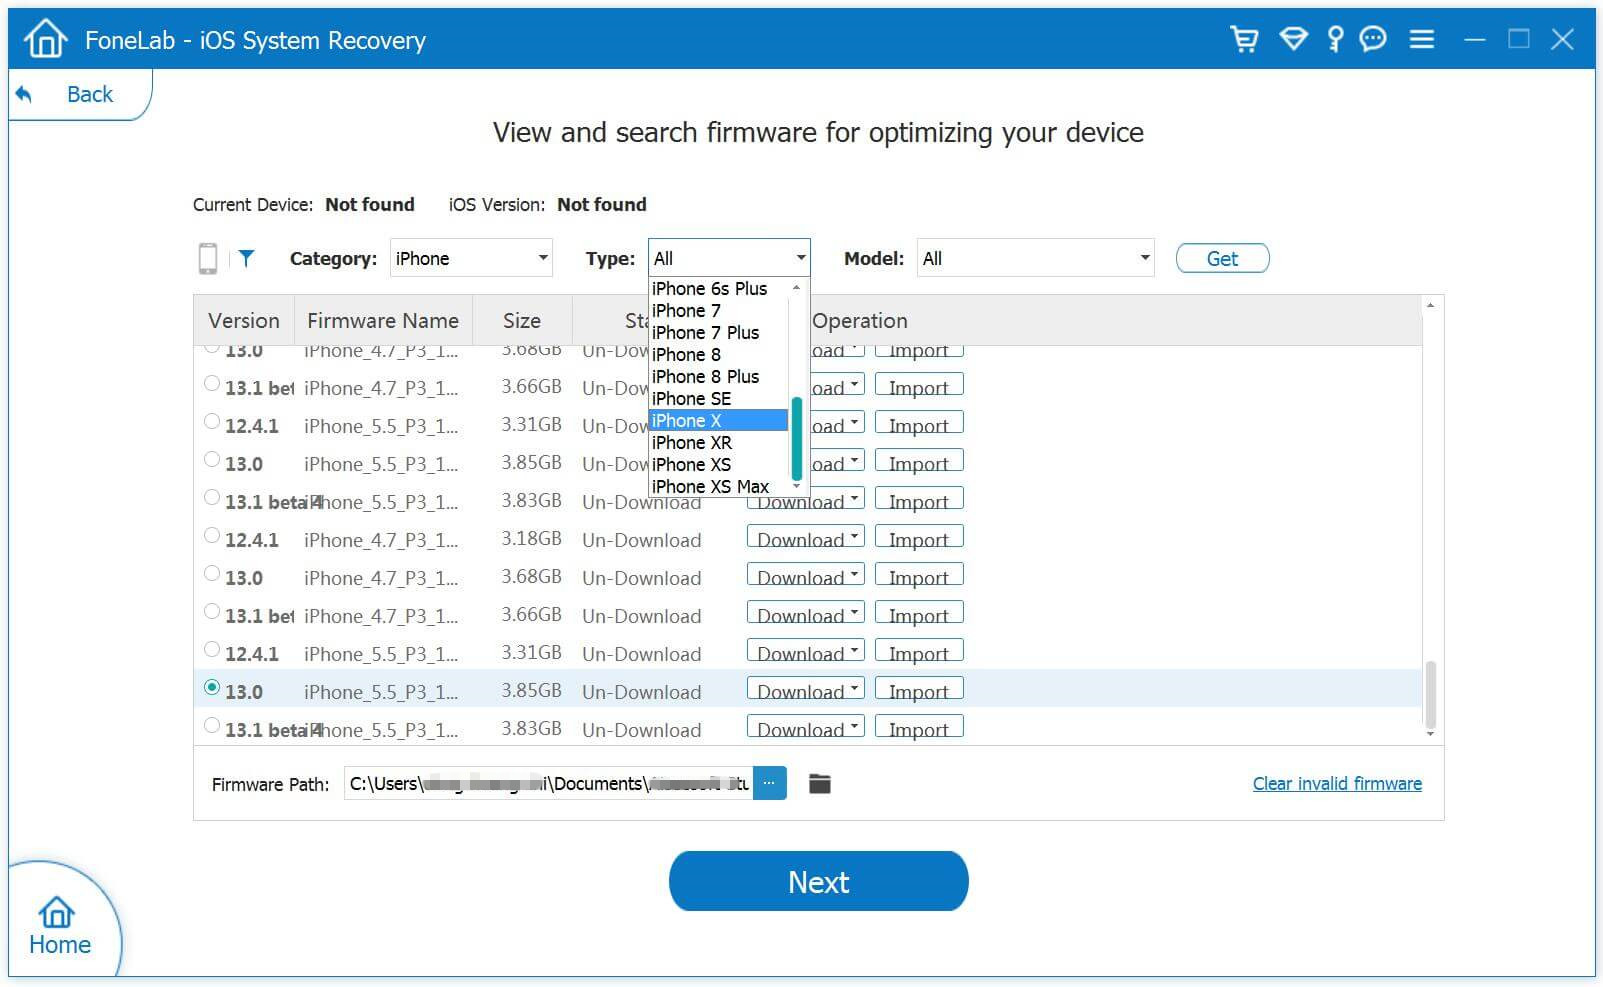
Step 4.Download the iOS 9.3.5 Firmware Package for iPhone
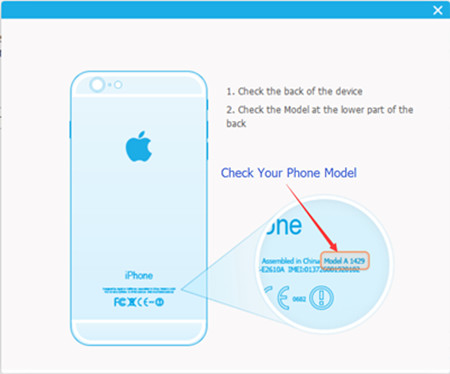
In this step,you need to confirm your iPhone model and select the iOS 9.3.5 firmware to download.
To downgrade iPhone from iOS 10 to iOS 9.3.5,iOS 10 System Recovery will offer the latest version of iOS firmware package for your selection.Choose “iOS 9.3.5”,then click “Download” and wait for the download to complete.
How to check and comfirm your iPhone model?Please see as below:
Start to Download iOS 9.3.5 Firmware Files for iPhone

Step 5.Start to Restore iPhone to iOS 9.3.5 from iOS 10 and Return to Normal
As soon as the download completes,iOS 10 System Recovery will start begin the iOS downgrade process without any data loss and restore your iPhone to normal state.In less than 10 minutes,you will get a message prompt that your iPhone is restarting to normal mode,your iPhone now is running iOS 9.3.5 as your like.

Extra tips:iOS 10 System Recovery support to fix iPhone stuck issues and restore iPhone system to normal under various of unexpected circumstances.In addition,it also can help you recover deleted data from iPhone after iOS 10 update in three recovery modes.
Related Article:
How to free Up Space on iPhone/iPad/iPod
How to Permanently Delete Photos off iPhone/iPad to Free Up Space
How to Erase All Content and Settings on iPhone Permanently
How to Clean Junk Files from iPhone/iPad/iPod
Prompt: you need to log in before you can comment.
No account yet. Please click here to register.
 (No Ratings Yet)
By Selena KomezUpdated on March 15, 2017
Hey,have you ever get the prompt that “Storage Almost Full.You can manage your storage in Settings”on iPhone/iPad/iPod?Reminding you manage your phone data and free up more space to use?For example,sometimes,you may think 16GB iPhone or iPad don’t really have 16GB of available storage.It’s more like 13 GB.That’s because some of your device’s storage is being used for important things that make it work, like the iOS operating system.

So,it’s necessary to clean up your device and give extra space to use your iPhone/iPad/iPod.And how can you make smart decisions about what to keep and what to delete?You wanna get a simple way to free up it without erasing any data?You mean optimiz iPhone/iPad/iPod to release massive space on your device instead of deleting files?
You can get your target if you use the iOS Data Eraser,which is our first suggest program that helps to clean up iOS device and free up space on iPhone/iPad/iPod efficiently and safely,this program supports to optimiz iPhone/iPad/iPod and speed it up without wiping photos,videos,apps.The unbelievably easy tip has been circulating on so many iOS users,get favorable comment from them.Moreover,this iOS Data Eraser enables to erase personal data from iOS device permanently before selling or resetting.Click on the button next to the passages,and a prompt will appear telling you that you are downing the useful program for your judgmatic selection.
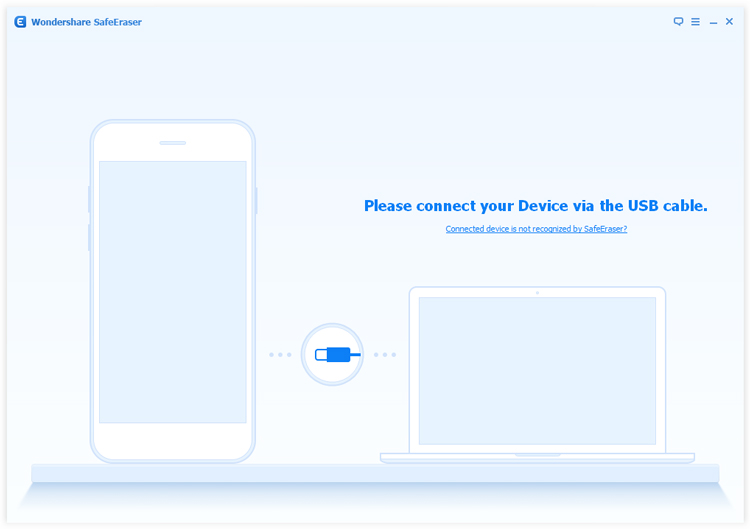
Step 1.Connect iPhone/iPad/iPod to Computer
If this is the first time you connect your device to computer,you need to trust the computer firstly and make connecting with your device and computer.
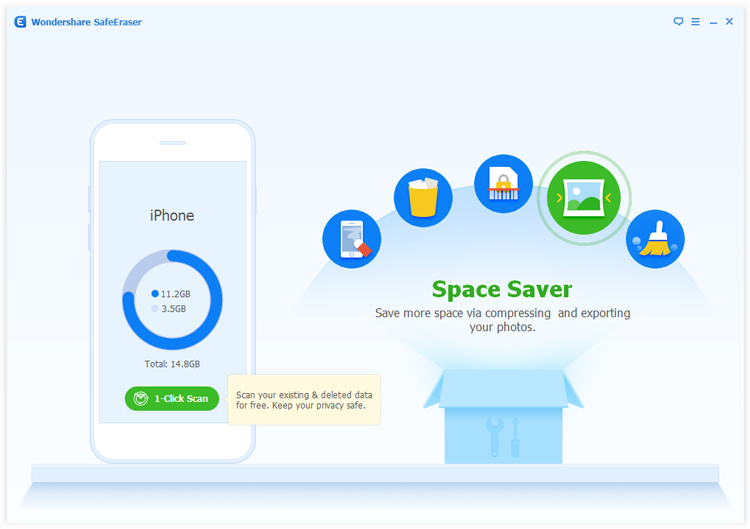
Step 2.Select the Mode of iOS Data Eraser
Click the “Space Saver” button on the main window of iOS Data Eraser.
Step 3.Select the Way to Deal and Clean Up Your Device
Now you can choose “Compress”way or “Export” way.
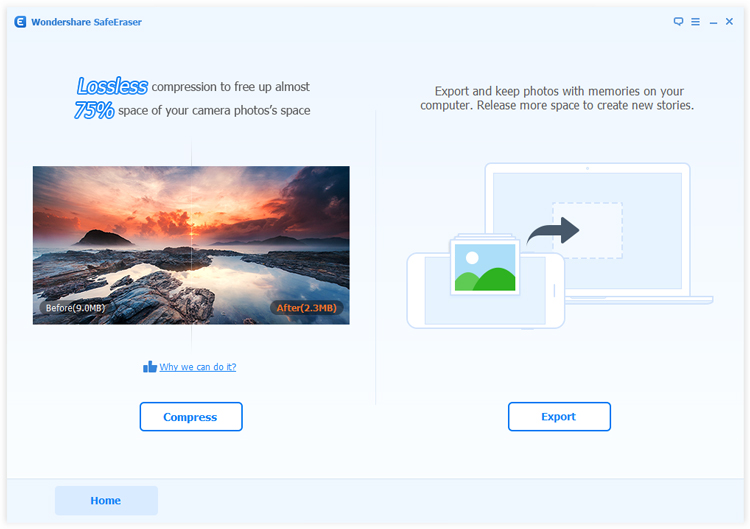
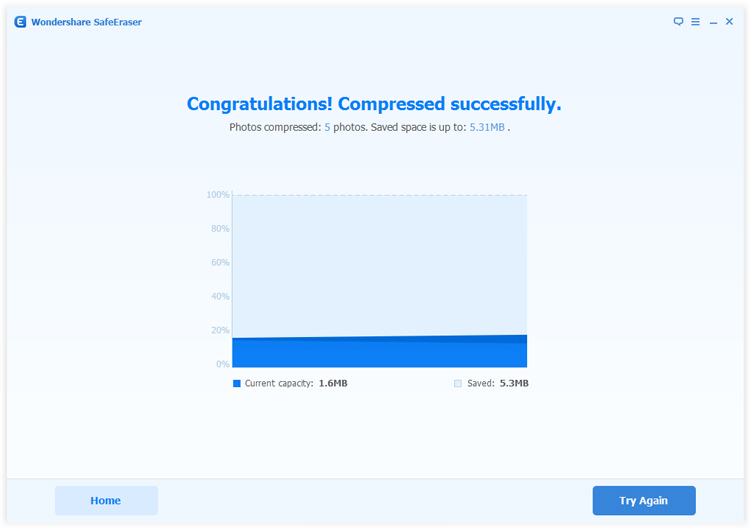
1)While you choose “Compress”way,iOS Data Eraser will start searching photos which can be compressed and list them all.
Then click “Start”button to begin the compress process.iOS Data Eraser will show how much space was saved in the end.
2)If you choose “Export”action,iOS Data Eraser will search the photos.You may choose export the selected photos to your computer only or delete them after exporting.Just click to select which one(s) you want to export.Finally click “Start”button.

At last,iOS Data Eraser will tell how much space you saved.
Here,we recommend you choose the first one,compress your photos without deleting.
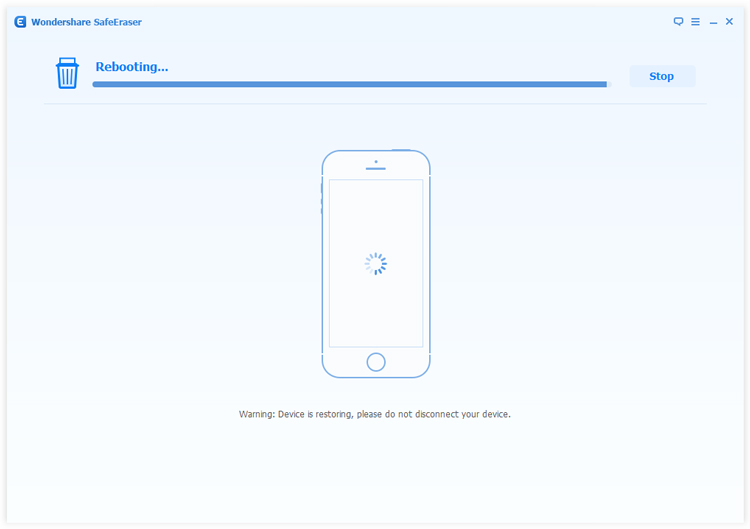
The iPhone/iPad/iPod will automatically reboot after finishing the optimization job on your device.(You can right now open the folder contains exported photos by clicking the Open Folder button if you select the second one in the previous step.
The above steps is the use guide to helps you release massive space on your iPhone/iPad/iPod,and you should be satisfied with quite a bit if you follow all of them religiously.In addition,this multifunctional iOS Data Eraser provides the function that remove all types of junk files on iPhone/iPad/iPod.
(Attention:Please DO Backup Job before you clean your iPhone/iPad/iPod storage space or delete files from device,the data once erased by iOS Data Eraser,it will never be able to recovered by any data recovery.Extra tips:How to Backup Data on iPhone/iPad)
Read more:
How to Optimize Slow iPhone For Best Performance
How to Clean iPhone and iPad Junk Files to Free Up Space
How to Delete and Erase Data from iPhone Permanently to Free Up Space
How to Delete and Erase Data from iPad Permanently to Free Up Space
Prompt: you need to log in before you can comment.
No account yet. Please click here to register.
(No Ratings Yet)