Category Archives: iOS Solution

Download and Install iOS 12 on iPhone without Data Loss

[Summary]: Apple has released the newest version of its iOS operating system – iOS 12, on June 4 at the keynote event of the Worldwide Developers Conference. This post is going to show you three ways to download and install iOS 12 on iOS device without hassle.

People also read:
* Downgrade iOS 12 to iOS 11.4 without Losing Data

* Install IPSW File on iPhone iPad with/without iTunes

iOS 12 will focus on performance and quality improvements. Apple introduced new customizable functions, which you can personalize to look like you. Group FaceTime is here and supports calls with up to 32 people, and Memoji, Animoji, and other fun effects can be used both in Messages and with FaceTime through the new Effects camera. With Apple’s performance improvements, apps launch faster, the keyboard appears faster, and the Camera is quicker to open. Apple has also optimized the system when it’s under load, making iOS devices faster when you need performance the most.

If you are interested in the newest iOS 12 and have a plan to update this iOS version on your device, here are some guidance in the follow passages to download and install iOS 12 on iPhone. Before getting start with the iOS update process, you should check the it if your device is available for upgrading to iOS 12.

iOS Device Compatible with iOS 12:

ios 12 supported devices

Part 1: How to Avoid Data Loss before Installing iOS 12 on iPhone

Since updating iOS 12 on iPhone will lead to data loss, you are suggested to back up your iPhone safely before performing the process. If you backup iPhone data using iTunes, the data synced with iTunes won’t be overwritten by new backup. What’s more, you can’t backup some files selectively instead of the whole device. Here is our sincere recommendation.

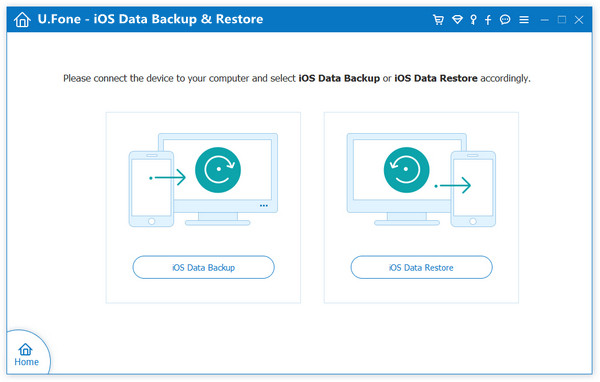
U.Fone iOS Data Backup & Restore can be a perfect choice for you to backup iPhone data before iOS 12 update without iTunes. All file types can be transferred to your computer as a backup, such as photos, messages, contacts, whatsapp messages, call logs, and more. It allows you to select the data you needs to be backed up, preview the iPhone backup before restoring, restore the backup to your iPhone without data loss. It’s a iOS device backup software available on both Mac OS and Win systems, compatible with all iOS devices run any iOS system.

d_win d_mac

How to Backup iPhone Data Safely before Installing iOS 12

Step 1. Download U.Fone iOS Data Backup & Restore
Launch the U.Fone iOS Data Backup & Restore on your computer until the download is successful.

backup restore tool main page

Then you should select“iOS Data Backup & Restore” icon from the interface.

select backup restore option

Step 2. Connect Your iPhone to Mac
In this section you should connect your iPhone  to PC (Windows or Mac). There are two options on the screen: Standard backup and Encrypted backup. If you intend to protect the data on your iDevice, here you can to click “Encrypted Backup” which will require you to set a password for the backup. Otherwise you can tick Standard backup. Now you should click “Start” button to start the backup process.

connect iphone to computer

Step 3. Choose Data to Backup
The data you can deal with is showed on the screen and you can see many data types are supported. Now you are able to select data to back up. Then click “Next”and wait a few minutes.

select file type

Step 4. Back Up is Finished
Wait for a moment, the software is backing up your data.

backup iphone data

As long as the backup is done, you can see the name and the size of the backup file.

view backup files

d_win d_mac

Part 2: Download and Install iOS 12 on iPhone Directly

When you have do a secure backup of your iPhone, now you could install iOS 12 on your iPhone directly.

You can download iOS 12 Over-The-Air – Upgrade and install.

Related: Download iOS 12.0 Beta for Free (IPSW Direct Download Links)

Step 1. On your iPhone, go to: https://beta.apple.com. Click “Sign in” and sign in with your Apple ID and password.
If this is your first time to visit the Apple Beta Software Program, please create Apple ID (Developer account activation charge is $99/Year), you need to read and accept the Apple Beta Software Program Agreement and Sign up an Apple Developer account.

If you have an Apple Developer account, just sign in with your Developer account login details.

Step 2. Login to Apple ID and Password, then click Enroll your iOS device > “Download profile”. When asking your permission to show the configuration profile, click “Allow”. When you go to the download page, then move to iOS tab, and Download profile for your iPhone model (iPhone X/8/8 Plus/iPhone 7/7 Plus/6).

When you see the “iOS 12 Beta Software Profile”, tap “Install” and enter the phone password. Follow the on-screen instruction to continue. Restart your iPhone when asked.

download ios 12 beta

Step 3. After the phone reboots, go to “Settings” > “General” > “Software Update” and you’ll see iOS 12 Public Beta. Tap “Download and Install”. Then it will start to install the iOS 12 on your phone.

install ios 12 public beta

Tips: If you can’t receive the software update, restart or reboot your iPhone

Done. You can then access all new features on your iOS 12 device.

Shortcoming: It will take 30 minutes to 1 hour + to download and install iOS 12 public beta on your iPhone. The installation time varies depending on the following factors: A. Needing to backup device. B. Your current version of iOS on your device. C. Wi-Fi connection speed. In general, it will take longer time to download a public beta than a official version. So when you should be patient when the iPhone stuck in iOS 12 installation. Now we will guide you to perform the iOS update with another method.

Part 3:Download and Install iOS 12 on iPhone via iTunes

We could update iOS 12 on iPhone using iTunes by downloading & installing iOS 12 IPSW files on device. Here are steps to update iOS 12 on iPhone via iTunes, you need to download iOS 12 Developer Beta ipsw file on computer.

Step 1. Firstly, please download IPSW file of iOS 12 beta from Apple official site.

Here is the screenshot of my iOS 12 developer ipsw, I have login my Apple Developer Account and ready download iOS 12 (.ipsw) file.

iOS 12 IPSW download on apple developer account

Step 2. Get the latest version of iTunes on your computer and launch it.

Step 3. Connect your iPhone to the computer and make a backup with iTunes. (If you have backup your device previously, you could slip this step.)

Step 4. Get your iPhone into the DFU mode. (How to Get iPhone into the DFU Mode)

Step 5. On iTunes, select your device, press “Option” button on Mac (“Shift” button on Windows) while clicking on the “Upgrade” button.

Step 6. Choose the downloaded IPSW file on iTunes, and it will begin to install iOS 12 beta on your iPhone.

add ipsw file

However, no matter your install iOS 12 on iPhone directly or using iTunes, it may be lead to data loss on your device. Is it any way to install iOS 12 on iPhone without data loss? Yes absolutely.

Part 4:Download and Install iOS 12 on iPhone via iOS System Recovery

It may be lead to get stuck issues when/after installing iOS 12 on iPhone, such as, get stuck at Recovery mode, DFU mode, white Apple logo screen, etc,. To smoothly update iOS 12 on iPhone and install iOS 12 on iPhone without data loss, you could check this last section.

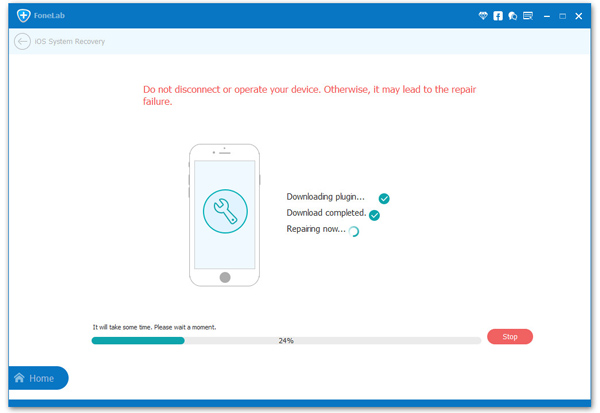
iOS System Recovery will do a favor for you to easily download and install iOS 12 on iPhone without data loss, and it will not cause to cost you too much time. Moreover, it can help to fix iPhone system to normal after iOS 12 update, insist of, iPhone stuck in the Recovery Mode/DFU Mode, iPhone stuck in Apple logo screen, iPhone stuck at black/white screen, or other iPhone frozen issues. iOS System Recovery works well for all iOS models, including iPhone X, iPhone 8(Plus), iPhone 7(Plus), iPhone 6S(Plus), iPhone SE and compatible with all iOS system including iOS 12 and lower.

d_win d_mac

How to Install iOS 12 on iPhone without Data Loss

Step 1.Run iOS System Recovery on the Computer
Launch this iOS System Recovery on your computer. Then connect your iPhone to it with USB cable. Click “More tools”then “iOS System Recovery” in the home page of it.

iOS system recovery

After that, click “Start” button to begin the process.

connect iphone to pc

If your iPhone is working and you want to install the iOS 12 IPSW firmware on your iPhone by this iOS System Recovery, please click the question mark below “Device is connected but not recognized“, then the program will guide you how to get the device into recovery mode ready for detected by the program.

iPhone is connected but not recognized

Step 2.Boot iPhone into the Recovery mode or DFU mode
Then follow the on-screen guide to connect your device to computer and put it in recovery mode.

1)Power off your iPhone.
2)Press and hold the Power button and the Home button together for 10 seconds.
3)Release the Power button and keep holding the Home button until the device is in DFU mode.

boot iphone into dfu

Note: If your iPhone/iPad is in abnormal status because of the current version of the iOS software, for example, your iPhone stuck in recovery mode, black screen of death, Apple logo screen, connecting to iTunes screen or iPhone is disable. Don’t worrry, the software can detect that your device is in the abnormal status, so you don’t need to put it in recovery mode, just click “Confirm” and the iOS System Recovery will download the suitable (.ipsw) file for your iPhone and installing it without data lossing, so it’s very effect, safely and quickly helps you fix ios system to normal.

Step 3.Select Device Model and Download the iOS 12 Firmware
In this step, please select the correct iPhone device model and iOS 12 firmware files for your iPhone, then click “Download” button,

install ios 12 on iPhone

Manually add the downloaded iOS 12 IPSW file to iOS System Recovery program (Above steps, you have download the IOS 12 Developer Beta ipsw file for your device model)

Tips: If you haven’t download the iOS 12 IPSW files, here we also provides the iOS 12 IPSW Download Link for iPhone.

If you have downloaded the IPSW file previously, please select the IPSW file you just download and let the iOS System Recovery program install the iOS 12 IPSW files onto your iPhone without data loss.

add and install iOS 12 on iPhone

Add iOS 12 IPSW file to Program:

add iPSW file

Note: To download the iOS 12 IPSW file for your iPhone, and place the IPSW file somewhere easily accessible(you can get other IPSW files here but only the most recent versions are signed and possible to use).

Step 4.Begin to Install iOS 12 on iPhone without Data Loss
When the iOS 12 IPSW file download is finished, now your phone will be updated to iOS 12 successfully.

install iOS 12 on iPhone

d_win d_mac

Related Articles:

How to Restore iPhone System to Normal after iOS 12 Update

How to Fix iPhone Stuck in Recovery Mode after iOS 12 Update

Export Everything from iPhone X/8/7/6S/6 to Computer before iOS 12 Update

How to Backup and Restore Data from iPhone before iOS 12 Update

Recover Lost Data from iPhone/iPad after iOS 12 Update

Best iPhone Manager: How to Transfer & Manage Files for iPhone

Install iOS 12 on iPhone without Data Loss

How to Downgrade iOS 12 to iOS 11.4 without Losing Data

[Summary]: Looking for a safe way to downgrade your iPhone, iPad, iPod Touch from iOS 12 beta to iOS 11.4? This article will teach you two effective methods to downgrade iOS 12 to iOS 11.4/11.3/11.2/11 with iTunes or iOS system recovery. No data loss.

Recently, Apple released the latest iOS 12 public beta at the WWDC 2018 Developer Conference. I did a simple start-up experience with this newly released iOS 12 public beta. I found that this iOS 12 is different from the system that Apple released in the past. The new iOS 12 system’s optimization of the iPhone is beyond my understanding.

iOS 12 has been designed to make the iPhone and iPad faster, more responsive, and more pleasantly surprised. iOS gives you a comprehensive optimization and enhancement. Whether it is iPhone or iPad, it will be faster and more sensitive to use. A variety of everyday operations, such as opening the camera app and typing text on the keyboard, are faster than ever. In addition, when you work on multiple tasks at the same time on the device, the performance increase will be more significant. The performance of all applicable devices will benefit from these optimizations, even the iPhone 5s and iPad Air. Apple’s latest iOS 12 system is consistent with the devices supported by iOS 11, with support down to iPhone 5s and iPad mini 2. Specific support model as shown below:

ios 12 supported devices

Some Apple users have installed iOS 12 on iPhone, there will be bugs, but the first beta version of iOS 12 is quite stable as far as I can tell so far, and battery life isn’t taking any hits. While iOS 12 seems pretty safe to use on your main iPhone, you should know you can always dial things back if you want to. It’s easy to safely downgrade to iOS 11.4, which is the latest public iOS 11 release. That means you won’t lose any data even if you haven’t backed up your iPhone or iPad before jumping on iOS 12.

How to Backup Data before Downgrading iOS 12 to iOS 11

Before updating, you should back up all your data and settings. For the beta, Apple advises that you should back up to iTunes specifically (rather than to iCloud) and then archive the backup.

People also read: Safely Backup iPhone Data before iOS 12 Update

Here’s how to archive an iTunes backup and prepare for iOS 12:

Step 1.Plug in your iPad or iPhone and start up iTunes on your Mac.
Step 2.Click “Summary“, then “Back Up Now“.

itunes 12.7 backup iphone data

Step 3.Wait for the backup to finish.
Step 4.Now select iTunes > Preferences > Devices and look for your device’s backup.
Hold the Ctrl key and click on the backup. Finally, select the option Archive.

This creates a safe backup that we can return to after trying out iOS 12. By archiving or copying iTunes backup, you can ensure the iOS 11 backup won’t be covered by the new iOS 12 backups so that after going back to iOS 11, you can still restore the device from iOS 11 backup. Remember that you cannot restore an iOS 11 device from backup that was made when the device was on iOS 12 beta.
If you worry about data loss during the iOS 12 beta downgrade, you can use an thrid party iOS Data Exporter to back up photos, text messages, contacts, videos, audio, WhatsApp messages, and other App data from iPhone to computer.
Next, we’ll look at how to go back to a previous version of iOS 11 (and restore the backup we just created) from iOS 12.

How to Downgrade iOS 12 to iOS 11 with Backup by iTunes

Above guide, you have make your iPhone backup with iTunes or thrid-party iPhone data backup & restore tool, the only issue is that you’ll have to restore from a pre-iOS 12 backup (here’s how to back up an iPad or iPhone), so any data or preferences you’ve saved since then will be lost – and if you haven’t got an archived backup from your iOS 11 (as Apple suggests doing before upgrading), you won’t be able to restore your data at all. Let’s teach you how to downgrade iOS 12 to iOS 11 with iTunes.

Step 1.Enter Recovery mode by holding the Power and Home buttons until your iPhone or iPad turns off, then continue holding the Home button. This can take a while, so don’t give up after a few seconds.
Step 2.When it says ‘Connect to iTunes’, do exactly that – plug it into the computer and open up iTunes.
Step 3.Download the proper IPSW file of iOS 11.4 according to your device model.
Download iOS 11.4 IPSW files in HERE.
Step 4.Open iTunes and choose your device. Press Option button on Mac (Shift button on Windows) while clicking on the Upgrade button.

add iOS 11.4 ipsw file

Note: Do Not select Restore iPhone. Otherwise, iTunes will erase all data on your iPhone after downgrading to iOS 11.

Step 5.iTunes will tell you that it’s detected an iPhone or iPad in Recovery Mode, and that this needs to be restored – click OK to agree to this, and then Upgrade iPhone or Upgrade iPad (as appropriate).

Step 6.Finally, choose the option to Restore and Update. iTunes will begin to download iOS 11.4 to your iPhone or iPad device. After the download is complete, your device will restore to iOS 11.4 and restart.

downgrade iphone to ios 11.4

Step 5. Now, you iPhone downgraded to iOS 11.4, if you want to restore the iTunes backups to your devices, please keep your device connected iTunes, once iTunes has reinstalled a fresh version of iOS 11, and then click Restore from this backup in iTunes and choose the archived iOS 11 backup you made before the iOS 12 beta (remember, your iOS 12 backup won’t work) or setting it up as a new iPhone.

Well done, you have success downgrade iOS 12 to iOS 11 with iTunes, but you should backup your iPhone data at first.Next, we will teach you how to downgrade iOS 12 to iOS 11 without backup, no data loss at all, too.

How to Downgrade iOS 12 to iOS 11 without Backup by iOS System Recovery

Some people say it is very troublesome to using iTunes to upgrade or downgrade iOS 12 on iPhone, iPad, iPod Touch, because it takes a lot of time to back up the data, the processing is very slow, and there is a high-risk of data loss.For example, some users couldn’t downgrade from iOS 12 to iOS 11 with iTunes and get stuck at recovery mode, Apple logo screen, black screen; a few users reported that their iDevices cannot turn on or got frozen.

Don’t worry, iOS System Recovery can help you fix all kinds of iOS system issues, such as fixing frozen or dead iPhone on iOS 12 beta; fix iPhone black screen of death after iOS 12 update; fix iPhone stuck at Recovery mode/DFU mode after iOS upgrade/downgrade. In additional, iOS System Recovery for Windows or Mac, both can help you downgrade iOS without iTunes, it won’t erase the device’s data. Let’s shows you how to use the iOS System Recovery program to install OS on the iPhone, iPad or iPod without data loss.

Free download the easy-to-used and safe to iOS System Recovery to downgrad iOS 12 to iOS 11.4 without erasing data on your device.

d_win d_mac

Tips: If your iPhone X/8/7/6/5/4 has been disabled after iOS 12 upgrading or downgrading, the program can helps you fix a disabled iPhone with or without connecting to iTunes.

Simple Steps to Downgrade iOS 12 to iOS 11.4 without Losing Data

Step 1.Install and Launch iOS System Recovery on your PC or Mac
Launch this iOS System Recovery on your computer. Then connect your iPhone to it with USB cable. Click “More tools” on the left column and then tab the “iOS System Recovery” on the preview window.

ufone ios system recovery

After that, click “Start” button to begin the process.

connect iphone to pc

Tips: In order to downgrading iOS 12 to iOS 11.4, you need to download the iOS 11.4 firmware first, the iOS System Recovery program will help you download the latest firmware package and fix it, but you need to put your iPhone in recovery mode for detecting by the iOS System Recovery tool.

Situation 1: If your iPhone is working and you want to get back to iOS 11, click Start and select question mark below “Device is connected but not recognized“, the program will guide you how to get the devices into recovery mode as below step.

device not recognized

Step 2. Boot iPhone into Recovery or DFU mode
Then follow the on-screen guide to connect your device to computer and put it in recovery mode.
Led iPhone into DFU
Click “Question” button and follow the guide to turn your iPhone into Recovery or DFU mode. Here we put disabled iPhone into DFU mode:

For iPhone 6S and older version:
1)Power off your iPhone.
2)Press and hold the Power button and the Home button together for 10 seconds.
3)Release the Power button and keep holding the Home button until the device is in DFU mode.

boot iphone into dfu

For iPhone 7/7 Plus: Put the iPhone 7/7 Plus into recovery mode to be detected before fix it

1. Turn off the iPhone 7 device and connect it to computer.
2. Press and hold the Side and Volume Down buttons at the same time.
3. Keep holding them until you see the “connect to iTunes” screen, it mean device be putted into recovery mode, at this time the program will detect it.

put iphone 7 into recovery mode

For iPhone 8/8 Plus and iPhone X:

1. Shut down your device and confirm it is connected to computer, press and quickly release the Volume Up button.
2. Press and quickly release the Volume Down button.
3. Press and hold the Side button until you see the screen shows iTunes logo screen appear(recovery-mode screen status)

put iphone x and iPhone 8 into recovery mode

Situation 2:If your iPhone/iPad works abnormal because of the iOS 12 beta, for example, your device stuck at black screen, Apple logo screen, recovery mode, etc. Just connect the iPhone to computer and click Start,the program will recognize that your device is in the abnormal status. Click “Confirm” and follow the step 3 begin download the IPSW firmware and installing it by this program.

Step 3.Select Device Model and Download the iOS 11.4 Firmware
In this step, please select the correct iPhone device model and iOS 11.4 firmware files, then click “Download” button, the software will detect your phone model and download the suitable iOS 11.4 IPSW files for your device.

install ios 11.4 on iphone

Manually add the downloaded iOS 11.4 IPSW file to iOS System Recovery software

If you have downloaded the IPSW file before, please select the IPSW file you just download and let the iOS System Recovery program install the iOS 11.4 IPSW files onto your iPhone/iPad device without data loss.

add and install ios 11 on iPhone

Add IPSW files to the program

add ipsw file

Tips: To download the iOS 11.4 IPSW file for your specific iPhone or iPad model, and place the .ipsw file somewhere easily accessible (you can get other IPSW files here but only the most recent versions are signed and possible to use)

Step 4.Begin Install iOS 11.4 on iPhone and Restore it Back to Normal
When the iOS 11.4 plug-in download is finished, this software can automatically downgrade iOS 12 beta to iOS 11.4 on iPhone/iPad/iPod Touch and fix disabled iPhone back to normal.

downgrade iPhone from iOS 12 to iOS 11.4

Well done, above easy guide helps you downgrade iOS 12 beta to iOS 11.4 successfully, at this time,the device will boot up automatically. You can check on Settings > General > About and see if your iPhone device downgraded to iOS 11, you can find the previous data and setting still on the device.If you found lost data after iOS 12 upgrading or downgrading, check this guide about how to recover lost data after iOS 12 update.

iOS System Recovery

Related Articles

Recover Lost Contacts from iPhone after iOS 12 Update

How to Restore Lost Photos from iPhone after iOS 12 Update

Get iPhone Out of Apple Logo after iOS 12 Update

How to Fix iPhone System to Normal after iOS 12 Update

Recover Deleted WeChat History from iPhone after iOS 12 Update

Some important WeChat conversation were lost suddenly after performing iOS 12 update on my iPhone 7. I heard that there are some tools are available for us to recover all iOS data. Which one is the best? Any recommendations?

As one of the most powerful and most functional messaging applications, WeChat is one of the popular chat app among users. Losing WeChat is a trouble thing. If you have made backup using iTunes, iCloud or for Windows/Mac before, you could restore WeChat history from iTunes backup, iCloud backup or backup made by computer. But sometimes, you will lost some important WeChat messages that were not included in a backup and can’t be recovered by yourself, for example iOS 12 update. How to deal with recovering WeChat data without backup? In this article, we are going to show you how to recover deleted WeChat messages from iPhone after iOS 12 update even without backup.

Restore Deleted WeChat Data from iPhone after iOS 12 Update

iOS Data Recovery gives you the chance to restore deleted WeChat data from iPhone after iOS 12 update, including WeChat messages, photos, videos, audio messages, expression patterns and attachments. Besides to WeChat data, iOS Data Recovery allows to recover more than 19 kinds of iOS data, like contacts, messages, photos, videos, call logs, apps data, etc,. It provides you with three recovery modes: directly recover from iOS device, recover from iTunes backup, recover from iCloud backup. Supports to restore iOS data under any data loss circumstances. Compatible with all iOS models and iOS system.

d_win d_mac

Recover Deleted WeChat Data from iPhone after iOS 12 Update

Step 1.Run Program and Select Recovery Mode
Please Download and launch iOS Data Recovery on the computer. Next click on “Recover from iOS Device” recovery mode then begin the process by tapping “Start“. Connect your iPhone to the computer. iOS Data Recovery will detect your iPhone soon.

iOS Data Recovery home page

Step 2.Select WeChat File to Scan by Program
You should select the file type to scan by program. For WeChat history recovery, just click “WeChat“, then click “Next“.

select WeChat file to recover

Then the program begins scanning your device automatically.

scan iPhone and search deleted data

Step 3.Preview and Recover Deleted WeChat History from iPhone
Once the scan is completes, results will be shown in an interface, preview and select the specific data that you wish to recover from the WeChat history. Select what you need and hit “Recover” to save it on the computer.

recover WeChat from iPhone

d_win d_mac

Related Articles:

How to Recover Deleted App Files from iPhone after iOS 12 Update

How to Backup and Restore Data from iPhone before iOS 12 Update

Recover Lost Data from iPhone/iPad after iOS 12 Update

How to Restore Photos from iPhone after iOS 12 Update

Best iPhone Manager: How to Transfer & Manage Files for iPhone

Recover WeChat Data after iOS 12 Update

iOS Data Recovery

Recover Your iPhone iPad Lost Data
Now, Even without Backups

Compatible with iOS 11 & iPhone X/8 (Plus)

Recover Lost Data Now

How to Recover Deleted App Data from iPhone after iOS 12 Update

Summary: If you are one who lost apps data from iPhone/iPad/iPod after iOS 12 update, you can take this way for reference to restore deleted App data which in the follow section we will mention.

Some WhatsApp chat history and WeChat chat conversion were disappeared after I updated my iPhone to iOS 12. Did these files really gone forever? Any suggestions to get it backup? I haven’t backup, I am serious to restore these apps data. Please help.

Accidental deletion can be the most common cause will lead to app data loss on your device, the second one is iOS update. Losing app data is really a frustrating experience for anyone, especially losing it due to iOS 12 update without previous backup. We will find a lot of iOS data recovery tools on the Internet, all of them are used for recovering the common types of data, like contacts, photos, messages, etc,. But there is seldom solution to rescue app data on iOS device. If you need to recover app data from your iPhone/iPad/iPod after iOS 12 update, here is your solution. iOS Data Recovery makes it easy to see all of your available options and recover specific data from backups via iTunes, iCloud and the device itself even without backup.

Undelete App Data from iPhone after iOS 12 Update

iOS Data Recovery is your perfect choice, to recover deleted app data from iPhone after iOS 12 update, insist of WhatsApp, WeChat, Kik, Viber, Skype, Line and more app. It is an excellent program designed for restoring more than 19 kinds of deleted data from iPhone/iPad/iPod, including apps data, contacts, messages, photos, videos, call logs, etc,. It enables you to recover iOS data under any data loss causes, for instances, iOS update, iOS jailbreak, restore to factory reset, virus attack and more. Allows to preview data before selectively recovery, compatible with all iOS models and all iOS system.

d_win d_mac

How to Restore App Data from iPhone iOS 12 Update

Step 1.Run Program and Select Recovery Mode
First of all, please install and run iOS Data Recovery program on the computer, connect your iPhone to the computer with its USB cable.

After connecting, the program will display detailed information of your iPhone in the interface of program. Select “Recover from iOS Device” recovery mode and then click “Start” button.

iOS Data Recovery home page

Step 2.Select the File to Recover
Now you should click the file name to scan by program, for app files recovery, just click “App Photo” & “App Video” and then click “Next” button. (Or you could select “WhatsApp“. “WeChat“, “Viber“, “Kik“, “Skype“, “Line“.)

select app files to recover

Now the program will begin to scan all the data from iPhone. It will take a few minutes to finish the files scanning.

scan iPhone for deleted data

Step 3.Preview and Recover Deleted App Data from iPhone
When the scanning is end, it will list all files found from your iPhone. Preview the recoverable data under “App Photo” & “App Video” category, pick on the data you want, recover it and save it on the computer by clicking “Recover” button.

recover deleted app data from iPhone after iOS 12 update

d_win d_mac

Related Articles:

How to Recover Deleted App Files from iPhone

How to Backup and Restore Data from iPhone before iOS 12 Update

Recover Lost Data from iPhone/iPad after iOS 12 Update

How to Restore Photos from iPhone after iOS 12 Update

Best iPhone Manager: How to Transfer & Manage Files for iPhone

Recover iPhone App Data after iOS 12 Update

iOS Data Recovery

Recover Your iPhone iPad Lost Data
Now, Even without Backups

Compatible with iOS 11 & iPhone X/8 (Plus)

Recover Lost Data Now

How to Backup iPhone/iPad/iPod Data before iOS 12 Update

Finally, iOS 12 is released in WWDC. iOS 12 cements Apple as a leader in augmented reality (AR) with the arrival of groundbreaking multiplayer capabilities it calls shared experiences in ARKit 2. User interface and core app updates give us grouped notifications and also group FaceTime. And, of course, Siri will be smarter in 2018, as it is every year, this time thanks to Siri Shortcuts.

As usual, however, there were still a bunch of new features for updating. iOS 12 bring things like your standard performance improvements, new Animoji features, Memoji — since everyone has always wanted to turn themselves into an Animoji — group FaceTime, camera effects, ways to limit your screen time and many more features that Apple crammed into its two hour-long keynote presentation.

If you own an iPhone/iPad/iPod, after the WWDC you realized how convenience the new OS can help your daily life. Certainly, you can’t wait to update to the latest version of OS and enjoy all the new features. But you still have to be careful before doing so. Keeping iOS data is the most important thing when you decide to update iOS system on iOS device. Since there is always a risk of data loss when upgrading iOS system. Since we save all our previous contacts, photos, videos, documents and important data on our device, update to iOS 12 would possibly cause data loss and we can hardly get them all back. In this tutorial, we will show you the best solution to safely backup iOS data before iOS 12 update.

Safely Backup iOS Device before iOS 12 Update

iOS Data Exporter is the best software can help. It could be used to backup & restore more than 20 types of iOS data, including contacts, SMS, photos, video, note, calendar, reminder, apps data(WeChat, Skype, Viber, Kik, Line, Skype) and more. With using this reliable software, you could safely backup iPhone/iPad/iPod before iOS 12 update. It offer three modes for you: back up & export from device, extract data from backup, restore backup to device. It provides three backup modes with you, insist of export data from iPhone directly, export data from iTunes backups, and download data from iCloud backups; making a full backup or backing up portion data selectively. Supports all iOS devices, such as, iPhone X, iPhone 6S/6, iPhone 5S/5, iPad and iPod.

d_win d_mac

How to Backup iPhone Data Safely before iOS 12 Update

Step 1. Run Program and Select the File to Backup
To begin with, download iOS Data Exporter and run it on the computer. From the “Export from iOS Device” tab, click “Start” to proceed.

export iphone data option

Select the file types you need to backup and click on “Next“. The iOS Data Exporter will prompt you to connect your iPhone to the computer.

select file to scan

Step 2. Scan iPhone Data Completely
Once your device is connected, click “Scan” button and then the program will scan your device.

scan iPhone data

Note: The scan will last for a while and the time depends on the storage of your device.

Step 3. Preview and Backup Data from iPhone
Once the scan is completed, the data available will be displayed on the interface of program. You can check the specific files by clicking different tabs. After selecting the wanted files, just click on the “Export” button at the bottom right corner to backup the selected data on your computer.

preview and backup iPhone data

A popup window will ask you to select where you want to store the selected data on your computer.

select position to save iPhone data

d_win d_mac

Related Articles:

How to Backup and Restore Data from iPhone X/8/7/6S/6

Recover Lost Data from iPhone/iPad after iOS 12 Update

How to Restore Photos from iPhone after iOS 12 Update

Best iPhone Manager: How to Transfer & Manage Files for iPhone

How to Play Apple Music offline on iPhone/iPod/iPad

Backup iPhone Data before iOS 12 Update

Transfer Photos between iPhone 8/X and Windows 10/8/7 without iTunes

[Summary]Have got a iPhone 8/X, the most important thing you should consider is how to sync photos to computer for backup.For you convenience, we will recommend an easy and efficient way to help you transfer photos between iPhone 8/X and Windows computer without iTunes.

The most powerful smart phone products of Apple’s latest generation, the iPhone 8 and the iPhone X, use a more powerful camera design and have enhanced the flash.Now the iPhone 8, iPhone 8 Plus and iPhone X developed a more advanced feature with a larger, faster sensor.There are many attractive characteristic of the latest iPhone 8/X.As we know, the iPhone 8 is equipped with a 12-megapixel main camera, the iPhone 8 Plus is equipped with a 12-megapixel dual camera, F1.8 large aperture design, and a new lens module. Both use 3GB of running memory and 64GB/256GB of body storage.There is no doubt that taking photos with iPhone 8/X is almost the first thing you want to do as soon as you got the devices.

As demonstrated above,you must can’t wait to transfer your important and precious photos from iPhone to computer to take a protection of the data.However, use iTunes to back up and sync iPhone photos is not as simple as we thought.Sometimes you may lose or delete several photos accidentally because of the syncing.Therefore, you should find a useful and efficient method to help you transfer photos from iPhone 8/iPhone X to computer without iTunes syncing.Fortunately, here in the following article, we will share you a simple method to help you transfer your valuable pictures between iPhone 8/X and Windows 10/8/7 in just a few clicks.

The iOS Manager is definitely a powerful transfer program for transferring photos between iPhone and computer that you should not miss it.With the iOS Manager, you don’t need to worry about the problem of transferring photos between iPhone 8/X and Windows 10/8/7 without iTunes at all. It supports transferring & managing varies kinds of iOS data, including photos, music, videos, contacts, messages, playlists, etc,. In fact, vice versa, if you want to transfer some photos from to computer to iOS device, it can also help you complete it.All data you want to transfer can be accomplish in just one click for 5 minutes.In addition, it can perfectly compatible with all the kinds of iOS models, such as iPhone 5/5s/SE/6/6s/7/8/X, and almost all Windows and Mac operating systems.

First of all, you should download the iOS Manager on your computer and here is the trial version of the program we provide.

d_win d_mac

Transfer Photos between iPhone 8/X and Windows 10/8/7 without iTunes

Step 1.Download the Program on Windows
First of all, please install the iOS Manager on your computer and then link your iPhone 8/X to PC with the USB cable.Remember to tap “Trust” on the phone screen to allow the computer to access to your iPhone.

click trust on iphone

Step 2.One Click to Transfer Photos to PC
Then the program will identify your device automatically.Then you should click the “Backup Photos to PC” button on the interface.In this step,you can transfer all photos to Windows 10/8/7 at a time.

iOS manager main page

If you want to browse the photos in detail and pick them selectively, you should click into “Photos” section in the top-middle data bar.Just tick those you want and press the “Export” button. After that, you can select “Export to PC“button then you can transfer photos from iPhone X/8 Plus to Windows PC.

photos export

If this article helps you, you can share them to your friend via Facebook, Instagram, Pinterest and other social media on PC.

d_win d_mac

Related Articles:

How to Transfer Samsung Data to iPhone 8/iPhone X

How to Transfer iPhone Files to iPhone 8/iPhone X

How to Transfer Data to a New iPhone X

How to Transfer Music from Computer to iPhone X/iPhone 8

How to Import Data to iPhone X from Samsung Android

How to Recover Data from iPhone X

How to Recover Data from iPhone 8

How to Transfer Content from Previous Phone to New iPhone 8/X

Summary: Did you get a new iPhone 8 or iPhone X and now you want to move your personal data from an older phone to the new iPhone? It’s easy to migrate everything from an old phone to a brand new iPhone with you. This tutorial will show how to get all data over from an old phone to the new iPhone in the fastest manner possible.

Apple’s newest flagship smartphones – the iPhone 8 and iPhone X become the hot models for mobile users. Before switching from an old device to the new one, you may be wonder how to transfer the data between them. The most common way to sync from an old iPhone to a new one is by the way of iCloud or iTunes, however, iCloud has limited free space if you don’t pay for more, and iTunes is very hard to use and the process is inconvenient. Moreover, how to deal with switching data between Android and the new iPhone since the two device based on different OS? Are there any other ways to transfer content from previous phone to new iPhone 8/X? Here we provide you the best tool help to sync data from old phone to the new iPhone device with only one click.

One-Click to Transfer Phone Data to New iPhone 8/X

Phone Manager is what I want to recommend for you, it is an excellent data manager tool for mobile device, help to transfer & manage data for Android device or iOS device. The transferable types of data including music, videos, playlists, contacts, SMS, photos. With the help of Phone Manager, you can easily transfer data between old phone and the new iPhone 8/X with one click. Phone Manager not only allow to do the phone to phone transfer, but also rebuild iTunes library, transfer iTunes media to device, backup photos to PC. It is such a efficient and safe solution that make the transfer smoothly without iCloud/iTunes syncing.

d_win d_mac

How to Switch Old Phone Data to New iPhone 8/X

Step 1. Download and Run Phone Manager on Computer
To begin with, please download and run Phone Manager on computer.

phone manager main page

Step 2. Connect Old Phone and iPhone 8/X to Computer
Connect both source and target iPhone to PC/Mac via USB cable. Unlock your devices and tap “Trust” on iPhone screen to authorize the connection. When you see the interface below, choose “Phone to Phone Transfer” option.

select target device

When both source and target phones are recognized and connected, hit the “Next” button to move on.

Step 3. Select Data Types to Transfer
Phone Manager enables you transfer music, videos, playlists, contacts, SMS and photos between two phones. The number of each content will be also listed. By default, all data types are selected, you can also do the selectively file transfer.

select file to transfer

Hit the “Transfer” button to start syncing data from your old phone to the new iPhone 8/X. The transfer process will complete in minutes. Now you can check the data on your iPhone 8/X.

1 click phone to phone transfer

d_win d_mac

Related Articles:

How to Transfer Samsung Data to iPhone 8/iPhone X

How to Transfer iPhone Files to iPhone 8/iPhone X

How to Transfer Data to a New iPhone X

How to Transfer Music from Computer to iPhone X/iPhone 8

How to Import Data to iPhone X from Samsung Android

Recover WhatsApp on iPhone/iPad after iOS 12 Update

[Summary]WhatsApp is one of the most common apps that experience data loss every time on iPhone/iPad after iOS 12 update. What would you do when you lost your WhatsApp files and get them back on iPhone/iPad after iOS 12 update? The good news is that there are effective ways we provide to recover lost WhatsApp messages from iPhone/iPad after iOS 12 upgrade.

IOS 12 is packed with many great features and changes that iPhone users will surely love, such as update the new interface icon, accomplish a true darkness mode, supports multi-tasking mode of operation function and fix previous mistakes.However, many iOS users were also frustrated that they may lost their WhatsApp messages right after the iOS 12 upgrade.Though you can easily get them back from your backups, but what if you don’t have make the backup and lost WhatsApp after iOS 12 upgrade.How can you retrieve WhatsApp on iPhone/iPad after iOS 12 update?In this article, we will show you the most possible and effective ways to restore your messages with a powerful recover program in a faster time.

The best iOS Data Recovery—-iPhone iPad Data Recovery can perfectly help users restore lost WhatsApp from iPhone after iOS 12 update include SMS/iMessages, pictures, videos, call logs, WhatsApp messages, notes and more contents.Besides lost data after iOS 12 update,the other terrible unexpected situations like factory reset, jailbreak or ROM flashing, Phone crashed, virus attacks can also cause the data deletion.No matter what lead to the data lost, this program can much more quickly and safely to restore your lost data on iPhone/iPad.All deleted contents from iPhone X/8/7/6s/6/5s/5c/5 can be recovered after iOS 12 update.The recovery solution are very simple with three simple steps. Now please follow the steps below to get back your lost WhatsApp chat history,WhatsApp messages,WhatsApp videos safely and selectively.

The trial version of the iPhone iPad Data Recovery program compatible with Windows and Mac version.You can download the program on your computer in 100% Security.

d_win d_mac

How to Recover Lost WhatsApp from iPhone/iPad after iOS 12 Update

Step 1. Connect Your Updated iPhone to the Computer
On the first step,you should download and run the iPhone iPad Data Recovery on your PC or on the Mac, please use the USB cable to connect your iPhone to the computer as soon as the iPhone Data Recovery installed. Next, select “Recover from iOS Device” option in the main interface of the program.

iOS Data Recovery home page

Step 2.Select WhatsApp Files to Scan
All the main file categories found inside the iPhone will be displayed on the left side screen. Now you can select the file types that you want to scan. For WhatsApp recovery, please tick the “WhatsApp” categories on the main screen.The scanning may take a while but you can see its progress on the program screen.

select WhatsApp file to recover

The scanning may take some time depending on a total load of data stored in the iPhone/iPad. Please wait a few minutes for the program analyzing data on your device.

scan iphone and search data

Step 3.Preview and Recover Lost WhatsApp Data
Now you can preview and mark those lost WhatsApp data you want on the interface.Go over your WhatsApp messages and find the lost messages you require.Once found, you can selectively recover them or select them all to restore by clicking “Recover”button to save them to your computer.

recover iPhone WhatsApp data iOS 12 update

d_win d_mac

Related Articles:

How to Recover Lost iPhone Data after iOS 12 Update

How to Recover Lost iPhone Photos after iOS 12 Update

How to Recover Lost iPhone Contacts after iOS 12 Update

How To Backup and Restore Data on iPhone

How to Restore iPhone System to Normal

How to Play Apple Music on iPhone for Free

How to Manage iPhone on Computer

Recover Call Logs on iPhone/iPad after iOS 12 Update

Is it possible to recover my call logs on iPhone? Last week I have update my phone system on iOS 12, when it was almost successful but it crashed at last!Now I lost all precious data on my iPhone and I want to get call logs back as soon as possible.What can I do?

Important Call History in Our Life
In fact, the beginning of this year there are signs that Apple will release the newest iOS system, iOS 12 at WWDC 2018. And now according to a new report shows that Apple will be in the next version of the iOS 12 system, to manage files easier and fix previous mistakes of iOS 11. There is no doubt that the latest iOS 12 update will reveal so many ways to improve user experience and total phone functions, however, there is a problem that needs attention, that is how to recover data from iPhone after iOS 12 update. One of the files most commonly affected by data loss is deleted call history.As we all know, call log including all incoming calls, outgoing calls and missed calls from other people, and our daily life can not live without these important call records.Losing call history from iPhone/iPad has become a very common trouble and it’s a very big disaster after iOS 12 update. But sometimes, when you forget to back up the call history or the recent call was not backed up, then in this case how can you get your call logs back ?

Restore Call logs on iPhone/iPad after iOS 12 Update

Here, we will recommend a powerful data recovery tool to help you recover deleted call logs on iPhone/iPad after iOS 12 update. Choose iPhone iPad Data Recovery (Computer/Mac version) is to choose an easy and safe solution for effectively recovering lost call history after iOS 12 update. It is possible to retrieve all deleted contents include call logs, contacts, text messages, pictures, videos, WhatsApp messages, and more data files from iPhone X/8/7/6s/6/5s/5c/5 after iOS 12 update.This program also can be used to restore iOS data cause you accidentally lost data commonly, such as restore factory settings, accidentally or intentionally deletion, virus infection, phone crash, etc,.

A trial version of the iPhone iPad Data Recovery we recommend can perfectly compatible with Windows and Mac version.

d_win d_mac

Simple Steps to Recover call logs on iPhone/iPad after iOS 12 Update

Step 1.Run the Program and Connect Devices to the Computer
Download and install iPhone iPad Data Recovery on your computer. Run it and then connect your iPhone iPad to the computer via an USB cable.Click” Recover from iOS Device” button.

iOS Data Recovery home page

Step 2.Select Call Logs Files to Scan
Choose the file type you need to recover from iPhone/iPad. For call history recovery,just click “Call History”on the interface and click on “Next”.

select file to recover

Please wait a few minutes for the program analyzing data on your device.

scan iphone and search data

Step 3.Preview and Recover Lost Call Logs
Now you can preview and mark those lost call logs you want on the interface.Then you should click “Recover”button to save them to your computer.

recover iPhone call logs iOS 12 update

d_win d_mac

Related Articles:

How to Recover Lost iPhone Data after iOS 12 Update

How to Recover Lost iPhone Photos after iOS 12 Update

How to Recover Lost iPhone Contacts after iOS 12 Update

How To Backup and Restore Data on iPhone

How to Restore iPhone System to Normal

How to Play Apple Music on iPhone for Free

How to Manage iPhone on Computer

How to Restore Contacts from iPhone after iOS 12/13 Update

[Summary] If you are annoying about lost contacts from iPhone after iOS 13/12 updatewithout making a backup.This tutorial can show you the easiest and the most efficient way to recover lost contacts from iPhone after iOS 13/12 update.

For many years, Apple’s iOS operating system has long been loved by everyone for its clean, secure, closed-loop ecosystem and its availability and ease of use. Apple has launched the latest iOS version – iOS 13 on Jun 3, 2019. As a major iOS upgrade, iOS 13 will not only fix iOS 12 vulnerabilities, but will also increase several useful features such as a completely new interface icon, darkness mode, a phone that also supports multi-tasking mode of operation, upgrade photos management capabilities; significantly enhance the Siri features and more. Although we do not know more details about iOS 12 before Apple released, it also attracted more people to update the system to enhance the device performance.

However, every nutshell has a concave and convex side.Updating your new iOS system can improve your device’s performance, but at the same time the iOS system update may also bring many new problems to your phone.The most common problem is data loss. Therefore, be aware that it is important to back up your phone data before iOS 12 Update, otherwise you may have a bad situation with contacts loss after updating your system.If you don’t have any backup, or you wouldn’t like to restore an backup to recover your lost contacts after iOS 11 update,what if you are in such a situation and loss your precious contacts, how would you deal with it? Is it possible to retrieve deleted contacts from iPhone after iOS 12/13 update? The answer must be Yes. Fortunately, you are on the right site and now we will recommend a powerful data recovery tool that will do that and more.In this post, we will share the easiest ways helping you restore contacts on iPhone after iOS 12/13 update.

To recover data contacts from iPhone XS/XS Max/X/8/7/6S/SE after iOS 13 upgrading and restore contacts on iOS 12 devices, you need to use a professional iOS 13/12 Data Recovery.

The best iOS 13/12 Data Recovery – iPhone Contacts Recovery can perfectly help users restore lost contacts from iPhone after iOS 12/13 update or other terrible unexpected causes like factory reset, jailbreak or ROM flashing, Phone crashed, virus attacks.Besides contacts, the program supports to recover lost SMS/text messages, pictures, videos, call logs, WhatsApp messages and more contents from iPhone. It can also recover data from iOS 11, iOS 10, iOS 9 devices. With the help of iPhone Data Recovery program, you can directly restore your lost iPhone contacts without backup or with the help of the backup in your iTunes/iCloud. The recovery solution are very simple with three simple steps.

Here is the trial of the iPhone Data Recovery which can perfectly apply to Windows or Mac version.

d_win d_mac
d_win d_mac

Method 1: Restore Contacts from iPhone Directly after iOS 12 Update

Step 1.Download the Program and Connect Your iPhone on PC
Firstly, please download and install iPhone Data Recovery on the computer. Then launch it as soon as possible.Then connect your iPhone to the computer with the USB cable. Next, select “Recover from iOS Device” option on the main interface.

iOS Data Recovery home page

Step 2.Scan Data on Your iPhone
Just select the file types that you want to scan. All data files will be list by the program and for contacts, you should tick the “Contact” options and click on “Next” button.

Attention: By default, all data will be selected at first. You can uncheck the other except for the Contacts.

select contact file to recover

Now the program will show the scanning interface, this process may take you a few minutes.

scan iPhone and search data

Step 3.Recover the Selected Contacts from iPhone
Now all recoverable data will be displayed on the main screen, such as text messages, photos, contacts and so on. You can preview the found data by choosing the file type on the left side . Select the contacts you want to restore and then click “Recover” button.

recover deleted contacts from iOS 12 iPhone

d_win d_mac
d_win d_mac

Method 2: Restore Contacts on iPhone via iCloud (Erase All Data)

Step 1. Erase iPhone data and settings: Before restoring iCloud, you need to erase iPhone. Go to “Settings” < “General” < “Reset” < “Erase All Content and Settings”.

Step 2. Restore iCloud backup to your iPhone: After that you can start to restore iPhone from iCloud backup by going to “Set up your device” < “iCloud Sign In” < “Choose backup”.

icloud backup restore

Apparently, this method is not perfect enough since it require erasing your device before the restore. And it is not flexible, this way can’t restore only contacts.

Conclusion: We conclude two methods to recover deleted contacts on iPhone. We suggest you use the first way to restore your contacts from iPhone after iOS 12 via iOS 13/12 Data Recovery, since it could help to recover iPhone contacts selectively and without overwriting the previous data or even erasing all previous data. This solution can be used to recover lost iPhone data no matter you have a backup or not.

More iPhone Data Recovery Articles:

How to Recover Lost iPhone Photos after iOS 12/13 Update

How To Backup and Restore Data on iPhone

How to Restore iPhone System to Normal

How to Manage iPhone on Computer

How to Play Apple Music on iPhone X/8/7/6S/6 for Free

Recover iPhone Contacts

iOS Data Recovery

Recover Your iPhone iPad Lost Data
Now, Even without Backups

Compatible with iOS 12 & iOS 13

Recover Lost Data Now