Category Archives: Fix iOS

How to Put iPhone 11/11 Pro, iPhone XR/XS/X into Recovery Mode

[Summary]: Want to put the iPhone XS, XR, XS Max, or iPhone X into recovery mode or DFU mode to restore with iTunes or macOS Finder (for Catalina and later), or to fix ios system to normal? This article teach you how to enter recovery mode or exit recovery mode on iPhone XR, XS, XS Max, iPhone X, iPhone 8/8 Plus.

Sometimes you may put your iPhone into Recovery Mode to effectively restore the device, fix iPhone stuck on Apple logo screen/black screen of death, remove iPhone screen passcode(unlock iPhone) and fix various ios system error.

If your iPhone XS, XR, XS Max or X is stuck on the Apple logo for an extended amount of time and does not boot, is stuck on the iTunes logo with a USB cable, or if the computer is not recognizing the iPhone. When in Recovery Mode, the iPhone XS, XR, XS Max, or X can be restored directly with iTunes or macOS Finder (for Catalina and later), but it will erase all iOS data and settings when your using iTunes/macOS Finder to restore the devices.
Also read: How to fix iOS to normal without data loss

How to put an iPhone XR, iPhone XS, iPhone XS Max, or iPhone X into recovery mode? This article teach you how to enter or exit recovery mode on iOS 13 devices, If you have an older iPhone, then follow the instructions for putting older iPhone models into Recovery Mode instead.

enter recovery mode on iphone xs, iPhone 11 pro

What to do before putting iOS 13 devices into recovery mode

1. A Apple USB cable
2. A computer with the latest version of iTunes, or MacOS Catalina or later
3. Update iTunes to the latest version before attempting to use Recovery Mode.
4. Backup your iPhone data, because using recovery mode or attempting to restore without a backup can result in permanent erase your data.

How to Put iPhone XR, XS, XS Max, X, 8, 8 Plus into Recovery Mode

Backup your iPhone data before beginning. Failure to have an available backup may lead to permanent data loss from the iPhone.

Step 1. Connect the iPhone XR, iPhone XS, iPhone XS Max, or iPhone X to a computer with a USB cable
Step 2. Open iTunes on the computer (Mac or Windows, or in macOS Catalina open Finder)
Step 3. Press and release Volume Up on the iPhone
Step 4. Press and release Volume Down on the iPhone
Step 5. Press and continue holding the Power button until the iPhone XR, XS, XS Max, X is in recovery mode

Put iPhone 11/11 Pro, iPhone XR/XS/X into Recovery Mode

iTunes (or Finder) will show an alert stating an iPhone has been found in Recovery Mode
After the iPhone has entered into Recovery Mode, you can update the iPhone XR, XS, XS Max, X with the latest available iOS release, or restore with iTunes (or Finder) as usual either with a backup or by setting the device up as new.

An iPhone in recovery mode can also be restored by using IPSW if needed, as long as the IPSW file is actively being signed by Apple and matches the specific iPhone XR, XS, XS Max, X model. You may find iOS IPSW files here for the latest iOS versions.

How to Exit Recovery Mode on iPhone XR, XS, XS Max, X

Exiting Recovery Mode happens automatically once the iPhone is restored or updated, but you can also exit recovery mode without restoring by issuing a force reboot to the iPhone XR, XS, XS Max, X as follows:

Step 1. Disconnect the iPhone XR, XS, XS Max, X from the computer
Step 2. Press and release the Volume Up button on iPhone
Step 3. Press and release the Volume Down button on iPhone
Step 4. Press and hold the Power button on iPhone, continue to hold until you see the  Apple logo appear on iPhone screen
Step 5. Exiting Recovery Mode will return the iPhone to whatever the prior state was before it was placed into recovery mode in the first place. If the iPhone was stuck on the ‘connect to iTunes’ screen anyway, then it won’t boot back into the normal home screen or lock screen.

All other iPhone (and iPad) models can also enter into recovery mode is needed for troubleshooting purposes, but the steps to do so differ per device.

Additionally, DFU mode is available for when Recovery Mode is not working to restore a device. DFU mode is a lower level restore mechanism but is rarely needed.

Looking for a safe way to fix your system problem? Please keep reading the below effective guide, you need to free download an iOS system recovery to repair your iPhone software problem.

Repair All iPhone Problems with iOS System Recovery(No Data Loss)

If you’re having trouble with your iPhone or iPad – for example: iPhone Stuck in Recovery Mode, iPhone Stuck in Spinning Circle, iPhone Stuck on Apple Logo, White Screen of Death, Black Screen of Death, iPhone Frozen, iPhone Boot Loop, iPhone Won’t Turn On, iPhone Restore Failure, iPhone Update Failure, or you can’t get it out of recovery mode – this reliable iOS system recovery software is exactly what you need.

This iOS System Recovery is expert at fixing your iPhone/iPad/iPod touch device when you cannot enter the system in normal way and compared with iTunes, the iPhone fix tool can repair with various iOS system issues like white Apple logo, boot loop, recovery mode, DFU mode, etc. Besides, it can fix your iOS system without data loss. What’s more, it also can help you downgrade iOS without iTunes through downloading and installing IPSW firmware, no data loss at all.

Main Features of iOS System Recovery

  • Enter & Exit Recovery Mode With One Click, No Data Loss
  • Fix 50+ iOS System Problems without Data Loss
  • Factory Reset iPhone/iPad without iTunes/Password – Unlock iPhone
  • Supports all iOS versions and devices including the latest iOS 13 devices
  • Works well with Windows and Mac computer

d_win d_mac
d_win d_mac

How to Fix iPhone Stuck in DFU Mode

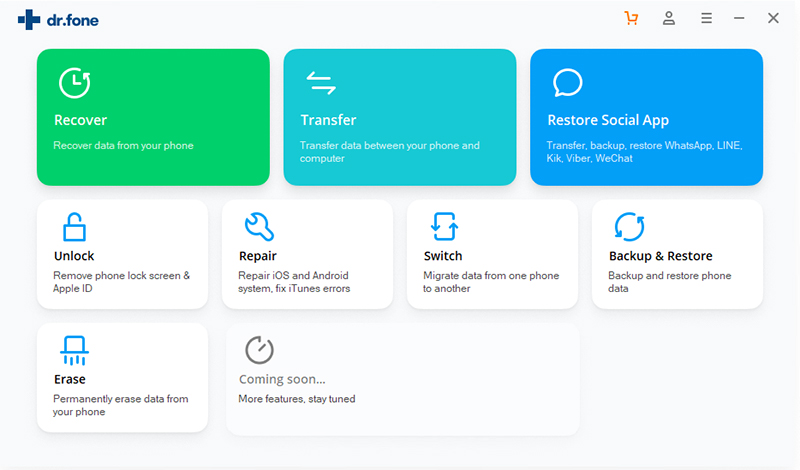
Step 1: Launch the iOS Toolkit on PC or Mac
Run the software on your computer and connect your iPhone to the computer via a USB cable.

connect iPhone to computer

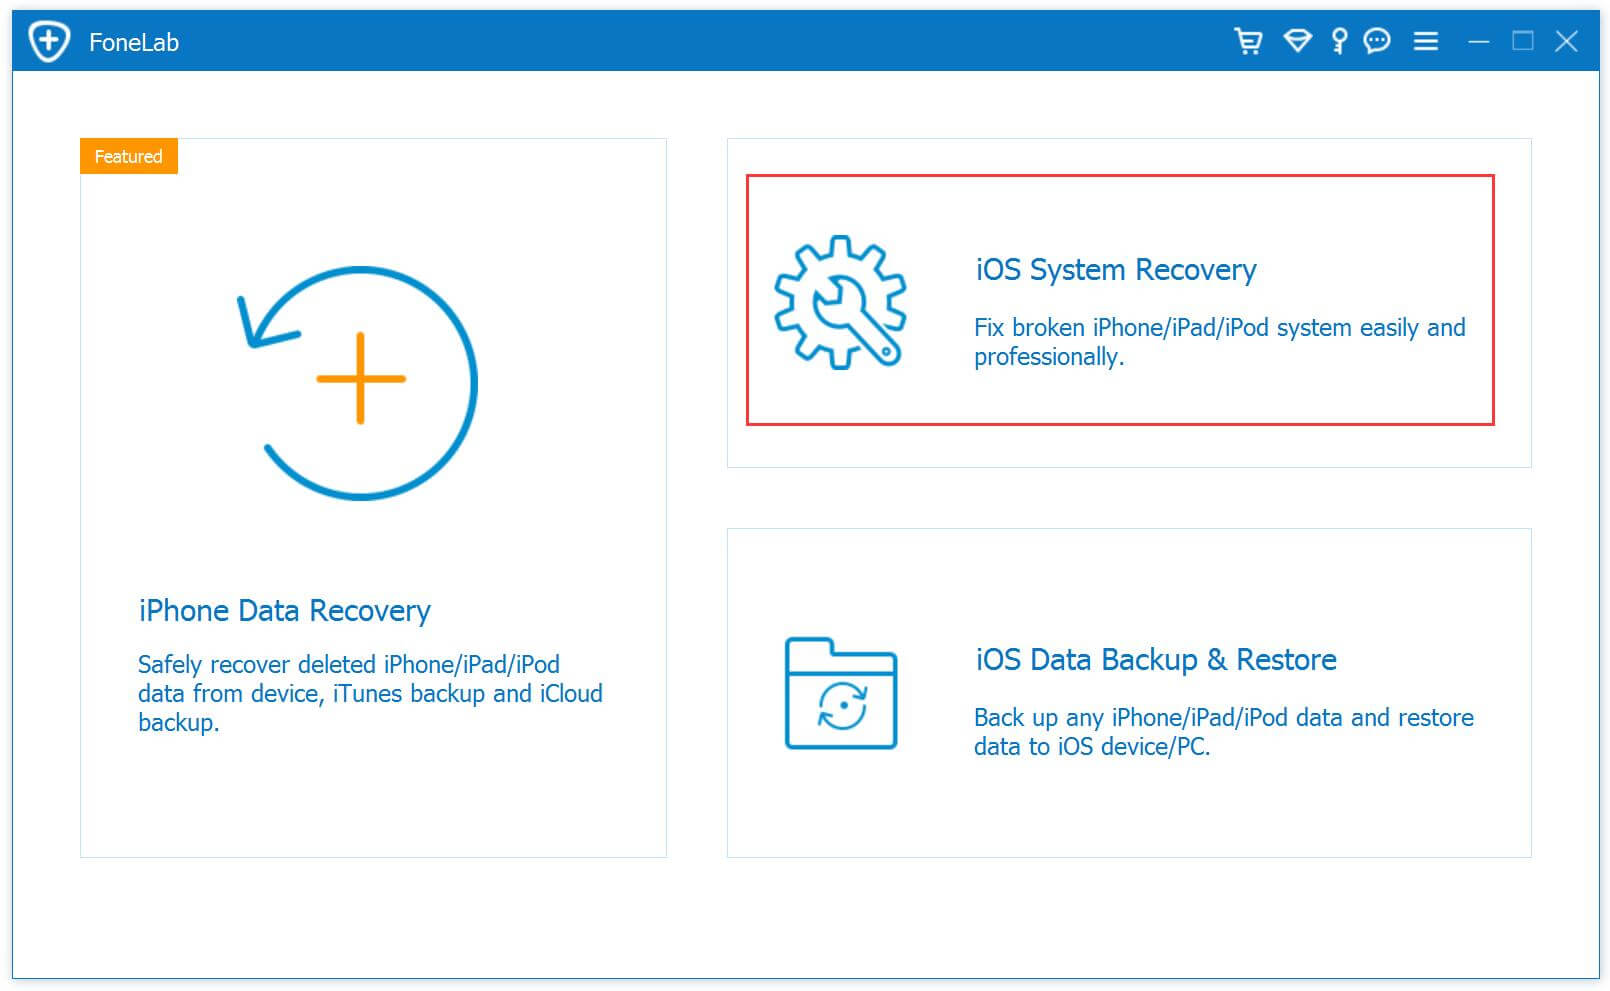
Step 2: Click “iOS System Recovery”
You’ll see there are three main functions: iPhone Data Recovery, iOS System Recovery , iOS Data Backup & Restore. To fix the iPhone stuck in DFU mode, click the More tools and click “iOS System Recovery“.

launch iOS System Recovery

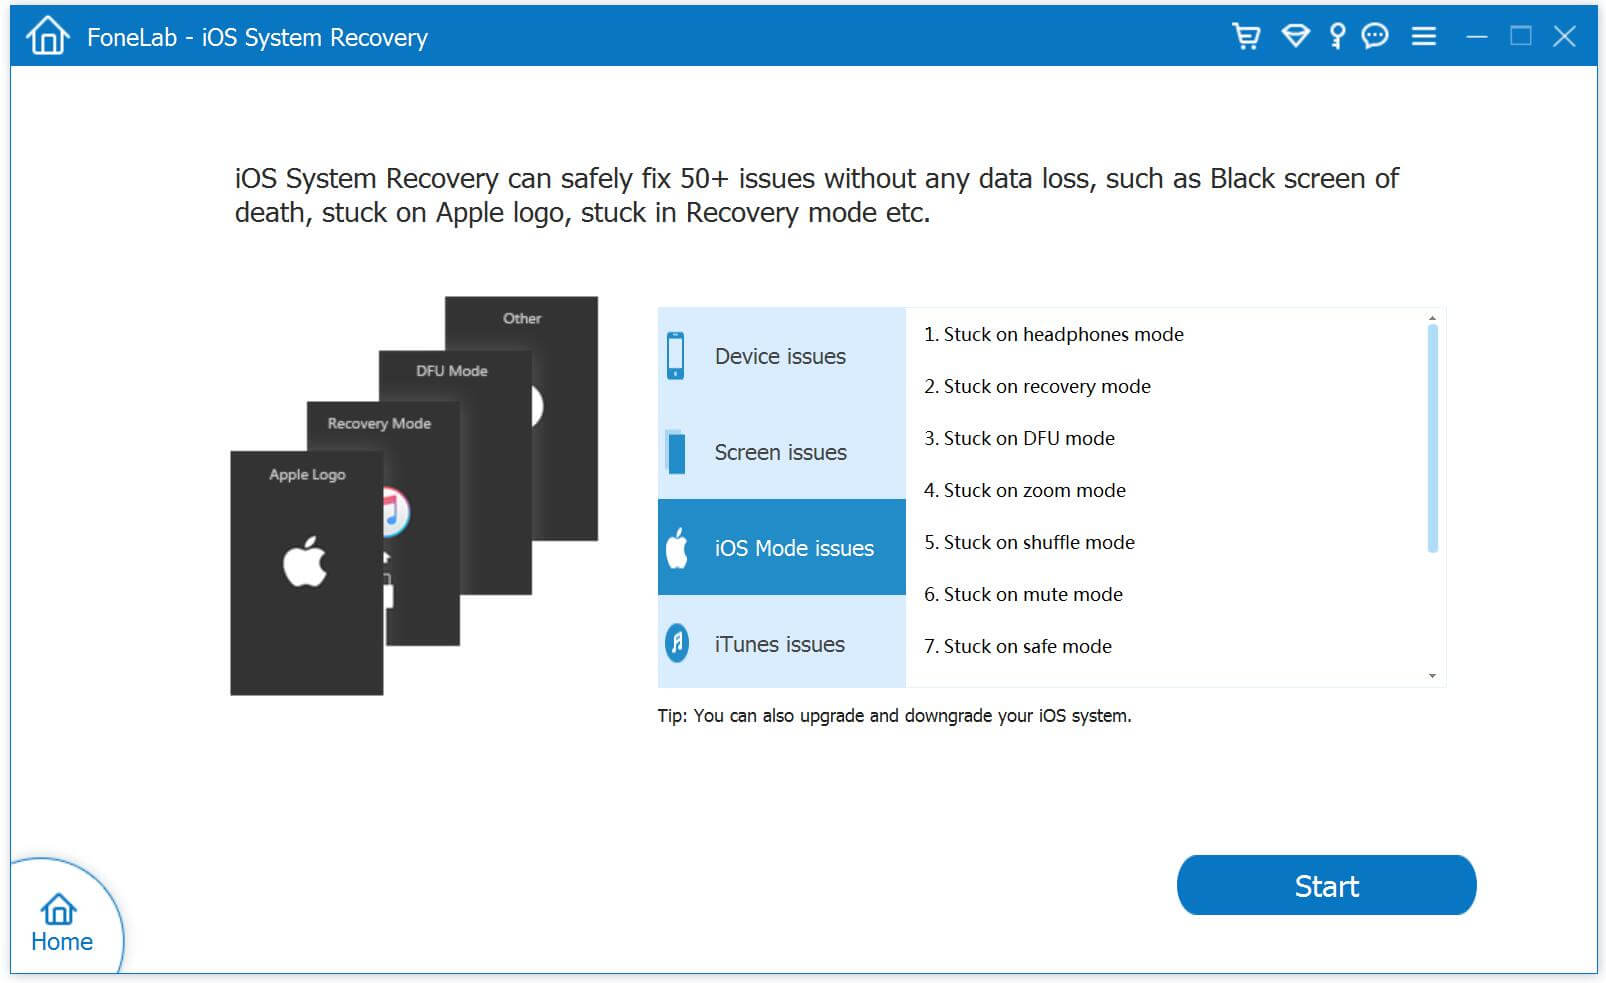
The iOS System Recovery can hep you fix iPhone stuck on recovery mode, headphones mode, DFU mode, etc. Then, hit the “Start” button at the lower right corner to go on.

select iOS Mode issues option

Step 4: Choose a Repair Mode
You then will get into a new window, like the screenshot below. Please select “Standard Mode” or “Advanced Mode” to fix your iPhone device, then click “Confirm” to go on.
“Standard Mode” – Fix your device with this mode, all data on your device will not be lost.
“Advanced Mode” – Fix your device with this mode, it will erase all data on your device.
Suggest that you go to the advanced mode only if the standard mode fails.

iPhone fixing mode

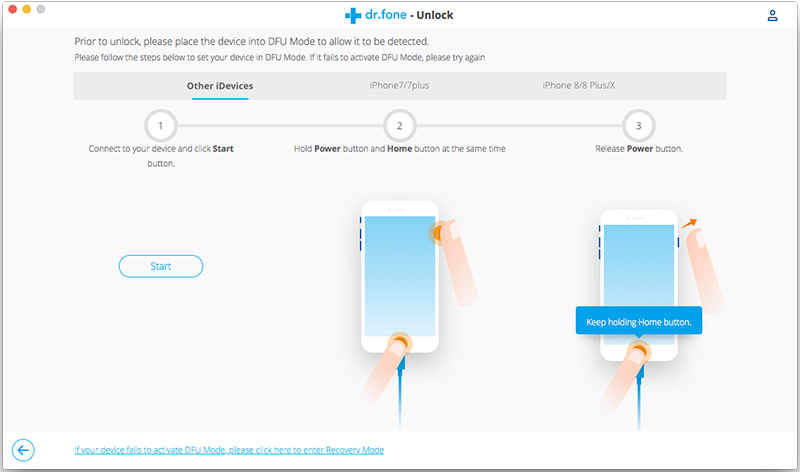
Step 5: Enter Recovery Mode
If your iPhone stuck on recovery mode, please skip this step. At this point, follow the instructions on the window to put your iPhone into recovery mode, you also can follow the below instructions to enter recovery mode on iPhone 11/11 Pro, iPhone XR/XS/X, iPhone 8 and iPhone 8 Plus.

put iPhone into DFU mode

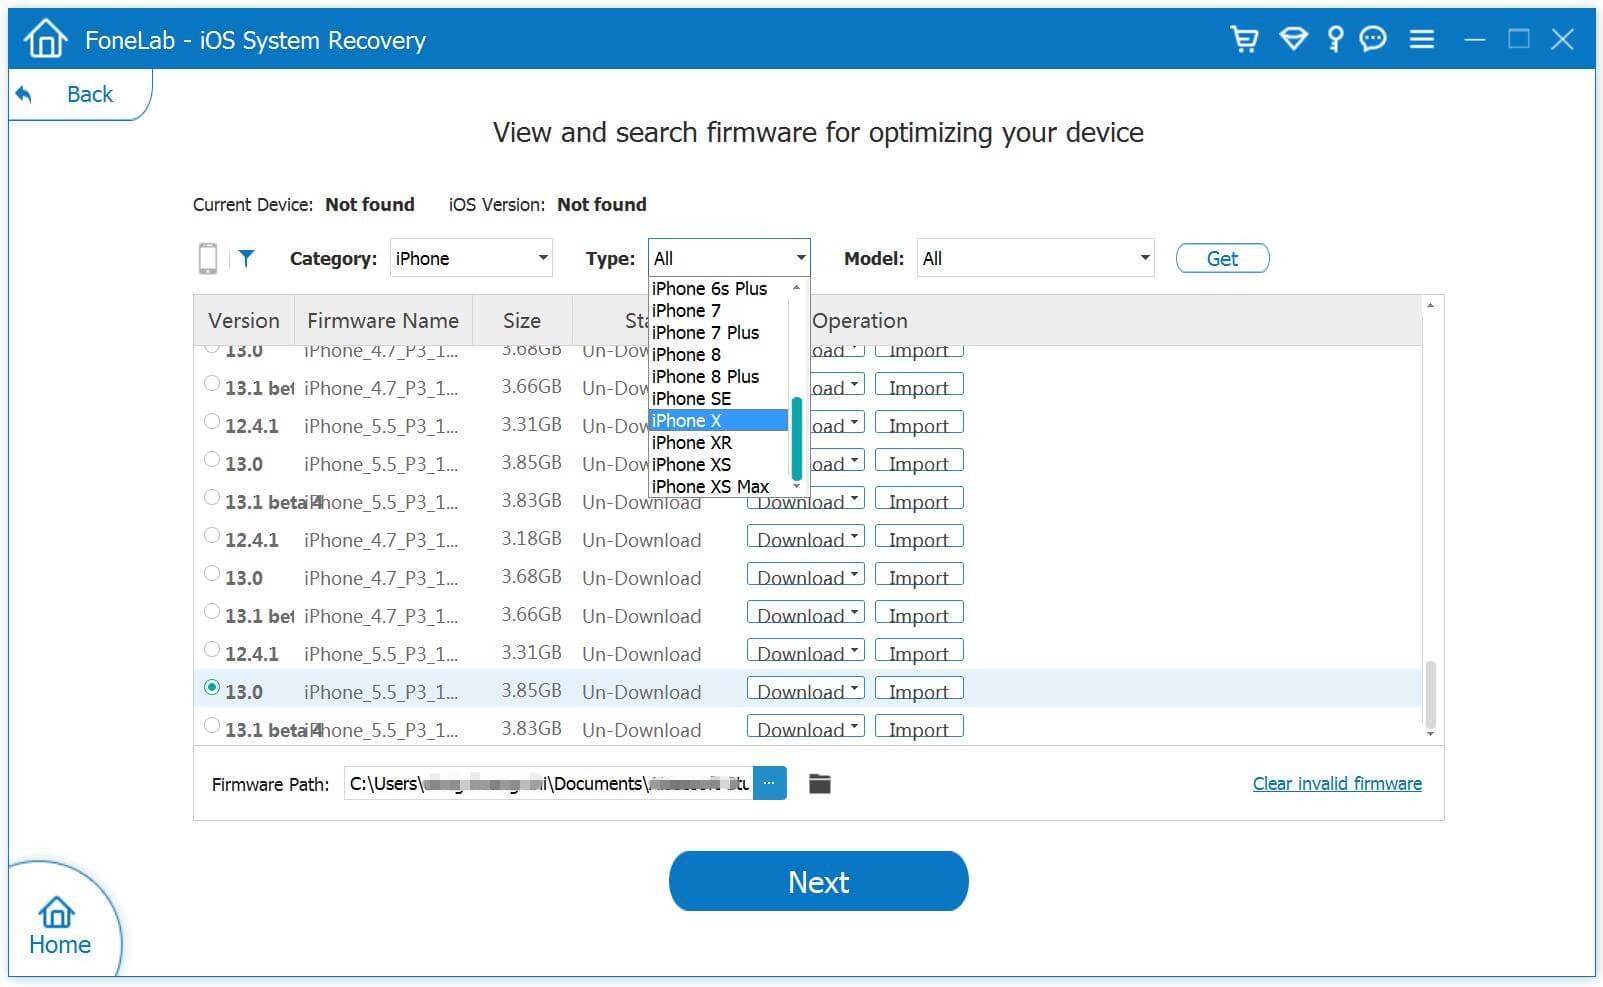
Step 6: Select Firmware to Download
Select a suitable ios firmware package and start to download.

Select Firmware - iOS 13/12/11/10

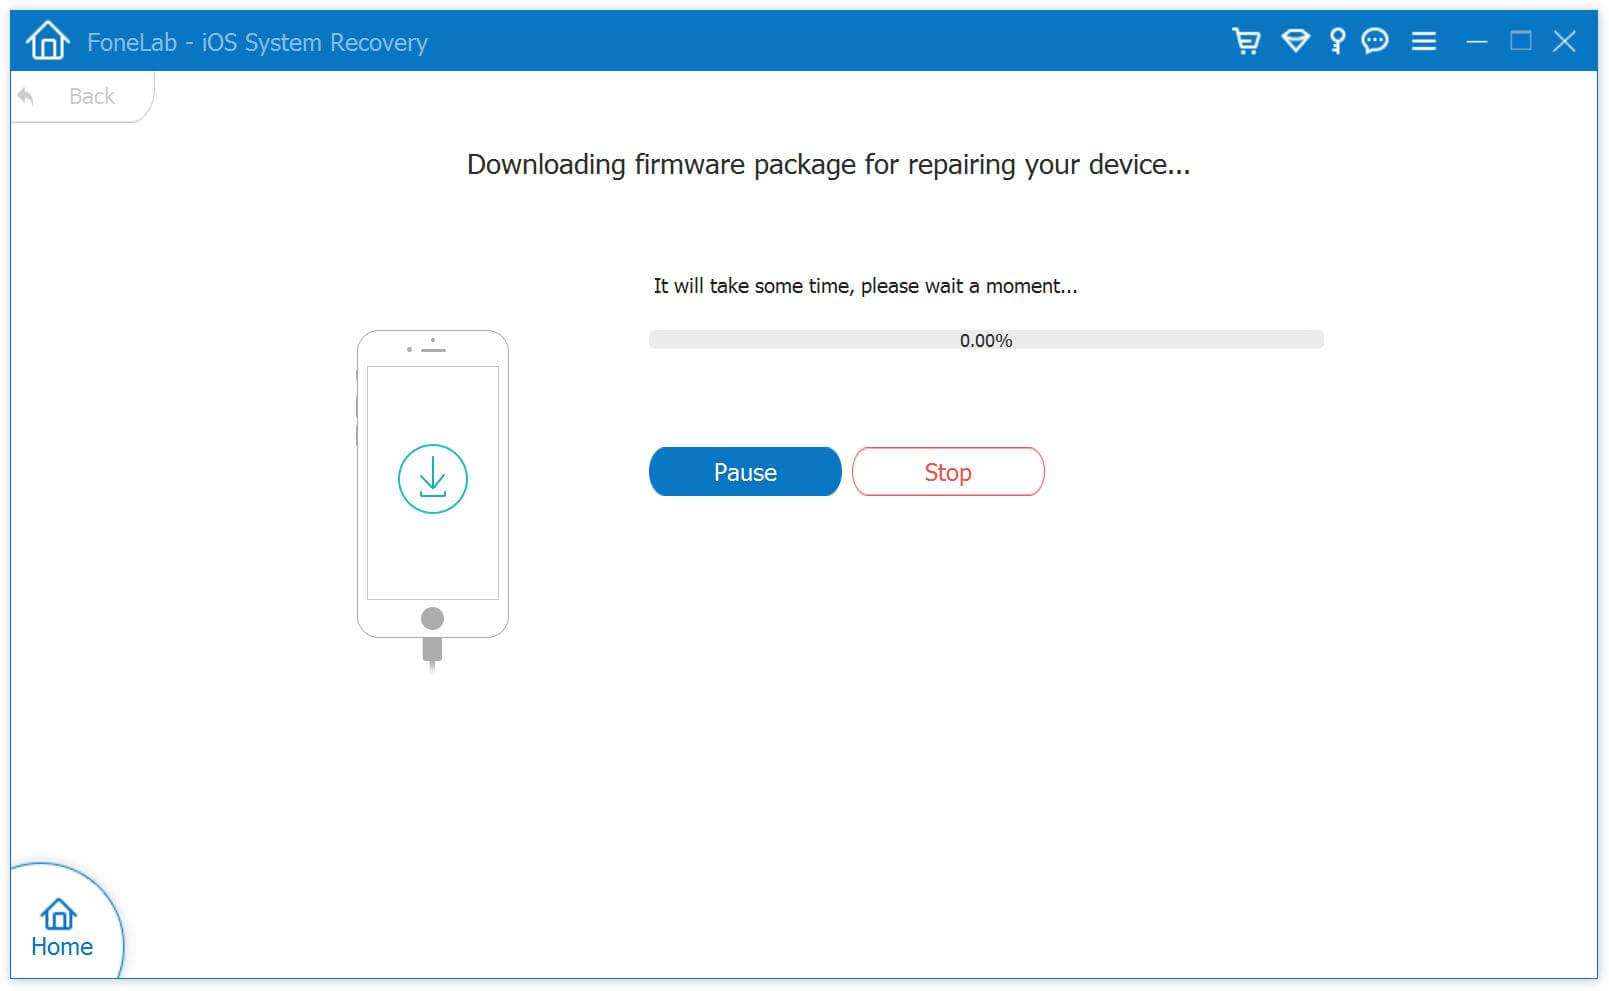
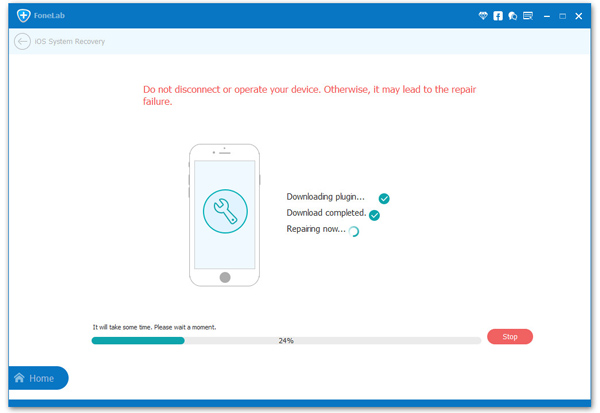
Step 7: Download Firmware Package for Repair your iPhone
The software start downloading firmware package and fix your iPhone device.

Download Firmware - IPSW files

Step 8: Repair the iPhone in Recovery mode or DFU mode
After downloading firmware package completed, then just click the “Repair” button at the lower right corner. The software starts the process of restoring your iPhone.

fix iPhone stuck in recovery mode

When it’s done, your iPhone will boot up automatically and get back to normal.

d_win d_mac
d_win d_mac

Conclusion

This powerful iOS Toolkit is not only able to fix iPhone stuck on recovery mode or DFU mode, but also allows you recover lost and deleted data from your iPhone/iPad/iPod touch, such as messages, photos, video, contacts, and more. Even better, you can backup your iPhone data to your computer or external hard drive to in case your iPhone is lost, damaged or stolen.

Your May Want to Know

How to Fix iPhone Stuck in Recovery Mode After iOS 13 Update

How to Fix an iPhone iPad Stuck on Apple Logo

How to Recover Lost Data from iPhone after iOS 13 Update

How to Recover Deleted Data on iPhone 11/11 Pro

Repair iPhone on Recovery Mode

How to Reset Locked/Disable iPhone iPad without Passcode

[Summary]: Your iPhone/iPad locked or even disabled? Don’t worry, this tutorial shows you how to reset your locked iPhone or iPad without passcode.

Hi, I got a second-hand iPhone 7, but it is showing a message saying: “iPhone is disabled – connect to iTunes”, how to unlock a iPhone without passcode?

iphone is disabled locked

Your iPhone was locked but you forgot the passcode? When you enter the wrong passcode on your iPhone more that 6 times continuously, you will get a message pop up on your iPhone: “iPhone is disabled, try again in 1 minute”. Once you forgot the passcode of your iPhone, how to unlock your disable iPhone? How to reset locked iPhone without passcode? Let’s learn how to reset your screen locked iPhone.

How to Reset Locked iPhone without Passcode – iOS 13 Device Supported

When you forgot your iPhone/iPad lock screen password or you locked the device after too many wrong attempts. Don’t worry, this iOS Toolkit – Unlock (iOS) can help you to unlock iPhone screen lock without knowing passcode, it also enables you unlock your Apple ID with a few clicks, the software supports iPhone XS (Max) / iPhone XR / iPhone X / 8 (Plus)/ iPhone 7(Plus)/ iPhone6s(Plus), iPhone SE and the latest iOS 13 version.

Free download iOS Toolkit – Unlock (iOS) and try to reset your disable iPhone on Windows/Mac computer.

d_win d_mac
d_win d_mac

Steps to Reset a Locked iPhone (without Password)

Step 1. Launch the iOS Toolkit on PC or Mac
Please download, install and run the iOS Toolkit on your computer and click “Unlock” among all the tools.

ios locked screen removal

Step 2. Connect your iPhone to Computer
Connect your iPhone device to the computer with a USB cable. Then click “Unlock iOS Screen” on the program.

unlock iOS and Android

Tips: The software also can help you unlock Android phone with few steps.

Step 3. Put iPhone into Recovery mode or DFU mode
The software need to download the iOS firmware package to unlock your iPhone, since your iPhone is disable and lock, you need to boot iPhone in recovery mode or DFU mode firstly, then the software will helps you download firmware package. Please follow the instructions to put your iPhone into recovery mode or DFU mode.

Choose your device model “Other iDevice,” “iPhone 7/7 Plus” or “iPhone 8 or Later” on the top bar. Then follow the instruction on how to put your device into DFU mode.

Put iPhone into dfu mode

Step 4. Confirm your iPhone Model and System Version
When your iPhone stuck in DFU mode, the software will display the iPhone device information, then select the latest iOS version that your iPhone supported from the dropdown lists. Then click “Download” the download the iOS firmware package for your iPhone.

Put iPhone into dfu mode

Step 5. Start to Unlock and Reset your Disable iPhone
After the firmware is downloaded successfully, click “Unlock Now” to start remove passcode from your disable iPhone, this software will reset your iPhone during unlocking process.

unlock Disable iPhone

Step 6. Restart Your iPhone
After unlocking your iPhone successfully, it will take a few minutes to restart your device, you need to re-set up your device and then access the system.

remove passcode from disable iPhone

Note: It will erase the data on your iPhone/iPad during unlocking process. Honestly there is no solution to unlock iPhone/iPad without data loss for the moment in the market. So, we recommend you backup your iPhone/iPad data to computer regularly.

d_win d_mac
d_win d_mac

Unlock Disable iPhone

How to Fix “iTunes Unable to Process Purchases at This Time” Issue

[Summary]: Did you get a message that “your iTunes unable to process purchases at this time”? Don’t worry, please log out of Apple ID, disconnect wifi, restart your iPhone/iPad, and log in again via cellular network. In this article, you can also learn how to Fix bugs on iOS 13 and optimize iOS system to enjoy better iOS performance.

Recently, many iPhone users said that their iPhone has repeatedly appeared bugs: “the iTunes Store is unable to process purchases at this time,Please try again later“, and some even reach the frequency every two minutes.

itunes store error

The reason: This bugs is appear on some iOS 13 and iPadOS devices. This may be a problem with the Apple server, some problem in the iTunes Store server. Apple has yet to explain the cause of the bug.

Solution 1: Uninstall the iTunes Store App
Starting with iOS 10, the iPhone already supports uninstalling the app that comes with the system.
For iOS 10, iOS 11 and iOS 12, just press and hold the icon, and when it shakes, click on the small fork in the upper left corner to uninstall.

For iOS 13 users, short press to pop up the App secondary menu, click “Reorder App”, you can also trigger the uninstalled animation.

Solution 2: Exit Apple ID and Restart your iPhone
To fix this bugs, please exit Apple ID, disconnect wifi, restart your iPhone/iPad, and log in again via cellular network.

Note: After exiting the Apple ID, it will cause a problem, the Apple service cannot be used, such as iCloud and Apple Music, because we need to log in to the Apple ID to use these Apple services.

Do not connect to Wi-Fi after restarting the phone. In the state of 4G network, log in to the Apple ID again, which is a simple method to solve the problem.

Of course, if you want to completely fix this bug, the most common method is to update the perfect system. This might be the time for you to exercise a little bit of patience for Apple’s iTunes Support to release a fix. You can always check out the Apple System Status website for server status.

About iOS 13 Bugs

Apple has released the latest version iOS 13 system, which has encountered many bugs. According to Apple’s official update instructions, the iOS 13 system has added users’ favorite dark mode and new privacy protection features, which has increased the speed of software opening and is known as the best system to date. However, a large number of users after upgrading the iOS 13.0 official version of the system reflect the camera can not be used, software flashback, mobile phone fever and mobile phone power consumption and other issues. Subsequently, Apple made an emergency deployment and released three official versions of the system in an 11-day period to update the bugs: iOS 13.1 was released on September 25 and iOS 13.1.1 was released on September 28. The official version, released in the early morning of October 1 iOS 13.1.2 official version. In addition, on October 3, Apple also released the iOS 13.2 Beta1 beta.

download install ios 13.2 beta on iphone

Apple gradually closed the old version of iOS system verification after releasing the iOS 13 system. In the early morning of October 8, Apple officially closed the iOS 13.1 system verification. This means that users will not be able to upgrade or downgrade to that system version. Previously, Apple closed the system verification of iOS12.4.1 and iOS13.0 on October 5, and skipped iOS13.1 and chose to disable the system verification of iOS13.1.1. At present, only the iOS13.1.2 version verification channel is enabled, that is to say, iPhone users with iOS 12.4.1 and previous versions can only upgrade iOS13.1.2 or iOS 13.2 Beta1 after upgrading, and will not be able to downgrade after the upgrade. Go to iOS 12.4.1.

ios 13 update history

From September 20th, Apple pushed the official version of iOS13.0 system. In just 19 days, Apple has pushed four official versions of iOS13.0, iOS13.1, iOS13.1.1, and iOS13.1.2, and closed these four system verifications for iOS12.4.1, iOS13.0, iOS13.1.1, and iOS13.1. The iOS 13 system has also been dubbed the most closed version of the system ever, iOS 13, iOS 13.1, iOS 13.1.1 is called the shortest-lived version update in Apple history.

Fix iPhone iPad iPod to Normal and Optimize iOS Performance

Some bugs on your iPhone and iPad? iPhone is stuck in Apple logo after iOS 13 update? iPhone stuck in headphone mode or DFU mode? iPhone stuck on recovery mode after iOS 13 update?  iPhone restarts endlessly? Or iPhone is frozen for unknown reasons? Even iPhone screen is locked? No matter what situation your iPhone is facing, you can fix iPhone to normal and optimize iOS performance to make your iPhone works better.

This iOS System Recovery not only can help you fix your iPhone/iPad to normal state, but also can help you optimize iOS 13/12/11 to enjoy better iOS performance. It compatible with the latest iOS 13 and iPodOS, like iPad Pro, iPad Air/mini, iPhone 11 Pro Max/11 Pro/11, iPhone XS/XS Max, iPhone XR/X, iPhone8/8 Plus, iPhone 7/7 Plus, iPhone SE, iPhone 6s/6s Plus, iPhone 5s/5s/5, iPhone 4S/4, iPod touch and more. Let’s teach you how to fix bugs on iPhone and optimize iOS performance.

d_win d_mac
d_win d_mac

How to Fix Optimize iOS 13/12 on iPhone

Step 1. Launch the iOS Toolkit on Computer
Click the above download button to download the iOS Toolkit on PC or Mac, then click the “iOS System Recovery”.

launch iOS System Recovery

Step 2. Connect iPhone to Computer
Then, connecting your iPhone with the computer via Apple USB cable, the software will detect it, and then click “Start” button to go on.

optimize iOS performance

Step 3. Select Fixing Mode
The standard mode installs iOS system by retaining device data. The advanced mode will erase data while installing firmware package or fixing the iOS system issues. Suggest that you go to the advanced mode only if the standard mode fails.

iOS optimize mode

Step 4. Click Optimize
If you want to make your iPhone works more better, please optimize iOS system by click “Optimize” option go to next step.

Optimize iOS System

Step 5. Select Firmware
The software will automatically detects your iPhone and displays available firmware package, please select the latest firmware package for your iPhone device. This iOS system recovery is easy to use and safe enough to install iOS firmware and avoid data loss.

Select Firmware - iOS 13/12/11/10

Step 6. Download Firmware Package
Begin downloading firmware package and install it to your iPhone, iPad or iPod Touch device.

Download iOS Firmware for iPhone, iPad, iPod Touch

Step 7. Install IPSW File and Optimize iOS System
After downloading the firmware package completed, the iOS System Recovery will verify the downloaded firmware package and install on your iPhone, no data loss at all.

Start to Optimize Your iPhone

After optimizing iOS system performance complete, your iPhone will restart again, you will find your iPhone runs more smoothly that before.

d_win d_mac
d_win d_mac

More Features:

There are three main function in iOS Toolkit: iOS Data Recovery, iOS System Recovery and iOS Data Backup & Restore, it can help you protect your iOS data and optimize your iPhone/iPad/iPod, making your iPhone runs more smoother.

iOS Data Recovery: Recover lost contacts, messages, notes, WhatsApp messages, safari history, photos and more data from iPhone/iPad/iPod, or from iTunes backups and iCloud backups.

iOS System Recovery: If your iPhone stuck on stuck in DFU mode, recovery mode, Apple logo, headphone mode, etc. This function can help you fix iPhone/iPad/iPod to normal state without data loss, as well as optimizing iOS performance.

iOS Data Backup & Restore: Backup and restore iOS data to your computer, or restore the bacups to iPhone, iPad and iPod touch selectively.

Fix iOS 13/12

How to Optimize iOS 13/12 Performance to Speed Up Slow iPhone

[Summary]: Want to optimize iOS 13 or iOS 12 performance to speed up your iPhone/iPad, this article teach you an effective ways to optimize iOS performance, no data loss at all.

iOS 13 has been released. It is likely to push many an older iPhone or iPad to the limits of its capabilities, the iOS 13 compatible with iPhone 11, iPhone 11 Pro(Max), iPhone XS(Max), iPhone XR, iPhone X, iPhone 8(Plus), iPhone 7(Plus) and iPhone 6S(Plus), the iPhone SE or the 7th-generation iPod touch; iPadOS is compatible with any iPad, iPad mini and iPad Pro that was released in 2014 or later; and tvOS 13.1 is compatible with any Apple TV that can run tvOS 12.

Optimize iOS 13 Performance

Many iPhone users complain about the performance of iOS 13. However, it is important to identify the exact reason behind it before you try to enhance iOS 13 performance. When you use your iPhone, data files will get stored in it along with time. And too much useless files, like junk files and caches, will surely effect your iOS device. To improve iOS 13 performance, you can erase junk files on iPhone, if your iPhone runs in iOS 12, iOS 11 or older version, you can reinstall iOS system to optimize your iOS performance. Most users may use iTunes to upgrade or downgrade iOS system, but you may lost data after restore iPhone via iTunes, to reinstall iOS system on iPhone without erasing all data and settings, this article will teach you an effective and easy method to optimize iOS 13 or iOS 12.4 performance, so that you can speed up your slow iPhone/iPad, please keep reading the below guide to install iOS 13, iOS 12.4 on your iPhone without data losing.

How to Fix Bugs on iOS 13 or iOS 12 Performance?

To optimize iPhone, iPad and iPod performance, try updating iOS system on your device again, it means you need to reinstall the latest iOS 13/12 or iPadOS, in ordering to upgrade your iPhone without erase all current data, you need to use an iOS System Recovery.

This iOS System Recovery provides all iOS firmware for optimizing your iPhone, iPad and iPod, including iOS 13, iOS 12, iOS 11, iOS 10, iOS 9 and more previous version, you can view as the below screenshot:

iPhone Firmware Files (IPSW firmware files)

iphone firmware - iOS 13

iPad Firmware Files (IPSW firmware files)

iPad firmware - iOS 13

iPod Touch Firmware Files (IPSW firmware files)

iPod Touch firmware - iOS 12

After download, install and launch this iOS System Recovery on your PC/Mac computer, then connect your iOS device to the computer, the software will detect your device and shows all information of the device, then click “Optimize” button go to optimize your iOS performance, please select your device’s name and mode, the program will list suitable iOS firmware files for optimizing your device, the iOS System Recovery can download suitable firmware to computer and install it on your iPhone, iPad or iPod Touch, no data loss at all. It means, this software can help you upgrade or downgrade your iOS system.

In addition, if your iPhone/iPad stuck into recovery mode, DFU mode, white Apple logo, etc. The iOS System Recovery also can help you fix iPhone and iPad to normal status, it won’t erase the data and settings while repairing the iOS system issues, this program also enables users fix all types of errors on iTunes.

Download the iOS Toolkit – iOS System Recovery to fix or optimize your iOS system.

d_win d_mac
d_win d_mac

Key Features:

  • Fix all iOS system issues when iPhone stuck on white Apple logo, recovery modes, DFU modes, boot loop, etc.
  • Fix your iOS 13/12/11/10/9 system without data loss.
  • Work for all models of iPhone, iPad and iPod touch.
  • Offers iOS 13, iOS 12/12.4, etc. firmware to download.
  • Reinstall iOS system without data loss.
  • Optimize iOS performance without using iTunes.
  • Support all iOS devices like iPhone 11 Pro Max/11 Pro/11, iPhone XS/XS Max/XR/X/8/8 Plus, iPad Pro, iPad Air, iPad mini, iPod and more.
  • Fix iTunes issues: iTunes error when syncing/backing up/updating/restoring iOS devices.
  • Works well with Windows 10/8/7, Mac OS X 10.7 or higher.

Guide: Download and Install iOS 13 to Optimize Your iPhone/iPad

Step 1. Launch iOS Toolkit on Computer and Connect Your iPhone
Download, install and run the iOS Toolkit on your Windows or Mac computer, then connecting your iPhone with the computer via USB cable. And click the “More tools” option at the bottom left of the interface.

connect iPhone to computer

Then, click the “iOS System Recovery” function.

launch iOS System Recovery

You an see this iOS System Recovery can help you fix ios to normal, fix iTunes error, upgrade or downgrade your iOS system, or optimize iOS performance. Please click “Start” button to go on.

optimize iOS performance

Step 2. Select Standard Mode and Advanced Mode
The standard mode installs iOS system by retaining device data. The advanced mode will erase data while installing firmware package or fixing the iOS system issues. Suggest that you go to the advanced mode only if the standard mode fails.

iOS optimize mode

Step 3. Optimize iOS System
As above we have told you that the software can help users get iPhone, iPad and iPod Touch out of white screen, Recovery Mode, Apple logo, black screen, and fix other iOS issues.
If your iDevice works normally and you want to optimize iOS system only, you will get a tips as below said “The device system is in normal state, and you can continue to optimize”, if you want to enjoy better iOS performance, please click “Optimize“.

Optimize iOS System

Step 4. Select IPSW firmware Files to Download
The software will pops up an new windows, it will automatically detects the model type of your iDevice and displays available iOS system versions, please select the latest iOS firmware to download, we suggest you upgrade to the latest version for optimizing your iPhone/iPad/iPod Touch. For example: If you want to upgrade iPhone to iOS 13, please select a corresponding iOS 13 firmware; If you want to downgrade iOS 13/iPadOS back to iOS 12.4.1 on your iPhone or iPad, please choose iOS 12.4.1 and click “Next” button start to download firmware for your iDevice.

Select Firmware - iOS 13/12/11/10

Step 5. Download iOS Firmware for iPhone, iPad, iPod Touch
The software start downloading firmware package for installing IPSW file and repair your iPhone, iPad or iPod Touch device.

Download iOS Firmware for iPhone, iPad, iPod Touch

Note: Do not disconnect or operate your device during the download processing.

Step 6. Start Installing IPSW file to Optimize Your iPhone
After downloading the firmware package completed, the tool starts to verify the downloaded iOS firmware, then just click on “Repair” to start repairing your iOS and install the downloaded IPSW files on your iPhone, the tool will optimize your iOS device.

Start to Optimize Your iPhone

After installing complete, your iPhone will start up again, an you can find all iOS system issues are gone, your will find the iOS runs more smoothly that before.

d_win d_mac
d_win d_mac

These is one of the most effective methods to improve iOS 13 performance, you can also use this iOS Data Eraser to erase all junk files, useless documents & Apps permanently and complete, or backup iPhone photos, videos to computer, which is another method to get more additional storage space, so you can speed up your iPhone/iPad/iPod(touch).

iOS System Recovery

3 Ways to Fix iPhone Stuck in Recovery Mode After iOS 15 Update

Summary
Your iPhone stuck in boot loop, recovery mode or Apple Logo screen when upgrading to iOS 15/iOS 14.8? Here how to fix iPhone 12/11/XS/XR/XS Max/X/8/7/6S stuck in recovery mode loop after iOS 15 update failed.

iPhone stuck in Recovery Mode and won’t restore” during/when iOS 15 upgrading, recently, many iPhone users have encountered similar problems, some users may ask how to get iPhone out of recovery mode, you can find an effective solution to fix iPhone stuck in recovery mode after iOS 15 update. When you get a corrupted iOS operating system during software update, you may try to restore it by putting your iPhone in Recovery Mode. If your iPhone 12/11/SE/XS/XR/XS Max/X/8/7/6S upgraded to iOS 15 is stuck in Recovery Mode, you can’t miss this article which covers the potential solutions to the problem “iPhone stuck in Recovery Mode in iOS 15”. By the ways, you can also fix “iPhone stuck on Apple logo in iOS 15” without data loss, read it for reference if you get the same problem.

Method 1: Force Restart iPhone to Fix “iPhone stuck in Recovery Mode” in iOS 15

When your iPhone is stuck in Recovery Mode, you can try to force restart your iPhone and get it out of recovery mode. The way to force restart your iPhone varies according to the iPhone you are using. Choose one of the three ways below to reboot your iPhone.

For iPhone 6 or earlier, hold and press both Sleep/Wake button and Home button until you see the Apple logo. (Sleep/Wake button is also called Side button.)

For iPhone 7/7 Plus, hold and press both Sleep/Wake button and Volume Down button until the Apple logo appears.

hard reboot iphone 7/7 plus

For iPhone 11/XR/XS/X, iPhone 8 and iPhone 8 Plus, quickly press and release the Volume Up button, quickly press and release the Volume Down button and then press and hold the Sleep/Wake button until you see the Apple logo.

force restart iPhone 11/XR/XS/X/8

Method 2: Using iTunes to Restore iPhone when iPhone Stuck in Recovery Mode

If your iPhone stuck in Recovery Mode after iOS 15 update failed, you can also use iTunes to restore your iPhone, but this method will erase all data and settings on your iPhone, f you don’t care about the data on your phone, you can restore your iPhone by using iTunes.

What should you need to do before using iTunes to restore iPhone?
Download and install the latest version of iTunes application on your PC or Mac computer.

To avoid problems like “iPhone not connecting to iTunes”, so you need to update your iTunes to the latest version.
Please go to iTunes > Help > Check for Updates on your Windows PC or App Store > Update > Install on your Mac to update your iTunes to its latest version.

When your iPhone stuck in Recovery Mode, then follow the steps below to restore your iPhone by using iTunes:

Step 1: Connect your iPhone to your computer and launch iTunes.

Step 2: Then you may see a window in iTunes telling you “iTunes has detected a device in Recovery Mode”. If so, tap on Ok in the window.

Step 3: Tap on the iPhone Device button in iTunes and choose Summary.

Step 4: Click Restore iPhone > Restore to reset your iPhone to factory settings. After that, your iPhone will be set up as new.

Restore iPhone with iTunes

Note: The iTunes will erase all data and settings on your iPhone, if you looking for a safely method to fix iPhone stuck in recovery mode in iOS 15/iOS 14, we recommend you use a safe iOS System Recovery tool, please keep reading the below iOS system fixing solution.

Method 3: Fix iPhone Stuck in Recovery Mode via iOS System Recovery

Put your iPhone in DFU mode at first
If you iPhone in iOS 15 is stuck in Recovery Mode and you don’t want to fix it with the help of some third-party software, the last solution you can try to use the 3 best iOS System Recovery to fix iOS system to normal after putting your iPhone in DFU mode, which enables you to fix the iOS 15 software issus without data loss.

Then, fix iPhone Stuck in Recovery Mode by using iOS System Recovery

This iOS 15 System Recovery is designed to fix your iPhone and iPad back to normal status without data loss, it not only can help you fix frozen, disabled or bricked iOS devices to normal, but also enables you fix iPhone from DFU mode, recovery mode, Apple log, etc. This professional iOS System Recovery is easy to use & 100% safe without any data loss, so you can fix iPhone stuck in recovery mode at home.

iOS System Recovery For Any Situations:

  • Recovery mode: iPhone is stuck in recovery mode
  • DFU mode: iPhone gets trouble into DFU mode
  • Black Screen: iPhone is in black/blue/red/white screen
  • Apple logo: iPhone shows Apple logo
  • Headphone mode: iPhone stuck in headphone mode
  • Frozen: iPhone is frozen for some reasons
  • iPhone disabled: iPhone is disabled after unlock failure
  • Loop restart: iPhone is in the loop of restarting
  • More situations: iPhone is in more abnormal situations

Now, you can download the free trial version to have a try. Please choose the right version for your computer.

d_win d_mac
d_win d_mac

What’s more, this program also can help you recover lost data from iPhone and iPad, and back up your important data regularly to protect your data. You can follow our step by step guide on how to recover lost data from an iPhone, it works well with all iOS devices, including iOS 13, iOS 12, iOS 11, iOS 10, etc.

How to Fix iPhone Stuck in Recovery Mode after iOS 15/iOS 14.8 Update

Step 1: Launch the iOS Toolkit and Connect iPhone to Computer
Open the iOS Toolkit and click the “More tools” option at the bottom left of the interface. Then, connect your iPhone with the computer via USB cable.

connect iPhone to computer

A new window pops up, offering you three options to choose from. Since we’re going to fix iPhone stuck in recovery mode, choose the “iOS System Recovery” option to proceed.

launch iOS System Recovery

The software will pops up an new window, then click “iOS Mode issues”, you can see the program can fix iOS device stuck on recovery mode, headphones mode, DFU mode, etc. Then, hit the “Start” button at the lower right corner to go on.

select iOS Mode issues option

Step 2: Select a Fix Mode
You then will get into a new window, like the screenshot below. Please select “Standard Mode” or “Advanced Mode” to fix your iPhone device, then click “Confirm” to go on.
Standard Mode” – Fix your device with this mode, all data on your device will not be lost.
Advanced Mode” – Fix your device with this mode, it will erase all data on your device.
Suggest that you go to the advanced mode only if the standard mode fails.

iPhone fixing mode

You then will be prompted to set up a connection between your iPhone and the computer with a USB cable. Do it as required

Step 3: Optimize iOS System(Option)
The software will detect and analyze your iPhone device and shows all information of the device, if your iPhone is working properly, you will get the screenshot as below:

iPhone information

Tips: If you want to enjoy better iOS performance, you can continue to optimize your iPhone, please click “Optimize” button to go on. So, this iOS System Recovery can help you update or downgrade iPhone/iPad/iPod Touch without data loss.

If your phone is working abnormal, you need to put your iPhone into DFU mode or recovery mode at first, then the software will detect it and download the suitable firmware to fix iOS system to normal, please keep reading the below steps.

Step 3: Enter DFU Mode or Recovery Mode(Skip)
Just follow the on-screen instructions to put your iPhone into DFU mode.

put iPhone into DFU mode

Or, put your iPhone into Recovery mode, just follow the on-screen instructions to put your iPhone into Recovery mode.

put iPhone into recovery mode

This case teach you how to fix iPhone to normal when it stuck on recovery mode, so you don’t need to put your iPhone into recovery mode or DFU mode, the software can detects it.

Step 4: Select Firmware Package
In this step, you need to select a suitable firmware package for your iPhone, the software provides the latest iOS 13 for iPhone 11/XS/XS Max/XR/X/8/7/6S(Plus).

Select Firmware - iOS 13/12/11/10

Step 5: Download Firmware Package for Fix your iPhone
The software automatically detects the model type of your iPhone and displays available iOS system versions. Select a version and click on “Next” button start downloading Firmware package for repair your iPhone device.

Download Firmware - IPSW files

Do not disconnect or operate your device during the download processing.

Tips: Then the iOS firmware will be downloaded. Since the firmware we need to download is large, it will take some time to complete the download. Make sure your network is stable during the process. If the firmware is not download successfully, you can also click on “Download” to download the firmware using your browser, and click on “Import” to button to import the downloaded firmware package to the software, it will help you install the downloaded firmware without erase your iPhone data.

Step 6. Start Fixing the iPhone in Recovery Mode
After downloading the Firmware package completed, then click the “Repair” button at the lower right corner. The software start to fix iOS system to normal, please keep connecting your iPhone device with the computer during the fixing processing.

fix iPhone stuck in recovery mode

When it’s done, your iPhone will restart automatically and get back to normal.

Why not download this powerful iOS Toolkit – iOS System Recovery to fix your iPhone device to normal status, or optimizing iOS system to enjoy better iOS performance.

d_win d_mac
d_win d_mac

No matter your iPhone stuck in the loop of restarting, stuck on Apple logo, stuck in black screen, or screen locked, this iOS System Recovery can help you fix iOS system to normal without data loss. Additionally, the powerful “iPhone Data Recovery” can help you recover deleted iPhone data such as photos, contacts, text messages, notes, reminders, etc.

Complete Guide on How to Put iPhone into DFU Mode

Before fix iOS system to normal by using this iOS System Recovery, if the software can detect your device, you need to put your iPhone into DRU mode firstly. Let’s learn how to put iPhone in DFU mode and read it for reference no matter you are using an iPhone 11/XR/XS, iPhone 8, iPhone X, iPhone 7 or iPhone 6.

1)Put iPhone 8/X/XR/XS/11 in DFU mode

Step 1: Connect your iPhone 8/X/XR/XS/11 to your computer and launch iTunes.

Step 2: Press and quickly release the Volume Up button, press and quickly release the Volume Down button and then press and hold the Side button (Sleep/Wake button) until you get a black iPhone screen.

Step 3: When your iPhone screen goes black, release Side button only and then quickly press and hold both Side and Volume Down Buttons for 5 seconds.

Step 4: Then release Side button only and hold the Volume Down button for another 5 seconds.

Step 5: During the process, pay close attention to iTunes. When you see a small window in iTunes telling you iTunes has detected an iPhone in recovery mode, release the Volume Down button and check your iPhone screen. If it’s black, fortunately, you have put your iPhone 8/8 Plus/X in DFU mode successfully. While if it’s not, for example, it’s the “connect to iTunes” screen, you have to repeat the steps above to enter DFU mode again.

Step 6: If you have put your iPhone 8/X/XR/XS/11 in DFU mode successfully, click OK and then choose to Restore iPhone. When it’s completed, your iPhone will exit DFU mode automatically.

2)Put iPhone 7/iPhone 7 Plus in DFU mode

Step 1: Connect your iPhone 7/7 Plus to your computer and launch iTunes.

Step 2: Press and hold Sleep/Wake button (Side button) until a slider appears. Drag the slider to shut down your iPhone.

Step 3: Then hold and press both Sleep/Wake button and Volume Down button for 10 seconds.

Step 4: Keep holding Volume Down button only for 5 seconds after the 10 seconds.

Step 5: If your iPhone screen remains black, you are now in DFU mode. And iTunes will tell you that it has detected your iPhone. (To exit DFU mode, you just need to turn off your iPhone.)

3)Put iPhone 6 or earlier in DFU mode

Step 1: Connect your iPhone 6 or earlier to your computer and run iTunes.

Step 2: Hold and press Sleep/Wake button (Side button) until you see a slider on the screen. Drag the slider to switch off your iPhone.

Step 3: Press and hold both Sleep/Wake button and Home button for 10 seconds.

Step 4: Then keep holding Home button only for another 5 seconds.

Step 5: If your iPhone screen stays black, your iPhone is in DFU mode now. At the same time, a window in iTunes will pop up and tell you iTunes has detected your device. (To exit DFU mode, you just need to turn off your iPhone.)

iOS 14/15 System Recovery

How to Fix iPhone Stuck in Recovery Mode in iOS 13/iOS 12?

[Summary]: Your iPhone stuck in recovery mode and looking for a way to fix iPhone stuck in recovery mode? No matter you use iPhone XS/XR, iPhone 8, iPhone 8 Plus or iPhone X in iOS 12 or the iPhone you recently update to iOS 13 stuck in Recovery Mode, you can follow the easy guide to fix the iPhone Stuck in Recovery Mode after iOS 13 upgrading.

You may want to read:

* Recover lost data from iPhone/iPad after iOS 13/iOS 12 Update

* Transfer data from old iPhone to new iPhone XS/XR/X

iOS 13 will be released on June 3 (Pacific Time) at the WWDC 2019 Global Developer Conference. iOS 13 will only support iPhone 7 and above models, including iPhone XS(Max), iPhone XS, iPhone XR, iPhone X, iPhone 8/8 Plus, iPhone 7 and iPhone 7 Plus, in another word, the older models such as iPhone 6s/6s Plus and iPhone 6/6 Plus will no longer be supported. iOS 13 will appear “dark mode”, similar to the “dark mode” on the current macOS Mojave, this night mode in the iOS 13 system will greatly increase the battery life. It is rumored that the new iOS 13 system will improve the interface of the CarPlay in-vehicle system, and it will also make some updates for the iPad, such as optimizing the device’s file management system and multi-tasking interface, and the new iOS 13 will bring a new system interface.

Here is a case about iOS 13 stuck in recovery mode:

Hey! My iPhone 7 is stuck in recovery mode after iOS 13 update. But, I do not want to restore with iTunes to prevent erase all data. However, I have connected my iPhone to my computer but it is not recognized by iTunes as well. How can I fix iPhone 7 stuck in recovery mode after iOS 13 update? I don’t want to erase all data off my iPhone after restoring the iOS system. Help Me!

I believe that when iOS 13 is released, many Apple users will upgrade their iPhone, iPad to iOS 13 for the first time to experience the newest UI and the latest features. But when if your iPhone stuck in white apple logo, stuck in recovery mode, or stuck in black screen of death after iOS 13 update failure, how you can fix your iOS 12/iOS 13 system without data loss?

This is a common issue that the iPhone stuck in recovery mode after iOS 13/iOS 12 update. That is the reason why I wrote this tutorial to help you fix iPhone stuck in recovery mode/Apple Logo/Boot Loop/Black Screen of death and more OS issues without losing data. But, before teaching you an effective method to fix the iPhone stuck in “recovery mode” while iOS update failed, you need to know why the iPhone stuck into recovery mode during iOS upgrading, so that you can avoid similar accidents when you plan to upgrade the phone OS next time.

Part 1: Reasons cause iPhone into recovery mode during iOS update

Generally, your iPhone/iPad /iPod could suddenly stuck into recovery mode during OS upgrading for the below reason:

1.Not Enough Battery: The battery is not sufficient for the complete installation of the upgrading process. Under normal circumstances, you are be suggested that the remaining power cannot be less than 50%, so you better connect the iPhone to the power supply during the whole upgrading process.

2.Update Jailbroken iPhone: Your jailbroken stuck at “Checking for Updates” status when you using OTA update method. This is because modern jailbreaks have the OTA updates disabled beforehand. Eventually, the jailbreak will get disabled and the jailbreak firmware not allowed to download directly. So, when you try to update on iPhone directly, the iPhone will crash and get stuck in recovery mode status. To update a jailbroken iPhone, you can use iTunes to update the iPhone or you can restore jailbroken iPhone without iTunes, the details are available below.

3.Other Unknown Reasons: A wrong operation or failure during iOS upgrading can cause the iPhone stuck in recovery mode.

Part 2: Force Restart iPhone to Get iPhone Out of Recovery Mode(Data Loss)

If your iPhone is stuck in Recovery Mode during/after iOS 13 or iOS 12 upgrading, you can try to force restart your iPhone to get it out o recovery mode, but this method will cause data loss. If you ignore data loss, please follow the detailed steps below to force restart your iPhone varies according to the iPhone models. You can easily reboot the iPhone when it stuck in recovery mode/white Apple Logo issues.

For iPhone 6 or earlier, hold and press both Sleep/Wake button and Home button until you see the Apple logo. (Sleep/Wake button is also called Side button.)

For iPhone 7/7 Plus, hold and press both Sleep/Wake button and Volume Down button until the Apple logo appears.

For iPhone XS/XR, iPhone X, iPhone 8 and iPhone 8 Plus, please press and release the Volume Up button, quickly press and release the Volume Down button and then press and hold the Sleep/Wake button until you see the Apple logo.

Part 3: Fix iPhone Stuck in Recovery Mode by iOS System Recovery(No Data Loss)

If you don’t want to erase the data after force restarting the device, you can use a professional third-party iOS System Recovery software.

U.Fone iOS System Recovery is designed to fix various iOS problems on your iPhone/iPad/iPod touch and restore your device back to normal status, you can easily fix iPhone stuck in recovery mode, Apple logo, black screen, etc. after iOS 13/iOS 12 update, even no data lost at all. Just connect your iPhone to the computer, the U.Fone iOS System Recovery helps you download a corresponding firmware package and install it on your iPhone quickly, after installing and restoring your iPhone successfully, the iPhone will restart and return to normal status. Moreover, you will find that all previous data is still in the phone. In additional, the “iPhone Data Recovery” feature also can help you recover deleted or lost data from your iPhone after iOS 13/iOS 12 update, including Photo, Contacts, Text Messages, Call Logs, Notes, Videos, Calendar, Media, WhatsApp Messages and more. But in this case, I will show you the detail guide about how to fix iPhone stuck in recovery mode in iOS 13.

Download the iOS System Recovery firstly, it is available on both Windows PC and Mac.

d_win d_mac
d_win d_mac

Step-by-Step to Fix iPhone Stuck in Recovery Mode after iOS 13 Update

Step 1. Download and Install the iOS Toolkit
First, you have to download and install iOS Toolkit, it is available for Windows and Mac as well. To fix ios system to normal, please go to “iOS System Recovery” feature.

U.Fone iOS System Recovery

Step 2. Connect iPhone to Computer
After entering into the “iOS System Recovery” function, you will get an new interface as below, then connect your iPhone to the computer with USB cable. After the program detects your device, you will get a message on the screen that your phone is in recovery mode, please click “Start” to continue.

connect iPhone to computer

Step 3. Select Device Firmware
Follow the instructions to select the firmware that matches your device.

Select Device Firmware

Step 4. Download Device Firmware
In this step, the iOS System Recovery tool will help you download firmware version according to your device mode. When the download finishes, the software will automatically install the newly downloaded firmware to your iPhone.

Download Device Firmware

Step 5. Start to Fix iPhone to Normal Mode
After downloading the plugin package complete, the program will start to fix iOS system to normal and restore iPhone to normal status. A few minutes later, your iPhone will restart and get into normal mode.

Get iPhone out of recovery mode

d_win d_mac
d_win d_mac

Besides fixing iPhone/iPad/iPod stuck in recovery mode after iOS update, this program can also fix iOS issues for many common scenarios, such as black screen, DFU mode, white screen of death, iPhone boot loop issues, frozen issues, iPhone keeps restarting issues and more. After fixing iOS system to normal, it won’t damage your device, and all original data and settings are preserved. In addition, the iOS Toolkit also can help you backup and restore iPhone/iPad/iPod data, and recover deleted or lost data from iOS 13/iOS 12/iOS 11/iOS 10/iOS 9 devices.

Although our software can help you fix iOS system and recover lost data, we strongly recommend that you should back up your phone data regularly, just in case of unexpected damages to the device. If you think this guide is helpful for you, please share this article to Facebook or twitter for your friends.

iOS System Recovery

How to Fix Apple Music Not Playing after iOS 12/13 Update

[Summary]: Having a problem with Apple Music? Is your Apple Music not working properly after updating to iOS 13/12.3/12.2/12? Read this article to learn the most direct and effective way to fix all Apple Music problems on iOS 11/12/13.

“Apple Music won’t play on my iPhone after I updated my iPhone to iOS 12.3. I can’t open it to play any song. How to fix Apple Music not playing properly?”

Some of our iPhone, iPad and Mac users have reported some Apple Music issues after updating iOS to the latest version. Among those Apple Music issues, Apple Music doesn’t work after iOS 12.3 / 12.2 / 12.1 / 12/11 updates, and the latest iOS 13 system is no exception. Actually, there are many possible scenarios where Apple Music is not working properly, including:

Unable to sync.
Unable to login.
unable to download.
The song is skipped randomly.
Can’t play any music.
These songs are gray or skip some songs while playing.
Shuffle does not work properly and you cannot play songs repeatedly.
Apple music cannot be played offline.
“Apple Music” freezes (no response/crash).
Receive “Item not available”, “Unexpected error code 4010” or “This media is not supported” error.
My music can’t load music.
The radio is not working.
Apple Music Library is cleared after iOS 12 update.
Apple Music cannot be used as background music or ringtones.

If Apple Music doesn’t play songs after iOS 11/12/13 update, then the most effective way to fix your iOS system to normal. U.Fone iOS Toolkit – iOS System Recovery is a powerful tool to help you fix iPhone errors without using iTunes or causing any stuck problems or data loss. It’s good at fixing your iOS system issues like app errors, frozen screen, white Apple logo, recovery mode, DFU mode, black/white screen of death, etc. This is its main feature.

Fix iOS devices from recovery mode, DFU mode, headphone mode, Apple logo, etc. to normal state.
Safest way to fix iOS system issues without losing data.
Supports for all iPhones, iPods, iPads & the latest iOS 13.

d_win d_mac
d_win d_mac

Steps to Fix Apple Music Won’t Play on iPhone

Step 1.Install and Launch iOS System Recovery
Download and install the latest version of U.Fone iOS Toolkit – iOS System Recovery, you can launch the program to fix Apple Music not playing on iPhone.
ios system recovery

Step 2.Connect Bricked iPhone to Computer
Select the option of ‘iOS System Recovery’ from the primary window after the software is download completely. Next, Connect your iPhone to your computer with a USB cable. Click “Start”.

connect iphone

Step 3. Select your iPhone Model and Latest Version of the iOS System
You will be asked to confirm the information of your iPhone. Click “Repair” if it is correct, but if not, select the exact information manually before repair.

fix bricked iPhone on iOS 13

Step 4.Download the Latest iOS Firmware for your Bricked iPhone

Now the program will download the required plug-in to fix the issue. Restart the iPhone and check whether the issue has already been fixed.

download the firmware and fix bricked iPhone

d_win d_mac
d_win d_mac

Related Articles:

How Fix iPhone iPad Stuck on Apple Logo on iOS 13

iPhone Stuck on Black Screen after iOS 12 Update, How to Fix

How to Fix iPhone 6s/7/8/X/XS Glitch after iOS 13/12 Update

Top 6 Ways to Backup iPhone/iPad for iOS 13 Update

How to Play Apple/iTunes Music after Canceling Subscription

Fix Apple Music Not Playing on iOS 13/12/11

iPhone Got Bricked after iOS 13 Update? Here’s How to Fix

[Summary]: If you are looking for a way to fix a bricked iPhone after updating to the latest iOS 13, you have come to the right place. You will find the most efficient and easiest way to fix it here.

WWDC 2019 and the grand unveiling of iOS 13 is just over a week away and based on the rumors, it could be one of the biggest iPhone and iPad upgrades ever. Dark Mode, an updated Files, a redesigned volume indicator, iMessage profiles and more are on full display. We all think that iOS 13 is almost perfect, but past experience tells us that it may also have some bugs. Similar to iOS 12 update, severe users have reported about different types of issues with it and one of them was iPhone Getting bricked or freezing. And if your iPhone has got bricked after upgrading to iOS 13 then you might be worried about the date stored on it. Don’t worry, this guide will definitely help you fix iPhone bricked issue after iOS 13 update and there is no data loss here.

Maybe you don’t know what does a bricked iPhone look like. Here are some of the symptoms that your iPhone is bricked:

• iPhone won’t turn on after iOS update
• There is only an Apple logo left on your non-responding screen.
• iPhone gets stuck in boot loop.
• iPhone stuck on the connect to iTunes logo.
• iPhone won’t turn on but it is full charge.
• iPhone bricks microphone.
• iPhone get bricked and get error 53 or iTuens error 53.
• iPhone units with third-party display.
• iPhone screen is black/white/red.
• iPhone is dead and no-responding to your any tap or voice order.
• And more.

What are the factors that cause these symptoms? The reason is various, maybe it’s just an update error; you upgrade your iPhone to an unstable version of iOS; due to heavy application, music, video, photos, etc., there is not enough storage space; firmware corruption or malware attacks; iPhone jailbreak and so on. Whatever the reason, you need to find a way to help you reboot your device. This article is written for you to fix iPhone got bricked after updating to iOS 13/iOS 12.3/iOS 12.2/iOS 12 in the most direct and efficient way.

U.Fone iOS Toolkit – iOS System Recovery may be the best way to deal with any kind of issues or errors occur on iPhone/iPad/iPod Touch. In fact, it is a data recovery tool coming with a feature of “Fix iOS System”. You can use it to recover various types of data or rescue your iPhone from the problems like being stuck in recovery mode, DFU mode, Apple Logo, black screen, white screen and other issues. The software supports all iOS devices and all iOS versions including the latest iOS 13.

d_win d_mac
d_win d_mac

How to Fix Bricked iPhone after iOS 13 Upgrade

Step 1.Run the iOS System & Data Recovery on PC or Mac
Click the link as given above and download iPhone/iPad data recovery on your computer,you can get the windows as below.

ios system recovery

Step 2.Connect Bricked iPhone to Computer
Select the option of ‘iOS System Recovery’ from the primary window after the software is download completely. Secondly,use the USB cable to connect your iPhone to your computer . After a few seconds,the iPhone/iPad will be detection by iPhone/iPad data recovery and display it on its screen. Now, click on the button ‘Start’.

fix bricked iPhone,iPad

Step 3. Select your iPhone Model and Latest Version of the iOS System
You will be asked to confirm the information of your iPhone. Click “Repair” if it is correct, but if not, select the exact information manually before repair.

fix bricked iPhone on iOS 13

Step 4.Download the Latest iOS Firmware for your Bricked iPhone
In this step, the program will download the latest version of your firmware to repair the corrupted system and fix it to normal.

download the firmware and fix bricked iPhone

d_win d_mac
d_win d_mac

Related Articles:

How Fix iPhone iPad Stuck on Apple Logo on iOS 13

iPhone Stuck on Black Screen after iOS 12 Update, How to Fix

How to Fix iPhone 6s/7/8/X/XS Glitch after iOS 13/12 Update

Top 6 Ways to Backup iPhone/iPad for iOS 13 Update

Recover Lost Data from iPhone/iPad after iOS 12/13 Update

Fix iPhone Got Bricked after iOS 13 Update

How to Fix iPhone Glitch after Update to iOS 13

[Summary]: iPhone met glitch after an iOS 13 update? Here this post will offer top solutions on how to fix iPhone glitch after updating to iOS 12.3/12, even with the latest iOS 13.

We’ll get an official list of iOS 13 features at WWDC 2019. Every iOS update brings new highlights. Similarly, this time Apple did its homework in terms of details. Apple will bring its dark mode to iOS with this latest update. If you want to use your phone at night without blinking, it will come in handy. Also, the new iOS 13 system offers a new slide-based keyboard, the Revamped Health app. Features such as Sleep mode, Home security, iPad multitasking and more have also been optimized in the new iOS 13. If you want to update to iOS 13, please check to see if your device supports the system. The following devices will almost certainly get iOS 13: iPhone XS/XS Max/XR/X/8/8 Plus/7/7 Plus/6s/6s Plus/SE, 12.9-inch iPad Pro (2nd generation), 12.9-inch , iPad Pro (1st generation), 10.5-inch iPad Pro, 9.7-inch iPad Pro, 9.7-inch iPad (2018), iPad Air 4, iPad (2017), iPad mini 5, iPad mini 4.

iPhone Met Glitch after an iOS 13 Update? Like an iOS 12.3/iOS 12.2/iOS 12 update, every update can cause some errors. Some users complained about an iPhone glitch after updating to iOS 13, such as a black screen, a frozen screen, stuck on Apple logo screen or white screen, and so on. There are many reasons for these glitches, but you can easily fix them in many simple ways. Here are some iPhone troubleshooting tips to fix some of the most common iPhone glitches.

Part 1: What You Should Do before Fixing iPhone Glitch

No matter what the circumstances, mobile phone data must be something you don’t want to miss, such as contacts, WhatsApp, news, photos, etc. Therefore, before we show you how to fix iPhone glitch, we strongly recommend that you use iPhone Data Exporter to back up your iPhone. iPhone Data Exporter is designed to transfer data from iPhone, iPad and iPod touch to your computer for extra security. Various data types are supported, namely contacts, messages, photos, music, videos, calendars and more. Plus, iPhone Data Exporter can help you extract and download data from iTunes or iCloud backup without any hassle. If you want to know more, click here.

Here is what iPhone Data Exporter can do for you:

Transfer data from iPhone, iTunes backup, iCloud backup to PC or Mac.
Export iPhone files, like contacts, messages, photos, music, videos, calendars and more.
Import photos, music, videos, ringtones, eBook from PC to iPhone
Restore lost iPhone data due to accidental deletion, broken device, damages, virus infection, jailbreak failure, unsuccessful iOS upgrade, factory reset, frozen device, etc.
You will be able to preview each file before exporting them.

d_win d_mac
d_win d_mac

export iphone data option

Part 2: Fix iPhone Glitch after Update to iOS 13

1. Force Restart Your iPhone

This is the most direct method and a force restart is an activity done at the hardware level and does not affect the software.

iPhone XS Max/XS/XR/X/8 Plus/8:Press and hold the Side and either Volume button until you see the slider appears. Then, drag the slider to turn off your iOS device. Then you can press and hold the Side button again to turn on your iPhone.

iPhone 7/7Plus: Press and hold the Volume button and Side button for about 10 seconds until the Apple logo appears. Then, drag the slider to turn off your iPhone. Then press and hold the Power button to turn on your iPhone.

iPhone 6s/6s Plus: Press the Home and Top/Side buttons, hold them for at least 10 seconds until the Apple logo appears.

2. Fix iOS 13 Glitches by A iOS Repair Tool (No Data Loss)

The focus of the U.Fone iOS Toolkit – iOS System Recovery is entirely on iOS system repair. If you are dealing with any kind of iPhone problem while updating iOS, jailbreaking, it is recommended that you use this iOS System Recovery to get your device back to normal.

Main Features of iOS System Recovery

Easily fix iOS system to normal, such as iPhone stuck in recovery mode, spinning circle, Apple logo, white/black screen of death, frozen screen, iPhone won’t turn on, update failure, forgot lock screen password.
Supports All Models of iPhone, iPad and iPod.
Fix your iOS to normal without any data loss.
Compatible with all iOS versions, the latest iOS 13 supported.

d_win d_mac
d_win d_mac

How to Use iOS System Recovery to Fix iPhone Glitch

Step 1. Install and Run iOS System Recovery
Install and run iOS System Recovery on your computer. Then connect your iOS 13 iPhone to PC with its USB cable.

Step 2.Choose Repair Mode

Select the “iOS System Recovery” option from “More tools“. You will see some notes displayed in the window. If you have no problem with all the notes here, click “Start“.

iOS System Recovery home page

click start to begin

Reminder: Your iPhone will be updated to the latest version after fixing. If it’s a jailbroken iPhone, it will be updated to a non-jailbroken phone.

Step 3.Download the Firmware for Your iPhone

This is automatically done by the program once the model is detected. You can also manually choose the firmware version you like if there is more than one option. Click on “Repair” to download the firmware for your iPhone.

select your iPhone model

After downloading the firmware, the program will start the repair process automatically.

download the firmware for iPhone

Step 4.Fix iPhone Glitch to Normal
After a short while, your iPhone glitches will be removed and your device can work normally again.

restore iPhone system to normal

This all-in-one application can quickly repair various iOS system issues without any data loss, such as iPhone stuck on Apple logo, DFU mode, recovery mode, iPhone i glitch, iPhone screen, keyboard glitch and iPhone FaceTime glitch, etc.

d_win d_mac
d_win d_mac

Related Articles:

How to Restore iPhone Photos after iOS 12/iOS 13 Update

How to Recover Lost Data on iPhone/iPad after iOS 13/12 Update

How to Fix iPhone System to Normal after iOS 12/12.1 Update

How to Fix All iOS Errors on iPhone/iPad without Data Loss

[Fixed]iOS 12/11 Update or Downgrade Stuck in Recovery Mode

Fix iPhone Glitch after iOS 13 Update

How to Fix iPhone Keyboard Not Working Problem

Summery: iPhone keyboard not working? If you encounter the same problem and want a self solved solution, just focus on this article. It will give you several ways to fix this issues with easy steps.

I was texting a SMS then the iPhone keyboard was not working, it just being unresponsive . Has anyone ever experienced this? How do I fix iPhone keyboard not working without sending it to the Apple repair store?

iphone keyboard

Have you found that your iPhone keyboard being abnormal while using it? Some people reflect that the keyboard of their device was not working after iOS system updated, screen replacement or when charging. iPhone keyboard not working issue is one of the main issues of different iOS device models, it need to be solved rapidly in case not to cause any other damages on iPhone. In general, iPhone keyboard not working issue includes several situations: 1. Keyboard is Frozen or Unresponsive. 2. Keyboard Predictions Not Working. 3. Keyboard Not Appearing. If you are getting the keyboard not working problem on iPhone, just take a glance on the follow section, we well provide you with some quick tips to help you out of the trouble.

Part A: Reset Keyboard Dictionary to Fix iPhone Keyboard Problem

iPhone keyboard is laggy or frozen? Try to reset keyboard dictionary. Go to Settings > General > Reset on your iPhone and choose “Reset Keyboard Dictionary”.

reset keyboard dictionary

Part B: Reboot iPhone to Fix iPhone Keyboard Problem

If your iPhone keyboard is frozen, try to reboot your device to fix the “iPhone keyboard not working” issue. On iPhone X, iPhone 8 and iPhone 8 Plus, quickly press and release the Volume Up button, quickly press and release the Volume Down button and then press and hold the Sleep/Wake button (side button) until you see the Apple logo.

Part C: Fix iPhone Keyboard Problem via iOS System Recovery

Keyboard problem can be caused by system errors for users who have just updated to the new iOS system for example iOS 12. You can fix the keyboard not working problem without restoring your iPhone with the help of iOS System Recovery, which will solve your problem without losing any data on device.

iOS System Recovery is a powerful software which can not only specialize in data recovery but also help you fix the iOS system issues. It is totally safe and it can offer the best help for fixing iPhone keyword not working issue. It’s good to fix all kinds of iOS system issues like iPhone stuck in recovery mode, DFU mode, iPhone gets frozen on Apple Logo , black screen, white screen and so on. It offers 3 modes for users to fix iOS issues on device without losing data. It compatibles with all iOS models run any iOS system, such as iPhone X, iPhone 8/8 Plus (iOS 12/11.3 included).

d_win d_mac

Fix iPhone Keyboard Problem without Data Loss

Step 1. Run the iOS System Recovery on the Computer
First of all, run iOS System Recovery on the computer, it will show the home page as below.

ios system recovery home page

Step 2. Select Mode and Connect iPhone
Click “iOS System Recovery” option in the home page after clicking “More tools” option. Connect your iPhone to the computer using a USB cable. The device will be detected by program soon and display it on its screen. Click on the button “Start“.

connect iPhone

Step 3. Select Model and iOS Version of iPhone
Now you should select the iPhone model which matching your device. The program will offer for you the latest iOS version for downloading. Then click “Repair” to go on.

select iPhone model

Note: It will be update the selected iOS system on your device after restoring.

Step 4. Download the Latest iOS Firmware for iPhone
The program will download the selected iOS firmware for fixing your device. Please don’t interrupt the connection of your iPhone and the computer until the firmware downloading process is end.

download the firmware for iPhone

Step 5. Fixing iPhone Keyboard Not Working Issue
When the iOS System Recovery has finished downloading the latest firmware for your iPhone, it will begin to fix iPhone system to normal and fixing iPhone keyboard not working issue without data loss at the same time.

fix iPhone keyboard problem

d_win d_mac

More iOS System Recovery Articles:

How to Restore iPhone System to Normal

Fix Siri Not Working on iPhone Problem(iOS 12 Supported)

How to Fix iPhone Get Frozen/Bricked Screen

How to Fix iPhone Stuck on Apple Logo

How to Get iPhone Out of Recovery Mode

How to Fix iTunes Cannot Connect to iPhone Error

How to Use IPSW File to Restore iPhone without Data Loss

Fix iPhone Keyboard Not Working Problem