Category Archives: Android Data Recovery

How to Enable USB Debugging Mode on Samsung Galaxy

Most of the time whenever you would like to flash or upgrade your Samsung device via flash tool or whenever you want to root your device you need to enable USB debugging mode in order to connect and communicate with your device.By default the USB debugging mode is disabled for any brand new device to avoid unintentional modifications on your device.But you need to enable debugging option manually for your Samsung development process.For different Android versions of Samsung device there will be different configurations to turn the USB debugging mode.

* How to Recover Deleted Data from Samsung Galaxy

* How to Manage Samsung Galaxy Data on Computer

Part 1:How to Enable USB Debugging Mode on Samsung Galaxy S8/S7/S6/S5/S4

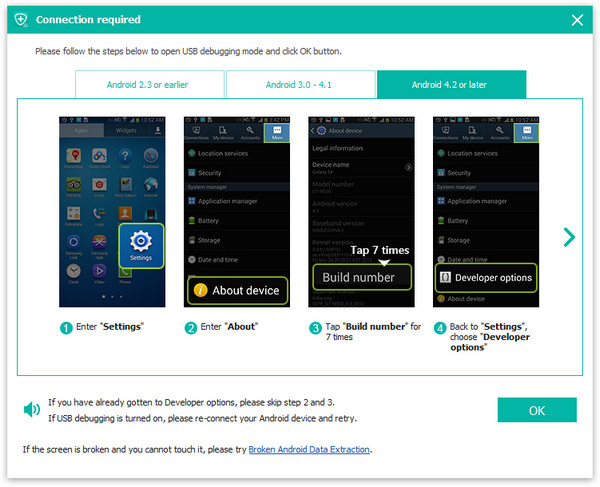
Step 1.If you haven’t enabled the option already, go to “Apps” > “Settings” > “About phone” and tap “Build number” repeatedly until it says “You are now a developer“.

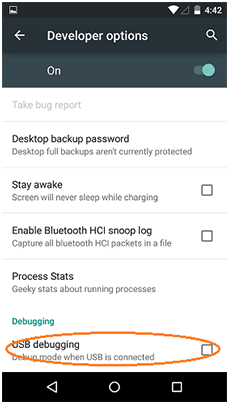
Step 2.You will now have an option under “Apps” > “Settings” called “Developer options” where you can enable or disable the “USB debugging” option.

enable USB debugging mode on Samsung

Part 2:How to Enable USB Debugging Mode on Samsung Galaxy Note 7/5/4/3

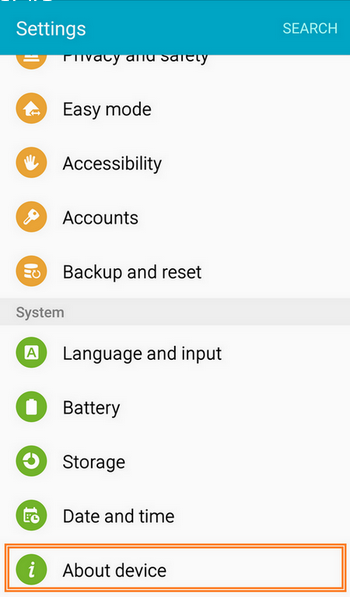
Step 1.Unlock Samsung phone and go to Settings > About Device

enable USB debugging on Samsung

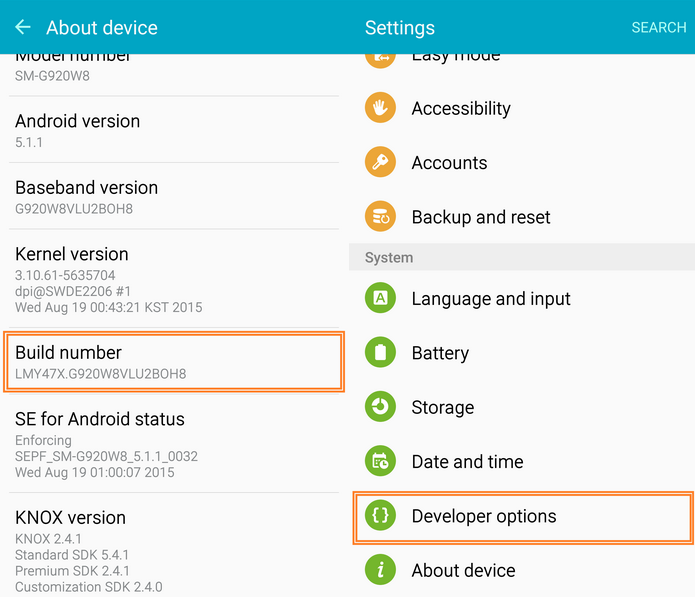
Step 2.Tap on Build number repeatedly until it says “You are now a developer” and then you will get the access to the Developer menu through Settings > Developer options

enable USB debugging on Samsung2

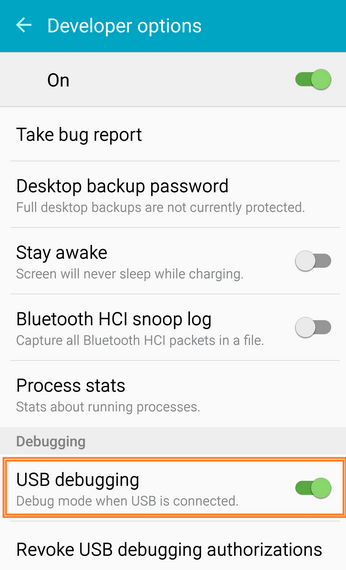
Step 3.Under “Developer option”,scroll down to find USB debugging option and enable it.

enable USB debugging on Samsung3

Part 3:A Professional Data Manager-Samsung Galaxy Data Transfer Tool

Samsung Galaxy Data Transfer is a professional data manager tool,which enable to transfer data between iOS,Android,Symbiam devices and computer with only one click,including contacts,SMS,photos,videos,call logs,music,calendars,apps.Moreover,this program allow to backup phone data and restore data from backup without any data loss.Multiple brand phones supported:Apple,Samsung,HTC,Sony,MOTOROLA,LG,HUAWEI,ZTE,Xiaomi and more.

phone transfer

d_win d_mac

Read more:

How to Enter,Use and Exit Recovery Mode on Android

25 Best Android Tips to Make Your Phone More Useful

How to Backup and Restore Samsung

How to Transfer Samsung Data to Computer

How to Transfer iPhone Data to Samsung Galaxy Note 7/5/4/3

25 Best Android Tips to Make Your Phone More Useful

Android is the most popular computing platform in the world thanks in part to how fast it has evolved over the years. Google is always adding new features and making changes to existing ones, and OEMs like Samsung and LG can add their own stuff on top of that. It can be hard to keep up, but we’ve got the 25 best tips for Android right here.

1

Configure a secure lock screen
Android phones all offer various forms of secure lock screens. Most phones will prompt you to do this during setup now, and you should. The defaults are PIN, pattern, and password. Some devices also offer fingerprint security and device-specific things like LG’s Knock Code. To control your lock screen, head to the system settings, and find the Security menu. Some phones have a separate lock screen menu instead. You will need to have a secure lock screen to use features like Android Pay and factory reset protection.

Disable/uninstall bloatware
Most phones come with some apps pre-installed that you won’t want to keep around. Luckily, they can be dealt with these days. Some pre-installed bloat can be uninstalled normally by using the Play Store or finding it in the app settings menu. However, anything that’s part of the system image is non-removable. What you can do is disable it by opening the app menu from the main system settings and finding the app in your list. Right at the top will be a “Disable” button that removes it from your app drawer and prevents it from running in the background.

Set up adoptable storage (on some devices)
One of the cooler additions to Android 6.0 Marshmallow was adoptable external storage. It finally makes microSD cards first-class storage by merging them with the internal storage. To do this, you need a phone running Marshmallow with a card slot.

2

When you insert the card, you’ll be presented with the option of portable or internal storage. Internal storage will adopt the card as a part of the system, so important data can be stored there automatically and expand your total internal storage. The only drawback is that the card will be formatted and encrypted such that it only works in that device. To use it for anything else, you have to completely reset it and move all data back to your phone’s internal flash.

Add mobile data tracking
Data caps are common across mobile carriers, and data rates just keep getting faster. To make sure you don’t blow through your monthly allotment, visit the data usage menu in the system settings. Some phones call this something a little different, but it’s always right near the top. Here, you can set your plan reset date, create a warning threshold, and even have data automatically disabled when you’re about to incur an overage.

Choose Do Not Disturb settings
Android’s notification settings are a bit of a mess right now. Not only do OEMs often change the terminology, but Google itself has revamped it a few times in recent updates. You’ll find this feature either in your volume popup when you hit the toggle or by going into the system settings for notifications (usually Sound and Notification). It will be called Do Not Disturb on most devices. In this menu, you can choose when DND is toggled on automatically, what is blocked, and if any contacts are allowed to ring through anyway.

Enable Smart Lock
Turning on a secure lock screen as explained above is important to keep your data safe, but it can be a pain to input a code every single time you pick up the phone. You can avoid that with Smart Lock. You’ll find this feature tucked away in the security menu on most devices. It includes different methods of bypassing the secure lock screen automatically. You can keep your phone unlocked when you’re in a certain place (like home), when a device like a smartwatch is connected, or when the phone sees your face with the front-facing camera.

3

You can even have multiple Smart Lock modules active at the same time. So for example, you could force the secure lock method only when you’re away from home and the phone gets far enough away from your smartwatch to disconnect.

Make sure your photos back up automatically
There’s nothing worse than losing or breaking a phone only to realize your photos aren’t backed up. You can avoid this by simply opening the Google Photos app and following the prompts to enable auto-backup. The default mode is “high quality” and unlimited space. This compresses your photos, but they look surprisingly good. If you want to save the original image, you can opt to use your Drive storage space. You get 15GB free and can buy more.

Get started with “OK Google”
Google search is at the heart of all Android phones, and you can start searching at any time just by saying “OK Google.” This works on the home screen and in the search automatically, but if you go into the search settings, you can get OK Google working everywhere. In the search settings, go to Voice > OK Google detection.

4

Just turn on the “From any screen” option and the phone will have you say “OK Google” a few times to learn your voice. Now you can use the hotword any time the device ID awake from any screen. Note: Some Nexus phones also support this when the screen is off.

Google Now on Tap (Marshmallow and higher)
If you’ve got a Marshmallow phone, you have Google Now on Tap. This is Google’s attempt to bring the power of Google Now out of the search UI. When you long-press the home button, On Tap reads the text on the screen and offers contextual actions. It might help you make a calendar appointment, look up restaurant reviews, or just perform a Web search. Give it a shot before you jump into another app to take care of things manually.

Try a different home screen
Most Android devices have a custom UI created by the device maker (eg. Samsung’s TouchWiz). That includes the home screen. This is an important part of the experience, and the default home often isn’t very powerful. Installing an alternative like Nova Launcher or Action Launcher can make your device much easier to use. You can use these apps to change the icons, assign navigation gestures, organize apps, and so much more. Any time you want to change between your installed home screens, just go to the Home menu in the system settings.

Use screen pinning
If you need to hand your phone to someone else, you don’t necessarily want them snooping around in other apps. This is easy to prevent — just pin the screen. This should be enabled by default on most devices, but if it’s not, check the security menu.

5

Tap the pin icon on any app in the multitasking interface and you can lock the screen to just that app. If you have a secure lock screen, you can require that unlock method to leave the pinned app.

Swipe input on the keyboard (most devices)
Tapping with your thumbs is okay as an input method, but most phones have swipe input built-in too. Give it a shot by dragging across the letters for each word. The accuracy varies by device, but you can also install a different keyboard that might suit you better. There’s the Google Keyboard for a clean but somewhat limited experience, and then more complex and powerful options like SwiftKey.

Use power saving modes
All Android phones have power saving modes of some sort — sometimes two or three of them. Head to the battery menu (usually just Settings > Battery) on most phones to see these settings. For example, Samsung offers a regular power saving mode that reduces screen brightness and slows the CPU, then there’s also an ultra power saver that locks the device to just a few essential applications. Most phones offer basic power saving modes like the former that can be turned on automatically when the device reaches a certain battery level. This is definitely something you should set up.

Enable system UI tuner (stock Android Marshmallow)
If you have a stock Android phone on Android 6.0 like a Nexus or Motorola device, you have a particularly cool new toy to play with called System UI tuner. This is an experimental feature of Android that lets you make changes to the Status bar and Quick settings. To activate, long-press on the settings icon at the top of your Quick Settings panel. This will add a new item in the main settings for the UI tuner.

6

You can use it to hide items like signal, clock, alarm, and so on from the status bar. You can also add a battery percent to the battery icon. There’s even an option to rearrange the tiles in Quick Settings. Some of this already exists on skinned versions of Android like TouchWiz, but this is the first time pure Android has supported it.

Manage default apps
Many actions on Android will ask you to set a default app, but what if you decide you don’t like that default anymore? Some phones have a dedicated default app settings menu (e.g. Samsung), but the surest way to clear out those defaults is to find the app in the app menu under the main system settings. When you look at the info page for an app, there will be a button toward the bottom to view and clear the defaults. That will let you select a new default the next time you perform an action.

Turn on Developer Options
Google hides some of the more advanced tools in a special Developer Options menu that you’ll have to enable to get at things like animation speed, USB debugging, and app standby (which I’ll get to momentarily). To turn on Developer Options, open the “About phone” menu at the bottom of the system settings and find the build number. Tap on that seven times and you’ll get a message that you are a developer. The dev options will now be at the bottom of your main system settings.

Activate guest mode for shared devices
If you want to let someone borrow your phone for a bit and screen pinning is too restrictive, you may have the option to enable Guest mode. All stock Android devices have this, as well as most phones running 5.0 or higher from OEMs like Samsung and LG. To switch to a guest account, tap the profile icon in the upper right corner of the notification shade and select the guest profile.

7

All your data, accounts, and apps will be hidden from the guest account. There’s also a Users menu in the settings of most devices to control what guests can and cannot do. Note, some carriers remove this option from the phones they sell for some (probably stupid) reason.

Make tweaks to App Standby and Doze mode (Marshmallow and higher)
Google introduced two new battery saving features in Android 6.0 called Doze and App Standby. Doze mode puts your device into deep sleep and blocks most apps from waking it up when it’s been sitting unused for a little bit. Meanwhile, Standby blocks apps you haven’t used recently from running background tasks. These both work fine on their own, but you can tweak things if you want.

Doze mode is accessible in Settings > Battery > (menu) Battery optimization on most phones. From here, you can make apps exempt from Doze, allowing them to operate even when the phone sits unused. This is only necessary if the app isn’t working right under Doze mode. Standby is found at the very bottom of the developer options menu where it’s labeled Inactive apps. This has a list of all apps on the device, some of which will probably be marked as inactive. Tap on any of them to toggle between active and inactive. Don’t worry — inactive apps become active again once you’ve opened them.

Screen casting
Do you have a $35 Chromecast or Android TV? If so, you can do more than stream video to it. Android devices can mirror the entire display onto your TV, and it’s essentially foolproof. On stock Android devices (and a few more) there is a Cast icon in the Quick Settings. Tap that and pick an output device to start mirroring your display. On other phones, just download the Chromecast app and use the screen casting feature included there.

Identify which app sent that notification
Android’s notification system is great, but sometimes it’s not clear which app produced a notification. Should you ever be confronted with a mysterious notification that you can’t identify, there’s an easy way to figure out where it came from.

8

Simply long-press on the notification and the parent app will be revealed. Tap the info icon to head to the app’s notification settings to disable it if you like.

Manage apps on the Web Play Store
Google includes the Play Store client on Android devices, but there’s also a version of the Play Store accessible online. For some people this is a no-brainer, but not everyone thinks to use the Web-based Play Store. You can do all the same things here that you do on your phone, but faster. Apps and games can be purchased and pushed over the air to Android. You can queue up multiple installs in a fraction of the time it takes on Android. If you’ve got more than one device on your account, you can pick where the app goes.

Adjust animation speed
Android Lollipop and higher includes a lot of flashy animations that help to cover some of the load times as you tap around, and can also help direct your attention to the right areas of the screen. If, however, you’ve got a fast phone and you don’t want the animations slowing you down, you can speed them up. You’ll need Developer Options enabled (see above), then just open that menu and find the settings for Window animation scale, transition animation scale, and animator duration scale. They all default to 1x, but you can turn them down to 0.5 for a snappier experience. Shutting them off is an option too, but I think that makes things look a little busted.

Use (and remove) factory reset protection
Android 5.1 added factory reset protection to Android, which is nice should your phone ever be stolen. The thief won’t be able to reset and log into the phone without first knowing your Google password. However, you might also accidentally lock the new owner out of your phone (or even yourself) if you sell it.

9

Factory reset protection is enabled automatically when you have a secure lock screen enabled in Android 5.1 or higher. Make sure you don’t reset your phone less than 24 hours after changing your Google password, or you’ll trigger a 72-hour anti-theft lockout. To disable reset protection for a new user to log into the phone, just disable the secure lock screen, enable OEM unlock in the Developer Options, or manually remove your Google account in the Accounts menu (this also factory resets the phone).

Sideload (safe) apps
The Play Store has plenty of apps, but if you want to branch out a little, there are safe ways to do that. First, head into the security settings on your device and enable “Unknown sources.” That will let you install APKs downloaded from outside the Play Store. Some of the popular ones are the Amazon Appstore, F-Droid, and APK Mirror. Amazon offers a fair number of paid apps for free, and F-Droid is for free and open source software. APK Mirror re-hosts free APKs so you don’t have to wait on staged rollouts and can get old versions of software.

Save offline maps
Google Maps includes support for saving maps offline, and the feature was recently expanded to be more powerful. It’s not easy to find, though. Find the area you want to save offline, then tap in the search bar at the top of the screen. Close the keyboard and scroll the the bottom and you’ll see the option to download.

10

The app will bring up an outline to indicate the area that will be downloaded and estimate how much space it will take up. The offline data will include streets, basic points of interest, and the ability to use turn-by-turn navigation.

And much more…
After all that, you should be a pro at using Android. This is just the beginning, though. There’s a lot more to discover in Android, and every device is a little different. So, don’t be afraid to poke around in the deep, dark corners of the settings and see what you can find.

Read more:

Samsung Pay:What You Need to Know

How to Fix An Wet Android Phone

How to Fix Top 5 Android Problems

How to Get More Internal Storage from Android

How to Delete Apps from Android Phone
How to Restore Data from Bricked Samsung

“I just root my Samsung Galaxy S5.However, it has been bricked since then.I am eager to restore all data from my bricked Samsung” Familiar situation and similar problem,right?Just follow our guide, and we will show how to retrieve data when Samsung/Android device get bricked.

Installing a custom ROM can bring big benefits but it may lead to brick your phone.The rewards of rooting your phone and installing a custom ROM can be worth the risky, heart-in-mouth process of wiping your mobile’s officially sanctioned software. But if you’re one of the unlucky few for whom it all goes wrong, leaving you with a bricked Samsung phone, what do you do next?

While the severity of how badly bricked your phone is varies, the symptoms are often the same — a reboot loop, switching itself off after the Samsung logo or never getting into the operating system.For the purposes of this article, as long as you can get back data from a bricked phone, there’s hope.I’m going to guide you through the process of recovering a bricked Samsung phone.

Retrieve File on Bricked Samsung Device

Broken Android Data Recovery enable to download recovery package for bricked Samsung and fix bricked Samsung device and restore data from bricked Samsung/Android device, including contacts,SMS/MMS/iMessages,call history,WhatsApp messages,gallery,videos,audio,and documents,etc,.This program allow to restore data from bricked Samsung device under several unexpected circumstances:black scree/white screen,stuck on Samsung logo,stuck in download mode/recovery mode,or other bricked issues.

d_win d_mac

How to Recover Data on Bricked Samsung Phone
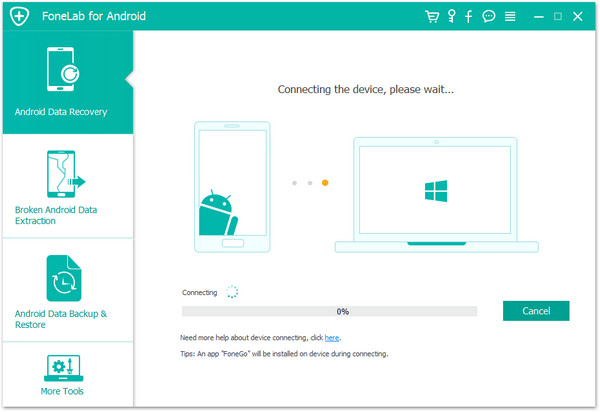
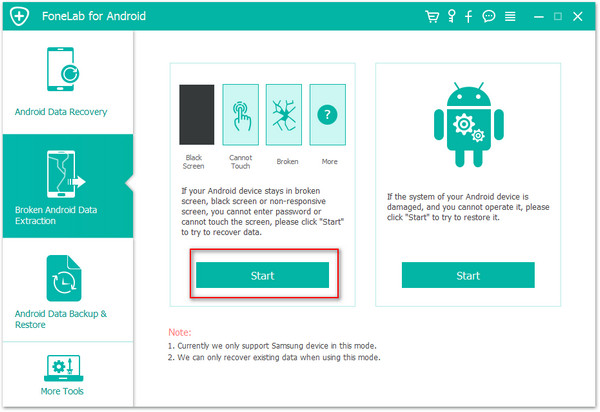
First of all you need to come across and it can be done by installing the Android recovery on your computer and then going for the scan option. When it has completed scan, you should click “Broken Android Data Extraction” to enter the restoring process.

Step 1.Run Program and Connect Bricked Samsung to PC
Run Android Data Recovery program on computer.Then connect the bricked Samsung phone(Samsung Galaxy S5 for example) to the computer.When the following interface occurs,select “Data Extraction(Damaged Device)”.

run android data recovery

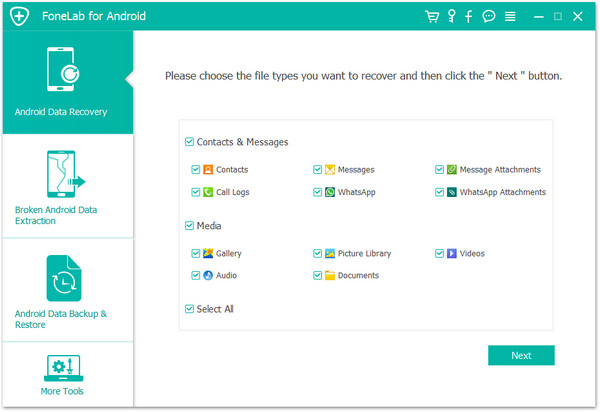
Step 2.Choose the File Types to Recover
Now you need to select the file type to restore from bricked Samsung. The recoverable data includes contacts, text messages, photos, gallery, music, video, documents,etc,.

select the data type to restore from bricked samsung

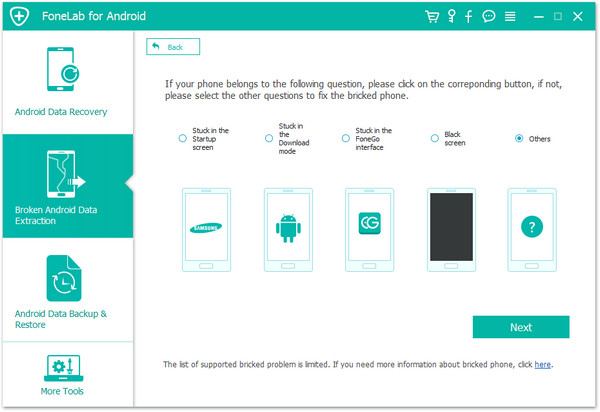
Step 3.Select the Broken Type of your Samsung
You should select the broken situation that match your device.

bricked choose fault type

Step 4.Select the Phone Fault Type for your Samsung
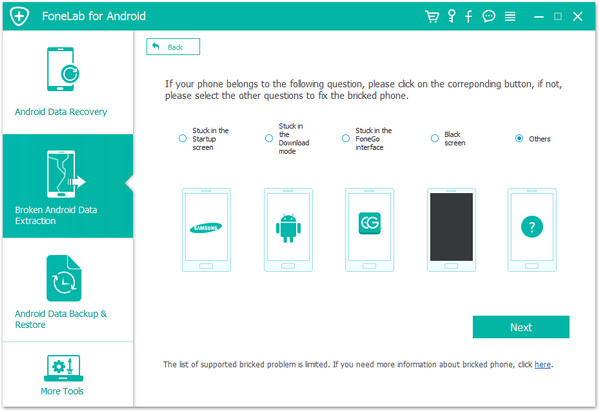
The program will enter the interface as the screenshot shows.Please select a kind of problems that matches your Samsung state,for example,mobile phone black screen,stuck in the start screen or other,and then click on NEXT.
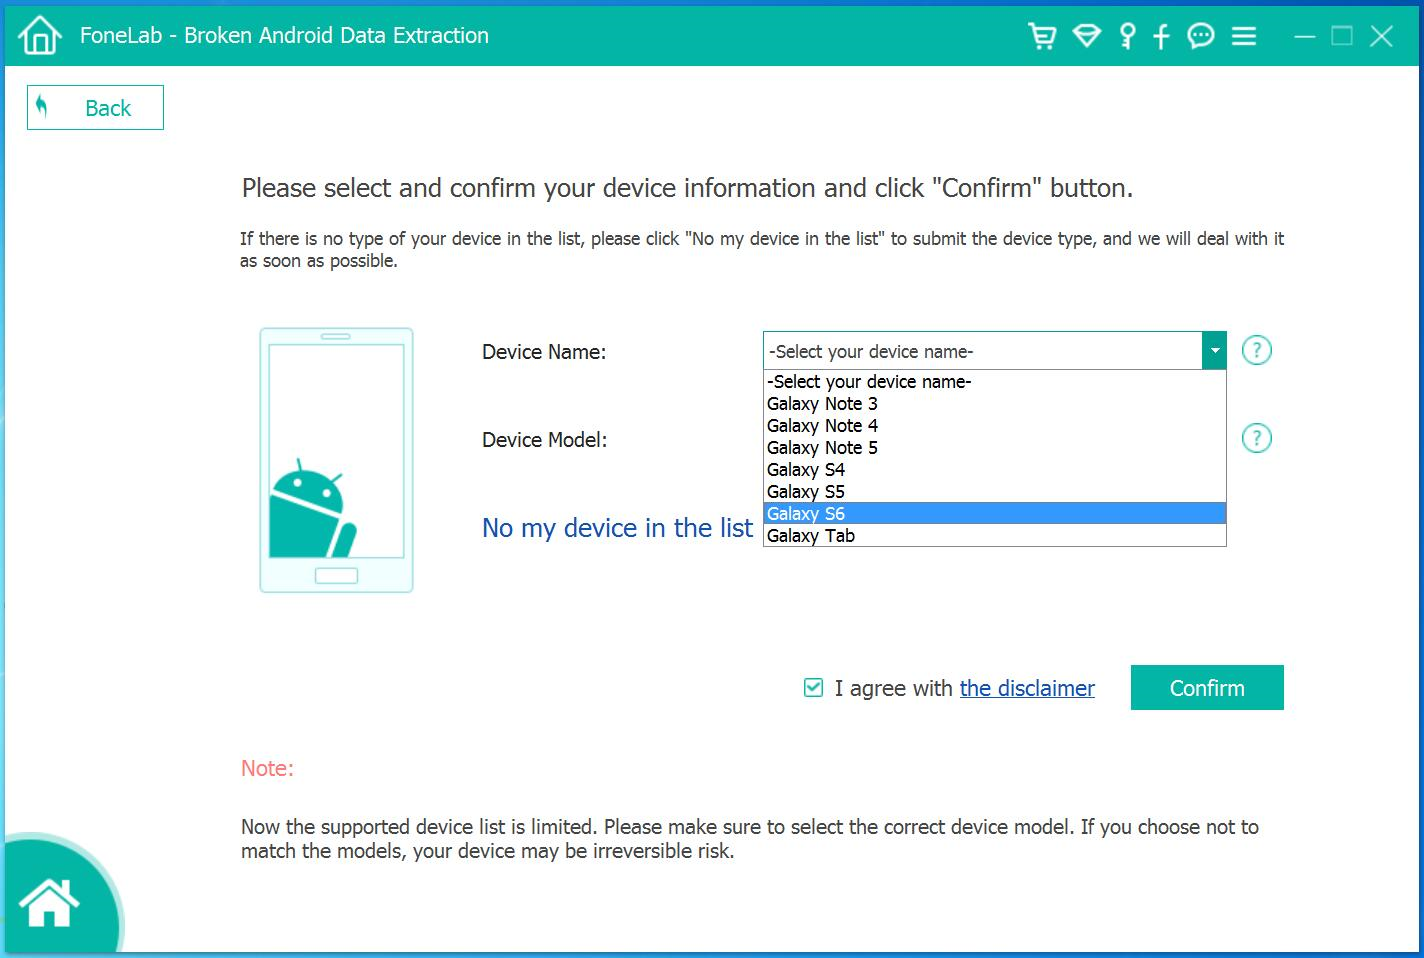
Step 5.Choose the Phone Name and Model
Select the proper Android system version of the Samsung as well as the exact model you are using.

select the bricked samsung model

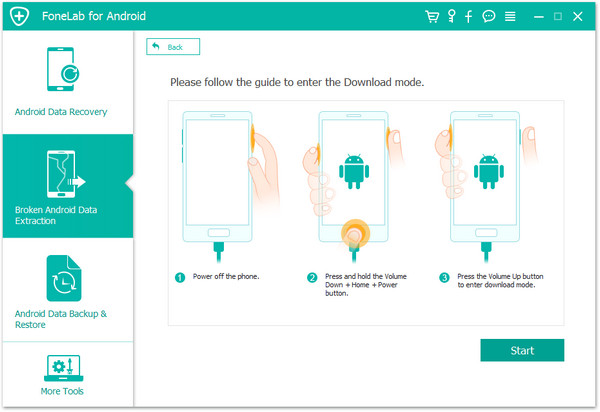
Step 6.Get Bricked Samsung into Download Mode
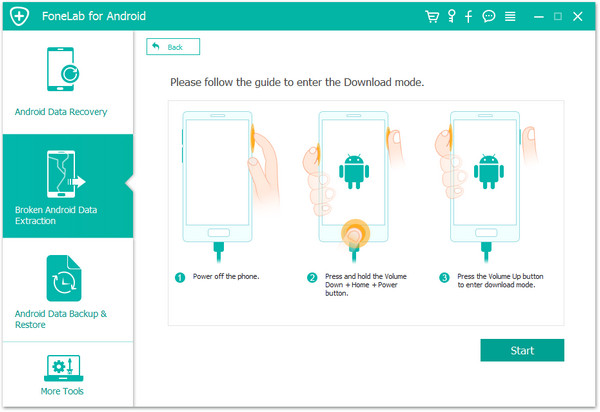
Now follow the guide to enter the Download mode: Power off the phone > Press the volume down + Home button + Power button > Press the volume up to enter download mode.
get bricked phone enter download mode

After that,your phone will enter “Download Mode” successfully.

download recovery package for samsung

Step 7.Restart Samsung Device
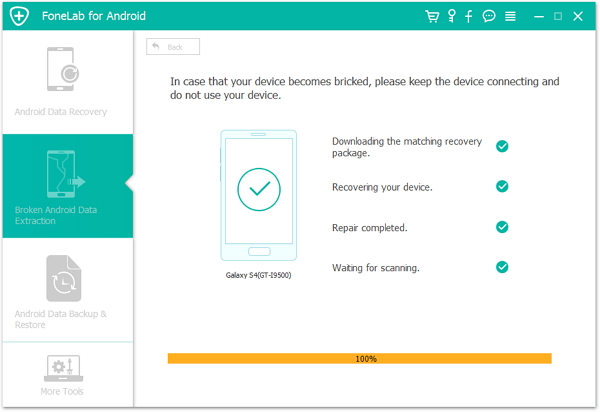
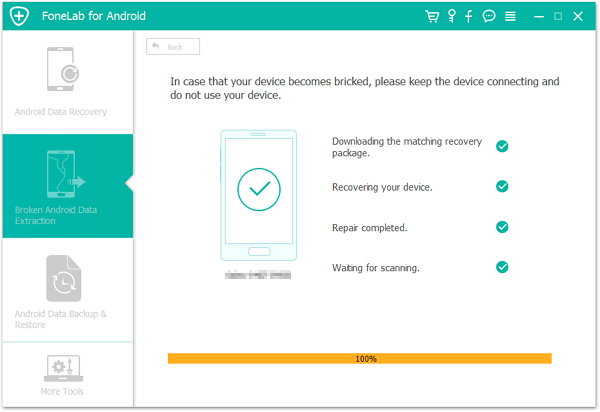
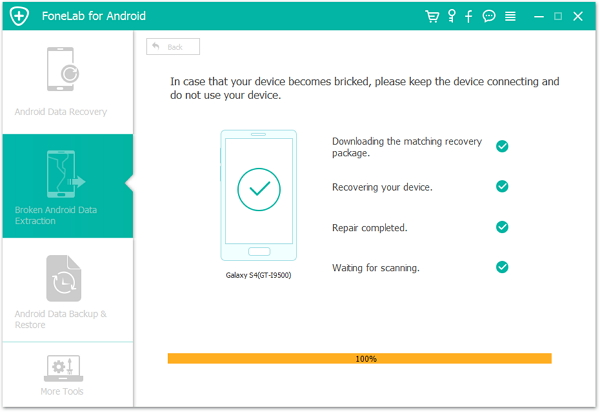
Android Data Recovery program will download the recovery package for repairing your bricked device,which helps you enable it back to the normal state.Several seconds later,the bricked phone will restart as the normal one.Then you need to check whether the device works or not.

restart samsung phone

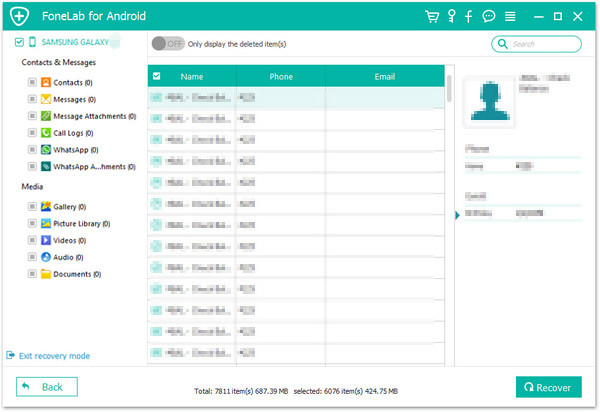
Step 8.Restore Data from Samsung Phone
Since your phone is normal now,you can recover files from Samsung phone.Just select the data and save on your computer.

recover data from samsung

Done.Note that recovered files are stored on the computer.If you would like to send the recovered data to Samsung, you should use the excellent Android Transfer.Click to see how to transfer data from computer to Samsung device.

d_win d_mac

Related Article:

How to Recover Data from Broken Samsung Phone

How to Retrieve Lost Data from Broken Samsung Galaxy

How to Recover Data from Samsung with Broken Screen

How to Fix Samsung Frozen on Samsung Logo

How To Fix Samsung Galaxy Black Screen Problem

How to Recover Text Messages from Broken Samsung Phone

Summary:If you suddenly broken or damaged your Samsung phone,you find yourself staring on a blank screen or broken screen when you open your device?Any other worse?You cannot open your files on the broken Samsung anymore?If you encounter it by accident,just read this tutorial for reference to easily recover data from broken Samsung phone.

SMS is one of the most important convenient communication way for each other.Text messages play an useful role in everyone personal and business life.However, you may carelessly delete a text message of great importance while trying to delete the old ones.Or it’s not your fault,but your Samsung phone is broken under any circumstances.Under normal conditions,damage due to operator misuse including;water;infusion.All files that you have stored cannot be opened anymore, if you do it by accident, and that original data could be gone, it makes it difficult to recover the SMS or more data from broken Samsung phone.

How to Restore SMS on Broken Samsung Phone/Tablet

In this case,you still have a chance to get back you messages from the broken device.Here is the solution for you.A recovery program can help you retrieve SMS from broken Samsung phone/tablet.

Samsung Broken Screen Data Recovery,a strong Samsung data recovery software,will be your reliable and trustworthy helper to restore all lost or existing data from broken Samsung,including SMS,contatcs,photos,call logs,document and so on.With the help of this wonderful program,you are allow to restore data from broken Samsung device,like broken screen Samsung,black screen Samsung, locked screen, can’t enter the system of Samsung,non-responsive of Samsung,etc,.Try it,it must do a geat help for you all Samsung users.

d_win d_mac

Easy Guide to Recover SMS from Broken Samsung Galaxy

After running Broken Samsung Data Recovery – Android data recovery on your computer,you will get the following main window.Then you should select the “Broken Android Data Extraction” option in the main interface of program.

Step 1.Connect Broken Samsung to Computer
Connect the broken Samsung phone to computer,and click the “scan it” button next to in the bottom of the interface.

connect broken samsung to pc

Step2.Select the File Need to Restore
The scanning will take you a few minutes to waiting.After that,you can preview all recoverable data found in the scan result one by one.Actually,the current including the deleted/lost or existing messages, contacts, photos and video are also scanned out in the result.You can distinguish them by different color.Now you can click the option which is the type data name.If you want to recover all files at once,please click “Select All” item.If you only need to restore SMS,just select “Messaging”.

scan broken samsung

Step 3.Select the Fault Types of Broken Samsung
In this step,the program will guide you to another screen,you will see the following screen. There are two fault types of phone choices: “touch screen can not be used or can not enter the system” and “black or cell phone screen is broken”.Select it depend on your phone situation.

choose broken types

Step 4.Select the Model of Broken Samsung
According to option to select the brand and model of your Samsung device,click”Next”.If you are not sure what model of your Samsung device,please click the “How to confirm the device model”option.

broken select device model

Step 5.Enter Download Mode for Broken Samsung
Now you should follow different steps to enter download mode depends on broken Samsung.

broken samsung download mode

Then,please click the “Start” button,the countdown will display on the phone screen that in the program to let you know how to enter download mode for the device.

Note:During process of getting into “Download mode” process,do keep connecting your broken Samsung device to computer via USB cable.

Step 6.Analyze your Broken Samsung Galaxy S/Note for Lost Data
Once entered the “Download mode”,the program will start downloading “recovery package” for device,it will take you a little time,please wait a while.

scanning text messages on broken samsung phone

When the downloading finish,the selected data item stored on the device will scanned out.

Step 7.Preview and Recover Selected SMS from Broken Samsung
When scanning is complete,you are allow to preview the lost or existing SMS by selecting,including the detailed messages,photos,videos and more document.Just click “Recover” button at the lower-right corner and save them on the computer or recover to your Samsung device.

recover sms from broken samsung phone

Free download the Android tool kit and try to extract SMS files from your Samsung phone with broken or black screen.

d_win d_mac

The Samsung Broken Recovery program is versatile since it can do wonderful things except retrieving data from broken Samsun.If the operating system of Samsung encounters a problem, the program will help to fix the Samsung system issues and fix it right away. If you want to create a back up for Samsung, you can easily export all data to computer for backup,it can save text messages as a HTML or text file.

Related Article:

How to Recover Data from Broken Samsung Phone

How to Recover Lost Data from Broken Samsung Galaxy

How to Recover Data from Samsung with Broken Screen

How to Recover Data from Water Damaged Samsung Phone

How to Recover Lost Data from Samsung

Samsung Pay:What You Need to Know

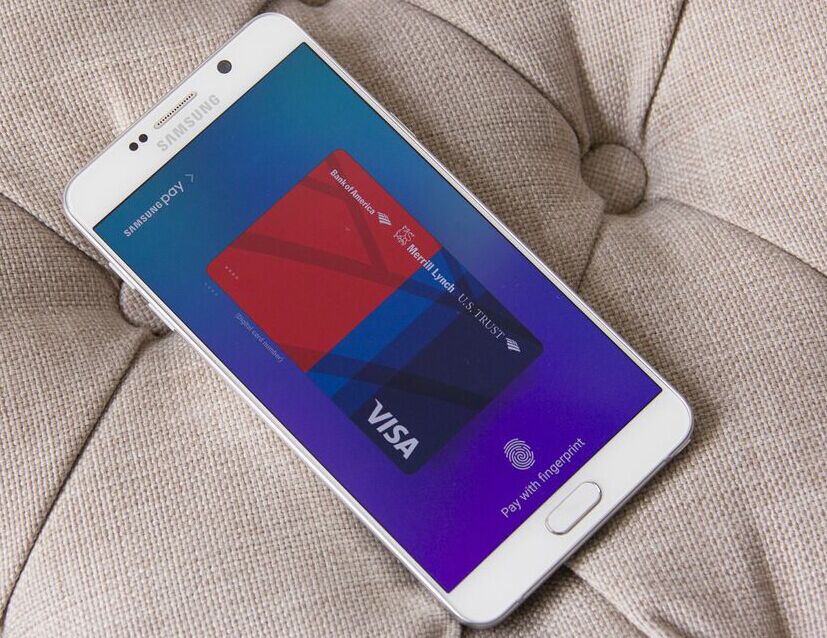
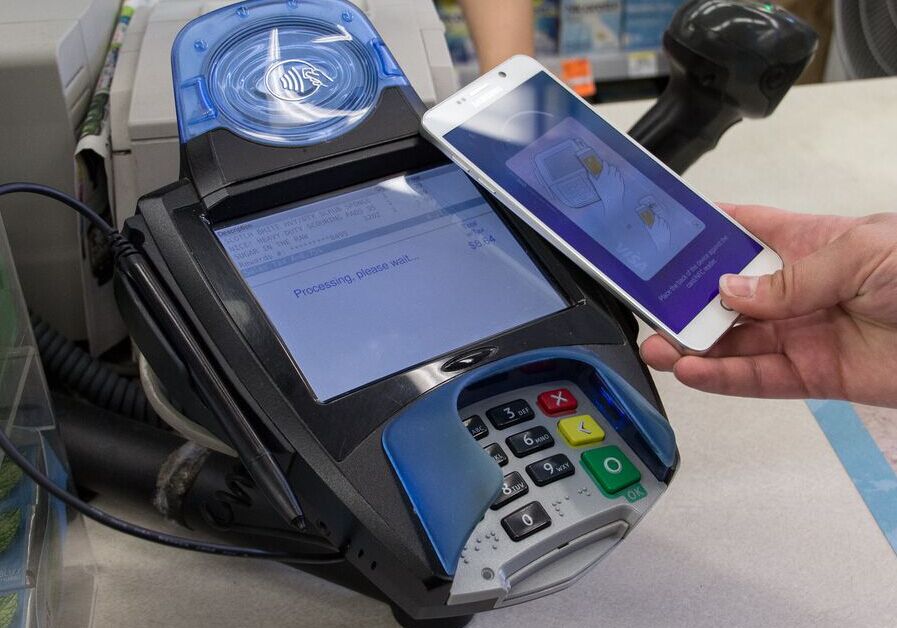
Samsung Pay is now available in the US. Here’s how it works and what you need to use the mobile payment system.Samsung’s mobile payment system Samsung Pay is now available in the United States after an earlier deployment in the electronic giant’s home country of South Korea.

It works in almost all stores — including those that use older magnetic stripe point-of-sale terminals — without merchants needing to opt-in to any program or update hardware.

Where is Samsung Pay available?
It’s currently available in South Korea and the US. Samsung Pay will be available in China in March, with the service launching in Australia, Brazil, Canada, Singapore, Spain and the UK later in 2016.

samsung-pay

What phone/bank/card/carrier do I need?
Samsung Pay works with higher-end Samsung phones: the Galaxy S7, S7 Edge, S6 Edge+, S6, S6 Edge, S6 Active and Galaxy Note 5. It is also available on the Gear S2 smartwatch, but only for transactions on NFC terminals.

The phone also needs to be on one of the following carriers in the United States: AT&T, Sprint, T-Mobile, US Cellular or Verizon.You will need a Visa, MasterCard or American Express issued by Bank of America, Chase, Citibank, PNC, Synchrony Financial, US Bank or Wells Fargo.

For Australia, there’s no information about which carriers Samsung Pay will be partnered with and so far the only financial institution partnership that has been announced is American Express.

Where can I use Samsung Pay?
Samsung claims that its system will work with almost all point of sale systems: NFC, magnetic stripe and EMV (Europay, MasterCard and Visa) terminals for chip-based cards.

However, it won’t work with readers where you need to physically insert your card into a slot such as those found at gas stations and on an ATM.

In two weeks of using Samsung Pay in stores around San Francisco, I found that it was accepted almost everywhere. These included vendors using Square readers; NFC terminals in major chain retailers like Trader Joe’s and Walgreens; and magnetic stripe readers in smaller stores. Merchants may still require you to sign a receipt for the transaction.

One point-of-sale system that did not work with Samsung Pay was an iPad-based payment terminal called Shopkeep. It recognized that I was trying to make a payment but it said that Samsung Pay wasn’t a valid credit card. A Samsung spokesperson said that “We are constantly updating Samsung Pay to work with the vast majority of card readers — unlike every other mobile payment option which only work with a limited number.”

What does the setup process involve?
Once the Samsung Pay app is installed, register your fingerprint on the device if you haven’t done so already. The camera will launch so you can scan your credit or debit card. Check that the number, name and expiration date are all correct. Finally, the app will need to verify the card by sending you an SMS or email from your bank.A total of 10 cards can be added to Samsung Pay.

How does it work?
Samsung Pay uses near-field communication (NFC) technology to process payments at tap-to-pay terminals.

However, the system also works with almost all other magnetic stripe terminals as well. These older systems are widely deployed throughout retailers in the US. Samsung Pay uses magnetic secure transmission (MST) when the phone is held against one of these registers. The phone emits a magnetic signal that simulates the magnetic strip found on the back of a credit or debit card.

Earlier in 2015 Samsung acquired mobile payment company LoopPay which developed the specific MST technology used for Samsung Pay.

samsung-pay2

How do I make a payment with Samsung Pay?
From the lock screen, swipe up from the small Samsung Pay bar just above the home button. Then place your finger on the home button to verify your fingerprint and hold the back of the phone against the payment terminal.

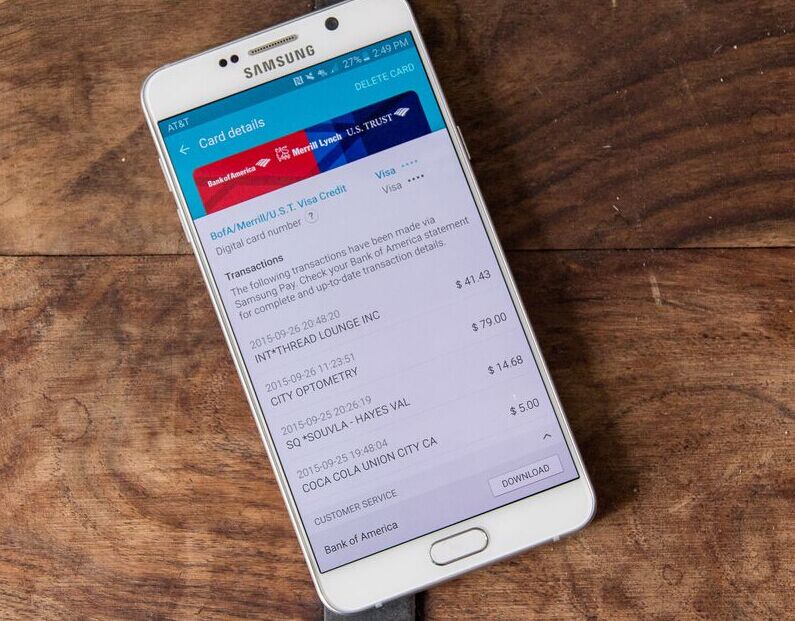
Once the payment is made you will get an Android notification that confirms the merchant name and the amount of your purchase. This information is also documented in the Samsung Pay app.

samsungpay

How does it differ from Apple Pay or Android Pay?
The main difference is that Samsung Pay works at almost all stores that accept credit or debit cards, not just those with tap-to-pay NFC terminals.

Is it secure?
Samsung Pay does not store the account or credit card numbers of cards on the device, instead using tokenization for transactions. Each time a purchase is made, the Samsung Pay handset sends two pieces of data to the payment terminal. The first is a 16-digit token that represents the credit or debit card number, while the second piece is a one-time code or cryptogram that’s generated by the phone’s encryption key.

What if I lose my phone?
Payments can’t be made from your phone without being authorized via fingerprint or the PIN chosen during the setup process. If you register with Samsung’s Find My Mobile service you can remotely erase information on the phone, including any cards stored in Samsung Pay.

Can I use Samsung Pay even without a Wi-Fi/cellular connection?
Yes, although you will only be able to make 10 payments without the device being on Wi-Fi or cellular data. You will also need to have an active internet connection to add a card and to access transaction history.

Does Samsung Pay also work for returns?
Yes. Merchants may require you to hold the phone against the payment terminal in the same way as when you make a payment to process the return. Also, you will be asked to match the payment information on the receipt with the last four digits of your virtual card number. This is accessed through the Samsung Pay app.

Read more:

Apple Pay:Everything We Should Know

How to Fix Top 5 Samsung Problems

How to Get More Internal Storage from Samsung

Top 5 Music Player for Samsung Phone

Tips to Make Full Use of Samsung Galaxy S7(Edge) Camera

How to Recover Data from Samsung Galaxy J2/J3/J5/J7

[Summary]:Samsung data recovery helps you recover lost/deleted/erased data such as photos, videos, SMS messages, contacts,phone numbers, WhatsApp chat history and other documents from Samsung Galaxy J2/J3/J5/J7,as well as Galaxy S and Note series smartphone.

Samsung Galaxy J series smartphone including Galaxy J2, J3, J5 and J7,although the Galaxy J series not Samsung’s flagship phone like Samsung Galaxy S9/S8/S7/S6/Note 8,but many people using Samsung Galaxy J series smartphone.When data get deleted or lost from Samsung galaxy J3 smartphone, the raw data of deleted files are not permanently deleted.Some users may ask how to recover lost data from Galaxy J3;how to retireve deleted photos on Galaxy J7;is it possbile to restore contacts on Samsung J5?

samsung galaxy j3

You may want to know:

* How to Transfer WhatsApp Chat History from iPhone to Samsung Galaxy

* How to Manage Samsung Data on Computer

The J3 is likable enough in its looks and feel, and its battery kept going long after I expected the phone to conk out.However,a lot of users reported that they lost data from Samsung Galaxy J3 under several circumstances,such as restore device to factory resetting,reboot device,poisoning,deleted by mistaken,device damaged,rooting,etc.To be honest,there are millions of satisfied users around the world that has used this tool called Samsung Data Recovery to fix Samsung Galaxy J2/J3/J5/J7 data recovery issues and easily recover all data from the Samsung J series phones.

How to Recover Lost File on Samsung Galaxy J3

Android Data Recovery enable to restore lost data from Samsung Galaxy J2/J3/J5/J7 phones easily,including SMS,contacts, text messages,photos,call history,WhatsApp chats & attachments, audios, videos and documents.Almost all models of Samsung devices are applicable to this smart program,like Samsung Galaxy J2/J3/J5/J7,Galaxy Note 8/5/4/3,Galaxy S9/S8/S7/S6/S5/S4 and other Android devices.In other words, it can be said that this is the useful recommended and secure ways through which you can restore lost data from any Samsung phone & tablet in simple steps.

d_win d_mac

Android Data Recovery Features:

-Retrieve deleted/lost photos, videos, music, contacts, messaging, call logs, WhatsApp data and many more.
-Fix and extract data from damaged or locked Samsung devices(Galaxy S6 to S4 and Galaxy Note 5 to Note 3).
-If you have experienced system crash or a black screen, still you can recover your data with the help of this data recovery tool.
-Backup your Android data and restore them to the device later.
-Compatible with 6000+ Android devices.

Simple Steps to Retrieve Deleted Files from Samsung Galaxy J3

Step 1.Connect Samsung Galaxy J3 to Computer
Run the Samsung Data Recovery program on your PC/Mac after downloading and installing,you need to connect your Samsung Galaxy J3 to computer via an USB cable.

connect samsung with the computer

Step 2.Enable USB Debugging on Samsung Galaxy J3
The program may require that you enable USB debugging on Samsung Galaxy J3 before scanning process begin.Simply follow the instructions in the next window to complete the process.

usb debugging samsung phone

Step 3.Scan Data on Samsung Galaxy J3
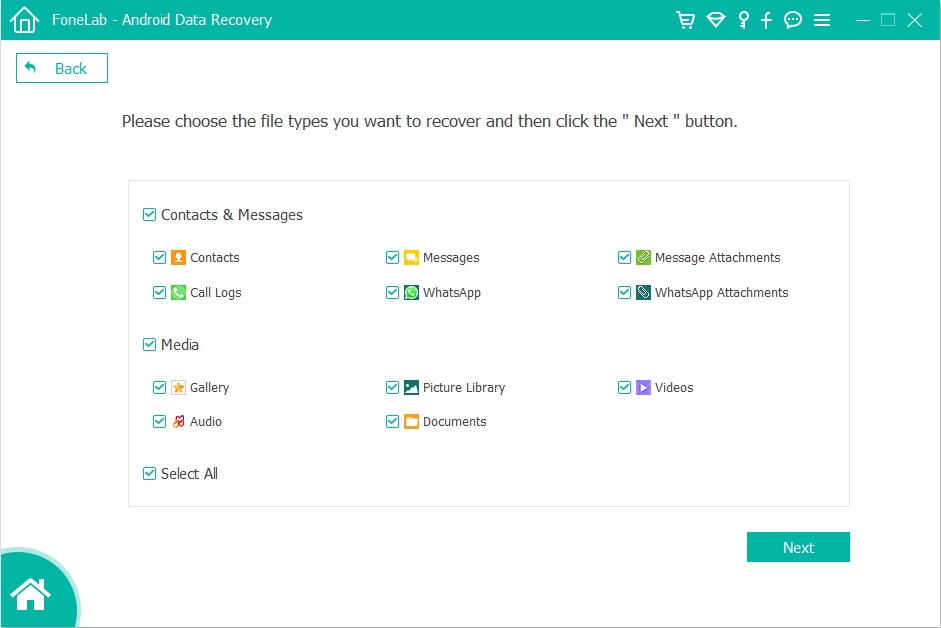
Once your Samsung Galaxy J3 is detected,the program will scan the device for all data.You should select the file you want scanned in the next window.Such as “Contacts”, “Messaging”,”Call History”,”Gallery”,and so on.You can choose the one you want to recover and click “Next” button.

select file tpye to recover from Samsung

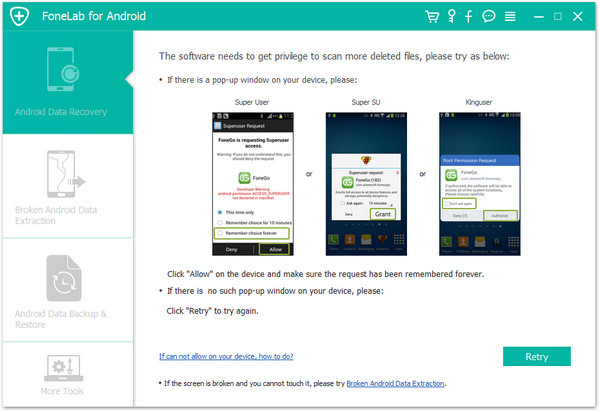
If there is a prompt on your Samsung phone as follow,tap “Allow” and permit the program to access and scan the selected files on your Samsung smart phone.

allow scan the samsung

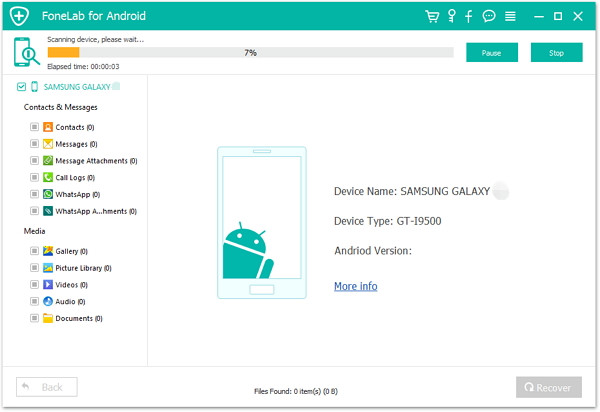
Now the program will begin to scan and analyze data stored on your Galaxy J3.

scan samsung for lost data

Step 4.Preview and Recover Data from Galaxy J3
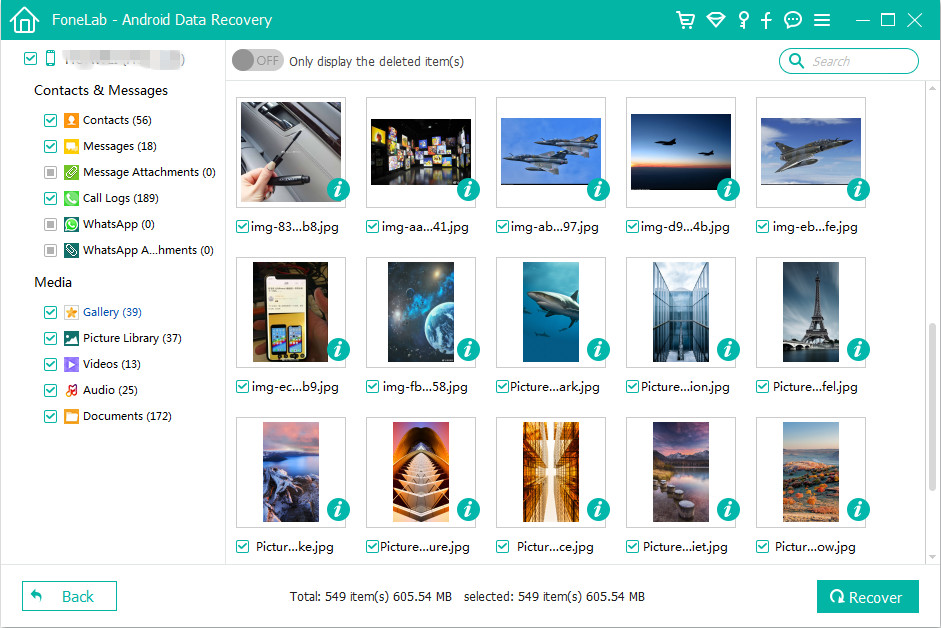
When the scanning process is complete,all the files will be displayed as shown below.Choose the ones you to preview and click on “Recover” button to save them on your PC.

recover lost data from samsung galaxy j3

d_win d_mac

Have to say,Samsung Data Recovery is a powerful and efficient data recovery for Android as well as Samsung,it can also retrieve lost data from broken device/Android SD card.The complementary function of program is that support to fix bricked Samsung/Android phone,fix the stuck issues on phone,for example fix Samsung stuck in download mode/stuck in the start screen,remove the locked screen on phone,etc,.

Related Article

How to Recover Data from Samsung SD Card

How to Recover Data from Water Damaged Samsung Phone

How to Backup and Restore Samsung Data

How to Fix Samsung Frozen on Samsung Logo

How to Fix Samsung Touch Screen Cannot be Used Issue

How to Set the Smart Lock of Samsung Phone

Most people like to secure smartphones with screen lock.So do I.However,Screen lock may be inconvenient in some time.If we urgent to make a phone call, it seems redundant.It is moreover annoying that we have to enter password/pattern every time we turn on the screen.Smart Lock is a new feature on Samsung devices later than Galaxy S5,which can automatically unlock your mobile device as long as you are at trusted location or using your phone on trusted device.Galaxy S7 currently enables users to set up Trusted devices,Trusted places,Trusted voice and On-body detection.Follow the steps below and see how to do it.

Part 1:How to Set up a Trusted Device for Smart Lock

Step 1.Tap”Settings” on Home screen or Notification Bar.
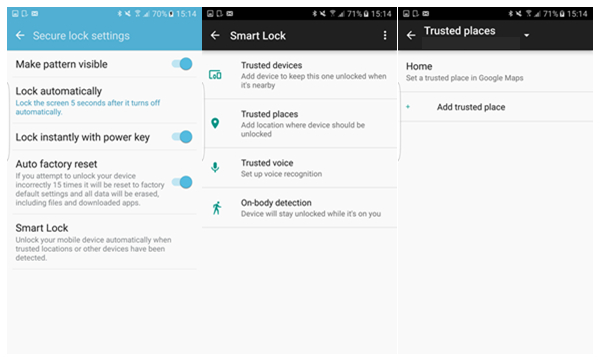
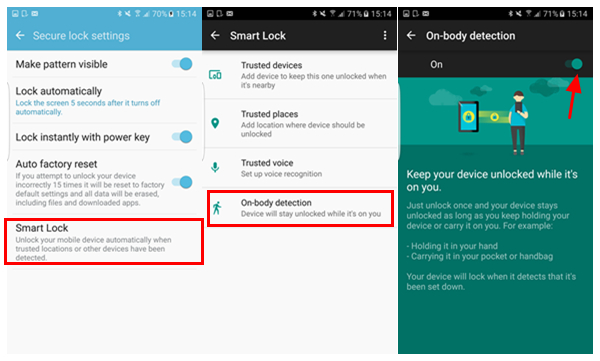
Step 2.Go to “Lock screen and security” > “Secure lock settings” > “Smart Lock”.
Step 3.Draw the current pattern or enter current password/pin.
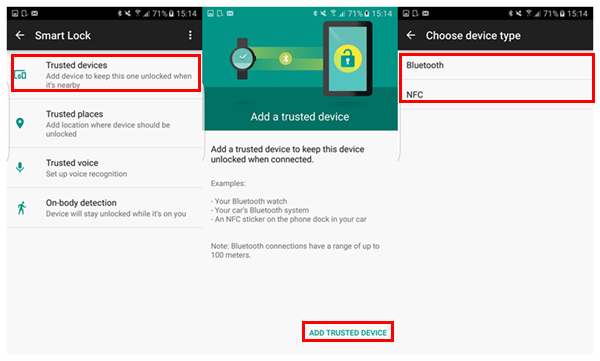
Step 4.Tap “Trusted devices” > “ADD TRUSTED DEVICE” > “Bluetooth” or “NFC”.
Step 5.Select the device you want to trust,and tap “YES, ADD”

smart-lock-s7-trusted-device

You can set your trusted devices,such as Bluetooth watch,car Bluetooth system,an NFC sticker on the phone dock in your car and so on.Once your Samsung phone detects the trusted device,it will keep unlocked.

Part 2:How to Set up a Trusted Place for Smart Lock

Step 1.Tap”Settings”on Home screen or Notification Bar.
Step 2.Go to “Lock screen and security” > “Secure lock settings” > “Smart Lock”.
Step 3.Draw the current pattern or enter current password/pin.
Step 4.Tap “Trusted places” > “Add trusted place”.
Step 5.Choose “YES” to allow access to GPS and pick a place.
You can position your home or company,so the device will stay unlocked when it detects via GPS that you are at these places.

smart-lock-s7-trusted-place

Part 3:How to Set up On-body Detection for Smart Lock

Step 1.Launch “Settings” app on Home screen or Notification Bar.
Step 2.Go to “Lock screen and security” > “Secure lock settings” > “Smart Lock”.
Step 3.Draw the current pattern or enter current password/pin.
Step 4.Tap “On-body detection”.
Step 5.Switch “On” the bar.

This function allows you phone to stay unlocked when it’s being held or carried by you.However,from where I stand,I don’t think this is good for protecting your privacy,because it cannot detect whether it’s exactly you who is using the device.Thus,it’s not recommended to keep this option on.

smart-lock-s7-onbody-detection

Part 4:How to Set up a Trusted Voice for Smart Lock

Step 1.Launch “Settings” app on Home screen or Notification Bar.
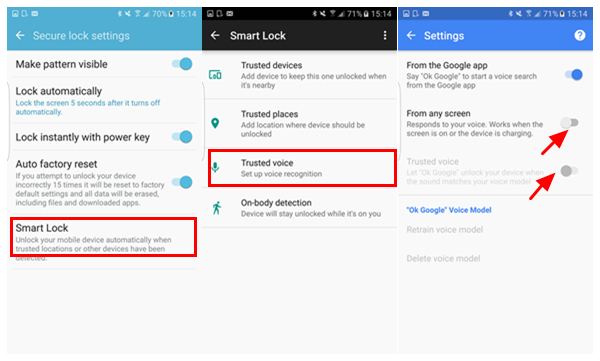
Step 2.Go to “Lock screen and security” > “Secure lock settings” > “Smart Lock”.
Step 3.Draw the current pattern or enter current password/pin.
Step 4.Tap “Trusted voice”.
Step 5.Toggle on the “From any screen” switch.You will need to log in your Google account to do the next.
Step 6.Tap the “Get Started” button and follow the instructions,and then tap “FINISH”.
Step 7.Turn on the “Trusted voice” switch.

As long as you set up voice recognition,your Samsung phone keeps unlocked by detecting that it’s you who is speaking.I personally regard this option as the best choice,for nobody can pretend the voice of yours.

smart-lock-s7-trusted-voice

Part 5:How to Remove Screen Lock

unlock-samsung

Way 1.Try to unlock your device with Google Account.
Way 2.Restore Phone to Factory Resetting.
Way 3.Remove Screen lock with Android Data Recovery.

Read more:

How to Fix Top 5 Samsung Problems

How to Fix WhatsApp Programs on Samsung Phones

How to Fix Samsung Frozen on Samsung Logo

How To Fix Samsung Stuck in Download Mode

How to Get More Internal Storage from Samsung

How to Restore Lost Data from Samsung

14 New Features You Need to Know about Samsung Galaxy S7 and S7 edge

South Korean tech major Samsung finally took the wraps off its next-generation flagship phones – the Galaxy S7 and Galaxy S7 Edge – at its MWC 2016 keynote on Sunday. On the face of it, nothing has changed at all. Both the new Galaxy S phones look ridiculously similar to last year’s Galaxy S6 (and Galaxy S6 Edge). But that’s necessarily not a bad thing. The Galaxy S6 brought Samsung back into the game and a lot of this had to do with its design, which in a word was fantastic. Samsung deciding to retain much of its design elements in the Galaxy S7 is in fact a well-thought out plan.

While nothing has changed on the outside, Samsung has made sure that almost every internal aspect of the new phones gets a boost some way or the other. Moreover, the new Galaxy S phones see the return of the microSD card slot and water-proofing capabilities, after they were stripped off in the Galaxy S6. These two features alone are capable to spark a renewed interest in Samsung’s Galaxy S7 and Galaxy S7 Edge even though they look a lot like last year’s phones.

Here are the 14 useful features of Samsung’s new Galaxy S7 and Galaxy S7 Edge phone:

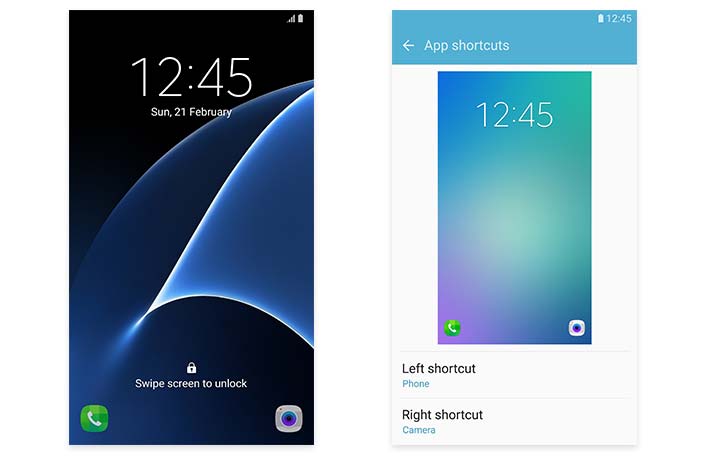
1. Customizable App Shortcuts on Lock Screen
When the Galaxy S7 and S7 edge are locked, two apps can be placed in the lower corners for easy access. Choose the apps you use the most-whether the camera, phone, photo gallery, S Health or even third-party apps-and the Galaxy S7 and S7 edge can provide you with faster access.

Lockscreen-2

How to Set Up: Setting > Lock screen and security > Info and app shortcuts > App shortcuts

2. Multiple Lock Screen Images
For your Lock screen’s wallpaper,you can now select multiple images from your Gallery to change the look each time you check your lock screen. It allows you to choose up to 30 images.

In addition,if you long press the display while the lock screen is on,the time and other information on the display disappear leaving only the wallpaper image.That allows you to see your lock screen image without interference from any on-screen information.

How to Set Up: Settings > Wallpaper > Lock screen > Select From Gallery and choose the photos (up to 30)

3.More Ways to Manage Apps from Home Screen
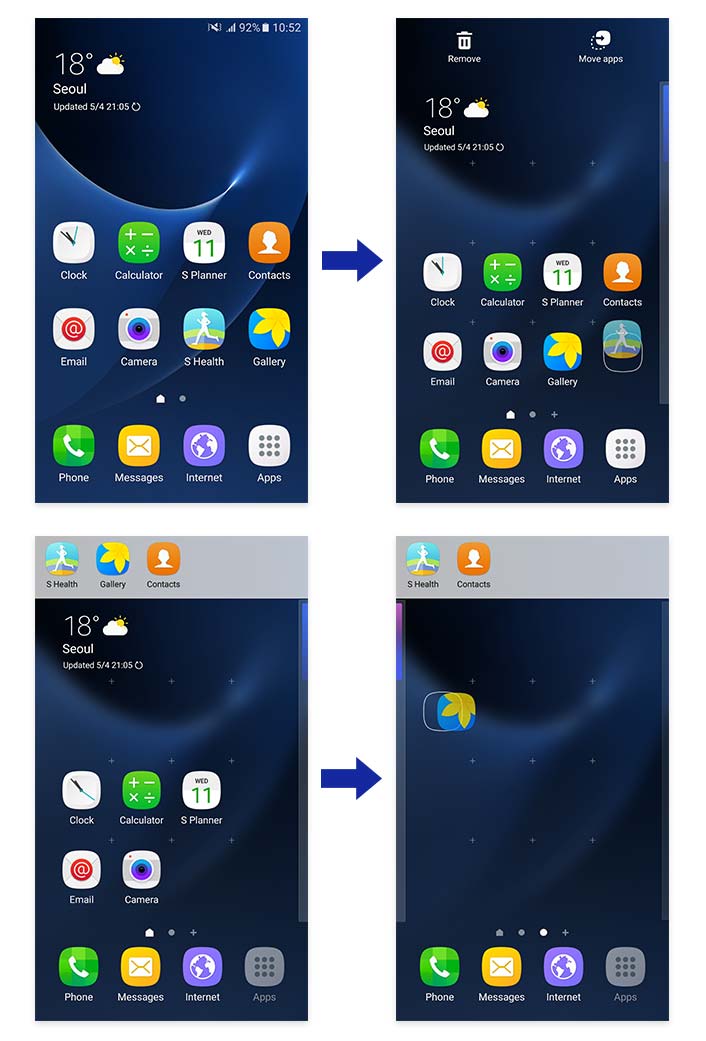
With the Galaxy S7 and S7 edge,you can now easily move apps around your home screens and search for apps more simply.

To move icons to different Home screens,long press an icon, and then drag it to the Move apps icon on the upper right.The Move apps is a temporary container for managing several applications at once.Then tap or drag it to move it to another page.

Manage Apps from Home Screen-1

In addition,you can look for an app by name in the app tray by selecting “Search” at the top of the screen.

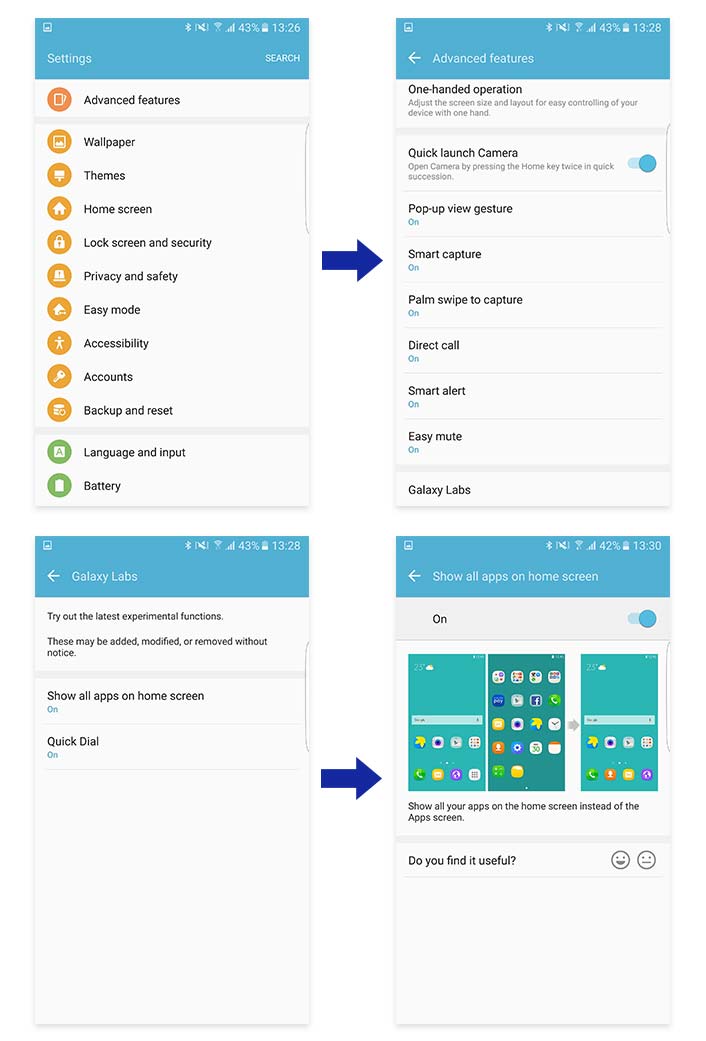
4.Show All Apps on Home Screen
Usually downloads all go to an app tray, but if you don’t like that way of organizing them,the Galaxy S7 and S7 edge give you an alternative method.Choosing “Show all apps on home screen” gets rid of the app tray, and moves all the apps to the Home screens.

Show All Apps on Home Screen-1

How to Set Up: Settings > Advanced features > Galaxy Labs

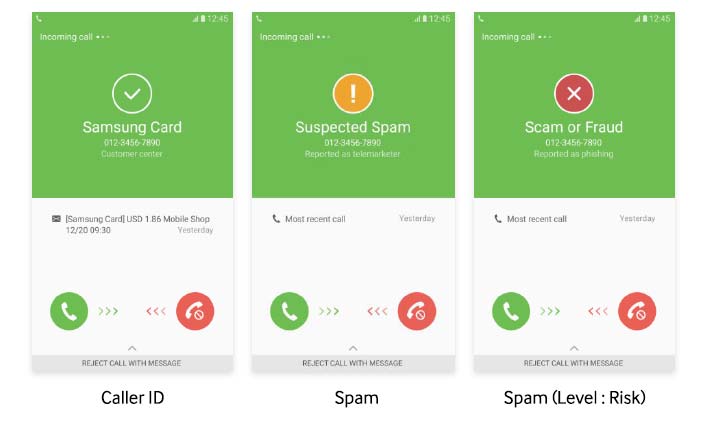
5. Identify Unsaved Callers
When you receive a call from a number not in your address book,the Galaxy S7 and S7 edge can check to see if that phone number is suspected of being a spammer or even a fraud-related number, and what the risk level is.Depending on that analysis, you can choose to block or report the number.

Identify Unsaved Callers

How to Set Up: Settings > Advanced features > Identify unsaved numbers

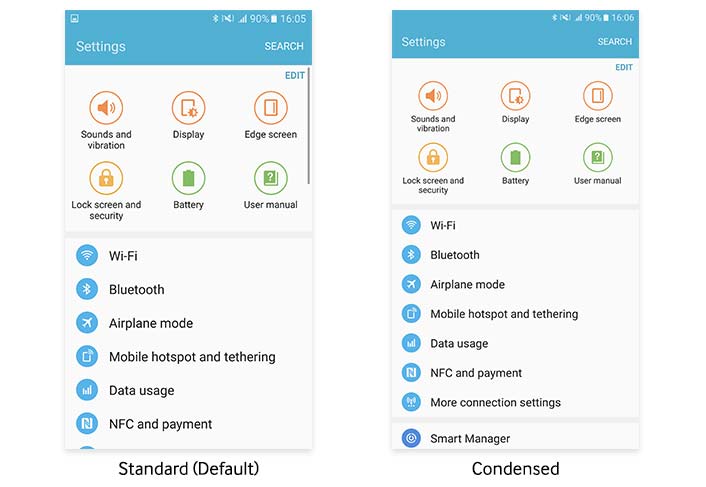
6. Display Scaling
Display scaling lets you optimize the DPI (Dots Per Inch) settings of your display.You can either choose to stay as Standard or change to Condensed.Condensing your display lets you view more content on the screen at one time with smaller icons,controls, and text.

Display Scaling

How to Set Up: Settings > Display > Display scaling

7. Icon Backgrounds
For the Galaxy S7 and S7 edge,the look of the icons has been updated to be more unified and natural. For native apps, the icons all come in a “squircle” shape (a square with rounded edges), creating a pleasing and organized appearance. For third-party apps, users can turn on the Icon background, which creates a squircle container background for all those icons, too, unifying the look of all of a user’s apps. In addition, many icons now offer two different styles—a traditional flat look, and a more 3D look.

How to Set Up: Settings > Display > Icon backgrounds

8.Schedule Auto Restart
Often restarting a device is one of the best ways to keep it running efficiently,as it clears out the system and ensure new apps and updates are operating properly.Auto restart ensures that your Galaxy S7 or S7 edge gets a regular restarting,so you don’t have to worry about remembering to do it manually. The function also takes care to prevent restarting from happening at inconvenient times,so it only occurs when the screen is turned off and the device is not in use, but there is at least 30 percent of the battery power remaining.

How to Set Up: Settings > Backup and reset > Auto restart

In addition to these innovative features newly added to the Galaxy S7 and S7 edge,a variety of other useful functions are also available on these flagship Galaxy devices.

9. Always On Display
Now you can check on notifications, missed calls,the time,date and more without ever unlocking your display.Always On Display puts that information right on your screen,freeing you from activating your display to check them, and without draining your battery.

How to Set Up: Settings > Display > Always On Display

10. Cross App
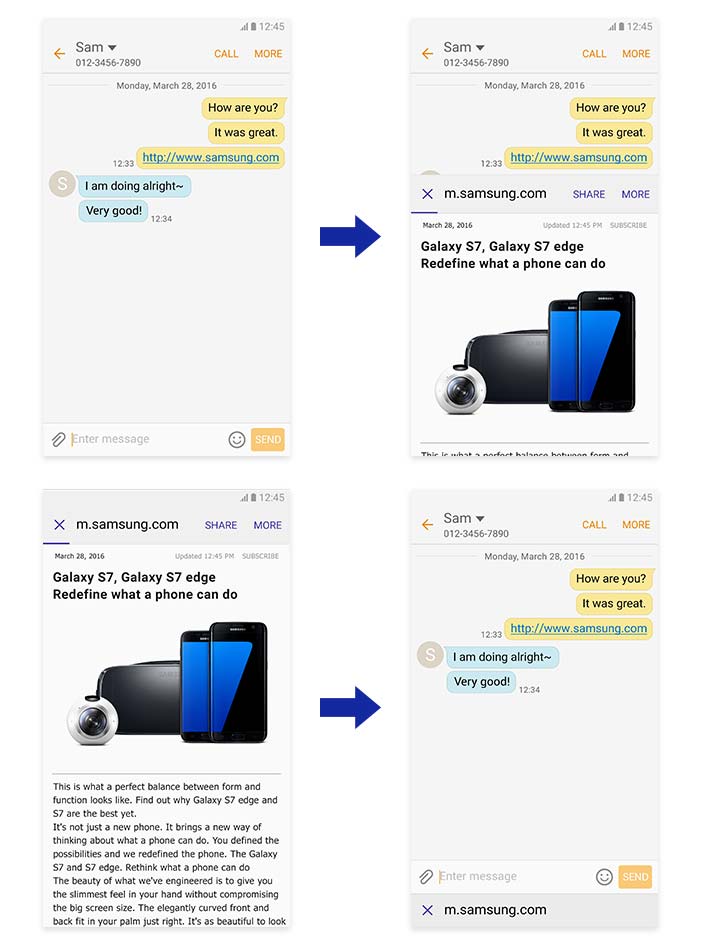
With Cross App,you can use apps from within certain other apps.For example,while chatting with a friend in the Messages app,you can access photos and videos and share them,or open a URL and check out a web page, all without exiting the messenger first.

Cross App is automatically integrated with the Galaxy S7 and S7 edge.When using the Messages app, just click on the paperclip icon on the left of the Enter message panel.That gives you the choice of Camera, Gallery or Other.Camera lets you take photos or record video and send it directly to the person you are chatting with. Gallery lets you select photos and videos saved on your device.Other offers a range of apps, including Audio, Voice recorder, Memo and more.

Cross App1

11. Game Launcher
The Galaxy S7 and S7 edge are gamer-friendly devices,and both come with an app that makes gaming even better.Game Launcher lets you maximize your game-playing time through a variety of power-saving options.You can also turn off all notifications so nothing interrupts your gaming and lock the Recent and Back keys to prevent accidentally exiting a game.In addition,you can also take screen shots, record games and share them with friends.

How to Set Up: Settings > Advanced features > Game > Game Launcher

12. Smart Switch
Smart Switch, which makes it easy to transfer your old data to a new Galaxy device, has gotten an upgrade for the Galaxy S7 and S7 edge,with a new home layout, better app data recovery,and other improvements. A USB connector (On-The-Go Adapter) also comes with the Galaxy S7 and S7 edge,ensuring you can transmit data easily from the moment you unbox your device. Allowing transfers from devices with different operating systems,Smart Switch is a convenient way to move all your files, including contacts, chat messages, photos,calendar, apps and music.

How to Set Up: Settings > Backup and reset > Open Smart Switch

13. Quick Dial
Quick Dial makes calling your contacts faster and easier.Once enabled,you just need to give the home key a long press (even if the display is off),and then speak the name of the person you want to call.Quick Dial takes care of the rest.Also,the feature’s machine learning allows your device to become more familiar with your voice over time,thus increasing the device’s functionality as you use it more often.

How to Set Up: Settings > Advanced features > Galaxy Labs > Quick Dial

14. Tasks edge
This is a function only on the Galaxy S7 edge model.Just as People edge puts your most important contacts right into the curved edge screen for easy access,and Apps edge does the same for your favorite apps,Tasks edge lets you assign a shortcut for your most common tasks.Setting an alarm, composing a text message or creating an event can be assigned to the edge of the display,for fast, easy access.

How to Set Up: Settings > Edge screen > Edge panels

Read more:

How to Make Full Use of Samsung Galaxy S7(Edge) Camera

How to Recover Data from Samsung Galaxy Samsung Galaxy S7(Edge)

How to Get More Internal Storage from Samsung Galaxy S7(Edge)

How to Fix Top 5 Android Problems

Solutions to Fix WhatsApp Programs on Android Phones

How to Restore Deleted Picture from Digital Camera

More and more people get a digital camera these days.Many of them use digital cameras to record wonderful moments.But it seems digital pictures are easier to lose than traditional film pictures because the digital camera has an useful but dangerous delete button.An operation mishap may delete one or all of the pictures instantly.

If you’ve ever accidentally deleted pictures from your digital cameras memory card,you’re not alone.That feeling of dread when you forever lose photographic evidence of memories and experiences in digital can be resolved- whether your digital camera fell into the wrong (toddler’s) hands,or you had a momentary lapse of eye-hand coordination when faced with a “Delete All” photos,don’t be crazy please be quite yet.

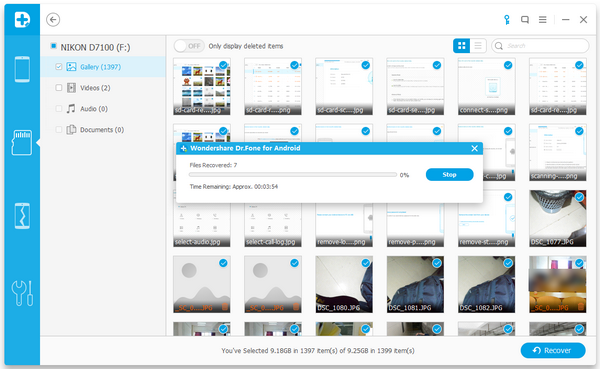
Android Data Recovery recently has released a new feature that support to recover deleted pictures from SD card completely.Both deleted photos and videos on SD memory card can be restored by this powerful Android SD Card Data Recovery.Additionally,this program also allow to recover files from hard drive,hardware RAID,external drives,etc.After scanning for the deleted files, you can selectively select the images you want to restore.To know more details,please follow the steps.

d_win d_mac

How to Recover Deleted Picture from Digital Camera

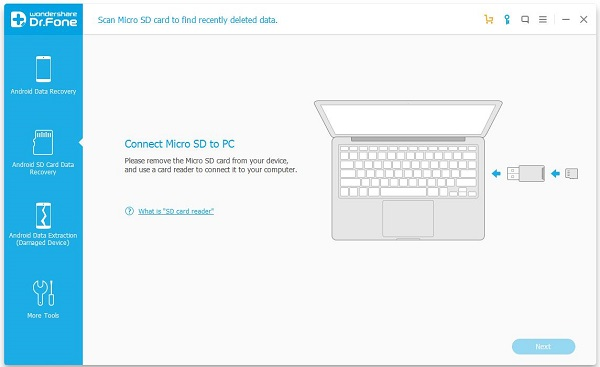
Step 1.Connect Memory Card to the PC
Please download the Android Data Recovery for the first time to use.Run the program and insert your camera’s SD card to PC.
Android SD Card Data Recovery

Step 2.Scan for Deleted Picture from SD Card
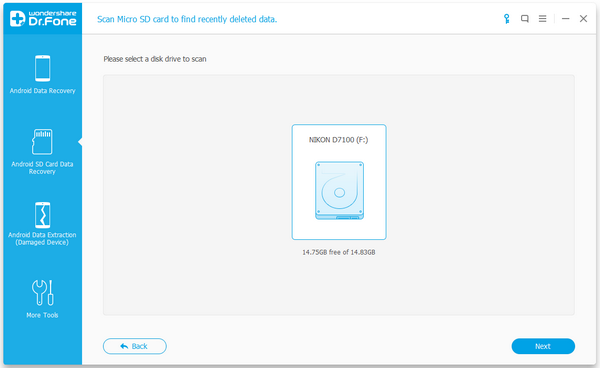
From the left sidebar,please tap on “Android SD Card Data Recovery” option.Then,you will be prompted that your SD card has been detected by program.After that,tap on “Next” to enter the next step.

detect-sd-card

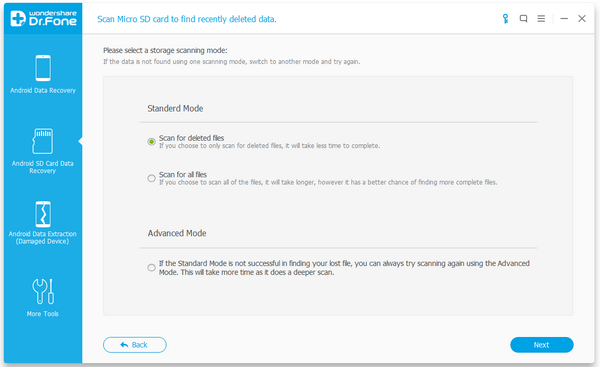
Now,you need to select a storage scanning mode,of which are Standard Mode and Advanced Mode.Normally,you can get deleted picture back by choosing “Scan for deleted filed”,which takes much shorter time.Then you have to wait for a second until the scanning process is finished.

scan-mode

Step 3.Restore Deleted Picture from SD Card
After scanning,you are able to see the deleted picture listed on the program.Select those you want to recover and tap the “Recover” button,then save the selected picture to computer.

recover-deleted-photo-sd-card

d_win d_mac

Related Article:

How to Make Full Use of Samsung Galaxy S7(Edge) Camera

How to Get More Internal Storage from Samsung

How to Delete Photos from Samsung without Restoring

How to Recover Lost Data from Android SD Card

How to Recover Lost Data from Samsung SD Card

Tips to Make Full Use of Samsung Galaxy S7(Edge) Camera

Phone cameras are getting so good companies like LG and Huawei are pulling all sorts of tricks out of the bag to stand out.The Huawei P9 has two cameras just on the back,the LG G5 has a GoPro strapped to it.The Samsung Galaxy S7 doesn’t make any such moves,opting instead for a single,pretty wonderful camera that can take shots that will beat some dedicated compacts in many conditions. Who’d have thought Samsung was capable of such restraint?

If you are a photo shooter, then you definitely want to know about the skills of managing Samsung Galaxy S7’s photos on the computer. Then don’t missing:  How to Manage/Import Photos between PC and Galaxy S7(Edge)

s7-camera-tour

* How to Recover Deleted Data from Samsung Galaxy S7

* How to Manage Samsung Galaxy S7 on Computer

Its hardware is pure class,but as ever,Samsung has packed the software with enough half-hidden extras to fill a GCSE course.Consider this your personal cheat sheet.These are the camera tips you need to get the best results out of a Samsung Galaxy S7 or Samsung Galaxy S7 Edge.

Part 1:Samsung Galaxy S7 Camera:Feature Focus

QHD recording on the front, 4K on the back
Now, one thing I did enjoy was that the Samsung Galaxy S7’s front-facing camera can record videos at QHD resolution. This is incredibly handy for anyone looking to vlog. In my case, it was helpful to know I could set the phone down and frame the image properly. It was simple to use the front-facing shooter and the phone’s screen as a guide, while still keeping a high resolution.

QHD

The rear camera is capable of recording at a higher 4K resolution. The only caveat here is that you do lose some cool functions when you turn this feature on. This includes the software-enhanced video stabilization, but OIS (optical image stabilization) does still tend to do a pretty good job.

Auto-focus in video
I do like taking advantage of auto-focus in video. It works great before taking a picture, but really stands out in videos, as it allows for a very clean way of focusing on a subject.

Why use Pro mode instead of just Auto
It is after stepping into a video installation when I realized this was the perfect environment to showcase the phone’s Pro mode and its advantages. After taking a picture of my brother looking at a screen, one can notice the Galaxy S7 is trying to expose for the whole frame. However, I would like to apply another effect and show more of a silhouette. Achieving this was as simple as going into Pro mode and speeding up the shutter.

auto-1 auto-2

Panorama mode
Things get more lit as you move to the top floor of The Broad Museum. I decided to take advantage of Panorama mode and things looked quite great. One thing to point out is that, in the picture below, the gentleman in the hat was walking as I was panning from right to left to take the shot. The Galaxy S7 was able to stitch him just fine. There are no deformed body parts or blurry spots to be seen.

panorama mode

A bit on the sensor’s aspect ratio
You may notice these images are almost square, as opposed to adopting the 16:9 ratio most mobile screens tout. This is because I wanted to take full advantage of the 12 MP sensor, which is built with a 4:3 aspect ratio. The image would otherwise be cropped and information would be lost.

4-3-3

4-3

4-3-2

One weird thing I did notice is that by taking a photo in the 4:3 ratio and then hitting record, the video had a zoomed in effect. The camera had to zoom in and crop the sensor, so it seemed like everything was suddenly closer.

HDR
HDR is not something you should be using all the time, as it slows down the camera and the expected effect is not always noticeable. You can set HDR to auto and the phone will try and figure out when it’s right to use it, though. As you can see in the images, it is best to take advantage of it in high contrast situations in which one area of the photo is much more lit than others.

HDR-1 NON-HDR

Handling lower light situations
It was here we were also able to see how images get warmer and less crisp as the light starts to become less dominant. Most whites looked more yellow, and my tasty burrito wasn’t as crisp due to the camera trying to compensate for noise.

handing lower light situation

Wrapping up
Overall, The Galaxy S7 is a great shooter to have as a companion for your daily adventures. Sure, the details may not be as sharp, but that is something you will only notice if you are pixel peeping. On the other hand, you will really enjoy the much improved low-light performance and the overall general performance.

Part 2:Tips to Make Full Use of Samsung Galaxy S7 Camera

1. Virtual shot
Samsung Galaxy S7 Edge features the camera functionality “Virtual shot”. In this mode, you can create a 360-degree movement, which can be seen in different angles. Open the camera app. Then go to “MODE”. Select “Virtual shot”. After that, tap the shutter button. Then circle around an object while keeping it in the center of the frame.

Virtual shot

2. Animated GIF
To create an animated GIF photo (for graphics interchange format photo), you don’t need to turn to a piece of software. Now, with Samsung Galaxy S7 camera, you can achieve the goal. Press and hold the shutter button take continuously picture.

Animated GIF

3. Adjust Brightness
This functionary is quite useful. When capturing snaps in low-light environment, you can automatically adjust the brightness. Randomly tap the screen. Then there will be a bar. You can touch slide it to adjust the brightness.

Adjust Brightness

4. Tracking AF
The feature tracking auto-focus (AF) refers to focusing on and tracking a subject selected on the preview screen. Launch the camera. Then tap the gear icon (setting button). In the Camera Settings page, locate “Tracking AF”. Then you can switch on the feature.

Tracking AF

5. Motion Photo
Motion Photo is able to help record a short video clip of what happens before each picture is taken. Open the camera. Then tap the gear icon to enter the Setting page. Switch on the feature “Motion Photo”. Then every time you tap a photo, the Android camera will record a very short video before you press the shutter button.

Motion Photo

6. Quick Launch
Have you ever met a situation where you were going like to capture fireworks but they disappeared but after activating the camera. Now the issue is fixed. You can double click the Home button quickly and capture the moment in time. Go to the Setting page. Then you can switch on the feature.

Quick Launch

7. Beautify Your Photos
Download the “Beautify face” mode. Then you can beautify the selfie before capturing it. Run the app and go to MODE. Then tap and download “Beauty face”. When shooting photos, you can slide the bar to adjust Skin Tone, slim face and enlarge eyes.

Beautify Your Photos

8. Surround Shot
Surround Shot mode, which helps include more objects in the frame, is available on Samsung Galaxy S7. You’ll take a bunch of captures to fill up a 360-degree view of the world, from the top to the bottom, from the left to the right. And you have the option to stop at any time, or undo your last capture.

Surround Shot

That’s all.Now you can make full use of your Samsung Galaxy S7(Edge) camera.Just enjoy it!If you need to backup photos from Samsung to computer,please check this link:How to Backup Samsung Data to Computer.

Read more:

How to Recover Photos/Videos from Galaxy S7/S7 Edge

How to Recover Deleted Photos from Galaxy S7/S7 Edge

How to Get More Internal Storage from Samsung

How to Delete Photos from Samsung without Restoring

How to Permanently Erase Samsung Data before Selling