All posts by DHZ

How to Download and Sync Spotify Music to iPhone 8(Plus)

Summary: Apple released three models as part of the 10th anniversary of iPhone: iPhone 8, iPhone 8 Plus, and iPhone X. Here this article will we will introduce the best solution and show you how to sync Spotify Music to iPhone 8/8 Plus with ease.

Besides to Apple Music, Spotify Music is one of the popular music streaming service in the world. It provides you Free and Premium version. What’s difference between it? Spotify Free users have to listen to ads and is limited to play music in “Shuffle Mode”, which means that they can’t play songs smoothly or for offline playing. Spotify Premium subscribers can access to ad-free Spotify songs but they must pay the $9.99 monthly fee. Both Spotify Free users and Spotify Premium subscribers are confined to enjoy Spotify music with Spotify app.

Similar to Apple Music, Spotify Music is also DRM-protected. What is DRM restriction? It is a special music file format for Spotify Music. It prevent you saving music for offline listening, ripping it for illegal purpose, avoid you downloading it and play it without Spotify. How to download ad-free music and sync from Spotify to iPhone 8 be played without limits? To transfer and play Spotify Music on iPhone 8 freely, the first step is definitely to remove the DRM from Spotify. Here we are going to show you the best way to convert DRM-protected Spotify music to DRM-free songs with the most popular Spotify DRM removal tool – Spotify Music Converter.

Remove DRM from Spotify Music & Sync to iPhone 8

The smart Spotify DRM Removal tool we strongly recommend here is called Spotify Music Converter. Spotify Music Converter is famous for removing the DRM from Spotify Music with fast speed, recording Spotify Music to DRM-free formats (MP3/M4A/WAV/FLAC) with its original quality and keeping ID3 tags after conversion. So that you could sync the converted music to iPhone 8(Plus) for playing without limits. Moreover, you could stream the music to any device for offline playing as local files without Spotify; save it to SD card/USB drive; make it as phone ringtone; etc,.

d_win d_mac

How to Sync and Transfer Spotify Music to iPhone 8

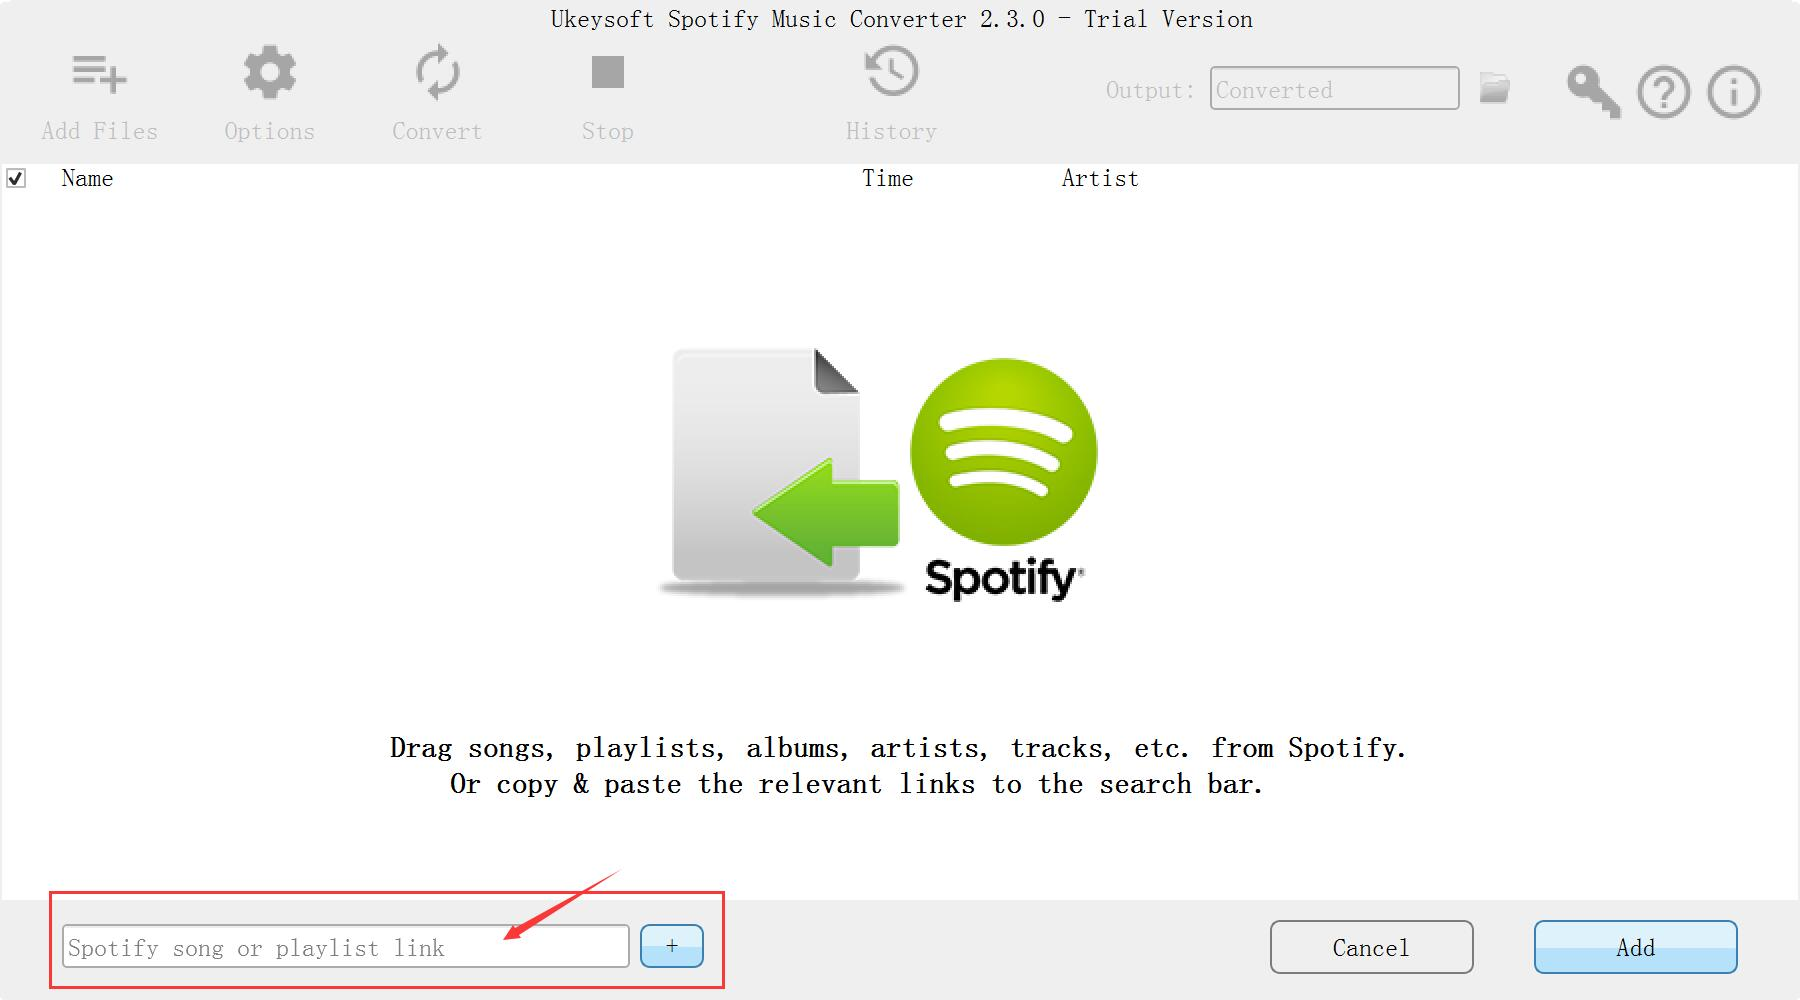
Step 1. Add Songs or Playlist from Spotify to Program
After installing and running Spotify Music Converter on the computer. Just click “Add Files” icon or drag and drop songs to add songs or playlist to convert from Spotify Music Converter. Check all the songs that you want to convert and then press “OK“.

Spotify Music Converter home page

add Spotify Music

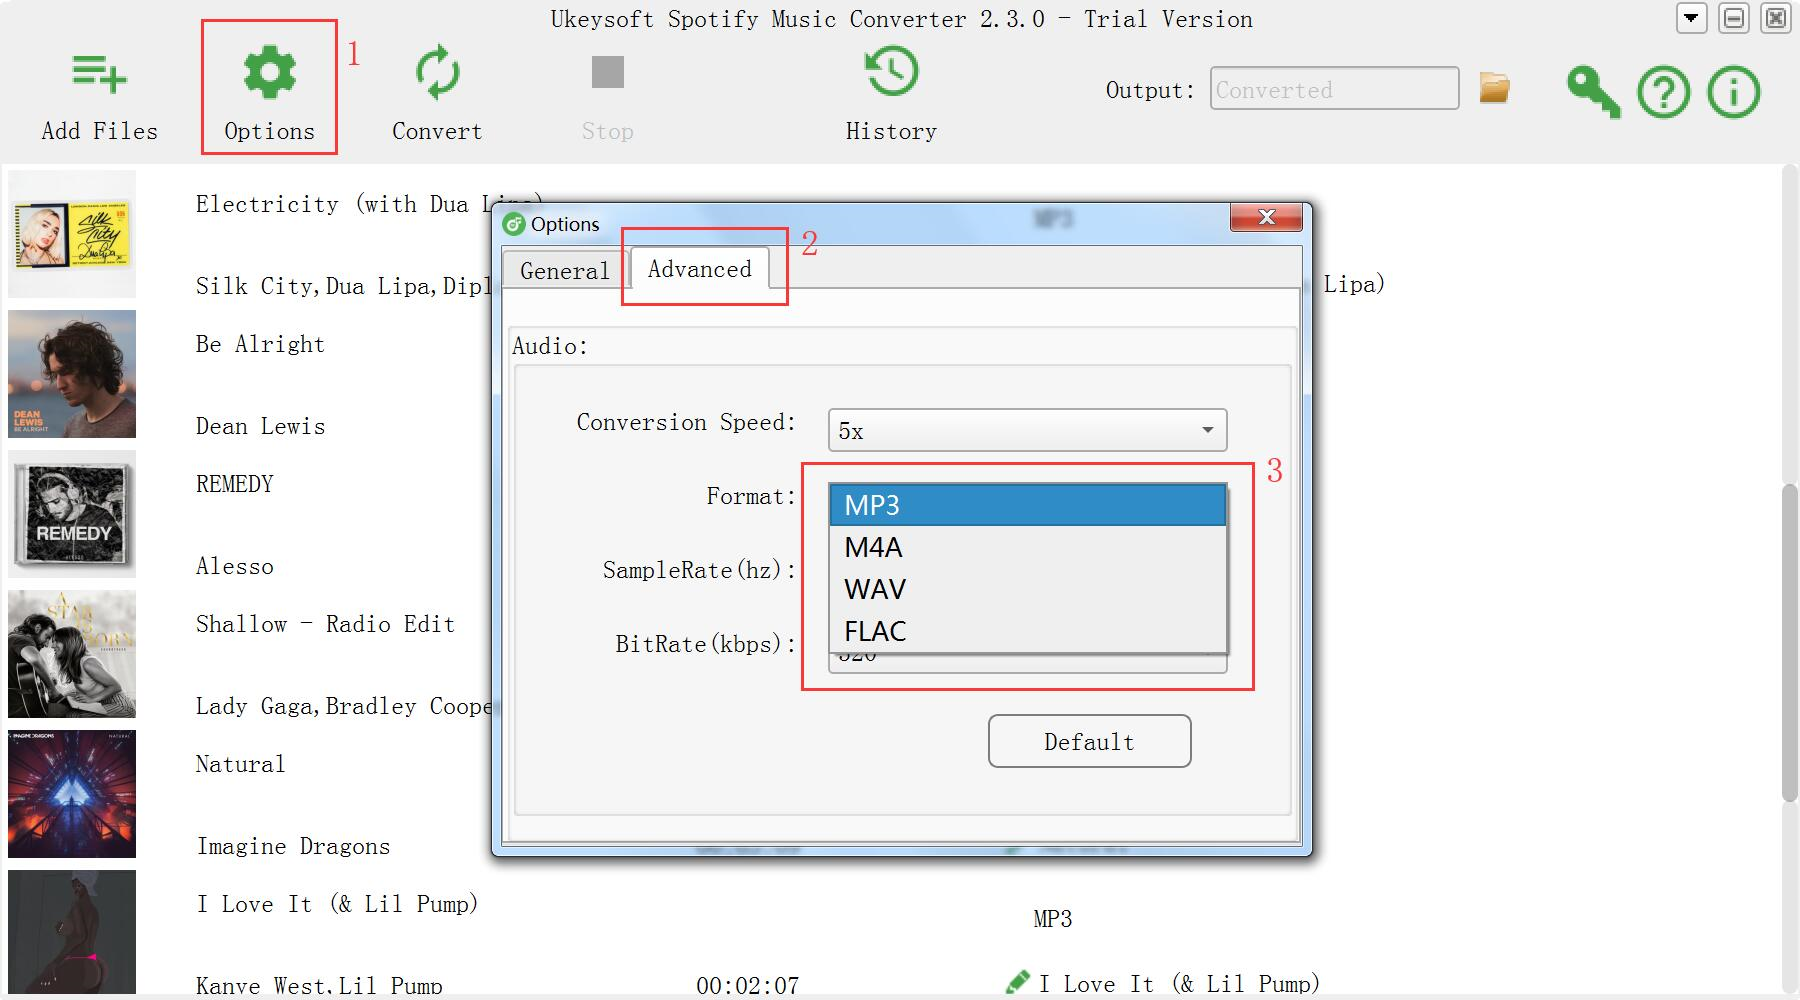
Step 2. Choose Output Format
After the Spotify songs are loaded successfully, you’re able to select and change some basic settings (Including Output format, Output quality and Conversion speed, etc,.). It’s available to choose MP3, AAC, FLAC or WAV as output format. For syncing to iPhone 8 device, you should select “MP3“.

select MP3 as output format

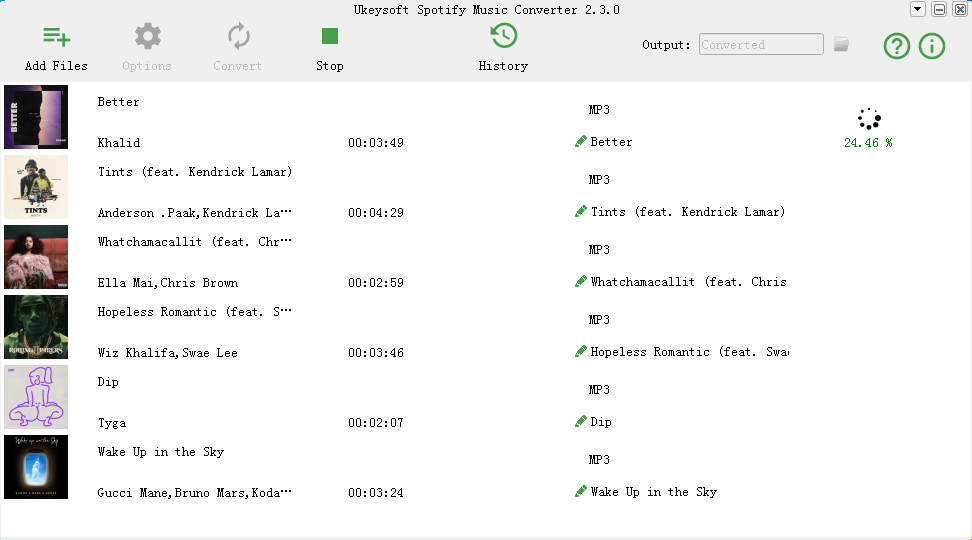
Step 3. Start Recording Spotify Music Losslessly
Click “Convert” button to start recording and converting selected audio files to MP3 format with its original audio quality.

convert Spotify Music to MP3

d_win d_mac

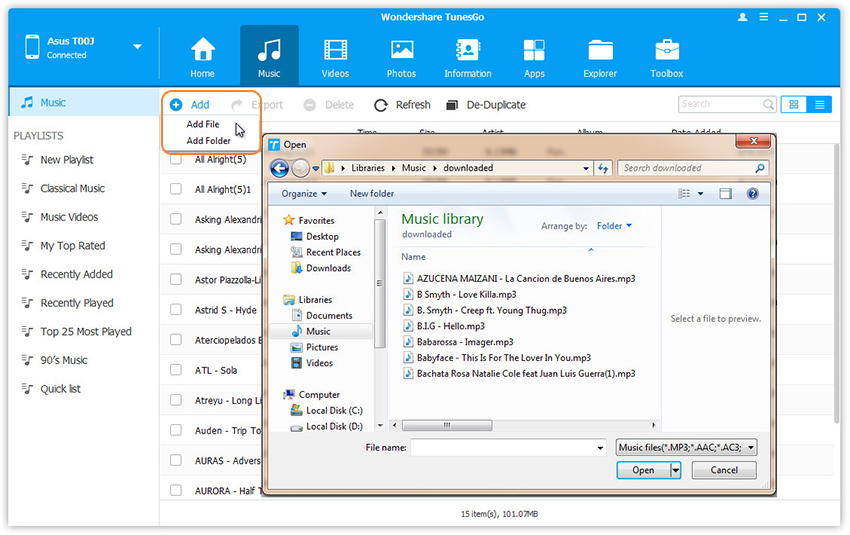
Step 4. Transfer Music to iPhone 8
After conversion, you’ll quickly find the well-converted audio files on the computer. Now transfer the music from the computer to iPhone 8 via iOS ToolKitiOS Transfer.

import music to iPhone 8

Free Download iOS ToolKit – iOS Transfer:
d_win d_mac

Done. Now you could play the music on iPhone 8 without limits. Enjoy!

Related Guides:

How to Convert Spotify Music to MP3

How to Remove DRM from Spotify Music

How to Listen to Spotify Music without Subscription

How to Get Spotify Music at 320kbps High Quality

How to Listen to Spotify Music on MP3 Player

How to Sync Apple Music to iPhone 8 for Offline Playing

Sync Spotfiy Music to iPhone 8

How to Transfer Spotfiy Music to Samsung Galaxy

[Summary]: Do you want to free download MP3s from Spotify and transfer to Samsung phone for playing on Android media player? This tutorial will teach you a easy method to download Spotify music to MP3, then you can play Spotify music and playlists on Samsung Galaxy S10/S9/S8/S7 offline.

How to transfer Spotify music to Galaxy S8 to listening offline?
I got an excellent Samsung Galaxy S8 phone for upgrading, now I want to sync my Spotify playlist to it, how can I do that? Is it possible to transfer Spotify Music to the Samsung S8 for playing without Spotify? Any suggestions?

How to sync songs from Spotify to Galaxy S9?
Why Spotify app crash on my Galaxy S9+? How to fix Spotify that keeps crashing on Samsung Galaxy S9 Plus? Any way to enjoy Spotify music without Spotify app?

It consistently produces for Samsung models with outstanding photos and audio quality in all lighting and shooting conditions. Samsung Galaxy S8 is a hot models among Samsung phones. Like most Android device makers, Samsung Galaxy S8 features with the high quality music player. For most people, Music is one of the most important content you want to transfer or sync to new phone, whether these music come from Spotify or your iTunes library, it will take you some time to move to new places. How to transfer and sync Spotify Music to Samsung Galaxy S8?

Transferring phone data won’t be a problem as we have done it many times. But as a Spotify user, even after re-downloading Spotify on the Galaxy S8, it still need more steps to finally sync all tracks and playlists that we’ve saved in Spotify. Since Spotify Music is DRM protected, we can’t sync and play Spotify Song on device without Spotify. It means that we can directly download and save the Spotify music as local files for offline listening. We find that there are some question on the Internet like this “How to sync Spotify Music on Galaxy S8 without Spotify/limits?”. This post is aiming to give you the best answer to fix how to play Spotify Music on Galaxy S8 as MP3 files issue.

Method 1: Transfer Spotify Music to Samsung Galaxy S8/S9 via Spotify App

If you are a Spotify Premium subscriber, this will be easily done by signing into the same Spotify account on your new device which have access to Spotify Music app.

Step 1. Firstly run Spotify on the computer and run Spotify on the Galaxy S8 at the same time, log into with the same Spotify account.

log in spotify

Step 2. Connect Samsung Galaxy S8 to the computer via USB cable or Wi-Fi.

Step 3. Click “Devices” from Spotify desktop app, and select “Samsung Galaxy S8” from the list, then click on “Sync ‘device’s name’ with Spotify”.

Step 4. Click on the playlists you want to sync to Samsung, or you can choose “Sync all music to this device” or “Manually choose playlists” to start the synchronization.

sync spotify music

Note: The synced Spotify playlist and songs just can be play while you are Spotify Premium, which can’t be offline playing as the local files. To sync and play Spotify Music on Samsung Galaxy S8 without limits, you need another solution.

Method 2: Remove DRM from Spotify Music and Transfer to Galaxy S8/S9

Fortunately, thanks to UkeySoft Spotify Music Converter, this impossibility will come true now. With the help of Spotify Music Converter, you can easily remove the DRM protection from Spotify music or playlists with fast speed, convert them to common audio formats including MP3, M4A, FLAC, WAV with high audio quality. Then you could save the music as local music files, sync and play the music on Samsung Galaxy S8/S9/S10 without Spotify app. Moreover, you could stream the music to any compatible audio player for offline playing without limits, like Android device, iOS device, MP3 player, web player, PSP, xbox one; save it to SD card/USB drive; make it as phone ringtone.

d_win d_mac

How to Transfer DRM-Free Spotify Music to Galaxy S8/S9

Step 1. Download & Install Spotify Music Converter
Download and install the Spotify Music Converter, then running it on the computer.

Spotify Music Converter home page

Step 2. Add Spotify Songs to Spotify Music Converter
Click “Add Files” to import songs from Spotify. You can directly drag songs, playlists or albums from Spotify program or copy and paste the song link.

add Spotify Music

Step 3. Choose Output Format
Go to “Options” > “Advanced” to select the output format (MP3, M4A, WAV, FLAC) for your Spotify songs which is going to be sync to Samsung. In this case, you should select “MP3“. Besides, you are free to change SampleRate and bitrate before conversion.

output format settings

Step 4. Start the Conversion
After finish all the settings, please click “Convert” to start converting the Spotify songs to MP3 files.

convert Spotify Music to MP3

d_win d_mac

Step 5. Import Music to Samsung Galaxy S8
When the conversion is done, you could transfer the music from the computer to Samsung Galaxy S8 via Android ToolKitAndroid Transfer, finally you could play the converted Spotify Music on Galaxy S8 phone as local files without limits.

transfer music to Google Pixel 2

Free Download Android ToolKit – Android Transfer:
d_win d_mac

Related Guides:

How to Convert Spotify Music to MP3

How to Remove DRM from Spotify Music

How to Listen to Spotify Music without Subscription

How to Get Spotify Music at 320kbps High Quality

How to Listen to Spotify Music on MP3 Player

How to Record Apple Music M4P Streams as MP3

Sync Spotfiy Music to Samsung Galaxy S8

How to Stream Spotify Music to Google Pixel 2/2 XL

Spotify was first launched in 2008 and currently advertises more than 35 million songs in its catalog. In the early 2016, it also support video content, as well as podcasts. Spotify can also read your locally supported music but you’ll have to sync it to your device internal storage through Spotify desktop application first. In 2018, the service had 75 million paying customers and a total of 170 million users. Spotify Music is a popular music streaming app, designed to let you listen to a variety of songs in its library at any time, and it doesn’t take up valuable space on your device, which is really awesome.

On October 19, 2017, Google Pixel 2/2XL have released. Google Pixel and Pixel 2 is the new released phone models from Google Company, it is famous for its high performance, it attractive a lot of Android users. Google Pixel 2/2 XL features with excellent audio quality, it is a great portable music player to listen to music everywhere. However, Spotify Music is DRM restriction. It would prevent you from transferring or replicating the songs. What’s more, with DRM protection you can’t offline play Spotify Music on any device without subscription. How to play the Spotify songs after the Spotify Free and Premium subscription without limits? How to stream Spotify Music to Google Pixel 2/2 XL as local files for offline playing?

Download Spotify Music as MP3 & Sync to Google Pixel 2/2 XL

No matter you are a free user or premium user of Spotify, Spotify Music Converter is the one you might need to remove DRM restriction from Spotify Music with fast speed, it can help to convert Spotify Music to DRM-free formats with its ID3 tags, including MP3, M4A, WAV, FLAC; so that you can easily stream the converted Spotify Music to Google Pixel 2/2XL as local music files playing. When the conversion is finished, you could transfer the converted music files to Android phone, iOS phone or other HD devices for enjoying them outside Spotify app and web player without limits. What makes this program stand out from other converter tool is the excellent output audio quality.

d_win d_mac

How to Stream Spotify Music to Google Pixel 2/2 XL

Step 1. Install and Run Spotify Music Converter on the Computer
To get started, install and run Spotify Music Converter on the computer.

Spotify Music Converter home page

Step 2. Add Spotify Songs, Playlists, Albums, Tracks
Click “Add Files” to drag songs, playlists, albums, tracks, etc,. from Spotify Music. Or you can find the songs you want to convert on Spotify Music, copy the song link, and paste it into the search bar. Click “Add“.

add Spotify Music

Step 3. Output Format Settings
In the “Option” settings, choose the output format for converted files. To convert Spotify Music to Google Pixel phone, select “MP3” since it is the most common music format that compatible with all phone models. What’s more, you could change SampleRate and bitrate before conversion.

output format settings

Step 4. Convert Spotify Songs to MP3 for Google Pixel
Simply click “Convert“, the program will start removing DRM from Spotify Music, converting Spotify Music to MP3 files with fast speed.

convert Spotify Music to MP3

d_win d_mac

Step 5. Transfer Music from Computer to Google Pixel
After some minutes later, you will get the DRM-free Spotify Music with MP3 as the local music files. Now you can sync and transfer the converted Spotify Music to Google Pixel 2/2 XL via Android ToolkitAndroid Transfer for playing without limits.

Android ToolkitAndroid Transfer is an all-in-one data manager tool for Android mobile devices, it features with transferring & managing files for Android, transfer files between Android and computer, transfer files between Android and iTunes, transfer files between Android and iOS/Android devices.

Free Download Android ToolKit – Android Transfer:
d_win d_mac

transfer music to Google Pixel 2

Related Guides:

How to Convert Spotify Music to MP3

How to Remove DRM from Spotify Music

How to Listen to Spotify Music without Subscription

How to Sync Spotify Music to iPod Touch/Nano/Shuffle

How to Listen to Spotify Music on MP3 Player

How to Record Apple Music M4P Streams as MP3

Stream Spotify Music to Google Pixel 2

How to Fix iPhone Stuck in Recovery Mode after iOS 13/12 Update

[Summary]: Upgrading your iPhone to iOS 13 or iOS 12.1 but failed and it stuck in the Recovery Mode? Don’t worry, following guide will give you the best solution to get iPhone out of recovery mode and restore device to normal without data loss.

The latest iOS version, iOS 13 is released on June 3, 2019, everyone all over the world is eagerly waiting for it. iOS 13 is released for both the users and the developers, and most of us are attractive and want to enjoy the features of the new iOS update. Upgrading to the new iOS is usually very easy but everything won’t go according to the plan for us especially when you have no professional skills, you need to prepare and learn how to smoothly perform the iOS update by yourself. There are a few different accidents that you may have to face during an update, but one of the most common ones is that your iPhone will be stuck in Recovery Mode.

You may want to read:

* How to Install the iOS 13 Beta on Your iPhone Safely

* How to Recover Lost Data from iPhone afer upgrading to iOS 13

Before you fix the iPhone stuck in the Recovery Mode issue, it is important that you understand the possible causes of the problem, so that you can solve the issue properly. There are two main causes of iPhone stuck in the Recovery Mode: namely software corruption or hardware issues. DFU (Device Firmware Update) Mode is the only sure shot way to get rid iPhone of stuck in the Rrecovery Mode, and it is a process that should not be confused with Recovery Mode because it does not load the device operating system or boot loader. However, get iPhone into the DFU Mode will lead to data loss on device, which is not the best way to fix iPhone stuck in recovery mode issue absolutely.

Fix iPhone Stuck in Recovery Mode via iOS System Recovery

If you wish to fix iPhone stuck in the Recovery Mode after iOS 12 update without losing any data, then give iOS System Recovery a try. It is able to fix various iOS system issues such as, stuck in the Recovery Mode, stuck in DFU Mode, stuck in white Apple logo, stuck at black screen of death, looping on start, etc,. Works for all models of iPhone, iPad and iPod touch, supports iPhone XS, iPhone XR, iPhone X, iPhone 8(Plus), iPhone 7(Plus), iPhone 6S(Plus), iPhone SE and compatible with all iOS system including iOS 13, iOS 12 & iOS 11 fully.

d_win d_mac
d_win d_mac

Fix iPhone Stuck in Recovery Mode after iOS 13/12.3.1 Update

Step 1.Run Program on the Computer
First of all, install and run iOS System Recovery on the computer. Connect your iPhone to the computer with its USB cable.

iOS System Recovery home page

Step 2.Choose Repair Mode
Click the “iOS System Recovery” option under the “More tools” mode in the home page of program. You will see some notes displayed in the window. If you have no problem with all the notes here, click “Start” button.

click start to begin

Notes:After finishing the restoring process, your iPhone will be updated to the latest version. Unlocked network will be re-locked. And if it is a jailbroken iPhone,it will be updated to a none jail-broken phone.

Step 3.Download Official Firmware for iPhone
In this step, select your phone model and iOS version, the official firmware download link for your iPhone will be provided.

select your iPhone model

iOS System Recovery will detect your iPhone soon, offering the latest iOS version for you to download. You should download the firmware by clicking “Repair” button.

download the firmware for iPhone

Step 4.Fix iPhone Stuck in Recovery Mode to Normal
When the firmware downloading is complete, iOS System Recovery will continue to fix iPhone stuck in Recovery Mode, return iOS system to normal in a few minutes, please wait for your iPhone to restart.

fix iPhone stuck in Recovery Mode

Finished. Now your device has been return to the normal state, you can use it as usual without any data loss.

d_win d_mac
d_win d_mac

Related Articles:

How to Restore iPhone System to Normal after iOS 13/12 Update

How to Backup and Restore Data from iPhone before 13/iOS 12 Update

Recover Lost Data from iPhone/iPad after iOS 12 Update

How to Recover Photos from iPhone after iOS 13/12 Update

Best iPhone Manager: How to Transfer & Manage Files for iPhone

Fix iPhone Stuck in Recovery Mode

How to Sync Spotify Music to Sony Walkman

Summary: Spotify Music is a popular streaming music service. As we know we can’t sync Spotify Music to other audio device for offline playing, for example, Sony Walkman. This article is going to show you how to play Spotify Music on Sony Walkman without Spotify Premium.

Sony Walkman is famous for its excellent audio quality and high-res audio compatibility. Dispite of other factors, if audio quality is what you are most concerned about, then Sony Walkman will be absolutely the best choice. Sony Walkman is compatible with all common audio formats like MP3, M4A, WAV, FLAC, etc., However, it’s not equipped with internet connection ability. For Sony Walkman users who have subscribed Spotify Music, you may meet some problems when trying to download Spotify playlist onto your Sony Walkman.

When you try to sync Spotify Music to Sony Walkman, you’ll probably get the response saying that it’s impossible to transfer the music directly from Spotify to Walkman. In order to sync Spotify Music to Sony Walkman, the first thing you should do is downloading the tracks or playlists from Spotify to your computer. In this case, you are required to subscribe the premium membership of Spotify as only the paid users have right to download and save Spotify Music offline since Spotify Music is DRM restriction. But if you are using free account and don’t want to upgrade to the premium plan, you can’t sync Spotify Music to Sony Walkman.

Sync Spotify Music to Sony Walkman as Local Files

There have always been many ways to download Spotify Music as local files for syncing to Sony Walkman. Here we’ll suggest you try Spotify Music Converter, a professional and unique DRM audio converter that enables you easily bypass DRM from Spotify songs/playlist, convert Spotify Music to DRM-free files with fast conversion speed, like MP3, M4A, WAV and FLAC. What’s more? This awesome tool can also keep the best output audio quality and retain the ID3 tags & metadata with converted music files. After the conversion, you could offline playing back the converted music as local files on all audio player without paying; burn Spotify Music to CD; enjoy them outside Spotify app and web player; even you cancel the Spotify Music Premium.

d_win d_mac

How to Import Spotify Music to Sony Walkman

Step 1. Run Spotify Music Converter on the Computer
Firstly run Spotify Music Converter on the computer.

Spotify Music Converter home page

Step 2. Add Spotify Songs
Click “Add Files” to drag songs, playlists, albums, tracks, etc,. from Spotify Music.

add Spotify Music

Or you can find the songs you want to convert on Spotify Music, copy the song link, and paste it into the search bar. Click “Add“.

Step 3. Output Format Settings
Go to “Option“, choose the output format for converted files.  To sync the converted music to Sony Walkman, select “MP3” since it is the most common music format. Besides, you are optional to change SampleRate and bitrate before conversion.

output format settings

Step 4. Convert Spotify Songs to MP3 Files
Lastly, click “Convert” and the program will start removing DRM from Spotify Music and converting music to MP3 files for offline playing.

convert Spotify Music to MP3

Some minutes later, you will get the DRM-free Spotify Music with MP3 as the local music files. Now you can sync and listen to the converted Spotify Music for free on Sony Walkman.

d_win d_mac

Related Guides:

How to Convert Spotify Music to MP3

How to Remove DRM from Spotify Music

How to Listen to Spotify Music without Subscription

How to Sync Spotify Music to iPod Touch/Nano/Shuffle

How to Listen to Spotify Music on MP3 Player

How to Record Apple Music M4P Streams as MP3

Play Spotify Music on Sony Walkman

How to Stream Spotify Music for Free without Ads

Is there any way to stream Spotify Music for free version without advertisement? I want to listen to the Spotify Music without paying after a 30-day-free trial. How?

Spotify Music free version limits user to stream Spotify Music at 192kbps or lower audio quality, plays ads every few songs, and excludes users from using other features such as being able to use it with Sonos and Spotify Connect. While Spotify Premium allows users to listen to tracks offline, enjoy up to 320kbps audio quality and plays music with full features without any ads. All in all, the premium version is far more superior than the free one.

There are millions of songs in Spotify and music can be browsed or searched by artist, album, genre, playlist, or record label. However, just like Apple Music, Spotify is a streaming service that adds a DRM layer to its streaming music collection. The technology DRM, short for Digital Rights Management, which was intended as a means to protect digital media from piracy, has been giving consumers trouble since its inception. With DRM restriction, you can’t copy or download the Spotify Music as local music files as the common MP3 files. Besides this, you can’t stream Spotify Music for free without ads, offline playing Spotify Music without subscription.

Remove DRM from Spotify Music

To stream Spotify Music for free without ads, you should remove DRM from Spotify Music first. Spotify Music Converter can solve the problem. It is a professional Spotify to MP3 converter aiming to remove DRM from Spotify Music and make it easier to convert Spotify Music to DRM-free format with fast conversion speed, like MP3, M4A, WAV and FLAC, so that you can stream Spotify Music for free without ads no matter even you are free user of Spotify. Besides, this converter enables to keep lossless quality as original audio including ID3 tags information. Moreover, after the conversion, you could offline listen to Spotify Music without paying; burn Spotify Music to CD, enjoy them outside Spotify app and web player.

d_win d_mac

How to Stream Spotify Music for Free without Ads

Step 1. Run Spotify Music Converter on the Computer
Download and install the Spotify Music Converter step-by-step, then launch it an run it on the computer.

Spotify Music Converter home page

Step 2. Add Spotify Songs
Click “Add Files” to drag songs, playlists, albums, tracks, etc,. from Spotify Music.

add Spotify Music

Or you can find the songs you want to convert on Spotify Music, copy the song link, and paste it into the search bar. Click “Add“.

Step 3. Output Format Settings
Go to “Option“, choose the output format for converted files.  Normally, select “MP3” since it is the most common music format. Besides, you are optional to change SampleRate and bitrate before conversion.

output format settings

Step 4. Remove DRM from Spotify Songs
At last, click “Convert” and the program will start removing DRM from Spotify Music and converting music to DRM-free files without ads.

convert Spotify Music

Some minutes later, you will get the DRM-free Spotify Music with MP3 as the local music files. Now you can listen to the converted Spotify Music for free without ads.

d_win d_mac

Related Guides:

How to Listen to Spotify Music without Subscription

How to Convert Spotify Music to MP3

How to Remove DRM from Spotify Music

How to Sync Spotify Music to iPod Touch/Nano/Shuffle

How to Listen to Spotify Music on MP3 Player

How to Record Apple Music M4P Streams as MP3

Play Spotify Music for Free without Ads

How to Remove DRM from Spotify Music

Summary: Users who listen to Spotify Music are under the DRM (Digital Right Management) protection. How to remove DRM from Spotify Music in an effective way still puzzles all the users in these days. You can easily remove DRM from Spotify Music right here from this post.

Spotify Music is a streaming service that adds DRM protection to its songs. What’s DRM protection? It is intended as a means to protect digital media from piracy. Spotify DRM restrictions may prevent you from sharing a copy of the songs downloaded even you have already been a subscriber. The best way to enjoy Spotify Music without limits is to remove DRM protection from it, for the purpose of keeping local files for playing back freely. A good news comes for you, you can remove DRM protection from Spotify Music via an excellent music converter – Spotify Music Converter.

Remove DRM from Spotify Music

Spotify Music Converter  is a wonderful Spotify Music downloader and speedy converter tool to easily remove DRM from Spotify Music with customizing output Spotify Music quality, convert Spotify Music to DRM-free format with its original quality. It could help to remove DRM and convert Spotify songs and playlist to MP3, M4A, WAV and FLAC. After the conversion, you could listen to Spotify Music offline for free; burn Spotify Music to CD, enjoy them outside Spotify app and web player. You can select the conversion speed for faster conversion with keeping ID3 tags.

d_win d_mac

How to Easily Remove DRM from Spotify Music

Step 1. Run Spotify Music Converter
First of all, download, install and run Spotify Music Converter on your Windows/Mac computer.

Spotify Music Converter home page

Step 2. Add Spotify Songs/Albums/Playlists for Conversion
From the interface of program, find the songs, albums or playlists on Spotify and drag them to the interface of program. If you are using the web player, copy & paste the link of the song, album or playlist. And then click “Add”.

add Spotify Music

Step 3. Choose Output Format for Converted Music
The default output format is MP3. Spotify Music Converter supports to MP3, M4A, WAV, FLAC format. Click “Option” button to change output format or output folder if you need. You can also change bitrate, samplerate according to your needs. Spotify Music Converter will keep the Artwork, Title, Artist and Album of each song to the output DRM-free songs.

choose format

Step 4. Start to Remove DRM from Spotify Music
Click “Convert” button to start removing DRM from Spotify Music and convert to the format you choose.

remove DRM from Spotify Music

When the conversion is finished, you are allowed to quickly locate the DRM-free Spotify songs by clicking below folder icon. You can then transferring and offline playing it on any compatible device as the local MP3 music files.

view MP3 music

d_win d_mac

Related Guides:

How to Listen to Spotify Music without Subscription

How to Convert Spotify Music to MP3

How to Get Spotify Music at 320kbps High Quality

How to Listen to Spotify Music for Offline Playing

How to Listen to Spotify Music on MP3 Player

How to Record Apple Music M4P Streams as MP3

Remove DRM from Spotify Music

How to Fix iPhone to Normal after iOS 13/12 Update

My iPhone 7 is suddenly stuck in the Recovery Mode after I updated iOS 13 on it. What worse is that I have backup all the iPhone data frequently. Is it possible to return iPhone system to normal with a simple solution? How?

iPhone/iPad/iPod has been a miniature computer for us in daily life, with which we can enjoy our favorite videos and games, read latest news, navigate to the restaurant you have never been, etc,. Though iOS system is the best operating system, sometimes iPhone/iPad/iPod may come across some unexpected trouble. These issues can happen after updating to a new iOS version(for example iOS 13); iOS jailbreak, or the operating system performs sluggish or unresponsive with a unknown curse.

Let’s assume one day when you find it is in an abnormal operating mode to stop you using as usual like: stuck in the Recovery Mode, stuck at white screen, stuck in Apple logo, stuck at black screen of death, stuck in the DFU Mode, apps crashing; how to deal with restoring iOS system to normal? If your iOS devices (iPhone/iPad/iPod touch) is running into the abnormal situation, repairing operating system is recommended as final solution. When you need a helpful solution to fix iOS system to normal, U.Fone iOS Toolkit – iOS System Recovery is the professional one you need.

Fix iOS System to Normal after iOS 13 Update

U.Fone iOS ToolkitiOS System Recovery makes it more efficient to solve all kinds of stuck and booting issues and get your iOS devices to normal mode without data loss. With the help of this program, you could easily fix iOS system to normal after iOS 12.4/13 update, such as, stuck in the Recovery Mode, stuck at black screen, stuck at white screen, stuck in the DFU Mode, and more. All iOS models are compatible with this program, including iPhone XS, iPhone XR, iPhone X, iPhone 8(Plus), iPhone 7(Plus), iPhone 6S/6, iPhone 5S/5, iPad and iPod.

d_win d_mac
d_win d_mac

How to Fix iOS System to Normal after iOS 13 Update

Step 1.Run iOS System Recovery on the Computer
Download and run iOS System Recovery on the computer. After that, connect your iOS 12 iPhone to the computer with its USB cable.

Step 2.Choose Repair Mode of iOS System Recovery
Click the “iOS System Recovery” option under the “More tools” mode in the program main page. And then you can see some notes displayed in the window. If you have no problem with all the notes here, click “Start” button.

iOS System Recovery home page

click start to begin

Notes:Please pay attention that after fixing the issue-restoring iPhone system to normal, your iPhone will be updated to the latest version. And if it is a jailbroken iPhone,it will be updated to a none jail-broken phone.

Step 3.Download Official Firmware for iPhone
In this step,the official firmware download link for your iPhone will be provided. iOS System Recovery will detect your iPhone soon, offering the latest iOS version for you to download. You should download the firmware by clicking “Repair” button.

select your iPhone model

download the firmware for iPhone

Step 4.Restore iPhone System to Normal
When the firmware downloading is end, iOS System Recovery will continue to restore your iPhone system to normal mode in a few minutes, please wait for your iPhone to restart.

restore iPhone system to normal

Done. Now your device has been return to the normal state, you can use it as usual without any iOS system issue.

d_win d_mac
d_win d_mac

Related Articles:

How to Get iPhone Out of Recovery Mode

How to Backup and Restore Data from iPhone before iOS 12 Update

Recover Lost Data from iPhone/iPad after iOS 12 Update

How to Restore Photos from iPhone after iOS 12 Update

Best iPhone Manager: How to Transfer & Manage Files for iPhone

Fix iPhone to Normal

Recover Deleted WeChat History from iPhone after iOS 12 Update

Some important WeChat conversation were lost suddenly after performing iOS 12 update on my iPhone 7. I heard that there are some tools are available for us to recover all iOS data. Which one is the best? Any recommendations?

As one of the most powerful and most functional messaging applications, WeChat is one of the popular chat app among users. Losing WeChat is a trouble thing. If you have made backup using iTunes, iCloud or for Windows/Mac before, you could restore WeChat history from iTunes backup, iCloud backup or backup made by computer. But sometimes, you will lost some important WeChat messages that were not included in a backup and can’t be recovered by yourself, for example iOS 12 update. How to deal with recovering WeChat data without backup? In this article, we are going to show you how to recover deleted WeChat messages from iPhone after iOS 12 update even without backup.

Restore Deleted WeChat Data from iPhone after iOS 12 Update

iOS Data Recovery gives you the chance to restore deleted WeChat data from iPhone after iOS 12 update, including WeChat messages, photos, videos, audio messages, expression patterns and attachments. Besides to WeChat data, iOS Data Recovery allows to recover more than 19 kinds of iOS data, like contacts, messages, photos, videos, call logs, apps data, etc,. It provides you with three recovery modes: directly recover from iOS device, recover from iTunes backup, recover from iCloud backup. Supports to restore iOS data under any data loss circumstances. Compatible with all iOS models and iOS system.

d_win d_mac

Recover Deleted WeChat Data from iPhone after iOS 12 Update

Step 1.Run Program and Select Recovery Mode
Please Download and launch iOS Data Recovery on the computer. Next click on “Recover from iOS Device” recovery mode then begin the process by tapping “Start“. Connect your iPhone to the computer. iOS Data Recovery will detect your iPhone soon.

iOS Data Recovery home page

Step 2.Select WeChat File to Scan by Program
You should select the file type to scan by program. For WeChat history recovery, just click “WeChat“, then click “Next“.

select WeChat file to recover

Then the program begins scanning your device automatically.

scan iPhone and search deleted data

Step 3.Preview and Recover Deleted WeChat History from iPhone
Once the scan is completes, results will be shown in an interface, preview and select the specific data that you wish to recover from the WeChat history. Select what you need and hit “Recover” to save it on the computer.

recover WeChat from iPhone

d_win d_mac

Related Articles:

How to Recover Deleted App Files from iPhone after iOS 12 Update

How to Backup and Restore Data from iPhone before iOS 12 Update

Recover Lost Data from iPhone/iPad after iOS 12 Update

How to Restore Photos from iPhone after iOS 12 Update

Best iPhone Manager: How to Transfer & Manage Files for iPhone

Recover WeChat Data after iOS 12 Update

iOS Data Recovery

Recover Your iPhone iPad Lost Data
Now, Even without Backups

Compatible with iOS 11 & iPhone X/8 (Plus)

Recover Lost Data Now

How to Recover Deleted App Data from iPhone after iOS 12 Update

Summary: If you are one who lost apps data from iPhone/iPad/iPod after iOS 12 update, you can take this way for reference to restore deleted App data which in the follow section we will mention.

Some WhatsApp chat history and WeChat chat conversion were disappeared after I updated my iPhone to iOS 12. Did these files really gone forever? Any suggestions to get it backup? I haven’t backup, I am serious to restore these apps data. Please help.

Accidental deletion can be the most common cause will lead to app data loss on your device, the second one is iOS update. Losing app data is really a frustrating experience for anyone, especially losing it due to iOS 12 update without previous backup. We will find a lot of iOS data recovery tools on the Internet, all of them are used for recovering the common types of data, like contacts, photos, messages, etc,. But there is seldom solution to rescue app data on iOS device. If you need to recover app data from your iPhone/iPad/iPod after iOS 12 update, here is your solution. iOS Data Recovery makes it easy to see all of your available options and recover specific data from backups via iTunes, iCloud and the device itself even without backup.

Undelete App Data from iPhone after iOS 12 Update

iOS Data Recovery is your perfect choice, to recover deleted app data from iPhone after iOS 12 update, insist of WhatsApp, WeChat, Kik, Viber, Skype, Line and more app. It is an excellent program designed for restoring more than 19 kinds of deleted data from iPhone/iPad/iPod, including apps data, contacts, messages, photos, videos, call logs, etc,. It enables you to recover iOS data under any data loss causes, for instances, iOS update, iOS jailbreak, restore to factory reset, virus attack and more. Allows to preview data before selectively recovery, compatible with all iOS models and all iOS system.

d_win d_mac

How to Restore App Data from iPhone iOS 12 Update

Step 1.Run Program and Select Recovery Mode
First of all, please install and run iOS Data Recovery program on the computer, connect your iPhone to the computer with its USB cable.

After connecting, the program will display detailed information of your iPhone in the interface of program. Select “Recover from iOS Device” recovery mode and then click “Start” button.

iOS Data Recovery home page

Step 2.Select the File to Recover
Now you should click the file name to scan by program, for app files recovery, just click “App Photo” & “App Video” and then click “Next” button. (Or you could select “WhatsApp“. “WeChat“, “Viber“, “Kik“, “Skype“, “Line“.)

select app files to recover

Now the program will begin to scan all the data from iPhone. It will take a few minutes to finish the files scanning.

scan iPhone for deleted data

Step 3.Preview and Recover Deleted App Data from iPhone
When the scanning is end, it will list all files found from your iPhone. Preview the recoverable data under “App Photo” & “App Video” category, pick on the data you want, recover it and save it on the computer by clicking “Recover” button.

recover deleted app data from iPhone after iOS 12 update

d_win d_mac

Related Articles:

How to Recover Deleted App Files from iPhone

How to Backup and Restore Data from iPhone before iOS 12 Update

Recover Lost Data from iPhone/iPad after iOS 12 Update

How to Restore Photos from iPhone after iOS 12 Update

Best iPhone Manager: How to Transfer & Manage Files for iPhone

Recover iPhone App Data after iOS 12 Update

iOS Data Recovery

Recover Your iPhone iPad Lost Data
Now, Even without Backups

Compatible with iOS 11 & iPhone X/8 (Plus)

Recover Lost Data Now