By Selena KomezUpdated on April 11, 2018
Summary: Apple Music is a popular music streaming service app, when comes to this question “How to keep Apple Music without paying after canceling subscription”, nobody get a perfect answer. From now on, you can stop wondering how to fix it. This tutorial is going to shows you the best solution to make Apple Music be playable on iPhone without limits.
“How to make Apple Music be playable on my iPhone 8 after I cancel the subscription? I am a Apple Music fans and want to own the songs forever without paying. How?”
You know, Apple Music is a hot streaming music service, which offer a large amount of Apple Music tracks for you all Apple Music users. Users can play them and download for playing offline and so on during the subscription. This looks good, isn’t it. When you unsubscribe from Apple Music, all your playlists, downloaded songs/videos will be removed from your devices, or probably will be with DRM protected which will prevent you from accessing. If you want to resubscribe at a later date, then you have to start from scratch. You have to find songs, create playlists and so on. So is there any way to remove the DRM from downloaded Apple Music files, and then you can transfer the converted audio tracks to iPhone 8 for listening without limits?
To solve the problem, Apple Music Converter comes up. This music converter supports an ideal, simple and fast way to convert DRM Apple Music and iTunes audio files, like purchased Audiobook and downloaded Apple Music files, remove DRM from Apple Music, convert Apple Music to common audio formats like MP3, AAC, FLAC, WAV and more with fast conversion speed and perfect output quality. After the conversion, you could play the converted Apple Music on iPhone 8 for free after you unsubscribe, it mains that you own these music forever without paying. You could enjoy the converted music on any compatible device for offline playing after transferring, like iPhone(iPhone X, iPhone 8, iPhone 7), iPod, Android device, PSP/PS4, Xbox, MP3 player, computer, etc,.
Step 1. Launch Apple Music Converter
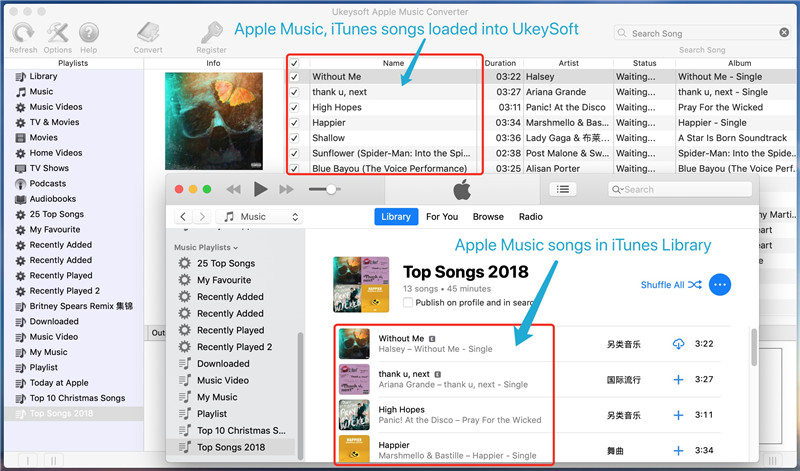
Launch Apple Music Converter and iTunes will be opened as well. Your entire iTunes library including Apple Music tracks and playlists will be listed in the left as playlists. You don’t have to download your favorite Apple Music tracks or playlist to PC first, Apple Music Converter can effortless convert them as long as you added them to iTunes music library.
Step 2. Select Apple Music Tracks
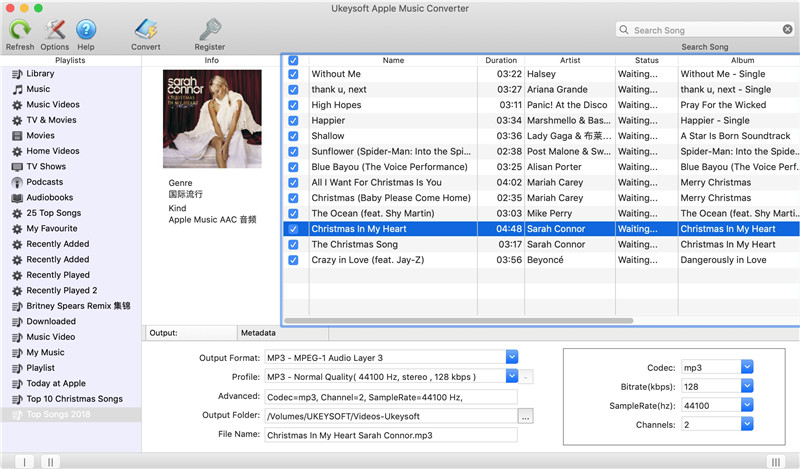
Click a playlist in the left panel and tick the checkbox to choose. Tick the top checkbox to choose whole playlist. You can also use provided search box to locate your favorite Apple Music songs quickly.

Step 3. Choose Output Format for Converted Music
The program provides MP3, M4A, AC3, M4R, WAV, FLAC, MKA and more output formats. For general usage, MP3 or M4A will be good enough. You can also choose other output format depending on your need.

Step 4. Start Conversion
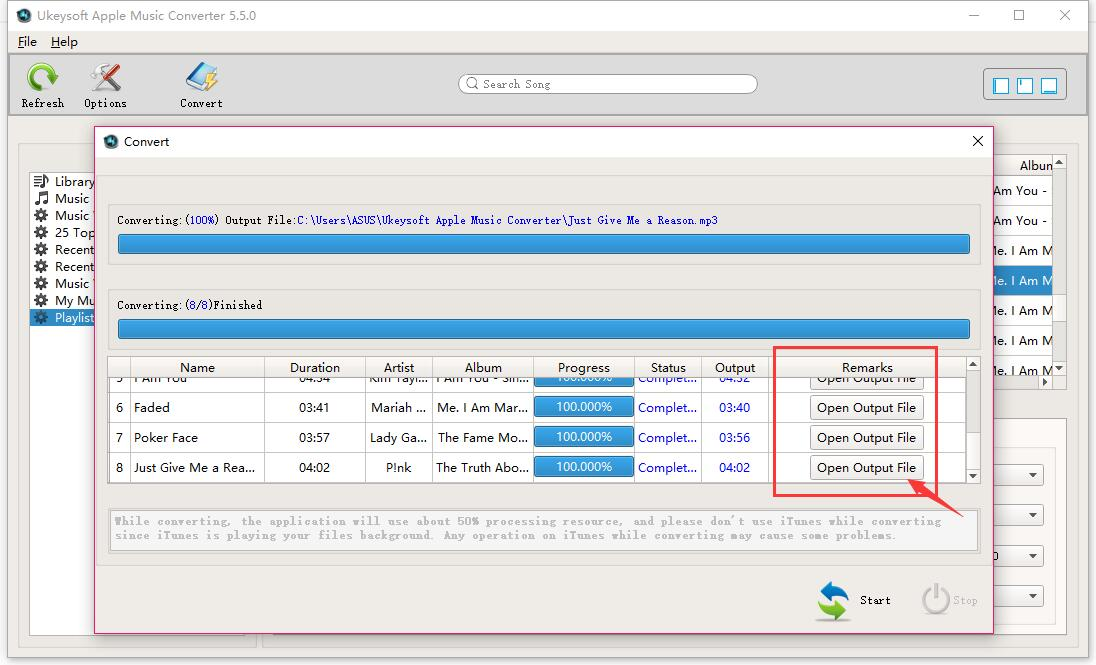
Simply click “Convert” button to start conversion. You will get output files very soon as the program performs 16X faster conversion speed.

Step 5. Transfer Music to iPhone 8
Lastly, transfer the converted DRM-free music files to iPhone 8 via iOS Manager, then you could enjoy the music without paying all the times.

(This is the best end-result for downloaded Apple Music tracks after 3-month free trial.)
How to Convert Apple Music M4P to MP3 for iPhone 8 on Mac
How to Remove DRM Lock from Apple Music Streams
How to Play Apple Music on iPhone 8/7/6S/6 for Free
How to Play M4P Apple Music on iOS Device
How to Manage iPhone 8 on Computer
Prompt: you need to log in before you can comment.
No account yet. Please click here to register.
No comment yet. Say something...