All posts by DHZ

How to Transfer Music from iTunes to Galaxy S10/S10+

[Summary]: If you want to transfer iTunes music to Samsung Android smartphone. Here in this page, you’ll find a powerful iTunes to Android transfer software to simply transfer music or playlists from iTunes library to Samsung Galaxy S10/S10+ on Windows/Mac.

I have synced songs from iPhone to iTunes library for backup, now I have got an new Galaxy S10, does anyone know a tool that can help me directly transfer music from iTunes to Galaxy S10? My Android device is not getting detected by iTunes and I can’t sync iTunes music to Samsung Android phone

Hi, I use Samsung S10+ and I need to sync iTunes music to Galaxy S10+, or is there solution to transfer Apple Music from iTunes to Galaxy S10+? I’d like to offline play Apple Music songs and playlist on Galaxy S10 after canceling subscription. What should I do now?

I want to sync Apple Music from iTunes to Galaxy S10, how to keep apple music songs forever free? If you cancel apple music do you keep the songs playable on Samsung Galaxy S10?, how to keep apple music songs forever after unsubscribing?

CONTENTS:

iTunes is a great program for storing and managing your music, and no wonder that most – if not all – Mac owners rely solely on it to organize and enjoy their music content. iTunes store offers millions of Apple Music songs, if you have free music in iTunes, you can easily sync to iOS devices, but you can’t sync music from iTunes to Android devices like Samsung Galaxy phone. In additional, Apple Music tracks in iTunes added DRM protection, Apple company not allow users to transfer or copy the streaming music to other devices, when you have got an new Samsung Galaxy S10, how to transfer music from iTunes to your Galaxy S10? Don’t worry, this article teach you an effective way to transfer iTunes music to Samsung Galaxy S10 or S10+.

Part 1: Transfer iTunes Music to Samsung Galaxy S10/S10+ in 1 Click

To transfer songs, movies, Podcasts, iTunes U and more from iTunes Library to Galaxy S10/S10+ and other Android devices, the quickest way is to use the Android TransferiTunes Music to Android Transfer – a part of Android Toolkit, which not only can help you transfer music, playlist, podcasts, and iTunes U from iTunes to Galaxy S10/S10+ in 1 click, but also also you backup music, movies and playlists from Android devices/iOS devices to iTunes library for backup. What’s more, the Android Toolkit enables users transfer data between Android and PC/Mac, including contacts, photos, music, SMS, and more.

Enjoy Your Music, Playlist, Videos, Photos, and more.on Samsung Galaxy S10

FROM/TO:
– iTunes <-> Samsung Galaxy S10
– Computer <-> Samsung Galaxy S10
– Android Phones and Tablets <-> Samsung Galaxy S10
– iPhone/iPad/iPod <-> Samsung Galaxy S10

Download the Phone Toolkit – Android Transfer and try to sync iTunes music to Galaxy S10

d_win d_mac
d_win d_mac

Tutorial: How to Get iTunes Music on Samsung Galaxy S10/S10+

Step 1. Launch Phone Toolkit – Transfer and Connect S10 to PC/Mac
First of all, please download, install and launch the Phone Toolkit – Transfer (Android) and connect your Samsung Galaxy S10 to your Mac or Windows computer.

itunes music to android transfer

Step 2.Click “Transfer iTunes Media to Device”
Go to iTunes to Android transfer function, you will see the program will pop up an new windows.

sync iTunes music to galaxy s10

Step 3.Loading iTunes Library
In this step, the program will load all media of iTunes library, you can select Entire library or selected playlists to loading.

Load iTunes music

Step 4. Start to Sync Music and Playlist from iTunes to Samsung Galaxy S10
You can select the entire libray, or select the files which you want to transfer from iTunes to Galaxy S10. Then click the “Transfer” button begin to transfer music from iTunes library to Galaxy S10 directly.

copy iTunes music to samsung galaxy s10

d_win d_mac
d_win d_mac

Tips: Android Toolkit also is a phone to phone transfer tool, it can transfer your files, including music, videos, photos, contacts, SMS, call logs, calendar, notes and more from phone to phone, iTunes to phone, iCloud to phone, etc. Besides moving iTunes music to S10, Phone Transfer also can help you backup and restore S10 music to and from PC and Mac computer.

Part 2: Keep Apple Music Songs Playable on Android after Canceling Subscription

Do you want to still enjoying Apple Music songs on your mobile phone after unsubscribing? Many Apple Music users ask how to keep songs downloaded from Apple Music forever on PC, Mac, iPhone, iPad, Android phone? Before solve this problem, you may know that the Apple Music streams are added DRM protection, which restricts use from listening to downloaded Apple Music tracks after canceling subscription, or transfer/copy to any unauthorized device like MP3 player, iPod nano, Android devices. To keep your downloaded Apple Music songs forever on your iPhone, iPad, Mac or Android devices, you should remove DRM from Apple Music songs.

When you have bought an new Samsung Galaxy S10, if you try to sync Apple Music songs from iTunes library to S10, you will found that the Android device is not getting detected by iTunes. In order to play Apple Music on Samsung Galaxy S10/S9/S8/S7 without using Apple Music App for Android, or keep songs downloaded on Samsung phone playable forever, you need to remove DRM from Apple Music and convert them to MP3 format.

This Apple Music Converter can help you keep Apple Music songs forever on Samsung Galaxy S10/S10+ after you unsubscribe Apple Music. How it can do? The Apple Music Converter is supports remove DRM from Apple Music and convert Apple Music M4P to MP3 format, because most Android devices supported MP3 audio format. After converting Apple Music to MP3, you can transfer the converted Apple Music to Galaxy S8 for listing offline, even after you unsubscribe from Apple Music membership.

d_win d_mac

Step 1.Download and Launch Apple Music Converter on PC or Mac

Apple Music to Galaxy S10 Converter

Step 2.Select Apple Music Songs to Convert.

Select Apple Music Tracks

Step 3.Select MP3 as Output Format.

Select MP3 as Output Format

Step 4.Start to Convert Apple Music to DRM-free MP3.

Convert Apple Music to Samsung Galaxy S10

Step 5.Import Converted Apple Music to Samsung Galaxy S10/S10+
After getting the converted DRM-free apple music files, you can use Samsung Kies, Android Transfer or Android Manager to import converted Apple Music songs from computer to Galaxy S10/S10+ directly.

transfer Apple Music to Samsung Galaxy S10

Apple Music Converter is a simple way to convert Apple Music to MP3 or any other audio formats for easy playback on any device you like e.g. iPod/iPad/iPhone, Sony Walkman, Samsung Galaxy phone, Samsung Galaxy Tab, BalckBerry PlayBook, Kindle Fire, Huawei phones, HTC phones, LG phones, Motorola Droids, car media player, any other devices. It’s possible to keep all the apple music songs forever after canceling subscription. If you want to keep Apple Music songs playable on mobile phone after you unsubscribe, Apple Music to MP3 Converter is you best choice.

Sync iTunes Music to Galaxy S10

How to enjoy Apple Music on Samsung Galaxy S10/S10+

[Summary]: Just got a new Samsung Galaxy S10 and haven’t installed Apple Music on your Samsung phone? Here in this article, we’ll show you two ways to transfer iTunes library (including Apple Music and iTunes M4P music) to Samsung Galaxy S10/S10+.

transfer apple-music to samsung galaxy s10

Like iPhone XS Max, Huawei Mate 20 Pro and Samsung Galaxy S9/Note 9, Samsung Galaxy S10/S10+ is one of the most expensive smart phones available in 2019 – the new year’s Android smart phone. Samsung will release the latest Samsung Galaxy S10 and Galaxy S10+ at 2pm on February 20th, US Eastern Time.

CONTENTS:

Samsung Galaxy S10 News and Specs

The latest leak information, the Galaxy S10 will be equipped with 6GB of memory, with 128GB or 256GB storage. On the other hand, the Samsung Galaxy S10+ is expected to offer up to 8GB of RAM and 512GB of internal storage. According to reports, the Galaxy S10 E will contain 4GB of RAM and 128GB of internal storage.

As for the size of the display, the Galaxy S10 E is expected to use a 5.8-inch screen, while the standard Galaxy S10 will use a 6.1-inch display. The Galaxy S10+ is expected to be equipped with a 6.4-inch display, exactly the same as the Galaxy Note 9. But it is said that only the Galaxy S10 and Galaxy S10+ are equipped with In-display fingerprint sensors. The Galaxy S10 E will feature a side-mounted fingerprint sensor. On the camera side, the rear of the Galaxy S10 and Galaxy S10+ models are equipped with a three-camera configuration. The more affordable Galaxy S10 E will be equipped with dual cameras on the back. The Galaxy S10+ will be the only model with front dual camera. All three Galaxy S10 models will be released in February 2019.

When you have got an new Samsung Galaxy S10/S10+, do you want to enjoy Apple Music on Galaxy S10? Looking for a way to transfer music and playlist from iTunes library to Galaxy S10? So this article teach you the best 2 ways to transfer iTunes library (including Apple Music and iTunes M4P music) to Samsung Galaxy S10/S10+.

Part 1: Use Apple Music for Android App on Samsung Galaxy S10/S10+

Apple Music for Android available for Samsung Galaxy S10/S10+, so you can download and install Apple Music for Android App on Galaxy S10/S10+ from Google Play.

If you’ve ever purchased song, album, movie or something else from iTunes, you have an Apple ID. But if you’ve never used Apple’s products, it’s easy to create an Apple ID.

Subscribe Apple Music and Enjoy Songs on Galaxy S10/S10+:

1.Start a trial membership of Apple Music.
If you never join Apple Music membership, please start your free 3-month trial of Apple Music today and stream over 50 million songs. If you want to continue with Apple Music experience, it would costs £9.99/ month.

2.Sign in Apple Music.
Click the Sign in option at the bottom of the screen. You’ll be prompted to enter your Apple ID and password. If you don’t already have one choose ‘Create an Apple ID’.

3. Confirm and Enjoy Apple Music on Galaxy S10.
You’re all set! Get ready to enjoy Apple Music on your Galaxy S10 for free 3-month trial.

Part 2: Enjoy Apple Music on Samsung Galaxy S10 without Apple Music for Android App

Apple Music added DRM protection, so you not allowed to sync Apple Music to other devices, any solution to transfer Apple Music songs to Samsung Galaxy S10/S9/S8/Note 9/Note 8 and other Android devices? Please keep reading below guide:

If you don’t want to install Apple Music for Android App, you can try to remove DRM from Apple Music songs and convert to MP3, then transfer the DRM-free Apple Music to Samsung Galaxy S10.

To solve the problem, here we recommend you try a third-party software – UkeySoft Apple Music Converter. It can help users convert Apple Music to plain MP3, AAC, FLAC or WAV format up to 20X speed, in additional, during the conversion process, it will remove DRM from protected Apple Music and keep it’s grab ID3 tags and metadata. What’s more, Apple Music Converter also allows you convert iTunes M4P music, iTunes M4A, M4B & Audible AA, AAX audiobooks to MP3, M4A, etc.

With Apple Music Converter, users can

– Convert downloaded Apple Music files to MP3, AAC, FLAC, WAV.
– Remove DRM from Apple Music songs and iTunes audiobooks.
– Convert purchased Audiobook to MP3, AAC, FLAC, WAV.
– Remove DRM from protected Apple Music tracks.
– Convert iTunes M4P audio to MP3, M4A, etc.
– Extract audio from iTunes M4V videos, movies, music videos.

d_win d_mac

Steps to Stream Apple Music from Computer to Samsung Galaxy S10/S10+

Step 1. Run UkeySoft Apple Music Converter and Load Apple Music Files
Download, install and launch UkeySoft Apple Music Converter on your computer first, after launching the program, the iTunes will run automatically and load all your iTunes media (Apple Music track) together with playlists. Just wait for a moment.

Apple Music Converter interface

Apple Music DRM removal

Note: Sign in Apple ID on iTunes at first, just add songs and playlist from iTunes store/Apple Music store to library. If there are no songs appear in the main interface, please click on “Refresh” button to load the music manually.

Step 2. Select Apple Music Tracks
Then, select all the Apple Music song you want to convert by clicking at them one by one. Or you can select all playlist or album by clicking on the checkbox at the top menu.

Select Apple Music Tracks

Step 3. Choose MP3 as Output Format for Galaxy S10
The Apple Music Convert can convert Apple Music and iTunes M4P files to MP3, AC3, AIFF, FLAC, M4A, M4R, MKA and AU. Because Samsung Galaxy S10 supports MP3 audio files, please select MP3 as output format.

Choose Output Format for galaxy s10

Tips:

• MP3 and AC3 are the popular audio format that can be played on most of media devices, the Samsung devices supported MP3 format, please select MP3 as output format.

• AIFF and FLAC are a lossless audio format which provides high audio quality.

• M4R is the format for iPhone ringtone. If you want to make a ringtone from Apple Music, you can choose M4R as output format.

Step 4. Adjust Conversion Speed and Other Output Settings (Optional)
By clicking “Options”, you can adjust the conversion speed from 1X to 16X. If you want to keep the metadata tags like album, artist, cover art, etc, please make sure that the “Metadata tags (Only works with M4A, MP3 files)” option is selected.

Adjust Conversion Speed

Step 5. Start to Convert Apple Music to MP3 for Galaxy S10
After setting the output setting and conversion speed, click on “Convert” button to recover DRM from Apple Music and convert them to DRM-free MP3.

Convert Apple Music to MP3 for Galaxy S10

After conversion, you can click “Open output file” to locate converted Apple Music songs in MP3 format.

Apple Music songs in MP3 format

Step 6. Transfer Converted Apple Music & iTunes M4P Music to Galaxy S10/S10+
After that, you can listen to Apple Music with any device or media player you want. In order to listening Apple Music on Galaxy S10, you can connect your Samsung Galaxy S10 to computer via USB cable and open the output folder to transfer them to your Samsung Galaxy S10. Or, you can use this Android Toolkit – Android Transfer to import songs from computer to Android devices directly, this Android Transfer also can help you sync music from iTunes to Galaxy S10 directly.
Read the guide: how to transfer music from PC/Mac to Samsung
How to transfer iTunes music to Android
Transfer music from iPhone/iPad/iPod to Android

Note: The trial version of Apple Music converter has 3-minute conversion limit. If you want to unlock the time restriction, you’ll need to spend just $39.95.

d_win d_mac

Part 3: One-click to Transfer Music from iTunes Library to Samsung Galaxy S10/S10+

If you want to transfer songs and playlist from iTunes library to Samsung Galaxy S10, you can use this iTunes to Android Transfer, which also is an Android to PC Transfer, it will offer users a simple and effective solution to sync music from iTunes to Galaxy S10/S9/S8/S7/Note 9/Note 8, etc. What’s more, this program also can help you transfer mobile contents including music, photos, videos, contacts, messages, call logs, WhatsApp and more between iOS and Android devices, Android to Android, iOS to iOS, as well as backup contents from Android and iOS devices to iTunes library.

Download the Phone Toolkit – Android Transfer for Windows or Mac:

d_win d_mac

Note: This program do not supported transfer DRM-ed Apple Music to Android.

Now, let’s look at how to transfer music from iTunes Library to Samsung Galaxy S10.

Step 1. Run Phone Toolkit on PC or Mac
First of all, please download, install and run the Phone Toolkit, then visit the “Transfer” module and connect your Galaxy S10 to it. It will automatically detect your S10 and display its snapshot.

samsung galaxy s10 music transfer

Step 2. Transfer iTunes Media to Device
On the home screen, you can view various shortcuts. Out of all the provided options, click on “Transfer iTunes Media to Device”.

sync iTunes music to galaxy s10

Step 3. Loading All Media on iTunes Library
This will launch the following pop-up as the application will start detecting the iTunes media on your system.

Load iTunes music

In no time, it will fetch all the prominent data from iTunes and display it in a categorized manner. You can simply select the playlists of your choice or check the “Entire library” option as well.

Step 4. Start to Transfer Music from iTunes to Galaxy S10
After making your selection, click on the “Transfer” button. The application will automatically transfer iTunes media to your Samsung Galaxy S10.

sync iTunes music to samsung galaxy s10

As you can see, the program can help you easily to transfer iTunes music to S10. If you want, you can also backup music from Galaxy S10 to computer, or manage your phone’s data easily using this remarkable application.

d_win d_mac

Apple Music for Galaxy S10

How to Recover Deleted Audio Files from Android Phone

[Summary]: Your Android audio files loss can be caused by many reasons. In this article, you can get the most efficient way to recover deleted audio files on Android phones & tablets.

Have you ever encountered an error in deleting some valuable audio files on Android? Unexpectedly deleting certain important files such as audio, photos, videos, and contacts is really an annoying thing. Instead of regretting it, it is better to find an effective way to retrieve your deleted files. Do you know? When you delete a file on Android, the deleted file will only be marked as useless and wait for other data to be written to that location. Therefore, as long as it is not covered by new data, it is very likely that the deleted audio files will be found. But how to find them? Actually, you need a professional data recovery software.

Before we start recovering audio files, we have listed scenarios where you may end up losing your significant audio files on Android. To prevent audio and other data loss, you should avoid the following as much as possible.

Accidentally deleting some audio files from Android device
Viruses can make your audio files invisible or deliberately erase them
After formatting Android phone memory card
Performing factory reset erases everything, audio files as well
Interrupted audio file transfer between Android and PC

The Right Audio File Recovery Software for Android

U.Fone Android Data Recovery is one of the right, suitable and perfect Audio File Recovery software for Android. This tool will allow you to retrieve deleted audio files (mp3, amr, wav, midi, etc) from Android smartphones and tablets. Besides, it has the ability to recover other file types on Android such as images, music, contacts, call logs, videos, audio, apk files and other documents. Now, let’s check the detailed features:

Easily scan both the internal storage and SD card memory on Android.
Recover all types of data like images, music, contacts, call logs, videos, audio, apk files and other documents.
Restore deleted/lost files after deleting, formatting, factory resetting, rooting, virus infected, etc.
Preview data before recovering.
Support Android phones and tablets like Samsung, LG, Sony, Motorola, Google, Huawei, and many more.
Compatible with Windows 10/8.1/8/7/Vista/XP, Mac OS X 10.7 or above (macOS Sierra/macOS High Sierra).

d_win d_mac

Simple Steps to Retrieve Audio Files from Android Devices

Step 1. Run U.Fone Android Data Recovery

After you finish downloading the Android audio recovery software, run and open it on your PC or Mac computer. In the main window, please select Android Data Recovery mode so that you can get your lost audio files scanned.

run android data recovery

Next, you should use a USB cable to connect your Android phone to PC as the photo shows.

connect android to the computer

Step 2. Enable USB Debugging

In order for the software to detect your device correctly, you should follow the pop-up detailed instructions to open the USB debug mode. Then click “OK”.

turn on usb debugging

Step 3. Select Data to Scan

Almost all Android files can be scaned and recovered, including contacts, call logs, text messages, pictures, videos, etc. In this case, choose the “Audio” optiona and click “Next” to scan your selected data.

select data to scan

U.Fone Android Data Recovery requires your authorization to read and scan your Android phone. Therefore, when a pop-up window appears on the phone screen, select Allow/Grant/Authorize for authorization. If no message pops up, please click “Retry” in the interface to try again.

allow to scan

Step 4. Scan Your Android Phone

Now the program will start scanning all the files on the device. The entire process will check all storage memory, including existing files and deleted files.

scan android phone for deleted audio files

Step 5. Preview and Recover Audio Files on Android

Now you can preview the scanning result. Click Audio to view the details. Choose those files you want to recover and click the Recover button to save them to your computer.

restore-audio-from-android

d_win d_mac

Now You Should Learn How to Prevent Data Loss

The best way to prevent data loss is to develop the habit of backing up your data. And most Android users think that the best and perfect way to back up their data is to use cloud services. You are likely to already have a Gmail account, which gives you 15 GB of free storage on Google Driveand if you exceed it, you need to pay for more storage. This is similar to iPhone iCloud. This is a choice if you don’t mind, but it is certainly not the best. With the help of Android Toolkit –  Android Backup & Restore tool, you can easily back up all your important Android data to the computer and then recover deleted audio files and other data types from your backups more easily than ever before.

1 click tool to backup your Android safely
Restore data from backup files selectively, safely
Easily backup contacts, SMS, photos, audio, videos, documents and more from Android to PC
Preview and restore backup to Android without overwriting existent data
The whole process only takes you a few minutes

android toolkit home page

Related Articles

How to Recover Deleted Data from Samsung

How to Recover Deleted Data from Vivo Android Phone

How to Recover Deleted Documents from Android

How to Restore Media File on Android(Photos/Videos/Audios/Songs)

How to Recover Deleted Data from Android Without Root

Android Audio File Recovery

How to Recover Permanently Deleted Photos from iCloud

[Summary]: This article describes how to recover permanently deleted photos/pictures in 3 ways. You can choose the most suitable method for your situation, even if you don’t have a backup, you can retrieve your valuable photos on iPhone iPad.

“My iPhone reminds me that there is not enough space in iCloud. When I deleted the useless photos to free up storage space, I accidentally selected some valuable photos and clicked delete. Now they are gone, how can I get back the data that has been deleted from iCloud?”

Everyone knows iCloud brings 5GB of free storage. If the memory is almost full, you will be prompted if you need to upgrade. Typically, we use iCloud to store and sync files between iPhone, iPad and Mac computers, like photos, contacts, messages, video, audio, music, call log and so on. Whether you intentionally or unintentionally delete an iCloud Drive file on your iPhone or iPad such as photos/pictures, iOS will tell you that it has disappeared forever. If you are unlucky one who mistakenly deleted important photos from iCloud and is looking for ways to recover, you can stop here. Since this article covers the comprehensive iCloud data recovery method, whether or not there is a backup, you can completely retrieve permanently deleted photos/pictures from iCloud.

Now keep on reading and find out how to recover deleted data through iCloud in three methods.

CONTENTS

Method 1: Restore Permanently Deleted Pictures from iCloud/iOS (Selectively)

It is well known that the file system only creates a delete flag on the disk before the original data is overwritten by other new data. U.Fone iPhone Data Recovery software scans and analyzes your device in depth and then finds deleted photos. This software works regardless of whether you have a backup, since it comes with 3 recovery modes: Recover from iOS device, recover from iTunes backup and recover from iCloud backup. Therefore, you can choose to directly restore deleted photos from iPhone XS/XS Max/X/8/77 Plus/6S/6S Plus/6, or extract and restore iPhone photos and other types of data from iCloud backup, like contacts, text messages, videos, call logs, Whatsapp messages, notes and more.

Download the free trial to the computer and try to retrieve iPhone photos from iCloud backup.

d_win d_mac

Key Features of U.Fone iPhone Data Recovery

3 recovery modes: recover data from iOS device, iTunes backup and iCloud backup.
Recover many types of files, including photos, videos, SMS, contacts, call history, app and app data.
Fast data scan & analysis speed and export all data to local hard drive.
Recover iPhone data lost due to accidental delete, formatted, damaged/stolen, factory reset, iOS update/jailbreak or various.
Totally compatible with all iPhone/iPad/iPod, including the lastest iPhone XS, iPhone XS Max, iPhone XR.

Step 1. Launch U.Fone iPhone Data Recovery

Install and launch U.Fone iPhone Data Recovery on your computer and soon you will be taken to the main page of the program. As you can see, the program is divided into three major modules, namely iPhone Data Recovery, iOS System Recovery and iOS Data Backup & Restore. In this case, choose “iPhone Data Recovery” to start the data recovery journey.

ios data recovery home page

Step 2. Log in Your iCloud Account

Select “Recover from iCloud Backup” from the left side of the program and you will be prompted to type the iCloud ID and password associated with your phone.

log in icloud

Step 3. Download iCloud Backup Files

Once the login is successful, the program will automatically detect all backups in iCloud and display them as a list. Please select one of the backups which contains the photos you need to restore. Then click on the corresponding download button.

choose icloud backup

Step 4. Preview and Recover Deleted Photos from iCloud Backup

Once the download is finished, the interface will show you all data types, you can select the photo data to preview and select the pictures you want to restore. Then click to “Recover” and wait for program download them to PC/Mac.

recover data from icloud

Take it easy, don’t worry if you can’t find the permanently deleted photos you want to recover in the iCloud backup package. U.Fone iPhone Data Recovery also allows you to directly scan and restore all data types deleted from an iPhone iPad, including contacts, MMS/SMS/iMessages, photos, videos, and application data such as WhatsApp, Kik, Line, Viber, WeChat, and more. If you want to know more, please click here: How to recover deleted photos from iPhone directly.

d_win d_mac

Method 2: Recover Photos from iCloud Recently Deleted Albums

Normally, if you press the delete button, the photos will not disappear immediately, they will be sent to the “Recently Deleted” folder and it will retain the deleted items within 30 days. Once they expire they will disappear forever. If you meet the criteria, here are the specific steps:

Note: It would clear all current data that has not been backed up. If you still want to know how it works, read on.

Step 1. Open iCloud.com and sign in with your iCloud account credentials.

using-icloud-to-recover-photos

Step 2. Select Settings and scroll down to the bottom of the Settings page to find “Restore Files” under the Advanced heading.

Step 3. you’ll see tabs for “Restore Contacts” and “Restore Calendars”, etc. Clicking on either of these tabs will present you with an interface for recovering this type of data as well.

Step 4. Or you can select the photo part, and hit on the “Albums” at the top. Here you can see all recoverable pictures and videos, choose the picture you want to restore, and then click to the “Recover” to start the recovery process.

finding-the-restore-files-command-in-settings

Method 3: Retrieve Permanently Deleted Photos from iCloud Backup

After restoring photos from iCloud backup files, all data on the iPhone will be replaced by this backup and will disappear forever. This is terrible, if you are habitually backing up your data, then you can try this approach. This alternative does not require the use of third-party tools, you can do it yourself.

Tip: iOS Data Exporter is a comprehensive iPhone data backup & restore tool. With it, you can back up data on all your iPhone files with your computer, including photos, videos, contacts, text messages, and more, with a single click. At the same time, it allows you to selectively restore data from backup without deleting other content as long as you need it.

Step 1. Navigate to the Settings on your iPhone screen and then click “General” > “Software Update” to get the latest iOS version.

Step 2. Go to SettingsGeneralReset, and then select Erase all content and settings.

Step 3. Find setup assistant, select “Restore from a Backup” on Apps & Data screen. Log in iCloud and then you can choose the backup package which contains your deleted picture to restore.

restore-iphone-from-icloud-backup

Recover Photos from iCloud

Recover Deleted Instagram Direct Messages on iPhone/Android and Online

[Summary]: Deleted Instagram direct messages by mistake? Don’t worry, this article teach you two online Instagram direct messages recovery solutions, you can also learn how to recover deleted Instagram DM, text messages, WhatsApp messages and more App data from iPhone and Android phone.

instagram dm recovery

Instagram is a mobile app that supports iOS, Windows Phone, and Android platforms. It allows users to capture their own life memories in any environment. Choose the filter style of the image (Lomo/Nashville/Apollo/Poprocket and other 10 kinds of aprons). ), one-click sharing to Instagram, Facebook, Twitter, Flickr, Tumblr, foursquare or Sina Weibo platform. More than just taking pictures, as a lightweight but very interesting app, Instagram’s Direct Message or DM is a private messaging feature for users to send photos, videos or just plain text messages to anyone you’re following.

CONTECTS

But, sometimes, you may accident deleted Instagram direct messages on iPhone or Android phone, or lost Instagram Messages after factory reset, root, jailbreak, OS update,etc. However, how to recover deleted Instagram direct messages? Any way to retrieve lost Instagram Messages from iPhone or Android phone like Samsung Galaxy S10/S9/S8/S7/Note 9/Note 8/Note 5, HUAWEI Mate 20/Mate 10/P30/P20/P10, Google Pixel 3 XL/Pixel 3a, HTC, LG, Sony, Google Nexus, Xiaomi, Motorola, ZTE, and more Android smartphones and tablets. Don’t worry, you can find deleted direct messages on Instagram, today, we will teach you two different ways to recover deleted Instagram Direct Message. One is recovering deleted Instagram Direct messages from mobile phone by professional iPhone data recovery or Android data recovery, the other is recovering deleted and lost Instagram messages online by using Instagram Message Recovery, which developed by former Instagram employee.

Method 1: Recover Deleted Instagram Messages Online by Instagram Message Recovery

The Instagram Message Recovery is developed by a former Instagram employee, it can help you recover deleted or lost Instagram messages online, you need to logging into your Instagram account on the Instagram Message Recovery online website, it will help you recover deleted Instagram messages. Let’s show you the detail guide on how to using this Instagram Message Recovery to recover deleted Instagram direct messages online.

Step 1. Go to Instagram Message Recovery online Site
If you want to recover your deleted Instagram Message online, please go to the Instagram Message Recovery online website, then enter your Username or Profile URL.

instagram message recovery

Step 2. Click “Recover Messages”
After signing in your Instagram username or Profile URL, just click “Recover Messages” button, the service will scan all deleted Instagram messages from your Instagram account.

instagram DM recovery

Step 3. Finish Human Verification
The last step, it will ask you whether you are a human and not an automated bot, please complete a quick offer below to verify that you are an Authorized user.

recover instagram DM

Step 4. Start to Instagram Message Recovery Online
After completing the Human Verification, you can recover deleted messages on Instagram online, all the recovered Messages will be downloaded in a ZIP format once.

recover instagram directly messages

Disadvantage: This is free online Instagram Message Recovery service, but there are some bugs in this free online service, currently. For example, sometime you will failed to pass the human verification, you need to network connection, during the verification process, the website will often pop up up some ads, in additional, the whole recovery process is very slow. If you looking for an effective to recover deleted Instagram messages from iPhone or Android phones, please keep reading the below effective iPhone Instagram Message Recovery solution and Android Instagram Message Recovery solution.

Method 2. Recover Deleted Instagram Messages on iPhone

U.Fone iPhone Data Recovery also is an iPhone Instagram Message Recovery, which can help users easily to recover deleted Instagram direct messages from iPhone XS, iPhone XS Max, iPhone XR, iPhone X, iPhone 8/8 Plus, iPhone 7/7 Plus/6s/6s Plus, iPad Pro/Air/Mini, etc (iOS 12 supported). What’s more, U.Fone iPhone Data Recovery also supports recover photos, videos, contacts, text messages, notes, WhatsApp and more from iOS devices.

Free download U.Fone iPhone Data Recovery and try to recover Instagram directly messages from iPhone on Windows or Mac computer.

d_win d_mac

In additional, if you want to recover other App data, this iPhone Data Recovery also is you best choice, it not only allows you recover WhatsApp messages, Viber messages, WeChat messages, Instagram Messages, Kik messages, Line messages, QQ messages and App photos & videos, but also enables you recover photos, videos, SMS, contacts, call logs, notes, Safari History, Voice Memos, Reminders, Calendars and more from iOS devices/iTunes backup/iCloud backup, or via smart recovery.

Download this iPhone Data Recovery and try to retrieve App data from iOS devices.

d_win d_mac

Steps to Recover Deleted Instagram Messages from iPhone by U.Fone iPhone Data Recovery

Step 1. Run iPhone Data Recovery on PC or Mac
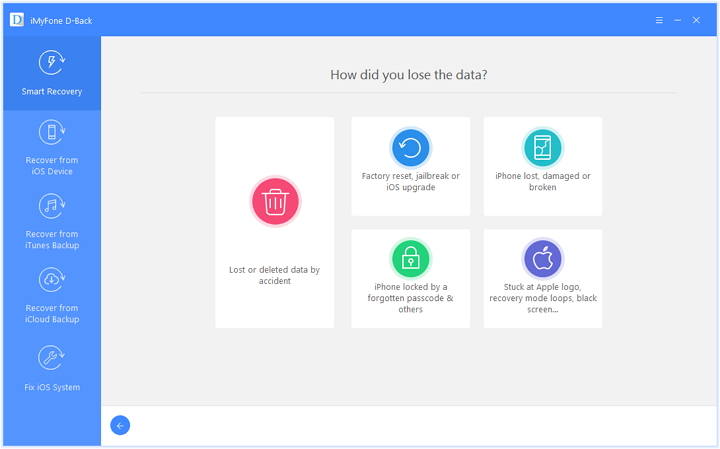
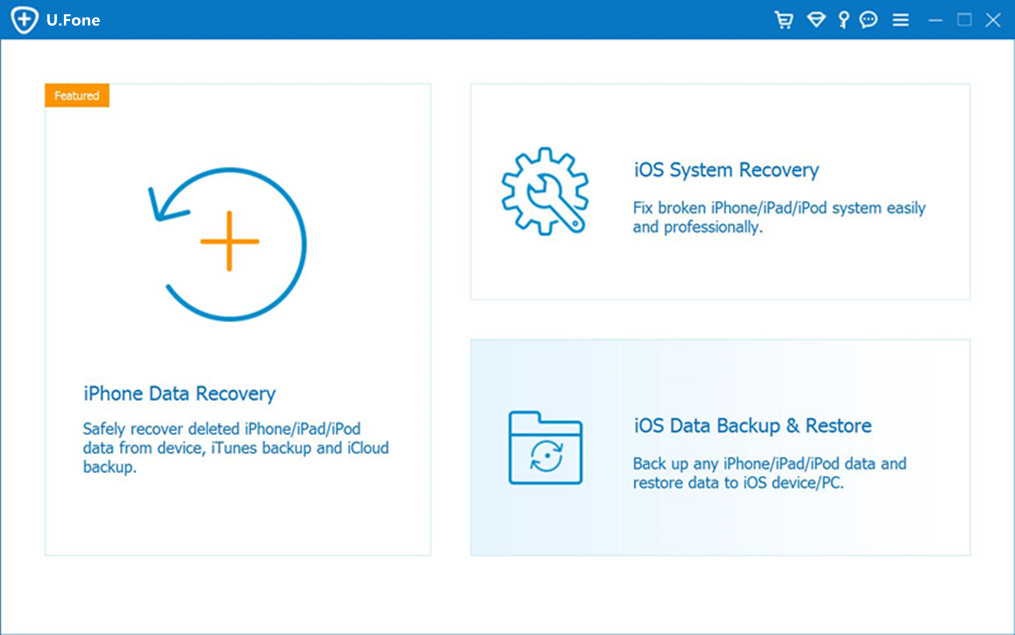
First, please download and launching this iPhone Instagram messages recovery software on your PC/Mac, you will see there are three main function. To recover deleted and lost data from iPhone, please click “iPhone Data Recovery” to go on.

run U.Fone iPhone data recovery

Step 2. Connect iPhone to Computer
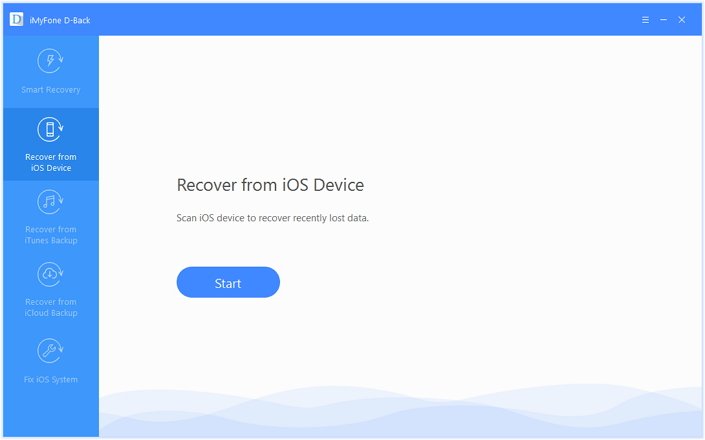
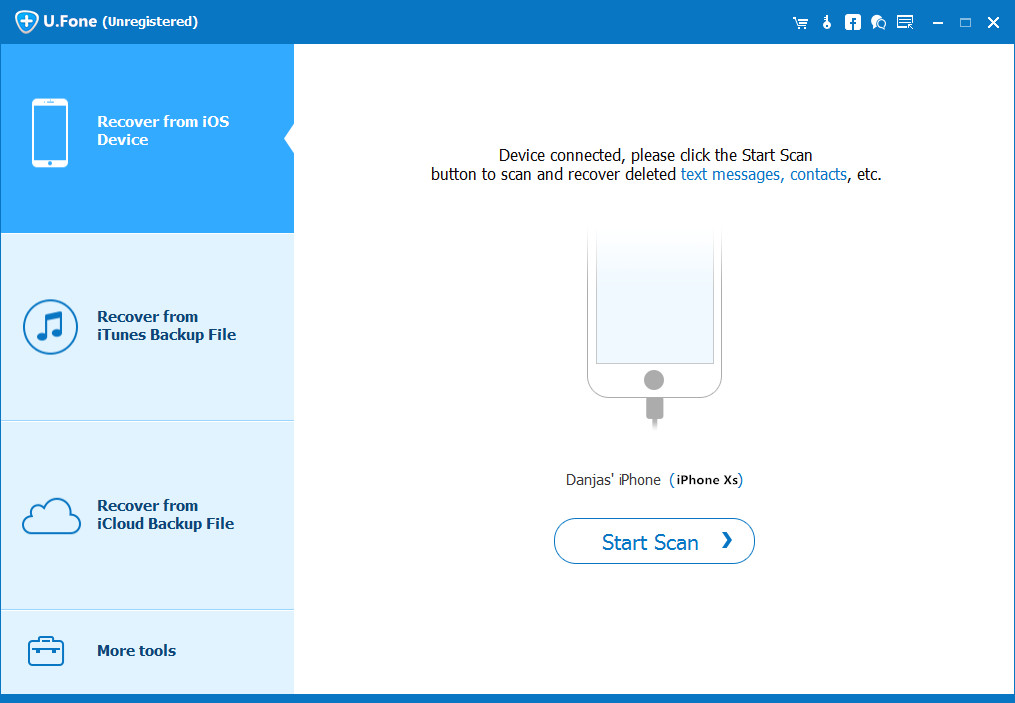
To directly can and recover deleted Instagram messages from iPhone, please click select “Recover from iOS Device” mode, then connect your iPhone to computer with USB cable, and this program will automatically recognize your iPhone. Click “Start Scan” to scan the detailed files your iPhone.

connect iPhone to computer

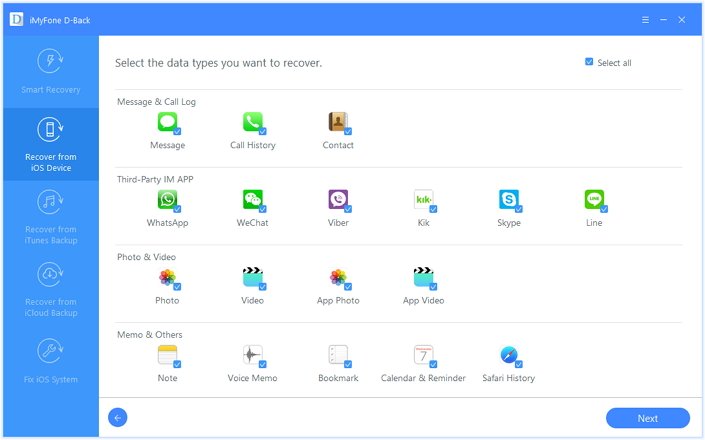
Step 3. Select “App Document”
In this step, please select the type of data you want to recover, in order to recover Instagram messages on iPhone, although you can’t see the “Instagram” item, please select “App Document”, which related items to check all the WhatsApp data including Instagram messages. If you want to recover WhatsApp messages and Text Messages from iPhone directly, please select “Messages”, “Messages Attachments” and “WhatsApp Messages” & “WhatsApp Attachments”. If you want to recover all lost data from iPhone, please click “Select All” and click “Scan” button go to the scanning process.

select contacts to recover

Step 4. Scan your iPhone Deleted Data
Then, the program start to analyzing and scanning all lost, deleted, missing and existing files from your iPhone. It will take some time during the entire scanning process, depending on how much data is on your phone, please be patient.

scan lost files from iPhone

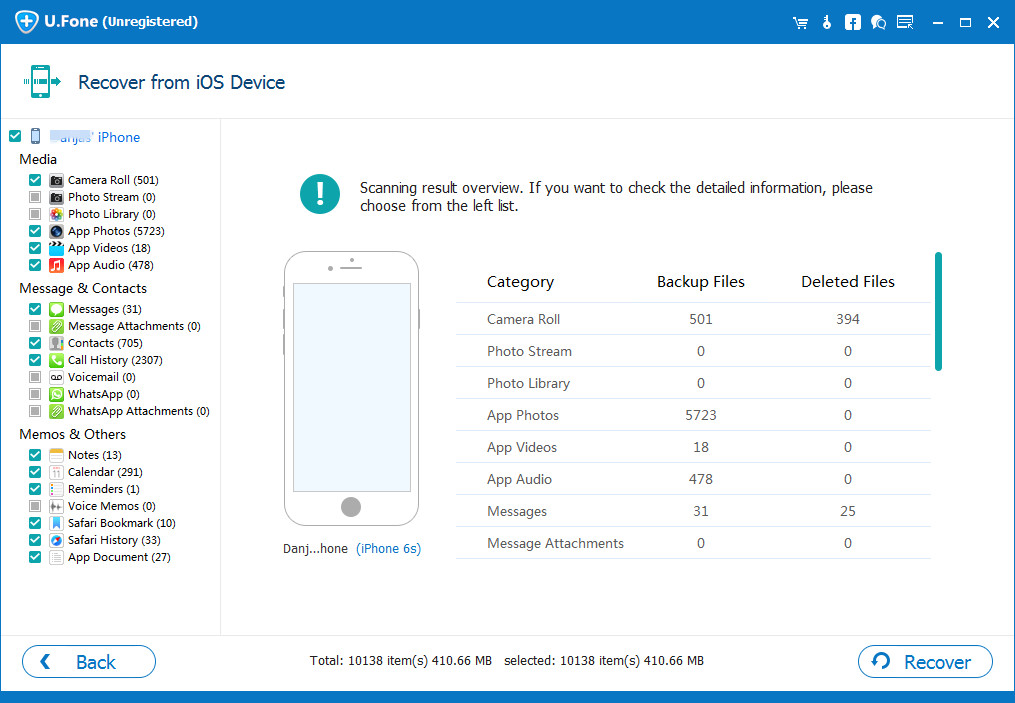
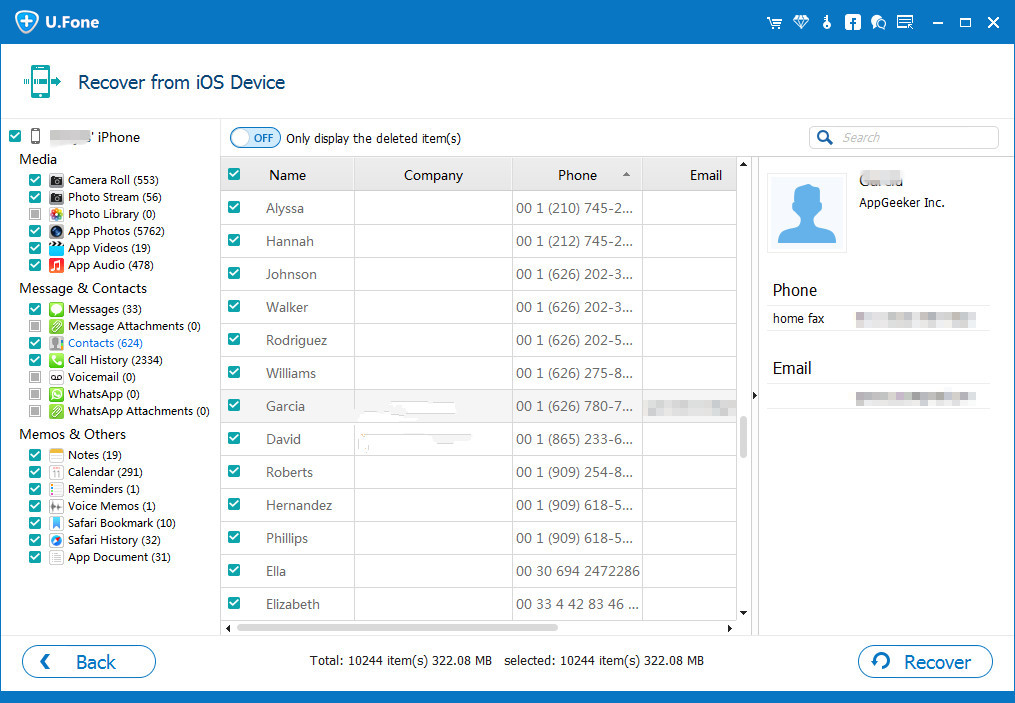
Step 5. Recover Deleted Instagram Messages from iPhone
After scanning the iPhone complete, you can check these messages, the red marked messages are those deleted Instagram Direct messages on iPhone, and the black are the still existing iPhone messages. Please select the messages you want to recover, click “Recover” to retrieve the deleted Instagram messages from iPhone to computer in HTML or CSV file alternatively.

Recover Deleted Instagram Messages from iPhone

d_win d_mac

Tips: This part teach you how to use iPhone Instagram Message Recovery to recover deleted Instagram Messages from iPhone/iPad without backups, if you failed scan and recover data from iOS device directly, the program also provides you other two recovery modes to check and retrieve deleted messages on Instagram: “Recover from iTunes Backup File” and “Recover from iCloud Backup File”. If you have a suitable iCloud backup, then you could use this app to view and recover these messages from iCloud. If you made iTunes backup, then you can easily check and restore App data from iTunes backup.

Method 3: Recover Deleted Instagram Messages on Android

If you are using an Android phone and want to recover deleted Instagram messages from your mobile phone, what you need is an Android Instagram Messages Recovery.

U.Fone Android Data Recovery also is an Android Instagram Messages Recovery, it not only can help you recover deleted Instagram messages from Samsung, HTC, LG, Sony, Google, HUAWEI, Motorola, ZTE, Xiaomi, OnePlus, Sharp, Windows phone, etc. But also allows you recover deleted SMS, pictures, videos and contacts from Android cell phones. As the world’s first Android data recovery software, it’s completely safe and reliable.

More about U.Fone Android Data Recovery Software

1. Directly recover deleted messages from Android phone with full information such as name, phone number, attached images, email, message, data and more. And saving the deleted messages as CSV, HTML for your use.
2. Recover lost photos, videos, audio files, contacts, messages, messages attachments, call history, whatsApp, documents from Android phone and SD cards inside your Android device.

3. Retrieve lost files from Android phone missing due to accidentally deleting, factory resetting, system crash, forgotten password, flashing ROM, rooting, ect.
4. Preview and selectively check to restore lost or deleted data from android smartphone and tablet.

5. Fix android phone system to normal like frozen, crashed, black-screen, virus-attack, screen-locked and extract data from dead/broken android phone internal storage,
6. Also support backup and restore Android data.
7. Existing files will not be overwritten, just scan and recover your Android lost or deleted data after rooting it, you can return to un-root status after success retrieve Android data.
8. Fully compatible with major providers like AT&T, Verizon, Sprint and T-Mobile, and Android 9.0 fully supported.

Download the free trial version of this Android data recovery software on your computer.

d_win d_mac

Steps to Recover Deleted Instagram Messages from Android by U.Fone Android Data Recovery

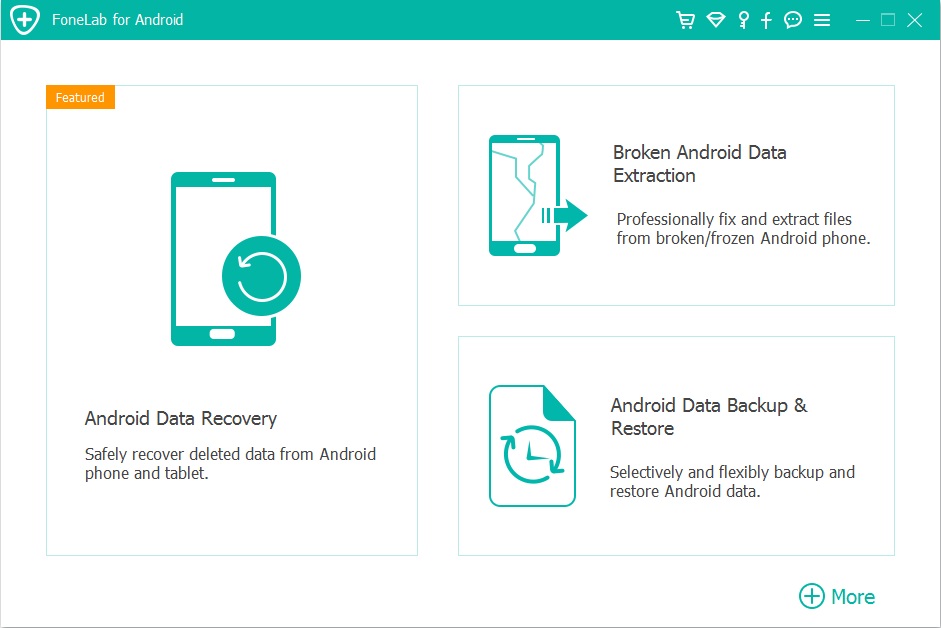
Step 1. Run Android Data Recovery on PC or Mac
First of all, please download and launching the Android Toolkit on your computer, then click “Android Data Recovery” feature go to data recovery process.

Instagram Messages

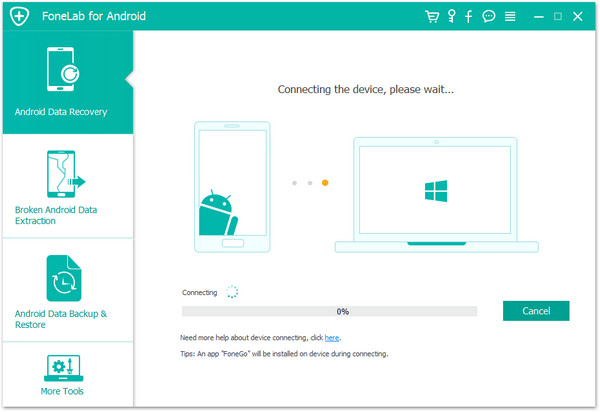
Step 2. Connect your Android Phone to the computer
Then connect your Android phone to PC via USB, the program will detect it.

connect Android to PC

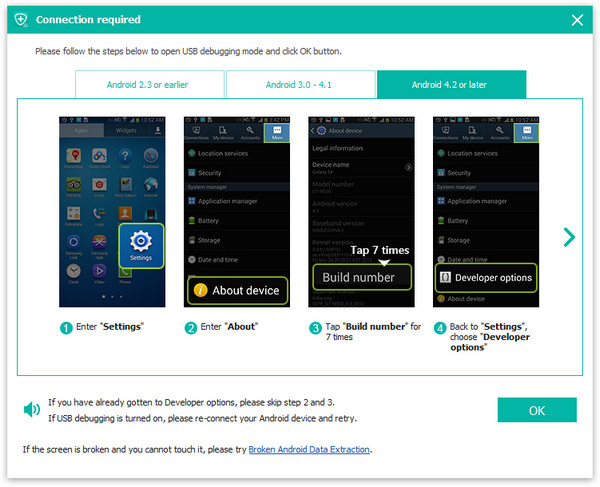
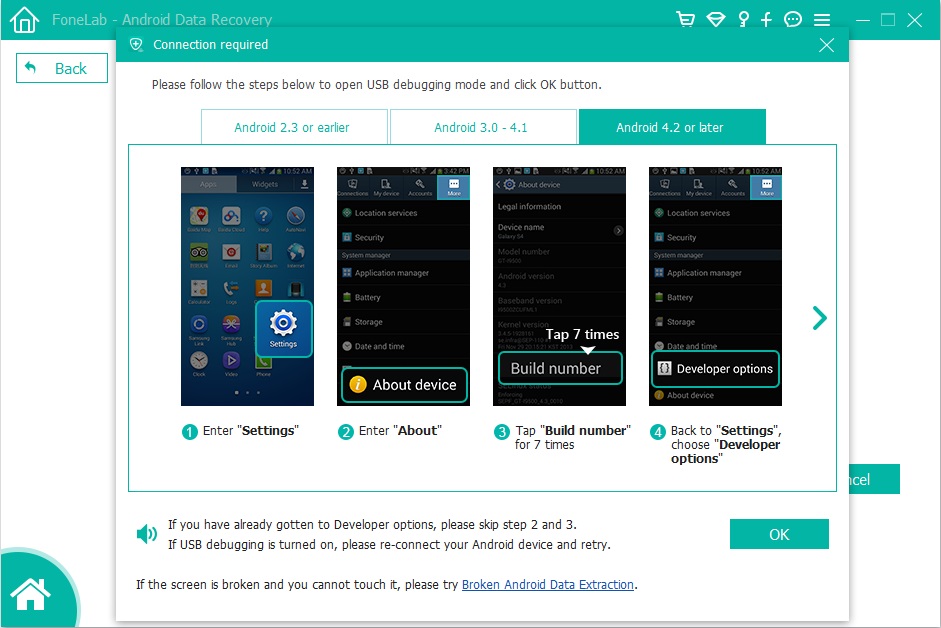
Step 3.Enable USB debugging on Android
If you have not opened the USB debugging option yet, this program will ask you to do it. Follow the way below to do it now.
1) For Android 2.3 or earlier: Enter “Settings” < Click “Applications” < Click “Development” < Check “USB debugging”
2) For Android 3.0 to 4.1: Enter “Settings” < Click “Developer options” < Check “USB debugging”
3) For Android 4.2 or newer: Enter “Settings” < Click “About Phone” < Tap “Build number” for several times until getting a note “You are under developer mode” < Back to “Settings” < Click “Developer options” < Check “USB debugging”
enable usb debugging

enable usb debugging

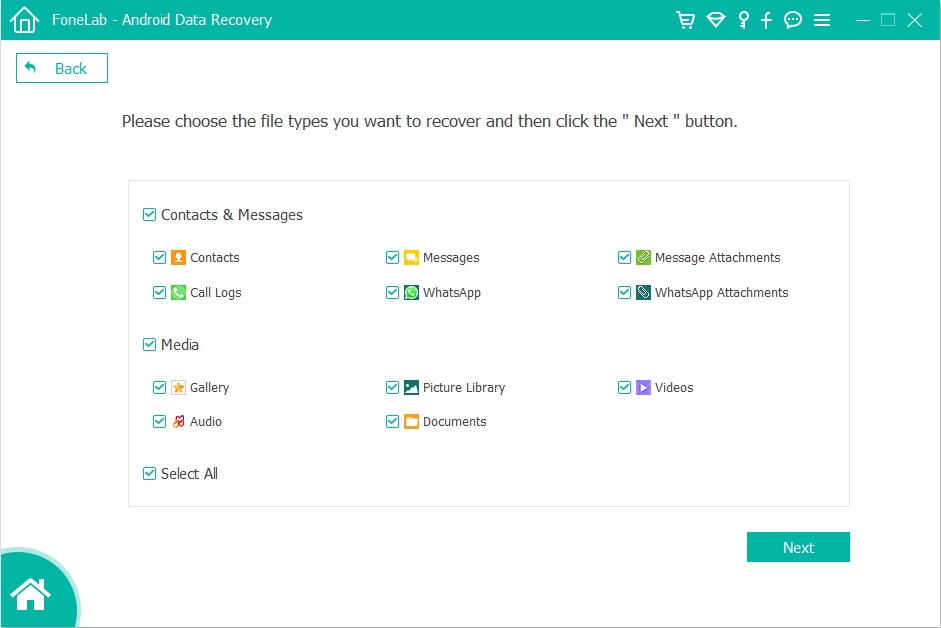
Step 3. Select “Messages” to Recover
If you want to recover Instagram directly messages, please select the file type “Messages” and “Document”, then click “Next” on the window below to begin it.

select messages to recover

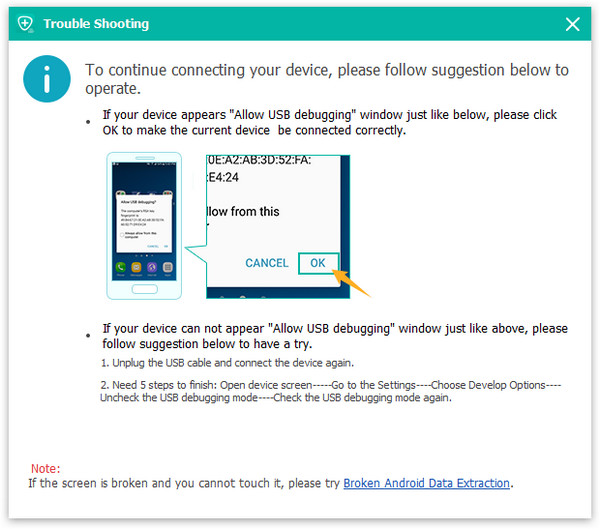
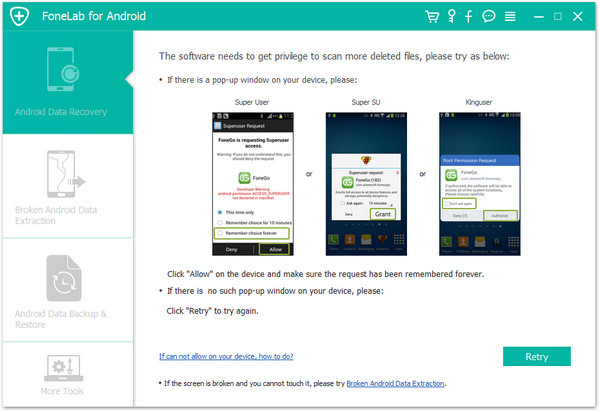
Step 4. Enable the Superuser Request to Allow Scan
Then go to your Android when you get the window below. Here you need to move to your phone and tap on “Allow” to enable the Superuser Request. And then click “Start” on the program’s window to begin scanning your mobile phone.

Superuser Request

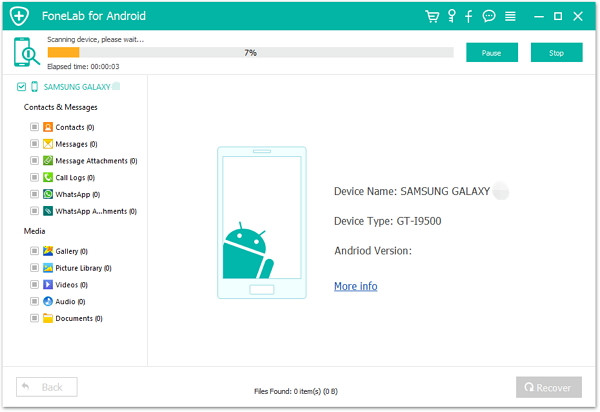
Step 5. Analyze and Scan Instagram Data from your Android
Now the program needs to analyze your device before scanning it, during the scanning process, please wait be patiently.

Scan Instagram Data from your Android

Step 6. Preview and Recover Deleted Messages from Android
When the scan finishes, you can preview the whole message contents and other App data in the scan result as a list. You can preview them one by one and choose those you want to recover and click “Recover” button to save them as a HTML file on your computer.

recover deleted messages from android phone

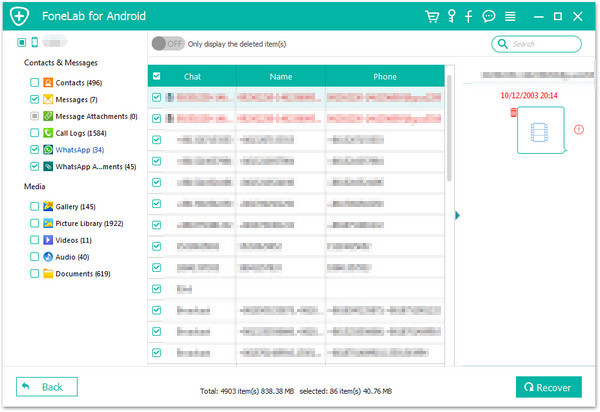
Note: You can see that messages found here contains those you deleted recently (displayed in orange) and those existing on your Samsung (displayed in black). You can separate them by using the button above: Only display deleted items.
Moreover, you can preview and retrieve the deleted contacts, photos and videos (no preview), as well as you do with the messages. Contacts can be saved as CSV, VCF and HTML files on your computer.

Now, download this powerful program to have a try!

d_win d_mac

Important Note: Currently, both U.Fone iPhone Data Recovery & Android Data Recovery still have problems to restore deleted Instagram direct messages. Our technicians are working hard to fix this issue. Next version, both two mobile phone data recovery program will support recover Instagram directly messages. Currently, our products supports recover deleted and lost text messages, WhatsApp messages, contacts, call history, photos, videos, etc. So you can still keep our programs as they are professional to your iPhone and Android phone’s other lost data easily.

Method 4: Download Direct Messages and More Data from Instagram Online

If you deleted Instagram direct messages, photos, comments and other data, don’t worry, you can download the deleted data from Instagram web version online.

Step 1. Open Instagram web version on browser and login your Instagram account.

Step 2. Click on the Profile icon in the top right corner to enter your personal Instagram page.

instagram messages recovery - sign in

Step 3. Click “Edit Profile” button on your personal page

instagram messages recovery - edit

An new windows will pop up, then select Privacy & Security.

instagram messages recovery - Privacy & Security

Step 4. Scroll down to Data Download and click Request Download.

instagram messages recovery - Data Download

Step 5. Click Log In Again, then enter your email to login to your Instagram again.

login again

If this the first time you log in Instagram to download the data from Instagram web, you will get the below tips:

Get a Copy of What You’ve Shared on Instagram: We’ll email you a link to a files without your photos, comments, profile information and more. We can only work on one request form your account at a time, and it may take up to 48 hours to collect this data and send it to you.

Instagram Direct Message Recovery

Please enter your Instagram password to request download

Instagram Direct Message Recovery - download messages

After submitting the download request, you will see this message.
Download Requested: We’ve started creating a file of things you’ve shared on Instagram and will email a link to your email. It may take up to 48 hours to collect this data and send it to you.

recover Instagram Direct Message online

Step 6. After a few minutes, you will receive an email from Instagram officially with the subject “Your Instagram Data”, and the email contacts said “Here is the file you requested with the photos, comments, profile information and other data you’ve shared on Instagram as XXX.
This link will only work for the next four days. Because it may contain personal information, be sure to keep the link private and only download the archive to your own computer.”

Instagram Direct Message Recovery online

Click Download Data to open the link, and click Download Data again start to download the file from your email.

Instagram Direct Message download

A ZIP file with all the data you shared on Instagram will be downloaded. The data may include direct messages, photos, videos, profile, comments, media, settings and more.

Step 7. After download completed, you will get a compressed file, please extract the downloaded file.

compressed instagram file - messages

Step 8. After extracting the compressed file, you can see this folder including messages, contacts, profile, photos and more information. Now, you can use text editor or other compatible application to view the ‘messages.jason’ file.

Recover Instagram Direct Message Online

Tips: You can also directly open the profile and photo folder to view all pictures.

Step 8. Press Ctrl+F on your keyboard, then you can locate the message you want to recover with the keywords.

To Sum Up

Above is the detail guide to download and recover deleted Instagram Direct Messages from Instagram web manually, you can also download Instagram photos and videos to computer via this method. Instagram official provides this very helpful data download service, so you can recover the Instagram messages easily without software. However, the data requested for download can only be downloaded within four days, otherwise the data unavailable for downloading.

If you want to recover deleted messages, contacts, photos, videos, WhatsApp messages and App data from iPhone/iPad/iPod Touch or Android phones, you should use a third-party tool like U.Fone iPhone Data Recovery and Android Data Recovery, both can help you directly scan and recover lost/deleted data from mobile phone.
What’s more, the iPhone Data Recovery also supports recover deleted WhatsApp messages, Viber messages, Line messages, Messenger, Kik messages and WeChat messages from iPhone XS/XR/X/SE/8/7/6S/6, etc.
Related Guide: How to Recover Deleted Social App Data from iPhone

Android Messages Recovery

How to Recover Deleted Instagram Messages on iPhone/Android

[Summary]: Deleted Instagram messages by mistake? This article provides easy and effective ways to help you recover deleted Instagram DM online or on iPhone or Android.

Instagram is a popular platform that instantly enhances photos and videos with cool effects and then shares them with friends and other Instagram members. Instagram’s messaging service is called Instagram Direct. Normally, when anyone encounters the following problem, Instagram Direct Messaging (DM) will disappear:

1. When deleting unused files (for example, images, text messages, videos, audio, contacts, WhatsApp messages, etc.), you may accidentally delete key Instagram messages in the same way.
2. When resetting your Android or iPhone device to factory settings, your Instagram message may be deleted by mistake.
3. Many existing infected system files may affect file corruption and you may lose Instagram messages.
4. There may be a virus attack on the Android or iPhone device, which may result in the loss of data on the phone, including Instagram direct messages.
5. Android device root failure or iPhone device jailbreak failure has the risk of losing Instagram direct messages.

Other than that, maybe you deliberately delete these messages for some reason, and you realize that you need them later. For whatever reason, here we will discuss a variety of ways to recover deleted Instagram Direct messages on Android/iPhone. Read on to learn the process of each option.

Before we get started, you can take a look at two different scenarios to recover deleted Instagram messages.

Delete: If the user has deleted the chat, the message is still saved on someone else’s Instagram. Therefore, the user can ask the other person to send screenshots of the messages.

Unsend: Once the user unsend the message, he/she cannot recover the message. The message will be removed from the Instagram user’s chat.

3 Workable Ways to Restore Deleted Instagram Direct Messages

Part 1. Recover Deleted Instagram Messages Online

To recover Instagram Direct messages, the first option you can try is the Instagram Message Recovery website.

Step 1. Visit the Instagram Message Recovery online platform and login your Instagram account.

Step 2. Tap on the option “Recover Messages” to get started with the recovery process.

Step 3. Finish the human verification and then you will be able to recover deleted messages from Instagram account.

recover-deleted-instagram-messages-online

However, you find it difficult to finish the human verification process.

Part 2. Recover Deleted Instagram Messages on iPhone

iPhone Data Recovery is the designed for iPhone users to recover deleted data on iPhone. You can use it to scan your iPhone and find the deleted messages or photos from Instagram. You can also use it to retrieve deleted text messages, videos, contacts, call history, notes, calendars, reminders, voice memos, Whatsapp messages, books, voicemails and other deleted data on iPhone XS Max/XS/X/8/7/6S/6/5S/5, etc.

What Can This Software Do For You?

Recovers missing photos, videos, WhatsApp, WeChat, Line, Viber, Kik messages, contacts, SMS, call logs, etc.
Supports data recovery with smart recovery mode or from iOS device, iTunes backup, iCloud backup.
Recover data lost from common scenarios such as jailbreak, water damage, stolen iPhone, black screen of death, iPhone stuck at Apple logo, factory reset, etc.
Supports iPhone XS, XS Max, X, 8 Plus, 8, 7 Plus, 7, 6S Plus, 6S, 6 Plus, 6, 5S, 5c, 5, 4S, 4, iPad Air/Pro, and iPod.

Free download the iPhone Data Recovery with Windows/Mac and try Instagram Messages Recovery on iPhone:

d_win d_mac

Step 1. Open iPhone Data Recovery on PC

Install and open the program of iPhone Data Recovery on your computer. It has 4 different recovery modes. Select “Recover from iOS Device” mode in this case. Click “Start” to go to the next page.

iphone data recovery main page

Next you need to connect your iPhone to PC with a USB cable. As soon as the program successfully detects your iDevice, click “Next” to go on.

connect iPhone to PC

Step 2. Select File Types

If you need to restore Instagram messages on iPhone directly, you can select the “Messages” icon under the “Third-Party IM APP” menu and click “Scan” button.

select file to recover

Step 3. Preview and Recover Deleted Instagram Messages on iPhone

The software will list all the data on the interface after scanning. You can preview whether the lost Instagram messages are found. If yes, select the messages you need and click “Recover” to get deleted Instagram messages back from iPhone.

recover Instagram messages on iphone

d_win d_mac

Part 3. Recover Deleted Instagram Messages on Android

If you are looking for steps to recover deleted Instagram messages on Android, Android Data Recovery is the tool I would like to recommend to you for recovering deleted messages from Instagram. It can scan your Android phone and SD card in depth to find lost or deleted Instagram messages on your Android device. Besides, you are allow to recover deleted contacts, messages, photos, videos, books, call logs, music, Whatsapp messages/photos and other document files on your Android phone. Regardless of the device you are using, such as Samsung Galaxy S9/Note 9, HTC U12+, Huawei Mate 20 Pro, Google Pixel 3 XL, LG G7, OnePlus 6T, Sony, Moto, Xiaomi, Oppo and more, the following steps are all useful to you.

First of all, get this Android Data Recovery installed on your computer.

d_win d_mac

Step 1. Run Android Data Recovery on PC

Install and run this powerful Android Data Recovery on your computer and select the “Android Data Recovery” option.

Choose Android data recovery mode

Step 2. Connect Android Phone to PC

Next, connect your Android phone to it via USB cable. The program will automatically detect the device.

allow to connect android

Note: In order to successfully detect your device, you should enable USB debugging on your Android phone. If you don’t know how to do it, don’t worry, this app has tutorials.

Step 3. Select Data Types to Scan

Now, choose the file types you want to recover. In this case, tick the “Messages” and “Messages Attachments” and click “Next” to begin scanning data on your Android.

select files to recover

Step 4. Scan Your Android Phone

Please tap Allow/Grant/Authorize when it asks you to. If the messages don’t pop up, click Retry on the interface to try again.

allow scanning android

As you can see, the program starts scanning your device to find out your data.

scan data from android

Step 5. Preview and Recover Deleted Instagram Messages on Android

After the scan, you can preview and check the Instagram messages & photos you want to restore, then hit the “Recover” button to save them to your computer.

recover deleted Instagram messages on android

d_win d_mac

Related Articles

Android Contacts Recovery – Retrieve Deleted Phone Number from Samsung/Android

How to Recover/Extract Text Messages from Disabled/Locked iPhone

How to Transfer WhatsApp from iPhone to Huawei Mate 20

Android SMS Recovery – How to Recover Deleted Text Messages from Android

Smart Switch: Transfer Data to Samsung Galaxy 10/S9/S8/Note

[Summary]: Want to know how to use Smart Switch to transfer data from an Android, iOS iPhone/iPad, BlackBerry or Windows mobile phone to new Samsung Galaxy phone? This article teach you the detail guide on how to transfer contacts, photos, music, videos, messages, notes, calendars and more from your old phone to Galaxy Fold, Galaxy S10/S10+/S10e/S10 5G/ Galaxy S9/S9+, Galaxy S8/S8+ and Galaxy Note 10/Note 9/Note 8 with Free Samsung Smart Switch.

You may want to know:

* How to recover deleted photos from Samsung S9/S9+

* How to transfer music from iTunes to Android

Each brand of mobile phone has its own data transfer tool for new mobile phone users to switch data to the new phone, such as Samsung Smart Switch, Huawei Phone Clone, Google Pixel’s Quick Switch Adapter, LG Mobile Switch, Apple iTunes & iCloud(Data Backup & Resotre), Sony Xperia Transfer Mobile App, Motorola Migrate, HTC Transfer, ect. When you have bought an new Samsung Galaxy Fold, Galaxy S10/S9/S8(Plus)or Galaxy Note 9/Note 10, you many want to migrate all data from old phone to Samsung Galaxy phone, this article will teach you how to use Free Smart Switch app to transfer data including contacts, messages, photos, videos, music, calendar events, apps and even the device settings from Android phone to your new Galaxy Note 10/Note 10+/Note 10 5G/Note 10+ 5G.

Smart Switch: Transfer Data to Samsung Galaxy

Smart Switch is developed by Samsung company to transfer data from your old phone to your new Samsung Galaxy phone, there are three connecting method to transfer data to new Galaxy phone by Smart Switch:
– Transfer data directly from your old phone wirelessly.
– Transfer data directly from your old phone via USB cable.
– Transfer data from a PC or Mac to your new Galaxy phone.

samsung smart switch

So, user can choose the method you feel most comfortable with, then using Smart Switch to move the data from an existing mobile phone to another Samsung Galaxy phone, Samsung Smart Switch is a freely available app that you can download on your old Android/iOS devices and Samsung Galaxy phone, please free download the Smart Switch on your both mobile phones, then follow the detail guide to transfer data like photos, message, contacts, etc. from Android to Galaxy S9 via wirelessly connection. Let’s take transfer Everything from Galaxy S7 to Galaxy S9 by using Samsung Smart Switch as example.

Steps to Transfer Data from Galaxy S7 to Galaxy S9 using Smart Switch

This guide show you how to use Smart Switch to move data from Samsung to Samsung, you can also follow the same steps to transfer data to Samsung phone from Apple iPhone/iPad/iPod, HTC, LG, Sony, Google Pixel, HUAWEI, Motorola, ZTE, Xiaomi, ZTE and more smartphones and tablets.

Step 1. Download and Launch Smart Switch app
First of all, please download the Smart Switch app on both the devices and launch it. Grant it all the needed permissions and choose the mode of transfer.

Step 2. Set Galaxy S9 as Target Device
TO move data to your new Galaxy S9, please mark the Samsung Galaxy S9 as a receiver(target device).

smart switch app Transfer Data to Your New Galaxy Phone

Step 3. Connect Both Phones and Set Galaxy S7 as Source Device
Mark your Galaxy S7 as a sender and connect the Galaxy S7 and Galaxy S9 by simply tapping on the “Connect” button via wirelessly.

smart switch app Transfer Data to Your New Samsung Phone

To make sure both Galaxy S7 and S9 connected via the same wirelessly, a one-time generated pin needs to be matched. After when a secure connection is established, you can select the contents you want to move, including Contacts, Messaegs, Calendar, Memo, Call Log, ect.

Step 4. Start to Transfer Data from Galaxy S7 to Galaxy S9
After click “Send” on your old Galaxy S7, your S9 will appear a “Receive” button, please tapping on the “Receive” button to receive data from the old Galaxy S7.

smart switch app Transfer Data to Galaxy S9

Please waiting during the data transferring process from old Galaxy S7 to new Galaxy S9. Once it is done, the interface will let you know all selected file types moved to the new S9. After moving the select contents to from old Android phone to new Galaxy phone, you can close the Smart Switch app and use your Galaxy S9 with all the newly transferred data.

Smart Switch Disadvantage:

Samsung Smart Switch can only transfer data from other devices to a Samsung device. Exclusively made for Samsung devices.Cross-platform transfer is not supported, for example, Samsung Smart Switch can not transfer contents between an Android and iOS, Android and Android, iOS and Android, and so on. Using the Smart Switch to transfer data to Samsung phone, the process is a bit complicated and slowly, it can’t transfer app data(for example WhatsApp messages from iPhone to Samsung), but can transfer major data files like photos, videos, contacts, etc. In additional, Smart Switch’s limited compatibility, it as different Smart Switch versions for different phone OS versions, so it doesn’t support different of devices running on different platforms. In order to transfer data between iPhone, Android, Windows Phone and Symbian Nokia phone without any loss, we will recommend you an more powerful Phone to Phone Transfer tool.

Phone Switch: Copy One Phone to Another, Easy and Fast

Phone Transfer and Phone Switch can help you transfer your photos, videos, music, contacts, calendar, text messages, call logs and all the other important files between devices directly, such as Android to Android, Android to iOS, iOS to Android, iOS to iOS, and restore backup from Blackberry 7/10, iTunes, iCloud, OneDrive, Kies to your Android and iPhone/iPad/iPod devices. What’s more, for the rooted Android devices and jailbroken iOS devices, transfer of App data is also supported. Both Phone Transfer and Phone Switch program works perfectly for more than 6000 smartphones and tablets, including Apple, Samsung, HUAWEI, OPPO, Sony, HTC, Google Pixel, Nexus, LG, Motorola, ZTE, Panasonic, OnePlus, Xiaomi, Nokia, Oppo, Vivo, Lenovo and more. No matter your device is provided by AT&T, Verizon, Sprint or T-Mobile. It compatible with Android 8.0 and the latest iOS 12.
Related guide: Phone Transfer – transfer files from old Samsung to Galaxy S9

Free download Phone Toolkit- Phone Switch for Windows and Mac and try to move data between two devices directly.

d_win d_mac

Below follow the complete tutorial to transfer data from and iPhone to Samsung Galaxy S9 by using Phone Switch software, you can also follow the same steps to transfer data from Android to Android Safe, Easy and Fast.

Steps to Transfer Data from iPhone to Galaxy S9 using Phone Switch

Step 1. Connect iPhone and Galaxy S9 To Computer
Download and launch Android Switch on your computer and click on “Switch” among the available option.

iPhone to Samsung transfer

Now connect both of your devices to your computer with the help of USB cable. Here we have taken iPhone and Android Samsung phone as an example.

The data will get transferred from the Source Device to Destination Device.

Note: If source and destination device are in wrong place then you can use the “Flip” button to exchange their position.

Step 2. Select The File To Transfer
Choose the files types that you want to transfer, including contacts, text messages, photos, videos, music and many other contents.

select iphone data to transfer

Step 3. Start to Transfer iPhone Data to Samsung Galaxy S9
After selecting the file types, just click on “Start Transfer” to start transferring contents from your old iPhone to new Samsung Galaxy S9 smart phone directly.

transfer data to from iPhone to Samsung S9

Note: Do not disconnect the devices until and unless the transfer process gets complete.

You may also check mark the box “Clear data before copy”, if you want to delete data on the destination phone before transferring the files to the target phone.

sync iphone data to huawei mate 20

In just few minutes, all the selected files will get transferred to Samsung Galaxy S9 successfully.

d_win d_mac

Wrap Up: So that was the two methods to transfer data to Samsung Galaxy smartphone. It totally depends upon you which method you want to go for. Samsung

Smart Switch is free but the process is a bit complicated, it can only transfer photos, videos, contacts from other devices to a Samsung device. If you looking for a safely, easily and quickly method to transfer data between different phones, we recommend you use Phone Transfer or Phone Switch, both provides a 1-click simple solution to transfer/copy/switch/migrate data from one phone to another directly. No technical knowledge is needed to copy your phone’s data.

Best Smart Switch Alternatives

How to Transfer Data from Samsung to Huawei Mate 20/Mate 20 Pro

[Summary]: From the article,we can learn a useful way to transfer data from a Samsung phone to Huawei Mate 20/Mate 20 Pro.Just for a click, all the data such as contacts, photos, SMS, calendar, video, call history, music, apps and more can be transfer to your new Huawei Mate 20/Mate 20 Pro.

My old Samsung Galaxy S6 works so slowly,maybe it has not enough memory capacity, so I bought a new Huawei Mate 20.But who can help me transfer the contacts from Samsung phone to Huawei Mate 20?” – Asked by Sherry.

Maybe some friends has the same problem,when they buy a new phone,all the data should be transfer to a new one,as the same example like Sherry. Actually, with the help of a powerful software – Samsung to Huawei Mate 20(Pro) Transfer, all the data can be transfer in a click.

Phone Switch – Samsung to Huawei Mate 20(Pro/X/RS) Transfer

Phone Switch is a powerful phone to phone transfer software for us to transfer photos, contacts, text messages, call logs, applications, application data, music, video and more from Samsung Galaxy S5/S6/S7/S8/S9/Note 5/Note 4/Note 3/Galaxy J/ Galaxy Ace to Huawei Mate 20/Mate 20 Pro.In addition,the program can move data from iPhone to Huawei Mate 20,also can transfer contacts,text message,music and many other file types to another android phone,such as HTC, LG, SONY,  OPPO, vivo, Google, OnePlus, Xiaomi, Nokia, BlackBerry, and so on.Phone Switch not only helps us to transfer the data between different phone, but also helps to restore your lost data easily.Let’s take the example of transfer contacts from Samsung Galaxy S8 to Huawei Mate 20.

d_win d_mac

Transfer contacts from Samsung Galaxy S8 to Huawei Mate 20(Pro) in a click

Step 1. Download and launch the program
The first thing you need to do is download the software on your Windows PC or Mac. Then  installing it,launch the Phone Switch toolkit and click on the “Switch” option to go on.Through this function,it can help you copy the contact from Samsung S8 to Huawei Mate10(Pro).

samsung to huawei mate 20 transfer

Step 2.Connect Samsung and Huawei Phone to PC or Mac
Then,you should use the authentic USB cable connect both your Huawei Mate 10(Pro) and Samsung S8 to the system at the same time,the program will detected both the devices,please wait for a while.

Step 3.Detected your devices
Once the devices are detected, the interface will provide their basic snapshot. Ideally, your S8 should be listed as source and  Huawei device as a destination device. If not, then click on the “Flip” button to interchange their positions.

Step 4.Select the Contact to Transfer
Then, you can select the contacts which you need to copy from S8. In addition ,you can also select  photos, videos,messages, music, etc.

connect huawei and samsung to pc

Step 5.Start to Transfer Contacts from Samsung to Huawei Mate 20(Pro)
After selecting the contact from S8, click on the button “Start Transfer” to go on.

It will take you a minute to transfer the contacts from your old Samsung S8 device to Huawei Mate 10. During the process, don’t push out the USB cable.You can view its progress from an on-screen indicator.

huawei to huawei mate 20 transfer

Note: In this way you need to wait patiently during the transfer program and let your phones be connected to the computer before it was transfer completely.

Step 6. Safely remove the data
In the end, you will be notified by the application that you have successed to transfer all the contacts. As the same method,all the photos, messages, APP, musics ect can be transfer to Huawei Mate 20 too.

d_win d_mac

Related Articles

Transfer WhatsApp Data from Android to Huawei Mate 20(Pro/X/RS)

Transfer Photos from iPhone to Huawei Mate 20/Mate 20 Pro/X

How to Transfer Data from Samsung to Huawei P20/Mate 20(Pro)

Transfer Contacts & SMS from Samsung to Huawei Mate 20(Pro)

How to Transfer Photos, Videos, Music from iPhone to Huawei Mate 20

Transfer Samsung Data Huawei Mate 20

How to Recover Deleted WhatsApp Messages on Huawei Mate 20(Pro)

[Summary]: Regret for deleting important WhatsApp Message on your Huawei Mate 20 or Mate 20 Pro? Here you can find out the solution to retrieve WhatsApp messages, photos, videos and other attachment files with simple steps.

“Recently, my lover sent me a message from WhatsApp reminding me the date of Wedding anniversary. But unfortunately, I cleaned up the WhatsApp chat history by a Phone Data Manager program. However, I can’t remember the date of Wedding anniversary which means my sincerity towards my lover and I need to find a way to recover deleted WhatsApp chat history on Huawei Mate 20 for viewing the date again.Could you guys has a advice for me?”

Most often, Whatsapp chat history disappears:

Accidental deletion: instead of “Add conversation”, you click the “Delete chat” button;
After refreshing the phone: all data stored in the memory will not be recovered;
Uninstall the software: Under normal circumstances, you need to reinstall the whasApp software after switching to the new phone, as the result all messages are lost;
Cleared by some mobile data cleaning software, such as Android Eraser.

Maybe you like to work with WhatsApp because this app is popular in your social circles. Therefore, you you probably have some pretty important messages and media there, and it will be a shame if it suddenly disappears. This is an old topic about people who was mistakenly deleted WhatsApp message/chat history from Huawei Mate 20 or Huawei Mate 20 Pro. When you delete WhatsApp messages/chat history by mistake, don’t worry, we will show you how to use different methods to get deleted WhatsApp messages back, as well as other contents like text messages, videos, photos, contacts, etc. Among them, we recommend the more powerful U.Fone Android Data Recovery software, which is easy to use and fully functional.

Different ways of restoring WhatsApp Data on Huawei Mate 20(Pro):

Method 1. Restore WhatsApp Chats from Google Drive Backup

Making the method work requires you to make sure you have backed up your WhatsApp chat to Google Drive.If not, skip this method and go to method 4 is also a good idea. If you have successfully switched to a new smartphone and have re-downloaded and installed WhatsApp on your device, then you can:

step 1. Start WhatsApp and click on “AGREE AND CONTINUE“.
Step 2. Click Continue to allow WhatsApp to access your contacts to search for WhatsApp users.
Step 3. Next you will see a message prompting you to verify the information if you need to restore from your Google Drive backup.
Step 4. Verify your country and phone number when prompted. Or enter the six-digit verification code if it’s not done for you automatically.
Step 5. Click Continue to allow WhatsApp to access your Google Drive backup.
Step 6. Click GIVE PERMISSION to allow WhatsApp to check for Google Drive backups.
Step 7. Tap the account that contains the backup. Then just click Restore and set up your profile as you did for the first time.

Now that you have retrieved your previous WhatsApp chat history, all you have to do is log in.

restore-whatsapp-from-google-drive

Method 2. Recover WhatsApp Chat History from Recent Backups (Recent 7 days)

WhatsApp provides a service to automatically back up at 4 am (your local time) and stores it in the phone’s memory (only enough free space) or on an external microSD card for Android phones. All you need to do is reinstall WhatsApp, launch it and click “Restore” to restore deleted whatsApp messages on Huawei Mate 20(Pro) within 7 days.

Method 3. Recover WhatsApp Messages from older (7 days before) Backups

Follow this method to restore the longer WhatsApp chat history on Huawei Mate 20 from a backup.

Step 1. On your Huawei Mate 20 (Pro) phone, go to the File Manager and look for sdcard / WhatsApp / Database. If your data is not available on the SD card, you may see “internal storage” or “main storage” instead of an SD card.

Step 2. You may see a list of backup files. Select the backup you want to restore.

Step 3. Rename the backup file from “msgstore-YYYY-MM-DD.1.db.crypt12” to “msgstore.db.crypt12“.

Step 4. Uninstall and reinstall WhatsApp.

Step 5. During the installation process, click RESTORE when prompted. Then the backup you selected will be restored to the Huawei phone.

Method 4. Recover WhatsApp Chats without Backup Using U.Fone Android Data Recovery

All three methods mentioned above require at least one backup support. And once you restore the previous backup to Huawei phone, all new data generated after the backup will be overwritten. Why not try this simple U.Fone Android Data Recovery program to recover deleted/lost WhatsApp messages from Huawei Mate 20 (Pro)? There are no restrictions and data loss. Whether you have a backup or not, you can easily recover deleted WhatsApp messages, photos, videos and other attachment files from Huawei Android phones without deleting any other contents on your device. Below we gradually explain what this U.Fone Android Data Recovery program can do for you:

– Retrieve WhatsApp pictures, videos, audio, GIF images, attachments, documents and much more from Huawei phone.
– Recover deleted WhatsApp messages from Huawei Mate 20 without backup.
– Recover all types of data from Android devices, WhatsApp messages, contacts, SMS, photos, videos, call history, apps and app data and more.
– Restore data deleted or lost due to accidental deletion, factory reset, water damaged, broken screen, locked screen and so on.
– Preview recoverable files and selectively recover deleted WhatsApp chats.
– Supports a lot of Android devices offered by Samsung, LG, HTC, Sony, Huawei, and ZTE smartphones as well as tablets.

d_win d_mac

Step 1.Install U.Fone Android Data Recovery

First of all, free download and install this U.Fone Android Data Recovery program on your computer, launch it and choose “Android Data Recovery” modules from a pop-up window.

run android data recovery

Step 2.Connect Huawei Mate 20 Or Huawei Mate 20 Pro To Computer

Follow the instructions on the page to connect your Huawei Mate 20 or Mate 20 Pro device to your computer.

connect huawei mate 20 to the computer

Step 3. Enable USB Debugging On The Phone

Once detected, the program will present you with simple instructions to turn on USB Debugging Mode on your phone.

turn on usb debugging

Step 4. Select WhatsApp To Scan

You will be asked to select specific file types to scan. Tick “WhatsApp” only so that the program scans only WhatsApp data for time-saving. Or you can select all if you want to restore deleted files on Huawei mobile phone.Then click on “Next“.

select whatsapp data to scan

Step 5. Scan Huawei Phone to Access Your Data

Go to your Huawei phone and you might receive the pop-up that asks for privilege. Tap on “Allow“.

allow to scan

The program is going to scan WhatsApp messages on your Huawei Android device and it will take you some time to scan the data.

scan huawei mate 20 for deleted whatsapp messages

Step 6.Restore WhatsApp Chat History from Huawei Mate 20

When scan is completed, you can preview all recoverable data found in the scan result one by one. Then find out the “WhatsApp” folder in the left panel and tap on it to preview the detailed contents of this folder in the program. Mark the data you want to restore and click on “Recover” button to save them on your computer.

recover whatsapp messages from huawei mate 20

d_win d_mac

Related Articles

How to Recover Deleted WhatsApp Messages from Huawei Mate 9/10

How to Recover Deleted Files from Huawei Mate 20(Pro)

WhatsApp Messages Recovery for Android

Recover Deleted WhatsApp Messages from Samsung Galaxy S9

How to Restore Deleted WhatsApp Data from LG Phone

Recover Deleted WhatsApp on Huawei

How to Recover Deleted Call History from Huawei Mate 20(Pro)

[Summary]: Simple and powerful U.Fone Data Recovery can recover lost/deleted files on Android phones, in this page we will show you how to restore lost/deleted call history from Huawei Mate 20(Pro) without difficulty.

“My Huawei Mate 20 Pro touch screen was in poor contact, which caused me to accidentally clean up my call history. I am working on trade sales, and calling history is too important for me. I have to do my best to recover deleted call records from Huawei Mate 20 Pro, can anyone tell me somehow?”

The benefits of call history:

Viewable call memory to quickly return calls and respond to messages
Quickly store contacts
Track costs, transactions, billing and other business metrics

How terrible if you delete/lost the call record from Huawei Mate 20 (Professional Edition) with any wrong operation, it would definitely affect the user’s convenience. For example, you won’t be able to track your account billing, quickly call someone, and more. Maybe a phone call from a new customer, and then you clean up wrongly, then you should be upset about the accident that may have lost business opportunities. Don’t be nervous now, follow the guidelines below to get deleted call logs back from Huawei Mate 20 or Huawei Mate 20 Pro by using powerful and reliable U.Fone Android Data Recovery software.

Retrieving Call History from Huawei Mate 20 Internal Memory

U.Fone Android Data Recovery has been designed innovatively for Android mobile users. With it, you can directly get access to your phone’s internal memory & SD card and conduct a deeply scanning on it. Finally, you’ll get both deleted yet existing data on your Huawei Mate 20(Pro/X/RS), so you can preview them and only recover deleted call history from Mate 2. Besides, this program also works well on other crucial data like contacts, text messages, photos, videos, whatsApp messages, documents, etc. The software supports all major brands of Android phones and tablets, such as Samsung, LG, Sony, HTC, Huawei, OnePlus, Google. Now, download the free trial on Windows 10/8.1/8/7 then follow below steps for recovering call history or call logs from Huawei Android phone.

d_win d_mac

Step Guide to Recover Deleted Call History from Huawei Mate 20

Step 1. Download The Program For Recovery

Download and install the U.Fone Android Data Recovery with your computer, open it and choose “Android Data Recovery” modules to start.

run android data recovery

Step 2.Connect Your Android Device

Connect your Huawei Android device to computer via a USB cable. Thus, your device can be recognized automatically.

connect huawei mate 20 to the computer

Step 3. Enable USB Debugging

Once detected, the program will present you with simple instructions to turn on USB Debugging Mode on your phone. There are three options. Please choose the one for your Huawei phone’s Android OS.

1) For Android 2.3 or earlier: Enter “Settings” < Click “Applications” < Click “Development” < Check “USB debugging”
2) For Android 3.0 to 4.1: Enter “Settings” < Click “Developer options” < Check “USB debugging”
3) For Android 4.2 or newer: Enter “Settings” < Click “About Phone” < Tap “Build number” for several times until getting a note “You are under developer mode” < Back to “Settings” < Click “Developer options” < Check “USB debugging”

turn on usb debugging

Step 4. Select Call History to Scan

For the purpose on retrieving deleted call logs on Huawei Mate 20, just mark the “Call Logs” option and press the “Next” button to proceed.

select call logs to scan

Step 5. Analyze Deleted Call History on Huawei Phone

Before scanning the files on Huawei Mate 20 or Huawei Mate 20 Pro, you need to allow the program scan your Huawei device. Turn to the Huawei phone and tap “Allow”.

allow scan the huawei phone

You may see a progress bar that indicates the process of scanning your device. This will take sometime depending how much data stored on the phone.

scan huawei for deleted call logs

Step 6.Preview and Recover Call History on Huawei Mate 20(Pro)

Once finished, you will be presented with scan results showing the contents of all your phones. Go ahead and click on “Call Logs” category under “Contacts & Messages” section, then select the call logs you want to recover. Simply click on “Recover” button to save these call logs on your computer.

recover call logs from huawei mate 20

d_win d_mac

Related Articles

How to Recover Deleted Files from Huawei Mate 20(Pro)

Ways to Restore Deleted Photos/Gallery from Huawei P20

How to Retrieve Deleted/Lost Data on Huawei Mobile Phone

How to Restore Deleted Text Messages from Huawei P20

How to Recover Deleted Data from Android Without Root

Recover Call Logs from Mate 20