All posts by DHZ

Best Deezer Music Downloader to Download Deezer to MP3

Summary
This review focus on helping user to know everything about the best Deezer downloader in 2023 – UkeySoft Deezer Music Converter, use it to download Deezer to MP3. So that user can play Deezer Music songs with freedom.

Deezer is a well-known platform with online music streaming service for all users. You can ideally listen to music, radio, and podcasts using a Free account. However, to enjoy music without ads, and download your favorite music on Deezer for offline playback with no restriction, a Deezer Premium account is required. However, even if you get a paid Deezer account, there are some limitations. For example, you can’t play Deezer Music on any devices/players without logging Deezer, the downloaded music files will be disappear after subscription ends. It means that you are only allowed to listen to Deezer within Deezer app under authorization.

Have you ever searched for best Deezer Music downloader to download Deezer Music to MP3 for offline listening without restriction? If yes, you can focus on this post. Among so many Deezer Music downloaders in the market, seldom of them are workable and even worse, bring ads and risk to computer. A professional Deezer Music Downloader should have some excellent features: high-quality output, fast conversion speed, batch downloading, user-friendly interface, and so on. Let’s look into the recommended best Deezer Music Downloader. UkeySoft Deezer Music Converter, which is a friendly Deezer Music downloader. After reading the follow passages, you will know everything about this perfect music downloader.

Part 1. Introduction of UkeySoft Deezer Music Converter

UkeySoft Deezer Music Converter is an all-in-one music converter & downloader, works on both Windows and Mac computer. This tool allowing users to quickly download tracks, playlists, albums, podcasts from Deezer to computer as local files. Download and convert Deezer Music MP3 and other general audio formats such as M4A, AAC, WAV, FLAC, AIFF with fast speed. With advanced encoding technology, this software export Deezer Music with lossless quality, while retaining the ID3 tags for further organization. In the latest update, it is embedded with music web player, music player and music manager. As a result, user will get Deezer Music forever even without subscription, play Deezer Music on any devices/players without limitations.

ukeysoft deezer music converter

d_win d_mac

Part 2. Main Features of UkeySoft Deezer Music Converter

In this section, we will show you a detailed review of UkeySoft Deezer Music Converter, so that you can have a thorough understanding of this tool and choose whether to use it or not. Let’s check the main features of UkeySoft software.

General Output Format
UkeySoft software supports general output formats, including MP3, M4A, AAC, WAV, FLAC, AIFF. MP3 is a widely compatible audio format that can be played on a majority of devices or players. Apart from MP3, it can output other audio formats to meet all needs for user. The formats of AAC and FLAC will keep lossless audio quality, and save as smaller file size.

Ensure Lossless Conversion Quality
UkeySoft software ensure nearly 100% lossless sound quality for music playing after conversion. By default, the output format is M4A and the bitrate 256 kbps. But this tool provides you with more selection of output audio quality, like 128kbps, 192kbps, 224kbps, 320kbps, 384kbps, 448kbps, 512kbps.

Fast Conversion Speed
Because UkeySoft software is an online tool, its download and conversion speed is largely decided by the Internet connection and server status. When you have a stable network, you can download Deezer songs smoothly and swiftly with 10X faster speed. Besides, it does provides batch conversion service for user, make the conversion being more efficient.

Keep original ID3 tags and Metadata Information
During the conversion, the ID3 tags and media metadata information will be preserved, such as Track Title, Album, Artist, Artwork, Track Number, and Year. After conversion, you may sort the converted files by Artist, Album, Artist/Album, Album/Artist. So that you could manage the music collection conveniently after downloading.

User-Friendly Interface
UkeySoft software is an easy-to-grasp tool requiring no extra apps installation and registration. A simple operating interface, non advertisements, especially those pop-ups. It is so simple for users even the new beginner.

Embedded with Music Web Player, Music Player & Music Manager
In the latest version of UkeySoft software, it is embedded with Deezer Music web player, music player & music manager. It is strive to make you get a great user experience in Deezer Music conversion.

Play Deezer Music on Any Devices/Players Offline
With the help of UkeySoft Deezer Music Converter, you can achieve offline listening Deezer Music without Deezer app. It means that all Deezer Music downloads can be transferable without Deezer limitations. So that you can listen to Deezer Music offline across different devices and players. For instance, smartphone, tablet, MP3 player, game player, smart TV, wearables, Sono; VLC media player, Windows media player; etc,.

Get Deezer Music Forever with Freedom
After music conversion, user can get Deezer Music forever forever, never worry about losing music after subscription expires. It will not need a Premium account, you can listen to Deezer Music offline. All the music contents can be playable on compatible devices/players. In other words you are allowed to use Deezer Music with more freedom.

Part 3. Tutorial of Download Deezer Music to MP3 Easily

In this part we will show you the tutorial to download Deezer Music to MP3 with easy steps. Now please download UkeySoft Deezer Music Converter on your PC/Mac computer first.

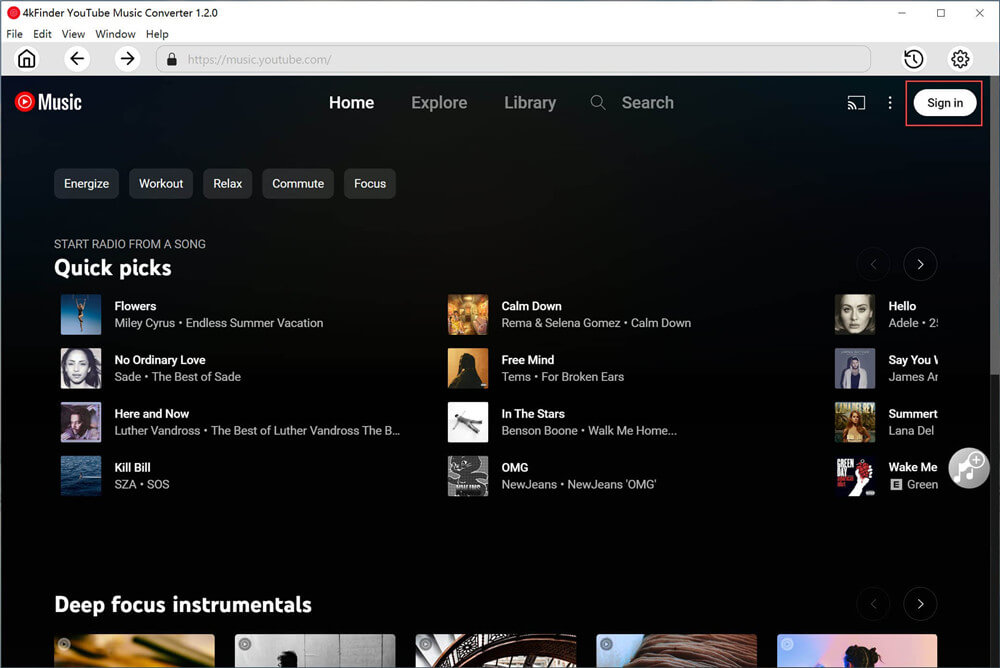
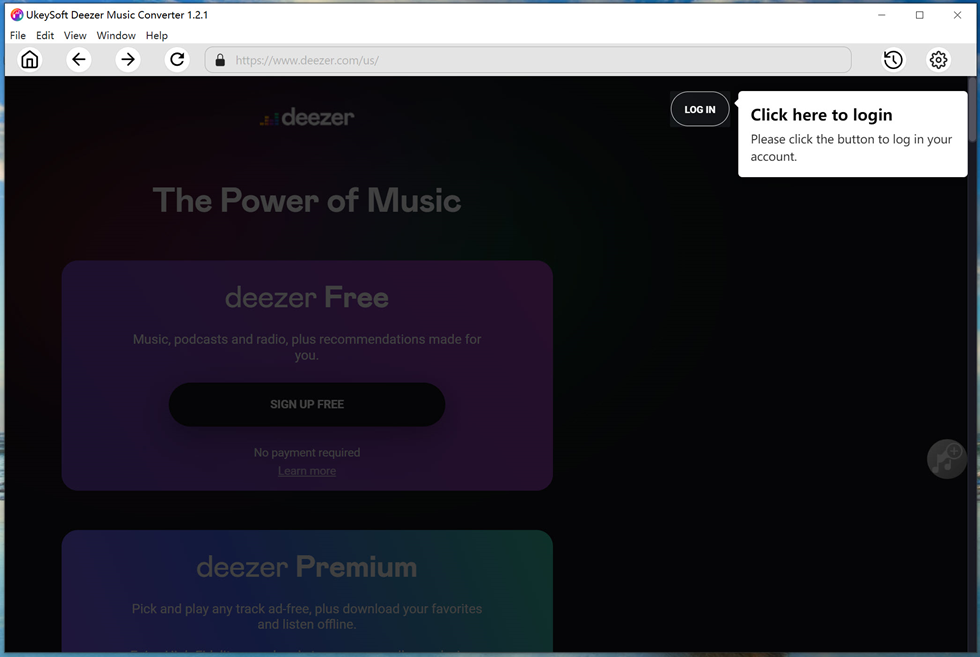
Step 1. Log In Deezer Account
Click “LOG IN” button in the upper right corner of home page, to log in your Deezer account.

login deezer account

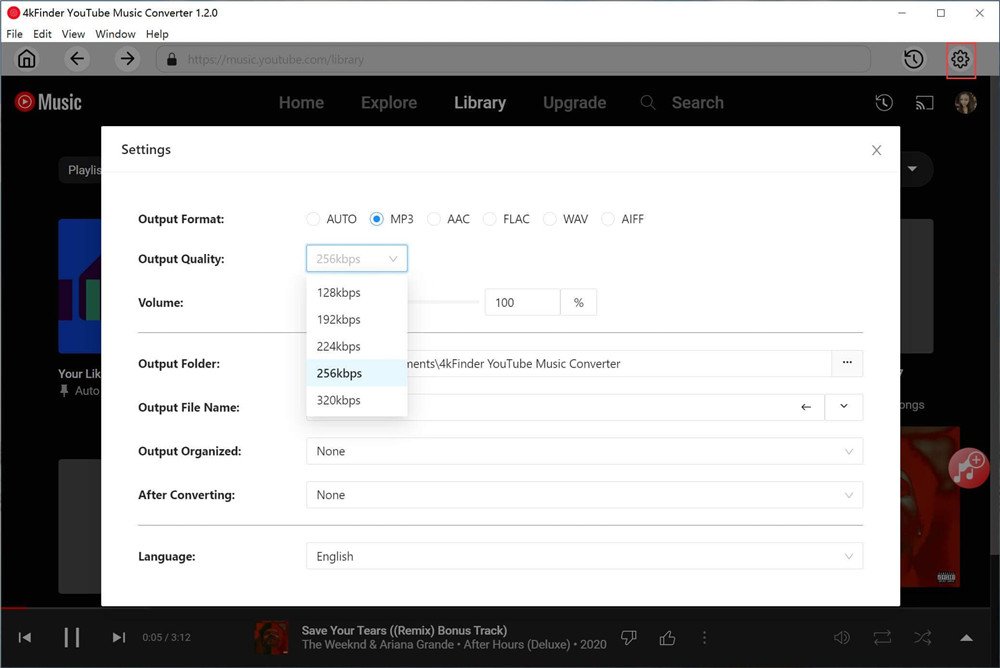
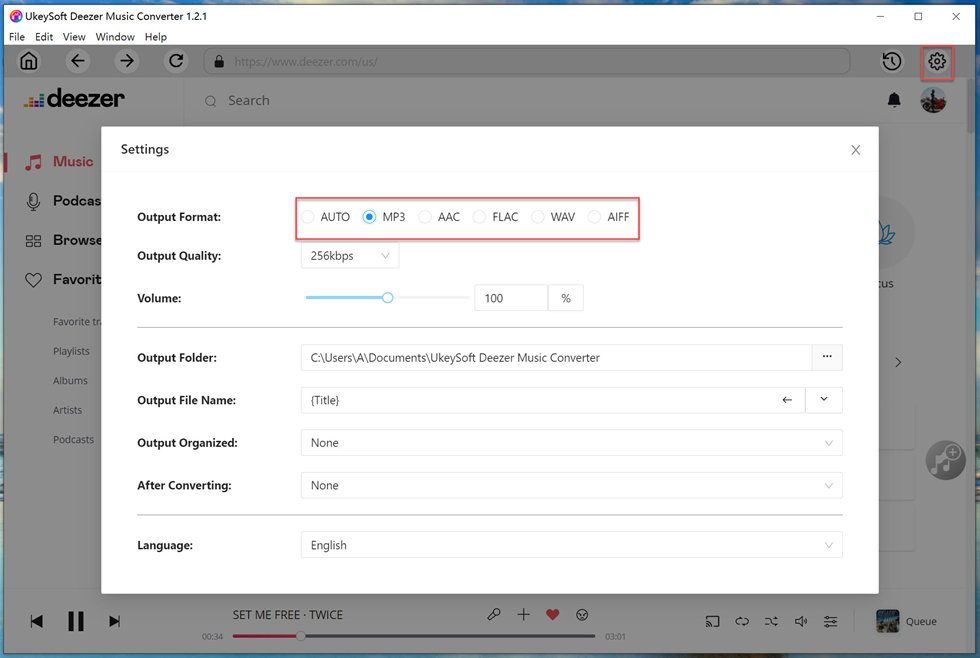
Step 2. Customize Output Settings
There are 6 output formats for selection: M4A (default), MP3, AAC, FLAC, WAV, AIFF. To download music to MP3, tap “MP3” option. In this step, you can customize more output settings, like output quality, volume, output folder, output file name, etc,.

output setting

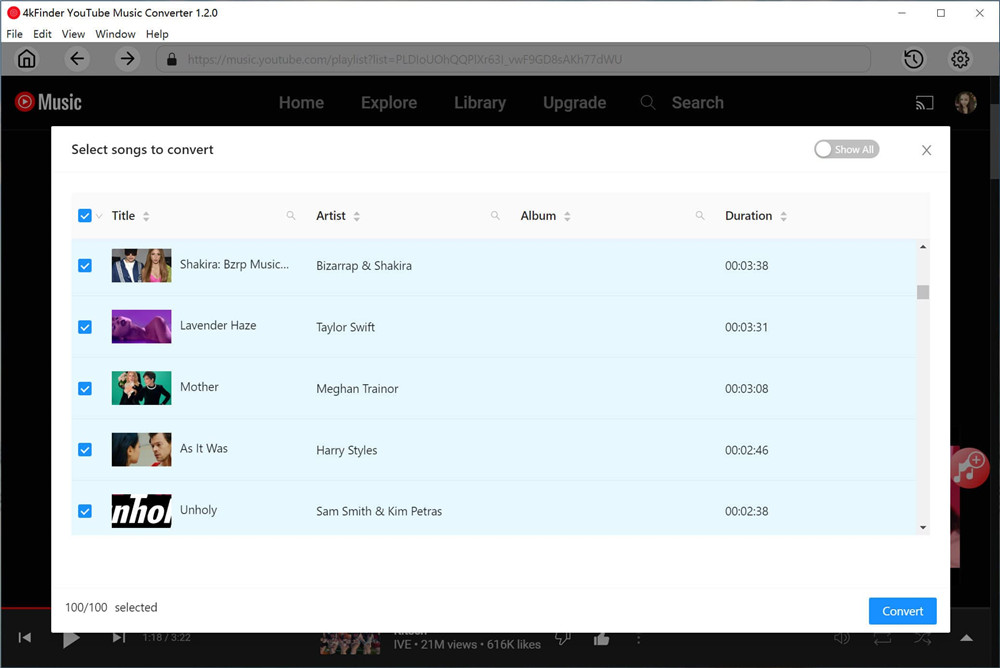
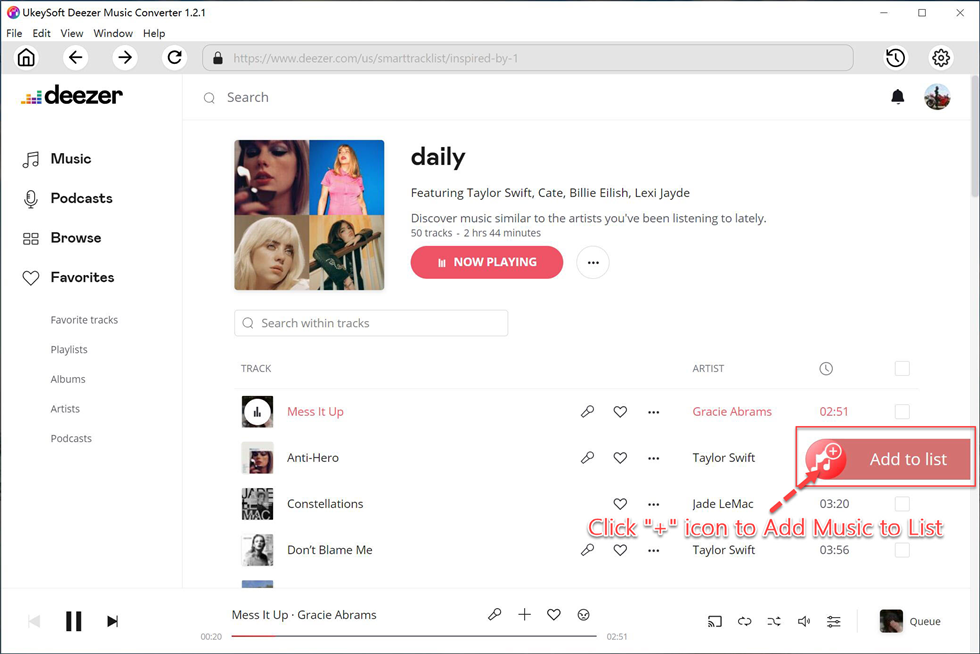
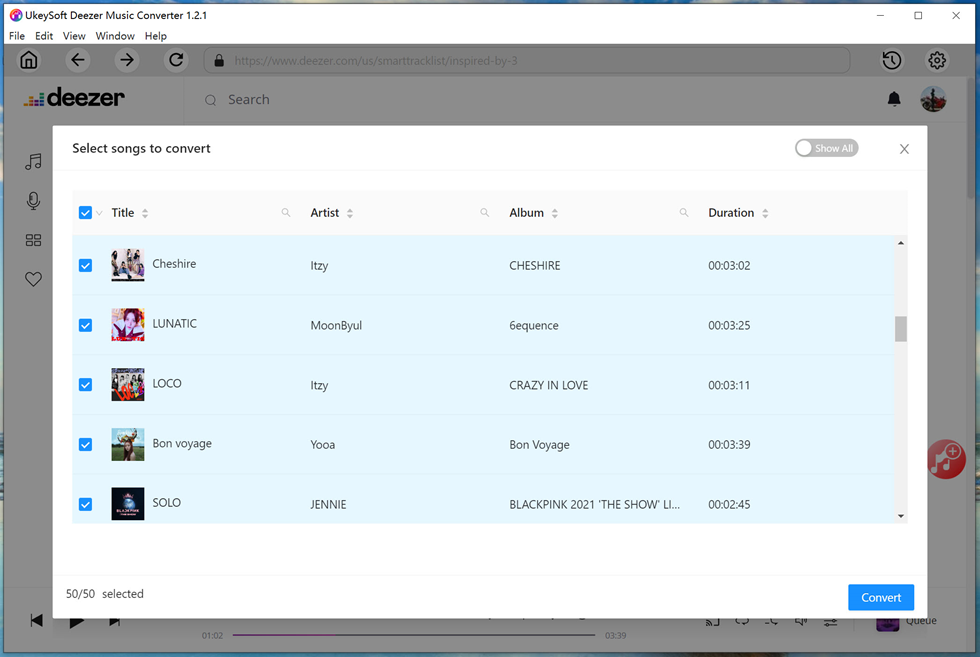
Step 3. Add Deezer Music
Click the playlist or album including the songs you want to conversion list, then click red icon “Add songs”, it will show all items in it for you.

add deezer music to list

When you select a playlist/album, all items in it will be selected by default. You could unclick some items you don’t want in the checkbox.

select deezer songs

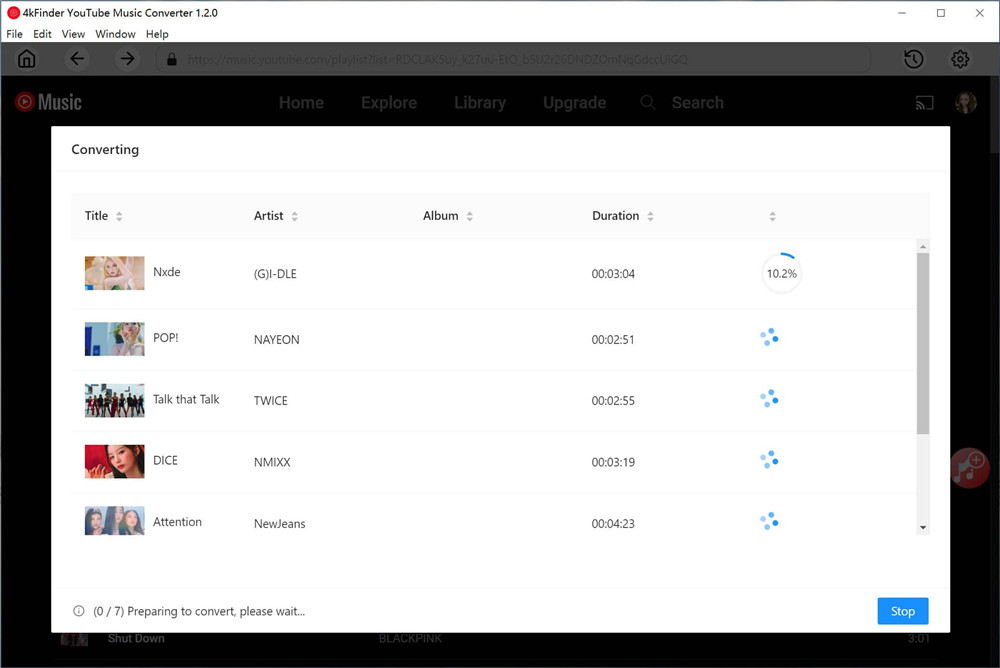
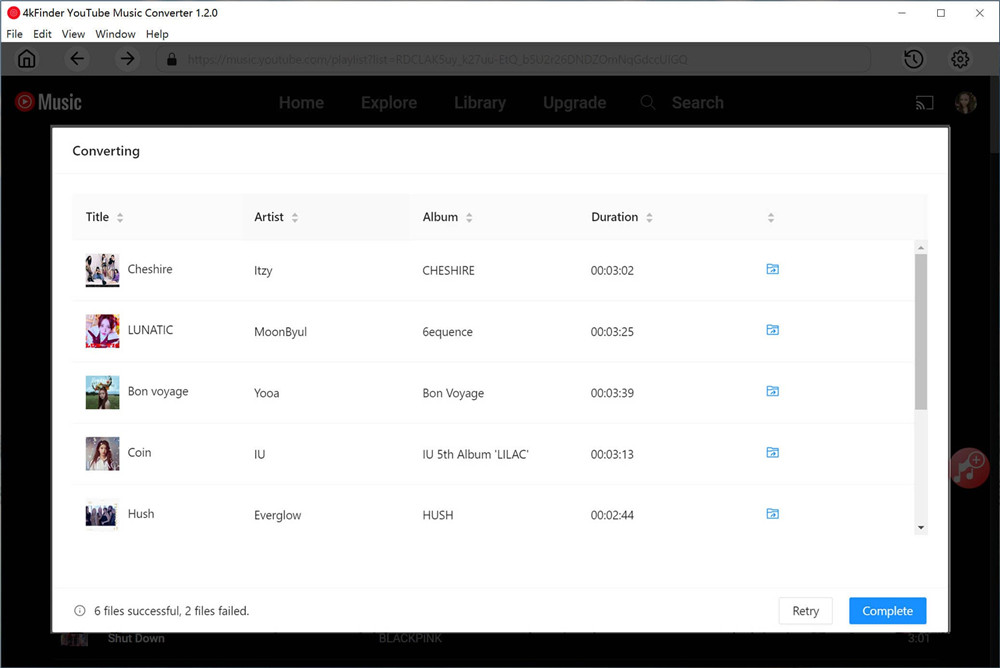
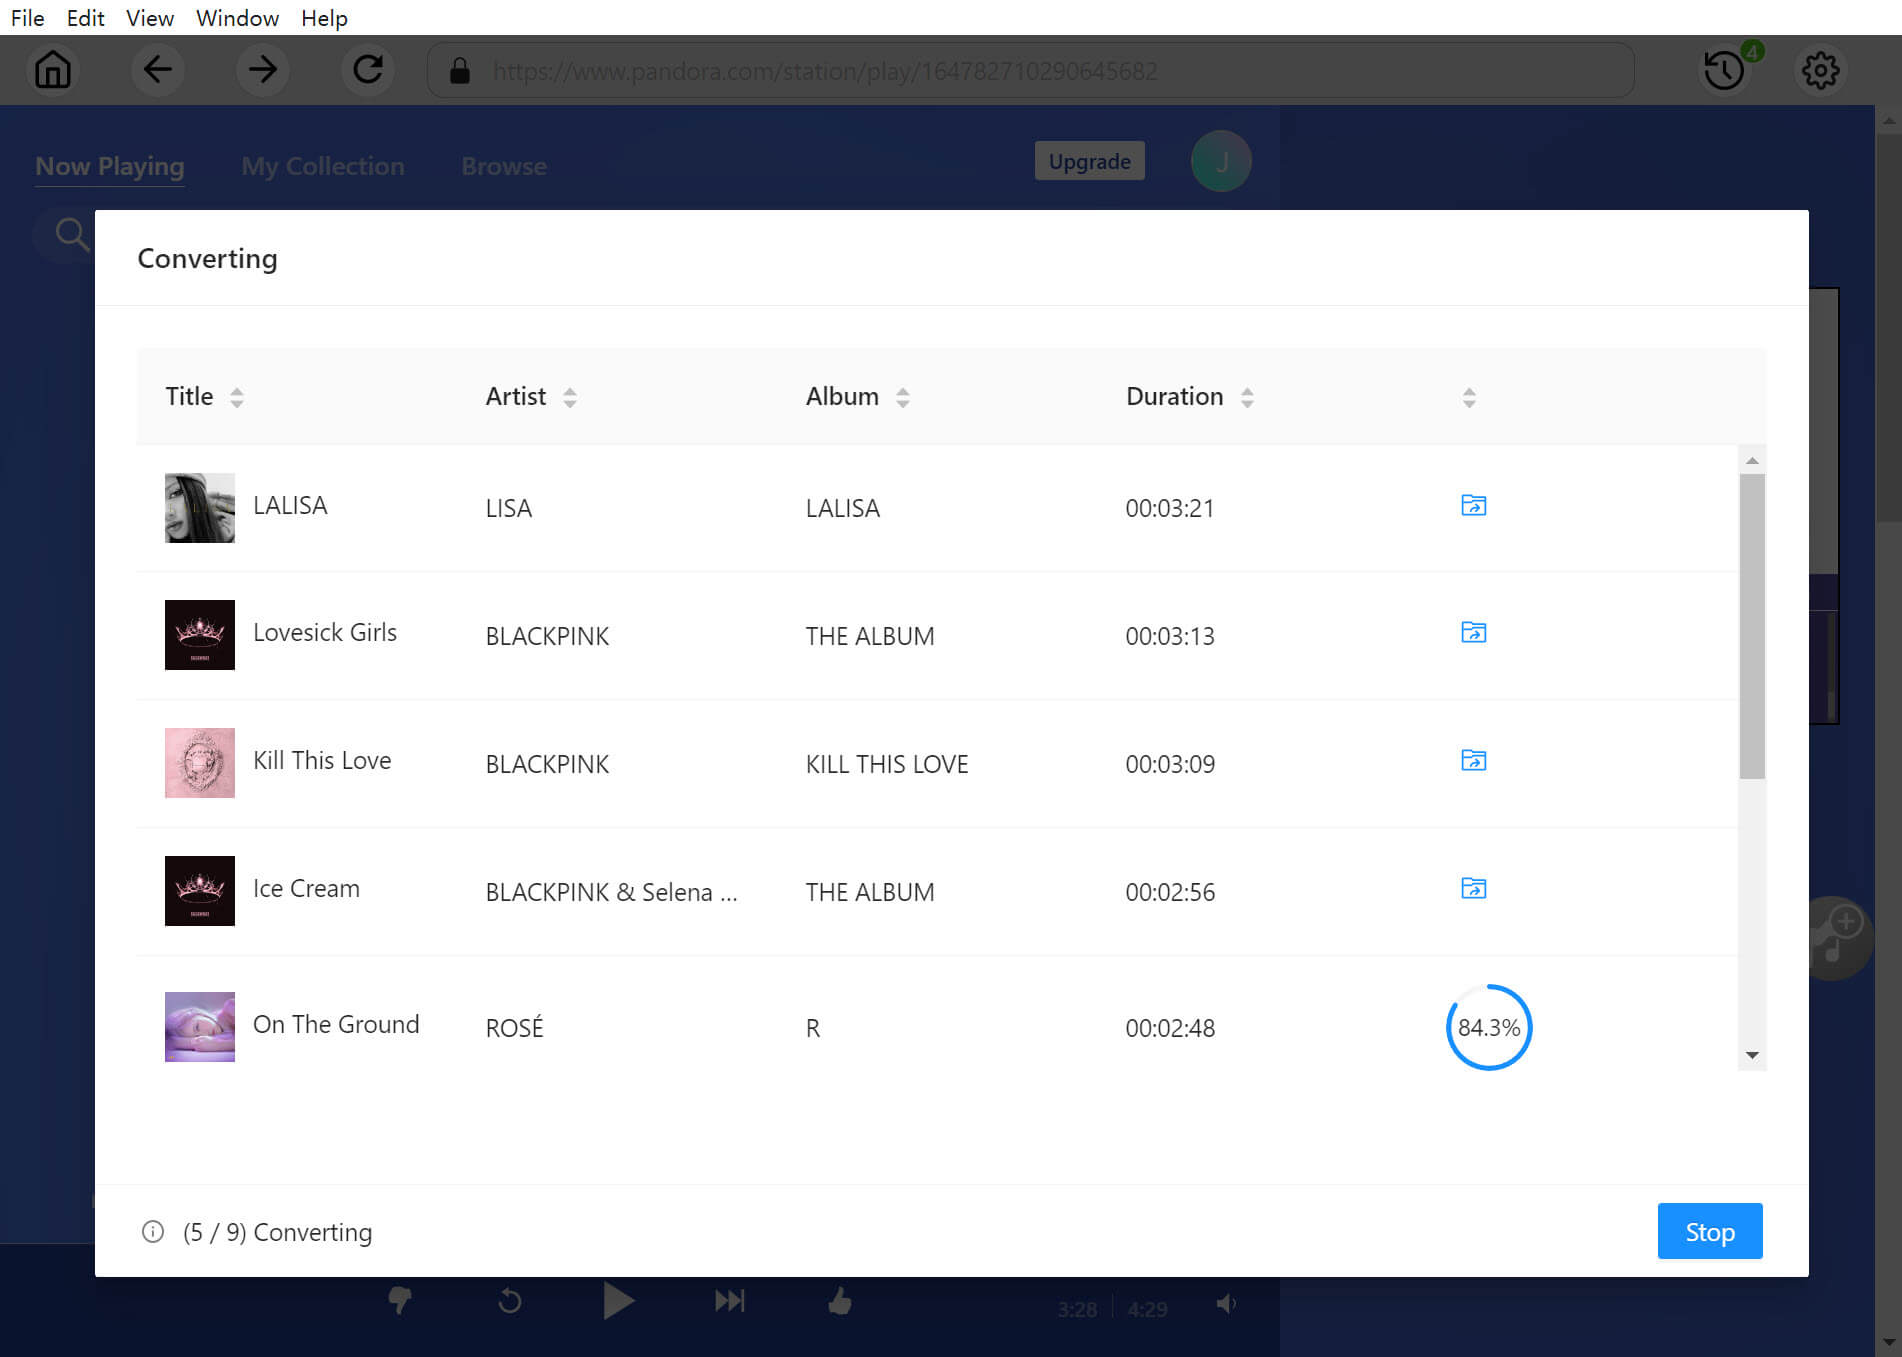
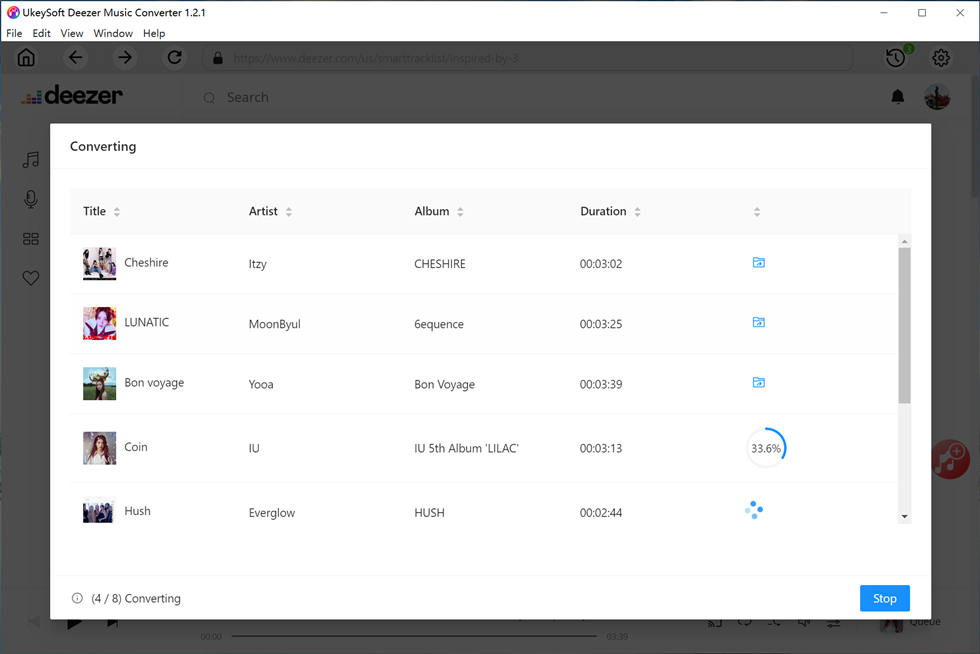
Step 4. Download Deezer Music to MP3
At last, click “Convert” button to begin downloading selected songs to MP3. All output music files will be exported with its lossless audio quality and all ID3 tags.

download deezer music to mp3

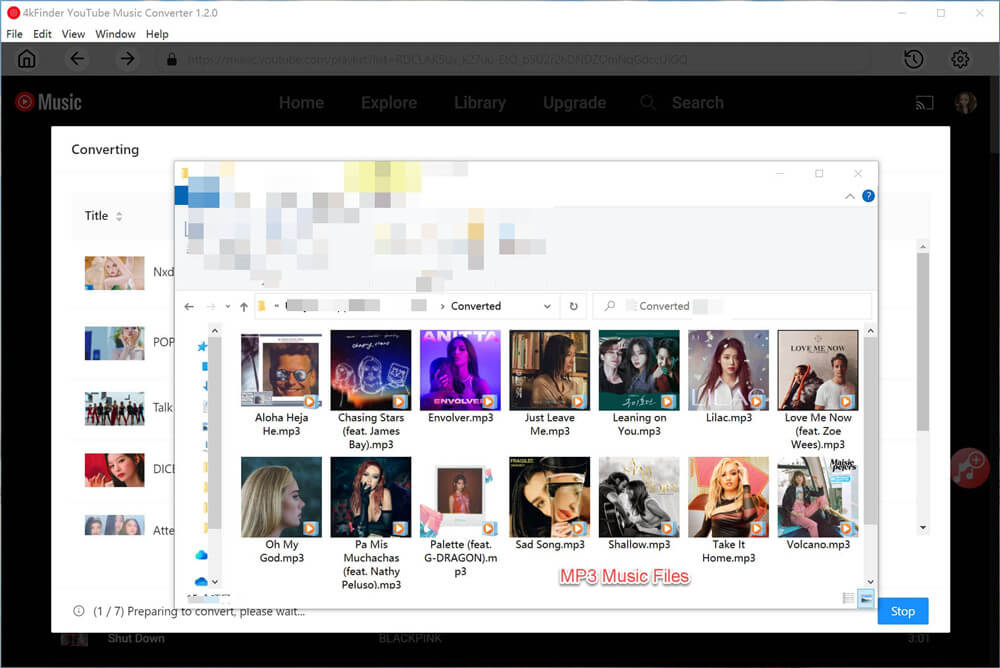
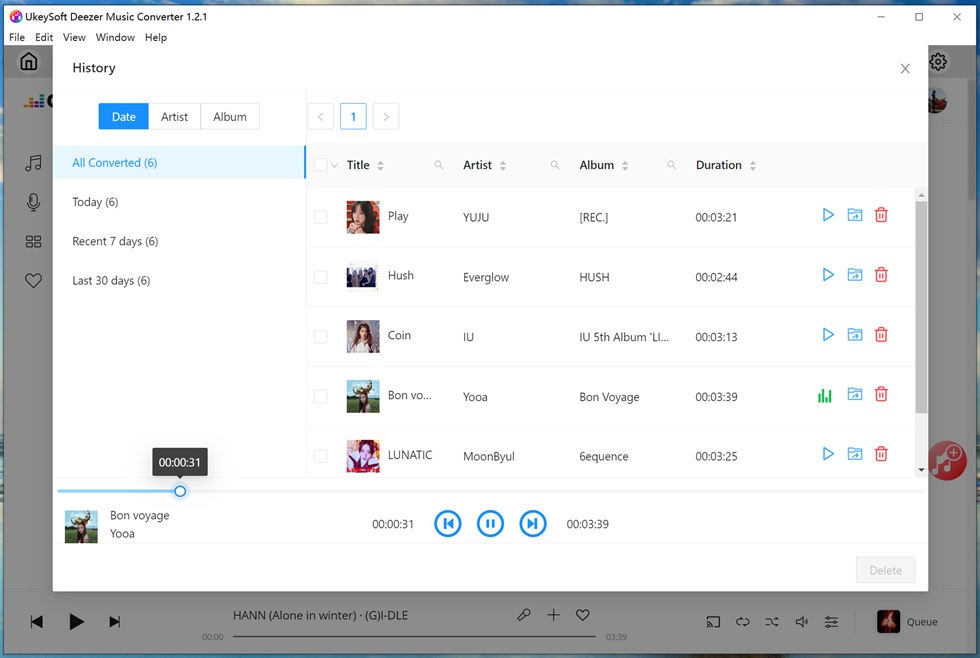
Step 5. Preview Deezer Music
The whole music conversion will be end with 10X faster speed. Once it is done, click blue folder icon to preview the downloaded songs in MP3. Also, you can play the music offline directly via its music player.

preview deezer songs

d_win d_mac

Part 4. Pros and Cons of UkeySoft Deezer Music Converter

After testing UkeySoft Deezer Music Converter, I found something about it I like and I don’t like.

What I Like:

1. Easy to use, user-friendly interface, and I think nobody will have trouble using this software.
2. Variety of general audio formats output, e.g. M4A (default), MP3, AAC, FLAC, WAV, AIFF.
4. The software is very stable, and the conversion speed is super faster than other music converters.
5. The output quality of music files is the same as the original one.
6. Convenient to manage music library as it save all original ID3 tags and metadata info for Deezer Music.
7. There is no need to install Deezer Music or other extra apps, since it is embedded with music web player, even music player & music manager.

What I Don’t Like:

1. This tool only works for Windows and Mac computers, with no Linux, iOS, and Android versions.
2. Need to pay for using. But the trial version is free, and user can use it to convert the first 3 minutes of each song.

Part 5. Price of UkeySoft Deezer Music Converter

1)Monthly Subscription Plan: USD 14.95 for one month and 1 PC/1 Mac

2)Yearly Subscription Plan: USD 59.95 for one year and 1 PC/1 Mac

3)Lifetime Plan (One-time payment): USD 79.95 for a lifetime and 1 PC/1 Mac

Final Words

This is the review of the best Deezer Music downloader in 2023. After comparing its several features, you may have an idea of choosing this tool or not. All in all, UkeySoft Deezer Music Converter is a powerful yet user-friendly music converting tool for all Deezer Music users. With its help, you’ll be able to download any Deezer Music songs to MP3 or other general audio formats with high audio quality output. If you’re satisfied with this tool, you can subscribe for one month for $14.95 on one computer. But I guess its lifetime plan could be much better of $79.95 for one computer, and user will enjoy lifetime free updates and tech support.

d_win d_mac

If you have any problems about UkeySoft Deezer Music Converter, welcome to send email to UkeySoft Support Team: support@ukeysoft.com. You will be answered as soon as possible.

Best Deezer Music Downloader

Best YouTube Music Converter – Convert YouTube Music to MP3

Summary
Here is the best YouTube Music Converter review for you with features, pricing, pros, and cons, & detailed guides on how to convert YouTube Music to MP3. You will be able to keep YouTube Music forever and listen to them anytime with the help of it. Please don’t miss it.

If you want to play YouTube Music on MP3 player, backup and save YouTube Music to USB drive, consider converting YouTube Music to MP3. Well, YouTube Music Converter can help you make this dream come true. But you may have no idea about what is the best YouTube Music Converter on the market. Here we will show you a comprehensive review of the best YouTube Music Converter, named 4kFinder YouTube Music Converter. You will find 4kFinder YouTube Music Converter features, pros and cons, price, and other details. More importantly, you will learn how to convert YouTube Music to MP3 for offline playing on all your devices.

Part 1. Why Do You Need YouTube Music Converter?

YouTube Music is a separate music app split from the popular video site YouTube, and it is also a popular streaming music platform. By registering an account, users can stream millions of songs, albums, singles, MVs, live performance on YouTube Music app or web player. But you can’t access any content without an internet connection, unless you have a Premium account. Only the Premium subscribers are allowed to download YouTube Music for offline listening.

But the problems are that all YouTube Music users can only play YouTube Music within the app. Even the Premium subscribers are unable to take any downloaded song out the app to other platforms or devices. This is where we need a professional YouTube Music Converter to convert YouTube music to MP3. In this way, people can keep YouTube Music songs forever, and enjoy them offline anytime, anywhere. There are many YouTube Music Converter and Downloader tools in the market, 4kFinder YouTube Music Converter stands out with its powerful features and performance.

Part 2. A Detailed Review on 4kFinder YouTube Music Converter

4kFinder YouTube Music Converter is a professional yet user-friendly music downloader and converter tool. Whether you are using YouTube Premium or not, it assists you to download songs, albums, playlists, singles from YouTube Music to computer locally. This awesome tool is specially designed to download and convert any YouTube Free and YouTube Premium to MP3, M4A, AAC, FLAC, WAV, AIFF audio formats with lossless music quality.

To make YouTube music conversion straightforward and smoothly, 4kFinder YouTube Music Converter not only works at 10X faster than other brands, but also embeds the YouTube Music Web Player inside of itself. With it, users can directly search, add, choose and download any song without the YouTube Music app installed.

Moreover, it supports to customize output file name, and classify YouTube Music by artists or albums for easy management. To make YouTube music download straightforward and smoothly, 4kFinder YouTube Music Converter embeds the YouTube Music Web Player inside of itself where you can directly add and download songs or playlists in batch.

Next, let’s check its features in depth.

Highlighted Features of 4kFinder YouTube Music Converter

#1. Integration with YouTube Music Web Player
Through embedding the YouTube Music Web Player, the 4kFinder YouTube Music Converter allows users to access, stream, convert and download all music content in the music library, even using the YouTube Music free accounts. During the entire conversion process, the YouTube Music app is not required.

#2. Mainstream Output Formats Available
YouTube Music encrypts music tracks in AAC format and is only accessible within the YouTube Music app. 4kFinder YouTube Music Converter gives you different options when converting your YouTube Music tracks. You can use it to convert YouTube Music to MP3, M4A, AAC, FLAC, WAV, AIFF. Thus, you’ll be able to transfer and play YouTube music on any device, player.

#3. Keep Original Quality and ID3 Info
When it comes to choosing a music platform, most people focus on sound quality. The same is true when choosing a music converter. YouTube Music only offers Premium subscribers at highest 256kbps. With 4kFinder, now even the Free users have opportunity to convert YouTube music to MP3 at 320kbps high quality, or even 512kbps (in AAC format). Besides, it will also help preserve the ID3 tags info, like title, cover, album, artist, etc.

#4. 10X Accelerated Conversion Speed
To boost efficiency, 4kFinder YouTube Music Converter uses an advanced acceleration technology to ensure the fastest music conversion possible. It can run at 10X super-fast speed. It allows users to add and convert full playlist or album with just one click, which helps save a lot of time.

#5. Built-in Music Player and Music Manager
Thanks to its built-in music manager, you can organize converted YouTube Music songs by Artist, Album, Artist/Album, Album/Artist to build your own music library. After conversion, you can also classify the converted YouTube Music songs by Date, Album or Artist. Moreover, users can directly play the converted songs on the tool!

Is 4kFinder YouTube Music Converter Free?

4kFinder YouTube Music Converter is a paid software, but a free trial version is also available. With the free trial, users can convert the first 3 minutes of each song for 30 days. If you like the tool after testing it, you can buy the full version at the following prices:

4kFinder YouTube Music Converter is a paid software, but also offers free trial version. With free trial, users can convert the first 3 minutes of each song for 30 days. If you like the tool after testing it, you can buy the full version at the following prices:

– Monthly Subscription Plan: $14.95 for 1 PC/1 Mac
– Annual Subscription Plan: $59.95 for 1 PC/1 Mac
– Lifetime Plan (One-time payment): $79.95 for 1 PC/1 Mac

Pros & Cons of 4kFinder YouTube Music Converter

Pros:

● Offers easy operation to convert YouTube Music.
● Download and grab YouTube Music tracks without Premium.
● Supports various audios formats such as MP3, M4A, AAC, WAV, FLAC, AIFF.
● Doesn’t need to install YouTube Music app at all.
● Provides high quality settings to convert YouTube Music songs with lossless quality.
● Supports batch conversion of YouTube music, 10X faster speed.
● Built-in YouTube Music web player, music player, music manager.

Cons:
● Not free, and no mobile version.
● Free version only lets you convert less than 3 minutes of each song.

Part 3. How to Convert YouTube Music to MP3?

d_win d_mac

Step 1. Open 4kFinder YouTube Music Converter
First, you need to download and install the 4kFinder YouTube Music Converter on your desktop and log onto your YouTube Music account, either Free or Premium.

login youtube music account

Step 2. Choose WAV Format for YouTube Music
Click the “Gear” icon to open the settings window. Select MP3 as the output format. To make the better or lossless YouTube Music quality, choose 320kbps in “Output Quality” option. Besides, you may also customize the output folder, output file name and more.

customize output settings

Step 3. Add YouTube Music Tracks/Playlist
Open any song, album or playlist and click on the red “+” icon on the right side.

add youtube music to list

4kFinder will add the whole playlist/album songs to the converting list. Select the songs you want to convert.

select youtube music songs

Step 4. Start Converting YouTube Music to MP3
Finally, click the “Convert” button to start converting the YouTube Music songs you chose in Step 3 to MP3 format.

convert youtube music mp3

Step 5. Get the Downloaded YouTube Music WAV Songs
Once the conversion is done, you can find the converted YouTube Music songs by clicking “History” (a clock icon).

convert youtube music finished

Or click the “Blue Folder” icon to quickly locate the output folder of YouTube Music.

youtube music mp3 files

Conclusion

YouTube Music is a great music platform and app. But it is hard to play YouTube Music on other players. With the best YouTube Music Converter, it becomes easy to convert YouTube Music to MP3 and save them as local files. So that you could enjoy your favourite music tracks on any device you have. 4kFinder YouTube Music Converter is highly recommended if you are looking for the best YouTube Music converting tool. Download it and give it a try, you will be satisfied!

d_win d_mac

Best Pandora Music Downloader

Best Pandora Music Downloader to Download Music from Pandora Free

Summary
Do you want to download music from Pandora Free? In this software review, we will show you a full review of the best Pandora Music Downloader. You can use it to download songs, albums, playlists & podcasts from Pandora Free/Plus/Premium to MP3, M4A, AAC, FLAC, WAV, AIFF audios with lossless quality at high speed.

Pandora Music is an emerging streaming music service for music and radio streaming in the United States. It now has over 6.2 million active subscribers, including Pandora Plus ($4.99 / month) and Pandora Premium ($9.99 / month). Unfortunately, Pandora Free users cannot enjoy Pandora music without the internet or mobile data. They are only allow to stream Pandora music online. In that case, you need a little help from a Pandora Music Downloader to download music from Pandora Free, so you can listen to your preferred Pandora songs anytime you want.

But, with so many of Pandora music downloaders (some known as Pandora music converter, or Pandora audio recorder) out there in the market, how do you choose the best one? We’ve done the research for you and gone through all the highs and lows of the top Pandora Music Downloaders. In this review, we will discuss what UkeySoft Pandora Music Converter is and why it can be the best Pandora Music Downloader.

1. Why UkeySoft Pandora Music Converter?

Pandora Music is an excellent app, and it allows users to listen to music tracks, albums, podcasts just by accessing an app. This requires you have an smooth and stable internet connection. If you want to listen to Pandora music offline, a paid subscription is needed. But the problem is that all users (Pandora Free or Paid) can only access Pandora music on the official app or web player. This is where we need UkeySoft Pandora Music Converter, which enables us to download Pandora songs to MP3 for free. Thus, users can keep them on all music devices offline forever.

UkeySoft Pandora Music Converter is a trustworthy and excellent Pandora music download helper for all users. Whether you have Pandora Premium or not, it enables you to download songs, playlists, albums or podcasts from Pandora web player to computer for free. Apart from this, it can download and convert Pandora songs MP3, AAC, M4A, WAV, FLAC or AIFF audios at 10X faster speed. By adopting advanced technology, it will preserve the original music quality and ID3 tags, giving a lossless offline playback experience. And users can keep the downloaded Pandora songs forever, and use, open, enjoy, transfer them without limitations.

2. Advantages of UkeySoft Pandora Music Converter

You can also choose to download songs by subscribing to Pandora Plus or Pandora Premium, but it won’t allow you to download and save the songs on all of your devices. The UkeySoft Pandora Music Converter is committed to downloading Pandora songs to local computer. Thus, users can enjoy their favorite music tracks anytime, anywhere. Moreover, it has more advantages than the built-in downloader of Pandora, including:

* Download Pandora songs to computer, which is almost impossible with Pandora member accounts.
* The Pandora songs can be downloaded in various audio formats.
* Listen to Pandora music offline on MP3 players, Apple iPods, Xbox, PSP, Zune player, car player, smart speakers and more portable devices.
* Save and backup Pandora songs to USB disk, SD card, external drive, etc.
* Burn Pandora songs to CD, or upload to Google Drive, OneDrive, etc.
* Use Pandora songs as video BGM, or add them to DJ software for mixing.
* Keep Pandora songs forever even after you cancel/stop the Plus or Premium subscription.

3. Features of UkeySoft Pandora Music Converter

● Non-Premium Available – The program can download songs from Pandora for free. Whether you are using Pandora Free, Pandora Plus or Premium account, you can use it to download and save Pandora audios offline.

● Built-in Pandora Web Player – It allows users to quickly browse, search, access, stream and download Pandora music with its in-built Pandora web player.

● Offers Multiple Formats – This professional Pandora Music Downloader tool enables users to download and convert Pandora Music tracks to popular audio formats, including MP3, M4A, AAC, WAV, FLAC and AIFF.

● Lossless Music Quality – UkeySoft Pandora Music Converter can download Pandora songs to different audio formats with original sound quality and even better. 192 kbps is considered the highest audio quality for Pandora Premium subscribers. But UkeySoft offers common 256kbps, higher 320kbps in MP3, even 512kbps in AAC format.

● Faster Speed – Compared with traditional audio recorders with single download and 1:1 speed, this tool can do multiple download tasks at the same time, and runs at up to 10X faster-decoding process.

● Music Manager – To improve your music experience, it offers a free music management feature. It allows users to classify the output Pandora songs by Artist, Album, Artist/Album, Album/Artist.

Once you’ve got UkeySoft Pandora Music Converter installed on your computer (Windows 11/10/8.1/8/7, Mac OS X 10.9 or higher), let’s see how to use it to download Pandora songs to MP3 for free.

d_win d_mac

4. How to Download Music from Pandora Free?

Step 1. Log in Pandora Account
After installation, start the UkeySoft Pandora Music Converter on desktop. You will need to log in your Pandora account, either free or premium.

login pandora account

Step 2. Customize the Output Settings
Next, open the setting window by clicking on the “Gear” icon in the upper right corner. From where you can customize the output format (default AUTO M4A, MP3, AAC, FLAC, WAV, AIFF), output quality, output folder, output file name, and more.

output setting

Step 3. Add Pandora Songs
On the home page, you can search for any song, album, playlist or podcast. Then open any song or playlist and click the “+” in right side.

add pandora music playlist

In the converting list, select and confirm the Pandora songs you want to download.

select pandora music

Step 4. Download Pandora Music to MP3
If everything is set well, hit on the “Convert” button to start downloading music from Pandora Free to MP3. The downloading process will take a few minutes.

download pandora music to mp3

Step 5. Get the Downloaded Pandora Songs
When finished, click on the “History” icon > “blue folder” icon to preview all downloaded Pandora songs. They are saved with full ID3 tags kept. You can play these Pandora songs offline directly with its built-in music player.

pandora music conversion history

5. What I Like

  • Easy to use, and simple interface.
  • No Pandora Plus or Premium needed.
  • Fast, and supports batch download.
  • Lossless output audio quality.
  • Allows to customize output audio parameter.
  • Keep ID3 tags and sort output songs.
  • Built-in Pandora Web Player and Music Player.

6. What I Don’t Like

  • Not free, but offers free trial.
  • A desktop software, no mobile version.

Conclusion

To download music from Pandora Free, UkeySoft Pandora Music Converter can help with that. With its lossless sound quality, fast speed, user-friendly design and more great features, it becomes the best Pandora music downloader. It assists you to download Pandora music to MP3, M4A, FLAC, AAC, WAV, AIFF audio formats and make them playable on any device, player. Now, download this software and check it for yourself!

d_win d_mac

Best Pandora Music Downloader

How to Download Deezer Song/Playlist to MP3

Summary
If you want to download Deezer playlists to MP3, this article is for you. Here you will meet the best Deezer Music Downloader and learn how to download Deezer songs, playlist to MP3 with lossless quality.

How do I download Deezer songs to MP3? I want to put Deezer songs on SanDisk MP3 Player. Any suggestion?”

Nowadays, we all like to enjoy music on music streaming services. Most music streaming services focus on providing users with the best possible music quality. People can access music by signing up for a music streaming service. With a free account, we can stream millions of songs and podcasts for free or by paying a monthly subscription fee. For instance, you can sign up for Deezer to start its 30-days free trial. During the Premium free trial, you can enjoy all features like a Premium subscriber, such as download music from Deezer for offline listening. After that, you can continue your Premium subscription by paying a $10.99 monthly fee.

However, even you’ve paid, you can still only access all Deezer music content in the Deezer Music App or Web Player. To play Deezer music freely, the best solution is to download Deezer songs to MP3. In this post, we will introduce you the best Deezer Music Downloader. You can use it to download song/playlist to MP3 with lossless audio quality. Let’s go!

Best Tool to Download Deezer Playlists to MP3

Is it possible to play Deezer music on MP3 player? How to download Deezer playlist to MP3? These are common questions from many Deezer users. UkeySoft Deezer Music Converter comes into rescue. It and helps all users download tracks, albums, playlists and podcasts from Deezer without a Premium account. What’s more, it enables users to download and convert Deezer songs & playlist to several audio formats, including MP3, M4A, AAC, FLAC, WAV, AIFF. UkeySoft handles the conversion at a 10X faster rate.

Not only that, it lets users download Deezer songs to MP3 without touching any audio quality. With a built-in Deezer Web Player, users can search, add and download any song without the Deezer app. In addition, it allows uers to sort the output Deezer songs by artist, album.

Key Features of Deezer Music Converter:

  • Download Deezer songs, albums, playlists, podcasts with Free account.
  • Download Deezer songs & playlists to computer locally.
  • Convert Deezer songs to MP3, M4A, FLAC, AAC, WAV, AIFF.
  • Remain Deezer music with lossless audio quality.
  • Keep full ID3 tags like title, album, track number, cover, etc.
  • Batch download Deezer music at a 10× faster speed.
  • Built-in Deezer Web Player, Music Player, no Deezer app needed.
  • Transfer the downloaded Deezer songs to any music platform, app, player, device.

d_win d_mac

Guide: How to Download Deezer Songs, Playlist to MP3

Step 1. Open UkeySoft Deezer Music Converter
First, download and install the UkeySoft Deezer Music Converter on your computer (Mac or PC). Launch the prorgam, log in your Deezer Free or Premium account.

login deezer account

Step 2. Customize the Output Settings
Click the “Settings” icon in the upper right corner, and then you can customize the output format, output quality and more settings. Here choose MP3 format for Deezer songs.

output setting

Step 3. Add Deezer Songs/Playlists to Converter
Browse the Deezer song or playlist you want to download. Then open any song or playlist, and click the “+” icon in the right side.

add deezer music to list

All songs in the playlist will be selected by default. You can unselect the songs you don’t like.

select deezer songs

Step 4. Start Downloading Deezer Songs to MP3
Once successfully importing Deezer songs, hit on the “Convert” button to start downloading and converting Deezer songs to MP3 audios.

download deezer music to mp3

Step 5. Find Downloaded Deezer MP3 Songs
After the downloading process is completed, you can click the “History” > “Blue Folder” icon to find the output Deezer MP3 songs.

download deezer songs to mp3 completed

Now get this powerful tool and use it to download Deezer songs, playlists to MP3 at fast!

d_win d_mac

Download Deezer Song/Playlist to MP3

How to Download Pandora Music to MP3 for Free

Summary
This post will show you the best solution to download Pandora Music to MP3 for free, so that you can keep Pandora Music as local files forever, and use Pandora Music on more ways without limitations.

Just like Apple Music, Spotify, Amazon Music Unlimited, etc, Pandora is another well-known music streaming service which provides lots of streaming music for users. Pandora provides two membership service: free membership and subscription membership. Pandora free members can enjoy Pandora music with ads and Pandora subscription users can enjoy more function while listening music without limitations, like no ads, high music quality, music download for offline playback, etc,. However, both Pandora free users and subscribed users can only enjoy Pandora music within America area and Pandora subscribed users can only enjoy Pandora offline playback within Pandora app.

The problem is that you can’t transfer Pandora Music anywhere or play them with other music players other than Pandora because all Pandora Music songs are special protection. All music contents you access from Pandora Music is encrypted audio file, which means that you are not allowed to use them without Pandora authorization. Even more, all the downloads from Pandora will be inaccessible when music subscription expires. To play Pandora Music out of America area, keep Pandora Music forever without worrying about losing them after the subscription ends, and use Pandora Music on more ways in life without limitations, you could download Pandora Music to MP3 for free and save them as local files on your computer.

Tool is Designed for Downloading Pandora Music Locally

UkeySoft Pandora Music Converter is your ultimate music converter for Mac/Windows. It allows you to download Pandora Music to computer locally, while downloading Pandora Music to MP3, M4A, AAC, WAV, AIFF, FLAC. If you care about music quality and music download speed, UkeySoft software is the best choice for you, no matter if you’ve subscribed to Pandora Premium or not. It will keep original audio quality and all ID3 tags in output music files, to make you get a great music listening experience. This tool is built-in Pandora Music web player. What you need to do is to log in your Pandora Music account and then get your entire playlist downloaded in one click. With advanced design, the download speed will reach 10X and even faster, that will save you much time. As a result, you get Pandora Music forever without subscription, play music on any area not only America. Besides, you are able to transfer and play Pandora Music on any devices offline without limitations. What’s better, you can use Pandora Music on more ways in life conveniently.

Features of UkeySoft Pandora Music Converter

  • Download Pandora Music to computer locally
  • Download Pandora Music to MP3, M4A, AAC, WAV, AIFF, FLAC
  • Work for all Pandora Music users
  • Keep original audio quality and all ID3 tags
  • Built-in Pandora Music web player
  • 10X faster music download speed
  • Get Pandora Music forever without subscription
  • Play music on any area not only America
  • Transfer and play Pandora Music on any devices offline
  • Use Pandora Music on more ways in life

d_win d_mac

How to Download Pandora Music to MP3 for Free

Step 1. Log in Pandora Account
To begin with, download, install and run UkeySoft Pandora Music Converter on the PC/Mac computer. Then log in your Pandora account in its home page, by clicking “Log In” icon.

login pandora account

Step 2. Customize the Output Settings
Click on the “Settings” icon in the upper right corner to customize the output format (M4A, MP3, AAC, FLAC, WAV, AIFF), output quality (up to 320kbps), output folder, output file name, and more depend on your needs. To download Pandora Music to MP3, tap “MP3” option.

output setting

Step 3. Add Pandora Songs
Open any playlist or album in Pandora web player, which contain the songs you want to download to MP3.

add pandora music playlist

Once you click a playlist or an album, all items in the playlist/album will be selected by default. Just cull some items you don’t need.

select pandora music

Step 4. Download Pandora Music to MP3
Finally, click on the “Convert” button to start downloading Pandora Music to MP3. The music conversion will end with only some minutes, and output music with its original music quality and all ID3 tags.

download pandora music to mp3

Step 5. Preview Pandora Music
Once the music download completes, click on blue folder icon to preview all Pandora Music songs in MP3. Also, you can play Pandora Music offline directly in its built-in music player.

pandora music conversion history

d_win d_mac

Conclusion

There are various reasons you decide to download music from Pandora Music to MP3 files, but one of the primary reasons should be listening to music with more freedom. This page shows the best music downloader from UkeySoft that is capable of exporting Pandora audio to computer locally at 10X super-fast speed with zero quality loss. After that you can listen to Pandora Music offline without any limitations. It’s worth trying!

Download Pandora Music to MP3 for Free

iPhone 14/13/12/11 Won’t Turn on or Is Frozen [Fix Now!]

Summary
iPhone 14/13/12/11 won’t turn on or is frozen? What to do if iPhone 14 won’t turn on? Here we have prepared some tricks for you to fix iPhone 14/13/12/11 won’t turn on or is frozen. You can fix a frozen or unresponsive iPhone via hard reset, or using an iOS system repair tool, no any data loss!

Apple released iPhone 14 series on September, 2022, including iPhone 14, iPhone 14 Plus, iPhone 14 Pro, iPhone 14 Pro Max. Compared to iPhone 13, 12, 11, the iPhone 14 series have more excellent battery life, faster low-light performance and higher-quality photos and more. But there are a lot of questions about the brand-new iPhone 14 series, such as iPhone 14 is frozen and won’t turn on. Today, we are not going to compare the differences among iPhone 14, 13, 12, 11, but we will focus on how to fix iPhone 14/13/12/11 won’t turn on or is frozen problems. You will get some tricks here to fix iPhone 14, 13, 12, 11 not turning on issue, and fix a frozen iPhone 14, 13, 12, 11 at all.

Way 1. Hard Reset iPhone to Fix iPhone 14/13/12/11 Won’t Turn on or Is Frozen

If your iPhone is frozen and won’t turn on, you can do a force restart or hard reset to wake it up. Follow the simple steps below:

On an iPhone 14/13/12/11/XR/XS/X/8/SE 2nd gen/SE 3rd gen:
Press and quickly release the volume up button.
Press and quickly release the volume down button.
Press and hold the side button until the Apple logo appears.

On an iPhone 7 or iPhone 7 Plus:
Hold the Sleep/Wake button and the Volume down button at the same time.
Release both buttons until the Apple logo appears on the screen.

On an iPhone 6, 6s, 6s Plus, SE 1st gen:
Press and hold the Home button and the Sleep/Wake button.
When the Apple logo appears, release both buttons.

hard reset iphone

Way 2. Fix iPhone 11/12/13/14 Won’t Turn On or Is Frozen via iOS System Recovery (No Data Loss)

Another safe and impressive method is to use a third-party iOS system recovery tool. With a third-party iOS system recovery software, you can repair most iOS system issues. Here we highly recommend the U.Fone iOS System Recovery.

U.Fone iOS System Recovery is sophisticated yet professional program that can help to fix many minor software-related issues, including frozen iPhone, iPhone won’t turn on / off, iPhone keep restarting, or iPhone stuck in recovery mode, DFU mode, Apple logo, black/white/blue screen, etc.

It has a simple and user-friendly interface. You can use it to fix iPhone 14/13/12/11 won’t turn on or is frozen issues without any data loss. Besides that, it also enables you to upgrade or downgrade your iPhone without jailbreak.

Here are the specific steps to fix iPhone 14, 13, 12, 11 won’t turn on or is frozen with U.Fone – iOS System Recovery.

Step 1. Download and Install Program
Click the Download button below to get the program for computer. Once downloaded, install and start the program.

d_win d_mac

Step 2. Go to iOS System Recovery
On the main screen, click “More tools” in the left, and you’ll now get access to 3 functions.

iOS System Recovery tool

Click “iOS System Recovery” function.

select iOS System Recovery

As you can see, it can fix 50+ iOS system issues. Here choose “iOS Mode issues” and click “Start” button.

select iOS Mode issues option

Step 3. Connect iPhone 14/13/12/11 to Computer
Next, connect your iPhone 14/13/12/11 to computer using an Apple USB cable. It will detect your device and show you 2 repair types.

select Standard Mode

To fix iPhone is frozen and won’t turn on issue without data loss, you need to choose “Standard Mode”.

Step 4. Optimize iOS System (Optional)
As the picture shown below, it will detect and analyze your iOS device. In this step, you are able to optimize iOS System. You can click “Optimize” to update your iPhone, or just skip this step.

Optimize iOS System

Step 5. Enter Recovery Mode
Then follow the on-screen instructions to put your iPhone 14/13/12/11 into recovery mode manually.

enter recovery mode

Step 6. Download Firmware Package
It will then display the firmware package on the screen, select the one to match your iPhone.

select Firmware package

Click “Download” button to download the matched firmware package corresponding to your iPhone.

Download Firmware package

Step 7. Fix a Frozen iPhone or iPhone Won’t Turn On
At last, click “Repair” button to repair iPhone 14/13/12/11 back to normal.

fix iphone 14 won't turn on

When finished, you can open your iPhone and enjoy all iOS features with ease.

The Bottom Line

Here are 2 effective ways to help you wake up your iPhone 14 won’t turn on or is frozen. You can do a hard reset or use an iOS system repair tool to fix a frozen or unresponsive iPhone 14, 13, 12, 11. Pick the one you like!

d_win d_mac

iPhone 14/13/12/11 Won’t Turn on or Frozen

How to Recover Deleted Photos from iPhone 14/14 Plus/14 Pro/14 Pro Max

Summary
Accidentally deleted photos from your iPhone 14? Want to know how to recover deleted photos from iPhone 14? In this article, we will teach you 3 ways to recover deleted photos form iPhone 14 series, including iPhone 14/14 Plus/14 Pro/14 Pro Max.

“I mistakenly deleted some important photos from the ‘Recently Deleted’ folder in my iPhone 14 Pro’s Photos app. Is it possible to recover these deleted photos?”

Thanks to advances in smartphone technology, taking photos with the camera on your iPhone 14 is easier than ever before. However, accidental deletion of these precious photos can happen with just a single tap on the screen, leaving you in despair if the photos were not backed up. The good news is that there are various ways to recover permanently deleted photos from your iPhone 14, even if you thought they were lost forever. Whether you have a backup or not, you can recover your deleted photos and save them from being lost forever.

If you’re in a situation where you’ve accidentally deleted an important photo from your iPhone 14, don’t worry. In this guide, you’ll discover everything you need to know about recovering your deleted photos from iPhone 14/14 Plus/14 Pro/14 Pro Max, including methods for recovering them with or without a backup.

Part 1. Recover Deleted Photos from Recently Deleted Folder

Fortunately, if you haven’t permanently deleted your photos, you can easily recover them from the Recently Deleted folder within 30 days. Follow these simple steps to retrieve your photos:

Step 1. Open the Photos app on your iPhone.
Step 2. Tap on the Recently Deleted folder.
Step 3. Select the photos you want to recover by tapping on them, or tap ‘Select’ in the upper-right corner to select all.
Step 4. Tap on ‘Recover All’ or select the individual photos you want to recover, and then tap ‘Recover’ to restore them to your iPhone’s photo gallery.

photo recently deleted

Recovering deleted photos on your iPhone 14 is a straightforward process. However, if it’s been more than 30 days since you deleted the photos, you won’t be able to retrieve them from the ‘Recently Deleted’ feature in the Photos app. In this case, your best option is to use a specialized photo recovery program to recover the deleted photos directly from your iPhone 14’s memory, without the need for a backup.

Part 2. Recover Deleted Photos from iPhone 14 without Backup

Among the available tools for recovering deleted photos on iPhone 14, iPhone Data Recovery stands out as an excellent option. Its advanced algorithms enable deep scans of the device’s memory, making it possible to recover not only photos but also other types of data, such as messages, contacts, notes, and call history. In addition, this iPhone photo recovery software provides the ability to retrieve images from iTunes and iCloud backups, making it a versatile tool.

More Features of iPhone Data Recovery

  • Easily recover lost or deleted data from your iPhone, iPad, or iPod touch.
  • Retrieve lost or deleted photos from your iTunes or iCloud backup.
  • Recover lost or deleted photos directly from your iOS device.
  • Save the recovered data directly to your computer for safekeeping.
  • Fix a variety of iOS system issues, including broken iPhones, stuck on the Apple logo, and DFU mode.
  • Compatible with the latest iPhone models (iPhone 14/14 Plus/14 Pro/14 Pro Max) and iOS 16.

d_win d_mac

Guide: How to Recover Deleted Photos from iPhone 14

Step 1. Download and Launch the Software
After downloading and installing iPhone Data Recovery on your computer, you can launch the program. The software’s main interface provides you with three primary functions, among which you can select “iPhone Data Recovery” from the list.

launch iphone data recovery

Step 2. Connect Your iPhone to Your Computer
Choose the “Recover from iOS Device” option to retrieve lost photos directly from your iPhone. Then connect your iPhone to your computer with an Apple USB cable.

connect iphone to pc

Step 3. Scan and Analyze Data on iPhone
Once your iPhone is connected to the computer, click on the “Start Scan” button to begin scanning for lost data. The program will then proceed to analyze all of the files and data on your iPhone. After the scan is completed, the program will display all of the data and files that were found on your iPhone.

scan app

Step 4. Choose and Preview the Desired Photos
Navigate to the left-hand side of the interface and select the specific photo categories you want to recover, such as “Camera Roll”, “Photo Stream”, “Photo Library”, “App Photos”, “App Videos”. Once selected, the recoverable photos and videos will be displayed on the right-hand side of the interface, where you can preview them. Simply choose the ones you want to recover.

select data to recover

Step 5. Start to Recover Photos on iPhone
Select the photos you want to recover and click on the “Recover” button to start the recovery process. The software will then retrieve the chosen photos and save them to your computer. Be sure to pick a safe location to store the recovered files.

start to recover

d_win d_mac

Part 3. Recover Deleted Photos from iPhone 14 via iTunes

A viable option to recover photos from an iTunes backup is to perform a selective restore of the backup. By doing so, you can recover specific photos from the backup without losing any other data on your iPhone. Keep in mind that if you perform a full restore, it will erase all the data on your iPhone and replace it with the backup, including the newly taken photos that you might not want to lose.

Step 1. Launch iTunes on your computer and connect your iPhone 14 to it using a USB cable.
Step 2. Click on the iPhone icon, then navigate to the “Summary” tab in the Settings section.
Step 3. Under the “Backups” section, click on “Restore Backup” and select the most recent backup.
Step 4. Wait for the backup to restore, and then check if the deleted photos have been recovered on your iPhone.

restore from itunes backup

Conclusion

Losing important photos from your iPhone 14 can be a frustrating experience, but fortunately, there are various ways to recover them. You can try recovering the deleted photos from your Recently Deleted album, iTunes backup, or use third-party data recovery tools such as iPhone Data Recovery. With these methods, you can easily retrieve your lost photos from your iPhone 14/14 Plus/14 Pro/14 Pro Max, regardless of the cause of the loss.

Recover Deleted Photos from iPhone 14

How to Fix iOS 16 iPhone to Normal without Data Loss

Summary
iPhone get into abnormal state after upgrading to iOS 16? Read this post then you will get the best method to fix iPhone which run on iOS 16 to normal without data loss.

My iPhone 13 stuck at restart loop after I upgraded it to iOS 16. What happen on it? Any ways to fix this device to normal? By the way, I haven’t backed up recently. How to return it to normal without data loss? Thanks so mush!

It is no doubt that the hottest topics are mostly about the newly released iOS 16. Recently Apple released iOS 16.4 and iPadOS 16.4, two updates that come after several weeks of beta testing. iOS 16.4 add a long list of new features, ranging from updated emoji characters to web push notifications on the iOS device. Lots of iOS users want to get their device on iOS 16, they can’t wait to upgrade their device to iOS 16. Lots of iOS users want to upgrade their device to the newest iOS 16. However it likely have many bugs that frustrate the users. Some iPhone user complain a variety of performance issues with iOS 16. The current list of iOS 16 performance issues includes UI lag, freezes, lock ups, and random reboots. These are extremely common, particularly on older iPhone models. This post aims to show you some simple tips and the best solution to fix iOS 16 iPhone to normal. Hope it will do a great help for you.

Part 1. Simple Tips to Fix iOS 16 iPhone to Normal

If you get some issues on your iOS 16 device, and you don’t have time to get in touch with Apple support, here are some simple tips may help you fix iOS 16 performance issues you’ve meet on your device.

1.Restart Your Phone
If you start noticing iPhone stuck or another performance issues after installing the latest version of iOS 16, try restarting your iPhone. Power it down, leave it off for a minute, and then turn it on. This has solved many issues for iPhone user in the past.

2.Clean Up the Storage of Your iPhone
If you’ve used your iPhone for some years you might have a ton of clutter taking up space on its internal storage. Deleting unnecessary files could help speed up your iPhone. This is especially true if you’re almost out of storage.

3.Stop Using Background App Refresh
iOS background app Refresh feature refreshes apps in the background to show you the latest data when you open it. It also makes your phone work in the background. So, if you don’t need this, you might want to shut the feature off. It may help to fix iOS stuck issue on device.

4.Downgrade iOS System
If it is not work for fixing abnormal state issues on iPhone with iOS 16, you can try downgrading device to the previous iOS version.

Part 2. Fix iOS 16 iPhone to Normal without Data Loss (Best Solution)

Well, if you try these tips above in the last part and it is not work perfectly, you can turn to this best solution. Thanks to U.Fone iOS System Recovery, you are able to fix iOS 16 iPhone to normal without data loss. With the advanced technology design, this tool provides a faster and reliable way with users. Only some easy steps, you can get your iPhone back to normal state as usual. What case can this tool help to fix? It supports to effortlessly repair 150+ iOS system issues at home like restart loop, stuck at white Apple logo, stuck on recovery mode, etc,. What’s more, this powerful tool is compatible with all iOS versions and devices including iOS 16 and iPhone 14 models.

d_win d_mac

How to Fix iPhone to Normal without Losing Data

Step 1. Install U.Fone iOS System Recovery
Download, install and run the U.Fone iOS System Recovery on PC/Mac computer, click the “More tools” function in its main interface. Then, connect your iPhone to the computer via an USB cable.

connect iPhone to computer

After that, a new window will pop up, offer three options for your chosen. To fix iPhone to normal without data loss, tap “iOS System Recovery” option.

select iOS System Recovery

Then click “iOS Mode issues”, the program enable to fix 50+ issues, like stuck on headphones mode, stuck on recovery mode, stuck on DFU mode, etc,. Select one depend on your case. Then, hit the “Start” button to go on.

select iOS Mode issues

Step 2. Select Fix Mode for iPhone
You then will get into a new window, like the screenshot below. Please select “Standard Mode” to fix your iPhone without data loss, then click “Confirm” to go on.

iPhone fixing mode

Tips: You are suggested to choose advanced mode only if the standard mode fails. (It may lead to data loss on device).

Step 3. Detect Your iPhone
The program will detect and analyze your iPhone and shows its information.

detect iphone

Step 4. Select Firmware Package
In this step, select a suitable firmware package for your iPhone, the program provides the latest iOS version for iPhone.

select Firmware

Step 5. Download Firmware Package for Fixing iPhone
It will detect the model of your iPhone and displays available iOS system versions automatically. Select a version and click on “Next” button. It will start downloading Firmware package for repairing your iPhone. Please don’t interrupt the connection of your device during the download processing.

Download Firmware

Step 6. Fix iPhone to Normal without Data Loss
When the Firmware package downloading completes, click the “Repair” button. The program will begin to fix iOS system to normal without data loss, please keep connecting your iPhone with the computer until the fixing task finishes.

fix iphone without data loss

Well done, now your iPhone has restart automatically, and it has back to normal state without data loss.

d_win d_mac

The Bottom Line

After reading this post, we hope you have fix your iPhone successfully. Of all solutions mentioned above, get help of U.Fone iOS System Recovery is the most effective solution to fix iOS 16 iPhone problems. Almost all iPhone issues can be solve by using this program. Though it can fix iOS issues without data loss on iOS device, don’t forget to back up your device frequently. That’s all about our guide. If you have any questions about this topic, welcome to share it with us.

Fix iOS 16 iPhone without Data Loss

How to Transfer Data from Samsung to iPhone 14/13/12

Summary
Wonder how to transfer data from Samsung to iPhone 14/13/12? In this article, we will explore 2 ways that can assist you to transfer data including WhatsApp data, photos, media, files, contacts, and messages to iPhone 14/13/12 from Samsung.

“I have recently acquired an iPhone 13 and I am looking for guidance on how to transfer data from Samsung to my iPhone 13. Can anyone provide me with instructions or suggestions on how to proceed with this process?”

For those who are transitioning from Samsung to iPhone 14/13/12, transferring data from the old device to the new one is often a major concern. But don’t worry, you’ve landed on the right page! We’ve got you covered with the best tips and tricks that can assist any user to transfer data from Samsung to iPhone 14/13/12.

Part 1: How to Transfer Data from Samsung to iPhone 14/13/12 with Phone Switch [Best Tool]

When transferring data from your Samsung to iPhone 14/13/12, it’s crucial to use a data-sharing software that is reliable and efficient. Phone Switch is the perfect tool for this task, as it has advanced technology that enables seamless and secure data transfer without the risk of losing any original data.

With Phone Switch, you can transfer a variety of data types from Samsung to iPhone 14/13/12, including WhatsApp data, photos, media, files, contacts, and messages. This software is designed to simplify the transfer process and ensure that the operation can be completed with just a few clicks. So, if you’re looking for a hassle-free way to transfer data from Samsung to iPhone 14/13/12, Phone Switch is the way to go.

Key Features of Phone Switch

  • Quickly transfer large amounts of data from Samsung to iPhone 14/13/12.
  • Transfer up to 18+ different types of data between phones.
  • Compatible with over 6000 different mobile devices.
  • Simple to use, even for those who are beginners.

Guide: How to Transfer Data from Samsung to iPhone 14

Before proceeding with the steps below, ensure that Phone Switch is downloaded and installed on your computer.

d_win d_mac

Step 1. Run the Program and Connect Samsung and iPhone 14
After launching Phone Switch on your computer, select the “Switch” mode to begin. Connect both your Android phone and iPhone 14 to your computer using USB cables, and ensure that your computer recognizes both devices before proceeding. The Phone Switch interface will be displayed on the screen.

phone switch home

Step 2. Choose File Types to Switch
Once the Phone Switch program detects both devices, click the “Flip” button to ensure that the Samsung phone is on the left side as the source device, and the iPhone 14 is on the right side as the target device. You can now select the data types you want to transfer to your new iPhone 14.

choose file types

Step 3. Transfer Data from Samsung to iPhone 14
Simply click on the “Start Transfer” button and wait for the program to import the selected data from Samsung to iPhone 14. It’s important to avoid disconnecting either device during the transfer. Once the process is complete, you should find all your desired data, including text messages, call logs, calendar, photos, videos, and music, on your new iPhone 14.

transfer data to iphone

Part 2: How to Transfer Data from Samsung to iPhone 14/13/12 via Move to iOS

Move to iOS is a free app that allows for easy transfer of data between Android and iPhone devices. However, it can only be used when setting up a new iPhone. If you have already set up your iPhone 14, we recommend using the first method with Phone Switch. Here are the steps to transfer data from Samsung to iPhone 14 via Move to iOS:

Step 1. Install the Move to iOS app on your Samsung device from the Google Play Store.

Step 2. On your iPhone 14, go to the ‘Apps & Data’ screen and select ‘Move Data from Android’.

select move data from android

Step 3. Tap ‘Next’ and then wait for a ten or six-digit code to appear on the iPhone 14 screen.

wait for code

Step 4. Open the Move to iOS app on your Samsung phone and follow the on-screen instructions until you reach the point where you’re asked to enter the code provided on your iPhone 14.

Step 5. Choose the data you want to transfer from your Samsung phone to the iPhone 14 and then click ‘Next’ to start the transfer.

Step 6. Wait a few minutes for the transfer to complete. Once done, finish setting up your iPhone 14 and access the transferred data.

finish transfer

Conclusion

No matter which data transfer method you choose to transfer data from Samsung to iPhone 14/13/12, this post has provided clear instructions on each method to simplify the process. If you are still unsure which method is the best for you, we highly recommend using the MobileTrans data-sharing tool. It offers a fast and straightforward data transfer operation that is sure to make the transition from Samsung to iPhone 14/13/12 much easier for any user.

Transfer Data from Samsung to iPhone 14

How to Transfer Contacts to New iPhone 14/13/12

Summary
Wondering how to transfer contacts to New iPhone 14/13/12?Read this article, you will learn four ways on how to transfer contacts to new iPhone 14/13/12. Whether you want to use SIM Card or transfer contacts from iPhone to iPhone with iTunes, you will find the solution here.

Getting a new iPhone is an exciting experience, and the first thing most people want to do is to transfer data from the old device to the new one. Among all the data on your phone, your contact list is perhaps the most important information. Losing your contacts can be a nightmare, especially if you have a large list of people you need to keep in touch with. Fortunately, with the advancements in technology, transferring contacts to a new iPhone has become a hassle-free task and you can complete in a matter of minute.

In this guide, we will provide you with three different methods to transfer your contacts to your new iPhone 14/13/12 that you can use to transfer your contacts seamlessly. These methods include using U.Fone – iOS toolkit, iTunes, and SIM Card. By following the step-by-step instructions, you can transfer your contacts from your old iPhone to your new one quickly and easily.

Method 1. Transfer Contact to New iPhone 14/13/12 Using iOS Toolkit

iOS Toolkit – Phone Switch is a robust software solution that facilitates the seamless transfer of data to and from iOS devices such as iPhones, iPads, and iPods. This all-in-one toolkit enables users to easily manage their personal data, including contacts, SMS, photos, music, and videos, among others.

With iOS Transfer, you can effortlessly export, add, delete, and organize your data, allowing for more efficient management of your iOS device. This versatile program makes it simple to transfer files between your iOS device, Android and WinPhone, ensuring that your data is always accessible and up-to-date.

More Features of U.Fone iOS Toolkit

  • Transfer contacts, SMS, photos, music, video and more from iPhone to iPhone.
  • Backup and Restore your phone and app data easily.
  • Support data transfer between iOS and Android devices.
  • Easy-to-use file management system.
  • Compatible with all iOS devices, including iPhones, iPads, and iPods.
  • Support latest iOS 16.

Guide: How to Transfer Contacts to New iPhone 14/13/12

Download and install U.Fone iOS Toolkit on your Windows & Mac computer.

d_win d_mac

Step 1. Connect Your iPhones
Connect both your old iPhone and new iPhone 14 to your computer using USB cables. Then launch iOS Toolkit – iOS Transfer and select “Phone Transfer”, and choose “Phone to Phone” option to start transferring contacts.

ios transfer interface

Step 2. Select Contacts to Transfer
Locate the “Flip” button and use it to select them as the source and the destination. Then the software will detect and display all available files for transfer. To transfer your contacts, make sure that the “Contacts” option is selected, and then click on the “Start” button to begin the transfer process.

transfer file from iphone to iphone

Step 3. Transfer Contacts from iPhone to iPhone 14/13/12
U.Fone will start transferring contacts from your olde iPhone to iPhone 14/13/12.

transfer completed

Once the transfer process is complete, disconnect both of your iPhone, and all the contacts will be transferred to your new iPhone 14/13/12.

d_win d_mac

Method 2. Transfer Contact to New iPhone 14/13/12 via iTunes

iTunes is also a workable way to transfer contacts, music, videos, and other data between your iOS devices, but it’s music more complicated. Here’ s how to transfer your contacts using iTunes:

Step 1. First, make sure you have the latest version of iTunes installed on your computer.
Step 2. Connect the iPhone with the contacts you want to transfer to your computer using a USB cable. If iTunes doesn’t launch automatically, open it.

Step 3. In iTunes, click on the “Device” tab, then choose “Info”. From there, select “Sync Contacts” and click “Apply” to begin the sync process. This will copy the contacts from your iPhone to your computer.

Step 4. Once the sync is complete, disconnect the source iPhone and connect the target iPhone to your computer.

Step 5. In iTunes, select the “Device” tab again, and choose “Info”. This time, check the “Contacts” option in the “Advanced” section.

Step 6. Finally, click “Apply” to sync the contacts to your new iPhone.

That’s it! Your contacts should now be copied over from your old iPhone to your new one.”

transfer contacts itunes

Method 3. Transfer Contact to New iPhone 14/13/12 Using SIM Card

Another way to transfer contacts to a new iPhone is by using a SIM card. However, this method is only useful if your old phone and new phone support the same type of SIM card. Here’s how you can transfer your contacts using a SIM card:

Step 1. Insert the SIM card from your old phone into your new iPhone.

Step 2. Go to “Settings” on your iPhone and select the “Contacts” option.

Step 3. Click on the “Import SIM Contacts” option.

Step 4. Wait for the contacts to be imported to your new iPhone.

Step 5. Remove the SIM card from your new iPhone and insert your old SIM card back into your old phone.

import contacts from sim

Conclusion

Transferring contacts to a new iPhone has become a lot easier with the advancements in technology. You can use any of the above methods to transfer your contacts to your New iPhone 14/13/12. If you want a hassle-free and efficient transfer, we recommend using U.Fone – iOS Toolkit. However, if you prefer using Apple’ s native software, then iTunes is excellent option. Lastly, if you have a SIM card that supports your new iPhone, then using the SIM card method can also be a great option. Choose the method that works best for you and enjoy your new iPhone with all your contacts.

Transfer Contacts to New iPhone 14/13/12