All posts by DHZ

Apple Pay:Everything We Should Know

Apple Pay now available in the US, UK, China, Canada, Singapore, Switzerland, France, Hong Kong, and Australia in participating retail stores and apps.

AT A GLANCE
Apple Pay is Apple’s mobile payment service, which lets iPhone 6, 6s, 6 Plus, 6s Plus, SE, and Apple Watch owners make payments using NFC with their devices.

FEATURES
-NFC Integration.
-Touch ID for Security.
-Available in the U.S., UK, China, Australia, Canada, Switzerland, France, Hong Kong, and Singapore.
-Accepted at more than 2.5 million locations in the U.S..
-Supported by iPhone 6, 6s, 6 Plus, 6s Plus, and Apple Watch.

applepay

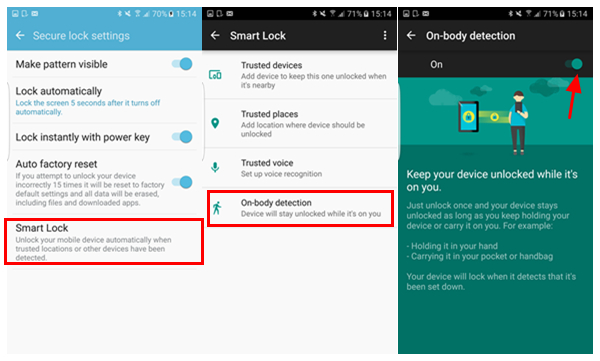
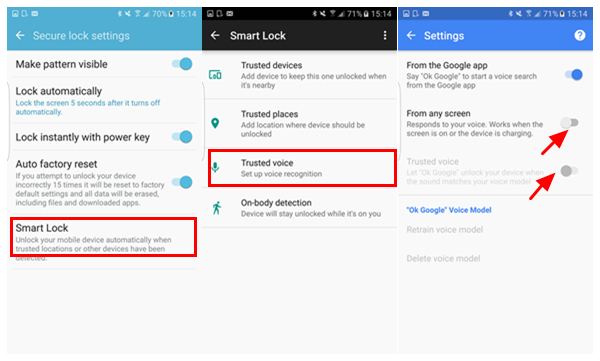
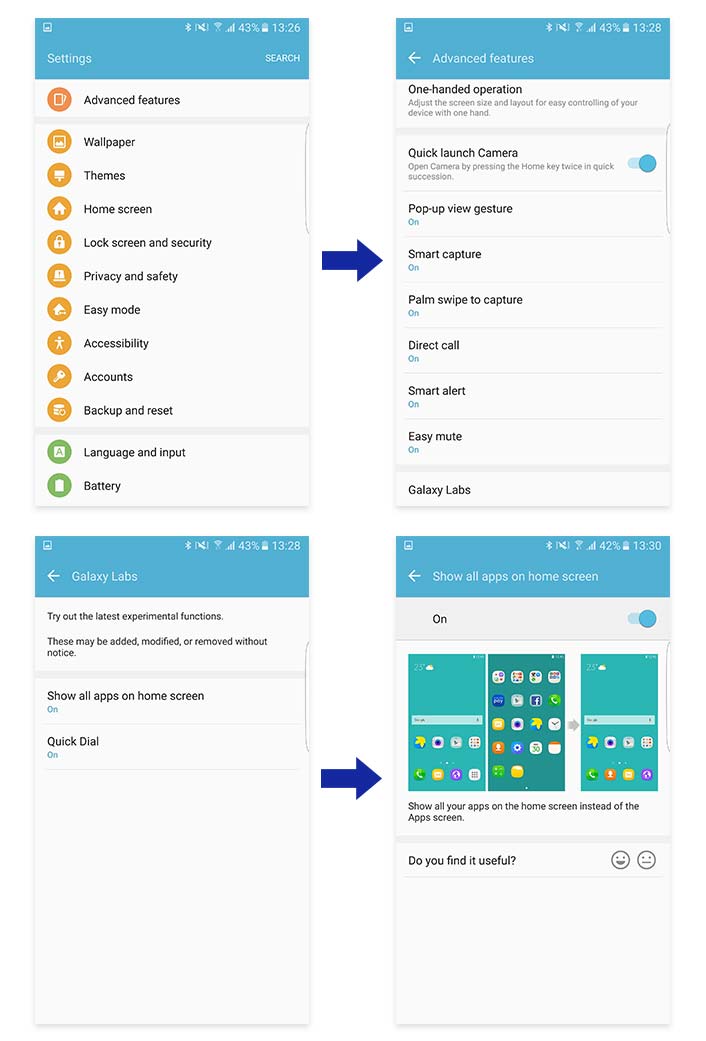
Setting Up Apple Pay
After installing iOS 8.1 or later, Apple Pay can be set up in the Wallet app (called Passbook in earlier versions of iOS). Tapping the “+” icon in Wallet lets users to add a credit or debit card to Apple Pay, either selecting a card already on file with iTunes or scanning one in with the camera.

applepay-settings

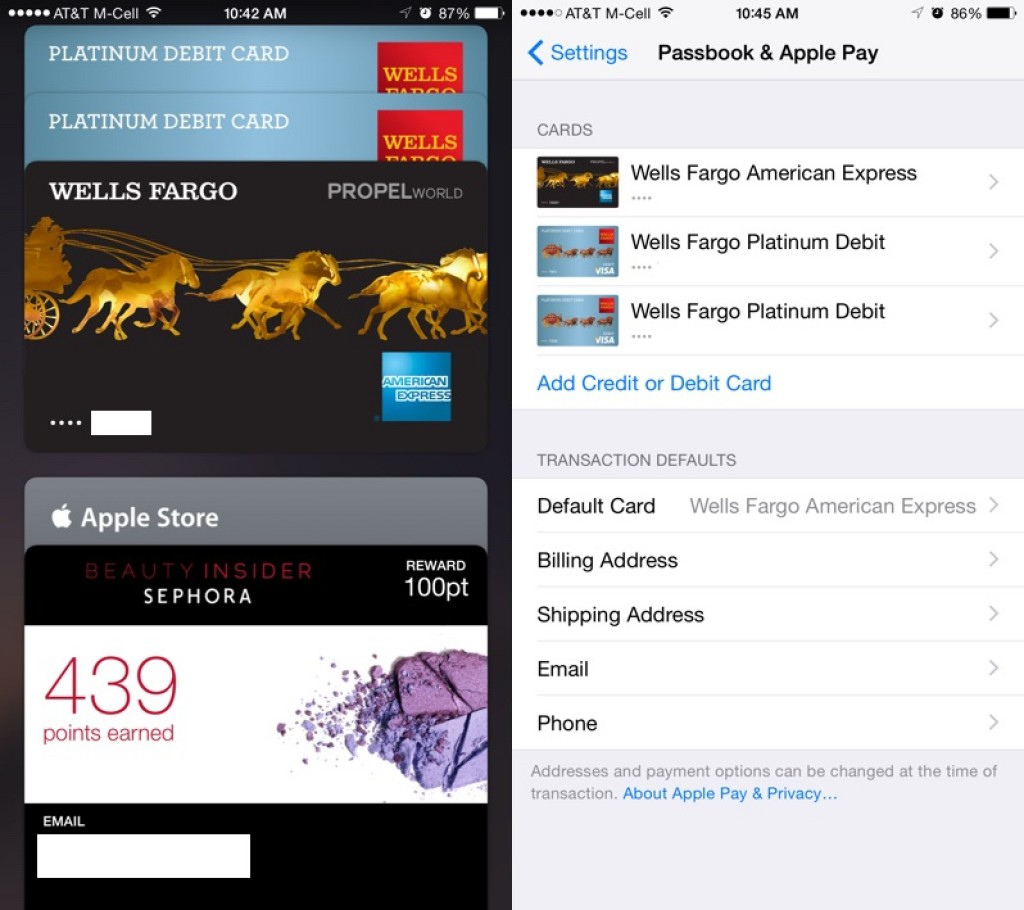
Credit and debit cards are verified in just a few seconds, but some cards require a phone call, app download, or an email to verify a card before it can be added to Apple Pay. Once a card is verified, it is immediately available for purchases both in stores and within apps. Up to eight cards can be registered with Apple Pay at one time.

Apple Pay can be managed in the Settings app, located in the “Wallet and Apple Pay” section. Each card added to Wallet is listed in that section, along with information like billing address, email, and phone number. Tapping on a card offers specific information like last digits of the card number, last digits of the Device Account Number that replaces the card number in transactions, and it also provides contact information for the bank that issued the card.

applepay-settings-2

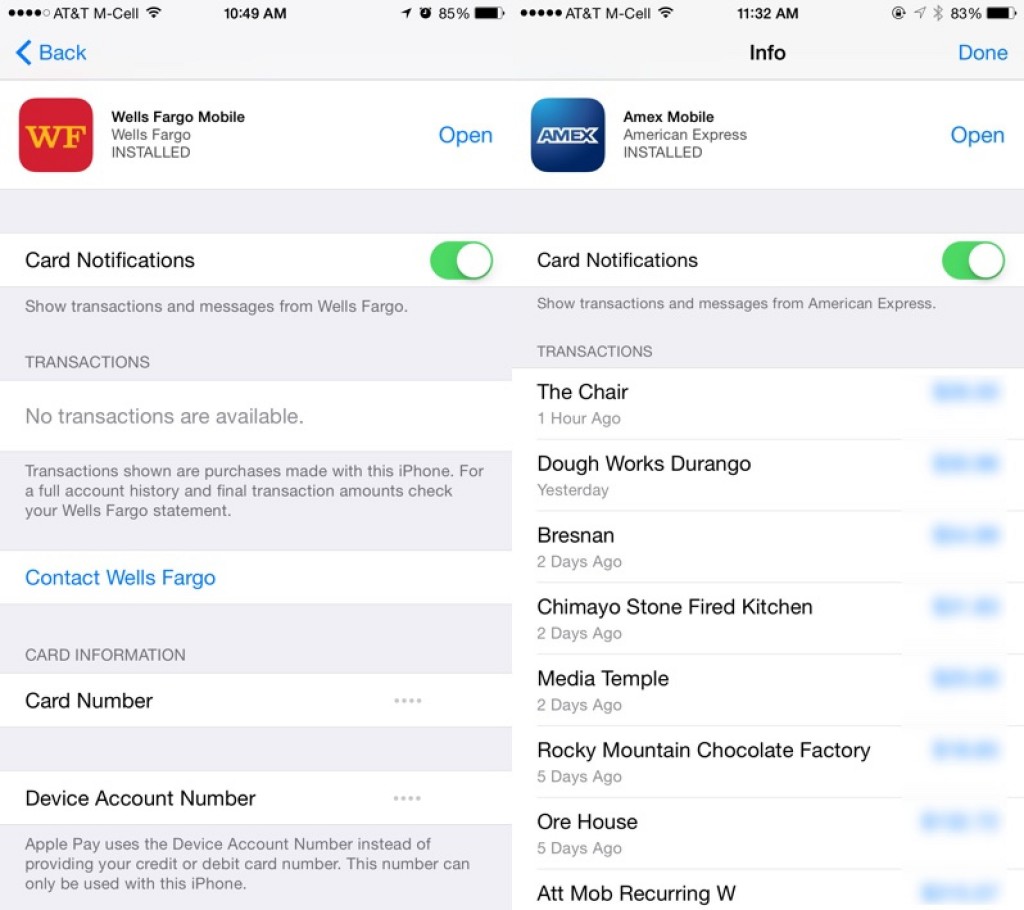
Some cards are also able to display transaction information, offering a list of recent transactions that have been made.

How It Works
In a retail store, when approaching a point-of-sale system compatible with Apple Pay, the screen of the iPhone will light up and open Wallet automatically, where a user can tap on a credit card to be used or pay with the default card.

A payment is made by holding a compatible iPhone or Apple Watch near a checkout system that includes NFC, most of which look like standard card checkout terminals within stores. A finger registered with Touch ID must be kept on the home button for a short amount of time (or the Apple Watch must be kept on the wrist), after which a payment is authenticated and the transaction is completed. A completed payment is denoted by a slight vibration, a check mark on the screen, and a beep.

In some stores, users may still be asked for a PIN code or to sign for a purchase due to older point-of-sale machines, but in other retail locations, checking out with Apple Pay is an easy one-step process.

At times, Apple Pay may not be much more convenient than swiping a card, but it’s important to recognize that Apple Pay is still more secure than a traditional card-based transaction. With Apple Pay, a cashier does not see a credit card number, a name, an address, or any other personally identifying information. There is no need to take out a credit card or confirm the authenticity of a credit card with a driver’s license or ID card, because all of that information is stored on the iPhone and protected by several built-in security systems, including Touch ID.

Stores are also not given a credit card number (as card numbers are replaced with unique Device Account Numbers) so store security breaches involving leaked credit card numbers will no longer affect Apple Pay users.

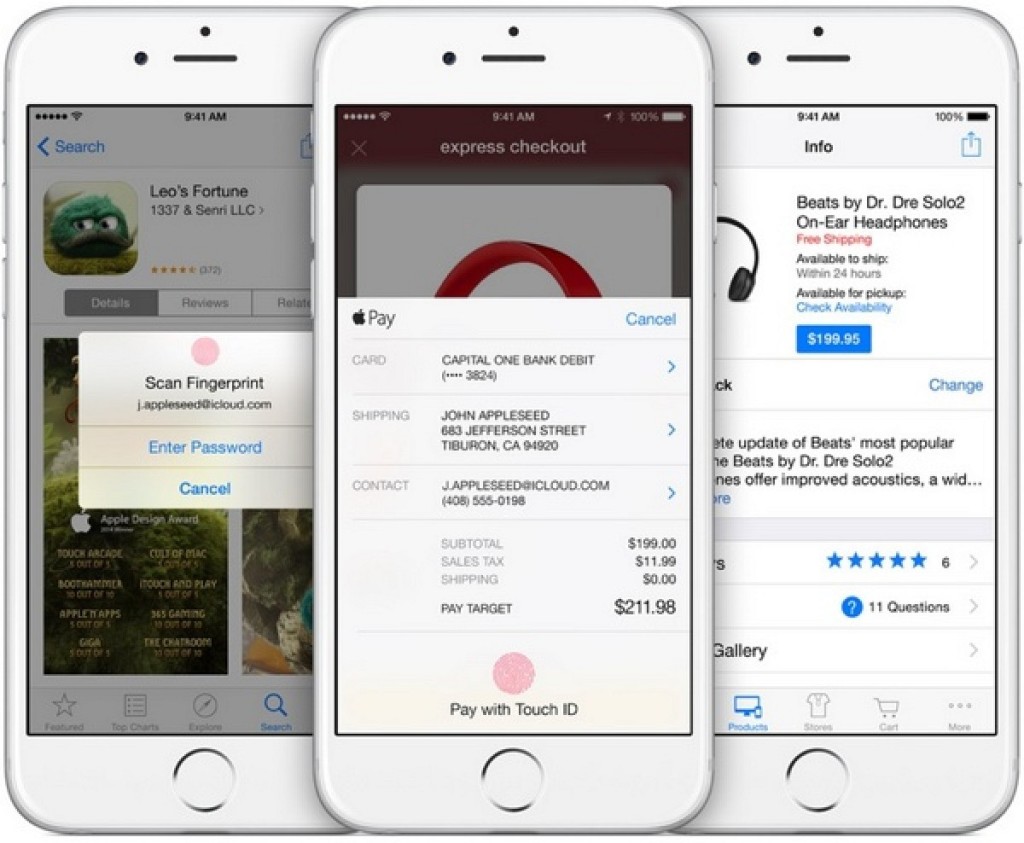
Making a payment online via Apple Pay is equally as simple, as it uses the same credit card and authenticates with Touch ID in participating apps that have adopted the Apple Pay API. Using Apple Pay in an app bypasses all of the steps that are usually required when making an online purchase, including entering shipping and payment information.

After an item is added to an online cart and a user initiates the checkout process, Apple Pay can be selected as the payment method. The shipping/billing address associated with the credit or debit card on file is automatically entered, as is a user’s name, and the purchase is confirmed via Touch ID. During this process, information like shipping address can be altered, which is useful when ordering a gift.

applepay-apps

In-store returns are almost as simple as payments. As described by Apple, when returning an item purchased via Apple Pay in an Apple Store, users can tap their Apple Pay-compatible iPhone against a payment terminal which displays their recent in-store transaction information.

Online and retail payments are both limited to participating merchants. Apple Pay is only available within apps that have adopted the Apple Pay API and to make a payment in a retail location, the shop will need to support Apple Pay directly or allow NFC payments.

PRIVACY
Apple has been careful to point out the company does not store or monitor the transactions that people make with Apple Pay. Apple says it does not know what people are purchasing, nor does it save transaction information.

“We are not in the business of collecting your data,” said Eddy Cue during the keynote speech introducing Apple Pay. “Apple doesn’t know what you bought, where you bought it, or how much you paid. The transaction is between you, the merchant, and the bank.”

Upcoming Features and Partnerships

PARTNERSHIPS
Beginning in late 2015, a select number of Starbucks stores will begin accepting Apple Pay. A wider launch will come in 2016, with Apple Pay support planned for approximately 7,500 corporate-owned stores.

Bank of America and Wells Fargo may begin accepting Apple Pay at their ATM locations in 2016.

FEATURES
In the future, Apple Pay may expand to allow person to person payments much like Square Cash or Venmo. In late 2015, The Wall Street Journal reported Apple is in talks with banks over a potential mobile-to-mobile payments service. Such a service could launch at some point in 2016.

Read more:

iPhone 7:Everything You Need to Know

iOS 9.3.3 :The Things You Need to Know

How to Factory Reset an Locked iPhone

How to Recover Data from iPhone/iPad with iOS 10

How to Recover Lost Data on iPhone 7

How to Recover Data from Samsung Galaxy J2/J3/J5/J7

[Summary]:Samsung data recovery helps you recover lost/deleted/erased data such as photos, videos, SMS messages, contacts,phone numbers, WhatsApp chat history and other documents from Samsung Galaxy J2/J3/J5/J7,as well as Galaxy S and Note series smartphone.

Samsung Galaxy J series smartphone including Galaxy J2, J3, J5 and J7,although the Galaxy J series not Samsung’s flagship phone like Samsung Galaxy S9/S8/S7/S6/Note 8,but many people using Samsung Galaxy J series smartphone.When data get deleted or lost from Samsung galaxy J3 smartphone, the raw data of deleted files are not permanently deleted.Some users may ask how to recover lost data from Galaxy J3;how to retireve deleted photos on Galaxy J7;is it possbile to restore contacts on Samsung J5?

samsung galaxy j3

You may want to know:

* How to Transfer WhatsApp Chat History from iPhone to Samsung Galaxy

* How to Manage Samsung Data on Computer

The J3 is likable enough in its looks and feel, and its battery kept going long after I expected the phone to conk out.However,a lot of users reported that they lost data from Samsung Galaxy J3 under several circumstances,such as restore device to factory resetting,reboot device,poisoning,deleted by mistaken,device damaged,rooting,etc.To be honest,there are millions of satisfied users around the world that has used this tool called Samsung Data Recovery to fix Samsung Galaxy J2/J3/J5/J7 data recovery issues and easily recover all data from the Samsung J series phones.

How to Recover Lost File on Samsung Galaxy J3

Android Data Recovery enable to restore lost data from Samsung Galaxy J2/J3/J5/J7 phones easily,including SMS,contacts, text messages,photos,call history,WhatsApp chats & attachments, audios, videos and documents.Almost all models of Samsung devices are applicable to this smart program,like Samsung Galaxy J2/J3/J5/J7,Galaxy Note 8/5/4/3,Galaxy S9/S8/S7/S6/S5/S4 and other Android devices.In other words, it can be said that this is the useful recommended and secure ways through which you can restore lost data from any Samsung phone & tablet in simple steps.

d_win d_mac

Android Data Recovery Features:

-Retrieve deleted/lost photos, videos, music, contacts, messaging, call logs, WhatsApp data and many more.
-Fix and extract data from damaged or locked Samsung devices(Galaxy S6 to S4 and Galaxy Note 5 to Note 3).
-If you have experienced system crash or a black screen, still you can recover your data with the help of this data recovery tool.
-Backup your Android data and restore them to the device later.
-Compatible with 6000+ Android devices.

Simple Steps to Retrieve Deleted Files from Samsung Galaxy J3

Step 1.Connect Samsung Galaxy J3 to Computer
Run the Samsung Data Recovery program on your PC/Mac after downloading and installing,you need to connect your Samsung Galaxy J3 to computer via an USB cable.

connect samsung with the computer

Step 2.Enable USB Debugging on Samsung Galaxy J3
The program may require that you enable USB debugging on Samsung Galaxy J3 before scanning process begin.Simply follow the instructions in the next window to complete the process.

usb debugging samsung phone

Step 3.Scan Data on Samsung Galaxy J3
Once your Samsung Galaxy J3 is detected,the program will scan the device for all data.You should select the file you want scanned in the next window.Such as “Contacts”, “Messaging”,”Call History”,”Gallery”,and so on.You can choose the one you want to recover and click “Next” button.

select file tpye to recover from Samsung

If there is a prompt on your Samsung phone as follow,tap “Allow” and permit the program to access and scan the selected files on your Samsung smart phone.

allow scan the samsung

Now the program will begin to scan and analyze data stored on your Galaxy J3.

scan samsung for lost data

Step 4.Preview and Recover Data from Galaxy J3
When the scanning process is complete,all the files will be displayed as shown below.Choose the ones you to preview and click on “Recover” button to save them on your PC.

recover lost data from samsung galaxy j3

d_win d_mac

Have to say,Samsung Data Recovery is a powerful and efficient data recovery for Android as well as Samsung,it can also retrieve lost data from broken device/Android SD card.The complementary function of program is that support to fix bricked Samsung/Android phone,fix the stuck issues on phone,for example fix Samsung stuck in download mode/stuck in the start screen,remove the locked screen on phone,etc,.

Related Article

How to Recover Data from Samsung SD Card

How to Recover Data from Water Damaged Samsung Phone

How to Backup and Restore Samsung Data

How to Fix Samsung Frozen on Samsung Logo

How to Fix Samsung Touch Screen Cannot be Used Issue

How to Set the Smart Lock of Samsung Phone

Most people like to secure smartphones with screen lock.So do I.However,Screen lock may be inconvenient in some time.If we urgent to make a phone call, it seems redundant.It is moreover annoying that we have to enter password/pattern every time we turn on the screen.Smart Lock is a new feature on Samsung devices later than Galaxy S5,which can automatically unlock your mobile device as long as you are at trusted location or using your phone on trusted device.Galaxy S7 currently enables users to set up Trusted devices,Trusted places,Trusted voice and On-body detection.Follow the steps below and see how to do it.

Part 1:How to Set up a Trusted Device for Smart Lock

Step 1.Tap”Settings” on Home screen or Notification Bar.
Step 2.Go to “Lock screen and security” > “Secure lock settings” > “Smart Lock”.
Step 3.Draw the current pattern or enter current password/pin.
Step 4.Tap “Trusted devices” > “ADD TRUSTED DEVICE” > “Bluetooth” or “NFC”.
Step 5.Select the device you want to trust,and tap “YES, ADD”

smart-lock-s7-trusted-device

You can set your trusted devices,such as Bluetooth watch,car Bluetooth system,an NFC sticker on the phone dock in your car and so on.Once your Samsung phone detects the trusted device,it will keep unlocked.

Part 2:How to Set up a Trusted Place for Smart Lock

Step 1.Tap”Settings”on Home screen or Notification Bar.
Step 2.Go to “Lock screen and security” > “Secure lock settings” > “Smart Lock”.
Step 3.Draw the current pattern or enter current password/pin.
Step 4.Tap “Trusted places” > “Add trusted place”.
Step 5.Choose “YES” to allow access to GPS and pick a place.
You can position your home or company,so the device will stay unlocked when it detects via GPS that you are at these places.

smart-lock-s7-trusted-place

Part 3:How to Set up On-body Detection for Smart Lock

Step 1.Launch “Settings” app on Home screen or Notification Bar.
Step 2.Go to “Lock screen and security” > “Secure lock settings” > “Smart Lock”.
Step 3.Draw the current pattern or enter current password/pin.
Step 4.Tap “On-body detection”.
Step 5.Switch “On” the bar.

This function allows you phone to stay unlocked when it’s being held or carried by you.However,from where I stand,I don’t think this is good for protecting your privacy,because it cannot detect whether it’s exactly you who is using the device.Thus,it’s not recommended to keep this option on.

smart-lock-s7-onbody-detection

Part 4:How to Set up a Trusted Voice for Smart Lock

Step 1.Launch “Settings” app on Home screen or Notification Bar.
Step 2.Go to “Lock screen and security” > “Secure lock settings” > “Smart Lock”.
Step 3.Draw the current pattern or enter current password/pin.
Step 4.Tap “Trusted voice”.
Step 5.Toggle on the “From any screen” switch.You will need to log in your Google account to do the next.
Step 6.Tap the “Get Started” button and follow the instructions,and then tap “FINISH”.
Step 7.Turn on the “Trusted voice” switch.

As long as you set up voice recognition,your Samsung phone keeps unlocked by detecting that it’s you who is speaking.I personally regard this option as the best choice,for nobody can pretend the voice of yours.

smart-lock-s7-trusted-voice

Part 5:How to Remove Screen Lock

unlock-samsung

Way 1.Try to unlock your device with Google Account.
Way 2.Restore Phone to Factory Resetting.
Way 3.Remove Screen lock with Android Data Recovery.

Read more:

How to Fix Top 5 Samsung Problems

How to Fix WhatsApp Programs on Samsung Phones

How to Fix Samsung Frozen on Samsung Logo

How To Fix Samsung Stuck in Download Mode

How to Get More Internal Storage from Samsung

How to Restore Lost Data from Samsung

How to Backup and Restore Samsung Galaxy Note 8

Samsung Galaxy Note 8-What’s New
Samsung has used previous Galaxy Note handsets to test out new design concepts. In fact, we first saw Samsung’s curved ‘Edge’-style display on a Note phone, and it’s now a staple of the core Galaxy S series. Importantly, the ‘Infinity Display’ also means that much more screen can be packed into the same size body. For instance, the Galaxy S8+ is only marginally bigger than the Galaxy S7 Edge, but the screen size moved from 5.5 inches to 6.2 inches with the Galaxy Note 8. Considering that the Galaxy Note 7 used a 5.7-inch display, we’d expect to see similar screen size gains.

Why Should You Backup Samsung Galaxy Note 8
In case of accidently data loss you should backup Samsung phone data as often as possible,such as phone stolen,deleted by mistaken,Android system upgrade,factory settings or water damage.Backing up your Samsung Galaxy Note 8 is important if you want to avoid losing personal data and media files under any circumstances.

How to Backup and Restore Samsung Galaxy Note 8

Tool 1:Phone Transfer
However Android doesn’t offer a native backup service and Google hasn’t implemented a native photos and text messages backup service yet.Phone Transfer offer you the best way to backup and restore data on Samsung Galaxy Note 8,to protect the privacy perfectly,including:contacts,text messages,call logs,calendars, music,apps,photos,videos.Phone Transfer work well for Samsung Galaxy Note 8/5/4/3,Galaxy S8/S7/S6/S5/S4 data backup and restore.Not only Samsung phone and Android phone(HTC,Motorola,Lenovo,Huawei,etc),but also iPhone,Nokia,and blackberry are supported by this program.

d_win d_mac

Tool 2:Android Data Backup & Restore
Another helpful Samsung data manager tool our strongly recommend for you is the Android Toolkit – Android Data Backup & Restore tool,which help to effectively backup & restore data for Samsung Galaxy Note 8.Android Data Backup & Restore tool,backing up your Android data has never been easier.The program makes it easy to backup your Android data to computer and even selectively restore backed up data to your Android device.Almost all types of Android files are applicable,such as contacts,messages,call logs,calendars,gallery,video,audio,application,application data(WhatsApp,Line,Viber,Kik,etc,.).In additionally,Android Data Backup & Restore tool provide you extra function that allow to restore deleted data from Android easily with simple steps.Detail tutorial:How to Restore Deleted Data from Samsung Galaxy Note 8.

d_win d_mac

Part 1:Backup Samsung Galaxy Note 8 Data to Computer

Step 1.Select Backup Mode under Phone Transfer
As you see,there are four mode in the homepage of Phone Transfer.Select the one “Back Up Your Phone”.Then connect your Samsung Galaxy Note 7 phone with PC/Mac.

backup samsung galaxy note 8 to computer

Step 2.Start Backup Samsung Data to Computer
When the phone is connected,you will enter the interface as below.Click all the data to backup in the middle column(contacts,photos,SMS,etc,.)and click “Start Copy” button.If you don’t need to backup all data you can select data to backup.

backup samsung galaxy note 8 to computer

Only a few minute later,all selected data will be all copy to computer.

backup data from note 8 to computer

d_win d_mac

Part 2:Restore Samsung Galaxy Note 8 from Backup File

Step 1.Select Recovery Mode under Phone Transfer
Please firstly select “Restore From Backups” mode in the homepage of Phone Transfer.

restore backup to galaxy note 8

Step 2.Restore Data from Backup to Samsung Phone
Click the backup files of your phone after connecting the Samsung phone with computer.Then,choose the file you want to restore in the middle column and tap “Start Copy” button.

restore backup to galaxy note 8

The program will complete the restoring task on your Samsung phone in a short time.

restore backup to galaxy note 8

d_win d_mac

Everyone should realize how important it is to backup data on phone.Fortunately,with the wonderful Phone Transfer-a phone data manager,you can finish the backup and restore task easily and quickly.There is no need to worry about losing phone data any more. Just download and share it with your friends right now.

Part 3: Backup and Restore Samsung Galaxy Note 8 via Android Data Backup & Restore

Step 1. Connect your Galaxy Note 8 to Computer
Launch Android Data Backup & Restore and from the “More Tools” section,select “Android Data Backup & Restore” option.Then connect the Samsung device to your computer using USB cables.

Android Data Backup & Restore

Step 2.Select File Types to Backup
Android Data Backup & Restore can be used to back up 9 different file types including messages, call history, calendar, gallery, audio, video, Applications and Application data(WhatsApp,Line,Viber,Kik,etc,.).Please note that to backup app data requires your Samsung device to be rooted.

select note 8 data to backup

When the backup is complete, you can click on “View the backup” on the lower left corner of the window to see the contents of the backup file.

Step 3. Selectively Restore Backed up Content to Device
You are allow to choose the data you want to restore. Select the different file types on the left and then select the files you want. Click on “Restore” to start.

restore backup files to samsung

d_win d_mac

Part 4: Backup and Restore S Memo, S Note and Memo Files on Samsung Galaxy Note 8 by Samsung Kies

Many users using Samsung Galaxy Note’s Memo apps to record some important things everyday,once your Galaxy Note 8/Note 5/Note 4/Note 3 phone is broken, crashed or stolen,how can you recover lost Memo from Samsung Galaxy S/Note/Ace/J2? However,to avoiding memo files lost or deleted,it’s very necessary to backup memos from Samsung to computer to avoid important data loss. This part teach you how to backup and restore Samsung Galaxy Note 8 phone memos to PC with Samsung Kies on Windows or Mac PC. You can easy to backup S Memo, S Note or Memos to computer, and restore the data to your device by Kies or Kies 3,when need it.

Backup S Memo, S Note and Memo files from Samsung Galaxy Note 8 to Computer

Step 1. Run the Samsung Kies or Kies 3 on computer, then connect your Galaxy Note 8 to computer via USB cable, and select your Note 7 under Connected devices.
Step 2. Select the Files to backup tab from the “Back up/Restore” tab at the top right of the Kies or Kies 3 screen.
Step 3. Select the Memo files type you want to back up and click the “Back up” button and begin to backup Phone S Memo, S Note and Memo App Files from Samsung Galaxy Note 8 to computer.
Note: Please do not disconnect your phone to computer during the backup process.

backup restore memos on Samsung Galaxy Note 8

Restore S Memo, S Note and Memo Files to Samsung Note 8 or Note 5/4/3 from Backup Files

Above steps,you have backup Memo files from Samsung to computer,if you want to restore memos to Samsung Galaxy Note 8/5/4/3, Galaxy S7/S6/S5/A9,please follow the easy steps as below to restore Samsung Galaxy Note 8 Phone S Memo, S Note and Memo Apps from the list of backup files.

Step 1: Connect your Samsung Galaxy phone to computer and Launch the Kies or Kies 3
Step 2: Select a data file (Memo files) you want to restore from the list of backup files
Tips:You can click “Find file” button at the bottom to browse and select a file manually, then select “Memo” item and click the “Restore” button.
Step 3: Only few minutes to restore all backed up memo files back to your Samsung Galaxy Note 8 easily.

Note: If Memo files lost or deleted on your Samsung Galaxy,you can use this Android Data Recovery to recover deleted memo from Android Samsung phone directly.What’s more,the Broken Android Data Recovery also allows you extract and recover lost data from broken Samsung phone with broken screen or black screen.

Related Article:

How to Backup and Restore Samsung

How to Transfer Samsung Data to Computer

How to Backup and Restore Samsung Galaxy S7

How to Transfer iPhone Data to Samsung Galaxy Note 8

How to Transfer Samsung Data to Samsung Galaxy Note 8

iPhone 7:Everything You Need to Know

The iPhone 7 is edging ever nearer and there’s already rumours flying around about Apple’s upcoming phone.

Most recent news: Looks like the iPhone 7 will be available to pre-order on September 9, and released on September 16. Head down to Section 7 for a possible glimpse of the fabled lightning-to-35mm adapter.

iphone-7-concept

iPhone 7 cheat sheet:
September 9 pre-order, September 16 release date
Similar metal unibody design, antennas moved
Screen improvement
No headphone jack
It’ll have a slightly larger battery
No 16GB option
Dark Blue, and darker ‘Black’ option
Before we get started, we to guess what it’ll be called. Tradition is that after the iPhone 6S, the next iPhone will be called the iPhone 7 and iPhone 7 Plus. Of course, Apple could switch things up, some rumours suggesting the larger iPhone will now be called the iPhone 7 Pro.

Maybe there will be three models, the iPhone 7 Mini, iPhone 7 Plus and iPhone 7 Pro?

1. The iPhone 7 release date is September 16
This one’s a no-brainer. Every iPhone going back to the iPhone 5 was released in September, so it doesn’t take a genius to work out that the iPhone 7 should present itself in September (but it WILL make me look foolish if that’s not the case).

According to a ‘reliable source’, Apple may be bringing the iPhone 7 out earlier than previous years, but this was likely relating to the smaller, cheaper iPhone SE.

It’s now pretty much confirmed that the iPhone 7 will ready for pre-order on September 9, and then fully released on September 16 . Add it to your diaries folks!

2. The iPhone 7 price will be the same as the current 6S
The cost of a new iPhone generally follows the same convention every new model. If that’s the case this year, the iPhone 7 will cost around the same as the current iPhone 6S (and the iPhone 6S will get a £80/$100 price decrease).

Following that logic, the iPhone 7 will cost around £539/$649 for the cheapest option with the least memory. And range up to £699/$849 for the top spec model.

3. iPhone 7 will have iOS 10
Previous new iPhones have shipped with brand new versions of iOS, the iPhone 7 will come running iOS 10 (we’re currently on iOS 9.3).

We heard more about the new version of Apple’s mobile OS at Apple’s developer conference WWDC in June so check out our full feature rundown: iOS 10: the new Apple iPhone features set to slay Android come September

4. The rear case will be sleeker
Whereas the iPhone 6S looked a lot like the iPhone 6, the iPhone 7 should be sporting a new design. Exactly how different is difficult to imagine, however, as the iPhone 6 seems like peak Apple design.

Early rumours suggested Apple will ditch the camera bump and antenna lines. This will make the rear casing completely smooth and uninterrupted. That makes complete sense in our eyes.

But as we get closer to the launch, and more leaks around the phone design appear, it looks like the redesign won’t be too drastic at all. Take a look at this supposed image of the iPhone 7:

It certainly lacks imagination. The key difference here is that the antenna lines have moved. While this probably isn’t a real iPhone 7 out in the wild, it certainly mirrors most of the rumours and leaks coming from Cupertino.

Elsewhere, it seems Apple could lose a few pounds thanks to a new slimmer LCD panel. What’s more, Apple is said to be shrinking some of the internal components to make more room for a larger battery.

Meanwhile, the leaks we’ve seen so far can’t agree on whether the iPhone 7 is going to be waterproof or not – some say yes, some say no. Sounds like this one could go either way at the moment.

Maybe it’s RIP for the iconic home button? A new supply chain link suggests the iPhone 7 will have a capacitive button which also has 3D Touch. This was first rumoured back in June 2015 when it was reported that Apple was developing a touchscreen with an integrated fingerprint sensor. Take this with a pinch of salt, though, there’s not much evidence out there yet.

It seems there will be some new colour options as well! Introducing the sexy new black and blue models:

iphone-7-leak

While these are renders from Martin Hajek, we think they look great, and can’t decide which we prefer!

5. The iPhone 7 screen will be sharper with no bezel
Most of Apple’s rivals have a QHD or 4K display whereas the iPhone 6S doesn’t even have a 1080p HD screen, so a bump in resolution for the iPhone 7 would make sense.

This rumour comes from a supply chain source speaking to DigiTimes, who suggests that Apple will make a jump back to glass-on-glass screens. This would allow a boost in resolution, and the ability to have a bezel-less display. iPhone 7 Edge, anyone?

That streamlined bezel could lead to Apple ditching the ‘clicky’ home button in favour of a capacitive touch button instead. This would result in fewer parts which could break, and take up less physical space. Sounds like a no-brainer to us.

6. Did someone say hexacore? and that the iPhone 7 battery will be bigger?
Every iPhone comes with a speed boost, and we can’t see that changing with the iPhone 7. There have been rumours on Weibo that the next iPhone will come packing the hexacore A10 chip (up from the dual-core processor in the 6S).

Whether those turn out to be the exact details, who knows… But it will be faster than the current model, that’s for sure.

We can also expect to see 2GB RAM, but that’s it for internal specs – there’s not much else nailed down yet.

Images of the iPhone 7 and iPhone 7 Plus’s batteries have surfaced on Chinese social network Weibo. The codes on the cells indicate the iPhone 7 will have a 1735 mAh capacity, and the iPhone 7 Plus will have a 2810 mAh capacity. That’s up, very slightly, from the iPhone 6S which contains a 1715mAh battery, and the iPhone 6S Plus holds a 2750mAh battery.

While Apple is refreshing the internals, it seems they may get rid of that useless 16GB storage option from the range. This rumour comes from Chinese social media, and suggests that 32GB will be the new minimum.

7.There won’t be an iPhone 7 headphone jack
Some reports suggest the iPhone 7 will be the thinnest device Apple has ever made, and that involves ditching the bulky 3.5mm headphone jack.

iPhone 7 headphone jack

Now, that means there are three options for listening to music:

1. You’d have to buy Bluetooth headphones, which would annoy a lot of people
2. Apple will include a pair of lightning connector headphones with the iPhone 7
3. Apple will include a lightning to 35mm adapter with the iPhone (pictured above)

Does Apple think the consumer is ready for the jump to Bluetooth or Lightning? It’s certainly a bold move, but the plus side is you might get a second speaker out of it for better audio.

Other rumours suggest Apple may opt to include a smaller, 2mm headphone jack, which Apple has a patent for – and which would then require you to use an adapter, or buy new headphones… which is even more of a pain.

The iPhone 7 could also go without a charging port! Logitech has just let slip that smart connector in place on the iPad Pro models usually used for keyboard cases, can also transfer power. Seems unlikely this will feature here, but there is one reason this could pop up. If there was no headphone jack, Apple would HAVE to include a lightning cable adapter in the box. But then users should have to occasionally choose between charging and listening to music. The would be a slightly over-complicated way to solve that problem.

Are these the new standard iPhone-bundled headphones?

iphone-bundled-headphone

Probably not. The ear buds and in-line remote look genuine, but the lightning connector looks as fake a Gucci handbag sold on the street for £20.

8. You’ll be able to charge iPhone 7 wirelessly
Apple is apparently testing a prototype with wireless charging, a rumour that comes straight from Chinese social network Weibo.

But that’s not the only model Apple is testing. Other prototypes include multi-Force Touch, a fingerprint scanner in the screen, and USB-C connector. No one knows which of these will make it to the market… if any.

The wireless charging is certainly the most likely, even if it’s not true wireless charging like the S7 has. Logitech let slip there might be an iPhone model which includes a smart connector similar to the iPad Pro. This would allow charging through it, possibly.

9. Could iPhone 7 have a dual camera?
Trusted analyst Ming-Chi Kuo at KGI Securities believes the larger iPhone 7 Plus (or iPhone 7 Pro) may have a dual camera setup. And while that’s just speculation, we can certainly see it happening.

Apple tends to keep camera components for a long time, so expect the same 12MP camera module carried over from the iPhone 6S.

It seems very likely that the camera will be improved in some way, so maybe optical image stabilisation will be standard across the range?

Leaks from the supply chain seem to back up that rumour that the iPhone 7 Pro will have a dual camera, and a sizable camera bump.

10. People will start queuing in July
This one’s a guess. In 2014, we saw a Japanese blogger start queuing in February for the iPhone 6, but anticipation for the 6S was somewhat less extreme.

Considering the iPhone 7 is a major update, people could get really excited… we’ll see. Care to hazard a guess?

Read more:

iOS 9.3.3 :The Things You Need to Know

How to fix Bug on iPhone/iPad after iOS 10 Upgrade

How to Transfer Samsung Data to iPhone 7

How to Transfer Android Data to iPhone 7

How to Backup and Restore Files on iPhone 7

How to Factory Reset an Locked iPhone

Forgot iPhone password?iPhone stuck at the locked screen?Few things are more frustrating than a forgotten password on iPhone.If you’ve been locked out of your iPhone,the only way to unlock it is by restoring iPhone to factory resetting and wiping all of your data.The effective way to get access to your locked iPhone is to reset iPhone without password.

If you own an iPhone and you want to restore it to factory setting,the process is easy.But if you want all the personal information and data saved, it is best if you can backup your data with your computer.Restoring iPhone to factory setting is going to delete everything and the setting will be restore to original status.There are only 2 workable methods on how to factory reset iPhone without password:Restore iPhone to factory reset with iTunes;Restore iPhone to factory reset with iOS System Recovery.

Remind:If you factory reset iPhone without password with iTunes, all data on your iPhone will be erased and your iPhone would be like a new one.Remember to backup your data first to avoid losing data after restoring iPhone to factory reset.Before preparing to factory reset iPhone,what should we do first?

1.Backup iPhone
We had better back up iPhone.You will know this backup is so important if you want to restore iPhone after hard reset.

2. Take out iPhone SIM
This action can protect iPhone SIM card.

Part 1:Factory Reset iPhone without Password via iTunes

Step 1.Open iTunes on your Mac or PC. If you can’t access a computer and your device still works, you can erase and restore your device without a computer.
Step 2.Connect your iPhone to your computer with USB.
Step 3.If a message asks for your device password or to Trust This Computer, follow the onscreen steps. If you forgot your password,get help.
Step 4.Select your iPhone when it appears in iTunes.For an unresponsive device or one that won’t turn on,learn what to do.Or get help if your device doesn’t appear in iTunes.
Step 5.In the Summary panel, click Restore [iPhone].

itunes-iphone-restore-reset

Step 6.Click Restore again to confirm.Then iTunes erases your device and installs the latest iOS system on iPhone.
Step 7.After your device restores to factory settings, it restarts. Now you can set it up as new.

Part 2:Factory Reset iPhone without Password via iOS System Recovery

Another better selection is the iOS System Recovery.iOS System Recovery is used for restoring iPhone to factory resetting without password,hard reset a locked iPhone and help to delete all data on iPhone and reset it as an new iPhone without password.Furthermore,this perfect program is available to fix iPhone system to normal,such as fix iPhone stuck issues:iPhone stuck in recovery mode,iPhone stuck in DFU mode,iPhone stuck at Apple logo screen,etc.Out of many ways to restore a locked iPhone,the ones given are simplest, and quickest.Where iTunes gives you a free solution, iOS System Recovery makes the entire process effortless and simply.

d_win d_mac

Step 1.Run iOS System Recovery and Select the Recovery Option
Firstly please run the iOS System Recovery and click “More Tools” >”iOS System Recovery” in the program homepage.Connect iPhone with computer,then click “Start” to continue.

restore iphone to factory resetting

Step 2.Download the Firmware for iPhone
Make sure that your iPhone is connected to the computer and now iOS System Recovery will recognize your iPhone very soon,offering the latest iOS version for you to download.Then click “Download”,the program will begin to download the suitable firmware for your iPhone.

restore iphone to factory resetting

download the firmware for iPhone

Step 3.Restore Locked iPhone to Factory Resetting
Once the firmware downloading process is finish,iOS System Recovery will start to restore your locked iPhone to factory resetting.

restore iphone to factory resetting

When the process is complete,your iPhone will be as a new phone without any data,you can start using it normally as usual.

restore iphone to factory resetting

d_win d_mac

Related Article:

Two Solutions to Factory Reset iPhone

How to Erase All Content and Settings on iPhone Permanently

Three Situations to Erase iPhone Data and Settings

14 New Features You Need to Know about Samsung Galaxy S7 and S7 edge

South Korean tech major Samsung finally took the wraps off its next-generation flagship phones – the Galaxy S7 and Galaxy S7 Edge – at its MWC 2016 keynote on Sunday. On the face of it, nothing has changed at all. Both the new Galaxy S phones look ridiculously similar to last year’s Galaxy S6 (and Galaxy S6 Edge). But that’s necessarily not a bad thing. The Galaxy S6 brought Samsung back into the game and a lot of this had to do with its design, which in a word was fantastic. Samsung deciding to retain much of its design elements in the Galaxy S7 is in fact a well-thought out plan.

While nothing has changed on the outside, Samsung has made sure that almost every internal aspect of the new phones gets a boost some way or the other. Moreover, the new Galaxy S phones see the return of the microSD card slot and water-proofing capabilities, after they were stripped off in the Galaxy S6. These two features alone are capable to spark a renewed interest in Samsung’s Galaxy S7 and Galaxy S7 Edge even though they look a lot like last year’s phones.

Here are the 14 useful features of Samsung’s new Galaxy S7 and Galaxy S7 Edge phone:

1. Customizable App Shortcuts on Lock Screen
When the Galaxy S7 and S7 edge are locked, two apps can be placed in the lower corners for easy access. Choose the apps you use the most-whether the camera, phone, photo gallery, S Health or even third-party apps-and the Galaxy S7 and S7 edge can provide you with faster access.

Lockscreen-2

How to Set Up: Setting > Lock screen and security > Info and app shortcuts > App shortcuts

2. Multiple Lock Screen Images
For your Lock screen’s wallpaper,you can now select multiple images from your Gallery to change the look each time you check your lock screen. It allows you to choose up to 30 images.

In addition,if you long press the display while the lock screen is on,the time and other information on the display disappear leaving only the wallpaper image.That allows you to see your lock screen image without interference from any on-screen information.

How to Set Up: Settings > Wallpaper > Lock screen > Select From Gallery and choose the photos (up to 30)

3.More Ways to Manage Apps from Home Screen
With the Galaxy S7 and S7 edge,you can now easily move apps around your home screens and search for apps more simply.

To move icons to different Home screens,long press an icon, and then drag it to the Move apps icon on the upper right.The Move apps is a temporary container for managing several applications at once.Then tap or drag it to move it to another page.

Manage Apps from Home Screen-1

In addition,you can look for an app by name in the app tray by selecting “Search” at the top of the screen.

4.Show All Apps on Home Screen
Usually downloads all go to an app tray, but if you don’t like that way of organizing them,the Galaxy S7 and S7 edge give you an alternative method.Choosing “Show all apps on home screen” gets rid of the app tray, and moves all the apps to the Home screens.

Show All Apps on Home Screen-1

How to Set Up: Settings > Advanced features > Galaxy Labs

5. Identify Unsaved Callers
When you receive a call from a number not in your address book,the Galaxy S7 and S7 edge can check to see if that phone number is suspected of being a spammer or even a fraud-related number, and what the risk level is.Depending on that analysis, you can choose to block or report the number.

Identify Unsaved Callers

How to Set Up: Settings > Advanced features > Identify unsaved numbers

6. Display Scaling
Display scaling lets you optimize the DPI (Dots Per Inch) settings of your display.You can either choose to stay as Standard or change to Condensed.Condensing your display lets you view more content on the screen at one time with smaller icons,controls, and text.

Display Scaling

How to Set Up: Settings > Display > Display scaling

7. Icon Backgrounds
For the Galaxy S7 and S7 edge,the look of the icons has been updated to be more unified and natural. For native apps, the icons all come in a “squircle” shape (a square with rounded edges), creating a pleasing and organized appearance. For third-party apps, users can turn on the Icon background, which creates a squircle container background for all those icons, too, unifying the look of all of a user’s apps. In addition, many icons now offer two different styles—a traditional flat look, and a more 3D look.

How to Set Up: Settings > Display > Icon backgrounds

8.Schedule Auto Restart
Often restarting a device is one of the best ways to keep it running efficiently,as it clears out the system and ensure new apps and updates are operating properly.Auto restart ensures that your Galaxy S7 or S7 edge gets a regular restarting,so you don’t have to worry about remembering to do it manually. The function also takes care to prevent restarting from happening at inconvenient times,so it only occurs when the screen is turned off and the device is not in use, but there is at least 30 percent of the battery power remaining.

How to Set Up: Settings > Backup and reset > Auto restart

In addition to these innovative features newly added to the Galaxy S7 and S7 edge,a variety of other useful functions are also available on these flagship Galaxy devices.

9. Always On Display
Now you can check on notifications, missed calls,the time,date and more without ever unlocking your display.Always On Display puts that information right on your screen,freeing you from activating your display to check them, and without draining your battery.

How to Set Up: Settings > Display > Always On Display

10. Cross App
With Cross App,you can use apps from within certain other apps.For example,while chatting with a friend in the Messages app,you can access photos and videos and share them,or open a URL and check out a web page, all without exiting the messenger first.

Cross App is automatically integrated with the Galaxy S7 and S7 edge.When using the Messages app, just click on the paperclip icon on the left of the Enter message panel.That gives you the choice of Camera, Gallery or Other.Camera lets you take photos or record video and send it directly to the person you are chatting with. Gallery lets you select photos and videos saved on your device.Other offers a range of apps, including Audio, Voice recorder, Memo and more.

Cross App1

11. Game Launcher
The Galaxy S7 and S7 edge are gamer-friendly devices,and both come with an app that makes gaming even better.Game Launcher lets you maximize your game-playing time through a variety of power-saving options.You can also turn off all notifications so nothing interrupts your gaming and lock the Recent and Back keys to prevent accidentally exiting a game.In addition,you can also take screen shots, record games and share them with friends.

How to Set Up: Settings > Advanced features > Game > Game Launcher

12. Smart Switch
Smart Switch, which makes it easy to transfer your old data to a new Galaxy device, has gotten an upgrade for the Galaxy S7 and S7 edge,with a new home layout, better app data recovery,and other improvements. A USB connector (On-The-Go Adapter) also comes with the Galaxy S7 and S7 edge,ensuring you can transmit data easily from the moment you unbox your device. Allowing transfers from devices with different operating systems,Smart Switch is a convenient way to move all your files, including contacts, chat messages, photos,calendar, apps and music.

How to Set Up: Settings > Backup and reset > Open Smart Switch

13. Quick Dial
Quick Dial makes calling your contacts faster and easier.Once enabled,you just need to give the home key a long press (even if the display is off),and then speak the name of the person you want to call.Quick Dial takes care of the rest.Also,the feature’s machine learning allows your device to become more familiar with your voice over time,thus increasing the device’s functionality as you use it more often.

How to Set Up: Settings > Advanced features > Galaxy Labs > Quick Dial

14. Tasks edge
This is a function only on the Galaxy S7 edge model.Just as People edge puts your most important contacts right into the curved edge screen for easy access,and Apps edge does the same for your favorite apps,Tasks edge lets you assign a shortcut for your most common tasks.Setting an alarm, composing a text message or creating an event can be assigned to the edge of the display,for fast, easy access.

How to Set Up: Settings > Edge screen > Edge panels

Read more:

How to Make Full Use of Samsung Galaxy S7(Edge) Camera

How to Recover Data from Samsung Galaxy Samsung Galaxy S7(Edge)

How to Get More Internal Storage from Samsung Galaxy S7(Edge)

How to Fix Top 5 Android Problems

Solutions to Fix WhatsApp Programs on Android Phones

Two Solutions to Factory Reset iPhone

When you wanna selling your iPhone,give it to someone or sent it to repair store,you may need to restore the factory reset on iPhone.To remove all data and reset the iPhone previous setting,avoid to expose any personal information from iPhone.Most iPhone users will choose the original method to achieve the goal,it’s no doubt that it’s an easy way to complete the factory reset job with it.However,we are going to describe both the simple way and another safely way on restoring factory reset iPhone.

A factory reset can help resolve issues with your iPhone if it’s crashing or freezing,but it is also what you’ll want to do if you need to wipe your iPhone before selling it,or passing it on to a family member or friend.When selling an iPhone,it’s absolutely vital that you delete all the sensitive data stored on it.If not, an unscrupulous buyer could gain access to your social media profiles,your financial information and even your personal photos and videos, enabling them to browse through your private moments or steal your identity.

Tips:If you want to start iPhone with a clean state,then there are two solutions to take.First of all make sure you have a backup ready.Because all data and settings will be wiped completely from your device after performing factory reset on it,here we strongly recommend you to do a backup for your iPhone first.The iOS System Recovery enables to  backup iPhone safely before restoring it to factory settings,and we’re about to show you how to do so.

Guide:How to Safely Backup iPhone before Factory Reset

Part 1:Restore iPhone to Factory Settings with iTunes

If you need to restore the iPhone to its original state the process requires iTunes.This can be useful for troubleshooting to see if a problem is hardware or software related.

Step 1. Connect your iPhone to the computer and run iTunes.
Step 2. Make sure your iPhone is selected from the left menu in iTunes.
Step 3. Click the Restore button in the center of the iTunes Summary tab.
Step 4. You can choose to Back Up the contents of your iPhone to the computer.
Step 5. iTunes will ask if you’re ready to Restore the iPhone, this will wipe all of your data and settings from the device. Click Restore.

itunes-iphone-restore-reset

Step 6. iTunes will download, prepare and restore the software on your iPhone. Do not unplug the iPhone from the computer during this process.
Step 7. When it finished, iTunes will ask if you want to restore from backup. Choose “Set up as a new iPhone” to start fresh with factory settings.
Step 8. Enter a name for your iPhone and the process is complete.

Part 2:Restore iPhone to Factory Settings with iOS System Recovery

This way works when you couldn’t use iTunes to enter iPhone recovery mode successfully and then restore it to factory default.

iOS System Recovery is available for restoring iPhone to factory resetting,completely wipe all data and setting on iPhone.In addition,iOS System Recovery allow to fix iPhone system to normal with various iOS system issues like recovery mode,white Apple logo,black screen,looping on start, and so on.iOS System Recovery work for all models of iPhone(iPhone 7,iPhone SE,iPhone 6S/6,iPhone 5S/5C/5,iPhone 4S/4), iPad(iPad Air,iPad Pro,iPad Mini) and iPod touch.Fully compatible with Windows 10 or Mac 10.11, iOS 8,iOS 9/9.3,iOS 10,etc.

What’s iOS System Recovery can do for you:
-Restore iPhone to factory reset when iPhone freezes.
-Restore iPhone to factory reset when iPhone couldn’t work right.
-Restore iPhone to factory reset when iPhone has been attacked by virus.
-Restore iPhone to factory reset before selling it or giving it to someone.
-Restore iPhone to factory reset when you want to erase iPhone personal data.
-Restore iPhone to factory reset when you forget the password of iPhone.

d_win d_mac

Step 1.Run iOS System Recovery and Select the Recovery Option
Run the iOS System Recovery and click “More Tools” > “iOS System Recovery” in the program main interface.Connect iPhone with computer.

restore iphone to factory resetting

On the next window,read the instructions and warnings carefully,click “Start”.

Step 2.Download the Firmware for iPhone
When on the next window,make sure that your iPhone is connected to the computer and select your iPhone model and other information.Then click “Download”.

restore iphone to factory resetting

Then the program will start to download the suitable firmware for your iPhone.

download the firmware for iPhone

Step 3.Restore iPhone to Factory Resetting
When the firmware downloading process is finish,iOS System Recovery will begin to restore your iPhone to factory resetting.

restore iphone to factory resetting

When the process is complete,you can start using your iPhone normally when done.

restore iphone to factory resetting

d_win d_mac

Related Article:

How to Erase All Content and Settings on iPhone Permanently

Three Situations to Erase iPhone Data and Settings

Permanently Erase Data from iPhone/iPad without Recovery

How to Fix “Verifying Update”/”Slide to Upgrade” Error on iPhone

Since iOS 10 is coming on the way,a lot of iOS fans are interested in the newest iOS version and ready to do the iOS upgrade.In a General,there are two practical ways to upgrade device to iOS 10, but either OTA or through iTunes,it is easy to encounter some errors in updating.In fact, Apple website has given solutions to fix some common bugs of iOS 10.Here we are going to talk about the two cases:”Verifying Update” and “Slide to Upgrade” error while installing iOS 10 or the beta version.

Part 1:Tips to Fix “Verifying Update”/”Slide to Upgrade” Error on iPhone

Status One: iDevice Stuck in “Verifying Update” Screen
From iOS users communication,part of users reported the pop-up of “Verifying update” still occurs all the day and nothing changes.Some advise to restore iPhone in order to exit the error screen while it is in vain. Just try these tricks to fix your case to check the results.

Tips 1: Undoubtedly, waiting for several minutes is what should be done firstly. Because here may be network mistake, just be patient to wait for 10-20 minutes.

Tips 2: Stay pressing the power button to get your device locked and it would take more than 5 times. As you see the loading screen, the process of downloading would start right now.

Tips 3: Go to open the newest version of iTunes and use it to get iOS updated on the computer.

Tips 4: Try to hard reboot on iPhone/iPad. At first, just hold the “Home” and “Sleep/Wake” button at the same time. Then, when you see apple logo appear, please release the buttons.

Status Two:iDevice Stuck in “Slide to Upgrade”Screen
Another case about stuck screen also annoys users,”Slide to Upgrade” signal stays on the device interface and it seems to get frozen. At this time, for getting iPhone/iPad back to normal status, we found some steps which work for this situation.

Step 1.Use USB cable to get iDevice and PC connected. Then run iTunes on computer.
Step 2.Pressing “Home” and Power button at the same time for several seconds once the PC cannot detect the mobile device. As iPhone/iPad restart, you can select the device on iTunes.
Step 3.Click “Restore” to restore your iOS device.If you have no any backup before upgrading iOS 10 or public beta version. Please do a backup immediately and choose it to restore.

Note:If you have enabled “Find My iPhone” before,official Apple Support may assist you to fix your need.

Hope the helpful tips above can do a great help for restoring your device to normal.To thankful, these cases will only occur on iPhone6S/iPad mini 4/iPad Air 2 or the former device.Wish you have a good experience with iOS10.

Part 2:Solve iPhone “Verifying Update”/”Slide to Upgrade” Error via iOS System Recovery

iOS System Recovery,a third-party tool which is excellent on restoring iOS system to normal for iPhone(iPad).This program works well for fixing iPhone/iPad stuck on “Verifying Update”/”Slide to Upgrade”screen while installing iOS 10.Additionally,it enables you to fix iOS frozen/crashed status during or after iOS update/jailbreak,fix recovery mode stuck,DFU stuck,red iTunes logo stuck,etc.iPhone SE/6S/6/5S/5/4S,iPad,iPod are supported.One point can’t be ignored is that this wonderful program empower to restore lost data from iPhone/iPad after iOS 10/iOS 9.3.3 upgrade.Use guide on:How to Recover Lost Data on iPhone/iPad after iOS 9/iOS 10 Upgrade.

d_win d_mac

Step 1.Select the Repair iOS System Feature
Click “Fix iOS to normal” from “More Tools” in the homepage of iOS System Recovery.Then connect your iPhone/iPad to computer with its USB cable.When iOS System Recovery detects your device,click “Start” to go on.

iphone-system-fix-tools

fix-verifying-update-error-on-iphone

Step 2.Download and Select Firmware for Device
To fix the abnormal operating system of iPhone/iPad,you need to download the suitable firmware for your device first.iOS System Recovery will recognize your device very soon,offering the latest iOS version for downloading.You should click “Download” and wait a second.The program will finish it automatically.

select iPhone model

download the firmware for iPhone

Step 3.Get iPhone/iPad out of “Verifying Update”/”Slide to Upgrade” Screen
When the download is complete,the program will continuously start repairing your device to restore device system to normal,and get your device to work properly.In a few minutes,it will tell you that your device is restarting to normal mode.The whole process of fixing the operating system of iPhone/iPad only takes you less than 10 minutes.

fix-verifying-update-error-on-iphone

fix-verifying-update-error-on-iphone

d_win d_mac

Related Article:

How to fix Bug on iPhone/iPad after iOS 10 Upgrade

How to Restore iPhone System to Normal without Firmware Upgrade to iOS 10

How to Get iPhone Out of Recovery Mode after iOS 10 Update

4 Ways to Transfer Photos from Computer to Mobile Phone

You probably use your mobile phone primarily for making calls,but it also works as a portable storage device for photos.Now that every smartphone has at least one camera built into it,we’re taking more photos than ever.So may be it is necessary for you to transfer photos between computer and mobile phone to manage your photos.You’ve got plenty of options for moving photos to your phone,including Bluetooth, USB transfer or email attachment.Each transfer method takes just a few minutes to complete,and none require any expensive or complicated equipment.

transfer photo to  phone

Way 1:Transfer Photos from Computer to Mobile Phone via USB Transfer

Your cell phone likely came with an USB cable for connecting the device to your computer.Once connected,your phone may automatically enter mass-storage mode.In this mode, you can’t make or receive calls,using the phone only as a storage device until it’s disconnected.Your phone may also prompt you to enable mass-storage mode upon connection.Depending on your phone model,tap “Yes,” “OK” or “Mass Storage” to confirm.

Browse the photos on your computer that you want to transfer to your phone.Drag pictures into your phone’s Pictures, Photos or Media folder. To save time, you can highlight multiple photos and drag all of them to your phone’s folder at once. After you’re done, disconnect the phone from the computer and USB cable.You may need to tap “Done” or “Exit” on the phone to exit mass-storage mode.

Way 2:Transfer Photos from Computer to Mobile Phone via Bluetooth

Bluetooth enables you to transfer photos between devices across short distances. Nearly all cell phones and computer operating systems support Bluetooth transfer. To get started, you’ll need to enable Bluetooth on your cell phone and make the device discoverable.Instructions vary depending on your phone, so consult your user manual, if necessary.

Once your phone is ready, click the Bluetooth icon in your computer’s notification area, and then select “Send File.” Your phone should appear in the Bluetooth File Transfer window. Select it, and then browse to the location of your photos. Click a photo and select “Next” to transfer it. When you finish transferring, remember to turn off Bluetooth on your phone. Leaving it on will drain the device’s battery.

Way 3:Transfer Photos from Computer to Mobile Phone via Email Attachment

If you want to send photos to a friend’s phone,try transferring the images via email. You can also email the pictures to yourself.

To start it,sign in to your email account and open a new message.Click the “Attachment” icon or button. In the window that opens, locate the photo you want to transfer. Double-click the picture to attach it to the email. In the Recipient field, enter your phone’s email address.

Once you’ve sent the photo, check your email on your phone. Open the attachment and download the photo to phone or phone’s memory card.

Way 4:Transfer Photos from Computer to Mobile Phone via Transfer Apps

Android Transfer and Android & iOS Manager, both is a perfect data manager to freely transfer photos from computer to Android phone.Android Transfer is designed to manage data between computer and Android. With this program,users can freely transfer photos/contacts/SMS/music/video/apps/files from computer to Android phones with simple clicks.It is such a convenient transfer tool help to manage data on mobile devices.The powerful program support to all Android mobile phones(Samsung,HTC,LG,Lenovo,Huawei,Xiaomi,Motorola,etc).What’s more,the user-friendly interface makes it possible to be easily used by both professionals or home users.

d_win d_mac
d_win d_mac

Step 1.Run the Android Transfer
After downloading the program,please install and launch it on your computer.

connect android by qr code

Step 2.Connect Android and Computer
Use an USB cable to connect the devices or simply scan the QR code on screen.Then you will see your phone captured and shown as a thumbnail.

android transfer photos

Step 3.Transfer Photos to Android from Computer
Click “Photos” on the left.You can choose one of the listed folders to locate your imported images and photos.Otherwise,create a new folder by right clicking your mouse within photos.

add photo to mobile phone

Tick “Add” button as the photos it show you.Browse your file on the computer, then select photos to import to the Android phone.

Note:Do not disconnect your phone and PC during the whole progress.

d_win d_mac
d_win d_mac

With only 3 steps,you can easily import photos from computer to Android with Android Transfer.Besides transferring data between Android and computer,it can also help to backup files on computer,restore Android data with one click,easily manage phone apps, etc.

Read More:

How to Convert YouTube FLV Video to Samsung Galaxy

How to Transfer Video from Computer to Samsung Galaxy S7/S6

How to Backup Android Phone or Tablet Data to Computer

How to Transfer Android Data to Computer

How to Get More Internal Storage from Android

How to Connect Android Phone to Car Audio