All posts by DHZ

How to Transfer WhatsApp Messages from Android to iPhone

How to transfer WhasApp messages from Android Samsung to iPhone XS?
I often chat online by WhatsApp app on my previous Samsung Galaxy S7, now I have got an new iPhone XS, is it possible to move WhatsApp messages from Galaxy S7 to iPhone XS without Move to iOS app?” – Suerong

How to transfer WhatsApp chat history from Android Huawei to iPhone X?
“I just bought the new iPhone X last day for its bright features,I am so glad to switch from my old Android phone to the new one.However,what actually disturb me is that I am wondering how to transfer the WhatsApp messages from Huawei P10 to iPhone.I search the ways on the Internet but I find no best answer.So I ask you guys for help.” -Winnie Tung

WhatsApp is a messaging App that provide the convenient way of communication for people around the world.It allows you to send messages, photos, videos instantly for each other. It is no doubt that there are many Android users and iPhone users who are using this app in daily life.A part of people encounter the problem that can’t
successfully transfer the WhatsApp messages between mobile device,the most common situation is between the Android phone and iPhone.In this article,we will show you a available way on how to transfer WhatsApp messages from Android to iPhone without complicated steps.

Backup Android WhatsApp Messages to Computer

The top Android WhatsApp data backup tool is called – Android Backup & Restore,it’s such a professional manager tool which is specifically design for backup WhatsApp messages from Android to computer,perfectly help to sync Android WhatsApp messages,WhatsApp photos,WhatsApp videos and attachments to computer.In addition,this program enable to backup & restore data on Android,including contacts,gallery,videos,notes,call logs,messages,calendars,Application,Application data(WhatsApp,Viber,Line,Kik),etc,.

Free download Phone Tookit – Backup & Restore and try to backup your Android data, including WhatsApp messages, photos and videos.

d_win d_mac

Restore WhatsApp Messages Backup to iPhone

To restore WhatsApp messages from backup to iPhone,you are strongly recommend this wonderful tool- iOS WhatsApp Transfer, Backup & Restoretool,empower to restore WhatsApp messages from backup to iPhone completely,the WhatsApp text,photos,videos,attachments are included.What’s more,this program support to safely backup iOS WhatsApp messages to computer.Almost all models of iPhone are applicable to iOS WhatsApp Transfer tool,such as iPhone XS, iPhone X, iPhone 8, iPhone 7,iPhone SE,iPhone 6S(Plus),iPhone 6(Plus),iPhone 5S/5C/5.

Part 1:How to Sync Android WhatsApp Messages to Computer

Step 1.Run Android Backup & Restore and Connect Android to Computer
Please run Android Backup & Restore on computer,connect Android with computer and then allowing enable the debugging on Android.Click “More Tools” in the homepage of program.Then,continue with “Backup” button under “Backup & Restore” option,select “WhatsApp” of “Application” and “Application data”.

backup android whatsapp to computer

backup android whatsapp to computer

Step 2.Backup WhatsApp Messages on Android
Once clicking the “Backup” button,program will start the backup process.When you are prompt that the backup task is completed,you can move to view on the backup history.Although you can’t see the details about the WhatsApp data but you can know the size of it.

backup android whatsapp to computer

d_win d_mac

Part 2:How to Restore WhatsApp Messages from Backups to iPhone

Step 1.Run iOS WhatsApp Transfer and Connect iPhone to Computer
To restore WhatsApp messages from backup to iPhone,you should choose “Restore WhatsApp messages to iOS device” under the “More Tools” option of iOS WhatsApp Transfer tool.Get your iPhone connected to the computer.Then you’ll see all your backup files listed.

restore whatsapp backup to iphone

restore whatsapp backup to iphone

Step 2.Restore WhatsApp Message Backup to iPhone
You should choose a backup file and click “Next” to directly restore it to your iPhone as follows.

restore whatsapp backup to iphone

Or you can choose to view the backup file first,and then selectively choose what you want to restore it to your device by clicking “Restore to device”.

restore whatsapp backup to iphone

d_win d_mac

Related Article:

How to Transfer WhatsApp Chat History from iPhone to Samsung Galaxy

How to Restore WhatsApp Messages Backup to Android Devices

How to Backup,Restore and Transfer WhatsApp Messages on iPhone

How to Transfer WhatsApp Messages to iPhone 11/XS/XR/X/8/7

“I am a user switched from an iPhone 7 to the new iPhone 11. I would like to continue with my WhatsApp old chats on the new phone.So my question is there any ways to transfer WhatsApp messages from my old iPhone to the new one? Has anyone else dealt with this problem?” -Nancy Gu

Have the same problem as this buddy? Old conversions don’t automatically come with you when you switch to the new mobile device.Luckily, we’ll try to provide you an convenient way to transfer WhatsApp chats from iPhone to iPhone 7. Hope to make your switch a pleasant experience.The following guide is applied for transferring WhatsApp data from iPhone SE/6S(Plus)/6(Plus)/5S/5C/5/4S to 11/XS/XR/X/8/7 efficiently.

Restore Social App – iOS WhatsApp Transfer is a part of iOS Toolkit, which is recommend for you to fix WhatsApp chat history transfer issue between iOS device,you can use it to easily transfer WhatsApp messages from old iPhone to new iPhone 11/XS/XR/X/8/7,including WhatsApp text,photos,videos and attachments.What’s more,this program support to backup and restore WhatsApp data on mobile phones efficiently.Export WhatsApp messages and WhatsApp message attachments to computer and restore the backup to device.Besides,allow to transfer WhatsApp messages to Android devices with simple steps.

d_win d_mac
d_win d_mac

Part 1:Transfer WhatsApp Messages between iPhone with iCloud Backup

Step 1.Connect your old iPhone to a Wi-Fi network.

Step 2. In iOS 8 or later, tap Settings > iCloud > Backup.

Step 3. Tap iCloud Backup to turn it on.

Step 4. Tap Back Up Now. Wait till the backup process is finished. (It may be take you a little while.)

sync whatsapp with icloud

Step 5. Make sure the backup finished by tapping Settings > iCloud > Storage > Manage Storage. The backup you just made should appear with the correct date and backup size.

Step 6. Start your iPhone 7 and restore it from the iCloud Backup your just have created. After that your messages will be available in WhatsApp installed to the target iPhone.

Note: If you have some data on your new iPhone, when you choose “Restore from iCloud Backup” from the old iPhone, you’ll lose the existing data on the new one. Therefore, before restoring the target iPhone from backup, I strongly recommend you to backup photos, music, videos, contacts, etc. to your computer first.(Extra tips:How to backup iPhone data to computer)However,how to transfer WhatsApp history between iPhone without recovered?Just go on to read please.

Part 2:Transfer WhatsApp Messages from Old iPhone to iPhone 7 with iOS WhatsApp Transfer

Step 1.Connect Device to Computer
To transfer WhatsApp messages from old iPhone to iPhone 7,you should click “Transfer WhatsApp messages” under the “More Tools” option of iOS WhatsApp Transfer tool.Then connect your iOS devices to the computer.Once the program detects them, you will get the window as follows.

 iPhone 7 WhatsApp data transfer

Transfer WhatsApp messages from iOS device to iOS device:

transfer-whatsapp-to-iphone-7

Step 2.Transfer WhatsApp Messages between iPhone
Click “Transfer” to begin the WhatsApp message transfer process.Since the transfer process here will erase existing WhatsApp messages from the destination device,you need to click “Yes” to confirm this action if you want to move forward.

transfer whatsapp chat history to iphone 7

Then the transfer process starts.

Wait until the WhatsApp messages transfer task is completed.During the transfer process,you just need to keep your devices are connected well.When you see the window below,you can disconnect your device and view the transferred data on your iPhone 7.

transfe whatsapp messages to iphone 7

d_win d_mac
d_win d_mac

Part 3:Backup WhatsApp Messages from iPhone 7 to Computer

Step 1.Connect iPhone 7 to Computer
To backup WhatsApp messages from iPhone 7 to computer,you should choose “Backup WhatsApp messages” under the “More Tools”option of iOS WhatsApp Transfer, tool.Get your iPhone 7connected to the computer.Then you’ll see the window of the program as follows.

whatsapp-transfer-tool

backup-iphone-7-whatsapp-computer

Step 2.Backup iPhone 7 WhatsApp Messages to Computer
Once your device is detected,you should click “Backup” to start the process.

backup-iphone-7-whatsapp-computer

When the backup begins,wait a little while.The program will finish the process automatically.When you’re told that the backup is completed, you will see the window below.Here, you can click “View it” to check the backup file.

view-whatsapp-backup

Step 3.View the Backup File and Export Data Selectively
Choose the backup file that you want to view if there are more than one backup file listed.

view-whatsapp-backup

Then you will see all the details.Choose any item you want to export to your computer.

export-whatsapp-to-computer

d_win d_mac
d_win d_mac

Part 4:Restore WhatsApp Messages to iPhone 7 from Backups

Step 1.Connect iPhone 7 to Computer
To restore WhatsApp messages to your iPhone 7,you need to choose “Restore WhatsApp messages to iOS device” under the “More Tools” option of iOS WhatsApp Transfer tool.Get your iPhone 7 connected to the computer.Then you’ll see all your backup files listed.

whatsapp-transfer-tool

restore-whatsapp-from-backup

Step 2.Restore WhatsApp Message Backup to iPhone 7
You should choose a backup file and click “Next” to directly restore it to your iPhone 7 as follows.

restore-whatsapp-to-iphone-7from-backup

Or you can choose to view the backup file first,and then selectively choose what you want to restore it to your device by clicking “Restore to device”.

restore-whatsapp-to-iphone-7from-backup

d_win d_mac
d_win d_mac

Related Article:

How to Backup,Restore and Transfer WhatsApp Messages on iPhone 7

How to Transfer Everything from Old iPhone to iPhone 7

How to Transfer WhatsApp Chat History from iPhone to Samsung Galaxy

How to Backup and Restore Contacts,SMS,WhatsApp Messages on iPhone 7

How to Backup Data before Recalling Samsung Galaxy Note 7

News about Recalling Samsung Galaxy Note 7
Samsung has finally revealed details about its Galaxy Note7 safety recall.As previously reported, all customers are entitled to a replacement, repair or refund. Yes, this includes eBay purchases, postpaid mobile plans and grey market imports.

In the unlikely event that you missed the news, Samsung Galaxy Note7 smartphones have been bursting into flames in an alarming fashion when customers attempt to charge them.So far, there have been less than one hundred reported incidents out of more than one million units sold. Nevertheless, the company has deemed the issue serious enough to prompt a worldwide product recall.

note7-recall

The issue is caused by the Note7’s new 3500mAh battery; specifically an unintended meeting of the battery cells’ terminals which can potentially cause the device to explode. Needless to say, customers have been advised to immediately stop using their phones.

Backup Data on Samsung Galaxy Note 7 before Recalling

After the Note 7 burning accident happened,most of Note 7 users ate attend to recall their device to Samsung company.However,before recalling Note 7 you should do backup job on it to protect your personal data and avoid to leak the privacy to anyone.

Android Data Backup & Restore Tool is your No.1 ideal helper to safely backup everything on Samsung Galaxy Note 7 before recalling,contacts,photos,videos,audios,messages,notes,calendars,application data(WhatsApp,Viber,Line,Kik),call logs are included.What’s more,this useful program allow to restore data on Android device from backup,you can restore all backup files stored on computer to your Samsung or other Android phone.Almost all models of Samsung are applicable to Android Data Backup & Restore Tool.Except Samsung,other Android device are supported too,such as HTC,Motorola,Lenovo,Huawei,Xiaomi,LG,Sony,ZTE.

d_win d_mac

Part 1:Backup Samsung Galaxy Note 7 before Recalling with Samsung Cloud

With the Samsung Note 7,Samsung introduced the Samsung Cloud to you as a way to backup your phone.Auto backup happens every 24 hours, but for it to take place your Note 7 needs to charging with the screen off for 10 minutes.However, you can also do a manual backup with Samsung Cloud prior to returning your Note 7.

Open the Settings on your Note 7 > Cloud and accounts > Samsung Cloud > Back up my data > tap the Back up now button at the bottom of the screen.

Samsung Cloud provides a comprehensive backup of your Note 7 device.In addition to your Samsung account’s Contacts and Calendar, Samsung Cloud will also backup keyboard data, gallery,notes, and internet bookmarks etc. Using Samsung Cloud will also backup your phone logs, clock settings, apps, home screen layout including widgets and wallpapers, messages, music, device settings, including ringtones, and documents.

Part 2:Backup Samsung Galaxy Note 7 before Recalling with Google Account

Open the Settings on your Note 7 > Cloud and accounts > Accounts > Google. Ensure sync is enabled for your contacts, calendar, etc,.

In the Settings again > tap Cloud and accounts > Backup and reset. Under the Google account section, ensure Back up my data is enabled.

Part 3:Backup Samsung Galaxy Note 7 before Recalling with Android Backup & Restore

Step 1.Connect Note 7 to Computer and Run Program
Launch Android Data Backup & Restore Tool and from the “More Tools” section,select “Android Data Backup & Restore” option.Then connect the Samsung to your computer using USB cables.The program will detect the device soon.

backup note 7 before recalling

backup note 7 before recalling

Note:If you have other Android management program on your computer,make sure none of them is running.

Tips:If you have used this program to back up your device previous,you are allow to view your past backup by clicking on “View backup history”.

Step 2. Select File Types to Backup
Once program has detected your device,click on “Backup” to select the data you want to backup(include in the past backup).Android Data Backup & Restore Tool can be used to back up 9 different file types including messages, call history, calendar, gallery, audio, video, applications and application data.Please note that to backup app data requires your Android device to be rooted.

select note 7 data to backup

After you have selected the file which you want to backup,click the button “Backup” to start the process.The entire process will take no more than a few minutes.

backup note 7 before recalling

When the backup is complete,you can click on “View the backup” on the lower left corner of the window to see the details of the backup file.

backup note 7 before recalling

Now you can view your backup file by clicking on “View”.

select backup note 7 data to view

d_win d_mac

Part 4:Restore Backup Data to Another Android Device

Step 1.Connect Android Device to Computer and Run Program
Launch Android Data Backup & Restore Tool and from the “More Tools” section,select “Android Data Backup & Restore” option.Then connect the Android device to your computer using USB cables.The program will detect the device soon.

Click on “Restore” and choose from the older backup file on your computer. These backups can either be of this Android device or any other device.

restore data to android from backup

restore data to android from backup

restore data to android from backup

Step 2.Select Backup Data to Restore on Android
You are allow to selected the data you want to restore.Select the different file types on the left and then select the files you want.Click on “Restore” to start.

restore data to android from backup

On restoring process,Android Data Backup & Restore Tool will require authorization during the restore process.Allow authorization and then click “OK” to continue.

restore data to android from backup

The whole process should last only a few minutes,Android Data Backup & Restore Tool will prompt you that the restore process has been completed along with a detailed account of which types of data have been successfully restored and which ones have not.

restore data to android from backup

d_win d_mac

Part 5:Factory Reset on Samsung Galaxy Note 7 to Erase Data before Recalling

To delete all of your files data and settings from your Samsung Galaxy Note before returning, from the Home screen, touch Apps > Settings > Backup and reset > Factory data reset.

Read the information provided, and then touch Reset device. If you have a security lock set up on the device, you will be prompted to enter the lock information before proceeding. Touch Delete all to delete all information and downloaded applications.

The factory reset process may takes you a few minutes while your Samsung data and settings are all removed.However,I have to remind you that do the factory reset on Samsung is just simply delete data and settings on device instead of permanently erasing data on it.To wipe data from your Samsung device without restoring,you should get help of Android Data Eraser.Please keep on reading.

Part 6:Permanently Erase Data on Samsung Galaxy Note 7 before Recalling

When you finished backed up Samsung Galaxy Note 7 to computer,the next you should do is to permanently erase all data and settings on Samsung Galaxy Note 7 before recalling.As we know,only do factory resetting on device can’t remove data completely from device,the deleted data can be restored by some professional data recovery.To wipe all data from your Samsung surely,here we strongly recommend for you this trustworthy data removal tool-Android Data Eraser,which help to erase existing data,wipe off everything on Android Samsung phone:erase all deleted data from Samsung Galaxy Note 7without recovery,including contacts,messages,photos, videos, call logs, Apps and other private data.It supports all Android devices ever created,such as Samsung, Sony, HTC,LG,Motorola,ZTE, Huawei and so on.

d_win d_mac

Step 1.Run the Android Data Eraser on Computer and Connect Note 7 with it
Step 2.Click “Erase All Data” Option
Step 3.Begin to Erase All Data from Samsung Galaxy Note 7
Step 4.Factory Reset on Your Note 7

wipe-note-7-data-before-recalling

Detail tutorial:How to Permanently Remove Data on Samsung Galaxy Note 7 before Recalling

Related Article:

How to Backup and Restore Samsung Galaxy Note 7

How to Backup and Restore Contacts on Samsung Galaxy Note 7

How to Backup and Restore Android on Computer

How to Backup Android Phone or Tablet Data to Computer

How to Unlock the Screen Lock on Samsung Galaxy

How to Unlock the Screen Lock on My Samsung Phone?
Help!What do I do if I forget the screen lock password on my Samsung Galaxy S6?How to unlock my phone’s locked screen remotely on the Find My Mobile web page?

* How to Unlock Samsung Phone with a Broken Screen

* How to Recover Lost Data from Samsung Phone with Broken Screen

Unlock the Screen Lock on Samsung Galaxy

Most of the times that we key in new security details on our phones in order to prevent our personal data on device and avoid leak to anyone.A good number of us tend to forget the passwords, and in most cases, the patterns. With the patterns forgotten and passwords lost, we’re usually locked out, and can’t access our device without password.In this article, we are going to take a look at the solution with detail procedures to unlock Samsung without password.I hope that the three methods is useful for you that perfectly suits your needs.

Method 1: Remove Samsung Locked Screen without Password(No Data Loss)

Android Lock Screen Removal is your ideal choice to unlock Samsung without password in minutes,no more series steps,no more security problems.This helpful program is used to solve Android locked screen problems effectively.Now the latest version currently supports Samsung devices only.It can help Samsung users disable the password and pattern lock issues on Samsung device without data loss,afer remove the phone’s locked screen,you can access your contacts, SMS, pictures, emails or other important data.The program applicable Samsung device including Samsung Galaxy S9/S8/S7/S6/S5/S4/S3,Note 5/4/3,etc.

d_win d_mac

Bypass Samsung Lock Screen Pattern, Password, Pin and Fingerprint Without Data Loss

Step 1. Run Android Toolkit on Computer
Download and install Android Lock Screen Removal & Data Recovery program on your computer.Then run the program,and then click “Android Lock Screen Removal” option.

remove samsung locked screen

Step 2. Begin the Removal Process
Click the Start button to start the removal process.

select mode

Step 3. Connect Samsung to the Computer
Once you see the prompts below, connect your Samsung to computer via USB cable. Note that the USB debugging mode on your device should be turned on before.

Step 4. Download Recovery Package for Samsung
Android Lock Screen Removal & Data Recovery is downloading recovery package for device and match the phone model after checking the agreements. Then it will begin to restore your device. Please wait until this restoring process is complete.

downloading recovery package for samsung

Step 5. Remove Password on Samsung Completed
Now Android Lock Screen Removal & Data Recovery has unlocked your Samsung without password.You can go to your phone and confirm if your device still has a password for the screen lock or not.

remove samsung locked screen

The whole removal task is so easy,isn’t it? In addition,the Android Lock Screen Removal also enables to restore deleted data from Android device after losing data under any circumstances,it allow to restore data from Android SD card/Android memory card as well.

d_win d_mac

Method 2: How to Unlock the Screen Lock on Samsung Phone Remotely

If you forgot your screen lock password,you can also unlock Samsung Galaxy phone locked screen remotely on the Find My Mobile web page.Let’s teach you how to unlock your Samsung phone’s locked screen remotely on your computer.

Step 1.Go to Find My Mobile web page: http://findmymobile.samsung.com and log in with your Samsung account details.

find my mobile page - unlock screen

Step 2.After logging in to your Samsung account successfully, find the “Unlock my screen” option on the main page and click it.

Unlock my screen

Step 3.Step 3.Click “Unlock” button start to unlock your phone screen.

unlock samsung screen

Step 4.Select OK when you receive a Notification on your computer saying your screen is unlocked, you can unlock your Samsung phone screen remotely on computer.

unlock Samsung phone screen remotely

Method 3: Unlock Samsung Screen Locked by Hard Reset(Data Loss)

To bypass Samsung lock screen pattern, Pin, password and fingerprint by yourself at Home,the free way is Factory / Hard Reset your phone.But after performing factory / hard reset the phone,it will will erase all data and personal information from the phone,your phone will back it to its original factory state.Please carefully consider whether to perform hard reset and bypass the security.

Step 1.Turn off your Samsung phone at first.
Step 2.Press and hold Volume UP,Home and Power keys at the same time.

hard reset s7

Step 3.When you see the Samsung logo appear,please release the Power key but continue to hold the Volume Up key and the Home key.
Step 4.When you see the Android System Recovery screen appears,please release all keys.
Step 5.Use the Volume Up/Down keys for navigation and the Power On key for OK.
Step 6.Choose “wipe cache partition

hard reset galaxy s7

Choose “Yes — delete all user data” option

samsung hard reset

Finally,choose “reboot system now” to reboot the Android system and hard reset your phone now.

hard reset samsung s7

Note:During the hard reset process,all of your data will be erased,so we recommend you use the Android Lock Screen Removal to unlock your phone,it will not erase your data.What’s more,this Android Tool Kit also can help you recover lost/deleted data from Android; extract files from Android with broken screen, locked screen and black/blank screen; backup and restore Android data; Unlock Android phone SIM Card in minutes.

Download the Android Toolkit – Android Lock Screen Removal and solve your phone problem at Home now:

d_win d_mac

Related Article:

How to Unlock Android Locked Screen

How to Recover Lost Data from Samsung with Locked screen

Forget Android SIM Card Lock PIN and How to Remove it

How to Set the Smart Lock of Samsung Phone

Forget iPhone Locked Screen Password and How to Remove it

Unlock the Screen Lock on Samsung

How to Restore LINE Photos & Videos on iPhone

Line is an useful chat application that use for free to send text,photos,videos,audios to others on mobile device.It’s a little bit trouble if someone accidentally deleted the LINE chat history, especially the Line photos and videos.But later request a restore is not as simple as you think, because LINE won’t store any deleted data and files.Once the Line messages got deleted, that are completely removed from the LINE app.

line-app

How to Undelete Line Photos & Videos from iPhone

It’s really no more easier than restoring Line photos & videos on iPhone with iOS Data Backup & Restore Tool,Line messages,audios,contacts,call logs are supported additionally.What’s more,iOS Data Backup & Restore Tool allow to backup Line data(chat history) with attachments from iOS device to computer without data loss.
Here list the applicable iOS device:iPhone 7,iPhone SE,iPhone 6S(Plus),iPhone 6(Plus),iPhone 5S/5C/5,iPad Air,iPad Pro,iPad Mini,etc,.

d_win d_mac

Part 1. Restore Line Photos & Videos on iPhone without Backup

If you have a backup copy your iOS Line chat history, it is very easy for you to restore the data on iPhone or other iDevice.But if you don’t, you can try the first solution to begin restore with iOS Data Back & Restore Tool.

Step 1.Connect iPhone to Computer
First of all,please install the program and launch it on computer.Then select “Recover from iOS Device” on the left pane and connect your device to computer via USB cable that is matched.Now you should go to your device and tap “Trust” on the pop-up window so that the data can be accessed.

Step 2.Choose the Data Types to Restore
When your iPhone is connected successfully,you can see the interface that shows different data types on your device.Here need to choose “App Photos” and “App Videos” and start to scan the LINE data.

choose-line-file-to-scan

Tips:
1. You are allow to recover the deleted data as well as restore existing data to computer. But please notice that the two different types of data recovery support different data types. You can check it on the interface of the program above.
2. For LINE chat history, you couldn’t find the data type on the page. But just choose “App Photos”, “App Videos” or “App Document” and the program can access the App data like LINE, Viber and so on.

Step 3.Preview the LINE Chat History and Export to Computer
The scanning may cost you a little while, please wait for a moment. Once the scanning is done, you can preview the App data.

line-data-recovery-preview

Just click “App Photos > line” to check the photos from LINE chat history. And now you are allow to view the videos in the same way. Please select the photos and videos you wanna restore and click “Export to Mac” or “Export to PC”.

line-data-recovery-export

Step 4.View the Exported Photos and Videos
You are allow to check the exported data on your computer now.

view-line-recovered-data

d_win d_mac

Part 2. Recover Line Photos & Videos on iPhone from Backup

Step 1.Run Program and Connect iPhone to Computer
Please click “More Tools” and connect your iPhone to computer via USB cable.

restore-line-photo-video

Step 2.View the Previous Backup Data
Once your device has been connected, you can see the interface above. Please click “To view the previous backup file” in blue. Now you can see the backup history. Choose the history you need to restore and click “View”.

view-line-backup-file

Note: You are allow to check the details of the backup history including name, model, latest backup data, and file size on the page. It would be easier for you to find out the one you want to restore.

Step 3.Restore the LINE Photos & Video
You can check the Line chat history here. Choose “LINE Attachments” and you can see all the photos and videos are show on the page. Select the ones you wanna restore and click “Export to Mac” or “Export to PC”.

restore-line-photos-videos

As you see, iOS Data Back & Restore Tool support to almost all the data types like contacts, messages, call history, photos, and App data on iOS device.Just download it right now and try to undelete your data on device.

d_win d_mac

Related Article:

How to Backup and Restore Line Chat History

How to Backup and Restore iOS Kik Messages

How to Backup and Restore iOS Viber Messages

How to Backup and Restore iOS WhatsApp Messages

Transfer Videos from PC/Mac to iPhone(iPhone XS/XS Max/XR Included)

Are you excited about updating to iPhone XS Max? Then be bother to export your fantastic videos from computer to the new device? Searching the simple ways to transfer media file to iPhone X without iTunes but still no best answer? Take it easy,here you came to the right place, we are going to offer you the most effective solution, which will perfectly solve your problems in just a coffee time.

You should get the approachable tutorials on how to transfer videos between computer and iPhone with iOS Transfer,including Movies, Music Videos, Home Videos, TV Shows, iTunes U and Podcasts.You can fully enjoy movies or videos on your iOS devices anytime anywhere.With this program, you are able to manage your media files on iPhone/iPad/iPod freely.iOS Transfer allow to sync videos,music,contacts,SMS from computer to iPhone 7 in a simple click.To sum up,transfer music, photos, videos and playlists from iPhone, iPad& iPod to iTunes Library& PC and vice versa, manage iOS device music, photos, contacts and SMS easily. iPhone X/XS/XS Max/XR, iPhone 8(Plus), iPhone 7,iPhone 6S(Plus),iPhone 6(Plus),iPhone SE,iPhone 5S/5C/5,iPad,iPod are applicable for iOS Transfer.

Features of iOS Transfer:
-Transfer Videos from Computer to iPhone/iPad/iPod
-Transfer Videos from iPhone/iPad/iPod to Computer
-Transfer Videos from iPhone/iPad/iPod to iTunes Library
-Transfer Videos from iTunes Library to iPhone/iPad/iPod
-Transfer Videos Between iPhone/iPad/iPod/Android Devices
-Delete Videos on iPhone/iPad/iPod

d_win d_mac

Part 1:How to Sync Videos from Computer to iPhone 7

Step 1. Launch iOS Transfer and connect iPhone 7 with the Computer

iOS Transfer main page

Method 1: Transfer Videos Using Buttons

Step 2. Find video type on iPhone 7
Click Videos icon at the top of the main interface. Select a specific option Movies/Music Videos/Home Videos/TV Shows/iTunes U/Podcasts to transfer( “Movies” is the default option).

select videos to transfer

Step 3. Select and Add Videos from PC/Mac to iPhone 7
Later, click Add and then select Add File or Add Folder.
Note: If you need to select a few videos,then click Add File, and then hold down Shift or Ctrl key to choose multiple videos; if you want to transfer all the videos in one folder, then click Add Folder.

select Add File or Add Folder

From the pop-up window, browse and choose the target video(s) from your computer. And click Open. Then, the selected videos will be imported to the iPhone 7.

open the video older

Method 2: Transfer Videos by Drag and Drop

Step 2. Find videos on your PC/Mac
Find and open the video folder on your PC or Mac which includes the videos that you wish to transfer to your iPhone 7.

Find videos on computer

Step 3. Export the Videos to iPhone 7 by Drag and Drop
Click Videos icon on the main interface of iOS Transfer,it will go to the Movies window by default, Music Videos, TV Shows, iTunes U and Podcasts are available here too. Drag and drop the selected videos from your computer to the Movies window of iOS Transfer.

Export videos to iPhone 7 by Drag and Drop

d_win d_mac

Part 2:How to Transfer Videos from iPhone 7 to Computer

Step 1. Launch iOS Transfer and connect your iPhone 7 with the computer.

iOS Transfer main page

Step 2. Export videos from iPhone 7 to computer
a. Click Videos icon at the top of the main interface, then select a specific option Movies/Music Videos/Home Videos/TV Shows/iTunes U/Podcasts to transfer( “Movies” is the default option). Later, select the videos (Note: Hold down Ctrl or Shift Key to select multiple videos) you want to transfer to the computer, and click Export > Export to PC.

select videos to transfer

Note: Here you can right-click on the selected videos and then select Export > Export to PC as well.

export video to pc
b. Browse and choose the target folder on the computer to export. And click OK to start the export process.

click ok to confirm

Step 3. Export videos to computer completely
Click Open Folder to see the exported files on the computer or click OK to close the dialog.

export video completed

view transferred videos

d_win d_mac

Part 3:How to Transfer Videos from iTunes to iPhone 7

iOS Transfer provides two solutions to transfer videos from iTunes to iPhone 7, include Movies, Music Videos, TV Shows, iTunes U and Podcasts.

Method 1: With 1-Click File Transfer

Step 1. Launch iOS Transfer and connect your iPhone 7 with the computer.Then click Transfer iTunes Media to Device icon on the main interface.

ios transfer main page

Step 2. iOS Transfer will detect all the media files in iTunes and show them by list on the pop-up window. By default, the entire library has been checked. But you can uncheck some items that you won’t transfer to your iPhone.

select transfer videos to iphone 7

Step 3. Transfer media contents to iPhone 7
Click Transfer to start transferring selected files to your iPhone and then click OK to complete the process.
Note: iOS Transfer enables to automatically detect the duplicates and only transfer the exclusive contents from iTunes to iPhone 7.

click transfer button

transfer music to iphone 7

Method 2: With Toolbox

Step 1. Launch iOS Transfer and connect your iPhone 7 with the computer. Then go to Toolbox > Transfer iTunes Media to Device on the Toolbox interface.

tool box main page
Step 2. iOS Transfer will detect all the media files in iTunes and show them by list on the pop-up window. By default, the entire library has been checked. But you can uncheck some items that you won’t transfer to your iPhone.

select video file transfer

Step 3. Transfer media files to your iPhone 7
Click Transfer to start transferring selected files to your iPhone 7 and then click OK to complete the process.
Note: iOS Transfer enables to automatically detect the duplicates and only transfer the exclusive files from iTunes to iPhone 7.

click transfer to begin

transfer itunes videos to iphone 7 complete

d_win d_mac

A Media File Transfer for iPhone 7

Another iOS media file manage here we strongly suggest you use is Mobile Sync. It is the best tool for sync iOS data between iOS device and computer, it has several features like PC to iOS Transfer, iOS to iOS Transfer, add files to iOS, or vice versa. Mobile Sync is a professional iOS data manage & transfer software, it is designed for syncing data between iPhone/iPad/iPod and computer. With the help of Mobile Sync, you can efficiently transfer videos from the computer to iPhone 7 easily. The iOS data sync job can be done with easy steps: Launch Mobile Sync and then connect your iOS device to it with USB cable; select specific iOS files on the preview window; start the transferring. Only three simple steps, you can finish the iOS data sync job.

mobile sync home page

Related Article:

How to Transfer Music from Computer to iPhone 7

How to Transfer Photos from Computer to Mobile Phone

How to Transfer Video from Computer to Samsung

How to Transfer Music from Android to iPhone/iPad/iPod

Transfer Videos from Computer to iPhone 7

How to Transfer Music from Computer to iPhone without iTunes?

[Summary]:Finding a way to enjoy music and Apple Music songs on your iPhone?This article not only teach you how to import music from computer, iTunes library, old mobile phones to iPhone X and iPhone 8/7/6S/6(Plus) directly,but also shows you how to remove DRM from Apple music and convert to DRM-free MP3 for playing on iPhone/iPod for free forever,even your canceleted the Apple Music subscription service.

“I got an iPhone X,now I should resell my old Samsung phone.Then I completed contacts,photos,messages transfer task.However,I have no idea to copy the favorite songs from computer to iPhone X.Could anyone tell me some available ways?Thanks”—–Garry Lee

Transfer iPhone 7 music

You May Like to Read:

* How to Play Apple Music on iPhone/iPod/iPad for Free

* How to Transfer Data from iPhone to iPhone

iPhone X/8 – the newest models of iPhone now is release around the world.For the funny features of iPhone 8,you must can’t hold yourself to get one.When you need to switch your old device to the new iPhone 8,the first thing you wanna do may be add some file to your new iPhone 7 device.Probably you are consider how to transfer favorite music from computer to iPhone 8/8 Plus. In addition to the traditional iTunes way, this article also help to transfer music to iPhone 8/X with an iPhone Data Transfer tool.

The iPhone Music TransferiOS & Android Manager provides you with 1-click solution to export music on computer to iPhone 7 easily,Songs, iTunes U, Audiobooks, Podcasts are included.Meanwhile,it also allow to transfer videos,photos,contacts,SMS from computer to iOS device (such as iPhone X and iPhone 8/7/SE/6S/6/5S/5) without complicated steps.In conclusion,transfer music, photos, videos and playlists from iPhone, iPad& iPod to iTunes Library& PC and vice versa, manage music, photos, contacts and SMS freely.

d_win d_mac

Let’s learn how to transfer music to iPhone X/8/7/7 Plus:

How to Copy Music from Computer to iPhone X/8/7

Free download and launch the iOS & Android Manager on your Windows computer or Mac:

d_win d_mac

When running the iOS & Android Manager on your computer,you can see the main interface as below.

iPhone Music Transfer

Step 1.Launch iOS & Android Manager and connect iPhone 7 with the Computer

iOS Transfer main page

Method 1:Transfer Music Using Buttons

Step 2.Add music from Computer to iPhone 7
Click Music icon at the top of the interface,then select the specific option Music (Music is the default option). Please note that iTunes U/Audiobooks/Podcasts is available to select here also.

select music to transfer

select-itunes-u-music

select podcasts music

select audiobooks music

Then you should click Add and then select Add File or Add Folder to add music files from your computer. If you only want to select some music files, then click Add File, and then hold down Shift or Ctrl key to choose multiple files; if you want to transfer all the music in one folder, then click Add Folder. After that, click Open to import the selected music. Here we only add music to iPhone by clicking Add File for example, others are with the similar steps.

Add Folder to add music files

transfer music file from computer to iPhone

Method 2:Transfer Music by Drag and Drop

Step 2.Find Songs on Computer
Find and open the music folder on your PC or Mac which includes the music files that you wish to transfer to your iPhone 7.

open the music folder on computer

Step 3.Export Songs to iPhone 7 by Drag and Drop
Click Music icon on the main interface of iOS Transfer,it will go to the Music window by default.Drag and drop the selected music from your computer to the Music window of iOS Transfer.

Export the songs to iPhone 7 by Drag and Drop

Tips:iOS Transfer additionally supports to add Podcasts, iTunes U, Audiobooks from PC/Mac to iPhone/iPad/iPod with this method too. The only change while adding these media files is to select one of the options: Podcasts, iTunes U, Audiobooks instead of Music.

Part 2: How to Transfer Music from other Android/iOS devices to X/8/7

iOS & Android Manager not only can help you transfer music between iPhone and computer,but also allows you transfer music from old iPhone, iPad, iPod to iPhone X/8/7; sync music from Android to iPhone 7/7 plus,like Samsung Galaxy S7/S7 Edge/S6/S6 Edge/S5, HTC One M9/M8, Google Pixel, Motorola, Sony,etc.It is a simple yet effective solution for transferring data between different devices, like Phone to Phone Transfer software.Let’s teach you how to use this powerful iPhone Data Transfer to transfer all your music files from other devices like iPod, iPad, old iPhone,Android phone to new iPhone 7/7 Plus by one click without quality loss.

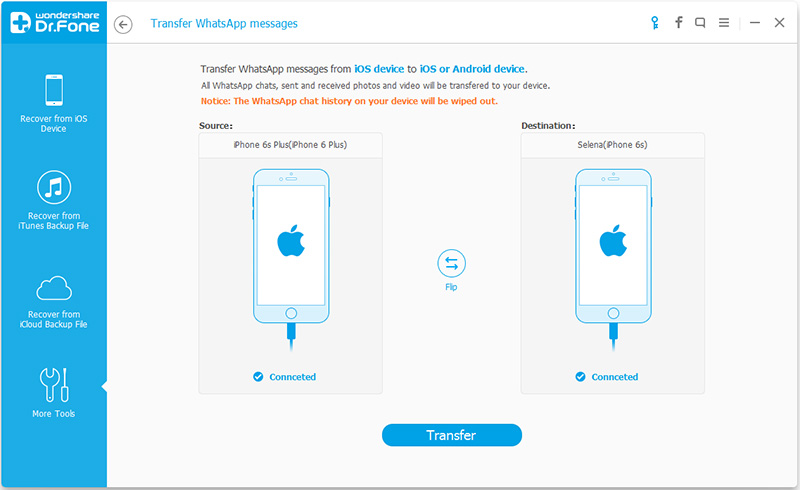
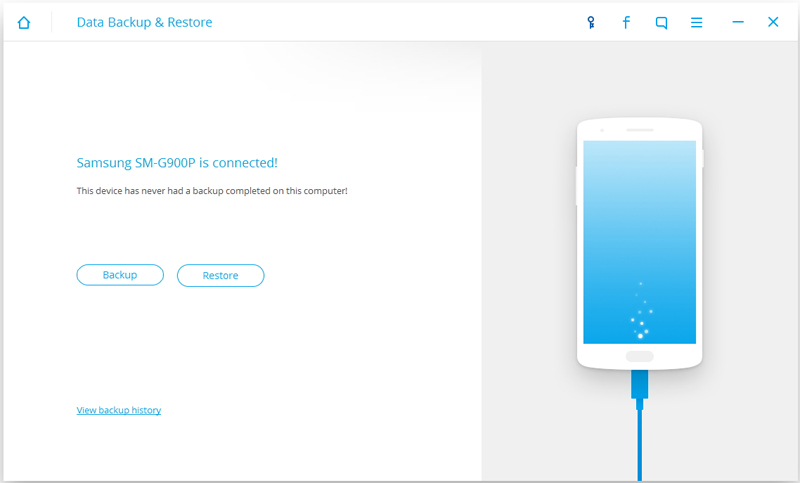
Step 1. Launch the iOS & Android Manager and connect your iPhone 7 and the source device to the computer via USB cables.
Launch iOS & Android Manager on computer,if you use Macbook,we also provides you the iOS & Android Manager(Mac) version,and connect your iPhone 7 and the old iOS/Android device with your computer, here we take transfer music from Samsung to iPhone 7 for example.

transfer songs from Samsung to iPhone 7

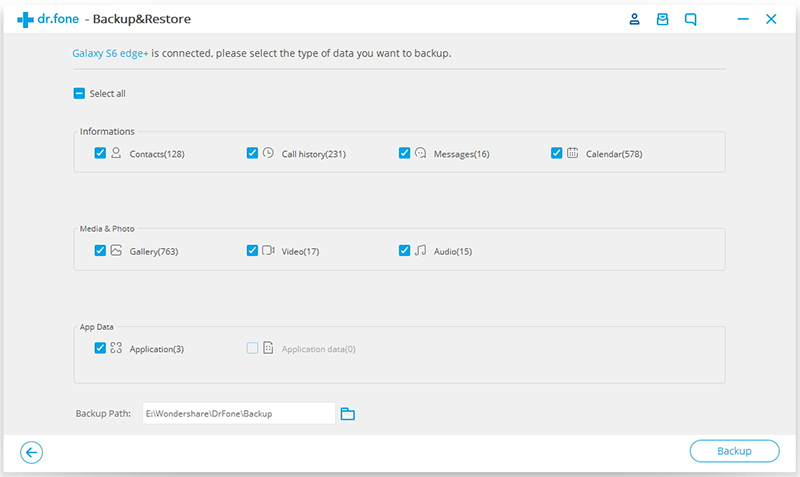
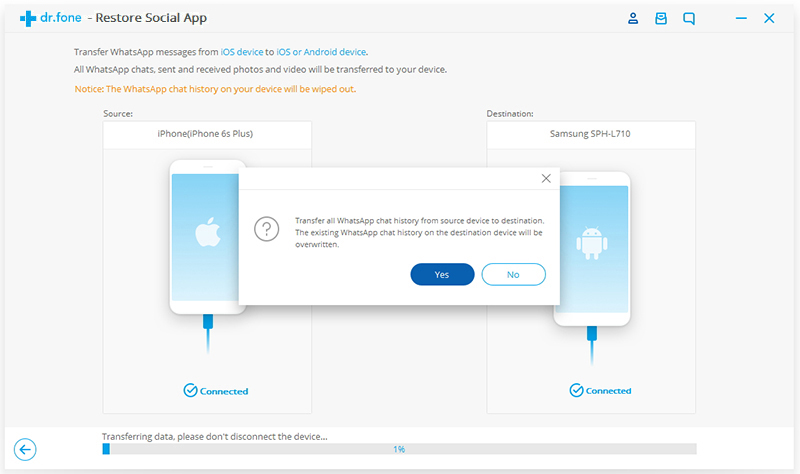
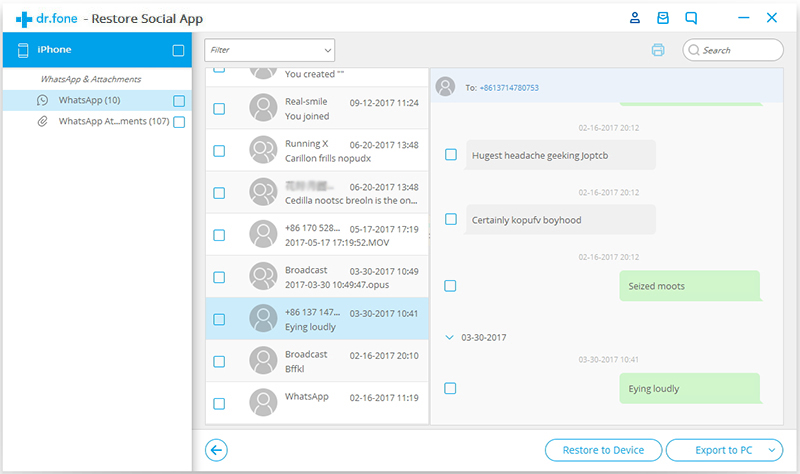
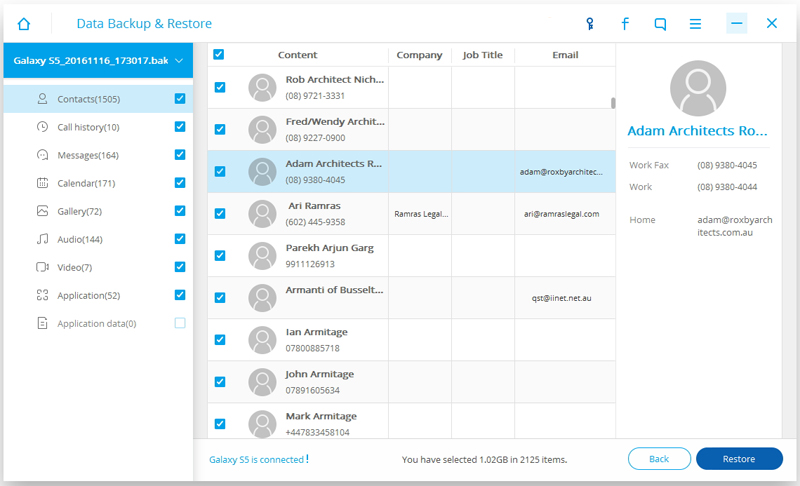
Step 2. Select the Songs you want to Transfer from Samsung to iPhone 7
Select the iPhone 7 device from which you want to transfer music, and switch to “Music” item at the top of the main interface, then select the musics which you want to transfer from Samsung to iPhone 7, then click “Export > Export to iPhone 7”. As for the following screenshot, the music on the Samsung phone can be transferred to the iPhone 7.Also, the songs informations such as artist, album, lyrics, cover, time, etc was transferred to your iPhone 7.

Transfer Music from Android to iPhone 7

Note: Here you can right-click on the selected music and then select Export > Export to B or Export to C for transferring your iPhone 7 music to other devices as well.

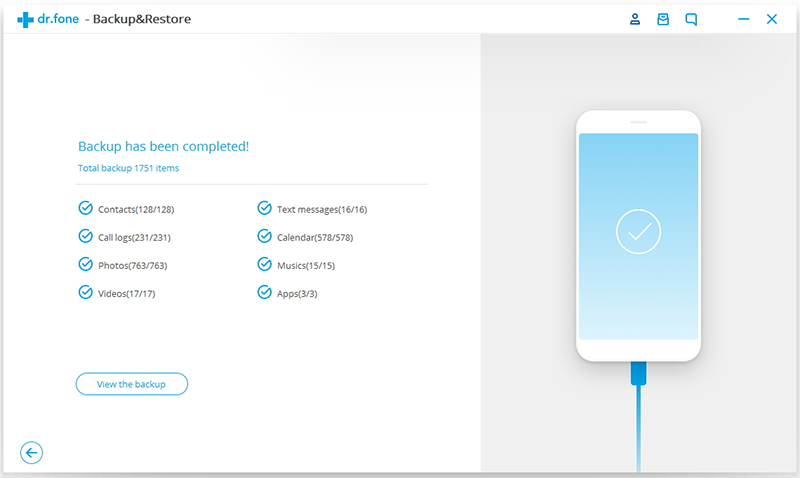
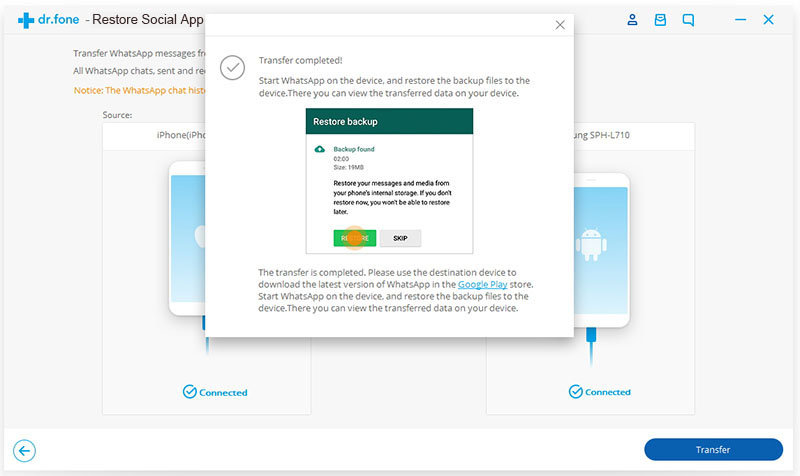
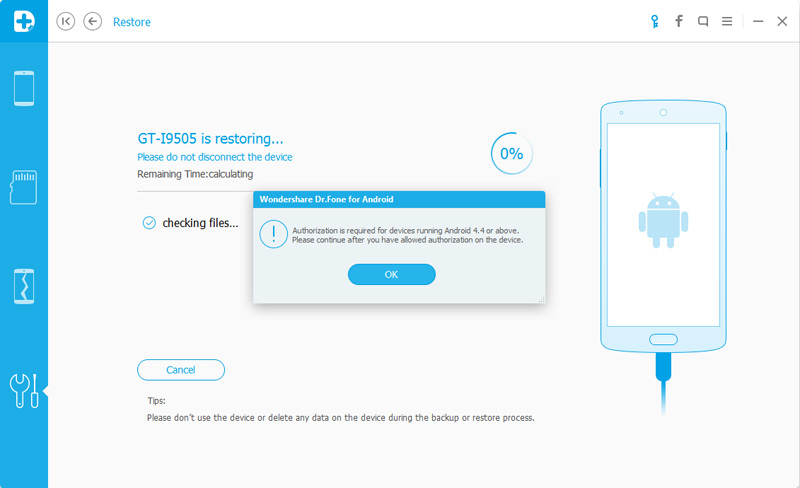
Step 3.Complete Sync Music from Android to iPhone 7
Now,you have complete transferring music from old phone to iPhone 7,open the Music App on your iPhone 7 and enjoy listening songs on your iPhone 7 in anywhere at any time

Transfer Music from iPhone 6/5s to iPhone 7

Part 3: How to Transfer Music from iTunes to iPhone X/8/7 without iTunes

Some iOS users may ask “Why Doesn’t Syncing from iTunes to iPhone X/8/7?”,”How to sync iTunes music to iPhone without erase the previous data?” Actually,you can transfer iTunes music to iPhone/iPad/iPod without iTunes program,many people may have bought lots of songs on iTunes store,or synced music from old iPhone 6s/6/SE/5s/5/4s/4 to iTunes,when you have got a new iPhone 7,the first you will transfer songs, playlist from iTunes library to iPhone 7.The iOS & Android Manager also as an iTunes to iOS/Android Transfer for you transfer songs from iTunes to iPhone 7, Samsung Galaxy S7/S6, HTC One, Google Pixel/Nexus and other Android phone with 1 click.
Let’s teach you how to use this iOS & Android Manager to transfer music from iTunes to iPhone 7/7 plus without overwriting your previous music and other content in your devices. In just one step, your iTunes media files could be transferred to your iPhone 7 without data losing.

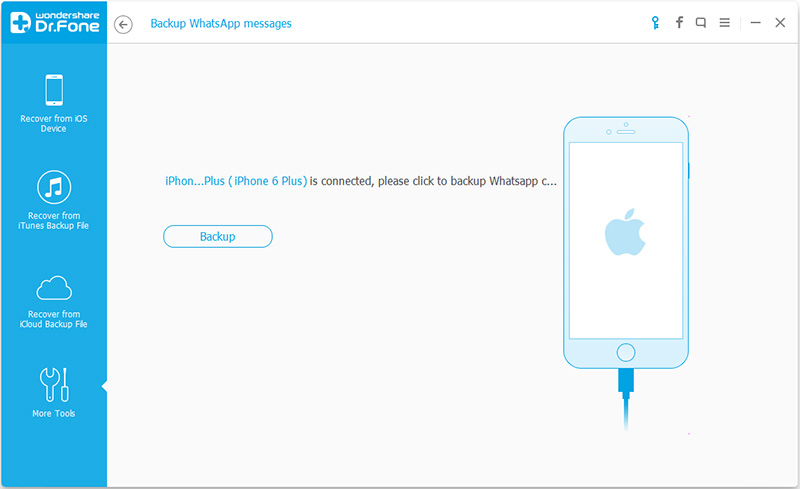
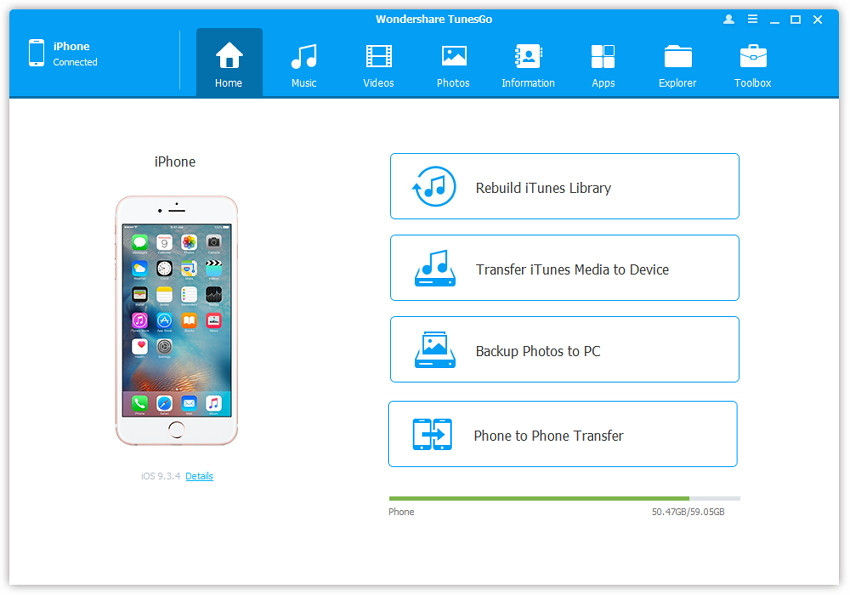
Step 1. Launch the iOS & Android Manager and connect your iPhone 7 to computer via USB cable. Then click the “Transfer iTunes Media to Device” feature on the main interface,the program will pop up a new windows for you.

Music from iTunes Library to iPhone 7/7 plus

Step 2.Select the Music items you want to Transfer to iPhone 7
The program will detect all the media files in iTunes,including Music, Entire library, Music Videos, Movies, Home Videos, Podcasts, iTunes U, Audiobooks,if you just want to sync iTunes music to your iPhone 7,please select the “Music” items and click “Transfer” button begin to sync iTunes music to your iPhone 7 directly.

transfer iTunes Music to iPhone 7

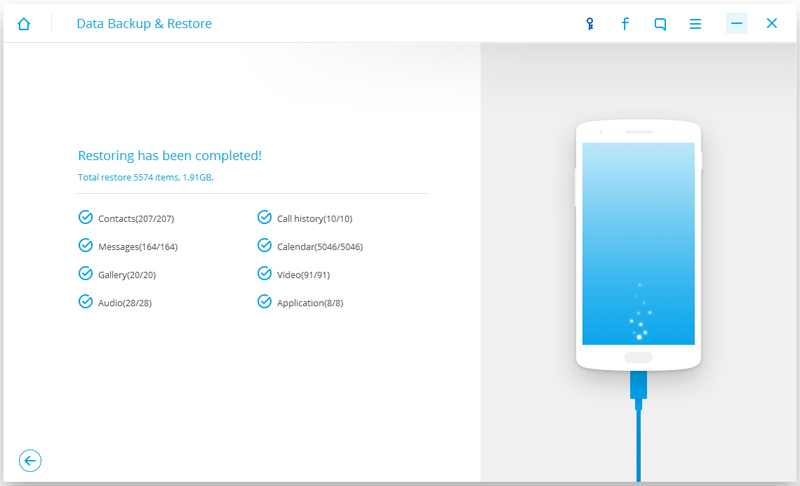
Step 3. Finish Transfer Music to your iPhone 7 and Play Music on iPhone 7
Only few minutes,the program helps you sync songs from iTunes library to your iPhone 7,and then click “OK”to complete the process.Then open your iPhone 7 Music app you can found all the music transferred to your phone,including the previous music still on your iPhone 7.

sync iTunes music to iPhone 7

Recommend: You can use this iOS & Android manager to transfer music from iTunes to new Samsung Galaxy S7/S7 Edge/S6/S6 Edge, just follow the tutorial as above and choose iTunes music and playlists, then click Start Transfer. After a while, the music will appear in your Samsung Galaxy S7/S6,as well as other Android and iOS devices.

d_win d_mac

Part 4: Free Music and Videos Downloader for iPhone 7/7 Plus

Finding top free Music Download Tools for iPhone 7 to get music and play on iPhone 7, iPhone 7 plus? TunesGo is the best Music and Videos download tool for iOS/Andriod users fast download free music to iPhone 7/6S/6/SE, Samsung Galaxy S7/S6/S5/Note 5/Note 4 and other Android devices with originally audio quality,you can also directly transfer the downloaded music & videos to your devices,and enjoying music on iPhone iPad Android devices.

download music video to iPHone 7

d_win d_mac

iOS & Android Music/Videos Downloader Key Features:

-Transfer music and playlists between iPhone,iPad and iPod(touch)
-Transfer music and playlists between iOS devices and Android devices
-Transfer music and playlists between iPhone,iPad/Android devices and iTunes library
-Backup photos,videos,music from iPhone/iPad/iPod/Android to computer
-Free download any music, album, movie, video, TV shows, 4K UHD videos from 300+ sites, including YouTube, Dailymotion, Facebook, Vevo, Vimeo, etc, without ads and virus

download free music to iPhone 7/7 plus

Download Music on iPhone 7

Part 5: How to Get Apple Music on your iPhone, Mac and PC for Free

Want to get free Apple Music forever and playing on your iPhone 7 for free forever once the subscription service is canceled?

Apple Music Converter helps Windows and Mac users easily convert Apple Music M4P songs to DRM-free MP3 without downloading them,so that you can keep your purchased Apple Music as long as you like.What’s more,the Apple Music Converter also could helps you remove DRM from Apple Music and output as DRM-free MP3, M4A, AC3, AIFF, FLAC, etc. for playing on any music players,such as iPhone 7/6S/6/SE/5S/5/4S/4, iPod(touch), MP3 player and Android mobile phones, etc.Let’s teach you how to convert Apple music to iPhone on Mac for example.

Free download the Apple Music Converter for Mac or Windows:

d_win d_mac

Make Apple Music Playable on iPhone for Free Forever

Step 1.Run Apple Music Converter on PC or Mac
After download and run the program on your computer.,the iTunes will be opened automatically.

run apple music to iPhone converter

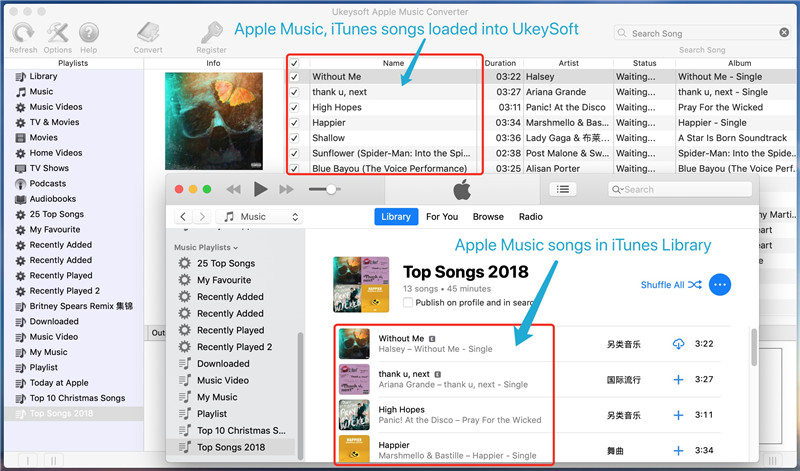
Step 2.Select Apple Music to Remove DRM and Convert to MP3
In this step,you can see all your iTunes library playlist on the left side of the program.Please choose the iTunes music you want,please add the Apple music tracks or playlists to iTunes library first. Then, refresh the program to select them and import the the program.

select iTunes music to convert

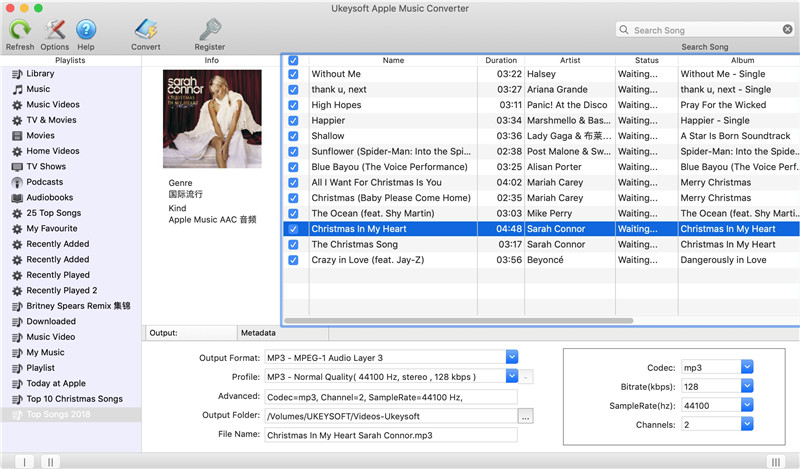
Step 3.Select MP3 Output Settings
For playing Apple music on your iPhone devices,please choose MP3 and M4A as output format.Then, you can adjust the bitrate, sample rate, etc. according to your preference.

select mp3 output profile

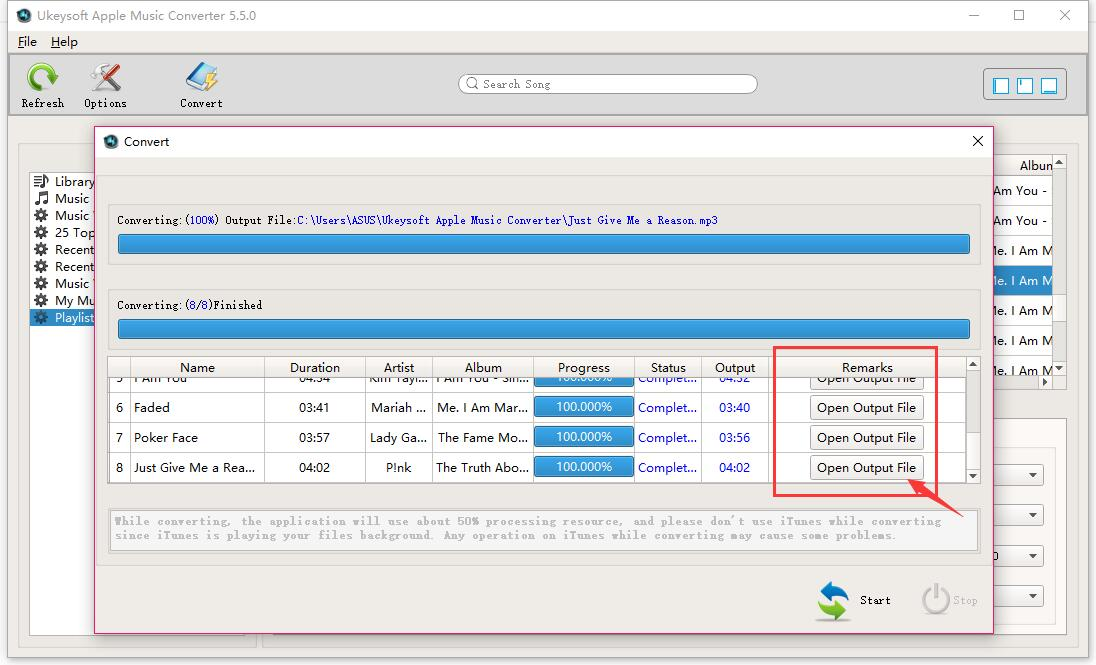
Step 4.Remove Apple Music DRM and Convert to DRM-free MP3
After select the .mp3 as output format,finally please click the “Convert” button start to bypass iTunes DRM and DRM-protected Apple Music tracks and convert them to MP3.After conversion,you can enjoy all converted Apple music in MP3 without iTunes or iOS devices.

convert apple music from m4p to mp3

Step 5.Transfer Apple Music Tracks to iPhone
After conversion,you can transfer the converted Apple Music songs to iPod/iPhone for offline playback without DRM limitation., you can play Apple Music on iPhone or iPod with more freedom,even the Apple Music subscription service is canceled.

transfer converted Apple music to iphone

Learn more: How to transfer music from computer to iPhone

Free download the Apple Music Converter for Mac or Windows and try to make your Apple music as free local music files.

d_win d_mac

A Smart Media Files Transfer for iOS

If you need to transfer media files between iPhone and computer, like music, you are recommended to try this iOS Media Files Transfer – Mobile Sync. It can do you a great help for you to transfer music from computer to iPhone X/8/7/6S/6(Plus) with ease. Besides music, other types of files are supported to be transferred, insist of videos, photos, contacts, messages and others. It is made of five functions, including add files from computer to iOS device; transfer iOS files to computer; transfer data between iOS devices; ringtone maker and HEIC converter.

mobile sync home page

Related Article:

How to Transfer Photos from Computer to Mobile Phone

How to Transfer Video from Computer to Samsung

How to Transfer Music from Android to iPhone/iPad/iPod

Transfer Music from Computer to iPhone

How to Jailbreak iOS 10 on iPhone without Losing Data

Summary:iOS 10 is officially out and now Pangu finds itself in the limelight. After showcasing that celebrated iOS 10 jailbreak at MOSEC 2016 back in July, Apple has repeatedly found ways to thwart attempts to hack their mobile operating system, Yahoo reported.Read this article and get tips of jailbreaking iOS 10 on iPhone/iPad without data loss and make full use of iOS 10 freely.

ios-10-jailbreak-iphone

Part 1:Backup Data on iOS 10 iPhone

Before jailbreak iOS 10 on iPhone,you should backup data before the jailbreak task begin to avoid data loss on device.Here we are going to offer 3 ways to backup your iOS 10 data via iTunes,iCloud,PC.

Way 1:Backup iOS 10 Data to iCloud

Step 1. Turn on WiFi, tap Settings > iCloud;
Step 2. Scroll down and tap Backup > tap Back Up Now;
Make sure that iCloud Backup is turned on. And device should stay connected to the WiFi until the process is completed.
Step 3.Once the process is finished, you can tap Settings > iCloud > Storage > Manage Storage and make sure the backup is finished. You can also check the details of backup file .

Way 2:Backup iOS 10 Data to iTunes

Step 1. Update the newest version iTunes on your PC,run iTunes and connect iPhone with PC;
Step 2. Follow the onscreen steps to enter your device password or to choose Trust This PC;
Step 3. Select your iPhone when it appears in iTunes;
Make sure that Summary tab at the top of iTunes is selected;
On the device’s tab,check Prevent iPods,iPhones and iPads from syncing automatically.
Step 4. Tap Backup to this computer under the backup section.

Way 3:Backup iOS 10 Data to PC

iOS Data Backup & Restore Tool is your first choice to completely backup iOS 10 data on iPhone to computer,restore backup data to iPhone without data loss.It’ no more easier than backing up iPhone data to PC with iOS Data Backup & Restore Tool in only a few clicks,including contacts,photos,videos,messages,notes,call logs,calendars and so on.Applicable iOS device are listed:iPhone 7,iPhone SE,iPhone 6S/6,iPhone 5S/5,iPad Air,iPad Pro,iPad Mini,etc,.

d_win d_mac

Step 1:Run Program and Select “More Tools”
Step 2:Select iOS 10 File to Backup
Step 3:Begin to Backup iPhone Data to PC

backup device

Part 2:How to Jailbreak iOS 10 on iPhone without Losing Data

Once finish the backup task on iOS 10 iPhone,now you should start to jailbreak iOS 10 on your iPhone safely.Follow the detail steps below and try to jailbreak iPhone with iOS 10 on your own.

Step 1. Turn on Safari on your iOS 10 iPhone with iOS 10 firmware running;
Step 2. Search the URL:download pangu.org and tap on the webpage degined for Pangu iOS 10 app icon;And download it on your iOS 10 device;
Step 3. Go to the bottom of your iPhone and tap on the Up arrow as shown there when the page loads up;
Step 4. Select Add to HomeScreen in the next screen and tap to proceed;
Step 5. Rename the app icon as Pangu and tap Add;
Step 6.After installing Pangu app on your iOS 10 device, tap on the icon and get the latest of Pangu iOS 10.

ios 10 jailbreak pangu

Then you run Pangu and follow the onscreen guidelines to complete the jailbreak process on your iOS 10 iPhone without data loss.

Part 3:How to Restore Data on iPhone after iOS 10 Jailbreak

Many people know that it will loss data when iOS 10 jailbreak on iPhone/iPad failed,how to solve the data restoring issue in no worries?Just give a try on the iOS 10 Data Recovery,which is a professional iOS data recovery tool to perfectly restore data on iPhone after iOS 10 jailbreak without losing data,such as contacts,photos,videos,messages,notes,call logs,calendars and more.It allow to restore deleted data on device with three modes:directly recover from iPhone,recover from iTunes backup file,recover from iCloud backup file.Just select one and retrieve deleted data on device effectively.

d_win d_mac

Step 1:Run Program and Select Recovery Mode
Step 2:Select File to Restore
Step 3:Restore Selected Data on Device

recover iphone data after ios 10 jailbreak

Extra tips:How to Restore Deleted Data on iPhone after iOS 10 Jailbreak

Read more:

How to Downgrade iPhone or iPad from iOS 10 to iOS 9

How to Fix Bricked iPhone,iPad when iOS 10 Update/Downgrade

How to Get iPhone Out of Recovery Mode When Update to iOS 10

Top 3 New Features in iOS 10 You Should Know

Some new iOS 10 features now are supported on iOS device after iOS 10 successfully update.After users upgrade device to iOS 10,they won’t be able to take full advantage of some new features on device.Here I’m going to talk about the three most hot feature of iOS 10 you should know,in order to help you to make full use of your iOS 10 device in daily life.

top 3 feature ios 10

Part 1:Top 3 Useful Features of iOS 10

1. Know Who’s Calling
This is a handy little feature that is a welcome addition especially when one is driving. Siri is now equipped to announce not only the name,but also the number of the incoming call.

To enable the feature, simply do the following:
Go to Settings > Phone > Call > Announce Calls.
Choose any of the options: whether you want Siri to announce the calls when connected to CarPlay and when the earphones are on, or when the headphones are on, or if you never/always want Siri to announce the incoming call.

2. Hail A Ride
Booking a ride on Lyft or Uber now gets simpler thanks to Siri. You don’t even need to access the ride-hailing apps! Simply instruct Siri to “Book me an Uber” or “Order a Lyft.”

If you ask Siri to book an Uber, it will follow up and ask you which category you prefer, UberGo or UberX. Once you make your preference clear, Siri detects your location and alerts you of the nearest available cab as well as the estimated fare to your destination. You can then confirm the booking request or cancel it.

Just ensure that the Uber or Lyft app is updated to the latest version that supports iOS 10!

3. Retrieve Photos Easily
This feature is also pretty handy, especially if you find it annoying to sift through realms and realms of images in your photo gallery just to locate a particular snapshot.
Siri now makes life easier and is able to search for a picture from a particular date on iOS 10. For example, if you want Siri to seek out a picture taken on your birthday in March, simply issue the voice command “Show me photos from March 11.” It really is that easy! No more scrolling through a massive library!

That’s not all. You can even instruct Siri to look up images from “last week” or “yesterday” or even “last month.” You can even issue commands to find videos in your photo library.

We know we said top 3 features in the passages above, but there are more funny features you can extra focus on.

Part 2:How to Restore Deleted Data on iPhone after iOS 10 Update

Although iOS 10 contain so many surprise new features,but it is not perfect as you think for its bugs.We’ve received the report which came from iPhone users,they claim that their lost data from iPhone after iOS 10 update,some data just disappear after upgrading to iOS 10,for no more reasons.And then ask us for help.

In this case,we are strongly recommend a helpful tool-iOS 10 Data Recovery,which is a wonderful data recovery to restore deleted data from iPhone after iOS 10 update.Supported data types:photos,videos,contacts,messages,call logs,notes and so on.In addition,iOS 10 Data Recovery usefully help to restore iPhone data due to any circumstances,such as iOS update,iOS jailbreak,device broken/damaged,deleted mistaken,etc,.Available iOS devices:iPhone 7,iPhone SE,iPhone 6S(Plus),iPhone 6(Plus),iPhone 5S/5C/5,iPad Air,iPad Pro,iPad Mini and more.

Easy Steps to Recover iPhone Data after iOS 10 Upgrade:
Step 1:Run iOS 10 Data Recovery and Connect iPhone
Step 2:Select Data to Restore
Step 3:Start the Restore Process

recover data from iPhone after iOS 10 update

Related Article:

How to Recover Data from iPhone/iPad with iOS 10

How to Safely Backup iPhone/iPad before iOS 10 Update

How to Backup and Restore iPhone/iPad Files after iOS 10 Upgrade

How to Upgrade iOS 9 to iOS 10 on iPhone/iPad

Samsung Galaxy Note 7 Catching Fire Accident

The Port St. Lucie Police Department released this video of a car fire on Sept. 13. The driver told investigators he was charging his Samsung Galaxy Note 7 when it burst into flames. How could this have happened? Simple: your phone is a Samsung Galaxy Note 7 — and it’s one of over a hundred that have spontaneously burst into flames.

samsung note 7 catch fire

Part 1:Why Samsung Galaxy Note 7 Phone are Catching Fire

After 35 reported incidents of overheating smartphones worldwide, Samsung made the unprecedented decision to recall every single one of the Galaxy Note 7 smartphones sold.That’s said to be 1 million of the 2.5 million that were manufactured. (Since the recall was first announced, the number of explosive Note 7s has nearly quadrupled.)The company says it’s stopped all sales and shipments of the Note 7 and is working with government agencies and cellular carriers around the world to provide refunds and exchanges for the phone.

In every country, the message is the same: return your Samsung Galaxy Note 7 now, just in case something bad might happen to you.

The Note 7 battery fiasco is a huge black eye for Samsung, made worse by the fact that it’s playing out just as the company’s archrival, Apple, is releasing its new iPhone 7 and iPhone 7 Plus.

But how bad is it, really? What causes a phone to explode this way, and why this specific Samsung phone?

Here’s what we know about Samsung’s battery woes.

Why didn’t the phones catch fire immediately?

When Sadoway explains these theories, one thing doesn’t seem to add up. Today’s cell phone batteries generally charge faster (and get hotter) when they’re first plugged into the wall, not at the end when they’re trickle-charging the last few percent to reach their maximum capacity.

But these Note 7 phones didn’t explode right away. In practically every reported instance of a Note 7 catching fire or exploding, it happened after the phone was plugged in and left charging, sometimes overnight.

Then, there’s the little matter of how Samsung plans to make these phones safer — by issuing a firmware update that keeps the Galaxy Note 7 from charging to more than 60 percent of its full capacity. How could that possibly help, if things heat up the moment a phone is plugged into the wall?

Sadoway has a theory — albeit one without proof. What if only part of the battery was squished improperly, so that the phone couldn’t tell when it was 100 percent charged, and kept on charging the cell?

When lithium ion batteries are continually trickle charged, the lithium ions can start to cover the surface of the negative contact in a coating of lithium metal through a process called “plating.” And in extreme conditions, that lithium metal can form tiny spikes (called “dendrites”) that can poke right through the separator, creating — you guessed it — a short circuit.

That would seem to line up with the “variations in tension” Samsung says it found inside the defective battery cells.

“My guess is by backing off to 60 percent charge, they’ll be well below the threshold where these things happen,” says Sadoway. “Imagine we’re trying to fill our gas tank, we don’t have a really good regulator, and we don’t want to spill the gas all over our shoes. We want to make sure we’re cutting off the flow well before this thing gets to overflow conditions.”

Samsung didn’t immediately respond when asked for comment on the theory.

Part 2:How to Backup Samsung Galaxy Note 7 Data

You may lost data on Samsung Galaxy Note 7 under several unexpected circumstances since Samsung Galaxy Note 7 phone is still not perfect enough,such as deleted mistaken,restore device to factory settings,iOS upgrade/jailbreak,device broken/damaged,device lost,even get burned or more other situations,you ought to backup data on Samsung Galaxy Note 7 to protect your personal data.

To completely backup Samsung Galaxy Note 7 data to computer,you should try this Android Backup & Restore Tool,this terrific program enable to backup data on Samsung Galaxy Note 7,additionally allow to restore backup file to Samsung Galaxy Note 7 effectively without complicated steps.Available data types including contacts,messages,photos,videos,call logs,application (data),calendars,audio,etc,.Most Samsung models are supported by Android Backup & Restore Tool,such as Samsung Galaxy Note 5/4/3,Galaxy S8/S7/S6/S5.

d_win d_mac

Detail simple steps:
Step 1:Download and Run Android Backup & Restore Tool,Connect Samsung
Step 2:Select Data to Backup from Samsung to Computer
Step 3:Start the Data Backup Process

Extra tips:How to Backup & Restore Data on Samsung Galaxy Note 7

backup data on samsung galaxy note 7

Part 3:How to Restore Lost Data on Samsung Galaxy Note 7

You must feel worry about losing data on Samsung Galaxy Note 7 after hearing the different news about it,especially the reclamation after the fire catching happened.Actually,your worrying is unnecessary.Android Data Recovery program can solve your problem.

Android Data Recovery is a secure and powerful tool that can be used to restore lost data from Samsung Galaxy Note 7 no matter any accident happen,including photos, videos,contacts,messages,call logs,notes,and more kinds of Android data.What’s more,this magic program also allow to restore data from Android SD card,Android memory card.

d_win d_mac

Step 1:Run Android Data Recovery and Connect Samsung
Step 2:Select Data to Restore
Step 3:Begin to Restore Samsung Data

Extra tips:How to Restore Lost Data on Samsung Galaxy Note 7

Read more:

How to Backup & Restore Data on Samsung Galaxy Note 7 with Phone Transfer

How to Backup Samsung Data to Computer

How to Transfer iPhone Data to Samsung Galaxy Note 7

How to Transfer Samsung Data to Samsung Galaxy Note 7

How to Transfer Android Data to Samsung Galaxy Note 7