The Pixel is Google’s answer to the premium mobile market,battling the likes of Apple’s iPhone and the Samsung Galaxy series. However, it is “noticeably faster than a Galaxy S7”, says The Verge, and it and its big brother the Pixel XL are “the best Android phones you can buy”.
Ever since device makers armed mobile phones with top-of-the-line cameras, many have not stopped snapping and capturing those precious life moments. And, when easy Internet connectivity came to the mobile phone,many also started sharing their photos to friends, family, and in many cases also to the world at large.After getting the new Google Pixel phone,you may wonder how to transfer the photos to your new device from the old one,for example exporting iPhone photos to Google Pixel.
A Quick Way to Transfer iPhone Photos to Google Pixel
It’s no more quicker way to sync photos from iPhone to Google Pixel with the help of Phone Transfer.Phone Transfer is an excellent transferring tool for smart phone users.It is high-efficiency and can move data between iPhone and Google Pixel even if they support the different operating system.By the way, you can also choose the type of data that you want to transfer,including photos,contacts,SMS,videos,call logs,calendars,music,apps(WhatsApp/Viber/Kik,etc,.).Supported iOS devices:iPhone 7,iPhone 6S/6,iPhone 5S/5C/5,as well as iPad and iPod.
How to Transfer Photos from iPhone to Google Pixel
Step 1.Launch Phone Transfer on PC after Installation
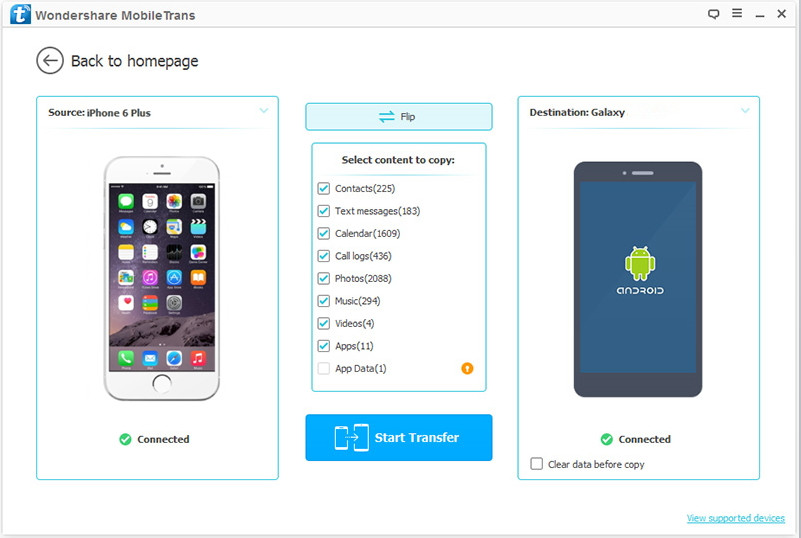
To start with,you will be asked to run Phone Transfer on your computer after you download and install Phone Transfer on your computer.Then, select a mode -“Phone to Phone Transfer”.
Step 2.Connect iPhone and Google Pixel to the Computer via USB Cable
Once you connect both your phones to the computer with USB cable, Phone Transfer will start detected your iPhone and Pixel simultaneously and automatically list them as source device and destination device if your devices are detected successfully.
Note:If you want to exchange the position of destination device and the source device, you can simply click “Flip” button in the interface.
Step 3.Transfer Photos from iPhone to Google Pixel
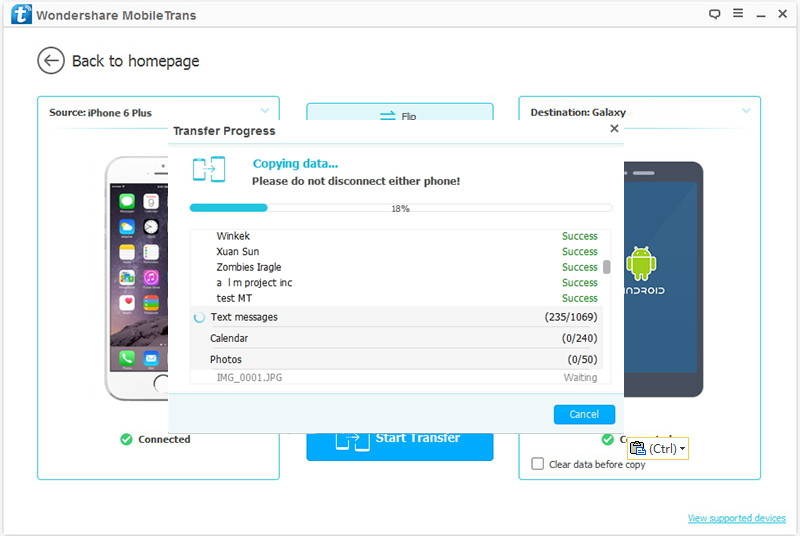
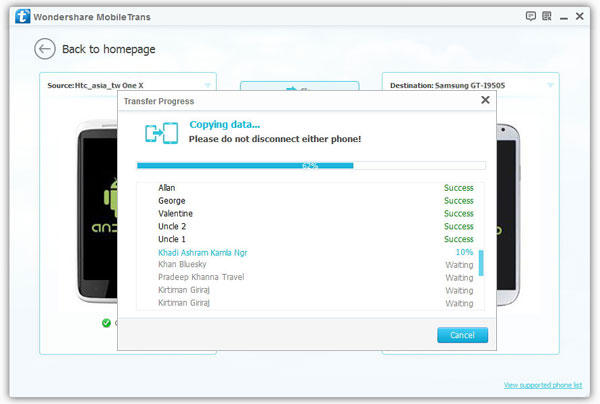
After successfully detected, all the transferable data will be displayed in the interface, photos,contacts, SMS, videos, music, etc are all included. If you want to copy photos only, you can tick off the box in front of other data. If you have chosen all the data that you want, you can simply click “Start Copy” to begin. Make sure that the USB cables are well connected to the computer during the process. Click “OK” after finishing.
As you see, with these 3 easy steps, we can have our iPhone photos transferred to your new Google Pixel seamlessly.With Phone Transfer,you can also move videos, SMS, music and contacts as well between smart phones without difficulty. Why not try Phone Transfer on your own.
Meet Pixel,Phone by Google
When Google announced the Pixel on October 4, it did so knowing it was about the shake up the smartphone market. For the first time, it was primed to release a phone that was designed, both hardware and software, in house. No equal partnership with a manufacturer like Huawei or Samsung, just HTC tightening the nuts and bolts.
Have you just bought a new Android phone like Google Pixel or Pixel XL with improved operating system, design and performance? You must be very happy as you can enjoy all the latest games, Apps, on it.The excitement of getting a new phone often diminishes as the hassle of setting it up. While it might seem like a daunting task to sync contacts, it is actually a quick and painless task on the Android operating system.
Transfer Contacts from Android to Google Pixel with One Click
The easiest way to transfer Android contacts to Google Pixel is with the help of Phone Transfer.The superior data transfer program not only help to transfer Android contacts to Google Pixel with one click,but also allow to transfer various of data between Android and Google Pixel,including SMS,photos,videos,call logs,calendars,music,apps.In addition,Phone Transfer support to transfer data between mobile devices even though they are running different operating systems,iOS system,Symbiam system,and Android system are included.
How to Transfer Android Contacts to Google Pixel
Step 1.Run Program and Connect Device to Computer
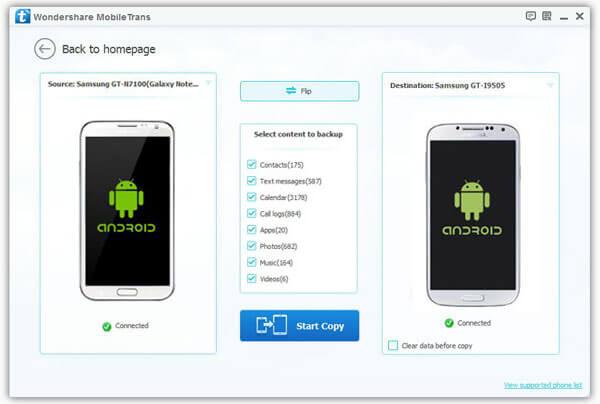
Firstly,please run Phone Transfer on computer and connect both two Android devices with the computer.Select “Phone to Phone Transfer” option.
Step 2.Select Contacts File to Transfer
You should select the file type to transfer,you are allow to select more than one file for transferring, contacts,SMS,photos,videos,music,call logs,calendars,apps(WhatsApp/Line/Viber/Kik),apps data are included.If you just need to sync contacts between Android,just click “Contacts” file.
Note:Make sure the Android and Google Pixel phone are on the right position,as the source device and target device,the Android should be on the left and Pixel phone on the right.You can click “Flip” to exchange the position of them if they are not on the correct place.
Step 3.Transfer Android Contacts to Google Pixel Phone
Once everything is setting completed,simply click “Start Copy” to start the data transfer process.
Done.Only 3 easy steps,your Android contacts now is finished transferring to your new Google Pixel phone.Please don’t forget to share this useful data transfer tool – Phone Transfer with your dear friends if you are satisfied with using it.Thanks.
“I’ m planning to sell my old iPhone 6 and ready to buy the iPhone 7 to take place.How to delete individual conversations and group chats permanently from my iPhone before selling it?”-Judy
WhatsApp is an instant messaging app that can send and receive messages, photos, videos, stickers, emoticons and all others straight on your phone with others. It’s like the usual SMS and MMS but the only difference is that it lets you send messages without text plan, instead it send messages by connecting to the internet or Wi-Fi.WhatsApp is free to download and use, making it a worldwide hit to many iPhone users.However,before you are giving up or selling your iPhone,you be better to remove the WhatsApp chat history(including the contacts,text,attachments) from your device without restoring.
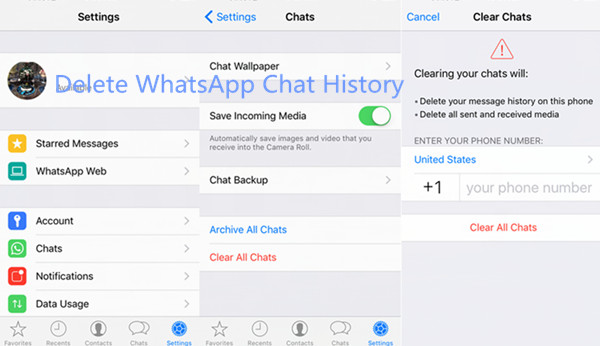
Part 1: How to Erase Entire WhatsApp Chat History from iPhone
Step 1. Run WhatsApp app on your iPhone and go to Settings.
Step 2. Tap Chats and then select Clear All Chats.
Step 3. You will be required to enter WhatsApp number to accomplish your order. Confirm your action by taping on Delete All Chats. That’s it. All WhatsApp messages are removed permanently from your iPhone, but you can continue to participate in groups or individual conversation.
Part 2: How to Delete WhatsApp Chat Content and SMS from iPhone Permanently
To complete the WhatsApp messages deleting task effectively,we want to introduce you the best iPhone data eraser software in the market – iOS Data Eraser-a practical feature of Dr.Fone iOS Data Recovery :iOS Private Data Eraser and iOS Full Data Eraser. It is an useful and perfect data eraser tool to delete WhatsApp messages,photos,videos,attachments from iPhone permanently.Expect the WhatsApp data,iOS Data Eraser enable to wipe various of data from iPhone without restoring,such as contacts,messages,photos,videos,call logs,notes,calendars,etc,.You can wipe iPhone data selectively or erase all data from iPhone at once.All iPhone models are supported,including iPhone 7,iPhone 6S/6,iPhone 5S/5C/5,iPad and iPod.
Step 1.Launch iOS Data Eraser on Computer
Launch the program after you have successfully installed it and select “More Tools”.
Choose “iOS Private Data Eraser” and then click “Start Scan” to begin scanning your device automatically and also show you the scan progress.
Step 2.Select the Data Type to Delete
Once the scanning is done in a few minutes, the program will list all of your private data on its screen. You can then select the option of “Messages” from the left hand side and then press on the button “Erase from the Device”.
Step 3.Confirm the Erasing Process
The program will ask you to confirm now that you want all of the data in your messages deleted, so type in “delete” and click on the button “Erase now” once again.
Once the data is deleted, you should see a screen in the picture given below.
Now all your WhatsApp messages and attachments are removed completely from your iPhone without restoring.
Part 3: How to Remove WhatsApp App on iPhone Permanently
With iPhone Data Eraser,you are able to remove WhatsApp app from iPhone permanently before selling it,as well as other iPhone apps,such as Viber,Kik,Line.iPhone Data Eraser is used to permanently erase everything safely as well as securely on an iPhone, iPad or an iPod. It prevents identity theft when selling your old device with 1 click “Clean Slate” privacy safeguard.It keeps you personal information safe and permanently removes it with iPhone Data Eraser before your dispose your old device.
Features of iPhone Data Eraser:
1.Permanently Erases Device -When you are recycling, trading or selling your iPhone, the 1-Click phone erase option can play the trick for you and delete everything permanently before passing on the device.
2.Clears Private Data & Free Up Space – Ensures that the data that is stored in your phone while browsing the web, using apps, sending messages, etc stays private. It will keep your private data safe, freeing the space.
3.Clean Junk File – 1-Click cleanup will perform all the optimal speeds by removing all the junk files and other unnecessary data.
Step 1.Download iPhone Data Erser and Install it
After the installation, run iPhone Data Eraser on your Computer. Connect your iPhone via USB cable to your computer. After the device is detected, you will see main window pop up.In the pop up window, you will see the space information of your device along with other 5 features on the right.
Step 2.Remove WhatsApp App from iPhone without Restoring
The first feature is 1-Click Cleanup. You just need to click on it and the scanning will begin on your device automatically.
After the scanning is completed, you will see the total number of files displayed. Now you need to click the “Unused Apps” and tap on “CleanUp” for delete WhatsApp app from iPhone.
Make sure you keep your device connected while the scanning process completes, so that you ensure that the files are cleaned up totally.
When you will be done with the cleanup, you will see that the window will appear as follows, displaying the space information of your device.
After this, you can either go back to Home page by clicking on “Home” or click on “Rescan” to scan your device once again.
Samsung Phone with not Working Screen Problem
Blank screen issues are very common not just to Samsung phone but any other Android phones in the market. They can either be caused by a firmware error or a hardware problem. The best thing an owner can do is try to find out the cause so that it would be easier to formulate a solution.Samsung Galaxy phones,especially the Samsung Galaxy S3, S4 and S5, are known for their problematic screens. Many users either experience black screen despite the fact that the phone is fully charged, the touch screen stopped responding or unidentified dots appearing on screen. If you just using one of these Samsung phone and ever encounter the similar screen problems,you are in the right place here. In this article, we will inform you the reasons behind these failures, and how you can extract your personal data from the Samsung phone with not working screen.
Part 1: The Common Situations that Samsung Screens Not Working
There could be several reasons that caused the Samsung phone screen problem.Look the common situations below and check which match your Samsung phone.
1. Blank Screen
This is a very common problem for all smartphones, not just Samsung Galaxy phones. It is usually caused by the following:
• An app or feature on your Samsung froze;
• There is not enough battery to power the device
• An actual physical damage to the touch screen.
2. Unresponsive Screen
An unresponsive screen is usually caused by a system error, be it software or hardware. A software issue will be easier to fix. Here are some of the causes of an unresponsive screen:
• A problematic third-party app;
• Your Samsung phone froze
• There is a fault in one of the hardware inside the device.
Part 2: How to Restore Data from Samsung Phone with not Working Screen
Broken Android Data Recovery enable to restore files on Samsung phone with not working screen and broken Samsung/Android device freely,for example the Samsung with broken/damaged/black screen,water damaged Samsung.You can use it to extract the existing data from the your broken device,restore the deleted data from the broken device as well.Various of data are supported,including contacts,messaging,photos,videos,call logs,audio,WhatsApp messages & attachments and documents.Furthermore,Broken Android Data Restore allow to restore data from Android after losing data under any circumstances:Android system update,Android system rooting,restore Android to factory reset,etc,.
Step 1.Run Broken Android Data Recovery
Firstly,you need to download and launch Broken Android Data Recovery on PC and you will see the option” Android Broken Data Recovery“,then connect the Samsung phone with not working screen to computer with USB cable,and click “scan it” button.
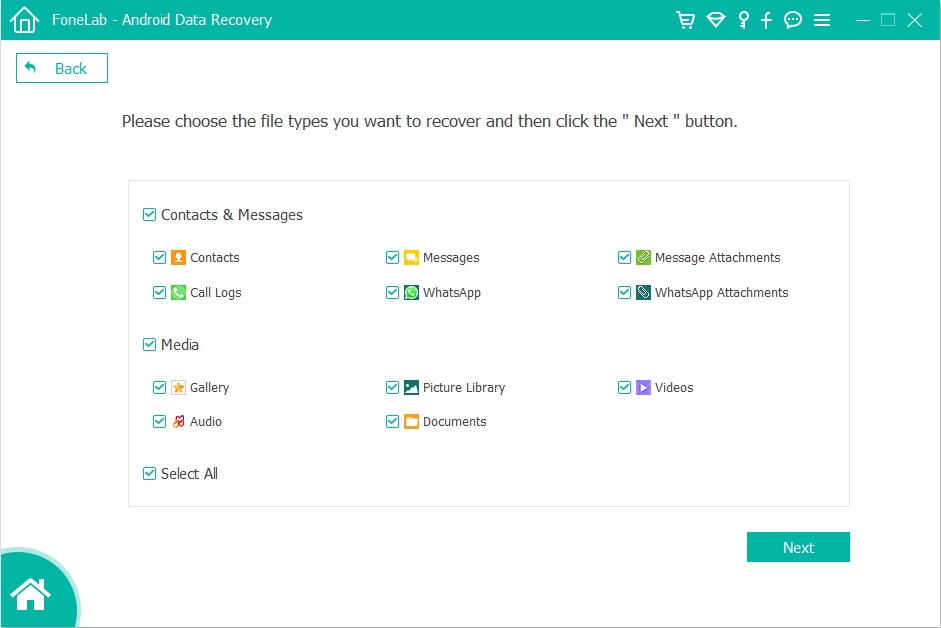
Step 2.Select the File Types to Recover
Now you need to select the files you need to recover from the Samsung with not working screen.Including all file of recovery option(Contacts,Call History,Gallery,Messaging,etc,).
Step 3.Select the Fault Type of Samsung Phone with not Working Screen
Before recovering your Samsung phone,there are two options to choose from the system- “touch cannot to used or cannot enter the system” as well as “Black screen (or the screen is broken)”.You need to choose the appropriate one depends on your phone(here you should click the “2.Black screen”option and then click on “NEXT”.
Step 4.Select the Model of Your Samsung Phone
Now you should select the proper version of the Android as well as the exact model you are using.
Step 5.Enter Download Mode on Samsung
Here you need to follow three individual steps to enter Samsung to download mode which include:
· Hold the Power key to power off the Phone
· You next have to press the volume down key,the Power key as well as the Home key at the same time
· Next up leave all the keys and press the volume up key to enter the download mode of the phone
Step 6.Analysis of the Samsung Phone with not Working Screen
You should connect Samsung to computer again and the Broken Android Data Recovery will automatically analyze it.After entered the “Download mode”, the software will start to download “recovery package” for it,it will take you a few minutes,please wait patiently.
When the downloading finish,the selected data from Samsung will be list.
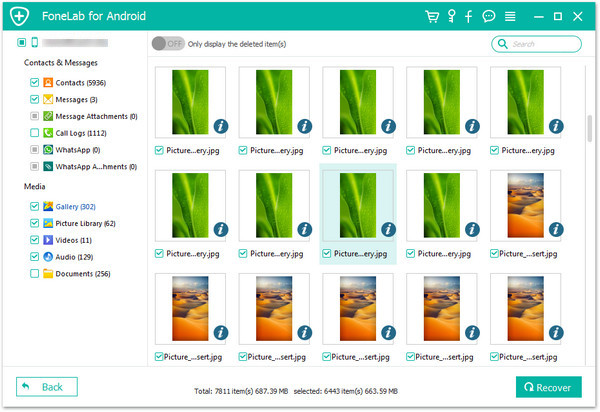
Step 7.Preview and Extract Data from Samsung with not Working Screen
You are allow to preview all deleted/lost or existing data before recover it on Samsung,including the detailed messages,photos,videos and more types of files.Then just click “Recover” option to go on the data recovery process.
Summary
Do you want to recover contacts from Android phone with broken screen or black screen? Read on this guide to learn how to recover contacts from broken Android Samsung phone effortlessly.
“My Samsung phone is not working as normal,it will always suddenly power off itself under expected moment.Sometimes when I try to turn it on but it still stuck at the black screen.Now I just wanna extract the friend number and the client number from it,in case I need the contacts anytime.How?”
“How to retrieve contacts from broken phone? My Samsung Galaxy S6 was broken screen, I want to extract contacts for backup.”
Nowadays, smartphone have totally occupied the hearts of person in today’s new world. It is very common to see more and more Android users around our life. If your Android phone is broken, damaged or death, it seems impossible that you can recover contacts from a broken Android phone, we all know that the contacts are stored in the device’s internal memory. Therefore unlike other data such as photos, music and videos that can be stored on an SD card, you cannot simply remove the SD card and then insert it in another device to get them back. It is also a common accepted fact that many of the data recovery software in the market are unable to effectively extract data from a broken device. But with an professional Broken Android Contacts Recovery tool and the right processes, you are allow to easily recover contacts from broken screen Android Samsung phone.
Part 1: Can I Extract Contacts from Broken Android Phone
If you accidentally have your Android phone broken, it is possible to restore contacts from a broken Android since most data are saved in internal or external memory and they are likely to be safe even though the device is physically damaged. But it is troublesome to access the data on a damaged Android. if you have ever backed up your Android with Google Account, you can restore the backup contacts to device easily. But to deal with that you have no backup?
In this case, you will need to think about get some help of professional data recovery to recover contacts from your broken Android phone. It is almost impossible to recover the contacts from broken Android phone by yourself. It is the best way to select a reliable software which is able to access your broken phone content without limitations and recover it successfully. Keep on reading and we would show you the possible way to recover contacts from a broken Android device with ease.
Part 2: Recover Android Contacts from Google Account and Samsung Account(for Backup Users)
If you have synced the contact to your Google account, you can restore deleted contacts from Google account even when your phone is broken or death.
Steps to recover deleted contacts from Google account:
1. From the home screen, tap Settings.
2. Scroll to ‘USER AND BACKUP‘, then tap Accounts.
3. If you have backup contacts to Google account before, please tap Google and go to Google account.
4. Enter your Google account email and click NEXT.
5. Enter your account password, and then click NEXT.
– View the terms of service and privacy policy, and then click “Accept“.
6. Click to select or deselect your preferred Google services, and then click on the “Next” button.
7. Select the Sync contacts check box.
8. Tap Sync now start to restore contacts from Google account.
Then it will begin to sync the contacts from the Google account to your phone.
If you have sync contacts to Google Contacts web, you can restore Google Contacts from Gmail easily.
Step 1. Open Google Contacts on a browser and log in your Google account.
Step 2. Then, click “More” option on the left panel.
Step 3. Select “Undo changes“, at this time a new window pops up.
Step 4. Just select a time or customize the time, then click “Confirm“.
Step 5. Tap “Google” or “Accounts” > “Google“.
Step 6. Click “Restore contacts” and start to restore contacts.
Recover Deleted Contacts from Samsung Account (for Backup Users)
If you backed up your contacts with a Samsung Account previously, once you deleted contacts or lost phone numbers by careless, dont worry, you can easily to get the deleted contacts backupfrom Samsung account. Here are the specific steps:
1. From the Samsung phone Home scree, please go to Settings and scroll down to the “Personalisation” section, then tap Accounts.
2. Then, log into your Samsung Account with your email address and password.
3. Tap “ Restore” and “OK” to restore deleted contacts from Samsung phone.
To sum up: Restoring contacts from Google account backups,this method is easy to recover the Android backed up contacts, no matter what’s brand of phones you using, such as Samsung Galaxy S10/S9/S8/S7/Note 9/Note 8, Huawei Mate 20/10/P30/P20, LG, HTC, Sony, Google Pixel, Motorola, OnePlus, Xiaomi, etc. However, make sure you have backed up your previous contacts to Google account.
Note: If you hanve’t sync contacts to your Google account before, how to recover contacts if your Samsung phone is broken screen or screen-black? Don’t worry, you can extract contacts from broken Samsung phone internal memory by a third-party broken Android contacts extraction, please keep reading the Part 3, you can easily get contacts back from a broken screen Android phone.
Part 3: How to Recover Contacts from Broken Android via Broken Android Data Recovery
To solve this problem, this Broken Android Data Recovery is the ideal data recovery helper for you, it helps to extract and recover contacts from broken Android phone. With Broken Android Data Recovery,you are able to recover contacts from broken Android, besides contacts, various of data are supported to be extracted by this powerful program, including photos, videos, text messages, audio, WhatsApp messages & attachments, call logs and documents. The Broken Android Data Extraction works well with the broken/damaged Samsung Galaxy S6/S5/S4, Galaxy Note 5, Note 4 and Note 3.
In addition, if your Android phone works fine, if you deleted contacts on Android phone by by mistake. Don’t worry, you can use the Android Data Recovery function to recover deleted contacts, SMS, photos, etc. from Android phone, the Android data recovery works will with almost all brands of Android,such as Samsung, HTC, Motorola, Google Pixel, Google Nexus, LG,Sony, Huawei, Xiaomi, etc,.
More Features:
Extract contacts and save them as VCF, CSV or HTML to your computer for your use or print.
Recover Android contact information: contacts name, phone number, email, job title, address, companies and more
Recover Android data lost due to mistaken deletion, factory reset, system crash, forgotten password, flashing ROM, rooting, ect.
Recover data from dead/broken Samsung Galaxy S/Note smartphone.
Fix Samsung stuck on recovery mode, black-screen, startup status, etc.
Preview & selectively recover contacts and more before recovery.
Supports recover deleted data from Samsung Galaxy S, Samsung Galaxy Note, Samsung Galaxy A, Samsung Galaxy C, Samsung Galaxy Grand and more Samsung models.
Recover Contacts from Broken Screen Android Phone with Ease
The broken Android data extraction function only works for Windows computer, please download the Android Toolkit for Windows version. Let’s take how to recover contacts from a broken screen Samsung phone as example, you can also follow the same steps to extract messages, WhatsApp messages, photos and more from broken Android Samsung phone.
Step 1. Download and Install Android Toolkit on PC
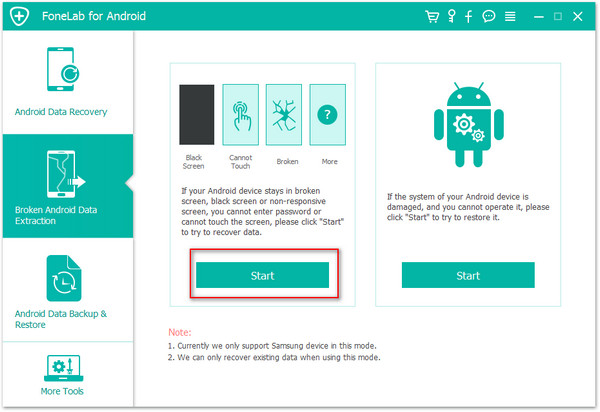
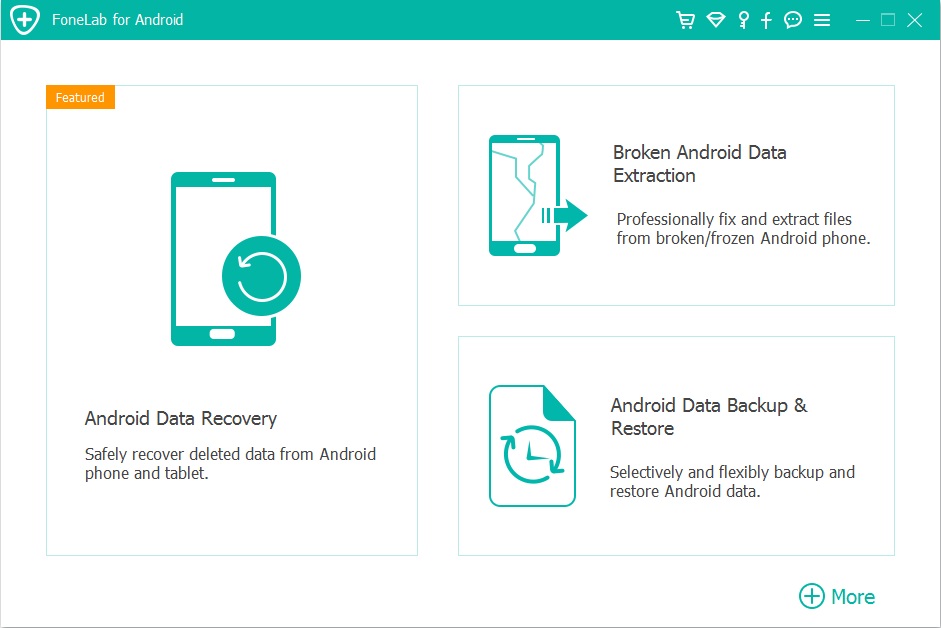
Launch the Android Toolkit on the Windows computer, you can see three are three main function in the main window: “Android Data Recovery”, “Broken Android Data Extraction” and “Android Data Backup & Restore”. To recover/extract data from broken Android phone, please click on “Broken Android Data Extraction” function.
Step 2. Connect Broken Screen Samsung Phone to PC
Then, please connect your broken Samsung phone to the computer via a USB cable and click the left side “Start” button.
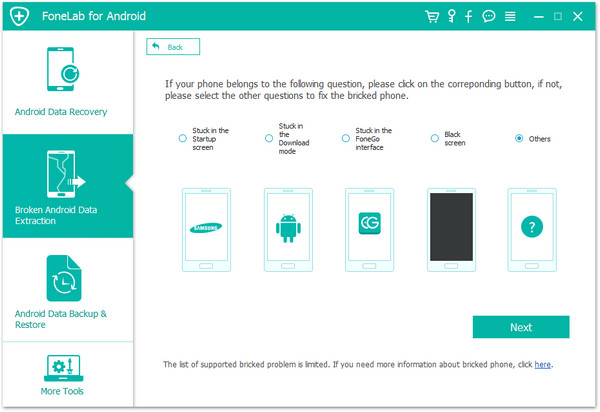
Step 3.Choose the Fault Type (Fix-Option)
If your Samsung phone is frozen, crashed, black-screen, virus-attack or screen-locked, you can fix the phone at firstly, please select the option at the right side and select one as you need based on what type of issues you meet, including the startup screen, dead screen, black screen, password forgot, and more.
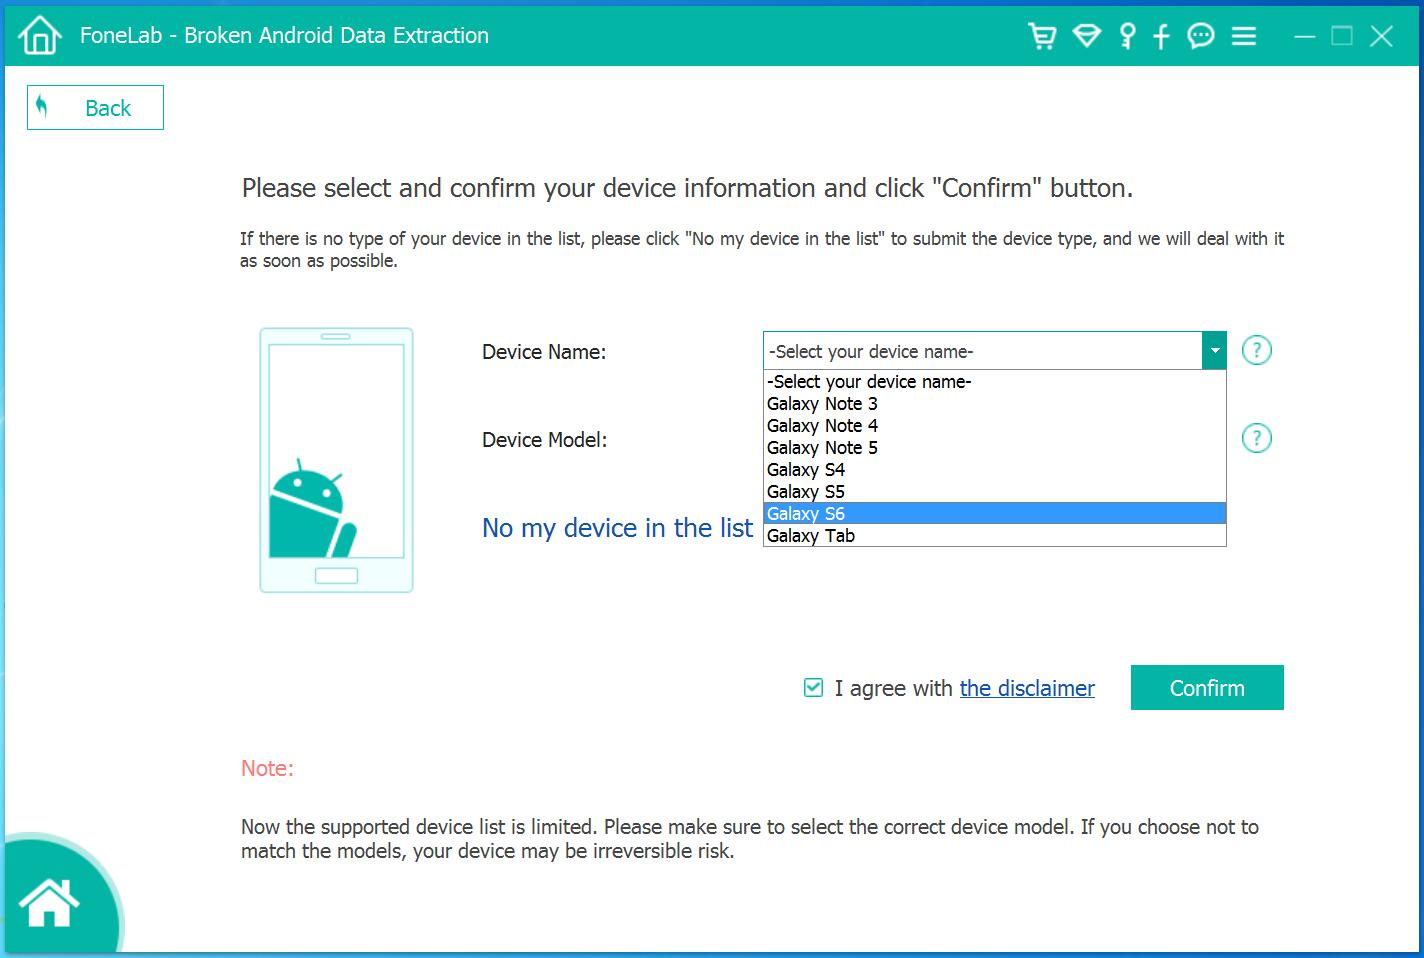
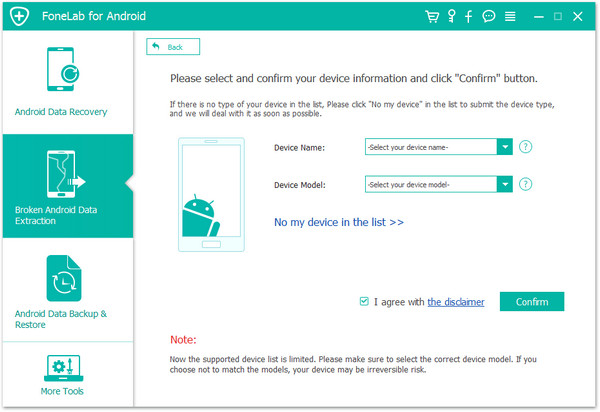
Step 4. Select the Model of your Android
In the next window, you need to select the correct “Device Name” and “Device Model” of the broken Android. If you don’t know your device’s model, click on “How to Confirm the device model” to get assistance.
Tips: Currently, this broken Android data extraction & fix feature is only available for the Samsung Galaxy S6, Samsung Galaxy S5, Samsung Galaxy S4, Samsung Galaxy Note 5, Samsung Galaxy Note 4, Samsung Galaxy Note 3 and Galaxy Tab Pro 10.1: SM-T525. For other Samsung models and other brands of Android smartphones, please waiting for the software updates, we do our best to repair more brands of mobile phones.
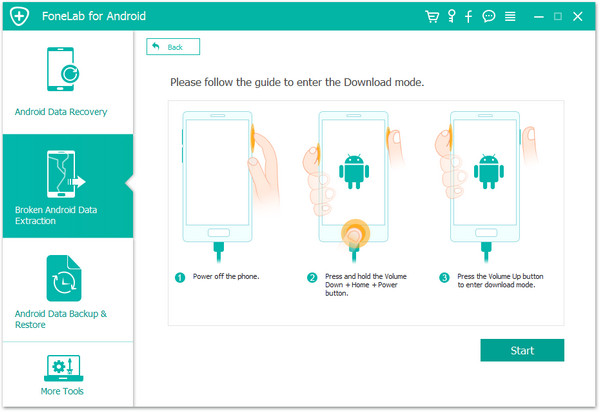
Step 5. Get Broken Android Phone into Download Mode
You will be provided with instructions on how to enter your Samsung phone into “Download Mode.” Simply follow the instructions on the next window.
How to Enter Download Mode on the broken phone?
1) Power off the phone.
2) Press and hold Volume “-“, “Home” and “Power” button on the phone.
3) Press “Volume +” button to enter download mode.
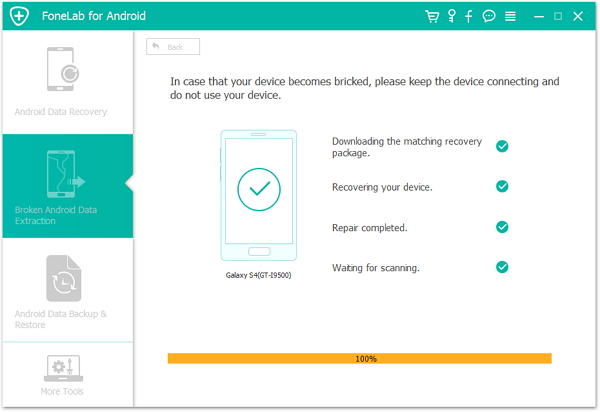
Step 6. Download Recovery Package and Fix it
After the broken Android phone get into Download mode, the software will analyze it and download the matching recovery package. When the software download the recovery package successfully, it will recover your phone and repair it automatically.
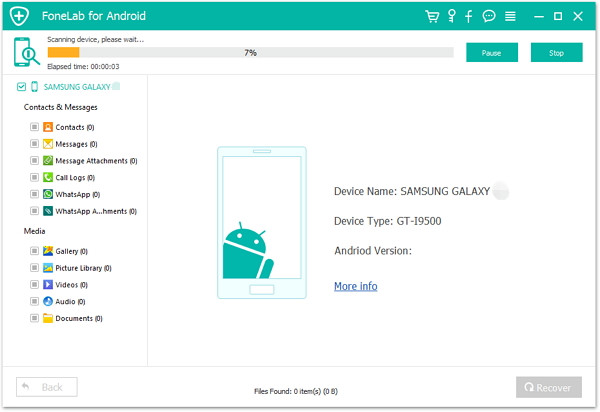
After fixing the broken phone completed, the software will scan all existing data from the broken phone, including contacts, photos, text messages and more.
Step 7. Restore Contacts from Broken Samsung Phone
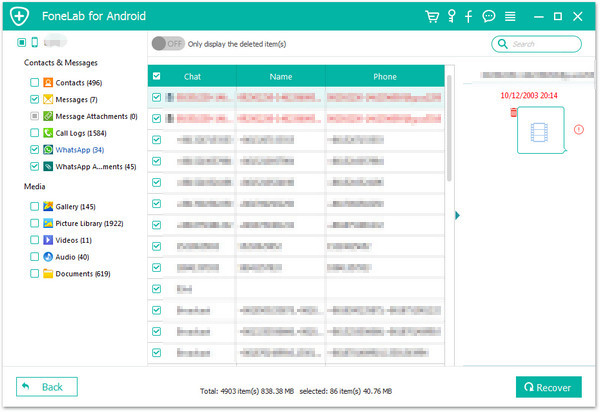
After the scan, all existing contents not only the Contacts will be shown in the window as follow, you can preview them one by one and mark those data you want, please select the contacts you want to recover and then click on “Recover” to recover them on your computer.
Tips: You can extract the contacts with full information like contacts name, phone number, Email, job title, address, and more which you fill on your phone. And the extracted contacts will be saved as VCF, CSV or HTML for your use. If you want to import the contacts to your Android or iPhone for using again, please save them as VCF file, then use this Android & iOS Manager tool to transfer contacts from PC to Android or iPhone.
Youtube video guide to recover data from broken Android phone.
To sum up: Above is the detail guide on how to recover existing contacts from broken screen Samsung phone, the Broken Android data extraction function not only can help you extract messages, contacts, call history, WhatsApp, photos, etc. from broken Samsung phone, but also allows you fix bricked, crashed, frozen or locked Android phone to normal. If you want to recover deleted and lost contacts from Android phone, please learn the below guide on how to recover deleted contacts from Android phone by using Android Data Recovery function, this Android recovery function works well with all normal Android phone, you can easily recover deleted contacts, sms, photos, WhatsApp data from almost all Android device, no matter rooted or not.
Part 4: How to Restore Deleted Contacts from Android
Android Data Recovery (Mac & Windows) is designed to recover deleted data on Android, it help to restore deleted contacts and other types of data from Android easily. It enables to recover deleted contacts from Android under any data loss situations, such as, deleted accidentally, Android OS updated, factory reset restoring, virus attacked, system crash, forgotten password, flashing ROM, rooting, etc.
The Features of Android Data Recovery Software
Recover deleted/lost contacts with full information such as contacts name, phone number, email, job title, address, companies and more which you fill on your phone. And saving the deleted contacts as VCF, CSV or HTML to your computer.
Preview and selectively recover deleted contacts from Android phone.
Deep scan and recover data from a rooted Android device.
Rrecover photos, videos, contacts, messages, messages Attachments, call history, audios, whatsApp, documents from andorid phone or SD card.
Compatible with 6000+ Android phone, such as Samsung, HTC, LG, Huawei, Sony, Windows phone, Google Pixel, Motorila, Xiaomi, Redmi, OnePlus, Oppo, etc.
Steps to Recover Deleted Contacts from Android
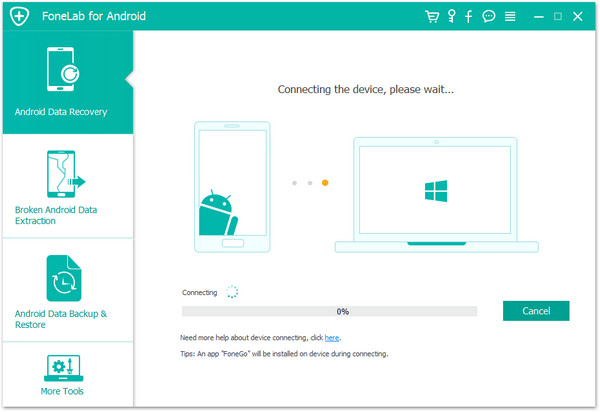
Step 1. Connect Android Phone to the computer
Download, install and run Android Toolkit on your computer, select “Android Data Recovery” and you’ll get the main window below.
Then connect your Android phone to the computer and move to the next step.
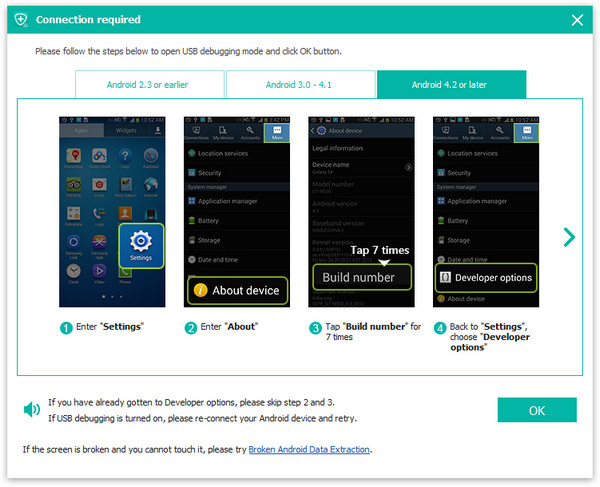
Step 2. Enable USB debugging
If you didn’t enable USB debugging on your device, you’ll see the window below. Follow the detailed expression below. There are three different ways to finish this job for different Android system:
1) For Android 2.3 or earlier: Enter “Settings” < Click “Applications” < Click “Development” < Check “USB debugging”
2) For Android 3.0 to 4.1: Enter “Settings” < Click “Developer options” < Check “USB debugging”
3) For Android 4.2 or newer: Enter “Settings” < Click “About Phone” < Tap “Build number” for several times until getting a note “You are under developer mode” < Back to “Settings” < Click “Developer options” < Check “USB debugging”.
Note: If you have already enabled USB debugging on your device before, you can skip this step.
Step 3. Select Contacts to Scan With
An interface will pop up for you to select what to restore. Since only contacts are to be retrieved, we tick “Contacts” in order to save time.
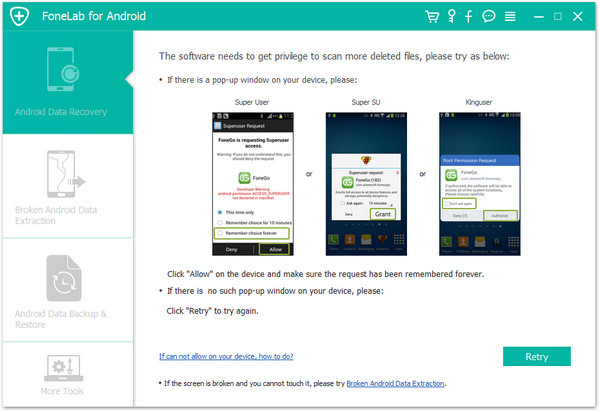
After that, you’ll get a window as follows. As the window shows, click “Allow” button on your Android device’s screen to permit the Superuser Request.
Step 4. Analyze and Scan the Deleted and Lost Contacts from Android Phone
After the program detected your Android phone, the program start to analyze your Android phone by clicking “Next” button, the analysis will take you a few seconds.
Step 5. Preview and Recover Deleted Contacts from Android Phone
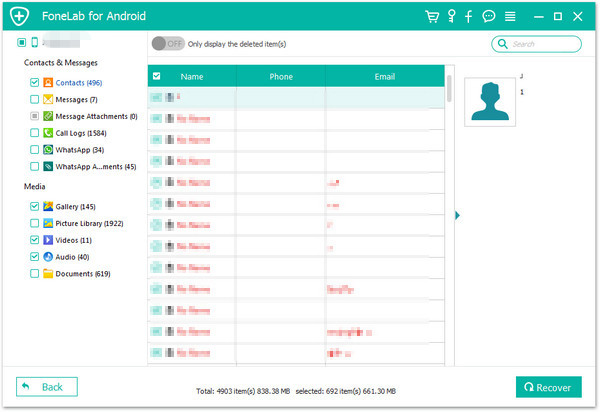
After the scan, the program will find and display all scanned contacts for you, if you find the contacts you need, then you can stop it and preview all your contacts.
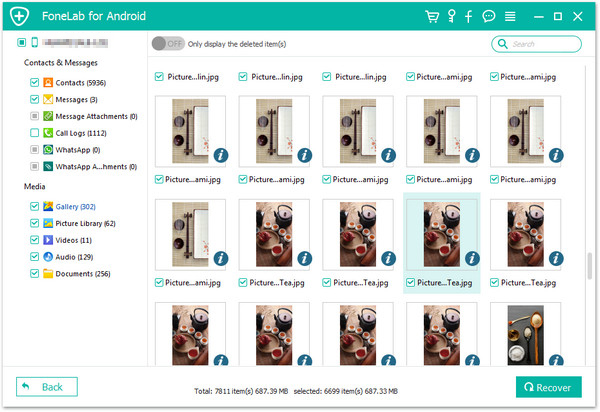
Note: Contacts in the scan result are displayed in different colors. Actually,those in orange are the contacts deleted recently, and the black ones are those existing contacts on your Android phone. If you have such a need, you can use the button above (Only display deleted items) to separate them.
Finally, please mark the contacts those you want to get back and click “Recover” button to save them on your computer.
Tips A. Sync and save your contacts on Android phone with your Google account.
Tips B. Take regular backup of Android contacts to avoid data loss.
Tips C. Upload Android contacts to cloud services.
Tips D. Handle your phone carely so that it will not get damaged or broken.
[Summary]: This article teach you two userful methods to restore iPhone, the first method shows you how to use iTunes restore iPhone device(cause data loss), the second method teach you how to use iOS System Restore tool to manually install the iOS 13/iOS 12/iOS 11 IPSW file to restore your iPhone, no data loss at all.
“Yesterday my iPhone 7 was suddenly stuck at the black screen and I try to powered it on, it still nothing, no response at all. I don’t know what happened on it.Can anyone help me to rescue my device without data loss? Thank you so much.” -Christy
“After installing iOS 12.3.1 on iPhone X via iTunes, my iPhone stuck in recoery mode, how to get iPhone out of recovery mode and restall iOS 12.3.1 to iPhone without using iTunes application?” – Jone
As we know,iPhone may meet some unexpected situations that lead to the error occur on iPhone,that means iPhone system get into the abnormal state for any reasons.I researched a lot methods and then I came to the conclusion that we can rely on installing IPSW file on iPhone to restore iPhone system to normal with several effective solutions to solve it.So here are the step-by-step guides about how to restore iPhone system to normal in details.Just read the passages below and select one match your circumstance.Hope it really do a great help for you all.
What is IPSW File
IPSW file is the raw iOS software for iPhone/iPad/iPod touch, which is normally used in iTunes to install iOS firmware. And iTunes utilizes the IPSW file format to store iOS firmware to restore any device to its original state.
Part 1:Restoring iPhone using IPSW File with iTunes
The IPSW is very important since it contains everything that you would need to run the core iOS system on your iPhone, thereby restoring it to a state where you can use it without having any password.Using IPSW file to restore iPhone with iTunes is such an easy and convenient job for all iPhone users.Before start the restore process,we suggest you do a backup for your iPhone.
Step 1.Download the iOS IPSW file[ links below ] that relates to your specific iOS device.
Step 2.Run iTunes.
Step 3.Connect your device to the computer.
Step 4.Open Device Summary for the iOS device you are updating.
Step 5.Hold down the SHIFT [ Windows ] or ALT [ Mac ] key and click Restore in iTunes simultaneously iTunes restore.
Step 6.Locate the iOS IPSW file you downloaded and select it.
Step 7.Follow the on onscreen instructions and iTunes will begin the update process.
Step 8.When the update has finished, your iOS device will reboot into the iOS you select.
Part 2:Install IPSW File to Restore iPhone without Data Loss
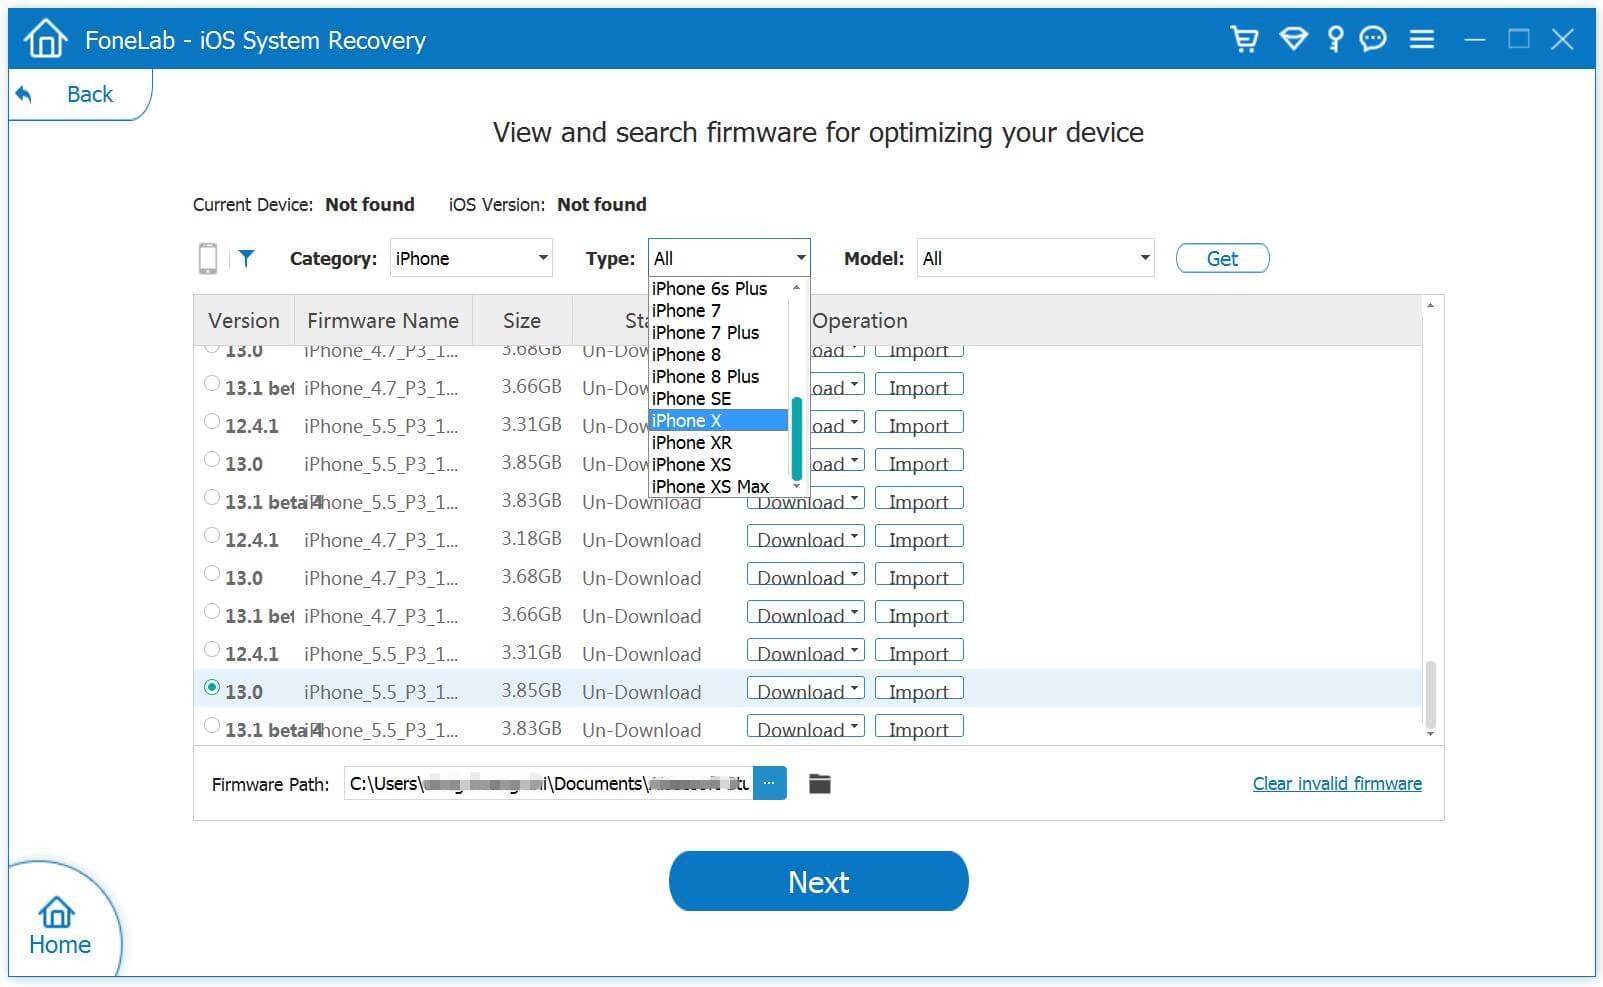
To be honest,download and use IPSW file to restore iPhone with iTunes will lead to lost data on your precious device.If you wanna another better solutions,just focus on this part.We are going to introduce this best way to you-IPSW Files Installation Tools – iOS System Recovery.As its name,this program work well for installing IPSW file to restore iPhone system to normal state without data loss,no need to run iTunes.It’s a quick and safe tool for helping you finish the iPhone restore task.iOS System Recovery perfectly empower to install the IPSW file for iPhone and restore iPhone system to normal,making it easy for users to get iPhone,iPad out of white/black screen,recovery mode,Apple logo,connect to iTunes screen,etc;help to fix the issues on iOS device perform abnormally.Supported iOS device:iPhone XS/XR/X/8/7/6S/6S Plus/6/6 Plus/5S/5C/5/4S, iPad Air 2/3, iPad Pro 3, iPad Mini, iPod Touch 4/5, etc,.
Step 1.Run the IPSW Files Installation Tools and Connect iPhone to Computer
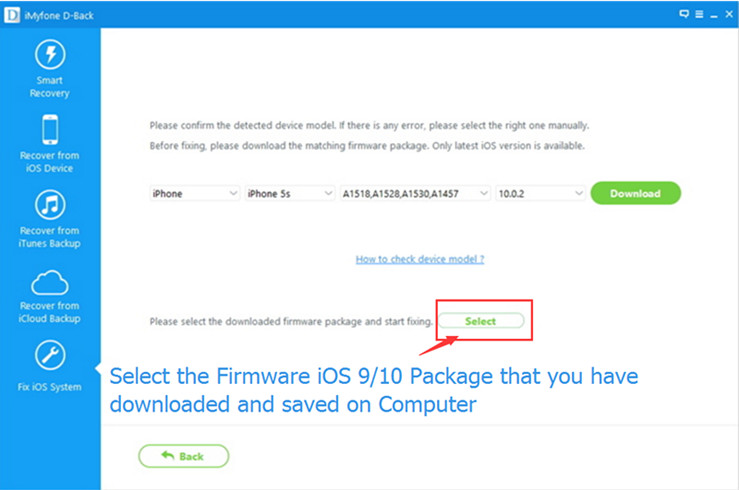
Step 2.Select iOS 9/iOS 10 IPSW Files and Download for iPhone
iOS 9 IPSW File for iPhone:
iOS 10 IPSW File for iPhone:
Tips:The program provides the newest iOS 10.1.1 firmware file package for download.
Note:If you want to install iOS 10 on your iPhone directly,please click the “Download” button to download the iOS 10.1.1 IPSW file for your iPhone.If you want to install iOS 9 or other older IPSW file on iPhone,please select and install the .IPSW files on your iPhone via IPSW Files Installation Tools(no data loss),then save it on your computer.
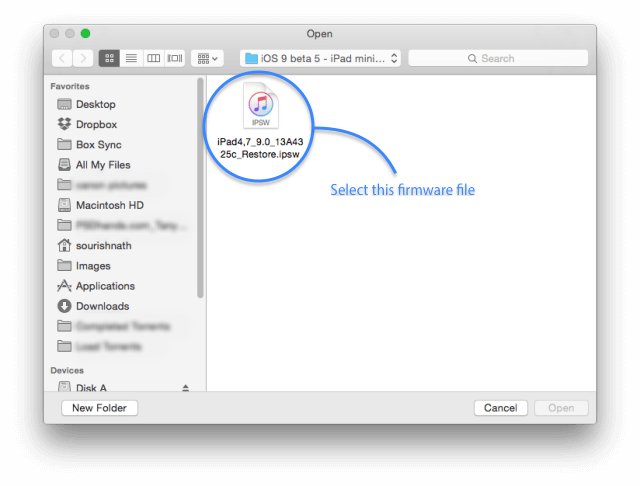
Locate the iOS IPSW file you downloaded and select it:
To install the iOS IPSW file on your iPhone,please click the “Select” button the import the files to the IPSW Files Installation Tools and going on.
Step 3.Install the iOS IPSW File to Restore iPhone without Data Loss
As soon as the restoing completes,you will get a message prompt that your iOS device has restored to normal state,and it will reboot into the iOS version which you select.
Note:When this restoring job is end, your iPhone/iPad/iPod Touch will be updated to the iOS version which you select. If your iOS device is a jailbroken one, then it will be updated to non-jailbroken.If you have unlocked your iOS device before, then it will be re-locked again.
“Hi,my iPhone 6S was suddenly get into the Recovery Mode when I connect it to computer via USB one day,then iTunes prompt me that restore the device to factory reset.However,I am afraid of doing it because I haven’t backup the contacts,photos and more other data on my iPhone.Are there any ways to restore my personal data from the iPhone which stuck in Recovery Mode?Please let me know ASAP.” – Sharon
Nowadays since iPhone play an important role in daily life that people like to use it to sent SMS,take photos,or many other personal actions.The panic is understandable when finding their device somehow stuck in recovery mode. If we can’t handle it properly, all precious content, like photos and messages will be erased.Here is the available way to fix your abnormal iPhone and restore data from iPhone which stuck in recovery mode.They also work for iPad and iPod.
Part 1: Fix iPhone in Recovery Mode without Data Loss
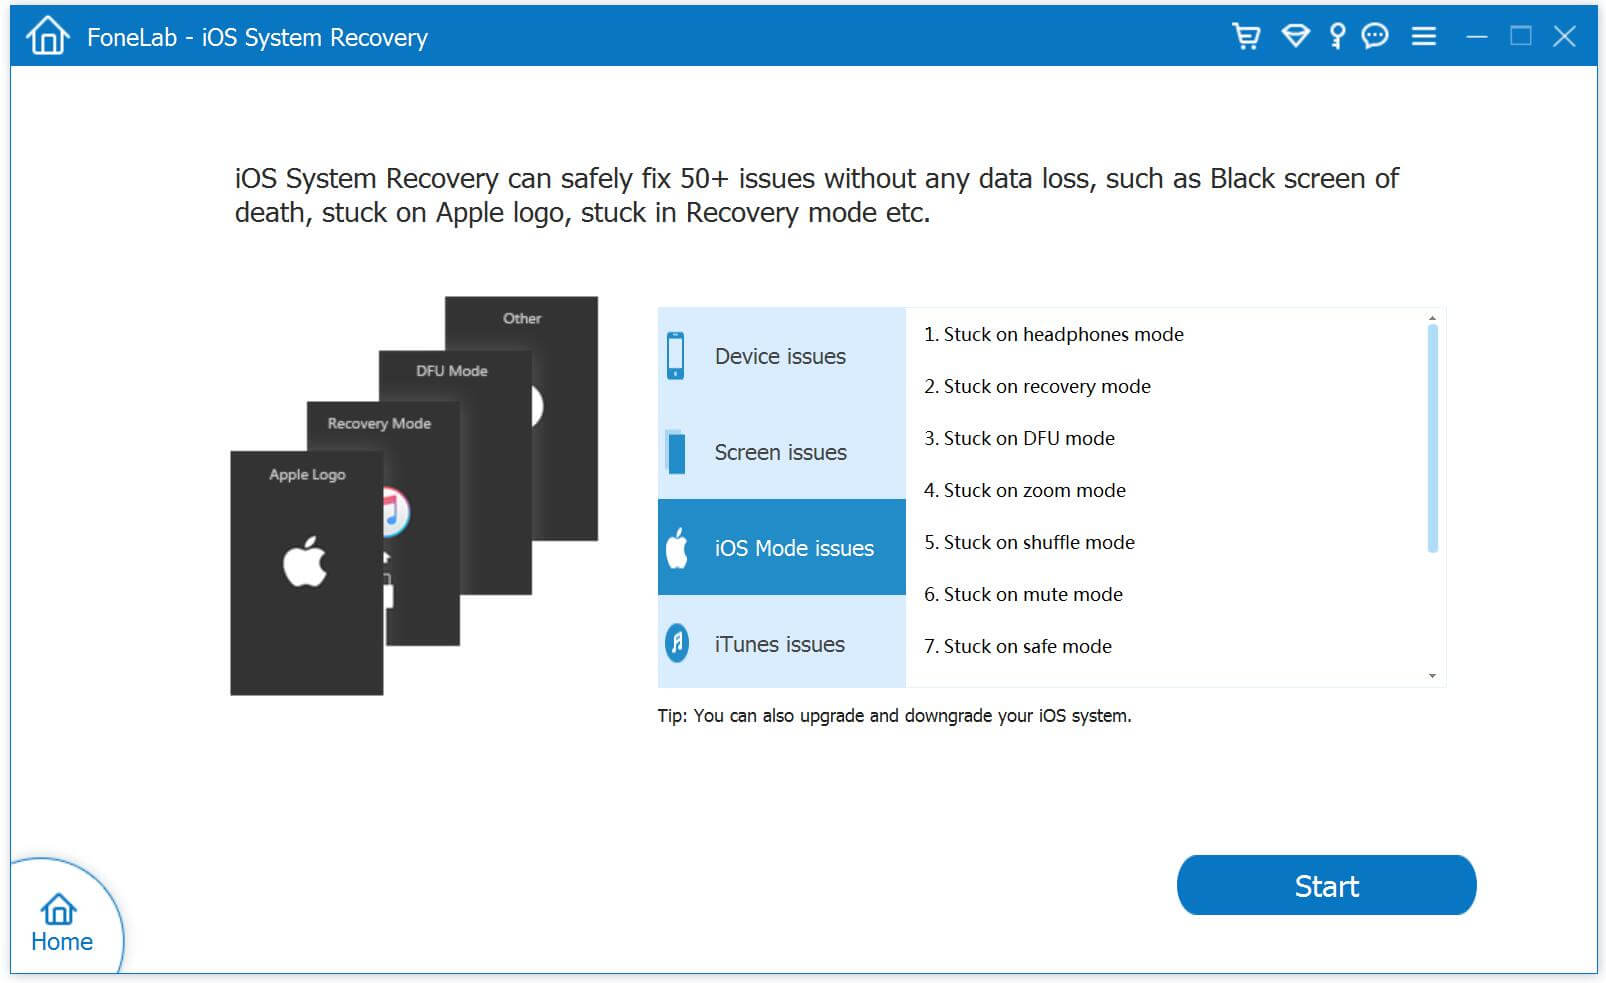
Now here is a software that our strongly recommend for you-iOS System & Data Recovery, that claims to fix iPhone stuck in recovery mode without losing data and return it to normal state when this happens.More importantly,this software help to fix several iPhone system abnormal situations,such as iPhone stuck in Apple logo,iPhone stuck at “connect to iTunes” screen,iPhone stuck in DFU mode,etc,.
Focus on the Features of iOS System & Data Recovery:
-Fix with various iOS system issues like Recovery Mode, white Apple logo, black screen, looping on start, etc,.
-Restore iPhone system to normal state without data loss.
-Work for all models of iPhone, iPad and iPod touch.
-Fully compatible with Windows 10 or Mac 10.11, iOS 10 or lower.
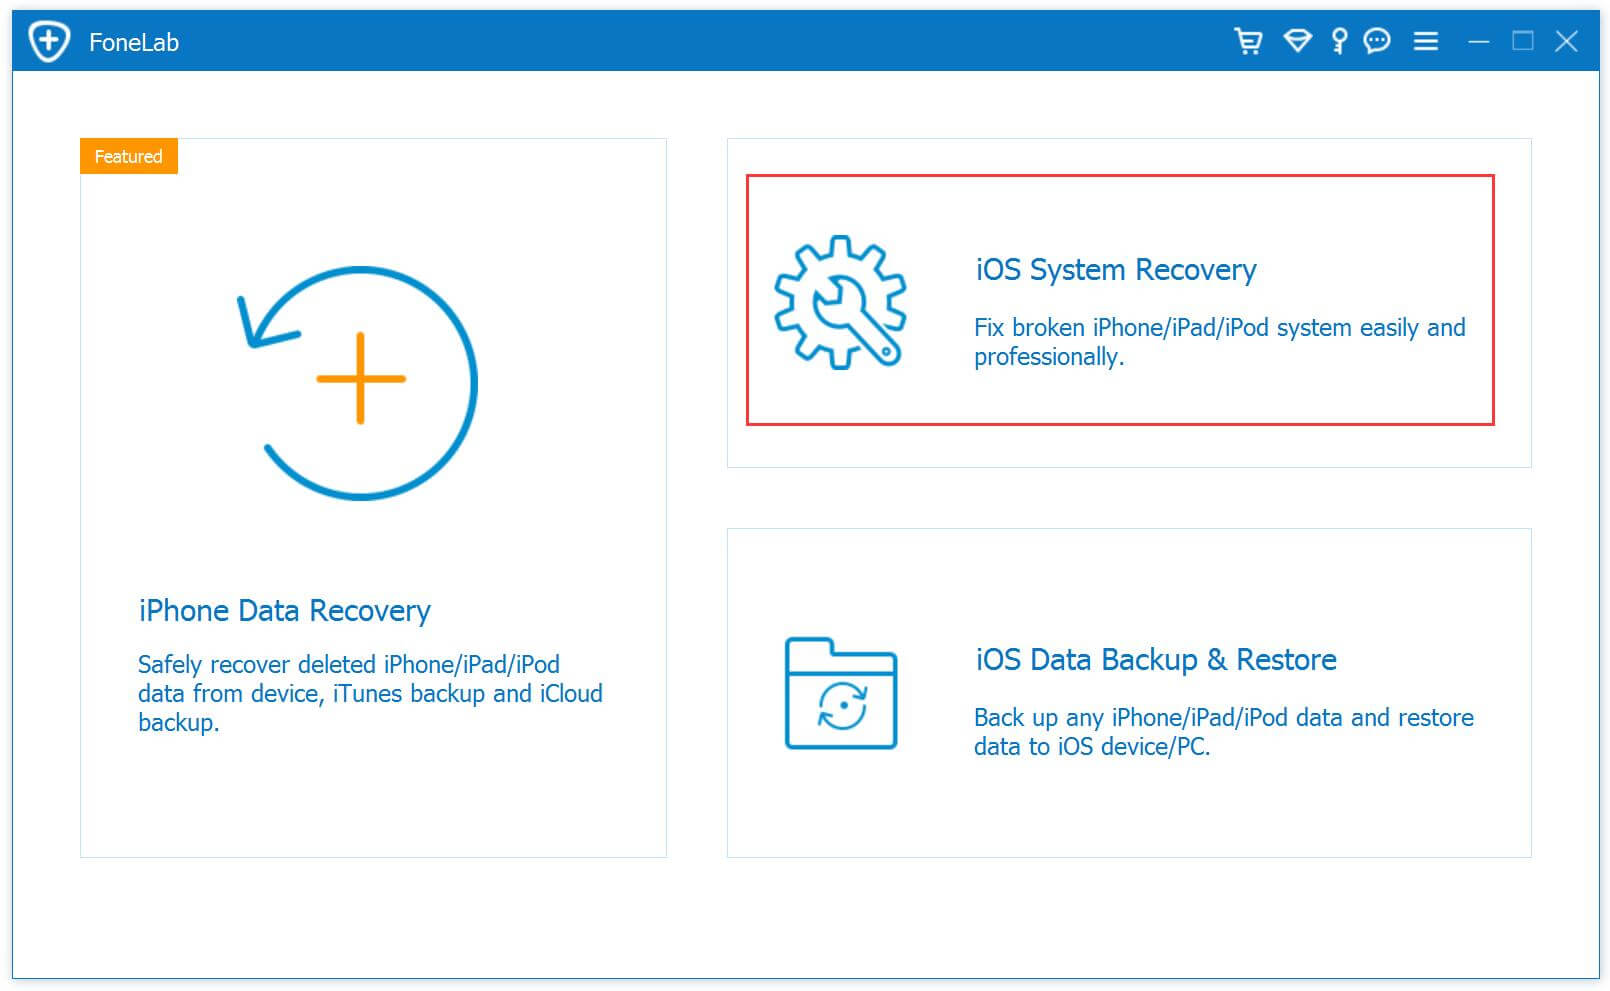
Step 1.Run Program and Select iOS System Recovery Option
Launch iOS System & Data Recovery and click on the “iOS System Recovery” tab from “More Tools” on the software interface. Connect your iPhone to computer via USB cable. The software should detect your iPhone soon. Click “Start” to initiate the process.
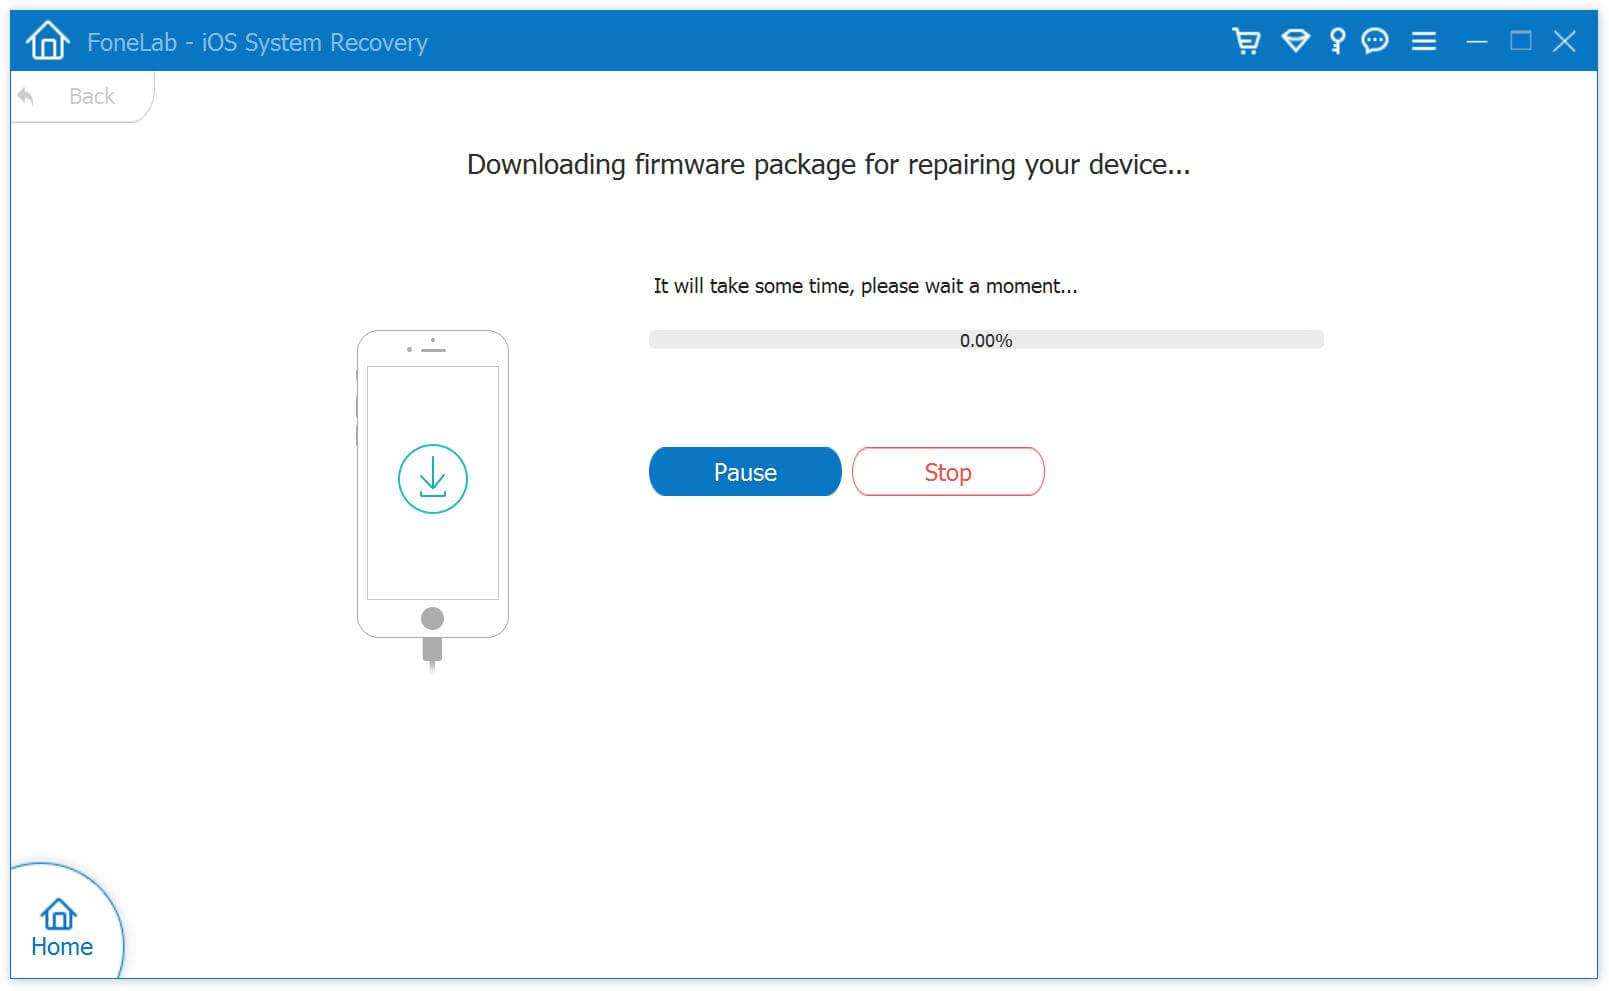
Step 2.Download and Select Firmware for iPhone
You will need to download the right firmware for your iPhone to fix the device.iOS System & Data Recovery should be able to recognize the model of your iPhone, suggest which iOS version that is best for your iPhone for you to download.
Click on “Download” and wait until the software finishes downloading and installing it to your iPhone.
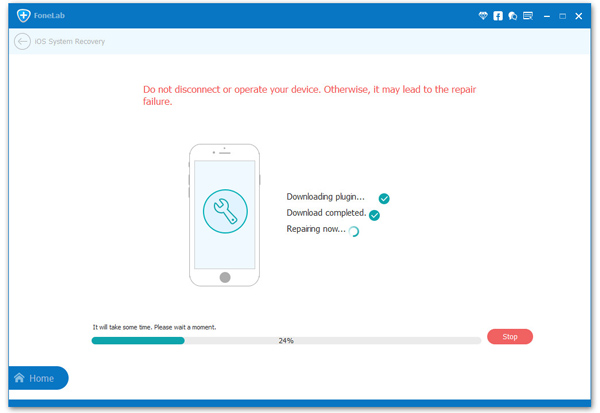
Step 3.Fix your iPhone Stuck in Recovery Mode
Once download is complete, the software will continue to repair your iPhone, get it out of Recovery Mode. It should take a few minutes. The software will restart you iPhone to normal mode.
Part 2: Restore Data from iPhone which Stuck in Recovery Mode
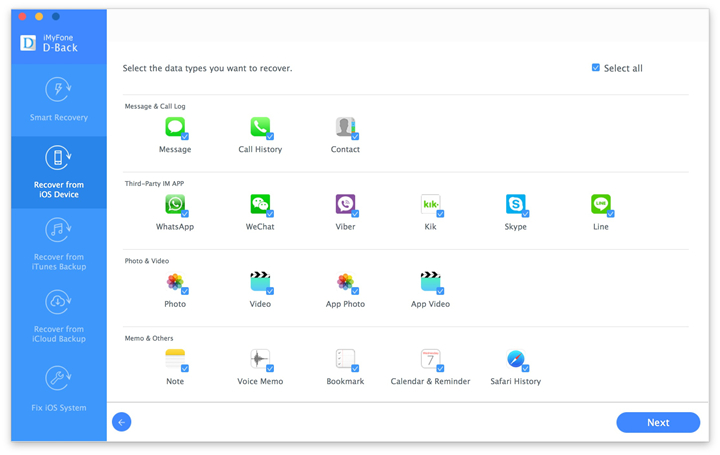
The best solution that help to restore data from your iPhone which stuck in recovery mode is using iPhone Data Recovery.With this wonderful software,you are able to restore data from iPhone which stuck in recovery mode,such as contacts,messages,photos,videos,call logs,notes,calendars,WhatsApp messages & attachments,etc,.
What’s More about iOS System & Data Recovery Feature You should Know:
-Recover data from iPhone in Recovery Mode fastly and easily.
-Recover photos, videos, contacts, messages, notes, call logs, and more types of data.
-Recover data from iPhone which get into different stuck:iPhone stuck in Apple logo,iPhone stuck at “connect to iTunes” screen,iPhone stuck in DFU mode,so on.
-Compatible with latest iOS devices.
-Preview and selectively recover what you want from iPhone stuck in Recovery Mode.
Step 1.Run Software and Connect iPhone with Computer
Launch the software on your computer.Connect your iPhone to your Mac or PC with an USB cable. It should be able to automatically detect your iPhone and have the “Recover from iOS Device” tab active in the window.
Tips: Before running iOS System & Data Recovery, you are supposed to download the latest version of iTunes. To avoid the automatically sync, don’t launch iTunes when running iOS System & Data Recovery.
Step 2.Scan iPhone Data
Click on the “Start Scan” button to start scanning your iPhone for lost/deleted or existing data. The software will take several minutes to complete. While it is end, you will be able to see retrievable data in a list. If you found a specific data that you want during this process, just click “Pause” to stop the process.
Step 3.Preview and Recover Data from iPhone in Recovery Mode
You should be able to see a list of retrievable items after the software has finished scanning your iPhone.There are several filter options to help you find data that you want. To have a look at what each file contains, click on the file name to see what it is.
Once you have identified the data that you want to recover, check on the boxes next to the filenames. After selecting all that you need, click the “Recover” button. To recover it directly to your iPhone, click on “Restore to device” and if you’d like to recover them to your computer, you can just click on “Export to PC”.
“Help!My Samsung phone was broken,it suddenly powered off automatically for no reason just right now,when I powered it on again,the call logs on it was gone.OMG,I forgot to save my business client phone number which was in the call logs.If I miss this client it will lead to a great loss on my business.How can I get back the deleted call logs from my broken Android?Thanks advance!”-Tracy
Android devices play an important role in our daily life, for instance, the photos, videos, messages, contacts, call logs,of course all of these are of great significance to our intimate social communication. However, we always encounter some unexpected occasions, such as call logs are deleted from the broken Android device, especially those for business purpose. We may feel depressed for fear that it may make us miss important commercial opportunity and ignite the unnecessary troubles for us.However,it no doubt that there are still chance to restore the deleted call logs or other personal data from the broken Android device.Just read the passages following,we will give you the best solution to rescue your data on broken Android.
Recover Deleted Call Logs on Broken Android
Fortunately,a powerful data recovery program: Broken Android Data Recovery, which can help you restore deleted call logs from broken Android easily in a simply way.Android Broken Data Recovery support to recover data from broken Android device,including call logs,photos, videos, contacts, messages, audio,WhatsApp messages & attachments and documents.Broken Android Data Recovery is applicable for various of broken Android device,such as water damaged Android,broken screen Android,black screen Android,or other broken circumstances of Android.
How to Retrieve Deleted Call Logs from Broken Android
Step 1.Run Broken Android Data Recovery on PC or Mac
After downloading,launch the program on your computer.Then, choose “Broken Android Data Extraction” in the homepage of the program.
Step 2.Select the File Types to Restore from Broken Android
You’ll be taken to a screen with all kinds of supported file types that you can recover from your broken device.Select the type of files you want to recover. “Select All” is tick by default.Then, click the “Next” button.For call logs recovery,click “Call History”.
Step 3.Choose a Phone Fault Type
In this step,you should select a phone fault type. Select the option at the left or right side which depend on your Android.
Step 4.Select the Model of your Android
Please select your device’s name and model.If you are not sure of the mobile phone model you own, hit the “How to confirm the device model” to check it.
Step 5.Enter Broken Android into Download Mode
After you choose the phone name and model, you will be asked to get your Android device into the Download Mode.Just follow the three steps displayed on the window to finish it.
Tips:You should connect your Android device with computer once entering Android into download mode.
Note:After you finished the steps of the guide above and hit the “Start” button, the countdown will display on the phone screen in the program to tell you the process status.
Step 6.Analyze Data on Broken Android
Once entering into download mode for Android,the program will download recovery package your broken Android.
Step 7.Restore Deleted Call Logs from Broken Android
Upcoming screen shows all files recoverable from the broken device.Preview them one by one and mark down those you need.At last,click “Recover” to save the selected data on your computer.
“Yesterday I was slipped my Android phone to the ground carelessly when I was taking something in the supermarket.Now this phone is power off and it still nothing at all when I try to power it on.Now the most urgent matters is that extract my data from this broken Android,the contacts,SMS,documents.Any ways suggestions?”-Cathy
Are you familiar with Android broken data recovery? In the eventuality that when your Android device get broken like Samsung Galaxy slipped to the ground and the phone screen was unfortunately broken, or you cannot unlock your phone for the malfunction of touch screen. What are you going to do next? Let it alone and abandon all your memories like photos, videos, as well as contacts and messages,even the documents? Or find the available way to extract/retrieve data from the broken Android? If I were you, I would definitely choose the later since the personal data are priceless. Nevertheless, how to recover data/documents from broken Android device with easy steps?
Recover Documents on Broken Android
Broken Android Data Recovery can help to complete the broken Android data recovery effectively,enable to extract and restore documents from broken Android completely.For example the broken screen Android,black screen Android,water damaged Android.Not only documents,but also the contacts,messaging,photos,videos,audio,WhatsApp messages & attachments,call logs,are supported.In addition,Broken Android Data Recovery allow to recover data from Android device after losing data due to accidental deletion, device formatting, restoring to factory settings, rooting, system error or virus invasion,etc,.More importantly, it is compatible with almost all Android smartphones and tablets brands, such as Samsung, HTC, Motorola, Sony, Google, LG ,Huawei and so on.
How to Restore Documents from Broken Android
Step 1.Run Broken Android Data Recovery
Firstly,you need to download and launch Broken Android Data Recovery on PC and you will see the option”Broken Android Data Recovery“,then connect the broken Android to computer with USB cable,and click “scan it” button.
Step 2.Select the File Types to Restore
Now you should select the files you need to recover from broken Android.Including all file of recovery option from Android(Contacts,Call History,Gallery,Messaging,etc,).
Step 3.Select the Fault Type of Broken Android Phone
Before recovering your broken Android phone,there are two options to choose from the system- “touch cannot to used or cannot enter the system” as well as “Black screen (or the screen is broken)”.You need to choose the appropriate one depends on your phone.
Step 4.Select the Model of Your Phone
Select the proper version of the Android as well as the exact model you are using.
Step 5.Enter Download Mode on Android
· Hold the Power key to power off the Phone
· You next have to press the volume down key,the Power key as well as the Home key at the same time
· Next up leave all the keys and press the volume up key to enter the download mode of the phone
Step 6.Analysis of the Broken Android Phone
You should connect your Android to computer again and the Broken Android Data Recovery will automatically detect it.
After entered the “Download mode”, the program will start to download “recovery package” for it,it will take you a few minutes,please wait patiently.
When the downloading is end,the selected data from broken Android will be list.
Step 7.Preview and Recover Documents from Broken Android
You are allow to preview all deleted/lost or existing data before recover them on Android,Including the detailed messages,photos,videos and more types of files.Then just click “Recover”Option to complete the data recovery process.
Summary:If your iPhone 6S suddenly power off itself,you can recall it to the Apple store,before the recalling,you should backup and remove all your data on your device.This article is showing you the best way to backup and erase data and setting from iPhone 6S without restoring before recalling.
News about Recalling iPhone 6S
It seems Apple has run into its own smartphone battery troubles. Days after the company launched an iPhone 6 Plus repair program for units impacted by so-called “touch disease” faults, a new initiative activated on Sunday seeks to replace a batch of iPhone 6S batteries causing unexpected device shutdowns.
Apple has promised to replace the batteries in what it says are “a very small number” of iPhone 6S handsets that have suffered sudden shutdowns.Over the weekend, the company confirmed rumours coming out of China that some customers were seeing their phones unceremoniously switch off.Unlike the battery problems with the Samsung Galaxy Note 7, which saw some handsets unexpectedly go up in flames, Apple has insisted that its iPhone 6S recall doesn’t represent “a safety issue.”
Part 1:How to Backup Data for iPhone 6S before Recalling
The iPhone 6S gain the highly evaluation from Apple users.However,lately iPhone 6S has finally revealed details about its battery recall.As previously reported, all customers are entitled to a replacement, repair or refund.If you plan to recall the iPhone 6S or buy an new iPhone 7,I remind you do remember to backup data for your device.There are several options available for backing your iPhone 6S data.
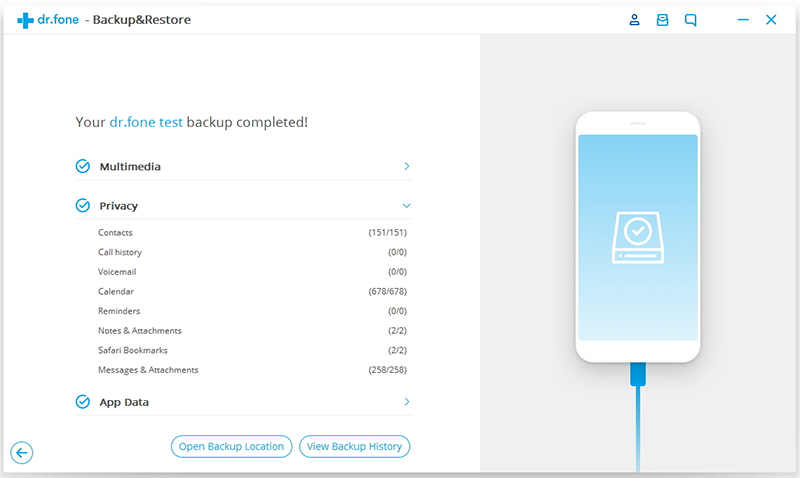
iOS Backup & Restore Tool,which is an useful data manage tool here we strongly recommend for you,which permits to backup data from iPhone 6S to computer safely,as well as restore data from backup files on iPhone directly.This predominate data manage program is helpful for backup and restore various files on iPhone,including contacts,SMS,photos,videos,notes,call logs,calendars,apps,WhatsApp & attachments and other personal documents.It offers full support for iPhone 7, iPhone 6,iPhone 6S,iPhone SE/5S/5C/5,iPhone 4S/4 and iPad,iPod.It works with all iOS versions, including iOS 10 or lower.
Step 1.Run the Program on Computer and Connect iPhone to Computer
After launching iOS Backup & Restore Tool on computer,click on “More Tools”option in main page of this program,select “Device Data Backup & Export”option from the tool list.Then use the USB cable to connect your iPhone to computer.By default,iOS Backup & Restore Tool will automatically detect your iPhone soon.
Note:If you have used iOS Backup & Restore Tool to backup your device before,you can click on “To view the previous backup file” to view the previous backup files list.
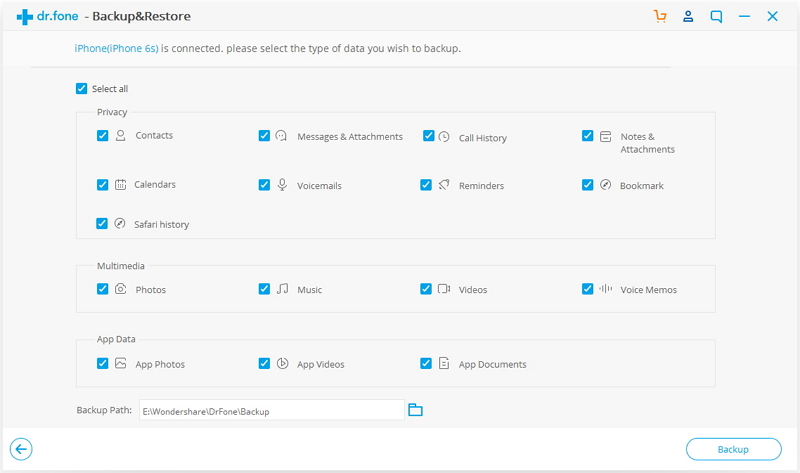
Step 2.Select File Types to Backup from iPhone
Once your iPhone is connected successfully,iOS Backup & Restore Tool will detect the file types on your device automatically.Then program will display all the supported data,like Photos & Videos, Messages & Call Logs, Contacts, Memos and other data.You can select the file types to backup.One or more are allows.Then click on “Backup”button.
It only will take a few minutes on the whole backup process,depending on the data storage on your iPhone.
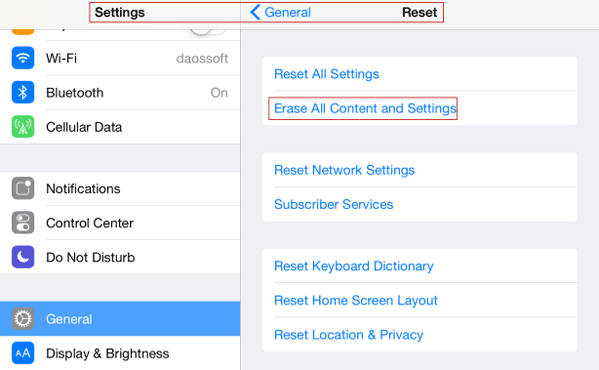
Part 2:How to Perform Factory Reset on iPhone 6S before Recalling
Before recalling the iPhone 6S,you may need to perform the factory reset on your device,in order to wipe the personal files and settings on it.Now we are going to show you how to complete the factory reset on iPhone 6S before recalling.
Step 1: Backup iPhone data first.
Step 2: Navigate to Settings – General – Reset – Erase All Contents and Settings.
Step 3: Type passcode in pop-up dialog.
Step 4: Continue and follow prompt message to delete all data and settings on iPhone.
Part 3:How to Delete All Data and Settings on iPhone 6S Permanently before Recalling
As you know,perform the factory reset on iPhone 6S which can’t remove the data and settings permanently,the deleted data can be restored by some professional data recovery.If you are worry about exposing your privacy to someone,you should better erase your data from iPhone 6S via the iOS Data Eraser before recalling.
iOS Data Eraser is the most professional tools that allows you to 1 Click ultimate privacy protection in order to prevent identity theft when disposing of your iOS devices,for example recalling your iPhone 6S.With the help of iOS Data Eraser, you are allow to delete all data and setting from iPhone 6S without restoring, includes contacts, messages, photos, apps, account info, videos, passwords and other personal data stored on your iDevices and ensure that 100% nothing recoverable even if use the third party data recovery tool.
Features of iOS Data Eraser:
* Erase all data from iPhone/iPad/iPod, including text messages, contacts, videos, photos, account info, password, etc;
* 3 levels of data erasing for your choice and your can choose to overwrite the existing data with random files.
* Works with all iPhone, iPad and iPod series, including Jailbroken iPhone and carrier-locked iPhone.
* Protect your personal information by removing it permanently and preventing them from being recoverable.
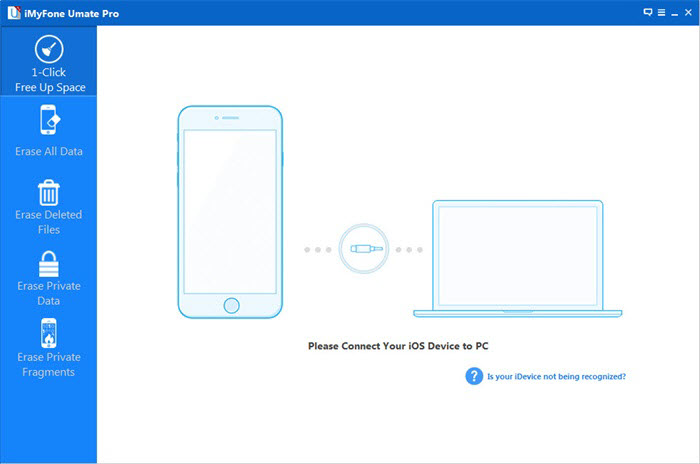
Step 1.Install iOS Data Eraser software
Download the program from below download link and double-click the file to begin installation process. After that, the software will be opened automatically and a shortcut will display on computer desktop.
Step 2. Connect iPhone to Computer and Select Right Earsing Option
Connect the iPhone to computer via USB cable. The program will detect the device once it was well connected. Then you can proceed to the next step. However, if the program can’t detect the device, please make sure iPhone USB driver and iTunes are installed properly on the computer.
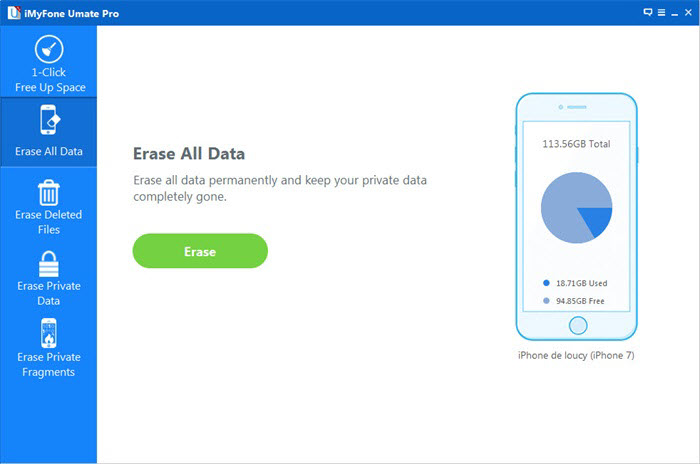
Note: The program offers 4 erasing option for your different demands: “EXPRESS CLEANUP”, “ERASE PRIVATE DATA”, “ERASE DELETED FILES” and “ERASE ALL DATA”. You can select the appropriate option and give it a try. As we want to erase everything stored on the iPhone, so the first method is preferred in this case. Select Erase All Data from the sidebar, which leads to the next step.
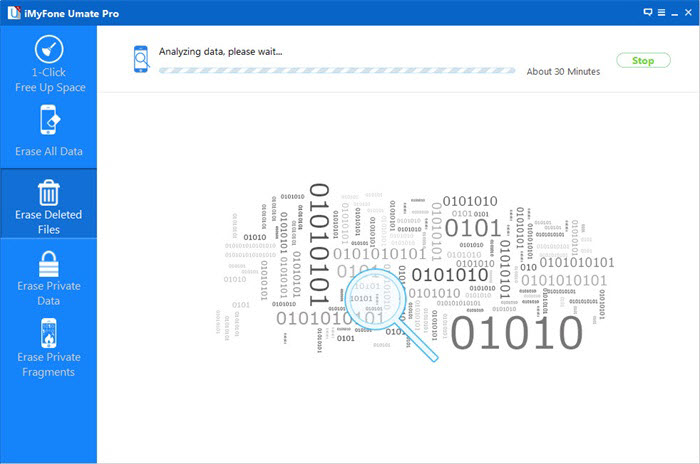
Step 3.Start Analyzing and Scanning the Data on iPhone
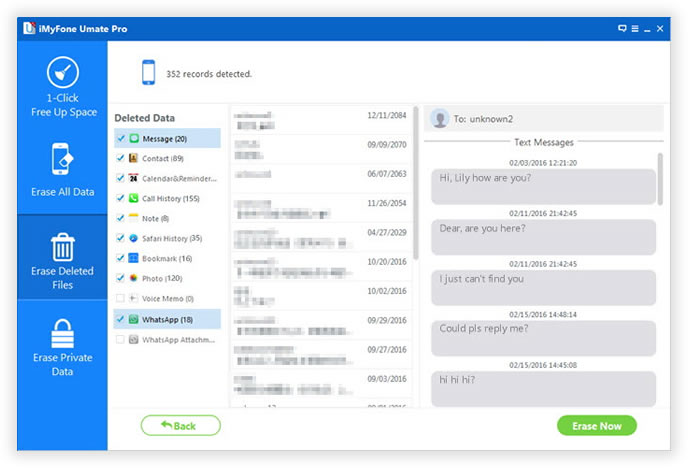
In this step, it will automatically analyze and scan all your deleted files in your iPhone device; generally it takes few minutes to complete the process depending on the file. After scanning – select the deleted data to view detailed information on the file.
Step 4. Privew and Select the Data You Want to Erase
After scanning, all deleted data will be scanned out and presented as details, by default, all files will be selected. Unselect the files you wish to keep.
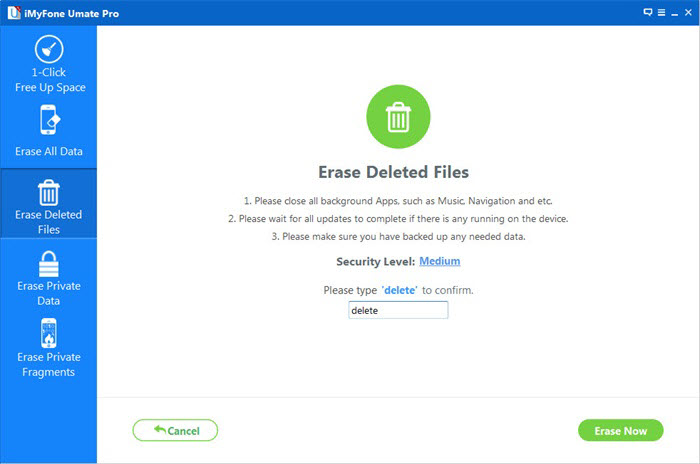
Step 5.Start Erasing All Data on iPhone Permanently
Input ‘delete ‘ and click Start Button to confirm that you are going to erase all the data on the iPhone. Then the program starts erasing apps, music, videos, photo, contacts, SMS and other files stored on the device. It only takes a few minutes to complete the task.
Finish Erase All Data on iPhone and Set Your iPhone as a new one
Deletion process may take you some time, patience, stay connected iPhone 6S with the computer.
Now all the data and settings are removed from your iPhone 6S permanently. You should be no longer worries about your privacy being leaked by using this program.