Category Archives: iOS Solution

How to Fix iOS 10 System Update Failed

“I can’t successfully update my iPhone 6S to iOS 10. I tried several times with the same result.It gets the message “Software Update Failed An error occurred downloading iOS 10″.Anyone know how to solve it?Thanks advance”-Janie Pan

ios 10 update failed

Getting the “Software Update Failed” messages that prompt on your iPhone when you trying update iOS 10 system on device?It’s exciting to install a new firmware on your iOS device but you may sometimes encounter a problem like Janie that will make you disappointed.An example is the “Software Update Failed” error that pop up when installing iOS 10 on device.It is one of the most common iOS system issues that users face when updating to a new iOS firmware.The error has occurred on iOS 8 and iOS 9 as well.If you are facing the problem like this,luckily here we are talking about solutions to fix it completely.

Part 1:Backup iPhone Data before iOS 10 Update

First of all,please do backup on iPhone before updating to iOS 10,in order to protect your personal data on device,you’d better keep your iPhone files safety.If you lost data from iPhone after iOS 10 update,you should restore backup to your iOS 10 device without data loss via iOS Backup & Restore tool.

d_win d_mac

Tips:How to Backup iPhone before iOS 10 Update

backup-iphone-before-ios10-update

Part 2:iOS 10 Software Update Failed,How to Fix it

1.Wait for a Few Hours
As we said,Apple servers simply can’t handle the level of traffic.So wait for a few hours or several days and it will be much smoother to download iOS 10 on your device.

2.Restart iPhone and Try it Again
When you get the message that prompt “An error occurred downloading iOS 10”, just ignore the message and reboot your iPhone.Waiting for a moment and then tap on “Download and Install” again.

3.Reboot WiFi and Reset iPhone Network Settings
Reboot your iPhone and your WiFi to make sure your internet connection is working well.On your iPhone, go to Settings > General > Reset >Reset Network Settings to reset the network settings.Waiting for a little while and then tap on “Download and Install” again.

4.Update iOS 10 with iTunes
If you still fail to complete the iOS 10 update task on your device via the methods above,the last one you should try is to update iOS 10 on device with iTunes after connecting iPhone to computer via USB.

Part 4:Restore Deleted Data on iPhone after iOS 10 Update

iOS 10 update on iPhone may lead to data loss under various of circumstances,but you can restore backup on iPhone after iOS 10 update,even directly restore deleted data from iPhone after iOS 10 update without backup via iOS Backup & Restore tool.No matter what kinds of data you wanna restore on device,this reliable data recovery tool help you to solve the restoring perfectly.

d_win d_mac

Tips:3 Ways to Restore Deleted Data on iPhone after iOS 10 Update

Restore Data on iPhone from Backup:

restore backupto iPhone after ios 10 update

Directly Restore Data from iPhone:

restore data from iphone after ios 10 update

Related Article:

How to Fix iPhone Freezes During/After iOS 10 Update

2 Ways to Fix iPhone Stuck in Recovery Mode After iOS 10 Update

Fix iPhone Stuck on iTunes Logo After iOS 10 Update

How to fix Bug on iPhone after iOS 10 Update

How to Fix iOS 10 iPhone Running Slow Issue

How to Jailbreak iOS 10 on iPhone without Losing Data

How to Downgrade iPhone or iPad from iOS 10 to iOS 9

How to Jailbreak iOS 10 on iPhone without Losing Data

Summary:iOS 10 is officially out and now Pangu finds itself in the limelight. After showcasing that celebrated iOS 10 jailbreak at MOSEC 2016 back in July, Apple has repeatedly found ways to thwart attempts to hack their mobile operating system, Yahoo reported.Read this article and get tips of jailbreaking iOS 10 on iPhone/iPad without data loss and make full use of iOS 10 freely.

ios-10-jailbreak-iphone

Part 1:Backup Data on iOS 10 iPhone

Before jailbreak iOS 10 on iPhone,you should backup data before the jailbreak task begin to avoid data loss on device.Here we are going to offer 3 ways to backup your iOS 10 data via iTunes,iCloud,PC.

Way 1:Backup iOS 10 Data to iCloud

Step 1. Turn on WiFi, tap Settings > iCloud;
Step 2. Scroll down and tap Backup > tap Back Up Now;
Make sure that iCloud Backup is turned on. And device should stay connected to the WiFi until the process is completed.
Step 3.Once the process is finished, you can tap Settings > iCloud > Storage > Manage Storage and make sure the backup is finished. You can also check the details of backup file .

Way 2:Backup iOS 10 Data to iTunes

Step 1. Update the newest version iTunes on your PC,run iTunes and connect iPhone with PC;
Step 2. Follow the onscreen steps to enter your device password or to choose Trust This PC;
Step 3. Select your iPhone when it appears in iTunes;
Make sure that Summary tab at the top of iTunes is selected;
On the device’s tab,check Prevent iPods,iPhones and iPads from syncing automatically.
Step 4. Tap Backup to this computer under the backup section.

Way 3:Backup iOS 10 Data to PC

iOS Data Backup & Restore Tool is your first choice to completely backup iOS 10 data on iPhone to computer,restore backup data to iPhone without data loss.It’ no more easier than backing up iPhone data to PC with iOS Data Backup & Restore Tool in only a few clicks,including contacts,photos,videos,messages,notes,call logs,calendars and so on.Applicable iOS device are listed:iPhone 7,iPhone SE,iPhone 6S/6,iPhone 5S/5,iPad Air,iPad Pro,iPad Mini,etc,.

d_win d_mac

Step 1:Run Program and Select “More Tools”
Step 2:Select iOS 10 File to Backup
Step 3:Begin to Backup iPhone Data to PC

backup device

Part 2:How to Jailbreak iOS 10 on iPhone without Losing Data

Once finish the backup task on iOS 10 iPhone,now you should start to jailbreak iOS 10 on your iPhone safely.Follow the detail steps below and try to jailbreak iPhone with iOS 10 on your own.

Step 1. Turn on Safari on your iOS 10 iPhone with iOS 10 firmware running;
Step 2. Search the URL:download pangu.org and tap on the webpage degined for Pangu iOS 10 app icon;And download it on your iOS 10 device;
Step 3. Go to the bottom of your iPhone and tap on the Up arrow as shown there when the page loads up;
Step 4. Select Add to HomeScreen in the next screen and tap to proceed;
Step 5. Rename the app icon as Pangu and tap Add;
Step 6.After installing Pangu app on your iOS 10 device, tap on the icon and get the latest of Pangu iOS 10.

ios 10 jailbreak pangu

Then you run Pangu and follow the onscreen guidelines to complete the jailbreak process on your iOS 10 iPhone without data loss.

Part 3:How to Restore Data on iPhone after iOS 10 Jailbreak

Many people know that it will loss data when iOS 10 jailbreak on iPhone/iPad failed,how to solve the data restoring issue in no worries?Just give a try on the iOS 10 Data Recovery,which is a professional iOS data recovery tool to perfectly restore data on iPhone after iOS 10 jailbreak without losing data,such as contacts,photos,videos,messages,notes,call logs,calendars and more.It allow to restore deleted data on device with three modes:directly recover from iPhone,recover from iTunes backup file,recover from iCloud backup file.Just select one and retrieve deleted data on device effectively.

d_win d_mac

Step 1:Run Program and Select Recovery Mode
Step 2:Select File to Restore
Step 3:Restore Selected Data on Device

recover iphone data after ios 10 jailbreak

Extra tips:How to Restore Deleted Data on iPhone after iOS 10 Jailbreak

Read more:

How to Downgrade iPhone or iPad from iOS 10 to iOS 9

How to Fix Bricked iPhone,iPad when iOS 10 Update/Downgrade

How to Get iPhone Out of Recovery Mode When Update to iOS 10

How to Downgrade iPhone or iPad from iOS 10 to iOS 9.3.5

iOS 10 now is released around the world.However,even though iOS 10 bring many new features but it still not the perfect iOS system for some iOS device.Some iPhone users reported that their iPhone was get bricked after iOS 10 upgrade,some of them were complained that iPhone got something wrong for bugs after updating to iOS 10,others reflex that iPhone was not as useful as previous.So a part of iOS user need to downgrade their iOS device to iOS 9.3.5 from iOS 10.

downgrade iPhone from ios 10 to ios 9

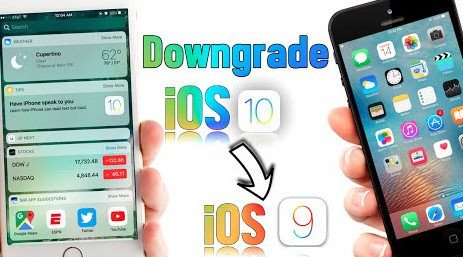
Officially Apple does not provide a way to downgrade iOS system,but there is easy ways to do this available for a short time.Apple closed the option to downgrade to iOS 9.3.5,however thanks to a security hole,you are able to downgrade iOS 10 iPhone to iOS 9.3.5.Here are the detail ways to downgrade iPhone from iOS 10 to iOS 9.3.5.I’m going to show you how to downgrade iPhone to iOS 9.3.5 from iOS 10.0.1 in the following tutorial.Check out the two methods and see how it work.

2 Ways to Downgrade iOS 10 to iOS 9.3.5 on iPhone, iPad or iPod Touch

Part 1:Downgrade iPhone from iOS 10 to iOS 9.3.5 with iTunes(Free but data loss)

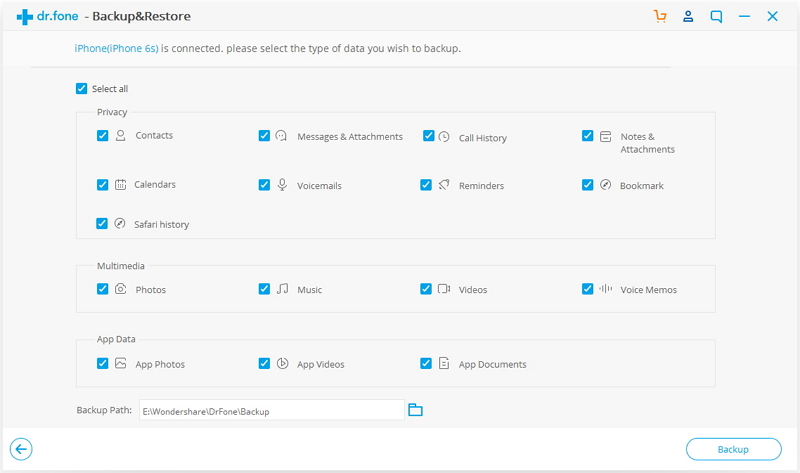
Before starting the iPhone system downgrade process,it is very important that you do a backup your iPhone before iOS 10 downgrade.In case someday to restore iPhone from a backup you created after losing data.

Step 1:Begin by downloading the iOS 9.3.5 IPSW file for your device.You can download it to click here:download iOS 9.3.5 IPSW file.Save this file on your computer.It is also important that you make sure the IPSW file matches the device model to avoid getting an error in iTunes.

Here,you can download iPhone iOS firmware file(iOS 8,iOS 9 and iOS 10.0.1)

iphone-Firmware-Files

iOS firmware file for iPhone
iOS firmware file for iPad
iOS firmware file for iPod touch

Step 2:Now,run iTunes and then connect iPhone to your computer via USB cable. Select the device and then go to the Summary Page and hold the Option Button (Mac OS X) or Shift Key (Windows) and click the “Restore iPhone” button.

restore-iphone-system-itunes

Step 4:Next find the IPSW file that you had downloaded earlier and choose “Update”.This will erase the device and downgrade your device from iOS 10 beta to iOS 9.3.5.You can then restore from your backup once the downgrade is complete.

Please be attention:Downgrading iPhone with iTunes may wipe all data and settings on your iPhone,in order to protect your device data,I’m going to introduce to you another better method to downgrade iPhone to iOS 9.3.5 from iOS 10.Please keep on reading patiently.
(Tips:How to Restore Lost Data from iPhone after iOS 10 Downgrade)

Part 2:Downgrade iPhone from iOS 10 to iOS 9.3.5 by iOS 10 System Recovery(not data loss)

iOS 10 System Recovery,which is a wonderful iOS data manager tool to restore iOS 10 to iOS 9 on iPhone without any data loss,perfectly help to downgrade your iPhone /iPad from iOS 10 back to iOS 9.3.5 smoothly.iOS 10 System Recovery rolls out the feature “Fix iOS to normal” for restoring iPhone system to normal after downgrading iOS 10 to iOS 9.3.5,making it easy for users to get iPhone,iPad out of white/black screen,recovery mode,Apple logo,connect to iTunes screen,etc;help to fix the issues on iOS device perform abnormally.

d_win d_mac

Easy Steps to Restore iOS 10 to iOS 9.3.5 on iPhone

Step 1.Run the iOS 10 System Recovery and Connect iPhone to PC/Mac
Download and install iOS 10 System Recovery(Windows&Mac) on computer.When the installation is complete,connect your iPhone to computer with USB cable and launch the program.

iOS 10 System Recovery

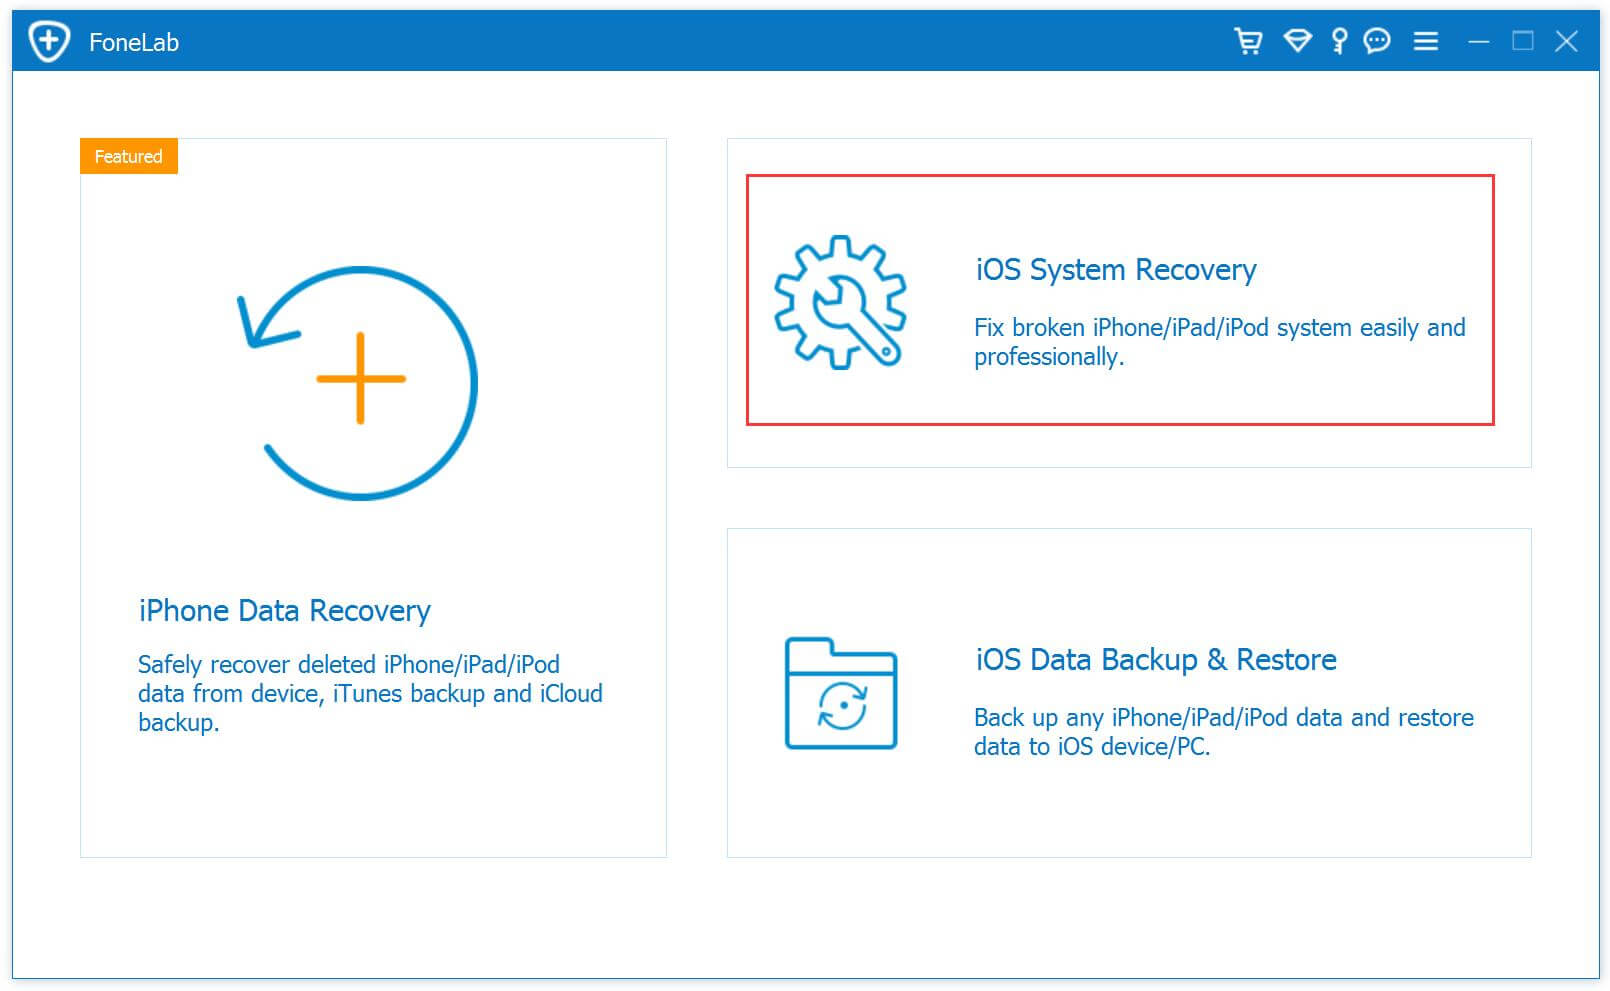
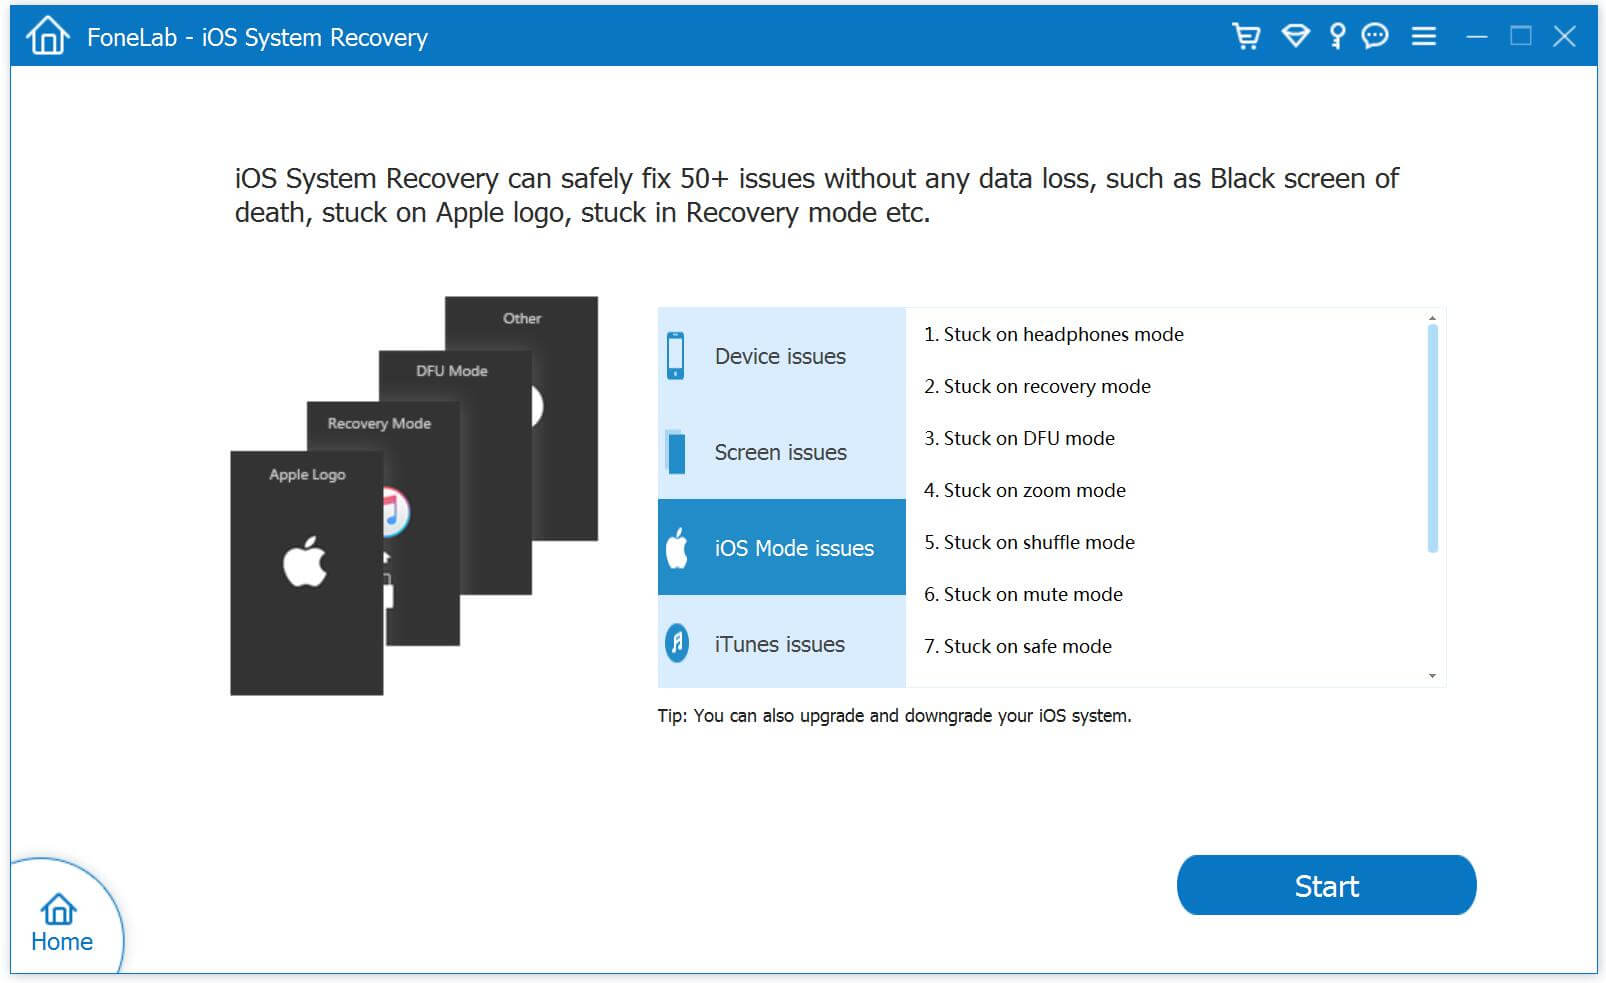
Step 2.Select “iOS System Recovery” Option
From the main window,please select “Fix iOS to Normal” located at the top right of the screen.Wait for iOS 10 System Recovery to detect your iPhone.Click “Start” once the device has been detected.

restore iPhone from ios 10 system to ios 9

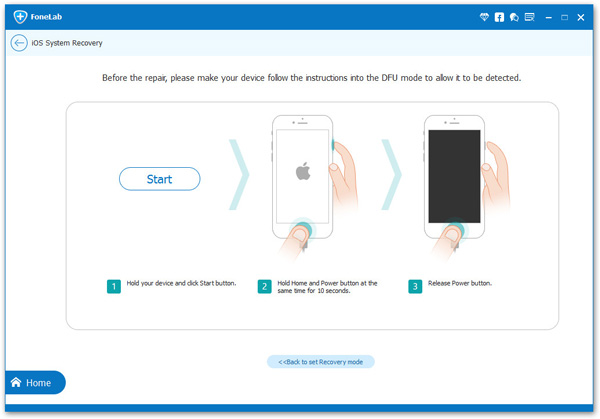
Step 3.Put iPhone into Recovery Mode
1)First, disconnect the cable. Shut down the iPhone
2)After the shutdown, press the “HOME” button to remain intact, connect your iPhone to Mac or Windows PC and make sure iTunes is running.
3)Release the HOME button,and you can see the “Connect to iTunes screen” on the iPhone,it means you have enter iPhone to recovery mode successfully.

enter iphone into recovery mode

Tips: Run the iTunes software,at this point iTunes should display an alert saying it’s detected an iPhone in recovery mode, and will let you restore your iPhone device.

Other way enter recovery mode:If you are unable to set the iPhone,iPad into recovery mode,please learn as below tutorial to enter DFU mode.

enter iPhone into DFU mode

Step 4.Download the iOS 9.3.5 Firmware Package for iPhone
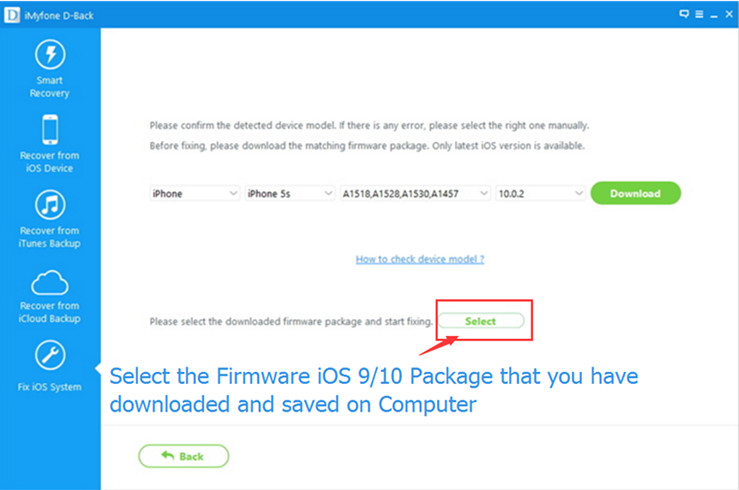
In this step,you need to confirm your iPhone model and select the iOS 9.3.5 firmware to download.
To downgrade iPhone from iOS 10 to iOS 9.3.5,iOS 10 System Recovery will offer the latest version of iOS firmware package for your selection.Choose “iOS 9.3.5”,then click “Download” and wait for the download to complete.

download iOS 9.3.5 Firmware to iPhone

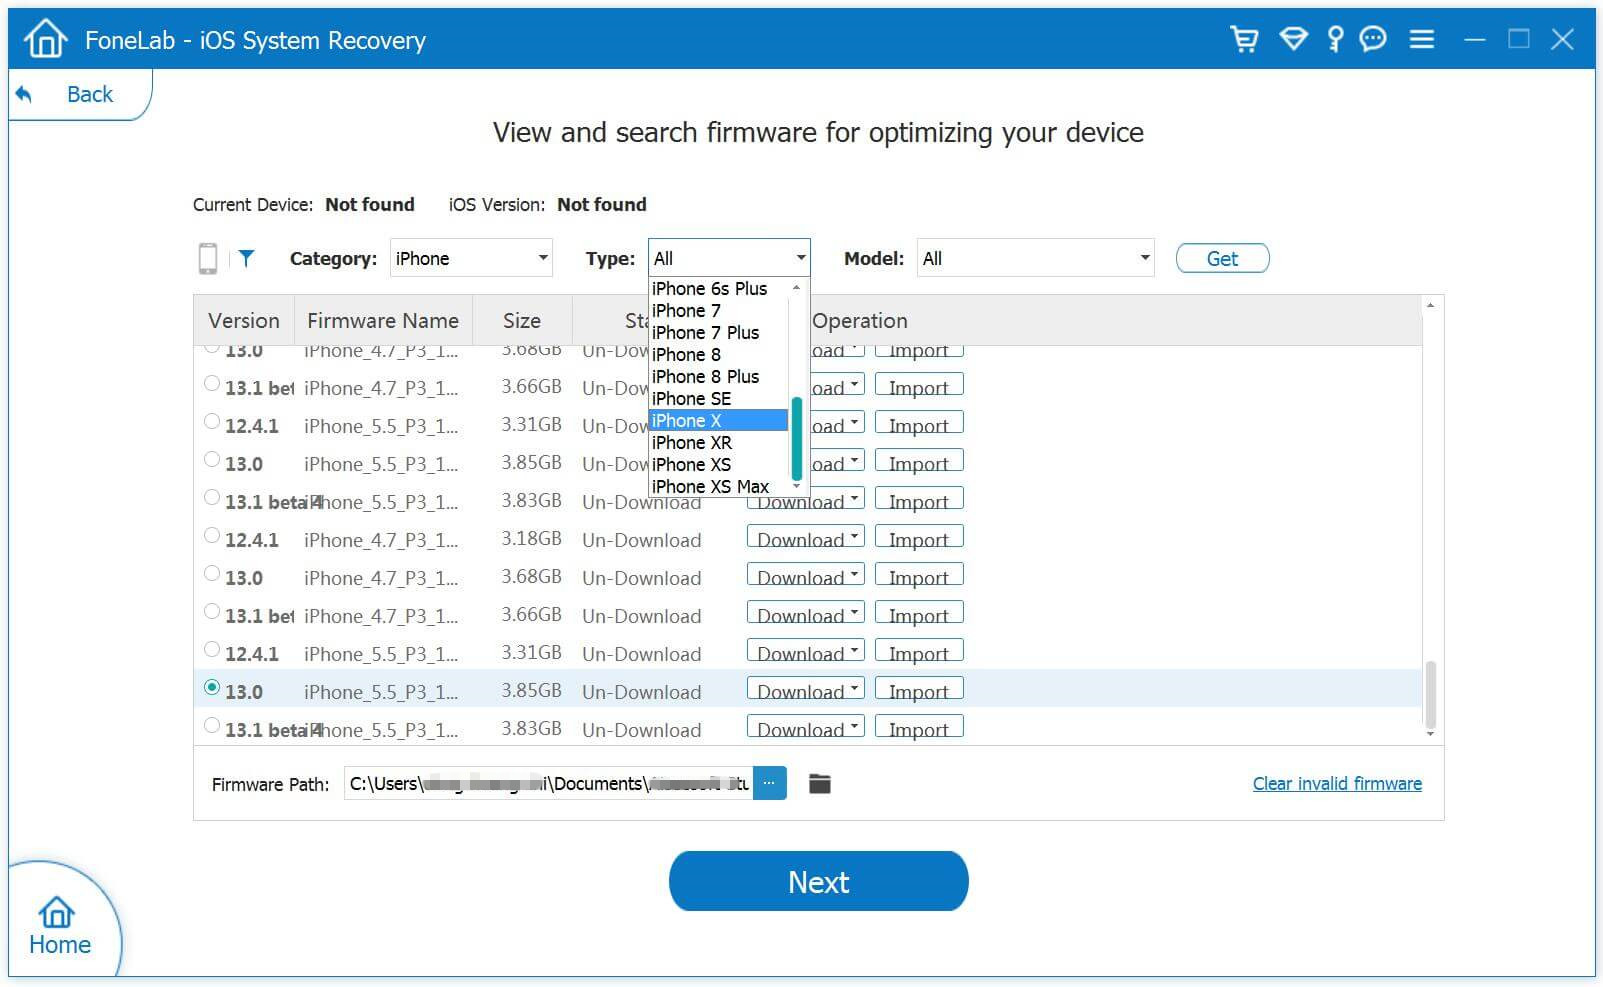
Tips:Now,the program provides iOS 10.1.1 firmware package for users download,if you want to downgrade iOS 10 to iOS 9,like iOS 9.3.5,please download the iOS 9.3.5 package and save them on your computer at first,then select and install the .IPSW files on your iPhone via iOS 10 System Recovery(no data loss).
(Note: If you installing it via iTunes program,it will erase your contents.)

Free links to download the .IPSW files:

iOS firmware file for iPhone
iOS firmware file for iPad
iOS firmware file for iPod touch

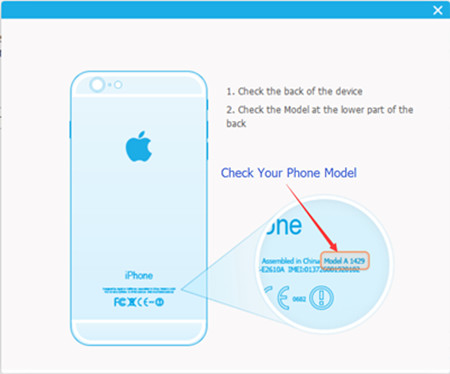
How to check and comfirm your iPhone model?Please see as below:

check and comfirm iphone model

After downloading the iOS 9.3.5 IPSW files and saved on your computer,then click the “Select” button the import the files to the iOS 10 System Recovery and go to next step.

download-ios-firmware-package

Tips:If you want to install iOS 10.1.1 on your iPhone, iPad or iPod touch,please select,download and install it on your iOS devices directly,during the installing process,it won’t cause data losing.

Locate the iOS 9.3.5 IPSW file you downloaded and select it:

downgrade iphone from ios 10 to ios 9

Step 5.Start to Restore iPhone to iOS 9.3.5 from iOS 10 and Return to Normal
As soon as the download completes,iOS 10 System Recovery will start begin the iOS downgrade process without any data loss and restore your iPhone to normal state.In less than 10 minutes,you will get a message prompt that your iOS device has restored to normal state,and it will reboot into iOS 9.3.5.

restore iphone from ios 10 to ios 9

Note: After finish restoring device via iOS 10 System Recovery,your iPhone/iPad/iPod Touch will be updated/downgraded to the iOS version which you select. And if your iOS device is a jailbroken one, then it will be updated to non-jailbroken.

d_win d_mac

Extra tips:iOS 10 System Recovery support to fix iPhone stuck issues and restore iPhone system to normal under various of unexpected circumstances,such as fix iPhone stuck in DFU Mode/Recovery Mode,fix iPhone stuck on Apple logo,fix iPhone stuck on black/white screen,etc,.What’s more,it also can help you recover deleted data from iPhone,iPad with iOS 10 update in three recovery modes:directly recover data from iOS 10 devices; restore lost data from iTunes or iCloud backups after iOS 10 updating.Don’t hesitate to share this powerful program with your dear friends after using it.

Related Tutorial:

Get iPhone Out of Recovery Mode after Update to iOS 10

Fix iOS 10 Update Bricked iPhone With iTunes Screen

Fix Bricked iPhone,iPad when iOS 10 Update/Downgrade

How to Backup iPhone or iPad Data before updating to iOS 9

Notes: Before iOS 9 Firmware Upgrade,you must to backup your iPhone or iPad data to computer or iTunes. As we all know,many ios users jailbrearking their old iPhone 6/5s/5/4s/4 on iOS 8/iOS 7,once your jailbreaking the iPhone, iPad before,if you want to upgrade iPhone, iPad to iOS 9 by default settings on the devices (update iPhone,iPad to iOS 9 without iTunes),it’s failed! However,to upgrade your jailbroken iPhone 6/5s/5/4s/4 to iOS 9,you must to upgrade by “Firmware Upgrade”,it means you must to download the iOS 9 Firmware on a computer,and then upgrade iPhone to iOS 9 by iTunes.But if you update iPhone to iOS 9 in this way,it may erase all data on your iPhone, iPad,however,this use guide mainly teach you how to recover lost iPhone data after update to iOS 9.

Backup iPhone Data Before Upgrading to iOS 9 (iOS 9Firmware Upgrade)

Many iPhone users may ask how to backup iPhone data to computer before update the devices to iOS 9. We all know that it’s very easy to backup photos to computer,by if you want to backup contacts, text messages, call logs and other important to computer,you must to use a third-part iPhone data backup software.

Today,we recommend you two useful data transfer tool: iPhone iPad Data Manager tool and Phone to Phone Data Transfer,both allows you transfer & backup iPhone data to computer directly,including contacts, text messages, photos, videos, call logs,etc,. With the help of iOS Data Manager, you not only can backup photos, live photos, 4k videos, music, videos, text messages, contacts, notes and other contents from iPhone computer or iTunes,but also allows you transfer contacts, messages, photos (live photos), videos (4k vides) between old iPhone and new iPhone directly.Let’s taking backup iPhone contacts to computer before iOS 9 upgrading for example.
Read the use guide: Transfer data from old iPhone to new iPhone.

Free download the iOS Data Manager:

d_win d_mac

Using iPhone Data Transfer, before update to iOS 9,all iPhone user can backup the contacts and contact’s photo to computer as a txt file or a ANTC file. In ANTC file condition, you can protect the file with a password to keep your iPhone contacts privacy.

How to Backup Contacts from iPhone to Computer Before iOS 9 Upgrading

Step 1. Launch iOS Data Manager and connect your iPhone/iPad/iPod with the computer.

connect-iphone-with-computer
Step 2. Backup contacts from iPhone/iPad/iPod to computer.
a. Click Information at the top of the the main interface, you’re expected to enter Contacts > Local by default; if you want to backup contacts on the iCloud or other account, then select iCloud or other account instead of Local. Here we back up contacts in Local for example.

select local contacts

b. Check the contacts you want to back up, and then click Export from the top menu, and then select one file type you want to export: to Vcard File, to CSV File, to Windows Address Book, to Outlook 2010/2013/2016.

select the place to export
c. A new window will pop up, browse and select the target folder on your computer and click Save to start the export.

browse and select the target folder on your computer

d. Export successfully, you can click OK to finish the process, or click Open Folder to reach the target folder to check the saved file.

export-contacts

Try iPhone Data Transfer to transfer/backup iPhone contacts to PC.

d_win d_mac

Read more:

What to Do before Update iPhone to iOS 9

How to Backup Contacts from iPhone to Computer

2 Ways to Backup and Restore iPhone Data on Windows or Mac

How to Recover Lost Contacts on iPhone after iOS 9/10 Update