Category Archives: iOS Solution

Fix iPhone Stuck on Connect to iTunes Screen after iOS 11 Update

I need some help. My iPhone stuck on Connect to iTunes screen after iOS 11 update, how to get my iPhone out of this stuck issue?

iphone stuck on itunes logo

Further Reading:

* Free Download Previous Purchases Apple Music from iTunes to Computer

* How to Manage iPhone Files on PC or Mac

Many of iOS users may have met the same troubles, and lots of they have complained that iPhone get the errors with red iTunes logo during 90% done of iOS 11 update. Here are the different circumstances that lead to stuck on Connect to iTunes screen of iPhone.

1. iOS 11/10/9 update. iPhone stuck on Connect to iTunes screen during/after iOS update could easily happen when there is an error while installing the iOS update.
2. Factory settings restore. iPhone may stuck on Connect to iTunes screen during/after factory reset restore when there is an error while performing a regular restore.
3. iOS 11/10/9 Jailbreak. Wrong operation during jailbreak, jailbreak failure or even the correct steps of jailbreak may get your iPhone stuck on Connect to iTunes screen.
4. Some unknown reasons. Sometimes when you are using iPhone, it would suddenly stuck on Connect to iTunes screen with unknown reasons.

No matter what causes lead to iPhone get into the stuck loop, In this article, we will share with you various ways to fix these stuck problems and have your iPhone working normally again.

Restore iPhone Stuck on iTunes Logo after iOS 11 Update

iOS System Recovery can be useful in fixing all iOS system issues. It can help you fix iPhone stuck on Connect to iTunes screen after iOS 11 update, return iPhone to normal state. iOS System Recovery is design for restore iPhone to normal for any stuck issues under different situations without data loss. Such as, stuck on the black/white screen, stuck in Recovery Mode, stuck on Apple logo, etc,. It works perfectly with the latest iOS 11/10/9. Supported iOS devices insist of iPhone 7, iPhone 6S/6,iPhone 5S/5C/5, iPad Pro, iPad Mini, iPad 4/3/2.

d_win d_mac

Repair iPhone Stuck at iTunes Logo Screen after iOS 11 Update

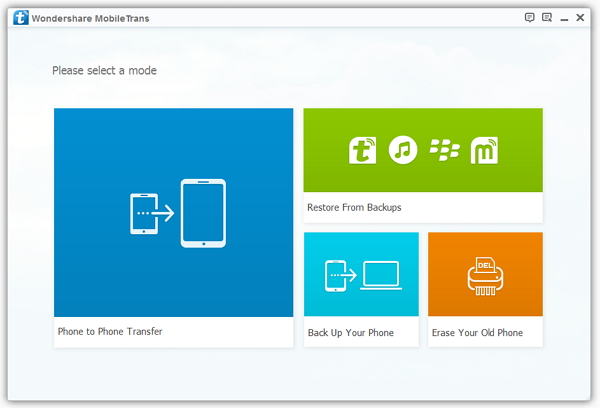
Step 1.Run Program and Connect iPhone
Run the iOS System Recovery on your computer and connect iPhone to the compute.

ios system recovery main page

The program will automatically identify your iPhone. Click “Fix iOS System” option of program. After that you need to click “Start” to proceed.

connect iphone to the program

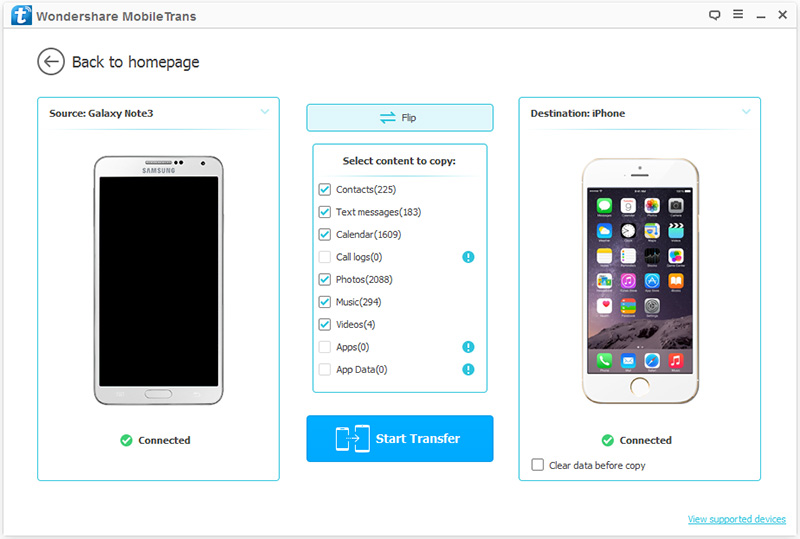
Step 2.Initiate Downloading of Firmware
To fix your iPhone stuck on Connect to iTunes screen, iOS System Recovery will install the latest iOS version on your iPhone. The program identifies your device and provides you the latest and compatible version of iOS required for your phone. All you have to do is press “Download” after the firmware is offered.

select iphone model

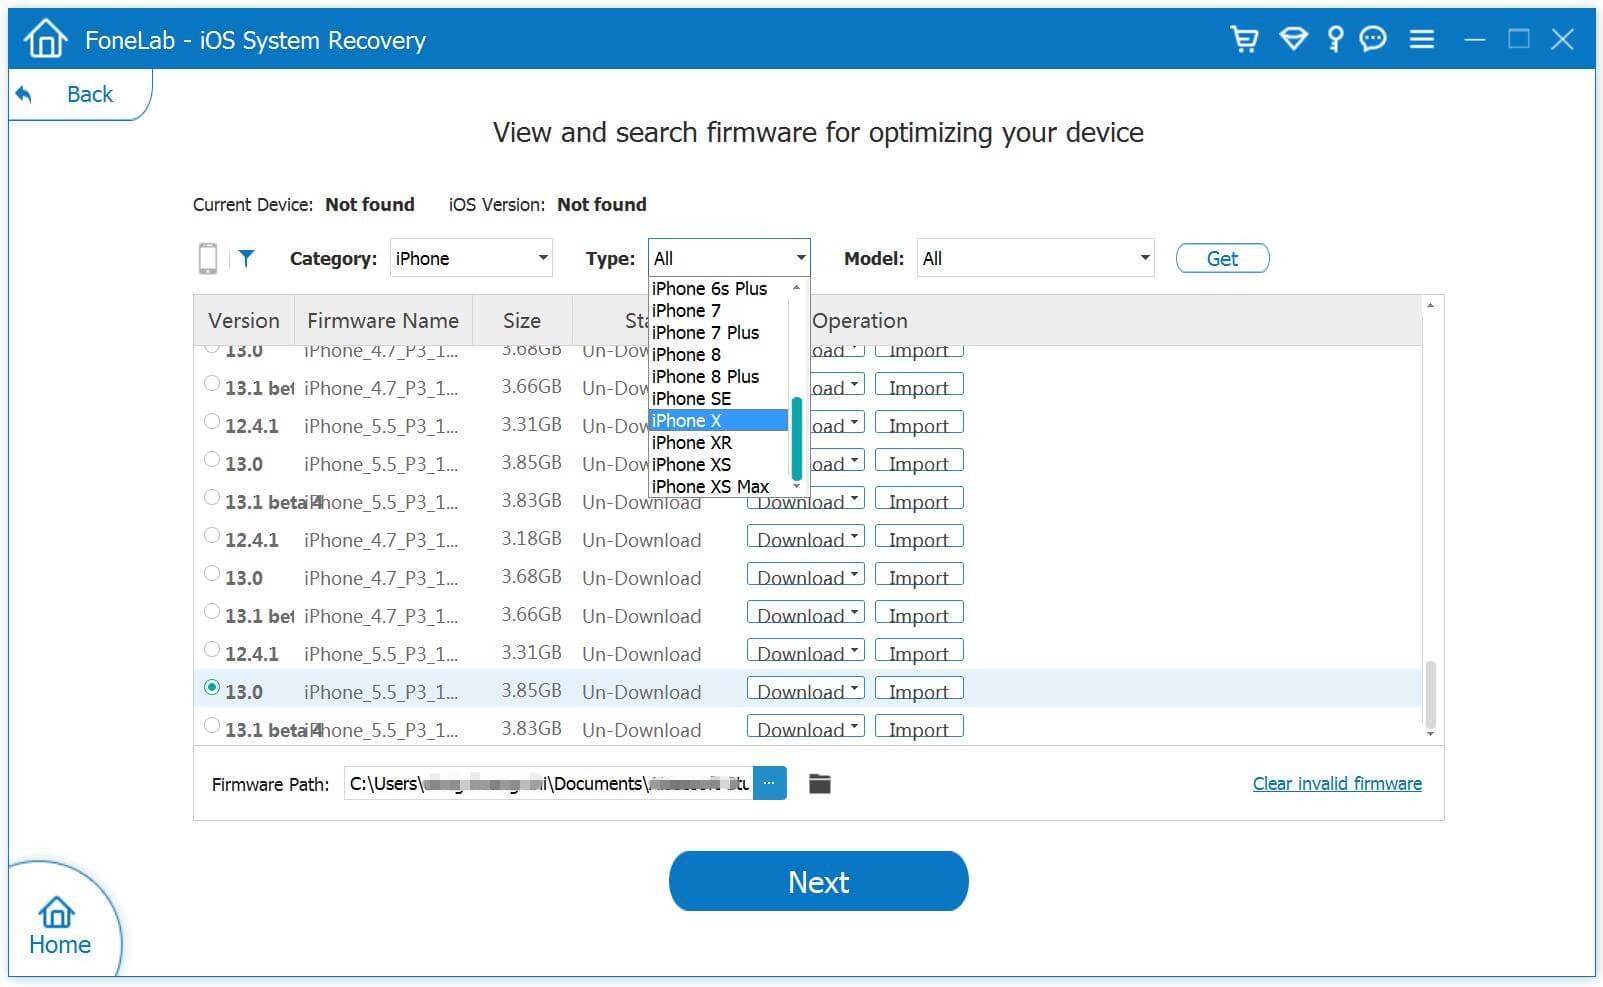
The firmware will take some time to be downloaded so you have to be patient.

download firmware for iphone

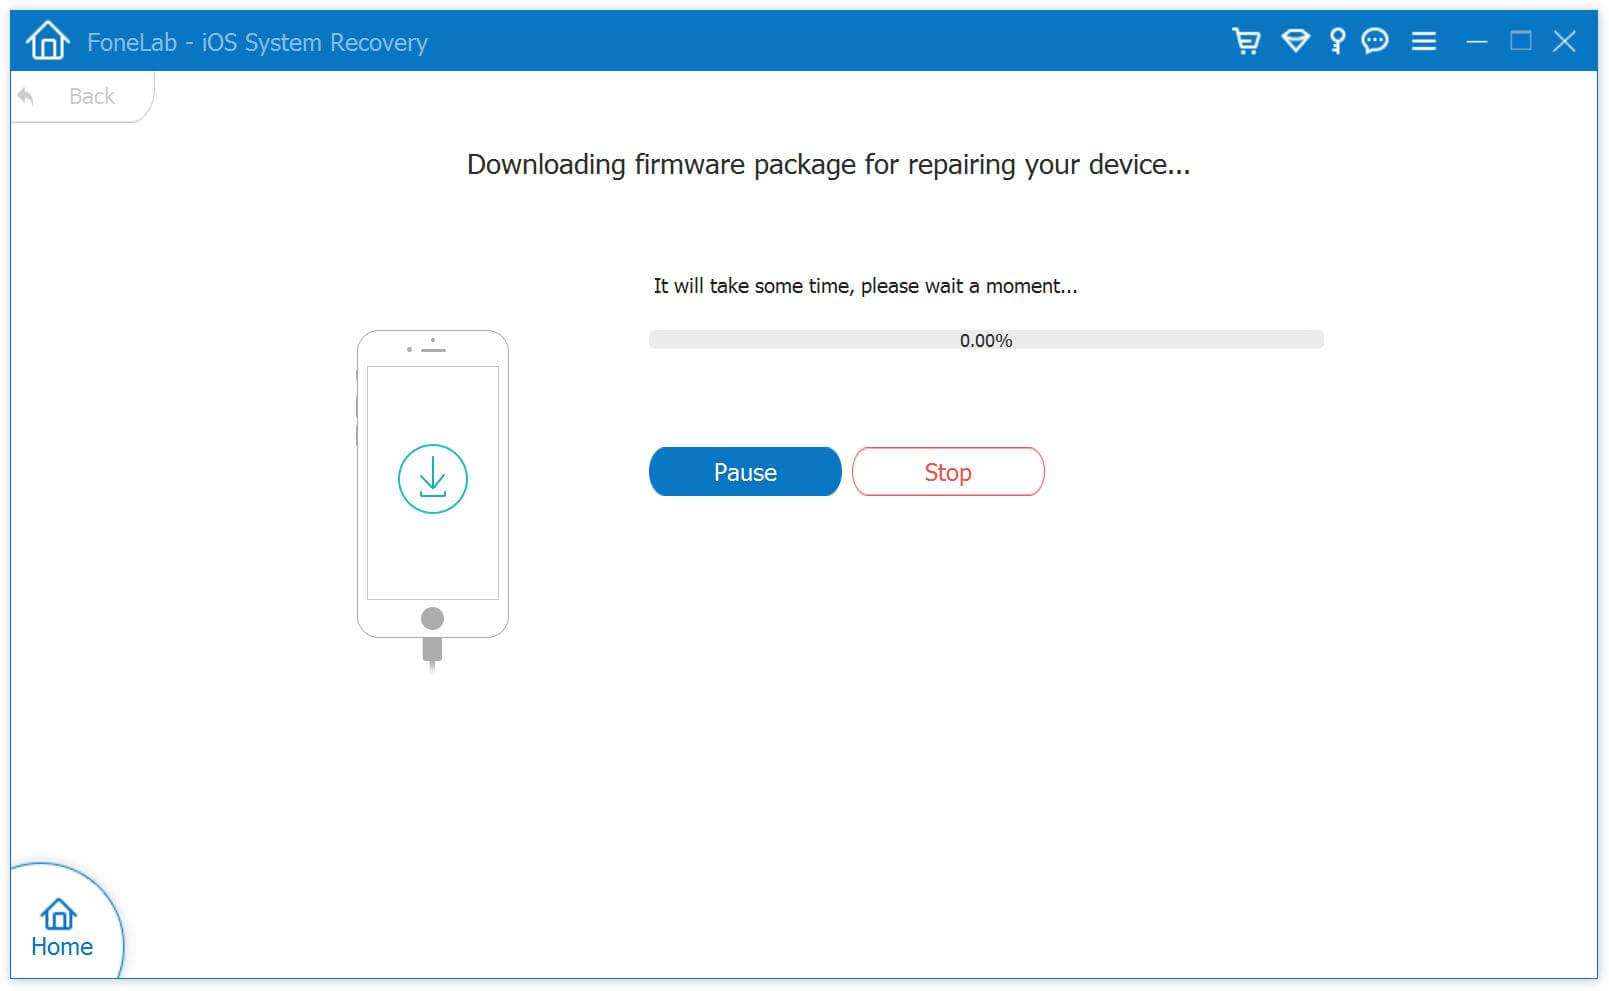
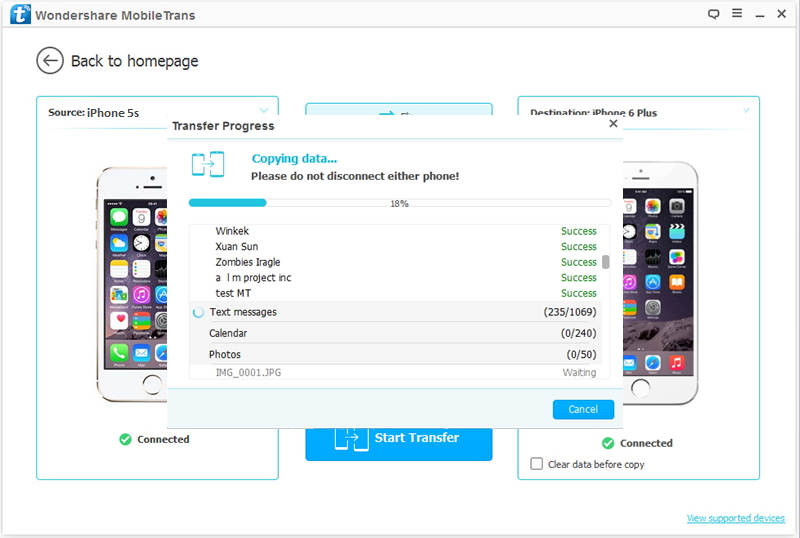
Step 3.Restore iPhone System to Normal
After the firmware is downloaded, iOS System Recovery will start running the repair process to make your iPhone working again.

fix iphone stuck on connect to itunes screen ios 11 update

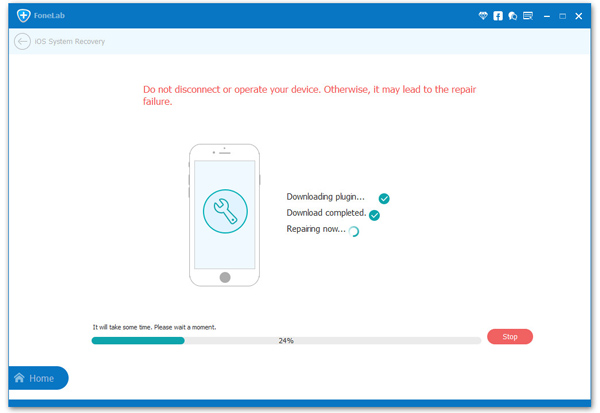
You iPhone will be booted after repairing to make it functional. You can now use your iPhone as usual without any data loss.

restore iphone system to normal completed

d_win d_mac

Related Article:

How to Fix iPhone Stuck in Recovery Mode after iOS 11 Update

How to Fix iPhone Stuck on Apple Logo after iOS 11 Update

How to Fix iPhone Stuck in Reboot Loop

How to Enter & Exit iPhone Recovery Mode

How to Restore iPhone System to Normal after iOS 10 Update

How to Restore iPhone System to Normal

How to Recover Lost iPhone Data after iOS 11 Update

Restore Deleted iPhone Data after iOS 10.3 Jailbreak

Hi. I need some help. My iPhone data was gone after I jailbreaked iOS 10.3 on it. Any ways to restore the deleted data from iPhone after iOS jailbreak?

The iOS 10.3.2 update for iPhone, iPad and iPod touch is now the newest version of iOS 10. The company’s latest version of iOS 10 isn’t a big milestone upgrade but, iOS 10.3.2 is still a very important release thanks to the bug fixes and security patches on board. The iOS 10.3.2 could have a positive impact on your device’s performance. It could also cause problems if you aren’t careful. As we know, the new iOS system is unstable, it may lead to data loss after iOS jailbreak and iOS update. Are you looking for ways to restore deleted iPhone data after iOS jailbreak? Here is your ideal solution help to fix the issue.

Recover Deleted iPhone Data after iOS 10.3 Jailbreak

iOS Data Recovery, a trustworthy program that allows you to preview and recover data from iPhone after iOS 10.3 jailbreak (iOS 10.2/iOS 10), including contacts, SMS, photos, videos, notes, calendars, apps and more. All of this only requires a few steps and will allow you to preview data before recovery. iOS Data Recovery enables to restore deleted iPhone data for any data loss cases, such as, iOS jailbreak, iOS update, deleted accidentally, etc,. iOS Data Recovery offer three recovery modes for you: directly recover from device, recover from iTunes backup, recover from iCloud backup.

d_win d_mac

Part 1:Directly Recover Deleted Data from iPhone after iOS 10.3 Jailbreak

Step 1.Launch iOS Data Recovery and Connect iPhone
Downloaded iOS Data Recovery on your computer,launch it.Then,connect iPhone to your PC with the USB cable.

connect iphone to the pc

Step 2.Select Files to Scan from iPone Devices Directly
Now you can select the files types to let the program scanning, such as “Contacts”, ”Photos”, ”Call history”, etc,. (Here including both the deleted data and existing data).Then tap on “Next”.

select file to recover

Click “Scan” to search for your deleted data,then the program begins scanning your device automatically for deleted data.

scan iphone and search selected data

Step 3.Preview and Recover Deleted Data from iPhone after iOS Jailbreak
Now you can choose the detail data you want to recover after previewing that,mark you want click “Recover” button on the lower right corner of the interface.Then select to save the recovered data to the computer.

recover deleted iphone data after ios jailbreak

d_win d_mac

Part 2:Recover Deleted iPhone Data with iTunes Backup after iOS 10.3 Jailbreak

Step 1.Choose the iTunes Backup File and Scan
If you have done iTunes backup before,you will see the backup files listed once you launch iOS Data Recovery and then click the second mode”Recover from iTunes Backup”. Connect iPhone to the PC.Choose the backup file you want and click “Scan”.

select itunes recovery mode

Step 2.Preview and Restore Deleted iPhone Data from iTunes Backup
It will be taken to scan your iTunes backup files. And you are allowed to preview all the content in backup file.Choose the files you want and click “Recover” to motivate the recovery. Then save the selected data to the computer.

restore iphone data from itunes backup

Note:Once your data being lost, remember not to do any backup or sync job.

d_win d_mac

Related Article:

How to Recover Deleted iPhone Data after iOS 10.3 Update

How to Recover Deleted Photos from iPhone after 10.3 Update

How to Recover Deleted Contacts on iPhone after iOS 10.3 Update

How to Recover Deleted iPhone Text Messages after iOS 10.3 Update

How to Restore/Downgrade iOS 11 to iOS 10

Can anyone offer the ways for me to downgrade my iPhone from iOS 11 to iOS 10 without data loss?I’v upgraded my iPhone to iOS 11 once it’s available to download and install,but I found it’s not stable and it always stuck and get into the abnormal state when I was using it.Last night I was try to downgrade the iOS via iTunes but it’s frozen.How to downgrade iOS 11 to iOS 10 on iPhone without iTunes?Please Help!

You may be one of people who meet some iOS 11 problems, and regret installing this operating system on your iPhone/iPad,but don’t get the suitable way to correctly downgrade from iOS 11 to previous iOS on your iPhone or iPad.To downgrade iOS system on your iPhone you need the older IPSW (iPhone) file.However,download IPSW files via iTunes make lead to get your iPhone into stuck issues and even lead to data loss.In order to protect your personal data on iPhone seriously,we are going to show you another better method to downgrade iPhone to iOS 10 from iOS 11.Please keep on reading patiently.

Restore iOS 11 to iOS 10 on iPhone without Data Loss

iOS System Recovery can help you perfectly fix the issue,enables to downgrade iOS 11 to iOS 10 on iPhone without data loss.iOS System Recovery rolls out the feature “Fix iOS to normal” for restoring iPhone system to normal after downgrading iOS 11 to iOS 10,install IPSW file on iPhone for restoring iOS system without losing any data,making it easy for users to restore iPhone to normal under any stuck issues,such as,stuck at white/black screen,stuck on Apple logo,stuck at connect to iTunes screen,etc;help to fix the abnormal issues on iOS device smoothly.

d_win d_mac

How to Downgrade iOS 11 to iOS 10 on iPhone without Data Loss

Step 1.Run Program on Computer and Connect iPhone to the Computer
Download iOS System Recovery and run it on your computer.Using a USB cable connect your iPhone to the computer.Select “Fix iOS System” from its home page.

ios system recovery main page

On the window that appears,click the “Start” button.

connect iphone to the program

Step 2.Download IPSW File for iPhone
A new window will pop up.You can select your device model and download a matched iOS IPSW file for restoring iOS 11 to iOS 10 on your iPhone.Here you should select “iOS 10” IPSW file to download.

select iphone model and ipsw file

Now the program will begin to download the IPSW file on your iPhone.

download ipsw file for iphone

Step 3.Restore iOS 11 to iOS 10 on iPhone without Data Loss
Once the download is complete,iOS System Recovery will continue to restore and downgrade the iOS 11 to iOS 10 on your iPhone without losing any data.

downgrade ios 11 on iphone

Just a few minutes later, your iPhone will be restore to iOS 10 system completed.Now you can use it freely as usual.

downgrade ios on iphone completed

d_win d_mac

Related Article:

2 Ways to Downgrade iPhone from iOS 10 to iOS 9

How to Downgrade iPhone from iOS 10 to iOS 9 without Data Loss

How to Install IPSW File on iPhone with/without iTunes

How to Download iOS Firmware File for iPhone

How to Recover Lost Data from iPhone after iOS 11 Update

How to Transfer iPhone Photos to iPhone 8

Apple’s 10th anniversary iPhone 8 will continue to be the subject of heavy speculation until its launch, which we think will happen in September, based on previous iPhone launches. It’s Apple’s hallmark product, and one of the best selling phones in the world. The iPhone 8 also represents the company’s chance to bring innovations to a category that it revolutionized a decade ago.

When you get a new iPhone 8,you may need to switch the data between the old device and the new iPhone.When it comes to transfer photos between iPhone and iPhone 8, it’s no doubt that iTunes and iCloud syncing is the most widely mentioned methods. All you need to do is to log in same Apple ID on both of iPhones. But the question is that you have no choice but to transfer the whole Camera Roll photos album, and can’t decide what to share or not. This tutorial is going to show you how to transfer photos from iPhone to iPhone 8 without iTunes or iCloud syncing, we will show you an easy & quick way with great data transfer to move photos between two iPhones.

Directly Transfer iPhone Photos to iPhone 8

To transfer photos between iPhone and iPhone 8,you should rely on Phone Transfer,which is a powerful data manage tool help to switch photos from old iPhone to iPhone 8.Not only photos,but also other types of data are supported to transfer,like contacts,SMS,videos,music,calendar,call logs,apps.Phone Transfer allows to transfer data between iOS devices,transfer data between iOS and Android devices.Phone Transfer works well for almost all iOS devices,including iPhone 8,iPhone 7,iPhone 6S/6,iPhone 5S/5C,etc,.

d_win d_mac

How to Directly Sync iPhone Photos to iPhone 8

Step 1.Launch Phone Transfer on Computer
Download and install Phone Transfer on your computer.Select the option “Phone to Phone Transfer”.

phone transfer main page

Step 2.Connect Devices to the Computer and Select File to Transfer
You will be asked to connect your old iPhone and iPhone 8 to the computer via USB cables.After the connection,both of your two iPhone model will be listed in the interface of program.Please make sure that your old iPhone is displayed in the box on the left as a source device and your iPhone 8 on the right as a destination one.

select file transfer from old iphone to iphone 8

Once both your devices are detected,the program will start scanning the files on your source device.After the scanning,the data stored on old iPhone will be scanned out.You are allow to choose the file types you need to transfer,for photos transfer,you should click “Photos”.

Step 3.Sync Photos from iPhone to iPhone 8
After that,click on “Start Transfer” to sync photos from old iPhone to iPhone 8.

transfer iphone photos to iphone 8

d_win d_mac

Related Article:

How to Transfer iPhone Data to iPhone 8

How to Transfer SMS between iPhone and iPhone 8

How to Transfer Samsung Data to iPhone 8

How to Transfer Android Data to iPhone 8

How to Recover Deleted Photos from iPhone 8

How to Recover Deleted Data from iPhone 8

How to Restore Deleted Contacts from iPhone 8

How to Recover Deleted SMS from iPhone 8


How to Transfer Android SMS to iPhone 8/iPhone X

I bought a new iPhone 8 for my wife as the anniversary gift.She was so glad to get it but now she is wondering how to transfer the SMS from her old Android phone to the new iPhone.”

Apple’s upcoming iPhone 8 is without question the company’s most anticipated product in years. Said to feature an edge-to-edge OLED display, the hype surrounding Apple’s next-gen iPhone seems to get more intense with each passing month. And with good reason: the iPhone 8 will introduce a radical new form factor, a welcome change in light of the fact that the current iPhone design has more or less remained unchanged since Apple rolled out the iPhone 6 in 2014.

Part 1:Transfer Android SMS to iPhone 8/iPhone X via Phone Transfer

Among all the data transfer programs, Phone Transfer is regarded one of the best.This software is used for transferring files among Android and iOS devices, and it enables users to transfer various kinds of files without the sync of iTunes.With the help of Phone Transfer,you are allow to transfer SMS between Android and iPhone 8/iPhone X directly.Except SMS,more other types of data are supported to be switched between mobile devices,including contacts,photos,videos,call logs,music,calendar,apps.Phone Transfer works well for most of Android phones,such as,Samsung (Galaxy S7/S6/S5/S4,Note 5/4/3/2,A9/A7),HTC,Lenovo,Motorola,Sony,Huawei (Mate 9,P9/P10),Xiaomi,LG and more.

d_win d_mac

Step 1.Run Program and Connect Devices to the Computer
Download,install and run the Phone Transfer on your computer.Connect both Android and iPhone 8/iPhone X to the computer via USB cables.

phone transfer main page

Step 2.Select SMS File to Transfer between Android and iPhone 8/iPhone X
Now you are allow to select the file to transfer between Android and iPhone 8/iPhone X,here SMS,contacts,photos,videos,call logs,music,calendar,apps are included.For SMS transfer,you should click “Text messages“.

select data to transfer to iphone 8

Note:Click “Flip” to exchange the phone place if the two phones are in the wrong position.(Ensure Android listed as Source and iPhone as Destination.)

Step 3.Transfer Android SMS to iPhone 8/iPhone X
Tap on “Start Transfer” to begin transferring messages from Android to iPhone.

transfer android sms to iphone 8

d_win d_mac

Part 2:Copy SMS from Android to iPhone with Move to iOS

Step 1.Download and install the app on the Android phone after you make sure the Android and iPhone 8/iPhone X be connected to the stable Wi-Fi and be plugged to the power.Then just start it.

Step 2.Run the app and when you choose to transfer the messages,the iPhone 8/iPhone X will create a private Wi-Fi network.Then iPhone will find the Android device running the Move to iOS and when you enter the security code, the files will be exported to the iPhone.

Step 3.Find the SMS you just transferred on the iPhone 8/iPhone X.This is the whole process.

move to ios

Related Article:

How to Transfer Android Data to iPhone 8/iPhone X

How to Transfer Samsung Data to iPhone 8/iPhone X

How to Transfer iPhone Data to iPhone 8/iPhone X

How to Recover Deleted Data from iPhone 8

How to Restore Deleted Contacts from iPhone 8

How to Recover Deleted SMS from iPhone 8

How to Recover Deleted Photos from iPhone 8

How to Transfer Samsung SMS to iPhone 8/iPhone X

Can I ask how to copy my SMS from Samsung to iPhone 8 with an easy way?The SMS contain some business data that are so important for me.Thx.

The iPhone 8 is coming with its smart functions,I guess there will be a large Samsung users may switch to the new iPhone model.If you are one of them, or just have an Samsung phone and get the new iPhone 8 at the same time, you will may to know how to copy personal messages between the old phone and the new one,which is related to your work or life. The problem is, how?This tutorial will show you the best ways to switch SMS between Samsung and iPhone 8 in a coffee time.

Sync Samsung SMS to iPhone 8/iPhone X

Phone Transfer is an useful tool that make data transfer workable from phone to phone even if they run the different operating system, for example,Samsung to iPhone 8, HTC, Motorola,Sony,LG ,Lenovo and more Android phones are compatible to this program.You can also use it to transfer various of data like messages, contacts,videos, pictures,call history,calendars,music,apps and so on.Thanks to Phone Transfer,you are able to sync SMS from Samsung to iPhone 8/iPhone X efficiently and simply.

d_win d_mac

How to Import Samsung SMS to iPhone 8/iPhone X

Step 1.Run Phone Transfer on the Computer
After downloading and installing the software on your computer, launch it, by double click its icon. Then the interface as follow will be showed on your computer.

phone transfer main page

Step 2.Connect Samsung and iPhone 8/iPhone X Via USB Cable
Connect Samsung and iPhone 8/iPhone X to your computer with USB cables. Then the program will detect for your phones. Samsung is shown on the left side of the interface and iPhone 8/iPhone X on the right. It means to move data from your Samsung to iPhone 8/iPhone X.

Note:There’s a “Flip” tab between your two devices. You can click it to change the position of these two devices so as to transfer iPhone data to Samsung ones.

select sms to transfer to iphone 8

Step 3.Transfer Text Messages from Samsung to iPhone 8/iPhone X
SMS,contacts,photos,videos,music and more can be transferred to iPhone 8/iPhone X from Samsung with the help of Phone Transfer. Tick off the marks before the files except text messages. Then, start the text messages transferring process by clicking “Start Transfer“. After the process finished, click “OK“.

transfer samsung sms to iphone 8

Note:This software works well for most Samsung phones,such as,Galaxy S7/S6/S5/A9/A7,etc,.

Related Article:

How to Transfer Samsung Data to iPhone 8/iPhone X

How to Transfer Samsung Photos to iPhone 8/iPhone X

How to Transfer Samsung Contacts to iPhone 8/iPhone X

How to Transfer Android Data to iPhone 8/iPhone X

How to Transfer iPhone Data to iPhone 8/iPhone X

How to Recover Deleted Data from iPhone 8

How to Restore Deleted Contacts from iPhone 8

How to Recover Deleted SMS from iPhone 8

How to Recover Deleted Photos from iPhone 8

How to Transfer Contacts between iPhone and iPhone 8/iPhone X

The latest rumor about the iPhone 8 could make audiophiles very happy and one-up its biggest rival — even if it raises the cost of the already potentially super-expensive flagship.It’s no double that iPhone 8 will become the hottest iPhone among all the models of iPhone.Are you one of the iPhone users going to buy a new released iPhone 8 for replace the old one?When switch to the new device,you may need to transfer the data between the old one and the new one,especially the contacts.

With iCloud and iTunes, transferring contacts from your old iPhone to iPhone 8/iPhone X is not a big deal.In fact,if you’ve backup data correctly (on your old iPhone), you don’t have to worry about transferring contacts between the old one to the new one.But how to transfer contacts between iPhone without backup?Here are some general tips to show you how to transfer contacts from old iPhone to iPhone 8/iPhone X with a few clicks.

Switch Contacts between iPhone and iPhone 8/iPhone X

Phone Transfer is a safe and effective data manage tool used for transferring data between iOS and Android devices.With the help of Phone Transfer,you are allow to transfer contacts between iPhone and iPhone 8/iPhone X.It can also transfer SMS, photos, videos, music,call logs,calendar and apps between mobile devices.Just follow the steps below to transfer contacts to your new iPhone with simple steps.Phone Transfer works well for all models of iPhone,like iPhone X,iPhone 8,iPhone 7,iPhone 6S/6,iPhone 5S/5C/5,etc,.

d_win d_mac

Part 1: Transfer Contacts from old iPhone to iPhone 8/X with Phone Transfer

Step 1.Launch Phone Transfer on Computer
Download and install Phone Transfer on your computer.Launch it after the installation.Tap on the blue section called “Phone to Phone Transfer”.

phone transfer main page

Step 2.Connect Two iPhone to Computer
After launching Phone Transfer,you will be asked to connect your old iPhone and iPhone 8/iPhone X to the computer via USB cables.After the connection,both of your two iPhone model will be listed in the interface of program.Please make sure that your old iPhone is displayed in the box on the left as a source device and your iPhone 8/iPhone X on the right as a destination one.

select file transfer from old iphone to iphone 8

Step 3.Sync Contacts from iPhone to iPhone 8/iPhone X
When both your devices detected,the program will begin scanning the files on your source device.After the scanning,the data stored on old iPhone will be scanned out.You can choose the data types you need to transfer,for contacts recovery,click “Contacts”.After that,click on “Start Transfer” to transfer contacts from old iPhone to iPhone 8/iPhone X.

transfer contacts from old iphone to iphone 8

d_win d_mac

Part 2: Transfer Contacts from old iPhone to iPhone 8/X with iCloud Syncing

Another method can also enable transfer contacts old iPhone to iPhone 8/X is usning iCloud syncing.Here is steps how to do:

Step 1.Firstly you should log-in to iCloud on your old iPhone.
Step 2.Then go to settings and click on to “iCloud”.
Step 3.Select “Back up” option and then click on to “Back up now”.
backup iphone contacts icloud

Step 4.Now take out the SIM card from your old iPhone and transfer it to your new iPhone 8/X.
Step 5.Switch on your new iPhone 8/X.
Step 6.Press the “Home Screen” once a Hello screen comes on your phone. Turn on the Wi-Fi.
Step 7.When the screen with “Apps and Data” comes on, click on “Restore from iCloud backup” and then click on to “Next”.

restore iphone contacts icloud

Step 8.Login your Apple ID and password on the iCloud.
Step 9.Choose the backup very carefully by checking the date and time.
Step 10.Keep your iPhone 8/X connected to the Wi-Fi until the process is completed.

Related Article:

How to Transfer iPhone Data to iPhone 8

How to Transfer Android Data to iPhone 8

How to Transfer Samsung Data to iPhone 8

How to Recover Deleted Data from iPhone 8

How to Recover Deleted Contacts from iPhone 8

How to Transfer Android Photos to iPhone 8/iPhone X

I’m wondering are there any available ways to transfer all photos from my Android phone to iPhone?I am planning to buy iPhone 8 as long as it releasing.

News about iPhone 8:Apple’s next iPhone isn’t supposed to arrive until much later in 2017,but that hasn’t stopped legions of fans from fervently speculating about it.Things may be a little different this year, as it’s the 10th anniversary of the iPhone.Rumors suggest we may see up to three models — the iPhone 7S,the 7S Plus,and the iPhone X (aka, the iPhone 8).The latter is expected to be an expensive,technical showcase phone released as a celebratory model.

Transfer Android Photos to iPhone 8/iPhone X

To switch photos from Android to iPhone 8/iPhone X,you can try this iOS & Android Manager,which is a smart data manage tool for transferring and managing iOS/Android data with one click.The transferable files including photos,videos,music,contacts,SMS,apps.iOS & Android Manager enables to transfer data between Android and iOS device,transfer data between Android device and iTunes,transfer data between iOS/Android device and computer.Supported iOS/Android device insist of iPhone X,iPhone 8,iPhone 7,iPhone 6S/6;Samsung,HTC,Huawei,Xiaomi,LG,Motorola,etc,.

d_win d_mac

How to Copy Android Photos to iPhone 8/iPhone X

Step 1. Launch iOS & Android Manager on Computer
Launch iOS & Android Manager and connect your devices with the computer.Connect Android and iPhone 8/iPhone X to the computer at the same time.

ios android manager main page

Step 2.Setting the Source Device
Select Android as the source device from which you want to transfer photos.Click Phone to Phone Transfer option on the main interface of program. Then a new window will pop up.

Step 3. Setting the Target Device
Select iPhone 8/iPhone X as the target device to which you want to transfer photos to,click Next.

select target device

Step 4. Transfer Photo File from Android to iPhone 8/iPhone X
By default, all the content on your source device that can be transferred are checked, namely Music and Videos, Playlists, Photos, Contacts( Note: Contacts are not supported by Mac version). You can uncheck the contents which you don’t want to transfer. Then, click Transfer. In the whole transfer process, DO NOT disconnect either of the devices. When the transfer completes, click OK.

select photo file to transfer

transfer android photo to iphone 8

Note: Only for Windows version, you’re enabled to tick the option: “Delete contents on target device then transfer” before clicking Transfer button, then the selected contents on the target device will be deleted before the transfer.

confirm to delete data on target device

d_win d_mac

Related Article:

How to Transfer Android Data to iPhone 8/iPhone X

How to Transfer Android Contacts to iPhone 8/iPhone X

How to Transfer iPhone Data to iPhone 8/iPhone X

How to Transfer Samsung Data to iPhone 8/iPhone X

How to Recover Deleted Data from iPhone 8

How to Restore Deleted Contacts from iPhone 8

How to Recover Deleted SMS from iPhone 8

How to Recover Deleted Photos from iPhone 8

How to Fix iOS 11 Stuck in Recovery Mode

Apple’s iOS platform debuted way back in 2007, and back then the OS was called iPhone OS 1.0. We don’t expect any retro name changes for the 11th iOS, however. So, what will iOS 11 offer feature-wise? Expect to see improved mapping, the long-awaited dark mode, and even some Snapchat-like features baked right into iOS.

iOS 11 Stuck in Recovery Mode

Different kinds of issues may happen after updating to a new iOS 11 on iPhone/iPad/iPod touch:for example the iPhone stuck in Recovery mode after iOS 11 update.iOS 11 brings a set of new features,however,the newest-released iOS 11 is not perfect enough,and it is possible that you may meet kinds of iOS 11 issues like iOS stucks problems we just mentioned.Now we are going to discuss that how to fix iPhone system to normal after iOS 11 update.

Fix iPhone Stuck in Recovery Mode after iOS 11 Update

To fix iPhone stuck in Recovery Mode after iOS 11 update perfectly,you should try this iOS System Recovery,which is a powerful data fixing tool for restoring iPhone system to normal state under any circumstances,like stuck in Recovery,stuck at connect to iTunes screen,stuck in DFU Mode,stuck in Apple logo,stuck at white/black screen,etc,.iOS System Recovery promise you that it help to get device our of abnormal state without losing data.Supported iOS devices including iPhone X,iPhone 8,iPhone 7,iPhone 6S/6,iPhone 5S/5C/5,iPad Mini,iPad Pro,and so on.

d_win d_mac

Part 1:Fix iPhone Stuck in Recovery Mode after iOS 11 Update via iOS System Recovery

Step 1.Run iOS System Recovery and Select “Fix iOS System” Option
Firstly,please run iOS System Recovery on your computer.Then click on “Fix iOS System” to start the function.

ios system recovery main page

Connect iPhone to the computer by USB cable,the program will detect the device soon.Click on “Start” button to begin.

connect iphone to the program

Step 2.Download Firmware for iPhone
To fix iPhone stuck in Recovery mode after iOS 11 update,you should download the firmware for iPhone.

The program will detect the model of device,asks for confirmation,and suggests the latest version of firmware to download.Click “Download”button.The process will complete automatically.

select iphone model

download firmware for iphone

Step 3.Get iPhone Out of Recovery Mode without Data Loss
Once the firmware is installed,the program will start fixing iOS system for device and return iPhone to normal state in minutes.

fix iphone stuck in recovery mode ios 11 update

restore iphone system to normal completed

Done.Now your iPhone have finished restoring to normal state.

d_win d_mac

Part 2:Fix iPhone Stuck in Recovery Mode after iOS 11 Update with iTunes

Fixing iPhone stuck in Recovery Mode after iOS 11 with iTunes could be your next option. You can restore iPhone with iTunes when your device stuck in recovery mode. Following are the steps involved in the process:

restore-iphone-with-itunes

-Launch iTunes on the computer. Connect the iPhone to the PC via USB cable.
-Hit on your device in the left corner on the top.
-Now click on “Restore iPhone” and confirm that by tapping “Restore” button.
-Wait for the completion and your device will restart.

Note: This method will wipe off all your data on iPhone. So making backup of the data is suggested while performing this.

Related Article:

How to Backup iPhone iPad before iOS 11 Update

How to Recover Lost Data from iPhone after iOS 11 Update

How to Recover Data from iPhone in Recovery Mode

How to Fix iPhone Stuck on Apple Logo after iOS 11 Update

iPhone Stuck in Boot Loop after Updating to iOS 11

How to Fix iPhone System to Normal after iOS 11 Update