Category Archives: iOS Data Eraser

How to Free Up Space on iPhone 7/6S/6

The prompt message always appear on My iPhone 7 with 16GB storage,which tell me that my phone is full.I puzzle about how to free up space the phone.Any good ideas?”-Bill

You may get an “out of memory” message prompt you that you should release more storage on your device,especially for a 16 GB iPhone,actually you can’t use all 16 GB of storage.You may need to free up space on iPhone for different reasons,for example,get more storage to perform iOS update,get more space to save photos/apps,and others.In these similar cases,how can you do?Simply say,you could remove the junk files,delete unwanted apps,manage data,or clean the apps running cache.In this page we offers you an efficient way to free up space on iPhone and protect privacy on your device.

One Click to Free Up Space on iPhone 7/6S/6

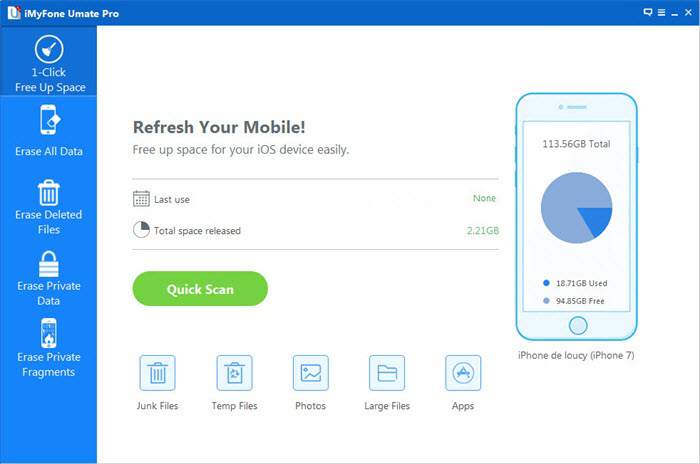
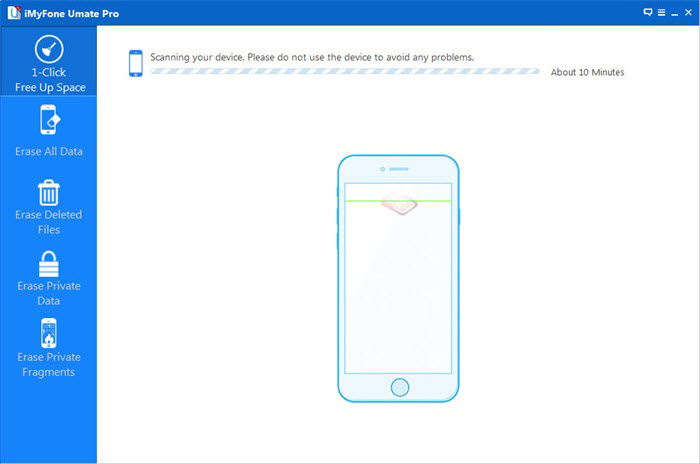
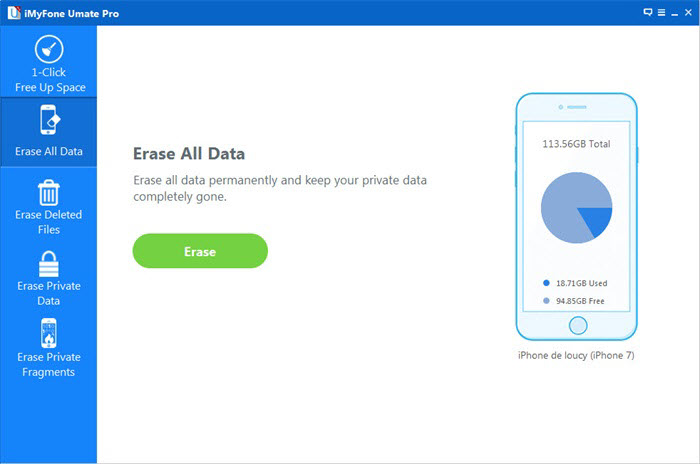
iPhone Data Eraser is your ideal tool help to one click to free up space on iPhone 7/6S/6,and use for erasing data completely from device.iPhone Data Eraser allows you to release space iOS device easily.It provide five powerful functions to you: One Click to Free Up Space,Erase All Data,Erase Deleted Files,Erase Private Data,Erase Private Fragments.With over 25 analysis technologies, you can securely delete useless data, free up space and speed up your iPhone, iPad and iPod Touch via the powerful iPhone Data Eraser.

d_win d_mac

How to Free Up Space on iPhone 7/6S/6

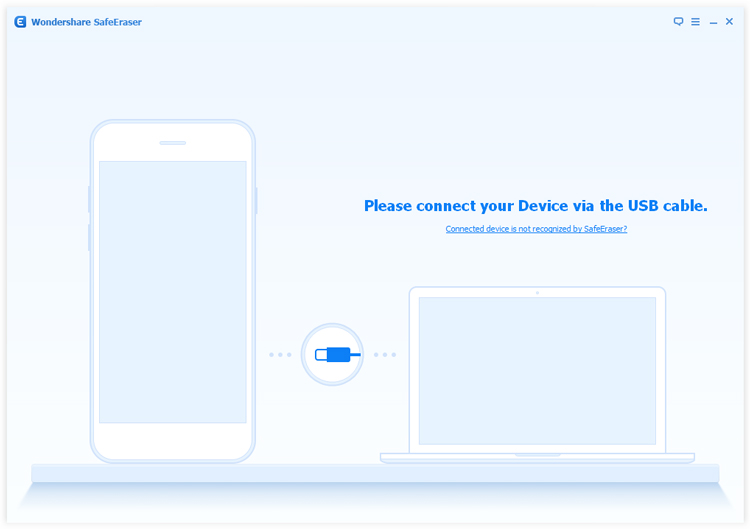
Step 1.Run Program on Computer
Run iPhone Data Eraser and connect your iPhone via an USB.

connect-iphone

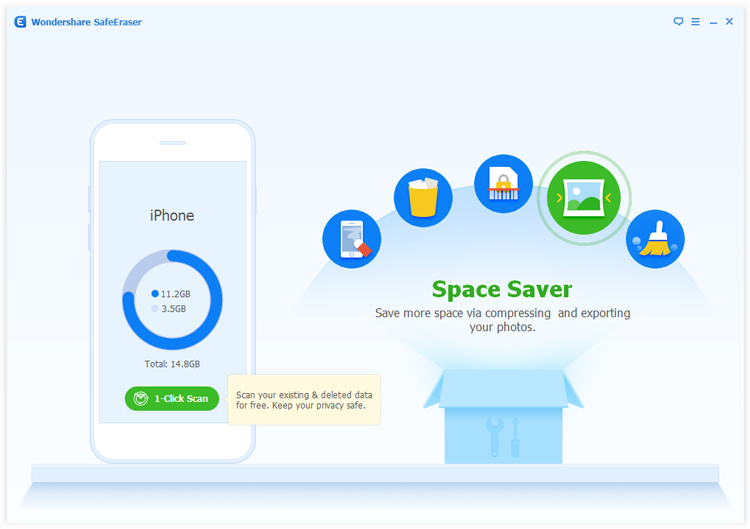
Step 2.Scan iPhone for a Full Space-Saving Analysis
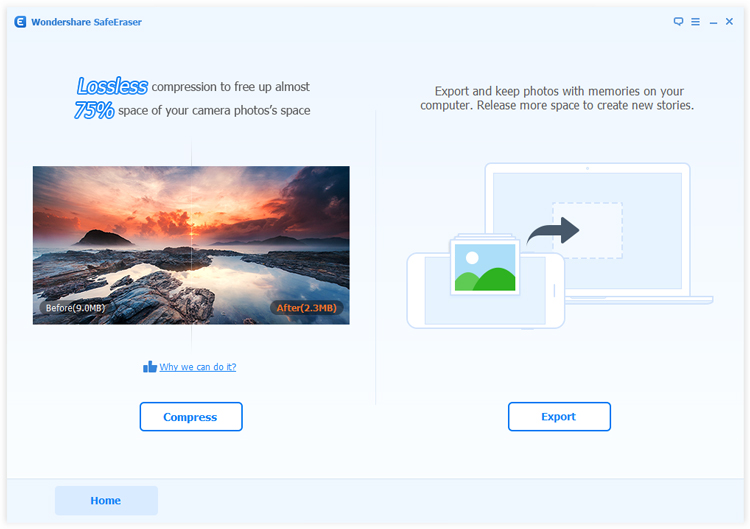
This program integrates more than 25 analyzing technologies,and it support to scan and analyze data of device accurately.Click “Quick Scan” for a full space-saving analysis on how much space can be saved by cleaning up junk files,clearing temporary files,compressing photos,deleting large files and removing apps.

analyze-iphone-data

Then the program starts scanning.

scanning

Step 3.Begin to Free Up Space on iPhone 7/6S/6
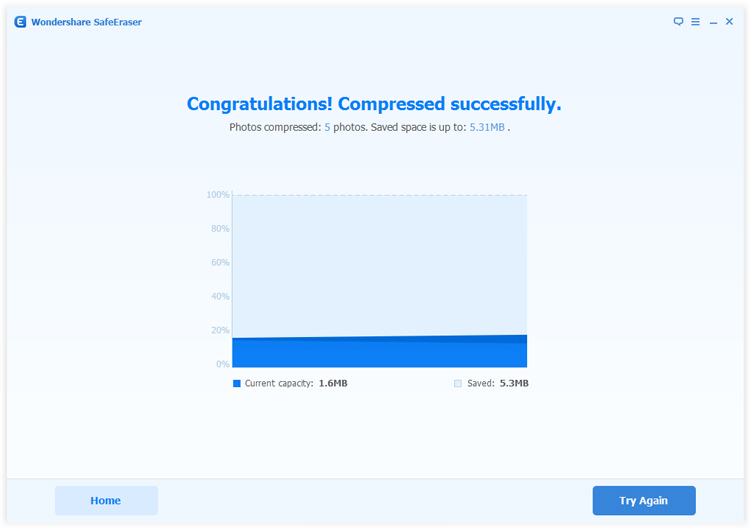
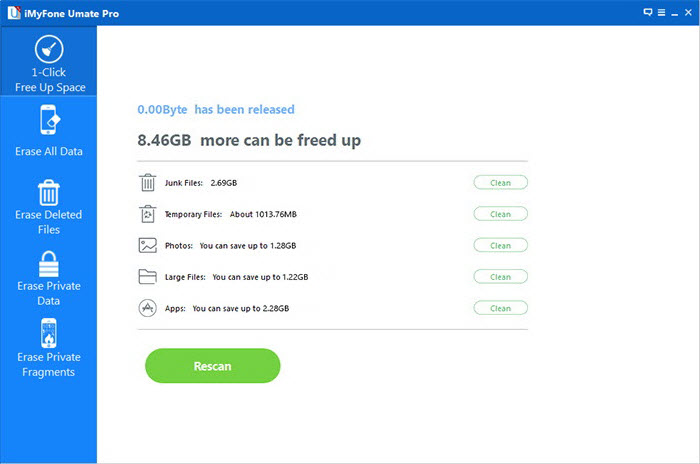
After scanning,it will show that the storage could be freed up.Now you can click “Clean” button to release space for iPhone.

free-up-space-iphone

After cleaning,you will see how much space has been released and how much more can be released by the other items as the below interface shows.Choose any part to continue.

free-up-space-iphone-completed

You can show off the results with your friends on Twitter or Facebook;or check out your backup files in backup folder.

Note:

1.There are two releasing modes you can choose to free up space on iPhone.First, all the space-releasing procedures can be done after you click the Quick Scan button, which is a full space-saving analysis. They can be done individually in each tab at the bottom of the interface according to their different functions. That means you can start with junk cleaning, photo compression or managing apps as you prefer.

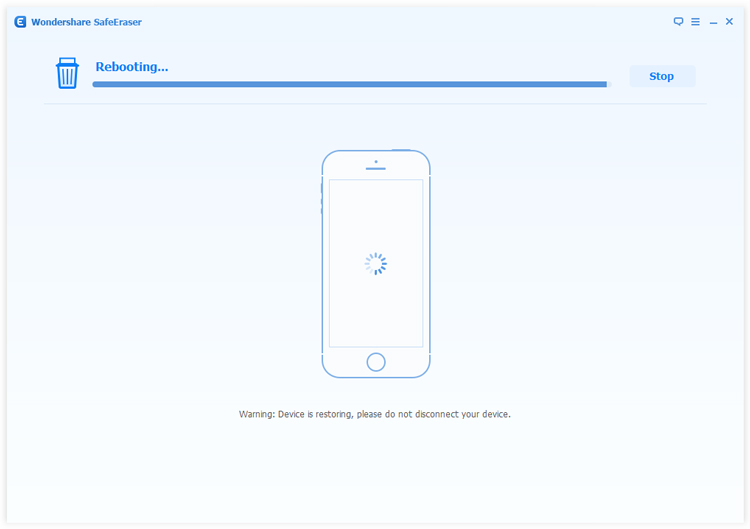
2.Please keep your device connected with your computer and do not use the device until the whole process is end to ensure the program operates properly.

d_win d_mac

Read more:

How to Free Up Space on iPhone/iPad/iPod

How to Optimize Slow iPhone For Best Performance

How to Clean iPhone and iPad Junk Files to Free Up Space

How to Delete and Erase Data from iPhone Permanently to Free Up Space

How to Wipe Cache Partition on Galaxy S7/S6/S5

I deleted the apps I don’t used from my Samsung Galaxy S6 phone,but the phone still running slowly.How to clean the system cache to free up space and get better performance on my device?”-Chris

For many Samsung users,they likely to clean the system cache to free up space for device,clean cache for better performance.Clearing the system cache on Samsung device is an useful standard way for fixing bugs,troubleshooting system performance and taking good care of  Android device.What’s more,clearing cache on device regularly help to improve the general performance of your device by clearing out unwanted data or stuff from older versions that causes problems after you’ve updated to a newer version.There are several ways you can clean the cache and free up space on your Samsung mobile phone,make it running more efficiently.Here are some tips to help you.

Part 1:How to Wipe Cache Partition on Samsung Galaxy

Step 1.Powering off Samsung device.
Step 2.Press the VOLUME UP + HOME + POWER buttons at the same time and HOLD THEM DOWN.
Step 3.Release only the POWER button when the device vibrates.
Step 4.Release the other buttons when the ANDROID SYSTEM RECOVERY screen appears.
Step 5.Using the VOLUME DOWN / UP buttons to navigate, select WIPE CACHE PARTITION.
Step 6.Press the POWER button, which will act the ENTER key on your keyboard.
Step 7.You will see some progress notes (at the bottom of the screen in small print) and after about 20 seconds it will likely show DONE.
Step 8.Done.Now the system cache was clean completely.Now you can then reboot the device.

how-to-wipe-cache-partition-android-samsung

Part 2:How to Erase All Data on Samsung Galaxy Permanently

To wipe cache on Samsung Galaxy completely,you could try this Android ToolkitAndroid Data Eraser,which is a data eraser offer the best ways for you to erase all data,settings and system cache from Samsung Galaxy permanently.With Android Data Eraser,you are allow to clean cache on Samsung Android device to free space on it.Android Data Eraser enables to erase photos, contacts, messages, call logs and all private data from device without restoring.Supports all Android devices available in the market,such as,Samsung (Galaxy S7/S6/S5,Note 5),Google (Pixel,Nexus),Vivo,HTC,Lenovo,Motorola,ZTE,etc,.

d_win d_mac

Step 1.Connect Samsung Phone to the Computer
Launch Android Toolkit-Android Data Eraser on your computer.Select “Data Eraser” among all the toolkit.

android-data-eraser--more-tools

Connect your Samsung phone to computer using an USB cable.Make sure you have enabled USB debugging on your phone.If the Android OS version is above 4.2.2, there will be a pop-up message on your phone asking you to allow USB debugging.Tap on “OK” to continue.

android-data-erase-connect-phone

Step 2.Start Cleaning Cache and Erasing Your Samsung Phone
Android Data Eraser will automatically connect and detect your device.Click on “Erase All Data” button to start erasing all your data and settings (including the system cache) from Samsung.

android-data-erase-phone-connected

Since all the erased data are not recoverable,make sure you have backed up all needed data before the proceeding.Then key in “delete” in to box to confirm your operation.

android-data-erase-confirm-erase

Then Android Data Eraser will start erasing all data and settings on your Samsung phone.The whole process takes only a few minutes.Please don’t disconnect the phone or open any other phone management software on the computer.

android-data-erase-erasing-samsung-sms

Step 3.Perform Factory Data Reset on Your Phone
After all privacy data have been completely erased,the program will ask you to tap on factory Data Reset on your phone.This will help you completely wipe all the settings and cache on the phone.

android-data-erase-factory-reset-samsung

Now your Samsung phone has been completely wiped and it’s like a brand new one.

android-data-erase-complete

d_win d_mac

Related Article:

How to Permanently Erase Samsung Data before Selling

How to Erase Android Data before Selling

How to Delete SMS on Samsung without Restoring

How to Get More Internal Storage from Android

How to Delete WhatsApp Messages on iPhone Permanently

“I’ m planning to sell my old iPhone 6 and ready to buy the iPhone 7 to take place.How to delete individual conversations and group chats permanently from my iPhone before selling it?”-Judy

WhatsApp is an instant messaging app that can send and receive messages, photos, videos, stickers, emoticons and all others straight on your phone with others. It’s like the usual SMS and MMS but the only difference is that it lets you send messages without text plan, instead it send messages by connecting to the internet or Wi-Fi.WhatsApp is free to download and use, making it a worldwide hit to many iPhone users.However,before you are giving up or selling your iPhone,you be better to remove the WhatsApp chat history(including the contacts,text,attachments) from your device without restoring.

Part 1: How to Erase Entire WhatsApp Chat History from iPhone

Step 1. Run WhatsApp app on your iPhone and go to Settings.

Step 2. Tap Chats and then select Clear All Chats.

Step 3. You will be required to enter WhatsApp number to accomplish your order. Confirm your action by taping on Delete All Chats. That’s it. All WhatsApp messages are removed permanently from your iPhone, but you can continue to participate in groups or individual conversation.

clear-all-whatsapp-messages-on-iphone

Part 2: How to Delete WhatsApp Chat Content and SMS from iPhone Permanently

To complete the WhatsApp messages deleting task effectively,we want to introduce you the best iPhone data eraser software in the market – iOS Data Eraser-a practical feature of Dr.Fone iOS Data Recovery :iOS Private Data Eraser and iOS Full Data Eraser. It is an useful and perfect data eraser tool to delete WhatsApp messages,photos,videos,attachments from iPhone permanently.Expect the WhatsApp data,iOS Data Eraser enable to wipe various of data from iPhone without restoring,such as contacts,messages,photos,videos,call logs,notes,calendars,etc,.You can wipe iPhone data selectively or erase all data from iPhone at once.All iPhone models are supported,including iPhone 7,iPhone 6S/6,iPhone 5S/5C/5,iPad and iPod.

d_win d_mac

Step 1.Launch iOS Data Eraser on Computer
Launch the program after you have successfully installed it and select “More Tools”.
WhatsApp data eraser

Choose “iOS Private Data Eraser” and then click “Start Scan” to begin scanning your device automatically and also show you the scan progress.

Step 2.Select the Data Type to Delete
Once the scanning is done in a few minutes, the program will list all of your private data on its screen. You can then select the option of “Messages” from the left hand side and then press on the button “Erase from the Device”.

confirm erase WhatsApp messages

Step 3.Confirm the Erasing Process
The program will ask you to confirm now that you want all of the data in your messages deleted, so type in “delete” and click on the button “Erase now” once again.

erase iphone whatsapp sms

Once the data is deleted, you should see a screen in the picture given below.

delete WhatsApp messages

Now all your WhatsApp messages and attachments are removed completely from your iPhone without restoring.

d_win d_mac

Part 3: How to Remove WhatsApp App on iPhone Permanently

With iPhone Data Eraser,you are able to remove WhatsApp app from iPhone permanently before selling it,as well as other iPhone apps,such as Viber,Kik,Line.iPhone Data Eraser is used to permanently erase everything safely as well as securely on an iPhone, iPad or an iPod. It prevents identity theft when selling your old device with 1 click “Clean Slate” privacy safeguard.It keeps you personal information safe and permanently removes it with iPhone Data Eraser before your dispose your old device.

Features of iPhone Data Eraser:
1.Permanently Erases Device -When you are recycling, trading or selling your iPhone, the 1-Click phone erase option can play the trick for you and delete everything permanently before passing on the device.
2.Clears Private Data & Free Up Space – Ensures that the data that is stored in your phone while browsing the web, using apps, sending messages, etc stays private. It will keep your private data safe, freeing the space.
3.Clean Junk File – 1-Click cleanup will perform all the optimal speeds by removing all the junk files and other unnecessary data.

d_win d_mac

Step 1.Download iPhone Data Erser and Install it
After the installation, run iPhone Data Eraser on your Computer. Connect your iPhone via USB cable to your computer. After the device is detected, you will see main window pop up.In the pop up window, you will see the space information of your device along with other 5 features on the right.

1 click cleanup WhatsApp app

Step 2.Remove WhatsApp App from iPhone without Restoring
The first feature is 1-Click Cleanup. You just need to click on it and the scanning will begin on your device automatically.

search WhatsApp data

After the scanning is completed, you will see the total number of files displayed. Now you need to click the “Unused Apps” and tap on “CleanUp” for delete WhatsApp app from iPhone.

select WhatsApp app to delete

Make sure you keep your device connected while the scanning process completes, so that you ensure that the files are cleaned up totally.

delete whatspp app from iPhone

When you will be done with the cleanup, you will see that the window will appear as follows, displaying the space information of your device.

After this, you can either go back to Home page by clicking on “Home” or click on “Rescan” to scan your device once again.

d_win d_mac

Related Article:

How to Backup and Restore iPhone WhatsApp Messages

How to Transfer WhatsApp Chat History from iPhone to Samsung Galaxy

How to Transfer WhatsApp Messages to iPhone 7

How to Transfer WhatsApp Messages from Android to iPhone

How to Fix iOS 10 iPhone Running Slow Issue

After I updated my iPhone 6S to iOS 10 it was not in the good way.My iPhone was running slower and sometime it was suddenly get bricked for no reasons.How to Fix this trouble?-Daniel Tong

Why is my iPhone 6 get slower after installing iOS 10 ?Is it a conspiracy by Apple to convince users to buy the new iPhone 7 or iPhone 7 Plus?But I just wanna keep using my device until the next iPhone is released.So I’m asking help to fix the iPhone running slower with iOS 10 issue.-Sophia Huang

speed-up-your-iphone

Do you often get the prompt that your iPhone storage is nearly full and suggest you clear up device to free up space on it?It is no a secret that your iPhone will eventually become slower after updating to iOS 10 on it for some time due to various reasons.This significant reduction in performance is likely to affect how you use your device if you do not act in time to solve it.You have probably realized that this unfortunate case often occurs when you decide to install a newly launched iOS upgrade version,for example the iOS 10 update.We have received a lost of the complained that came from iPhone users like the iPhone 6 and and iPhone 6S after iOS 10 update.Join us for a look at the complaints about a slow iPhone with iOS 10 and how you can try to fix slow iOS 10 performance without buying a new iPhone 7 or iPhone 7 Plus.This following passages is going to give you some advice of the top tips on how to fix iOS 10 iPhone running slower issue,to optimize iPhone performance and speed up iPhone after iOS 10 update.

Part 1:Reset the Settings of iPhone after iOS 10 Update

This optimization technique is guaranteed to provide your iPhone,iPad,iPod Touch with the much-needed speed boost.Like doing a “Factory Reset” on device,restoring your iOS device’s settings will erase any of your data.Doing this reset will return all your device’s general settings to the state they were when you first bought it.Kindly note that you will be required to reset your Wi-Fi setting on device, create a new passcode and rejoin your previous WI-FI networks among other activities after doing this.

To do it, you can simply go to the settings of your iDevice,select the “General” option, tap on “Reset” option once prompted and then activate the “Reset All Settings” feature.

Part 2:Turn Off Automatic Updates on iPhone after iOS 10 Update

There are numerous benefits that can be realized when you keep your applications continuously up to date.However,it is recommended that you off this automatic updates feature and instead opt to manually update all your favorite applications. Leaving your applications to automatically update themselves is known to not only affect the battery life but also slow the performance of your iPhone/iPad/iPod Touch. Disable this unnecessary feature by selecting the “iTunes & App Store” option found in main settings on device and then turning off the “Automatic Download” feature,everything is OK.

Part 3:Erase Data and Setting on iPhone to Optimize iPhone for Best Performance

Permanently erase data and setting from iPhone can help to remove the rubbish from iPhone and free up space of it.The conventional deletion can’t wipe the data from iPhone without restoring.After deleting iPhone data by tapping the “Delete”button,the deleted seem to gone,however,the deleted data still can be restored by the data recovery.

Here you should try this iOS Data Eraser,this program works well for permanently erase data and setting from iPhone to free up space on device after iOS 10 upgrade,including contacts,photos,SMS,call logs,videos,notes,document and more.The applicable iOS devices list here:iPhone 7,iPhone SE,iPhone 6S(Plus),iPhone 6(Plus),iPhone 5S/5C/5,iPad Pro,iPad Air and so on.iOS Data Eraser provide you four erase modes for selection,you are allow to delete all data from device,delete private data from device,erase the deleted data from device or optimize the performance on device.Read more tips about how to optimize iPhone for best performance.

d_win d_mac

erase data on iphone after ios 10 update

Part 4:Downgrade iOS 10 to iOS 9 on iPhone

You can still go back to iOS 9 for a limited time.This normally only lasts a week or more so if you are concerned,now is the time to downgrade your iPhone to iOS 9.You can go back to iOS 9.3.5,and wait for iOS 10.0.1 or iOS 10.1.

How to Downgrade iOS 10 to iOS 9 on iPhone Without Data Loss

iOS System Recovery,which is a wonderful iOS data manager tool to restore iOS 10 to iOS 9 on iPhone without any data loss,perfectly help to downgrade your iPhone /iPad from iOS 10 back to iOS 9.3.5 smoothly.iOS 10 System Recovery rolls out the feature “Fix iOS to normal” for restoring iPhone system to normal after downgrading iOS 10 to iOS 9.3.5,making it easy for users to get iPhone,iPad out of white/black screen,recovery mode,Apple logo,connect to iTunes screen,etc;help to fix the issues on iOS device perform abnormally.

d_win d_mac

Easy Steps to Restore iOS 10 to iOS 9.3.5 on iPhone

Step 1.Run the iOS 10 System Recovery and Connect iPhone to PC/Mac
Download and install iOS 10 System Recovery(Windows&Mac) on computer.When the installation is complete,connect your iPhone to computer with USB cable and launch the program.

iOS 10 System Recovery

Step 2.Select “iOS System Recovery” Option
From the main window,please select “Fix iOS to Normal” located at the top right of the screen.Wait for iOS 10 System Recovery to detect your iPhone.Click “Start” once the device has been detected.

restore iPhone from ios 10 system to ios 9

Step 3.Put iPhone into Recovery Mode
1)First, disconnect the cable. Shut down the iPhone
2)After the shutdown, press the “HOME” button to remain intact, connect your iPhone to Mac or Windows PC and make sure iTunes is running.
3)Release the HOME button,and you can see the “Connect to iTunes screen” on the iPhone,it means you have enter iPhone to recovery mode successfully.

enter iphone into recovery mode

Tips: Run the iTunes software,at this point iTunes should display an alert saying it’s detected an iPhone in recovery mode, and will let you restore your iPhone device.

Othe way enter recovery mode:If you are unable to set the iPhone,iPad into recovery mode,please learn as below tutorial to enter DFU mode.

enter iPhone into DFU mode

Step 4.Download the iOS 9.3.5 Firmware Package for iPhone
In this step,you need to confirm your iPhone model and select the iOS 9.3.5 firmware to download.
To downgrade iPhone from iOS 10 to iOS 9.3.5,iOS 10 System Recovery will offer the latest version of iOS firmware package for your selection.Choose “iOS 9.3.5”,then click “Download” and wait for the download to complete.

download iOS 9.3.5 Firmware to iPhone

How to check and comfirm your iPhone model?Please see as below:

check and comfirm iphone model

Start to Download iOS 9.3.5 Firmware Files for iPhone

downgrade ios 10 to ios 9.3.5

Step 5.Start to Restore iPhone to iOS 9.3.5 from iOS 10 and Return to Normal
As soon as the download completes,iOS 10 System Recovery will start begin the iOS downgrade process without any data loss and restore your iPhone to normal state.In less than 10 minutes,you will get a message prompt that your iPhone is restarting to normal mode,your iPhone now is running iOS 9.3.5 as your like.

restore iphone from ios 10 to ios 9

Extra tips:iOS 10 System Recovery support to fix iPhone stuck issues and restore iPhone system to normal under various of unexpected circumstances.In addition,it also can help you recover deleted data from iPhone after iOS 10 update in three recovery modes.

d_win d_mac

Related Article:

How to free Up Space on iPhone/iPad/iPod

How to Permanently Delete Photos off iPhone/iPad to Free Up Space

How to Erase All Content and Settings on iPhone Permanently

How to Clean Junk Files from iPhone/iPad/iPod

How to Clear Facebook Cache on iPhone

Facebook is a social networking site that makes it easy for you to connect and share with your family and friends online. Originally designed for college students,Facebook was created in 2004 by Mark Zuckerberg while he was enrolled at Harvard University.By 2006,anyone over the age of 13 with a valid email address could join Facebook.Today,Facebook is the world’s largest social network,with more than 1 billion users worldwide.

facebook-notifications

How iPhone Facebook Cache Produced
Have you ever wondered why people like using Facebook?After all,there are already a lot of other ways to communicate online,such as email,instant messaging,and so on.What makes Facebook unique is the ability to connect and share with the people you care about at the same time.However,Many users have noticed that various apps such as Facebook produce caches and it goes on increasing over time.iPhone users find that their device is occupied by large amount of caches and need to free up space on phone by clearing the caches,so many users just search for some ways on the Internet to clear the Facebook cache from iPhone.Though users apply several ways to clear cache on Facebook but they failed because they don’t know how to deal with it correctly.

facebook

How to Clear Facebook Caches on iPhone with One Click

Here I have to strongly recommend this Facebook cache clear up tool for you,which is named-iOS Data Eraser,which enable to clear the Facebook cache on iPhone completely.With the help of this software,you are allow to easily clear all caches which are generated by various applications like Facebook,YouTube and Twitter etc,.As it’s name,with the help of this software,you can also permanently delete photos,messages,call history, contacts, apps, notes etc,. from iPhone.This software is famous for erasing data from iPhone such as device rubbish or the file you need to deleted without restoring,to speed up space on iPhone.This is one of the reliable software which is used for erasing iPhone data permanently and it is applicable to almost all models of iOS devices, like iPhone 7/SE/6S/6/5/5S/5C/4/4S,iPad Air,iPad Pro,iPad Mini.

d_win d_mac

Let’s have a look at main features of iOS Data Eraser:
-Support to erase all types of data from iOS devices:contacts,messages, photos, videos, apps, account info, passwords and other personal data stored on iPhone/iPad/iPod.
-Permanently erase iPhone/iPad/iPod data,prevents personal data from being recoverable(no data recovery can restore the deleted data).
-5 powerful data wiping models available for choice.
-Quickly clear junk files, invalid files, cache files & more.
-An intuitive and easy-to-follow user interface.

Clean Junk Files from iPhone

Welcome to add us or follow us on Facebook:Click here to link our Facebook.Please leave your recommendation
messages for us,Thank you.

Related Article:

How to Clean Junk Files from iPhone/iPad/iPod

How to Permanently Erase Data from iPhone/iPad without Recovery

How to Permanently Delete Photos from iPhone/iPad to Free Up Space

How to Erase All Content and Settings on iPhone Permanently

How to Factory Reset an Locked iPhone

Forgot iPhone password?iPhone stuck at the locked screen?Few things are more frustrating than a forgotten password on iPhone.If you’ve been locked out of your iPhone,the only way to unlock it is by restoring iPhone to factory resetting and wiping all of your data.The effective way to get access to your locked iPhone is to reset iPhone without password.

If you own an iPhone and you want to restore it to factory setting,the process is easy.But if you want all the personal information and data saved, it is best if you can backup your data with your computer.Restoring iPhone to factory setting is going to delete everything and the setting will be restore to original status.There are only 2 workable methods on how to factory reset iPhone without password:Restore iPhone to factory reset with iTunes;Restore iPhone to factory reset with iOS System Recovery.

Remind:If you factory reset iPhone without password with iTunes, all data on your iPhone will be erased and your iPhone would be like a new one.Remember to backup your data first to avoid losing data after restoring iPhone to factory reset.Before preparing to factory reset iPhone,what should we do first?

1.Backup iPhone
We had better back up iPhone.You will know this backup is so important if you want to restore iPhone after hard reset.

2. Take out iPhone SIM
This action can protect iPhone SIM card.

Part 1:Factory Reset iPhone without Password via iTunes

Step 1.Open iTunes on your Mac or PC. If you can’t access a computer and your device still works, you can erase and restore your device without a computer.
Step 2.Connect your iPhone to your computer with USB.
Step 3.If a message asks for your device password or to Trust This Computer, follow the onscreen steps. If you forgot your password,get help.
Step 4.Select your iPhone when it appears in iTunes.For an unresponsive device or one that won’t turn on,learn what to do.Or get help if your device doesn’t appear in iTunes.
Step 5.In the Summary panel, click Restore [iPhone].

itunes-iphone-restore-reset

Step 6.Click Restore again to confirm.Then iTunes erases your device and installs the latest iOS system on iPhone.
Step 7.After your device restores to factory settings, it restarts. Now you can set it up as new.

Part 2:Factory Reset iPhone without Password via iOS System Recovery

Another better selection is the iOS System Recovery.iOS System Recovery is used for restoring iPhone to factory resetting without password,hard reset a locked iPhone and help to delete all data on iPhone and reset it as an new iPhone without password.Furthermore,this perfect program is available to fix iPhone system to normal,such as fix iPhone stuck issues:iPhone stuck in recovery mode,iPhone stuck in DFU mode,iPhone stuck at Apple logo screen,etc.Out of many ways to restore a locked iPhone,the ones given are simplest, and quickest.Where iTunes gives you a free solution, iOS System Recovery makes the entire process effortless and simply.

d_win d_mac

Step 1.Run iOS System Recovery and Select the Recovery Option
Firstly please run the iOS System Recovery and click “More Tools” >”iOS System Recovery” in the program homepage.Connect iPhone with computer,then click “Start” to continue.

restore iphone to factory resetting

Step 2.Download the Firmware for iPhone
Make sure that your iPhone is connected to the computer and now iOS System Recovery will recognize your iPhone very soon,offering the latest iOS version for you to download.Then click “Download”,the program will begin to download the suitable firmware for your iPhone.

restore iphone to factory resetting

download the firmware for iPhone

Step 3.Restore Locked iPhone to Factory Resetting
Once the firmware downloading process is finish,iOS System Recovery will start to restore your locked iPhone to factory resetting.

restore iphone to factory resetting

When the process is complete,your iPhone will be as a new phone without any data,you can start using it normally as usual.

restore iphone to factory resetting

d_win d_mac

Related Article:

Two Solutions to Factory Reset iPhone

How to Erase All Content and Settings on iPhone Permanently

Three Situations to Erase iPhone Data and Settings

Two Solutions to Factory Reset iPhone

When you wanna selling your iPhone,give it to someone or sent it to repair store,you may need to restore the factory reset on iPhone.To remove all data and reset the iPhone previous setting,avoid to expose any personal information from iPhone.Most iPhone users will choose the original method to achieve the goal,it’s no doubt that it’s an easy way to complete the factory reset job with it.However,we are going to describe both the simple way and another safely way on restoring factory reset iPhone.

A factory reset can help resolve issues with your iPhone if it’s crashing or freezing,but it is also what you’ll want to do if you need to wipe your iPhone before selling it,or passing it on to a family member or friend.When selling an iPhone,it’s absolutely vital that you delete all the sensitive data stored on it.If not, an unscrupulous buyer could gain access to your social media profiles,your financial information and even your personal photos and videos, enabling them to browse through your private moments or steal your identity.

Tips:If you want to start iPhone with a clean state,then there are two solutions to take.First of all make sure you have a backup ready.Because all data and settings will be wiped completely from your device after performing factory reset on it,here we strongly recommend you to do a backup for your iPhone first.The iOS System Recovery enables to  backup iPhone safely before restoring it to factory settings,and we’re about to show you how to do so.

Guide:How to Safely Backup iPhone before Factory Reset

Part 1:Restore iPhone to Factory Settings with iTunes

If you need to restore the iPhone to its original state the process requires iTunes.This can be useful for troubleshooting to see if a problem is hardware or software related.

Step 1. Connect your iPhone to the computer and run iTunes.
Step 2. Make sure your iPhone is selected from the left menu in iTunes.
Step 3. Click the Restore button in the center of the iTunes Summary tab.
Step 4. You can choose to Back Up the contents of your iPhone to the computer.
Step 5. iTunes will ask if you’re ready to Restore the iPhone, this will wipe all of your data and settings from the device. Click Restore.

itunes-iphone-restore-reset

Step 6. iTunes will download, prepare and restore the software on your iPhone. Do not unplug the iPhone from the computer during this process.
Step 7. When it finished, iTunes will ask if you want to restore from backup. Choose “Set up as a new iPhone” to start fresh with factory settings.
Step 8. Enter a name for your iPhone and the process is complete.

Part 2:Restore iPhone to Factory Settings with iOS System Recovery

This way works when you couldn’t use iTunes to enter iPhone recovery mode successfully and then restore it to factory default.

iOS System Recovery is available for restoring iPhone to factory resetting,completely wipe all data and setting on iPhone.In addition,iOS System Recovery allow to fix iPhone system to normal with various iOS system issues like recovery mode,white Apple logo,black screen,looping on start, and so on.iOS System Recovery work for all models of iPhone(iPhone 7,iPhone SE,iPhone 6S/6,iPhone 5S/5C/5,iPhone 4S/4), iPad(iPad Air,iPad Pro,iPad Mini) and iPod touch.Fully compatible with Windows 10 or Mac 10.11, iOS 8,iOS 9/9.3,iOS 10,etc.

What’s iOS System Recovery can do for you:
-Restore iPhone to factory reset when iPhone freezes.
-Restore iPhone to factory reset when iPhone couldn’t work right.
-Restore iPhone to factory reset when iPhone has been attacked by virus.
-Restore iPhone to factory reset before selling it or giving it to someone.
-Restore iPhone to factory reset when you want to erase iPhone personal data.
-Restore iPhone to factory reset when you forget the password of iPhone.

d_win d_mac

Step 1.Run iOS System Recovery and Select the Recovery Option
Run the iOS System Recovery and click “More Tools” > “iOS System Recovery” in the program main interface.Connect iPhone with computer.

restore iphone to factory resetting

On the next window,read the instructions and warnings carefully,click “Start”.

Step 2.Download the Firmware for iPhone
When on the next window,make sure that your iPhone is connected to the computer and select your iPhone model and other information.Then click “Download”.

restore iphone to factory resetting

Then the program will start to download the suitable firmware for your iPhone.

download the firmware for iPhone

Step 3.Restore iPhone to Factory Resetting
When the firmware downloading process is finish,iOS System Recovery will begin to restore your iPhone to factory resetting.

restore iphone to factory resetting

When the process is complete,you can start using your iPhone normally when done.

restore iphone to factory resetting

d_win d_mac

Related Article:

How to Erase All Content and Settings on iPhone Permanently

Three Situations to Erase iPhone Data and Settings

Permanently Erase Data from iPhone/iPad without Recovery

How to Free Up Space on iPhone/iPad/iPod

Hey,have you ever get the prompt that “Storage Almost Full.You can manage your storage in Settings”on iPhone/iPad/iPod?Reminding you manage your phone data and free up more space to use?For example,sometimes,you may think 16GB iPhone or iPad don’t really have 16GB of available storage.It’s more like 13 GB.That’s because some of your device’s storage is being used for important things that make it work, like the iOS operating system.

free storage space

So,it’s necessary to clean up your device and give extra space to use your iPhone/iPad/iPod.And how can you make smart decisions about what to keep and what to delete?You wanna get a simple way to free up it without erasing any data?You mean optimiz iPhone/iPad/iPod to release massive space on your device instead of deleting files?

You can get your target if you use the iOS Data Eraser,which is our first suggest program that helps to clean up iOS device and free up space on iPhone/iPad/iPod efficiently and safely,this program supports to optimiz iPhone/iPad/iPod and speed it up without wiping photos,videos,apps.The unbelievably easy tip has been circulating on so many iOS users,get favorable comment from them.Moreover,this iOS Data Eraser enables to erase personal data from iOS device permanently before selling or resetting.Click on the button next to the passages,and a prompt will appear telling you that you are downing the useful program for your judgmatic selection.

d_win d_mac

How to Release Massive Space on iPhone/iPad/iPod

Step 1.Connect iPhone/iPad/iPod to Computer
If this is the first time you connect your device to computer,you need to trust the computer firstly and make connecting with your device and computer.

connect-device

Step 2.Select the Mode of iOS Data Eraser
Click the “Space Saver” button on the main window of iOS Data Eraser.

space-saver-screen

Step 3.Select the Way to Deal and Clean Up Your Device
Now you can choose “Compress”way or “Export” way.

guide-space-save-choose

1)While you choose “Compress”way,iOS Data Eraser will start searching photos which can be compressed and list them all.

Then click “Start”button to begin the compress process.iOS Data Eraser will show how much space was saved in the end.

compress-iphone-photo

2)If you choose “Export”action,iOS Data Eraser will search the photos.You may choose export the selected photos to your computer only or delete them after exporting.Just click to select which one(s) you want to export.Finally click “Start”button.

export-photo
At last,iOS Data Eraser will tell how much space you saved.

Here,we recommend you choose the first one,compress your photos without deleting.

The iPhone/iPad/iPod will automatically reboot after finishing the optimization job on your device.(You can right now open the folder contains exported photos by clicking the Open Folder button if you select the second one in the previous step.

iphone reboot

The above steps is the use guide to helps you release massive space on your iPhone/iPad/iPod,and you should be satisfied with quite a bit if you follow all of them religiously.In addition,this multifunctional iOS Data Eraser provides the function that remove all types of junk files on iPhone/iPad/iPod.

(Attention:Please DO Backup Job before you clean your iPhone/iPad/iPod storage space or delete files from device,the data once erased by iOS Data Eraser,it will never be able to recovered by any data recovery.Extra tips:How to Backup Data on iPhone/iPad)

d_win d_mac

Read more:

How to Optimize Slow iPhone For Best Performance

How to Clean iPhone and iPad Junk Files to Free Up Space

How to Delete and Erase Data from iPhone Permanently to Free Up Space

How to Delete and Erase Data from iPad Permanently to Free Up Space

How to Optimize Slow iPhone For Best Performance

iPhone is equipped with powerful and latest specs which makes it become one of the most popular Smartphone arround the world. Just owning a iPhone is not enough you have to keep it with care. Apple’s app store iTunes offering thousands of apps, games, music and videos for iPhone which you can easily download and use all this app and games runs smoothly on your iPhone. With the time your iPhone might have slowed down. What’s more, the longer time the iPhone be used, the more junk files will be generated, so you need to clean up junk files to speed up your iPhone. Clearing out files and apps that you don’t use anymore can keep your iPhone device performing well and give you plenty of room for fun new apps and new memories.

Optimize-iPhone-best-performance

Further more, the software update includes bug fixes, so if your iPhone is still working with any iOS version earlier than iOS 8, you can upgrade your device to the latest iOS 9.1.

However, the data just on the surface to be cleaned which hidden in places you can not see, and have not been completely cleaned up. If you want a simpler and safer way to optimize your iPhone, ensure your iPhone running quickly. You need to download iPhone Data EraseriPhone Optimizer tool,which can clear junk files on your iPhone, and remove cache of photo, video, app cookie, etc.

What’s more, with iPhone Data Eraser, you can permanently delete the files you deleted and some unwanted files to free up your iPhone, so that your iPhone can run faster. Now free download this software and try to clean up and optimize your iPhone for best performance in a easy ways.

Free Download the iPhone data eraser tool:

d_win d_mac

Simple Ways to Speed Up iPhone – Clean Up Junk Files On iPhone

Step 1. Launch the program and get your iPhone connected

After installation, the program will automatically run, at the same time connect your iPhone iPad to PC by using its USB cable.

se-cleanup-sc01

se-cleanup-sc02

Step 2. Choose a mode you want to scan and clean up your device

In the left sidebar, all features for this tool are listed. You can use it to erase junk files, private data, deleted files or even all data on your iPhone. Choose the right feature you need.

se-cleanup-sc03

-Express Cleanup: clean junk files, like log files, photo/video cache, iTunes syncing cache, download temp files, app cache, app cookies, app temp files and more.

-Photo Compress: compress your iOS device captured photos to reclaim more storage.

-Unused App Eliminator: UNINSTALL UNUSED APP – Uninstall not used apps from your iPhone to get more storage.

-Erase Private Data: safari cache, safari history, safari cookies, keyboard cache, message, message attachments, call history, notes, photos, etc.

-Erase Deleted Files: messages, iMessage, contacts, call history, facetime, calendar, reminders, notes, safari bookmarks, photos, videos and so on.

-Erase All Data: erase all data on your iPhone, setting it as a new phone.

To ensure that the junk files are cleaned up totally, keep your device connected during the whole process.

se-cleanup-sc04

When the clean finished, you will see the window as follows: displaying the space information of your device.

se-cleanup-sc05

This software supports iPhone devices, such as iPhone 6S/6/5S/5/4S and so forth.Once deletion is complete, you will see the corresponding completed screen, and you will get a fully new iPhone, but please remember that if deleted files are erased, no way to recover them, even some data recovery programs. So, please remember to backup data from iPhone to PC before wiping your device.

Free Download the iPhone data eraser program:

d_win d_mac

Read More Use Guide About iOS Eraser:

How to clean iPhone and iPad junk files to Optimize iPhone, iPad and iPod Performance for Free
Just owning an iPhone is not enough you have to keep it with care. Apple’s app store offers thousands of apps, games and videos for you to easily download and use on your iPhone, iPad, iPod. Over the time your iPhone might have slowed down and you need to optimize iOS so that the apps, music, games, etc. could run smoothly. In this case, you can read on to learn how to free optimize iOS.

How to erase all contents on iPad to Free Up iPad Space
I don’t get enough memory for iOS 9.1 update, how to free up space on my iPad? Running out of storage space on your iOS devices is annoying, and if you encounter with the following situations, you should be aware. They are signs that your iPad is short of space.

How To Permanently Delete All Content on iPad Before Selling it

After the release of the iPad Pro, many iPad users choose to sell their old iPad, to buy the new version. Before you selling the old iPad, it is necessary to delete all stored sensitive data and information. You can go to Settings> General> Reset> Erase all content and settings, so your iPad in the factory default settings. However, someone even can recover the data from your old iPad by using some iPad Data Recovery.

Make sure all personal data on your iPad can be deleted permanently without restoring, you can use the iPad Data Eraser, which can help iPad users to wipe iPad data permanently 100 percent. You will never have to worry about information leakage on your iPad before selling it.

The iPad Data Eraser tool allows you wipe data from your iPad permanently before selling. Such as Text Messages, Call History, Contacts, Calendar, Reminders, Notes, Voice, Memos, Safari Bookmarks,etc.

d_win d_mac

Tips: All iPad models are supported by this software, including iPad Pro, iPad Air, iPad Mini, iPad 4/3/2/1.

Permanently Erase All Content on iPad Before Selling it

Step 1: Run iPad Data Eraser and Connect iPad to PC

Run the tool after you download and install it. Then, connect your iPad to the computer via iPad provided USB cable and you will see the program detect the iPad automatically once the connection is successful.

se-all-sc01

Step 2: Choose Lever of Data Erasing as You Want

The program provides you with three different levers for erasing data: Low – Medium – High. You can directly choose the default second Medium lever, which will leave no traceability of data erasure and use random data to overwrite all existing and deleted data on your iPad.

se-all-sc02

Step 3: Start to Erase Your iPad Content Before Selling it

On the left directory tree, all iPad content is displayed here. Choose the files you want to delete from your iPad and click the option of erase all data and settings to delete them all.

se-all-sc03

After the data removal, you’ll get a totally new iPad. No matter how powerful the data recovery software you use, you can’t recover any data from the iPad.Now you can make sure all personal data on your iPad can be deleted permanently without restoring.

se-all-sc05

More information about The iPad Data Eraser:

Speed Up Your iPad-Clear Junk File and Uninstall Apps Permanently with the iPad Data Eraser,and Speed Up your iPad devices You can use this iPad Data Eraser to clean up the junk files permanently,and make your device working as quickly as a new one.

How to erase data on iPhone Before Selling it:

How to delete the contacts,sms,photos data permanently on iPhone before selling? iPad users are afraid that the deleted data can be retrieved from some data recovery tool. Is there any way to totally delete the information on the iPhone? The answer is “Yes”.When you want to sell your old iPad, it is of vital importance for protecting your privacy. In fact, The iOS Data Eraser tool can easily clean all your old iPad data. iPhone Data Eraser is such a wonderful data-cleaning software for you.