Category Archives: Converter

How to Rip DVD to iPhone

[Summary]: It would be a wonderful experience to watch DVD movies on iPhone. Take full advantage of Video Converter Ultimate to rip and covert DVDs to commonly used formats like MP4 for iPhone XS, iPhone X, iPhone 8/7/6s/6, etc.

Do you enjoy watching high-definition DVD movies on iPhone? Every time Apple launches a new phone, it will cause a boom. More and more mobile phone users are attracted by the new features of Apple’s phones. Super-big screen, HD Retina Display, powerful iOS 12/2.1, massive battery life, brand-new user interface design and other under-the hood improvements will never let you down. However, iPhone doesn’t have a built-in DVD-ROM or DVD player for playback of DVD movies.

Have a great collection of DVDs? Why not convert your favorite DVDs into your iPhone?

However, iPhone doesn’t have a built-in DVD-ROM or DVD player for the playback of DVD movies. So if you are a music lover and intend to watch DVDs on iPhone when on a journey, you’d better rip DVDs to iPhone playable video files first. Besides, it’s also a good way to prevent some precious DVD discs from being scratched or damaged due to repeated use.

Best Way to Rip and Convert Protected DVDs to iPhone

The best DVD to iPhone Ripper can professionally rip DVD movies to iPhone supported MP4/MOV/M4V and other regular video formats like AVI, WMV, MKV, FLV, 3GP, etc. and even extract audio in MP3, WAV, WMA, etc. It enables you to adjust the output profile parameters to output the best video/audio effects for your iPhone, such as adjust the output video codec, bit rate, sample rate and so on. Now take full advantage of DVD to iPhone Ripper to convert multiple DVD files to iPhone XS/XR/X/8/7/6S/6/5S in batch without any quality loss.

d_win d_mac

Remember: DVD to iPhone Ripper can also rip any copy-protected commercial DVD that you can unlock region code, remove copy protection including Disney X-project DRM, Cinavia Protection, CSS, RCE, Sony ArccOS, UOPs, etc. Most importantly, before you start streaming DVD to your iPhone, you should check if it is legal to rip a DVD in your country.

Step by Step Guide to Convert DVD to iPhone

Step 1. Lauch DVD to iPhone Ripper on PC

Once you have downloaded and installed DVD to iPhone Ripper on your PC/Mac, launch it and you will get the main interface shown as below. If you want to rip a DVD to an iPhone: Insert a DVD into your PC’s DVD-ROM, then click on “Load Disc” button to upload the DVD files to the program.

dvd-ripper-add-1

Step 2. Select Output Format

Click “Profile” and select the format you want from the pop-up list. All regular videos formats like MP4, MOV, WMV, AVI, MKV, FLV, 3GP, MPEG and more are provided and there are also 300+ video presets for portable devices. To enjoy HD movies or videos on iPhone devices, it is ideal for you to choose the output “4K H.265/HEVC MP4 video format (*.mp4)” or “4K H.264 /MPEG-4 Video (*.mp4)” under “4K Video” as final output file format.

convert-video-4k

Step 3. Edit Your Output Video

You can go into the video editing area to customize your DVD movies like cutting off unnecessary parts, adding watermarks, adjusting video effects, cropping videos, adjust bitrate, frame rate, etc.

edit-rotate-video

Step 4. Start Ripping DVDs to iPhone

Before conversion, you can click “Browse” to choose the path where you want to save the output files in. Once done, click the “Convert” button to begin to put DVD to iPhone on Windows or Mac.

rip-dvd-to-video-02

After conversion, you can click on the “Open Output Folder” to get the converted videos instantly.

view-converted-video

d_win d_mac

Step 5. Transfer Converted Videos to iPhone XS/X/8/7/6

Now, you can easily and directly transfer converted videos to iPhone XS, iPhone XS Max, iPhone X, iPhone 8/8 Plus, iPhone 7, etc. by using the iOS Transfer software.

transfer video from PC to iPhone

Read More

How to Convert,Rip and Play DVD Movies on iPhone 6S/6/iPad Pro

How to Convert DVD Movies to iPhone XS/XS Max/XR/X

How to Convert DVD Movies on Samsung Galaxy

How to Convert Videos/Movies to DVD Disc/Folder/ISO

How to Burn Movies/Videos to DVD on Mac/Windows

Rip DVD to iPhone

How to Import Apple Music to iMovie Projects

[Summary]: The Apple Music songs are protected and unavailable in iMovie. From this post, you can solve this problem easily by converting Apple Music to plain MP3/FLAC/AAC/WAV, and import to iMovie as background music for video editing.

iMovie is a video editing software developed by Apple that bundles all new Mac and iOS devices (iPhone, iPad and iPod). In iMovie, users can edit photos and video clips and add titles, themes, background music and effects, including basic color correction and video enhancement tools and transitions such as fades and slides. Simultaneously, iMovie can take advantage of Apple’s latest features, including support for 3D touch, 1080p HD videos at 60fps, and ultra high-definition 4K footage, etc.

“As an Apple Music subscriber, I can pick and choose full albums or individual songs, and download these streaming music freely. However, it seems that I am not given the ability to import downloaded Apple music songs to iMovie, what should I do?”

Disable to Add Apple Music to iMovie as Background Sound? Why?

Each of Apple Music songs is DRM-locked. Except for listening, DRM protection will prevent user from using Apple Music songs freely, such as setting Apple Music as iPhone ringtone, importing Apple Music to iMovie for video projects, which is why you can’t import Apple Music into your iMovie project. Therefore, to add Apple music songs to iMovie without restrictions, the first thing you need to do is to remove DRM protection for Apple Music.

While Apple Music Converter is such a software that helps users remove DRM protection from any Apple Music song and convert to iMovie supported audio file formats, such as MP3, WAV, M4A, AIFF, AAC with super fast conversion speed and lossless output quality.

Here are some amazing features of Apple Music Converter.

Remove DRM from Apple Music, iTunes M4A, M4B & Audible AA, AAX audiobooks.
Convert Apple Music to plain audio formats like MP3, WAV, M4A, AIFF, AAC.
Keep ID tags and metadata information after conversion.
Keep 100% original audio quality.
Perform up to 16X faster speed & support batch conversion.
Fully compatible with latest Windows OS, Mac and iTunes.

The following will show you the complete steps to remove DRM from M4P music & Apple Music for importing to iMovie project as background music.

d_win d_mac

Part 1: How to Remove DRM from Apple Music

Step 1. Launch Apple Music Converter

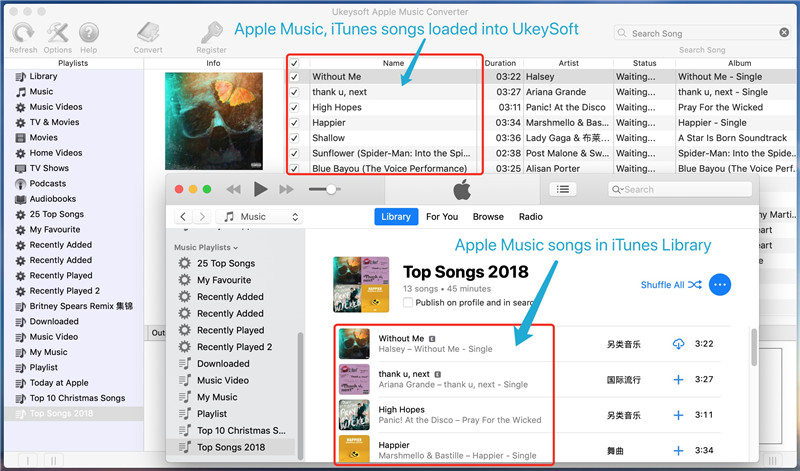
Launch Apple Music Converter on your computer and iTunes will be also launched automatically. The entire iTunes library will be listed as playlists in the left panel.

Note: Apple Music Playlists created by Apple will be listed as separate lists in the left bottom.

run Apple Music on PC

Step 2. Select Apple Music Tracks

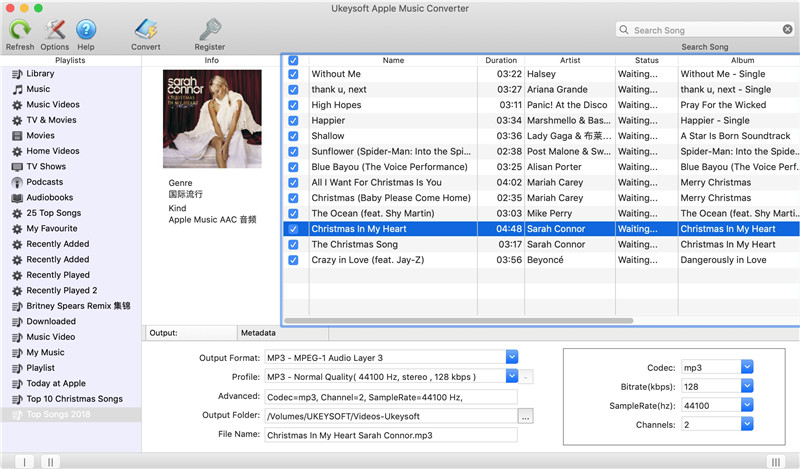
Next you can select the playlist category at the left pane and select songs you want. You can also use search box to locate songs quickly. Of course this powerful program can also batch convert the entire album.

add music

Step 3. Choose MP3/AAC/FLAC/WAV for iMovie

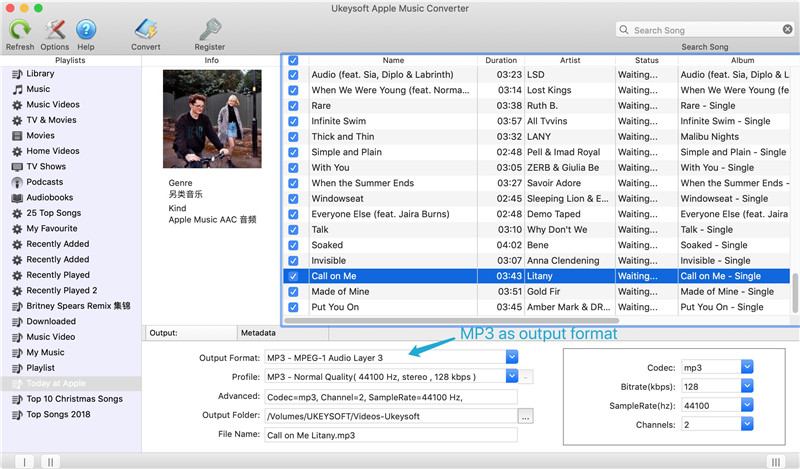
Apple Music Converter supports many output formats, of which, MP3, WAV, M4A, AIFF, AAC. You can choose one of them as output. Besides, you are allowed to define output path if you don’t want to save the converted songs in the default folder.

output settings

Step 4. Start Conversion

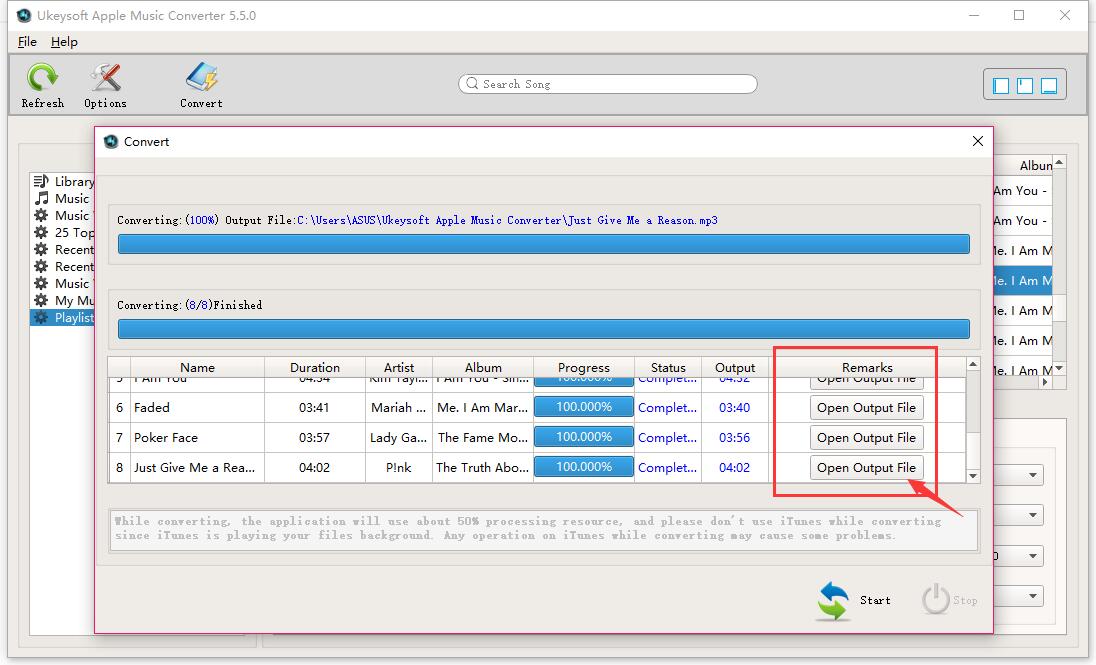
Now, simply click “Convert” button to start converting Apple Music tracks to MP3/AAC/FLAC/WAV. After conversion, you can click “Open output file” to locate converted Apple Music tracks.

dwonload Apple Music without subscription

d_win d_mac

Part 2: Import Converted Apple Music Songs to iMovie

The original Apple Music can’t be imported to iMovie to be a part of the project, however, the converted Apple Music song has no such restriction. You need to import the converted Apple Music (the MP3 audio) to iTunes first, then you can add Apple Music as BGM for iMovie.

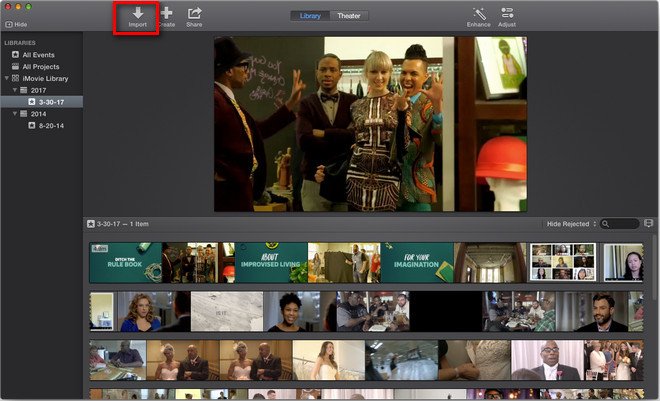
Step 1: Launch iMovie on your computer, open the movie item you want edit, and then click “Import” to add the converted Apple Music file to iMovie.

launch-imovie

Step 2: Open the output folder and then choose the Apple Music song from it, and then click “Import Selected”.

Now, you have imported Apple Music songs to iMovie successfully, the next you need to do is edit the movie item and Apple Music as you want.

More Apple Music Conversion Articles:

How to Remove DRM from Apple Music Completely

How to Record Apple Music M4P Streams as MP3

How to Download Apple Music and Playlist for offline listening

How to Download and Listen to Apple Music/iTunes Music Songs offline

How to Play Apple Music after Canceling Subscription

Import Apple Music to iMovie Projects

How to Add Spotify Music to iMovie as BGM

[Summary]: The article provides a step-by-step guide on how to add songs from Spotify to iMovie as a background music for your videos with a powerful Spotify Music Converter.

“As a long-term tenant of Spotify, I have the ability to download my favorite music to a local music library. But this doesn’t seem to work for adding Spotify songs to iMovie. Is there any effective way to make my Spotify music compatible with iMovie perfectly?”

iMovie provides a wonderful platform for video editing where numbers of video clips can be joined together so easily in order to create something very interesting. With Spotify Premium subscription, you can get the offline playback feature and download songs, playlists or albums for offline listening. But I am afraid that it is impossible to directly import Spotify Music songs to iMovie since Spotify songs are in DRM protected Ogg Vorbis format and can only be played with Spotify app. iMovie supported audio File formats like MP3, WAV, M4A, AIFF, AAC, MP4, MOV, MPEG-2, AVCHD, DV, HDV, MPEG-4, H.264, etc, while all editing tools including iMovie don’t support Ogg Vorbis format. Perhaps you are bothering how to add Spotify music to iMovie as background music for your video, what you should do?

spotify-to-imovie

The video files are in different formats, you won’t be able to add Spotify into iMovie as expected. To get out of the trouble, you should try UkeySoft Spotify Music Converter, an easy-to-use Spotify music downloader and converter which can quickly and losslessly download any Spotify song/playlist/album, remove DRM protection and convert Spotify songs to MP3, AAC, WAV that are supported by iMovie. It’s able to keep the original metadata info and ID3 tags as well, such as artwork, artist, album, etc. After converting, you can add Spotify music to video editing tools, like iMovie, WMM, etc. with ease to make the video more attractive.

Now free download the Spotify Music Converter with your Windows/Mac and then follow the steps tutorial to copy Spotify tracks to iMovie easily.

d_win d_mac

Part 1: Convert Spotify Music to iMovie Friendly Format

Step 1. Launch Spotify Music Converter

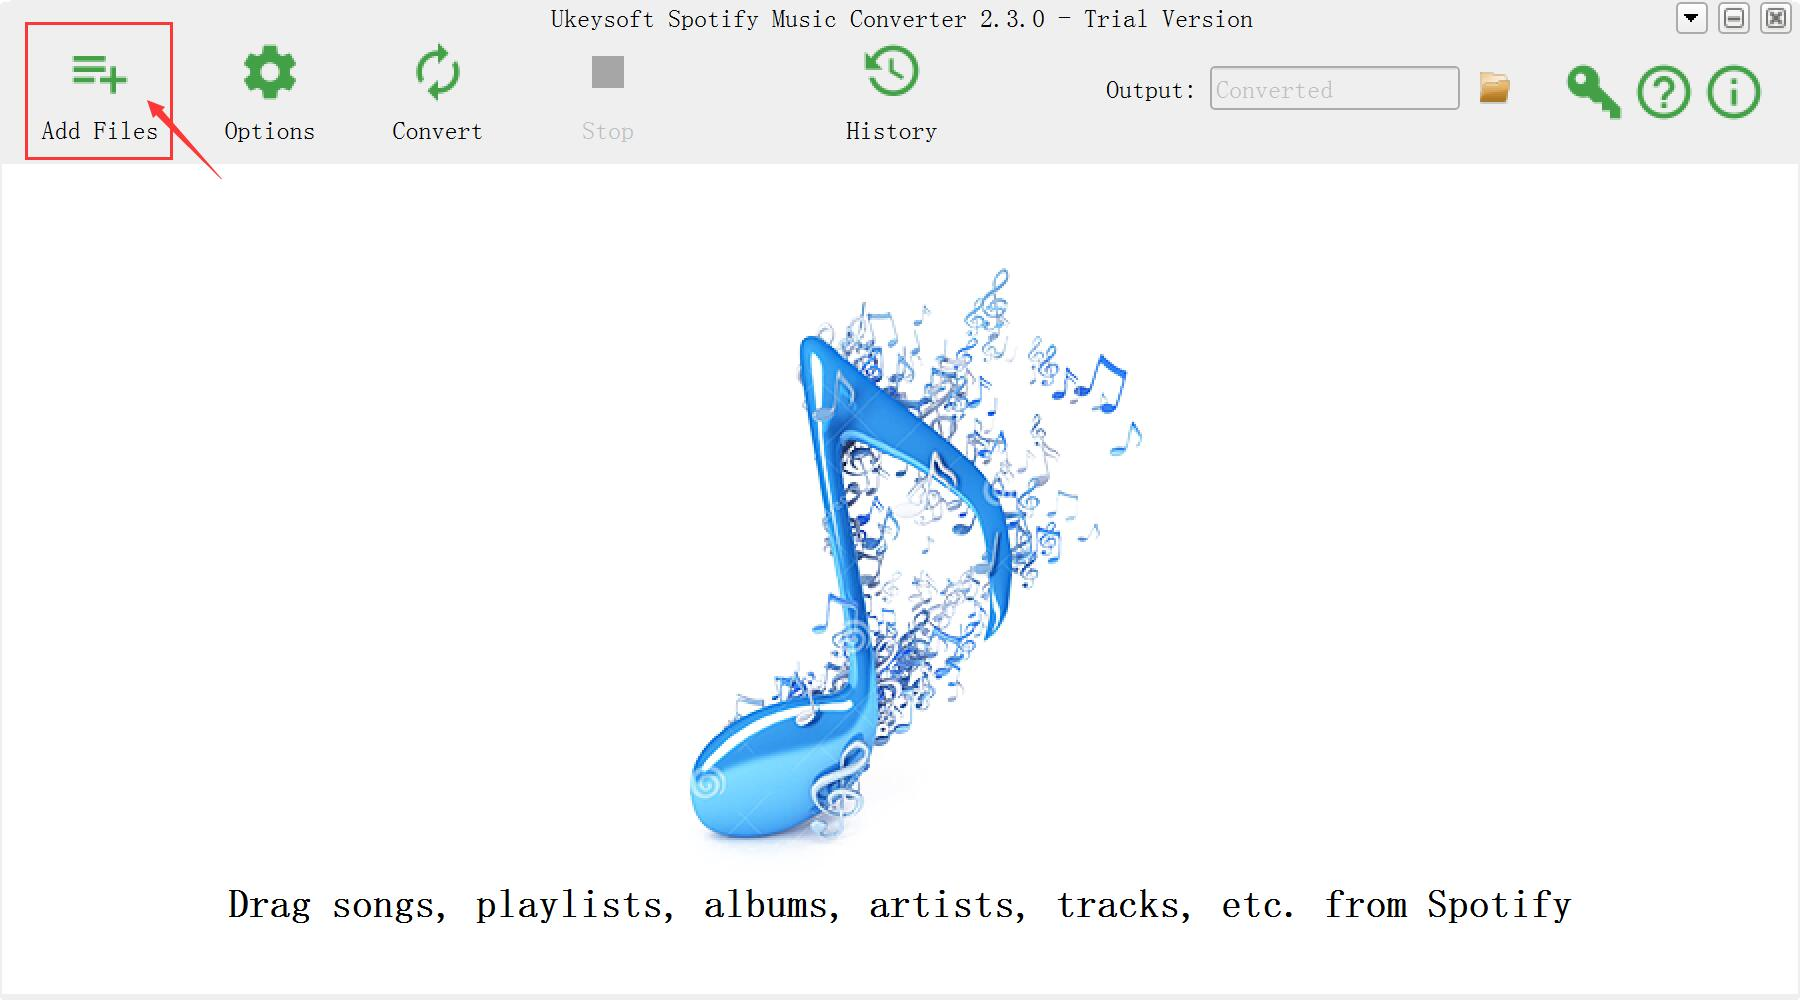
Simply launch the installed converter software and you will see the intuitive interface of UkeySoft Spotify Music Converter. Spotify will be open automatically.

Spotify Music Converter home page

Step 2. Import Spotify Songs

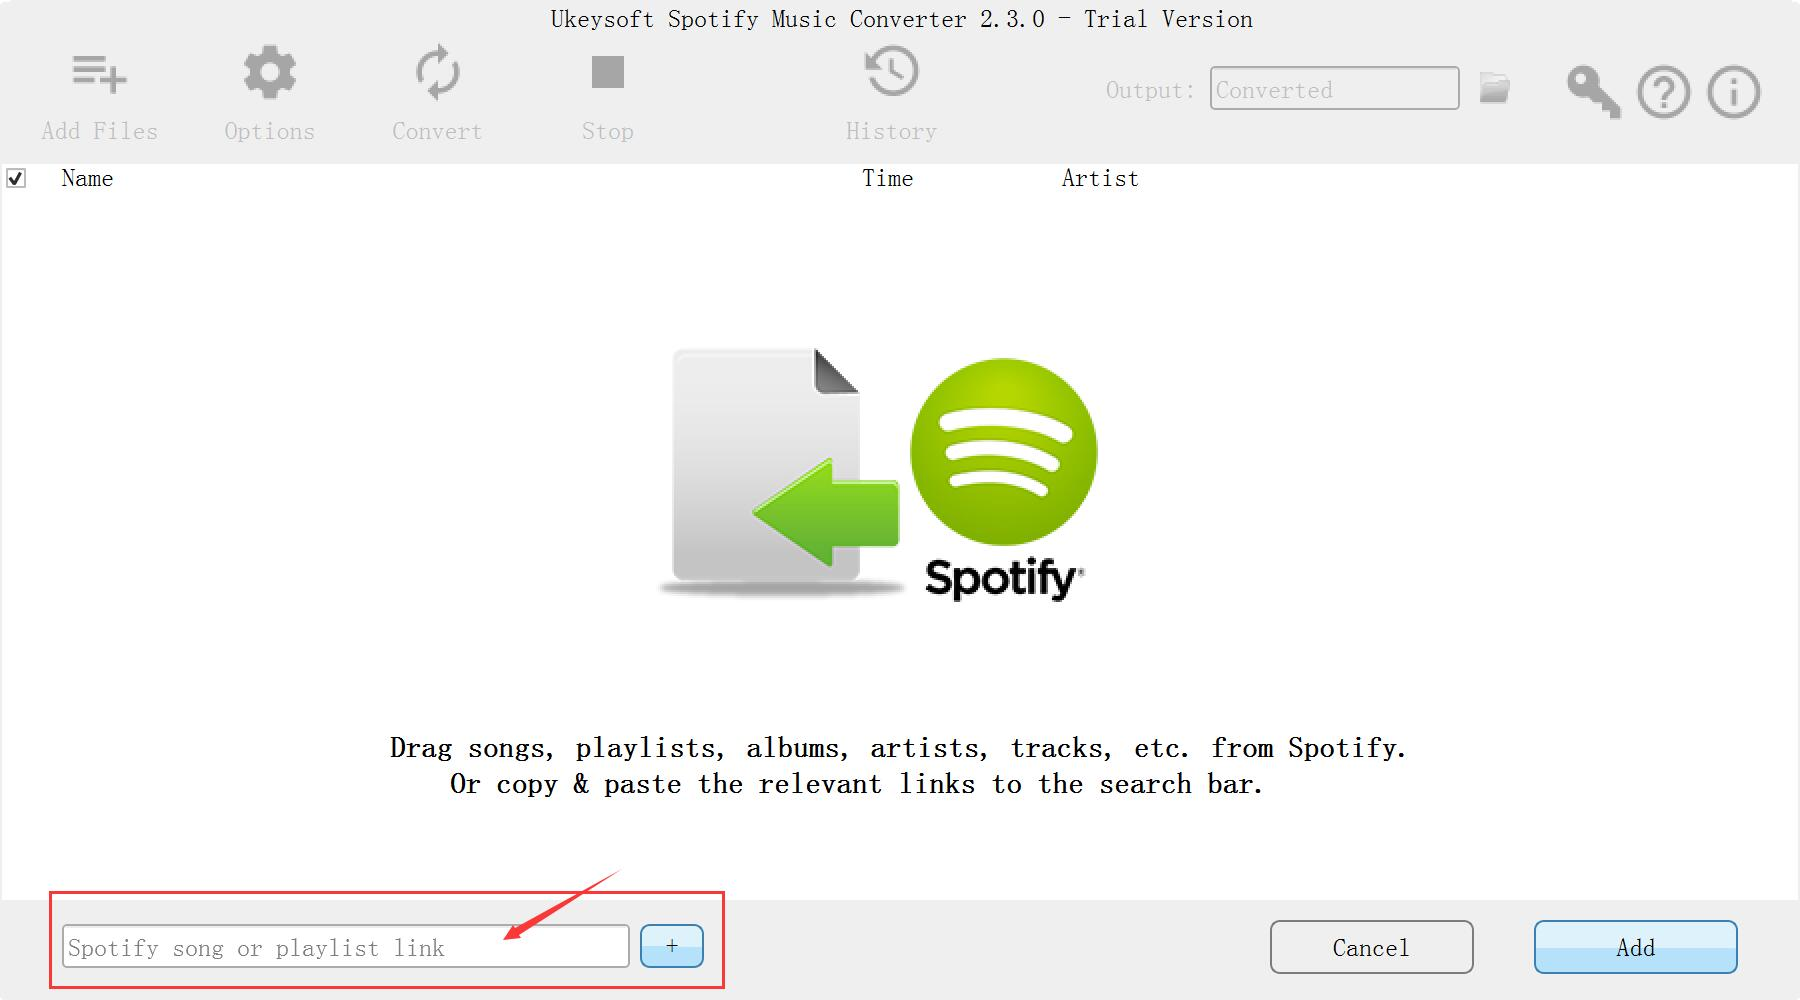
Browse the Spotify store to find the songs you want to add into iMovie. You can drag and drop the songs you want to convert. Or if you have already got the link of the songs, you can also click “+” button to add through the URL directly.

add Spotify Music

Step 3. Choose Output Format

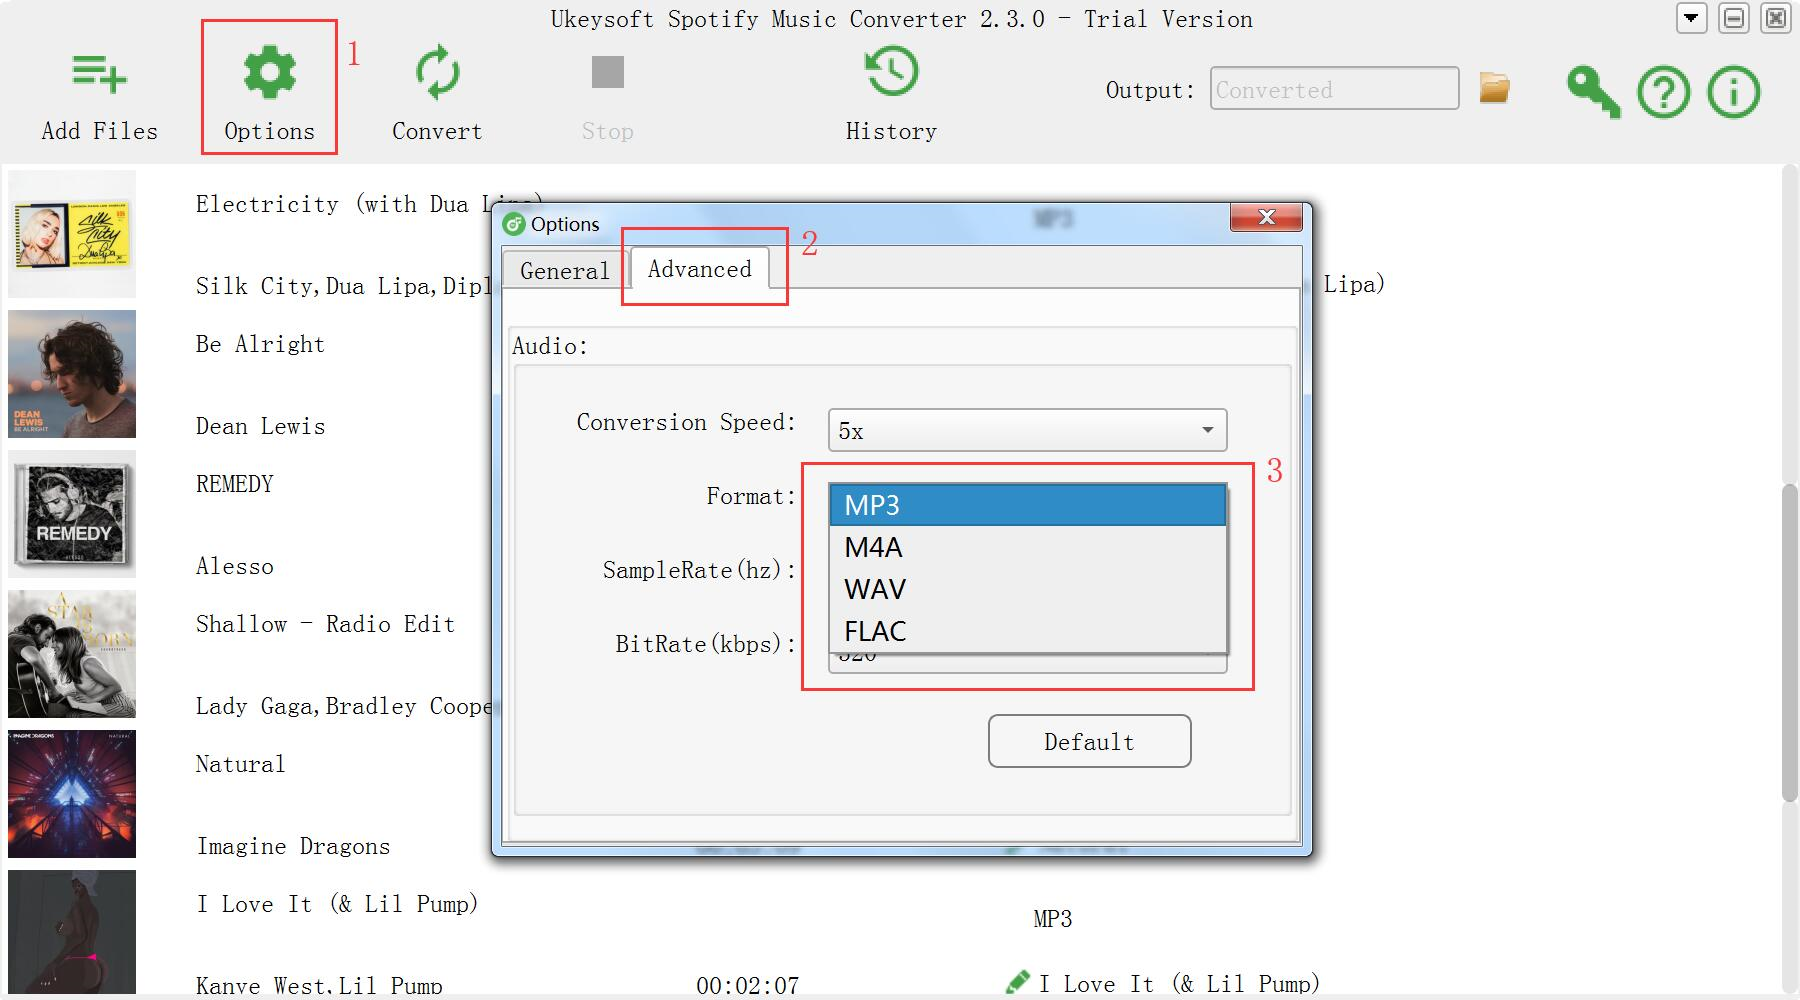
Click the Options button to select the output format. You can choose output format (MP3, AAC, FLAC or WAV…), output quality (High 320kbps, Medium 256kbps, Low 126kbps). Also, you can change the output channel, sample rate, bit rate and more as you prefer.

choose mp3 format

Step 4. Start Conversion

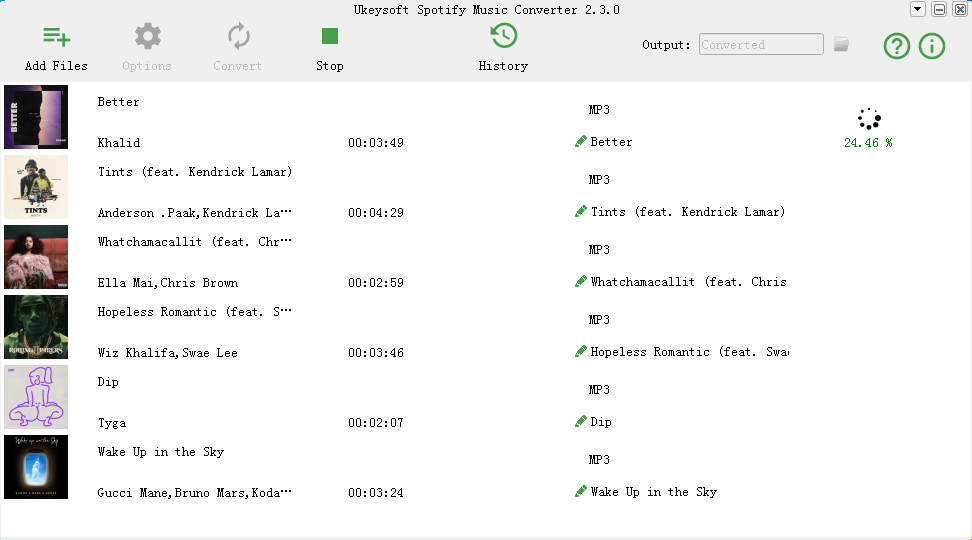
After setting down, click ‘Convert’ button to start removing DRM from Spotify sons and converting Spotify audio files to MP3 or other iMovie supported formats. After conversion, click on ‘History’ icon to view the DRM-free songs.

convert Spotify Music to mp3

d_win d_mac

Part 1: How to Convert Spotify Music Tracks to MP3 Format

Now you have the Spotify music in iMovie friendly format. Follow the steps below to add the DRM-free Spotify songs to iMovie for your video creation.

add music to iMovie

Primary Condition: You should add the converted Spotify songs to your iTunes library firstly.

Step 1. Launch iMovie with your computer or iDevice to open your project. Make sure you have created a project. If not, you can click “Create New” menu to create a new one.

Step 2. Click “Audio” menu from iMovie > select “iTunes” from the sidebar > Browse to the target converted Spotify downloads that you’d like to add to your project and then adjust it on the timeline.

Related Guides:

How to Listen to Spotify Music without Subscription

How to Convert Spotify Music to MP3

How to Sync Spotify Music to iPod Touch/Nano/Shuffle

How to Stream Spotify Music to Apple TV 4

How to Set Spotify Music as Android Phone Ringtone

Add Spotify Music to iMovie

How to Stream Spotify Music to Apple TV 4

[Summary]: Spotify haven’t released official Spotify app for tvOS. Spotify Music Converter helps you stream Spotify songs to play on Apple TV without using AirPlay.

“I have been waiting for the Apple TV app store to add the Spotify music app, but it has not been implemented! Is it possible to play Spotify music on Apple TV without AirPlay?”

Why no Spotify for Apple TV?

The new Apple TV 4 is finally arrived, but it lacks a popular app. The new Apple TV 4 has built-in support built into the App Store and Apple Music. We are still waiting for Spotify, the largest streaming music service in the world to release its tvOS app for Apple TV. So far, Spotify users must use AirPlay to play music on Apple TV. To make matters worse, many users complain about unexpected situations with Airplay Spotify, such as unsuccessful download or stuttering audios.

If you want to listen to Spotify on your Apple TV 4, don’t leave, this tutorial will show you a quick and easy way to listen to Spotify Music on Apple TV 4 without using AirPlay.

Tools that Help You Stream Spotify Music to Apple TV

All Spotify music is DRM protected, restricting you from playing Spotify music directly on Appel TV 4. To break this limit, you need to use the Spotify DRM Removal Tool. Most worthy of being introduced is Spotify Music Converter, which can download and convert any Spotify audio track into DRM-free MP3/AAC/WAV/FLAC without losing quality. It works with Spotify free accounts and premium accounts. By using this smart software, you can easily convert all Spotify songs to audio formats supported by Apple TV. Look at the key features of Spotify Music Converter:

Remove DRM from Spotify Music
Convert Spotify Music tracks to MP3/AAC/FALC/WAV
Lossless quality & preserve ID3 tags
5X faster speed & Easy to use

Simply download the program on your computer to get started:

d_win d_mac

Part 1: How to Convert Spotify Music Tracks to MP3 Format

Step 1. Install Spotify Music Converter

After downloading, install and launch Spotify Music Converter with your computer. And Spotify will open with it automatically.

Spotify Music Converter home page

Step 2. Import Spotify Music

Drag&drop tracks, playlists or albums from Spotify app to the interface directly. Or click “Add Files”, copy&paste the link of the song, album or playlist to the bottom area and then click + icon.

add Spotify Music

Step 3. Choose Output Format

To make the songs playable on Apple TV, you are suggested to set the output format as MP3. It also supports converting Spotify Music to M4A, WAV, FLAC.

choose mp3 format

Step 4. Convert Spotify music to MP3

Once done, click “Convert” button to start converting Spotify Music tracks to MP3. After conversion, click the “History” icon to quickly locate the DRM-free Spotify songs, albums or playlists in MP3 format.

convert Spotify Music to mp3

d_win d_mac

Part 2: How to Transfer Converted Spotify Songs to Apple TV 4

Now you get all Spotify Music tracks are in MP3 format on your computer. Next you can find out the way to transfer converted Spotify songs to Apple TV 4.

Step 1. Launch Home Sharing in iTunes

Launch iTunes and then go to File > Home Sharing and select Turn on Home Sharing. Next you need to enter your Apple ID and password to start the program.And then click Turn on Home Sharing.

turn-on-home-sharing-in-itunes

Step 2. Launch Home Sharing on Apple TV 4

Launch Apple TV 4 and then go to Settings > Accounts > Home Sharing and choose Turn on Home Sharing, you need to enter your Apple ID and password too.

home-sharing-on-apple-tv-1

Step 3. Start Playing Spotify Songs with Apple TV 4

After completing the above settings, you can click on “Computers” on your Apple TV 4 and then select a library. You’ll see all media files available. Now you can play Spotify songs on your Apple TV 4 freely.

play-spotify-on-apple-tv

Related Guides:

How to Listen to Spotify Music without Subscription

How to Convert Spotify Music to MP3

How to Sync Spotify Music to iPod Touch/Nano/Shuffle

How to Remove DRM from Apple Music Completely

How to Set Spotify Music as Android Phone Ringtone

Stream Spotify Music to Apple TV 4

How to Stream Spotify Music to Chromecast

[Summary]: Here we’ll guide you to cast Spotify Music to Chromecast so that you can easily play any Spotify Music track on smart speakers or other devices without Spotify premium subscription.

“I am a Spotify premium subscriber. But it appears I can’t cast the songs from Spotify Music to Google Chromecast. Did I miss anything? Can anyone help me to stream Spotify on chromecast Audio?”

spotify-music-on-chromecast

Chromecast has native support for Spotify Music, which means you can stream Spotify songs online from Chromecast. However, it only works if you spend $14.95 per month to subscribe to Spotify Premium membership. Well, for some users, monthly renewals are still stressful. Here, we’ve brought you another great alternative to downloading Spotify songs and casting Spotify music to Chromecast audio without Spotify premium subscriptions. The following is the complete guide – whether you are a premium user or a free user, you can easily stream Spotify music to Chromecast.

Part 1: Stream Spotify Music to Chromecast with Premium Account

Step 1. Insert Chromecast or Chromecast Audio to TV HDMI port or a speaker input port.

Step 2. Start the Spotify app on the same WiFi network as your Chromecast/Chromecast Audio.

Step 3. Select a track that you want to listen to. At the bottom of the screen, tap “Devices Available”.

Step 4. Select your Chromecast or Chromecast Audio from the devices listed. Then you’ll be able to stream Spotify music track to TV or speaker via Chromecast.

spotify-on-chromecast

Part 2: Play Spotify Music on Chromecast without Premium Subscriptions

Free users are not allowed to download Spotify music for offline listening. Since the DRM protection inserted, songs only can be played on Spotify app. In order to play Spotify music on Chromecast without premium subscriptions, the most important thing is to download Spotify music and remove DRM restriction from Spotify songs. If you’re a Spotify free user, or cancel the premium subscription but want to keep the Spotify tracks still playback on Chromecast, then you can try a powerful Spotify downloader and DRM remove tool – Spotify Music Converter.

UkeySoft Spotify Music Converter allows you enjoy Spotify music offline with free or premium account. It is designed to download Spotify songs, albums or playlists and convert to MP3, M4A, WAV or FLAC with 100% audio quality retained. Let’s take a look at its specific features:

Download Spotify songs, albums and playlists for offline listening.
Remove DRM from Spotify songs/albums/playlists.
Convert Spotify music to DRM-free MP3, M4A, WAV or FLAC.
Enjoy Spotify music offline without premium.
Get rid of protected Ogg Vorbis format when using Spotify Premium.
One click to burn Spotify music to CD.
Preserve ID3 tags(artwork, title, album, artist name) and 100% original quality.
5X faster conversion speed.

Free download Spotify Music Converter from here:

d_win d_mac

Step 1. Launch Spotify Music Converter

Please make sure you have installed Spotify app on your computer. Install and launch Spotify Music Converter on your Mac/Windows.

Spotify Music Converter home page

Step 2. Add Spotify Music Songs

You can drag&drop Spotify songs, albums or playlists to software directly. Or click “Add Files”, copy&paste the URL of the Spotify song, album or playlist to the left bottom area and then click “Add”.

add Spotify Music

Tip: By default, all songs in a playlist or album are selected. You are free to uncheck the tracks you don’t want to convert. Then click “Add” to import all selected songs.

Step 3. Choose Output Format

The default output format is MP3. Currently it supports multiple output formats, including MP3, AAC, WAV, FLAC, M4A, and M4B. You can also adjust output audio quality, conversion speed and directory, etc. according to your own requirements.

choose mp3 format

Step 4. Start Converting

Click the “Convert” button to start converting the DRM-ed Spotify music to MP3.

convert Spotify Music to mp3

After recording, click the “History” button to quickly locate the DRM-free Spotify song.

view mp3 spotify music

Step 5. Stream the Converted Spotify Music on Chromecast

To play the converted Spotify music on Chromecast. Start Chrome and connect your computer and Chromecast device to the same wireless network. Use Chrome to go to Google Play Music (play.google.com/music). Click the song and then click Play. At the bottom of the screen next to the playback controls, click the Cast button . Under “Dress to,” select your Chromecast from the device list.

d_win d_mac

Related Guides:

How to Listen to Spotify Music without Subscription

How to Convert Spotify Music to MP3

How to Sync Spotify Music to iPod Touch/Nano/Shuffle

How to Remove DRM from Apple Music Completely

How to Set Spotify Music as Android Phone Ringtone

Stream Spotify Music to Chromecast

How to Extract Audio from iTunes Music Videos

[Summary]: What to do if you want to get the audio only from the iTunes videos? This tutorial tells you how to extract audio from iTunes music videos, movies, TV shows with no quality loss by Apple Music Converter.

“I am a music lover and hope someone can teach me how to quickly extract the audio I need from the movie somehow.”

If you are the music lover or language learner, or you are the one who likes to collect your favorite music in a movie or TV episodes, you may want to extract audio from a video file. But it is known that iTunes music video files come encrypted with DRM (digital rights management) protection, which keeps legally purchased music videos from being played on your MP3 player, PMP, and other unauthorized devices. So, how to rip audio from iTunes M4V videos?

View also:

Keep Apple Music Forever after Trial

Keep Spotify Music after Canceling Subscription

extract audio from itunes music videos

Extract MP3 Audio from iTunes M4V Videos

Now Apple Music Converter features a solution for this. It is a professional DRM removal program with deciphering technology to convert purchased or rented iTunes music video files to unprotected songs. You can use it to extract audio tracks from iTunes music videos by exporting the audios to common MP3, AAC, WMA, etc. with little quality loss, so as to TV shows and iTunes movies. And it stands out converting Apple Music, iTunes M4P songs, Audible AA/AAX audiobooks to MP3, M4A, etc. This Apple Music Converter supports you to:

Remove DRM protection from iTunes music videos, movies, TV shows.
Convert purchased and rental M4V music videos files.
Convert iTunes music videos to multiple audio formats like MP3, AAC, M4A, WMA, etc.
Extract audio tracks from iTunes videos with a few simple clicks.
Extract any audio files with super high quality and 16X faster speed

d_win d_mac

A Step-by-step Tutorial for Extracting Audio from iTunes Music Videos

Tip: Before extracting, you should make sure that you have added your iTunes music videos to iTunes library first.

add-music-video-to-itunes-library-1

Step 1. Open Apple Music Converter

Download the installation package above and install it on your Windows or Mac PC. Then, open it then iTunes will be launched automatically. This program will open the iTunes to load your iTunes media library.
extract-audio-from-itunes-videos-1

Step 2. Select iTunes Music Videos

All your iTunes library files will be imported to the different playlist category. Click on the “Music Videos” then you can choose the music video you want to extract audio from and click “Add” to load it to the converter.

Note: You can select several files for batch conversion.

extract-audio-from-itunes-videos-2

Step 3. Setup Your Output Format

You can choose the output format on the “Output Settings” section, such as P3/AAC/WAV. It is also able to customize the audio quality like codec, bitrate, sample rate, etc.

extract-audio-from-itunes-videos-3

At the same time, you are free to choose a conversion speed from 1X to 16X by clicking “Options – Preferences”. Generally 5X high-speed conversion output quality is the best.

extract-audio-from-itunes-videos-4

Step 4. Start to Extract Audio from iTunes Videos

Simply click on “Convert” button and Apple Music Converter begins to extract audio from iTunes music videos and save to the output folder as designed before on Mac.

extract-audio-from-itunes-videos-5

During the conversion process, please don’t click iTunes or don’t play music,videos via iTunes.

convert itunes m4v movies to mp3

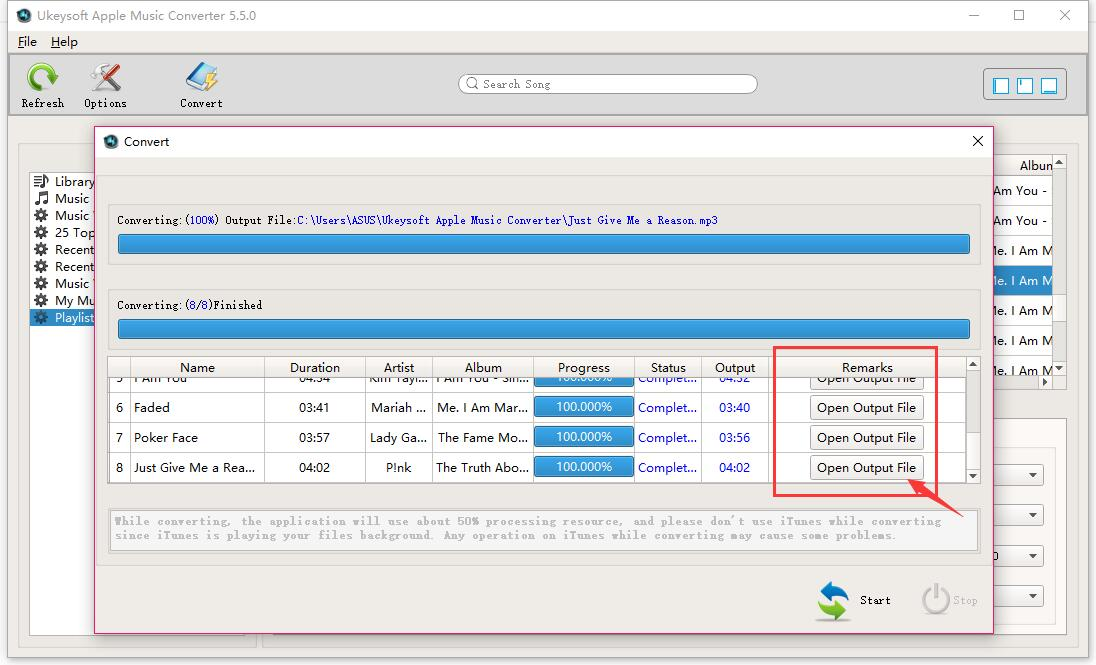
When it is done, you can click “Open Output File” from the converted list to find all the audio files.

extract-audio-from-itunes-videos-6

d_win d_mac

Related Articles:

How to Convert iTunes Music to MP3

How to Convert M4V iTunes Videos to MP3

How to Record and Rip Apple Music for Free

]Transfer iTunes Music Songs for Playing in a Car

How to Convert Apple Music to MP3?

Extract Audio from iTunes Music Videos

How to Keep Apple Music on Mac Forever

[Summary]: If you cancel Apple Music, will you keep your songs offline forever? Here you will find detailed answers to keep Apple Music songs, albums on Mac forever, even if you cancel your subscription.

remove drm from apple music mac

Apple Music users’ quesions:
“Will I lose my music if I cancel my Apple Music subscription? How to save Apple Music songs as MP3 or M4A files and transfer to iPod Nano for playing offline?”

How to convert Apple Music to MP3 and save them on MacBook Pro forever? I want to transfer Apple Music songs from Mac to Sony Walkman MP3 player, is it possible to download Apple Music songs as MP3 format?

How remove DRM from Apple Music on Mac? Becuase Apple adds DRM protection to all Apple Music’s tracks, if I unsubscribe from Apple Music, I will lost all added or downloaded songs on iTunes library, how to keep Apple Music on MacBook Pro forever even after unsubscribing?

This is a question many Apple Music users asking. We all know that any song you listen or download from Apple Music has DRM (digital rights management) protection applied to it. These streaming music/playlists you added to the library from Apple Music catalog will no longer be playable and will be deleted if you are no longer a subscriber. So, you can’t keep Apple Music songs on Mac forever or play it in other MP3 players or devices after canceling subscription. After removing DRM from Apple Music, you can keep Apple Music free Forever, even you cancel the subscription someday.

The Best Solution to Keep Apple Music Songs on Mac Forever

Society is always making progress. Soon, we have found some useful softwares that focuses on remove DRM from Apple Music tracks and convert Apple Music songs, albums to common format, so that you can save Apple music forever after unsubscribing. And this Apple Music Convert software is one of the best leader among many softwares.

The UkeySoft Apple Music Converter (Mac) is an all-in-one and powerful iTunes DRM Removal and iTunes Music Converter which can remove DRM and convert not only Apple Music files , but also iTunes audiobooks and iTunes M4P music to plain MP3, AAC, FLAC and WAV format. Maximum 16X conversion speed is available to choose while converting. What’s more, you are able to convert Apple Music songs to MP3 with all ID3 tags, metadata kept. With Apple Music Converter, you can keep Apple Music songs on Mac forever even you have cancelled the subscription.

mac apple music converter

Free download Apple Music Converter for Mac version and start to convert Apple Music to MP3 on Mac:

d_win d_mac

How to Keep Apple Music Songs on Mac After You Unsubscribe

Step 1.Install and Launch the Software on Mac

To start with, download and install the UkeySoft Apple Music Converter (Mac) on the MacBook, MacBook Air, MacBook Pro, iMac or iMac Pro, it works well with the latest macos mojave.

install ukeysoft apple music converter for Mac

Launch the Apple Music Converter and iTunes will be launched automatically at the same time.

launch apple music converter

Step 2.Add Apple Music Tracks

The program will load all Apple music files automatically if you have added Apple Music tracks to iTunes Library. Locate “Library” and mark the Apple Music tracks that you want to convert.

select apple music tracks to convert

Step 3.Set the MP3 as the Output Format

After choosing the Apple Music tracks you want to rip/convert,you need to set up the output format in the next step. in order to converting all Apple music songs to MP3 format. From the drop-down list under the “Output Format” column, there are several formats for you to choose from, and MP3 is recommended. You can also change the output parameters like channels, sample rate, codec, bitrate, etc,.

select mp3 as output format

Step 4.Convert Apple Music to MP3 for Offline Listening Forever

Finally, click on “Convert” button to start converting Apple Music from M4P music to MP3 and save the converted MP3 Apple songs on Mac.

convert iTunes Music from M4P to MP3

Original ID tags and metadata information will be saved to the output MP3 audio files, the moment the conversion finished means you own your Apple Music on Mac forever, now you can offline listening Apple Music songs on Mac without iTunes, or transfer the converted Apple Music files from Mac to MP3 player, iPod, mobile phone, etc.

keep apple music forever

d_win d_mac

Related Article

Keep Apple Music Free Forever after Trial without Paying

How to Play Apple/iTunes Music after Canceling Subscription

Remove DRM and Play Apple Music on iPhone without Limitation

How to Convert M4B iTunes Audiobooks to MP3

How to Play Apple Music on iPhone 7/6S/6 for Free

Keep Apple Music on Mac Forever

How to Transfer iTunes Music to iPhone 11/XS/XR/X

[Summary]: Do you want to transfer all of your iTunes music tracks including Apple Music tracks to your new iPhone 11/X/XS (Max)/XR? This guide shows how to sync songs from iTunes to iPhone without iTunes. You can also use this iTunes alternatives to import music, videos, photos from computer to iPhone 11/XS/XR/X without wiping data.

CONTECT

When your have got an new iPhone XS, iPhone XS Max or iPhone XR, you may want to sync files from computer to iPhone, you might first think of iTunes, but using iTunes to sync files to device, it will taking lots of your time, worse, this through this method to sync iTunes to iPhone iPad with erasing data on device. If you are looking for a way to transfer music from iTunes to your iPhone XS, iPhone XS Max, iPhone XR, iPhone 8, iPhone 8 Plus or iPhone X without erasing data, read this guide and you will quickly learn how to sync music, playlist and videos from iTunes to iPhone X/XS (Max)/XR, and vice versa; how to put music from computer to iPhone without iTunes. Read on to see more details.

Fast and Reliable iTunes Music to iPhone Transfer

The fast way to transfer music and playlist from iTunes to your new iPhone XS (Max) or iPhone XR, the iOS Transfer – iOS Toolkit not only helps you sync iTunes to iPhone iPad without erasing eata, and vice versa; but also allows you transfer music from old iPhone/iPod/iPad to iPhone XS/XS Max/XR, import music and videos from PC or Mac to iPhone, keep reading on this guide to learn more.

This iOS Transfer is the best iTunes alternative, which not only support sync music, videos and playlist from iTunes to iPhone X/XS (Max)/XR, but also enables you transfer music from (Windows or Mac) computer to iPhone X/XS (Max)/XR without iTunes to avoid syncing data, you can also use this all-in-one iOS Transfer tool to transfer music, videos, photos, contacts, text messages between two iOS devices, when you get a new iPhone X or iPhone XS (Max)/XR, you can just launch the iTunes app and have it syncing data from iPhone to iPhone X/XS(Max) with ease. Besides, this iOS Toolkit – iOS Transfer can also help you manage your iPhone/iPad data with its files management features. Music, ringtones, photos, movies, TV shows, contacts, messages and more can all be managed on your PC or Mac. Follow the steps below to learn how to transfer music from iTunes or computer to iPhone 11 and iPhone X/XS (Max)/XR without iTunes.

d_win d_mac
d_win d_mac

Tips: MobileSync also can help you transfer media files between iOS devices; add music, photos, videos from computer to iPhone X/Xs/Xs Max/XR…..

Part 1: How to Transfer Music from iTunes to iPhone X/XS (Max)/XR without Erasing Data

Step 1. Run iOS Toolkit – Transfer and Connect iPhone Xs to PC/Mac
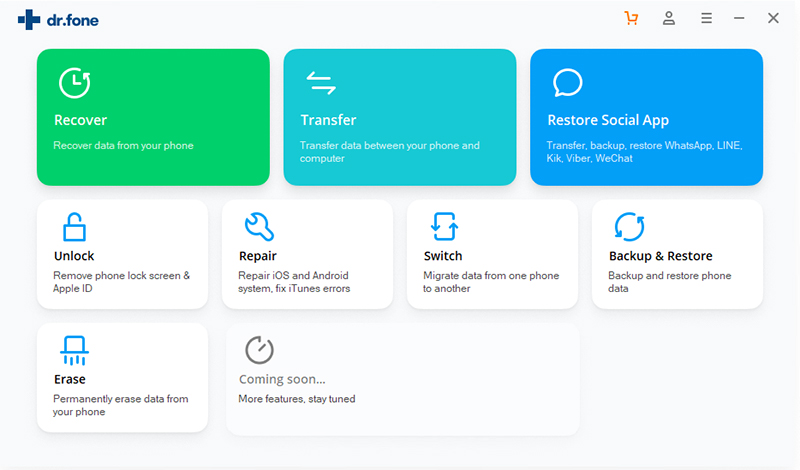
First of all, please download the iOS Toolkit on your computer, we provides Windows version and Mac version for users to transfer or manage iPhone files on computer. After launching the program on computer, then click “Transfer” function to enter the selected function interface.
u.fone ios toolkit - transfer

Step 2. Click “Transfer iTunes Media to Device”
Once your iPhone Xsis connected, click “Transfer iTunes Media to Device” on the primary window.

Transfer iTunes Media to iPhone Xs

Step 3. Scan All Contents from iTunes
Then click “Start” button to scan the media files in your iTunes library, including music, video, Podcast, audiobooks, playlists, artworks, etc. When the scan is complete, it will display all media file types, you can see how may songs in the iTunes library.

scan iPhone music

Step 4. Transfer Music from iTunes Library to iPhone Xs
Please select the “Music” file type you would like to transfer to iPhone Xs from iTunes library, and click “Transfer” button to start syncing all songs from iTunes to iPhone Xs easily.

sync iTunes music to iPhone Xs

Within a few minutes, the media files on iTunes library will be transferred to iPhone X successfully.

Tips: The entire process will not erase the existing data in your iPhone, and you will save a lot of time, this is something that iTunes can’t do! So iOS Toolkit – iOS Transfer is the best iTunes alternatives.

Download the iOS Toolkit – iOS Transfer and try to manage and transfer music from iTunes, PC/Mac, old Android/iOS to your new iPhone XS/ XS Max and iPhone XR.

Part 2: How to Transfer Music from Computer to iPhone XS without iTunes

Have download lots of downloaded songs on computer, if you want to transfer your songs without having to erase any data on your iPhone XS. Let’s show you how to put music from PC/Mac to your new iPhone X with the help of this iTunes alternatives.

Step 1. Download and Run the iOS Toolkit on PC or Mac
Download and launch iOS Toolkit on computer and click “Transfer” function.

d_win d_mac
d_win d_mac

Then connect your iPhone Xs to PC, your iPhone device will be recognized and displayed in the primary window. No matter you transfer photos, video or music, the steps are similar.

transfer music to iPhone Xs

Step 2.Click “Music” Tab
Once your iPhone Xs device is connected, go to “Music” tab at the top of the program, the program will analyze your iPhone and display all exiting songs.

add music to iPhone Xs

Step 3. Put Music File/Folder from Computer to iPhone Xs
Then click on the “Add” Music icon on the top to add musics to the interface, the program will help you transfer music files from computer to iPhone Xs device. You can select to add one music file to iPhone Xs by this iPhone manger tool, or add all music files in a folder, and then import the music folder to the device.

transfer music to iPhone Xs

Select the music file(s) and tap on “OK”. All selected music files will be added to your iOS device in a few minutes.

add music to iPhone Xs Max

In additional, you can also go to “Video” and “Photo” tab to video/photos from computer to iPhone Xs directly.

Transfer Music, Photos, Videos from iPhone XS to Computer

If you want to backup all media files from iPhone to computer, please select the music files you would like to backup to computer, and click the “Export” icon. It not only supports to transfer music files from iPhone to computer local storage, backup also enables user transfer music, videos, photos, iTunes U/Podcasts/Ringtone/Audiobooks to iTunes library.

import music from computer to iPhone Xs

After select the contents you want to backup to computer local or iTunes library, then click “OK” to start the backup process. The all selected music files will be transferred to your PC/iTunes quickly.

export music from iphone to computer

Other than music, you can also add ringtones to iPhone Xs or make ringtones for your new iPhone Xs/ Xs Max or iPhone XR.

Now, please free download the iOS Toolkit – Transfer and try to sync music, photos, videos to your new iPhone to enjoy it’s latest features.

d_win d_mac
d_win d_mac

Related Articles:

How to Transfer Media Files between iPhone/iPad/iPod and Computer

How to Transfer Data from Android to iPhone X/Xs (Max)

How to Transfer Data from iPhone to Transfer Data to iPhone XS/XS Max/XR

iPhone Manager: Best iTunes Alternatives to Manage your iPhone XS/X Files on Computer

iTunes to iPhone XS Transfer

How to Download and Convert Apple Music Playlist as M4A

[Summary]: If you want to download Apple Music songs, playlist to DRM-free M4A, please grab Apple Music Converter, which can losslessly convert Apple Music songs to M4A with ID tags retained.

“I know the songs in Apple Music app that are formatted as . m4p, but is it possible to download Apple Music playlist as M4A format?”

All your downloaded Apple Music songs, playlist are DRM protected AAC audio files in M4P format, and the M4A is an unprotected AAC audio format that you can use widely without any restrictions. If you want to remove the DRM from Apple Music into DRM-free M4A, for playback on more smart devices like Samsung Galaxy S/Note/Tab, HTC, LG, Sony, Moto, Google Pixel, music players, or gaming consoles, Apple Music Converter is your perfect partner.

1 Click to Convert Apple Music to M4A Easily

To download and convert Apple Music songs to M4A files, what you need is an Apple Music to M4A Converter, this UkeySoft Apple Music Converter can bypasses these annoying limitations by removing DRM protection from Apple Music songs legally, it can also convert Apple Music to M4A and various unprotected audio formats, such as MP3, M4R, AC3, AU, AAC, FLAC, AIFF, or MKA. And it supports 1X to 16X faster conversion speed and keeps original metadata to MP3, M4A audio files. As a result, you are able to download Apple Music playlists, songs as M4A. Take a full look what this powerful Apple Music Converter can do for you.

Convert Apple Music to M4A, MP3, M4R, WAV, FLAC without quality loss.
Convert iTunes music and Audiobooks to MP3, M4A, etc.
All ID3 tags and metadata kept after conversion.
Perform 16X faster conversion speed.
Rename and sort output M4A songs by ID tags and characters.
Perfectly run on latest Windows 10, macOS High Sierra and iTunes version.

d_win d_mac

Easy Guide to Download Apple Music Playlist as M4A

Step 1. Launch Apple Music Converter

Firstly, download and install the Apple Music Converter on your computer. Then launch it and iTunes will be opened along with the program, purchased M4P tracks and Apple Music M4P tracks will be listed as playlists in left panel.

launch Apple Music Converter

Step 2. Select Apple Music Playlist

Since this Apple Music Converter supports batch conversion perfectly, you can select as many tracks as you want or select entire playlist by ticking the first checkbox in the label bar.

select Apple music playlist to convert

Step 3. Choose M4A as output format

In the output format list, you can see MP3, M4A, WAV, FLAC, AC3 and some other audio formats. Here choose “M4A – MPEG4 Audio” as we need to convert Apple Music to M4A. Also, you can click Options to adjust conversion speed if necessary.

Select M4A as Output Format

Step 4. Convert Apple Music Playlist to M4A

Now you can simply click “Convert” button to convert your Apple Music to DRM-free M4A format quickly.

convert apple music m4p to m4a

When the conversion is done, you can simply click “Open Output File” to get output M4A songs. And you can copy output M4A to iPhone, Android phones, PSP, PS3, Sony Walkman or other MP3 players for playback.

get m4a files

Besides, after converting Apple Music to M4A, you can also set M4A as your ringtone on iPhone or Android mobile phones.

d_win d_mac

Related Tutorials:

How to Play M4P Apple Music on Android

How to Play M4P Apple Music M4P on iPhone iPod for Free

How to Play Apple Music M4P on MP3 Players

How to Convert Purchased Apple Music to MP3

How to Convert Spotify Music to M4A

How to Convert iTunes M4P to MP3 on Mac

Download Apple Music Playlist as M4A

How to Convert Audible AA/AAX Audiobooks to MP3 on Mac

Hi. I need some help. I just purchased some audiobooks from Audible. I want to listen to the Audible audiobooks as MP3 files. Is there any way to remove the DRM restriction from the audiobooks on Mac for listening without limits?

Audible providing tons of audiobooks in various types for audiobook users. Audible offers an easy and popular way for people to listen to audiobooks on Mac, Windows, iOS, Android, Windows phone, etc,. However, to protect the copyright of the audiobooks, Audible has encoded in the books with AA and AAX format with Audible’s Digital Rights Management (DRM) technology. In result, unauthorized playback is not allowed. In other words, Audible AA/AAX audiobooks are only playable on specifically selected devices and media players, other players are not available, like Creative Zen, Zune, PSP, Sony Walkman, Blackberry, etc,. How to listen to Audible audiobooks anywhere you want without incompatibility?

Remove DRM from Audible Audiobooks on Mac

iTunes Audio Converter for Mac is an all-in-one Audible audiobooks DRM removal to convert DRM-protected Audible audiobooks from AA, AAX to MP3 or other common audio formats by removing DRM restriction from Audible audiobooks on Mac, like M4A, AC3, AAC, AIFF, AU, FLAC, M4R, MKA. Customize ID3 tags and chapter info according to your needs, 16X fast converting speed with lossless quality kept. After this, you can save the converted audiobooks like common audio files without DRM-protected, transfer the converted audiobooks to any audio storage device for playing without limits, like MP3 player, Sony Walkman, PSP, etc,. Moreover, iTunes audio converter is capable of convert Apple Music/iTunes music/iTunes audiobooks to DRM-free files.

d_win d_mac

How to Bypass DRM from Audible Audiobooks

Step 1.Run iTunes Audio Converter for Mac
To start with, download and run iTunes Audio Converter for Mac on the computer.

Step 2.Import Audiobooks to Conversion List
Import Audible AA or AAX audiobooks to iTunes Library. iTunes Audio Converter for Mac will automatically load all files from iTunes, add the audiobook to iTunes.

Launch iTunes and click File > Add File to Library. Browse to the locating of Audible audiobook file. Select audiobooks you want to import and then click Open.

add iTunes Audio Converter for Mac

Step 3. Adjust the Output Format
Click the checkbox of the program before the Audible audiobooks, choose the output format of converted audiobooks. Here are 9 output formats for you to choose: MP3, M4A, AC3, AAC, AIFF, AU, FLAC, M4R, MKA. In this case, you should select “MP3”. You can custom the output folder, sampleRate, etc,.

adjust output settings

Step 4. Bypass DRM from Audible Audiobooks
Click “Start Convert” button to begin bypassing DRM from Audible audiobooks with fast speed.

convert audible audiobooks to MP3

Some minutes later, you will get DRM-free audiobooks with its original audio quality. Now you can listen to the converted Audible audiobooks with MP3 format.

d_win d_mac

More Audiobooks Conversion Tips:

How to Remove DRM from Audible Audiobooks

How to Sync iTunes Audiobooks to MP3 Player

How to Keep Audiobooks in USB Drive

How to Burn iTunes Audiobooks to CD

The Best Way to Remove DRM from iTunes Audiobooks

How to Remove DRM from Apple Music on Mac

Convert Audible Audiobooks to MP3 on Mac