Category Archives: Backup Restore

Restore iTunes/iCloud Backup to Samsung Galaxy S10/S10+

[Summary]: If you have backup files on iCloud or iTunes, follow this tutorial to restore iCloud or iTunes backup to the new Samsung Galaxy S10 or S10+ easily.

Samsung Galaxy S10 and S10 Plus

The Samsung 10th Anniversary smartphone lineup will include the Galaxy S10, S10+ and S10e. According to rumors, the higher specification model may be the first to use Samsung’s Infinity-O display, display fingerprint scanner and three cameras. We are all looking forward to their arrival.

“How can I transfer data from iCloud to Samsung Galaxy S10”? Upgrade your phone from an old iPhone 4/4S/5/5S/6/6S/7/8/X to Samsung Galaxy S10/S10+? Many people will encounter this problem when you are used to backing up your personal files from your iPhone or iPad to iTunes/iCloud. Obviously, you can restore iTunes backed up files to almost any iDevices. But how to sync contacts, text messages, photos, videos, call logs, app data and more from iTunes or iCloud backup to Samsung Galaxy S10, a completely different platform from the iPhone?

In order to enable iTunes / iCloud backup to be restored to Samsung Galaxy S10 / S10 +, you need a professional third party software, and Phone Switch is generated. Android ToolKitBackup & Restore is designed to help users transfer file types like text messages, call logs, contacts, photos, music, videos, notes, and applications between Android or iOS devices. Of course, it also has a useful feature that helps you download data from your iCloud / iTunes backup to your Android device. With its help, syncing your iCloud / iTunes backup to the Samsung Galaxy S10/S10+ is an easy job. This software works well for cross-platform data transfer, from iOS to Android and vice versa, as well as backing up data from Android/iPhone to a Windows PC or Mac computer. When needed, you are allowed to restore individual data because it allows you to preview before restoring and selectively check the content you want.

Now get the right free trial by clicking the below downloading icon and we’ll guide you through each of them in detail.

d_win d_mac
d_win d_mac

Part 1: How to Restore iCloud Backup to Samsung Galaxy S10

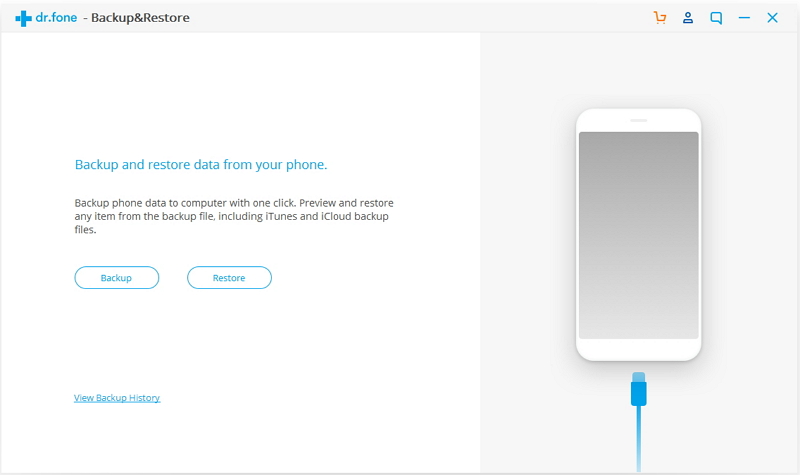
Step 1. Connect Samsung Galaxy S10 to Computer

Please follow the installation instructions to install the Android Toolkit – Backup & Restore program to your computer after downloading. Running it you will find that the program not only supports data transfer, but also has other useful advantages such as data recovery. In this case, you need to go into the “Backup & Restore” mode. Don’t forget to connect your Samsung Galaxy S10 device to your computer.

android toolkit home page

After connect your Samsung phone to the computer, then click the “Restore” button in the middle of the screen if you gain the screen as below.

ios device backup restore

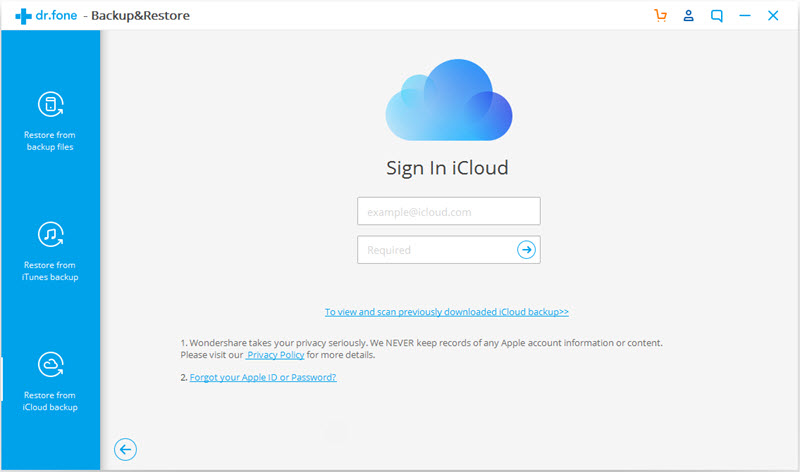
Step 2. Sign in iCloud Account

Several restore options are displayed in the left column, please click “Restore from iCloud backup”. Then get all the backup content by filling in the iCloud account you used for iCloud backup.

sign in icloud

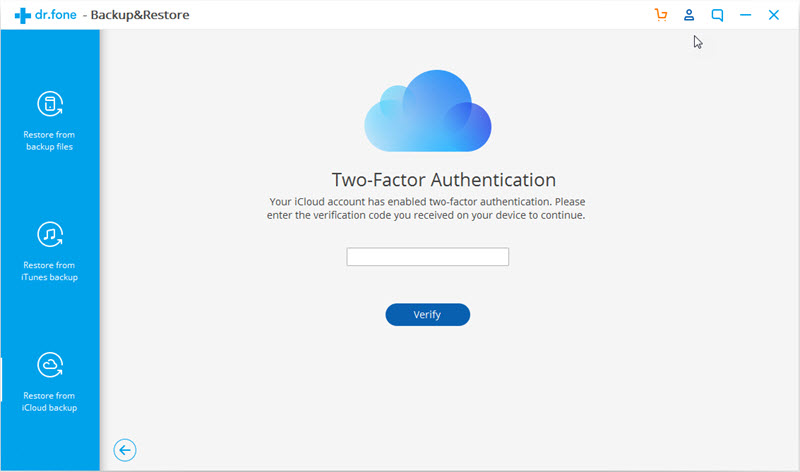
Note: You may have enabled two-factor authentication for your iCloud account. In this case, the verification code will be sent to your iPhone. Type the verification code you received and click “Verify”.

verify icloud id

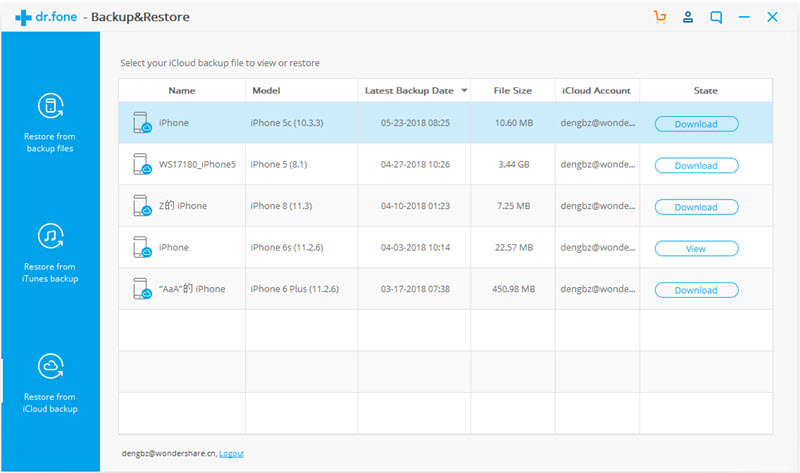
Step 3. Download iCloud Backup File

You will successfully get all the backups for this account. Select one of the backups you wish to restore and click “Download” to save the file to a local directory on your computer.

download icloud backup file

Step 4. Restore iCloud Backup File to Galaxy S10

Then the Android Toolkit – Backup & Restore will automatically read and display all the data in the downloaded iCloud backup file. Preview the data and check all or part of the files, click “Restore to Device”.

select icloud backup data to restore

Immediately, there is a window pop up, where you can select your Samsung Galaxy S10 from the drop down list and click “Continue” to restore the selected data from iCloud backup to Samsung device.

confirm to restore to android

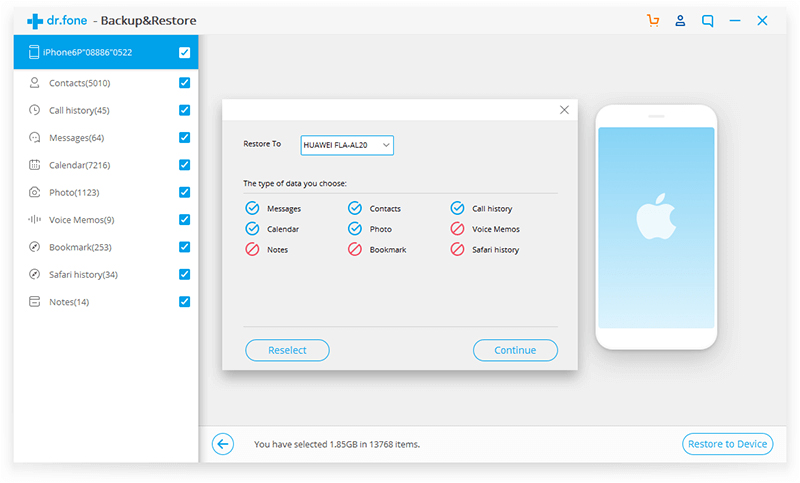
Note: Data types such as voice memos, Notes, bookmarks, and Safari history are not supported for restoring from iCloud backups to Android devices.

Part 2: How to Restore iTunes Backup to Samsung Galaxy S10

Step 1. Run Android Toolkit – Backup & Restore Software

This step is the same as the first step of Part 1. Run on the software and connect your Samsung phone to PC. Locate to the “Restore” from “Backup & Restore” option from the main screen.

ios device backup restore

Step 2. Select Restore from iTunes Backup

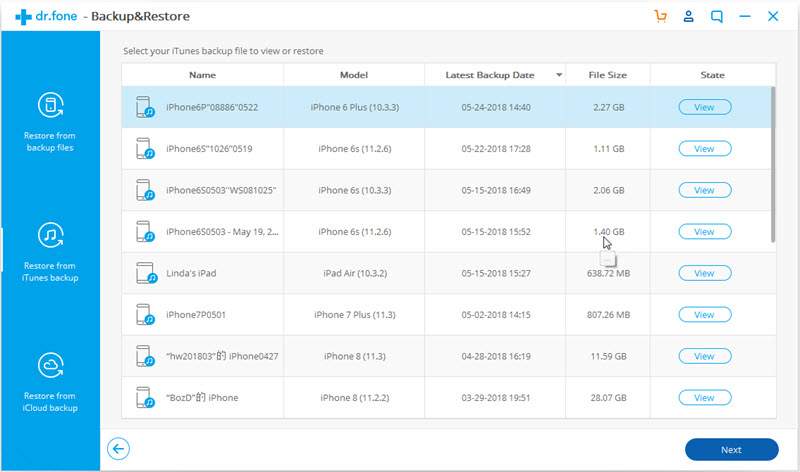
Select “Restore from iTunes Backup” from the left column. Soon, the program will detect the location of the iTunes backup files on your computer and display them one by one on the right side of the window.

detect itunes backup files

Step 3. Preview & Sync Data from iTunes Backup to Samsung

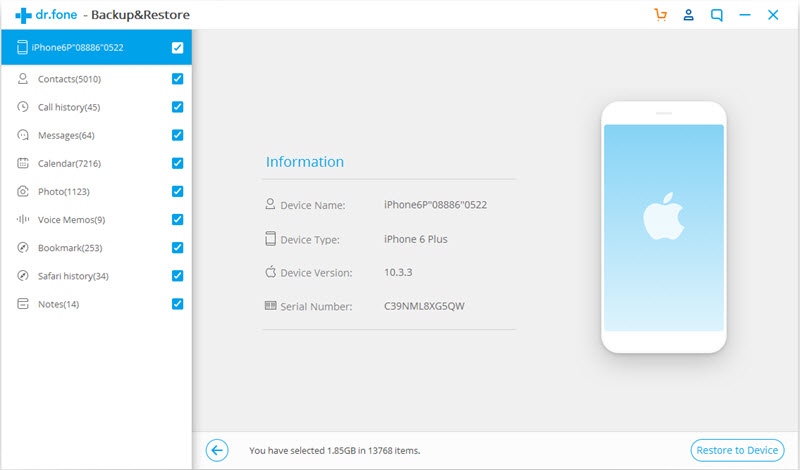
You can choose the latest iTunes backup and click on “View”, or you can choose another you want. This software perfectly reads and displays all the details from the iTunes backup file by data type.

confirm android device to restore to

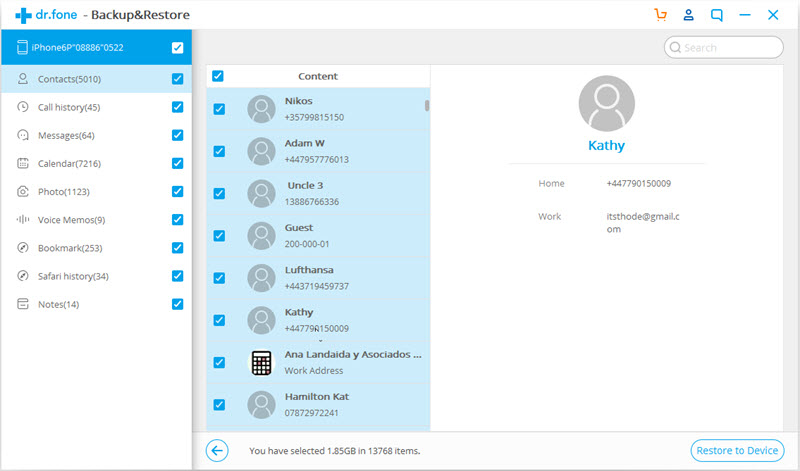
Next, select the data you need to restore by data type and click “Restore to Device”. You are able to choose all or some of the items.

select itunes backed up data to restore

In the new dialog box that pops up, select your Samsung phone and click “Continue” to confirm restoring iTunes backup to Samsung Galaxy S10/S10+.

confirm to restore to samsung galaxy s10

d_win d_mac
d_win d_mac

More Android Toolkit Tips:

How to Transfer Photos from Samsung to Computer

How to Backup Files from Android Phone to Mac

How to Backup Text Messages from Samsung Galaxy

How to UnLock your LG Phone Screen Lock

How to Move WhatsApp Messages from iPhone to Galaxy S10

Restore iTunes/iCloud Backup to Samsung

Android Backup & Restore: Restore iCloud/iTunes Backup to Android

[Summary]: Want to transfer iCloud or iTunes data to your new Android phone? This aritcle teach you how to restore iCloud/iTunes backup to Android phone without affecting existing Android data and settings, you can also learn how to backup and restore your Android data on computer.

I am searching an iCloud to Android restore tool to restore iCloud data to Samsung Galaxy S10+. Any suggestions to restore iCloud backups to Android phone? Please let me know. Thanks advanced.

I have backed up iPhone data to iTunes, but my iPhone was lost, then I have bought an new Huawei P30 Pro, since all iPhone data stored in iTunes library, can I restore data from iTunes to Huawei P30?

Here is the best Android phone overall in 2019, which is the most popular Android smart phone? We have listed some popular Android phones for you to choose: Huawei P30 Pro, Huawei Mate 20Pro, Samsung Galaxy S10 Plus, Samsung Galaxy Note 10+, Google Pixel 3, OnePlus 7 Pro, Samsung Galaxy S10e, OnePlus 6T, Samsung Galaxy S9 Plus, Google Pixel 3a, Samsung Galaxy Note 9, Samsung Galaxy A50, Moto G7 Power, LG G8 ThinQ, Sony Xperia XZ3, Xperia XZ1, Sony Xperia L2, Sony Xperia XA2, Sony Xperia XZ2 Premium, Sony Xperia 10, Xiaomi Mi 9, Xiaomi Mi 8 Pro, Xiaomi Pocophone F1, Oppo A9, OPPO Reno 10x Zoom Edition, OPPO Reno, Meitu T9, Meitu M8, Meitu V6. When you have purchased an new Android phone to replace the old iPhone, the first thing you need to do is transferring data from iPhone to Android phone, but your iPhone is not in hand, for example lost, damaged, stolen, screen-broken, etc. However, how to transfer data from broken iPhone to Android phone? If you have sync iPhone data to iCloud or backup your iPhone to iTunes before, you can restore data from iTunes to Android phone, or download and restore iCloud backup to Android.
Also read: Transfer Contacts from Broken iPhone to Android

The rapid development of communication and mobile technology allows mobile phone to become the indispensable tool for all of us in daily life. Mobile phone store all kinds of personal data, which together form a kind of virtual life. Our friends’ phone numbers, photos, text messages, audio, our agenda, the shopping list, personal documents and more. Losing data from Android device is something that unfortunately happens often and with it all that valuable information is going, even it will be heartbroken if your Android was lost or stolen. To prevent losing data on Android under any unexpected situations, you should be aware of the importance of taking a backup for your Android frequently. Thankfully, there is a number of ways to backup your files on Android. For this post, we’ll take a look at the best Android backup & restore tool.

Simple Android Data Backup & Restore Tool

Android ToolKitAndroid Backup & Restore tool is a terrific tool for flexibly backup & restore Android data safely. Supported Android files including contacts, call history, messages, calendar, photo, music, video, audio, application, and even application data(for rooted devices). It could be used to backup Android data to computer safely with one click. More importantly, it allow you to preview and restore backup to any Android/iOS devices selectively(transfer content among Android and iPhone that based on different system), restore iCloud/iTunes backup to Android device directly with easy step. Supports 8000+ Android models based on any brands, like Samsung, Huawe, Google, LG, HTC, Sony, Motorola, etc,.

d_win d_mac
d_win d_mac

More Features of Android ToolKit:

  • Android data recovery, Android SD card recovery, broken Android data recovery.
  • Root Android without data loss.
  • Switch files between Android and iOS devices.
  • Transfer & Android files between Android and computer.
  • Unlock Android lock screen without password.
  • Erase data from Android permanently.

Part 1: How to Backup & Restore Android Device

How to Back up your Android Phone

Step 1. Run Program & Connect your Android Phone to Computer
Run Android ToolKit – Android Backup & Restore on your computer, select “Backup & Restore” among all the functions.

android toolkit home page

Connect your Android phone to the computer using a USB cable. Please make sure you have enabled USB debugging mode on the phone. If your Android os version is 4.2.2 or above, there will be a pop up window on the Android phone asking you to allow USB Debugging. Please tap on “OK“.

android data backup restore

Click “Backup” to start the Android data backup process.

If you have used this program to back up your device in previous, you can view your previous backup by clicking on “View backup history“.

Step 2. Select File Types to Back Up
After the Android phone is connected, select the file types you want to backup. By default, the program has checked all the file types for you, you can unselect the one you don’t need. Then click on “Backup” to go on.

select android files to backup

The backup process will take a few minutes. Please keep the connection of your Android phone and the computer, don’t use the device or delete any data on the phone during the backup process.

backing up android

After the backup is completed, you can click on “View the backup” button to browse the backup file.

android backed up completed

d_win d_mac
d_win d_mac

How to Restore Backup to your Android Phone

Step 1. Run Program & Connect your Android Phone to Computer
Run Android ToolKit – Android Backup & Restore on your computer and select “Backup & Restore” among all the tools. Connect your Android phone to the computer using a USB cable.

check backed up android file

Step 2. Select the Backup File to Restore
Click on “Restore” button, the program will display all the Android backup files from this computer. Select the backup file you need and click “View” to check it.

select android data to restore

Step 3. Preview and Restore the Backup Data to Android Phone
Here you can preview all data in the backup file. Preview and click all the data you need and finally click on “Restore” to recover it to your Android phone.

restoring android data from backup

The whole process will only take you a few minutes. Please keep the connection of your Android phone and the computer, don’t use the device or delete any data on the phone during the restoring process.

restore android data completed

d_win d_mac
d_win d_mac

Part 2: How to Restore iTunes Backup to Android

When you sync iPhone with iTunes, the iTunes application will backup iPhone data automatically, if your iPhone doesn’t in hand, don’t worry, you can restore iPhone data backed up in iTunes to Android phone, you need to use a third-party iTunes to Android transfer.

With Android ToolKit – Android Backup & Restore, you can easily extract, preview, and restore iTunes backup to Android phone/tablet easily, it won’t erase all data and settings off your Android device.

Step 1. Run Program & Connect your Android Phone to Computer
Run Android ToolKit – Android Backup & Restore on your computer, select “Backup & Restore” among all the functions.

android toolkit home page

Connect your Android phone to the computer via a USB cable. After the connection is finish, click “Restore” to begin the restoring process.

ios device backup restore

Step 2. Scan All iTunes Backup History
If you want to restore iTunes data to Android phone, please select “Restore from iTunes backup” from the left column, the software will scan all the location of iTunes backup files on your computer, after scanning complete, you can see all backup history.

detect itunes backup files

Step 3. Preview and Restore iTunes Backup Data to Android
The program will list all types of data, including contacts, text messages, photos, videos and more, select the data you want and click “View” button to view the detail before restore them.

confirm android device to restore to

Preview and select all or some of the data, and click on “Restore to Device” to restore the data from iTunes to Android phone.

restore iTunes data to android

The software will pop up an new windows, then select the desired Android phone and click “Continue” button start to restore iTunes backup to Android.

Note: The selected data can’t be restored if the Android phone doesn’t support the corresponding data type you select, such as Notes, Bookmark and Safari history.

restore iTunes data to android

d_win d_mac
d_win d_mac

Part 3: How to Restore iCloud Backup to Android

iCloud is a good service for us manage data on Cloud, I believe most iPhone/iPad users backup the data to iCloud free, it is a good habit to backup and protect your important data regularly. Once your iDevice is stolen, you can restore iCloud data to iPhone, iPad, iPod or even Android devices, let’s teach you how to download and restore iCloud data to Android phone with 1 click.

With Android ToolKit – Android Backup & Restore, you can easily download and restore iCloud backup to Android, it allows you preview the downloaded data one by one before restoing. What’s more, this Android ToolKit won’t wipe the existing data and settings of your Android phone after restoring. Let’s shows you how to restore contacts, SMS, photos, videos, etc. from iCloud backup file to Android phone.

Step 1. Run Program & Connect your Android Phone to Computer
Run Android ToolKit – Android Backup & Restore on your computer, select “Backup & Restore” among all the functions.

android toolkit home page

Connect your Android phone to the computer via a USB cable, the software will detects it automatically, then click “Restore” starting the iCloud to Android restoring process.

ios device backup restore

Step 2. Login in Your iCloud Account
In this step, please choose “Restore from iCloud backup” from the left side, you will go to next step.

sign in icloud

If you have enabled the two-factor authentication for your iCloud account, a verification code will be sent to your iPhone, please enter the verification code to the below box, and click “Verify“.

verify icloud id

Step 3. Preview and Restore iCloud Backup Data to Android Phone
After verification successful, it means you allow the software analyze and detect all iCloud data. Only few minutes, the software will shows you all the backup history, please select one backup history and click “Download” button to download iCloud data to your computer.

select icloud backup file

After downloading iCloud backup data complete, you can preview all downloaded contents one by one, then select some or all of the contents and click “Restore to Device” to restore to your Android phone directly.

select icloud backup data to restore

The software will pop up an new windows, please select an Android device you want to restore to, and click “Continue“.

Note: Some special data can’t be restored to Android, such as Notes, Voice memos, Bookmark, and Safari history.

confirm to restore to android

d_win d_mac
d_win d_mac

More Android Data Recovery Tips:

How to Recover Deleted Data on Android without Root

How to Recover Deleted Photos on Android

How to Restore Lost Data from Rooting Android

How to Recover Lost Data from Android SD Card

How to Transfer iPhone Data to Samsung/Android

4 Ways to Backup & Restore Android Phone or Tablet

How to Manage Android on Computer

Safely Backup & Restore Android

How to Transfer Music/Videos Files between Huawei and Computer

With the rapidly development of mobile technology, more and more new Android models have released in these years. Mobile phone plays an important role in out daily life and became more and more powerful in business. Huawei is one of the biggest mobile phone companies in China, it is a modern Android brand and keep with the current trend. In fact, Huawei has been attracting lots of users in the domestic smart phone market because of its affordable price and excellent user experience.

As we know, the good audio quality of mobile phones are so important to us. There is no doubt that people like to save media files on mobile device, especially music, videos, photos and more. Most of us listen to music or watching/taking videos on mobile phone for entertainment frequently. However, just as nothing is perfect in the world, these precious files can be deleted or erased due to various reasons, and they can easily occupy the storage of mobile device. At this moment, getting a useful tool to backup media files from phone to computer is necessary.

Transfer Media Files between Huawei and Computer

Android & iOS Manager can be the best helper to transfer music, videos between Huawei and computer with one click. Except music and videos, it allow to transfer other files among device, computer and iTunes, including photos, playlist, contacts, SMS. It is an all-in-one data manager tool for managing files for bot of Android device and iOS device. Other functions of Android & iOS Manager insist of Rebuild iTunes Library, Backup Device, Restore Device and GIF Maker. It compatible wit all Android and iOS models, like Huawei Mate RS, Huawei P20/P10/P9, Huawei Mate 10/9, Huawei Honor; ZTE, Samsung, Google Pixel, HTC, OPPO, Lenovo, Xiaomi, Motorola, LG; iPhone, iPad.

d_win d_mac

Part A. How to Backup Music from Huawei to Computer

Step 1. Run Android & iOS Manager on the Computer
After running the program on computer, select “Music” Tab
Once your media loads,choose your wanted songs and click “Export” > “Export to PC“.

select music from huawei to pc

Step 2.Backup Music from Huawei to Computer
This brings up your file browser window,choose a save path to save songs from your Huawei to computer.

You can simply Drag and Drop music files from Huawei phone to computer.You can also transfer the whole music playlist from Huawei to computer in one click.

export huawei music to pc

d_win d_mac

Part B. How to Backup Videos from Huawei to Computer

Step 1. Run Android & iOS Manager on the Computer
After running the program on computer, select “Videos” Tab
Once your media loads, choose your desired videos and click “Export” > “Export to PC“.

transfer videos from huawei to pc

Step 2. Backup Videos from Huawei to Computer
This brings up your file browser window. Select a save path to store the videos from your Huawei to computer.You can simply Drag and Drop videos from Huawei to computer.

d_win d_mac

Related Articles:

How to Transfer Files between Huawei and Computer

How to Transfer Photos between Huawei and Computer

How to Transfer Data from Samsung to Huawei

How to Transfer Data from iPhone to Huawei

How to Recover Deleted Files from Huawei Phone

How to Backup and Restore Huawei Phone

How to Manage Huawei Phone on Computer

Transfer Media between Huawei and Computer

How to Transfer Photos/Gallery between Huawei and Computer

Huawei is one of the biggest smartphone manufacturers in the world. Especially in these years, Huawei has come up with popular models of Android-based smartphones to win over its fans. With a global reach, Huawei smartphones are used by millions of people around the world. One of the concerns is that Huawei camera function is pretty good with high audio quality and advance features, and almost all Huawei models got the good comment from users. Huawei phones will get more and more attention in the future.

Photos are considered as one of our important personal data and losing them can be quite frustrate for the most of us. It is no doubt that Huawei users may stored a large number of photos on their mobile device, may be you are one of them. To keep photos being safely and completely, it is necessary to manage Huawei photos on computer with a reliable solution. Have you encountered any difficulties of transferring photos between Huawei and computer? Read this tutorial and you will learn how to transfer transfer photos/gallery data between Huawei and computer without hassle.

Transfer Photos between Huawei and Computer with One Click

Android & iOS Manager is a great Huawei data transfer tool to help you transfer photos between Huawei and computer with one click. It not only can backup photos from Huawei to computer, but also transferring photos from computer to Huawei. Moreover, it allow to transfer files between Huawei and iTunes, transfer files between Huawei and Android/iOS device. It is such an all-in-one data manager to transfer files for Android device as well as iOS device, the transferable types of files including photos, music, videos, playlist, contacts and SMS. It features with more function such as, Rebuild iTunes Library, Backup Device, Restore Device and GIF Maker. Compatible wit all Android and iOS models, like Huawei Mate RS, Huawei P20/P10/P9, Huawei Mate 10/9, Huawei Honor; Google Pixel, HTC, Samsung, OPPO, Lenovo, Motorola, LG; iPhone, iPad.

d_win d_mac

Part A. How to Backup Huawei Photos to Computer

Step 1. Run Android & iOS Manager on the Computer
Run Android & iOS Manager  on computer and connect your Huawei to it. Click “Backup Photos to PC” on the interface of program.

Android & iOS manager home page

Step 2. Backup Photos from Huawei to Computer
This brings up your file browser window. Select a save path to store the photos from your device to the computer.

transfer photos from huawei to pc

Click “OK” to complete the process.

d_win d_mac

Part B: How to Transfer Photos from Computer to Huawei

Step 1. Run Android & iOS Manager on the Computer
Firstly, tun program on the computer, connect your Huawei to the computer via a USB cable.

Android & iOS manager home page

Step 2. Transfer Photos from Computer to Huawei
In the primary window, click “Photos” from the top menu. All albums on your device show up. Choose one album to save the importing photos.

Then, click “Add” and choose “Add file” or “Add folder“. When the file browser window pops up, find your desired photos or photo album and then import them.

transfer photos from pc to huawei

That’s the simple steps on how to move photos from computer to Huawei.

d_win d_mac

Related Articles:

How to Transfer Files between Huawei and Computer

How to Transfer Photos from Samsung to Huawei

How to Transfer Photos from iPhone to Huawei

How to Recover Deleted Photos from Huawei Phone

How to Backup and Restore Huawei Phone

Transfer Photos between Huawei and Computer

How to Transfer Files between Huawei and Computer

Summary:To prevent data loss on your Huawei smartphone, you should know some skills to protect your data stored on device. This post aims to tell you how to transfer photos, music, videos and more files between Huawei phone and computer, to backup Huawei or restoring files on Huawei with one click.

Huawei is one hot brands of Chinese smartphone, it has been making a host of Chinese best-selling smart phones. Personal data that stored on our mobile phone play an important role in life, especially photos, music, videos and more. Since aware of the importance of phone data, it is quite significant that this information must be protected before any disaster happens. In fact, data saved on Huawei are easy to face the data loss problem. Files will be missing due to all kinds of circumstances, like system corruption, virus infection, system formatting, etc,.

What will you do if you suffer data loss on your Huawei device? To backup data is the first choice for most people. Normally, people will transfer files between phone and computer using a USB cable. As we know, sync files via a USB cable on Android device should enable USB debugging on it. Unfortunately, it may be not always work since the USB debugging enabling is failed. Luckily, you can turn to Android & iOS Manager for help. This smart tool can easily transfer all files between Huawei and computer with one click, help to backup Huawei to computer safely and restore backed up to Huawei completely. It will provides you with the most efficient and simple way to complete the files transfer job on Huawei phone.

One Click to Transfer Files between Huawei and Computer

You can check this Android & iOS Manager, is an outstanding and creative tool to transfer files between Huawei phone and computer with one click. This program has been helping Android and iOS users to manage files for their device in no effort, including photos, music, videos, playlist, contacts, SMS and apps. It is an all-in-one data manager tool to transfer files between device and computer, transfer files between device and iTunes, transfer files between two mobile devices. Furthermore, it features with Rebuild iTunes Library, Backup Device, Restore Device and GIF Maker. Compatible wit all Android and iOS models, like Huawei Mate RS, Huawei P20/P10/P9, Huawei Mate 10/9, Huawei Honor; Google Pixel, HTC, Samsung, OPPO, Lenovo, Motorola, LG; iPhone, iPad.

d_win d_mac

Part 1. How to Backup Huawei Photos to Computer

Step 1. Run Android & iOS Manager on the Computer
Run Android & iOS Manager on computer, connect your Huawei phone to computer. Click “Backup Photos to PC” on the interface of program.

Android & iOS manage home page

Step 2. Backup Photos from Huawei to Computer
This brings up your file browser window. Select a save path to store the photos from your device to the computer.

transfer photos from huawei to pc

Click “OK” to complete the process.

d_win d_mac

Part 2. How to Backup Huawei Music to Computer

Step 1. Run Android & iOS Manager on the Computer
After running the program on computer, select “Music” Tab
Once your media loads,choose your wanted songs and click “Export” > “Export to PC“.

select music from huawei to pc

Step 2.Backup Music from Huawei to Computer
This brings up your file browser window,choose a save path to save songs from your Huawei to computer.

You can simply Drag and Drop music files from Huawei phone to computer.You can also transfer the whole music playlist from Huawei to computer in one click.

export huawei music to pc

d_win d_mac

Part 3. How to Backup Huawei Videos to Computer

Step 1. Run Android & iOS Manager on the Computer
After running the program on computer, select “Videos” Tab
Once your media loads, choose your desired videos and click “Export” > “Export to PC“.

transfer videos from huawei to pc

Step 2. Backup Videos from Huawei to Computer
This brings up your file browser window. Select a save path to store the videos from your Huawei to computer.You can simply Drag and Drop videos from Huawei to computer.

d_win d_mac

Related Articles:

How to Transfer Data between Huawei Phones

How to Transfer Photos between Huawei Phones

How to Transfer Music between Huawei Phones

How to Backup Android Data to Computer

How to Recover Deleted Data from Huawei Phone

How to Backup and Restore Huawei Phone

How to Backup Old iPhone & Restore to iPhone X

Summary: The new iPhone model always catch people’s attention, especially those who can’t wait to upgrade their device to the latest one. In this post we walk you through the absolutely easy and efficient way to backup everything from that old iPhone and then restoring backed up to the brand-new iPhone X.

I bought a new iPhone X for upgrading, the thing bother me is that I try to sync the data from my old iPhone with iTunes and then restoring it to the new device, the previous data saved in iTunes will be removed. Is there an other way to backup and restore iOS data without overwriting? Any suggestions?

iPhone X now is the most attractive product of iOS device, it comes with many new technologies and features like super Retina display, TrueDepth camera, Face ID (facial recognition), Animoji, wireless charging and more. It is awesome to upgrade to new iPhone X from iPhone 5/5S/6/6S/7. When you get the shiny iPhone X model, you’ll need to move all data from the old iPhone to the new iPhone X. Whether you’re using iOS 11 Automatic Setup feature, iCloud backup, iTunes backup or a USB cable, you should backup the old device first, then restoring backed up to iPhone X. It seems so complicated and time-costing. What’s worse, these backup ways not allow to perform backing up for selecting files, besides, your old data will be overwritten by new data. Here we will show you a better way that is safer and quicker to backup and restore contents for iOS device.

U.Fone iOS ToolKitiOS Data Backup & Restore tool is the ideal tool for backup & restore iOS data safely and efficiently, including photos, messages, contacts, WhatsApp messages, call history, notes, calendar, app data, etc,. With using this tool, you can backup data from old iPhone, restore backed up to iPhone X or other iOS device. It will not overwrite your previous data, allows to select files instead of the whole device, allows to preview before backing up or restoring. More importantly, U.Fone iOS ToolKit provides you a complete solution to manage your device with the features with iOS Data Recovery, fix iOS system under any abnormal situations. It is compatible with iPhone 5/5S/6/SS/7/8/X, iPad Pro/Air and iPod Touch.

d_win d_mac

Part 1: How to Backup iPhone to PC/Mac without iTunes/iCloud

Step 1. Run U.Fone iOS ToolKit – iOS Data Backup & Restore tool
Once the downloading is successful, install and run U.Fone iOS ToolKit – iOS Data Backup & Restore tool on your computer.

ufone toolkit home page

Choose “iOS Data Backup & Restore” feature in the interface of program. Then locate on “iOS Data Backup“.

ios backup restore

Step 2. Connect Old iPhone to Computer
Please connect your old iPhone to PC or Mac. There are two backup modes on the screen: Standard backup and Encrypted backup. Tick “Standard backup” then click “Start” button to enter the process.

connect iphone to computer

Note: With Encrypted backup, you will need to enter the password you created when you want to restore the backup.

Step 3. Choose Data to Backup
You can see the various data types are supported, you can select the data you want or check all depend on your needs. Then click “Next” to start backing up your iPhone data.

select file type

Step 4. Backup iPhone
Now the software is backing up your data, please be patient.

backup iphone data

Once the backup is completed, you can easily view the backup specific information, including backup time, backup size, device name and so on.

view backup files

d_win d_mac

Part 2: How to Restore Backup Data to iPhone X

Once you have a backup with iOS Toolkit, you can optionally restore data from the backup data to iPhone/iPad/iPod or to Windows or Mac PC depend on your need.

Step 1. Run U.Fone iOS ToolKit – iOS Data Backup & Restore tool
Run the U.Fone iOS ToolKit – iOS Data Backup & Restore tool on computer, select “iOS Data Restore” on the screen under “iOS Data Backup & Restore” option.

restore backup

Step 2. Select a Backup
All backups will be displayed on the page. Select a backup you want to restore.

select a backup

Step 3. Select Data to Restore to iPhone X
You are allowed to view the detailed backup data. Choose items that you want to restore, such as contacts, messages, photos, videos and more.

Choose Contacts from Backup

restore backup contacts

Choose Photos from Backup

restore backup photos

After selecting data, choose to tap on “Restore to Device” or “Restore to PC” option. In this case, you should select the previous one.Connect your iPhone X to the computer, it will be detected soon.

restore to device

Click “Restore” and go on.

Step 4. Start Restoring Files from Backup
Then it will begin the restoring job on iPhone X. After the data is completed, click “OK” to complete the process. You could check the restored files on your iPhone X.

d_win d_mac

More iPhone X Tutorials You can Check:

Transfer Photos between iPhone X and Windows 10/8/7 without iTunes

How to Recover Deleted Data from iPhone X

How to Transfer Android Data to iPhone X

How to Transfer iPhone Files to iPhone X

How to Backup & Restore iPhone X on the Computer Safely

How to Transfer Videos/Music/Photos to iPhone X

How to Manage Files for iPhone X on the Computer

How to Backup & Restore Huawei Mate RS

The Porsche Design Huawei Mate RS, is the first smartphone to exclusively rely on Goodix for its in-display fingerprint sensor technology, with Goodix announcing in a press release that its solution is “exclusively featured” in the device. Goodix’s statement adds that its solution is “the only option in the market that supports both flexible & rigid OLED displays, simultaneously maintaining performance and reliability”.

Huawei has released its super model Porsche Design Huawei Mate RS in these days. It is such an amazing mobile phone, features with Goodix function and others. People stored a large number of personal information on mobile device. Meanwhile, they are facing data loss in every moment. There are some common accidents that may cause data loss in Huawei phone: mistakenly delete important data; phone data disappear because of a update error; factory resetting; data loss caused by rooting failure.

Let’s assume that you’ve purchased newest Huawei Mate RS. Have you ever been wondering how to backup Huawei data such as contacts, videos, pictures, music, etc on the computer with a reliable way? To creating a backup is, probably, the one and only way to help you permanently preserve your files as well as your memory. In this article, we will show you the best method to backup and restore Huawei Mate RS data.

Backup & Restore Huawei Mate RS with A Reliable Way

Android toolkitAndroid Backup & Restore can perform a reliable data backup & restore task for you, help to backup & restore Huawei Mate RS on computer with a few clicks, including contacts, messages, gallery, videos, audios, call logs, documents, etc,. It enables to backup data from device to computer safely, restore backed up to device completely. What’s more, Android toolkit is an all-in-one Android data manager tool, features with Android Data Recovery and Broken Android Data Extraction. Works perfectly well for almost all Android models, like Huawei(Mate RS/Mate 10/Mate 9, P20/P10/P9), Samsung Galaxy S/Note series, Google Pixel, Nokia Android, OnePlus, HTC, Sony, ZTE, OPPO, Motorola, LG, Lenovo, and so on.

d_win d_mac

Part A. How to Backup Huawei Mate RS on Computer

Step 1.Run the Program on the Computer
Download Android ToolKit – Android Backup & Restore tool on the computer and run it, then click on “Android Data Backup & Restore” option to go on.

backup restore mode

Step 2.Connect Huawei to Computer
Connect your Huawei Mate RS phone to the computer via a USB cable. If you are prompted to enable the USB debugging mode on the device,you can follow the instruction to try it.

Step 3.Allow the USB debugging on Huawei Phone
In this section you must allow the USB debugging on your phone for the process,then you should tap “OK” when it shows up on the device screen.

allow usb debugging

Step 4.Select Backup Mode
In this step you should select data you would like to either backup or restore when it is successfully connected. To do a selective backup click “Device Data Backup” option to go on.

choose data backup

Step 5.Choose File Types to Backup
Choose the file types to backup,such as Contacts, Messages,Photos,Videos, etc,. and click “Start“.

Choose Backup Files

Step 6.Select the Folder for the Output Files
Select a location to store your backed up data and click “OK” to continue.

Choose Output Location

Step 7.Begin to Backup Huawei Data to Computer
In the last step,just simply click “Start” button to backup the selected data from Huawei to computer.

backup Huawei Mate RS to Computer

d_win d_mac

Part B. Restore Backed up to Huawei or Other Device

This Android Toolkit – Android Backup & Restore allows to restore the backup to your Huawei phone or other devices if needing. The easy steps are almost as same as the backup process except the step 4.Please locate to the step 4 and in this part you are required to click “Device Data Restore” selection.

choose backed up data

d_win d_mac

Related Guides:

How to Recover Deleted Data from Huawei Mate RS

How to Transfer Android Data to Huawei Mate RS

How to Transfer iPhone Data to Huawei Mate RS

How to iTunes Music/Videos Media Files to Huawei Mate RS

How to Manage Huawei Android on Computer

How to Stream Apple Music to Huawei Mate RS

How to Backup & Restore Huawei P20

Summary: Accident always come without saying a word, this page provides you the best solution to backup & restore Huawei P20 on the computer safely, including contacts, messages, photos and more kinds of personal data.

Backing up phone data is extremely imperative. While we have become so much reliant on technology, we never know when we have surprises or rather, shocks!! Smart phone play an important role in our lives and we have, more than anything and more than ever, become reliant on the smart phones to easily fulfill requirements. We save a lot of personal data on the mobile phone, it definitely needing a way to backup the data on the phone considering any adversities followed by loss of all important data.

Huawei has demonstrated its innovation and creativity for years rolling out delicate and powerful Android phones iteration by iteration. More and more people like to use Huawei phone instead of other Android device. There are various ways which can be used to backup and restore data on Huawei, including various software applications and programs. In this guide, you will get the best ways to backup Huawei data with ease. Let’s see how to backup Huawei phone without hassle, take Huawei P20 for example in this case.

Backup & Restore Huawei P20

The ease of using Android toolkitAndroid Backup & Restore is strongly recommend for you. It is a unique solution which you are looking for. It help to backup & restore Huawei P20 on the computer safely and completely, including contacts, messages, gallery, videos, audios, call logs, documents, etc,. It enables to backup Android data to computer, restore backed up to computer selectively. Additionally, Android toolkit allows to recover deleted data from Android, professionally fix and extract files from broken/frozen Android phone. Works well for almost all Android models, like Huawei(P20, P10/P9, Mate 10/9), Samsung Galaxy S/Note series, Google Pixel, Nokia Android, OnePlus, HTC, Motorola, LG, Lenovo, Sony, ZTE, OPPO and more.

d_win d_mac

Part A. Backup Huawei P20 on Computer Safely

Step 1.Run the Program on the Computer
Download Android Backup & Restore tool on the computer and run it, then click on “Android Data Backup & Restore” option to go on.

Huawei P20 data backup restore

Step 2.Link the Device to Computer
Connect your Huawei to the computer via a USB cable. If you are prompted to enable the USB debugging mode on the device,you can follow the instruction to try it.

Step 3.Allow the USB debugging on Huawei P20
In this section you must allow the USB debugging on your phone for the process,then you should tap “OK” when it shows up on the device screen.

allow usb debugging

Step 4.Select Data to Backup from Device to Computer
Now you can select data you would like to either backup or restore when it is successfully connected. To do a selective backup click “Device Data Backup” option to go on.

choose data backup

Step 5.Choose File Types to Backup
In this step you can choose the file types to backup,such as Contacts, Messages,Photos,Videos, etc,. and click “Start“.

Choose Backup Content

Step 6.Select the Folder for the Output Files
Select a location to store your backed up data and click “OK” to continue.

Choose Output Directory

Step 7.Begin to Backup Huawei Data to Computer
Lastly,just simply click “Start” button to backup the selected data from Huawei to computer.

backup Huawei P20 to Computer

d_win d_mac

Part B. Restore Backed up to Huawei or Other Device

The Android ToolkitAndroid Backup & Restore can also restore the backup to your Huawei phone or other devices when you need. The easy steps are almost as same as the backup process except the step 4.Please locate to the step 4 and in this part you are required to click “Device Data Restore” selection.

choose backed up data

d_win d_mac

More Guides you may be Interested in:

How to Recover Deleted Data from Huawei Mate P20

How to Recover Deleted Photos on Huawei Mate P20

How to Recover Deleted Contacts on Huawei P20

How to Backup and Restore Huawei Phone

How to Manage Android on Computer

How to Transfer iTunes Music to Huawei P20

How to Backup and Restore Samsung Galaxy S9/S10

[Summary]: Want to backup Samsung data to computer before factory reset? Here step by Step guides on how to backup and restore Samsung Galaxy S9/S9+/S10/S10+/S10e data.

I would like to replace my Samsung S7 to Samsung Galaxy S9 but I’m afraid that my precious data lost if my phone get lost or stolen.Is there any good way to back up my Galaxy S9 data to computer? What can I do ?

I want to reset Samsung Galaxy S10+ to factory settings, how to backup contacts, SMS, photos and videos from Galaxy S10 to computer, then I will restore the backups data to the device after resetting complete.

In order to avoid unexpected situations such as possible file deleted or loss, data corruption by accidentally when your Samsung get lost or stolen, virus attack, improper operation, you must back up your phone data to computer regularly. Actually, users can easily back up data from their Samsung without spending too much time and effort. Backing up your data should be an important thing, and you should back up your Samsung data to computer in case you need to restore it. Thankfully, there are many ways to back up your data on your phone. Here we will recommend a safe and effective Samsung Galaxy S10/S9 Backup and restore software to help you back up and restore Samsung Galaxy S10/S9/S8/S7/S6 data.

U.Fone Android Data Backup & Restore is just the right tool that can help you backup and restore Galaxy S9/S10 data including messages, photos, videos, audios, contacts, documents, etc,.It is a reliable solution with a list of features that you can use it to manage data for your Android device, recover deleted data from Android device, restore data from broken Android device. In addition,it can fully apply to various Android brands: Samsung Galaxy S, Samsung Galaxy Note, Google Pixel, Nokia Android, OnePlus, HTC, Lenovo, Sony, Motorola, Huawei, LG, ZTE, OPPO and others.

d_win d_mac
d_win d_mac

More about U.Fone Android Toolkit:

  • Android Data Recovery: Recover Deleted or Lost Files from Android Phone/Tablet/SD card
  • Android Data Backup & Restore: Selectively and Flexibly Backup and Restore your Android Data.
  • Broken Android Data Extraction: Fix Broken, Crashed, Frozen or Locked Phone to Normal and Extract Data from Broken Device.

Part 1: How to Backup Samsung Galaxy S9 to Computer

Step 1.Install the Program on Your Computer
Download Android Data Backup & Restore tool on your computer and run it, then click on “Android Data Backup & Restore” option to go on.

Galaxy S9 data backup restore

Step 2.Link the Device to Computer
Connect your Galaxy S9 to the computer with a USB cable. If you are prompted to enable the USB debugging mode on the device,you can follow the instruction to try it.

Step 3.Allow the USB debugging on Samsung Galaxy S9
In this section you must allow the USB debugging on your phone for the process,then you should tap “OK“when it shows up on the device screen.

allow usb debugging

Step 4.Select Data to Backup from Device to Computer
Now you can select data you would like to either backup or restore when it is successfully connected . To do a selective backup click “Device Data Backup” option to go on.

choose Android data backup

Step 5.Choose File Types to Backup
In this step you can choose the file types to backup,such as Contacts, Messages,Photos,Videos, etc,. and click “Start“.

Choose Backup Content

Step 6.Select the Folder for the Output Files
Select a location to store your backed up data and click “OK” to continue.

Choose Output Directory

Step 7.Begin to Backup Galaxy S9 Data to Computer
Last but not least,just simply click “Start” button to backup the selected data from Galaxy S9 to computer.

backup Galaxy S9 to Computer

Part 2: Restore Data from the Backup to Samsung Galaxy S9 or Other Devices

The U. Fone Android ToolkitAndroid Data Backup & Restore can also restore the backup to your Galaxy S9 phone or other devices when you need. It’s very simple and the steps are almost as same as the backup process except the step 4.Please locate to the step 4 and in this part you are required to click “Device Data Restore” selection.

choose Android data backup

d_win d_mac
d_win d_mac

Related Articles:

How to Recover Deleted Data from Samsung Galaxy S9

How to Recover Deleted Photos from Samsung Galaxy S9

How to Transfer iTunes Music to Samsung Galaxy S9

How to Transfer iTunes Videos to Samsung Galaxy S9

How to Transfer iPhone Data to Samsung Galaxy S9

How to Manage Samsung Galaxy S9 on PC/Mac

How to Stream Apple Music on Samsung Galaxy S9

How to Backup & Restore Samsung Galaxy S8

Samsung Galaxy S8 is releasing recently.The public media claimed that the Samsung Galaxy S8 and Galaxy S8 Plus would be shown off at Mobile World Congress 2017 in late February, although the company won’t reveal it to the public and instead will give select partners a preview of the new smartphones ahead of an official launch.It also features super-slim bezels and a headphone jack, with the latter in particular a cause for celebration. Early reports suggested the S8 would drop the headphone jack, but SamMobile and Android Police now say that it’s sticking around.

backup restore samsung galaxy s8

In these years lately,I often receive some emails,sent by Samsung users,who complained that they accidentally deleted or lost important data from their Samsung Galaxy phone.Worse yet,they were not able to get back the lost data from Samsung,because they didn’t do the backup job regularly.So to be prepare before raining,you should complete the data backup task for your new Samsung phone.How to backup & restore Samsung Galaxy S8 safely on computer?Here I will offer the entire effective solution for reference.

Backup & Restore Samsung Galaxy S8 Safely

Android Tool Kit is your ideal Android data manage tool to backup & restore Samsung Galaxy S8 on computer safely,including contacts,gallery,video,messages,calendar,audio,applications and application data(WhatsApp,Line,Viber,Kik,etc,.).With this powerful tool,you are able to backup Android data to computer completely,restore data to device from backup on computer.Android Tool Kit works well for various of Android devices,including Samsung (Galaxy S8/S7/S6,Note 5),Google (Pixel,Nexus),Motorola,HTC,Sony,Huawei (Mate 9,P9),ZTE and so on.

d_win d_mac

Backup & Restore Samsung Galaxy S8 on Computer Safely

Step 1. Connect Samsung Galaxy S8 to Computer
Launch Android Tool Kit on the computer and from the “More Tools” section,select “Data Backup & Restore” option.Then connect your Samsung device to your computer using USB cable.

android tool kit-backup & restore

Step 2.Select File Types to Backup
Android Tool Kit can be used to back up 9 different file types including messages, call history, calendar, gallery, audio, video, Applications and Application data(WhatsApp,Line,Viber,Kik,etc,.).Please note that to backup app data requires your Samsung device to be rooted.

select data to backup

When the backup is complete, you could click on “View the backup” on the lower left corner of the window to see the contents of the backup file.

Step 3.Selectively Restore Backup Data to Device
You are allow to choose the data you want to restore.Select the different file types on the left and then select the files you want.Click on “Restore” to start.

restore backup files to samsung galaxy s8

d_win d_mac

Related Article

How to Recover Lost Photos from Samsung Galaxy S8

How to Recover Data from Samsung Galaxy S8

How to Transfer iPhone Files to Samsung Galaxy S8

How to Transfer Android Files to Samsung Galaxy S8