Category Archives: Android Solution

3 Best Data Recovery Software for Broken/Damaged Samsung Phone & Tablet

[Summary]: What if your Android smartphones/tablets gets damaged or broken and you can’t access any of data files on it? Top 3 Broken Samsung Data Recovery Software is available to you here. Trying it to extract and recover lost data from dead/broken Samsung phones and tablets.

Read also:

* Recover Contacts from Water Damaged Samsung

* Samsung Galaxy Data Recovery after Factory Reset

My Samsung Galaxy device is completely dead, how can I recover its data. More and more similar voices we can hear on the Samsung forum. Sometimes, our unintentional operation or system problems can cause Samsung mobile phones to crash/dead, such as Galaxy S6 / S5 / S4/ S3/ S2, Note 5 / 4 / 3, accidental drop, water damage and so on. Your Samsung phone is broken, dead, broken screen, smashed screen, unresponsive, brick, frozen or black screen? Regardless of which of the above conditions your phone is in, the result is the same: you can’t access the device, and it’s even less likely to extract and recover any data from your dead device, including contacts, text messages, photos and videos, and more.

The damaged Samsung phone or tablet is no longer working properly. You can’t recover data in it with no response screen. At this time, Broken Samsung Data Recovery software came into being. More efficiently, we have evaluated the Top 3 Broken Samsung Data Recovery Software for you. Either of it can scan your device data even though they are corrupted. With just a few simple steps, you can recover lost data from a dead or damaged Samsung phone without any pressure. Please read further for details.

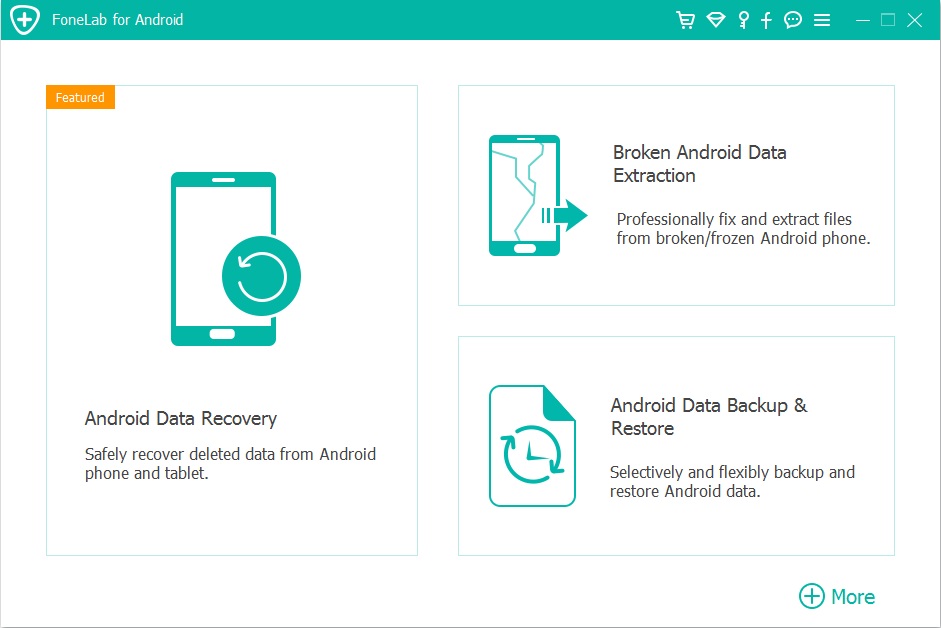
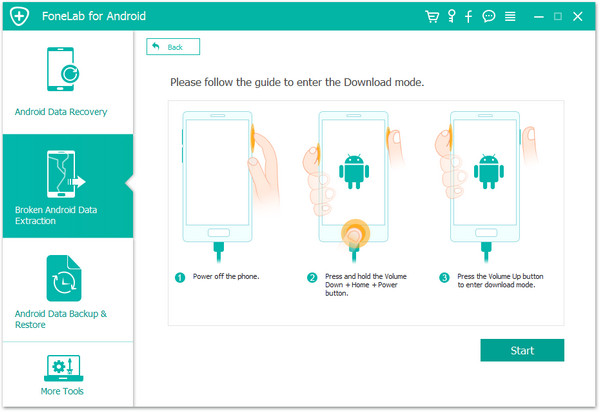
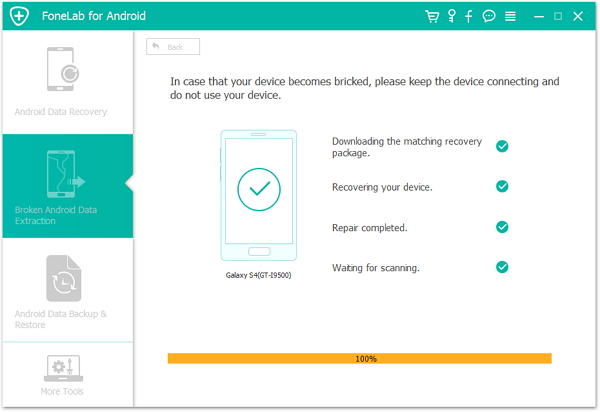
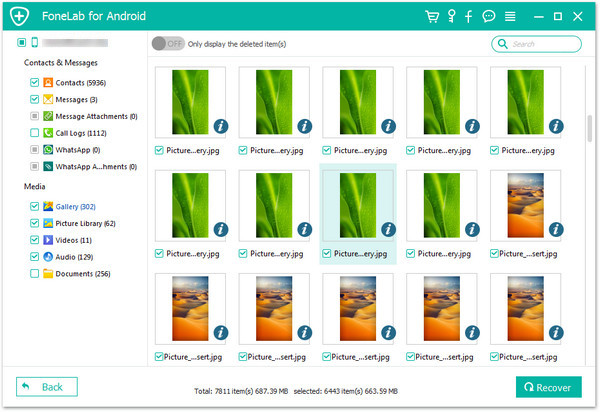
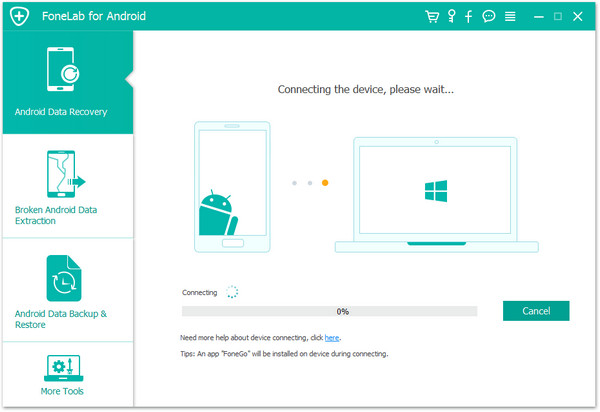
Top 1. Broken Android Data Recovery

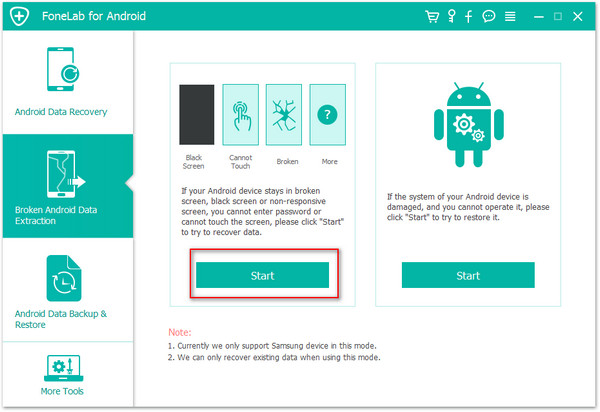
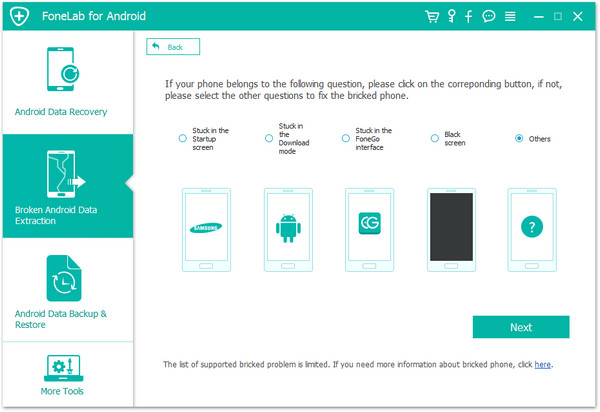
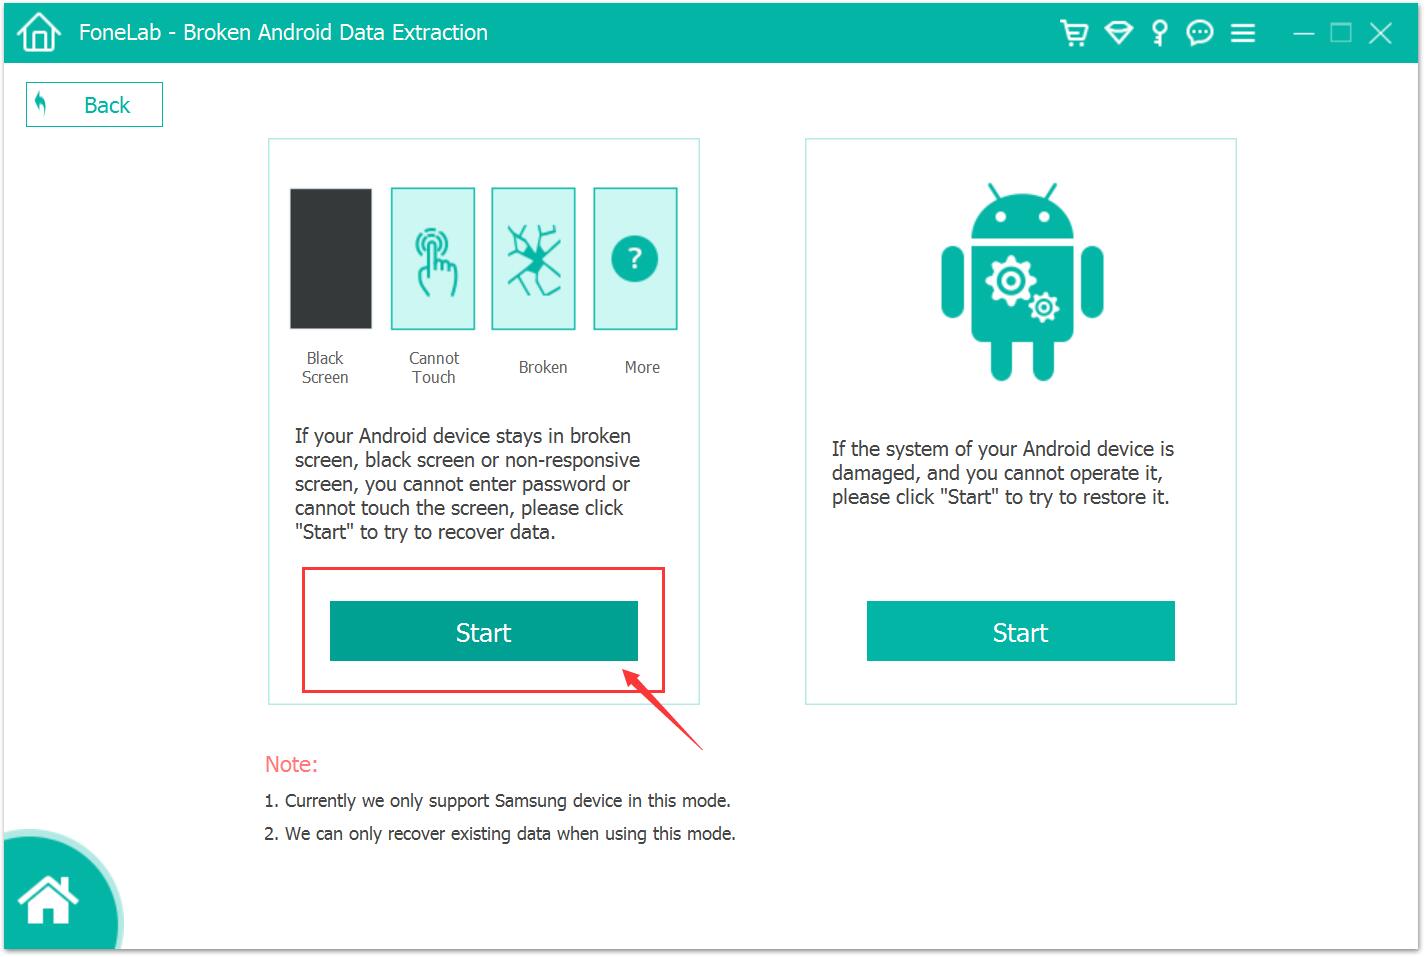
A versatile data recovery software, Broken Android Data Recovery is the first one recommended for you. Samsung phone is disabled after system upgrade failed? Stuck in black screen, non-responsive or locked screen? Or get frozen and can’t access to the system? Broken Android Data Extraction enables you to fix your broken Samsung phone to normal quickly and recover your files back, ever a virus-infected Samsung phone.

Features:

– Fix a disable Android OS to normal in just a few minutes.
– Recover files from Samsung phone’s SD card or internal storage.
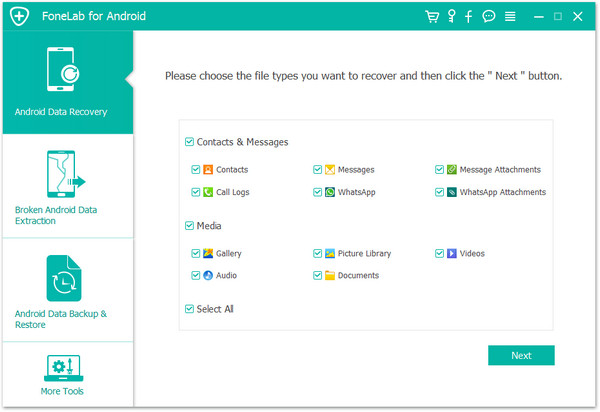
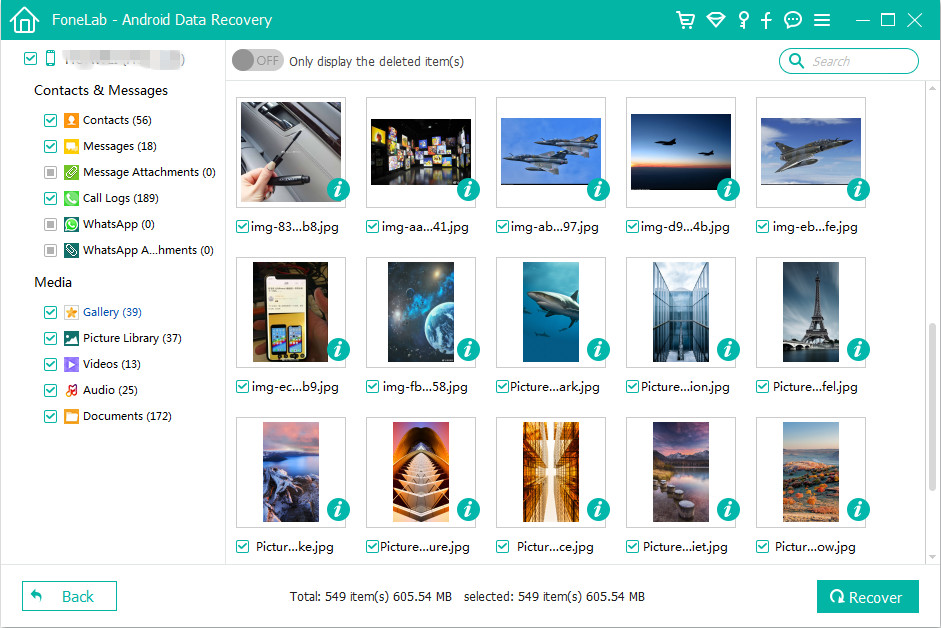
– Restore data types like contacts, SMS, videos, photos, apps and app data and more.
– Recover data from black/broken/smashed/cracked screen, non-responsive, disable USB debugging Samsung Galaxy.
– It won’t keep, modify or leak any data on your device or backup file.
– Free to scan and preview files on Android phone before recovery.

select file types

Pros:

– Skip USB debugging to access and scan all existing files on damaged Samsung phone
– The recoverable files are various, including SMS, contacts, videos, music, photos and so on
– Select the specific file types for time saving
– The process is 100% clean and secure;

Cons:

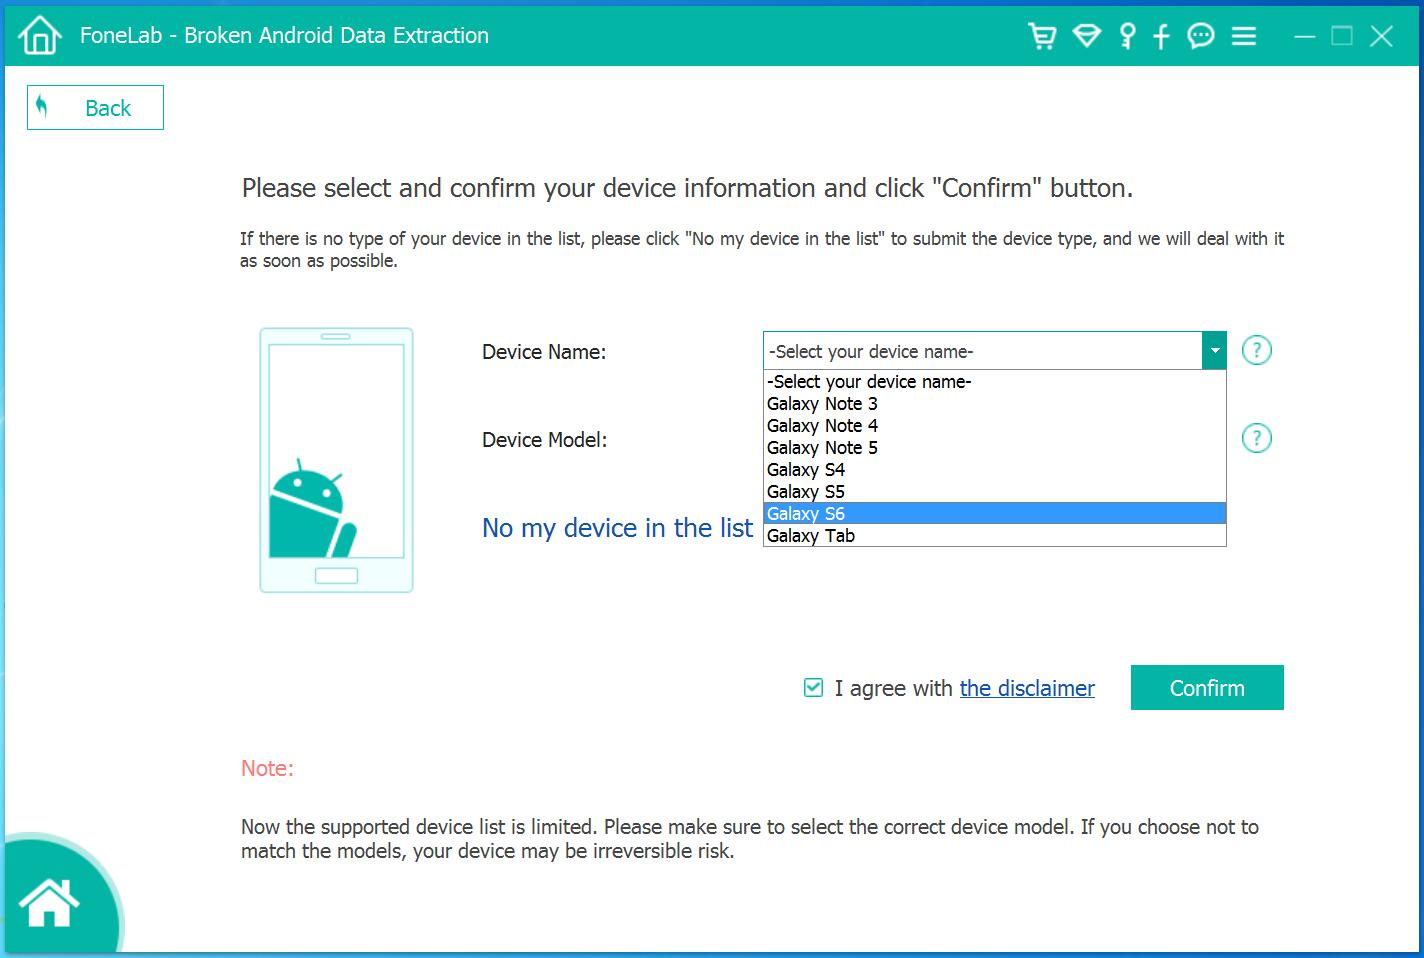
Only compatible with Samsung Galaxy Note 3/4/5, S3/S4/S5/S6, Tab Pro 10.1, etc.

Top 2. U.Fone Broken Android Data Extraction

If you have damaged your Samsung device due to a sudden drop it out or it has broken for other reasons, you can use U.Fone Broken Android Data Extraction software to extract data from damaged or broken Galaxy S, Galaxy Note and Samsung Galaxy Tab Pro 10.1.

Features:

– Restore data such as contacts, SMS, WhatsApp messages, call logs, photos, videos, audios, documents, etc.
– Data Recovery from broken Samsung Note 3/Note 4/Note 5/S4/S5/S6/Tab Pro 10.1;
– Fix broken Samsung system errors and return to normal state.
– Extract data both on internal memory and external SD card.

d_win d_mac

connect broken Samsung Galaxy phone to PC

Pros:

– Scanning is done automatically and quickly.
– Get access data on a damaged device without enabling USB Debugging mode.
– Easy to use and keep your data safe.

Cons:

– Temporarily unable to work on the latest Samsung Galaxy S7, S8, S9, Note 8, Note 9.

Top 3. Dr. Fone – Broken Android Data Recovery

Finally recommended to you is another high-usage software: Dr. Fone – Broken Android Data Recovery. The software can fully retrieve all your files though your Samsung phone or tablet is damaged or dead. It has a very easy user interface and even data lost due to factory reset, accidentally deletion, formatting, rooting, etc. still have a hope of being recovered.
Features:

d_win d_mac

broken-android-data-recovery-02

Pros:

– Choose specific data to save time.
– Easy to use and safe.
– Compatible with most Samsung phones.
– Data is previewable before recovery.

Cons:

– Not as fast in scanning data.
– Your damaged Samsung phone is not repairable.
– Expensive.

Regardless of how advanced the Samsung device is, once it is damaged or locked it becomes nothing. Therefore, in order to prevent data loss, we generally recommend that Samsung users regularly back up their Samsung devices in case of any unexpected situation. You can also retrieve lost contacts, SMS, photos, videos, whatsapp messages and more from a broken/dead Samsung Galaxy phones and tablets via any of the above software.

Related Articles

How to Fix Samsung Galaxy Blank/Black Screen of Death

Recover Data from Water Damaged Android Phone

How to Extract/Restore Documents from Broken Android

How to Recover Data from Samsung Phone with Black Screen

Recover Data When You Cannot Enter Password on Samsung Galaxy

Last night I accidentally break the screen of my Samsung Galaxy phone after dropped it on the floor. Now I want to extract some meaning photos from the broken phone before sending it to the repair store, this photos is important to me. However, I can’t enter password to unlock the phone since the broken touch screen is unresponsive. Are there any ways to recover data when I am locked out of the phone?

For most people, they set a lock screen password to protect their phone data from leaking for others. When your phone get a broken screen or it get damaged for other causes, you must be depressed. What’s worse, the data stored on the phone and you have no way to extract it from the broken device, since the screen is broken. Have you ever encountered with this situation? Your phone accidentally dropped on the floor and the screen is unresponsive and you can’t enter the lock screen password on it. How to recover data from the phone which you can’t enter password on it? Here is the best solution for you to solve the question.

Broken Samsung Galaxy Extraction – Recover Data from Broken Samsung

If your Samsung Galaxy screen is totally not working and you haven’t backed it up on your Google account, there is a perfect way to help you rescue the data. With Broken Android Data Extraction, you can access the locked Samsung Galaxy without a password and recover data when you can’t enter password on Samsung Galaxy. It allows you to extract contacts, messages, call logs, photos, videos, WhatsApp messages, documents, and more types of files from broken Android device. In general, it is a superior data recovery tool for recovering data from Android device for any broken cases, such as, broken screen, stuck at black screen, stuck in the Download Mode, stuck in the restart loop and others. This program compatibles with almost all Samsung models and Android models, insist of Galaxy S4/S5/S6, Note 3/4/5.

d_win d_mac

How to Recover Data from Samsung without Entering Password

Step 1. Connect Samsung Phone to the Computer
In the home page of program, click “Broken Android Data Extraction” among three options, then connect the Samsung Galaxy phone with locked screen to the computer with a USB cable, and click the “Start” button.

broken Android data extraction home page

connect broken screen Samsung to PC

Step 2. Select the Files to Scan
The program will begin to scan data from your phone, click the files contain the data you want. Click the files name then click “Next“. If you want to recover all files at once, please click “Select All” item.

select files to scan

Step 3. Select Broken Situation for your Samsung
In this step the program will guide you to another screen, you will see several fault types of phone choices. Please choose the one which match your phone. In this case, you should click “Others“.

choose Samsung broken type

Step 4. Select Samsung Phone Model
Select the brand and model of your phone according to the option. (You could click the “No my device in the list” option if you can’t find your phone model.)

select device model

Step 5. Enter Samsung into the Download Mode
Follow the instruction to enter your phone into the Download Mode.

enter broken screen Samsung into the download mode

Note:Please keep the connection between the phone and the computer during this process.

Step 6. Analyze Data of Samsung Phone
After entered the phone into the Download Mode, the program will start downloading the recovery package for analyzing your phone data, which will cost you some minutes.

analyze data from Samsung

Once the downloading is completes, all recoverable files including the selected items stored on the device will be scanned out.

Step 7. Preview and Recover Data from Samsung Phone
Lastly, it will list all deleted/lost or existing data from Samsung in the scan out list, including gallery, videos, contacts, messages, and more. Select and preview the data you want under items, recover the selected data and save them on the computer by clicking “Recover” button.

recover data from Samsung

d_win d_mac

Related Articles:

How to Recover Photos from Broken Samsung Galaxy Phone

How to Recover Data from Water Damaged Samsung Phone

How to Recover Photos from Broken Samsung Phone

How to Recover Lost Data from Broken Samsung Phone

How to Backup & Restore Samsung Galaxy

How to Manage Samsung Galaxy on the Computer

How to Stream Apple Music to Samsung Galaxy

Recover Samsung Data with Locked Screen

Android Data Recovery

Recover Your Lost Data from Android
Now, Even Device Broken

Compatible with Android 8.0 Oreo/7.0, etc.

Recover Lost Data Now

How to Get Pictures Off an Android Phone with Broken Screen

Summary: This page introduces you an easy Android broken screen pictures recovery solution – recover pictures from Android phone with broken screen via Broken Android Data Extraction.

Thin morning, my Samsung Galaxy S5 screen is broken after felling out of my jeans pocket. The phone is power on but I can’t unlock the phone since the screen is damaged. I have many precious family pictures stored on the phone. I need to get them off the broken screen device before sending it to the repair store. Any ease way to do this job by myself?

Did you be familiar with this situation? Your phone slips from your hands and fall into the floor, and this come into your mind urgently “Oh on! Please don’t let the screen be broken!”. Most of us ever encounter this case that break our phone screen and unfortunately the screen is damaged. We can’t lives without smartphones, we use the phone for doing all kinds of things and save lots of important things in it, from simple text to meaningful pictures and videos. Device get broken screen is nothing new for most of us. When your Android phone get broken, you can’t unlock it to have a access. Moreover, the foremost problem is how to get data off an Android phone with broken screen, especially the pictures.

Get Pictures Off Broken Screen Android Phone

You have the best choice here – try Broken Android Data Extraction to get pictures off Android phone with broken screen. It is a smart program designed for fix abnormal Android OS & retrieve your valuable data from any types of broken Android, like broken screen, black screen, water damaged, stuck in the Download Mode, stuck in reboot loop, etc,. It supports to recover all types of data from broken Android like gallery, contacts, messages, audio, videos, WhatsApp messages, documents, etc,. It works well for most popular Android phones from Samsung(Galaxy S4/S5/S6, Note 3/4/5), LG and so forth.

d_win d_mac

Extract Pictures from Broken Screen Android Phone

To begin with, please download and run the Broken Android Data Extraction on the computer.

broken Android data extraction home page

Step 1. Connect Broken Screen Android to the Computer
In the home page of program, click “Broken Android Data Extraction” among three options, then connect the Android phone with broken screen to the computer with a USB cable, and click the “Start” button.

connect broken screen Android to PC

Step 2. Select the Photos Files to Scan
The program will begin to scan data from your phone, click the files contain the data you want. For pictures recovery, you should click “Gallery” & “Picture Library” files, then click “Next“. If you want to recover all files at once, please click “Select All” item.

select photo files to scan

Step 3. Select Broken Situation for your Android
In this step the program will guide you to another screen, you will see several fault types of phone choices. Please choose the one which match your phone. In this case, you should click “Others“.

choose Android broken type

Step 4. Select Android Phone Model
Select the brand and model of your Android phone according to the option. (You could click the “No my device in the list” option if you can’t find your phone model.)

select device model

Step 5. Enter Android into the Download Mode
Follow the instruction to enter your phone into the Download Mode.

enter broken screen Android into the download mode

Note:Please keep the connection between the phone and the computer during this process.

Step 6. Analyze Data of Android Phone
After entered Android into the Download Mode, the program will start downloading the recovery package for analyzing your phone data, which will take you some minutes.

analyze data from Android

Once the downloading is completes, all recoverable files including the selected items stored on the device will be scanned out.

Step 7. Preview and Get Pictures Off Android Phone
At last, you could preview all deleted/lost or existing data from Android in the scan out list, including gallery, videos, contacts, messages, and more. To get pictures off Android phone, select and preview the data you want under “Gallery” & “Picture Library” items, save them on the computer by clicking “Recover” button.

recover pictures from Android

d_win d_mac

Related Articles:

How to Recover Photos from Broken Samsung Galaxy Phone

How to Recover Data from Android Phone with Broken Screen

How to Restore Data from Broken Android Phone

How to Fix Android Black Screen Issue

Get Pictures Off an Android Phone with Black Screen

How to Backup & Restore Android

How to Manage Android on the Computer

Get Pictures Off Broken Screen Android

Android Data Recovery

Recover Your Lost Data from Android
Now, Even Device Broken

Compatible with Android 8.0 Oreo/7.0, etc.

Recover Lost Data Now

How to Import Music to Samsung Galaxy Note 9

Music play an important role in our daily life. Most people like to listen to music in anywhere at anytime with the portable devices such as smartphone, tablet, MP3 player, etc,. All of these devices can save thousands of songs for enjoying. Android phone become more and more popular, especially Samsung phones. Galaxy Note 9 is one of the newest models of Samsung, it features with many new function, and it must attractive a lot of Android users. However the problem here is that how to import music from different source to the new Galaxy Note 9. This tutorial is going to show you 6 ways to transfer music to your new Samsung phone.

Part 1. Transfer Music from Computer to Galaxy Note 9 via USB

As we know, the most common way to transfer data between Android and the computer is using a USB cable. To export music from computer to Galaxy Note 9, just need to connect it to computer then copy the music files to the phone storage. This way can be one of your choices if you need.

Step 1. Connect Samsung Galaxy S9 to your computer via a USB cable. Click on “Allow” when pop-up message prompt on your device.

Step 2. Swipe down from the top of the screen, it will be a pop up that tells you how your device is connected. Underneath it will say “Touch for other USB options”, choose to connect as “Media device(MTP)”.

Step 3. Navigate to This PC and you’ll find Samsung device under “Portable Devices”. Open it and then find a music folder you are familiar with then copy and paste songs from computer to this music folder. Now check them on your phone.

usb transfer

Part 2. Transfer Music from Computer to Galaxy Note 9 by One-Click

Android ToolKit Android Transfer is an all-in-one data manage & transfer tool, it can help to transfer music from computer to Galaxy Note 9 with one-click. It is designed for backup Android files to computer & restoring backed up from computer to Android safely. Besides, it could help to transfer files between Android and iTunes, transfer files between Android and Android/iOS devices. The types of transferable files including music, videos, photos, contacts, SMS and playlist.

d_win d_mac

Once you’ve launched the Android Transfer software and connected it to your Galaxy Note 9, follow the steps to transfer music from computer to your phone:

Step 1. Run Program and Connect Samsung Phone
Run Android Transfer on the computer, connect your Galaxy Note 9 to computer via a USB cable, and wait until the program detects your phone.

android transfer main page

Step 2. Add Music from Computer to Samsung Phone
Click on the “Music” tab, located on top. Select the “Add” icon (you could choose to add either a file or a music folder). It’ll open a window that would display your music files. Select the file or folder that you’d like to import from the computer to your Samsung Galaxy Note 9.

sync music from pc to Samsung

Finished. It’ll automatically start transferring the selected songs to your Samsung and notify you once it’s done syncing.

d_win d_mac

Part 3. Transfer Music from Other Devices to Galaxy Note 9

Android & iOS ToolkitPhone Switch is a smart tool enables you to switch files between two phones no matter it run the same OS or not. Easily transfer every type of data from an old phone to Galaxy Note 9 including apps, music, videos, photos, contacts, messages, apps data, call logs, calendar, etc,. Moreover, this program allows you to backup phone data to computer safely, restore local/could backup files selectively. Works perfectly with Apple, Samsung, HTC, LG, Sony, Google, HUAWEI, Motorola, ZTE, Nokia and more smartphones and tablets.

d_win d_mac

Step 1. Run Program & Connect Devices
Firstly, you need to launch the software and connect both of the two phones to the computer. Now your old device has to be chosen as the source device. Click on the “Switch” tab in the home page of program.

android toolkit home page

Step 2. Ready for Transfer
Select your Samsung Galaxy Note 9 device as the destination. All the types of files are transferable, including apps, music, videos, photos, contacts, messages, apps data, call logs, calendar, etc,.

select files to transfer

Step 3. Transfer Music to Galaxy Note 9
Select “Music” and hit the “Start Transfer” button to begin the transfer.

switch data to Galaxy Note 9

Done. Now all the music have been transferred to Samsung phone.

transferred completed

d_win d_mac

Part 4. Sync Music from iTunes Library to Note 9

What’s going to do if you just switched from an iPhone to Samsung Galaxy Note 9 and want to sync iTunes music library to the new phone so that you don’t have to re-download or purchase the same music again? iTunes to Android Transfer software provides a simple method to transfer music files from iTunes library to Samsung Galaxy Note 9.

d_win d_mac

Basic Features:
-The best alternative to iTunes for managing files.
-Freely transfer music, videos and photos between your devices.
-Easily export, edit and backup contacts, SMS, MMS.
-Support for syncing iTunes music to Android or transferring music from Android to iTunes.
-Works on Mac and PC and is compatible with Android 8.0 and iTunes 12.X.

Easy Way to Enjoy iTunes Music on Samsung Galaxy Note 9

Step 1. Launch iTunes to Android Transfer Tool
First of all, free download, install and launch iTunes to Android Transfer tool on your computer. After connecting Samsung Galaxy Note 9 to PC, you will get a connected screen shown as below. Simple choose “Transfer iTunes Media to Device” option.

Android transfer home page

Step 2. Choose Data to Sync
As shown, you can select the entire library or any other options as needed. In this case, choose Music and once you have made your selection, just click “Transfer“.

select itunes music to transfer

Step 3. Sync iTunes Music Library to Galaxy Note 9
Now you must simply wait while the program transfers your chosen data from iTunes to Samsung Galaxy Note 9. As soon as the process is done, you will be prompted through a screen notification.

transfer itunes music to Galaxy Note 9

d_win d_mac

Part 5. Stream Apple Music on Galaxy Note 9

Apple Music are combined with digital rights management (DRM) protection. There is not an Apple Music app for Samsung Galaxy Note 9. This makes it complicated to stream Apple Music songs on newly Samsung Galaxy Note 9 until you find out the Apple Music Converter software which is a comprehensive tool to crack DRM protection from Apple Music songs, Audible audiobooks, iTunes Library and convert Apple Music M4P to common audio files MP3, M4A, FLAC, WAV, AAC at an up to 30X faster speed without reducing the audio quality.

d_win d_mac

Step 1. Install Apple Music Converter
You can start by connecting your Samsung Galaxy Note 9 to the PC and launching the Apple Music Converter program. Soon, you will see the program will load iTunes playlists on the left panel of the window.

launch apple music converter on mac or pc

Step 2. Add Apple Music Tracks
Hit on “Library” to browse the Apple music files to import directly. You can choose a few songs even the whole music library as this program supports batch conversion.

select music to convert

Step 3. Set Output Format
Generally, “MP3” which is highly recommended works for any scenarios. But if you want to convert your Apple Music songs losslessly, you can choose “FLAC” or “WAV”.

choose MP3 as output format

Step 4. Stream Apple Music on Samsung Note 9
Simply click on “Convert” button and Apple Music Converter will convert all the music files to DRM-free MP3 format in batch. After conversion, you are able to transfer & enjoy Apple Music songs on Galaxy Note 9 freely.

convert apple music to mp3 for Samsung

d_win d_mac

Part 6. Stream Spotify Music on Galaxy Note 9

Spotify is a streaming service that adds a DRM layer to its streaming music collection. To listen to Spotify music on Samsung Galaxy Note 9 successfully, you need to download and install Spotify Music Converter which assists you to directly remove DRM from Spotify music, playlist and convert to MP3/ AAC/ WAV/ FLAC, keeping Spotify music forever after canceling premium subscription.

d_win d_mac

Step 1. Add Spotify Music to the Program
After running on the Spotify Music Converter software on your computer, Spotify music app will be launched automatically and you can click on “Add Files” icon, then a dialogue will pop up to let you paste the URL. Or you can drag & drop the music or playlists from Spotify app to the program directly.

Spotify Music Converter home page

add Spotify Music

Step 2. Choose Output Format as MP3
Then click Setting button to customize the output parameters. You can choose MP3, AAC, FLAC or WAV as the output format and you are able to change SampleRate and bitrate before conversion.

output format settings

Step 3. Stream Spotify Music to Samsung Galaxy Note 9
Click “Convert” button to remove DRM from Spotify Music and convert these files to MP3 plain format without losing original quality.

convert Spotify Music to MP3 for Samsung

After conversion, you will easily find the downloaded DRM-free Spotify music files in the History folder.

d_win d_mac

Lastly, import the converted Spotify Music from the computer to Galaxy Note 9 phone via Android ToolKitAndroid Transfer tool, then you can enjoy the songs on your phone without any limits.

Related Galaxy Note 9 Articles:

Transfer Samsung/Android Data to Samsung Galaxy Note 9

How to Recover Deleted Data from Samsung Galaxy Note 9

How to Transfer iTunes Music to Samsung Galaxy Note 9

How to Transfer iTunes Videos to Samsung Galaxy Note 9

How to Backup & Restore Samsung Galaxy Note 9

How to Root Samsung Galaxy Note 9 with One Click

Manage & Transfer Files for Samsung Galaxy Note 9

Transfer Music to Samsung Galaxy Note 9

How to Recover Lost Contacts/Photos/SMS from LG G8

Summary:This post is intended to help LG smartphone users to easily recover lost files from the phone. It offers the best ways to retrieve photos, contacts, text messages and more types of data from LG smartphone, such as LG G8/G5/G4/G3/G2.

LG smartphones are quite popular all over the world these days. The smartphone has become a device that we can’t live without it. One of the major reasons why people prefer to buy LG phones is due to its higher specifications with cheaper price. Especially, with the new LG G8 phone, you can take pictures, store music and videos in highest qualities and with internal 32 GB storage, it gives you the opportunity to store a lot of data on your phone, such as contacts, SMS, photos, etc,. As time goes on, you will have tons of important data, contacts, photos, SMS and so on in your phone that you can’t afford to lose them. But data loss may occur for various reasons, you may lose data during software update or you may accidentally delete them as well. Whatever the reason, you should find a solution to recover those important content that stored on your phone. In this short tutorial, you will learn how to quickly and efficiently recover lost data from LG phone.

Android Data Recovery, like a doctor, rescue all types of Android data, including photos, messages, contacts, videos, call logs, WhatsApp messages, etc,. The lost Contacts, Photos, SMS can be recovered from LG G8, even without backup. It supports recovering lost Android data in any case of data loss, such as factory resets, accidental deletions, Android operating system updates, screen disconnects, Android OS crashes, and so on. It perfectly combines LG, Samsung, HTC, Sony, Google, Huawei, OPPO, Xiomi, Motorola, ZTE and almost all Android models. The following tutorial shows you how to restore data lost from LG.

d_win d_mac

How to Recover Lost Data from LG G8

Step 1. Run Android Data Recovery and Connect LG G8
Firstly, run Android Data Recovery on the computer and click “Android Data Recovery” among three options. Connect your LG G8 to the computer through the a USB cable. The interface is as follows.

connect LG phone

Step 2. Debugging USB on LG Phone
When the connection is successful, you should enable USB debugging on your device. Your phone will display a dialog box and click “OK“.

allow to detect LG

Step 3. Select the File Recovered from LG G8
Check and click the files contain the data you need to restore for scanning, or you can click “Select All” to scan from all LG data then click “Next“.

select files to scan

Step 4. Allow Scanning LG G8 for Lost Files
In this step, you should click ”Allow” to authorize program analyze the lost data from your LG phone.

allow to scan LG

Step 5. Scan Lost Files for LG G8
Now the program will start scanning the data on your LG G8 device. Please be patient.

scan lost LG data

Step 6. Preview and Restore Lost Files from LG G8
Once the scan is finished, you are allowed to preview all the data find from your phone, including photos, contacts, text messages, etc,. Lastly, click the “Recover” button to save the selected lost data on the computer.

recover lost data from LG

d_win d_mac

More LG Related Guides you can Check:

How to Recover Deleted Photos from LG Phone

How to Recover Deleted Data from LG Phone

How to Recover Data from Water Damaged LG Phone

How to Recover Data from LG G5/G4/G3/G2 with Broken Screen

How to Backup and Restore LG Phone

How to Manage Android Phone on the Computer

Recover Lost Data from LG G8

Android Data Recovery

Recover Your Lost Data from Android
Now, Even Device Broken

Compatible with Android 8.0 Oreo/7.0, etc.

Recover Lost Data Now

Transfer Samsung/Android Data to Samsung Galaxy Note 9

The Galaxy Note series has always been controversial. From the days of “who would ever want a 5.3-inch screen?” to the commercials that made Apple doubt itself, to the Note 7’s fiery fiasco, the series has constantly made the news. Despite the controversy – or maybe because of it – the Note family is Samsung’s proudest achievement, an embodiment of its leadership in technology and design. Announced in New York City, the Galaxy Note 9 is an exquisitae, yet utterly uncontroversial phone.

In these years, many competitive smartphones have been made by Android manufacturers. The phone run on Android OS, which is known for highly performance and quality, it is very popular on the mobile market. Undoubtedly, Samsung is one of the most outstanding brands. And Samsung Galaxy phones must be the most shining series. Whether you have got a new Samsung Galaxy or are thinking of buying one, Galaxy Note 9 is a good option. Whether you have got an old Samsung phone or Android phone and prepare to switch to this new Samsung model, you need to learn a reliable way to transfer data between the old device and the new one.

Currently, many Android manufacturers provide apps to help users transfer data to new phone easily, such as, Samsung Smart Switch, HTC Transfer Tool, LG Backup, Sony Xperia Transfer, Motorola Migrate, etc,. All these phone transfer apps are free and you can choose the suitable one to finish the transition. However, there are limitations on these free Android file transfer apps. Why not using Samsung Smart Switch to switch data between two Samsung phones? Smart Switch does NOT support phones running on Android OS lower than 4.0; Smart Switch is NOT compatible with some phones; for some non-Samsung phones, Smart Switch ONLY supports a small part of all the file types. To import the data from an old Samsung/Android to Galaxy Note 9, you need an excellent way.

Import Samsung/Android Data to Samsung Galaxy Note 9

Compared to free phone transfer apps, another professional tool is highly recommended Android & iOS Toolkit – Phone Switch. It is designed for switching data between two mobile devices among iOS device, Android device, Symbian device, Windows device. It provides you with a one-click solution which can help you transfer data between Samsung/Android and Samsung Galaxy Note 9, including contacts, text messages, call logs, calendar, photos, videos, music, apps and apps data. It supports to any brands of Android devices, including Samsung(Galaxy Note 9/8/5/4/3), Huawei, HTC, LG, Xiaomi, Sony, Motorola, ZTE, Google, etc,.

d_win d_mac

Switch Samsung/Android Data to Samsung Galaxy Note 9

Step 1. Run Program and Connect Tow Phones to the Computer
Run Android & iOS Toolkit – Phone Switch on the computer, select “Switch” among the 8 options in the home page.

android toolkit home page

Connect both of your old Samsung/Android phone and the new Galaxy Note 9 to the computer. Then the program will detect the two phones soon and show them in the control panel.

select files to transfer

The data can be transferred from the source device to the destination one. (The old Samsung/Android phone as the source device should be on the left and the new Samsung phone as the target phone should be on the right.) You can use the “Flip” button to exchange their position.

Step 2. Choose the File and Start to Transfer
Select the file types you would like to transfer between the two phones. Then click on “Start Transfer” to begin the transfer. Please don’t disconnect the devices until the process is end.

switch data to Galaxy Note 9

Note:You can check the “Clear Data before Copy” box if you want to erase data on the destination phone before transferring the data to the target phone.

After a few minutes, all selected files will be transferred to the target Galaxy Note 9 phone successfully.

transferred completed

d_win d_mac

Related Galaxy Note 9 Articles:

How to Recover Deleted Data from Samsung Galaxy Note 9

How to Transfer iTunes Music to Samsung Galaxy Note 9

How to Transfer iTunes Videos to Samsung Galaxy Note 9

How to Backup & Restore Samsung Galaxy Note 9

How to Root Samsung Galaxy Note 9 with One Click

Manage & Transfer Files for Samsung Galaxy Note 9

Transfer Samsung/Android Data to Galaxy Note 9

Manage & Transfer Files for Samsung Galaxy Note 9 on the Computer

I switch to a new Samsung phone lately. I want to sync my iTunes media files to the new device which synced with my old iPhone. Please send me your idea. BTW, my phone is Galaxy Note 9.

How to backup photos from Galaxy Note 9 phone to the computer with one-click? Any reliable phone manager tool can help?

There is no denying that Samsung phone has become one of the most popular smart phones all around the world. Every year it will announce several of new phone models. As a strong opponent to iPhone, Samsung has released some hot models, Galaxy Note 9 is one of them, Samsung phone become more and more popular in these years. People can do almost everything on the smartphone, take photos, mark notes, make calls, listen to music, watch videos, surf the Internet, chat with others, shopping, etc,.

But with more and more features of the smartphone and people staying with them longer and longer, managing them is not an easy task at all with large of data. With so many powerful applications, the smartphone enable us to live a more colorful and convenient life. Using a improper way to manage files in the Android phone can make it a mess. It is trouble to manage phone data without a reliable solution. So here comes your helper – Samsung Galaxy Manager, which is highly recommended for you to do the managing job of Samsung Galaxy Note 9.

Manage & Transfer Files for Samsung Galaxy Note 9

Android TransferSamsung Galaxy Manager is an ideal software to manage & transfer files for Samsung Galaxy Note 9 on the computer. It offer a secure solution for you to transfer files between Android and the computer; transfer files between Android and iTunes; transfer files between Android and Android/iOS device. The kinds of transferable files including Music, Photos, Videos, Contacts, SMS and playlist. Besides to manage and transfer files for Android device, it has extra features with rebuild iTunes library, GIF maker, one-click root. It compatible with almost all Android models, such as, Samsung(Galaxy Note 9/8/5), HTC, LG, Lenovo, Huawei, Google Pixel, ZTE, OPPO, Motorola, Xiaomi, etc,.

d_win d_mac

In the follow section we will take “Photos” as an example to explain how to do the files transfer between Samsung Galaxy Note 9 and computer via Android Transfer – Samsung Galaxy Manager.

Part 1:Backup Photos from Samsung Galaxy Note 9 to Computer

Step 1. Run Program and Click on “Photos” Option
Run Android Transfer – Samsung Galaxy Manager on computer, Click “Transfer” in the home page of program.

android toolkit home page

android transfer main page

In the “Photos” management window, choose photos you want to backup, and click “Export” > “Export to PC“.

export photos from Samsung to other device

Step 2. Backup Photos from Samsung to Computer
It will bring up your file browser window. Select a save path to store the photos from your Samsung phone to computer.

You can also transfer the whole photo album from Samsung to the computer.

transfer photo files from Samsung to pc

export photos from Samsung to pc

d_win d_mac

Part 2:Transfer Photos from Computer to Samsung Galaxy Note 9

Step 1. Run Program and Click on “Photos” Option
Run Android Transfer – Samsung Galaxy Manager on computer, Click “Transfer” in the home page of program.

android toolkit home page

android transfer main page

Click “Photos” tab. All the albums will be displayed. Select one folder to store new added photos on your Samsung phone.

select folder to store added photos on Samsung

Step 2. Transfer Photos from Computer to Samsung Phone
Click “Add” > “Add File” or “Add Folder“.

If you only want to select some photos, then click “Add File“. You can create new albums and add photos in it. Simply right-click the photos category on the left panel, then click “New Album“.

add folder to save Samsung photos

If you want to transfer all the photos in one folder, then click “Add Folder“.

Now select photos or photo folders and add to your Samsung phone. Hold down “Shift” or “Ctrl” key to choose multiple photos.

transfer photos from computer to Samsung

d_win d_mac

Related Articles:

How to Recover Deleted Data from Samsung Galaxy Note 9

How to Transfer iTunes Music to Samsung Galaxy Note 9

How to Transfer iTunes Videos to Samsung Galaxy Note 9

How to Backup & Restore Samsung Galaxy Note 9

How to Root Samsung Galaxy Note 9 with One Click

Manage & Transfer Samsung Galaxy Note 9

How to Recover Deleted Files from Samsung Galaxy X

Rumor of Samsung Galaxy X
The closest thing we actually got to a foldable phone from Samsung in 2013 was the Samsung Galaxy Round. This was far from the prototypes and concepts we’d seen, but as the world’s first curved screen smartphone it was a big step in the right direction. That was followed up by the Samsung Galaxy Note Edge, which curved in a now more familiar direction, one which Samsung has since fully embraced with the likes of the Samsung Galaxy S7 Edge and other phones with curved edges. We’ve been hearing rumblings for years that an amazing smartphone from Samsung was just around the corner. And now it doesn’t seem like 2018 is going to be the year, the Samsung Galaxy X will likely come out in 2018 and that it will fall under the Note brand.

There are many Samsung smartphone users have the terrible experience of deleting some important files such as text messages, family photos, contacts, or other kinds of files accidentally from their Samsung Galaxy phone. This unexpected disaster always make people frustrated. But now you can stop feeling despressed if you are one of them. We would like to tell you the good news that the deleted files can be recovered from the phones by professional Android data recovery tool. And in this page we will guide you how to recover deleted files from Samsung Galaxy X with step-by-step guide. Read this article and then you will get the perfect solution.

If you accidentally deleted some files of some data you want, then you may want to try any ways to restore it, an efficient Android data recovery tool is the best solution for you to make this true, since we couldn’t do this manually. But why the deleted files can be recovered from Samsung Galaxy phone? Here you should remember that the deleted files can be recovered only before being overwritten by new data. When the deleted data haven’t be overwritten by new data, it still be save in your phone internal memory but it become invisible.

Restore Deleted Files from Samsung Galaxy X

Android ToolKitU.Fone Android Data Recovery is a reliable data recovery tool for Android devices. It supports almost all Android phones and tablets from Samsung, LG, HTC, Motorola, Sony, Google, Huawei, Lenovo, etc,. You can use it to recover deleted files from Samsung Galaxy X whenever you need. Deleted contacts, text messages, photos, videos, WhatsApp messages, documents and all Android files are recoverable. It support to recover deleted Android data under any data loss cases, like accidental deletion, Android system update, Android system rooting, factory reset restoring, and so on. To sum up, Android ToolKit is a famous data manager tool for Android device, features with Android data recovery, Android data backup & restore, broken Android data extraction.

d_win d_mac

How to Recover Deleted Data from Samsung Galaxy X

Step 1.Run Program and Connect Samsung Phone
To begin with, please run Android ToolKit – U.Fone Android Data Recovery on the computer, connect your Samsung phone to the computer. It will detect your phone automatically quickly. Click “Android Data Recovery” option in the home page, it will lead you to the next step.

Android ToolKit home page

connect Samsung phone

Step 2.Enable USB Debugging on Samsung Phone
Unlock your phone, go to Settings > Developer options > Allow USB debugging mode. If you have already allowed the USB debugging mode, you will see a pop-up window on the screen, mark “Always” allow from this computer and click “OK“.

allow to detect Samsung phone

Step 3.Select Files to Restore
Once finishing enabling USB debugging, connect your Samsung phone to the computer via a USB cable, different types of files can be chose to be scan here. If you want to restore all types of Samsung data, you can click”Select all” to have all your phone data scanned.

select files to scan

Step 4.Allow to Scan and Analyze Data on Samsung
A new screen will appear on your phone to ask you if you allow the program to scan your phone. Tap “Allow” to enable the program to analyze your phone for deleted data.

allow to scan Samsung phone

Step 5.Scan Samsung for Deleted Data
The program will begin to scan the data from Samsung phone. The scanning process will take you some time. When the scanning is end, you will see a list of recoverable files, including the gallery, contacts, and other data, preview them one by one before recovery.

scan deleted Samsung data

Step 6.Recover Deleted Data from Samsung Galaxy X
Select the data you want under the files name to restore them to your computer by clicking “Recover“.

recover deleted data from Samsung Galaxy X

d_win d_mac

Related Samsung Data Recovery Articles:

How to Recover Deleted Photo Files from Samsung Galaxy

How to Recover Data from Broken Samsung Galaxy

How to Transfer Data from iPhone to Samsung Galaxy

How to Manage Samsung Galaxy Phone on PC/Mac

How to Play Apple Music on Samsung Galaxy without Limits

Recover Deleted Data from Samsung Galaxy X

Android Data Recovery

Recover Your Lost Data from Android
Now, Even Device Broken

Compatible with Android 8.0 Oreo/7.0, etc.

Recover Lost Data Now

How to Recover Deleted Data after Android 9.0 Update

Summary: In this post, we will show Android users steps to recover missing files after a Android 9.0 update as well as instructions to backing up Android data to the computer.

Even though most phones don’t have Oreo yet, Google has released the first beta tester build of Android P that anyone with a compatible device can install. It’s available on Google’s own Pixel devices, as well as partnered devices from Essential, Nokia, Oppo, Sony, Vivo, and Xiamoi, and we’re already digging into it to highlight all of the features and changes. There’s still no word yet on exactly what “P” stands for – Pie, Popsicle, Pudding, Pineapple Upside Down Cake – it’s anyone’s guess at this point. It will officially be Android 9.0, and we know for sure that it’s bringing lots of changes along with it.

Just like earlier issue of data loss on Android after OS update, similarly you may encounter data loss on your Android device after 9.0 update. There are various users who have been facing this issue. After upgrading their phone to Android 9.0 or other Android OS, they have been missing or lost some personal data on the smartphone. Sometimes the update gets failed and then they lose their data including contacts, pictures, videos, messages, some apps, music and more. To help you restore deleted data from Android after 9.0 update without hassle, U.Fone Android Data Recovery is the tool you need.

Android 9.0 Update Data Recovery

Android ToolKitU.Fone Android Data Recovery help Android users recover deleted data after Android 9.0 update. The types of recoverable files including contacts, text messages, gallery, videos, WhatsApp messages, documents, etc,. Almost all devices running any Android OS operating system are supported, including Samsung, Huawei, Google Pixel, LG, HTC, Sony, ZTE, Lenovo, Motorola, and more. Besides to Android OS update, this program supports to recover deleted data for any data loss causes, such as, accidental deletion, Android OS rooting, factory reset restoring, and so on. In addition, Android ToolKit is an all-in-one data manager tool for Android device, features with Android data recovery, Android data backup & restore, broken Android data extraction.

d_win d_mac

How to Retrieve Deleted Data after Android 9.0 Update

Step 1.Run Program and Connect Android to the Computer
To start with, please install Android ToolKit – U.Fone Android Data Recovery on the computer, run it and connect Android phone to the computer. It will take a few seconds to detect your phone automatically by program. In the home page of it, click “Android Data Recovery” selection.

Android ToolKit home page

connect Android phone

Step 2.Enable USB Debugging on Android Phone
Unlock your phone and allow USB debugging mode on your phone. If you have already allowed the USB debugging mode on it, you will see a pop-up window on the screen, mark “Always” allow from this computer and click “OK“.

allow to detect Android phone

Step 3.Select Files Type to Recover
All types of recoverable Android data will be displayed in the interface of program. Select your want files contain the data you need to restore and then click “Next“. It will take a few minutes to analyze the deleted and existent data on your phone.

select file to scan

Step 4.Scan Android Data
With safety, you should click “Allow” on the interface of your phone to allow the program analyze the data on your phone.

allow to scan Android phone

The program will begin to scan and analyze your data from the phone.

scan deleted Android data

Step 5.Recover Deleted Data after Android 9.0 Update
Once the scanning is completes, you could preview and select the data to recover from your Android phone directly after Android 9.0 update. Save and recover the selected data to the computer by clicking “Recover“.

recover deleted data after Android 9.0 update

d_win d_mac

More Guides about Android Tips:

How to Recover Lost or Deleted Data from Android

How to Recover Data from Frozen Android

How to Restore Lost Data from Rooting Android

How to Recover Lost Data from Android SD Card

How to Transfer iTunes Music to Android

How to Manage Android on the Computer

Recover Deleted Data after Android 9.0 Update

Android Data Recovery

Recover Your Lost Data from Android
Now, Even Device Broken

Compatible with Android 8.0 Oreo/7.0, etc.

Recover Lost Data Now

How to Unlock Samsung Galaxy S9 without Password

How to unlock the pattern lock on my Galaxy S9 phone? I have changed my password last night but I forgot it now. Please help.

What a great device! Samsung new released model- Samsung Galaxy S9, it is such an excellent smartphone. Some of its features are introduced for the first time by Samsung, such as adaptive camera lenses, which imitates the human eye. Lately, we have got lots of feedback and queries like who need to perform a pattern unlock on their Galaxy S9 device. It doesn’t matter if you have forgotten the password of your Android phone or would like to access someone’s phone, there are lots of ways to unlock an Android phone without password.

Forgetting password(pattern/PIN code) on Android is on of the most common problem that you can hear from a lot of Android users. Samsung is one of the most popular Android brands which come with a wide variety of functions and features. These functions and features of Samsung device allow users to do almost everything that they actually want. But problems occur when some unexpected conditions happen and lead to unwanted results like forgetting your Samsung phone’s password. In this case, they may be searching for an effective and efficient method to unlock their Samsung phone screen password.

Bypass Password of Samsung Galaxy S9 without Data Loss

If you are looking for a reliable software help to remove lock screen on Android without password, this Android ToolKitAndroid Unlock is what you need. With using this software, you could bypass password of Samsung Galaxy S9 without data loss. What’s more, it could be used to unlock remove 4 types of screen lock, including password, pattern, Pin, fingerprint. It is an all-in-one Android ToolKit that features with Android unlock, Android data recovery, data transfer, data switch, Android backup & restore, data erase, Android root. This smart program work well for most of Android devices, like Samsung Galaxy S9/S8/S7/S6, Note 8/5/4/3, A7/A5 and more.

d_win d_mac

How to Remove Locked Screen on Samsung Galaxy S9

Step 1. Run Software and Connect Samsung Phone
Launch Android ToolKit – Android Unlock on the computer, select “Unlock” among all the tools.

android toolkit home page

Connect your Galaxy S9 phone to the computer using a USB cable. Then click “Start” on the program.

click start to begin process

Step 2. Select Samsung Model
Since the recovery package for different phone models is different, it’s very important to select the correct phone model. You can find all the supported device models in the list.

select Samsung phone model

Begin your start, please enter “Confirm” to make sure that you have chosen the right model of the device that you need to unlock.

confirm to unlock

Step 3. Enter Samsung into the Download Mode
Then follow the instructions on the program to get the phone into the Download Mode.

-Power off the phone.
-Press and hold Volume Down + Home button + Power button at the same time.
-Press the Volume Up to enter Download Mode.

enter Samsung into download mode

Step 4. Download Recovery Package for Samsung
After you get your Samsung phone into the Download Mode, it will begin downloading recovery package for it. Just wait until it’s completed.

downloading recovery package for Samsung phone

Step 5. Remove Samsung Lock Screen without Data Loss
When the recovery package downloading is completed, the software will start to remove the screen lock for the phone. This process won’t hurt any data on your device. Once the whole progress is over, you can access your phone without entering any password and view all your data on the device without limits.

remove lock screen of Samsung phone

d_win d_mac

Related Articles for Galaxy S9 Users:

How to Recover Deleted Data from Samsung Galaxy S9

How to Transfer iTunes Music to Samsung Galaxy S9

How to Transfer iTunes Videos to Samsung Galaxy S9

How to Transfer iPhone Data to Samsung Galaxy S9

How to Stream Apple Music to Samsung Galaxy S9

How to Transfer & Manage Files for Samsung Galaxy S9

Unlock Samsung Galaxy S9 without Data Loss