All posts by DHZ

How to Recover Data from iPhone 13 after a Factory Reset

Summary
Factory reset iPhone 13 and lost all the data on it? How to recover data after factory reset on iPhone 13? Read on this article, here you will get 3 simple methods to recover data from iPhone 13 after a factory reset, with or without backup!

Question 1: “I accidentally set my iPhone 13 to factory settings and lost my Contacts. Can I recover data from iPhone 13? Any suggestion?” – from smallbusiness.chron

Question 2: “I accidentally reset my iPhone 13 Pro Max and lost everything. Unfortunately, I do not have iCloud backup. How would I be able to recover my deleted data?” – from Quora

Factory reset is a common way to fix frozen or unresponsive iPhone 13. However, it will remove all the data from your device. Some people may ask “Can someone recover my data after factory reset?” But what if you don’t have a backup factory reset? “Can data be recovered after factory reset iPhone 13?” The answers to both questions is positive. If you lost your iPhone 13 data after a factory reset, you’d better put your eyes on this article. In this article, recover data from iPhone 13 after a factory reset with or without a backup.

Method 1. Recover Data from iPhone 13 After Factory Reset Without Backup

If you don’t have a backup, how do you recover iPhone 13 data after a factory reset? Here you ask help from a third-party iPhone Data Recovery software. U.Fone iOS Data Recovery stands out from other brands for its powerful feature.

U.Fone iOS Data Recovery is a simple but powerful iOS Data Recovery, iOS Data Backup & Restore tool. It enables users to directly recover lost/deleted/erased data on iPhone 13/13 Pro/13 Pro Max/13 Mini /14/12/11/XR/X/XS/X/8/7/6, etc. For instance, it assists you to recover photos, videos, messages, contacts, notes, as well as App data like WhatsApp, Instagram, Facebook, etc. Apart from this, it also supports to recover iPhone/iPad/iPod Touch data from iCloud backup and iTunes backup.

Another highlight is that it can work as a smart iOS System Recovery tool to help you fix some common iOS system problems, such as broken screen, frozen screen, Apple logo, blue/black/white screen, DFU mode, Recovery mode, upgrade/downgrade failure, etc. This means you don’t need to factory reset your iPhone in case of iOS system issues!

d_win d_mac
d_win d_mac

Easy Guide to Recover Data from iPhone 13 Directly

Step 1. Download and Run U.Fone iOS Data Recovery
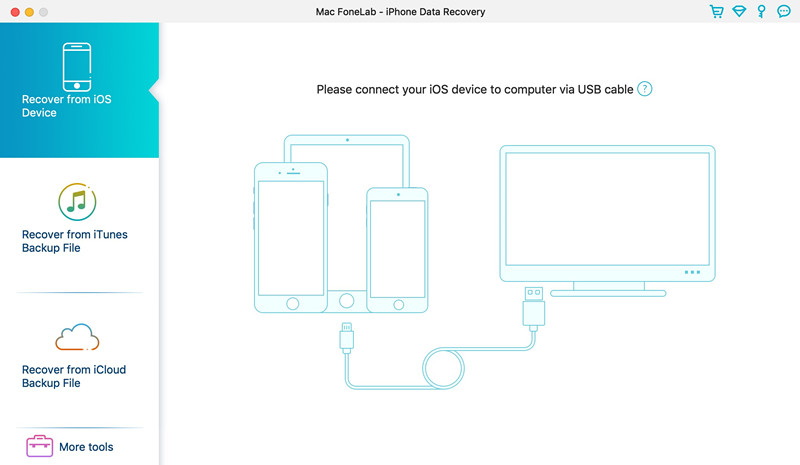
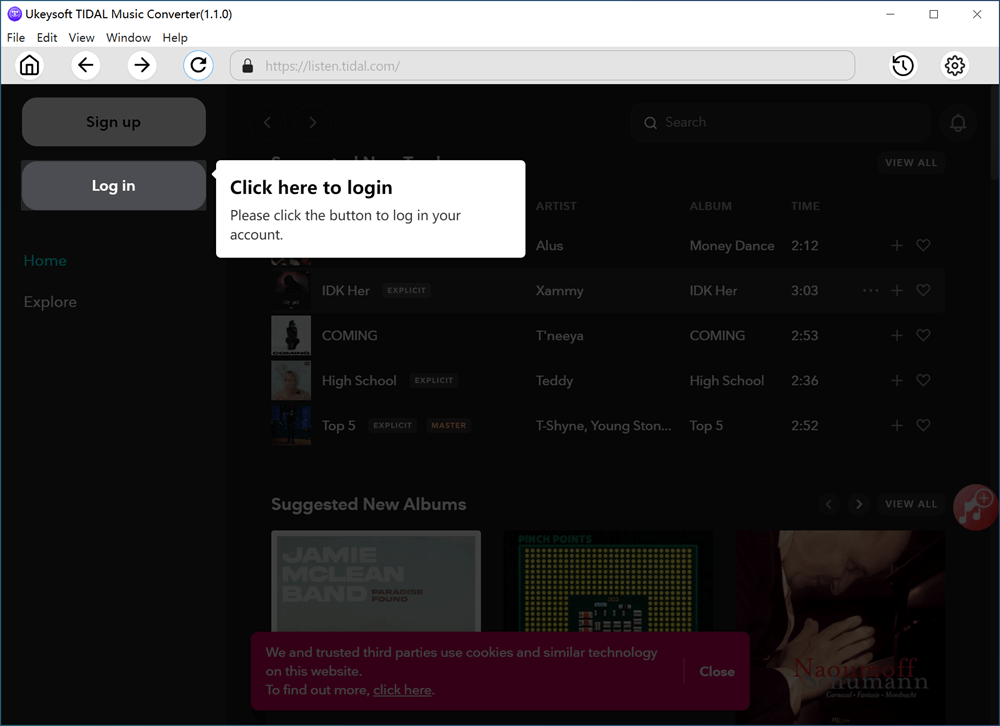
Click the Download button above, get U.Fone iOS Data Recovery installed on your Mac or Windows PC. Launch the U.Fone program, get your iPhone 13 connected to computer via USB cable.

recover iphone 13 data - iphone data recovery

Step 2. Select Recovery Mode
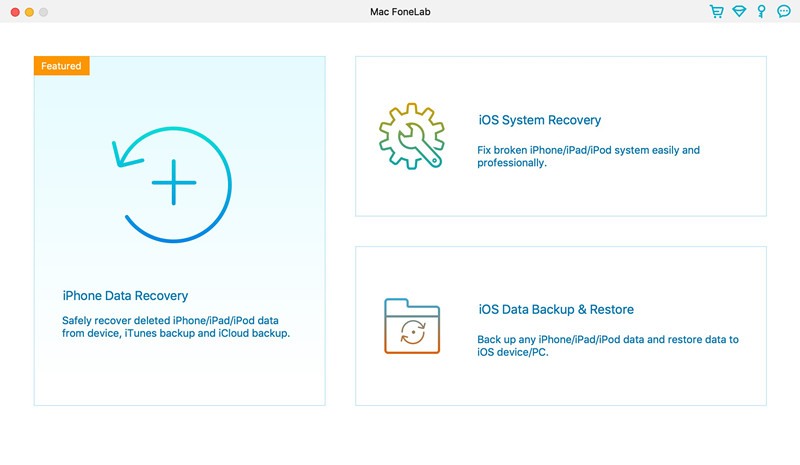
On the main screen, click “iPhone Data Recovery”. If you don’t have a backup, you can choose “Recover from iOS Device” option.

recover data from iPhone 13 directly

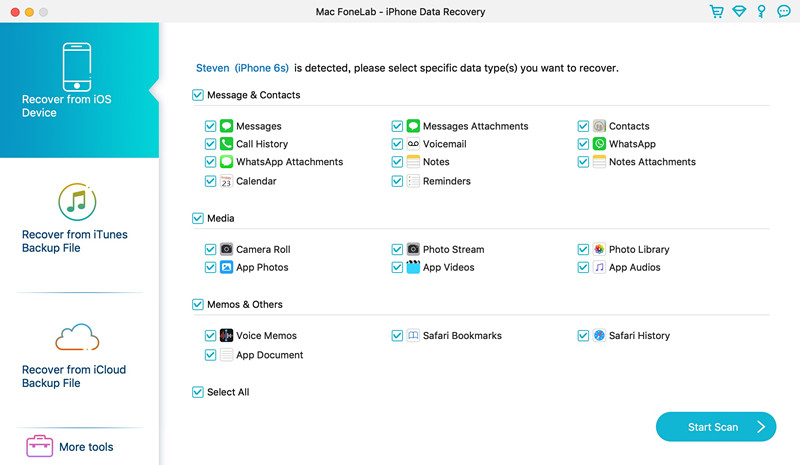
Step 3. Scan Your iPhone 13 to Retrieve Lost Data
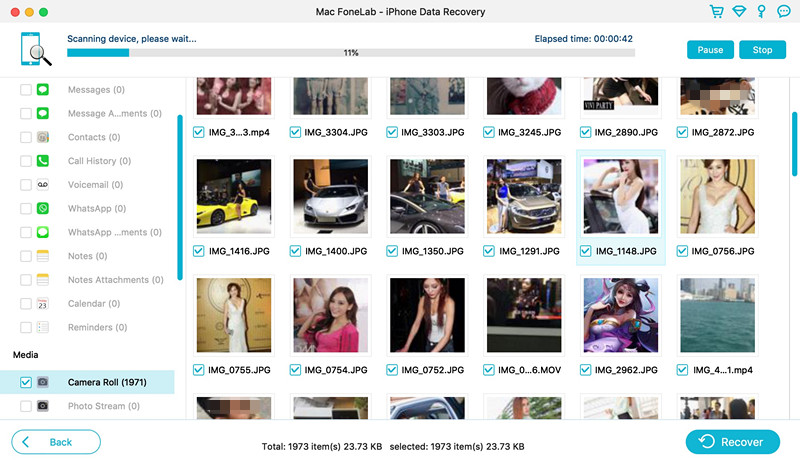
Then click on the “Start” button to start analyzing your iPhone 13. Once the scanning process is complete, this program will list all content of the connected device as shown below.

recover iPhone 13 - scan iphone

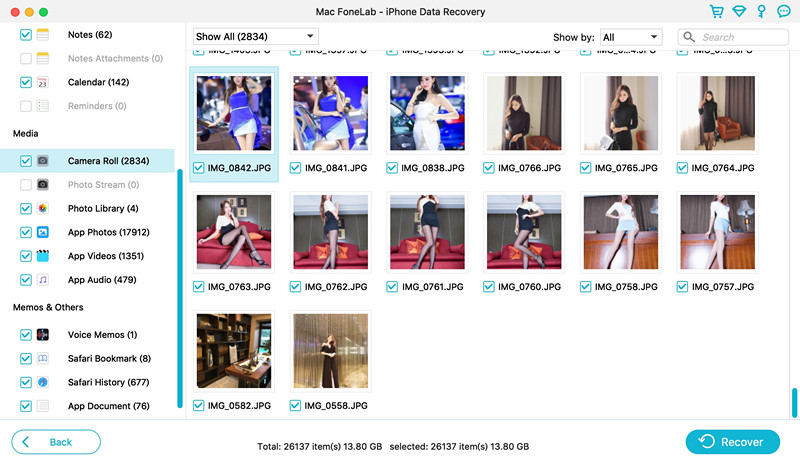
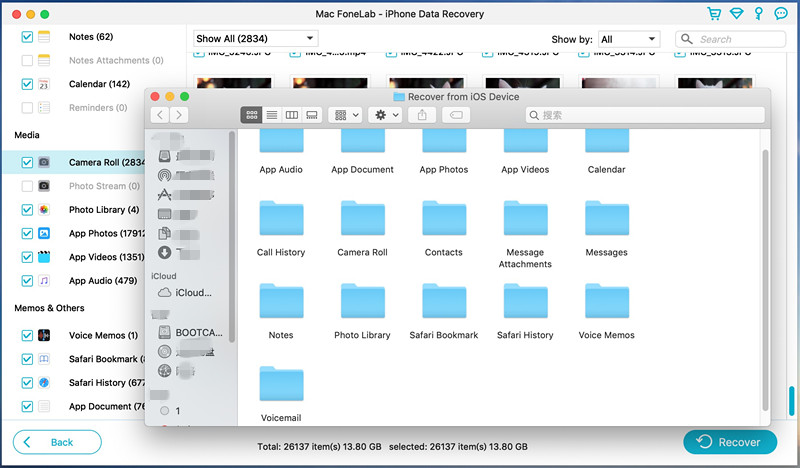
Step 4. Preview and Select File to Recover
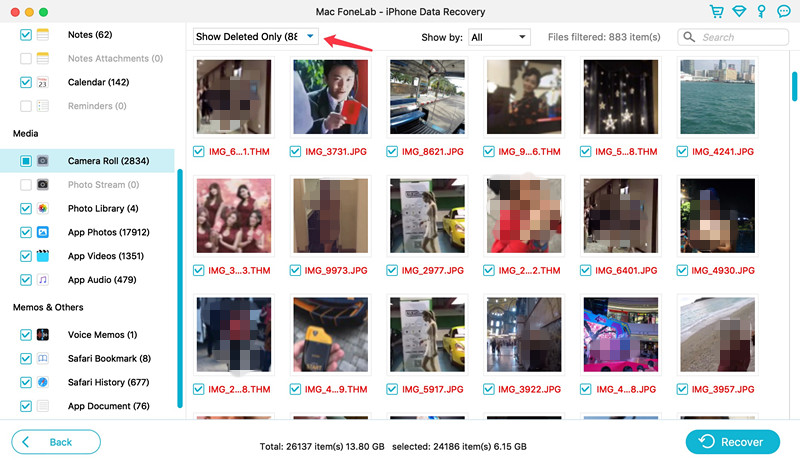
As you can see, these iPhone data will be displayed in three categories. Tick the checkbox in the left side, then preview and choose the contents you want to recover.

recover iPhone 13 - select data to recover

Hit on “Recover” button to begin to recover data from iPhone 13 directly!

recover data from iPhone 13 after factory reset

Method 2. Restore Data on iPhone 13 After Factory Reset With iTunes Backup

It is quite easy to recover iPhone 13 data after factory reset if you backup your data and files on iTunes before. With iTunes, you can restore all content to iPhone from a backup. Here’s how to do it.

2.1 Restore iPhone 13 Data after Factory Reset from iTunes Backup

Step 1. Open the iTunes app on your Windows PC or macOS 10.14 or earlier.

Step 2. Connect your iPhone 13 to Mac/PC with Apple USB cable.

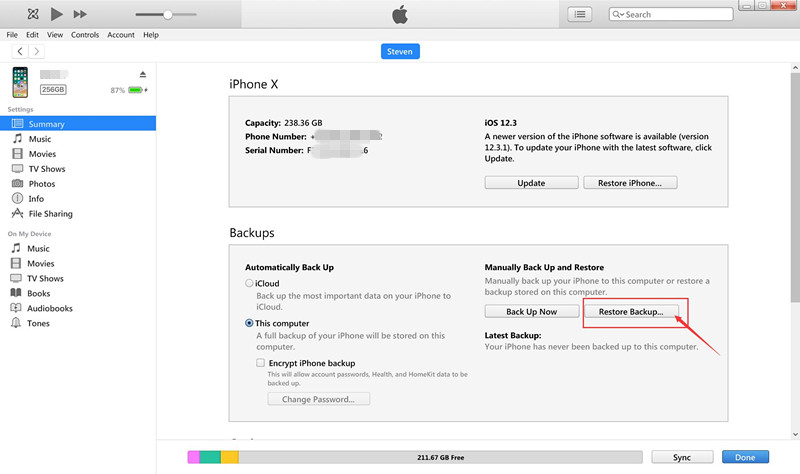
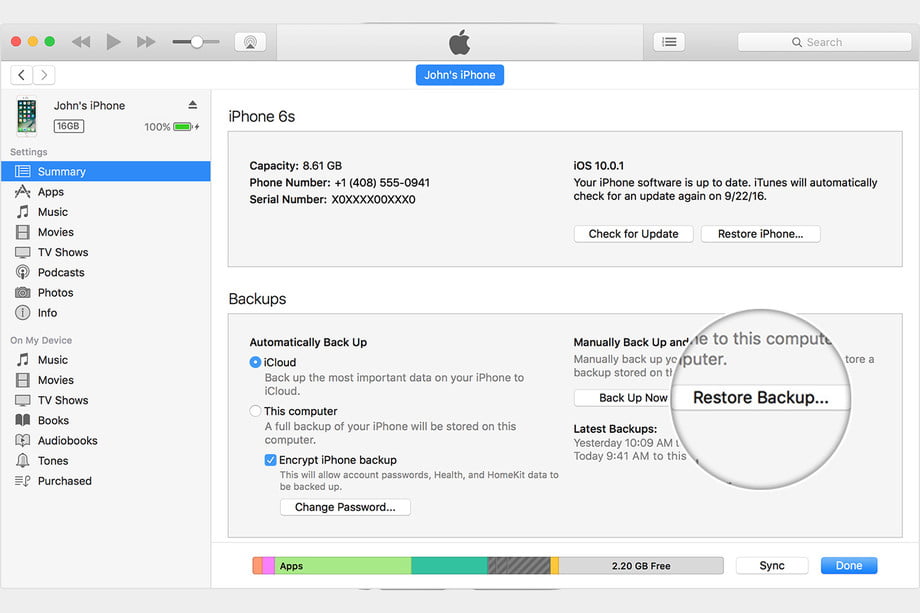
Step 3. Click on your iPhone 13 icon, and click ‘Summary’ in the left panel.

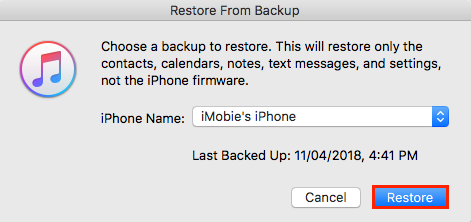
Step 4. Then click ‘Restore Backup’ > ‘Restore’, wait until the process to complete.

restore iphone 13 data from itunes backup

2.2 Recover Data from iPhone 13 after Factory Reset Using Finder

For macOS 10.15 or later, Finder has replaced iTunes. To restore data from iPhone 13 after factory reset, you need to use the Finder to sync your iPhone with your Mac.

Step 1. Open Finder on macOS 10.15 or later. Connect your iPhone 13 to your Mac with a USB cable.

Step 2. In the left sidebar, select your iPhone 13, click ‘Trust’ on iPhone 13 screen.

recover data from iphone 13 on mac

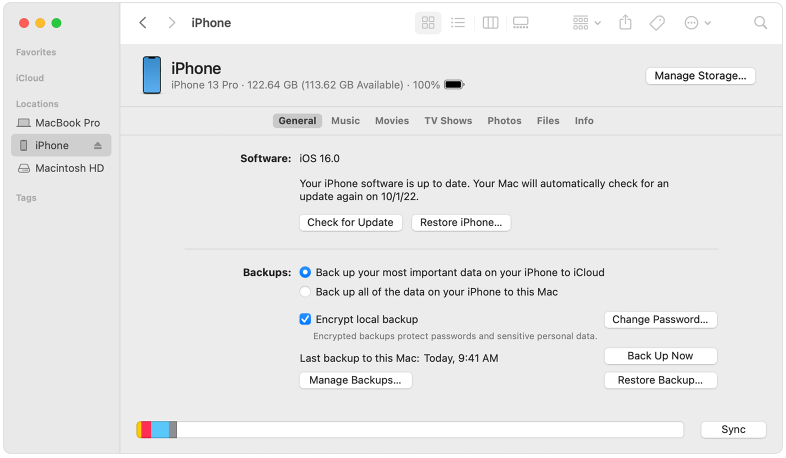
Step 3. Then click ‘Restore Backup’. It will pop up a small waindow. Select a data of your backup.

Step 4. Click ‘Restore’ and wait for the restore to finish. Enter your password to go on.

restor iphone 13 data on finder

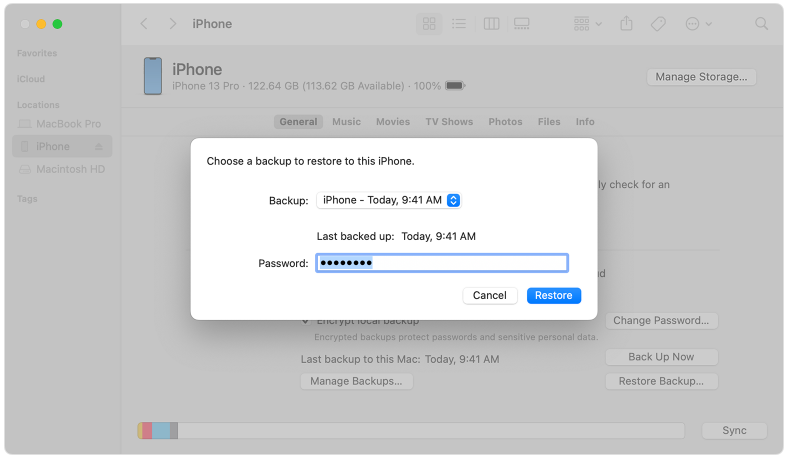
After success, you can see the recovered data on iPhone 13.

2.3 Recover iPhone Data from iTunes Backup File via U.Fone

U.Fone iOS Data Recovery not only lets you recover data from iPhone 13 directly, but also allows you to recover iPhone 13 data through iTunes backup file. Here’s how to use its recovery feature:

Step 1. Run iOS Data Recovery and Select Recovery Method
Fire up U.Fone iOS Data Recovery software on your Mac or Windows PC. Connect your iPhone 13 with computer using USB cable.

recover iphone 13 data using iTunes data recovery

Click “iPhone Data Recovery” function and select “Recover from iTunes Backup File”. Then tap “Start Scan” to scan iTunes backup files.

recover data from iPhone 13 with iTunes backup

Step 2. Select the iTunes Backup File to Scan
Next, it will list entire iTunes backup files in the screen, select the one you want to recover data from iTunes.

Step 3. Recover and Save Data
Select and preview the data you want to get back. Lastly click on the “Recover” to restore the lost data to your iPhone 13.

restore data from iPhone 13 with iTunes backup

Method 3. Recover iPhone 13 Data After Factory Reset With iCloud Backup

In this part, you can recover iPhone 13 data after a factory reset using an iCloud Backup, or recover from the iCloud backup file in U.Fone iOS Data Recovery software.

3.1 Restore iPhone 13 Data After Factory Reset With iCloud Backup

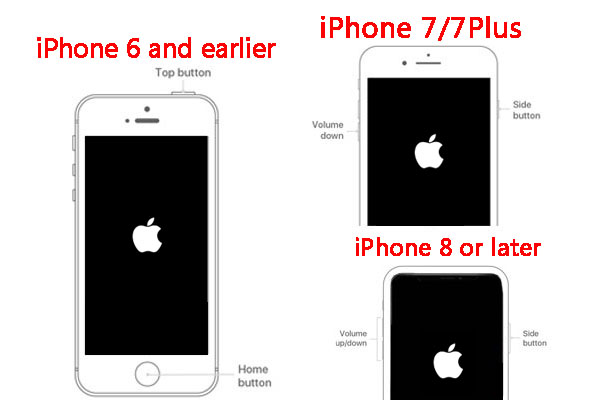
Step 1. Factory reset your iPhone 13 if it is set up already.

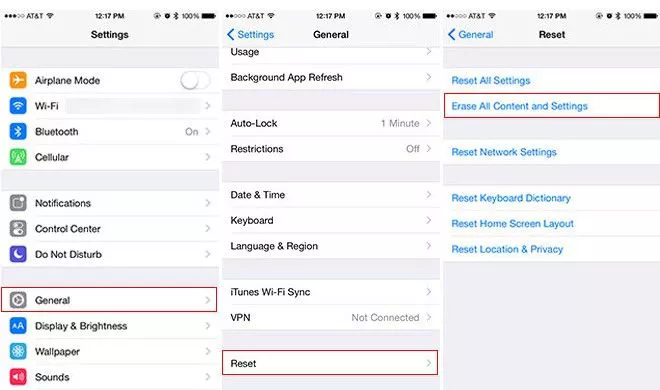
Step 2. Go to ‘Settings’ > ‘General’ > ‘Reset’ > ‘Erase All Content and Settings’.

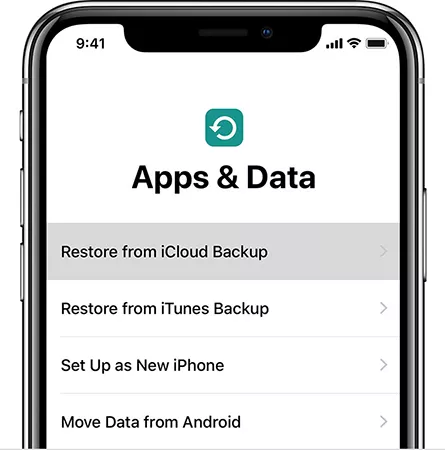
Step 3. Go to Set up your iPhone 13, then tap ‘Restore from iCloud Backup’.

restore iPhone 13 data from iCloud

Step 4. Sign in to iCloud with your Apple ID.

Step 5. Select a backup from the list of available backups in iCloud.

Step 6. When asked, sign in with your Apple ID to restore your apps and purchases.

restore data from iphone 13 via icloud

Step 7. Stay connected to Wi-Fi and wait for the progress to complete.

3.2 Recover iPhone 13 Data from iCloud Data with iCloud Data Recovery

Step 1. Run U.Fone iOS Data Recovery
Launch U.Fone iOS Data Recovery, and connect iPhone with computer using USB cable.

Step 2. Select iCloud Backup Recovery Mode
Select “iPhone Data Recovery” and then choose “Recover from iCloud Backup File”. Enter Apple ID and password on the screen.

sign in to icloud

Step 3. Select an iCloud Backup File to Scan
Next, it will list all available iCloud backup files on the screen.

restore data from iPhone 13 with icloud backup file

Select an iCloud backup file you wish to recover and click “Scan” to continue.

iPhone 13 data recovery

Step 4. Preview and Recover iPhone 13 Data from iCloud Backup
After the scan is complete, you can select and preview the file contents you need to restore. Then click “Recover” button to start recovering data from iCloud backup.

restore data from iPhone 13 with icloud backup file

The Bottom Line

Whether you have backed up your iPhone 13 or not, you can restore iPhone data after factory reset according to this article. You can recover iPhone 13 data via iTunes or iCloud backup file. Also, you could use a professional iPhone Data Recovery tool to directly recover lost data from iPhone 13 after a factory reset! Now download this smart tool and have a try!

d_win d_mac
d_win d_mac

Recover iPhone 13 Data after Factory Reset

How to Recover Photos from iPhone after Update iOS 16

Summary
Photos disappeared from iPhone after iOS 16 update? How to get back lost iPhone Photos after iOS 16? This full guide will cover 4 methods to recover Photos from iPhone after update iOS 16. You can even recover lost Photos after iOS 16 Update from iPhone directly without backup.

“Why did my old photos disappeared from iPhone after update iOS 16? Too bad I don’t have a backup. How do I retrieve lost iPhone Photos after update iOS 16? Any suggestion?”

It is common that iPhone lost data like photos after iOS 16 update. But unfortunately, most iOS users often forgot to backup iPhone data before iOS update. Why your iPhone photos disappeared after update iOS 16? For some reason, the iOS 16 system is not compatible with your iPhone. Or some of your photos were stored in iCloud. Or most photos were completely removed from the iPhone before you updated, etc. For whatever reason, If you’re missing photos or videos in the Photos app after iOS 16 update, you’ve come to the right place. In this guide, we will offers 4 methods to help you recover photos from iPhone after update iOS 16. Don’t have a backup? Don’t worry, you will learn how to directly recover lost Photos on iPhone after update iOS 16 without backup! Let’s explore!

Method 1. Hard Reset iPhone to Recover Photos after iOS 16 Update

Often, a hard reset or force restart of your iPhone can fix the most common iOS data recovery and iOS system issues, including recovering lost photos on your iPhone. Follow the simple steps to hard reset your iPhone (all models).

1) Hard Reset iPhone 8/X/11/12/13/13 Pro/14/14 Pro (Max)

– Quickly press and release the Volume Up (+) button.

– Next, quickly press and release the Volume Down (-) button.

– Press and hold the Power button (right Side button) until you see the Apple logo on the screen, then release the Side button.

2) Hard Reset iPhone 7/7 Plus

– Hold down the Volume Down (-) button and the Power button at the same time.

– Hold down both buttons for 10 seconds until the Apple logo appears,

– Then release the buttons and wait for the iPhone to restart.

3) Hard Reset iPhone 6/6S and Earlier Models

– Quickly press and release the Volume Up (+) button.

– Quickly press and release the Volume Down (-) button.

– Press and hold the Power (Side) button. Release the Power button when the Apple logo appears.

restore iphone photo via hard reset

In this way, you may fix iPhone photos disappeared after iOS 16 update issue. If this method is not feasible, please refer to the next method.

Method 2. Recover Photos on iPhone from Recently Deleted Folder

It is generally known that there is a ‘Recently Deleted Folder’ on iPhone/iPad,iPod Touch. Apple will help you keep the deleted photos and videos in the ‘Recently Deleted album’ for 30 days. During the period, you can recover or permanently remove them from all devices. Therefore, you can check the ‘Recent Deleted Folder’ to restore deleted photos free from iPhone after iOS 16 update. Here’s how to do it:

Step 1. Open the Photos app on your iPhone, tap on ‘Recently Deleted’ album.

Step 2. Click ‘Select’ in the upper right corner of the screen.

Step 3. You can select your desired photos or select ‘Recover All’.

Step 4. Finally, hit ‘Recover’ option in the bottom right corner.

recover iphone deleted photo

Method 3. Re-log into iCloud Account and Check iCloud Photo Sync

iCloud is built into every Apple device. It is a cloud service to help Apple users store their photos, videos, documents and more safely. Usually, your photos would be automatically uploaded to iCloud. If your Photos disappeared from iPhone after iOS 16 update, you can check if you’ve logged in to your iCloud account. Or log out your iCloud account and then log in to it again. You can refer to the steps below:

Step 1. Open your iPhone, go to ‘Settings’, and click [your name].

Step 2. Select ‘iCloud’ > ‘Photos’, manually turn off the ‘iCloud Photos’, and turn it on again.

Step 3. Select ‘Download and Keep Original’, and it will start downloading all original photos from iCloud to your iPhone.

recover iphone photos on icloud

Note: iCloud only offers 5GB of free storage, which may not back up all your photos if your previous iCloud storage is full.

Method 4. Directly Recover Lost Photos on iPhone without Backup

The above methods have different restrictions, and all of them can only help you restore some photos on your iPhone. What if you don’t have any backup before iOS 16 update? Is it possible to recover lost photos without backup? The answer is positive. A third-party iOS data recovery tool will come in handy when you lose iPhone photos after iOS update.

U.Fone iPhone Data Recovery is a simple yet professional iOS Data Recovery tool, which assists you to get your iPhone data back, and recover the deleted/lost/erased data & files from iPhone, iPad, iPod Touch with 3 modes. It supports to recover Photos, Videos, Notes, Messages, Contacts, Call History, WhatsApp from iPhone. For instance, you can recover photos from iPhone directly, or restore iPhone photos from iTunes backup files, or even recover iPhone photos from iCloud backup files.

Apart from being a professional iOS Data Recovery tool, U.Fone is also a powerful iOS System Recovery tool. It is able to fix various iOS system issues, such as broken screen, Apple Logo, DFU mode, Recovery mode, etc.

Step-by-step: Recover iPhone Photos Without Backup

U.Fone iPhone Data Recovery offers 3 modes to recover missing photos after iOS 16 update. Here we will guide you how to directly recover iPhone photos after update iOS 16. If you want to recover from iTunes backup or recover from iCloud backup, you can refer to this post.

Step 1. Download and Run U.Fone iPhone Data Recovery
First, download and install the U.Fone iPhone Data Recovery on your Mac or Windows PC. Fire up the program, and select “iPhone Data Recovery” function.

recover iphone phones

Step 2. Connect iPhone to PC/Mac
To directly recover lost photos from iPhone, please choose “Recover from iOS Device” mode. Then, connect your iPhone to the computer with an Apple USB cable, and wait for the program to detect your iPhone.

connect iPhone to mac

Step 3. Select Photos to Recover
In this step, you need to select the type of data you want to recover. Here please select ‘Camera Roll’, ‘Photo Stream’, ‘Photo Library’, ‘App Photos’, ‘App Videos’ under the “Media” section, then click “Start Scan” button.

select iPhone photos

Step 4. Scan Photos from iPhone
It will start scanning your iPhone. Wait patiently for the scanning process.

scan data from iPhone

Step 5. Preview iPhone Phones
At the completion of the scan, you can preview the photos or videos and select the photos you want to recover. You can choose from ‘Show All’, ‘Show Deleted Only’ at the corner. Then click on “Recover” button.

preview iPhone photo

Step 6. Recover Photos from iPhone Directly
U.Fone will begin to restore your missing photo from iPhone, and recover them to your PC or Mac computer.

recover photos from iPhone after iOS 16 update

Step 7. Transfer Photos to iPhone
After getting back lost photos, locate the folder on computer.

recover photos from iPhone after update ios 16

Install and launch this smart iOS Transfer Tool, then connect your iPhone to computer using USB cable, and transfer these recovered photos to your iPhone.

restore iPhone photos

d_win d_mac
d_win d_mac

Recover Photos from iPhone after Update iOS 16

How to Recover Deleted Data from iPhone 13/13 Pro/13 Pro Max

Summary
Accidentally deleted files on your iPhone 13? Want to recover deleted data from iPhone 13 but don’t have a backup? In this article, you will get an easy way to recover deleted and lost data on iPhone 13/13 Pro/13 Pro Max/13 mini without backup!

iPhone 13 series a top seller globally, with the improved battery life, performance, screen and camera and much more. Which iPhone 13 model are you using now? iPhone 13/13 Pro/13 Pro Max is great. After a long time usage, your iPhone storage will get smaller and smaller. At times you deleted some data like videos, photos, files, etc. to make space in iPhone 13. Sometimes, you have to hard reset your iPhone after upgrade or downgrade failure. Or your iPhone 13 get damaged and you took it to the shop for repairing. No matter accidentally deleted data or other reasons, you may want to recover deleted data from iPhone 13, right? Today, our topic is about how to recover deleted and lost data on iPhone 13/13 Pro/13 Pro Max/13 mini.

In the following content, we will discuss 3 parts: Where do deleted files go on iPhone? Can you get the deleted data back to your iPhone? How to recover deleted data from iPhone 13/13 Pro/13 Pro Max/13 Mini? Read carefully, you will find the answers and solution.

Part 1. Where can You Find Deleted Files on iPhone 13/13 Pro/13 Pro Max?

You can go to iCloud.com, click ‘Recently Deleted’ in the sidebar, then tap ‘Recover All’. Or choose the files you want to recover, then click ‘Recover’.

Accidentally deleted photos or videos on your iPhone 13/13 Pro/13 Pro Max/13 mini? Don’t worry, like other iPhone models, iPhone 13 series also have a ‘Recently Deleted Folder’. Just open Photos app on iPhone 13, open the ‘Album’ > ‘Recently Deleted’, preview the photos or videos you want to get back, then click ‘Recover’ to recover deleted data from iPhone 13.

Part 2. Can Deleted Data be Recovered from iPhone 13/13 Pro/13 Pro Max?

The answer is yes, but everything has two sides. If you have a backup in iTunes or iCloud, you can also recover deleted data on iPhone from iTunes or iCloud backup. However, whether you restore iPhone 13 with iTunes backup or iCloud backup files, your iPhone 13 will be overwritten with the old backed up data. So most iOS users wanna a way to recover deleted data from iPhone without backup.

On the other hand, you have to realize that deleted data is not always stored on your iPhone. When new data is created, these data will be occupied or replaced firstly. That is to say, these data might be overwritten once you create new data. Any operation on your iPhone will render the deleted data irrecoverable. In such case, you need a third-party iOS Data Recovery tool to help you restore deleted data from iPhone 13 directly.

Part 3. Recover Deleted Data from iPhone 13/13 Pro/13 Pro Max Without Backup

U.Fone iOS Data Recovery stands out in the market. This smart iPhone Data Recovery tool will help you get back the data to iPhone without backup. It is able to recover deleted/lost/erased photos, videos, SMS, contacts, notes and other types from iPhone, iPad, iPod Touch.

If you backed up your iPhone to iCloud or iTunes regularly, you can also use other 2 modes to recover deleted data from iPhone in U.Fone. One is to recover from iTunes backup file, another is to recover from iCloud backup file.

Amazingly, it is also a great tool for iOS data backup & restore. Another handy feature is that it can fix various iOS system issues to normal professionally and easily.

d_win d_mac

Tutorial: How to Recover Deleted Data from iPhone 13 without Backup

Step 1. Install and Run U.Fone iOS Data Recovery
Get U.Fone iOS Data Recovery downloaded on your Mac or Windows. Follow the instruction to install it. Launch the program and select “iPhone Data Recovery” option.

iphone data recovery home page

Step 2. Connect iPhone 13/13 Pro/13 Pro Max to Computer
Next, connect your iPhone 13 to PC/Mac using USB cable. Select “Recover from iOS Device” in the main screen, then click “Start Scan” button.

recover delete data from iPhone 13 directly

Step 3. Scan and Analyze Data on iPhone 13/13 Pro/13 Pro Max
Wait for the scanning process to complete. Afterward, U.Fone will list all the content of your iPhone 13.

recover delete data from iPhone 13

Step 4. Select Data to Preview and Recover
Tick the checkbox in the left side to select the file types you want to restore. You can also preview the file before recovering.

select data  to recover

Step 5. Directly Recover Deleted Data on iPhone 13
If everything is ready, simply press on “Recover” button to create one folder on your computer to restore the found data.

recover deleted data from iPhone 13

After which, you can use iTunes to sync these recovered data to your iPhone 13!

d_win d_mac

Recover Deleted Data from iPhone 13

How to Recover Deleted Files from iPhone 12/12 Pro/12 Pro Max

Summary
This post will share three practical ways with you to recover deleted files from iPhone 12, including iPhone 12 Pro/12 Pro Max, help you get data back no matter you have backup or not.

Can I recover deleted data from my iPhone 12 after accidental deletion by my son? Can I restore it from iTunes backup? How? Thanks so much!

Please help. The photos saved on my iPhone 12 Pro is deleted after I upgraded the iOS system on it. What worse is that I have no a backup recently. Any ways to get them back? Please let me know ASAP.

If you are looking this post, you may get into the similar situation that as the cases above. You may lost data from your device and be wondering if there is a possible way for you to recover data deleted from your iPhone with/without backup. Just reading the next sections, then you will get the complete answer in it.

iPhone actually is considered as one of the best mobile devices with advanced technology in these years. Because of its high-quality camera, large storage capacity, and other new cool features, iPhone had already attracted many smartphone users. With its large storage capacity, you can store a lot of iPhone data like contacts, text messages, photos, videos, music songs, call history and even social media apps like WhatsApp and WeChat. However, there are instances that mistakenly deleted data on your iPhone. In the follow sections we will talk about how to recover deleted files from iPhone 12/iPhone 12 Pro/12 Pro Max with three practical ways, help you get data back no matter you have backup or not.

A Superior iPhone Data Recovery Tool is Needed

U.Fone iPhone Data Recovery is sincerely recommended for you here. After testing, U.Fone iOS Data Recovery is a superior data recovery tool help to recover deleted data from iPhone 12/12 Pro/12 Pro Max. It offers two ways for you to recover data on iPhone with iTunes backup or iCloud backup. What’s more, it offers another data recovery solution for who deleted iPhone data without backup, through extracting lost data from device directly. It’s capable of recovering 22+ deleted file types, including photos, SMS, contacts, the 3rd-party app data, and more. Adopt advanced technology to finish data recovery efficiently under any data loss cases. High recovery rate and easy operations, best for beginners. In addition, this perfect tool compatible with various iOS devices and iOS system versions, such as iPhone 14/13/12/11 and older, iPad/iPod, running iOS 16/15/14/13 and above.

Conclude Main Features of U.Fone iPhone Data Recovery

  • Recover deleted data from iPhone without backup
  • Extract deleted iPhone data from iTunes backup
  • Extract deleted iPhone data from iCloud backup
  • Support to recover 22+ deleted file types
  • Recover deleted iPhone data under any data loss cases
  • High recovery rate and easy operations
  • Compatible with various iOS devices and iOS system versions

d_win d_mac
d_win d_mac

Part 1. How to Extract iPhone Data from iTunes Backup

Step 1. Run U.Fone iPhone Data Recovery and Select Recovery Mode
Above above, please download, install and run U.Fone iPhone Data Recovery on your computer. Select “iPhone Data Recovery” option, then “Recover from iTunes Backup File” mode to extract deleted data from iTunes backup.

iphone data recovery home page

Tips: Please don’t connect and sync your device with iTunes after you deleted data on the device, to prevent lost data from being overwritten.

Step 2. Select the iTunes Backup File to Scan
The software will list entire iTunes backup files and show you. Select an iTunes backup which you want to extract data from. Then click “Start Scan”.

Step 3. Select File to Extract
After scanning, it will list all data from this backup file. Choose the desired data from iTunes backup file that you want to retrieve and click “Recover”.

recover iphone data itunes

Done. Now you have restore the selected data from iTunes backup file. Just copy them to your iPhone for recovery.

d_win d_mac
d_win d_mac

Part 2. How to Extract iPhone Data from iCloud Backup

Step 1. Run U.Fone iPhone Data Recovery and Select Recovery Mode
First of all, please download, install and run U.Fone iPhone Data Recovery on your computer. Select “iPhone Data Recovery” option, then “Recover from iCloud Backup File” mode to extract deleted data from iCloud backup.

log in icloud

Step 2. Log in iCloud
Enter the Apple ID and Password to log in iCloud, then you will get a list of all backup files from iCloud is available.

download icould file

Tips: We promise you all your data and personal information in iCloud will not be leak.

Step 3. Select the Backup File from iCloud
The iPhone Data Recovery software will list all the iCloud backup files. Select which one you want to retrieve data from by clicking “Download”. Then it will start scanning process.

scan icloud backup file

Step 4. Preview and Retrieve Data from iCloud Backup
After finish scanning the backup contents from iCloud backup file, you can preview and select the items in detail, extract and save the selected data by clicking “Recover”.

recover iphone data icloud

Done. Now you have restore the selected data from iCloud backup file. Just copy them to your iPhone for recovery.

d_win d_mac
d_win d_mac

Part 3. Recover Deleted Data from iPhone 12 without Backup

This solution is solved by recovering deleted data from iPhone without backup, follow the steps to restore your precious data right now.

Step 1. Launch U.Fone iPhone Data Recovery
To get started, download,install and run U.Fone iPhone Data Recovery on your computer. Click the left one “iPhone Data Recovery” option in the main page to recover deleted data from device directly.

iphone data recovery home page

Step 2. Choose Recovery Mode
Connect your iPhone 12/12 Pro/12 Pro Max to the computer using an Apple USB cable, select “iPhone Data Recovery”. Then you will enter the next page. There are 4 options for your selection: “Recover from iOS Device”, “Recover from iTunes Backup Files”, “Recover from iCloud Backup File” or “More tools”. Click the top one to begin recovering data from iPhone.

choose recovery mode

Step 3. Scan Data from iPhone 12
Click “Start Scan”, U.Fone will begin to scan and analyze the connected iPhone.

connect iphone

Once the analysis completes, it will list all data content be scan out of your device and show you on the screen as it list below.

choose data for recovery

Step 4. Select Data to Recover from iPhone
Tick the checkbox in the left panel to select the wanted files for recovery. At last, click “Save” and then “Recover”.

recover deleted data from iphone

Done. Now you have restore the selected data from your iPhone device directly.

d_win d_mac
d_win d_mac

FAQ:

Q1: Can I restore iPhone data after reset it using U.Fone iPhone Data Recovery?

A: YES. You can recover data from iPhone using our professional software only before the data being overwritten.

Q2: Can I recover the data I deleted 6 months ago using U.Fone iPhone Data Recovery?

A: YES. It depends on whether the data has been totally overwritten. If not yet, then you can recover the deleted data with the help of U.Fone iPhone Data Recovery. Or, if you have a backup at that time, it’s a good way to restore the backup file via our software that has been deleted 6 months ago.

Recover Deleted Files from iPhone 12

How to Recover Lost Data after iOS 16/15 Update

Summary
Update your iOS device then some data lost? This page will show you some useful methods to recover lost data on iPhone/iPad after iOS 16/15 update, then you will get all your precious data back, like contacts, SMS, photos, etc,.

About iOS 16

iOS 16 is available as a free software update. iOS 16 enhances iPhone with all-new personalization features, deeper intelligence, and more seamless ways to communicate and share. iOS 16 brings the biggest update ever to the Lock Screen, the ability to edit and collaborate in Messages, new tools in Mail, and more ways to interact with photos and video with Live Text and Visual Look Up.

Lost Data after iOS 16/15 Update

iOS 16/iOS 15 is released in the past days, some iOS users can’t wait to upgrade their device to the new version of iOS system. However, it is not perfect enough as your imagine. There are some people said that lost data on device after update to iOS 16/15, contacts, SMS, photos, call history, and more. After installing the iOS 16/15 beta profile, not everyone will welcome the changes to the iPhone/iPad interface. They may find it’s too unstable and want to go back to a stable old iOS version build and uninstall the iOS 16/15 beta.

Once losing data after the iOS update, the first idea that comes to your mind must be restoring data from backup. If you backed up your device before upgrading to iOS 16/15, then you’re lucky to follow method 1 and method 2 to recover lost data from backup on iOS device. If you didn’t make a backup previously, then you can take method 3 for reference to recover lost iOS data from device without backup. Let’s check the three methods to recover lost data after iOS 16/15 Update in details.

Part 1: Recover Lost Data after iOS 16/15 Update via iTunes Backup

If you have made a backup of your iOS device with iTunes before updating it to the new iOS version, then you can follow the steps below to restore lost data from iTunes backup.

Step 1. Launch iTunes on the computer and connect your iPhone/iPad to the computer with a USB cable.

Step 2. Click your iDevice icon when it will appear in iTunes.

Step 3. Click Summary then “Restore Backup”.

recover lost data from iPhone on iTunes

Step 4. Check the backup info and select the backup you made before you update your device to iOS 16. If you didn’t make the backup recently and have old backups, choose the latest one and click “Restore”.

lost data after ios update

Tips: Restoring data from iTunes will erase all the existing data on your device, if your backup is complete, you should make sure if it should do.

Part 2: Recover Lost Data after iOS 16/15 Update via iCloud Backup

Some users used to backup data with iCloud. It means that you can restore backups with iCloud if you are facing with data loss after iOS 16/15 update. Follow the steps below to restore lost data from iCloud backup.

Step 1. Firstly, you need to erase all your content. Go to Settings > General > Reset > Erase All Content and Settings.

reset-data

Step 2. Enter your password to confirm it.

Step 3. Then it will pop up the Apps & Data screen.

restore data icloud

Step 4. Choose “Restore from iCloud Backup” and Sign-in with your Apple ID and choose the backup to restore your data.

Step 5. After that, you need to stay connected for over an hour to complete the process.

Part 3: Recover Lost Data after iOS 16/15 Update on Device without Backup

There are two ways to recover lost data after iOS 16/15 update from iTunes backup and iCloud backup respectively. To be honest, every coin has two sides. It will cover the existing data on your device after restoring data with iTunes backup, and the process of restore iOS from iCloud backup may take you a long time. However, if you don’t have any backup with iTunes/iCloud, there is another solution help you restore iOS data. Lucky for you, a professional data recovery tool calls U.Fone iOS Data Recovery will meet your needs.

What can U.Fone iOS Data Recovery do for you? With the advanced technology, U.Fone iOS Data Recovery is developed for recovering data on iOS device safely and easily. It can be used to restore iOS data after iOS 16/15 update or other data losing situations, like accidental deletion, iPhone lost/stolen, water damage, system problem, forgot password, etc,. It provides three recovery modes with users, including recover data from device directly, restore data from iTunes backup, restore data from iCloud backup. All types of iOS data is supported by restoring with U.Fone software, like Text Messages, iMessages, Photos, Contacts, WhatsApp/Kik/Line/Viber/Facebook Messenger Data, Notes, Call History, etc,. It fully compatible with all iOS devices and iOS system versions including iPhone 14, iPad Pro, iOS 16 and earlier.

Main Features of U.Fone iOS Data Recovery

  • Recover iOS data under any situations
  • Recover iOS data with three recovery modes
  • Recover iOS data safely and easily
  • Support to recover all types of iOS data
  • Recover data from third-party app
  • Recover data/fix iOS with the highest speed and rate
  • Fix iOS system under any abnormal states
  • Fully compatible with all iOS devices and iOS system versions
  • Support Windows 11/10/8.1/8/7/Vista/XP; Mac OS X 10.7 and above
  • Lifetime free upgrades and technical support

d_win d_mac
d_win d_mac

Here we will show you how to recover lost data from iOS device without backup using U.Fone iOS Data Recovery.

Recover Lost Data after iOS 16/15 Update from Device Directly

Step 1. Launch U.Fone iPhone Data Recovery
To begin with, download and install U.Fone iPhone Data Recovery on your Mac or PC. There are three main functions in the home page you can see, including “iPhone Data Recovery”, “iOS System Recovery”, “iOS Data Backup & Restore”. To restore iOS data, click the left one “iPhone Data Recovery” option.

iphone data recovery home page

Step 2. Choose Recovery Mode
Then you will enter the next page. There are 4 options for your selection: “Recover from iOS Device”, “Recover from iTunes Backup Files”, “Recover from iCloud Backup File” or “More tools”. Click the top one to begin recovering data from iOS device. Connect your iPhone/iPad to the computer using an Apple USB cable.

choose recovery mode

Step 3. Scan Data from iOS Device
Click “Start Scan”, U.Fone will begin to scan and analyze the connected iOS device.

connect iphone

When the analysis ends, it will list all data content be scan out of your device and show you on the screen as the picture below.

scan data

Step 4. Select Data to Recover from Device
Select the wanted files you for recovery by ticking the checkbox in the left panel. When all things are ready, click “Save” and then “Recover”.

recover lost data from iPhone

All selected data will be restored to your iOS device efficiently.

It seems so easy and effective! Isn’t it? Just download U.Fone iOS Data Recovery and get back your lost data right now!

d_win d_mac
d_win d_mac

Final Words

Now you have got three fixes to the issue “lost iOS data after update to iOS 16/15”. U.Fone iOS Data Recovery offers not only the solution to recover from your device directly but also get data back from iTunes/iCloud backups. Download the free trial and try it to see if it is a reliable and helpful tool to restore iOS data. Confirm it by yourself.

Recover Lost Data after iOS 16/15 Update

How to Recover Deleted Data from iPhone 14, 13, 12, 11

Summary
Can you restore deleted data from iPhone? The main purpose of this article is to share methods to recover deleted or lost data on iPhone including iPhone 14, iPhone 14 (Pro), iPhone 13 (Pro), iPhone 12 (Pro), iPhone 11 (Pro), iPhone 11, which also work with other iOS devices such older iPhone, iPad and iPod touch.

Question: “Why has my iPhone lost mobile data? How to get back deleted data from iPhone 14? Please help!!!”

A update or downgrade failure, a software malfunction, or maybe an accidental human mistake, and your precious Photos, Videos, Notes, Contacts, and many other data on your iPhone have gone bye-bye. Still, even if your iPhone data lost or deleted, don’t worry: you still have an opportunity to recover deleted data from iPhone. This tutorial will cover 2 methods to recover deleted data from iPhone 14, 13, 12, 11. Before you restore your iPhone deleted data, get the reasons why you deleted/lost your data on iPhone. Check it out!

Part 1. What Are the Causes of iPhone Data Loss?

No one wants to experience iPhone data loss. This is unfortunate and helpless. You may be confused about what causes data loss on iPhone. Here is a list of the most common causes of iPhone data loss.

  • Deleting Files by Mistake.
  • Lost or stolen iPhone.
  • Human Error.
  • Physical Damage.
  • iOS System Crash.
  • iOS Update or Downgrade Failed.
  • Jailbreaking Failure.
  • Virus and Malware Attacks.
  • Hardware or System Malfunctions.
  • ETC.

Part 2. Recover Deleted Data from iPhone 14/13/12/11 Using iTunes Backup

iTunes is a good helper for iOS users to manage, transfer, backup, and restore data. To get your iPhone data back, you can use iTunes Restore Backup function. As long as you regularly sync iPhone with iTunes, it will be a large chance to recover deleted or lost data on iPhone 14/13/12/11. Check out the instructions below.

Step 1. Open iTunes, connect your iPhone 14/13/12/11 to an authorized computer with which you have synced data.

Step 2. Tap on the iPhone icon, and click ‘Summary’ > ‘Restore Backup’.

Step 3. Then select a backup version and tap ‘Restore’ to confirm your action.

Step 4. iTunes will begin to restore all content to iPhone from a backup. After the restore is complete, you can check your iPhone to find the data.

recover deleted data from iPhone on iTunes

Note: * Remember to turn on “Find My iPhone” on your iPhone before your recovery.

* If you haven’t toggled on the “Encrypt local backup” for private data when you created a backup on iTunes, you will unable to backup these private data to your iPhone.

Part 3. Best Way to Recover Deleted Data from iPhone 14/13/12/11

You can recover deleted data from iPhone using iTunes Backup. But what if there is no backup at hand? Besides, this method could not help you restore deleted data from iPhone completely, instead, it can only recover the data you backup in iTunes. To make matter worse, the current data on your iPhone 14/13/12/11 will be erased, which may cause more data loss to some extent. So how to get back deleted data from iPhone 14/13 much easier? Is there any handy alternative tool? Yes! All you need is a professional iOS Data Recovery – U.Fone iPhone Data Recovery.

U.Fone iPhone Data Recovery is a top-rated iPhone data recovery software on the market, which supports to recover lost/deleted/erased data from iPhone, iPad and iPod touch. This powerful tool supports to restore all data types from iOS 9 to iOS 17, including photos, videos, contacts, reminders, text messages, call history, notes, calendars, voicemails, WhatsApp, app data, and more. With it, users can safely and easily recover deleted data from iOS internal memory without backup. Apart from this, U.Fone also can fix iOS system recovery issues!

Main Features of U.Fone iPhone Data Recovery:

  • All-in-on iOS Data Recovery, iOS Data Backup & iOS System Recovery.
  • Recover erased/lost/deleted data files from iOS device directly.
  • Recover deleted/lost data on iPhone 14/13/12/11/XS/X/8/7/6s/6.
  • Recover deleted Photos/Videos/Files/Notes/SMS and more on iPhone.
  • Restore deleted data and files on iPhone from iTunes backup or iCloud backup.
  • Fix various iOS system issues like DFU mode, recovery mode, Apple logo, black screen, etc.

d_win d_mac
d_win d_mac

4 Steps to Recover Your Deleted iPhone Data

Step 1. Launch U.Fone iPhone Data Recovery
First of all, download and install U.Fone iPhone Data Recovery on your Mac or PC. Open the program, and you will see its 3 functions.

iphone data recovery home page

Step 2. Choose Recovery Mode
Connect your iPhone 14/13/12/11 to computer using Apple USB cable. To restore deleted data from iPhone, select “iPhone Data Recovery”. Then you will enter the next page. You can choose from “Recover from iOS Device”, “Recover from iTunes Backup Files”, “Recover from iCloud Backup File” or “More tools”. The easiest way is to recover from iOS device.

recover delete data from iPhone 14 directly

Step 3. Start Data Scanning
Click “Start Scan”, and U.Fone will begin to analyze the connected iPhone.

recover delete data from iPhone 13

After the analysis is complete, it will list all data content of iPhone on the screen, as the picture shown below.

scan data from iPhone

Step 4. Select Files to Recover
Now select the desired files you want to recovery by ticking the checkbox in the left panel. If ready, hit on “Save” and then “Recover”.

recover deleted data from iPhone 14/13/12

All deleted data will be returned to your iPhone!

Now, download this great tool to recover the deleted data on your iPhone/iPad/iPod!

d_win d_mac
d_win d_mac

Recover Deleted Data from iPhone 14, 13, 12, 11

How to Play Tidal Music on Apple Watch

Summary

Looking for how to play Tidal Music on Apple Watch? Do you want to know how to download Tidal Music to Apple Watch for offline playing? In this post, you will learn 2 methods to play Tidal Music on Apple Watch: play Tidal Music on Apple Watch with Tidal app and play Tidal Music on Apple Watch without Tidal subscription.

I have got my Apple Watch recently, and as a Tidal fan, I am wondering how to listen to Tidal Music on my Apple Watch. Is there a way that I can download Tidal Music to MP3, so I can transfer them directly to my Apple Watch.

Tidal is now the most popular streaming music service with exclusive playlist and Hi-Fi sound quality. You can stream Tidal Music on multiple devices, such as your mobile phone (IOS/Android), smart TV or computer, etc,. You just need to download and install the Tidal app into your device to stream Tidal Music. Tidal supports downloading music for offline playing on authorized devices if you have paid for the Tidal subscription plan(Hi-Fi or Hi-Fi plus).

How about Apple Watch? Is Tidal Music able to be played on Apple Watch?

You can definitely play Tidal Music on Apple Watch. Tidal already had the announcement that Tidal app is available on types of wearable devices such as Apple Watch(iWatch), Samsung Watch, Galaxy Watch, etc,. You can stream Tidal Music directly on Apple Watch or download it for offline listening, but this is only for Tidal subscribers(HiFi or HiFi plus), so if you unsubscribe to Tidal or when the subscription ends, can we still play Tidal Music on Apple Watch?

As we all know, most of the streaming music service like Tidal Music, Spotify, Amazon Music, Youtube Music, etc. You can only stream music within its app. For Tidal as well, It is not possible to transfer and be playing on Apple Watch without the Tidal official app. If you want to get the solution on how to listen to Tidal Music on Apple Watch without subscription, you have come to the right place, we are going to show you 2 methods to play Tidal Music on Apple Watch.

Method 1: Play Tidal Music on Apple Watch with Tidal App

Tidal app is now available for Apple Watch to all Tidal subscribers, you can enjoy Tidal Music just simply install the Tidal app and play directly on your Apple Watch. But not all the Apple Watch model can run Tidal app, the following models are perfectly solve this problem.

Compatible Devices:
1.Apple Watch 3 or above.
2.WatchOS 7.1 or above.

Let’s follow this steps for playing Tidal Music on Apple Watch with Tidal app.

Step 1. Search the Tidal app on App Store, then download and launch it on your Apple Watch.

stream tidal on apple watch

Step 2. Go to link.tidal.com on your iPhone or PC, then log in Tidal account.

Step 3. You will get a 5-letter code, then enter the code on your Apple Watch to link your account and begin to stream Tidal music.

log in tidal on apple watch

Once the installation of Tidal app is done, you are able to stream Tidal Music on your Apple Watch directly.

Method 2: Play Tidal Music on Apple Watch without Subscription

How do you play Tidal Music on your apple Watch if you unsubscribe to Tidal or the subscription plan ends? You need a third-party tool to download Tidal Music to computer, UkeySoft Tidal Music Converter is a professional and useful tool enables you to download Tidal Music to plain audio file, including MP3, M4A, AAC, WAV, FLAC, AIFF, which are compatible with Apple Watch.

In addition, UkeySoft Tidal Music Converter helps you download and convert Tidal Music to various audio formats at 10X speed with ID3 tags kept. Moreover, the program has the ability to download Tidal with lossless audio quality, so you can play Tidal Music on Apple Watch with Tidal original Hi-Fi audio quality, even without accessing Tidal app.

Key Features

  • Support download Tidal Music for Tidal free and Tidal HiFi users.
  • Convert Tidal Music to MP3, AAC, M4A, WAV, FLAC and AIFF.
  • 10X conversion speed.
  • Keep Hi-Fi audio quality, preserve with ID3 tags.
  • No need to install the Tidal app.
  • Free update and technical support.

d_win d_mac
d_win d_mac

Part 1: How to Download Tidal Music to Computer

To download Tidal Music to computer with UkeySoft Tidal Music Converter, please follow the detail steps below.

Step 1. Run UkeySoft Tidal Converter and Log in Tidal
Download and launch UkeySoft Tidal Music Converter on the computer, then log in with your Tidal account. You can login in either Tidal free or Tidal Hi-Fi(Plus) account.

launch program

Step 2. Output Setting for Apple Watch
Click on the “gear” icon on the top right of the corner to set up the output format for playing Tidal Music on Apple Watch, the supported format for apple Watch are MP3, WAV, AIFF. Let’s choose MP3 with the output quality at 256 Kbps.

set mp3 output format

You can also set up output settings, output folder, output file name, output organized, etc,.

Step 3. Add Tidal Songs/Playlists/Albums
Choose and add Tidal tracks/playlists/albums by clicking on the red “+ Add” icon on the right side.

add tidal music to program

All songs are selected by default on the song list. You need to deselect the songs that you do not want to download manually.

select tidal music

Step 4. Download Tidal Music to computer
Click the “convert” button to download and convert Tidal Music to computer at 10X conversion speed.

download tidal music

Step 5. Check The located files
When the conversion is done, you can find the downloaded Tidal songs by clicking the output folder, or you can click the “History” button on the top right corner to check the downloaded songs.

get converted tidal music

d_win d_mac
d_win d_mac

Part 2: How to Sync Tidal Music to Apple Watch

Now you have downloaded the Tidal songs as local files on your computer, please follow the steps to sync Tidal Music to Apple Watch.

Step 1. Open iTunes on your computer and go to “File > Add to Library”, then choose the downloaded Tidal songs to upload to iTunes.

Step 2. Connect your iPhone to computer, go to “Music > Sync Music” on iTunes, choose “Selected playlists, artists, albums” section and click apply to start transferring Tidal Music to iPhone.

sync tidal to itunes

Step 3. Turn on the Bluetooth on your iPhone. Open the Apple Watch app on your iPhone and then tap on “My Watch”, Select the “Music > Add Music”, then choose the Tidal Music that you want to play on Apple Watch.

Now you can enjoy Tidal songs on your Apple Watch with your Blue headphone!

Conclusion
You have learned how to stream Tidal Music on Apple Watch with the Tidal app, and you also learned how to download Tidal Music to computer and transfer to you Apple Watch for offline listening. With the help of UkeySoft Tidal Music Converter, you can easily download Tidal Music as plain audio files, and put them to Apple Watch without accessing Tidal for streaming anywhere at anytime.

Play Tidal Music on Apple Watch

5 Best Amazon Music to MP3 Converters Review

Summary
Have you been looking for Amazon Music converter on the internet? How do you define the best Amazon Music to MP3 converter? Read this review, you will get to know about top 5 Amazon Music converter with the comparison of their features, pros & cons, and you will learn how to choose the best Amazon Music converter. With the best Amazon Music converter, you are able to download and convert Amazon Music to MP3 for offline playback without limits.

Amazon Music is one of the famous and top rated streaming music service around the world, it’s offering Amazon Prime Music and Amazon Music Unlimited subscription plans, there are over 50 millions subscribers and it’s regularly growing each year. With the subscription plans, you are able to access 90 millions of Amazon Music in SD and HD quality.

However, Amazon Music only provides download option for subscribers, and the downloaded Amazon Music can not be played outside the Amazon Music app. So for Amazon Music free or paid subscribers, they definitely need a Amazon Music downloader & converter to be more multi-playable with their personal devices. An Amazon Music downloader is capable to download and convert Amazon Music to MP3, so you can listen to Amazon Music for free without any limitations.

We believed that many Amazon Music users tried to search it from the internet and it is pretty hard to choose the suitable one. In this review, we will list 5 best Amazon Music converters, also Amazon Music recorder, it gives you better idea to choose the one that is the most suitable for usage.

Top 1. UkeySoft Amazon Music to MP3 Converter (The Best)

We have been testing many Amazon Music Converters, and summed up 5 best converters out of all brands. UkeySoft Amazon Music Converter is top 1, the reason why UkeySoft is the best Amazon Music converter is that this program is a one-stop Amazon Music Converter, Downloader and Player with amazing features.

UkeySoft Amazon Music Converter is the best Amazon to MP3 downloader & converter, it can convert Amazon Music to various audio formats, including MP3, M4A, AAC, FLAC, WAV and AIFF. All Amazon Music users (Amazon Free, Amazon Prime Music & Amazon Music Unlimited) are able to access this program and download music from Amazon for free. This program has a great capacity for removing DRM from Amazon Music, so you can save Amazon Music as local files on your computer, then you are able to transfer the downloaded music to other devices for backing up or offline playback. UkeySoft Amazon Music converter also keeps the original audio quality and ID3 metadata after conversion, this is perfect for those Amazon users who have high requirements for music output quality. More importantly, the program has a built-in Amazon Music player, you can play the converted songs directly on this program, you can just use the program for the whole process instead of installing the Amazon Music app.

d_win d_mac
d_win d_mac

How to Convert Amazon Music to MP3?

Step 1. Launch and Sign in Amazon Account
Launch UkeySoft Amazon Music Converter on your computer, log in your Amazon account by clicking the “Sign In” button on the top right corner. You can log in with your Amazon Free, Amazon Prime or Amazon Music Unlimited account.

launch amazon music converter

Step 2. Customize Output Format
Before you start downloading the songs, you need to customize your output setting. Click the ‘gear’ icon to the output setting window, Choose MP3 for the Output Format as MP3 is the most common audio formats. There are more output setting you can customize, output quality, output folder, output file name.

set output settings

Step 3. Add Amazon Songs, Albums or Playlists to UkeySoft
Choose songs, albums or playlists that you want to download from Amazon Music. Click the red ‘+’ add button on the right side to add the songs to the converting list.

add amazon music to program

All songs in the playlist are selected by default. Deselect the songs that you do not want to download from Amazon Music.

select amazon music

Step 4. Start Converting Amazon Music
Once you have the songs in the converting list, click the “Convert” button to download the selected songs to MP3 as local files to computer at 5x speed. All output music files will be kept its original audio quality and ID3 tags.

start to download amazon music to computer

Step 5. Get the Local Files
After the conversion is done, you can get your output music files in MP3 by clicking the blue folder icon as shown on the screenshot, or you can directly play in UkeySoft built-in music player.

get output amazon music songs

Pros:
Download Amazon Music and keep the songs forever
Removing DRM protection
Download and convert Amazon Music to MP3, FLAC, M4A, AAC, WAV, AIFF
Preserved ID3 tags and metadata
10X faster speed
Built-in Amazon Music player
Available on Windows and MacOS

Cons:
Only convert the first 3 minutes of each song for the Trial version
Not available on mobile devices

d_win d_mac
d_win d_mac

Top 2. Audials

Audials will be the top 2 Amazon Music downloader on our list, this is because with this program, you can download Amazon Music in high quality output files. Audials is not just an Amazon Music downloader, also it supports downloading music from different streaming music services such as Tidal Music, Spotify Music, Apple Music, YouTube Music, etc. Audials is actually a music recorder which provides a powerful music recording function to download Amazon Music at 5X faster speed on Windows. For the output formats, Audials only provides 2 formats, MP3 and FLAC with the best quality up to 320 Kbps for MP3 and 44100 Kbps for FLAC. What’s more, one of the best thing about this program is that you do not need to open the Amazon Music app to play the songs for recording, you could just use Audials to finish the whole process of downloading Amazon Music with easy operation.

audial audio recording

Pros:
Record streaming music services, such as Amazon Music, Spotify Music, Tidal, etc
Downloading music at 5X faster speed
Support high quality output formats like MP3 and FLAC
Do not need specific streaming music platform app

Cons:
Only compatible with Windows
Only two output formats

Top 3. Screen Recorder

Screen Recorder is a very handy and useful tool that is able to record and download music to MP3, AAC, FLAC, WMA and so on from many sources, including streaming music services like Spotify Music, Tidal Music, Amazon Music, Apple Music, etc. You can record audio sounds from both external and internal on your computer, then you can transfer and play them on any device and share them with others. Screen Recorder is not just an audio recording tool, but also a video recorder, with the help of this recording tool, you are able to record video from streaming service like Pandora, Tidal, YouTube and more.

record amazon music

Pros:
Record online streaming music services such as Amazon Music, Spotify Music, Tidal Music
Record Amazon Music to common audio format
Record video from Pandora, Tidal, YouTube and more
Record online audio from system or microphone
Save the recorded audio in MP3, WMA, AAC, M4A

Cons:
Loss audio quality after recording
Slow recording speed
Cannot be preserved ID3 tags after recording

Top 4. Apowersoft Streaming Audio Recorder

In our top 4 list, here comes Apowersoft Streaming Audio Recorder, this tool is such a great tool that is able to record audios from Amazon Music , also this is a multiple recording tool and it allows users to record streaming audio from music sites, video sites and radio stations. Apowersoft supports 4 type of output audio formats, MP3, AAC, FLAC and WMA, which are commonly compatible with most music players and portable devices. If you like to play music in CDs, Apowersoft Streaming Audio Recorder will be your great help, the program also supports burning audio to CDs, so you can play Amazon Music on CD in your car or CD players.

apowsoft audio recorder

Pros:
Record audio from streaming music services like Amazon Music, Spotify Music, Tidal Music, etc,.
Record streaming audios, radio stations, and more audios from the computer
Record and convert audio to common audio formats like MP3, AAC, FLAC and WMA
Support burning CD

Cons:
The output audio quality is only at 128 Kbps
It’s expensive to purchase the app

Top 5. Audacity

Audacity is a free program that helps download Amazon Music in best recording quality. This recording program is also able to download music from other popular streaming service beside Amazon Music, such as Spotify Music, Pandora Music, Tidal Music, Apple Music and more. Audacity has a in-built editing functions that allows people to edit the music before exporting to common audio files, the supported output formats are MP3, WAV, AIFF, AU, FLAC in high sound quality, which are also playable for most portable players.

audacity record amazon music

Pros:
Free Amazon Music recorder to download songs
Record audio from streaming music services, such as Amazon Music, Spotify Music, Tidal Music, Apple Music, etc.
Editing music before exporting
Record and convert audio to common audio formats like MP3, WAV, AIFF, AU, FLAC
High Sound quality
Support Windows, Mac, GNU/Linux

Cons:
Errors messages pops up
Not stable
There are still some bugs

These are the top 5 Amazon Music Converters above, now we will compare them on a table with some of the important features, like output formats, converting speed, supporting batch conversion, price, and if they are supporting all Amazon Music downloads. In this way, you can compare them wiith all list out clearly.

  UkeySoft Amazon Music Converter Audials Music Sceen Recorder Apowersoft Streaming Audio Recorder Audacity
Output formats MP3, M4A, AAC, FLAC, WAV, AIFF MP3, FLAC MP3, WMA, AAC, M4A MP3, AAC, FLAC and WMA MP3, WAV, AIFF, AU, FLAC
Speed 10X faster 5X faster 1X 1X 1X
Batch convert Yes No No No No
pricing 1-Month Plan: USD 14.95
1-Year Plan: USD 49.95
Lifetime Plan: USD 119.95
Lifetime: USD 39.95 Free 1-Month Plan: USD 19.95
1-Year Plan: USD 39.95
Lifetime Plan: USD 69.95
Free
Amazon Free Yes Yes Yes Yes Yes
Amazon Prime Music Yes Need subscription Need subscription Need subscription Need subscription
Amazon Music Unlimited Yes Need subscription Need subscription Need subscription Need subscription

Conclusion – the best Amazon Music to MP3 Downloader & Converter

After Comparing the top 5 best Amazon Music Converter from several aspects, you will probably have a clear idea of which is the best Amazon Music to MP3 downloader and converter. If you want to download music from Amazon Free, Amazon Prime Music and Amazon Music Unlimited at a fast speed, UkeySoft Amazon Music Converter is definitely the best choice for you. Besides, the output sound quality is very important, UkeySoft is able to keep original sound quality while others Amazon Music Converter could lose in audio quality after conversion. Why not download the tool just now and start enjoying original sound quality Amazon Music freely?

5 Best Amazon Music to MP3 Converters Review

How to Play Tidal Music on Sony Walkman

Summary
Wondering how to play Tidal Music on your Sony Walkman? Looking for a way to download music from Tidal and play on Sony Walkman? In this article, we will show you how to play Tidal Music on Sony Walkman or other MP3 devices/players.

Do you wan to play Tidal music on Sony Walkman, iPod nano and other MP3 players? As we know, Tidal is a music streaming service, even you have downloaded songs within Tidal app, you can’t transfer them to any MP3 player. And, the Sony Walkman is a popular MP3 player that no internet-connected function, if your looking for a method to enjoy Tidal music on Sony Walkman, you cannot download and install the Tidal app on Sony Walkman for steaming music.

Q: How to Download Tidal Music to Sony Walkman?
“I have a Sony Walkman and want to download Tidal songs to Sony Walkman for offline listening, but I found that Windows 10 has no download option for Tidal Music, even I can download Tidal Music on my mobile phone, and the Tidal files could not be found and do not work on the Sony Walkman. So is there a way to download and transfer Tidal music to Sony Walkman?”

Tidal is a global music streaming service that leads the new trend of music, you can stream over 80 millions songs online either you are subscribed for free or HiFi member. Moreover, You can even download and listen to Tidal high fidelity music on your mobile device if you are on a Hi-Fi or Hi-Fi Plus subcription. However, due to the unstable internet and inconvenient for carrying a mobile phone, it would be better to play Tidal Music on MP3 devices such as Sony Walkman. So is it possible to play Tidal Music on Sony Walkman?

Is there any solutions to download, transfer and play Tidal music on Sony Walkman? As we all know, Sony Walkman supports MP3, WMA, AAC, Linear PCM and HE-AAC audio formats, but the Tidal music is not compatible with Sony Walkman and most of the MP3 players, because it could not be possible to play Tidal music on Sony Walkman directly without an internet connection, even you have downloaded Tidal music with your mobile Tidal app, you are still not able to transfer them to Sony Walkman. Therefore we need a third-party tool to download Tidal music to computer and transfer them to Sony Walkman for offline listening.

For the following tutorial, we are going to show you 2 parts, one is to download Tidal music to MP3 or AAC files for Sony Walkman, and then you can transfer the downloaded Tidal songs(.mp3 or .aac) to Sony Walkman.

Part 1: How to Download and Convert Tidal Music to MP3 or AAC

As we mentioned above, we need a third-party tool to download Tidal music to computer for Sony Walkman. UkeySoft Tidal Music Converter is a one-stop music player, downloader and converter for Tidal users. With this tool, you can directly download Tidal music computer and convert them to various audio format, including MP3, AAC, M4A, WAV, FLAC and AIFF. Furthermore, this Tidal Music Converter runs at 10X faster speed during conversion with lossless HiFi audio quality. With built-in smart ID3 editor, it can manage the music library by album, artist, album/artist, artist/album. Most importantly, all Tidal users can download Tidal music to computer without any limitation, even you are a free member of Tidal.

Key Features:

  • Download Tidal songs/albums/playlist to computer for free.
  • Convert Tidal music to MP3, M4A, FLAC, AAC, WAV and AIFF.
  • Keep HiFi quality of Tidal music and retain ID3 Tag after conversion.
  • Available for Tidal Free and Tidal HiFi users.
  • 10X faster converting speed.
  • No need to install Tidal app, built in Tidal Web Player.
  • Free update and technical support.

d_win d_mac
d_win d_mac

Guide: Best Way to Download Tidal Music to Sony Walkman

To download Tidal Music for Sony Walkman, first of all, we need to download Tidal Music to computer, the following steps shows how to download Tidal Music to computer with UkeySoft Tidal Music Converter.

Step 1. Download and Launch UkeySoft Tidal Music Converter
Download and install the UkeySoft Tidal Music converter on your computer, then you need to login your Tidal account to launch the program.

launch program

Step 2. Choose MP3 or AAC as Output Settings
Click on the gear icon at the top right corner for output setting, there are a various of setting here, you can set up Output Format, Output Quality, Output Folder, Language, etc. as the screenshot shown below.

set mp3 output format

To download Tidal music for Sony Walkman, please set MP3 or AAC as the output format, we are taking MP3 as an example. You can select 320 kbps for high quality Tidal songs.

select mp3 320kpbs for tidal music

Step 3. Select Tidal Tracks/Playlists/Albums
Select your favour artist, playlist or album, then Click the Red “+ Add to list” icon on the right side to load the songs.

add tidal music to program

After you have select your playlist or album, it automatically ticks all the song on the list by default. If you just want to download some particular songs in the selected album or playlist, you can deselect the songs that you do not like to download.

select tidal music

Step 4. Start Converting Tidal Music for Sony Walkman
After you have selected all your songs, please click on the “Convert” button to start downloading and converting Tidal music to MP3/AAC format with high quality at 10X faster conversion speed.

convert tidal music to mp3 for sony walkman

When the converting is done, you can go to the little blue Output Folder to get the downloaded Tidal music for Sony Walkman.

get converted tidal music

Part 2: How to Put the Downloaded Tidal Music to Sony Walkman

Now you have all your Tidal Music downloaded on your computer, then you need to transfer the downloaded Tidal Music to Sony Walkman.

Step 1. Connect Sony Walkman to your computer with USB cable.
Step 2. Go to ‘This Computer’, click on the icon of Sony Walkman.
Stpe 3. Open the ‘Storage Media’ folder. You are going to put the downloaded Tidal songs in here as the target folder.
Step 4. Copy and paste or simply drag the Tidal songs to the folder in Sony Walkman.
Step 5. When it’s done, eject the Sony Walkman from the computer.

transfer tidal music to sony walkman

Now you can enjoy your high quality Tidal Music on your Sony Walkman for offline playing.

Conclusion

Now you have learned how to download and transfer Tidal Music to Sony Walkman, no matter if you are a Tidal Free or Tidal Hi-Fi (Plus) subscriber, with UkeySoft Tidal Music Converter, you can easily put Tidal Music on Sony Walkman for offline listening and playback. The Windows and Mac versions are available, please do not hesitate to get it to enjoy your favourite high quality Tidal Music on Sony Walkman at anywhere, anytime.

d_win d_mac
d_win d_mac

Play Tidal Music on Sony Walkman

How to Download Tidal Music without Premium

Summary
A tutorial teach you how to download Tidal Music without Tidal Premium, then you can easily save Tidal Music as local files and enjoy it on any movable devices freely.

I want to download songs from Tidal, and set the music as my ringtones. But the music I subscribed will be grayed once the Tidal subscription ends. Anyone give me the solution to download Tidal Music without Premium?

It’s well-known that Tidal like Spotify, it is available by the Chrome-based Web player or run in Tidal app. Tidal is a popular music streaming app, for those with a special liking for hi-fidelity audios. It provides two subscription plan – Hi-Fi and Hi-Fi Plus. The high sound quality always requires high internet speed. As a result, the best way to get the best listening experience of enjoying Tidal Music is to download Tidal Music to computer without Premium.

However, you can’t download Tidal Music on the computer even you are Tidal Premium. In other words, Tidal subscribers are authorized to download Tidal Music for offline listening on smartphone. The downloaded Tidal Music are not saved as local files on device. They are restricted to be played with the Tidal app and can’t be moved to anywhere else for offline playback. On the other hand, the music you downloaded from Tidal will be grayed without premium. To keep Tidal Music forever, or save it for more personal usage, such as, set it as ringtones, you should download Tidal Music on the computer first.

Download Tidal Music to Computer

UKeySoft Software has developed and created a professional Tidal Music Downloader, which is available for Tidal free and Tidal HiFi(Plus) users to download Tidal Music to computer without premium. UKeySoft Tidal Music Converter enables to convert and download Tidal Music to 6 kinds of usual file formats, including M4A, MP3, AAC, WAV, AIFF, FLAC. UKeySoft allows to download Tidal Music/albums/playlists to computer without Premium, with Hi-Fi audio quality kept. Then you can get Tidal Music on the computer for offline playing even without premium. Moreover, you can use the music for more personal usage, for example, set it as ringtones. The superior feature of this converter is that it is built-in web player, which is not require Tidal app installation while converting.

Pros of UKeySoft Tidal Music Converter

  • -Download Tidal Music for free and HiFi(Plus) Users
  • -Download Tidal Music with Hi-Fi audio quality
  • -Download Tidal to M4A, MP3, AAC, WAV, AIFF, FLAC
  • -Download Tidal with all ID3 tags, metadata kept
  • -Run at 10X converting speed
  • -Play Tidal Music on all devices and players without limits

d_win d_mac
d_win d_mac

How to Download Tidal Music without Premium

Step 1. Run UKeySoft Program
The first step, download, install and run UKeySoft Tidal Music Converter on the computer, which features a built-in Tidal web player.

Step 2. Log in Your Tidal Account
Follow the instructions to log in your Tidal account.

launch program

Step 3. Choose Output Format
The default output format is M4A. UKeySoft also supports MP3, AAC, FLAC, WAV, AIFF. Change the output format or output folder if you need.

You can also customize output song name with any combination of Title, Artist, Album, Track Number, Playlist Index.

set mp3 output format

Step 4. Add Tidal Songs/Playlists/Albums
Click Tidal songs/playlists/albums you want to download to the computer.

select tidal music

Then click the red icon to load songs. All songs in the playlist will be added by default. You can uncheck the songs if you don’t want to download.

Step 5. Download Tidal Music to Computer without Premium
In the final step, simply click “Convert” button to begin downloading Tidal Music to computer with the format you choose.

convert tidal music

When the conversion completes, you could click the folder icon to locate the downloaded Tidal Music on the computer for offline playing. You can use it for more personal usage even without Tidal Premium, for example, set it as ringtones or more.

d_win d_mac
d_win d_mac

Download Tidal Music without Premium