All posts by DHZ

How to Backup iPhone/iPad/iPod Data before iOS 12 Update

Finally, iOS 12 is released in WWDC. iOS 12 cements Apple as a leader in augmented reality (AR) with the arrival of groundbreaking multiplayer capabilities it calls shared experiences in ARKit 2. User interface and core app updates give us grouped notifications and also group FaceTime. And, of course, Siri will be smarter in 2018, as it is every year, this time thanks to Siri Shortcuts.

As usual, however, there were still a bunch of new features for updating. iOS 12 bring things like your standard performance improvements, new Animoji features, Memoji — since everyone has always wanted to turn themselves into an Animoji — group FaceTime, camera effects, ways to limit your screen time and many more features that Apple crammed into its two hour-long keynote presentation.

If you own an iPhone/iPad/iPod, after the WWDC you realized how convenience the new OS can help your daily life. Certainly, you can’t wait to update to the latest version of OS and enjoy all the new features. But you still have to be careful before doing so. Keeping iOS data is the most important thing when you decide to update iOS system on iOS device. Since there is always a risk of data loss when upgrading iOS system. Since we save all our previous contacts, photos, videos, documents and important data on our device, update to iOS 12 would possibly cause data loss and we can hardly get them all back. In this tutorial, we will show you the best solution to safely backup iOS data before iOS 12 update.

Safely Backup iOS Device before iOS 12 Update

iOS Data Exporter is the best software can help. It could be used to backup & restore more than 20 types of iOS data, including contacts, SMS, photos, video, note, calendar, reminder, apps data(WeChat, Skype, Viber, Kik, Line, Skype) and more. With using this reliable software, you could safely backup iPhone/iPad/iPod before iOS 12 update. It offer three modes for you: back up & export from device, extract data from backup, restore backup to device. It provides three backup modes with you, insist of export data from iPhone directly, export data from iTunes backups, and download data from iCloud backups; making a full backup or backing up portion data selectively. Supports all iOS devices, such as, iPhone X, iPhone 6S/6, iPhone 5S/5, iPad and iPod.

d_win d_mac

How to Backup iPhone Data Safely before iOS 12 Update

Step 1. Run Program and Select the File to Backup
To begin with, download iOS Data Exporter and run it on the computer. From the “Export from iOS Device” tab, click “Start” to proceed.

export iphone data option

Select the file types you need to backup and click on “Next“. The iOS Data Exporter will prompt you to connect your iPhone to the computer.

select file to scan

Step 2. Scan iPhone Data Completely
Once your device is connected, click “Scan” button and then the program will scan your device.

scan iPhone data

Note: The scan will last for a while and the time depends on the storage of your device.

Step 3. Preview and Backup Data from iPhone
Once the scan is completed, the data available will be displayed on the interface of program. You can check the specific files by clicking different tabs. After selecting the wanted files, just click on the “Export” button at the bottom right corner to backup the selected data on your computer.

preview and backup iPhone data

A popup window will ask you to select where you want to store the selected data on your computer.

select position to save iPhone data

d_win d_mac

Related Articles:

How to Backup and Restore Data from iPhone X/8/7/6S/6

Recover Lost Data from iPhone/iPad after iOS 12 Update

How to Restore Photos from iPhone after iOS 12 Update

Best iPhone Manager: How to Transfer & Manage Files for iPhone

How to Play Apple Music offline on iPhone/iPod/iPad

Backup iPhone Data before iOS 12 Update

How to Stream Apple Music to Google Pixel 2/2XL

Hi. I got a new Google Pixel 2 phone as my birthday gift. How to stream Apple Music I subscribed in Apple Music app to the new phone? I want to enjoy the music on the new Android even though without running Apple Music app. How to make it true?

As we know, we can’t play Apple Music on Android device directly since Apple Music is DRM-protected. We can’t enjoy Apple Music on non – iOS device. Recently, Apple Music released a app called Apple Music for Android, for Android users to play Apple Music more easier. However, Apple Music for Android is not a perfect app for music users on Android device. Because you need to log in Apple ID in this app on Android, what’s more, you can’t upload songs for your Android device. What worse, this app will run stuck on Android device sometimes.

On the other hand, some people may be want to try to play Apple Music on Android device via airplay. Airplay leads a newly trends of wireless streaming audio, video and photos together with related metadata between devices. Users who use iOS devices such as iPhone, iPad are relying on Airplay due to the convenience of transmitting music and other media files. However, the functions of Airplay do not work when transfer content from Apple devices to Android device.

Songs you purchased from Apple Music app or iTunes Store are the M4P format which is not available to play on all devices. But MP3 songs are compatible with all audio devices. If you are a people who want to stream Apple Music to Android device without Apple Music for Android app or Airplay, you need to make the preparation of dealing with protected Apple Music which encrypted DRM technology. To make this true, you need a smart Apple Music conversion tool.

Remove DRM from Apple Music for Playing on Google Pixel 2/2XL

Apple Music Converter is the DRM removal tool we are looking for. It enables you to remove DRM from Apple Music legally. With this Apple Music Converter, you could convert Apple Music to DRM-free music files without quality loss, including MP3/AC3/AIFF/FLAC/M4A or more. The conversion is up to 16x speed. Moreover, Apple Music Converter allows to convert iTunes music and audiobooks to MP3/M4A. All in all, you can offline playing back the converted Apple Music on Google Pixel 2/2XL or other audio players(iOS device, Android device, PSP/PS4, Xbox, TV, etc,), burn it to CDs, save it to SD card, set it as phone ringtone.

d_win d_mac

How to Stream Apple Music to Google Pixel 2/2XL

Step 1. Run Apple Music Converter on the Computer
To get started, download and install Apple Music Converter on your Windows or Mac computer.In the meantime,the iTunes library will be opened automatically. It will load all your Apple Music playlists and iTunes playlists.

Apple Music home page

Step 2. Add Apple Music for Conversion
Click the playlist in the left column, then you can add Apple songs, albums or playlists to the program that you want to convert. The program supports batch conversion so you can choose a few playlists, or select a few songs.

Add Apple Music

Note: If you can’t find the music you want to convert, you can search it in the search box. And please make sure that you have downloaded and saved the Apple Music tracks you want on computer.

Step 3. Select MP3 as Output Format
Then choosing MP3 as output format for Google Pixel phone since most of Android phone compatible with MP3 format. In this part, you can see the Apple Music Converter supports 8 output formats: MP3, M4A, AC3, AIFF, AU, FLAC, M4R and MKA. Just choose MP3 as output format.

select mp3 output format

In addition, you can also specify the location for saving output MP3 files, as well as select audio quality from low, normal, high or set bitrate, sample rate according to your needs.

Step 4. Start Apple Music Conversion
Simply click the “Convert” button and the Apple Music to MP3 conversion starts, the program will immediately pop up the conversion window.

convert Apple Music to MP3

When the conversion is finish, you can click the “Explore output File” button to get the converted DRM free Apple Music in MP3 format on the computer.

explore Apple Music in MP3 format

d_win d_mac

Step 5. Transfer Music to Google Pixel 2/2 XL
In the last step, you should sync the converted music files from the computer to Google Pixel 2/2 XL via Android Transfer tool.

transfer Apple Music to Google Pixel

Tips: Android Transfer is a practical tool to transfer & manage files for Android device on the computer safely and efficiently. Supported files including music, videos, photos, playlist, contacts, SMS, apps and more.

Free Download Android Transfer:
d_win d_mac

Done. Now you could freely play the converted Apple Music on your Google Pixel 2/2 XL without limits. Have fun.

More Guides for Google Pixel Users:

How to Import Music to Google Pixel 2/2XL

Transfer Music from iTunes to Google Pixel 2/2XL

How to Transfer Music and Videos to Google Pixel Phone

Music Transfer from Samsung Android to Google Pixel/Pixel 2

How to Transfer Samsung Data to Google Pixel/Pixel 2

How to Recover Deleted Data from Google Pixel/Pixel 2

How to Backup and Restore Google Pixel/Pixel 2

Stream Apple Music to Google Pixel 2

Transfer Music from iTunes to Google Pixel 2/2XL

I used iPhone device for 3 years, iPhone 5S, iPhone 6S and iPhone 7. I decide to switch to a new Google Pixel 2 phone in these days. However I am trying to figure out how to transfer the songs and playlist from iTunes library to the new model without complicated steps. Anyone could help?

Like most people, you may be curious about Android world and be anxious to get out of Apple’s constraint, you may be disgusted with iTunes’s overbearing attitude – you can’t manger your iPhone, iPad or iPod without iTunes. As we know that Apple iOS is a closed operating system that it doesn’t accept the external data from Android or other resources. If you’ve been a long time user of an iPhone device, you may get a huge collection of music in your iTunes. How to deal with the music when you switch a new Android device like Google Pixel 2/2 XL, Samsung Galaxy S9, Nokia 10, Xiaomi Mi 8, or other new Android models?

Because iTunes redefines and file locations and file format in the iTunes software, so that makes it difficult to get your music from iTunes to an Android device. It seem impossible to transfer music from iTunes to Android device directly. Music play an important in all of our life. You may being trouble in transferring media files between iTunes and Android device when you get a new Android for example Google Pixel 2/2 XL. Luckily, in this article we will give you the best way to move iTunes music to Google Pixel 2/2 XL or other Android models with a reliable Android toolkit – Android Transfer. It is described as a bridge between Android and iTunes.

Import Music from iTunes to Google Pixel 2/2 XL

Google Pixel ManagerAndroid Transfer is a well-known software that lets you manage iOS and Android devices safely. It can backup Google Pixel data to computer, delete files and also export the files on Google Pixel with ease. This Google Pixel Manager supports data types like music, playlist, videos, photos, contacts, SMS among others. With the help of this smart program, you can easily transfer music from iTunes to Google Pixel 2/2 XL. What’s more, this all-in-one program features with one-click-root, app manager, phone to phone transfer, Gif maker and others. Fully compatible with 3000+ Android devices (Android 2.2 – Android 8.0) from Google Pixel, Samsung, LG, HTC, Huawei, Motorola, Sony, Lenovo, OPPO, ZTE, etc,.

d_win d_mac

Part 1: How to Transfer iTunes Music to Google Pixel 2/2 XL

Launch Google Pixel Manager – Android Transfer and connect your Google Pixel 2/2 XL phone to the computer. Your device will be detected and displayed in the primary window very soon.

Step 1. Select Transfer Mode
Simply click “Transfer iTunes Media to Device” on the main interface. Or find the “Transfer iTunes to Device” option under “Toolbox” > “Transfer Tools” section.

Android Transfer home page

Step 2.Transfer iTunes Music to Google Pixel 2/2 XL
All the iTunes files will be scanned and will be shown under different categories like “Music“, “Movies”  and others. By default, all the file types will be selected but to transfer only the music files, you can uncheck the others. Click “Transfer” to start transferring.

transfer iTunes music to pixel 2

transfer iTunes music to pixel 2

d_win d_mac

Part 2: Convert Apple Music to MP3 and Transfer to Google Pixel 2/2 XL

If you want to sync Apple Music as local MP3 files and play it on Google Pixel 2/2 XL without limits, here we recommend this Apple Music Converter for you. It is a famous Apple Music conversion tool for removing DRM protection from Apple Music, convert Apple Music to DRM-free(like MP3, AAC, WAV, or FLAC) files for offline playing without subscription. After the conversion, you could play back the converted music files on any devices freely.

Free Download Apple Music Converter:

d_win d_mac

Step 1. Run Program and Load iTunes Playlist
Step 2. Select Apple Music to Convert
Step 3. Convert Music to MP3 Files

convert Apple Music to MP3 for Google Pixel

Step 4. Transfer Converted Music to Google Pixel 2/2 XL
Note: You could sync the converted music from computer to Google Pixel 2/2 XL via Google Pixel Manager – Android Transfer, it is easy, efficient and safe.

sync music from pc to pixel 2

Free Download Google Pixel Manager – Android Transfer:

d_win d_mac

More Guides for Google Pixel Users:

How to Import Music to Google Pixel 2/2XL

How to Transfer Music and Videos to Google Pixel Phone

Music Transfer from Samsung Android to Google Pixel/Pixel 2

How to Transfer Photos to Google Pixel Phone

How to Transfer Samsung Data to Google Pixel/Pixel 2

How to Recover Deleted Data from Google Pixel/Pixel 2

How to Backup and Restore Google Pixel/Pixel 2

Transfer iTunes Music to Google Pixel 2/2XL

How to Import Music to Google Pixel 3A/3/2/1(XL)

[Summary]: Here are some a tutorial for helping you transfer music to Google Pixel 2/2 XL efficiently. This tutorial also guiding you to know more in details about importing videos, photos and other files to Google Pixel 3/3 XL, Pixel 2/2 XL, Pixel/XL and Pixel 3A/3A XL.

Have you heard of Google Pixel and Google Pixel 2? These are the latest phones in the market manufactured by Google. The Pixel 2 and Pixel 2XL are Google’s second attempt at creating an Android version of the iPhone 8 and a proper competitor to the Samsung Galaxy S9. Instead of focusing solely on top-end specs and including every feature imaginable, it aims to aims to offer users the cleanest Android experience possible. For the most part this means you’re getting the best of Google in a phone.

Most of us save our data on the computer for backup. If you get a new Google 2/2 XL phone you may want to copy the data from the computer to the new device, especially to songs and playlist. To keep favorite music saving on the new phone for entertainment is a necessary thing to do when you switch to a new phone. How to sync music to Google Pixel 2/2XL with a simple solution? Here we will provide the best way with you, to import music and other files to Google Pixel 2/2XL without hassle.

Add Music from Computer to Google Pixel 2/2 XL

iOS & Android Manager and Android Toolkit Android Transfer is the best phone management tool that help to manage, transfer, backup files for Android device, including music, photos, videos, contacts, SMS, playlist and more. With the help of this program, it will be a simple job to import music from computer to Google Pixel 3A/3/2/1(XL). The four click shortcuts include “Rebuild iTunes Library”, “Transfer iTunes Media to Device”, “Backup Photos to PC” and “Phone to Phone Transfer” respectively. You are able to transfer files between Android device and computer, transfer files between Android device and iTunes, transfer files between Android device and iOS/Android device. It works well for most Android devices, such as, Google Pixel, Samsung, HTC, Lenovo, LG, ZTE, Motorola, Sony, OPPO, OnePlus, etc,.

d_win d_mac
d_win d_mac

1 Click to Import Music from Computer to Google Pixel 2/2 XL

Step 1. Run Program and Connect Device
Run Android Toolkit – Android Transfer on the computer first. Connect Google Pixel 2/2 XL that you want to transfer music from the PC using a USB cable.

android transfer home page

Step 2. Import Music to Google Pixel 2/2 XL
On the program home screen, click “Music” on the top left the side of the interface to enter the music window by default. Then click the “Add” button and select “Add Files” or “Add folder” to select the file or the folder that you wish to transfer.

sync music from pc to pixel 2

A new window will pop-out. Choose music file or the music folder that you want. Then click “Open” to transfer the music from your PC to your Google Pixel 2/2 XL. After a while, you can check the transferred songs on your phone to make sure that your desired music collection is moved.

d_win d_mac
d_win d_mac

More Guides for Google Pixel Users:

Music Transfer from Samsung Android to Google Pixel/Pixel 2

How to Transfer Music and Videos to Google Pixel Phone

How to Transfer Photos to Google Pixel Phone

How to Transfer Samsung Data to Google Pixel/Pixel 2

How to Recover Deleted Data from Google Pixel/Pixel 2

How to Backup and Restore Google Pixel/Pixel 2

Transfer Music to Google Pixel 2/2 XL

How to Recover Files from Broken Screen Samsung Galaxy Note 4

[Summary]: When the phone screen is broken, how to get photos, contacts, messages and more off the broken phone? This guide will show you all the possible way to recover data from Samsung Galaxy Note 4 phone with broken screen, as well as other Samsung models.

Many of us have been through situations like cracked screen, water-damaged, black screen when we use Android smartphones. A smartphone is just a fragile little device, no matter how the manufacturer brags about its ability of explosion-proof function. Sometimes accidents happen, breaking the phone screen. When one of these situations happens, the worst thing is not the phone is broken, but we are unable to access the precious data, such as photos, contacts, messages and more that have been stored in the phone memory.

Types of Phone Screen Damaged
There are two ways in which your mobile phone get broken screen can suffer: software damage and hardware damage. Software damage can occur after you get broken on your phone screen, it may be make the phone OS has been corrupted. Hardware damage can occur commonly when your phone is dropped, smashed, watered, thrown or stomped. It can bring a wealth of problems from cracked screens and rough scratches to broken home buttons (they are the worst!).

Extract Files from Broken Screen Samsung Galaxy Note 4

Android ToolKitBroken Android Data Extraction helps you recover data from Samsung Galaxy Note 4 with broken screen, getting your previous files like contacts, pictures, videos, messages, call logs, WhatsApp messages, documents, etc,. Besides to broken screen, other broken cases are also supported to be restored, like black screen, water damaged, stuck in Download Mode, etc,. What’s more, Android ToolKit enables to recover deleted data from Android device, backup & restore Android data. It works well for almost all Samsung models, for instance, Galaxy Note 4/5, Galaxy S4/S5/S6/S7/S8.

d_win d_mac

Recover Data from Samsung Galaxy Note 4 with Broken Screen

Firstly, please run Android ToolKit – Broken Android Data Extraction on the computer, click “Broken Android Data Extraction” option,then click “Start“.

broken Android data extraction home page

Step 2.Select File to Scan
Select the file name which contain the data you wish to recover. If you want to recover all files at once, please click “Select All” option. The program will begin to scan data on your Samsung phone with broken screen.

select file to scan

Step 3.Select Broken Case for Samsung
In this step, the program will guide you to another screen, you will see the following screen. Here are several fault types of phone choices. Please choose the one which match your phone. Then click “Next“. Here “Stuck in the Startup screen”, “Black screen” and more are available for selecting.

choose Samsung broken type

Step 4.Select the Samsung Model
In the new page, select the device name and model of your Samsung phone. For Samsung Galaxy Note 4, you should select”Galaxy Note 4″. Click “Confirm”.

select phone model

Step 5.Enter Samsung into the Download Mode
Now you should follow the simple guide to enter your device into the Download Mode. Power off the phone > press and hold three buttons: “Volume Down”, “Home” and “Power” > press the “Volume Up” button to enter the “Download mode”.

enter Samsung into the download mode

Step 6.Download Recovery Package for Samsung
The program will begin to download the recovery package for Samsung phone. Then it will scan data from your phone.

scanning data from Samsung

Note:Please don’t interrupt the connection with your device and the computer, don’t use your device until the scanning process is end.

Step 7.Preview and Recover Data from Samsung
When the scanning is finish, you are allowed to preview all recoverable data from Samsung, including gallery, contacts, messages, and more. Select the data under the file name to save them on the computer by clicking “Recover“.

recover data from Galaxy Note 4

d_win d_mac

More Guides for Samsung Galaxy Note 4 Users:

How to Recover Lost Data from Broken Samsung Galaxy

Recover Pictures from Broken Samsung Galaxy Note 5/4/3/2

How to Recover Photo Data from Broken Samsung Galaxy Note 4

How to Perform Broken Android Data Recovery, Backup and Restore

How to Manage Samsung Galaxy Note on PC/Mac

Recover Data from Broken Note 4


Android Data Recovery

Recover Your Lost Data from Android
Now, Even Device Broken

Compatible with Android 8.0 Oreo/7.0, etc.

Recover Lost Data Now

How to Recover Photos Data from Broken Samsung Galaxy Note 4

I cracked my Galaxy Note 4 screen carelessly. What worse I can’t turn it on as usual. I decide to buy a new Android phone, and want to know if I can access and recover contacts, messages and photos from this broken device?

Nobody wants to be a disaster when his phone get broken and it can’t be operate anymore. Accident always happen without your permission. Maybe you fell off your phone from your hand or getting out of car you dropped it on the floor and the screen get broken. Accidental drops are the most common case of the broken smartphones, while being damaged in water is the second most common situation. I do believe that no matter how careful you are, accident happens without giving you a single notice. Keeping phone data avoid losing it is important once your phone get broken, and Broken Android Data Extraction provides an excellent way to recover your broken Samsung data.

Recover Data from Broken Samsung Galaxy Note 4

Android ToolKitBroken Android Data Extraction is designed to recover data from broken Android device under any broken situation, insist of broken screen, black screen, water damaged, stuck in Download Mode, etc,. It can help to recover data from broken Samsung Galaxy Note 4 for any types of data, including photos, videos, contacts, text messages, call logs, documents, WhatsApp messages and more. More importantly, Android ToolKit features with Android data recovery, Android data backup & restore. Almost all Samsung models and Android models are compatible with this program, such as, Samsung Galaxy Note 4/5, Galaxy S3/S4/S5/S6, and so on.

d_win d_mac

How to Recover Data from Broken Samsung Galaxy Note 4

Step 1.Run Broken Android Data Extraction Program
To begin with, please run Android ToolKit – Broken Android Data Extraction on the computer, click “Broken Android Phone Data Extraction” option,then click “Start“.

broken Android data recovery mode

Step 2.Select File to Scan
Click the file name which contain the data you want to recover. If you want to scan all files at once, please click “Select All” item. The program will begin to scan data on your broken Samsung phone.

select file to scan

Step 3.Select Broken Situation for Samsung
The program will guide you to another screen, you will see the following screen. There are several fault types of phone choices. Please choose the one which match your phone. Then click “Next“.

choose Samsung broken type

Step 4.Select the Samsung Android Model
On the new window, choose the device name and model of your Samsung phone. For Samsung Galaxy Note 4, you should select”Galaxy Note 4″. Click “Confirm” to continue.

select phone model

Step 5.Enter Samsung into the Download Mode
Now you should follow the simple guide to enter your device into the Download Mode. Power off the phone > press and hold three buttons: “Volume Down”,  “Home” and “Power” > press the “Volume Up” button to enter the “Download mode”.

enter Samsung into the download mode

Step 6.Download Recovery Package for Samsung
The program will begin to download the recovery package for fixing your Samsung system to normal state. Then it will scan data from your phone.

download recovery package

Note:Please keep connection with your device and the computer, don’t use your device until the scanning process is end.

Step 7.Preview and Recover Data from Samsung
Once the scanning is end, you are allowed to preview all recoverable data from Samsung, such as, gallery, contacts, messages, and more. Select the data under the file name to save them on the computer by clicking “Recover“.

recover data from Galaxy Note 4

d_win d_mac

More Guides for Samsung Galaxy Note 4 Users:

How to Recover Lost Data from Broken Samsung Galaxy

Recover Pictures from Broken Samsung Galaxy Note 5/4/3/2

How to Recover Deleted Photo Files from Samsung Galaxy

How to Perform Broken Android Data Recovery, Backup and Restore

How to Manage Samsung Galaxy Note on PC/Mac

Recover Data from Broken Galaxy Note 4

Android Data Recovery

Recover Your Lost Data from Android
Now, Even Device Broken

Compatible with Android 8.0 Oreo/7.0, etc.

Recover Lost Data Now

How to Recover Data from Samsung with Cracked Screen

[Summary]: Looking for an Samsung broken screen data recovery to recover data from Samsung Galaxy with cracked screen? U.Fone Broken Android Data Recovery helps to recover data including contacts, photos, videos, text messages, WhatsApp messages and more from a broken Samsung phone.

My Galaxy S5 was knocked and the screen is cracked. When I tried to turn it on the screen was completely black. I have a ton of photos, contacts and other personal files which I thought were being backed up but I guess not. Is there anyway to access and recover the data from the broken screen device? I hope someone can help. Thanks!

My Samsung Galaxy S6 is broken screen, how can I recover contacts, sms, photos, WhatsApp messages and more from Galaxy s6 with cracked screen?

Nowadays smartphone as now been widely used. We use the screen to navigate between apps, send text messages, check email, play games, take photos and watch videos. When the phone screen is damaged, it will being inconvenient to operate it. We’ve all been there – your phone slips from your hands and starts tumbling towards the ground, and that dreaded thought pops into your mind: “Oh no! Please don’t break the screen!”. Is this situation familiar to you? No matter you break your phone screen under any cases, it could be a disaster for you.

Data Recovery on Samsung Phone with Broken Screen

Your Samsung Galaxy phone may encounter various accidents and some damages may be caused by different accidental situations. It would be troublesome about recovering data on a Samsung Galaxy phone with broken screen, and in this post we provides this guide telling you how to perform a quick and safe data recovery on broken screen Samsung Galaxy. To complete the broken Samsung data recovery, you can rely on this Android ToolKit – Broken Android Data Extraction.

Way1: Recover Data from Broken Screen Samsung via Broken Android Data Recovery

If you are looking for a reliable data recovery for Samsung Galaxy with broken screen to recover data from Samsung Galaxy S6/S5/S4/Note 5/Note 4 with broken screen.

U.Fone Broken Android Data Recovery can help you easily recover all kinds of data from your broken Samsung phone, like videos, photos, call history, text messages, contacts, documents, WhatsApp data and more. Not just broken screen device, this program fully supports damaged devices in different scenarios insist of black screen of death, system error, home key not working, stuck in the Download Mode, water damaged, etc,. It is fully compatible with the Samsung devices and other Android models, including Samsung Galaxy S, Samsung Galaxy Note and so on.

More Functions:

  • Recover data from broken Samsung phone: Not only supports extract Contacts, Messages, WhatsApp, Photos and more from broken Samsung phone, as well as recover lost data from Android phone’s memory card.
  • Fix Android OS to Normal: Fix your frozen, crashed, black-screen or screen-locked Android system to normal without data loss.
  • Fix your disable Android OS to normal after connect your phone to the Windows computer.
  • Recover deleted and lost photo, video files from SD card selectively.
  • Extract existing data from your broken Samsung phone.
  • Fix your disable Android OS to normal without data loss.

d_win d_mac

Supported Broken Samsung Galaxy Phone Models

S4: GT-I9500, GT-I9505, SCH-R970, SCH-R970C, SGH-I337M, SGH-M919, SPH-L720

S5: SM-G900F, SM-G900FQ, SM-G900I, SM-G900K, SM-G900L, SM-G900M, SM-G900P, SM-G900R4, SM-G900R6, SM-G900S, SM-G900T, SM-G900T1, SM-G900W8

S6: SM-G9200, SM-G920F, SM-G920P, SM-G920T, SM-G925F, SM-G925P, SM-G925T, SM-G928P, SM-G928T

Note 3: SM-N9006, SM-N9007, SM-N9008, SM-N9008V, SM-N900S, SM-N900, SM-N9002, SM-N9005

Note 4: SM-N9100, SM-N9106W, SM-N9108V, SM-N9109W, SM-N910C, SM-N910F, SM-N910G, SM-N910H, SM-N910K, SM-N910L, SM-N910P, SM-N910R4, SM-N910S, SM-N910T, SM-N910U, SM-N910V, SM-N910W8

Note 5: SM-N920C, SM-N920G, SM-N920I, SM-N920K, SM-N920L, SM-N920P, SM-N920R4, SM-N920S, SM-N920T, SM-N920W8

Broken Android Data Recovery Supported Scenarios

Virus Attack, Android OS Crash, Phone Screen Locked, Black Screen, Blank Screen, Non-Responsive, Smashed Screen, Water Damaged, Reboot Loop, Android Bricked

Step-by-Step to Recover Data from Samsung Galaxy with Broken Screen

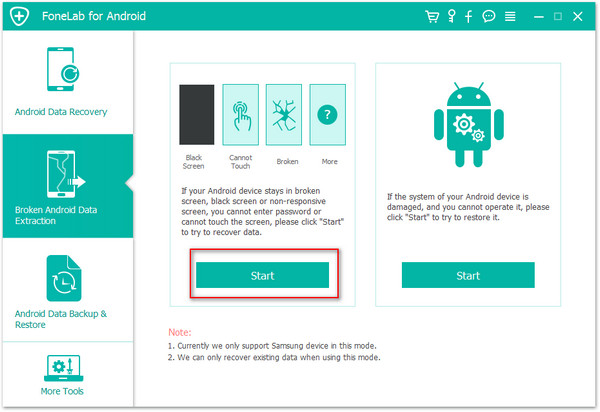
Step 1. Connect Your Broken Screen Samsung to Computer
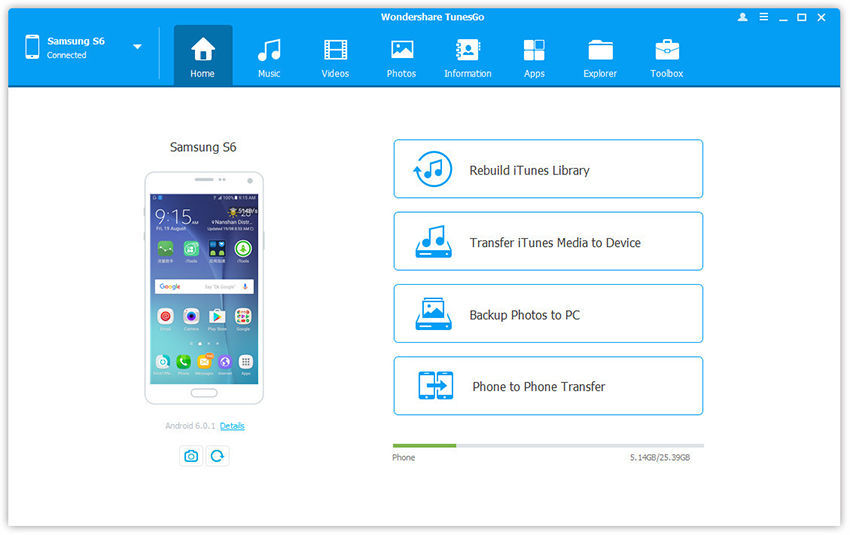
You will get the following main window after running Android Toolkit on the computer. Then you can see the option-“Broken Android Data Extraction“option, then connect the broken screen Samsung to the computer with an USB cable, and click the “Start” button.

connect broken samsung phone to pc

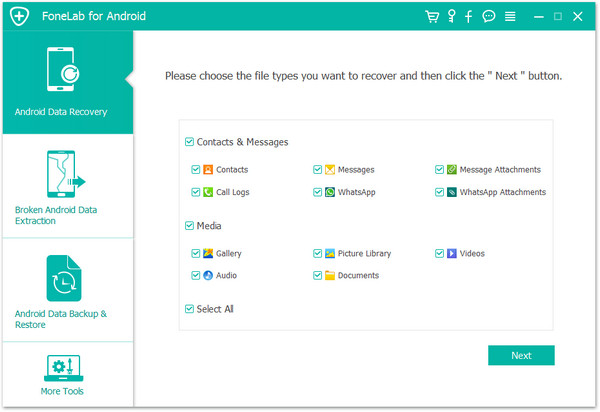
Step 2. Select the Files type to Scan
Now you can click the option which is the type data name to let the program scan the files. If you want to scan all files at once, please click “Select All” item. Then clicking “Next“.

scan broken screen samsung phone

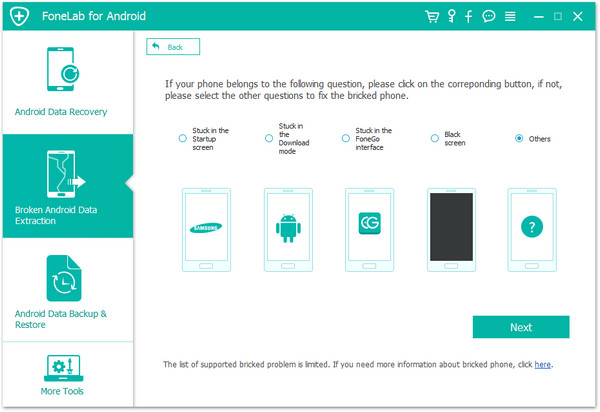
Step 3.Select the Broken Case for Samsung
In this step the program will guide you to another screen, you will see the following screen. There are several kinds of broken screen situations available for you, select the one depend on your phone.

select file types

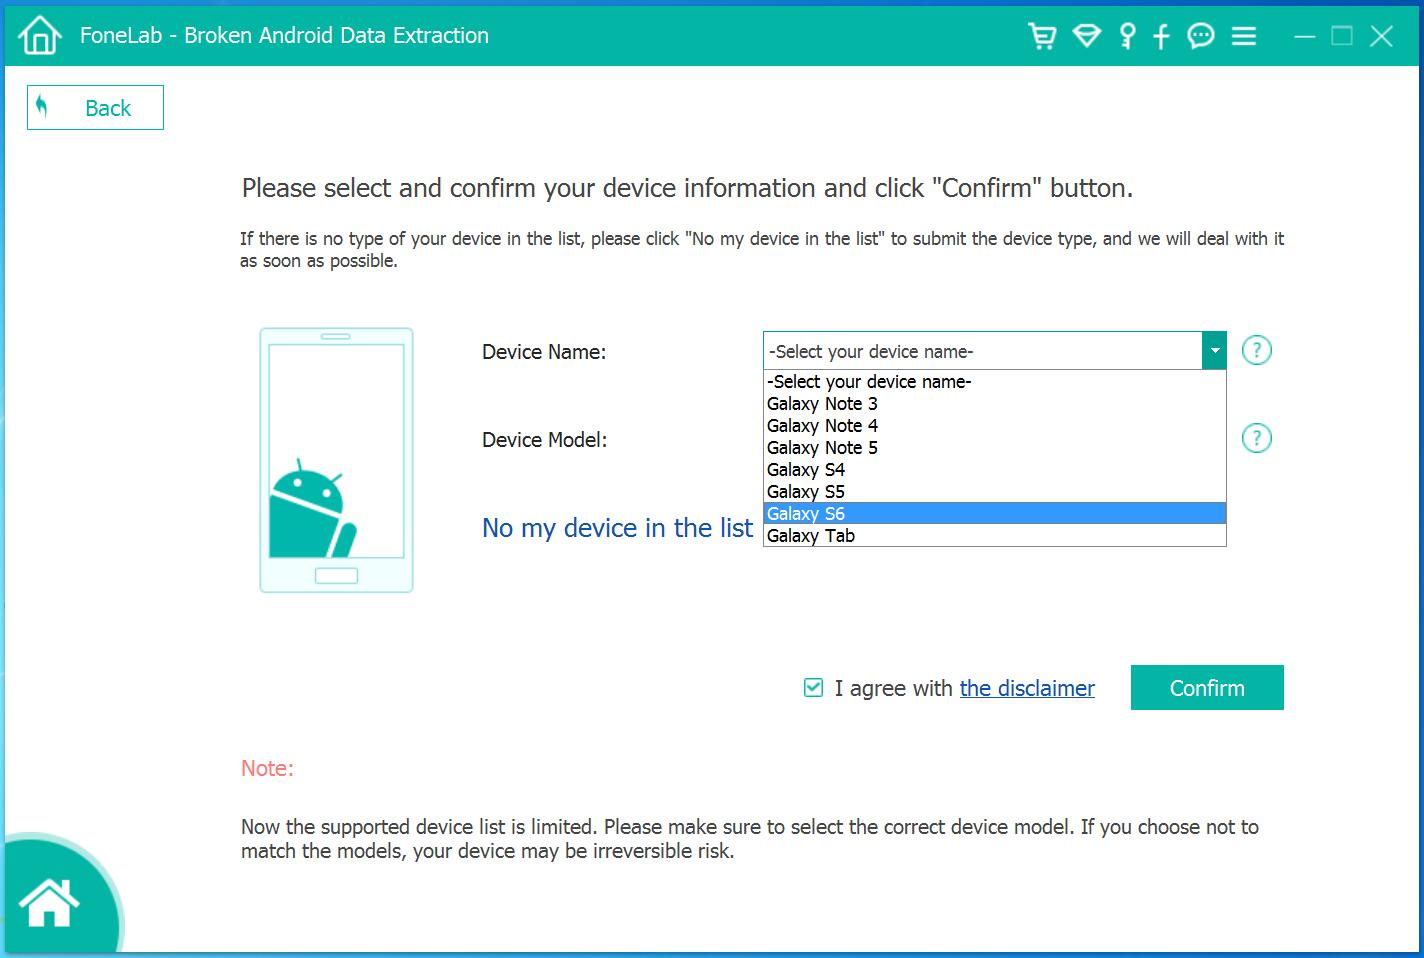
Step 4.Select Your Samsung Device Model
Then according to option to select the brand and model of your Samsung. In this case, you should click “Galaxy S5“. (If you are not sure what model of your device, please click the “How to confirm the device model”option.)

select phone model

Step 5.Enter Download Mode for Broken Screen Samsung
In this step, you should follow different steps to enter Download Mode depends on different problems.

enter Samsung into the download mode

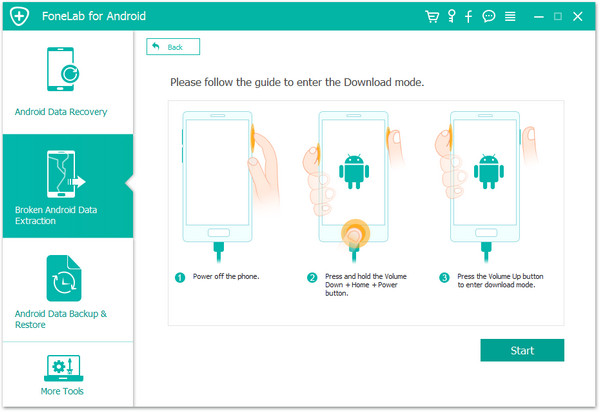
Note:During the getting into “Download Mode” process, remember to keep connecting your Samsung to the computer.

Step 6.Analyze Data on Broken Screen Samsung
After entering the phone into the “Download Mode”, the program will start downloading “recovery package” to fix its system, it will take you a short time, please wait a moment.

download recovery package and scan data

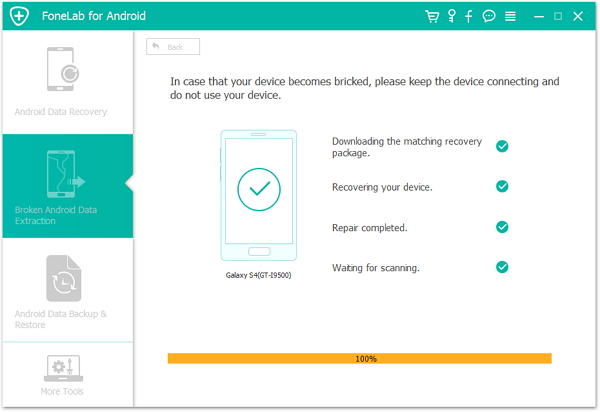
When the downloading finish, the selected data item stored on the device will scanned out.

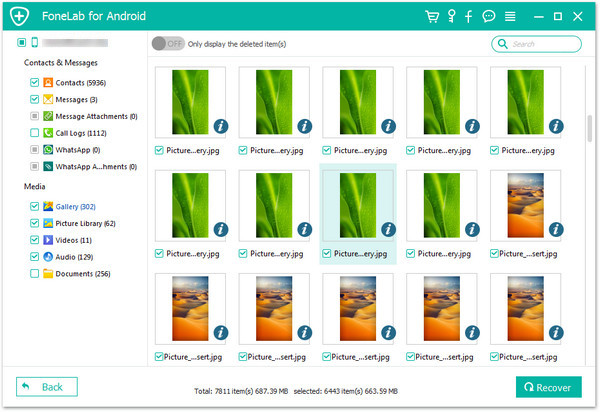
Step 7.Preview and Recover Data from your Broken Samsung
When finish scanning the broken screen Samsung, before getting data back you can preview all deleted/lost or existent data from the phone, including the messages, photos, videos and more files. Just click “Recover” button at the lower-right corner and save them on the computer.

recover data from broken screen S5

d_win d_mac

Way 2: Recover Data on Broken Samsung with Remotely Unlock

If you have tried creating backup of broken screen S5 with Kies or Smart Switch, you probably failed because you can’t unlock the phone with a broken screen. Here is an effective method to remotely unlock your screen broken S5.

sign-in-samsung-account

Note: This method only works on condition that you’ve enabled remote controls on you Galaxy S5 before it get broken. Otherwise, it will say there’s a network error and time out.

Step 1. Login from your Samsung Account
Enter your Samsung account ID and password.

Step 2. Find the Remote Control Option
After you sign in “Find my Mobile” service, you’ll see an option “Remotely unlock my phone or Unlock screen remotely”. And you can use it to unlock your screen broken phone.

Step 3.  Backup Data from Broken Phone
Now connect your Galaxy S5 with your MAC or PC computer, and create a backup using Kies or Smart Switch. But if you can only view the files inside unless you restore the backup to a normal functioning Samsung phone, maybe you can borrow one from your friend so that you can backup data on the broken phone to the computer.

Related Articles:

How to Fix Samsung Galaxy Blank Screen of Death

How to Recover Lost Data from Broken Samsung Phone

How to Recover Photos from Broken Samsung Phone

How to Recover Lost Files from Broken Samsung Galaxy S5

How to Backup and Restore Samsung Galaxy S5

Recover Data from Broken Samsung

How to Listen to Spotify Music on MP3 Player

Summary: Music play an important role in our life, but none of the MP3 players are compatible with streaming music services like Spotify. In this post we will share a tutorial on how to play Spotify Music on MP3 player.

Spotify is an online application with popular music streaming service on a computer, a smartphone running on Android or iOS. Usually, Spotify uses the Ogg Vorbis format to stream music. Although users have the option to download songs (premium subscription), it is entirely different from other audio formats such as MP3, FLAC, .m4a and other extensions.

MP3 player is a mobile device that convenient to take to anywhere. Many people like to listen to music using MP3 player. However, MP3 players are not compatible with streaming music services like Spotify Music. Since Spotify Music files are protected by DRM, which is troublesome for people who would like to enjoy Spotify Music without Spotify app, especially MP3 player. If Spotify Music can be played on MP3 player, then users can enjoy their music anywhere without limits. To listen to Spotify Music on MP3 player, what you need to do is removing DRM protection from Spotify Music.

Spotify Music Converter is a professional Spotify to MP3 converter tool which allows you to easily remove Spotify DRM with fast speed and convert Spotify songs albums/playlists to MP3, M4A, WAV, FLAC. It preserves 100% original quality and ID3 tags of Spotify songs. It allows users to customize output music quality. After the conversion, you can offline play back the converted Spotify Music on any mobile device(including MP3 player) without Spotify Music app, burn the converted Spotify Music to CD.

d_win d_mac

See the Main Features of Spotify Music:
-Download Spotify Music to MP3, M4A, WAV, FLAC.
-Remove DRM from Spotify songs/albums/playlists.
-Listen to Spotify Music offline without premium.
-Convert Spotify music to MP3, M4A, etc,.
-Customize Spotify music quality.
-Preserve ID3 tags and 100% original quality.
-5X conversion speed.

How to Play Spotify Music on MP3 Player

Step 1. Run Spotify Music Converter
Download and install the Spotify Music Converter step-by-step, then launch it an run it on the computer.

spotify converter home page

Step 2. Add Spotify Songs
Click “Add Files” to drag songs, playlists, albums, tracks, etc,. from Spotify Music.

add spotify music

Or you can find the songs you want to convert on Spotify Music, copy the song link, and paste it into the search bar. Click “Add“.

Step 3. Choose MP3 as Output Format
Go to “Option“, choose “MP3” as the output format. Moreover, you are optional to change SampleRate and bitrate before conversion.

output settings

Step 4. Start Conversion
In the last step, click “Convert” and the program will start converting.

convert spotify music

Only some minutes later, you will get the DRM-free Spotify Music with MP3 as the local music files. Then you should transfer the converted music to your MP3 player. Now you can offline listen to the converted Spotify Music on MP3 player without limits.

d_win d_mac

Related Guides:

How to Listen to Spotify Music without Subscription

How to Convert Spotify Music to MP3

How to Get Spotify Music at 320kbps High Quality

How to Listen to Spotify Music for Offline Playing

How to Record Apple Music M4P Streams as MP3

Sync Spotify Music to MP3 Player

How to Get Spotify Music at 320kbps High Quality

I’m a Spotify free users. Is there any way to get Spotify Music at 320kbs quality? I want to enjoy the high quality music eagerly. Please send me your ideas. Thanks.

Spotify is a music streaming service that has a catalog of more than 30 million songs to choose from, including the latest hits, and a variety of ways to discover new music. If you don’t want to pay for the service, you could get a free account, but you can only select specific songs. Generally, free subscriptions in most countries are only limited to 10 hours of streaming per month, the accessable music with limited quality. What’s the most annoying thing for free users is that Ads tend to pop up every three to six songs and last 15 to 30 seconds.

With Spotify Premium, you get access to higher quality music streaming. By default (and if you’re on the free plan), you will get Spotify streams at 96kbps and 160kbps. If you are a Spotify free subscriber, you may want to figure out how to get Spotify Music are 320kbps high quality, for getting rid of the limits of streaming Spotify Music for offline listening. To tell the truth, you can make this happen by using some Spotify Music recording tools. Thus, it is possible to offline play Spotify Music with up to 320kbs quality on any mobile devices or MP3 players with ease.

Record Spotify Music with High Quality

You are suggested to use this Spotify Music Converter, it is a great Spotify Music recording tool developed to record Spotify Music with 320kbs high quality, by removing DRM from it completely. It could be used to rip Spotify Music with fast conversion speed, for offline playing and save the tracks as MP3 or other DRM-free formats, like MP3, M4A, WAV and FLAC. After the conversion, you can burn the converted Spotify Music to CD, enjoy them outside Spotify app and web player with high quality without Spotify Premium subscription. What’s more, it preserve all original ID3 tags with the converted music files.

d_win d_mac

How to Convert Spotify Music at 320kbps High Quality

Step 1. Run Spotify Music Converter on the Computer
First of all, run Spotify Music Converter on the computer.

spotify music converter home page

Step 2. Add Spotify Music to Convert
Drag & drop Spotify songs, albums or playlists or copy & paste link. If you have installed Spotify app and logged in your account, whether free or premium, you can drag songs, playlists or albums from Spotify app to the interface directly. If you are using the web player, copy & paste the link of the song, album or playlist. And then click “Add“.

add spotify music

Step 3. Output Settings
Now you should choose the output format for converted music. The default output format is MP3. Spotify Music Converter also supports M4A, WAV, FLAC. Click “Option” button to change output format or output folder if you need. To record Spotify Music with 320kbps quality, you should select “320” in the “BitRate” option.

output settings

Step 4. Record DRM-Free High Quality Spotify Music
At last, simply click “Convert” button to start removing DRM from Spotify Music, recording Spotify Music to MP3 files with 320kbps high quality.

convert spotify music

After conversion, click below “folder” icon to quickly locate the converted Spotify song.

view mp3 music

d_win d_mac

Related Guides:

How to Listen to Spotify Music without Subscription

How to Convert Spotify Music to MP3

How to Sync Spotify Music to iPod Touch/Nano/Shuffle

How to Listen to Spotify Music for Offline Playing

How to Record Apple Music M4P Streams as MP3

Get Spotify Music with High Quality

How to Record Spotify Music on Mac

I pay for Spotify premium and can download all my tracks for offline use. As we know Spotify encodes and protects the music preventing users from downloading the audio files. Has anyone tried to download his Spotify playlist to local MP3 files on my Mac computer? I am trying to make an audio CD to play music in my car.

Music, like tourism and wine, is one of the choices mankind has indulged in during leisure time. Music plays an important part in our life. In today’s rapidly developing digital era, we have a lot of online websites to find, share and enjoy wonderful music. One of the popular music streaming service is Spotify. It’s a subscription music service which has a free trial with basic services while additional features are offered via paid subscriptions – Premium subscription. There are millions of songs in Spotify and music can be browsed or searched by artist, album, genre, playlist, or record label.

Spotify Music provides digital rights DRM-protected which restrict you to play it for offline without subscription, and it prevent users to play the music as local music files. That is to say, you can only enjoy music on Spotify and have no access to download Spotify music on other devices. Is there any way to get rid of DRM-protected from Spotify Music, record it as common files for playing without limits? To be honest, you can make this happen by using some helpful music recording tools. Thus, it is possible to play Spotify offline on any mobile devices as MP3 files with ease. Even if you have paid subscription, it’s also certainly worth a try.

Remove DRM-Protected from Spotify Music

To record Spotify Music on Mac, you should remove DRM-protected from Spotify Music. Spotify Music Converter for Mac can solve this problem. It is a professional Spotify DRM Removal tool aiming to remove DRM protection from Spotify Music and make it easier to download Spotify Music as MP3 format. Besides, this converter enables to keep lossless quality as original audio including ID3 tags information. After the conversion, you could freely play the converted music on any device.

d_win d_mac

More Features of Spotify Music Converter:
-Fast conversion speed.
-Record and convert Spotify songs/albums/playlists to MP3, M4A, WAV and FLAC.
-Burn Spotify Music to CD, enjoy them outside Spotify app and web player.
-Listen to Spotify Music offline for Free.

Record Spotify Music to MP3 on Mac

Step 1. Run Spotify Music Converter for Mac
Download and install the Spotify Music Converter first, then launch it and run it on the Mac computer.

spotify converter home page

Step 2. Add Spotify Songs
Click “Add Files” to drag songs, playlists, albums, tracks, etc,. from Spotify Music.

add spotify music

Or you can find the songs you want to convert on Spotify Music, copy the song link, and paste it into the search bar. Click “Add“.

Step 3. Output Settings
Go to “Option“, choose “MP3” as the output format. Besides, you are optional to change SampleRate and bitrate before conversion.

output settings

Step 4. Record Spotify Songs to MP3
Lastly, click “Convert” and the program will start converting, removing DRM-protected from Spotify Music, convert it to common MP3 files.

convert spotify music to MP3

d_win d_mac

Related Guides:

How to Listen to Spotify Music without Subscription

How to Convert Spotify Music to MP3

How to Sync Spotify Music to iPod Touch/Nano/Shuffle

How to Listen to Spotify Music for Offline Playing

How to Record Apple Music M4P Streams as MP3

How to Play Apple Music without Subscription

How to Recover Deleted or Lost Data from iPhone/iPad/iPod

Record Spotify Music on Mac