All posts by DHZ

How to Transfer Music to iPhone 14/14 Plus/14 Pro/14 Pro Max

Summary
Wondering how to transfer music to iPhone 14? Read this article, we will explore 3 ways to transfer music from computer to iPhone 14 series, including iPhone 14/14 Plus/14 Pro/14 Pro Max.

“How do I transfer music from my computer to my iPhone14 Pro without iTunes?”

If you frequently use your iPhone to relax and listen to music during your free time, you may want to consider enriching your music library. There are several ways to achieve this, such as downloading music directly to your iPhone, transferring music from your computer, or subscribing to popular music streaming services like Apple Music.

If you have recently acquired a new iPhone, you may be wondering how to transfer your music collection to your device. While using iTunes is a viable option, it may not always be the most efficient method. In this guide, we will explore various practical ways to transfer music to iPhone 14/14Plue/14 Pro/14 Pro Max, whether it be from a computer or music websites.

Method 1. Transfer Music to iPhone 14 from Computer with U.Fone – iOS Toolkit

When it comes to transferring music from your computer to your iPhone, the most effective and trustworthy method is by utilizing advanced data transfer software. With the iOS Toolkit – iOS Transfer, you can easily execute all types of data transfers, including from computer to iPhone or iPhone to computer, with just a few simple clicks.

In addition to its seamless transfer capabilities, iOS Toolkit – iOS Transfer offers a comprehensive suite of practical features that can make the data transfer process even easier. And with its user-friendly interface, navigating the software is a breeze, allowing you to transfer your music collection to your iPhone without any hassle or complications.

More Features of iOS Toolkit – iOS Transfer

  • Seamlessly export photos, music, videos, messages, and apps between your phone and PC.
  • Backup a diverse range of data types (over 18!) from both Android and iPhone devices to your PC.
  • Easily transfer data between more than 6000 mobile devices on different OS.
  • Efficiently transfer WhatsApp data between Android and iOS devices.
  • Compatible with both Windows and Mac OS.

d_win d_mac

Guide: How to Transfer Music to iPhone 14 from Computer

Firstly, download and install the newest version of iOS Toolkit – iOS Transfer to your computer from the link above.

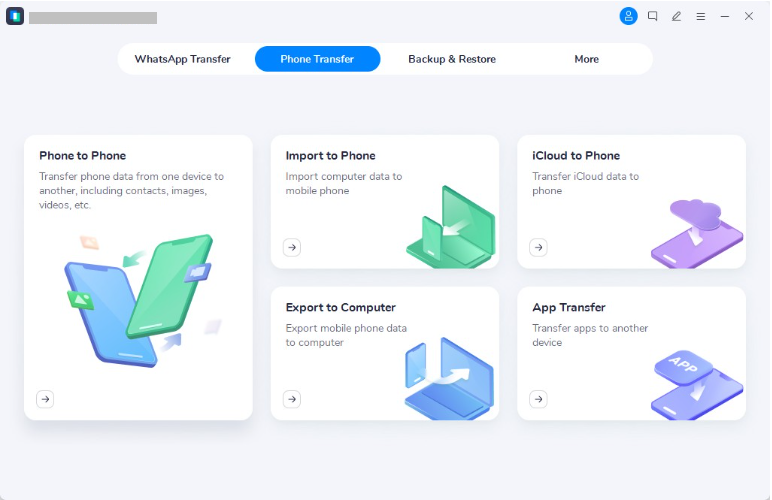
Step 1. Connect Your iPhone to PC
Connect your iPhone to your Mac/Windows PC, run iOS Toolkit – iOS Transfer, choose ‘Phone Transfer’ and click on ‘Import to Phone’ from the options as shown in the image.

ios transfer interface

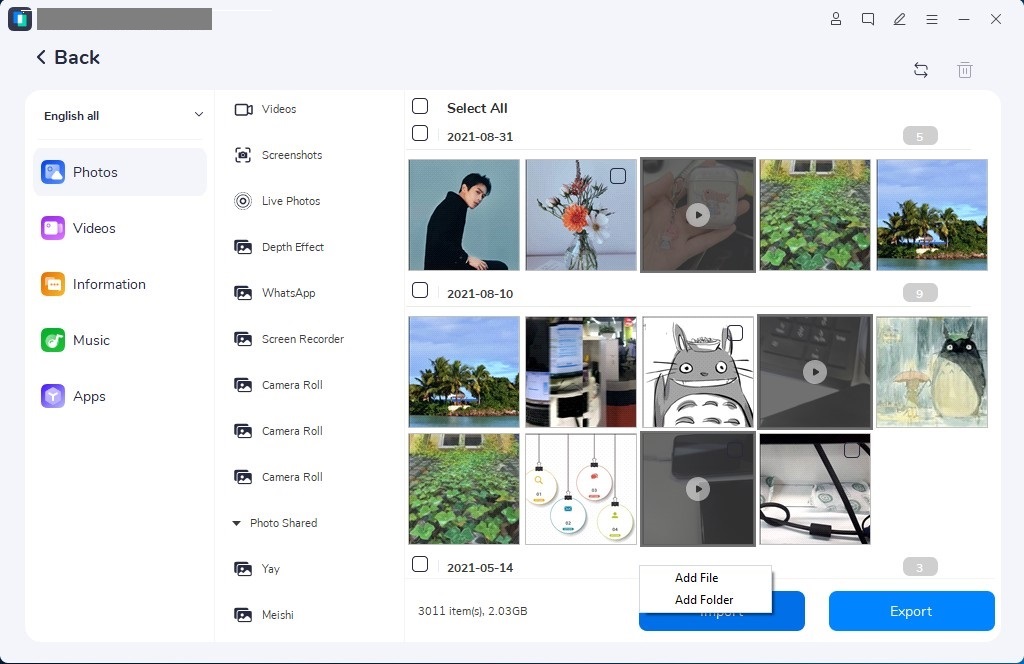
Step 2. Select the Music File
Clikc on ‘Music’ at the left-hand side of the interface, then click ‘Import’ and select ‘Add File’ to select the music file that you want to transfer to your iPhone.

select music file

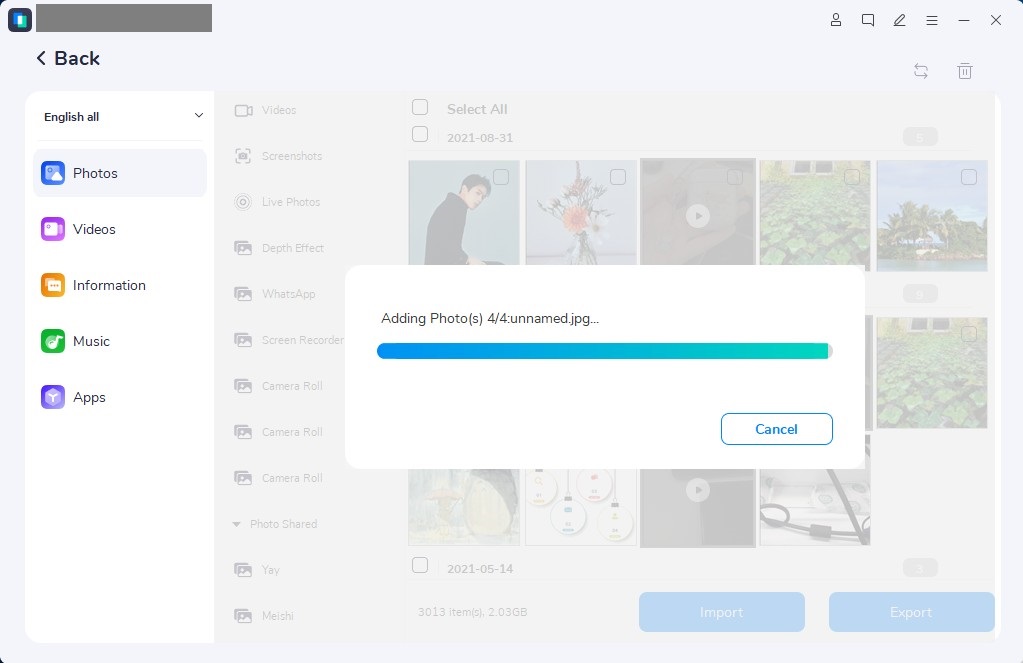
Step 3. Transfer Music to iPhone
Please select the checkbox next to the music file and click on Import again to instantly transfer the music from your PC to your iPhone.

transfer music to iphone

That’s it! By using iOS Toolkit – iOS Transfer, transferring music from your iPhone to PC is now as easy as three simple steps.

d_win d_mac

Method 2. Add Music to iPhone 14 from Computer Using Cloud Storage

Cloud-based storage solutions offer a convenient way to transfer music files from a computer to an iPhone without requiring the use of a USB cable. Instead, these services enable seamless sharing of media files across all your devices through network connections.

To ensure successful transfer of music files from a computer to an iPhone 14/14 Plus/14 Pro/14 Pro Max using a cloud-based service, you should consider the following:

– Sufficient storage space in your cloud storage account to save the music files you wish to transfer
– Using the same account on both your computer and the iOS device
– Availability of a reliable and fast network connection for your PC and Wi-Fi or ample mobile data for your iPhone

For instance, Dropbox is a perfect example of a cloud-based storage service that can be used to copy music to an iPhone from a computer. Here are the steps to transfer music from computer to iPhone using Dropbox:

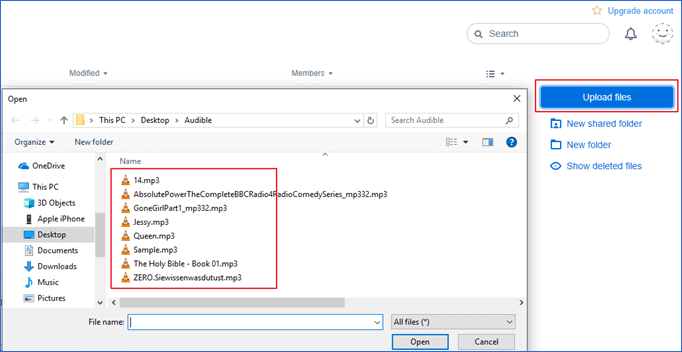
Step 1. Download and install the Dropbox program on your computer, and sign in to your account or create a new one. You can then upload the music files to Dropbox. Alternatively, you can sign in to Dropbox.com and upload the files there.

Step 2. Install the Dropbox app on your iPhone from the App Store.

Step 3. Sign in to the Dropbox app on your iPhone using the same account you used on your computer.

Step 4. Download the music files from Dropbox to your iPhone. You can do this by selecting the files you want to download and tapping the download icon. The music files will then be saved to your iPhone’s local storage, allowing you to play them using your preferred music app.

transfer mp3 to iphone dropbox

Method 3. Transfer Songs from Computer to iPhone 14 with iTunes

The official way to sync music from a computer to an iPhone is through iTunes. However, one drawback of using iTunes to add music from iTunes to the iPhone is that it will overwrite any media files, including music, movies, TV shows, and books, with the synced items, which could lead to data loss on your iPhone.

Despite this potential drawback, using iTunes is still an excellent option if you want to transfer music from a computer to a new iPhone. Follow these steps to import music to an iPhone using iTunes:

Step1. Connect your iPhone to your computer using a USB cable, and wait for iTunes to launch automatically.

Step 2. In the iTunes window, select “File” > “Add File to Library” to add the songs you want to transfer to the iTunes music library.

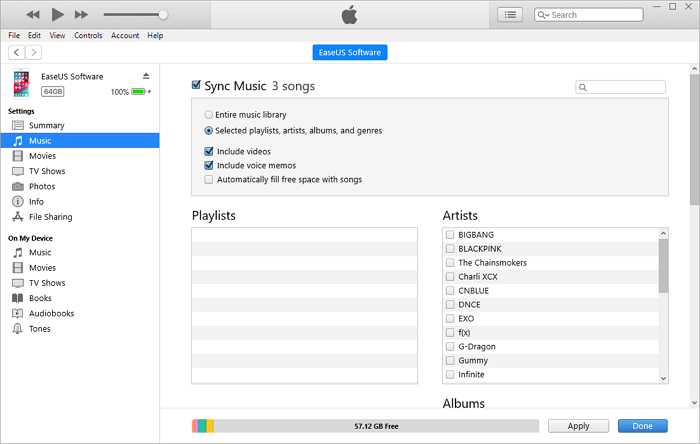
Step 3. Once you have imported the songs to the iTunes library, click the “Device” button in iTunes and select the “Music” option.

Step 4. Check the “Sync Music” > “Remove and Sync” option.

Step 5. Choose whether to sync the “Entire music library” or “Selected playlists, artists, albums, and genres.”

Step 6. Click “Sync” > “Done” to begin adding music from the computer to the iPhone.

transfer mp3 to iphone dropbox

Conclusion

Transferring music from your PC to your iPhone has never been easier. As you can see, there are multiple ways to transfer music from your PC to your iPhone depending on your preferences. Whether you choose to use iTunes, a cloud service, or data transfer tools, this article provides step-by-step guides to help you accomplish the task. While all the transfer methods discussed on this page work perfectly well, we highly recommend using the iOS Toolkit – iOS Transfer software, as it offers a wide range of features that enhance the transfer process, making music transfer from computer to iPhone even more effortless.

Transfer Music to iPhone 14

[Fixed] iOS 16 Downgrade Stuck on Recovery/DFU Mode/Apple Logo

Summary
Read this post some solutions to fix iOS 16 downgrade stuck on recovery mode, stuck on DFU mode, stuck at Apple logo screen; then you will get your iOS device to normal state.

I downgraded my iPhone 13 from iOS 16 to iOS 15 but failed. It stuck at Apple logo screen. Now I can’t do anything on my device. Any solutions to get it out of this abnormal state? Urgent!

Apple comes up with updates in the existing system software frequently. It is easy to upgrade your device to the newest iOS system, like iOS 16. However, you may feel it is not perfect of the newest iOS system, you don’t like the features that come with the updates. If you are not satisfied with the current iOS system, you can downgrade iOS to the old version, like iOS 15. It is very easy to downgrade from iOS 16 to iOS 15 or older iOS versions. However, the downgrade process may fail due to system or hardware issues. After that, you may put your device into some abnormal states. For example, stuck on recovery mode, stuck on DFU Mode, stuck at Apple logo screen, etc,. All in all, people get various kinds of issues like iPhone stuck issues after iOS downgrading. If you are one of those users who are facing iOS 16 downgrade stuck issues, here are some solutions that might help.

Part 1. Tips to Fix iOS Device Stuck after iOS 16 Downgrade

Here are some tips to fix iOS device stuck after iOS 16 downgrade, be available for all iOS stuck issues, like stuck on recovery mode, stuck on DFU mode, stuck at Apple logo screen. Try the solutions given below if something wrong with the iOS 16 downgrade procedure and it will resolve possibly.

A. Force Restart iPhone
Force restarting your iPhone/iPad is the first thing you should try. It won’t respond to several commands as the downgrade is stuck. Whether it is stuck in recovery mode, Apple logo, or DFU mode, you can force restart the device.

B. Exit Recovery Mode Stuck Manually
Once your device enter the recovery mode, you can exit it manually but many people don’t know this.

Step 1. Firstly, open iTunes on the computer and connect your iPhone to it.

Step 2. When you see the Apple logo screen, press and hold the sleep button on the device. Please don’t release the buttons and the “Connect to iTunes” icon will appear on the screen soon.

Step 3. Then the device will boot up, wait and you will see the lock screen.

C. Manually Exit DFU Mode
With the iOS 16 downgrade stuck issue happen, the same manual exit method can be tried also.

D. iTunes Restore
If you try these tips above but it doesn’t work, just try iTunes restore solution. But this solution will erase all of your data. So before you processing iTunes restore, we recommend you taking a backup.

restore itunes

Part 2. Final Solution to Fix iOS Device Stuck after iOS 16 Downgrade

If you have these tips which we mention in pat 1 but it doesn’t work, the final solution is offered for you. It will provide the best solution with you, help to fix all abnormal issues appear after iOS 16 downgrade. If you got yourself into a disaster after downgrade your iPhone, then you should know about this U.Fone iOS System Recovery. With the help of this software, you can solve all kinds of iOS 16 downgrade and other iOS issues. This software is specially designed to fix any iOS system issues without data loss. It can be used to fix iOS 16 downgrade stuck on recovery/DFU mode/apple logo without iTunes. After that, you will get your device back to normal state. It is compatible with most iOS devices and iOS system, including iPhone 14/13/12, iOS 16/15/14/13.

d_win d_mac

How to Fix iOS Device Stuck after iOS 16 Downgrade

Step 1. Run U.Fone iOS System Recovery and Connect Device to Computer
Download, install and run the U.Fone iOS System Recovery on the computer, click the “More tools” function at the bottom left of the main interface. Then, connect your iOS device with the computer via an USB cable. Here we take iPhone as an example.

connect iPhone to computer

A new window will pop up, offer three options for your chosen. To fix iPhone to normal state, choose the “iOS System Recovery” option to proceed.

select iOS System Recovery

The software will pop up a new window, then click “iOS Mode issues”, you can see the software can fix 50+ issues, like stuck on headphones mode, stuck on recovery mode, stuck on DFU mode, etc,. Then, hit the “Start” button at the lower right corner to go on.

select iOS Mode issues option

Step 2. Select Fix Mode for iDevice
You then will get into a new window, like the screenshot below. Please select “Standard Mode” or “Advanced Mode” to fix your iPhone, then click “Confirm” to go on.

“Standard Mode” – Fix iPhone with this mode, all data on your device will not be lost.
“Advanced Mode” – Fix iPhone with this mode, it will erase all data on your device.

You are suggested to choose advanced mode only if the standard mode fails.

iPhone fixing mode

Step 3. Detect iPhone
The software will detect and analyze your iPhone and shows all information of the device.

detect iphone

Step 4. Select Firmware Package
The software automatically detects the model type of your iPhone and displays available iOS system versions. Select a version and click on “Next” button.

select Firmware

Step 5. Download Firmware Package for Fixing iPhone
It will start downloading Firmware package for repairing your iPhone.

Download Firmware

Step 6. Fix iPhone to Normal State
After the Firmware package downloading completed, click the “Repair” button at the lower right corner. The software will begin to fix iOS system to normal, please keep connecting your iPhone with the computer until the fixing task end.

fix ios 16 stuck issue

Done, your iPhone will restart automatically and it will back to normal state without any problems.

d_win d_mac

Final Words

That are some solutions that you can try if you ever face issues like iOS 16 downgrade get stuck problems on your device. If you want a 100% reliable solution, then using U.Fone iOS System Recovery is the best option for you. It can return your device to normal state efficiently without data loss!

Fix iOS 16 iPhone Stuck issues

How to Fix iPhone 14/13/12/11 Stuck in Recovery Mode

Summary
There can be several reasons your iPhone is stuck on recovery mode. In this guide, we will show you how to get out of iPhone 14, 13, 12, 11 stuck on recovery mode. You can even fix iPhone 14/13/12/11stuck on recovery mode without data loss.

Q1: “iPhone 13 Stuck in Recovery Mode, How to Get Out of It?”

Q2: “How to Fix iPhone 14 Stuck in Recovery Mode?”

The iPhone 14 series get you 5G support, more storage, a better main camera, larger batter life and more attractive features. Have you upgraded to the iPhone 14, iPhone 14 Plus, iPhone 14 Pro, iPhone 14 Pro Max? Or are you using an iPhone 13, iPhone 12 or even iPhone 11? No matter which iPhone model you use, you can upgrade to the latest iOS 16 and enjoy new iOS features.

However, some Apple users reported that iPhone stuck in recovery mode after iOS 16 upgrade or restore. There can be several reasons your iPhone is stuck in recovery mode. The most common reason is a software corruption update during updating. If you’re facing the issue of iPhone 14/13/12/11 stuck in recovery mode, you come to the right place. Here we are going to teach you several solutions to fix iPhone 14/13/12/11 stuck in recovery mode.

Solution 1. Fix iPhone 14/13/12/11 Stuck in Recovery Mode Without Data Loss

Looking for a way to fix iPhone stuck on recovery mode without data loss? Here you can ask help from a third-party iOS system recovery software, such as U.Fone iOS System Recovery. It is capable of fixing 30+ iOS system issues, including recovery mode, DFU mode, black screen, white screen, Apple logo, boot loop, frozen iPhone, and more.

With it, you can easily and effortlessly fix all iOS/iPadOS/tvOS problems at home. In addition, it enables you to get your iOS back to normal with standard mode or advanced mode. Only in a few clicks, you can get out of iPhone 14/13/12/11 stuck on recovery mode, no data loss.

Here are some awesome features of U.Fone iOS System Recovery:

  • Fix iPhone stuck in Recovery Mode without data loss.
  • Fix various iOS system issues on iOS 16/15/14/13/13.
  • Fix iOS/iPadOS/tvOS system problems back to normal.
  • Downgrade iOS to old version without Jailbreak, keep your data.
  • Fix iOS issues like recovery mode, DFU mode, Apple logo, black screen, etc.
  • Recover data from iOS device, iTunes or iCould backup files.

d_win d_mac

How to Fix iPhone 14/13/12/11 Stuck in Recovery Mode?

Step 1. Open U.Fone iOS System Recovery
Download the U.Fone iOS System Recovery software from your computer. Install and start it. Click “More tools” in the left side, and connect your iPhone 14/13/12/11 to computer.

connect iPhone to computer

Step 2. Select “iOS System Recovery” Mode
From the options in the main window, select “iOS System Recovery” mode to fix iPhone stuck in recovery mode issue.

select iOS System Recovery

After that, you will see different issues in the screen. Please choose “iOS Mode issues” and click “Start”.

select iOS Mode issues option

Step 3. Select Standard Mode
You can repair iPhone stuck in recovery mode with Standard Mode or Advanced Mode. To keep your data, simple tick “Standard Mode” and tap “Confirm” to continue.

iPhone fixing mode

As your iPhone is stuck in recovery mode, so you don’t need to put it in DFU/recovery mode manually.

Step 4. Download Firmware Package
Before performing the system repair, you need select the matched firmware package for your iPhone 14/13/12/11.

select Firmware Package

After selection, click “Next” button to download the firmware package for iPhone.

Download Firmware

Step 5. Fix iPhone 14/13/12/11 Stuck in Recovery Mode
After the firmware package is downloaded successfully, press on “Repair” button to exit recovery mode on iPhone 14/13/12/11.

fix iphone 14 stuck in recovery mode

Wait a few minutes until it complete. After fixing iPhone 14, 13, 12, 11 stuck in recovery mode, your iPhone will restart automatically. And you can disconnect your iPhone from the computer and use it as usual.

Solution 2. Fix iPhone 14/13/12/11 Stuck in Recovery Mode With iTunes (Data Loss)

Don’t want to use a third-party tool? You may also get out of iPhone 14 stuck on restore mode with iTunes. iTunes can help you resolve many minor software-related issues, including recovery mode. But this method will erase all data and settings on your iPhone 14/13/12/11. You’d better make a backup in advance. Now try fixing it with the following steps.

Step 1. Open the latest version of iTunes on your computer.

Step 2. Use a USB cable to connect your iPhone 14/13/12/11 with computer.

Step 3. iTunes will detect your iPhone, and then pop up a window asking you to restore your iPhone.

fix iphone 14 stuck in recovery mode via itunes

Step 4. Click “Restore” button and confirm your action.

Step 5. Wait for the restore process to complete. Afterwards, your iPhone will restart and return to factory state.

If you want to fix iPhone 11, 12, 13, 14 stuck on recovery mode with no data loss, the best way is to use U.Fone iOS System Recovery. Have a try right now!

d_win d_mac

Fix iPhone 14/13/12/11 Stuck in Recovery Mode

How to Fix iOS 16 iPhone Stuck in Recovery Mode

Summary
iOS 16 iPhone stuck on recovery mode? How do you get out of iOS 16 stuck on recovery mode? Don’t worry. Here, we will list the most common reasons why iPhone stuck on recovery mode, and guide you how to fix iPhone stuck on recovery mode after iOS 16 upgrade or restore, no data loss.

For better user experience, Apple adds new features in its every iOS edition. The new iOS 16 features will help you make the most of your iPhone. Have you updated your iPhone to the lasted iOS 16 version? The latest version of iOS and iPadOS is 16.4. However, some people faced that iPhone stuck in recovery mode after iOS 16 upgrade or restore issue. Don’t worry, this is not a new thing that iOS 16 stuck iPhone in recovery mode. This post is written to help you fix iOS 16 iPhone stuck on recovery mode. Check it out!

Part 1. Why iPhone Stuck on Recovery Mode on iOS 16?

Some people are confused that why iPhone stuck on recovery mode after iOS 16 update or restore. To be honest, there are two main reasons for iPhone stuck in recovery mode: namely hardware issues and software corruption.

1) Hardware issue like water-damaged iPhone.

2) Software reasons of iOS 16 iPhone stuck in recovery mode include:

  • A failed jailbreak on your iPhone.
  • You activated the recovery mode accidentally.
  • A bugged software might’ve been installed on your iPhone.
  • An unsuccessful backup restore might be affecting the iOS.
  • Some old iPhone models don’t support iOS 16 version.

Next, let’s see how to fix iOS 16 iPhone stuck on recovery mode.

Part 2. Exit iOS 16 Stuck on Recovery Mode via Hard Reset

Force restarting iOS device is the easiest way to fix common iOS system issues, including an iPhone stuck in recovery mode. You can try to hard reset your device to fix iOS 16 iPhone stuck on recovery mode. iOS 16 is only compatible with iPhone 8 or above (iPhone SE 2nd, 3rd included).

For iPhone 8/X/XR/XS/11/12/13/14/SE 2nd/SE 3rd:

Press and quickly release the Volume Up button.
Press and quickly release the Volume Down button.
Press and hold the Power button on the right side until the Apple logo appears on the screen.

hard reset iphone 13

For iPhone 7, iPhone 7 Plus:

Quickly Press and Hold Volume up Button and Power button until you see the Apple logo on the screen.

hard reboot iphone 7

For iPhone 6/6s/6S Plus:

Quickly Press and Hold on the Home button and Power button until you see the Apple logo on the screen.

force reboot iphone 6

Part 3. Fix iOS 16 iPhone Stuck in Recovery Mode via iOS System Recovery (100% Work)

Another risk-free method to fix iOS 16 iPhone stuck on recovery mode is using a third-party iOS system recovery tool. U.Fone iOS System Recovery is a safe, reliable yet professional iOS system recovery software for iPhone/iPad/iPod Touch. It is able to fix various iOS system issues like stuck on recovery mode, headphones mode, DFU mode, black/blue/white screen, Apple logo, iPhone boot loop, iPhone keeps restarting, etc. With it, users can easily and quickly fix the iOS 16/15/14 stuck on the recovery mode issue.

Main Features:

  • Fix various iOS system issues without data loss.
  • Fix iOS system to normal on iPhone/iPad/iPod Touch.
  • Fix 30+ iOS system issues like Apple Logo, DFU/Recovery Mode, black screen, etc.
  • Repair iOS systems in 2 modes: Standard Mode, Advanced Mode.
  • Easily downgrade or update the iOS system without effort.
  • Supports all iOS devices, the latest iOS 16 and iPhone 14 series included.

d_win d_mac

How to fix iOS 16 iPhone Stuck on Recovery Mode?

Here is the detailed steps to fix iPhone stuck on recovery mode after iOS 16 upgrade.

Step 1. Launch U.Fone iOS System Recovery
Download U.Fone iOS System Recovery and install it on your Mac or Windows PC. Click the “More tools” in the left panel. Then connect your iOS 16 device to computer via USB cable.

connect iPhone to computer

Step 2. Select iOS System Recovery Function
It will turn to a new page with 3 options, including iPhone Data Recovery, iOS System Recovery, iOS Data Backup & Restore. Here please select “iOS System Recovery” function.

select iOS System Recovery

In the next window, it will list different device/screen/iOS/iTunes issues. Click “iOS Mode issues” and you will see “Stuck on recovery mode” included. Click the “Start” button to go on.

select iOS Mode issues option

Step 3. Choose Standard Mode
There are 2 modes that you can use to resolve stuck issues. To fix iOS 16 iPhone stuck on recovery mode without data loss, please choose select “Standard Repair”.

iPhone fixing mode

Step 4. Download Firmware Package
As your iOS device is stuck in recovery mode, U.Fone will detect and analyze your device automatically. For other iOS systems issues, you need to put your iOS device into DFU/Recovery Mode. So in this step, you just need to follow the onscreen instructions to download a suitable firmware, and click “Next” button.

Download Firmware

Then it will start downloading the firmware package, just wait patiently.

Step 5. Fix iOS 16 iPhone Stuck in Recovery Mode
After that, hit on “Repair” button to repair your iPhone system to normal. Keep connecting your iOS device with computer during the repairing process.

fix ios 16 stuck in recovery mode

Once finished, your iOS 16 device will restart automatically, and return to normal. Now you can use your iOS device and enjoy the iOS features as usual.

d_win d_mac

Fix iOS 16 iPhone Stuck in Recovery Mode

How to Restore iTunes Backup to New iPhone 14/13/12/11

Summary
Read this post then you will learn how to restore backup data from iTunes to your new iPhone models, including iPhone 14, iPhone 13, iPhone 12, iPhone 11 and more. Additionally, we will teach you how to restore lost data from iTunes backup files, and transfer data from old iPhone to new iPhone directly.

I backed up my old iPhone X with iTunes, now I want to restore the backup from iTunes to the new device iPhone 14. How can I restore my backup from iTunes?

Backup and restore is the normal thing for a mobile device, especially for iPhone. When you switch to a new device, it is necessary to transfer data between your old device and the new one. Nowadays, transferring data from an old iPhone to a new iPhone is not a difficult task anymore. Since there is a new feature of iPhone, you can sync data between two iPhone wirelessly with one click. However, wireless transmission is not perfect. Some users complain about the problems with the device-to-device migration, such as the process stuck, data loss. Honest speaking, wireless transfer is not as reliable as wired transfer because wireless transfer will be affected by many factors like Internet connection. In this case, we recommend you select the best solution for the restoration of your backup files, for example, restore iTunes backup to new iPhone 14/13/12/11.

Part 1: Restore iTunes Backup to New iPhone 14/13/12/11

There are more than one way to restore backup from iTunes to iPhone, here are one contain simple steps to restore iTunes backup to new iPhone 14/13/12/11 with Finder/iTunes.

Step 1. On a Mac with macOS Catalina or later, open the Finder. On a Mac with macOS Mojave or earlier, or on a PC, open iTunes.

Step 2. Connect your new iPhone device to the computer with a USB cable. If there is a message prompt you and asks for your device passcode or to Trust This Computer, follow the onscreen steps.

Step 3. Select your iPhone model (iPhone 14/13/12/11) when it appears in the Finder window or iTunes.

restore itunes finder

Step 4. Select “Restore Backup”. Look at the date of each backup and pick the one you want.

Step 5. Click “Restore” and wait for the restore to finish. If asked, enter the password for your encrypted backup. Keep your device connected after it restarts and wait for the sync completes.

enter password for encrypted backup

Part 2: Restore Lost Data from iTunes Backup Files

That’s the way to restore iTunes backup to iPhone officially in part 1. However, how to restore lost data to your new iPhone from iTunes? There are many causes may lead to data loss on your iPhone, like iOS upgrade, iOS jailbreak, device get broken, device water damaged, factory reset on device, etc,. If you lost data from iPhone accidentally, in fact, you are able to get back these lost files from iTunes backup. Here we share the way with you, which is used to restore lost data to your iPhone from iTunes backup files.

iPhone Data Recovery offers you the best solution to restore data on iOS device. It features with three recovery modes to meet all data lost cases, like recover lost data from iTunes backup files, recover lost data from iCloud backup files, recover lost data from device directly. It can help to restore data from iOS device under data loss cases. This powerful tool supports recover up to 19 types of iOS data, including contacts, messages, photos, videos, audio, notes, calendar, WhatsApp messages, and more. Besides, you can preview data before recovery. What’s more, it is compatible with all iOS devices and all iOS systems, like iPhone 14/13/12/11; iOS 17/16/15/14; etc,.

d_win d_mac
d_win d_mac

Tutorial to Restore Lost Data from iTunes Backup Files

Step 1. Run iPhone Data Recovery
To get started with, download, install and run iPhone Data Recovery on your computer. There are three main functions in the home page, including “iPhone Data Recovery”, “iOS System Recovery”, “iOS Data Backup & Restore”. To recover lost data, click the left one “iPhone Data Recovery” option.

iPhone Data Recovery home page

Step 2. Choose iTunes Recovery Mode
There are 4 options for your selection: “Recover from iOS Device”, “Recover from iTunes Backup Files”, “Recover from iCloud Backup File” or “More tools”. To recover lost data from iTunes backup files, click “Recover from iTunes Backup Files”.

choose recovery mode

Tips: Please don’t connect and sync your device with iTunes after you lost data,or the data you sync with iTunes previously will be overwritten.

Step 3. Scan Data from iTunes Backup File
Once the program lead you enter the iTunes recovery mode, then you can choose the backup file which contain the lost data you need and click “Start Scan“. It will begin to scan the backup file witch you choose.

select data from itunes backup

Step 4. Preview and Restore Data from iTunes Backup File
After scanning, all the content in the iTunes backup file will be show you. Preview all data in the backup file, and check the items you want to restore, just click “Recover” to save them on your computer.

recover data from itunes backup

d_win d_mac
d_win d_mac

Part 3: Transfer Data from Old iPhone to New iPhone Directly

That’s the solution to restore lost data from iTunes backup files via iPhone Data Recovery in part 2. In this part, we are going to show you a practical way to transfer data from old iPhone to new iPhone directly. If you switch to a new device, you can take this way for reference. Hope it can help your move files between two devices conveniently.

Phone Switch is an ideal tool for moving data between two devices which run on the same or different OS system. With the help of it, you can easily transfer data from old iPhone to new iPhone directly. All kinds of data are available for transferring, like photos, contacts, messages, videos, call logs, notes, voice memos, etc,. The process is extremely easy, no need any skills. What’s better, this tool supports 6000+ smartphone models on iOS, Android, and Windows. The whole data sync task will be finish in a fast speed, that will save your precious time.

d_win d_mac

How to Transfer Data between iPhone and New iPhone

Before begin the data sync process, please download, install and run Phone Switch on your PC/Mac computer.

Step 1. Select Phone Transfer Function and Connect Devices
In its home page, select “Phone Transfer” function. Connect both of your two iPhone to the computer with USB cable.

phone transfer function

Step 2. Select Files for Transfer
When you connect the devices, it will detect it and set it as the “Source” phone or “Destination” phone. You can change their position by clicking the Flip button. Select the files you want to transfer. There are more than 22 types of files for your selection, like photos, contacts, messages, videos, call logs, notes, voice memos, etc,.

select files to transfer

Step 3. Transfer Data from iPhone to iPhone 14/13/12/11
Finally, simply click on “Start Transfer”. Then Phone Switch will begin to transfer your selected files from Source iPhone to iPhone 14/13/12/11 with fast speed.

transfer files to iphone 14

d_win d_mac

Final Words

Now you have learn how to restore backup data from iTunes to your new iPhone 14/13/12/11. And you get the solution to restore lost data from iTunes backup files, even the method to transfer data from old iPhone to new iPhone directly. You will never worry about losing iPhone data, or restore data from iPhone. If you like our post, you can read more post and get more solutions from our products to help you in life.

Restore iTunes Backup to New iPhone

How to Transfer Messages from iPhone to New iPhone 14/13/12

Summary
If you wish to transfer messages from old iPhone to new iPhone, this guide is for you. This post covers 2 ways to help you transfer all or selected text messages & iMessages from iPhone to new iPhone 14/13/12. You can even move all/some old iPhone data to the new one directly.

“I have a new iPhone 14 Pro and need to move my data from iPhone 8 to iPhone 14 Pro. I found it difficult to transfer messages from iPhone to new iPhone 13. Any suggestion?”

Have you got a new iPhone 14? Do you need to transfer files from your old iPhone to new iPhone? It’s very common to transfer all your data, including photos and messages, to your new iPhone. Messages on iPhone are your precious memories and important data. If you are interested in how to transfer messages from iPhone to new iPhone, you’d better put your eyes on this guide. Here this post will cover 2 ways to transfer Messages from iPhone to new iPhone 14/13/12.

Way 1. Transfer All Messages to New iPhone 14/13/12 with iCloud Backup

Apple provides users with 5GB of free space on iCloud, and you can use iCloud to backup and transfer data on iPhone. iCloud makes it easy to transfer message from iPhone to new iPhone wirelessly. But you have to transfer all messages from iPhone to new iPhone 14/13/12. Let’s see how to do it.

Step 1. On your old iPhone, go to “Settings” > “iCloud”, turn on the Backup option.

Step 2. If you old iPhone is running iOS 11.4 and later version, you can go to “Settings” > “Messages”, and turn on the “Messages on iCloud” option.

messages on icloud

Step 3. Then turn on “Sync Now” to sync you messages from iPhone to iCloud.

Step 4. On your new iPhone 14/13/12, login to iCloud with your Apple ID. Select the recent iCloud backup to restore. Then all messages will be synced to your new iPhone.

restore icloud backup

Note: If you’ve already used your new iPhone 14/13/12, you need to factory reset your new iPhone before iCloud backup restore.

Restrictions: iCloud can assists you to sync some types of data, however, both iPhones should use the same Apple ID. Moreover, it may take a long time to complete the transfer if you have poor Wi-Fi. And you are not allowed to transfer selected messages from iPhone to new iPhone. Here we will show you another quick way to move messages from iPhone to new iPhone without iCloud. What you need is a third-party iPhone Data Transfer tool.

Way 2. Transfer All or Selected Messages to New iPhone 14/13/12HOT!

U.Fone iOS ToolkitPhone Switch is your smart iPhone transfer and managing tool. It enables you to transfer messages, SMS, photos, videos, notes, contacts, app data and more from iPhone to another iPhone/computer directly. Besides, it is able to quickly drag and drop files into any target app on iOS devices. With it, users can easily transfer all or selected text messages & iMessages from iPhone to new iPhone 14/13/12 or computer directly.

Another awesome feature is that it can transfer iCloud data to iPhone/iPad/iPod touch/computer directly. This handy tool also works as an iOS Data Manager, which helps you manage your iOS data by importing, exporting and deleting.

Main Features:

  • Transfer any data between iOS devices and iTunes.
  • Transfer data from iPhone to iPhone 14, 14 Plus, 14 Pro, 14 Pro Max, 13, 12, 11, etc.
  • Transfer Messages/Photos/Music/Video/Files/Contacts between iPhone and PC/Mac.
  • Manage files/data/apps between computer and iOS devices.
  • Import songs from iTunes or drag and drop files to iPhone/iPad/iPod Touch.
  • Support iOS 16 and iPadOS 16, Windows 7/8/8.1/1011, mac OS X 10.8 & higher, latest iTunes 12.10.

d_win d_mac

How to Transfer Messages from iPhone to New iPhone 14/13/12?

Read on the detailed guide to learn how to transfer messages from iPhone to new iPhone directly with U.Fone iOS Toolkit.

Step 1. Connect both the iOS devices
First of all, download, install and launch the U.Fone iOS Toolkit software. Then connect your old iPhone and new iPhone 14 to computer using USB cable. In the home screen, select “Phone Transfer“, and click “Phone to Phone” option.

ios transfer interface

Step 2. Select Messages to Transfer
U.Fone will automatically detect your two iPhones and mark them as source or destination. Your old iPhone should be the source, and your new iPhone 14 should be the destination. If not, simply click “Flip” at the top to correct their position.

transfer messages from iphone to iphone 14

Next, select any data you want to move. Here you should tick “Text messages” and click “Start” to start the process.

Step 3. Transfer Messages from iPhone to iPhone 14
U.Fone will begin to transfer messages from iPhone to iPhone 14/13/12, wait patiently.

transfer messages to iphone 14 completed

When finished, disconnect both iOS devices, and all messages have been moved to your new iPhone!

d_win d_mac

Transfer Messages to New iPhone 14/13/12

Backup Contacts, SMS, Photos, Videos, Notes from iPhone 14 to Computer

Summary
Do you want to backup to iPhone 14 to computer? Wanna backup iPhone without iTunes? This passage will introduce an awesome iPhone Backup software, and guide you how to backup contacts, SMS, photos, videos, notes from iPhone 14 to computer easily.

Question 1: “How do I backup my iPhone 14 photos to my computer?” – Nick

Question 2: “How do I back up Contacts from iPhone 14 to PC without iTunes” – Jenny

Question 3: “Can I backup my iPhone text messages to my computer?” – Mike

A restore is helpful to fix some software problems. Do you need to to restore your iPhone 14 data? If yes, you’d better to backup iPhone 14 data to computer in advance. We know that iPhone and Windows do not work well together. To backup data from iPhone to computer, you can use a third-party iPhone Backup Software. In this article, we will introduce an awesome iPhone Backup Software, and teach you how to backup Contacts, SMS, Photos, Videos, Notes from iPhone 14 to computer. You can backup all data from iPhone 14/14 Plus/14 Pro/14 Pro Max to computer without iTunes or iCloud!

Way 1. Backup iPhone 14 to Computer without iTunes

Usually, it will take a long time to create a backup with iTunes and iCloud. Take it easy! A professional iPhone backup tool can help you quickly backup photos, contacts, SMS, videos, notes from iPhone 14 to PC/Mac.

U.Fone iOS ToolkitiOS Data Backup & Restore is your best option. It is an all-round iOS data backup & restore tool, iOS data recovery tool, as well as iOS system recovery tool. This software enables users to easily and quickly backup iPhone/iPad/iPod Touch to computer without iTunes or iCloud. What’s more, it lets you selectively back up any iOS data you want to computer. With it, you can easily backup photos, contacts, SMS, videos, music, text, notes, WhatsApp, app data and more to computer with just a simple clicks.

Highlights:

  • Backup all data and file from iPhone/iPad/iPod to PC/Mac.
  • Backup iPhone 14/13/12/11/X/XR/S/8 to computer without iTunes.
  • Backup iPhone videos, photos, music, SMS, contacts, notes, app data and more to computer.
  • Recover lost/deleted data from iTunes/iCloud/iPhone backup.
  • Restore iPhone without data loss.
  • Restore the backup files to iPhone without iTunes/iCloud.
  • Fixes your iOS system issues like recovery mode, DFU mode, White/Blue/Black screen, etc.

d_win d_mac

How to Backup Photos/Contacts/SMS/Videos/Notes/ from iPhone 14 to Computer

Step 1. Download U.Fone iOS Data Backup & Restore
Start by downloading and installing U.Fone iOS Toolkit on your Windows PC or Mac computer. Launch the program, and select “iOS Data Backup & Restore” mode.

iPhone Backup tool

Step 2. Select iOS Data Backup
After this, you will see two options: iOS Data Backup and iOS Data Restore. Here you need to choose “iOS Data Backup” option.

ios Data Backup & Restore

Step 3. Connect iPhone 14 to Computer
Next, connect your iPhone 14/14 Plus/14 Pro/14 Pro Max to computer via an Apple USB cable. Then it will detect your iPhone 14, and show you two backup modes. Choose “Standard backup” and click “Start” button.

connect iPhone 14 to pc

Tips: If you choose “Encrypted backup”, you need to set a password for it. When you backup and restore your iOS data, you are required a correct password to go on.

Step 4. Select iPhone 14 Backup File Types
In the next window, you will see all file types, including Media, Message & Contacts, Memos & Others.

select iPhone 14 data to backup

You can select any data you want to backup, or just tick “Select All“, then click “Next“.

Step 5. Back Up Data from iPhone 14 to Computer
This tool will start to back up iPhone 14 files to computer without iTunes. During the process, keep your iPhone 14 connected to computer.

backup photos from iPhone 14 to pc

After the backup is completed, you can click “View Now” to view the local backup data. Now all backup files are stored on your computer locally!

view backed up iPhone 14 file

Way 2. Backup iPhone 14 to Computer Using iTunes

iTunes is another good helper to backup iPhone 14 data to computer. Compared to U.Fone iOS Data Backup tool, you can only backup all iPhone data on your computer with iTunes. Follow the steps below:

Step 1. Open iTunes on your Windows PC, sign in with your Apple ID.

Step 2. Connect your iPhone 14 to the computer via USB cable. iTunes will display your iPhone 14, tap on it.

Step 3. Trust your computer on the iPhone 14 screen.

Step 4. In iTunes window, click on your iPhone 14 icon.

Step 5. Tap “Summary” > “Backups” > “This Computer”, tick “Encrypt iPhone backup”.

Step 6. Click on “Back Up Now” and wait for the backup to complete.

backup iphone 14 in itunes

Restrictions: After creating an iTunes backup, you can see the backup file and the exact time and date it was created. However, you cannot check the backup file details and do not have access because Apple usually reformats the file. To backup data from iPhone to computer, we recommend you use a profession iOS backup tool, such as U.Fone iOS Toolkit – iOS Data Backup & Restore. Now try it free!

d_win d_mac

Backup iPhone 14 Contacts, SMS to Computer

How to Backup Data from iPhone 14/14 Pro to Computer

Summary
This post is aim to show you the best solution to backup data from iPhone 14/14 Pro to computer, so that you can keep your personal data safely avoiding losing them in any cases.

There are many causes may lead to data loss in iPhone daily, such as iOS update. Many iPhone users are changing their devices and upgrade iOS to the latest version without hesitation. However, it is common for iPhone users to confront these situations in the phone changing and system upgrading process: iPhone stuck, data removed when repairing, data lost after updating iOS system. iPhone is a good choice for almost everyone today. People like to capture fun loving videos with iPhone, record moment with taking photos, enjoy games or listen to music on their iPhone. It is depressed when you lost data from iPhone no matter for what reason. This post is going to show you a practical way to backup data from iPhone 14/14 Pro to computer, after that you are able to keep all data and without losing them under any cases.

Best Tool to Backup iPhone 14 Data to Computer

U.Fone iOS ToolkitiOS Data Backup & Restore is a popular and professional tool, which ensures you to backup iPhone and restore iPhone easily and quickly. Thanks to this tool, you can backup data from iPhone 14/14 Pro to computer safely, restore iPhone data completely and selectively. It supports up to 12 types of files, including contacts, messages, photos, videos, call history, notes, calendar, reminder, etc,. It is allowed to restore data after losing data under any cases, like iOS upgrade, iOS jailbreak, device broken, factory reset, water damaged, and more. With advance design, this tool is compatible with all iOS models and all iOS system, such as iPhone 14, iPhone 13, iPhone 12; iOS 17, iOS 16, iOS 15, iOS 14.

d_win d_mac

Part 1. How to Backup Data from iPhone 14/14 Pro to Computer

Step 1. Run U.Fone iOS Data Backup & Restore
Firstly, download, install and run U.Fone iOS Toolkit on your computer. Then you will see its main interface.

iOS Toolkit home page

Step 2. Select iOS Data Backup & Restore Function
It offers 3 modes. Here choose “iOS Data Backup & Restore” function, and tap “iOS Data Backup”.

ios Data Backup function

Step 3. Connect iPhone 14 to Computer
Next, connect your iPhone 14/14 Pro to computer with an USB cable. U.Fone iOS Data Backup & Restore will detect your iPhone soon. You will see two backup modes: Standard backup and Encrypted backup. Select “Standard backup” and click “Start” to go on.

connect iPhone 14 to pc

Note: If you choose Encrypted backup, you’ll need to enter password to protect your backup, and it will be needed when you restore the backup back to iPhone.

Step 4. Select Backup File Types
In this step, you are allowed to select backup file types, including photos, App data, messages, contacts, WhatsApp, Safari history and many other data types for backing up iPhone to computer. (You can also click “Select All”), then click “Next”.

select data to backup

Step 5. Back Up Data from iPhone 14
After that, this tool will begin to backup your iPhone 14 to computer with super fast speed.

backup iPhone 14 data

When the backup completes, just click “View Now” to view local backup data, they are now stored on local drive. Meanwhile, you can tap the Trash icon to delete it.

view backed up iPhone 14 data

d_win d_mac

Part 2. How to Restore iPhone 14/14 Pro Data from Computer

Step 1. Run U.Fone iOS Data Backup & Restore and Select Data Restore Function
To begin with, run the program on your computer, and choose “iOS Data Backup & Restore” function in the main interface. Connect your iPhone 14 to computer via an USB cable, then click “iOS Data Restore” option.

iPhone data restore function

Step 2. Select A Backup File
Next, you will see the backup files on the main screen for your selection. Select the one you want and click “View Now” to display the detailed backup data.

select backup file to restore

Step 3. Preview and Choose Backup Data
It will display all backup data on the page in detail.

preview backup data

Click the backup data that you want to restore from the backup. You can preview it and choose the items. Then click “Restore to device” or “Restore to PC”.

Step 4. Restore Data to iPhone 14/14 Pro
To restore iPhone 14 from the backup data, you can choose “Restore to Device”.

restore backup data to iphone 14

Step 5. Restore iPhone 14 Data from the Backup
Finally, it will start restoring files from Backup back to your iPhone without any data loss. Click “OK” to end the restoring process.

restore iPhone 14 data finished

d_win d_mac

Conclusion

To prevent data loss, you should back up your phone regularly. For iPhone users, this article give you the best suggestion to easily backup & restore iPhone 14/14 Pro and other iPhone models. We hope U.Fone iOS Data Backup & Restore can help you successfully get your target!

Backup iPhone 14 Data

How to Transfer Data from iPhone to iPhone 14/14 Plus/14 Pro/14 Pro Max

Summary
Read this post then you will learn how to transfer data between iPhone and iPhone 14 via Phone Switch. After that, you can get all files stored on the new phone, including iPhone 14, iPhone 14 Plus/ iPhone 14 Pro/ iPhone 14 Pro Max.

How can I move photos, contacts from my old iPhone 11 to the new released iPhone 14 with one click? I have got a new iPhone 14 but have no idea to transfer data between two devices with simple steps. How?

The iPhone 14 and the iPhone 14 Plus are Apple’s “affordable” flagship iPhones with pricing starting at $799, and the devices are being sold alongside the more expensive iPhone 14 Pro and iPhone 14 Pro Max. The iPhone 14 models come in blue, purple, midnight, starlight, and (PRODUCT)RED, plus Apple added a new yellow color in March. Unlike the iPhone 14 Pro models, the iPhone 14 and 14 Plus continue to have a notch at the top of the display that houses the TrueDepth camera. iPhone 14 and iPhone 14 Plus include Super Retina XDR OLED displays that support 1200 nits peak brightness, a 2,000,000:1 contrast ratio, Dolby Vision.

You’ll want to know how to transfer data from iPhone to iPhone if you’ve just purchased a new iPhone, or are thinking about doing so soon. While the process is relatively straightforward – as you’d expect given iPhone are some of the most popular and best phones around – it can be a little daunting. After all, your whole life is probably on your existing iPhone. How to transfer data from iPhone to iPhone 14? This is a common question recently posted by an iPhone 14 user on a mobile device online forum. If you have also got a new iPhone 14 model, then you might be having a similar doubt. This article is going to show you the best solution to switch files between iPhone and iPhone 14/14 Plus/14 Pro/14 Pro Max, and it can be used for transferring files between two mobile phones which run on same or two different iOS/Android system or other system.

Best Tool to Transfer iPhone Data to iPhone 14

There are so many phone data switch tools in the market, which can you trust on? In fact, Phone Switch is the best one we want to share with you. As its name, it provides a flexible solution to directly switch data between two mobile devices, even which run on different systems. With the help of this tool, you can transfer data between iPhone and iPhone 14 /14 Plus/14 Pro/14 Pro Max. It supports transfer all types of data, including contacts, messages, photos, videos, music, bookmarks, call logs, and more. It means that you are able to sync files from the old device to the new device with one click in super fast speed. Besides, Phone Switch is compatible with all iOS models and all iOS systems, including iPhone 14, iPhone 13, iPhone 12; iOS 17, iOS 16, iOS 15; etc,.

Main Features of Phone Switch

  • Transfer data between two devices run on same or different system.
  • Transfer all types of data like contacts, messages, photos and more.
  • Sync files from old device to the new one with one click in fast speed.
  • Be compatible with all iOS models and all iOS systems.
  • Switch files between two devices without skills.

d_win d_mac

Steps to Transfer Data from iPhone to iPhone 14

Step 1. Select Phone Transfer Function and Connect Devices
Download, install and run Phone Switch on your PC/Mac computer. In its home page, select “Phone Transfer” function. Connect your iPhone and iPhone 14 to the computer.

phone transfer function

When you connect the devices, it will start recognizing it and mentioned it as the “Source” phone or “Destination” phone.

Tips: You can change their position by clicking the Flip button.

Step 2. Select Files for Transfer
In this step, select the files you want to transfer. There are more than 22 types of files for your selection, like contacts, SMS, call logs, calendar, bookmark, photos, music, etc,.

select files to transfer

Step 3. Transfer Files from iPhone to iPhone 14
At last, click on “Start Transfer”. Then Phone Switch will begin to transfer your selected files from Source iPhone to iPhone 14 with super fast speed.

transfer files to iphone 14

d_win d_mac

Final Words

After following this guide, you would certainly learn how to switch data from old iPhone to new iPhone 14 with ease. Here are three simple steps above we have mentioned to transfer data between iPhone and iPhone/14 Plus/14 Pro/14 Pro Max. This way can be used to switch files between two mobile devices which run on same or two different systems. What’s more, Phone Switch is compatible with all iOS models and all iOS systems, including iPhone 14, iPhone 13, iPhone 12; iOS 17, iOS 16, iOS 15; etc,. What a practical data transfer tool you should have a try!

Transfer iPhone Data to iPhone 14

iOS Data Backup & Restore: Restore Backed Up Data After Upgrade to iOS 16

Summary
If you updated your iPhone to the latest iOS 16 and lost your data or files, don’t worry. Here you will get a professional iPhone data recovery software and learn how to use it to quickly restore back up data after iOS 16 update.

iOS 16.4 is out. Did you update your iPhone to the latest version? However, the attention that grabs after upgrading to iOS 16 is the data loss situation. This is not a new thing that Apple users met some iOS problems and bugs after upgrading to iOS 16.2/16/15/14. So there is a need to retrieve data from a backup on iOS 16. You come to the right place. Here this article is about iOS data backup and restore tricks. In this article, we will guide you how to restore backed up data after upgrade to iOS 16.

Part 1. Know More About iOS 16 Before Upgrading

About iOS 16

iOS 16 has some fascinating features iPhone users, including new emoji, voice isolation for better cellular calls, live text in videos, Safari website notifications for the lock screen, passkeys and more.

Which iPhone will get iOS 16?

The latest Apple iOS 16.4 is available for the iPhone 8/iPhone X and newer (namely all iOS 16-compatible devices). You can check the full list below:

  • iPhone 14
  • iPhone 14 Plus
  • iPhone 14 Pro
  • iPhone 14 Pro Max
  • iPhone 13
  • iPhone 13 Mini
  • iPhone 13 Pro
  • iPhone 13 Pro Max
  • iPhone 12
  • iPhone 12 Mini
  • iPhone 12 Pro
  • iPhone 12 Pro Max
  • iPhone 11
  • iPhone 11 Pro
  • iPhone 11 Pro Max
  • iPhone X
  • iPhone XR
  • iPhone XS
  • iPhone XS Max
  • iPhone 8
  • iPhone 8 Plus
  • iPhone SE (2nd generation)
  • iPhone SE (3rd generation)

How to Download and Install iOS 16.4?

Kind Reminder:
* Connect your iPhone to a stable Wi-Fi network.
* Clear up enough storage space.
* Make sure your iPhone have enough storage space.

Step 1. Open your iPhone and go to “Settings” > “General” > “Software Update“.

Step 2. Wait a few seconds for the update to appear, then tap on “Download and Install” for iOS 16.4.

ios 16 update

Part 2. Restore Backed Up Data After Upgrade to iOS 16

Generally, Apple offers its user with traditional methods to backup iPhone data, and restore your iPhone from a backup. They come from iCloud and iTunes. But these methods will only work if you have created a backup before the iOS update. What if you don’t have a backup? Is it possible to restore backup on iOS 16 without using iTunes or iCloud? The answer is Yes! Here you meet this professional third-party iOS Data Recovery tool, named U.Fone iOS Toolkit.

U.Fone iOS ToolkitiOS Data Backup & Restore is developed to flexibly backup and restore your iPhone, iPad and iPod Touch, with or without iTunes, iCloud. It allows to fully or selectively restore backup to iOS device without data loss. Specifically, you can restore all data or only specific data, such as photos, videos, SMS, message, text, Notes, music, app data, etc. In addition, it also supports to fix various iOS system issues, and recover lost/deleted iPhone data without backup.

d_win d_mac

Read Also: Backup iPhone/iPad Data before iOS 16/15 Update

How to Restore Data Back to iPhone After iOS 16 Upgrade

U.Fone iOS Toolkit makes it easy to back up all content on iPhone and restore data from backup without iTunes or iCloud. Now read the detailed tutorial to retrieve data from backup to iOS 16 device.

Step 1. Open Software and Go to iOS Data Restore
First, click the Download button above, get this tool installed on your Mac or PC. Start the program and go to “iOS Data Backup & Restore” function.

ios backup tool

Step 2. Connect iOS 16 Device to Computer
Then, use an Apple USB cable to connect your iOS 16 device to computer and click “Trust” the computer. You will see two options, please choose “iOS Data Restore“.

ios data restore

Step 3. Select A Backup
The software will display all backup files on your computer, select the one and click “View Now” to preview it.

ios data restore

Step 4. Preview and Select Backup Data
In the next window, you will see all detailed backup data on the screen.

select backup data

Select any data you wish to restore include contact, photos, app data and more. You can preview it, then tick the desired items.

preview backup data

Step 5. Restore Backed Up to iOS 16 Device
Finally, click on “Restore to Device” button to restore previous backup data to your iPhone.

restore backed up to ios 16

Also, you may click “Restore to PC” (or Mac), and set the Output Folder, then hit “Restore”.

restore backup data to pc

Step 6. Restore Backed Up Completed
Wait a few minutes until it finishes. Once the backup is completed, click “OK” button.

restore backup to ios 16 completed

d_win d_mac

Restore Backed Up After iOS 16 Upgrade