All posts by DHZ

Transfer Music (Apple Music, Spotify Music Included) to Huawei Mate 20/P20(Pro)

[Summary]: Do you want to import/transfer/put music from PC/Mac to Huawei Mate 20/P20(Pro)? This article teach you how to import music to Huawei phone? How to sync music from iTunes to Huawei? How to put Apple Music and Spotify Music to Huawei Mate 20/Mate 20 Pro & Huawei P20/P20 Pro, ect.

CONTENTS:

Huawei Mate 20/20 Pro/20 X/ 20 RS/ Mate 20 RS Porsche Design and Huawei P20/P20 Pro is the 2018 Huawei flagship Android smart phones. The newer Huawei Mate 20 Pro has Huawei’s latest Kirin 980 processor inside. Huawei claims that it’s 20 percent faster and 40 percent more efficient than the Kirin 970 which graces the P20 Pro. Both phones are available with 128GB of storage and 6GB of RAM or 256GB of storage and 8GB of RAM. Only the Mate 20 Pro allows for storage expansion via a card, but it won’t take any Micro SD card, you will have to spring for one of Huawei’s proprietary NM Cards. Not only does the Mate 20 Pro have a bigger battery, it also supports much faster charging at up to 40W, giving you 70 percent battery life in just 30 minutes, compared to just over 50 percent for the P20 Pro. Just to seal the deal, the Mate 20 Pro also supports Qi wireless charging which the P20 Pro lacks.

How to stream Apple Music to Huawei Mate 20 Pro?
I have got an new Huawei Mate 20 Pro, how to keep Apple Music songs playable on mobile phone after canceling subscription? I ready cancel subscription from Apple Music, how to download music from iTunes to Huawei Mate 20 Pro?

How to download music to Huawei P20 Pro without Spotify Premium subscription?
Spotify songs added DRM protection, how to remove DRM protection from Spotify songs, playlists & albums? I want to download Spotify music streams to Huawei P20 Pro for offline listening? Any way to download music from Spotify with free account?

Have downloaded songs on PC/Mac and want to import music from computer to Huawei phone? Looking for a iTunes music transfer to transfer iTunes music and library to Huawei Mate 20/Mate 20 Pro & Huawei P20/P20 Pro? Wanna transfer Apple Music and Spotify Music to Huawei Mate 20/P20(Pro)? Please keep reading the below methods, you can learn how to enjoy general music and streaming music on Huawei phone, no need download and install Apple Music Android app or Spotify for Android app on your phone, you can also enjoy Apple Music and Spotify Music on Huawei phone offline, even after after canceling subscription.

Part 1: Import Music from Computer to Huawei Mate 20/P20(Pro)

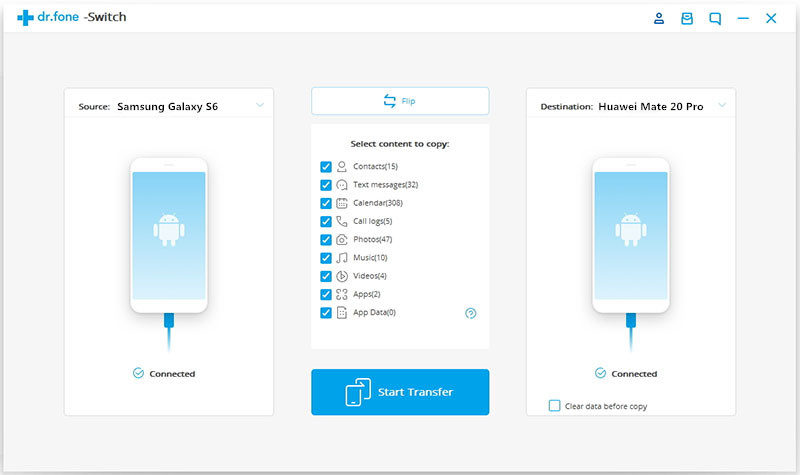
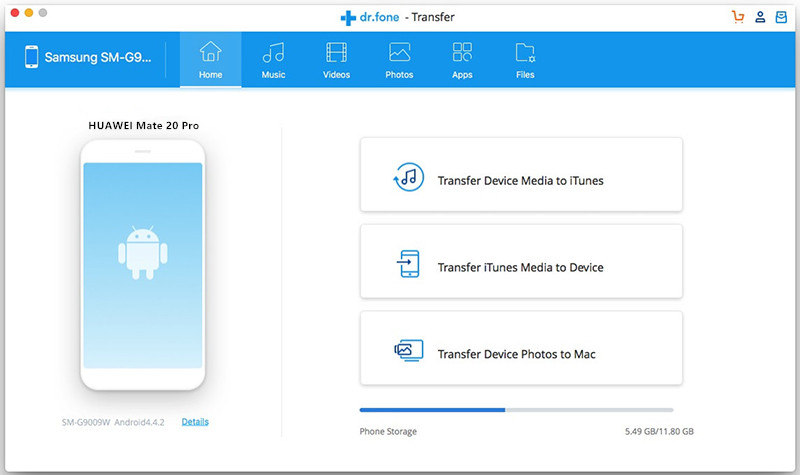
Phone Toolkit – Android Transfer(Windows/Mac) is a smart Android Transfer for transfer Everything between Android and computers, you can use this Android Transfer to transfer contacts, photos, Music, videos, SMS, contacts and more between Android Huawei Mate 20/P20(Pro) and computer easily, it enables you manage your Huawei phone on Windows/Mac computer. What’s more, Android Transfer allows you transfer iTunes music & library to Huawei Mate 20/P20(Pro) directly. If you use iPhone before, the Android Toolkit – Switch function can help you transfer contacts, text messages, music, videos and photos from iPhone to Huawei Mate 20/P20(Pro), it also is an iOS to Android transfer, Android to iOS transfer, iOS to iOS transfer, Android to Android transfer, if you have got a new phone, this program is very helpful for you!

Phone Toolkit- Android Transfer Key Features:

– Transfer music from iOS/Android, Computer, iTunes to Huawei Mate 20/P20(Pro);
– Transfer files between Huawei Mate 20/P20(Pro) and computer, including contacts, photos, music, SMS, and more;
– Manage, export/import your music, photos, videos, contacts, SMS, Apps etc.
– Transfer music, photos, videos, contacts, apps to Samsung, HTC, Google, LG, HUAWEI, Sony, Xiaomi, Oppo, ZTE and other Android phones.
– Transfer music, videos from iTunes to Android (vice versa).
– Manage your Huawei phone and other Android phone on computer.
– Fully compatible with Android 8.0.

Download the Phone Toolkit – Android Transfer for Windows or Mac and try to put music to your new Huawei phone.

d_win d_mac

Simple Steps to Transfer Music from Mac to Huawei Mate 20/P20(Pro)

Step 1. Download and Run Phone Toolkit on Mac
Download and run the Phone Toolkit on your Mac computer, and select “Transfer” among the modules.

huawei music transfer

Step 2. Connect Huawei Mate 20 to Mac
Then connect your Huawei Mate 20 to the Mac. After detected the device connected, your Huawei Mate 20 device will be shown in the primary window.
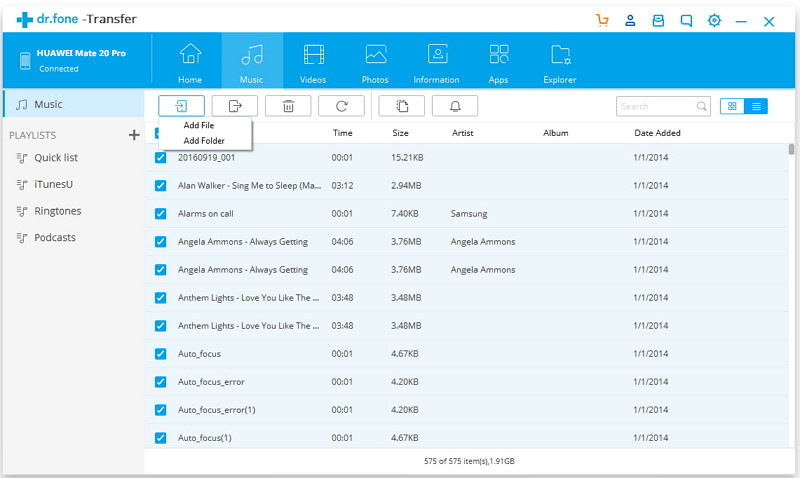
transfer music to huawei mate 20

Step 3. Tap “Music”
Tap “Music” on the top, you can transfer music data or music playlist from mac to your Huawei Mate 20 Android phone.

Step 4. Import Music from Mac to Huawei Mate 20
After entering the Music manager/transfer interface, then click “Add” to transfer music or music playlist from Mac to Huawei Mate 20 phone, select the songs or music playlist on your Mac, then click “Open” button start to transferring music from Mac to your Huawei Mate 20 directly.

add music to huawei mate 20

Part 2: Sync Music and Playlist from iTunes to Huawei Mate 20/P20(Pro)

Above, we have introduction the Phone Transfer- Android Transfer can help you transfer music from iTunes library to Android. Let’s shows you step by steps guide to sync iTunes music to Huawei Mate 20 Pro as example.

Step 1. Launch the Phone Transfer and Go to “Transfer” Function
After launching the Phone Toolkit and go to the “Transfer” module and connect your Huawei Mate 20 to the computer. It will automatically detect your Huawei phone and display its snapshot.

On the home screen, you can view various shortcuts. Out of all the provided options, click on “Transfer iTunes Media to Device”.

Transfer iTunes Music to Huawei Mate 20

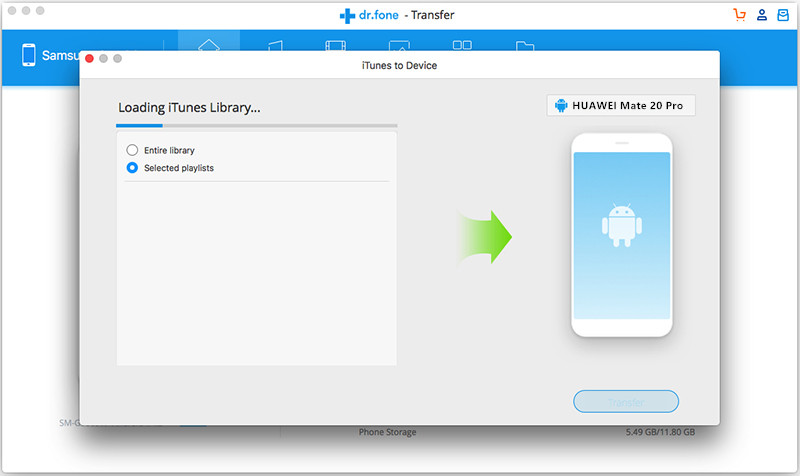
Step 2. Loading iTunes Library
At this time, the application pop up a new windows and start loading iTunes library.

Loading iTunes Music

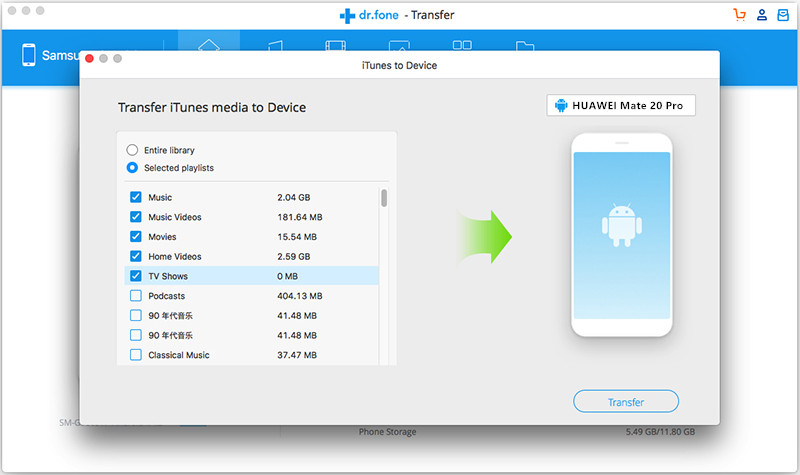
Step 3. Sync iTunes Music to Huawei Mate 20 Pro
After loading all your iTunes medias, it will fetch all the prominent contents from iTunes and display it in a categorized manner. You can simply select the playlists of your choice or check the “Entire library” option as well. If you just want to sync songs from iTunes library to your Huawei Mate 20, please select “Music” option and click on the “Transfer” button begin to transfer iTunes music to Mate 20.

Sync iTunes Music to Huawei Mate 20 Pro

Well done! You have transfer music from computer to Huawei phone and sync unprotected AAC music from iTunes to Huawei Mate 20 Pro, the program also allows you copy music from Huawei Mate 20/P20 (Pro) to iTunes as well or manage your device data easily using this remarkable application.

d_win d_mac

Disadvantage: Phone Toolkit – Android Transfer does not support transfer Apple Music (DRM-protected) and M4P songs from iTunes to Android, if you want to transfer Apple Music to Android phone, you must to remove DRM from Apple Music and convert Apple Music to MP3 at first, then transfer the DRM-free Apple Music songs from computer to your Huawei Mate 20/P20(Pro) and other iOS/Android devices, so you can enjoy Apple music on Huawei Mate 20/P20(Pro) offline, even after you unsubscribed Apple Music. Please read the below guide about how to remove Apple Music track’s DRM and transfer to Huawei Mate 20 Pro as example.

Part 3: Remove DRM from Apple Music and Transfer to Huawei Mate 20/P20(Pro)

For some Apple Music subscribers, you probably want to transfer some songs from Apple Music for enjoyment after switching to the new Huawei Mate 20/P20(Pro). But there is a big problem that Apple Music songs are limited to be enjoyed on Apple Music app or iTunes because of the DRM protection.

If you want to play Apple Music on Huawei Mate 20/Mate 20 Pro and Huawei P20/P20 Pro offline or keep Apple Music on Huawei phone forever, you need to convert Apple Music to Huawei phone compatible MP3 format, then stream Apple Music on Huawei Mate 20/P20 without Apple Music for Android App.

UkeySoft Apple Music Converter can help you unlock DRM from downloaded Apple Music files, M4P songs and purchased Audiobooks, and convert them to DRM-free MP3, AAC, FLAC and WAV format with 16X fast conversion speed. Besides, with an advanced DRM removal technique that differs from traditional recording, it can keep the original audio quality and ID tags of the music in output files.

Key Features of Apple Music Converter:

– Unlock DRM from Apple Music, iTunes M4P music and iTunes Audiobooks completely & legally;
– Convert Apple Music songs, iTunes M4P music, Audiobooks, iTunes music video to MP3/AAC/FLAC/WAV;
– Convert Apple Music to MP3 playable on Huawei Mate/P series;
– Convert Apple Music songs and playlist at 16X faster speed with lossless quality;
– Keep ID3 Tags information after conversion;
– Keep Apple Music forever after unsubscribed;
– Play Apple Music songs on any devices offline, such as MP3 players, iPod Nano, iPhone, Android phone, ect.
– Fully compatible with latest Windows 10, macOS Mojave and iTunes

d_win d_mac

Steps to Transfer Apple Music to Huawei Mate 20/P20(Pro)

Step 1. Launch Apple Music Converter on PC or Mac
Launch Apple Music Converter and iTunes will be automatically launched as the program needs to load iTunes media library and integrates the playlists in software interface.

Apple Music Converter interface

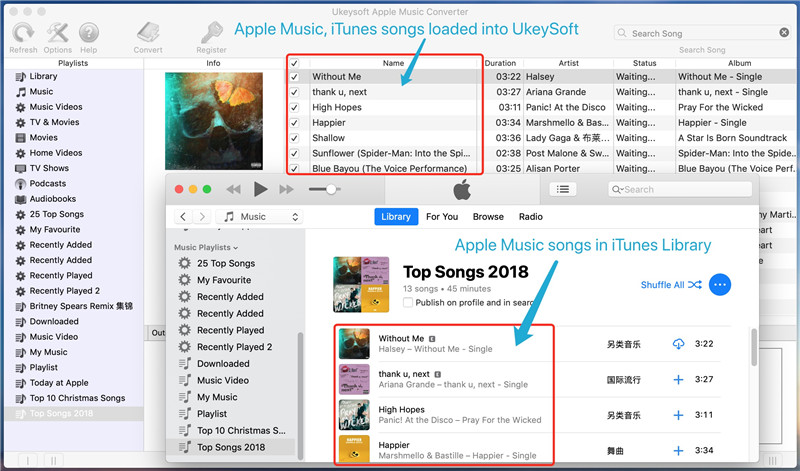
All iTunes media files, including Apple Music tracks, Apple Music playlists, audiobooks, TV shows, home videos, music videos, podcasts, etc. will be loaded into the program.

Apple Music DRM removal

Tips: You don’t need to download Apple Music tracks to PC, but make sure you have add them to your iTunes library.

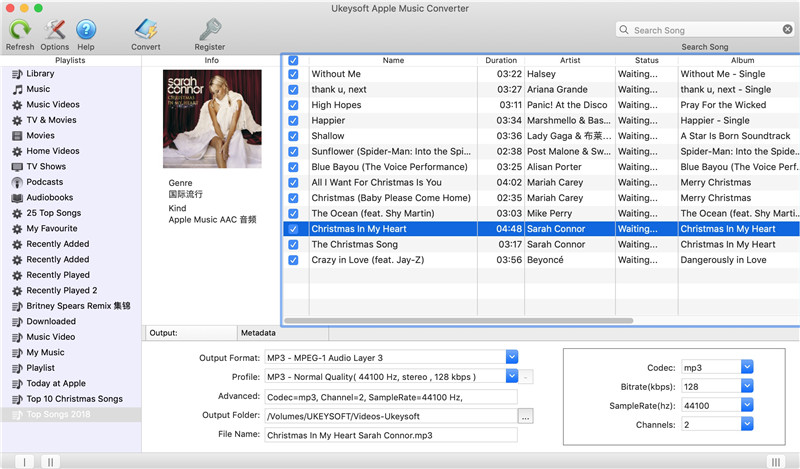
Step 2. Select Apple Music Tracks
Click a playlist and choose any Apple Music tracks you want to convert, you can also tick the first checkbox on the top to choose entire playlists, if you can’t find the songs you want, please search song title, album, artist, etc. and search results will be displayed in one or two seconds.

Select Apple Music Tracks

Step 3. Set MP3 as Output Format
Because The best audio format for Huawei Mate 20/P20(Pro) and most Android phone is MP3, please select MP3 as output format. The program also can download and convert the DRM-protected M4P songs, albums, playlists to common audio files such as AC3, M4A, M4R, FLAC, MKA, AU, AC3 and more, please select the output format you need.

choose MP3

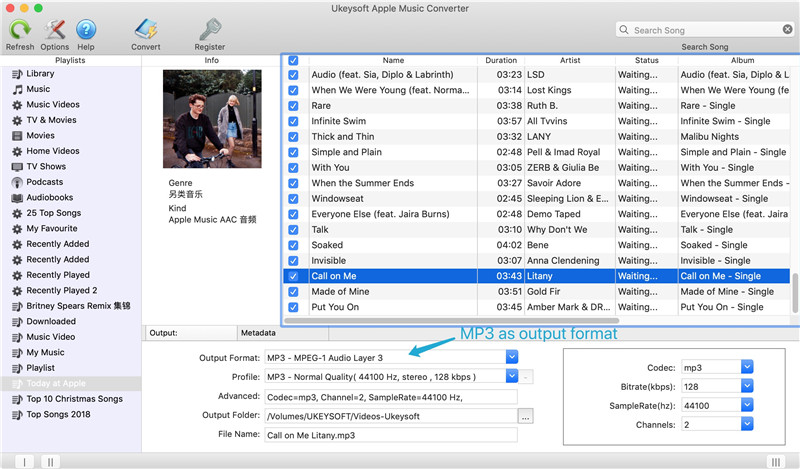
Apple Music Converter allows you to choose audio quality in profile list, or simply select a bitrate value. If audio quality is what you concern most, then 320kbps MP3 or 256kbps M4A will be good enough as this leads to lossless conversion.

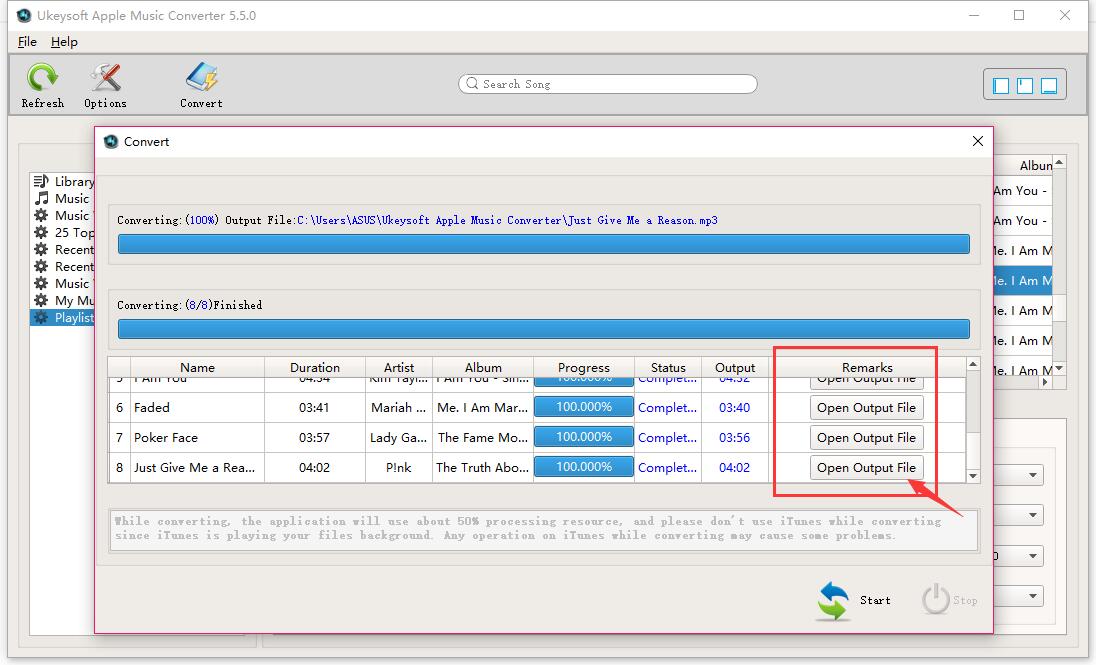
Step 4. Convert Apple Music to MP3 for Huawei Mate 20/P20(Pro)
After select the output format for Huawei phone, just click “Convert” button to start removing DRM from Apple Music and converting Apple Music tracks to MP3.

Convert Apple Music to MP3

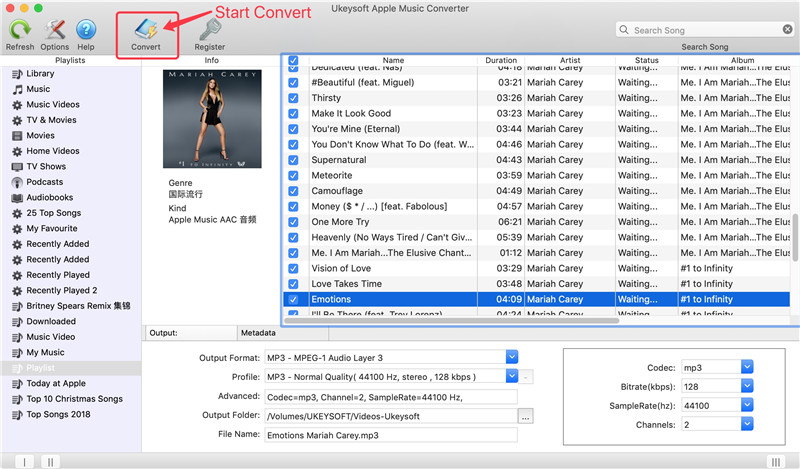
After conversion, you can click “Open output file” to locate converted DRM-free Apple Music songs in MP3 format.

Remove DRM from Apple Music Tracks

Step 5. Transfer DRM-free Apple Music Songs to Huawei Mate 20/P20(Pro)
Above steps, you have get the DRM-free Apple Music songs in MP3 format, now you can transfer or put the DRM-free Apple Music songs to Huawei Mate 20/P20(Pro). Above part 1, we have teach you how to transfer music from computer to Huawei phone with the help of Android Toolkit – Android Transfer. Or, you can drag and drop the converted Apple Music files to the Music folder of your Huawei Mate 20 after connecting the phone to computer via the provided USB cable.

transfer apple music to huawei mate 20

Note: The trial version of Apple Music Converter enables free users to convert 3-minute for each songs, you can unlock the time limitation by purchasing the full version. Please free download the program and try to remove DRM from Apple Music at first.

d_win d_mac

Part 4: Download Music from Spotify to Huawei Mate 20/P20(Pro)

Spotify is another popular streaming music platform/app, if you are not a Spotify Premium user, you can download any Spotify song, and you can’t download Spotify music streams to any device for offline listening, because all songs on Spotify is OGG Vorbis with DRM protected. Don’t worry, this part will teach you a easy method to free download Spotify songs/playlists/albums and transfer onto Huawei Mate 20/P20(Pro) for offline playback, as well as offline playing on other devices like MP3 player, iPod Nano, PSP/PS3/PS4, iOS/Android devices, etc.

When you have purchased an new Huawei Mate 20 or P20(Pro), for Spotify Music fans, you may want to enjoy Spotify music on the new huawei phone. Here we will show you the best way to stream Spotify music on Huawei Mate 20/P20(Pro) for both premium and free users.

UkeySoft Spotify Music Converter not only can help you remove DRM protection from Spotify songs, playlists & albums and convert them from OGG Vorbis to DRM-free MP3, M4A, WAV and FLAC. But also allows you to free download Spotify music streams to any device for offline listening. After convert Spotify music to MP3 for Huawei phone, you can enjoy Spotify tracks on Huawei Android phone offline without Spotify Premium.

Free download Spotify Music Converter for Windows or Mac and try to convert Spotify music to MP3 at first.

d_win d_mac

Steps to Download Spotify Music to Huawei Mate 20/P20(Pro)

Step 1. Run Spotify Music Converter on PC/Mac
Firstly, please free download and launch the Spotify Music Converter on your Windows or Mac computer, you will get it’s main interface as below.

Spotify Music Converter home page

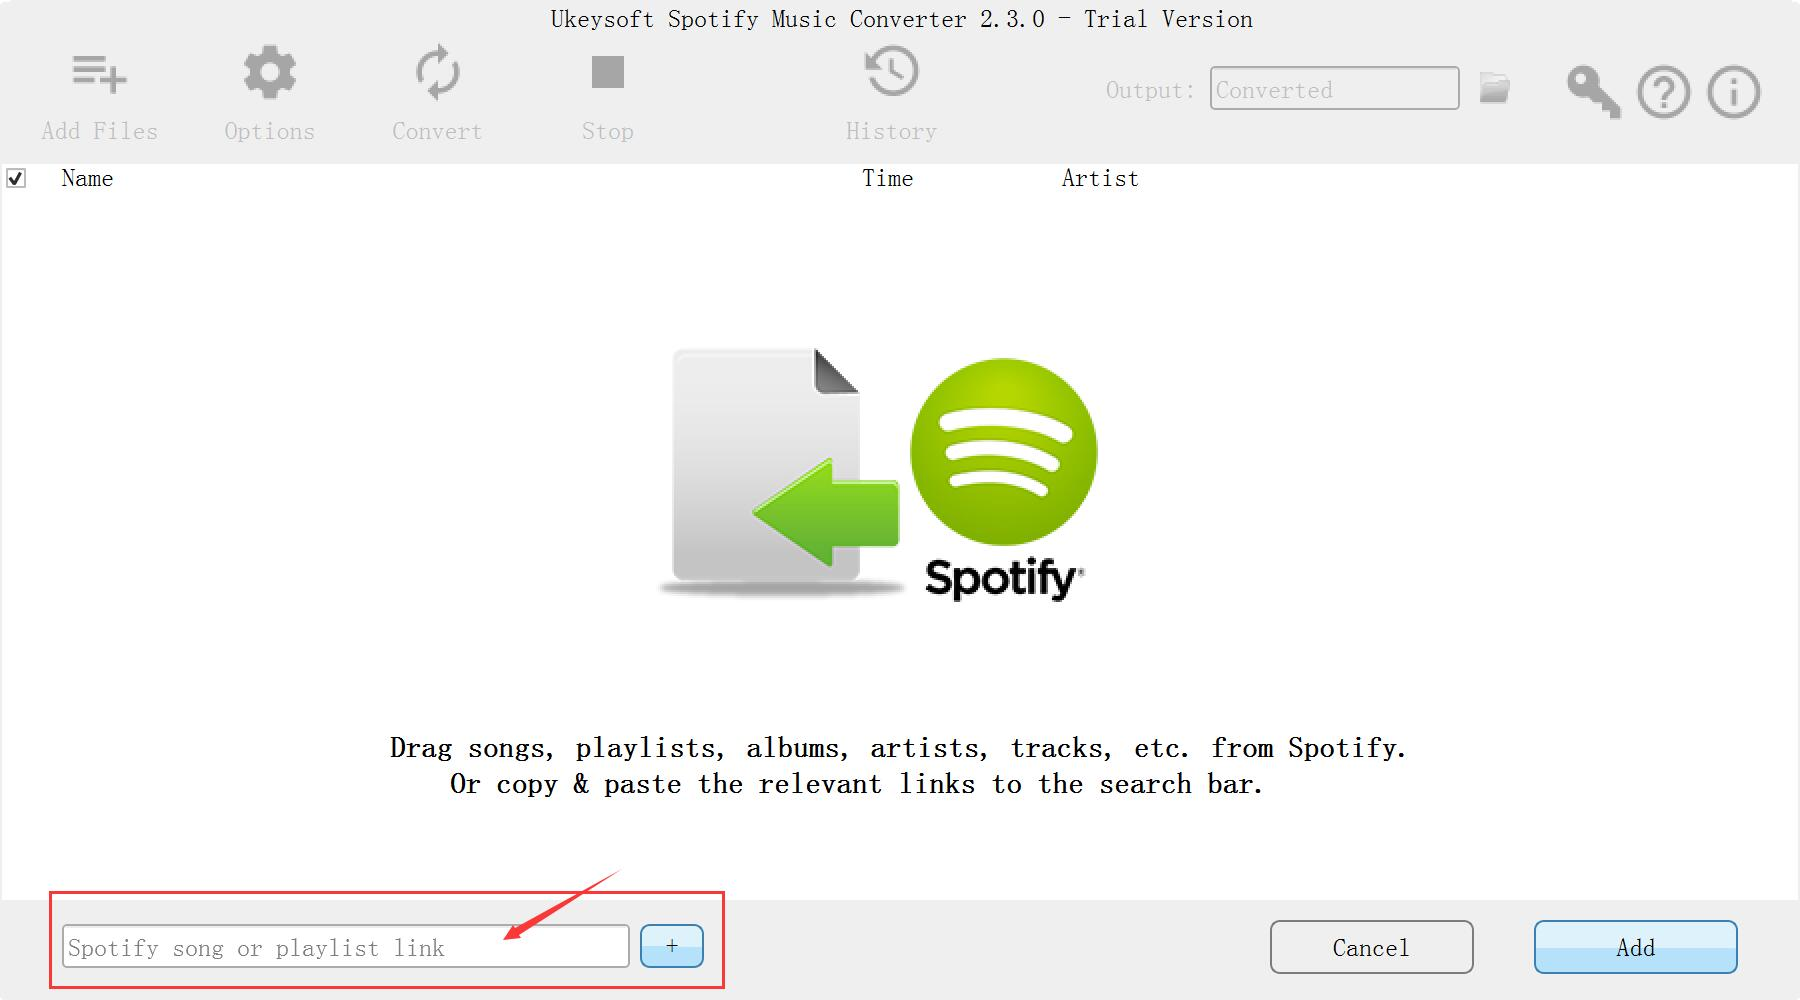
Step 2. Add Spotify Songs to Download
Drag&drop Spotify songs, albums and playlists you want to play in the car from Spotify app to the interface directly. Or click Add Files, copy&paste the link of the song, album or playlist to the left bottom area. And then click the Add button.

add spotify playlists

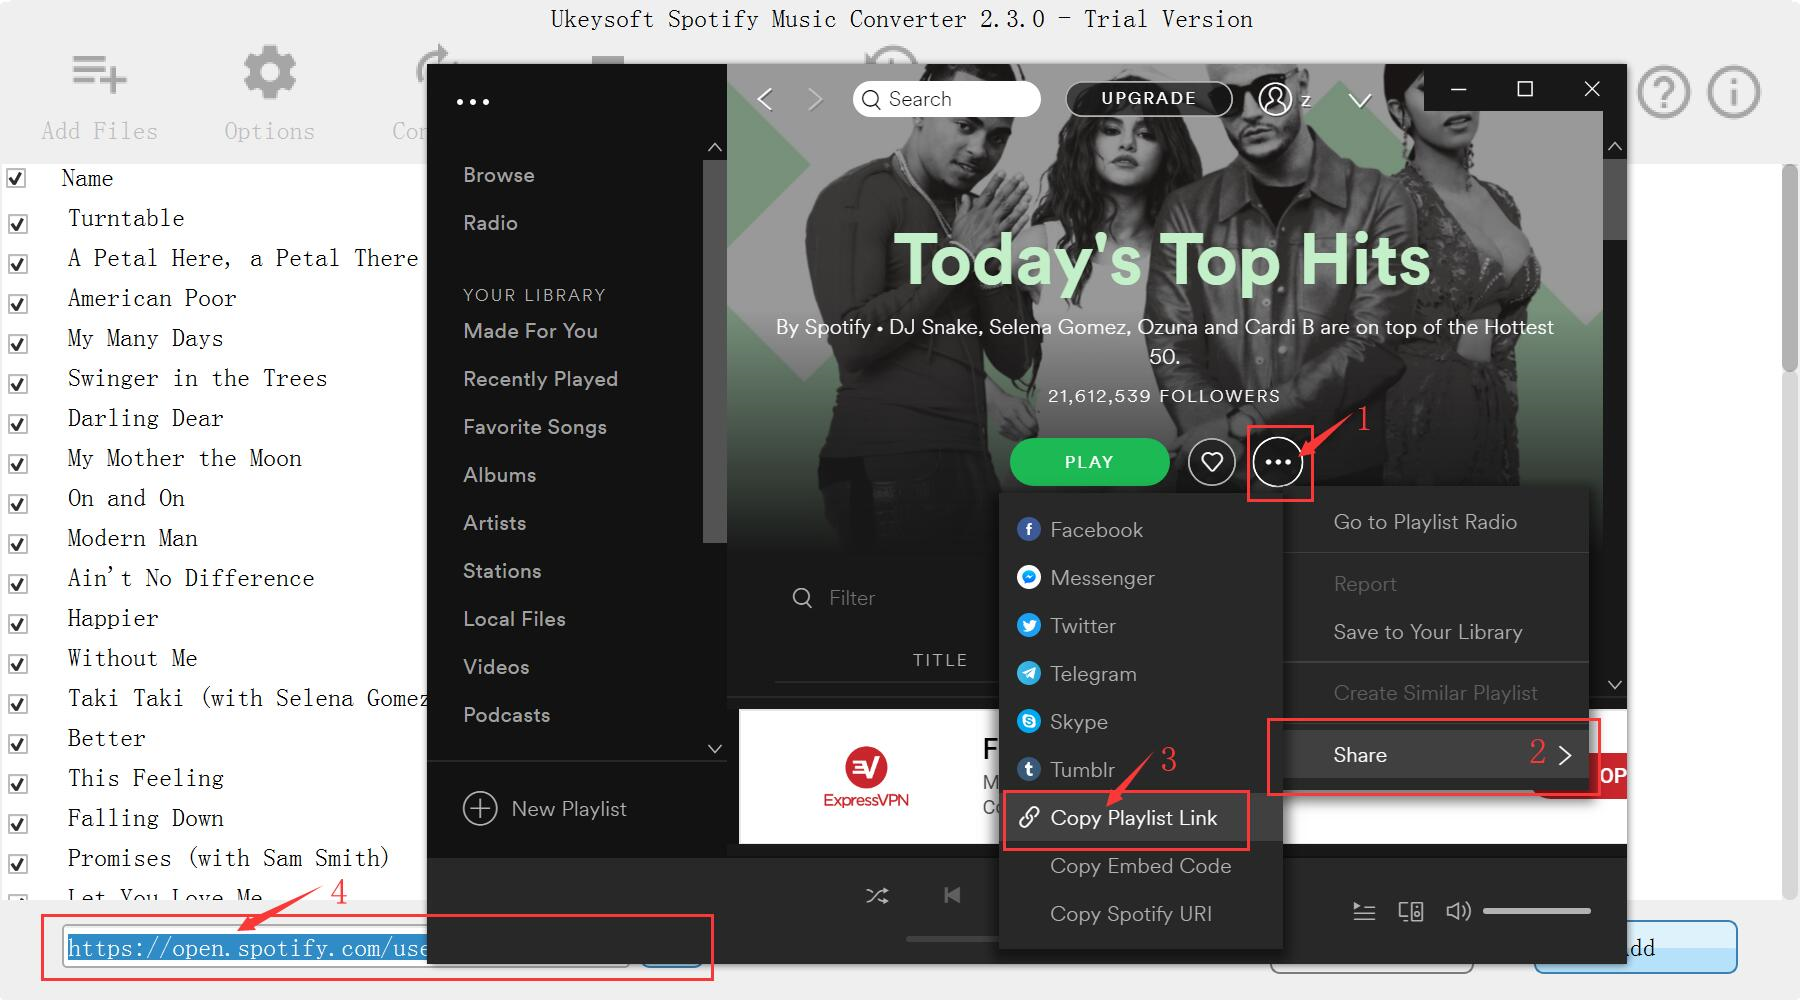
To copy a playlist link, right click the playlist corver or title and choose “Share” – “Copy Playlist Link“.

copy spotify playlist link

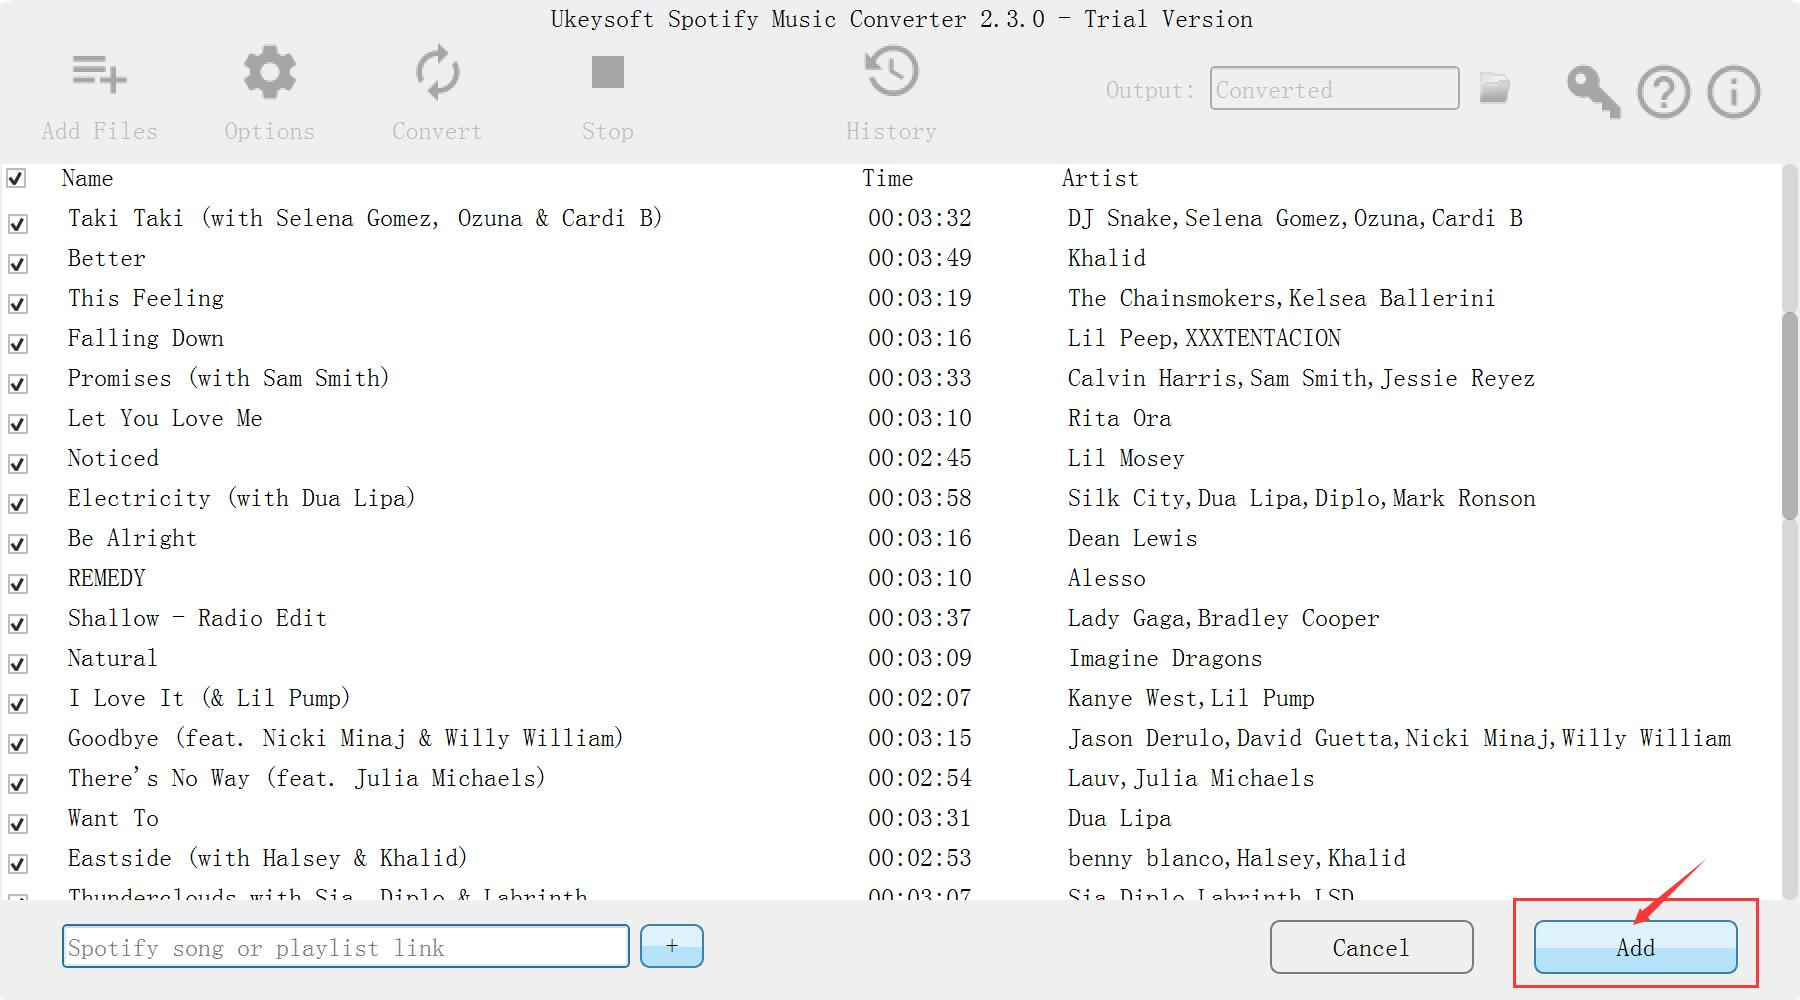
All songs in the playlist will be checked by default, you can uncheck the ones you don’t want to convert. Or add more playlists as you like.

add spotify playlist

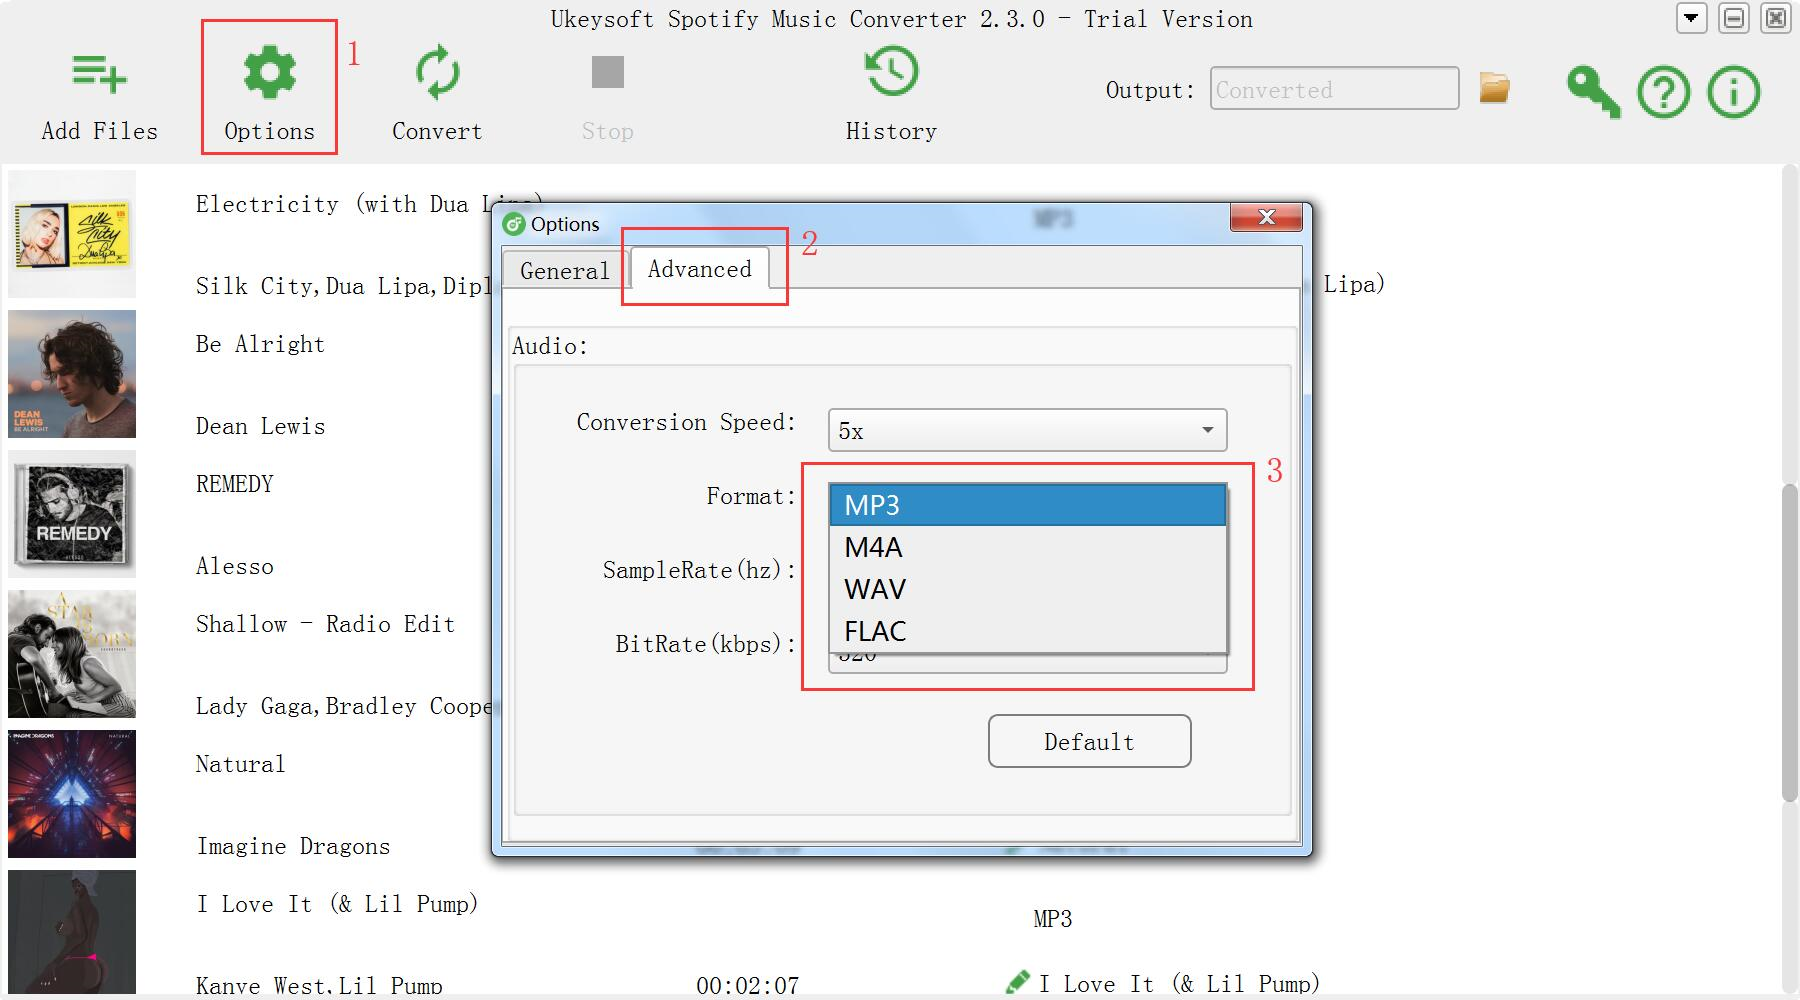
Step 3. Select MP3 as Output Format
The program supports download and convert Spotify music to MP3, M4A, WAV or FLAC audio formats, please choose the output format you want. If you plan to transfer the downloaded Spotify songs to Huawei phone, please select “MP3” as conversion format.

Audio Quality: The audio quality of the output songs can be adjusted. Select bitrate, samplerate according to your needs.

Select MP3 as Output Format

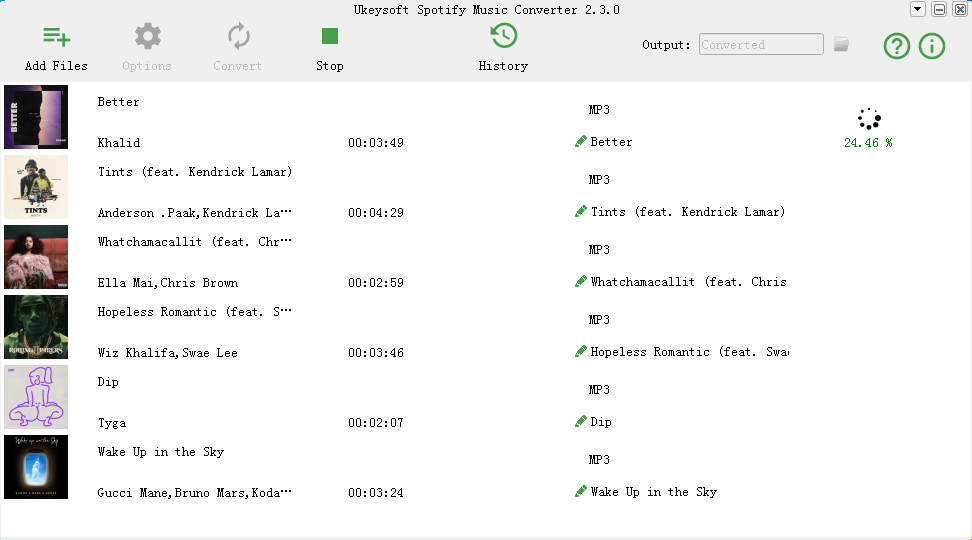
Step 4. Start Download and Convert Spotify Music to MP3
After setting MP3 as output format, just click the “Convert” button to start downloading and converting Spotify music to MP3. Only few minutes, you will get songs in DRM-free MP3 format.

Convert Spotify Music to MP3

Step 5. Transfer Converted Spotify Music to Huawei Mate 20/P20(Pro)
Above steps, we have teach you how to transfer music from computer to Huawei Android phone. After import the DRM-free Spotify music to your devices, you can enjoy Spotify Music on Huawei Mate 20/P20(Pro) offline.

Free download the Spotify Music Converter and try to download Spotify music as MP3 with free Spotify account.

d_win d_mac

Summary: Above three part, you know how to import Music including streaming music like Apple Music & Spotify Music to Huawei Mate 20/20 Pro, Huawei P20/P20 Pro and other Android devices, if you want to free download music from other Music Services like Spotify, Deezer, YouTube, Amazon, Pandora and SoundCloud, this streaming music platform/app not allow keep songs forever or playing songs offline, so you can use this Screen Record software to record various music, radio or online streaming music instead of downloading them, this screen not only can help you record online, streaming audio and microphone voice, but also capture any activity on Mac or Windows computer with full screen or customized screen size.
For example: how to capture streaming Amazon music
How to record Yotube video on Mac and Windows

Related Solution for Huawei Mate 20/P20

Transfer Music from iTunes to Huawei Mate 20(Pro/X/RS)

Transfer WhatsApp from iPhone to Huawei Mate 20(Pro/X/RS)

Recover Deleted Photos from Huawei Mate 20(Pro)

How to Recover Deleted/Lost Data from Huawei P20

Import Music to Huawei

How to Recover Deleted Contacts from Huawei Mate 20(Pro)

[Summary]: U.Fone Android Data Recovery can help you retrieve contacts lost due to accidental deletion, OTA update, factory reset, SD card formatting, etc from Huawei Mate 20 and Mate 20 Pro.

“I was saving contacts people to my Huawei Mate 20, but i didn’t notice the battery is low and shut down into a black screen of death. When i restart, all my contacts were gone. Now I am confused and looking for ways to recover contacts from Huawei Mate 20 phone. Can you help me?”

This situation is very common when user using smartphone, their phone accidentally get into black screen of death due to system upgrading error, app crashes, physical damage, etc. No matter which scenario you are experiencing that the contacts  just disappeared from Huawei Mate 20 and Huawei Mate 20 Pro suddenly, you can use an easily recovery program to recover deleted/lost contacts from Huawei Mate 20 and Huawei Mate 20 Pro by following the guide below.

Recover Deleted Contacts from Mate 20(Pro) without Backup

No matter how your contacts are deleted, such as accidentaly deletion, formatting, rooting, flash ROM, factory restore, etc., you can try this U.Fone Android Data Recovery to recover deleted contacts from Huawei Mate 20(Pro). Besides, this tool can retrieve deleted contacts from Huawei Honor, Mate 10/9 /7, P20 / P10, Nova series, G series and other Android phones and tablets. The program can be used to retrieve all file types like contacts, call logs, messages, photos, videos, WhatsApp chats, and much more.

d_win d_mac

Key Features of U.Fone Android Data Recovery:

-Efficiently recover contacts from Huawei smartphones.
-Also recover other data such as photos, videos, audio, call logs, notes, voice memos, messages, WhatsApp chat history and much more on Huawei Android phones.
-Preview recoverable files before final recovery.
-Support not only Huawei devices, but Samsung, Oppo, Google, HTC, LG, Blackberry and more Android devices.
-No leak, cloud storage or background records of personal info.

Step Guide to Recover Contacts on Huawei Mate 20(Pro)

Step 1. Download U.Fone Android Recovery

Free download and install this program for running, open the “Android Data Recovery” modules and go on.

Run android data recovery Software

Step 2.Connect Huawei Mate 20 Or Huawei Mate 20 Pro To Computer

Open U.Fone Android Data Recovery on a Windows computer. Make sure that Android USB driver has been installed on your computer. Then plug your Huawei Mate 20 or Huawei Mate 20 Pro phone to your PC, then your device will be detected and installed.

Connect huawei mate 20 to PC

Step 3. Enable USB Debugging On The Phone

Once detected, the program will present you with simple instructions to turn on USB Debugging Mode on your phone. There are three options. Please choose the one for your Huawei phone’s Android OS.
1) For Android 2.3 or earlier: Enter “Settings” < Click “Applications” < Click “Development” < Check “USB debugging”
2) For Android 3.0 to 4.1: Enter “Settings” < Click “Developer options” < Check “USB debugging”
3) For Android 4.2 or newer: Enter “Settings” < Click “About Phone” < Tap “Build number” for several times until getting a note “You are under developer mode” < Back to “Settings” < Click “Developer options” < Check “USB debugging”

turn on usb debugging

Step 4. Select Contacts To Scan

You will be asked to select specific file types to scan. Tick “Contacts” only so that the program saves time to scan only phone book in your phone. If you want to restore other data as you need, it also you can select.Then click the button “Next“.

Select Data Types

Step 5. Access Your Huawei Phone

Go to your Huawei phone. You will receive the pop-up that asks for privilege. Tap the “Allow” button.

Pass the Request

Then the software begins scanning your Huawei Mate 20. The scanning may take a while depending on the total amount of data being recovered.

scan Huawei mate 20 for deleted data

Step 6. Preview and Restore Contacts from Huawei Mate 20

When scan is completed, choose “Contacts” at the left pane. Then you can preview contacts in the table, including name, phone number, e-mail, even the profile image. Check items you want and click the button “Recover” to get them back.

restore contacts from huawei mate 20

d_win d_mac

Related Articles

How to Recover Deleted Files from Huawei Mate 20(Pro)

Ways to Restore Deleted Photos/Gallery from Huawei P20

How to Retrieve Deleted/Lost Data on Huawei Mobile Phone

How to Restore Deleted Text Messages from Huawei P20

How to Recover Deleted Data from Android Without Root

Recover Contacts from Huawei Mate 20

Recover Data from Broken Galaxy S8 or S8 Plus without 3rd Party App

We all know that Samsung is an absolutely massive player in the smartphone space, and that all comes down from up high with the flagship Galaxy S line. The Galaxy S7 and Galaxy S7 Edge might have been two of the best phones of 2017, but the well-documented issues faced by the Galaxy Note 7 have cast a shadow over Samsung’s mobile efforts. And its next flagship was always going to come under intense scrutiny. However, this does not affect the popularity of the Samsung Galaxy S8 and S8+ at all. The Samsung Galaxy S8 and its larger partner the Galaxy S8+, build on the core features and experiences from the Galaxy S7 and bring things into the future with great new design and a few eye-catching features that were all new for 2017.

Galaxy S8 and S8+: The basics

The two phones, which are only differentiated by their screen size and battery capacity, come in at 5.8-inches and 6.2-inches with extra-tall 18.5:9 aspect ratio displays. That battery difference is pretty subtle: 3500mAh for the Galaxy S8+ and 3000mAh for the standard Galaxy S8. You may note that the Galaxy S8+’s battery is actually 100mAh smaller than the Galaxy S7 edge of last year, while the Galaxy S8’s is the same size as the Galaxy S7 despite being a larger phone. They are equipped with Qualcomm Snapdragon 835
or Samsung Exynos 8895 processor and the main camera is a 12 MP shooter with large dual pixels, f/1.7 aperture, optical image stabilization, phase detection autofocus, and an LED flash. Samsung has opted for the rather safe capacities of 3,000 mAh for the Galaxy S8 and 3,500 mAh for the Galaxy S8 Plus.

My Samsung Galaxy S8 Phone is Broken

People can break their Android phones in many ways, from accident dropping, water damaged, screen-cracked, forgotten lock screen password and so on. Although the ways are completely different, they are in consensus at the result: My Samsung phone is broken. So, how to recover data from your broken Samsung Galaxy S8 or S8 Plus?

Recover Photos, contacts, and Notes from Broken Galaxy S8:

To recover photos on S8: If you have backed up Galaxy S8 photos via Google Photos, you can go to the Google Photos website. Sign in with the same email address you used to set up the Galaxy S8 and access all the images and videos that will be uploaded to the cloud.

To recover contacts on S8: If your Google / Gmail account was synced. You can access all your contacts by opening your Gmail account. Click on “Gmail” and select contacts.

To recover notes on S8: If you want to retrieve notes from the broken Galaxy S8, find out the “Compose” > “Notes“. The you can recover notes from broken Samsung Galaxy S8 or S8+.

Recover Data from Broken Galaxy S8 or S8+ via Find my Mobile:

If you have a Samsung account and you already use it on your phone, then you can easily retrieve data from Samsung Galaxy S8/S8+ with Samsung Find my Mobile. We will use Samsung’s Find My Mobile service to remotely unlock your Galaxy S8. After unlocking, you can connect your phone to your computer and copy all the data from your phone to your computer. Below is how:

Go to Samsung Find my Mobile > Find.
Log in using your Samsung Account. If you don’t remember your username or password. please use “forget your ID or password” option to get back your credentials.
Once logged in, select the “Unlock My Device” option to unlock your broken Galaxy S8 remotely.
Once done, connect your Galaxy S8 to your PC and transfer data to your PC using copy/paste or KIES. You can also use the Android Toolkit – Android Data Backup & Restore app to backup all your Samsung data to your PC.

recover-data-from-broken-galaxy-s8

Easily Recover Deleted/Lost Data from Galaxy S8(Photos,Contacts,SMS,WhatsApp, etc.)

If your Samsung Galaxy S8 or S8+ phone is in normal mode, then the data is deleted due to your mistake, accidentally formatted, etc. This U.Fone Android Data Recovery software would be your best pick if you want to recover your deleted or lost data thoroughly and quickly. It enables you to recover multiple kinds of data from Samsung Galaxy S8, like contacts, call logs, messages, photos, videos, audios, Whatsapp, Viber messages, documents, and so on. In addition, it not only works perfectly with Samsung Galaxy S8, but also other types of Samsung phones like Galaxy S9, S7, S6, S5, S4, Note 9, Note 5, Note 4, etc.

Main Feature of U.Fone Android Data Recovery

-Rescue lost, missing, erased, formatted, deleted data from Android phones/tablets.
-Get back photos, contacts, text messages, notes, voice memo, call recordings, videos, audio, call history and much more.
-Retrieve deleted files in different scenarios, such as factory restore, Android OS update, rooting, formatting, device stuck or not responding, bricked, broken screen, black screen, forgotten password, ROM flashing, etc.
-Preview each recoverable files before recovery.
-Safe, secure and 100% read only program.
-Support Samsung Galaxy, HTC, LG, Moto, Google, Sony and other Android phones and tablets.

Choose Android data recovery mode

How to Recover Deleted Photos from Huawei Mate 20(Pro)

[Summary]: Unexpectedly lost/deleted precious photos from Huawei Mate20(Pro)?If you have not backup these pictures, follow the article to learn how to restore deleted photos from Huawei Mate20(Pro).

“I am used to taking pictures with the powerful Leica camera Huawei Mate 20. But one day I found out that the precious photos disappeared in somehow. I guess they may have been deleted along with the junk files. There are too many precious memories in the album, about family and lover. Can anyone help me retrieve deleted photos from Huawei Mate 20?”

If you are an avid fan of photography, you are definitely familiar with the Leica camera. The new brand mobile phone Huawei Mate 20/Mate 20 Pro is equipped with three LeiCa lenses boasts of producing results from professional cameras with an all-around performance equivalent to that of a 16-270mm zoom lens. Obviously, the powerful Leica lens provides excellent camera functionality, and most people would choose Huawei Mate 20 or Mate 20 Pro as a real camera replacement.

We may encounter data loss issues during our use of the device. No need to be surprised, your precious pictures may be lost after your Huawei smart phone is damages or stolen. You may accidentally delete photos from Huawei Mate 20 while cleaning up your phone. Performing a factory reset will cause phone data lost. These situations are very  common, and fortunately, U.Fone Android Data Recovery can help you. It’s as simple as a few steps to recover deleted photos from Huawei Mate 20(Pro) in just a few minutes. Besides, it can also recover lost data due to Android OS upgrade, system crashes, and more. Almost all data types can be recovered such as text messages, music, videos, contacts, audio and other data, all of which can fully meet your needs. This all-in-one data recovery software that can be used for a variety of Android devices, including Samsung Galaxy S9/S8/Note 9, Huawei Mate 20 and Mate 20 Pro, Google, SONY, ZTE, LG, vivo, OPPO, HTC, OnePlus and so on.  Here’s how to restore deleted photos from Huawei Mate 20(Pro) without losing any other contents.

d_win d_mac

Easy Steps to Restore Lost/Deleted Photos With Few Steps

Step 1.Install U.Fone Android Data Recovery

Primarily, pleas download and install the U.Fone Android Data Recovery program on your computer. Launch it and you will gain into program interface shown as 3 function modules:“Android Data Recovery”, “Broken Android Data Recovery” and “Android Data Backup & Restore”.In order you to restore deleted files from Huawei Mate 20(Pro), click the “Android Data Recovery” and go on.

Run android data recovery Software

Step 2.Connect Huawei Mate20(Pro) To PC

Connect your Huawei Mate20(Pro) to PC with USB cable. Wait the moment, then the program will detect your Huawei Mate20(Pro) phone automatically.

Connect huawei mate 20 to PC

Step 3.Enable USB Debugging To Access Data

For your detect the phone, you should open the usb debug. Here you are three options to enable USB Debugging. Select an option which is compatible your phone status.

1) For Android 2.3 or earlier: Enter “Settings” < Click “Applications” < Click “Development” < Check “USB debugging”
2) For Android 3.0 to 4.1: Enter “Settings” < Click “Developer options” < Check “USB debugging”
3) For Android 4.2 or newer: Enter “Settings” < Click “About Phone” < Tap “Build number” for several times until getting a note “You are under developer mode” < Back to “Settings” < Click “Developer options” < Check “USB debugging”

turn on usb debugging

Step 4.Select Data Types

If you just want to recover deleted photos, you just need to select the “Photos”, or if you want to recover other data types, you can also choose those data types or choose “Select All” button for all data types option. And click “Next” to begin the loss/deleted data analyze.

Select Data Types

Step 5.Allow Analyze and Scan Files on Huawei Mate 20 (Pro)

In order you successfully restoration, you need to approve the program to scan your Huawei Mate 20(Pro), then turn back to phone to accept and tap on the “Allow” button to let the program scan your phone.

Pass the Request

The program will automatically start scanning your Huawei phone. The whole process takes a few minutes, please keep the connection stable while the phone and computer are running.

scan Huawei mate 20 for deleted data

Step 6. Preview And Recover Deleted Photos From Huawei Mate20(Pro)

After the scan results come out, the recoverable photos will display in a window of this program, you can preview and select more accurate on these photos before recovery. Simply click “Recover” button to save them on your computer.

recover deleted pictures from huawei mate 20

d_win d_mac

Related Articles

How to Recover Deleted Files from Huawei Mate 20(Pro)

Ways to Restore Deleted Photos/Gallery from Huawei P20

How to Retrieve Deleted/Lost Data on Huawei Mobile Phone

How to Restore Deleted Text Messages from Huawei P20

How to Recover Deleted Data from Android Without Root

Recover Photos from Huawei Mate 20

Samsung Video Recovery: Recover Deleted Video on Galaxy S9/S9+

[Summary]: Unexpectedly deleting videos from Samsung Galaxy S9 without any backup? This article helps you jump out of how to recover deleted videos from the Samsung Galaxy S9/S9+ using Android Data Recovery software.

Accidentally removed videos from Samsung phone?

“When I deleted the images on my Samsung Galaxy S9+ to optimize the phone’s memory, I mistakenly removed some important videos about my son’s birth. They are so precious. Can I recover deleted videos from Samsung Galaxy S9+ which I did not back up in time?”

The outstanding features of the Samsung Galaxy S9 / S9 Plus have won the approval of users. Their dual cameras allowing capturing a sharp picture even in a low light environment. However, the higher quality of photos and videos, the more memory space you need. Sometimes you have to delete many files to release storage space on your Samsung Galaxy S9/S9+, but you may delete some videos by mistake. And it would be very upsetting when those deleted videos are meaningful for you.

Can I get deleted videos back on Galaxy S9/S9+ without backup?

Apple added a feature in the photo app called “Recently Deleted”, similar to the recycle bin on our windows PC or Trash on Mac. All deleted photos and videos are stored here for 30 days. If you don’t restore them to your Camera Roll over this period, your photos and videos will disappear from your device forever. Unfortunately, Android phones do not currently have this feature.

When Samsung Galaxy S9/S9+ videos are deleted, their original spaces are marked as empty and are waiting to be replaced by any new data. Remember, once you find that the data has been lost, stop using your Samsung phone immediately, as long as the original data is not covered by new files, Samsung Video Recovery and Samsung Data Recovery are possible by using the professional Android data recovery program.

U.Fone Android Data Recovery – Perfectly Restore Files from Samsung Memory and SD Card

Apart from accidental deletion, there are also many cases of data loss on Samsung Galaxy S9 / S9 + smartphones, such as root failed, virus attack, Android OS crashed, factory restore, Android OS update failed, forgotten unlock pattern, etc. U.Fone Android Data Recovery is designed to recover deleted data from Android phone internal memory and SD card. Therefore, you can easily retrieve deleted videos on Galaxy S9/S9+ without losing any other contents. Besides, you can retrieve data from all of the above scenarios, including contacts, SMS, pictures, videos, call history, WhatsApp messages, music and documents.

This data recovery software can be used on Windows 10/8.1/8/7/Vista/XP and supports Samsung Galaxy S9, S8, S7, S7 edge, S6 edge, S6, S5, S4, Note 9, Note 8, Note 5, A9, A7, J7, etc. Now get the free trial version by downloading on your computer.

d_win d_mac

Kind Tips: Want to download HD videos from YouTube? 4kFinder Online YouTube Downloader is the ultimate one-click downloader that can easily download YouTube HD videos to MP4 format without quality loss. 4kFinder supports batch download and faster download speed. With its help, you can play YouTube videos offline on any HD media player. Other than YouTube, it also supports Facebook, Twitter, Dailymotion, Bilibili, NicoNico and many other sites.

Easy Steps to Recover Deleted Video from Samsung Galaxy S9/S9+

Step 1. Launch U.Fone Android Data Recovery

Install and launch the U.Fone Android Data Recovery program on your computer after downloading. The main window will pop up as below, you need to enter the “Android Data Recovery” mode.

Run the samsung video recovery Software

Step 2. Connect Galaxy S9/S9+ to PC

Then you need to connect your Galaxy S9/S9+ to the computer via a USB cable. Make sure USB debugging is enabled on your Samsung phone.

Connect Samsung Galaxy S9/S9+ to PC

Step 3. Select Data Types

Select what kind of files you want to scan for recovery, such as Contacts, Messages, Messages Attachments, Call Logs, WhatsApp, WhatsApp Attachments, Gallery, Pictures Library, Videos, Audio, Documents. In this case, choose “Videos” and click on “Next”.

Select Data Types

Step 4. Scan Galaxy S9 Videos

This may take a few minutes to thoroughly scan the selected files on the Samsung Galaxy S9 device. Later, tap “Allow” on your Galaxy S9 when the pop-up asks you to remember the request forever. If not, click “Retry” and try again in the lower right corner. The program will then automatically scan your Galaxy S9 or S9+.

Pass the Request

Step 5. (Optional) Deeply Scan Your Phone

To deep scan and find the deleted files, you need to root your Samsung Galaxy S9 or S9+ device before recovering. Please be free to do it as U.Fone Android Data Recovery can easily get your Samsung phone rooted without any data loss by clicking the “Advanced Root” button at the lower right corner of the window. All you have to do is following the prompts.

Root for deep scanning

Step 5. Preview and Recover Deleted Videos on Galaxy S9/S9+

When the scan is terminated, you can preview the files in the scan results. Preview and select the desired items you want to recover – “Videos” then simply click on “Recover” button to recover deleted Samsung Galaxy S9 videos on your computer.

recover deleted videos on galaxy s9/s9+

d_win d_mac

Alternative: Restore Deleted Videos on Galaxy S9 without PC(Google Photos)

This solution will help you recover deleted videos from Samsung Galaxy S9 and Galaxy S9+ without a computer. The condition for determining if it works is that you have enabled back up & sync ON before the video is deleted. Furthermore, Google Photos only keeps deleted videos for 60 days, and the videos are recoverable before they expire. The following is how to do:

Step 1. Find Deleted Videos on Google Photos App

Go to “Google Photos” app on your Samsung Galaxy S9, tap on “Menu” on the top left > “Trash“.

Step 2. Restore Deleted Videos

Select the videos that you want to recover and then hit “Restore” at the bottom. Now the deleted videos will be back. You can back to “Photos” app on your Samsung phone, go to “Albums” to check the deleted videos.

restore-videos-from-google-photos

Tip: How to Avoid Deleting Videos on Samsung Android

Tip 1. You need to develop a habit of regularly backing up your data. Backing up important videos to your PC, external SD card, hard drive or cloud backup, such as Google Drive, Dropbox, etc. is the best way to prevent video loss.
Tip 2. When you delete any video on your device to clean your phone’s memory, please double check it.
Tip 3. Install a reliable anti-virus application on your Samsung device to avoid virus attacks that could damage your videos.

Related Articles

How to Recover Deleted Contacts from Samsung Galaxy S9/S9+

Restore Disappeared Photos/Gallery on Samsung Galaxy S9/S9 +

[Fixed]Data Recovery on Samsung Galaxy with Broken Screen

Ways to Recover Deleted Videos/Photos from Galaxy S8/S8 +

Recover/Restore Deleted Video Files from Broken Samsung

How to Recover Deleted Data from Android Without Root

Galaxy S9/S9+ Video Recovery

Samsung Galaxy S8/S8+ Data Recovery: Retrieve Deleted Files from Galaxy S8/S8+

[Summary]: Accident lost or deleted data on your Samsung Galaxy S8/S8+? Here you can find the best Samsung Galaxy S8/S8+ data recovery method to recover lost photos/pictures, videos, contacts, SMS, WhatsApp data back.

The Galaxy S9, Galaxy S9+ Galaxy S8 and Galaxy S8+ have finally arrived, and they might just be the finest phones available. Samsung’s decided to stick curved edges on both phones, making the ‘Edge’ label redundant. Thus, the S8+ is the replacement for the former S7 Edge. The iris scanner from the Galaxy Note series has finally made its way onto the Galaxy S range, the normal Galaxy S8 has a 5.8-inch display, while the S8+ gets a huge 6.2-inch screen. Both phones have the same 1440 x 2960 resolution Super AMOLED panel, and they look fantastic. Although the Galaxy S9/S9+ have finally arrived, there are still many users using Samsung Galaxy S8 or S8+ for it’s powerful features and cost-effective.

Causes of Data Loss on Samsung Galaxy S8/S8+

Samsung phone base on Android OS, for different reasons, you may lose data or accidentally delete data on Samsung Galaxy S8/S8+. Below are some common situations or scenarios that lead to data loss on Samsung Galaxy S8/S8+ smart phone:

Accidental deletion – Sometime, you may deleted photos, videos, contacts or text messages on your Samsung Galaxy S8/S8+, this is one of the major causes Samsung Galaxy S8 data loss;
Factory reset – After reset your Galaxy S8/S8+ to factory, it will erase/wipe all settings and data on your Galaxy S8/S8+;
Root Failed – If you root your Android phone, it will make you lose your data from Samsung Galaxy S8/S8+;
Virus attack – Phone dead or black screen for virus attack, the virus attack cause data on lose on your Samsung Galaxy S8/S8+;
Data Transfer – While transferring data between Samsung Galaxy S8/S8+ and computer or moving files between other phone and Galaxy S8. Interruption computer shutdown, phone shutdown and so on.
Android OS Crashed – Due to the system crash and cause your Samsung Galaxy S8 stuck in black-screen, download mode, boot screen(Samsung logo screen)….

If you encounter the above situation cause losing data on your Samsung Galaxy S8/S8+, don’t worry, you still have chance to recover lost or deleted data from Galaxy S8/S8+, what you need is a powerful Samsung Galaxy S8/S8+ data recovery, which can help you directly recover lost or deleted data including text messages, contacts, gallery/photos/pictures, videos, WhatsApp messages, call history and so on.

An Effective Samsung Galaxy S8/S8+ Data Recovery Software

Need an effective and powerful Samsung Galaxy S8/S8+ Data Recovery software?
U.Fone Android Data Recovery is a very helpful third-party Samsung data recovery tool that can help to retrieve the deleted or lost files from Samsung Galaxy S9, S8, S7, S7 Edge, S6, S5, S4, S3, Note 9, Note 8, Note 7, Note 4, Note 3, Galaxy A9/A7/A5, etc. If you lost or deleted files on Galaxy S8, please download and install this Samsung Galaxy S8 data recovery program on your computer, then deep scan your devices and recover contacts, text messages, call history, photos, videos, music, documents and WhatsApp chat history from Galaxy S8 or S8 Plus directly.

This Samsung Galaxy S8/S8+ data recovery software available on Windows and Mac, and it is very easy to use, you can easily retrieved your Android data at home.

d_win d_mac

Part 1: How to Recover Deleted Files on Samsung Galaxy S8/S8 Plus

This guide teach you how to recover deleted photos from Galaxy S8 in Windows computer by U.Fone Android Data Recovery, you can also download the Mac version to recover your Samsung Galaxy S8/S8+ lost data on Mac

Please click the above download button to download the program. After launching the Android data recovery on the computer, select “Android Data Recovery” function.

Run the Samsung Galaxy S8/S8+ Data Recovery Software

Step 1. Connect Samsung S8 to PC via USB Cable
After enter the data recovery function, please plug your Samsung Galaxy S8 into PC via the matching USB cable.

Connect Samsung Galaxy S8/S8+ to PC

Step 2. Select File Types You Want to Recover
Now, you can see all the data types from your device would be displayed on the interface of the program. Please choose the file types including WhatsApp messages, contacts, text messages, photos, videos, documents and then click on the “Next” button.

Select Data Types

Step 3. Allow the Program to Scan Device
Please go to your Samsung device and allow the program to analyze it. Then the program would automatically scan your smartphone.

Pass the Request

Step 4. Gain Root Permission for Deep Scanning (Option)
The program will check the device information and perform a basic scan of the device. If it can’t find the files you need and want to deep scan your phone for all deleted/lost data, it’s suggested that you root the phone to access to the full Android system. (You can unroot the device after the recovery task.)
To do so, click the Advanced Root button at the lower right position. At this point, you will be taken to an external website to download a free Android rooting tool — KingoRoot to root the device.
[Also Read: How to Safely Root and Unroot an Android Device with KingoRoot ]

Root for deep scanning

After you’re rooted, the Android Data Recovery software will begin running a deep scan of your Samsung Galaxy S8 phone’s memory and SD card to search for the deleted Stuff. Please be patient.

Step 5. Preview and Recover Deleted Files from Samsung Galaxy S8
Please choose the data categories (Contacts, SMS, Pictures, Videos, Audio, Call History, Documents, WhatsApp Chat History, etc.) and preview the contained files in details. Mark those you want to get back and click “Recover” to export the data to computer.

Recover deleted files on Galaxy S8/S8+

Above simple steps, it is very easy to recover lost data from Galaxy S8 with the Android Data Recovery program, you can also follow the same steps to recover deleted or lost files from Galaxy S9/S9+/Note 9 directly. So why not have a try yourself?

d_win d_mac

Tips: After getting all your lost photos/pictures, videos, contact, SM back and save onto the computer, you can use this Android Transfer tool to import all retrieved files from computer to Samsung Galaxy S8/S8+ and other Android devices.

Part 2: Backup and Restore Samsung Galaxy S8 / S8+ via Google Account

To avoiding your Android data lost or deleted again, we recommend you use backup your Android data to computer regularly, there are many third-party Android backup app like U.Fone Android Data Backup & Restore, Android Manager, Samsung Kies and free cloud backup service like Google Cloud (or G Cloud Backup for Android ).

Google company also provides cloud backup service, which is an Android’s online file storage, you can back up your contacts, calendar data, app data, chrome data, documents, and Drive contents from Android phone to Google’s cloud online backup servers from within the “Settings” app, below is the step-by-step guide on how to backup and restore Samsung Galaxy S8/S8+ by using Google cloud backup services.

Step 1. From a Home screen, touch and swipe up or down to display all apps.
Note These instructions apply to Standard mode only.
Step 2. From a Home screen, navigate:Settings apps_settings_icon > Accounts accounts_icon > Backup and restore.
Step 3. Tap the Back up my data switch to turn on switch_on_icon or off switch_off_icon.
Step 4. With Back up my data turned on, tap Backup account.
Step 5. Tap the appropriate account.
Step 6. Tap Automatic restore switch to turn on switch_on_icon or off switch_off_icon.

Tips: If you want to backup photos and videos to Google cloud, you can backup your Samsung S8 photos and videos via “Google Photos” app.

Read related guide: Backup & Restore Samsung Galaxy S8/S8+ by Samsung Kies
backup samsung s8 photos to pc directly

Related Articles

Recover Data Contacts/Photos/SMS from Broken Galaxy S6

How to Recover Deleted Photos on Samsung Galaxy S8/S8 +

[Fixed]Data Recovery on Samsung Galaxy with Broken Screen

How to Recover Deleted Call Logs from Samsung Galaxy S8(Plus)

How to Recover Lost Data from Locked Samsung Phone

Recover Deleted WhatsApp Messages from Samsung Galaxy S8/S8+

Samsung Galaxy S8 Data Recovery

How to Recover Deleted Files from Huawei Mate 20(Pro)

[Summary]: Lost contacts, text messages, pictures, music, videos or call logs from Huawei Mate 20/Huawei Mate 20 Pro by accident? Check this page and find the best Huawei Mate 20 data recovery solution.

“My son was playing games on my new Huawei Mate 20 Pro phone, but he erased my contact in business accidentally.I try my best and search everywhere in my phone but empty and nothing inside. Can you help me to recover deleted contacts from Huawei Mate 20 Pro?” – Asked by Jack

“I am used to cleaning my Huawei Mate 20 with Android Data Eraser software to ensure that my phone has enough phone memory space to use. But sadly, I accidentally deleted the call history I forgot to save. Now I urgently need to recover deleted call logs without backup. What can I do?” Asked from Duncan.

When you encounter Huawei Mate 20 (Pro) data / files loss, you will not be a lonely one. Generally, data loss occurs on Android phones including Huawei phones when encountering the following conditions, such as error deletion, accidental formatting, water damaged, malware attacked, factory reset, phone stolen or broken. Regardless of which of these reasons, we need to know the fact that phone data loss is not a horrible thing and they are recoverable, as long as you use the trusted Android data recovery software.

As a professional Huawei data recovery software, U.Fone Android Data Recovery is a complete tool to restore all erased data from Huawei Mate 20 / Mate 20 Pro phones. Recoverable data types are varied, respectively, photos, pictures, videos, contacts, text messages, audio, WhatsApp messages, etc. This software is good at recovering data lost due to accidental deletion, rooting, upgrade, system crash, forgotten password, SD card problem, etc. With its powerful compatibility, it is suitable for almost all Android smartphones, including the latest Huawei Mate 20, Huawei Mate 20 Pro, Samsung Galaxy S9/Note 9 and so on. More importantly, the operation of the software is simple, you only need a few simple steps to complete the data recovery process. Therefore, the software is very practical and trustworthy. First of all, free download the U.Fone Android Data Recovery software on your computer and follow the step guide to retrieve deleted files on Huawei Mate 20 phone.

d_win d_mac

How to Recover Wiped Out Data from Huawei Mate 20

Step 1. Launch U.Fone Android Data Recovery

Launch U.Fone Android Data Recovery on your Windows PC or Mac after downloading and installing. You will gain into program interface shown as 3 function modules: “Android Data Recovery”, “Broken Android Data Recovery” and “Android Data Backup & Restore”. In order you to restore deleted flies from Huawei Mate 20(Pro), click the “Android Data Recovery” and go on.

Choose Android data recovery mode

Step 2. Connect Huawei Mate20(Pro) to PC

Connect your Huawei Mate20(Pro) to PC with USB cable. Wait the moment, then the program will detect your Huawei Mate20(Pro) phone automatically.

connect LG phone to PC

Step 3. Enable USB Debugging to Access Data

You should open the USB debug for detecting your device successfully. Here you are three options to enable USB Debugging on your Android device. Select an option which is compatible your phone status.

1) For Android 2.3 or earlier: Enter “Settings” < Click “Applications” < Click “Development” < Check “USB debugging”
2) For Android 3.0 to 4.1: Enter “Settings” < Click “Developer options” < Check “USB debugging”
3) For Android 4.2 or newer: Enter “Settings” < Click “About Phone” < Tap “Build number” for several times until getting a note “You are under developer mode” < Back to “Settings” < Click “Developer options” < Check “USB debugging”

enable USB debugging on Android

Step 4. Select Deleted Flies Types You Need

If you want saving time during recovery process , you can choose the data types which only you need.  Or you can select all types to scan and recover. And click “Next” to begin scanning your deleted files.

select LG phone's data to recover

Step 5. Scan and Analyze Phone Data

There might be a Superuser authorization appearing on your Huawei Mate 20 during the scan. If you get it, click “Allow” to continue. If not, just skip this step.

allow scan LG Android phone

The tool will now scan your Huawei phone to recover lost/deleted data. This process may take few minutes of time. Just wait for scanning process to get complete.

scan data from android

Step 6. Preview and Recover Deleted Flies from Huawei Mate20(Pro)

After a moment, the result of lost/deleted flies will display in the list on the left. Additionally, all the flies shown as the window allow you preview before recovery, such as contacts, photos, videos, text messages, call logs, etc. Confirm the data you want to restore from Huawei Mate 20(Pro) and click “Recover” button to save them on your computer.

recover lost data from Android

d_win d_mac

Related Articles

How to Retrieve Deleted/Lost Data on Huawei Mobile Phone

How to Recover Deleted/Lost Data from Huawei P20

How to Transfer WhatsApp from iPhone to Huawei Mate 20

How to Restore Deleted Data from Huawei Mate RS

How to Restore Deleted Call Logs from Huawei Mate 9/10

Ways to Restore Deleted Photos/Gallery from Huawei P20

Huawei Mate 20(Pro) Recovery

Transfer Contacts, SMS, Music from Old Huawei to Huawei Mate 20(Pro)

[Summary]: Are you looking a method to transfer significant data from old Huawei to new Mate 20(Pro)?This article will teach you how to move contacts, SMS, music data from old Huawei to Huawei Mate 20 without loss.

“I have beed a loyal fan of Huawei phone product for years, the Huawei Company was released the newest model Huawei Mate 20/Mate 20 Pro.The amazing configuration of these phone attracted me. I plan to replace my old Huawei mobile phone with a new Huawei Mate 20 Pro. However, if I complete the switch, how can I easily sync contacts, SMS, music and other data from old Huawei phone to Huawei Mate 20 Pro?”

As we all know, Huawei Mate 20 and Mate 20 Pro are equipped with outstanding features like Nice looking phones,Triple camera, Kirin 980 and Dual NPU, Speedy face unlock and in-display fingerprint sensor, Fast and reverse charging, etc. These features can appeal to many customers around the world, no matter which Huawei Mate model choose as a replacement. However, you should consider how to sync the data from the old Huawei mobile phone to the new Huawei Mate 20 mobile phone.

For example, you will not want to re-type contacts into the new Huawei Mate 20(Pro) by viewing the contacts in the old Huawei phone. Or other way, your music collection isn’t worth to pay again which pay for download from internet. Here we’ll introduce a quick method to move major data from old Huawei to Huawei Mate 20/Mate 20 Pro, including contacts, SMS, calendar, photos, videos, call logs, music, apps, etc.

Your Huawei Phone Transfer Toolkit – Phone Switch

Regarded as a professional Android data transfer tool, Phone Switch is fully capable of transferring data from HUAWEI to HUAWEI Mate 20 without any trouble.It allows move data between devices with different operating systems, i.e iOS to Android. Various data types for transfer such as contacts, text messages, photos, videos, music and many other file types. The easy transfer process takes only 3 steps. If you want to copy backup of iPhone iTunes/iCould to Huawei Mate 20(Pro), Similarly, this Phone Switch Toolkit can help you. Now free download the trial version on your computer first then follow the steps guide to sync old Huawei data to Huawei Mate 20(Pro).

d_win d_mac

How to Copy Data from Huawei to Huawei Mate 20(Pro)

Step 1. Install Phone Switch Software

You should download, install and run Phone Switch software on your computer. At this point, you can see that the program has 8 functions, select and click “Switch” module, then go on next.

iPhone to huawei mate 20 transfer

Step 2. Connect Both old Huawei and Huawei Mate 20 Phones

Now, you need to connect your old Huawei phone and Huawei Mate 20(Pro) to your computer, so you need to prepare two USB lines. Next, your old Huawei phone should be shown on the left, Huawei Mate 20(Pro) should be displayed on the right. You can click on “Flip” to adjust the position.

connect huawei phones to pc

Step 3. Transfer Contacts, SMS, Music from Huawei to Mate 20

This section, if you want sync Contacts, SMS, Music or other files like text messages, photos, videos, call logs, documents, and more, you should select data types on the middle of the window. And then click “Start Transfer”, the program starts syncing data from old Huawei to Huawei Mate 20 quickly and safely that without no losing. A few minutes later, you can preview your Contact, SMS ,Music on your new Huawei Mate 20(Pro) mobile phone.

huawei to huawei mate 20 transfer

d_win d_mac

Related Articles

Transfer Data from Android to Huawei Mate 20(Pro/X/RS)

Transfer Data from iPhone to Huawei Mate 20/Mate 20 Pro/X

How to Transfer Data from Samsung to Huawei P20/Mate 20(Pro)

Transfer Contacts & SMS from Samsung to Huawei Mate 20(Pro)

How to Transfer Photos, Videos, Music from iPhone to Huawei Mate 20

Transfer Data from Huawei to Mate 20

How to Transfer Contacts & SMS from Samsung to Huawei Mate 20(Pro)

[Summary]: Follow the tutorial below and you can find out the solution to transfer contacts and text messages from Samsung Galaxy S4/S5/S6/S7/S8/Note to the latest HUawei Mate 20 or Mate 20 Pro without any effort.

If you are using a Samsung smartphone, such as Galaxy S9, S8, S7, S6, S5, Note 9, Note 8, Note 5, Note 4, but you plan to switch to the best  Android phone as an alternative. So what is one of the best Android phones in 2018?

Huawei released the Huawei Mate 20 RS Porsche design, Huawei Mate 20 X, Huawei Mate 20 and Huawei Mate 20 Pro on October 16, 2018. Huawei Mate 20 is equipped with a 6.53-inch LCD and Mate 20 Pro is equipped with 6.39-inch OLED. Both of them come with a Kirin 980 processor and a large battery for long-term usage, supporting for screen fingerprinting and 3D structured glossy recognition. For these excellent parameters, would you like to choose Huawei Mate 20/Mate 20 Pro to replace your old Samsung phone? Obviously, many Samsung Galaxy users have made this choice. Contacts and text messages are one of the most important data on your mobile phone, you may not want to abandon these precious data. But how do you transfer Samsung contacts and text messages to Huawei Mate 20 / Mate 20 Pro when you get this new phone?

To sync all data from the old Samsung to Huawei Mate 20/Mate 20 Pro, what you need is just the Phone Switch which can sync your Samsung files to Huawei Android phone, such as Contacts, SMS, Music, Photos, Videos, Call logs, Calendars, Apps and App data and so on.  Transferring contacts and SMS from Samsung to Huawei Mate 20 is only a three-step process. Besides, this Phone Switch software can also be used to copy data from iOS/Android to Android/iOS, iOS to iOS, Android to Android.

Key features:

Data transfer between Android and Android, iPhone and Android, iTunes backup/iCloud backup to Android or iPhone.
Compatible with Android 2.1 to 9.0 (or higher), iOS 5 to 12 (or higher).
Support all data such as contacts, text messages, call logs, calendars, photos, music, videos, etc.
100% complete transfer, no loss or damage.
Absolutely secure transmission, no virus or privacy leaks.

d_win d_mac

Guide: Transfer Data From Samsung to Huawei Mate 20 with Three Steps

Step 1.Run Phone Switch on PC

Install Phone Switch and launch it on computer.You will see different modules on the maintenance, choose “Switch” modules to get start.

iPhone to huawei mate 20 transfer

Step 2.Connect Samsung and Huawei Mate 20 on PC

Next, connect your Samsung phone and Huawei Mate 20 devices with 2 USB cables. They will be detected right now by the software. If you want to sync Samsung files to Huawei mobile phone, please make sure your old Samsung device is detected as Source phone displayed on the left side while your new Huawei phone is shown as Destination phone on the right side. You can use the “Flip” button to exchange their position.

connect samsung and huawei mate 20 to pc

Tips: If you want to empty your destination phone, you can select “clear data before copy” option.

Step 3.Transfer Contacts, SMS from Samsung to Huawei Mate 20/Mate 20 Pro

In this section, you will see contacts, text messages, photos, videos, music, call logs, documents, and more displayed in the middle of the window. Choose the Contacts, SMS file types or other you need to transfer, and you would need to click “Start Transfer” button. In order to transfer successfully, please don’t disconnect both the Samsung and Huawei devices.Just wait for a moment to complete the transmission and verify the data later.

samsung to huawei mate 20 transfer

d_win d_mac

Read More

Transfer Data from Android to Huawei Mate 20(Pro/X/RS)

Transfer Data from iPhone to Huawei Mate 20/Mate 20 Pro/X

How to Transfer WhatsApp from iPhone to Huawei Mate 20

Transfer Contacts & SMS from Samsung to Galaxy Note 9

How to Move Text Messages from Samsung to Huawei Mate 10(Pro)

Copy Samsung Contacts & SMS to Mate 20

How to Fix “iOS 12 Recently Deleted Photos” Problem

[Summary]: Did your iPhone photos missing on “Recently Deleted” folder after iOS 12 update? This article will show you how to fix iOS 12 recently deleted photos not showing issues and how to get your disappeared photos back on iPhone after iOS 12 update.

CONTENTS

I just noticed that my photo album for Recently Deleted is missing after the iOS 12 upgrade. Any ideas? I have an iPhone 8.

After update my iPhone X to iOS 12.1.1, I found all of my photo albums disappeared, is it the iOS 12 upgrading process erase my photos? I haven’t backup my iPhone to iTunes before install iOS 12.1.1, is it possible to recover deleted photos from iOS 12 device?

Lost iPhone/iPad photos after iOS 12.1.1/12 update? All of your photos disappeared on “Recently Deleted Album” folder after iOS 12 update? Don’t worry, this page will teach you how to fix “ios 12 recently deleted photos missing” problem, you can also learn how to fix photos not showing up on iPhone after the iOS 12 update.

Way 1: Check “Recently Deleted Album” in iOS 12

Apple introduced the “Recently Deleted Album” in iOS 9/iOS 10/iOS 11/iOS 12 for users move the recently deleted photos, videos to this Recent Deleted Folder, users can keeps those deleted photos & videos of last 30 days. Normally if you have deleted the photos on iPhone by careless, you can easily to restore them in this “Recently Deleted Album”. If you lost photos after update to iOS 12, you better check your recent deleted folder and if you found all your photos there, just restore it in “Recently Deleted Album”.

Simple Steps to recover photos disappeared in “Recently Deleted Album” after iOS 12 update:

Step 1. First unlock you Phone and launch the Photos app from the Home screen.

Step 2.Tap on Albums and scroll down till you find the “Recently Deleted Album”.

Step 3. If your find the photos you want, just tap “Select” to select the photos and then tap on “Recover” option. You will find your missing photos in the Album.

recover recently deleted photos on iOS 12

Way 2: Enable iCloud Photos Settings

Enabling Apple’s iCloud Photo Library can help us to privately store photos and video online, we can syncs all the photos to iCloud across all the device log-in with same iCloud account. Apple’s iCloud Photo Library service lets you do all that while keeping your storage space free to take even more beautiful 4K video and HDR photographs. But if there is problem during iCloud syncing then you might think all the photos got missing only after the iOS 12 update. Let’s teach you how to recover lost photos from iCloud backups after iOS 12 update:

1. Open settings of your iPhone >> iCloud >> Photos >> Confirm that iCloud Photos Library is turned on.

2. You can even turn it off and after few second again turn it on to ensure that it is working fine.

Enable iCloud Photos Settings

You can even log out and again log in to iCloud account to make sure that there is not any problem with iCloud account and syncing.

1. Just go to settings of your iPhone >> tap on iTunes & App Store.

2. Tap on Apple ID >> Tap on Sign Out.

Enable iCloud Photos Settings

3.Now again sign in to iCloud account entering your Apple ID and Password.

Way 3: Force Restart iOS 12 Devices to Fix “iOS 12 Update Deleted Photos” Issues

If photos missing after iOS 12 update then try force restart your iPhone, because restarting the Phone can fix many issue of your phone. Let’s teach you how to force restart iPhone 8/X/XS Max/XR, iPhone 7/7 Plus, iPhone 6S/6/6 Plus and older models.

For iPhone 8/X/XS Max/XR:

1. Press Volume up and down button along with Power button for few seconds until you don’t see Apple logo.
2. You iPhone will now reboot and see if this fixes you issue or not.

For iPhone 7/7 Plus:

1.Press and hold sleep/wake and volume down button for at least 10 seconds until you see Apple logo.

For iPhone 6S/6 and older models:

1.Press and hold sleep/wake or power button and home button of your iPhone for at least 10 seconds until you see the Apple logo.

force restart iphone ios 12

Way 4: Recover Erased and Deleted Photos Not Only from “Recently Deleted” Folder

If you can’t find the missing photos in “Recently Deleted” Folder, you can use a third-party professional iPhone Photo Recovery to directly recover erased/deleted photos from iPhone after iOS 12 upgrading.

The way that the deleted photos is completely gone is when the space it resided is overwritten by the newly generated files, like any task of downloading media files and install software. So we still have chance to recover deleted and lost photos from iPhone built-in storage memory, what you need is a professional iPhone Data Recovery software. In additional, before recovering deleted files back, please don’t add any files to the phone, otherwise, the deleted data maybe overwritten and you can not get them back forever.

Fix Photos Disappeared from iPhone after iOS 12 Update

U.Fone iPhone Photo Recovery is designed to recover deleted photos, videos and more from iPhone with iOS 12, iOS 11, iOS 10 and older OS version. The iPhone data recovery provides you three ways to recover lost photos from iPhone after iOS 12/12.1 update: directly scan and recover lost/disappeared photos from iPhone, restore iPhone lost photos from iTunes backup and retrieve iPhone missing pictures from iCloud backup. What’s more, the iPhone data recovery supports recover more than 20 files types like WhatsApp, SMS, contacts, photos, videos etc. before they’re been overwritten.

Key Features of U.Fone iPhone Data Recovery:

For free trial version:
– You can recover missing photos without backup.
– You can recover deleted photos selectively or fully.
– You can view the all backed photos in iTunes/iCloud backup before recovering.
For full version:
– You can recover deleted and lost photos without restoring.
– You can recover missing pictures without affecting current data on device.
– Recover up to 18+ types of data including contacts, messages, videos, voice memos, notes, WhatsApp messages and many more.
– Works well with iPhone 8 and iPhone X/XS/XS Max/XR and iOS versions including iOS 12.1/12/11.4/11.3.

d_win d_mac

Recover Lost Photos from iPhone iPad After iOS 12 Update [without Backup]

Tested phone: iPhone X

Operating System: iOS 12

Step 1. Download and Launch iPhone Data Recovery
Click the above download button to download U.Fone iPhone Data Recovery for Windows or Mac, then install and launch it on your PC or Mac computer. Click “iPhone Data Recovery” function.

launch u.fone iPhone data recovery

Step 2. Connect iPhone X to computer
If you want to directly scan and recover lost photos from iPhone without backups, please choose “Recover from iOS Device” mode on the left side of the interface, and then use a USB cable to connect your iPhone to the computer.

connect iPhone X to computer

Step 3. Select Photos to Scan
In this step, you see the program support recover iPhone photos, videos, contacts, text messages and more, if you want to save time to get back your missing pictures, please just select “Camera Roll” category (or “Photo Library”, “Photo Stream”, “App Photos” category) under “Media” section from the left pane, and then go to next step.

select photos to recover

Step 4. Scan Lost Data from iPhone
At this stage, click the Start Scan button at the lower place to begin a deep scan of your iPhone. Just wait while the software scans your iPhone’s memory for stuff and you can track the progress of the scan in the window.

scan iPhone lost photos

Step 5. Preview and Recover Lost Photos from iPhone X(iOS 12)
When the scan completes, the program brings up an intuitive overview of all types of files. And multiple categories listed on the left side guide you to locate the exact files quickly.
Then, please click the “Photos” item to view the scanned pictures, just select one or more photos you need, and press the “Recover” button at the lower right corner, the program will help you recover your iPhone lost photos and save them onto the computer.

Retrieving Deleted iPhone Photos without Backup

Finally, hit the “Recover” button in the pop-up window to initiate the iPhone photos recovering process. This may take some time depending on how many pictures you’ve selected and the power of your computer.

Retrieving Deleted iPhone Photos without Backup

Once finished, open the destination folder on your computer and check up the retrieved pictures.

d_win d_mac

If you want to put the recovered photos from PC to your iPhone, please use this MobileSync tool, which allows you transfer contacts, photos, videos and music from PC to iPhone/iPad/iPod devices easily.

Above is the complete tutorial to fix “iOS 12 recently deleted photos” issues and recover disappeared photos from iPhone after iOS 12 upgrading. If you think this tutorial is helpful, please share this page to your Facebook or Google+ for those people who need help.


iOS Data Recovery

Recover Your iPhone iPad Lost Data
Now, Even without Backups

Compatible with iOS 12 & iPhone XS(Max)

Recover Lost Data Now

Recover Lost Photos iOS 12 Update