All posts by DHZ

How to Recover Lost and Deleted Text Messages from Samsung Galaxy Fold

[Summary]: How to recover deleted text messages from Samsung Galaxy Fold could be simply tackled with by using U.Fone Android Data Recovery. It becomes convenient for users to recover deleted SMS and other files like pictures, contacts, videos, audio, apps, etc. with this tool.

Samsung’s new Galaxy Fold smartphone was released on February 20, 2019 in San Francisco, California, USA. Multi-tasking is a big focus of this device, and Samsung demonstrated the device’s ability to maintain continuity within an app as you switch between displays, as well as its ability to run three apps on the larger screen simultaneously. Essentially, the presence of multi-active apps is made possible by the Snapdragon 855 processor, the generous 12GB of RAM and the cutting edge 512GB UFS 3.0 storage medium. It brings the multi-functionality of a conventional tablet into the pocketable, portable form factor of a smartphone.

“I accidentally erased a few text conversations on my Samsung Galaxy Fold and how do I have lost messages back to my phone again? I would be grateful if someone could help me out.”

Reasons for the Lost/Deleted SMS on Samsung Galaxy Fold

Accidentally deletion – You might delete SMS by mistake or accidentally which result in permanently deletion of SMS.

factory Reset – If you have performed a factory reset on your phone then it will delete all the data from phone memory including text messages as well.

Rooting – If you have root your Samsung phone then you will definitely lose the SMS from it.

Other reasons such as virus infection, up-gradation of OS, etc. may lead to your SMS loss.

So, the above mentioned reasons are the common through which you may lose text messages from your Samsung Galaxy Fold, Samsung Galaxy S10 and S10 Plus. However, you can restore deleted or lost text messages by the use of U.Fone Android Data Recovery tool.

Tool You’ll Need to Restore SMS on Samsung Galaxy Fold

U.Fone Android Data Recovery helps you to recover deleted text messages on Samsung Galaxy Fold in no time at all. It is the best option for us when we lost a valuable SMS and have no backup for it at all. Actually, it is also a great utility to restore other data files (photos, sms, call logs, audio, video, documents, etc) from your Samsung Galaxy Fold, Samsung Galaxy S10/S10 Plus/S9/Note 9/S8/S7/S6 as well.

If in case you do not have the backup, then it can be recovered with the help of U.Fone Android Data Recovery tool. This tool is also proficient in:

Rescuing deleted, lost, or hidden data from all types of Android devices.
Recover deleted/lost contacts, text messages, call logs, whatsapp messages, photos, videos, audio files.
Get back Samsung data from Internal Memory and SD Card.
Recover data from every Android brands including Samsung, HTC, LG, Sony, Motorola, Google and other.
Preview scanned files before recovery.
Easy, safe and you are only a few clicks away from recovering your Samsung phone.

d_win d_mac

Note – When deletion occurs, stop using your Samsung phone as adding new data will overwrite the existing data and hence you will lose the chance to recover your deleted text messages.

Steps to Retrieve Deleted SMS from Samsung Galaxy Fold

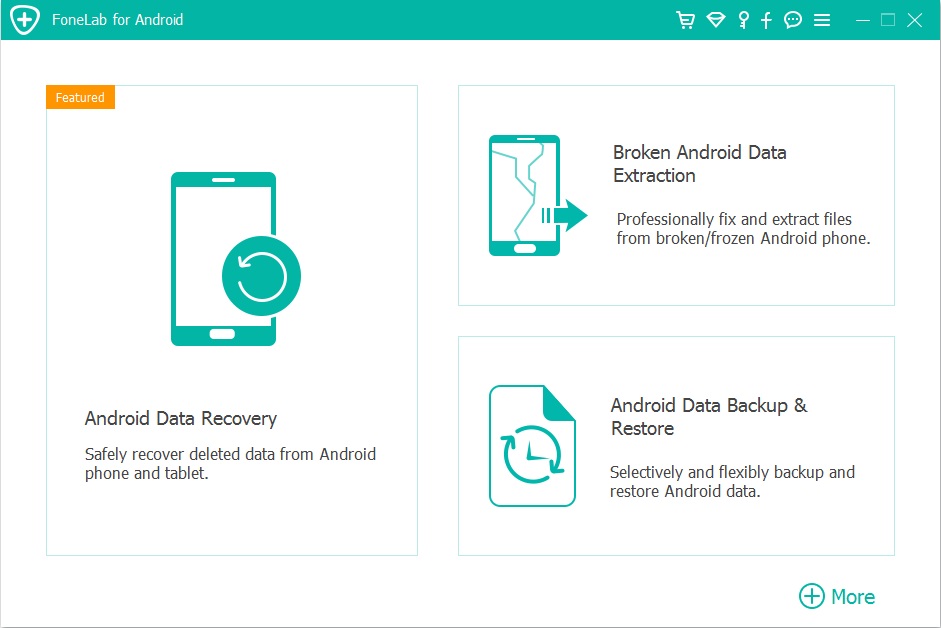
Step 1. Install U.Fone Android Data Recovery

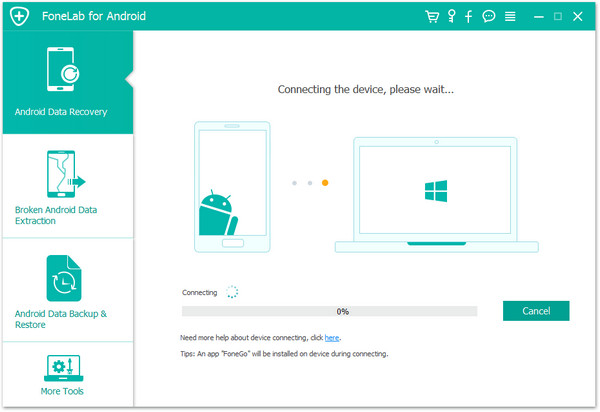
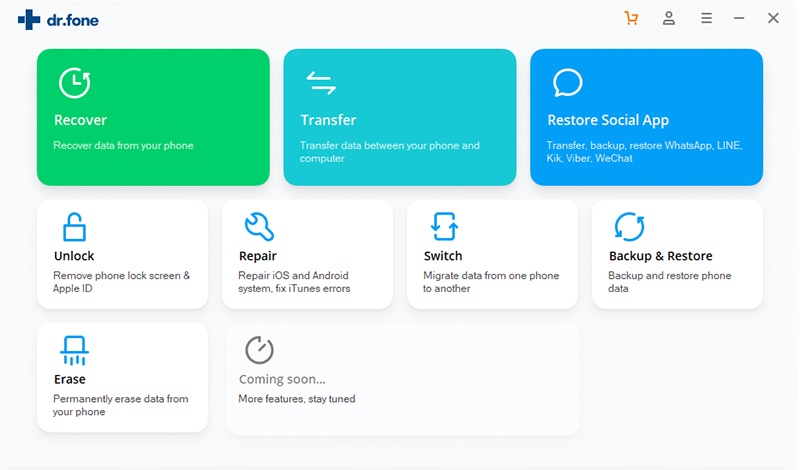
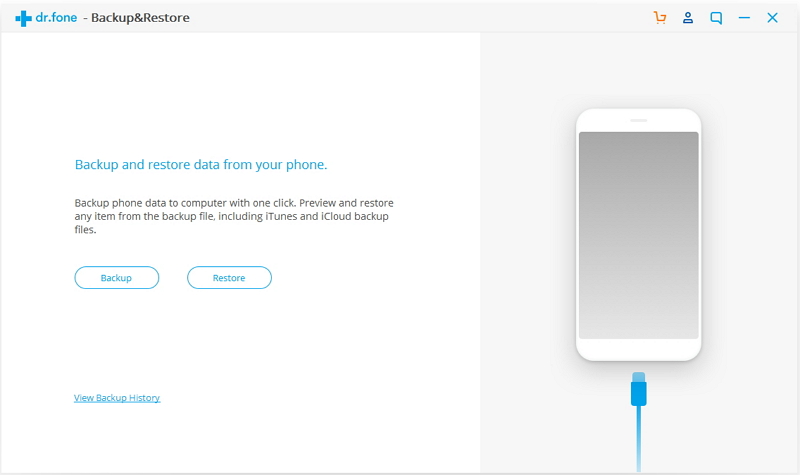
Install and launch the U.Fone Android Data Recovery on the computer first and you’ll be presented with an intuitive interface. Among the three options on it, choose “Android Data Recovery” to get into next window.

launch U.Fone Android data recovery

Next, connect your Samsung phone to computer and set it to USB debugging mode.

enable USB debugging on Samsung Galaxy Fold

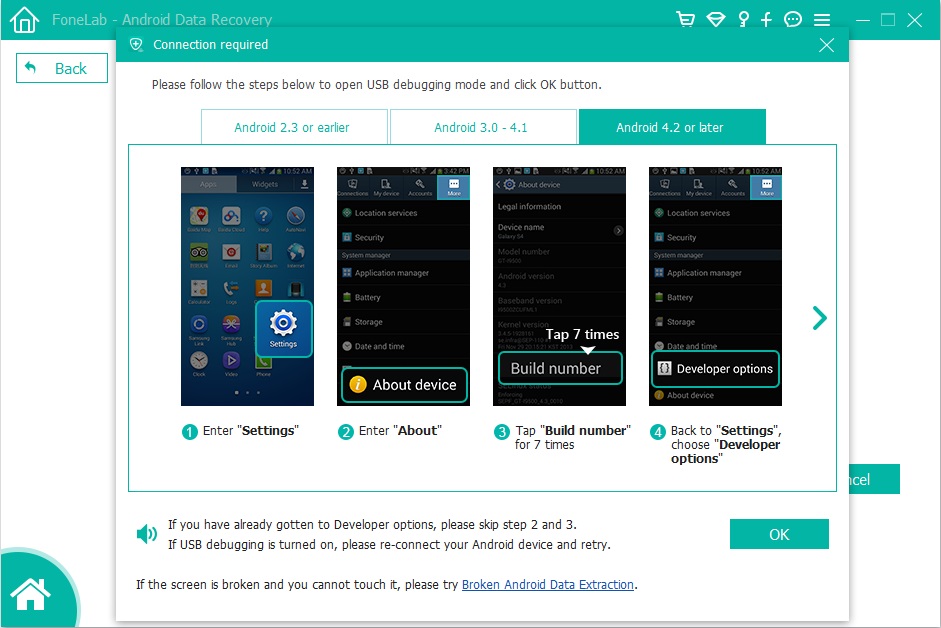
Step 2. Enable USB Debugging Mode

You can follow the on-screen wizard to finish it or refer to this article: How to turn on USB Debugging mode.

turn on debug usb

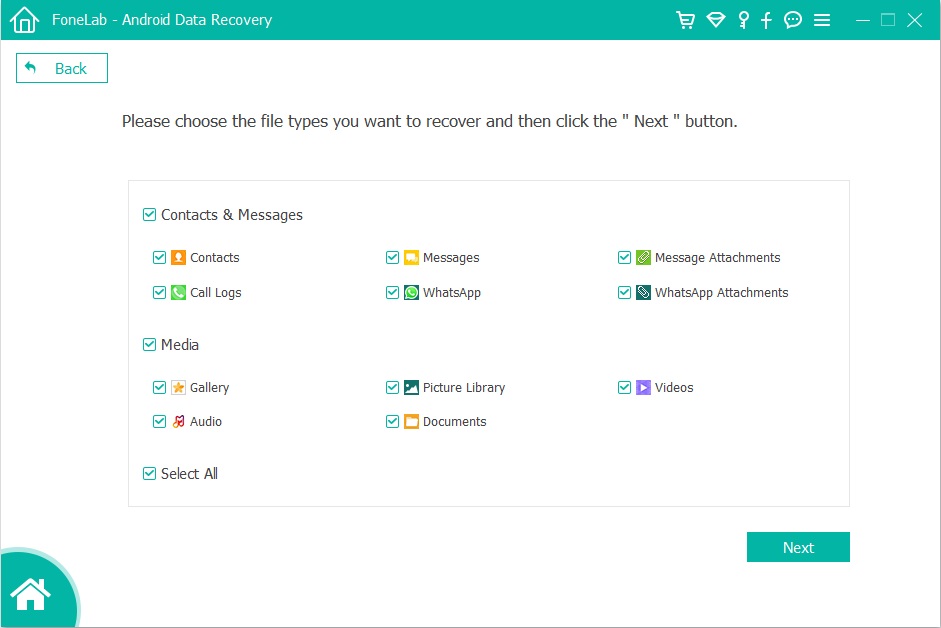
Step 3. Choose Messages to Scan

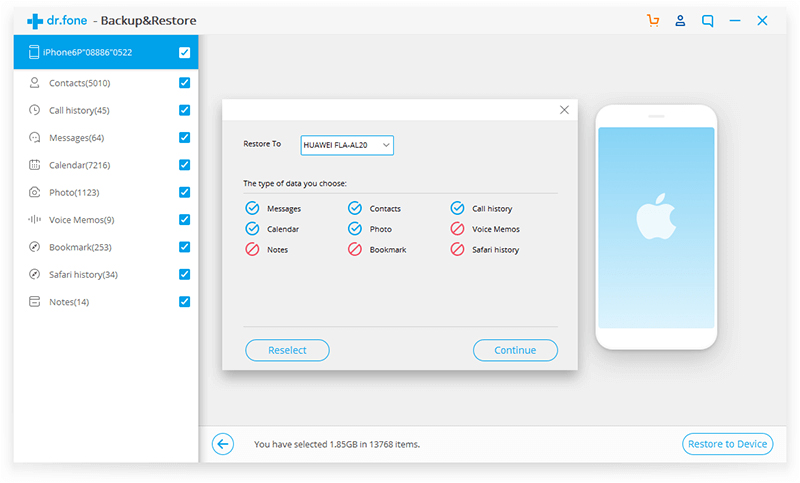
Here it will display a list of data types available for you to choose from for the aim of scanning, such as contacts, messages, call logs, photos, videos, audios, etc. In the case, simply check the “Messages” option and press “Next” button to proceed.

select mesages to recover

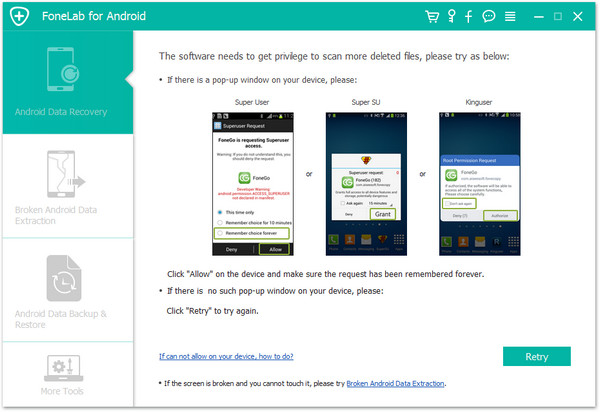
To successfully scan your device, the program needs your authorization. Click the “Allow” button to have the program scan for deleted files on your Samsung phone.

allow scan samsung galaxy fold phone

Step 4. Root the Samsung Phone for Complete Scan

In the following window, click “Advanced Root” button to root your Samsung Galaxy Fold device.

root Samsung Galaxy Fold phone

Once it takes root, the software will start scanning Samsung’s completely for deleted SMS, please be patient.

scan data from Galaxy Fold

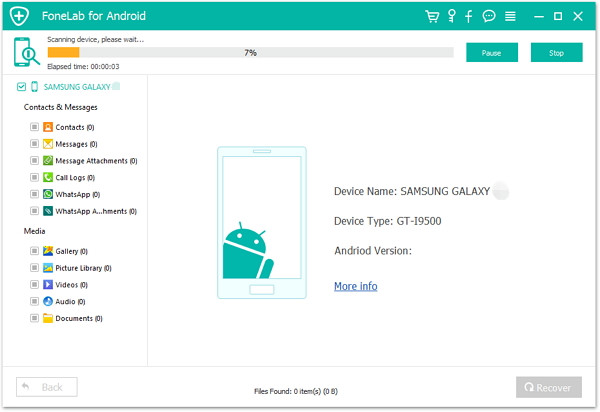
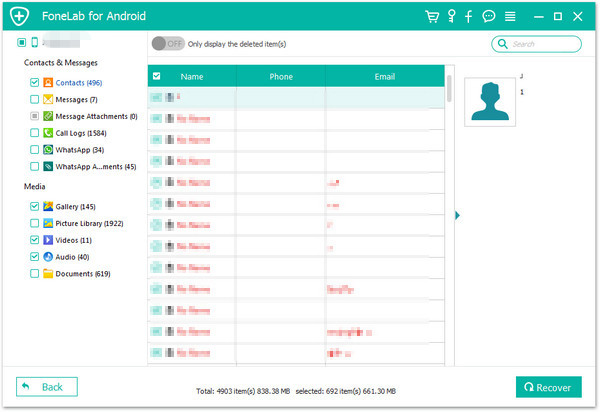
Step 5. Retrieve Deleted Texts on Samsung Galaxy Fold

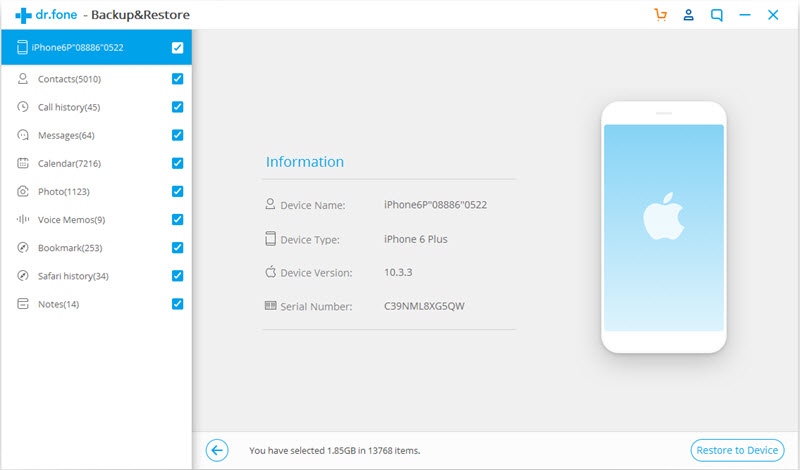
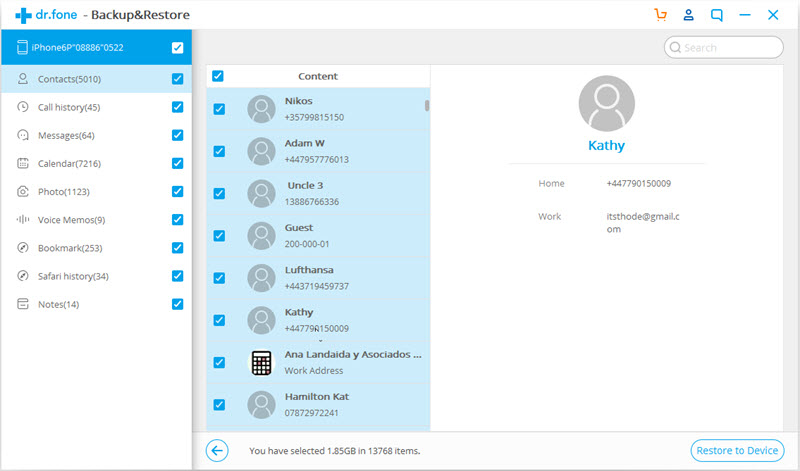
When it finished scanning, the software will display all found files on the window, sorted by different categories. Preview and select the text messages that you want to get back and click “Recover”.

recover deleted messages on galaxy fold

d_win d_mac

Related Article

How to Recover Deleted Contacts from Samsung Galaxy Fold

Samsung Galaxy Fold Data Recovery: Recover Deleted/Lost Data on Galaxy Fold

How to Recover Deleted Photos,Videos on Galaxy Fold

How to Recover Deleted Text Messages after Android 8.0 Update

How to Recover Lost SMS/Text Messages from Samsung Galaxy S10

Samsung Galaxy Message Recovery

How to Recover Deleted Contacts from Samsung Galaxy Fold

[Summary]: Efficient, safe and easy Samsung Galaxy data recovery solution helps you recover deleted contacts from Samsung Galaxy Fold with simple steps from all data loss situations.

February 20, 2019 – The Samsung Galaxy Fold is official! Samsung’s new Galaxy Fold smartphone has its outstanding highlights. Galaxy Fold itself is a multi-modal device that can be switched between a smartphone and a tablet at will. You can run multiple applications at the same time to provide serious multitasking credentials for your device. It gets a total of six cameras – arranged in a triple-camera, dual-camera and single camera configurations. In addition, it has inside plenty of firepower (Snapdragon 855 + 12GB RAM + 512GB storage + optional 5G variant) to make for an always connected laptop.

No matter how powerful your smartphone is, losing contacts on your smartphone can be stressful. Even if you handle the Samsung Galaxy Fold phone carefully, there are some main reasons why you lose valuable contact, phone numbers:

• Your Android operating system is corrupt
• You accidentally deleted a contact on Galaxy Fold
• The virus infects your smartphone
• USB is accidentally disconnected when transferring data from the device to PC
• OS updates can lead to data loss, such as contacts
• Restoring factory settings or formatting devices may misplace important data, including contacts.

If you are stuck in any of the above situations, you will suffer data loss. Is there a way to recover deleted or lost contacts/phone numbers from Samsung Galaxy Fold? Of course, this is a powerful Samsung Galaxy Fold data recovery software that can recover lost or deleted data, including your important contact data.

Why Deleted Contacts Can Be Recovered?

In general, deleted or lost contacts are not permanently deleted from the Samsung Galaxy Fold, they are still available on the device, they are just hidden, and it is difficult to find them without the help of a third-party software. Once they are covered by new data, unfortunately, you will lose them forever. That’s why you are advised to stop using your device immediately after discovering that data is lost.

Best Solution to Retrieve Deleted/Lost Contacts on Galaxy Fold

If you have not over-written the deleted/lost existing data on your Samsung Galaxy Fold then you can apply this famous U.Fone Android Data Recovery software for recovering erased, deleted, lost, formatted, missing contacts from Samsung Galaxy Fold, as well as Samsung Galaxy S10/S10 Plus. Of course, you can not only recover deleted contacts, but also save other files in Samsung devices such as photos, call logs, documents, WhatsApp chats, videos, text messages, audio, music files, etc. are all recoverable. Not only Samsung Galaxy Fold, S10, S9, S8, S7, S6, S5, Note 9, Note 8, Note 5, C5 Pro, C7 Pro, J1, J2, J5, J7, A7, A9 can be supported but users can retrieve data from other popular brands such as LG, Sony, HTC, Lenovo, Redmi, Huawei, Motorola, Google Pixel.

U.Fone Android Data Recovery scans your Samsung device and allows you to preview the recoverable files within the software before you proceed further to save files on your system. Now download it on your Windows PC or Mac and rescue lost/deleted contacts from Samsung Galaxy Fold.

d_win d_mac

Steps to Restore Lost/Deleted Contacts from Samsung Galaxy Fold

Step 1. Run U.Fone Android Data Recovery

Run on U.Fone Android Data Recovery after downloading and installing and you will get a window as below. Choose “Android Data Recovery” option on the left area for contacts recovery task.

launch U.Fone Android data recovery

Next, plug your Samsung Galaxy Fold into the computer with USB cable.

enable USB debugging on Samsung Galaxy Fold

Step 2. Allow USB Debugging

Once connected, you need to switch on USB Debugging mode on the handset to let it be identified by the software. The on-screen instructions will guide you through the whole process.

turn on debug usb

Step 3. Choose Contacts to be Scanned

When the following window opens up, uncheck the “Select All” checkbox. Click the “Contacts” checkbox and then click “Next”.

select contacts to recover

Before you start analyzing and scanning your device, you need to authorize and allow the software to scan your Samsung Galaxy Fold phone. Click the “Allow” button on your phone screen to agree to the program to scan deleted files on your Samsung device.

allow scan samsung galaxy fold

(Optional) Before the program can implement a deep scan of your Samsung phone, you have to root it. Press “Advanced Root” button on the screen below, which will take you to a site where you can download and install a tool called KingoRoot for the rooting job.

root Samsung Galaxy Fold phone

Step 4. Scan and Analyze Your Samsung Phone

Once rooted, it will start scanning your phone completely for lost contacts.

scan data from Galaxy Fold

Step 5. Retrieve Deleted Contacts on Samsung Galaxy Fold

After the scan process is completed, you will arrive at an overview screen listing the recoverable files on the left part. In your case, click “Contacts” category to expand a list of specific contacts. Next, highlight the contacts you want to restore then click on “Recover” button.

restore contacts from samsung galaxy fold

Next, a dialog box opens, asking you to specify where to save the recovered contacts. And your contacts will be saved in HTML, CSV and VCF format.

path

d_win d_mac

Related Article

How to Recover Lost and Deleted Text Messages from Samsung Galaxy Fold

Recover Lost Data from Samsung Galaxy S6 after Factory Reset

How to Restore Deleted Contacts from Nokia 8/7/6

Ways to Restore Deleted Contacts from Samsung Galaxy S9/S9+

How to Retrieve Deleted Contacts from Samsung Galaxy X

Samsung Galaxy Contact Recovery

Best Way to Recover Deleted Photos on Samsung Galaxy Fold

[Summary]: Guide to recover deleted photos from Samsung Galaxy Fold, get back deleted pictures/photos/gallerys/images/App photos on Samsung Galaxy Fold with professional Android data recovery software, U.Fone Android data recovery.

recover photos from samsung galaxy fold

Samsung officially released the latest mobile devices such as the folding screen mobile phone Galaxy Fold and Galaxy S10 series – Galaxy S10, Galaxy S10+, Galaxy S10e and Galaxy S10 5G. The Galaxy Fold folds up to 4.6 inches and expands to 7.3 inches. The screen is a flexible material with no seams in the middle. The Samsung Galaxy Fold uses the Snapdragon 855 processor. The folding screen has batteries on both sides. There are 6 cameras in the whole body, which are located on the rear, front and side of the fuselage. Samsung Galaxy Fold’s price starting at $1980.

How can I recover deleted photos on Samsung Galaxy Fold?

I have got an new Samsung Galaxy Fold. Usually, I like to use it to record anything about my life. Since I bought the device, I took pictures when I cooked a big meal, I took photos in my friend’s birthday party, yesterday, I deleted some important photos on Gallery by careless, is it possible to recover deleted pictures from Samsung Galaxy Fold? How to get back deleted photos on Samsung Android phone?

Samsung users are also experiencing the same headache – how to recover deleted photo files from the Samsung phone without backup? Data loss or accidental deletion is still a big trouble to Samsung phone users if they don’t back up Android data on Mac or PC regularly. Don’t worry, you still have chance to recover lost or deleted files such as pictures, messages, contacts, photos, videos, call log and WhatsApp chat history etc. from Samsung phones. Thus, this article will shows you the best Samsung Galaxy Fold data recovery solutions, you can directly scan and recover deleted photos on Samsung Galaxy Fold via U.Fone Android Data Recovery software.

U.Fone Android Data Recovery is the world’s best Android Recovery software to recover missing/deleted/lost photos, videos, messages, contacts, WhatsApp and more from Samsung Galaxy S/Note/J/A/F that lost due to accidental deletion, OS update, rooting, factory reset, virus and other unknown causes. If you want to recover data on Samsung Galaxy Fold, just connect your Galaxy Fold Android phone to PC or Mac, and then using the Android data recovery software to scan the phone’s internal memory or SD card and recover deleted photos directly. Let’s learn the simple guide about how to retrieve deleted photos from Samsung Galaxy Fold, as well as Galaxy S10/S9/S8/S7/S6 and Galaxy Note series.

d_win d_mac

Good News: The new Android Data Recovery for Mac now can recover files both from the internal memory and from the SD card inside the Android phone. Just give it a free try now! The Windows version is right on the way! You can also follow the same step-by-step guide to recover deleted photos from Android phone like Motorola, HTC, Google, OnePlus, Huawei, Xiaomi, Sony, LG, ZTE, etc.

Guide: Recover Deleted Photos, Videos from Samsung Galaxy Fold Internal Memory

Step 1. Free download the Android Data Recovery
Firstly, download and install this Galaxy Fold photo recovery to your computer, then click “Android Data Recovery” features to ready scan and recover your Android lost/deleted files.

launch U.Fone Android data recovery

Connect your Samsung Galaxy Fold device to the PC or Mac, at this time, the will detect your device is connecting successfully.

connect Galaxy Fold to PC

Step 2. Identify your Galaxy Fold
Next, you need to enable USB debugging to let the program identify your device. Just follow the instructions in the window to enable USB debugging.

enable USB debugging on Samsung Galaxy Fold

Just click “OK” to allow connect to the computer, if you have done ever before, just skip it.

debug usb

Step 3. Select Photo File Types to Recover
Then, select the “Gallery“, “Photo Library” item that you want to get back. If you want to recover deleted videos from Samsung Galaxy Fold, please select “Video” item, too.

select photos to recover

Step 4. Scan your Samsung Galaxy Fold for the lost or deleted photos
After the software identifies your device, click Scan to scan deleted and lost photos from your Samsung Galaxy Fold, the program also scans all exiting pictures from the device, so you can use this Android data recovery backup photos from Android devices to PC or Mac.

scan deleted photos from samsung galaxy fold

Step 5. Preview and Recover Deleted Photos from Samsung Galaxy Fold
After the scan, you can go to the photo folder on the left sidebar to preview the photos found on your Galaxy Fold, you can click “show deleted items” to find all deleted photos. Finally, just select the photos and App photos you need, hit “Recover” to retrieve your Samsung Galaxy Fold deleted pictures and save them onto your PC or Mac.

recover deleted photos from samsung galaxy fold

Well done! You have retrieved deleted photos from Samsung Galaxy Fold and save them in computer, if you want to import the retrieved photos and other contents to your Samsung Galaxy Fold or other iOS/Android devices for view/use, you can use this iOS & Android Manager tool to manage or add files to the devices easily.

d_win d_mac

In additional, you can also follow the same steps to recover deleted videos, music, contacts, text messages, WhatsApp messages, etc. from Samsung Galaxy Fold, Galaxy S10/S9/S8/S7 easily.

How to Recover Deleted or Lost Data on Samsung Galaxy Fold

[Summary]: Efficient, safe and easy Samsung Galaxy data recovery solution helps you recover files like photos, videos, music, contacts, text messages and other data from Samsung Galaxy Fold and other Samsung devices with simple steps from all data loss situations.

samsung galaxy fold

You may want to read:

* Smart Switch: Transfer Data to Samsung Galaxy Fold/S10/S9

* How to Transfer Data from iPhone to Galaxy S10/Galaxy Fold

The Samsung Galaxy Fold release date is April 26 in the US and May 3 in Europe. In addition, Samsung also released the new Samsung S10 series including the Galaxy S10e, Galaxy S10, Galaxy S10 + and Galaxy S10 5G. The Galaxy Fold has two AMOLED screens that can be folded in the same way as books, priced at up to $1,800. In addition, Samsung also launched a new high-end mobile phone Galaxy S10 series. The series will challenge the iPhone. The main screen of the Galaxy Fold phone is a 7.3-inch foldable “Infinity Flex” display with a cover screen of 4.6 inches. It comes with an 8-core processor, 12GB of RAM, 512GB of storage, and no Micro SD card slot. It is equipped with 6 lenses – 3 on the back, 2 on the inside, and 1 on the cover, which can capture the picture at any time no matter how the user holds or folds the device.

CONTENTS

As the hottest Android smartphones like Samsung Galaxy S10/S10+/S9/S9+/S8/S7, HUAWEI P20/P10/Mate 20/Mate 10, Google Pixel 3/2(XL), HTC U12+, LG G7/G6/G5, OnePlus. 6T, Motorola. Moto X4/Moto G6 and Nokia 6, etc. Samsung Galaxy Fold base on Android OS – Android Q(presumably code-named Android Q), which will include support for foldables in two different conformations: There will be one-screen foldables that fold over to leave the display exposed on both “sides” of the phone, as well as two-screen foldables that will fold closed with a secondary display on the outside. Once this folding screen phone is on the market, we believe as more and more people choose Samsung Galaxy Fold. For mobile phone users, data recovery problem is frequently asked. It is common for a Samsung smartphone or tablet user to encounter data loss problem. As a phone owner, we usually stored a lot of important data, such as photos, videos, music, contacts, text messages, WhatsApp messages, App data and other data in the phone memory and we wish to protect them well, hoping we can keep them forever. For a Samsung Galaxy Fold users, when your Android data lost due to various and unexpected situations, how to recover deleted data from Samsung Galaxy Fold?

Samsung Galaxy Fold Data Recovery solution

In this page, we will introduce you how to recover data from Samsung Galaxy Fold or Samsung Galaxy S10/S9/S8/Note 9/Note 8 with an easy and efficient Samsung Galaxy data recovery solution. Hope it is helpful!

Deleted or lost data on Samsung phones and tablets? Don’t worry, U.Fone Android Data Recovery can help you recover deleted data from Samsung Galaxy Fold. Before retrieving Samsung Galaxy Fold deleted/lost files, what you should pay attention to is that you need to recover lost or deleted data as soon as possible before they get overwritten. Once the data were overwritten, no matter what method you try, you can’t get them back.

Tips for successful Samsung Galaxy Fold Data Recovery

1. Stop using your Samsung Galaxy Fold once you get your files lost by accident. Any operation may generate new data and wipe the missing data permanently from your device.

2. Find a reliable and professional Android data recovery tool to do the Samsung Galaxy Fold data recovery as soon as possible, such as U.Fone Android data recovery.

3.Make sure your device can be switched on and recognized by your PC, and the battery should be more than 20% before starting to recover data from Samsung Galaxy Fold.

4.Don’t import or add files to Samsung Galaxy Fold before getting the lost data back.

5.Don’t take photos until the deleted/lost pictures retrieved.

Recover data from Samsung Galaxy Fold with U.Fone Android data recovery software

U.Fone Android data recovery software is a powerful data recovery for Android users to recover photos, videos, audios, text messages, contacts, WhatsApp messages, call logs, App data and documents on Android (Samsung, Sony, Google, Motorola, HUAWEI, OPPO, VIVO, OnePlus, ZTE, Xiaomi and more) from all data loss situations. Being powerful, safe and easy-to-use, it is your ideal tool to recover data from Samsung Galaxy Fold.

Recover deleted, erased, missing, lost, disappeared data/files from Samsung Galaxy Fold.

– Efficiently recover files such as photos, videos, audio, contacts, text messages, Whatsapp chat history, call history, notes, voice memo, documents and many more.
– Retrieve data from Samsung Galaxy Fold that got lost or deleted due to accidental deletion, factory reset, virus attack, formatting SD card, OS update, ROM flashing, rooting, water damaged, forgotten screen lock password and so on.
– Support all Samsung Android phones such as Samsung Galaxy Fold, Samsung Galaxy S9+/S9/S8+/S8/S7/S6/S5/S4, Samsung Galaxy Note 9/8/7/5/4, Samsung J3/J3 Pro, Samsung Galaxy A9/A8/A7/A5 and etc.
– Support backup and restore data from Samsung Galaxy Fold/
– Fix your bricked Android phones and recover your data on broken/damaged Samsung devices.

d_win d_mac

Here is the free trial version. Now you can download it to have a try by yourself. Then, follow the step-by-step guide below and check how to recover deleted data from Samsung Galaxy Fold with the help of U.Fone Android data recovery software.

Guide: Recover Deleted and Lost Data on Samsung Galaxy Fold

Step 1. Download and Launch Android Data Recovery
Download and install Android Data Recovery on your computer, then connect your Galaxy Fold to your computer with a USB cable.

launch U.Fone Android data recovery

Launch this software and select “Android Data Recovery”. Please wait when your device is connecting to this software.

connect Samsung Galaxy Fold to PC

Step 2. Enable USB debugging on your Galaxy Fold
Follow the software’s guide to enable USB debugging on your Samsung Galaxy Fold. (If you have done ever before, just skip it.) You may see an interface as below, just choose your current Android version and follow its steps.
For more detail guide to Enable USB Debugging Mode on Android.

enable USB debugging on Android

Step 3. Select Types of File to Recover
When your Samsung Galaxy Fold phone is detected successfully, then you can select the files types like contacts, messages, photos, videos, audios, App data, call logs or documents to recover and click on “Next”. You also can select all to retrieve if you want.

select LG phone's data to recover

Step 4. Authorize on Samsung Galaxy Fold
In this step, you need to authorize and allow the software to scan your Samsung Galaxy Fold phone, it will prompt you turn back to your phone again to accept and tap on the “Allow” button to let the program scan deleted files on your Samsung phone.

allow scan LG Android phone

Step 5. Gain Root Permission for a Deep Scan(Option)
Your Samsung Galaxy Fold phone may have a popup message to request a privilege to scan more deleted files, and you need to tap on “Allow” to continue, if not, skip this step. (You can unroot the device after the recovery task.)

To do so, click the Advanced Root button at the lower right position. At this point, you will be taken to an external website to download a free Android rooting tool — KingoRoot to root the device.

[Also Read: How to Safely Root and Unroot an Android Device with KingoRoot ]

root Samsung Galaxy Fold phone

After you’re rooted, this Android Data Recovery software will begin running a deep scan of your Samsung phone’s memory and SD card to search for the deleted Stuff. Please be patient.

Step 6.Deep Scan Deleted Data from Samsung Galaxy Fold
Now, the program begin to scanning your Samsung phone to find all exiting and deleted/lost data.

scan data from Galaxy Fold

Step 7.Preview and Recover Deleted Data from Samsung Galaxy Fold
When scanning is done, all of the found and recoverable data would be shown in the list on the left sidebar. Now tick the data types you would like to recover. (You also can choose to only display the deleted items). Then tap on “Recover” and wait for this process to be completed.

recover lost data from Galaxy Fold

Free download Android data recovery and try to recover deleted files from Samsung devices:

d_win d_mac

The Bottom Line

U.Fone Android Data Recovery Tool provides you the best solution to recover lost data and deleted files directly from Android device without backup, so you don’t need to worry about that anymore. For other Android devices, you can also follow the same steps to retireve lost or deleted text messages, contacts, pictures, videos, WhatsApp chat history, and documents etc. from your Android phone with a computer, a USB, a phone and an Android Data Recovery software. In additional, if your Samsung phone was broken screen, black screen or dead, the “Broken Android Data Recovery” function can help you fix broken Samsung and extract data from broken/damaged Samsung phone(Galaxy S6/S5/S4/Note 5/Note 4/Note 3, etc.).

Samsung Galaxy Data Recovery

How to Recover Deleted iPhone Whatsapp Chat History on Mac

[Summary]: Want to recover iPhone WhatsApp messages and attachments? Go through this post to get a workable way to retrieve deleted or lost WhatsApp chat history from iPhone 6/6s/7/8/X/XS/XS Max on Mac without hassle.

“Can I still recover deleted WhatsApp messages from iPhone X/8/7/6s when I deleted them by mistake?”

So far, Whatsapp has become one of the leading messaging apps along with Facebook’s Messenger, Line and Kakaotalk. WhatsApp lets you exchange messages without having to pay for SMS. Every day, users around the world can chat and share videos, audio, photos, etc. through this Whatsapp messaging app. There is no doubt that it contains information of great value. However, in some cases, this information is not sufficiently secure. If you are an iPhone user, your data and your WhatsApp chat history may be deleted from iPhone due to issues such as accidental deletion, jailbreaking or upgrading the iPhone.

If you are also looking for a way to recover deleted WhatsApp chat history on iPhone, here we introduce you an iPhone Data Recovery for Mac users. If you are using a Windows PC, you can refer to this guide to retrieve deleted WhatsApp messages on iPhone XS/X/8/7/6S.

U.Fone iPhone Data Recovery offers 3 recovery modes to retrieve deleted iPhone WhatsApp messages on Mac. You can recover deleted or lost WhatsApp chat history directly by scanning the memory of the device connected to the Mac computer. You can also restore WhatsApp messages via an iTunes backup or iCloud backup of your iPhone because the software will analyze the contents of the backup and let you extract contacts and conversations from WhatsApp (in XLS, TXT or XML), including multimedia file attachments (photos and videos) and save to your Mac.

d_win d_mac

More features:

Get deleted photos, videos, contacts, messages, call logs, notes, WhatsApp data and more files come back to you.
Three recovery methods available: Recover from iOS Device, Recover from iTunes Backup, Recover from iCloud Backup.
Recover data lost due to accidental deletion, device lost, virus attack, jailbreak failure, system crash, iOS upgrade/downgrade error, wrong password lock, water damage, or other factors.
Preview all recoverable data before the recovery.
Get back deleted or lost files in easy steps.
Perfectly support iOS 12 & nearly all models of iDevices, including iPhone XS/XS Max/x/8/7/6s/SE/6/5s/5, etc.
Suitable for Windows PC and Mac computer.

Steps to Recover Deleted iPhone WhatsApp Messages on Mac without Backup

Step 1. Launch U.Fone iPhone Data Recovery

Download and install the U.Fone iPhone Data Recovery
software on your Mac. The software will launch automatically once it completes. And you have three sections, select the “iPhone Data Recovery” to start.

ufone iphone data recovery for mac

Step 2. Connect iPhone to Your Mac Computer

Just follow the on-screen instructions to connect your Apple device to your Mac. The program will then automatically detect your device.

recover data from iPhone directly

If this is your first time connecting to your Mac, you will need to click “Trust” on your iPhone to activate the connection between the device and the computer.

trust on iphone

Step 3. Choose File Type to Scan

This program supports recovery of various data types. In this case, you will have the options to select “WhatsApp” and “WhatsApp Attachments” in the pop up window, and then click “Start Scan”. The application will then scan the WhatsApp data on your iPhone.

recover-iphone-whatsapp-on-mac

Step 4. Scan iPhone for Deleting WhatsApp Chat History

The scan will initiate thereafter. From the window you can keep track of the progress of the scan and understand what the program is scanning.

analyzing and scaning iPhone

Step 5. Preview & Recover Deleted WhatsApp Messages from iPhone to Mac

When the program finished scanning the device, a list of all the files will then be displayed. For this process, click the item “WhatsApp” to be able to retrieve your deleted Whatsapp files.The program will then display your current and deleted Whatsapp messages. Turn on the option “Only display the deleted items” to display the only deleted messages.

recover kik app pictures from iphone

Check WhatsApp and WhatsApp Attachments to preview detail. Then mark those items you want, and click “Recover” to save them onto your Mac.

view iPhone data recovery result

d_win d_mac

How to Recover Kik Messages & Attachments on iPhone XS/X/8/7/6S

[Summary]: Want to regain the deleted funny Kik pictures, videos and useful attachments you have created or received on your iPhone? Here is the solution for you to selectively retrieve deleted Kik messages from iPhone to Mac with ease.

Kik Messenger, commonly known as Kik, uses a smartphone’s data plan or Wi-Fi to send and receive messages, photos, videos, sketches, mobile web pages and other content after the user registers a username. Kik has successfully combined the power of Blackberry and Snapchat, while adding some useful communication tools to make it different from other messaging applications. Generally, you can do this in the Kik app: Share Camera photos or other photos stored on your iPhone; Buy or get free Stickers or Smileys from the Kik store; Send drawn pictures to your friends by using the built-in tools on Kik; Search for images in Kik on the Internet and send the images you find and so on.

Your iPhone Kik messages are deleted or lost, how to recover?

Sometimes data loss is an inevitable event. It is a common occurrence for iOS users to ask how to recover iPhone Kik messages that have been deleted or lost. And here, we summarize the most common scenarios. Usually, you may lose Kik chat logs from iPhone XS/XS Max/XR, iPhone X, iPhone 8/8 Plus, iPhone 7/7 Plus, iPhone SE, iPhone 6s/6s Plus, iPhone 6/6 Plus when you:

reset your account
login to your account on a different device
delete your Kik app
reset or update your iOS system on your iOS device
lose your iPhone or your phone is damaged or broken

With so many interesting pictures you created or received at Kik, it would be awful if the pictures and other contents were mistakenly deleted or missed. Want to regain lost Kik photos, videos, attachments on your iPhone? This is the fastest way – use U.Fone iPhone Data Recovery.

Tool You’ll Need to Recover Kik Messages on iPhone XS/X/8/7/6S

U.Fone iPhone Data Recovery works on both Windows PC and Mac computer. It is used to quickly scan your iOS device and find deleted Kik images from the iPhone’s internal storage. Don’t worry, the program supports multi-function recovery, it also automatically recognizes and extracts Kik messages from iPhone’s iTunes backup or iCloud backup without erasing any other data. Apart from Kik Messages, you are able to selectively restore or export messages, photos, SMS, app photos, videos, notes, reminders, call history, contacts, etc. from iPhone, iPad or iPod and backup file. This U.Fone iPhone Data Recovery fully supports iOS 12.1 and iTunes 12.9. Now get the free trial version on your PC or Mac computer by clicking on the download icon.

d_win d_mac

Step-by-step Guide to Restore Kik Messages from iPhone Directly

Step 1. Install U.Fone iPhone Data Recovery on PC/Mac

U.Fone iPhone Data Recovery supports to recover deleted/lost iPhone Kik messages including photos, videos, attachments from iPhone directly or your iTunes, iCloud backup. After downloading, enter “iPhone Data Recovery” mode to get started.

ufone iphone data recovery for mac

Next, use a USB cable to connect your iOS device to the computer.

recover data from iPhone directly

Step 2. Choose Recover from iOS Device

Then the software will recognize the device in seconds. In the case, you should locate the “Recover from iOS Device” mode and trust your iOS device.

trust on iphone

Step 3. Select Kik messages and Kik Attachments to Scan

You can choose the specific data type you want to recover, or check “Select All” to retrieve all the content on iPhone. The program is currently adding a new feature that you are supported to retrieve old Kik messages from your iPhone. So choose “Kik or Kik Attachments” and then click “Start Scan” to go to the next screen.

Select Kik messages and Kik Attachments

Step 4. Analyzing and Scaning iPhone for Deleted Messages and Kiki Messages & Attachments

As the page shows, you can see that the program is scanning all the contents of your iPhone. Please wait patiently until it is finished.

analyzing and scaning iPhone

Step 5. Preview and Recover Kik Messages and Kik Attachments from iPhone

After the scanning, all contents will be displayed in groups here. You are allowed to preview each file. Select “Kik” or “Kik Attachments” from the sidebar. Choose those items you want to recover and then click “Recover” button.

recover kik app pictures from iphone

preview and recover kik photos from iphone

Only few mintues, the program can help you easily to recover Kik messages/chat history, Kik Attachments including pictures, videos from iPhone and save onto your PC or Mac.

view iPhone data recovery result

Free download the iPhone Data Recovery and try to recover app data from iPhone on Mac/Windows.

d_win d_mac

Related Article

Recover Deleted Data from iPhone XS/X/8/7/6S/6 on Mac

How to Recover Deleted App Data from iPhone X/8(Plus)

Restore Deleted WeChat History from iPhone(Text,Photos,Videos)

How to Recover Deleted Photos from iPhone/Android/PC/Mac?

How to Restore Deleted Call Logs from iPhone XS/X8/7/6S/6

Recover Kik/Kik Attachments on iPhone

How to Sync iTunes/iCloud Backup to Huawei Mate 20

[Summary]: Switched from iOS to Huawei Mate 20 or Mate 20 Pro? This post shows you how to transfer iTunes and iCloud backup files to Huawei Mate 20 and Mate 20 Pro with one click.

Have you picked up a Mate 20 Pro for yourself yet? Huawei Mate 20 and Mate 20 Pro are the largest and most impressive phones in this entire lineup. The display of these two devices (Mate 20: 6.53 “FHD +; Mate 20 Pro: 6.32” 2K + curved OLED) offers rich, clear details that let you enjoy all your favorite photos, videos, games and more. Moreover, they are also equipped with a brand-new Leica triple camera system. If you’re shooting a video, you can also add unique movie effects using AI Cinema Mode. The 5000mAh battery and the Kirin 980 chipset are better able to handle long hours of gaming or multitasking.

If you are an iPhone user and have backed up iPhone to iCloud/iTunes, who wants to switch to a Huawei Mate 20 smartphone, this post shares with you a quick way to migrate your backup data from iTunes and iCloud to Huawei Mate 20/Mate 20 Pro.

Since we can’t restore iTunes and iCloud backup to Android Phone directly, we need Android ToolKitBackup & Restore software which is a very user-friendly data transfer tool, enable you to sync data types between iOS and Android phones, such as contacts, SMS, photos, videos, call logs, music, notes, apps, and more. In addition, the tool helps you access iTunes and iCloud backup files then directly transfer iTunes or iCloud backup to Huawei Mate 20(Pro) with supported and readable formats in Huawei phone. By using Android Toolkit – Backup & Restore, you can back up your essential data on a computer and restore data to device from iTunes backup, iCloud backup, and BlackBerry backup. Now download the software and have a try.

d_win d_mac

Part 1: Restore iTunes Backup to Huawei Mate 20

Step 1. Launch the Android Toolkit – Backup & Restore Tool

Free download, install and launch the Android Toolkit – Backup & Restore tool with your computer. After getting the full home page, select the “Backup&Recovery” module.

android toolkit home page

Step 2. Connect Huawei Mate 20 to the Computer

Next, connect your Huawei Mate 20 to the computer and choose “Restore” option. Secondly, click on the “Restore from iTunes backup” tab.

detect itunes backup files

Android Toolkit – Backup & Restore would detect the iTunes backup you’ve made, and list them out. Choose one iTunes backup you need and click on View to extract iTunes backup files.

confirm android device to restore to

Step 3. Transfer iTunes Backup to Huawei Mate 20

Then just select the contents you want to restore (including Contacts, SMS, Call logs, DCIM photos and Bookmarks) and click on “Restore to Device”.

select itunes backed up data to restore

Finally, tap on “Continue”confirm restoring iTunes backup to Huawei Mate 10 and Mate 20 Plus.

confirm to restore to samsung galaxy s10

d_win d_mac

Part 2: Restore iCloud Backup to Huawei Mate 20

Step 1. Run Android Toolkit – Backup & Restore

After downloading, install and launch Android Toolkit – Backup & Restore program on your computer. You can see all modules on the program homepage: Recover, Transfer, Switch, Backup&Restore, Repair, Unlock, Erase, Root. Select “Backup&Restore” module on the homepage.

android toolkit home page

Then choose “Restore” and connect your Huawei Mate 20 phone to the computer.

ios device backup restore

Step 2. Log in to iCloud Account

From the left sidebar, click on “Restore from iCloud backup”. Now you can use the following display to enter your iCloud account information.

sign in icloud

Note: After you sign in, you may have to enter a two-factor authentication code. Once you do this, press the “Verify” button to continue.

verify icloud id

Step 3. Download iCloud Backup File

A list of backups will be shown on the next display. Choose the backup that you want to restore by clicking “Download”.

download icloud backup file

After selecting, the program will start downloading your iCloud backup files. And once done, all data types will be shown on your screen.

Step 4. Restore to Huawei Mate 20 from iCloud Backup

Browse each category and choose the data that you want to restore. Click on “Restore to Device” to save what you want.

select icloud backup data to restore

A small window pops up, you can select Huawei Mate 20 from the drop-down list, and then click Continue to restore the selected data from the iCloud backup to the Huawei device.

confirm to restore to android

d_win d_mac

More Android Toolkit Tips:

How to Transfer Photos from Samsung to Computer

How to Backup Files from Android Phone to Mac

How to Backup Text Messages from Samsung Galaxy

How to Move WhatsApp Messages from iPhone to Galaxy S10

Sync iTunes/iCloud Backup to Huawei

Restore iTunes/iCloud Backup to Samsung Galaxy S10/S10+

[Summary]: If you have backup files on iCloud or iTunes, follow this tutorial to restore iCloud or iTunes backup to the new Samsung Galaxy S10 or S10+ easily.

Samsung Galaxy S10 and S10 Plus

The Samsung 10th Anniversary smartphone lineup will include the Galaxy S10, S10+ and S10e. According to rumors, the higher specification model may be the first to use Samsung’s Infinity-O display, display fingerprint scanner and three cameras. We are all looking forward to their arrival.

“How can I transfer data from iCloud to Samsung Galaxy S10”? Upgrade your phone from an old iPhone 4/4S/5/5S/6/6S/7/8/X to Samsung Galaxy S10/S10+? Many people will encounter this problem when you are used to backing up your personal files from your iPhone or iPad to iTunes/iCloud. Obviously, you can restore iTunes backed up files to almost any iDevices. But how to sync contacts, text messages, photos, videos, call logs, app data and more from iTunes or iCloud backup to Samsung Galaxy S10, a completely different platform from the iPhone?

In order to enable iTunes / iCloud backup to be restored to Samsung Galaxy S10 / S10 +, you need a professional third party software, and Phone Switch is generated. Android ToolKitBackup & Restore is designed to help users transfer file types like text messages, call logs, contacts, photos, music, videos, notes, and applications between Android or iOS devices. Of course, it also has a useful feature that helps you download data from your iCloud / iTunes backup to your Android device. With its help, syncing your iCloud / iTunes backup to the Samsung Galaxy S10/S10+ is an easy job. This software works well for cross-platform data transfer, from iOS to Android and vice versa, as well as backing up data from Android/iPhone to a Windows PC or Mac computer. When needed, you are allowed to restore individual data because it allows you to preview before restoring and selectively check the content you want.

Now get the right free trial by clicking the below downloading icon and we’ll guide you through each of them in detail.

d_win d_mac
d_win d_mac

Part 1: How to Restore iCloud Backup to Samsung Galaxy S10

Step 1. Connect Samsung Galaxy S10 to Computer

Please follow the installation instructions to install the Android Toolkit – Backup & Restore program to your computer after downloading. Running it you will find that the program not only supports data transfer, but also has other useful advantages such as data recovery. In this case, you need to go into the “Backup & Restore” mode. Don’t forget to connect your Samsung Galaxy S10 device to your computer.

android toolkit home page

After connect your Samsung phone to the computer, then click the “Restore” button in the middle of the screen if you gain the screen as below.

ios device backup restore

Step 2. Sign in iCloud Account

Several restore options are displayed in the left column, please click “Restore from iCloud backup”. Then get all the backup content by filling in the iCloud account you used for iCloud backup.

sign in icloud

Note: You may have enabled two-factor authentication for your iCloud account. In this case, the verification code will be sent to your iPhone. Type the verification code you received and click “Verify”.

verify icloud id

Step 3. Download iCloud Backup File

You will successfully get all the backups for this account. Select one of the backups you wish to restore and click “Download” to save the file to a local directory on your computer.

download icloud backup file

Step 4. Restore iCloud Backup File to Galaxy S10

Then the Android Toolkit – Backup & Restore will automatically read and display all the data in the downloaded iCloud backup file. Preview the data and check all or part of the files, click “Restore to Device”.

select icloud backup data to restore

Immediately, there is a window pop up, where you can select your Samsung Galaxy S10 from the drop down list and click “Continue” to restore the selected data from iCloud backup to Samsung device.

confirm to restore to android

Note: Data types such as voice memos, Notes, bookmarks, and Safari history are not supported for restoring from iCloud backups to Android devices.

Part 2: How to Restore iTunes Backup to Samsung Galaxy S10

Step 1. Run Android Toolkit – Backup & Restore Software

This step is the same as the first step of Part 1. Run on the software and connect your Samsung phone to PC. Locate to the “Restore” from “Backup & Restore” option from the main screen.

ios device backup restore

Step 2. Select Restore from iTunes Backup

Select “Restore from iTunes Backup” from the left column. Soon, the program will detect the location of the iTunes backup files on your computer and display them one by one on the right side of the window.

detect itunes backup files

Step 3. Preview & Sync Data from iTunes Backup to Samsung

You can choose the latest iTunes backup and click on “View”, or you can choose another you want. This software perfectly reads and displays all the details from the iTunes backup file by data type.

confirm android device to restore to

Next, select the data you need to restore by data type and click “Restore to Device”. You are able to choose all or some of the items.

select itunes backed up data to restore

In the new dialog box that pops up, select your Samsung phone and click “Continue” to confirm restoring iTunes backup to Samsung Galaxy S10/S10+.

confirm to restore to samsung galaxy s10

d_win d_mac
d_win d_mac

More Android Toolkit Tips:

How to Transfer Photos from Samsung to Computer

How to Backup Files from Android Phone to Mac

How to Backup Text Messages from Samsung Galaxy

How to UnLock your LG Phone Screen Lock

How to Move WhatsApp Messages from iPhone to Galaxy S10

Restore iTunes/iCloud Backup to Samsung

How to Copy Photos, Videos from Galaxy S/Note to Mac

[Summary]: Want to backup data from Samsung to Mac? This guide will show you the simple ways in steps to transfer photos from Samsung Galaxy S9/S8/S7/S6/Note to Mac.

“I tried to download a data transfer software to my Mac. Obviously it recognizes my Samsung phone and the MTP on the devices, but it can’t recognize my “Gallery” photos and so I can’t transfer photos and videos to my Mac for backing up good moments. Any ideas?”

When you first connect your Samsung Android device to your Mac for photo import, you may be disappointed to see that Aperture and iPhoto cannot recognize the device as a camera. The reason is there is no direct way for your Galaxy which is an Android device to communicate with the Mac. Android devices will generally communicate better with a PC. The article next shows a quick and easy way to copy photos & videos from a Samsung phone (Samsung Galaxy S10/S9/S8/S7/S6/S5/S4, Galaxy Note 9/Note 8/Note 5/Note 4/Note 3/Note 2, etc.) to a Mac.

People Also Read:

* Samsung Kies to Backup & Restore Galaxy S9/S8/S7/S6/S5

* Backup Apps/Apps Data on Samsung Galaxy S8

Android Toolkit – Transfer allows you to easily transfer photos and videos individually or all photo at once from your Samsung phone to Mac. You can also sync other contents (music, messages, contacts, applications, etc.) from Samsung Galaxy S/Note to a Mac or a laptop. Below are the key features of this Android Toolkit – Transfer.

  • Selectively transfer data from Samsung Galaxy S/Note;
  • Transfer contacts, photos, videos, music, SMS between Android and computer;
  • Sync iTunes to Samsung Android phone and vice versa;
  • Fully compatible with Android 9.0/8.0.

d_win d_mac
d_win d_mac

Kind Tips: Looking for a way to download videos from YouTube? 4kFinder YouTube Video Downloader provides everything you expect. This is an excellent online video downloader dedicated to downloading 1080p 60fps videos, 720p HD, 1080p HD, 4K, 8K videos, etc. from YouTube to MP4 without image quality loss. In addition, extracting MP3 audio from YouTube is also one of its features. Apart from YouTube, it is also able to download videos from more than 1,000 popular online streaming sites, like Facebook, Instagram, Twitter, Bilibili, NicoNico, BBC, Vimeo, VLive, Tumblr, Fmovies, etc.

Guide on How to Transfer Photos from Samsung Galaxy to Mac

Step 1. Launch Android Toolkit – Transfer

Download and install the Android Toolkit – Transfer program to your Mac computer. Launch it and enter Transfer feature. As you can see, the program has multiple built-in features, and you can experience them one by one after downloading.

ios toolkit

Step 2. Connect Samsung Galaxy Phone to Mac

Then connect your Samsung Galaxy mobile phone to Mac using an USB cable. And your device can be automatically detected by the program.

Step 3. Transfer Gallery from Samsung S/Note to A Mac

Option 1. Sync All Photos from Samsung Galaxy to Mac

On the main window of Transfer, click on “Transfer Device Photos to Mac”. This will help you transfer all photos on your Samsung Galaxy mobile phone to Mac in just 1 click.

select data to backup

Option 2. Transfer Photos from Samsung to Mac Selectively

If you would like to transfer photos from Samsung to Mac selectively, go to “Photos” tab on the top of the window. Here you can preview and select the photos you like and export them to your Mac easily.

transfer selected photos from samsung to mac

d_win d_mac
d_win d_mac

Related Article

Ways to Transfer/Import Videos to Samsung Galaxy Note 8(5/4/3)

Backup & Restore Android Files – Photos/Videos/Music

How to Manage & Transfer Files for Samsung Galaxy Note 9

Transfer Photos from Samsung to Mac

How to Backup Files from Android Phone to Mac

[Summary]: Here we give you a guide on how to backup Android phone to Mac by using Android Toolkit for Mac, which enables you to transfer contacts, SMS, photos, videos, music, apps, etc. from Android to Mac easily with one click.

How do I back up my Android phone to my Mac? Many users are trapped here. Your Android device may lose important data while system update, factory reset, accidentally deletion, rooting, formatting, flashing, etc. It’s hard to imagine losing important files on your Android phone. If your device is stolen, lost or damaged, it’s best to be prepared and ensure that the most valuable data is backed up. However, Android does not provide any built-in backup application, which makes users neglect the need to do daily backups. Here, we will show you the ideal solution for full backup is premium software specifically meant for the purpose.

Tool You’ll Need to Backup Android Data to A Mac

Android Toolkit for Mac works professionally in backing up Android phone on Mac, allowing users to either cherry pick selected files for backup, or conduct a full back up at the click of a button. And you can preview the detail contents before transferring to Mac computer. It means that you are able to backup Android phone to a Mac with one click or transfer photos from Samsung to Mac selectively.

Top Features of Android Toolkit for Mac

Full backup Android to Mac.
Transfer separate content from an Android to Mac.
One-click restore from backup file.
Preview data then selectively restore to your Android phone.
Multiple additional features are available for Android users.
Support Android phones and tablets like Samsung Galaxy S10/S9/S8/Note 9, HTC, Sony, LG, Huawei P20/Mate 20(Pro), etc.

The software is intuitive and simple to use. Follow the steps below to safely and securely backup your precious files and data from Android phone to your Mac computer. Now download the software on your Mac first.

d_win d_mac

Steps to Backup Android to Mac Selectively(Photos, Videos, Music)

Step 1. Install and Run Android Toolkit on Your Mac

After you download Android Toolkit on your Mac computer, you can install and double-click the program icon to run it. The program’s built-in features are shown in the figure. Enter “Transfer” mode to start.

ios toolkit

Step 2. Connect Android Phone to Mac

Next connect your Android phone to Mac with a USB cable. This software will detect and recognize your Android phone device information.

select data to backup

Step 3. Choose Files to Export

On the top, you can click the file type icon in the toolbar such as Music, Videos, and Photos. And then you can preview the detail content.

Step 4. Backup Files from Android to Mac

Select and mark the specific files that you need to backup to Mac from Android device. After that, click “Export” and you’ll asked to choose a target location to save the files on your Mac computer.

backup media files from android to mac

Wait for a few minutes to successfully complete the backup of Android device to your Mac. Once done, you can see the files that are backed up to the local folder on the Mac laptop.

d_win d_mac

Related Article

How to Backup and Restore your Android on Computer

Backup & Restore Android Files – Photos/Videos/Music

How to Backup and Restore Motorola Phones

Backup Files from Android to Mac