All posts by DHZ

How to Fix Bricked iPhone,iPad after iOS Upgrade

iOS 10 Over-the-Air Update Soft Bricked my iPhone
“My jailbroken iPhone 6s turns to brick after iOS 10 upgrade failure and won’t turn on,how to restore iOS system and unbrick my iPhone 6 device that refuses to switch on?”

fix bricked iPhone in iOS 10

iOS 10 iPhone Update Failed Or Stuck? How to Fix Bricked iPhone?

As you know,iOS 10 now is popularin in all iOS users . Many users have successfully finished iOS 10.1, iOS 10.2 update on their iPhone 6s/6/SE/5s, iPad Pro, iPad Air devices, but unfortunately there are still lots of people who will get in trouble during iOS 10 update, and cause iPhone,iPad turn bricked data loss, stucking in recovery mode, ios 10 itunes screen appears, iPhone frozen from update ios 10 and other issue.Today,we teach you a easy guide to fix iPhone turns to brick after upgrading to iOS 10 without data loss.

A few of the reasons why you may end up bricking your iPhone are as following.
• Hardware failure
• Cases such as power failure in the middle of flashing the NOR memory
• Restoring using a corrupt backup
• Faulty update (such as when updating to iOS 10 or iOS 9)
• Interrupted update process due to power failure
• Jailbreaking
• Unlocking

Step to Fix a Bricked iPhone Due to iOS 10 Update Failure

In case your iPhone/iPad turn to bricked or stuck in Recovery mode after updating iOS 10,don’t Worry! “Stuck in Recovery Mode” It’s a common thing after iOS 9 Updating.A helpful software which name is iPhone/iPad data recovery for iOS can solve the problem.
Read more: How to Fix iPhone stuck in Recovery Mode after iOS 10 Update

This professional iOS System Recovery not only can help you fix bricked iPhone, iPad without data loss,but also allows users fix various iOS system issues at home without any professional Skills,with the help of iOS System Recovery,you can restore ios system to normal status when your iPhone,iPad stuck in Recovery Mode, DFU mode,white Apple logo, white screen, black screen, “connect iTunes” screen, looping on start and other system problem.What’s more,the key features of iOS System Recovery also allows you recover lost data from iPhone,iPad after iOS 10 upgrading,you can eaisly recover lost photos, videos, music, contacts,SMS,notes and other files from iOS devices in three recovery modes.

Free download iOS System Recovery and have a try!

d_win d_mac

How to Repair Bricked iPhone after iOS 10 Upgrade

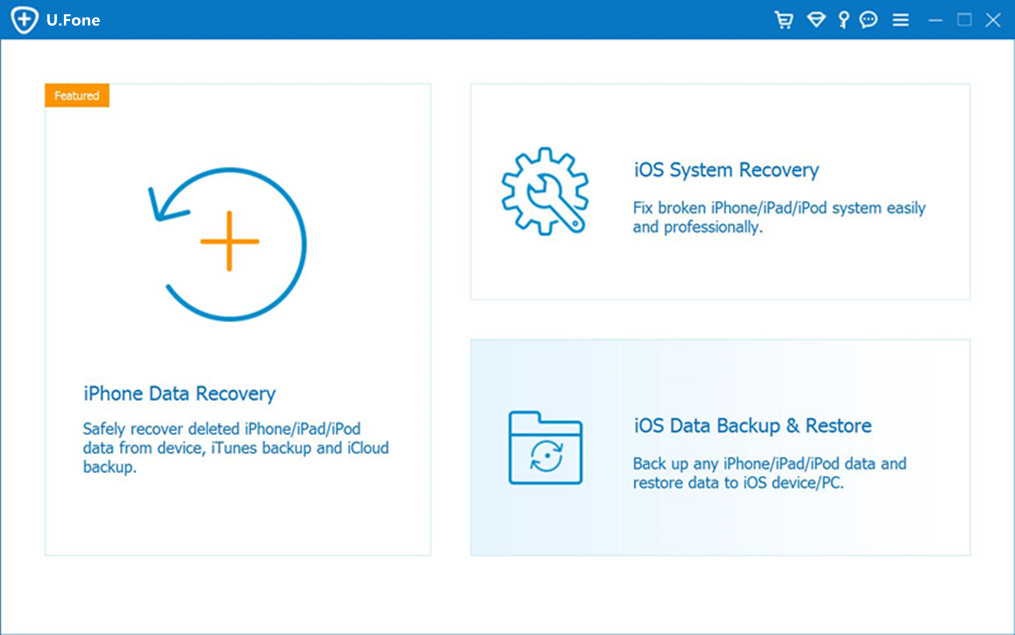
Step 1.Run the iOS System & Data Recovery on PC or Mac
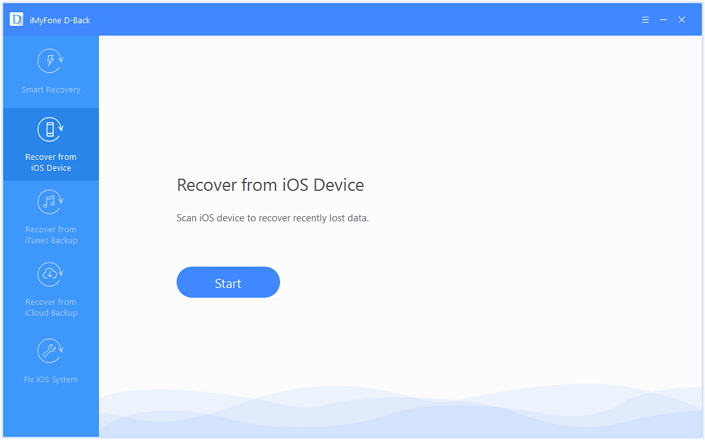
Click the link as given above and download iPhone/iPad data recovery on your computer,you can get the windows as below.

ios system recovery

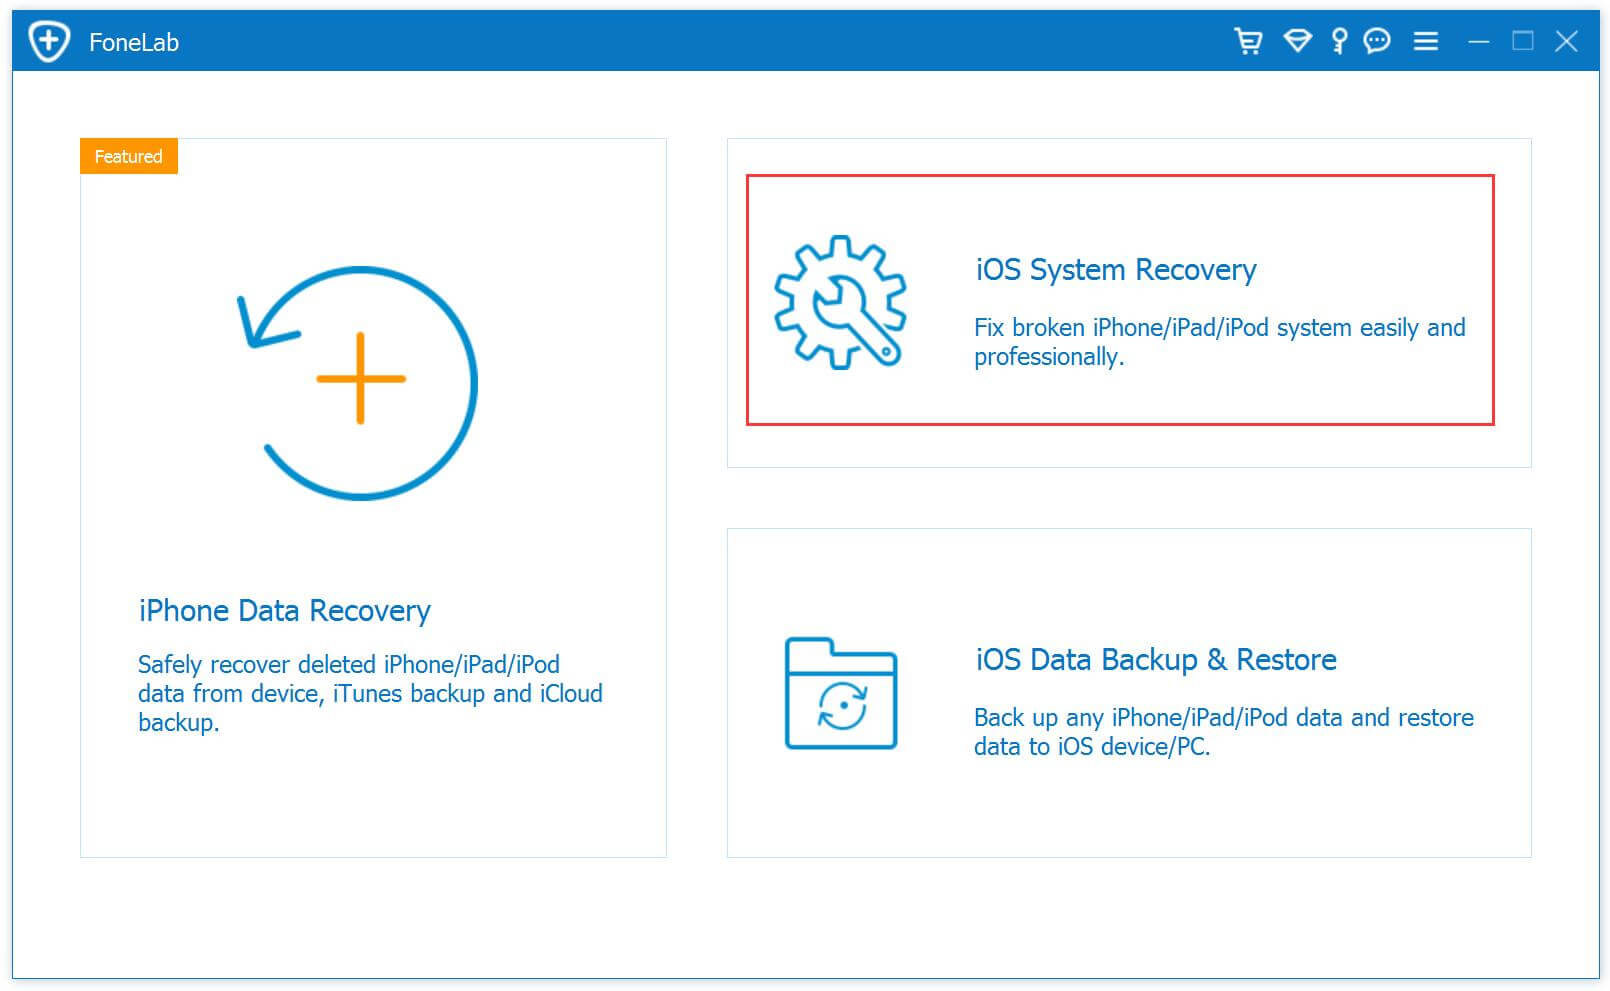
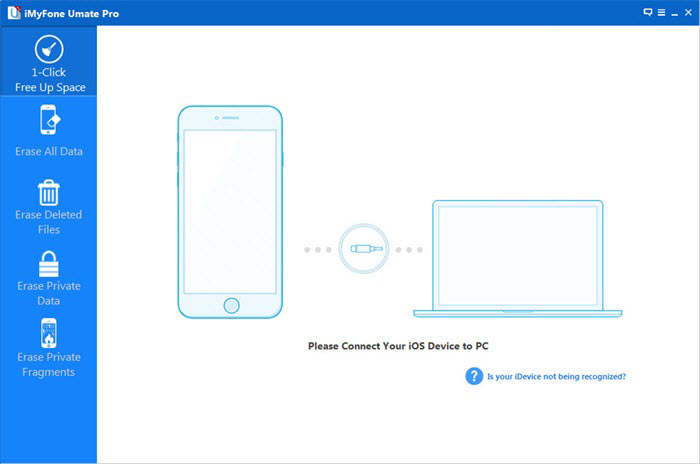
Step 2.Connect Bricked iPhone to Comptuer
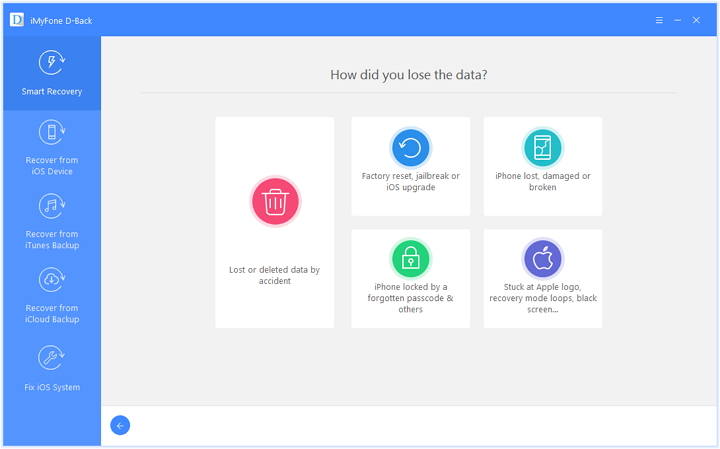
Select the option of ‘iOS System Recovery’ from the primary window after the software is download completely. Secondly,use the USB cable to connect your iPhone to your computer . After a few seconds,the iPhone/iPad will be detection by iPhone/iPad data recovery and display it on its screen. Now, click on the button ‘Start’.

fix bricked iPhone,iPad

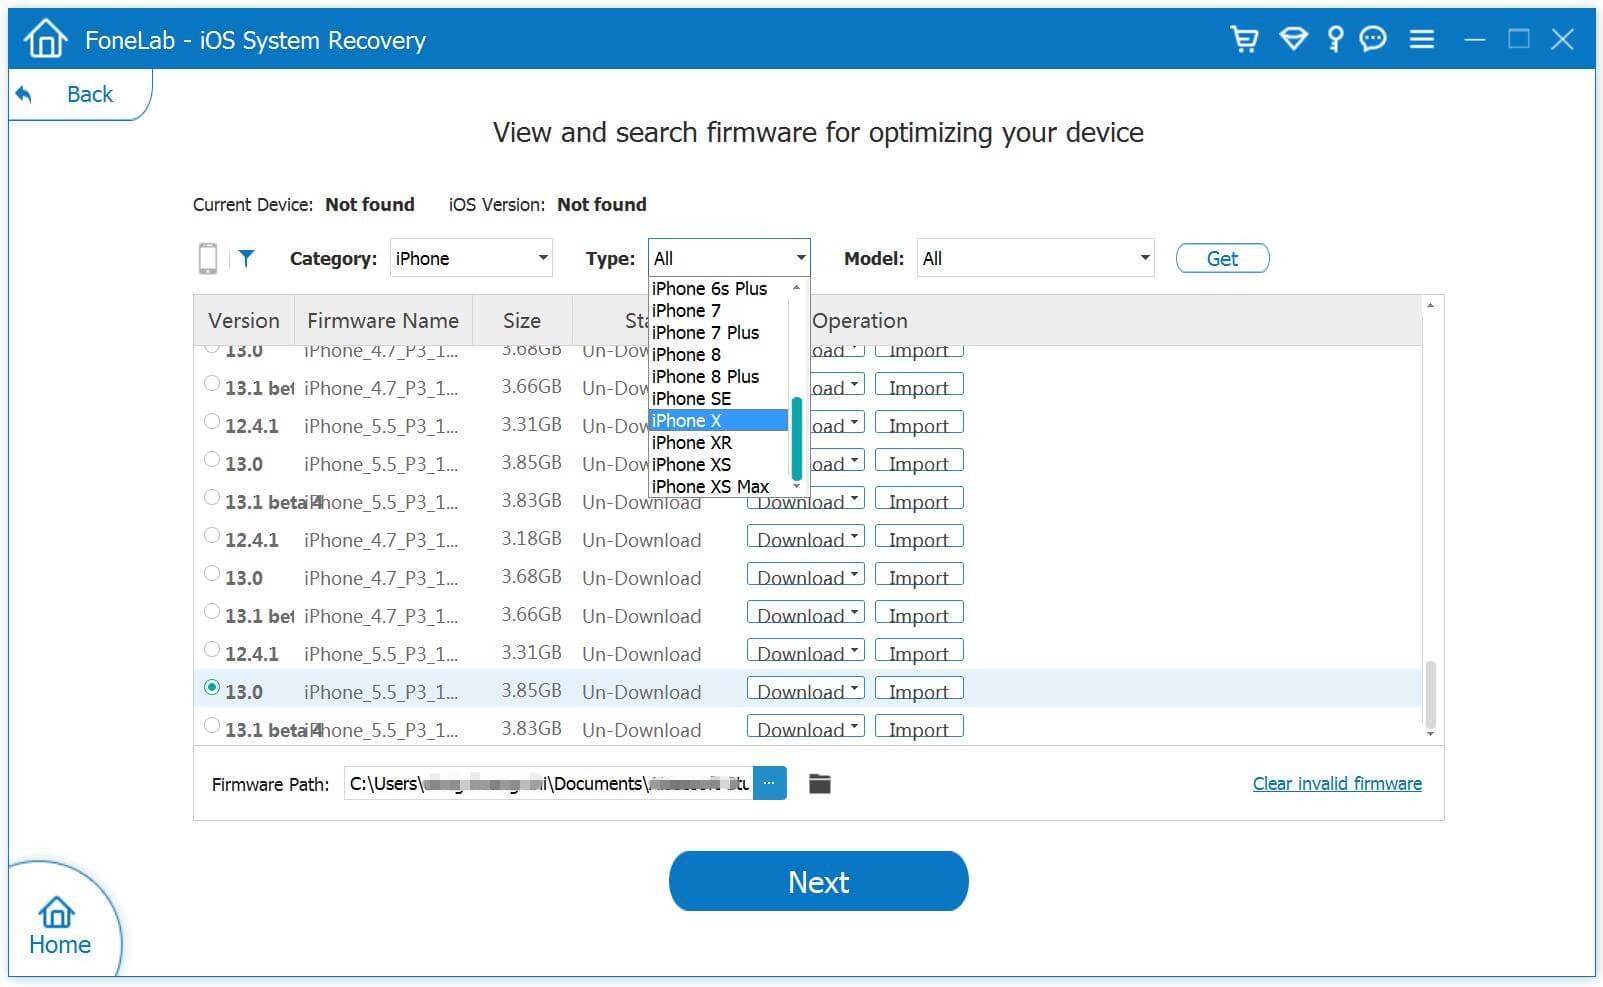
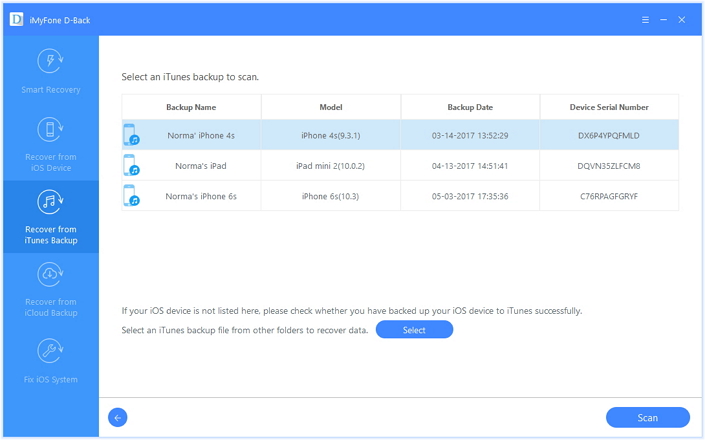
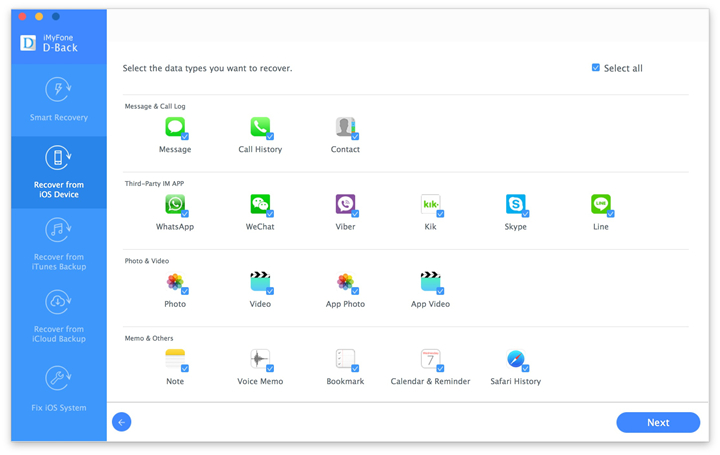
Step 3. Select your iPhone Model and Latest Version of the iOS System
The nest step is so easily for you to handle it .Click the button ‘Download’ and iPhone/iPad data recovery will do the rest for you.It’s absolutely that suitable for your device and let you choose it on the next screen.

repar bricked iPhone on iOS 10

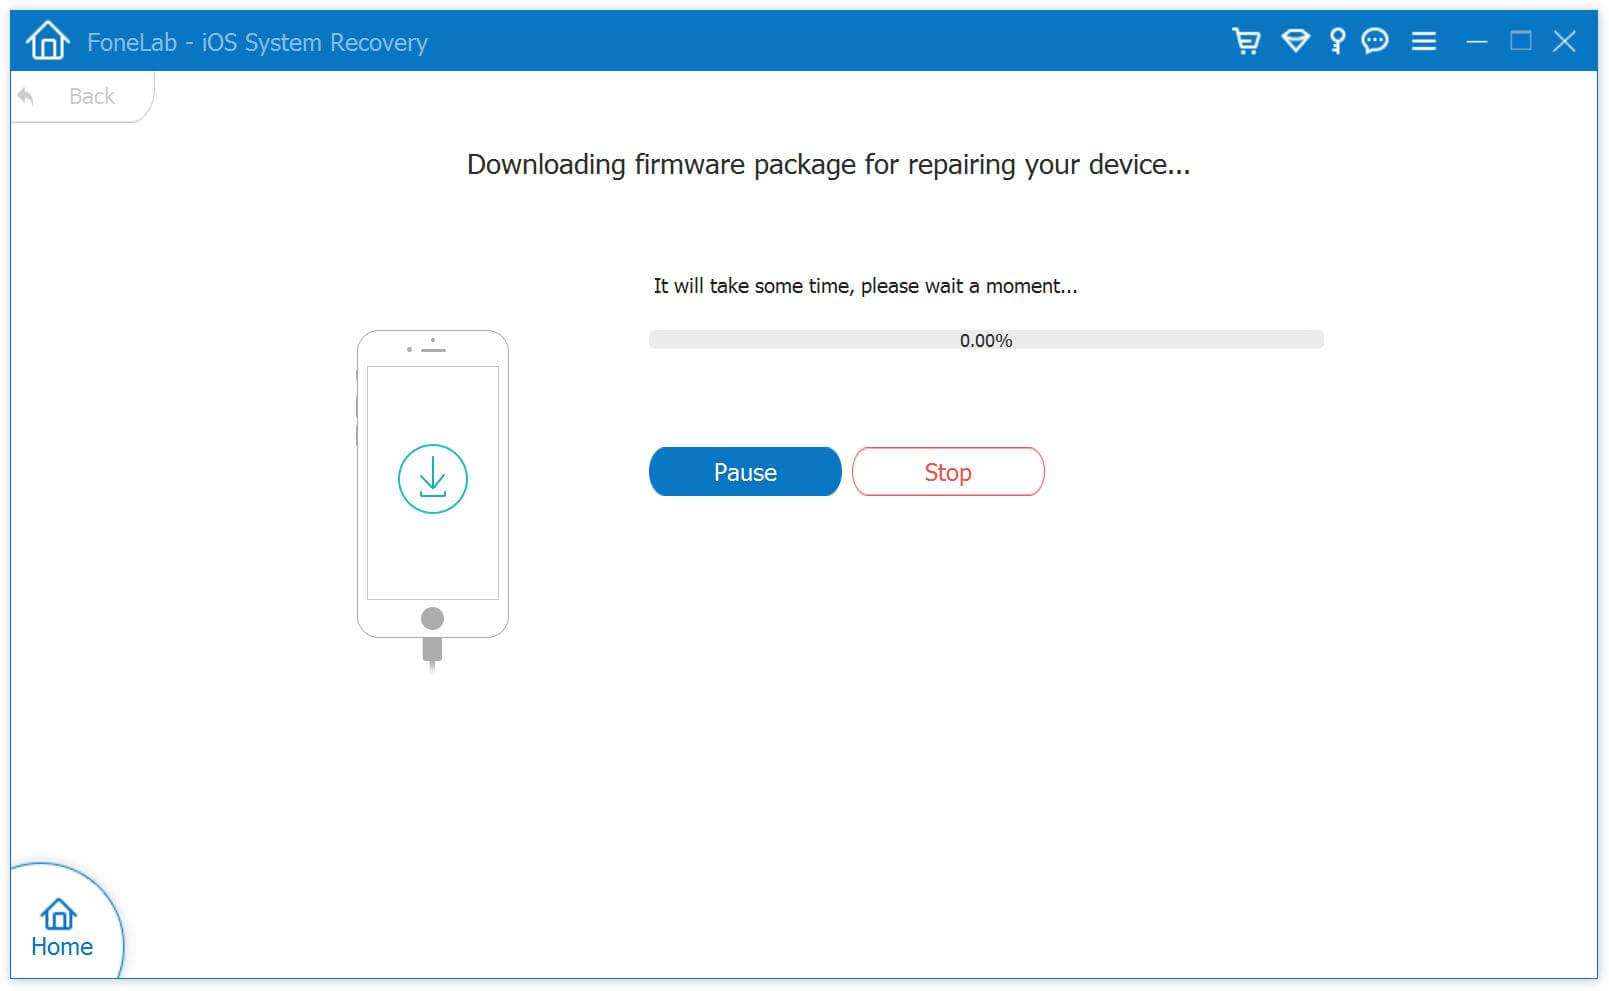
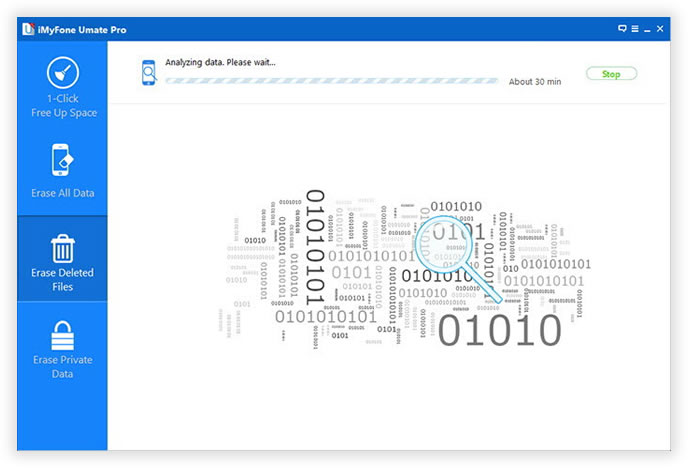
Step 4.Download the Latest iOS Firmware for your Bricked iPhone
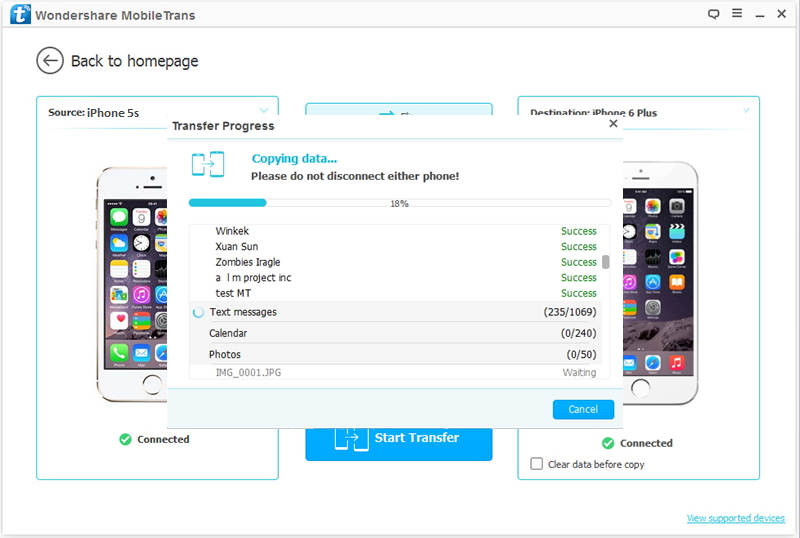
In this step,iPhone System Recovery tool has to download the latest iOS firmware,you will see that the program is offering you the latest version of the iOS to download,it wil display the progress of the download process as shown in the picture below. Let the software compelete this step fully,keep your iPhone/iPad and cpmputer connection.

download the firmware and fix bricked iPhone

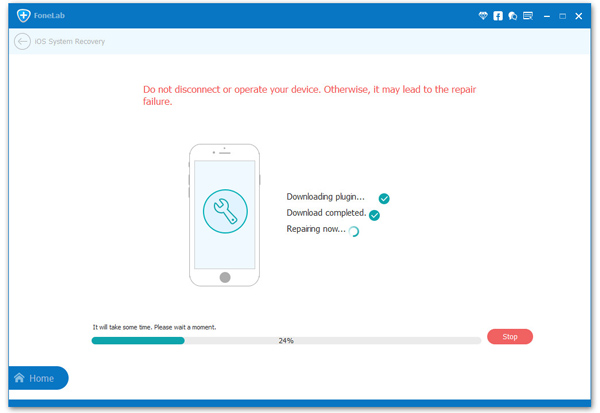
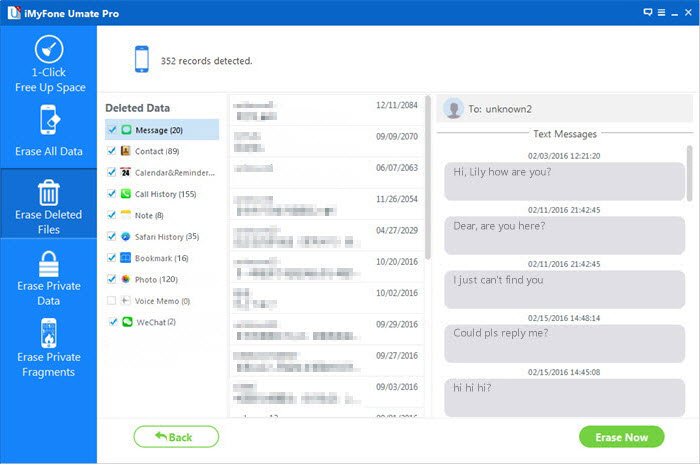
Step 5.Begin Fixing the Bricked iPhone
Waiting for the running step.Once iPhone System Recovery software has finished downloading the latest firmware for your iPhone, it will continue to fix the bricked iPhone without 10 minutes,the iOS fixing and keeping the status displaying as shown below.

fix ios to normal for ios 10 brick iPhone

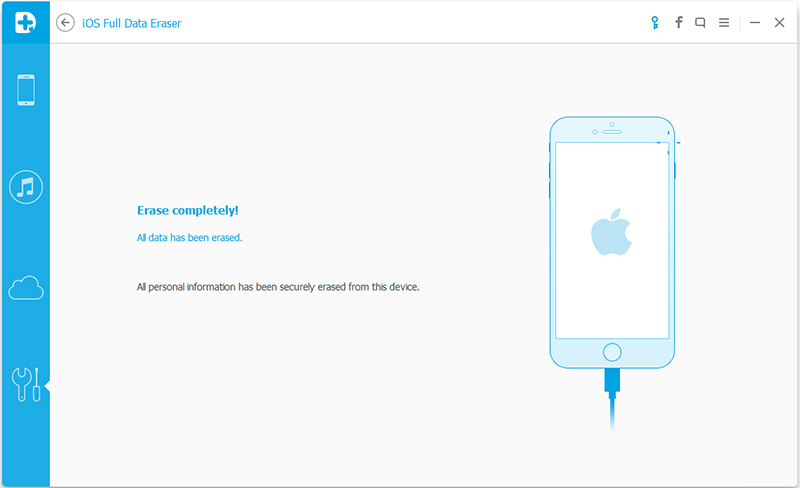
As soon as the iOS has been fixed on your iPhone/iPad, iPhone/iPad system recovery will confirm that to you as shown the feedback below and also proceed to restart your iPhone on its own.

After finishing all the steps,your iPhone/iPad has been restored to normal and turn to a unbricked device,now you can restart the device in normal mode.We hope that your iPhone/iPad will never get brick,however you know how to solve the ios system problem at home when you get in trouble again.

Free download the iOS Data Recovery:

d_win d_mac

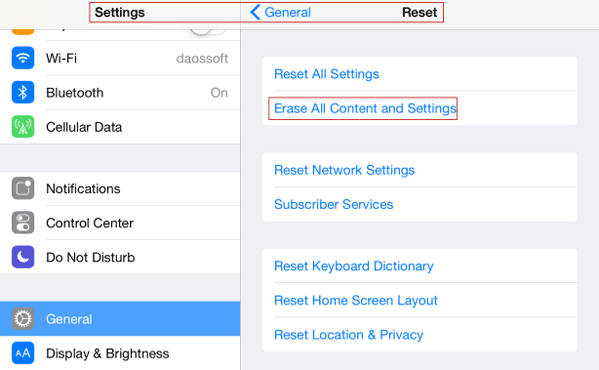
What’s Difference of iTunes,iCoud restore and iOS System Recovery restore?

Unlike iTunes or iCoud restore, this iOS System Recovery software can help you fix iOS to normal without data loss,it won’t change any data on your iPhone, iPad and iPod device during the fixing process.In additional, the program is 100% secure and won’t steal, change or leak your data on the device, either jailbreak your device. All it does is for novice to repair the broken iPhone,iPad,iPod device turn to normal at home,even if you do not have any professional skills.

Read More:

Restore iPhone Data after iOS 10 Firmware Upgrade

Backup data from iPhone to PC before iOS 10 Upgrade

Recover Lost iMessages after iOS 10 Upgrade

How to Fix iPhone to Normal After iOS 15/14 Upgrade Failed

Apple has released the iOS 15 official version, presumably some users have enjoyed on the iOS 15 official version, but there are still many users reflect that the update failed, prompted to download an error, encountered this problem, how to fix iPhone to normal while iOS 15/iOS 14 update failed?

Two Ways to Fix iPhone System and Return to Normal

According to our statistics, the problem is a common phenomenon, as the official version of the reason may be iOS 15 released the first time due to excessive number of downloads, the solution is relatively simple.
Method 1: try more than once (really simple ……) reflect that many users have encountered the beginning of such a problem, try several times after successfully downloaded iOS 15 official version.
Method 2: Using another upgrade that use iTunes upgrade.
Method 3: go to Apple’s official website to download the full installation image (requires developer account)

Some problem during iOS 11 Upgrading:

How can I Fix Apple White Screen after iOS 15 update?

My iPhone X is on iOS 14 version, I updated to iOS 14 to via OTA, which makes me crash is that my iPhone stuck on Apple White Screen death during upgrading to iOS 14/15, I have wait it a long time, but it does not have any progress. Now I want to get iPhone out of Recovery Mode and fix Apple White Screen of death after failure upgrading to iOS 13,someone here can help me? Thanks!”–Ask by Christina

There are many ways to handle the white screen of death situation. One can always visit an Apple store to get the device checked and repaired but not everyone can afford to pay $199 and more upfront. Local repair shops can also repair a hardware caused white screen of death but when it comes to software, the user does not has many options to look forward to.

Method 1. Repair iPhone System via iTunes

If find white screen of death randomly on your iOS device while upgrading to iOS 15 or iOS 14 then no need to worry you can fix up this issue via iTunes.

Step 1. Ensure that the latest iTunes is installed on your computer.

Step 2. Connect your Apple device to computer via USB cable

Step 3. Press and hold Home button and Sleep/Wake button for 10 second.

Step 4. After this release the sleep/wake button. But continue holding the home button till you get message saying “iTunes discovered Apple device in recovery mode, before the device is used by the iTunes restore your device”.

Step 5. Hit your iPhone, iPad or iPod touch in left sidebar to view the device control panel on right. Now click on Summary.

Step 6. Now move to Backups section and hit on Restore Backup. From the drop-down list select the backup file and restore your device.

fix iphone system stuck in itunes restore white screen iphone

Method 2. Fix iPhone Stuck on Recovery Mode via iOS System Recovery

Today,we recommend you use iOS System Recovery tool or iPhone System Recovery for Mac, both not only can help you get iPhone out of recovery mode loop; fix iPhone stuck in Apple Logo screen; fix iPhone stuck on itunes screen; repair iPhone stuck in DFU mode; fix iPhone stuck on black screen; exit iPhone recovery loop; fix iPhone frozen stuck on loading screen;restore iPhone system to normal;repair iPhone stuck on reboot sutation,ect during iOS 13 upgrade. The iPhone System Recovery tool not only allows you fix iPhone system to normal but also can enable you recover iPhone lost data after iOS 12/13 Update.

When you find the iPhone stuck on white screen of death then no need to panic. You can reboot your device and retrieve the lost or deleted back on your device. All you need to use is the iOS System and Data Recovery tool to get back the lost data easily.

After rebooting your device with the help of iOS System Repair tool,you not only can perform a system restore on iPhone, iPad,but also allows you easily get back the lost data such as photos, text messages messages, contact, call logs, videos, music etc. This data recovery software offers 3 ways to recovery data: directly data from iPhone, iPad, or extract and restore data from iTunes or iCloud backup files.

Free download the iOS Data Recovery and have a try!

d_win d_mac
d_win d_mac

Note: If you got iTunes or iCloud backup then you can use recover data from iTunes/iCloud backup recovery mode, that will help you to extract the backup file. Here you will find how recover from iOS device.

Step to Fix iPhone White/Black Screen after iOS 11 Upgrade

Step 1: Run the iOS Data Recovery and connect iPhone to PC

Download and install iOS Data & System Recovery (Windows&Mac) on computer. When the installation is complete, connect your iPhone or iPad device to your computer by means of a USB cable and launch the iOS Data & System Recovery.

fix iPhone stuck in recovery mode

Step 2: Select the item “iOS System Recovery ” to detected your devices

From the main window, select “Fix iOS” located at the top right of the screen. Wait for iOS Data Recovery to detect your iPhone/iPad device. Click “Start” once the device has been detected.

select your iPhone model

Step 3: Download the latest version of your firmware for your iPhone

To fix your iOS, Dr.Fone will download the latest version of your firmware after detecting your current iOS version. Hit “Download” and wait for the download to complete.

download the firmware and saved on iPhone

Step 4: Start to get your iPhone out of the “Withe Apple” without damaging your data

As soon as the download completes, Dr.Fone will iOS Data Recovery start repairing your iOS (iOS 11 is supported). It will do what is needed to get the device out of the white screen of death mode without damaging your data. In less than 10 minutes, you will get a message saying that your device is restarting to normal mode.

fix ios to normal

If you have followed all the above mentioned instructions carefully, your iOS device will be up and running within no time at all. However, if that is not the case, the nature of fault that has caused your device to have a white screen of death may be hardware related. To get the hardware problems sorted out, you will need to walk in to your local Apple store or any other Apple device repair shop as per your own convenience.

Download the free trial version to try it by yourself now.

d_win d_mac
d_win d_mac

What’s More About iOS Data Recovery:

The iPhone iPad Data Recovery is designed for ios users to scan and recover lost data from their iPhone, iPad or iPod no matter your device are on hand or not (restore data from iTunes/iCloud backup files). You can use this data recovery for iOS to fix iPhone, iPad from a white screen of death. It’s easy to use, and apart from fixing the white screen of death, it has a variety of other exiting features as well.
In additional,if you lost data due to factory settings; restore broken device; recover an iPhone back after a system crash or for ROM Flashing, the iPhone iPad Data Recovery also can help you get lost data back,including text messages, contacts, 4k videos, whatsapp chat history, photos, notes, voice memos and more.

Read More Use Guide About iOS Recovery:

Backup iPhone Data before iOS Upgrade: Before upgrading your iPhone to iOS 9, iOS 10 or iOS 11 with iTunes Firmware Upgrade, we recommended that you have a backup of your data to computer,or backup data to iCloud/iTunes no matter your device is iPhone X, iPhone 8, iPhone 7, iPhone 6s, iPhone 5s, iPhone 6, iPhone 6 Plus, iPad mini 3 and iPad …

Fix iPhone Stuck in Recovery Mode Due to iOS Update: Stuck in iPhone recovery mode during iOS 11/iOS 10 upgrade? … Your iPhone would get into recovery mode and you can use a iOS Data Recovery to fix your iPhone stuck in Recovery Mode due to iOS upgrading or downgrading.

Get iPhone Out of Recovery Mode During iOS Upgrade: When you iPhone stuck in recovery mode after iOS 10/iOS 11 update failure,you can learn this use guide to fix iPhone stuck in recovery mode.

Fix iPhone in iOS 15/14

iOS 9/iOS 10 Firmware Upgrade Failure, How to Recover iPhone Lost Data

Restore All Unknown Error Code when You Update the iOS Firmware Detailed Solutions

iOS 9 Firmware Upgrade Failure “Unknown Error 9”
Third, use iTunes to restore iPhone An “unknown error occurred update 9”

ios 9 upgrade failure and recover iphone data

(A) causes:
If the device is accidentally disconnected the USB bus and the communication stops, this error occurs. This occurs when the device is manually disconnected during the recovery process.

(B) The solution:
1. Check your USB.
The iPhone, iPad or iPod touch to a different USB port on your Mac or Windows PC. Compared hub built into the computer USB 2.0 port is preferred. If you have tried to connect the device to the front of the computer’s USB port, and then try to connect the device to the rear USB port. Once this is done, try to restore the device in iTunes.
If the problem persists, do the following:
(1) removing the keyboard, mouse, and iPhone, iPad or iPod beyond all USB devices.
(2) Remove all USB hub, your iOS device is connected directly to the computer. If your display has a USB connection, disconnect it from all USB devices.
(3) bypassing the dock, connect the device directly to the included USB cable.
(4) Restart your computer.
(5) Try again restore the device in iTunes.
If possible, please use an alternative known good USB cable for testing.

2, the elimination of third-party software conflicts
During use in the anti-virus software, security guards and other third-party software to completely exit can sometimes solve this problem.
PS: iTunes (Windows version): Troubleshooting security software issues:? Support.apple.com/kb/TS3125 viewlocale = zh_CN click View.

3, in the other computer recovery
If the above steps fail to resolve the issue, try to restore on a different computer. Make sure that the PC has a USB 2.0 port and is equipped with the latest version of iTunes, and you connect the device directly to your computer.

4, enter the DFU mode to restore the official firmware
(1) The need to make the phone into DFU mode.
Open the iPhone, use the USB connection to the computer, ensure a full charge. While holding down the power button + HOME top of the key 10 seconds (until the screen goes black), and only then release the power button and continue to hold the HOME button, and then wait 15 seconds. iTunes identification occurs, DFU mode drivers successful, but the screen is always black! At this time successfully entered DFU mode.
At this point, iPhone looks shut down, but in fact entered a special DFU recovery mode (Hint: then the screen must remain black state).

(2) Open iTunes
It will be prompted to open itunes detects an in recovery mode iPhone, click OK. Hold down the shift key and use the mouse to click on the “Restore” button, pop-up window select the firmware release the Shift key, select the official firmware.
5, sent to the maintenance point detection. (Hardware problem)

Read more: Back up iPhone or iPad Data before iOS 9 Update

>iOS 9/10 Firmware Upgrade Failure Cause Lost iPhone Data

If you failed upgrade to iOS 9.3.5 or iOS 10.2,it may cause erase all data on your iPhone,however,how can you recover erased data from iPhone after iOS upgradeing? This use guide teach you a easy use guide to get back lost data from iPhone after iOS 9/iOS 10 firmware upgrade failure…

First of all,you need to fix iPhone Stuck in Recovery Mode during/after iOS 9 Upgrading

What Can iPhone Data Recovery Help

*iPhone iPad Data Recovery can help you fix iPhone Stuck in Recovery Mode during iOS 9/10 update

*iPhone iPad Data Recovery supports recover almost all lost contnets/data from iPhone and iPad, including Text Messages, Photos, Live Photos, 4k Vidoes, Videos, Call Logs, Contacts, Notes, WhatsApp Messages/Tango/Viber chats, Safari history as well as Calendar and so on.

*iPhone iPad Data Recovery supports recover data lost due to iOS 10/9 update, iOS downgrade, accidental deletion, device crashed, smashed, broken, ios device loss, jailbreakor or factory settings restore. What’s more,sometimes the iPhone will be freezing on recovery mode or iPhone is stuck at White Apple Loop when iOS 9 upgrading/downgrade, iTunes requests you restore iPhone which will erase all data. iOS Data Recovery can help you get lost or deleted files back easily.

*Your iPhone, iPad was lost or stolen? Don’t worry,the iOS Data Recovery allows you scan and extract lost iPhone data from iTunes or iCloud backup files. You can get back the lost data with no worries. This powerful iOS Data Recovery software is even a life saver to restore your precious photos, contacts, or messages when iPhone is inaccessible like lost, stolen or physically damaged without a backup.

*It is not just data recovery software but also an iPhone backup tool that helps you back up all your iPhone data or selectively backup important data to computer before downloading the new iOS firmware,or backup iPhone data to computer before iOS Firmware Upgrade,make sure all your important contents never lost after iOS 9/10 upgrading success or failure.
What’s more,it also can help you Repair Operating System for iPhone.

Free download the powerful iOS Data Recovery and have a try!

d_win d_mac

Restore Lost Data from iPhone after iOS 9/10 Firmware Upgrade Failure

Step 1. Run the Program and Connect iPhone to Computer
After downloading iPhone Data Recovery, install and run it on your PC/Mac. Then you can connect your device with the computer.

connect iphone to computer

Step 2. Begin Scanning Lost Data from iPhone after iOS Update
You can directly select files to scan by program and click “Next” on the window above to scan your device and find data on it.

select data to scan

Step 3. Preview and Recover Lost iPhone Data after iOS Update
When the scan is finished, you can check all found data in the scan result generated by the program, such as photos, contacts, messages, notes, call log, whatsApp conversations, and more. Select what you want and click “Recover”. If you’re trying to recover contacts, when you click “Recover”, a pop-up will ask: “Recover to Computer” or “Recover to Device”. If you want to put these recovered data back to your iOS device, click “Recover to Device”.

recover iphone data after ios 9 upadate

Free download the iOS Data Recovery and have a try:

d_win d_mac

Note: If you want to import recovered contacts back to your iPhone, you can use iPhone/iPad/iPod Manager to do it in a few clicks.
Read More:

Recover Text Messages from iPhone 6: To get back deleted messages from iPhone 6, there are three ways for you: recover messages directly from iPhone, restore iPhone messages from iTunes backup and retrieve iPhone text messages from iCloud backup.

Recover Data after Restore iPhone to Factory Settings: When you restoring your iPhone to factory settings, you are faced with losing your data. Don’t worry. The iOS Data Recovery can help you scna and restore lost contacts, sms, photos, videos and other erased data back from a iPhone after restore iPhone to factory settings.

Erase All Data from Old iPhone Before Selling: Before you sell or give away your old iPhone device, you should remove your data permanently,or any other iCloud data while you’re signed in to iCloud with your Apple ID stored on your old device should be wiped, but it will prevent the new owner from deleting your personal data.

How to Backup iPhone or iPad Data before updating to iOS 9

Notes: Before iOS 9 Firmware Upgrade,you must to backup your iPhone or iPad data to computer or iTunes. As we all know,many ios users jailbrearking their old iPhone 6/5s/5/4s/4 on iOS 8/iOS 7,once your jailbreaking the iPhone, iPad before,if you want to upgrade iPhone, iPad to iOS 9 by default settings on the devices (update iPhone,iPad to iOS 9 without iTunes),it’s failed! However,to upgrade your jailbroken iPhone 6/5s/5/4s/4 to iOS 9,you must to upgrade by “Firmware Upgrade”,it means you must to download the iOS 9 Firmware on a computer,and then upgrade iPhone to iOS 9 by iTunes.But if you update iPhone to iOS 9 in this way,it may erase all data on your iPhone, iPad,however,this use guide mainly teach you how to recover lost iPhone data after update to iOS 9.

Backup iPhone Data Before Upgrading to iOS 9 (iOS 9Firmware Upgrade)

Many iPhone users may ask how to backup iPhone data to computer before update the devices to iOS 9. We all know that it’s very easy to backup photos to computer,by if you want to backup contacts, text messages, call logs and other important to computer,you must to use a third-part iPhone data backup software.

Today,we recommend you two useful data transfer tool: iPhone iPad Data Manager tool and Phone to Phone Data Transfer,both allows you transfer & backup iPhone data to computer directly,including contacts, text messages, photos, videos, call logs,etc,. With the help of iOS Data Manager, you not only can backup photos, live photos, 4k videos, music, videos, text messages, contacts, notes and other contents from iPhone computer or iTunes,but also allows you transfer contacts, messages, photos (live photos), videos (4k vides) between old iPhone and new iPhone directly.Let’s taking backup iPhone contacts to computer before iOS 9 upgrading for example.
Read the use guide: Transfer data from old iPhone to new iPhone.

Free download the iOS Data Manager:

d_win d_mac

Using iPhone Data Transfer, before update to iOS 9,all iPhone user can backup the contacts and contact’s photo to computer as a txt file or a ANTC file. In ANTC file condition, you can protect the file with a password to keep your iPhone contacts privacy.

How to Backup Contacts from iPhone to Computer Before iOS 9 Upgrading

Step 1. Launch iOS Data Manager and connect your iPhone/iPad/iPod with the computer.

connect-iphone-with-computer
Step 2. Backup contacts from iPhone/iPad/iPod to computer.
a. Click Information at the top of the the main interface, you’re expected to enter Contacts > Local by default; if you want to backup contacts on the iCloud or other account, then select iCloud or other account instead of Local. Here we back up contacts in Local for example.

select local contacts

b. Check the contacts you want to back up, and then click Export from the top menu, and then select one file type you want to export: to Vcard File, to CSV File, to Windows Address Book, to Outlook 2010/2013/2016.

select the place to export
c. A new window will pop up, browse and select the target folder on your computer and click Save to start the export.

browse and select the target folder on your computer

d. Export successfully, you can click OK to finish the process, or click Open Folder to reach the target folder to check the saved file.

export-contacts

Try iPhone Data Transfer to transfer/backup iPhone contacts to PC.

d_win d_mac

Read more:

What to Do before Update iPhone to iOS 9

How to Backup Contacts from iPhone to Computer

2 Ways to Backup and Restore iPhone Data on Windows or Mac

How to Recover Lost Contacts on iPhone after iOS 9/10 Update

How to Transfer Samsung Android Data to iPhone 7/6S(Plus)

[Summary] This article teach you the easy way to transfer contacts, text messages, videos, photos, music, ebooks, notes, call logs,WhatsApp messages from Samsung Galaxy to new iPhone 7,iPhone 6S(Plus), iPhone 6(Plus) and iPhone SE with one clicks!If you have purchased a new Samsung Galaxy S7/S6,Note 5/A9,you also can switch iPhone data to Samsung phone.

Move Everything from Samsung Galaxy to iPhone 7/6S/6(Plus)

If you used Samsung Galaxy phones before, such as Samsung Galaxy Note 5/Note 4, Samsung Galaxy S5, Samsung Galaxy S6, Samsung Galaxy J5, Samsung Galaxy A9 or other Samsung smartphones and now want to purchase the new iPhone 7(Plus) or iPhone 6s/6(Plus), how can you transfer contacts and messages from the old Galaxy S3/S4/S5/Note 4 to new iPhone 7 only with one click? Or how to transfer music to iPhone 7 plus from Galaxy S6? If you have any problem about how to move Samsung contacts to iPhone 7. How to transfer SMS from Samsung Galaxy S5 to new iPhone 6S. And, yes, how to move all photos, videos and songs from Samsung phone to new iPhone 7/6/6S, iPhone SE. Or basically, how to switch data from Android Samsung phone to iOS iPhone? Here is step-by-step guide you should need.

* How to Recover Lost Data on iPhone 7/6S

* How to Manage iPhone Data on Computer

Transfer Data between Samsung and iPhone 7

With the Samsung to iPhone Transfer Tool,you can transfer all text messages, contacts, videos, music, ebooks, notes from Samsung Galaxy to iPhone 6S/6, iPhone SE, iPhone 7(Plus) only 1 click!As well as iPhone to Android as return.

The Android to iPhone Transfer is a useful tool that make data transfer workable from phone to phone even if they run the different operating system, for example transfer Samsung data to iPhone,Samsung Galaxy S5 to iPhone 7, iPhone 5 to Samsung Galaxy S7/S6, HTC to iPhone SE,etc,. So most smart phone,like Samsun,HTC, Motorola, Sony, LG and more Android phones are compatible to this program. You can also use it to copy any data like contacts, messages, videos, pictures, songs, call history, apps, calendars, and so on. The steps to operate it are not that complex as you think. You need only 3 steps: Firstly, connect your phones; secondly, choose the data that you want to move; last but not least, transfer.

But, first, download and install it by clicking the buttons below.

d_win d_mac

Supported Samsung Galaxy to iPhone Transfer

Samsung:
Galaxy S7/S7 Edge, Galaxy S6/S6 Edge, Galaxy S8/S8 Edge, Galaxy S5/S4/S3/S2, Galaxy Note 1/2/3/4/5/7, Galxy S4/S3 mini, Galaxy A9/A8/A7/A5, Galaxy S Duos, Galaxy Grand, Galaxy Ace, Galaxy Nexus, Galaxy Tap, Galaxy Rugby, Galaxy Fame, and more samsung smartphones.

Apple Devices:
iPhone 6S/6S Plus, iPhone 6/6 Plus, iPhone SE, iPhone 7/ 7 Plus, iPhone 5S/5C/5/4S/4/3GS, iPad, iPad Mini, iPad Air, iPod Touch etc.
Support iOS 8, iOS 9(iOS 9.2, iOS 9.3),iOS 7, iOS 6 and the lastest iOS 10.

How to Transfer Contacts from Samsung Galaxy to iPhone 7/6S(Plus)

Step 1: Launch Android to iPhone Transfer tool to PC

After installing, run the Samsung Galaxy to iPhone Transfer tool,the interface will be shown as below.

phone transfer main page

Note: To manage iPhone data, you are required to make sure that you have installed iTunes on your computer before. If you haven’t, the interface will remind you to install one before transferring the precious data between Android and iOS.

Step 2: Connect Samsung and iPhone 7/6S to the PC and Select File Types Transferring

Then connect your Samsung phone and iPhone to computer,you will see your Samsung and iPhone displayed as below.The software will show all your files in the window. Please note that the source phone is on the left and the target phone is on the right. So if you would like to transfer from iPhone to Samsung Galaxy Phones, such as from iPhone 5 to Samsung Galaxy S6/S7(Edge), just simply click the “Flip” button to change positions of Android phone and iPhone.

select files to transfer

Check items you would like to transfer from Samsung  to iPhone.

Step 3: Start Transfer Files between Samsung and iPhone 7/6S

Hit the “Start Transfer” button. A dialog comes out both showing the files’ names and a progress bar, please do not disconnect neither your iPhone nor Samsung phones while transferring, or the transfer will stop.

copy samsung data to iphone 7

Download it and have it a try on your own.

d_win d_mac

As you can see, you can transfer your precious data with 3 simple steps. That is, connect, select and transfer. Clearly and easily operated, isn’t it? Why not have a try, you can easily move data from your Samsung Galaxy to your new iPhone.

More Android Samsung & iPhone Transfer Tutorial:

How to Transfer Text Messages from Samsung to iPhone 7/6S/6/SE

How to Transfer Data from Old iPhone to iPhone 6S/7

Transfer Contacts from old Samsung to Samsung Galaxy S6/S7/Note 7

How to Transfer WhatsApp Messages from iPhone to Galaxy S7/S6/S5

How to Recover Lost Data from iPhone 6S/6

Transfer WhatsApp Chat History from iPhone to Samsung

How to Backup,Restore and Transfer WhatsApp Messages

How to Fix iPhone Stuck in Recovery Mode

[Summary]: If iPhone stuck in recovery mode after iOS update, this article teach you how to restore iPhone via iTunes, you can also learn how to fix iPhone stuck in recovery mode by U.Fone iOS System Recovery, no data loss at all! Choose the method you want and start to get iPhone out of recovery mode now!

Today I downloaded & tried to install the new iOS 12.3.1 on my iPhone 7. After having an error stating that the download of iOS 11 could not be installed, I started to worry. I tried downloading & installing it through my PC. This worked, but then it could not install because I couldn’t backup my iPhone.Now,my iPhone 7 stuck in recovery mode during iOS 11.3 upgrading.how can I fix iPhone stuck in recovery mode after iOS 12.3.1 update?”Ask by Alen

Someone can help me solve iPhone stuck issue? My iPhone X stuck in recovery mode after iOS 13 update, is there any free ios repair tool to fix iPhone stuck in recovery mode after iOS 13 beta update?“–Ask by Jessica

Fix iPhone Stuck in Recovery Mode

I believe many people will encounter the same problem, because some unexpected cause your iPhone stuck in recovery mode after/during iOS software upgrading. When you iPhone or iPad stuck in Recovery Mode during iOS update or iOS jailbreaking, please don’t worry!

apple developer center download firmware

You can go to the official website of Apple Developer Center to download iOS 12.3.1 firmware to upgrade your iPhone system, then get iPhone out of recovery mode, this is a pre-release version of iOS 12.3 for iPhone, iPad, and iPod touch, after upgrade your iPhone to iOS 12, it can not be restored to earlier versions of iOS. Just in this free way to fix your iPhone stuck in recovery mode. More and more users willing to upgrade to the new iOS, but sometimes, you may fail update the device and cause lost data or system disorder, the best way to get iPhone out of recovery mode is use a professional iOS System Recovery, no data loss at all.

iOS System Recovery Key Features

-Completely wipe and reinstall the iOS to fix serious iOS issues
-Get iPhone out of recovery mode
-Restore ios system to normal status
-Repair iPhone stucking at white screen, black screen of dead
-Fix iPhone stuck at Apple logo,iTunes logo and so on
-Unlock your device without data lossing

d_win d_mac

Today, we want to teach you how to fix iPhone stuck in Recovery Mode after jailbreak or upgrade, if lost data on after iOS upgrade or jailbreaking. Don’t worry,you still have chance to recover lost data after iOS 13/iOS 12 update. You can mange it with two steps: backup your data with professional iPhone data recovery tool and get out of recovery mode by restoring the iPhone.

Part 1: Backup and Restore iPhone Data when Stuck in Recovery Mode

To get out of recovery mode,restoring the iPhone to factory is a simple way. Everyone can do it with no efforts. But it will erase all the data on the iPhone, iPad device. Obviously people want to minimize the extent of the loss of things. This is why users thought it is difficult to fix iPhone stuck in Recovery Mode and fix iOS to normal for iPhone.

But it doesn’t matter. The iOS 13/iOS 12 System Recovery tool can help you easily and completely fix iOS system to normal when iPhone stuck in recovery mode without any damage or data loss on your device. It also is a powerful iPhone Data Recovery software that allows you to backup and restore all data from iPhone, iPad directly, such as contacts, text messages, photos, videos, call history, notes, WhatsApp data, calendars and more in iPhone recovery mode. What’s more,you can use this iOS System Recovery to allows you fix iPhone device stuck at apple logo or recovery mode loop, getting black screen,white screen or others,and extract lost data from iTunes and iCould backup. Besides get iPhone exit recovery mode, it will easily get rids your device of DFU mode no matter after iOS 13/iOS 12 upgrade, downgrade or jailbreak.

iOS Data Recovery software can do you a favor to solve this emergent issue in an easy, quick and effective way. In order to recover all your endangered data, you should take measures to get your iPhone out of recovery mode first, and the tutorial below will guide you in this way.

d_win d_mac

Alternatively, you can try iTunes to restore your iPhone, iPad or iPod that is stuck in recovery mode during iOS update. The “Restore” here means to restore your device to the original factory settings and download the newest iOS to restore to the iDevice. This can fix the stuck in recovery mode and help you get the newest iOS on your device. Note that restore will delete all data on your device, so it’s better to backup data from iPhone to computer before iOS 13/iOS 12.3 update or jailbreak.However, the Phone Data Transfer or iPhone to Computer Transfer can help you backup iPhone data to computer.
Please go to: how to backup and restore iPhone data.

How to Backup & Restore iPhone Data in Recovery Mode

Download and run the iOS Data & System Recovery on the PC/Mac,then click “iPhone Data Recovery” to enter the recover feature.

ios-data-recovery-main

Step 1: Connect your iPhone to the computer
At first, please connect your iPhone to the computer and run the program after installing it,then click “Recover from iOS Device” button on the main window.

connect iPhone to PC

After the device detected by the software, you just need to click the “Start Scan” button to scan your iPhone, then you will see the scanning window.

scan iPhone data

Step 3: Extract iPhone Data and Save onto the computer

When the scan is completed, all found data will be listed in clear, organized categories. Choose “Messages” “Contacts” “Photos” “Note” “Call Logs” “Video” and other contents to preview the detailed content. Mark those you want and click “Recover” to save them on your compute with one click.

backup/recover iPhone data to computer

Note: The data you can found here includes the deleted data and those still on your iPhone. If you only want to recover your deleted ones, you can refine the scan result by using the slide button at bottom to only display deleted items.

d_win d_mac

Way 1: How to Fix iOS System When Stuck in Recovery Mode with iOS System Recovery

After downloading and installing the program on your computer, you can follow the way below to get your iPhone out of recovery mode or DFU with one click.

1. Run the program and connect your iPhone to the computer.

connect iPhone to computer to fix iPhone system

2. When the program organized your iPhone, you’ll see the window below,and click on the “iOS System Recovery” that can be found on the top right of the window.

connect iPhone to computer to fix iPhone system

3. Download and Select the Right Version Firmware for your iPhone

choose firmware

Begin to download the firmware,please wait for few minutes

download the firmware

4. Get iPhone Out of Recovery Mode and fix iPhone system to normal

fix iphone in recovery mode

Free download the iOS Data & System Recovery and try to restore ios system to normal.

d_win d_mac

After your iPhone is back to normal, you still can use iPhone Data Recovery to recover lost data from your iPhone, or backup data on your iPhone to your computer, if you have such a need.

If you found your data from your iOS device lost after returning to normal, you can click the below tutorial to learn how to recover your lost data from iPhone, iPad or iPod with 3 effective ways.
Read more: How to Restore iPhone System to Normal when stuck in recovery mode,apple logo,iTunes logo,etc,.

Way 2: How to Fix iPhone Stuck in Recovery Mode with iTunes Restore

The iTunes not only can help you sync data to iPhone, iPad and iPod device,and the iTunes Restore mode allows you fix iPhone stuck in recovery mode,but it may cause data loss,because all the data and settings on the iPhone will be erased before restoring process,and all the contents and setting on your iPhone will be restored to your last iTunes backup. However,before fixing your iPhone stuck in recovery mode with iTunes restore,we strongly recommend that you should back iPhone data to computer,then restore those backups to your iPhone after the restoring process done! If you have’t backup iPhone data,you still have chance to recover lost data from iPhone when this happens.The iPhone Data Recovery can help you recover lost or deleted data on iPhone,iPad since your last iTunes backup.

First of all,please make sure you have install the latest version of the iTunes program.If you haven’t update your iTunes program,please open iTunes and click “Help” in the main menu,and then select “Check for Updates“, iTunes will tips you if you are using the latest version. You may need to download the latest iTunes version before you continue.

Step 1: Run the iTunes program and connect your iPhone device to computer,then hold the “Home” button down (on the front of your iPhone),a message should pop up and say that your iPhone is in “recovery mode” and needs to be restored.
Step 2: Click on your iPhone device (in the iTunes windows) along the main toolbar, then go to the “Summary” tab.
Step 3: Select the “Restore” option.
Step 4: Backup your iPhone settings.
Step 5: Restore your iPhone back to its previous settings.

Tips: This method may cause data loss on your iPhone,we recommend you follow Way 1 to restore iOS system by using iOS System Recovery to fix your iPhone,iPad stuck in recovery mode without data loss.

Read More Tutorials

Recover iPhone Lost Data After iOS Upgrade: Once lost data after upgrading your iPhone to iOS 11 or iOS 12,the iOS Data Recovery can help you scan and restore lost contacts, SMS, photos, notes and more from your iPhone.

Recover iPhone Data after Factory Reset: When you restoring your iPhone to factory settings, you are faced with losing your data. Don’t worry. You can follow this tutorial to restore lost iPhone data back after restoring to factory settings.

How to Fix iPhone Stuck on Apple Logo
After upgrade your iPhone to iOS 11 or downgrade your iOS devices,it may cause your iPhone stuck on Apple Logo and can’t loop into the system,follow this use guide to get iPhone out of Apple Logo when iOS 9 update failure.Now,you can fix ios to normal when you iPhone stuck on Apple Logo,make [iPhone Stuck on the Apple Logo issue] easy to fix.

How to Recover Lost Data from iPhone after Factory Reset

How to Recover Data from iPhone after Restoring to Factory Settings
Help! My iPhone 6 went into recovery mode after upgrading to iOS 10.2. To get it out of recovery mode, I had to restore my iPhone 6 to factory settings,but after reset to factory setting,it cause erase all iPhone data,I don’t know why lost iPhone data after restore to factory setting? Is there anyone can help me restore data from iPhone after reset?Tony Wong

recover data from iphone itunes

People want to read:

* How to Recover Deleted Data on iPhone

* How to Manage iPhone Data on Computer

Lost Data on iPhone after Restoring to Factory Settings

Many iPhone users may ask similar question: “How to recover iPhone data after factory reset? What should we do to recover iPhone lost files after restore? How can I restore data from reset iPhone? How to retrieve contacts after reseting the iPhone?Can I restore data from iPhone that has been reset to factory settings?How to recover deleted pictures from iPhone after factory reset?”

As we all know,when reset the iPhone to factory setting,it may erase all iPhone data permanently.If you lost iPhone data after restore to factory settings, you can use iTunes to get back your data. If only part of the data is lost and you don’t want to erase what you have now, you need an iPhone Data Recovery tool to recover lost data from iPhone after factory restore.

When you delete files on your iPhone, it isn’t gone forever immediately, but only becomes invisible and can be overwritten by any new data. As to restoring iPhone to factory settings, it’s a little hard, because the data might have been overwritten during the restoring. It sounds impossible to recover data from iPhone after factory setting restore. If you have synce iPhone to iTunes before, you can restore iPhone data from iTunes,but you should know that iTunes doesn’t allow you to recover data selectively.If you never synced iPhone to iTunes before,to recover lost data from iPhone after restore to factory setting,you need to use an iPhone data recovery tool. Let’s teach you how to use a professional iPhone data recovery to recover your iPhone 7/6S/6/SE/5S/5/4S/4 lost data after restoring to factory settings.

Recover Lost iPhone Data after Restoring to Factory Resettings with iPhone Data Recovery

With iPhone Data Recovery-iOS Data Recovery software,you can easily recover lost data from iPhone after factory reset,including photos, contacts, text messages, videos, notes, whatsapp messages, call history,calendars, recordings, reminders,safari bookmarks and more types of data.The iOS Data Recovery provides you three recovery modes to recover lost data: “directly recover from iPhone”; “restore from iTunes backup”; “recover from iCloud backup”, you can use this powerful iOS Data Recovery to recover all lost files from iPhone, iPad, including iPhone 7(Plus), iPhone 6S(Plus), iPhone 6(Plus),iPhone SE, iPhone 5S, iPhone 5C, iPhone 5, iPhone 4S, iPhone 4, and even the iPad Pro, iPad mini 4, iPad Air,etc,. Download and install iOS Data Recovery on your computer and connect your iPhone to PC/Mac,then use the program to scan and restore lost iPhone data,and it works for iOS 10, iOS 9, iOS 8, iOS 7 devices.Next, I would like to share the detailed steps that how to restore lost iPhone data after restoring to factory settings.

Download the iPhone data recovery and try to get back your lost data.

d_win d_mac

Tips:The iPhone Data Recovery not only can help you recover lost data from iPhone,iTunes,but also allows you download and extract iPhone data from iCloud backup files.What’s more,the program enables you backup your iPhone before restoring to factory settings.

2 Ways to Recover Lost Data after Factory Reset iPhone

Way 1: Selectively Recover iPhone Lost Data from iTunes Backup after Factory Reset

The iPhone Data Recovery provides the contains several data recovery modes,including “Recover from iOS Device”,”Recover from iTunes Backup”,”Recover from iCloud Backup”,”Smart Recovery”.The “Smart Recovery“help to recover data when you don’t know which is your data loss circumstance.

smart iphone data recovery

Note:This recovery mode allows to scan device directly to find and restore all the lost lost data from your lost/broken device also.

Step 1: Run the Program on Computer
Download, install and run iPhone Data Recovery program on your computer. Then follow the steps below to perform iPhone data recovery after restore, as well as recover videos, messages, contacts, etc,.

Step 2: Extract iTunes Backup
Click the menu of “Recover from iTunes Backup File” on the top of the start window. Then you will find all your iTunes backup data are displayed as a list. You can choose any one to extract. For your iPhone data, you should choose the one for your iPhone here. Then click the “Scan” button to begin scanning it.

select recovery mode

Notice: Don’t connect your iPhone to the computer during the recovery work.

Step 3: Preview and Recover Data from the iTunes Backup
When the scan over, you will see all the data are extracted and displayed in detail. Before recovery, you can preview SMS contents in Messages and Message Attachments, photos and videos in Camera Roll and Photo Stream categories, etc. Please choose the data you want and click “Recover” button to save it on your Mac.

recover text messages from itunes

Note: If you have a need, you also can restore all of them with this program, and keep them on your PC/Mac.

d_win d_mac

Way 2: Directly Recover Lost Data from iPhone after Factory Reset

Step 1. Launch the Program and Connect iPhone to Computer
After downloading and installing iPhone Data Recovery program on your computer, launch it.

connect iphone with computer

There is only a “Start” button on the main window. After connecting your iPhone, click the “Start” button to scan your iPhone, then you’ll see this scanning window.

select file to recover

Then it will begin to scan your device quickly.

scan iphone and search lost data

Step 2. Preview and Select the Recover Data from iPhone
After the scan, all your data in your iPhone are found and listed in organized categories, such as photos, contacts, messages, call history, calendar, notes, reminders, voice memos and safari bookmark. You can preview full contents of all of them one by one.

If you want to restore all of them, please mark them all and click “Recover” button to save them on your computer in one click. You can selectively mark and recover those you want by pressing “Recover” button.

directly recover sms from iphone

Now, download the program and try to recover your data.

d_win d_mac

Note: Data found here includes lost data and those still on your iPhone. If you only want to recover your deleted data, just refine the scan result by using the slide button at bottom to only display deleted items. Choose the data you want and click “Recover” button to save them.

What’s More about iPhone Data Recovery:

The iPhone iPad Data Recovery software to help Apple users easily and quickly recover deleted or lost data from iPhone, iPad & iPod touch. This easy-to-use iPhone recovery software enables you to retrieve lost SMS, contacts, photos, videos and other lost data from iOS device, iTunes or iCloud Backup within only 3 recovery modes to get lost data back from iOS devices. Let’s learn more key features about the ios data recovery:
* Retrieve data from iOS devices, iCloud backup and iTunes backup (including encrypted one).
* Recover iPhone contacts, messages, notes, call history, photos, video, and so on.
* Lost or Deleted Text Messages be recovered and saved in computer as .txt, .xls, .xml, etc files;and contacts can also be restored as vCard/VCF files.
* All photos, videos, music files will be recovered to their original formats without quality loss.
* Compatible with the latest iOS 9, iOS 10 and supports iPhone 7/6S/6/5S/5C/5/4S/4/3GS
* Retrieve data lost due to deletion, iPhone device loss/stolen, or factory setting restore failure.
* Restore lost data after iOS Update Crash,iPhone jailbreak failure

How to Factory Reset iPhone Safely

iOS System Recovery is capable of restoring iPhone to factory resetting safely,completely wipe all data and setting on iPhone.Moreover,iOS System Recovery allows to fix iPhone system to normal with various iOS system issues like iPhone stuck in recovery mode,white Apple logo,black screen,looping on start, and so on.iOS System Recovery work well for all models of iPhone(iPhone 7,iPhone SE,iPhone 6S/6,iPhone 5S/5C/5,iPhone 4S/4), iPad(iPad Air,iPad Pro,iPad Mini) and iPod touch.Fully compatible with Windows 10 or Mac 10.11, iOS 8,iOS 9/9.3,iOS 10/iOS 10.2.1,etc,.

d_win d_mac

Detail Tutorial:How to Factory Reset iPhone Safely
Step 1.Run iOS System Recovery and Select the Recovery Option
Step 2.Download the Firmware for iPhone
Step 3.Restore iPhone to Factory Resetting Safely

restore iphone to factory resetting safely

d_win d_mac

Related Articles:

How to Recover Lost Contacts from iPhone 6S/6

How to Recover Deleted Text Messages from iPhone 6/6S

How to Transfer Data from old iPhone to new iPhone 6S/6/SE

iPhone 6s Data Recovery: Recover Lost Data on iPhone 6S/Plus

Common Causes of Data Loss for iPhone 6s/Plus

As we all know,the new iPhone 6S/6S Plus supported iOS 9 or iOS 10,if you use iPhone 6s and want to install the latest iOS 10.3,sometimes it may cause data loss due to iOS update failure;Unfortunately,you may delete photos, contacts, messages on iPhone 6s/6s plus by accidentally; Factory reset the iPhone 6s and erase all contents and settings; Failed to jailbreak your iPhone cause the phone stuck in black screen, recovery mode, iTunes screen, white Apple logo,etc.As we all know when iOS upgrade failure, jailbreaking failure or factory settings restore will cause data missing on iPhone.

If you deleted or lost pictures, contacts, text messages, videos and other files on iPhone,how your can recover lost files from iPhone?Even your iPhone is loss or damage(water damaged)

Recover Lost Data from iPhone 7/ iPhone 6S/ iPhone 6

iPhone Data Recovery can not only can help you backup data from iPhone to PC/Mac,or backup data to iTunes directly, but also help to recover lost data from iPhone 6S/6,allows user to recover contacts, text messages, photos, calendar, notes, call history, videos and more from iPhone 7, iPhone 6S, iPhone 6, iPhone 5S,ect with three recovery modes: Directly recover from iPhone, iPad and iPod without backups, extracting to restore from iTunes or iCloud backup files. Besides, the recovery program also enables you to fix your iPhone devices which stucking in recovery mode, white Apple screen, or just perform abnormally. In additional, the iOS Data Recovery also allows you repair operating system when ios devices damage or system crash, factory setting festore, broken device, system crash, ROM flashing, etc..

Free download the iOS Data Recovery:

d_win d_mac

Let’s show you how to recover data on iPhone 6s for example:

How to Recover Lost Data from iPhone 6S Without Backups

Step 1.Connect iPhone 6S with Computer and Choose the Recovery Mode
Run iOS Data Recovery on your computer after installation, then take out your iPhone’s USB cable to connect it with the program. Once your iPhone is detected by the software, in the pop-up main interface, by default, your device is in the “Recover from iOS Device” mode, according to the prompt, please click “Start” to let the program scanning and analyzing your iPhone.

connect iphone to the computer

Step 2.Select Files Type to Scan by Program
Now you should select the files type to scan by program,then click “Next” to go on.

scan data on iphone 6S

Note: To avoid the automatically sync, you’d better do not launch iTunes when running iPhone Data Recovery. Or you can disable the automatical syncing ability of iTunes firstly: Launch iTunes > Preferences > Devices, check “Prevent iPods, iPhones, and iPads from syncing automatically”.

Step 3.Preview and Restore Lost Data from iPhone 6S
The scan will take you some time. Once the scan is finish, all the recoverable data including lost and existing will be listed in the left sidebar of window as below. By default, all these data have been marked, you can unmark them according to your need. In addition, the program allows you to preview all the data on the right of window before restore. After choosing all the wanted data, just simple click “Recover“, and the recovered data will be automatically saved to your computer.

recover lost data from iphone 6s

Note: As for text messages, iMessage, contacts, or notes, when you click “Recover”, a pop-up dialog will ask you to “Recover to Computer” or “Recover to Device”. If you want to put these files back to your iPhone, click “Recover to Device”.

d_win d_mac

More about iPhone 6S Data Recovery:

iPhone 6S Data Recovery is the best data recovery for iPhone 6s users to get missing files back with/without backup, it’s safely, quickly and efficiently restore lost & deleted contacts, messages, photos, videos, notes, WhatsApp messages, Kik messages, Viber messages, Line chat history, Skype messages, App data and much more from iPhone 6S in 3 sample ways:

Ways 1: Directly scanning to recover from iPhone, iPad and iPod touch
Ways 2: Extracting to restore from iTunes backup files
Ways 3: Downloading and Extracting to recvoer from iCloud backup files

-Newly supprot iOS 8/iOS 9/iOS 10, iPhone 7, iPhone 6S, iPhone 6, iPhone 5s,ect.
-Directly scanning to recover 8 kinds of deleted data from iPhone, iPad and iPod.
-Recover App data from iPhone,like WhatsApp, Kik, Viber, Wechat, Line,etc.
-Restore lost iPhone data from iTunes & iCloud backup,even your iPhone is damaged or lost.
-Fix iOS to normal for iPhone 7/6S/6/SE/5S/5/4S,etc.

Related Article:

Top 5 iPhone 6S Data Recovery Software – Recover iPhone 6S Lost or Deleted Data on Windows Computer or Mac

How to Recover Lost Data from iPhone 6 and iPhone 6 Plus

How to Recover Deleted Contacts from iPhone 6(Plus)/6S (Plus)

How to Directly Recover Lost Data from iPhone 6S

Two Ways to Recover text messages on iPhone 6S

Transfer Data from Old iPhone to iPhone 6S/ iPhone 6S Plus

Summary: Have you bought a new iPhone?Do you want to switch everything from the old iPhone to the new iPhone?This article teach you a easy way to transfer everything from old iPhone 4/4S/5/5S to new iPhone 6S(Plus), iPhone 6(Plus),even the new iPhone 7,when you have bought a new iPhone 7/iPhone 7 Plus.Please keep reading this articles,you can transfer contacts,text messages, photos, videos, music, etc, from old iPhone to new one directly.

Transfer Data from Old iPhone to New iPhone with iTunes/iCloud

When you replace old iPhone to iPhone 6, iPhone 6S (Plus), only to find that your valuable data are still stuck on the old iPhone, including contacts, music, video, photos and others important contents. However,any way to copy old iPhone contents to new iPhone? Don’t worry. It’s a no-brainer to transfer data between two iPhone,no matter iOS 7, iOS 8, iOS 9 or iOS 10. You can make it simply by using iTunes, iCloud or some third party tool.If you switch contacts from old iPhone to new iPhone by iCloud,you need to back up the old iPhone manually with iCloud,and then sync contacts to the new iPhone from the same iCloud account,this way only allows you sync iPhone contacts,if you want to transfer sms,photos,videos,music, notes, call logs and more from old iPhone to new iPhone 6/6S/7 directly,you must to use a third-party phone transfer tool.Today,we teach you how to use a phone transfer tool to copy everything from old iPhone to new iPhone 6S, iPhone 6 and even iPhone 7 just 1 click.

Many iPhone fans may buy the new iPhone 6S(Plus), iPhone 6(Plus) or iPhone 7(iPhone 7 Plus),if you use old iPhone 5S/5/4S /4 before,when you buy a new iPhone 6S,the fist thing you want to do is transferring contacts,text messages, photos,videos and other data from old iPhone to new iPhone.Many people want to find a easy way to copy data from old iPhone to new iPhone 6S (Plus).

Transfer Data from Old iPhone to New iPhone 6S/iPhone 6S Plus

iPhone to iPhone Transfer – Phone Transfer can help you transfer data from old iPhone to new iPhone 6S(Plus)/6(Plus)/7 ,run the Phone Transfer on your computer,then connect your two iPhones to computer,just one click to transfer contacts, SMS, photos, videos, music, call logs, calendars,app from old iPhone to new iPhone 6/iPhone 6S/iPhone 7.What’s more,the iPhone to iPhone Transfer also allows you transfer everything between iPhone, Android (Samsung,HTC, LG),Nokia and other smart phone.If you want to copy data from old iPhone to new iPhone,this old iPhone to new iPhone Transfer is the best data transfer tool of you!

Free download the Phone Transfer and have a try!

d_win d_mac

How to Transfer Data from Old iPhone to iPhone 6S(Plus)

Step 1. Run the Phone Transfer on your PC/Mac

Install the Phone Transfer on your computer. Connect your old iPhone and iPhone 6S (Plus) with your computer via 2 USB cables. After running the program, you will see the primary window as follows.

transfer data from old iPhone to iPhone 6s

Step 2. Choose Phone to Phone Transfer

In the main window, you can see the Phone to Phone Transfer feature. Click it and you’ll see the window below. Apart from transferring old iPhone to iPhone 6S (Plus), this software also lets you transfer content from iPhone 5S to iPhone 6, from iPhone 4S to iPhone 5, from iPhone 6 to iPhone 6S, and more. As long as your two iPhones are supported, you can use this software to transfer photos, music, video, calendar, messages and contacts from one iPhone to another.

Transfer Data from Old iPhone to New iPhone 6s

Step 3. Start the old iPhone to iPhone 6S (Plus) Data Transfer

Just start the data transfer by clicking Start Copy. In the pop-up dialog, you can check the transfer progress. It takes you a few minutes. When it’s finished, the data on your old iPhone will be transferred to your new iPhone.

copy data from old iPhone to iPhone 6s

Free download the Phone to Phone Transfer:
d_win d_mac

What’s more about Phone Transfer:

With help of the Phone to Phone Transfer, you can choose to transfer almost all important files, including contacts, video, SMS messages, photos, call logs, music and playlists between phones. You can even transfer calendars easily!

Phone Transfer is specially developed for almost all users of different networks and devices including Samsung, HTC, Sony, HUAWEI, ZTE, Apple, Nokia, Google, LG, Motorola. In addition, all major networks are supported including Sprint, AT&T, T-Mobile and Verizon.

-Transfer old iPhone to iPhone 6(Plus), iPhone 6S (Plus), iPhone 7(Plus) in 1 click!
Samsung to Samsung Galaxy Transfer – Sync messages, contacts/calendar/call logs/media from Samsung Galaxy S3/S4/S5/Note 3 to Galaxy S6/S6 Edge/S7/S7 Edge/Galaxy S8/Galaxy A9/Note 7
-Transfer messages, contacts, photos and calendar from old iPhone to iPhone 6 (Plus)/iPhone 6S(Plus) and iPhone 7
-Copy music and video to new iPhone 6S(Plus) from the old iPhone, regardless of whether purchase them or not.
-Retrieve iTunes backup and transfer to iPhone 6S(Plus) effortlessly.
-Work perfectly with iPhone 7/6/6S/5S/5C/5/4S/4/3GS running iOS 10/9/8.
-Erase all data from old iPhone,Android before selling.

Mobile Sync – Switch Files between iPhone and iPhone 6S(Plus)

Another program here we introduce to you is this powerful Mobile Sync. As its name, it is designed for transferring data between two iOS devices with one click. The transferable types of music, videos, photos, contacts, text messages, etc,. Moreover, it allows to switch files between iOS device and the computer directly. If you want to sync iOS files with an easy solution, you could try this.

mobile sync home page

Related Articles:

Transfer Contacts from Galaxy S3/S4/S5 to iPhone 6S/6/7

Transfer Data from Android Phone to iPhone 6S/6

How to Backup and Restore Data on iPhone 6S/6/7

Transfer Data from Old iPhone to iPhone 6S

How to Erase Data and Settings on iPhone Without Restoring

Why we need erase iPhone data permanently?
You are not willing to leak your personal information readily to anyone who you know or not. What you arduously looking for is an easy and effective way to permanently erase all data from your old iPhone, iPad and iPod.Next,we show you some situations when you need to erase iPhone data:

When you prepare to give away the old iPhone or send or sell it to others
When your iPhone is stolen or lost, you want to keep data in iPhone safe
When you just get a second-hand iPhone
Erase iPhone and turn it back to factory default settings is necessary and important for us.

In summary, we can see that we have to learn to erase iPhone in three situations:

Part 1: How to Restore iPhone Videos from iTunes Backup

Part 1: Erase iPhone in your Hand

When iPhone is with you, you can take these two methods to erase iPhone data and settings.

-Method 1: Erase iPhone All Contents with iPhone Settings Menu

Step 1: Backup iPhone to iCloud or iTunes first.

Step 2: Navigate to Settings – General – Reset – Erase All Contents and Settings.

erase-iphone-contents-in-iphone-settings

Step 3: Type passcode in pop-up dialog.

Step 4: Continue and follow prompt message to delete all data and settings on iPhone.

-Method 2: Erase iPhone Data and Settings in Windows Computer

This is a common method. With iTunes in computer, you can backup iPhone and then restore it to factory default settings. All data and settings you have saved on iPhone will be erased.

Step 1: Install iTunes latest version in computer.

Step 2: Connect iPhone to computer with USB cable and run iTunes.

Step 3: Click iPhone in iTunes top-right side and then choose Summary menu.

Step 4: Under “Automatically Back Up“, check “Encrypt iPhone backup” or “Encrypt local backup”.

erase iphone data in itunes

It will ask you to set a password to lock iTunes backup for iPhone. Help you to keep iPhone backup safe. After that, when you want to restore iPhone to this backup point, just unlock this backup and restore iPhone from backup in iTunes.

If there is passcode to iPhone, you will need to type passcode first and then could back up iPhone in iTunes. But if the passcode is forgotten, only can click “Restore iPhone”.

Step 5: After iPhone backup, click “Restore iPhone” to erase iPhone contents and settings in the iPhone information part at the top of iPhone screen.

Warning by CNET: iPhone “Restore” does not delete personal data!
If you restore factory setting for your iPhone,it does’t mean “Erase” all iPhone contents permanently,because some recovery software can restore them easily,you need to use a third-part eraser tool to erase iPhone data and no data recovery can get them back.

Part 2: Erase iPhone Data Permanently Without Restoring

iPhone iPad Data Eraser is the most professional tools that allows you to 1 Click ultimate privacy protection in order to prevent identity theft when disposing of your old iOS devices. With the help of this porgram, you can complete erase includes contacts, messages, photos, apps, account info, videos, passwords and other personal data stored on your iDevices and ensure that 100% nothing recoverable even if use the third party data recovery tool.

* Erase all data from iPhone, including text messages, contacts, videos, photos, account info, password, etc;
* 3 levels of data erasing for your choice and your can choose to overwrite the existing data with random files.
* Works with all iPhone, iPad and iPod series, including Jailbroken iPhone and carrier-locked iPhone.
* Protect your personal information by removing it permanently and preventing them from being recoverable.

Now you can check the following 3 steps to learn how to use this ios data eraser software to delete private data from your iPhone completely and permanently.

How to Erase All Data on iPhone Permanently Without Restoring?

Step 1: Download and install the magical software on your computer
First of all,you need to download the iOS Data Eraser(Windows Version) or iOS Data Eraser for Mac(Mac Version):

d_win d_mac

Both iPhone iPad Data Eraser for Windows and Mac users can find suitable version for them. After choosing the correct version to download and then follow the instructions from the software to install this software on your computer. The interface should be shown to you after launching. You can check the brief but powerful interface of this software. You can see it be difficult to handle this simple operation.

erase iphone data with ios data eraser

Step 2: Scan and preview the data from iPhone

You need to choose Erase Deleted Files on the left side, and then you can click “Start” button on the right side. The software will take some time to scan your deleted data, that’s why you need to delete the text messages manually in the first step.

erase iphone data with ios data eraser

Step 3: Permanently delete all contents and setting on your iPhone

When the scan finished, you can preview the file of scan result at the right side of the interface. After checking everything is ok for you, you just need to click one more button to get this job done; you can find the Erase Now button at the bottom right side.

erase iphone data with ios data eraser

Free download the iOS Data Eraser to wipe all iPhone data permanently:
d_win d_mac

Part 3: How to Wipe iPhone Remotely

If your iPhone is stolen or lost, now it is not with you, wipe all of iPhone data and settings remotely is so important to protect your iPhone data from accessing or using by other people.

But if you really want to do this, you have to make sure Find My iPhone service enabled in your stolen or lost iPhone. Otherwise, you can only change Apple ID password and stop others deleting data in iCloud.

Now followings are steps to remotely erase iPhone contents with Find My iPhone service.

Step 1: Go to Settings – iCloud, and confirm that you have enabled Find My iPhone service on lost iPhone.

Step 2: Login into iCloud with your Apple ID.

login-into-icloud-with-apple-id

You can do this on any web browser (https://www.icloud.com/#find). Open Find My iPhone page, and you will be prompted to sign in with Apple ID. After Find My iPhone program runs, all the possible devices appear.

erase-iphone-with-find-my-iphone-service

Step 3: Click All Devices at the top and select your iPhone from the list.

There will appear a window with your iPhone name and three options.

Step 4: Select “Erase iPhone” option.

You will be asked to type Apple ID password to confirm. Enter it and click OK. If the device is connected to internet, remote iPhone will be erased immediately. And a confirmation email is sent to your Apple ID email address. If not, the remote erase will begin the next time when there is an internet connection.

From the introduction above about ways for erasing iPhone data or settings, we would realize the importance of backup, Apple ID and Find My iPhone service. It is them which help to wipe iPhone safe.

Part 4:Erase iPhone Data and Settings with iOS Full Data Eraser

iOS Full Data Eraser is an outstanding data eraser tool for iPhone/iPad.After using this program,all iPhone data and settings will disappear forever and can’t be restored under any ways.So just try this program to permanently delete data and settings from iPhone before selling or giving it up.Supported iOS Devices:iPhone 7,iPhone SE,iPhone 6S Plus,iPhone 6S,iPhone 6 Plus,iPhone 6,iPhone 5S,iPhone 5C,iPhone 5,iPhone 4S,iPhone 4;iPad Pro,iPad Air,iPad mini,iPad 4/3/2;iPod touch 5,iPod touch 4 and so on.

d_win d_mac

Run iOS Full Data Eraser on your computer,choose “More Tools” on the left side and you’ll see all features inside as follows.Choose “iOS Full Data Eraser” from tools.

erase iphone data with iOS full data eraser

Step 1.Connect iPhone to the computer

Step 2.Start Erasing iPhone Completely and Permanently

Step 3.Wait Until the Data Erasure is Complete

When the data erasure is complete,you will see a window disappearing as follows.

erase iphone data with iOS full data eraser

Now,your iPhone is fully erased and turns into a new device with no content,and you can begin to set it according to your need.

d_win d_mac

Related Articles:

How to Permanently Delete Messages on iPhone 7/SE/6S/6/5S/5C/5/4S

How to Delete Photos from iPhone iPad Permanently

How to Erase All Contacts from iPhone without Restoring

How to Clean Junk Files from iPhone/iPad/iPod