All posts by DHZ

How to Recover Deleted Audio Files from Huawei Phone

[Summary]: Guide to recover deleted audio or music files from Huawei Android phone, get back deleted audio on Huawei phone with professional Android data recovery software, you can also retrieve your lost photos, videos, WhatsApp messages, document, messages and contacts.

How can I recover deleted songs on Huawei P20?
Hey, guys. I want to know how to recover deleted music on Huawei P20. I accidentally deleted a folder in the miscellaneous section that contained a few hundred MP3 music files, I want to get the deleted MP3 file back on Huawei phone. Any Android data recovery software can scan and retrieve deleted audio file from Huawei smart phone?

You may want to read:

* How to Recover deleted Photos/ Videos from Huawei

* Huawei Data Backup and Restore

If you had backup music by Huawei Backup app or Huawei HiSuite, then the solution is as easy as simply restoring the backup. But if you didn’t, you need an third-party HUAWEI Data Recovery software to recover deleted files from Huawei phone directly.

Part 1: Restore Deleted Audio to Huawei Phone from Backup

If you have backed up your device to protect your data with Huawei Backup app, when you deleted files on Huawei phone by accidentally, you can easily restore backup and get deleted audio back to Huawei phone. Here, you can learn how to restore lost audio files to Huawei phone from it’s Backup app.

Step 1. Open Backup app on Huawei phone, and tap Restore.

restore data from huawei backup app

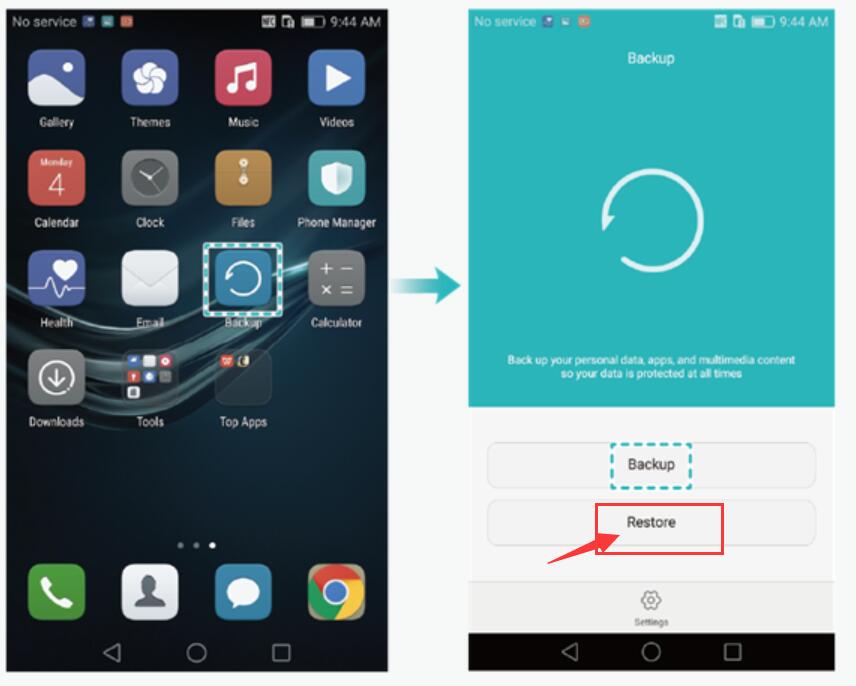
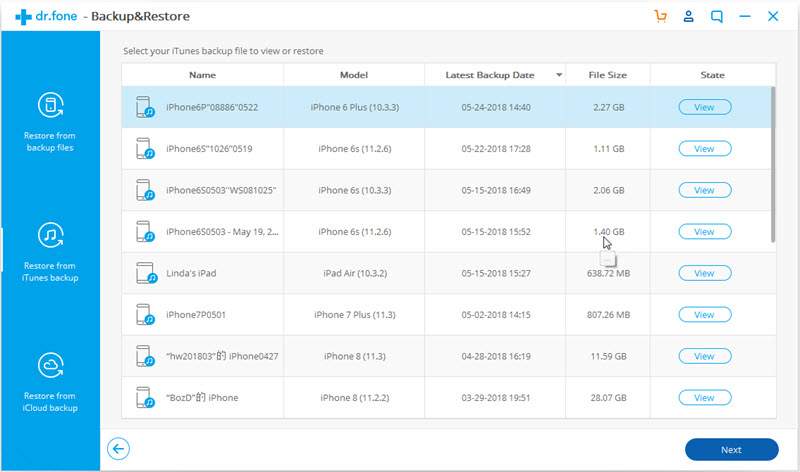
Step 2. Choose the source of the data to be restored, and tap Next.

restore huawei audio

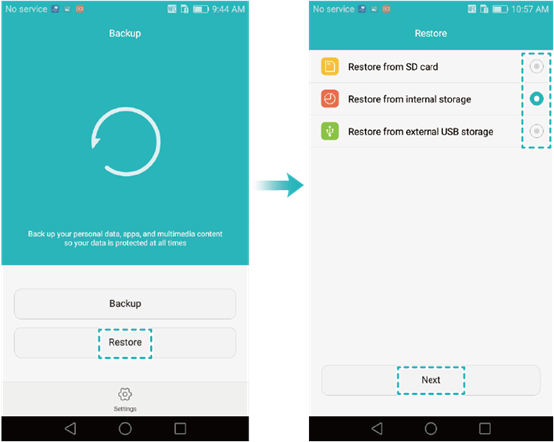
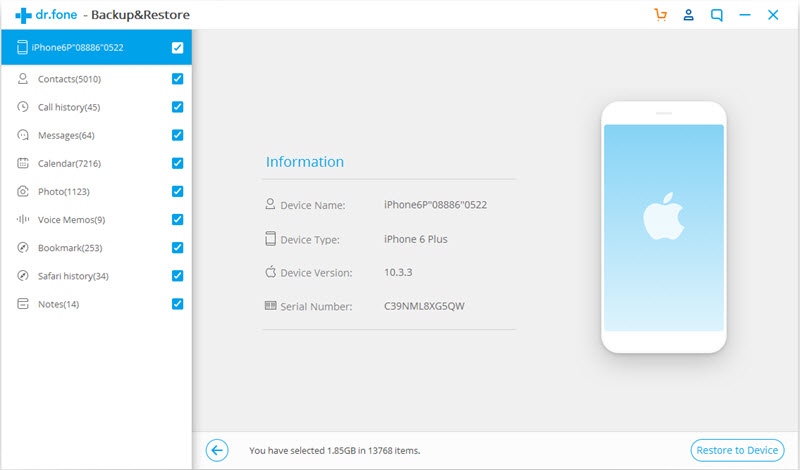
Step 3. Select Audio file type to restore.

restore audio to Huawei phone

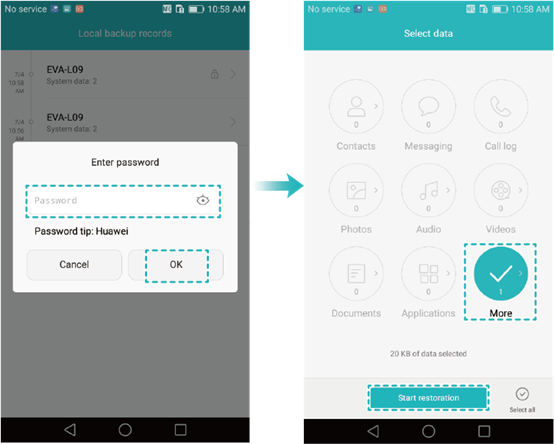
Step 3. Tap Start restoration.
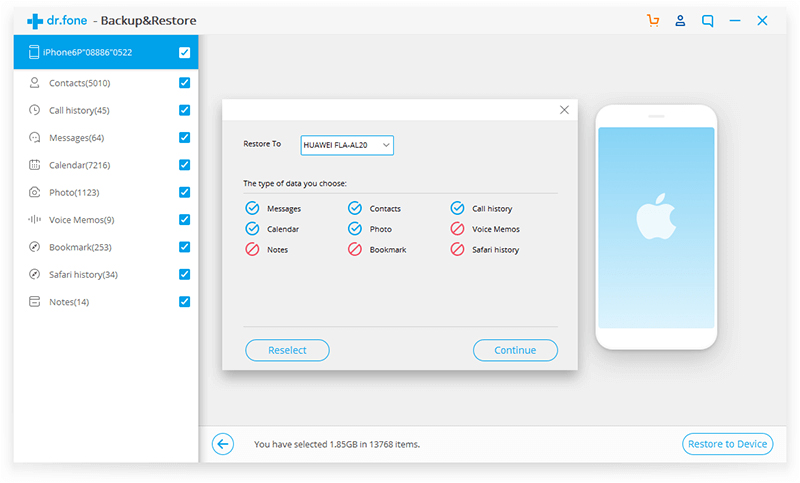
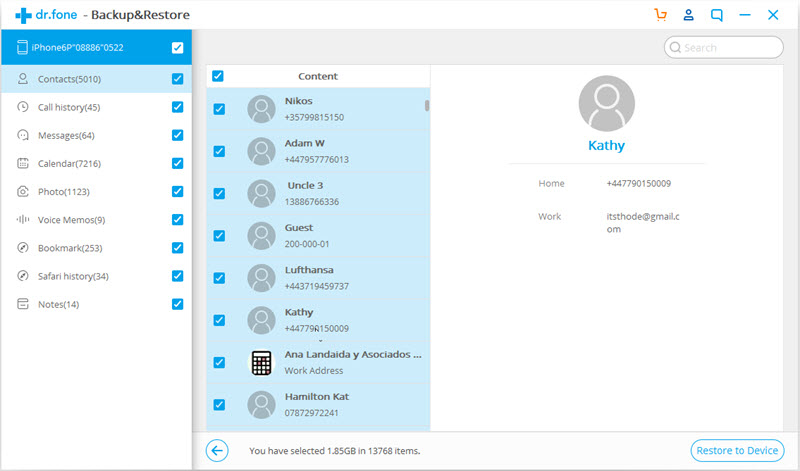
In the dialog box that pops up, choose a location to restore your backed up data from Videos, Photos, Audio, and other locations.
Step 4. Tap OK to begin restore the select Audio back to your Huawei phone.

Part 2: Recover Deleted Audio or Music Files with Huawei Data Recovery Software

If your can’t find a backup you made before to restore Huawei, or you haven’t backup your data before the file deleted. Don’t worry, you still have chance to scan and recover deleted files from Android device without backup.

Android Data Recovery is a professional data recovery tool for Huawei phones and tablets. It not only supports recover deleted audio or music files on Huawei phone, but also allows you recover photos, videos, WhatsApp messages, document, text messages and contacts from Huawei phone (Mate, P, Nova, Y, Honor, G, Ascend sries…), not matter data lost or deleted due to you accidentally clicking the delete button. In addition, it can recover deleted, lost or formatted files from SD cards inside your Android device.

This powerful Android data recovery tool supports you to recover your data from Samsung Galaxy, HTC, LG, Sony, Google Nexus, Google Pixel, Xiaomi, Motorola, Huawei, Sony, Sharp, OnePlus and and other brands with Android OS. Now you can download the software and try to use it to restore deleted data from your Huawei phone and tablets. The following guide will be much helpful.

d_win d_mac
d_win d_mac

Features:

  • Recover deleted/lost music files on Android smartphone/tablets.
  • Recover Android data by scanning your Android phone & tablet directly.
  • Preview and selectively recover what you want from your Android phone & tablet.
  • Supports various file types, including WhatsApp,Messages & Contacts & Photos & Videos & Audio & Document.
  • Extract data from dead/broken Samsung phone.
  • Fix Android system to normal like frozen, crashed, black-screen, virus-attack, screen-locked.
  • Supports 6000+ Android Device Models & Various Android OS.

Guide to Recover Deleted or Lost Audio Files from Huawei Phone without Backup

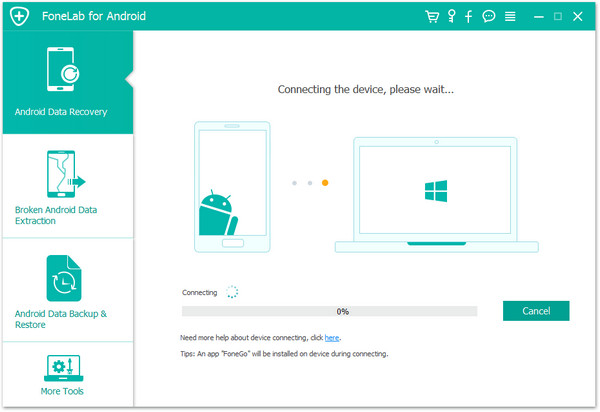
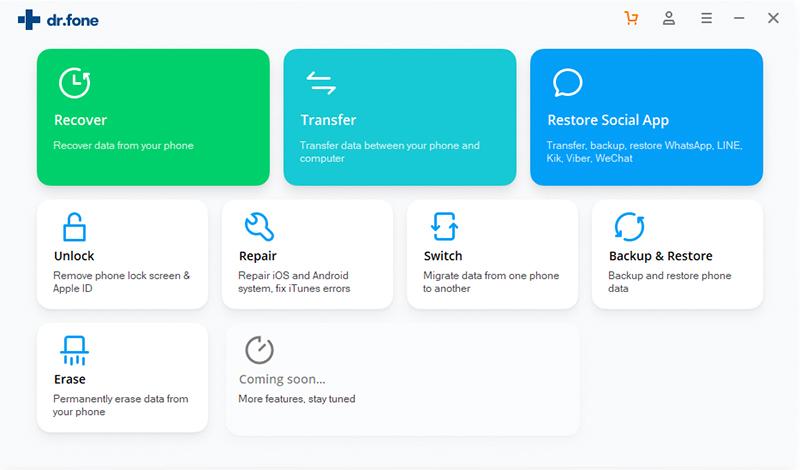
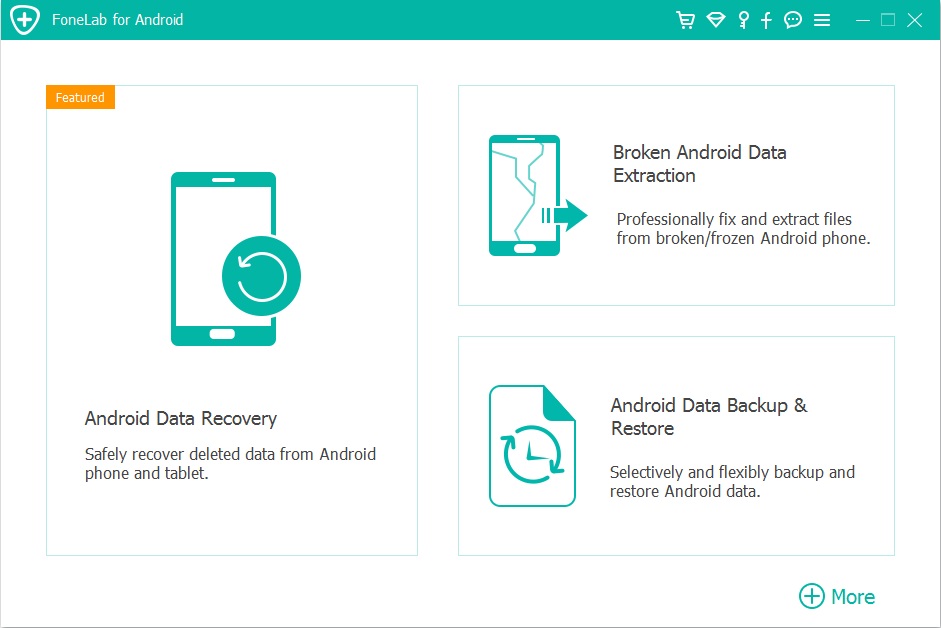
Step 1. Launch Android Toolkit on the Computer
Launch Android Data Recovery program after downloaded and installed it on the computer.

d_win d_mac
d_win d_mac

To recover deleted audio files from Huawei phone, please select “Android Data Recovery” option.

launch huawei file recovery

Step 2. Connect Huawei Phone to Computer and enable USB debugging
Use USB cable to connect your Huawei phone to the computer. Then the program will detect your Huawei phone automatically.
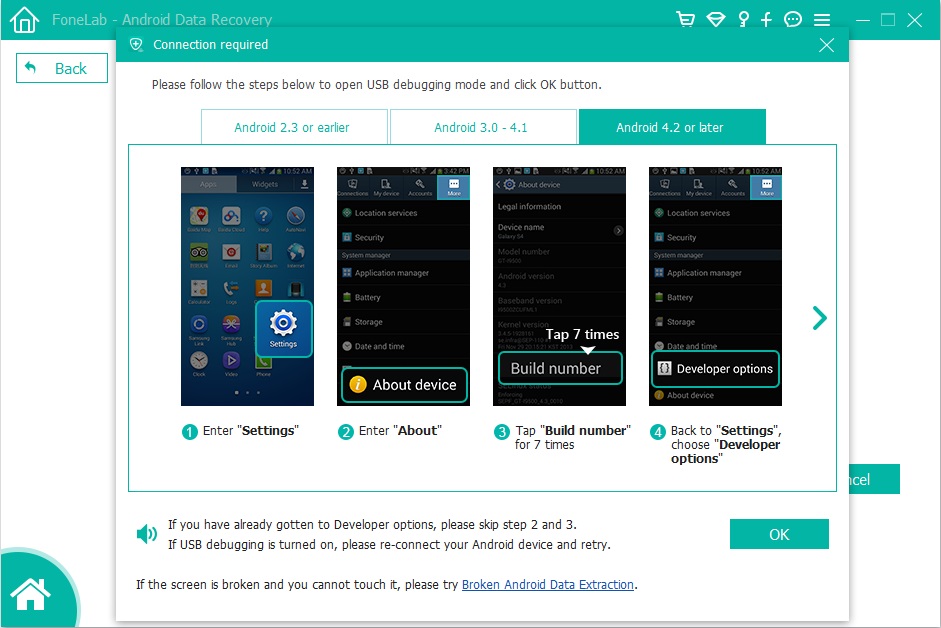
If the device can not be detected, turn to allow USB debugging. Follow the steps as below:

1. For Android 2.3 and earlier versions: Tap “Settings” app > “Applications” > “Development” > Check”USB debugging”.
2. For Android 3.0 – 4.1: Navigate to “Settings” > “Developer options” >  Check “USB debugging”.
3. For Android 4.2 and latter versions: Navigate to “Settings”, tab “Build number” for 7 times. Go back to “Settings” and select “Developer options” > Check “USB debugging”.
More details are included in this guide: how to enable the USB debugging on Android device.

After enable the USB debugging mode, continue to follow the next step.

enable usb debugging on huawei

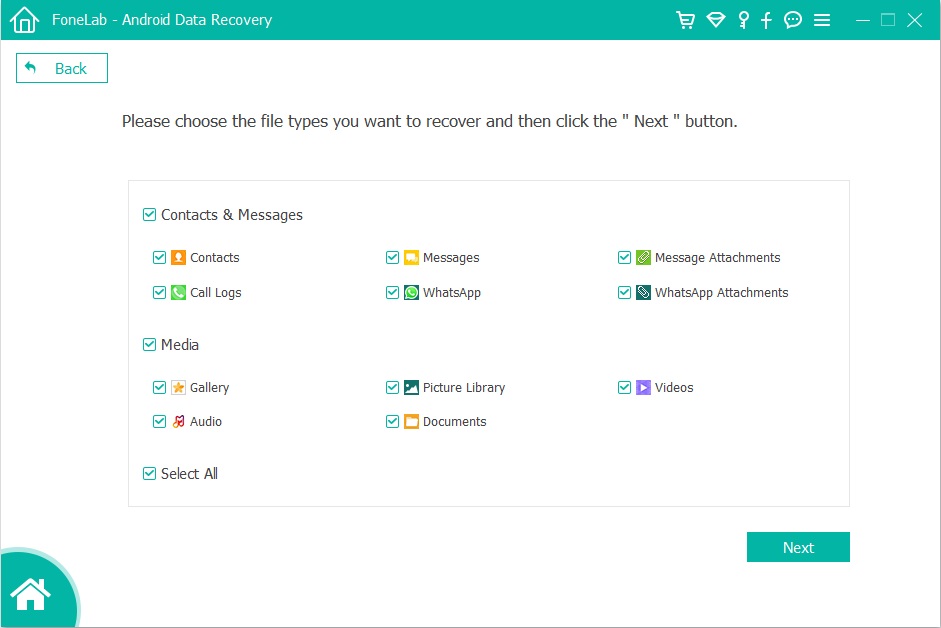
Step 3. Choose Audio File Type to Scan
When you see the interface as below, tick “Audio” and click “Next” to allow the program scan your device. You can also “Select All” to scan and recover all data from Huawei phone. In order to saving time during the scanning process, we recommend you just select “Audio” item.

select audio to scan

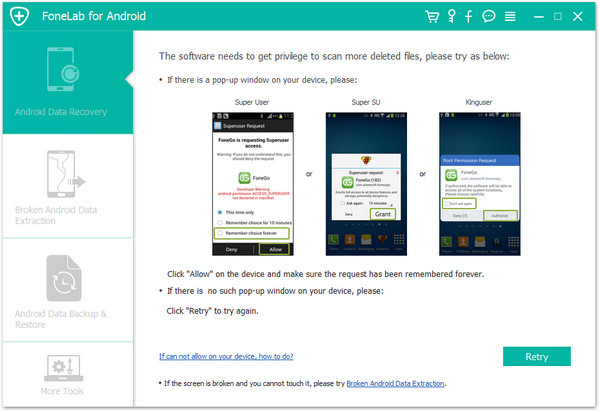
Step 4. Allow Scan the Device
When the below windows appear, you can switch to your Huawei phone again, click “Allow” on the device and make sure the request has been remembered forever, then turn back to the computer and click on the “Start” button to continue.

allow scan Huawei phone

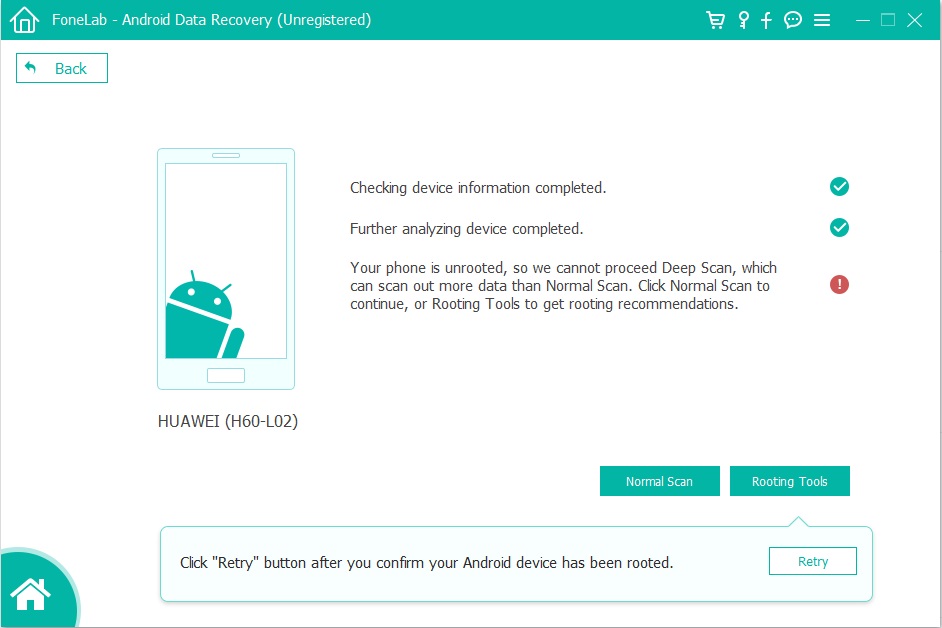
Step 5.Root the Huawei Phone to Deep Scan
When the below interface appear, a deep scan over the Huawei requires root permission. To do so, click the Advanced Root and download an Android Root tool (KingoRoot) on the computer, then install, launch and use it to root your Huawei phone at a fast speed.

Related article on how to root and unroot an Android device with KingoRoot.

root huawei phone

After rooting the phone complete, it will initiate a deep scan over your device. The process will take a few minutes (about 15 to 20 minutes). Please keep the connection between your Huawei phone and the computer during the scanning process.

Step 6. Preview and Recover Audio Files from Huawei Phone
After the scan, it will list all the audio files on the interface. If you only want to check the deleted data, you can turn on the button of “Only display the deleted item(s)” on top of the window. Please select the audio files you want and click “Recover” button to export and save them on the computer. After saving the deleted audio or music files on the computer, you can listen to the restored audio on computer.

recover deleted audio from Android

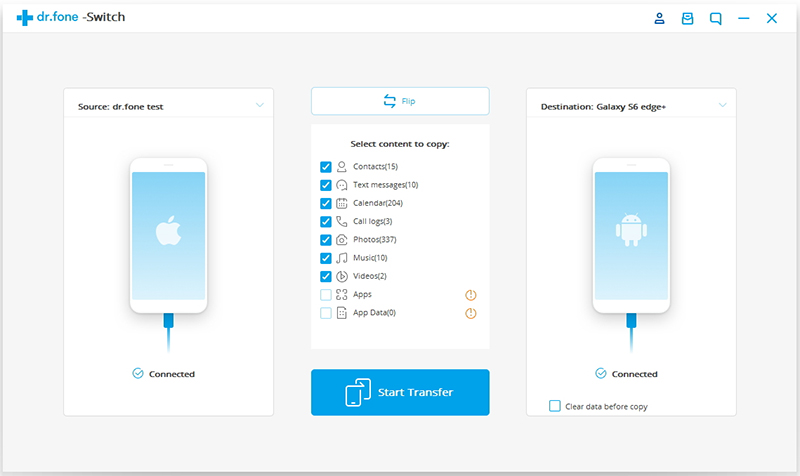
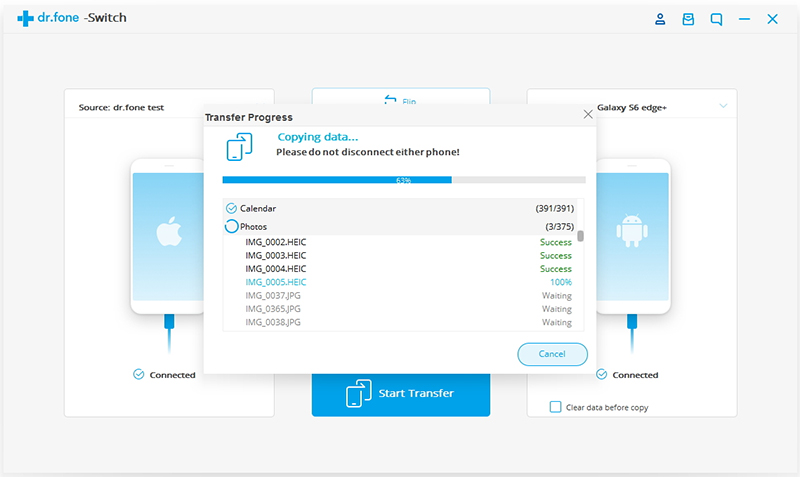
Step 7.Import the Restored Music to Android
Above simple steps, you have got back the deleted or lost audio files and save them on the computer. If you want to transfer the retrieved music files to Huawei phone or other Android devices for listening, you can use this useful Android Transfer tool, it can help you import music, video, photos, contacts to Android devices fast.
Related guide: How to Transfer Music, Video, Photos to Android

Not only Audio, this Android Data Recovery software can also help your recover your photos, videos, call logs, contacts, WhatsApp data and more from Android devices. You can give it a try and recover them in the similar steps.

d_win d_mac
d_win d_mac

HUAWEI Data Recovery Supported models:

Huawei Mate: Huawei Mate 20/ Mate 20 Pro, Huawei Mate 20 X(5G), HUAWEI Mate 20 RS Porsche Design, HUAWEI Mate RS Porsche Design, Huawei Mate 10/10 Pro, Huawei Mate 10 Porsche Design, Mate 10 lite, Huawei Mate 9, Huawei Mate 9 Pro, Huawei Mate 9 Porsche Design, Huawei Mate 8, Huawei Mate 7, Huawei Mate S and Huawei Mate RS Porsche Design.

Huawei P: Huawei P30/ P30 Pro, Huawei P20, Huawei P20 Pro, Huawei P10, Huawei P10 Plus, Huawei P9, Huawei P9 Plus, Huawei P8, Huawei P8max, Huawei P8 Lite, HUAWEI P smart+ 2019, HUAWEI P smart 2019, HUAWEI P smart

Huawei Honor: Huawei Honor V9, Huawei Honor 8,Honor 8 Pro, Huawei Magic,Huawei Honor 7/6, Huawei Honor 6, Honor 6X , Huawei Honor 5X,Huawei Honor 4c/3c, Huawei Honor 4x

Huawei Nova:HUAWEI nova 5 Pro, HUAWEI nova 5, HUAWEI nova 5i Pro, HUAWEI nova 4/nova 4e, nova 3/nova 3i, nova 2s, Huawei Nova 3e, Huawei Nova, Huawei Nova Plus

Huwei G: Huawei G9, Huawei G9 Plus, Huawei G9 Lite, Huawei G8, Huawei G7 Plus, Huawei GR5 2017, Huawei GT3, Huawei GR5, Huawei GR3, Huawei Ascend G7

Huawei Y: HUAWEI Y9 Prime 2019, HUAWEI Y7 2019, HUAWEI Y9 2019, HUAWEI Y6 2019, HUAWEI Y5 2019, HUAWEI Y6 Prime 2018, HUAWEI Y6 2018, HUAWEI Y9 2018, HUAWEI Y5 Prime 2018, Huawei Y5 2017, Huawei Y6II, Huawei Y5II, Huawei Y3II, Huawei Y6 PRO

Ascend:Huawei Ascend P8, Huawei Ascend G7, Huawei Ascend Mate 7, Huawei Ascend Mate 6

HUAWEI Audio Recovery

How to Recover Lost or Deleted Documents from Huawei Phone

[Summary]: If you lost your important Document files on Huawei phone, you can recover them from backup you made previously. If you don’t even have backup available, you can try to recover your Document files from Huawei phone internal memory.

I recently lost a word document on Huawei P20. Is there any way to recover it? Is Word file recovery possible? It is so important for me. Please help me retrieve deleted word documents from Huawei phone.

I deleted a important PDF document on my Huawei phone, how to recover deleted PDF document from Huawei Mate 20? I have made my phone data backup before, is it possible to recover PDF document from Android phone without backup?

Lots of Android users like to store valuable documents on Android device, hence it is important to ensure document security. Have you ever has the experience of losing important documents like TXT, DOC, DOCX, XLS, XLSX, PDF, etc. on your Android mobile phone? A reliable document recovery tool can get document back from Android phone/tablet. This tutorial is going to recommend the professional and powerful Android Data Recovery software for you.

Android Data Recovery not only can help you recover deleted photos, videos, contacts, audios, text messages, call logs from Android devices, but also allows you recover deleted or lost TXT, DOC, DOCX, XLS, XLSX and PDF document on Android internal memory and SD card. So, you can use this popular Android Data Recovery to recover deleted document from Huawei mobile like P30, P20, P10, P9, Mate RS, Mate 20/10/9, Honor 10/9/8, Nova 3e/2s, Y7/Y6, G9/G8, etc. The program can help you complete the Huawei Data recovery job in a safe way. It supports directly scan and preview deleted or lost data from Huawei phone. Before recovery, you are able to check and select the data which you want to get back.
If the document stored on your SD card, you can also use this Data Recovery software to recover TXT, DOC, DOCX, XLS, XLSX, PDF, photos and videos from SD card.

What’s more, the Android Data Recovery supports multiple Android phones and tablets, like Huawei Mate Series, P Series, Y Series, nova Series, Honor Series, Samsung Galaxy , HTC, LG, Motorola, and so on. This useful android recovery tool can help you get back lose data due to different issues, like accidentally deletion ,broken device, water damaged, virus attack, or have its system crashed.

In addition, if your Samsung phone is broken or death with frozen, crashed, black-screen, virus-attack, screen-locked, you also can use the “Broken Android Data Recovery” feature to fix Android system to normal and extract data from broken Samsung phone.

Now you can download the trial version to get your lost data back.

d_win d_mac
d_win d_mac

Recover Deleted Files from HUAWEI Phone

Step 1. Run this Huawei data recovery tool
First of all, please download, install and launch the Android Toolkit on computer. To recover deleted document from Android phone, choose the “Android Data Recovery” option to proceed.

launch huawei document recovery

Tips: The program is only read and recover your data one your computer, without any personal information leaking.

Step 2. Connect Huawei phone to computer and enable USB debugging
Connect your Huawei phone to the computer. The program will ask you to enable USB debugging on the Huawei phone. There are instructions on the screen that can guide you every step.

You can also read: how to enable the USB debugging on Android device.

enable usb debugging on huawei

Step 3. Choose Document to Scan
Here, you can see the software listes all types of data to retrieve, including contacts, messages, documents, videos, audios, etc. Generally, the more data types you have selected the longer scanning time it will take.If you only want to recvoer document, please select “Document” and click Next to go to next step.

select document to scan

Step 4. Root Android to Deep Scan
When you arrive at the screen shown as below, a deep scan over the Huawei requires root permission. To root the Android device, click the Advanced Root and download KingoRoot tool to root your phone at a fast speed.

If you want to know more about the root process, check out the article on how to root and unroot an Android device with KingoRoot.

root huawei phone to recover data

Once you’re rooted, it will initiate a deep scan over your device. The process will take a few minutes (15 mins around). Please keep the connection between your phone and the machine stable while it’s running.

Note: It might be a Superuser authorization appearing on your device during the scan. You just need to click “Allow” to continue. If not, skip this step.

Step 5. Preview and Recover deleted Document from Huawei
When the scanning process complete, you can see all existing, deleted and lost document files shown to you, you can preview them one by one. Check the data you want to get back and click “Recover” to recover the document on the computer.

recover documents from Huawei phone

Now, select the files you want to get back and click on the Recover button at the bottom corner. When a dialog pop-up, select a safe location to store your recovered data files on your computer.

Android Data Recovery is a powerful data recovery program for you to recover important data on Android devices. Download the free trial version of Android Data Recovery on your computer to have a try, and remember to share this useful tutorial with your friends.

d_win d_mac
d_win d_mac

Android Document Recovery

How to Recover Deleted Videos, Photos from HUAWEI Phone

[Summary]: If you looking for the most effective way to recover lost or deleted videos, photos from Huawei phone like P30/20/10, Mate 20/10/9, Honor 10/9/8, etc. This is a detailed guide on how to recover photos and videos from HUAWEI phone, including HUAWEI Mate, P, Nova, Y, Honor, G, Ascend series…

HUAWEI P30, Mate 20 is very popular, which is one of super Android smart phone in 2019. Since HUWEI is great, many users must have shot and stored tons of videos in the phone. However, Once data loss happens due to accidental deletion, factory reset, OS update, rooting, virus and other unknown causes. When you lost precious photos/videos on your Huawei mobile phone, how to recover lost videos/photos from Huawei Android phone? Especially haven’t backup data to computer, Google Photos or HUAWEI Mobile Cloud.

CONTENTS:

Way 1: Restore Photos to Huawei Phone from Google Photos

For Huawei P30/P20/Mate 20/Mate 10 users, you can backup photos to Google Photos app. If you enable “Backup and sync” option on Google Photos before deleting the photos, they should still be here and you can restore deleted photos on Huawei by follow these steps:

Step 1. Open the Google Photos app on your Huawei P30.
Step 2. Tap Menu at the top left, and tap Trash.
Step 3. Choose the photo(s) you want to retrieve.
Step 4. Tap Restore. Your photos will put back to Album they were in, you will find your lost photos restored to the Huawei phone.

Way 2: Retrieve Deleted Photos and Videos from Huawei Photo Directly

No backups in Google Photos? Don’t worry, since the deleted photos and videos overwritten by the new data, you still have a change to recover them from Huawei phone without backup file. So, you are required to stop using your phone once data loss occurs so that no data would be overwritten, then use a professional HUAWEI Data Recovery software, let’s show you the simple way to recover lost or deleted videos, photos from Huawei phone.

This Android Data Recovery is a professional Huawei data recovery tool that can help you retrieve pictures and videos from your HUAWEI, recoverable video format: JPG, JPEG, TIFF, GIF, PNG, BM and video format: MOV, M4V, MP4, AVI, 3GP, etc. Besides photos/videos, it allows you to restore deleted  audios, text messages, contacts, call logs, WhatsApp and more from Android devices, such as Samsung Galaxy, Google Pixel, HTC, OPPO, VIVO, LG, Sony, Motorola, Xiaomi, ZTE, OnePlus, Redmi etc.

In addition, the build-in Broken Android Data Extraction function can help you fix and extract photos, videos, contacts, messages and WhatsApp messages from broken/brozen Samsung phone. If your Samsung Galaxy S6/S5/S4/Note 5 stuck in black screen, system is damaged, screen-broken or non-responsive screen, you cannot enter password or cannot touch the screen, stuck in startup screen, stuck in the download mode. The Broken Android Data Extraction function can fix Android system to normal and recover existing data from the broken Samsung phone, but it currently only support some Samsung devices. For the broken Huawei phone, please wait for the software update.

Download and install Android Data Recovery software on the computer, and follow the step-to-step guide below to recover deleted videos and photos from Huawei phone.

d_win d_mac
d_win d_mac

Kind Tips: Looking for a way to download videos from YouTube? 4kFinder YouTube Video Downloader provides everything you expect. This is an excellent online video downloader dedicated to downloading 1080p 60fps videos, 720p HD, 1080p HD, 4K, 8K videos, etc. from YouTube to MP4 without image quality loss. In addition, extracting MP3 audio from YouTube is also one of its features. Apart from YouTube, it is also able to download videos from more than 1,000 popular online streaming sites, like Facebook, Instagram, Twitter, Bilibili, NicoNico, BBC, Vimeo, VLive, Tumblr, Fmovies, etc.

Here is how to directly recover deleted photos on Huawei phone by using Android Data Recovery program.

How to Recover Deleted Video/Photo Files from Huawei Phone

Step 1. Run the Android Data Recover on PC or Mac
The first step is to download the Android Toolkit, install and run it on your computer, retrieve deleted photos deleted from Huawei phone, please select “Android Data Recovery” tab in the main window.

launch huawei video/photo recovery

Tips: The program is only read and recover your data on your computer, without any personal information leaking.

Next, connect your Huawei phone to computer with USB cable.

connect Huawei phone to computer

Step 2. Allow USB Debugging on Huawe Phone
After connecting your phone with the computer complete, you will get prompt to enable USB debugging mode on the device to get access to the internal storage. You need to enable USB debug on your phone firstly.
Related article about: How to turn on USB debugging mode on Android
1. Android 2.3 or earlier: Go to “Settings < Applications < Development < USB debugging”.
2. Android 3.0 to 4.1: Go to “Settings < Developer option < USB debugging”.
3. Android 4.2 or newer: Go to “Settings < About Phone < Build number” for several times until you get a note about “You are under developer mode”. Then, you should go back to “Settings < Developer options < USB debugging”.

enable usb debugging on huawei

Step 3. Choose Videos and Photos to Scan
Next, select what data type to scan for deleted files. If you only want to recover deleted photos and videos, please select “Videos”, “Gallery” and “Picture Library” to continue.

select video and photos to scan

Step 4. Root Device to Deep Scan
The program will start analyzing the device and try to discover the deleted pictures. To be able to deep scan more deleted files inside the device storage, a root and in-depth search is required.

So you need to root the device firstly, please click the “Rooting Tools” to download an Android Root tool ( KingoRoot ), it helps root the device safely. Please don’t worry, you can also get the device back to it’s original status after data recovery complete.
Also check: Safely root and unroot an Android device with KingoRoot

root huawei device

Step 5. Recover deleted Videos/Photos on Huawei Phone
Once you’re rooted, the software will initial a full and complete scan on the internal memory or SD card on the Huawe phone. This might take a few minutes.

After the scan, it should display all detail information of deleted and existed data, you can view them one by one and mark all files you need, selectively restore and save them to computer for use. The software allows you preview photos before recovery, but it not allow you preview video before recover them, so you need to save the deleted videos on computer at first.

recover video, photos from Huawei phone

Finally, please mark the “Photos” and “Videos” that you want to retrieve and click “Recover” to export and recover the deleted pictures/videos on your computer.

d_win d_mac
d_win d_mac

Android Photo/Video Recovery

How to Backup and Restore Samsung Galaxy Note 10/Note 10+

[Summary]: Step by Step guides on how to backup and restore Samsung Galaxy Note 10/Note 10+(5G) data. Four different ways to help you save data on Samsung phone before reset to factory settings.

My Samsung Galaxy Note 10 is a little glitchy and I do have Reset as a security measure but I am not sure how to save the data to computer before I attempt to reset, especially for the contacts, text messages, photos, videos and WhatsApp data, I also want to restore the backups to the phone after doing factory reset complete.

General Android data backup and restore solutions:

If you just want to backup videos, photos, music, contact phone number, etc. You can backup data by using Samsung Cloud, Google Cloud, Google Drive; or transferring the media files from the Samsung phone to a folder after connecting the device to a computer; or using Samsung Kies to backup and restore the data. But, this will not work for apps, or data in apps. If you want to Contacts, Messages, Call History, Calendar, Gallery, Photos, Audio, Video, Documents, Application and even Application data (for rooted devices), you need to this Android Data Backup & Restore or Android Toolkit – Backup & Restore(Android).

Way 1. Backup Samsung Galaxy Note 10 to Computer and Restore via U.Fone Android Backup & Restore

Looking for a best Samsung Note/Note 10+ Backup & Restore Software to replace the Samsung Kies, Samsung Cloud and Google Cloud Backup service?

Android Data Backup & Restore is your best choice, it can help you easily backup Galaxy Note 10 or Note 10 Plus data to PC/ Mac and later you can use that backup file to restore data to any Android phone or Samsung Galaxy phone or tablet. You can selectively back up data from Android devices to PC and Mac easily, and then preview the data in detail before restoring data from backup.

More Features:

  • Backup and restore Android data to your computer easily.
  • Preview data in detail before you restore data from backups.
  • Backup and restore Android phone and SD card data Selectively.
  • Backup & Restore Files: Contacts, Messages, Call Logs, Gallery, Videos, Audio, Documents
  • Supported Devices: Samsung Galaxy, LG, HTC, Sony, Google Pixel, Nexus, OnePlus, Motorola, Xiaomi, Redmi, Oppo, Meitu, Windows Phone, Sharp phones and more.

d_win d_mac
d_win d_mac

Part 1: Backup Samsung Galaxy Note 10 to Computer

Step 1.Download and Run Android Toolkit on Computer
After downloading and launching Android Toolkit on PC or Mac, then click on “Android Data Backup & Restore” option to go on.

Galaxy note 10 data backup restore

Step 2.Connect Note 10 to Computer
Connect your Galaxy Note 10 to the computer with a USB cable. If you are prompted to enable the USB debugging mode on the device,you can follow the

Step 3.Allow the USB debugging on Samsung Note 10
In this section you must allow the USB debugging on your phone for the process,then you should tap “OK“when it shows up on the device screen.

allow usb debugging

Step 4.Select Data to Backup from Device to Computer
Now you can select data you would like to either backup or restore when it is successfully connected . To do a selective backup click “Device Data Backup” option to go on.

choose Android data backup

Step 5.Choose File Types to Backup
In this step you can choose the file types to backup,such as Contacts, Messages,Photos,Videos, etc,. and click “Start”.

Choose Backup Content

Step 6.Select the Folder for the Output Files
Select a location to store your backed up data and click “OK” to continue.

Choose Output Directory

Step 7.Start to Backup Your Samsung Galaxy Note 10 to Computer
Last but not least,just simply click “Start” button to backup the selected data from Galaxy S9 to computer.

backup Galaxy S9 to Computer

Part 2: Restore Data to Samsung Galaxy Note 10 or Other Devices

Above steps, you have backed up data from Galaxy Note 10 to the computer, after factory reset your phone successfully, then you can follow these quick steps to restore your data to Galaxy Note 10 or other Android devices safely and easily, including contacts, messages, call history, photos, videos, songs, documents and so on.

Step 1. Connect Samsung Galaxy Note 10 to the Computer

Step 2. click “Device Data Restore” selection, the program will pop up an new windows, then click “Restore” button to transfer the backups to Galaxy Note 10.

restore Android data to Samsung Galaxy Note 10

Free download the U.Fone Android Toolkit – Android Data Backup & Restore and try to backup your phone.

d_win d_mac
d_win d_mac

Way 2: Backup Samsung Galaxy Note 10 to Computer and Restore via Android Toolkit – Backup & Restore (Android)

Android ToolkitAndroid Data Backup & Restore allows you to easily backup almost all types of data from Samsung Galaxy Note 10/Note 10+/Note 9/Note 8/Note 5/Note 4, including calendar, call history, gallery, video, messages, contacts, audio, applications and even application data. You can also preview and selectively export any type of data you want. The program also allows you to easily restore the data to any Android/iOS devices whenever you need to.

Key Features:

  • Selectively backup data from Samsung to computer with one click.
  • Preview and restore backup to any Android/iOS devices.
  • Restore iCloud/iTunes backup to Android devices.
  • Supported Android Data: Messages, contacts, calendar, call history, gallery, video, audio, applications and even application data after rooting the devices.

Download the Android Toolkit for Windows or Mac and try to backup your Galaxy Note 10.

d_win d_mac
d_win d_mac

Simple Steps to Backup Samsung Galaxy S10/S10+ to Computer and Restore

Step 1. Launch Android Toolkit on PC or Mac
Launch the Android Toolkit on your Mac or PC and go to the “Backup & Restore” section.

android toolkit home page

Step 2. Connect Samsung Galaxy Note 10 to Computer
Then, please connect the Note 10 to computer and wait for it to be detected. Make sure that its USB debugging option is enabled beforehand. Afterward, you can choose to “Backup” your data.

android data backup restore

Step 3. Select Data to Backup
The interface will ask you to select the data files you wish to backup. You can manually select the type of data or enable the “Select all” option as well. You can also change the path where the backup would be saved.

select android files to backup

Step 4. Start to Backup Data from Samsung Galaxy Note 10 to Computer
As soon as you would click on the “Backup” button, the application will automatically start taking a backup of your data. Make sure that your Note 10 stays connected to the system till the process is completed.

backing up samsung galaxy note 10

Once the application completely backup Note 10 to PC, you will be notified. Now, you can view the backup data or can remove the device safely as well.

android backed up completed

In this way, you can easily use this Samsung Galaxy Note 10 backup software to keep your data safe. You can follow the same drill to restore your data as well. Just go to “Restore” section, load a backup file, and restore your data back to your Galaxy Note 10 and more Android/iOS smartphone.

restore samsung galaxy note 10

d_win d_mac
d_win d_mac

Way 3: Backup and Restore Samsung Galaxy Note 10 via Google Backup and Restore

Before factory reset your Android device, you can use Google Backup and Restore service to backup photos, videos, contacts, Wi-Fi® passwords, Browser bookmarks, User dictionary, a list of installed Market applications and other customized settings, this Google free service also can help you restore data and settings to applications utilizing the backup service upon reinstallation.

Step 1. From a home screen, select Apps Applications icon (located in the upper-right).
Step 2. From the Apps tab, select Settings.
Step 3. Select Backup and Restore.
Step 4. From the Backup account field, ensure the appropriate account is listed.

Note: To change accounts, please select Backup account, then select Google account. Enabled when a check mark Checkbox icon is present. In addition, if Back up my data is disabled, existing backups are deleted from Google’s servers.

Step 5. Finally backup the device and all the selected data to Google Cloud.

Step 6. Go to Backup and Restore setting on your phone and login with the same Google account that you have used to backup your files.

Step 7. After you logged-in, you will see your backed up history. You can then restore the data and settings from there. It’s very easy and simple.

Way 4: Backup and Restore Samsung Galaxy Note 10 via Samsung Cloud

Part 1: Backup Samsung Galaxy Note 10 Data to Samsung Cloud

Step 1 : From the Home screen, touch Apps > Settings > Backup and reset. Touch Back up my data.

Step 2 : If prompted, touch SIGN IN to log into your Samsung Account or CREATE ACCOUNT.

Step 3 : Select the Content(s) you want to back up. Touch the slider to turn Auto back up on. Touch OK.

Step 4 : Touch BACK UP NOW to complete.

Backup Samsung Galaxy S10 via Samsung Account

Part 2: Restore Back up Data from Samsung Cloud to Note 10

Step 1 : Touch Restore.

Step 2 : Select the content(s) you want to restore and touch RESTORE NOW to complete.

NOTE: Restoring the selected data will delete some data from this device. Make sure that the backed up data is up to date.

restore samsung by samsung cloud

Samsung Galaxy Note 10 Backup & Restore

Safely Backup & Restore Android

How to Transfer iTunes Music to Samsung Note 10 and Note 10+

[Summary]: Looking for a way to transfer iTunes music to Galaxy Note 10/9/8/5/4/3/Edge. Here is a solution for you to copy the non-DRM songs from iTunes to Samsung Galaxy Note 10/Note 10+/Note 10 5G/Note 10+ 5G without easily.

You may want to read:

* How to Transfer Apple Music to Samsung Galaxy

* 6 Ways to Import Music to Samsung Galaxy Note 10/9

Want to transfer music files from iTunes to the Samsung Galaxy Note 10 smartphone and enjoy listening to your music wherever you go? This article will share you the best way to transfer music to your new Samsung Galaxy Note 10/Note 10+ device from iTunes, as well as transferring from computer or other devices.

As you know, you can’t sync music to Android with iTunes as iPhone/iPad/iPod does. Also, songs downloaded or purchased from iTunes are under DRM protection and restrictions. That is to say, you can transfer the DRM protected and unprotected songs from iTunes library to Samsung Galaxy like that to transfer computer songs to Android. But in the following article, I will show you the way to a simple way to transfer the unprotected music from iTunes to Galaxy Note 10 at ease.

Useful Tips: If you want to transfer the downloaded Apple Music songs to Android devices for offline listening, you need to remove DRM from Apple Music at firstly.

To transfer unprotected songs and playlist from iTunes library to Android device directly, this iTunes to Android Transfer software is needed. It helps you sync songs from iTunes library to Galaxy Note Note 10/Note 10+/9/8/5/4 in three simple steps. What’s more, you can use it to transfer music, videos, photos, contacts and text message between iOS and iOS, iOS and Android, Android and Android, computer and mobile devices. This iOS & Android Manager can help you convert the media files into the suitable format, and then transfer to the devices directly, such as MP3, MP4, WMV, etc.

Download the iOS & Android Manager on your PC/ Mac computer at first.

d_win d_mac
d_win d_mac

The software requires PC and Mac running the following systems:
1. Windows 10/8.1(64bits)/8 (64&32 bits)/7 (64&32 bits)/Vista (64&32 bits)/XP (32 bit)
2. Mac OS X 10.10 (Yosemite), 10.9 (Mavericks), 10.8(Mountain Lion), 10.7, 10.6

Steps to Transfer Music from iTunes to Galaxy Note 10

Step 1.Run the Phone Toolkit on the Computer
After downloading, install the software on your computer. Then, launch it and you will get in to the interface as below and just click “Transfer“.

iTunes to Android transfer

Click “Transfer iTunes Media to Device“, then go to iTunes to Android transfer function, you will see the program will pop up an new windows.

sync iTunes music to galaxy s10

Step 2.Connect Samsung Galaxy Note 10 to PC/Mac
Connect Samsung Galaxy Note 10 to the computer via USB cable. The software will start analyzing the plug-in devices. When it’s successfully connected and recognized, you will see its model displayed on the main window.

After plugging Samsung Note 10 in the computer, you need to enable USB debugging on your Android device to make it detected and connected by the computer.

Step 3.Loading iTunes Library
The program will load all media of iTunes library, you can select Entire library or selected playlists to loading.

Load iTunes music

Step 4.Transfer iTunes Music to Samsung Galaxy Note 10
This “Transfer iTunes Media to Device” function allows you to move the songs to Galaxy Note 10 smart phone.

transfer iTunes music to samsung galaxy note 10

Move your mouse to the “Transfer” button and wait for some time. After it is done, you will get the completed signal.

Note: Apple Music songs downloaded or purchased from iTunes are under DRM protection, so this iTunes to Android Transfer tool can not helps you transfer Apple Music songs from iTunes to Android other other devices. If you want to transfer Apple Music to Android phones/ tablets, you should remove DRM from Apple Music and convert Apple Music M4P songs to MP3 firstly, after getting the DRM-free Apple Music tracks, you can use this Phone Manager tool to import songs from computer to Android.

Best Way to Transfer WhatsApp from iPhone to Samsung Note 10 and Note 10+

[Summary]: When you have got a new Samsung Galaxy Note 10, all the WhatsApp messages on your old iPhone can never let you rest assured. Follow this simple method to transfer WhatsApp chat history from iPhone to Galaxy Note 10/Note 10+/Note 10 5G/Note 10+ 5G directly.

For Samsung mobile phones, some people were more disgusted in the past two years, especially the explosion of Samsung Note 7. In a few years, the Samsung Galaxy Note series has undergone updates for Note 8 and Note 9. Today Samsung released the latest Note series Android phones – Note 10 and Note 10+. Then Samsung Note 10+ configuration is very powerful and comes with the the top Snapdragon 855 processor or Samsung Exynos 9825, the screen is the top 2K level Samsung dynamic AMOLED. Support wireless charging, support IP68 dust and water release, also comes with an upgraded S Pen, all configurations are very balanced and strong.

transfer WhatsApp Messages from iPhone to Samsung Note 10

When you have got an new phone, the first thing you want to dong is transferring previous data to the new phone, or import music to their new devices, or stream Apple Music on Samsung for offline listening. And some people are looking into how to transfer WhatsApp chat history to their new phones since almost everyone has a WhatsApp because of features like group chatting, attachment sharing, pictures, and voice calling nowadays.

If you transfer WhatsApp data from iPhone to a Samsung Note 10, and face data loss scenarios losing important WhatsApp text messages and media. You can combat such a situation, you got to learn how to transfer WhatsApp text messages from iPhone to Samsung Note 10, you can also backup WhatsApp media files from iPhone to computer and then restore to Samsung Note 10.

One click to transfer WhatsApp Messages from iPhone to Samsung Note 10

Android ToolkitRestore Social App, which is a part of Phone Toolkit, it not only can help you transfer WhatsApp messages from iPhone to Galaxy Note 10/Note 10+/Note 10 5G/Note 10+ 5G directly, but also allows you effectively backup and restore App data like chats and attachments of Viber, Kik, WeChat, WhatsApp, and LINE etc. You can back them up on your computer and later restore it to your Samsung Galaxy Note 10/Note 9/Note 8/S10/S9/S8/S7 or to another Android/iOS devices.

d_win d_mac
d_win d_mac

Key Features of Restore Social App:

  • Backup WhatsApp messages from iPhone, iPad, iPod Touch and Android to computer.
  • Restore iOS/Android WhatsApp backup to iPhone, iPad, iPod touch and Android.
  • Transfer WhatsApp chat history between iOS & Android.
  • Backup your LINE/Viber/Kik/Wechat chat history to computer with just one click.
  • Restore LINE/Viber/Kik/Wechat backup to new iPhone or Android.

How to Transfer WhatsApp Messages from iPhone to Samsung Note 10

Here is a quick guide to transfer WhatsApp chats from iPhone to Samsung Galaxy Note 10 and Note 10+ using Phone Toolkit – Restore Social App:

Step 1.Download and Launch Phone Toolkit
At first, run Phone Toolkit on your computer right after installing it. Tap over the ‘Restore Social App’ tab afterwards.

android toolkit - whatsapp transfer backup and restore

Step 2.Click ‘WhatsApp’
From the left panel, press the ‘WhatsApp’ over the following window. Now, you got to click over the ‘Transfer WhatsApp messages’ tab on the application interface.

whatsapp messages transfer

Step 3.Connect Samsung Galaxy Note 10 and iPhone to Computer
Next, plug in your iPhone to the PC using only an authentic lightning cable. Once the tool detects your iDevice, plug in your Samsung Galaxy Note 10 into another USB port. Let the tool recognize this device too.

connect iphone and samsung note 10 to the computer

Step 4.Start Transfer WhatsApp Data from iPhone to Galaxy Note 10
As soon as your devices are detected, they’ll be visible on your screen. Hit the ‘Transfer’ button on the bottom right of the interface.

Confirm Transferring

Lastly, you need to confirm your actions to proceed further by hitting ‘Yes’ button. This is because the transfer of WhatsApp chats from iPhone to Samsung Galaxy Note 10 will wipe off existing WhatsApp data on target device.

transfer iPhone WhatsApp messages to Samsung Note 10

That’s about it. Within a short span of time, process to transfer WhatsApp chats from iPhone to Samsung Galaxy Note 10 will get completed. You can then disconnect the devices from the computer and check for the transferred WhatsApp messages over your Samsung Galaxy Note 10.

d_win d_mac
d_win d_mac

How to Transfer Contacts from iPhone to Samsung Galaxy Note 10 and Note 10+

[Summary]: Do you want to transfer contacts from iPhone to Samsung Galaxy Note 10/Note 10+/Note 10 5G/Note 10+ 5G, this article teach you how to transfer contacts from iPhone/iTunes/iCloud to Galaxy Note 10 and Note 10+.

You May Want to Know:

* Transfer WhatsApp Messages from iPhone to Galaxy Note 10/Note 9

* Transfer Music from iTunes to Galaxy Note 10/Note 9/Note 8

CONTENTS:

Samsung has released its latest big-screened flagships Android smart phones, the Galaxy Note 10 and Galaxy Note 10+. Both smartphones boast a number of new features; they pack Samsung’s newly-outed 7nm Exynos 9825 SoC, ship with an “all-new” S Pen stylus, feature triple and quad-camera arrays, respectively, and – in the case of the Note 10+, at least – bring 5G support to Samsung’s phablet lineup for the first time.The Galaxy Note 10 starts at $949 and comes in just one configuration: 8GB of RAM and 256GB of storage. The Galaxy Note 10 Plus starts at $1,099 with 12GB RAM / 256GB storage and you can spend $100 more to get 512GB of storage. Both are available for preorder today and will ship on August 23rd.

galaxy note 10 vs note 10 plus

Here, you can see the detail specs of Samsung Galaxy Note 10 and Note 10+

What’s the same specs of Samsung Galaxy Note 10 and Note 10+?

  • Processor: Snapdragon 855
  • S Pen: Bluetooth LE, accelerometer and gyroscope for motion controls
  • Wide-angle camera: 16 megapixels, f/2.2
  • Screen: Dynamic AMOLED with tone mapping
  • Main camera: 12 megapixels, f/1.5 and f/2.4 dual aperture, OIS
  • Selfie camera: 10 megapixels, f/2.2
  • Radios: LTE Cat 2.0, Wi-Fi, Bluetooth 5.0
  • Telephoto camera: 12 megapixels, f/2.1, 45-degree
  • In-screen fingerprint sensor

What’s the different specs between Samsung Galaxy Note 10 and Note 10+?

Samsung Galaxy Note 10 Plus Spaces

  • Screen: 6.8-inch, 3040 x 1440 pixels
  • RAM: 12GB
  • Storage: 256GB or 512GB UFS 3.0, microSD expansion
  • Battery: 4,300mAh
  • VGA depth-of-field camera

Samsung Galaxy Note 10 Spaces

  • Screen: 6.3-inch, 2280 x 1080
  • RAM: 8GB
  • Storage: 256GB UFS 3.0, no microSD expansion
  • Battery: 3,500mAh

How to Transfer Data Contacts from iPhone to Galaxy Note 10(+)?

Have upgraded from iPhone to Samsung Galaxy Note 10(+)? If you’re looking for a way to transfer data from an old iPhone to the new Samsung Note 10 (+) phone, you will likely want to transfer the contacts, text messages, music, videos from iPhone to Samsung Android phone. It’s easy to transfer data from Samsung to Samsung by using Smart Switch, but if you want to transfer data contacts from iPhone to Android, you need to use a third-party iPhone to Android transfer tool to transfer iPhone contacts to Note 10 and Note 10+.

Powerful iPhone to Samsung Galaxy Note 10 Transfer Tool

The easiest method to transfer these contact phone numbers from iPhone to Galaxy Note 10 is using this Phone Switch, which is a part of Phone Toolkit. It not only can help you transfer data from iPhone/Android to Samsung Galaxy Note 10/Note 10+ easily, but also can help you backup phone to PC then restore data from PC, even more you can restore phone from iTunes backup and restore phone from iCloud backup easily. So, you can transfer contacts, text messages, photos, videos and more to Galaxy Note 10 from iPhone, Samsung, Huawei, Sony, HTC, Motorola, LG, Google Pixel, OnePlus, Oppo, Xiaomi, Redmi and more iOS/Android devices.

The app supports all kinds of Android devices and iOS devices, please download the software on your computer and try to move data between two phones directly.

d_win d_mac
d_win d_mac

Part 1: One-click to Transfer iPhone Contacts to Galaxy Note10(+)

Step 1. Download and Launch Phone Toolkit – Switch
First of all, please download an launch the Phone Toolkit on your computer, and select “Switch” among the modules.

iphone to galaxy note 10 transfer

Step 2. Connect iPhone and Galaxy Note 10 to the computer
Then get both of your devices connected. The data will be transferred from the source device to the destination one. You can use the “Flip” button to exchange their position. Please make sure the Samsung Galaxy Note 10 on the right as target device and the iPhone on the left as source device.

transfer iphone contacts to galaxy note 10

Step 3. Choose the File to Transfer from iPhone to Galaxy Note 10
Here let’s take transferring contacts from iPhone to Samsung Galaxy Note 10 as an example, you can also transfer messages, photos, videos, contacts and call logs from iPhone to Galaxy Note 10 directly. Please select the file types you would like to transfer. Then click on “Start Transfer” to begin the process. For efficiency, don’t disconnect the devices until the process is complete.

transfer iphone data to samsung note 10

Tips: You can check the “Clear Data before Copy” box if you want to erase data on the destination phone before transferring the data to the target phone.

Within a few minutes, all selected files will be transferred to the Samsung Galaxy Note 10 successfully.

Transfer Data from iPhone to Galaxy Note 10

Part 2: Transfer Contacts from iCloud Backups to Samsung Galaxy Note 10/Note 10+

We have already mentioned above, the Phone Toolkit not only can help you transfer data between two phones directly, but also can help you restore phone from iCloud backup. If you’ve backup iPhone to iCloud before, you can restore iPhone data from iCloud Backup to Note 10 directly as long as you log in to your iCloud account.
Tips: Please be assured that we will protect your account information. Let’s shows you the simple guide on how to restore iCloud data to Android Samsung phone directly.

Phone Toolkit – Backup & Restore (Android) can help you download, preview, and restore iCloud backup to Samsung Galaxy Note 10/Note 9/Note 8/Note 5/S10/S9/S8/S7/S6, etc. in minutes, without affecting existing Android data and settings. Follow the steps below to restore iCloud backup to Samsung Galaxy Note 10 as example.

Step 1. Connect your Android device to PC
Download, install, and launch the Phone Toolkit on your PC.

d_win d_mac
d_win d_mac

In the main screen, select “Backup & Restore“.

samsung galaxy note 10 toolkit

Step 2. Connect Samsung Galaxy Note 10 to Computer
Use the original USB cable of your Galaxy Note 10 to connect it to the PC. Then click the “Restore” button in the middle of the scren.

android device backup restore

Step 3. Sign in to your iCloud account
In the next screen that shows up, select “Restore from iCloud backup” from the left side.

sign in icloud

You may have enabled the two-factor authentication for your iCloud account. In this case, a verification code will be sent to your iPhone. Find the verification code and input it in in the following screen, and click “Verify”.

verification code of two factor authentication

Step 4. Restore Data from iCloud to Galaxy Note 10
Now you have signed in to your iCloud. All the backup files are listed in the dr.fone screen. Select one of them and click “Download” to save the file to a local directory on your PC.

download icloud backup file to pc

Then Phone Toolkit will read and display all the data from the downloaded iCloud backup file. Click a data type and preview what information is stored in it. Then you can select some or all of the data items and click “Restore to Device“.

restore icloud backup data to samsung note 10

In the dialog box that is displayed, select an Android device in the drop-down list, and click “Continue”.

confirm to restore to samsung note 10

Note: Samsung Galaxy Note 10 does not support such data types as Voice memos, Notes, Bookmark, and Safari history, so those data won’t restored to the Android phone.

Part 3: Transfer Contacts from iTunes Backups to Samsung Galaxy Note 10/Note 10+

if your iPhone or iPad is unavailable, or if your old iPhone was lost, broken, damaged or stolen, but you’ve backed up your iPhone with iTunes before. Don’t worry, when you have got an new phone, you can restore iTunes backups data to the new phone.

Phone Toolkit – Backup & Restore (Android) not only allows you restore iCloud data to Android/iOS directly, but also can help you restore all the iPhone or iPad data backed up in iTunes to Android devices.

Step 1. Download and Run the Phone Toolkit
After downloading Phone Toolkit on your computer, install and start the tool. Then select “Backup & Restore” among all the features.

d_win d_mac
d_win d_mac

Step 2. Connect the Galaxy Note 10 to computer
Use a workable USB cable to connect your Android device to the computer. After the connection is set up, click “Restore” in the center of the screen.

start iTunes backup restore

Step 3. Detect iTunes backup files
In the next screen, select “Restore from iTunes backup” from the left column. dr.fone will detect the location of iTunes backup files on your computer, and list them one by one.

itunes backup files listed

Step 4. Preview iTunes backup data, and restore to Galaxy Note 10
Select one of the iTunes backup files, and click “View”. The Phone Toolkit will read and display all details from the iTunes backup file by data type.

preview iTunes backup

Select all or some of the items, and click on “Restore to Device”

restore itunes backup to samsung note 10

In the new dialog box that pops up, select the desired Android device, and click “Continue” to confirm restoring iTunes backup to Samsung Galaxy Note 10.

confirm to restore to samsung galaxy s10

Note: The Voice memos, Notes, Bookmark, and Safari history cannot be restored, because Android phone does not support the corresponding data types.

Everything we know about transfer data from iPhone to Samsung Galaxy Note 10 and Note 10+ phone is here, contacts, messages, music, videos, photos, etc. One-click to transfer data from iPhone, iTunes and iCloud to Samsung Galaxy Note 10/Note 10+, as well as Galaxy Note 9, Note 8, Note 5 and Galaxy S10/S9/S8/S7/S6, etc.

Download the Phone Toolkit and try to transfer data contacts from iPhone/iCloud/iTunes to Android devices.

d_win d_mac
d_win d_mac

Related Articles

How to Transfer Data from Android to Samsung Galaxy Note 10/Note 10+

How to Transfer Data from Samsung to Galaxy Note 10/Note 10+

How to Recover Deleted Data from Samsung Galaxy Note 10/Note 10+

How to Recover Deleted Photos from Samsung Galaxy Note 10/Note 10+

Transfer iPhone Contacts to Note 10

How to Move Data from iPhone to OnePlus 7/7 Pro

[Summary]: Have you tried to transfer data between different mobile phones but you have no way to start? This tutorial will provide you with an excellent solution for moving important data from iPhone to OnePlus 7/7 Pro Android phone with just one click.

“I have already bought a new phone, but I am having trouble transferring data. I can’t find the storage place for the data. Can anyone provide me with a solution?”

The OnePlus 7 Pro is truly impressive for new buyers, with the right high-end hardware and software for the right price, making it popular and well-respected. As the OnePlus 7/7 Pro comes on the market, we may encounter problems with different phone types that can’t be transferred when we intend to move data from the iPhone to the OnePlus Android phone in the traditional way. In the traditional method of mobile transfer tools, we will find that some of the data can only be used in Android phones, while others only on the iOS iPhone. How to quickly and easily transfer data from iPhone to OnePlus phone completely?

This iPhone to Android TransferPhone Switch as one of the most popular applications on the web is noteworthy. It offers a comprehensive solution that will span different types of phones, iOS iPhone, Android, Windows Phone, Symbian etc. Under such conditions you can using this program transfer contacts you need from iOS to Android, Android to iOS, Android to Android, iOS to iOS, etc. On the other hand, it provides one-touch move data from iPhone to OnePlus 7/7 Pro, including contacts, WhatsApp messages, call history, photos, text messages, photos, videos, music, etc.

d_win d_mac
d_win d_mac

Another notable feature of the iPhone to Android Transfer is the ability to provide one-click backup, removal, and recovery options that not only ensure your important data can be smoothly transferred, but also guarantee your data will not be stolen by the user while the phone is being replaced. What’s more, the Phone Switch can also retrieve the important information you have lost from the backup via this program.

Tips: This  Phone Switch applies to HTC, LG, Apple, Motorola, ZTE, Samsung, Google, HUAWEI, Sony, Nokia, and many other tablets and smartphones.

Easy Steps to Move Data From iPhone to OnePlus 7/7 Pro

Step 1. Install and Run Program on PC

Download and install the iPhone to Android Transfer from below and start the program. Please select “Switch” section of the home page in the pop-up screen interface to transfer contacts, pictures, SMS, music and more from iPhone to OnePlus 7/7 Pro.

connect iphone and oneplus phone to pc

Step 2. Connect both Your Devices to the Computer

After the download shows success, connect both your iPhone and the OnePlus 7/7 Pro to the computer. The most important thing you should be aware of is that you should make sure the old iPhone as source device and the OnePlus 7/7 Pro as target device. Otherwise, you can click on “Flip” button to exchange them.

transfer iphone data to galaxy note 10

Step 3. Transfer Data from Old iPhone to OnePlus 7 and 7 Pro

In this part you can see many options like contacts, call logs, music, videos, calendars, apps, etc. in the middle checkbox. Choose what you want to move then click “Start Transfer” to begin the contacts transferring process.

transfer iphone data to oneplus 7 pro

d_win d_mac
d_win d_mac

Related Articles

How to Copy Data from Samsung to OnePlus 7/7 Pro

How to Transfer Data from Android to iPhone

Transfer Data to Huawei P30/P30 Pro from Old iPhone/Android

Ways Transfer Contacts between Samsung and iPhone 7/7 Plus

Move iPhone Data to OnePlus Phone

How to Copy Data from Samsung to OnePlus 7/7 Pro

[Summary]: This article is designed to help you easily copy contacts, text, pictures, videos, call history, and WhatsApp messages from your Samsung phone to OnePlus 7/7 Pro.

OnePlus 7Pro has a 90Hz refresh rate OLED screen, which allows gamers and mobile video movie viewers to have a smooth experience. 2K’s comprehensive screen design screen makes each angle look particularly round. More importantly, the world’s first UFS3 .0 storage, ultra-fast flash memory allows the CPU Snapdragon 855 processor to calculate the most extreme.

“I can’t wait to buy a new OnePlus 7 Pro phone instead of the old Samsung phone. But my old Samsung phone has a lot of precious data left, can anyone provide me with a way to copy mobile phone data?”

When you get a new OnePlus 7/7plus, the first thing you should do is copy the precious data from the old Samsung mobile phone to your new OnePlus 7/7plus phone. However, if you plan to copy data from your old Samsung Galaxy Note 2/Note 3/Note 4/Note 5, Galaxy S2/S3/S4/S5/S6/S7/S8/S9/S10 phone to OnePlus 7/7 Pro, but don’t know how to do, then you are in the right place.

Phone Switch is a simple and effective data copy tool for more than 6,000 smartphones and tablets, including Apple, Samsung, Huawei, OPPO, Sony, HTC, Google, LG, Motorola, ZTE and more. You can safely and reliably copy data between Samsung and OnePlus 7/7 Pro. You can also use this toolkit to copy data from different mobile platforms iOS and Android.

MAIN FEATURES OF ANDROID TOOLKIT – PHONE SWITCH

– Easy to copy contacts, pictures, videos, apps, photos, SMS, call logs, etc. between two phones.
– Works well with all Android phone such as HTC, LG, HUAWEI, Acer, Samsung, Motorola, ZTE, Sony and more other Android models.
– Support for transmission between various systems: iOS to Android, Android to iOS, iOS to iOS, Android to Android.

d_win d_mac
d_win d_mac

Easy Guide to Sync Data from Samsung to OnePlus 7/7 Pro

Step 1. Launch Phone Switch on PC

Firstly, free download the Phone Switch software on your computer. launch it and you will see different modules in the maintenance then select the “Switch” module to get started.

phone switch main page

Step 2. Connect Old Samsung Phone and OnePlus 7 Pro to PC

Secondly, connect your old Samsung Phone and OnePlus 7/7 Pro to your computer and you should enable USB debugging mode on your both Android devices. Phone Switch will detect the old Samsung Phone and New OnePlus 7/7 Pro and show all the transferable contents in the middle. Remember to make sure your old Samsung Phone listed on the left while the new OnePlus 7/7 Pro on the right.

connect samsung and galaxy note 10 to PC

Note: Click “Flip” button to change their positions if needed.

Step 3. 1-click Transfer Selected Data from Samsung to OnePlus 7/7 Pro

Simply check your desired items on the middle panel, then click on “Start Transfer” button to start copying everything from old Samsung to OnePlus 7/7 Pro. After a while, all your desired data would be synced to OnePlus 7/7 Pro successfully.

transfer data from samsung to galaxy note 10

d_win d_mac
d_win d_mac

Read More

How to Transfer Data from Android to OnePlus 7 Pro

How to Transfer/Switch Samsung Data to OnePlus 3T

Ways to Transfer Data from Samsung to Galaxy S10/Fold

2 Ways Transfer iOS/Android Data to Google Pixel 3A/3A XL

Sync Android Contacts and SMS to Samsung Galaxy Note 8/5/4/3

Android to Android Transfer

How to Sync Data from Samsung to Galaxy Note 10

[Summary]: Do you want to sync the data on your Samsung phone to the Galaxy Note 10 phone but can’t find a way? This tutorial will teach you how to sync data from Samsung phones to Samsung Galaxy Note 10, such as photos, contacts, SMS, call logs, WhatsApp, documents, etc.

What is the Samsung Galaxy Note 10?
The Samsung Galaxy Note 10 uses a 6.3-inch Dynamic AMOLED display with a screen refresh rate of 60 Hz. The core is equipped with Qualcomm’s latest Snapdragon 855+ processor, and is equipped with 8GB+256GB storage combination. The built-in 3600mAh capacity battery supports 25W fast charging specification.

“Samsung mobile phone Galaxy Note 10 series is about to be released, I plan to replace this phone, is there any way to sync all data files from my old Samsung mobile phone to the new phone?”

Maybe a lot of friends have encountered the same problem. When they change their new phone, they don’t know how to sync phone numbers, text messages, pictures, videos, music, call logs, WhatsApp, documents and more to the new phone. Now with the help of Phone Switch, you can easily sync everything between Samsung and Galaxy Note 10.

Phone Switch – Synchronize data from Samsung to Galaxy Note 10

Phone Switch is a powerful phone to phone transfer software for us to sync photos, contacts, text messages, call logs, applications, application data, music, video and more from Samsung Galaxy S5/S6/S7/S8/S9/Note 5/Note 4/Note 3/Galaxy J/ Galaxy Ace to Galaxy Note 10.In addition, the program can move data from iPhone to Galaxy Note 10,also can sync contacts ,text message, music and many other file types to another android phone, such as HTC, LG, SONY, OPPO, vivo, Google, OnePlus, Xiaomi, Nokia, BlackBerry, and so on. Phone Switch not only helps us to sync the data between different phone, but also helps to restore your lost data easily. Let’s take the example of sync data from Samsung to Galaxy Note 10.

d_win d_mac
d_win d_mac

Easy Guide to sync data from Samsung to Galaxy Note 10

Step 1. Download and launch the program

The first thing you need to do is download the software on your Windows PC or Mac. Then installing it, launch the Phone Switch toolkit and click on the “Switch” option to go on. Through this function, it can help you sync the data from Samsung to Galaxy Note 10.

phone switch main page

Step 2. Connect Samsung and Note 10 to PC or Mac

Then, you should use the authentic USB cable connect both your Samsung phone and Samsung Note 10 to the system at the same time, the program will detect both the devices, please wait for a while.

connect samsung and galaxy note 10 to PC

Once the devices are detected, the interface will provide their basic snapshot. Ideally, your Samsung should be listed as source and Galaxy Note 10 device as a destination device. If not, then click on the “Flip” button to interchange their positions.

Step 3. Sync Data from Samsung to Galaxy Note 10

Then, you can select the data which you need to sync from old Samsung. For example, like photos, videos, messages, music, etc. After selecting the data from old Samsung, click on the button “Start Transfer” to go on.

It will take you a minute to sync the data from your old Samsung device to Galaxy Note 10. During the process, don’t push out the USB cable. You can view its progress from an on-screen indicator.

transfer data from samsung to galaxy note 10

Note: In this way you need to wait patiently during the sync program and let your phones be connected to the computer before it was sync completely.

d_win d_mac
d_win d_mac

Read More

How to Sync Android Files to Samsung Galaxy Note 10

Smart Switch: Transfer Data to Galaxy 10/S9/S8/Note/Fold

How to Transfer Contacts & SMS from Samsung to Galaxy Note 9

How to Transfer Data from iPhone to Samsung Galaxy Note 10

Sync Android Contacts and SMS to Samsung Galaxy Note 8/5/4/3

Samsung to Samsung Transfer