All posts by DHZ

How to Recover Lost Data after Android 7.0 N Upgrade

Android 7.0 Nougat Review: An Android Version for Android Fans
Android 7.0 Nougat is Google’s way of refining what we already have, and adding some essential features to an operating system they were already happy with.Android Nougat doesn’t make major changes to the way your phone looks or the way it “feels.” But what Google has done under the hood brings some new features -and much needed polish – to our favorite smartphone operating system.

android-n

Android Nougat is here and it’s a thing of beauty. It may not have the same dramatic visual overhaul we were first treated to in Android Lollipop two versions ago, but Nougat provides a lot of major improvements and refinements over Marshmallow, along with quite a few nice new usability changes.

* How to Transfer Contacts from iPhone to Android

* How to Manage Android on Computer

Android N Upgrade Lead to Data Loss
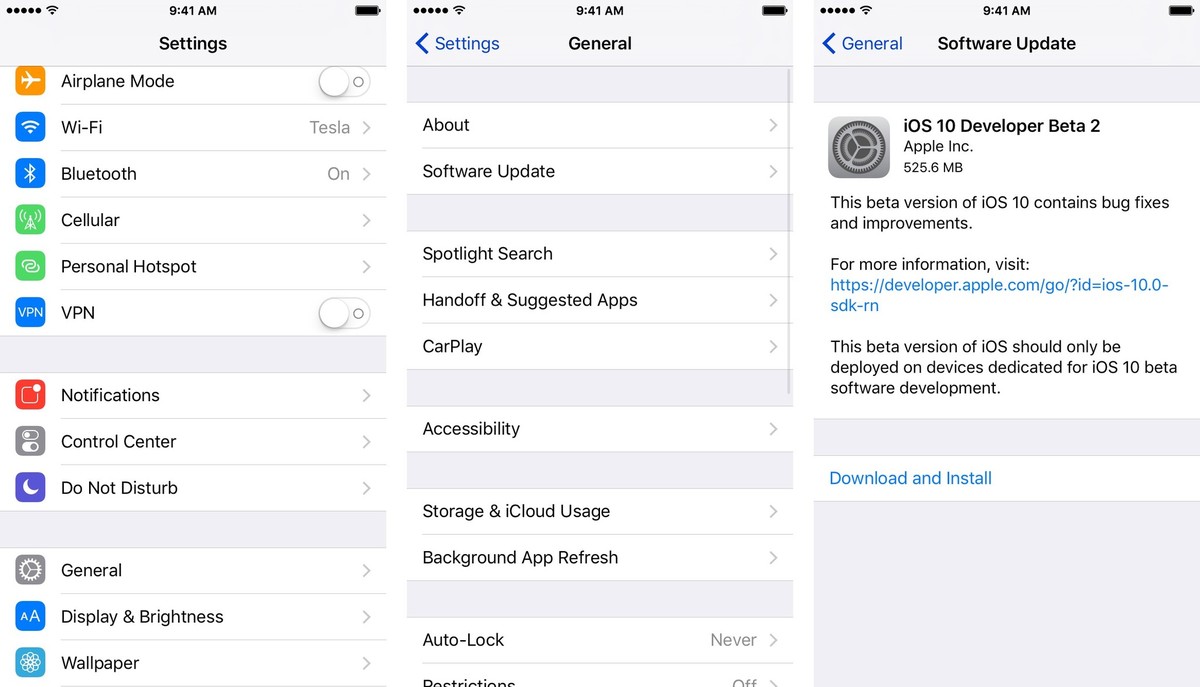
Now as the arrival of the Android N with the new features,some of you may can’t wait to update your Android device to the latest system?In fact,there are lots of Android users wonder if they should do it,because of the data loss disaster is possible to happen to them.As we know the newest means not perfect enough,and still have bugs need to be fixed.Upgrade Android device to Android N may lead to Android data loss after upgrading.So the problem is here:How to restore deleted data from Android after Android 7.0 Nougat update.If you have the job adequately prepared for the upgrade,you are allow to restore deleted Android data from backup.However,how to recover deleted data from Android in Android N without backed up file?

Android N Data Recovery to Restore Data with Android N

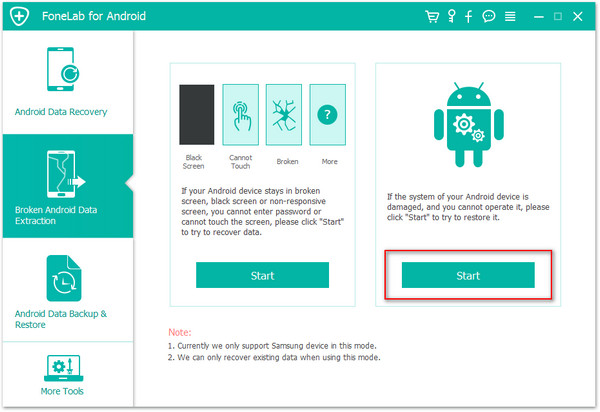
It’s possible for you to recover deleted data from Android after Android 7.0 Nougat upgrade with Android N Data Recovery.This program allows you to restore deleted Android data including contacts, text messages,pictures,videos,call logs,documents and more after android N upgrade from all popular Android devices ,like Samsung, LG, Motorola,Lenovo,HTC, Huawei, Sony, ZTE, etc,.Android N Data Recovery enable to retrieve deleted data from Android after losing data due to Android system upgrade,Android rooting,restore Android to factory resetting,deleted accidentally,Android get broken/damaged and so on.It’s available for Android 7.0,Android 6.0 or lower.

d_win d_mac

How to Recover Deleted Data After Android 7.0 Nougat Update

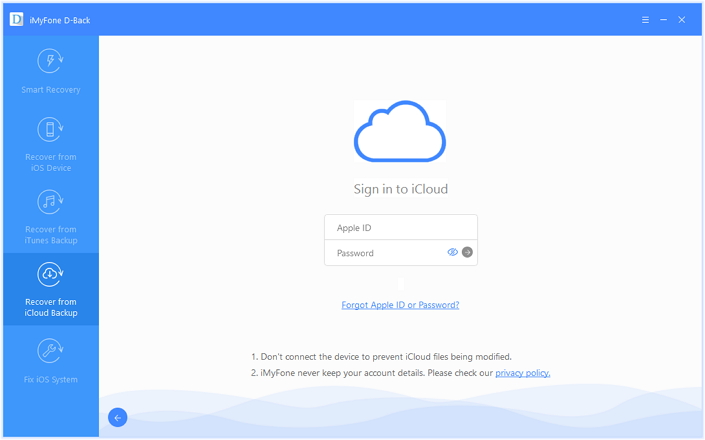
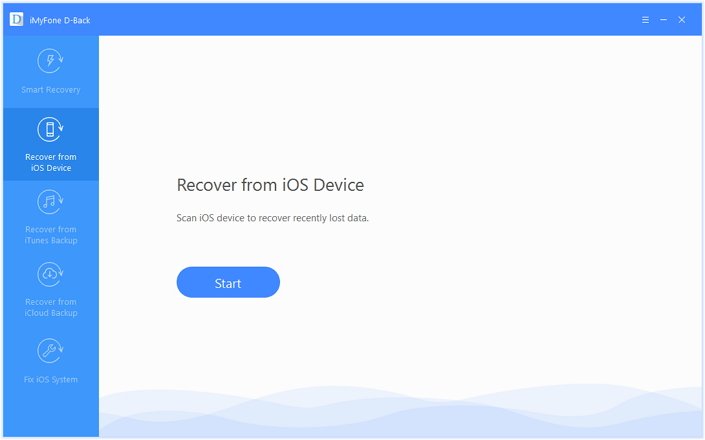
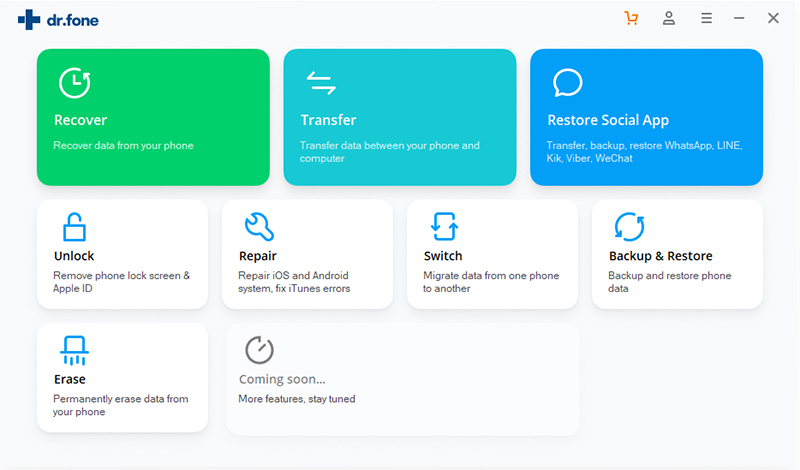
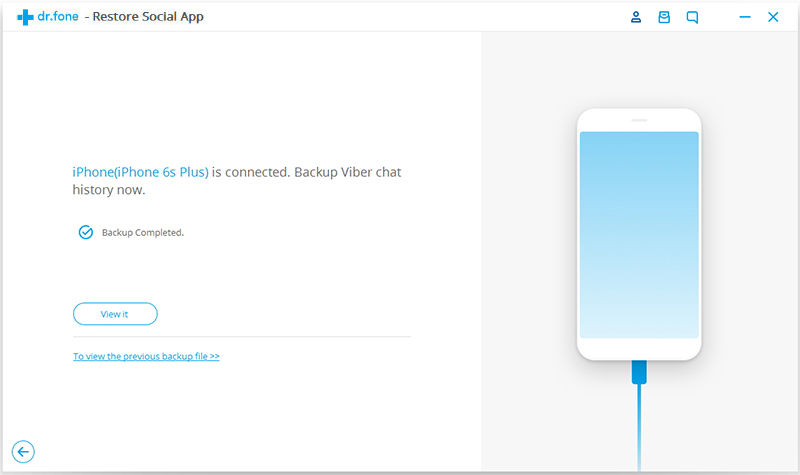
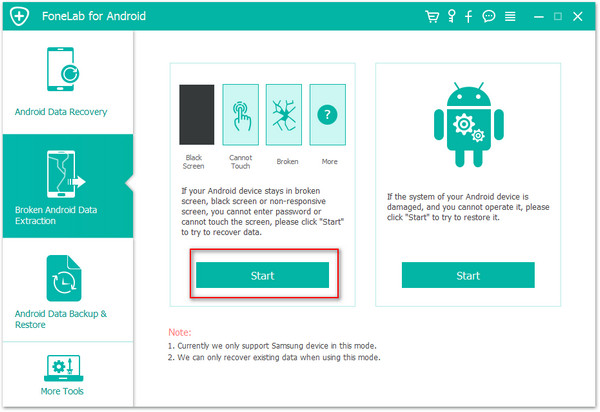
Step 1.Run Program and Connect Android to computer
Run Android N Data Recovery software and connect your Android to the computer with USB cable.The program will detect your device very soon.

recover android data after android n upgrade

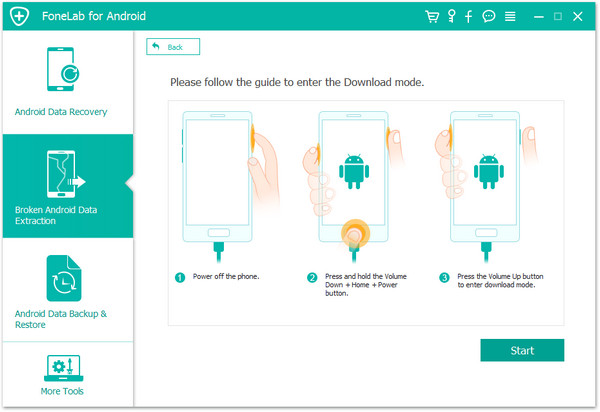
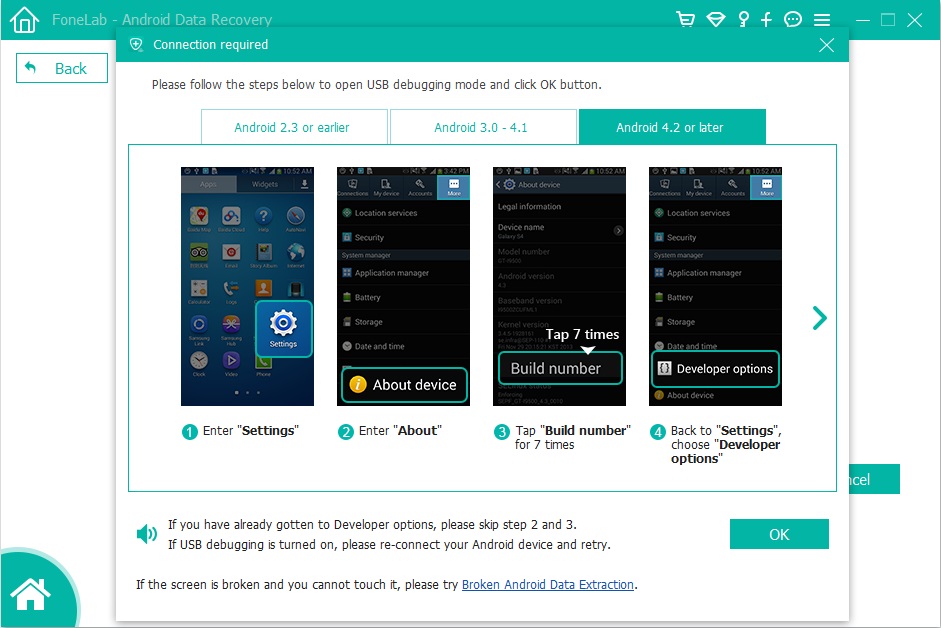
Step 2.Enable USB Debugging on Android
If you have not opened the USB debugging option on your Android previous,this program will ask you to do it.And there are ways to enable USB debugging for different Android OS version.

recover android data after android n upgrade

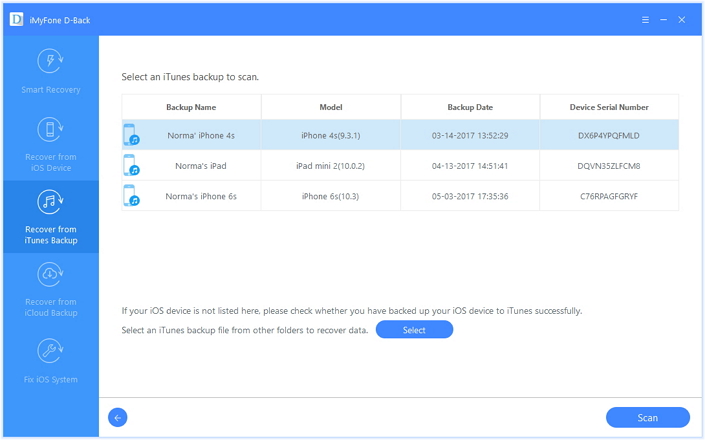
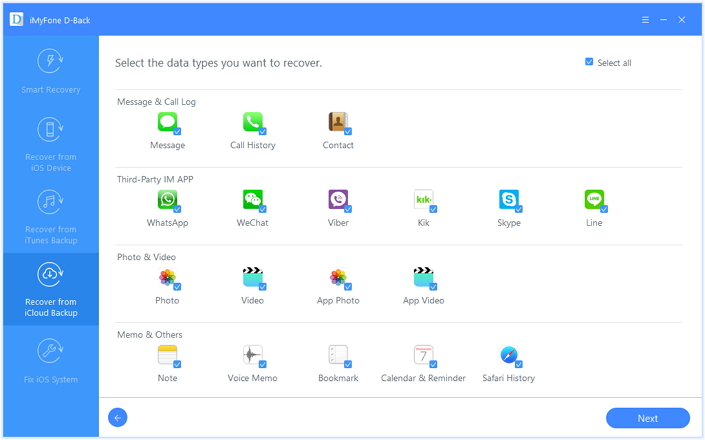
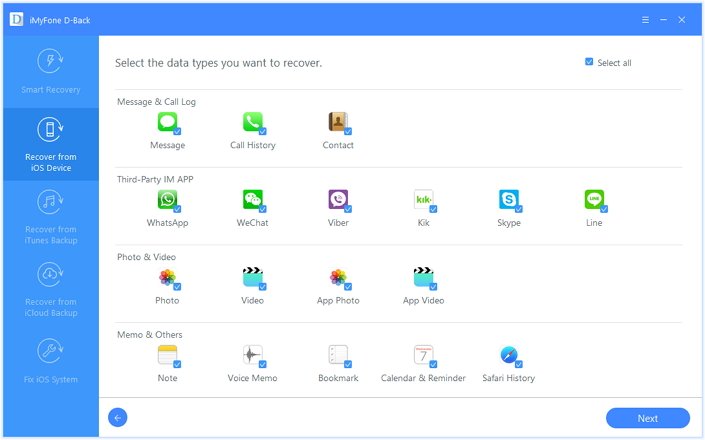
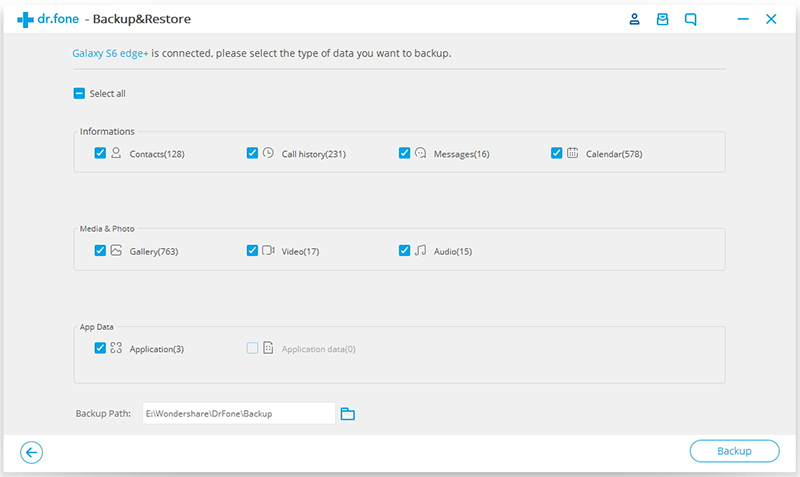
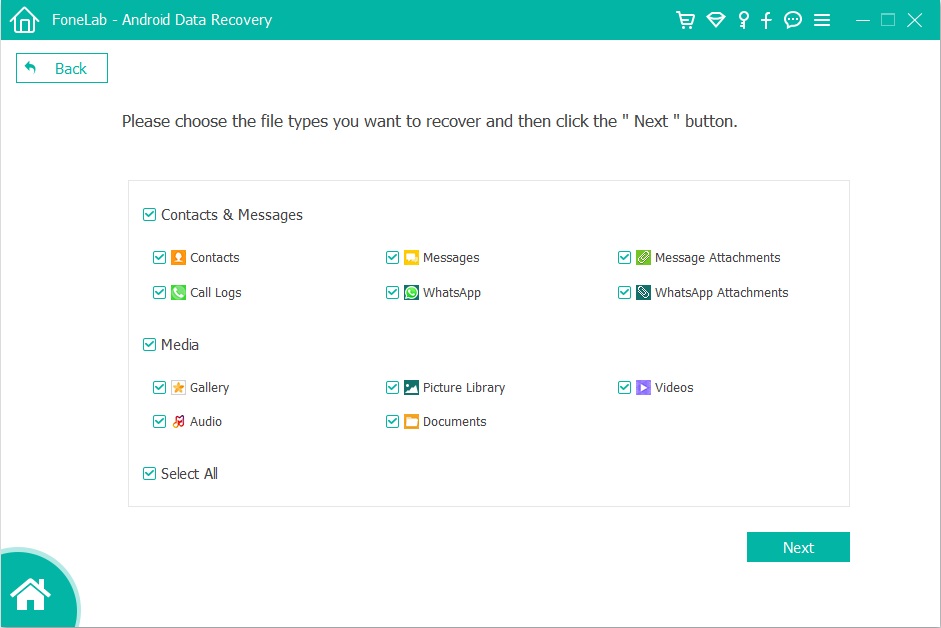
Step 3.Select the File Type for Scanning
Now you should select the file to scan for Android,such as contacts,messaging,call history.click “Next” button to go to the next step.

recover android data after android n upgrade

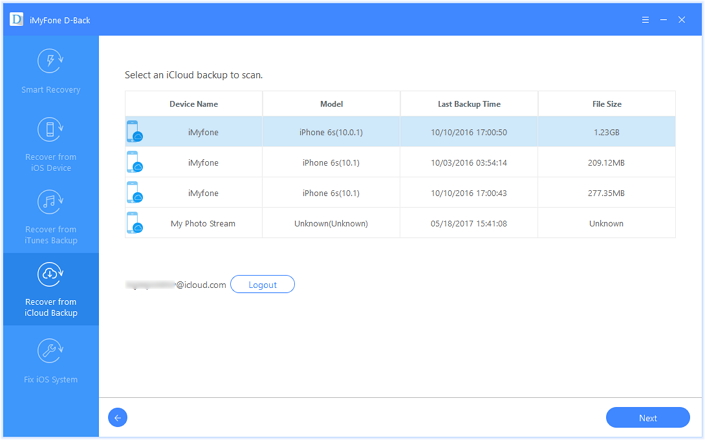
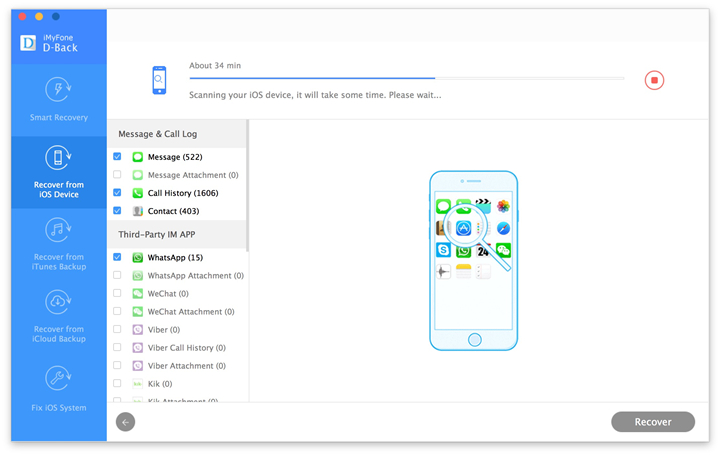
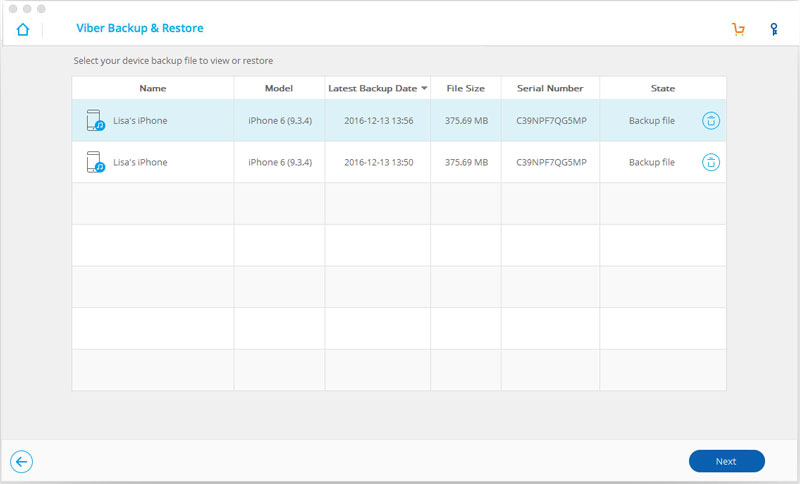
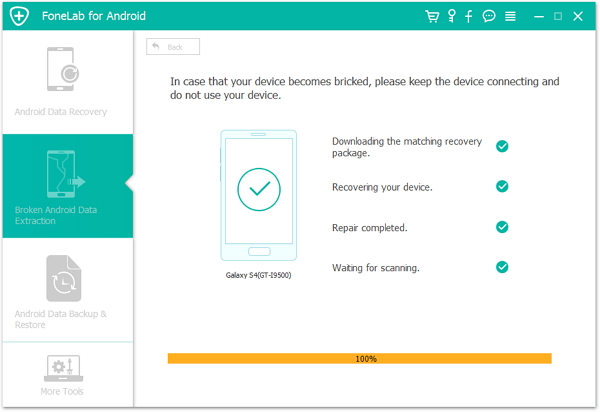
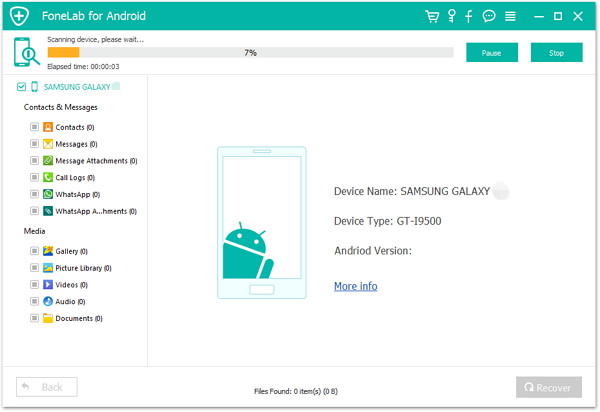
Step 4.Scan Android for Deleted Files
After detecting your Android,the program will quickly scan the device to find all the existing and deleted data from Android.Then the program will analyze your Android,a pop-up will ask whether allow or not to proceed.Here you need to move to your device and tap on “Allow” to enable the Superuser Request.

recover android data after android n upgrade
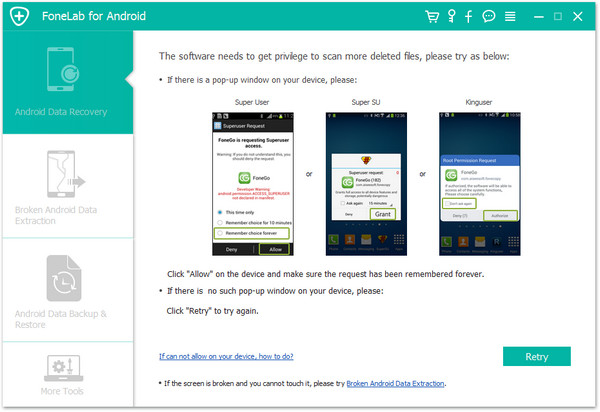
Now the program will begin to analyze data stored on Android.

recover android data after android n upgrade

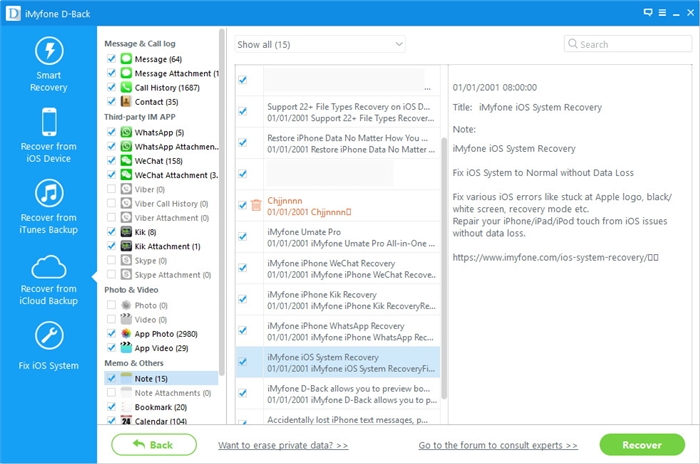
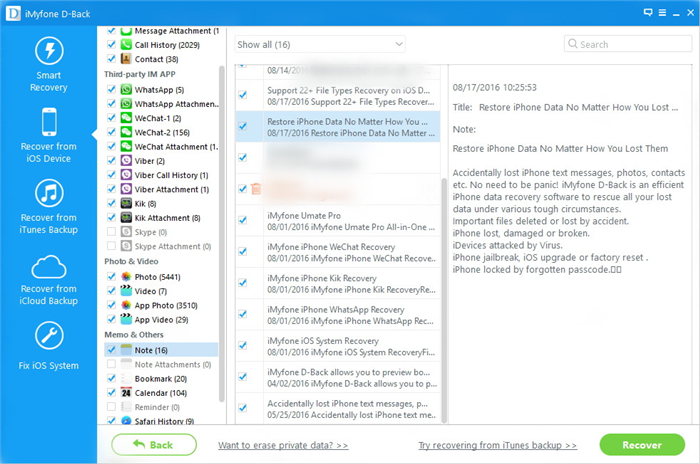
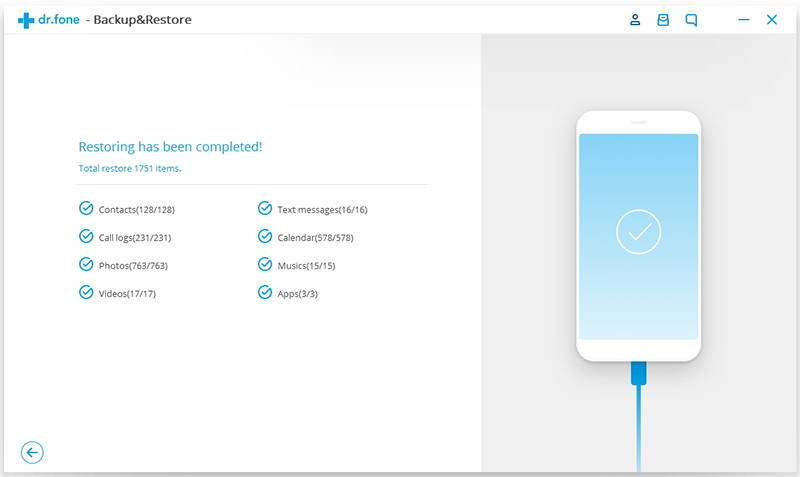
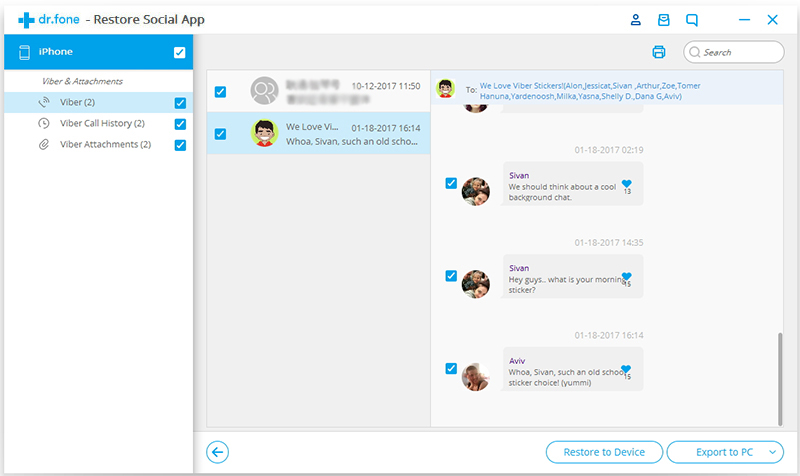
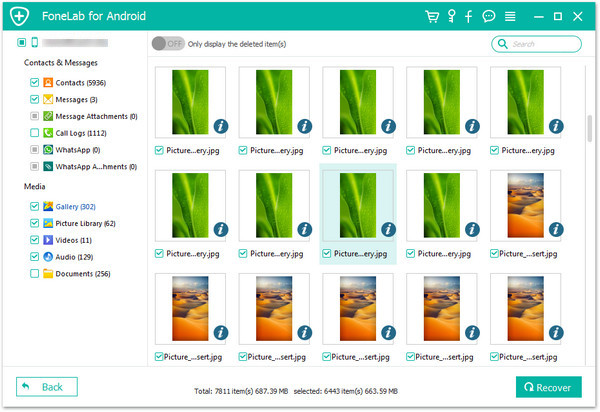
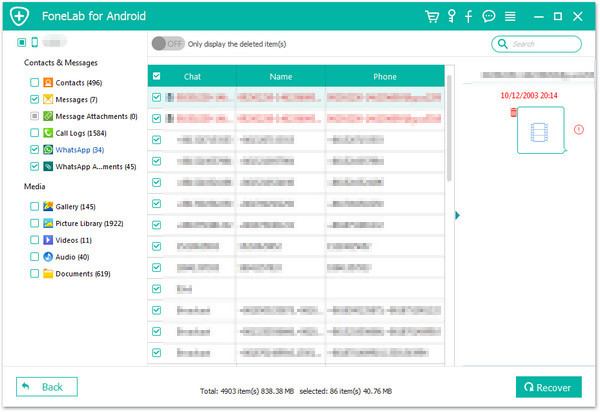
Step 5.Preview and Recover Deleted Data from Android
Preview all the recoverable files one by one and then select the data for recovery.Finally,you are allow to click “Recover” button to get back the selected files to computer

recover android data after android n upgrade

Done.Just enjoy your trip on Android device with Android 7.0 Nougat.

d_win d_mac

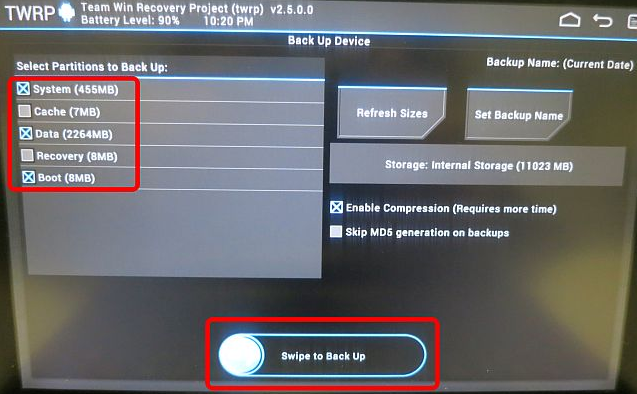
Note:After restoring data on Android,you’d better do a routine backup of Android frequently.Know more about the tips to backup Android file to computer is help to protect Android data and avoid android data loss happened.

Read more:

How to Recover Data from Android Phones

How to Restore Lost Data from Rooting Android

How to Recover Data from Broken Android Phone

How to Recover Data from Samsung after Upgrading to Android 6.0

How to Recover Data from Android Phone after Upgrading to Android 6.0

How to Clear Facebook Cache on iPhone

Facebook is a social networking site that makes it easy for you to connect and share with your family and friends online. Originally designed for college students,Facebook was created in 2004 by Mark Zuckerberg while he was enrolled at Harvard University.By 2006,anyone over the age of 13 with a valid email address could join Facebook.Today,Facebook is the world’s largest social network,with more than 1 billion users worldwide.

facebook-notifications

How iPhone Facebook Cache Produced
Have you ever wondered why people like using Facebook?After all,there are already a lot of other ways to communicate online,such as email,instant messaging,and so on.What makes Facebook unique is the ability to connect and share with the people you care about at the same time.However,Many users have noticed that various apps such as Facebook produce caches and it goes on increasing over time.iPhone users find that their device is occupied by large amount of caches and need to free up space on phone by clearing the caches,so many users just search for some ways on the Internet to clear the Facebook cache from iPhone.Though users apply several ways to clear cache on Facebook but they failed because they don’t know how to deal with it correctly.

facebook

How to Clear Facebook Caches on iPhone with One Click

Here I have to strongly recommend this Facebook cache clear up tool for you,which is named-iOS Data Eraser,which enable to clear the Facebook cache on iPhone completely.With the help of this software,you are allow to easily clear all caches which are generated by various applications like Facebook,YouTube and Twitter etc,.As it’s name,with the help of this software,you can also permanently delete photos,messages,call history, contacts, apps, notes etc,. from iPhone.This software is famous for erasing data from iPhone such as device rubbish or the file you need to deleted without restoring,to speed up space on iPhone.This is one of the reliable software which is used for erasing iPhone data permanently and it is applicable to almost all models of iOS devices, like iPhone 7/SE/6S/6/5/5S/5C/4/4S,iPad Air,iPad Pro,iPad Mini.

d_win d_mac

Let’s have a look at main features of iOS Data Eraser:
-Support to erase all types of data from iOS devices:contacts,messages, photos, videos, apps, account info, passwords and other personal data stored on iPhone/iPad/iPod.
-Permanently erase iPhone/iPad/iPod data,prevents personal data from being recoverable(no data recovery can restore the deleted data).
-5 powerful data wiping models available for choice.
-Quickly clear junk files, invalid files, cache files & more.
-An intuitive and easy-to-follow user interface.

Clean Junk Files from iPhone

Welcome to add us or follow us on Facebook:Click here to link our Facebook.Please leave your recommendation
messages for us,Thank you.

Related Article:

How to Clean Junk Files from iPhone/iPad/iPod

How to Permanently Erase Data from iPhone/iPad without Recovery

How to Permanently Delete Photos from iPhone/iPad to Free Up Space

How to Erase All Content and Settings on iPhone Permanently

How to Backup and Restore Line Chat History on iPhone iPad

[Summary]: Looking for a way to backup Line messages from iPhone to computer? This article teach you how to backup and LINE chats history, pictures and videos from iPhone and iPad to Windows or Mac comptuer, you can also restore Line backups file to iPhone, iPad easily.

“Hello,I used the iPhone 5 for 2 years,recently I am planning to buy the new iPhone SE,but now I stuck in the trouble.How can I restore my phone Line chat history to my new iPhone?Anybody give me some suggestion?Thanks a lot.”-Beverly

Line app

LINE is available for a variety of smartphone devices and mobile devices(iPhone/iPad,Android, Windows Phone,BlackBerry, and Nokia) and even your PC.As a LINE messenger user,you may want to backup and restore your LINE chat history on mobile device, switching it to a new device or just as a backup in case the data is lost under any circumstances for example deleted accidentally.It may seem an impossible task to restore the data and the latest LINE chat history on device.What’s more even worse,where the history is deleted automatically when there is a login detected on another device,which means the data would be lost forever if there is no backup performed.

How to Backup and Restore Line Messages on iPhone

If you are the iPhone/iPad users are you looking for an apposite way to backup Line chat history from iOS device to computer and keep them safe? iOS ToolKit – Restore Social App –  iOS Line Backup & Restore Tool, which provides a simple and effective solution to backup Line chat messages with attachments from iPhone/iPad to PC in only a few clicks. All these Line chat messages will be saved in a readable database on computer,the Line text,video messages,photos are included.In addition,this program also help to restore backed up Line messages from computer to iOS device freely.Here list the applicable iOS device: iPhone XS(Max), iPhone XR, iPhone X, iPhone 8(Plus), iPhone 7,iPhone SE,iPhone 6S(Plus),iPhone 6(Plus),iPhone 5S/5C/5,iPad Air,iPad Pro,iPad Mini,etc,.

d_win d_mac
d_win d_mac

Part 1:How to Backup Line Chat History from iPhone to Computer

Step 1.Run Program and Connect iPhone to the computer
Firstly,launch the iOS Line Backup & Restore Tool on computer and select “Restore Social App” on main interface,you will see a list of tools as follows: Select “iOS LINE Backup & Restore” from the tool list.Then connect your iPhone to the computer with an USB cable.The excellent program will automatically detect your device very soon.

line-backup-restore-tools

backup-line-messages

Step 2.Backup iPhone LINE Data to Computer
When your phone is detected by iOS Line Backup&Restore Tool,you are allow to click “Backup” to begin the data backup process.

backup-iphone-line-messages

Once the backup process is complete,you should click “View it” to preview your LINE backup files.

Part 2:How to Restore Backed up Line Chat History from Computer to iPhone

Step 1.Run Program and Connect iPhone to the computer
Firstly,launch the iOS Line Backup & Restore Tool on computer and select “More Tools” on the left side of the interface,you will see a list of tools as follows:Select “iOS LINE Backup & Restore” from the tool list.Then connect your iPhone to the computer with an USB cable.The excellent program will automatically detect your device very soon.

line-backup-restore-tools

backup-line-messages

Step 2.View and Extract LINE Backup Files
To check the LINE backup files,you should click “To view the previous backup file >>” on the first screen.Here you will see a list of LINE backup files,choose the one you want and tap on “View”.

view-line-backup-file

Step 3.Preview to Restore/Export LINE Backup
Once the scanning is finished,you are allow to preview all LINE chats history including attachments,and then restore or export the backed up by clicking “Restore to Device” or “Export to PC”.

preview-line-backup-data

Note:Currently,iOS Line Backup&Restore Tool allow you to restore or export the whole Line data.You can’t do it selectively.

If you would like to roll back, please restart iOS Line Backup&Restore Tool, open the preview window and click “Undo the Restore” to proceed. Please be noted that you could only undo the latest restore.

restore-line-data-backup

iOS Toolkit perfectly help to backup and restore iOS Line chat history on computer. More than 3,000s of satisfied users. Easy to use software and no technical knowledge required.Just download and have a try right now.

d_win d_mac
d_win d_mac

Related Article:

How to Backup and Restore iOS Kik Messages

How to Backup and Restore iOS Viber Messages

How to Backup and Restore iOS WhatsApp Messages

How to Backup and Restore Contacts/SMS/WhatsApp Messages on iPhone

How to Restore Deleted SMS/iMessages/MMS on iPhone

How to Transfer SMS/MMS/iMessage from iPhone/iPad/iPod to Computer

Backup & Restore Line Messages

How to Enter & Exit iPhone Recovery Mode

Many iOS users do not know what is the difference of the iPhone recovery mode and DFU mode, here I’m going to introduce the details to you all on the following passages.

Recovery-vs-DFU-Mode

What is Recovery Mode
Recovery mode allows iTunes to restores your iPhone to its original factory settings but with the latest iOS and firmware.When your device is in recovery mode, the iTunes logo and the icon of your USB cable will appear at the same time and iTunes will inform you that an iPhone/iPad/iPod touch in recovery mode has been detected.

What is DFU Mode
DFU mode is short for device Firmware Update mode. It skips the iBoot bootloader for jailbreak fascinates. When your device is in DFU mode, the device screen will be totally black. DFU mode can be used in different situations including upgrading firmware, downgrading firmware, and even rebooting your tethered jailbroken device.

What is the Difference of iPhone Recovery Mode and DFU mode
The biggest difference of iPhone recovery mode and DFU mode is that whether or not to start the iBoot.In iPhone recovery mode,the system uses iBoot to restore and upgrade the firmware,while in the DFU mode,the system will not start iBoot,so you can downgrade the firmware in DFU mode.iBoot is on IOS devices boot loader,when you in recovery mode for system recovery or upgrade,iBoot will lead you to upgrade the firmware version detection to ensure you want to upgrade the firmware version than the current system firmware version(to the new version number higher).If you want to upgrade the firmware version is less than the current installed version of the system,then iBoot will prohibit the recovery of the firmware.

So the degradation of the firmware must be switched to DFU mode. This also means that if you need to restore the current firmware version,only need to enter device to the recovery mode, iTunes will over the next restoration work; if you need the firmware downgrade, you need to enter DFU mode on device.For example, in the absence of access to the DFU mode, you can not downgrade your firmware from 7.04 to 7.02, of course, apple now officially released a new firmware, the firmware will soon be closed to verify. Of course, the firmware is closed to verify what way the firmware is not activated, DFU is not.

What You Should Do before Entering iPhone to Recovery/DFU Mode
Charge your device to 100% and last for a few minutes,which can help to solve the problem of partial power display error.

Part 1:How to Enter iPhone Recovery Mode

When your iOS device fail to reset,stuck during/after upgrading,software error,stuck at white screen,can not open the device, forget the password of device,stuck on the cycle loop issues,etc,. you should enter device to recovery mode.

Step 1.Turn Off your iPhone/iPad/iPod if it isn’t off already.Press and hold down the On/Off button on the right side (iPhone 6 or later) or top (all other iPhone/iPad/iPod) for 3 seconds.

Step 2.Swipe the slide to power off confirmation slider to the right.

how-to-iphone-power-off-screens

Step 3.Press and hold down the Home button on your device.

Step 4.Plug your device into your Mac or Windows PC and make sure iTunes is running.

Step 5.Release the Home button when you see the Connect to iTunes screen.

how-to-iphone-recovery-screens2

At this moment iTunes should display an alert saying it’s detected an iPhone/iPad/iPod in recovery mode,and will allow you to restore your device.

Part 2:How to Exit iPhone Recovery Mode and Restore iPhone to Normal

However,you may encounter the especial circumstance,for example your device stuck in recovery mode and can’t get it out of this mode.Over the years we’ve had a few customers contact us asking how to fix iPhone stuck in recovery mode.As it appears to be a common problem (even among some of us here in the office), we thought we’d share the best solution of how to solve an iPhone stuck in recovery mode issue.

What You Can Do When Your iPhone is Stuck In Recovery Mode
DO NOT do anything if your iPhone goes into Recovery Mode.The official way to exit Recovery Mode is to restore your iPhone with iTunes.However,sometimes you may fail to get iPhone out of recovery mode with iTunes,or you just wanna another better method to fix it.

Note:Trying to fix iPhone stuck in recovery mode in the common way may lead to data loss.Remind you doing this especially after backing up your iPhone regularly because restoring your iPhone will wipe all data and content on device.Tips:How to backup iPhone data to computer.

Here is our strongly recommendation-iOS System Recovery.iOS System Recovery can perfectly solve this program completely,enable to get iPhone out of recovery mode without losing data,get iPhone out of DFU mode without losing data and restore iPhone system to normal status as usual.It gains highly assessment from iOS users widely.While there is guarantee that definitely help to excellently fix iPhone system stuck issues after the restoring process.What’s more,this program provide an available way to recover deleted data from iPhone/iPad/iPod as well.

d_win d_mac

Step 1.Run Program and Connect iPhone to Computer
Run iOS System Recovery on computer and connect your iPhone to the computer with an USB cable.Select the “iOS System Recovery” from “More Tools” on program,and then click “Start” to begin the process.(The restoring errors happen mostly because the operating system on your iPhone performs abnormally.)

get iphone out of recovery mode

get iphone out of recovery mode

Step 2.Download the Firmware for iPhone Restoring
You’ll see that the program detects your iPhone,confirm it and “Download” the firmware for your device.

get iphone out of recovery mode

get iphone out of recovery mode

When it finished,iOS System Recovery will continue to get your iPhone out of Recovery Mode in a few minutes.

get iphone out of recovery mode

get iphone out of recovery mode

d_win d_mac

Read more:

How to Restore iPhone System to Normal

How to Get iPhone Out of Recovery Mode after iOS 10 Upgrade

How to Fix iPhone Stuck in Recovery Mode after Jailbreaking

How to Get iPhone SE/6S/6/5S/5 Out of Recovery Mode

How to Fix iPhone Stuck in DFU Mode

4 Ways to Recover Deleted Note from iPhone with iOS 10

Upon updating iOS 10.3.2 on my iPhone 6s,then I try to open the notes app.I was prompted with an informational screen about the changes,however after clicking “ok”,it only lists the notes that I’ve created in the last two days.Everything prior to that is gone.I still have a copy of all them on my Mac,I want to know how to recover lost notes from iPhone after iOS 10.3.2 update?-GaryNoine

recover iphone note ios 10

iOS 10 Upgrade Lead to Notes Data Loss
Apple announced the latest version of iOS 10.3.2 Since then the company has been pushing a lot of beta releases for the OS. With the official launch set for this fall, till now we have seen seven beta releases for the same and he seventh one being the most recent one.However,iOS 10 still have bugs and now it’s limit to solve completely,the most common program is lost data after upgrading to iOS 10.It’s lucky that you have a backup for iPhone so you can’t retrieve data from backup to iPhone.However,please not be depress if you haven’t backup file of your iPhone.If you also meet similar situation with the with Gary, read the guides below.

How to Check the “Recently Deleted Notes” on iPhone

If your iPhone, iPad running iOS 9, iOS 10 above,there are a “Recently Deleted” Folder in Notes app,so you can check the recently deleted notes in this folder.

Step 1.Tap Notes app on iPhone
Step 2.Tap “Recently Deleted” Folder.Here,you can see all recently notes within 30 days.
Step 3.Click Edit button in the upper right corner of the screen
Step 4.Select the note(s) you want to restore
Step 5.Tap Move To… button to move the recently deleted note(s) to the default Notes.

recover recently deleted notes on iOS 10 devices

Notes:These deleted note(s) will be deleted after 30 days,if you can not find the note(s) you need,please use a iPhone data recover to recover deleted notes from iPhone 7/6S/6/SE/5S with/without backup.

Get Back Lost Note from iPhone iPad with iOS 10.3.2

iOS Data Recovery will help in this situation.It supports to recover deleted notes on iPhone after iOS 10 upgrade,it also allow to restore deleted contacts,SMS,photos,videos,call logs,WhatsApp messages, document and more on iPhone/iPad after iOS update.Three recovery mode is available:directly recover from device,recover from iTunes backup,recover from iCloud backup.Suitable for losing data due to iOS upgrade,iOS jailbreak,device damaged/broken,deleted mistaken and so on.Supports almost all the models of iPhone such as iPhone 7/7 Plus, iPhone SE, iPhone 6S/6(Plus),iPhone 5S/5 on iOS 10/iOS 10.3.2.

You can download it on your computer first. Both Windows and Mac versions are available.

d_win d_mac

Part 1:Restore iPhone Note by Extracting iTunes Backup

The iOS Data Recovery provides the “Smart Recovery” feature for you recover your data quickly and easily.If you don’t know your device lost data under any circumstances,we suggest you click the “Smart Recovery” feature to choose How You Lost Your Data,which will solve your problem and improve the rate of data recovery.

smart iphone data recovery

This recovery mode allows you to scan your iOS device directly to find all the lost files lately, or recover lost data from your inaccessible device.

Step 1.Run iOS 10 Data Recovery and Select Recovery Mode
Run iOS Data Recovery on computer,choose “Recover from iTunes backup” mode among 3 recovery modes.Connect iPhone to computer.

Step 2.Select and Extract the iTunes Backup
Choose an iTunes backup which may contain the deleted notes and let program scan it for the lost file.

extract files from itunes backup

Step 3.Restore iPhone Note from iTunes Backup
When the scan is finished,all the found notes will be displayed in the interface.Simply choose the desired notes from them and tap on “Recover” button to extract them to the computer.

restore iphone deleted notes from itunes backup

You can download the iOS 10 data recovery on your computer first. Both Windows and Mac versions are available.

d_win d_mac

Part 2:Restore Lost iPhone Note by Extracting iCloud Backup

Step 1.Choose the Mode and Log on iCloud Account
Choose “Recover from iCloud Backup File” after launching iOS Data Recovery.Then,sign in your iCloud account.

sign in icloud account to login

Step 2.Select the Files to Retrieve from iCloud Backup
The program can help you selectively recover data from iCloud backups,including photos, App photos, videos, notes, contacts, SMS, iMessages.Just click your desire files and then click “Next”.

select the file types

Step 3.Select the iCloud Backup File and Download
You will see the iCloud backup files that you backed up with this account previously listed.Choose the one you want to recover and click “Download” to download the backup file.

download icloud files

Step 4.Preview and Restore Deleted Note from iCloud Backup
Once backup file downloaded,preview the lost notes data one by one by selecting the “Notes” item,then choose the notes you decide to get back.After that,save to either the computer by click “Recover” button.

recover deleted notes from icloud

d_win d_mac

Part 3:Regain Missing Notes from iOS 10 Devices without Backup

Note:The mode is available for losing data from iPhone and have no backup.This recovery mode is helping you to directly retrieve deleted data from iPhone.

Step 1.Run iOS Data Recovery and Connect iPhone to Computer
Firstly choose “Recover from iOS Device” option in the homepage of program and then connect iPhone to computer.

connect iphone with computer

Step 2.Select Notes
Select the “Notes&Attachments” for scanning.The program will start to scan your iPhone for the deleted notes by clicking “Next” button.

select file to recover

Step 3.Scan Your iPhone for Deleted Note
Click “Scan” to search for your lost data,then the program begins scanning your device automatically for deleted notes.

scan iphone and search deleted data

Step 3.Preview and Recover Deleted Notes from iPhone
After scanning,all your iPhone data will be listed orderly.You are allowed to preview them one by one,which includes notes,contacts, videos,music,photos,text messages,calendars,bookmarks and more.You should choose “Notes” only for previewing to save time.At last,click “Recover” button to get iPhone notes back on computer.

recover deleted notes on iphone

Free download the iOS 10 Data Recovery and try to get your missing notes back.

d_win d_mac

Related Article:

How to Restore Deleted Notes on iPhone 7/SE/6S/6/5S/5

How to Recover Lost Data on iPhone after iOS 10 Upgrade

How to Recover Lost Contacts on iPhone after iOS 10 Upgrade

How to Recover Lost Text Messages on iPhone after iOS 10 Upgrade

How to Recover Lost Photos on iPhone after iOS 10 Upgrade

How to Download & Install iOS 10 Beta 7 On iPhone

Update August 19, 2016: Apple has just released iOS 10 beta 7 for developers. If you already have iOS 10 beta installed, proceed to Settings > General > Software Updates and download away. If you’ve been waiting for beta 7 to get in on iOS 10, keep reading and we’ll walk you through the set up!

ios-10-beta-7

iOS 10 is coming this fall with a ton of new features, several that require lots of third-party developer input. As such, the company is releasing developer betas so that software engineers can get a head start on making great software for you.

Apple’s 2016 software updates- iOS 10, watchOS 3, tvOS 10, and macOS Sierra – are currently available as closed developer previews or as public betas for iPhone,iPad,and Mac.(Sadly, no public beta for the Apple Watch or tvOS this year.) While the betas contain new features, they also contain pre-release bugs that can prevent the normal use of your iPhone, iPad, Apple Watch, Apple TV, or Mac, and are not intended for everyday use on a primary device. That’s why we strongly recommend staying away from the developer previews, and using the public betas with caution. If you depend on your devices, wait for the final release this fall.

How to Download and Install iOS 10 Beta 7 On iPhone

To install the iOS 10 beta,you’ll need to visit Software Update on your iPhone or iPad.

Step 1.Launch Settings from your Home screen,tap on General,then tap on Software Update.
Step 2.Once the update appears,tap on Download and Install.
Step 3.Enter your Passcode.

install-ios-10-1

Step 4.Tap Agree to the Terms and Conditions.
Step 5.Tap Agree again to confirm.

Step Your iPhone or iPad will reboot to install iOS 10. There will be a couple progress bars going across the screen. Sit tight, and let everything finish.

Although there has been no confirmation as to how many betas the company will release before working on finalizing the Gold Master version of the software, Apple released the final beta for iOS 9 around this time last year. If beta 7 isn’t the final version, we’re certainly getting close.

Related Article:

iOS 10 Public Beta Now Available

Apple iOS 9.3.4 is Now Available:What is Included in the Update

iOS 9.3.3 :The Things You Need to Know

How to Backup iPhone/iPad Data before iOS 10 Upgrade

How to Restore Deleted Data on iPhone/iPad with iOS 10

How to Backup and Restore WhatsApp Messages for Android

[Summary]: Want to backup WhatsApp messages from Android phone to PC or Mac computer? This tutorial will show how to backup whatsApp chats and restore WhatsApp messages on Android, such as Samsung Galaxy S/Note, HUAWEI, LG, Google Pixel/Nexus, Sony, HTC, Xiaomi, OnePlus, ZTE, Oppo, Motorola, etc.

According to the report,WhatsApp Messenger is the most popular chat apps among the mobile users,not except the Android.WhatsApp has announced that there are more than 800 million monthly active users up from over 700 million users in January of 2015. The friends,families,colleagues around me are using WhatsApp Messenger to communicate with each other.They consider that this apps is convenient and efficient enough and more useful than other apps.

Since we are too often to chat with Backup WhatsApp Messenger,you should know the importance of have a backup of WhatApp chat history for Android.For example,avoid losing WhatsApp data after Android system upgrade,restoring Android to factory resetting,Android Rooming,Android damaged/broken/lost,even Android stolen.I think you must be a strong incentive to backup your precious Android WhatsApp messages,please read on then you will get the tips on how to backup WhatsApp chat history on Android.

How to Backup and Restore WhatsApp Messages on Android

Android Data Backup & Restore -a pretty good data manager for Android, which lead you to smoothly backup WhatsApp messages(text,sticker,photo,voice and video messages) from Android to computer,and restore WhatsApp messages to Android from backed up.Not only the WhatsApp data are supported to backup and restore,but also the other applications data,such as SCR Pro,AASTOCKS.Almost all brands of Android are available,including Samsung Galaxy S10/S9/S8/S7/S6/S5/S4, Samsung Galaxy Note Note 9/Note 8/5/Note 4/Note 3, HTC One M9/M8, LG, Lenovo, Motorola, Google Pixel, Nexus and so on.

d_win d_mac

Part 1:How to Backup WhatsApp Messages from Android to Computer

Step 1.Run Android Data Recovery and Connect Android to Computer
Please run Android Data Recovery on computer,connect Android with computer and go on allowing debugging on Android.Click “Backup & Restore“.

Android WhatsApp backup restore

Then, please click “Backup” and select “Application” and “Application data“.

backup restore select app data

Step 2.Backup WhatsApp Chats from Android to PC/Mac
Once clicking the “Backup” button,program will begin the backup process.After the processing bar shows you the ending of backing up,you can move to view on the backup history and view the app.Although you can’t see the details about the WhatsApp data but you can know the size of it.

backup whatspp data

d_win d_mac

Part 2:How to Restore WhatsApp Messages from Backed up to Android

Note:Here you are allow to restore the backed up file to the previous backup Android or another Android as you like.

Step 1.Run Android Backup Resotre and Connect Android to Computer
Please run the Android Backup Resotre on computer,connect Android with computer and go on allowing debugging on Android.Then, continue with “Restore” button under “Backup & Restore”.

Step 2.Extract Backup File for Android
Here you will see all backup files of your Android,choose one you want to check and click on the “View” button.

view-android-backup

Step 3.Restore WhatsApp Backup to Android
When the scan stops,you can click “Restore” to restore the backed up file to Android.Now you can open WhatsApp on your Android device. Then log into your WhatsApp account and restore WhatsApp messages to the Android phone.

restore-backup-android

d_win d_mac

Related Article:

How to Recover Deleted Text Messages from Samsung

How to Recover Deleted Text Messages from Android Phone

How to Restore WhatsApp Messages Backup to Android Devices

How to Backup/Restore and Transfer WhatsApp Messages

How to Fix WhatsApp Programs on Android Phones

Android WhatsApp Backup Restore

How to Backup and Restore Viber Messages on iPhone

[Summary]: In this article, we will share you a easy and fast method to backup Viber messages from iPhone XS/XR/X/8/7/6S/6, etc. to PC/Mac, as well as restore Viber messages to iPhone and iPad from backups.

What is Viber
Viber-A communication application on mobile device for sending free messages and making free calls on any network.Viber lets you make free phone calls and send text, sticker, photo, voice and video messages for free to anyone who also has the application installed.Viber integrates with the iOS to give you the best experience and performance.It syncs with your contacts, detecting which ones already have Viber. Simply select a contact and talk for free.

viber-logo

The Features of Viber:
-Best quality video and audio calls using 3G/4G or WiFi
-A complete redesign for a new look and feel
-Free text, photo and video messages with location-sharing
-Call non-Viber mobile or landline numbers at low rates with Viber Out
-Support for iPhone/iPad-use your iPhone and iPad at the same time
-Group messaging with up to 100 friends
-Add friends easily by entering their Viber number or scanning their QR code

The Importance of Have a Backup of Viber Messages
Like WhatsApp,Wechat,Line,Viber is one of the most popular instant messaging apps that allows to send free messages,photos,videos to anyone,make call to anyone who also have Viber installed.However,unlike the other apps,Viber doesn’t keep a copy of your chat history in the server or on mobile device.Many people now use Viber quite a lot on iPhone/iPad and the message history means a lot to them.What if mistakenly hit the clear data button on Viber app?Or Just lost all the data when you are selling your phone or buy the new device to replace?Now you will be advise to backup the viber messages on iOS device.

How to Backup iPhone/iPad Viber Chat History

Recently, I find that iOS Viber Backup & Restore Tool – iOS Toolkit – Social App Restore released on the mobile market, I try this program and I’m satisfied with this wonderful tool function that complete the Viber backup and restore task on my iPhone.Now I am ready to introduce it to you all who need to backup/restore Viber chat history.iOS Viber Backup & Restore Tool is work well for backing up Viber chat history from iPhone/iPad to computer perfectly,as well as restoring backed up Viber messages from computer to iOS device completely,including the Viber text,sticker, photo,voice and video messages.iOS Viber Backup & Restore Tool is provided through the Viber app and creates a backup file with your chat history data on iOS device,which is an option to backup and restore your iOS Viber chat history indeed.The supported iOS device:iPhone 7,iPhone SE,iPhone 6S(Plus),iPhone 6(Plus),iPhone 5S/5C/5,iPad Air,iPad Pro,iPad Mini,etc,.It’s applicable to iOS 10,iOS 9 or lower.

d_win d_mac
d_win d_mac

Part 1:How to Have a Backup of iPhone Viber Chat History on Computer

After launching the iOS Viber Backup & Restore Tool on your Computer,choose “More Tools” on the left side and you’ll see the screen as follows.

Step 1.Run Program and Connect iPhone to the Computer
To backup Viber chats history on your iPhone,you should choose “iOS Viber Backup & Restore” option in the main page.Then connect your iPhone to the computer.Once your device is detected,you will see the screen below.

more-tools

viber-backup

Step 2.Begin to Backup iPhone Viber Chats History
Click on the “Backup” button,and the program will start the backup process automatically.Wait until the process is complete.keep your iPhone connected all the time during the whole process.

backup-viber-messages

When the backup process ends,you will see the screenshot below.

viber-backup-finish

If you want to check the backup file and export the content,you can continue reading.

Part 2:How to Selectively Restore Backed up Viber Messages to iPhone from Computer

After launching the iOS Viber Backup & Restore Tool on your Computer,choose “More Tools” on the left side and you’ll see the screen as follows.

Step 1.View iPhone Viber Backup Files
To check the backup file’s content,you should click on the “To view the previous backup file >>” on the first screen under “iOS Viber Backup & Restore” option.

more-tools

viber-backup

Step 2.Extract Backup File for iPhone
Here you will see all backup files of your Viber chats history,choose one you want to check and click on the “View” button.

viber-backup-file

Step 3.Restore or Export Viber Messages from Backup
When the scan stops,you can preview all contents in the backup file,including text chats,call history and viber attachments.You can check any item you want and click “Restore to Device” or “Export to PC” for recovery.

restore-iphone-viber-backup

d_win d_mac
d_win d_mac

Viber Messages Backup and Restore

Related Article:

How to Backup and Restore iOS Kik Messages

How To Backup and Restore iPhone WhatsApp Messages

How to Backup and Restore Contacts/SMS/WhatsApp Messages on iPhone

How to Restore Deleted SMS/iMessages/MMS on iPhone

How to Transfer SMS/MMS/iMessage from iPhone/iPad/iPod to Computer

How to Backup and Restore Kik Messages on iPhone

What is Kik Messenger
Kik Messenger is the totally free, crazy-fast, cross-platform messenger app that connects you to your friends in real-time.Use Kik to chat,share pictures privately, plan outings with groups,and stay connected to the people who matter most to you.You’re going to fall in love with Kik Messenger and here’s why:-Hands-down the fastest,most life-like chat experience for your smartphone.

Can I save my Kik messages to computer?From Kik’s help center,you can find this answer: “There isn’t currently a perfect way to save or backup your Kik chats.You may be able to use your smartphone’s built-in features to ‘screenshot’ of your chats.”Don’t be depressed.If you are looking for a way to backup iPhone/iPad Kik messages to computer,here you have came to the right place.

* How to Export Kik Messages from iPhone to PC

* How to Recover Deleted Kik Chat History on iPhone

For now,you can find a lot of iOS data software on the web that claim to backup and restore Kik messages on iOS device with 100% success rate.Unfortunately, most of them failed to do so. And that is why we wrote a post on this topic because we came across the same situation a while go and spent hours to find a reliable solution.

Backup and Restore iPhone/iPad Kik Messages

Searching an easy way to backup and restore iOS Kik Messages on computer without taking a screenshot?

iOS Kik Backup & Restore Tool – iOS Toolkit – Social App Restore, which offers a good solution for all iPhone and iPad users.It not only enable to backup Kik Messages from iOS device to computer,but also empower users to restore Kik messages from backup file to iOS device.What’s more,iOS Data Exporter also allows you backup and restore WhatsApp messages, Viber messages, contacts, text messages, iMessages, photos, videos and more.This program is available for iPhone XS, iPhone XR, iPhone X, iPhone 8/8 plus, iPhone 7,iPhone SE,iPhone 6S(Plus),iPhone 6(Plus),iPhone 5S/5C/5,iPad Air,iPad Pro,iPad Mini,etc,.It’s applicable to iOS 12 and iOS 11/iOS 11.2.1/iOS 10 or lower.

d_win d_mac
d_win d_mac

Part 1:How to Backup iOS Kik Messages to Computer

Step 1.Run Program and Connect iOS Device to the Computer
Choose “iOS Kik Backup & Restore“option on the “Social App Restore” feature of program.Then connect your iPhone/iPad to the computer.When your device is detected by computer,you will see the screenshot below.

more tools option

Step 2.Begin to Backup iOS Kik Chats
Click on the “Backup” button,and the program will start working automatically.During the whole process,you only need to keep your device connected all the time,and then wait.

backup kik chats

When the backup process is finish,you will see the prompt message below.Which reminding you the backed is completed.

finish kik chats backup

If you need to check the backup file and restore/export the iOS backup Kik chats,continue to read.

Part 2:How to Restore Kik Messages to iOS Device from Backup File

Step 1.Run Program and Connect iOS Device to the Computer
To check the backup file’s content,you can click on the “To view the previous backup file >>” on the first screen after choosing “iOS Kik Backup & Restore” option on the “More Tools” feature of program.Then connect your iPhone/iPad to the computer.Once your device is detected by computer,you will see the screenshot below.

more tools

kik backup restore main

Step 2.Extract iOS Kik Chats File from Backup
Here you will see all backup files of your Kik chats,choose one you want to check and click on the “View” button.

extract kik backup file

Step 3.View and Restore/Export Kik Chats from Backup
When the scan stops,you are allow to preview all contents in the backup file,including Kik text chats and Kik attachments.

restore kik backup to ios

You can check any item you want and click “Restore to Device” or “Export to PC” for recovery.

ios-kik-backups-restore

d_win d_mac
d_win d_mac

In Conclusion,you know how easily it is to backup and restore Kik messages on iPhone/iPad with iOS Kik Backup & Restore Tool.It supports all Apple devices like iPhone, iPad and iPod touch. Besides Kik message recovery, it can use for recovering all kinds of deleted data on iOS device like Whatsapp messages/SMS/MMS/iMessages,contacts or photos.Those tools are shown on the left side bar of the section of iOS Kik Backup & Restore Tool.There are also step-by-step tips on iOS data recovery topics, you can find more tutorial in the homepage.

Related Article:

How To Backup and Restore iPhone WhatsApp Messages

How to Backup and Restore Contacts/SMS/WhatsApp Messages on iPhone

How to Restore Deleted SMS/iMessages/MMS on iPhone

How to Transfer SMS/MMS/iMessage from iPhone/iPad/iPod to Computer

How to Backup Contacts from iPhone to Computer

Backup and Restore Kik Messages

How to Fix Bricked Android Phone or Tablet

“Rooting my Android phone went well, but I’ve tried to flash a custom ROM and now I think I’ve bricked my phone.Is there anything I can do?How to fix my bricked Android phone?Please help.”Grace tong

fix bricked phone

One of the best things about being an Android user is the ability to play around with new ROMs, kernels and other new tweaks.However, things can go severely wrong sometimes. This may cause your Android device to brick.A brick Android is a situation where your Android device turns into a “dead” phone,for example stuck at the black/white screen,stuck in recovery mode,stuck in download mode,struck at the start screen,etc,.However,all may seem lost in this situation but the beauty is that it is easy to fix bricked Android devices.This guide will introduce you the best way to unbrick a bricked Android.

Part 1:What to Do on An Rooting Android Device

Six Things to Do after Rooting Your Android Device:
1.Install a Custom Recovery
2.Familiarize Yourself with Fastboot or ADB
3.Make a Backup of Your Device

make a backup of android

4.Keep a Full Android Backup On Your Device
5.Keep Another Backup on Your Desktop PC
6.Learn How to Hard-Reset Your Device

Conclusion
The most important thing you can do with your rooted Android handset is prevent it from getting broken.One of the best ways is to have a backup on hand.To this end,you will want six things:

(1)custom recovery,
(2) know ADB and Fastboot commands;
(3) keep a factory image on your device;
(4) keep a Android backup on your device;
(5) keep copies of both backups on a computer;
(6) if you can’t replace your battery, know how to hard reset your device.

If you take the necessary precautions,the chances of bricking your device drop dramatically.

Part 2:How to Fix Bricked Android Phone or Tablet

Broken Android Data Extraction & Fix Tool is your ideal tool to restore Android system on your brick Android device.With the help of this excellent fixing tool,you can efficiently download recovery package for Android and fix bricked Android to normal and set it to normal status as usual.Besides restore Android system to normal,this program also allows to recover deleted contacts, text messages,call logs, WhatsApp messages,photos,videos,music and more from Android device with one click.

Several Situations of Bricked Problem Can be Solved by Android Fix & Data Recovery Tool:
-Android Device with Black/white screen
-Android Device stuck in recovery mode
-Android Device stuck in download mode
-Android Device struck at the start screen
-Other bricked issues

d_win d_mac

Before beginning the fixing process,you should download and install the Android Data Recovery on your computer. Once it has completed scan, you fill find a button named with “Broken Android Data Extraction” which you need to click

Step 1.Connect Bricked Android to PC
The first step,please connect your bricked Android with the computer.

fix bricked android

Step 2.Choose the File Types to Restore
You now should select the files and the items you actually want to restore. The recovery option however includes contacts, text messages, photos, gallery, music, video and documents among others from Android.

select bricked type of android

Step 3.Select the Bricked Type of your Android
You should select the bricked situation that match your device.

bricked choose fault type

The program will enter the following interface.Please choose a kind of situation depends on your bricked Android,for example “Stuck in the start screen”.

Step 4.Get Android into Download Mode
Then the program will ask you get the phone into “Download Mode” manually.To get the phone into download mode,you need to power off your device completely.Then hold “Volume Down + Home + Power” on your phone together for a few seconds till the phone enter “Download Mode”.

fix bricked android

Step 5.Detect Android with Android Fix & Data Recovery Tool
Once the device enters download mode successfully,Android Fix & Data Recovery tool will detect it and display the device model,Android version etc,.

fix bricked android

Step 6.Repair Android and Fix to Normal
Android Fix & Data Recovery tool will download the recovery package to help you fix the device automatically and return it to normal status.After the download is completed,your device will return to normal as usual.Now, you can check your Android and make sure whether it can work or not.

fix bricked android

Step 7.Preview and Restore Data from Android
Now you should select data to preview and restore the selected data to your computer.

recover data from android

d_win d_mac

Related Article:

How to Fix Bricked Samsung Phone

How To Fix Samsung Galaxy Stuck in Download Mode Problem

How To Fix Samsung Galaxy Black Screen Problem

How to Fix Samsung Frozen on Samsung Logo

How to Unlock Android Lock Screen

How to Fix Samsung Frozen on Samsung Logo