All posts by DHZ

Comparison Between Android N And iOS 9

While many of us are still waiting for Android Marshmallow, Google’s engineers aren’t taking a break: the next version of Android, Android N, is nearly here. How does it compare to Apple’s iOS, which has reached version 9.3? There’s only one way to find out: read the comparison between Android N and iOS 9.

Yet as the two big producers of mobile operating systems, Apple and Google, continue their fight to outdo one another, it is particularly noticeable that the latest version of Android N borrows some functionality from its big competitor. Quite a few features, as it happens. So here is a rundown of the feature set in Android N that may be somewhat familiar to users of Apple devices.

Part 1:Differences Between Android N And iOS 9

Android N vs iOS 9: interface
Android N is likely to undergo a lot of interface changes between now and Fall, but we’re already seeing some key differences between it and Android Marshmallow. The notifications area has been completely redesigned and now enables you to respond to messages from within notifications, and there’s a new multi-window mode, which didn’t quite make the cut for Android M. Google also says it’s been working on Project Svelte to make Android feel smooth on older devices, but details of that haven’t been announced yet.

The last major redesign of iOS was years ago, with the controversial iOS 7. It’s not quite as garish as iOS 7 was and the new 3D touch adds extra functionality to (some) app icons, but there are still some shockingly bad interface elements such as the horrible, horrible Music app. iOS 9.3 does get one key new UI feature, though: Night Shift, which can automatically chance the color balance to minimize bright screens’ effects on your sleep.

Android N vs iOS 9: Google Now vs Siri
We’ve yet to see any significant changes in Google Now on Android N, but even if Google only tweaks the edges it’s still ahead of Apple’s Siri for us. Maybe it’s our accent but we find Google’s voice recognition much more accurate than Apple’s, so Siri’s usefulness suffers as a result. Being able to shout “hey Siri!” and issue commands is something we’re glad Apple copied; it’s just a shame that Siri seems to think everything else we say is “blargle argle garble”. Siri also remains far behind Google Now in the usefulness stakes.

Android N vs iOS 9: security and privacy
As ever, Apple and Google are coming at this from different directions. Apple goes for the Father Knows Best model, where apps are only allowed from the Apple app store and even the FBI doesn’t get to decrypt users’ iPhone. Google, on the other hand, wants to be open, so there are always security risks from malicious apps and third-party app stores. One thing we’re hoping to see in Android N is the Smart Lock for Passwords feature, which actually debuted in Marshmallow: that version doesn’t work with many apps yet, so we’re hoping Google promotes it more for Android N app developers.

security and privacy

Android N vs iOS 9: battery
Android’s kicking Apple’s backside in the battery stakes: only the enormous iPhone 6s really delivers the goods battery-wise for power users, whereas the Doze mode introduced in Android Marshmallow massively increased battery life in Android devices of all sizes. Android N doubles down on Doze, with an improved energy saving mode that kicks in any time the screen is off. That should make Android last even longer – hopefully without impairing notifications and usability.

battery

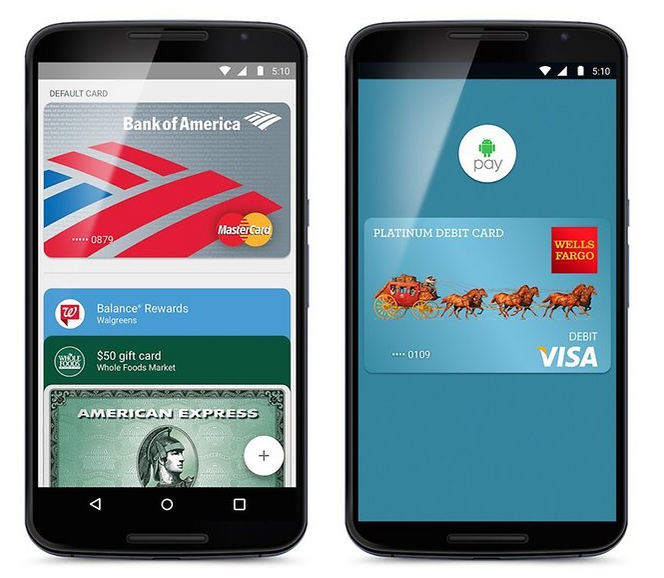
Android N vs iOS 9: mobile payments
Apple’s way ahead here, with Apple Pay embraced by banks all over the world. Google’s payment system has been revamped and rebranded – it’s Android Pay now – but at the time of writing it hasn’t launched in markets such as the UK. When it does, we’d expect the same retailers that support Apple Pay to support Android Pay too.

Android N vs iOS 9: early verdict
We’re not just comparing apples and oranges here; Android N is so far away that we’re comparing ripe apples with orange trees that haven’t borne fruit yet. Android N is already looking interesting, but we haven’t seen its best bits yet.

As with iOS 8 and Android M, both Android N and iOS 9 are improved versions of existing OSes: they’re better than their predecessors but in an evolutionary sense, not an “OMG they’ve changed everything!” sense. We think Android has the edge in some key areas – battery life and voice recognition in particular – and that Apple offers a more elegant but also more strictly controlled experience. As ever the choice between the rival OSes will largely come down to personal preference, so Android users are likely to gravitate to Android N while iOS users will tend to stick to iOS kit.

What do you think? Is there anything Google should learn from Apple or vice-versa? Let us know by leaving a message or the comments below.

Read more:

The New Features of iOS 10

iOS 9.3.3 :The Things You Need to Know

How to Recover Lost Data after Android 7.0 N Upgrade

How to Recover Lost Data after iOS 9 Upgrade

The New Features of Android 7.0 N You Should Know

Google has finally released Android 7.0 Nougat. In this article, we explain everything you need to know about the new software, including a look at all of its impressive features.The new OS is loaded with new features and refinements, each one improving upon the overall Android experience. Some changes, such as bundled notifications, are quite obvious.

Android-7.0-Naugat

Android Nougat makes updates faster and easier.When it’s time for your phone or tablet to get updated, you won’t have to do anything. While you’re doing the things you normally do all the hard work is done in the background-very similar to the upgrade experience on Chrome OS. The only thing you need to do is restart your phone to finish things up.Then there are the less visible changes, such as a new multitasking shortcut. Follow along as we take a look at what’s new in Google’s latest mobile OS.

Part 1:The New Features of Android 7.0 Nougat

Instant Apps
Google’s new Instant Apps feature debuts in Android 7.0 and while it hasn’t gotten as much press as it should, it really is an exciting new addition to Android. In fact, we would go as far as to call it the biggest change to app stores since Apple first introduced its on-device app portal all those years ago.

In a nutshell, Instant Apps lets Android users begin using an app in the Google Play store instantly. You don’t have to buy it — heck, you don’t even have to download it. Simply open the app’s store page and you can begin testing it immediately to see if it’s something you might be interested in downloading.

This is a killer feature that really is a game-changer for users.

Multi-window App Support
Samsung’s Galaxy Note smartphones have had this feature for quite some time, as have a few other Android phones. Now, all handsets can take full advantage of huge displays that have become increasingly popular over the years.

With Android 7.0 Nougat, Google has added the ability for users to open two apps side by side on the screen. That means you can watch YouTube videos while you respond to emails, read a webpage on half the screen while Facebook is updating on the other half, and so on.

Power-Saving Features
Google’s new “Doze” feature debuted in Android 6.0 Marshmallow, but the company is kicking its power-saving features up a notch in Android 7.0.

The original feature puts a smartphone or tablet in a dormant state when it’s not being used, but Android Nougat’s new “Doze on the Go”feature takes things a step further. Now, users will enjoy Doze’s battery-saving features even while the phone is in motion, anytime the display is off.

Also new in Android Nougat is Project Svelte, which stops apps from waking up each time a device’s network connection status changes.

Virtual Reality
Last but certainly not least is Daydream. Google saw all these different companies building separate virtual reality platforms, while likely leads to incompatibilities and can potentially hurt the VR market in the long run. In an effort to unify the mobile VR experience, Google has created the Daydream hardware and software platform for virtual reality.

This way vendors like Samsung, LG and others don’t each have to build their own VR platform or partner with different third parties. And for developers, it potentially means they can build one VR app or experience that will work across all Android devices.

Background System Updates
This new feature isn’t the sexiest addition you’ll find in Android 7.0 Nougat, but it truly is nothing short of a game-changer.

With Android Nougat, operating system updates will happen in the background, just like they do in Google’s Chrome OS. The system will download OTA updates in the background over Wi-Fi and install them as a separate system image on a device’s storage. Then the next time the device reboots, it’ll boot to the newly updated image. Voila!

Read more:

25 Best Android Tips to Make Your Phone More Useful

Solutions to Fix WhatsApp Programs on Android Phones

[Android Lock Screen Removal]How to Unlock Android Lock Screen

Forget Android SIM Card Lock PIN and How to Remove

What to Do if Android can’t be Accessed

[Solved]How to Fix Android Won’t Turn on Issue

Forget Android SIM Card Lock PIN and How to Remove

With the development of science and technology,more and more mobile phone are adding the SIM card lock function.Even with the best protection on your smartphone SIM card,someone could simply remove your SIM card-which holds your phone number, security data, billing information.You can protect SIM data that no one can access it without enter the PIN of your SIM card on Android device.

sim card locked

A SIM card PIN:A SIM card typically comes with a default PIN, but it’s not used for locking purposes.The SIM card has an associated PIN Unlock Key (PUK).If you attempt to do a SIM PIN Lock, and you fail to guess the original PIN, the SIM will be locked with the PUK. If you run into this situation,you must be annoy to unlock your Android SIM card when you forget the SIM PIN.

Part 1:Is it your Android SIM Locked

Not all Android are SIM locked.To confirm if yours is,you can begin by checking the documentation for the device. If the word “unlocked” appears on the initial device, you can be largely certain that it is SIM locked.But if you’ve find that your Android phone is locked to the SIM card, how can you unlock it without the PIN?

If you are not sure whether your phone is SIM locked, the easiest way to check is using a SIM card from a different carrier and see whether the phone accept the new SIM Card.

Part 2:Unlock SIM Card on Samsung S2-S4, Note 1-Note 3

Android SIM Unlock Tool is the super rescuer for you to unlock Android SIM card without data loss,it provide you a fast way to unlock your Android phone with simple process.Android SIM Unlock Tool analysis the locking principle on the SIM card and then choose different unlocking method for each device.The program will not affect any data on your device,your data is completely safe.It work well with almost all models of Samsung devices,like Samsung Galaxy S9/S9+/S8/S7/S6,Note 8/5/4/3.Fast and efficient service,totally worth have a try.

d_win d_mac

Firstly launch Android SIM Unlock Tool on your computer and select Android SIM Unlock from More Tools tab.

android-sim-unlock-tool

Step 1. Connect Android Device with Computer
To get started,connect your Android phone to the computer with an USB cable.Make sure you have enabled USB Debugging mode on your device.Then Android SIM Unlock Tool will detect your device automatically.

connect-android-device

Click on Next to go on.

Step 2.Enter USB Settings/Diagnostic/Service Mode
Follow the instructions on the program interface to enter USB Settings/Diagnostic/Service Mode on your Android phone.

Dial *#0808# or ##3424# or #9090# on your Android phone.Normally one of these will work for your phone.After you input one of the numbers and symbols,the phone will automatically enter USB Settings/Diagnostic/Service Mode.

enter usb mode android

Select DM + MODEM + ADB or UART[*] or CDMA MODEM on the phone.After the phone is set properly,click on Unlock.

Step 3.Unlock Android Phone
After you click on Unlock,Android SIM Unlock Tool will start to SIM unlock your phone.Just wait for a few seconds to complete.

unlock android sim card complete

Note:The phone will need to be set back into normal mode after it’s unlocked.Just click on Restore Mode on the program to continue.

Step 4.Restore Android to Normal State
To restore the phone to normal state,dial *#0808# or ##3424# or #9090# on your Android phone and select MTP + ADB or USB[*] or PDA on the hidden menu.

restore the phone to normal mode

Then click on Next,your phone will enter normal mode and now it’s successfully SIM unlocked.

d_win d_mac

Part 3:Unlock SIM Card on Samsung S5-S7, Note 4-Note 7

Note:The unlocking process for Samsung Galaxy S5-S7 devices is simpler.But to successfully unlock these devices,please make sure you have rooted your devices first.

Firstly launch Android SIM Unlock Tool on your computer and select Android SIM Unlock from More Tools tab.

android-sim-unlock-tool

Step 1.Connect Android phone with Computer
For rooted devices,please connect your phone to the computer using USB cable.Android SIM Unlock Tool will automatically detect your phone.

connect-locked-android

Click on Unlock to continue.

Step 2.Unlock Android Phone
After clicking on Unlock,Android SIM Unlock Tool will automatically SIM unlock your phone.All you need to do is waiting for about a few minutes till the process complete.During the process,your phone will restart once.Please don’t disconnect your phone with computer until the unlock task is finish.

unlock android sim card

d_win d_mac

Related Articles

What to Do if Android can’t be Accessed

[Solved]How to Fix Android Won’t Turn on Issue

How to Completely Remove Contacts from Android SIM Card

How to Set the Smart Lock of Samsung Phone

[Android Lock Screen Removal]How to Unlock Android Lock Screen

How to Recover Lost Data from Locked Samsung Phone

Unlock Android SIM Card

Forget iPhone Locked Screen Password and How to Remove it

Can’t sign in your iPhone and get it stuck at the locked screen?If you’ve forgotten the iPhone password and haven’t set up Touch ID on a modern iPhone, you’ll need to reset your phone to regain access.Unfortunately,it will erase all data and the settings from your device.If you ever made a backup on iPhone previous that you are able to avoid the data loss disaster.How to remove the locked screen on iPhone without password?

Is it possible to access iPhone without password?Actually,iPhone, iPad/iPod touch locked screen password can be removed by yourself without professional skill.What you need is iOS System Recovery program, which enable to remove the locked screen on iPhone/iPad/iPod touth without data loss.Now read on and see how to remove the locked screen and access your iPhone in three ways.

Solution 1:Restore iPhone via iTunes to Remove Locked Screen

1. Make sure that you are running the newest version of iTunes on computer.
2. Connect the locked screen iPhone to the computer, then select your iPhone when it appears in iTunes.
3. Click on Restore iPhone on the Summary panel.

restore iphone ituns

4. A pop-up messages will prompt and ask for your confirm,click on Restore.Then iTunes will download the device software file and restore your device automatically.

confirm iphone restore

After clicking Restore,iTunes will begin to restore your iPhone to factory settings,all of your data and settings will be erased from iPhone after restoring.We suggest you do a backup for iPhone before the restoring.

Solution 2:Get iPhone into Recovery Mode to Remove Locked Screen

Step 1. Run iTunes on computer.
Step 2. Power off your iPhone.And then connect iPhone to computer via the USB cable.
Step 3. Now press and hold the Home button until you see the iTunes logo (recover mode screen) pop up on your iPhone screen.

recovery mode

Step 4. Once your device is connected to iTunes, you will see a pop-up message appear on iTunes asking you to choose to Restore or Update as below. Select Restore.

Step 5. After that, iTunes will start downloading software for your device. When it’s done, you can set up and use your iPhone without password.

enter recovery mode itunes

Solution 3:Remove iPhone Locked Screen via iOS System Recovery

U.Fone iOS System Recovery is a data repair tool particularly work for restoring iOS system to normal and remove iPhone locked screen without data loss.Additionally,this iOS System repair tool help to fix iPhone stuck in Recovery Mode, black screen,stuck at “connect to iTunes” screen,looping on start and other issues of the device.Moreover,the program not only allows you repair iOS system issues on iPhone, iPad/iPod Touch,but also enable users recover data from iOS devices lost due to deleted by mistake,factory reset,device loss,iOS 10 upgrade/jailbreak,etc,.

d_win d_mac

Step 1.Run iOS System Recovery and Select the Recovery Option
Firstly please run the iOS System Recovery and click “More Tools” >”iOS System Recovery” in the program homepage.Connect iPhone with computer,then click “Start” to continue.

remove iphone locked screen

Step 2.Download the Firmware for iPhone
Make sure that your iPhone is connected to the computer and now iOS System Recovery will detect your iPhone soon,offering the latest iOS version for you to download.Then click “Download”,the program will begin to download the firmware for your iPhone.

remove iphone locked screen

remove iphone locked screen

Step 3.Remove iPhone Locked Screen and Set it to Normal
When the firmware downloading process is complete,iOS System Recovery will start to restore your locked iPhone to normal and remove the locked screen on iPhone.

remove iphone locked screen

Once the process is finish,your iPhone will be as a new phone without password,you can start using it normally as usual.

Note:
iOS System Recovery will update the latest version for iPhone after restoring.
Your iPhone will be restored to non-jailbroken state after restoring.

d_win d_mac

Solution 4:Bypass iPhone Locked Screen via iPhone Locked Screen Removal

Another solution to bypass locked screen on iPhone is with the help of iOS ToolkitiPhone Locked Screen Removal.It provides you a safe solution to unlock and access your iPhone easily. It empower to bypass locked screen iPhone and access the device without restoring to factory reset or performing Recovery Mode on it. iPhone Locked Screen Removal work for all iOS devices, including iPhone X, iPhone 8, iPhone 7, iPhone 6S/6, etc,.

The steps to access iPhone without locked screen:
Step 1. Connect the Locked iPhone to the Computer
Step 2. Enter iPhone into the DFU Mode
Step 3. Confirm the Information of iPhone
Step 4. Unlock iPhone without Data Loss

unlock iphone without data loss

Free download iPhone Locked Screen Removal:

d_win d_mac

Related Articles

Unlock iPhone Passcode when Forgot iPhone Screen Lock Passcode

How to Fix Forgot iPhone Screen Lock Password

How to Unlock a Stolen iPhone without knowing the Password

How to Unlock iPhone with Unresponsive Screen

How to Extract Data on Locked iPhone

How to Restore Data on Locked iPhone

How to Factory Reset an Locked iPhone

Remove iPhone Locked Screen

How To Restore Gmail Contacts On Samsung

“I wanna restore my Gmail account contacts to my Samsung Galaxy S6 phone.How?Can anyone tell me about the detail steps?Thanks.”Matt Saif

Android users that love to customize their devices should know that they can easily sync the contacts stored on their phone with the device designated Gmail account.This trick helps you keep your phone, Google+ contacts and all the other profiles synced with your Gmail Account,the one you’re using the Google Play Store and with all the other Google services.This feature is great and you can easily perform all the changes and syncing in several steps.

Syncing contacts with Gmail account comes in handy when you want to root/update the firmware of your phone.As you know, while rooting or updating firmware you’re risking to damage data files, text messages and contacts that could get corrupted or lost. That’s the reason I’ve created this article, in order to help you sync/restore the contacts on your Android with your Gmail account successfully.

Part 1:How to Restore Gmail Contacts on Samsung Galaxy Phone

Step 1.Open the Gmail App or navigate to gmail on google search on your phone.

Step 2.Click on the Gmail drop down option.

restore-gmail-contacts

Step 3.Click on the button “More”.

more

Step 4.Select “Restore Contacts”.

>Select the time you want to restore from,example:20 minutes ago,7 days ago etc,.

Part 2:How to Restore Deleted Contacts on Samsung Galaxy Phone

When you lost Android contacts due to deleted by mistake,device factory resetting,Android system upgrade,viral infection,device get broken/damaged or other reasons,you are recommended to try this wonderful data recovery-Android Contacts Recovery,which enable to restore deleted contacts from Samsung,HTC,LG,Lenovo,Motorola,and more Android devices.Besides Contacts,this program allow to restore various of deleted data from Android,such as photos,videos,call logs,notes and so on.Supported Samsung:Samsung Galaxy S8/S7/S6/S5,Galaxy Note 7/5/4/3,etc,.

d_win d_mac

Check the tips:How to Restore Deleted Contacts from Samsung

recover Samsung deleted contacts

Read more:

How to Fix Android Won’t Turn on Issue

How to Fix Bricked Android Phone or Tablet

25 Best Android Tips to Make Your Phone More Useful

How to Backup Android Contacts to Computer

How to Get More Internal Storage from Android

How to Completely Remove Contacts from Android SIM Card

What to Do if Android can’t be Accessed

In our daily life,you may meet this trouble:can’t access your Android device for unknown reason.There are many types of disabilities for device and most of them will lead to your Android broken or damaged,at least they seem to be.Whether it’s being hard of hearing, visually impaired,or physically disabled,chances are that you can’t use your smartphone or tablet to its full potential.In this article, we’re going to take a look the available ways to fix your Android which can’t be accessed.

can't access android

Like most new Android users you downloaded a lot of apps,you eventually rooted your smartphone/tablet and installed powerful apps and a custom ROM.Then something went wrong and your device became useless and then can’t be accessed. Sounds familiar?Yes,it is all about “bricking” Android device or damaging your Android Operating System.The cause can be file corruption,installation of some tricky apps on the Android device.You can first perform a hard reset from the System Start menu-hold Volume Down, Home or another button while turning on your device.

Most devices can’t be accessed and turn “brick” when they suffer a hardware abuse-falling hard, getting dropped, a custom ROM is incompatible with the device type, Google apps vanish after a custom ROM is installed, custom ROM does not match with the installed kernel, some error from the full data wipe/factory reset/cache wipe after flashing with a custom ROM.It is good to know that there isn’t a universal method to debug/troubleshoot your Android smartphone/tablet.Here is the way to fix your Android can’t be accessed.

Part 1:Fix Android Device can’t be Accessed

Hard Reset Android Device:
Step 1.Power off your Android.
Step 2.Press and hold your the Volume Down button of Android, then press the Power button or hold down the Home key while pressing the Power button.
Step 3.Press Volume Down button and scroll down to the “Clear Storage” or “Factory Reset”.
Step 4.Press Power or OK.
Step 5.Press Volume Up and wait for the reset process to finish.
Step 6.Now you can power on your device.

Tips:Hard reset may lead to wipe all data and the settings from Android,you should do a backup for Android to prevent Android data loss happen.

Part 2:Restore Data from an Inaccessible Android

Broken Android Data Recovery is an excellent data recovery tool which work perfectly for restoring data from Android which can’t be accessed,it’s powerful enough to recover data from disabled Android under any unknown reasons,including broken screen Android,locked screen Android,black screen Android,bricked Android,etc,.With Broken Android Data Recovery,you are allow to get back data from damaged Android with easy steps.Click here to view tutorial in detail :how to restore data from broken Android.

d_win d_mac

restore data from android can't be accessed

Step 1. Launch Broken Android Data Recovery and Connect Android

Step 2. Choose Data Type for Recovery

Step 3. Choose Fault Type for Android

Step 4. Enter Download Mode on Android

Step 5. Analyzing Data on Inaccessible Android Phone

Step 6. Restore Data from Android which can’t be Accessed

Related Article:

How to Fix Android Won’t Turn on Issue

How to Fix Bricked Android Phone or Tablet

How to Restore Data from Samsung with Touch Screen Cannot be Used

How to Enter,Use and Exit Recovery Mode on Android

How to Fix Android Won’t Turn on Issue

“I have a habit that power off my Samsung Galaxy S6 phone before I went to sleep.However,today morning I try to power on my phone and the phone won’t turn on for no reason.I really have no idea what suppose to do and how to fix the disabled Android phone.Anybody tell me the available way to turn the Android on and access it?In addition,the data stored on my phone are important for me indeed,especially the contacts and the text messages.How to extract the data from my dead phone?Thanks a lot.”-Ivy Bruce

There are many reasons may cause to a disabled Android phone,such as the power button is broken,the Android screen is broken,the Android internal memory is damaged,this problem can also be caused by hardware damage or so on.If your device refuses to turn on, you may immediately worry about how you can rescue data from the Android which isn’t turn on.In this post, we are going to discuss what you can do to turn on the no response Android and extra data from disabled Android with easy steps.

Part 1:Fix Android Won’t Turn on Issue

1.Charge Android For a Few Minutes
If your Android device battery is almost dead, you’ll often see an “empty battery” indicator on the screen when you try to turn it on. But, if you let the battery completely die, your phone won’t respond at all when you press the Power button.

To fix this problem, just plug your Android phone into a wall charger and let it charge. You can’t just plug it in and try to turn it on immediately — you’ll need to give it a few minutes to charge first.

Plug it in and let it charge for fifteen minutes or so. Come back later and try to power it on with the Power button. If the problem was caused by a dead battery, it should boot up normally.

If it doesn’t work at all, try plugging the device in with a different cable and charger. The charger or cable could be broken and preventing an otherwise-good device from charging.

2.Perform a Factory Reset From Recovery Mode
In some cases,your phone might begin booting, but the Android operating system might crash or freeze immediately.

To fix this, Android can boot straight to a recovery mode menu, where you can perform a factory reset on device.If your device is booting up before freezing or experiencing other serious problems,try to use recovery mode to perform a factory reset.

To do this, you’ll first need to power down your phone or tablet and then boot it up by holding down several buttons at the same time. The exact combination of buttons you need depends on your device. Perform a web search for the name of your device and “recovery mode” to find the buttons it needs. For example, the Samsung Galaxy S6 requires you to hold Volume Up + Home + Power.

Note:Restore Android to factory resetting will ease all data and settings on Android,remind you backing up Android data before restoring.

3.Maybe It’s Just Broken for Hardware Damage
No one likes hearing this, but if your device refuses to boot even after you hold the power button, swap out the battery, and charge it fully — or if it’s still malfunctioning after a factory reset — it may be broken for hardware damage.

If you have a cellular contract for Android, you’ll want to take the device to the repair store. If you purchased it directly from the manufacturer and it’s still under warranty, you should contact the manufacturer’s support department. If you’re not on contract and are out of your warranty period — well, you may need to get a new phone. If the device has a removable battery, it’s possible only the battery is bad and needs to be replaced.

Part 2:How to Restore Data from Android which Won’t Turn on

Broken Android Data Recovery is an superior data recovery program to download recovery package for Android and restore data from Android which won’t turn on,available for Android users suffering from different broken Android situations:dead Android,black screen Android,screen crashed Android,water damaged Android,can’t have USB debugging enabled on Android and more.No matter which fault type happens to your Android, you can recover contacts,photos,videos,SMS,call logs,notes and other types of file from broken Android with this program.

d_win d_mac

First of all,you should download and install the Android Data Recovery on your computer. Once it has completed scan, you fill find a button named with “Broken Android Data Extraction” which you need to click

Step 1.Launch Broken Android Data Recovery and Connect Android
Download Broken Android Data Recovery on computer and install it.After the installation,launch it and choose “Android Broken Data Recovery” which aims to recover data from dead phone.

connect broken android to pc

Step 2.Choose Data Type from Android
Click the data type you want to recover from your disabled Android,such as contacts,messaging,call history,WhatsApp messages&attachemets,etc,.You can also click “Select all” to recover all Android data.Just tap “Next” to continue.

scan data on android phone

Step 3.Select the Broken Type of your Android
You should select the broken situation that match your device.

broken choose fault type

Step 4.Choose Fault Type for Android
Choose either fault type below according to what happens to your Android:
1.Touch cannot be used or cannot enter the system.
2.Black screen (or the screen is broken).

If you cannot access system,to choose the left one is suggested for you.

choose broken type of android

Then,just choose the phone model and device name of your Android phone.Choose the device name from the drop-down list as shown below.Then, tap “Next” to move on.

recover data from broken android

Step 5.Enter Download Mode on Android
Please enter the download mode on Android as the interface below shows:
1. Power off Android phone if it is on.
2. Press “Volume -“, “Home” and “Power” at the same time.
3. Press “Volume +”.

recover data from broken android

Step 6.Analyzing Data on Dead Android Phone
After entering Android download mode,you will see the interface as below which are downloading recover package for Android,just wait for seconds.

recover data from broken android

Step 7.Recover Data fromAndroid
In this step,you will see all the data type in the interface below,like contacts, messaging, call history and more listed in the left panel with its amount.Just choose the data type you want,for example, “Gallery”. Then, you will see all the contacts on your Android listed in the interface.Preview and click those you want to recover and tap on “Recover” for recovery.

recover data from broken android

With the help of Broken Android Data Recovery,you are allow to restore data even if your Android is dead/broken,get water damaged and other case.The recover process of other data types are similar with this tutorial above,just download and try it for broken Android recovery.

d_win d_mac

Part 3:Tips to Protect Android Device

• Keep your device in a protective case to prevent damage to the power button in case of a fall.
• Keep your device out of reach of children who may play and touch the device without your permit.
• Uninstall any third party apps that you may think could be causing viral infection.
• Regularly clear the system cache on your device. It can magically improve your device’s performance not to mention avoid future problems.
• Check your device from time to time to ensure it is working correctly.

Related Article:

[Recovery]Samsung Touch Screen Cannot be Used

How to Fix Bricked Android Phone or Tablet

How to Enter,Use and Exit Recovery Mode on Android

How to Recover Files from Broken Screen Android Phone

How to Recover Data from Broken Android Phone

How to Recover Files from Water Damaged Android Phone

How to Extract and Backup Data from Locked/Disabled iPhone

Your iPhone that won’t turn on? Forget phone screen passcode? Your iPhone with broken screen or can not entering passcode on a broken iPhone screen?Don’t worry,you can recover data from a disable iPhone with locked screen,please keep reading.

How Can I Recover Data from Disabled iPhone 6S?

“My mother forgot the iPhone password.She entered the possible password several times, but now her iPhone 6S is knocked.How to fix the disabled iPhone without losing data?She want to recover the data from locked iPhone.Thanks advance.“-Vivian

recover data from disabled iPhone

Sometimes we will encounter the circumstance that forget iPhone password under unexpected situations.The only way to unlock your iPhone with a lock password,other than entering the password,is to restore your iPhone to factory resettings.However,all data on your iPhone will be erased after the restoring.In order to avoid data loss,you’d better back up your iPhone data when you plan to do it.How to backup data on locked screen iPhone?If you do forget your password for some reason and you’re locked out of your iPhone, this guide below will go over two methods that’ll available to recover data from locked iPhone completely in easy steps.Contacts,photos,videos,SMS,document and more other kinds of iPhone data included.

Part 1: How to Recover Data from Locked/Disable iPhone

The first method we recommend for you is to extra data from locked iPhone via iCloud backup.In this case,you can use iPhone Data Recovery to extract data on locked iPhone from iCloud backup to your computer,Such as contacts,photos,videos,call logs,notes,document and so on.This software is an outstanding data recovery tool,which allows to preview and selectively restore locked iPhone data from iCloud backup as well as iTunes backup.Applicable iPhone device: iPhone X, iPhone 8, iPhone 7,iPhone SE,iPhone 6S/6,iPhone 5S/5C/5.

d_win d_mac

Step 1.Download and Install iPhone Data Recovery Program
Please firstly download and install iPhone Data Recovery then run it on computer.

recover iphone data with icloud backup

Step 2.Select the Recovery Mode and Sign in
Select “Recovery from iCloud Backup File” option and sign in iCloud.

Step 3.Extra File from iCloud Backup
When you sign in iCloud,the program will list your iCloud backups in the interface.You can choose anyone you want and click “Download” to extra previous file from the iCloud backup.

recover iphone data with icloud backup

Step 4.Select and Retrieve Data from iCloud
When the download process is completed,you can preview and click the items to export them to your computer.

recover iphone data with icloud backup

Free download the iOS Data Recovery for Mac and Windows and try to recover data from your disable/locked iPhone:

d_win d_mac

Tips:If your iPhone screen is broken, disable or locked but it can be detected by computer,you can try scan and recover data from locked iPhone directly without iTunes/iCloud backup,or try to backup data from your locked iPhone to computer easily.

Part 2: How to Backup Data from Locked/Disable iPhone

If you had did a iCloud backup of the locked iPhone before you can use the first way to extra data from locked iPhone.How about having no backup for locked iPhone?The second section we are going to introduce to you is to backup data on locked iPhone with iOS Backup & Restore Tool.Which is a perfect data manager tool to directly backup locked iPhone data to computer efficiently.The program is work well for iPhone with iOS 10,iOS 9 or lower.

Free download the iOS Data Backup & Restore tool for Mac and Windows:

d_win d_mac

Step 1.Run Program and Connect iPhone to the computer
To backup locked iPhone,launch the program after installing it,and connect your iPhone to the computer.When your device is detected by the program, you’ll see the window shown as follows.

backup data from locked iphone to computer

Step 2.Choose “iOS Data Backup & Restore” Option
After select the “iOS Data Backup & Restore” mode,you need to select the type of data to backup.Then click “Backup”.

backup locked iphone data with ios backup&restore recovery

Step 3.Backup Data on Locked iPhone
Now the program is backing up the data of the locked iPhone,please don’t disconnect your device with computer.

backup locked iphone data with ios backup&restore recovery

Step 4.Backup Data from Locked/Disable iPhone to Computer
When the backup is completed,you are allow to check all contents of the backup file in categories.Check any of them for exporting/restoring just need click on the button “Restore to device” or “Export to PC” at the right lower corner of the window.

backup data from locked iPhone to mac

Free download the iOS Tool Kit and try to extract data from your disabled iPhone to computer for backup.

d_win d_mac

Part 3: How to Fix a Disabled iPhone to Normal?

After backup data on your locked iPhone,it’s the time to unlock your device now.Apple’s official instructions to restore iPhone to normal and unlock your phone screen by iTunes.

Step 1.Connect the iPhone to your computer.
Step 2.Select iPhone in the iTunes sidebar,and click the “Summary” tab.
Step 3.Click “Check for Update“. iTunes will prompt you if there’s a newer version of the iPhone software available.

Check for Update disabled iPhone

-Click “Restore“.Follow instructions on the screen to complete the restore process.During the process,it will recommend you to back up your iPhone.When the iPhone software has been restored,you can choose to set up iPhone as a new iPhone,or restore your videos, music,app data,and other contents from a backup.

Note:Even though you send the locked iPhone to the Apple service center,you will be told to restore your iPhone to unlock it.That’s to say,you need to erase everything on the locked iPhone.

Worry about data lossing after restore devices by iTunes,you can use a iOS System Recovery to fix ios to normal without data loss.
Learn the guide: How to fix a disabled/locked iPhone

fix a disabled iPhone

Part 4:Access the Locked/Disable iPhone without Data Loss

iOS Toolkit Locked Screen Removal is a reliable program to unlock and access locked or disabled iPhone without data loss.It is a poweful program enable to bypass locked screen without password and let you access your broken iPhone without restoring to factory reset or performing Recovery Mode on it.It is compatible with all iPhone and any iOS system, including iPhone X, iPhone 8, iPhone 7, iPhone 6S/6 and iOS 11.

d_win d_mac

Step 1. Connect your Locked iPhone to the Computer
Step 2. Get iPhone into the DFU Mode
Step 3. Confirm the Information of iPhone
Step 4. Unlock iPhone with Unresponsive Screen without Data Loss

unlock iphone without data loss

You may be want to see the full guide:

How to Access the Locked/Disabled iPhone without Data Loss

Related Article

How to Backup and Restore iPhone/iPad Files after iOS 10 Upgrade

How to Backup and Restore Files on iPhone 7/SE/6S/6/5S/5

How to Backup and Restore Contacts/SMS/WhatsApp Messages on iPhone

How to Extract iTunes Backup for iPhone/iPad

How to Fix iOS 10 iPhone Running Slow Issue

After I updated my iPhone 6S to iOS 10 it was not in the good way.My iPhone was running slower and sometime it was suddenly get bricked for no reasons.How to Fix this trouble?-Daniel Tong

Why is my iPhone 6 get slower after installing iOS 10 ?Is it a conspiracy by Apple to convince users to buy the new iPhone 7 or iPhone 7 Plus?But I just wanna keep using my device until the next iPhone is released.So I’m asking help to fix the iPhone running slower with iOS 10 issue.-Sophia Huang

speed-up-your-iphone

Do you often get the prompt that your iPhone storage is nearly full and suggest you clear up device to free up space on it?It is no a secret that your iPhone will eventually become slower after updating to iOS 10 on it for some time due to various reasons.This significant reduction in performance is likely to affect how you use your device if you do not act in time to solve it.You have probably realized that this unfortunate case often occurs when you decide to install a newly launched iOS upgrade version,for example the iOS 10 update.We have received a lost of the complained that came from iPhone users like the iPhone 6 and and iPhone 6S after iOS 10 update.Join us for a look at the complaints about a slow iPhone with iOS 10 and how you can try to fix slow iOS 10 performance without buying a new iPhone 7 or iPhone 7 Plus.This following passages is going to give you some advice of the top tips on how to fix iOS 10 iPhone running slower issue,to optimize iPhone performance and speed up iPhone after iOS 10 update.

Part 1:Reset the Settings of iPhone after iOS 10 Update

This optimization technique is guaranteed to provide your iPhone,iPad,iPod Touch with the much-needed speed boost.Like doing a “Factory Reset” on device,restoring your iOS device’s settings will erase any of your data.Doing this reset will return all your device’s general settings to the state they were when you first bought it.Kindly note that you will be required to reset your Wi-Fi setting on device, create a new passcode and rejoin your previous WI-FI networks among other activities after doing this.

To do it, you can simply go to the settings of your iDevice,select the “General” option, tap on “Reset” option once prompted and then activate the “Reset All Settings” feature.

Part 2:Turn Off Automatic Updates on iPhone after iOS 10 Update

There are numerous benefits that can be realized when you keep your applications continuously up to date.However,it is recommended that you off this automatic updates feature and instead opt to manually update all your favorite applications. Leaving your applications to automatically update themselves is known to not only affect the battery life but also slow the performance of your iPhone/iPad/iPod Touch. Disable this unnecessary feature by selecting the “iTunes & App Store” option found in main settings on device and then turning off the “Automatic Download” feature,everything is OK.

Part 3:Erase Data and Setting on iPhone to Optimize iPhone for Best Performance

Permanently erase data and setting from iPhone can help to remove the rubbish from iPhone and free up space of it.The conventional deletion can’t wipe the data from iPhone without restoring.After deleting iPhone data by tapping the “Delete”button,the deleted seem to gone,however,the deleted data still can be restored by the data recovery.

Here you should try this iOS Data Eraser,this program works well for permanently erase data and setting from iPhone to free up space on device after iOS 10 upgrade,including contacts,photos,SMS,call logs,videos,notes,document and more.The applicable iOS devices list here:iPhone 7,iPhone SE,iPhone 6S(Plus),iPhone 6(Plus),iPhone 5S/5C/5,iPad Pro,iPad Air and so on.iOS Data Eraser provide you four erase modes for selection,you are allow to delete all data from device,delete private data from device,erase the deleted data from device or optimize the performance on device.Read more tips about how to optimize iPhone for best performance.

d_win d_mac

erase data on iphone after ios 10 update

Part 4:Downgrade iOS 10 to iOS 9 on iPhone

You can still go back to iOS 9 for a limited time.This normally only lasts a week or more so if you are concerned,now is the time to downgrade your iPhone to iOS 9.You can go back to iOS 9.3.5,and wait for iOS 10.0.1 or iOS 10.1.

How to Downgrade iOS 10 to iOS 9 on iPhone Without Data Loss

iOS System Recovery,which is a wonderful iOS data manager tool to restore iOS 10 to iOS 9 on iPhone without any data loss,perfectly help to downgrade your iPhone /iPad from iOS 10 back to iOS 9.3.5 smoothly.iOS 10 System Recovery rolls out the feature “Fix iOS to normal” for restoring iPhone system to normal after downgrading iOS 10 to iOS 9.3.5,making it easy for users to get iPhone,iPad out of white/black screen,recovery mode,Apple logo,connect to iTunes screen,etc;help to fix the issues on iOS device perform abnormally.

d_win d_mac

Easy Steps to Restore iOS 10 to iOS 9.3.5 on iPhone

Step 1.Run the iOS 10 System Recovery and Connect iPhone to PC/Mac
Download and install iOS 10 System Recovery(Windows&Mac) on computer.When the installation is complete,connect your iPhone to computer with USB cable and launch the program.

iOS 10 System Recovery

Step 2.Select “iOS System Recovery” Option
From the main window,please select “Fix iOS to Normal” located at the top right of the screen.Wait for iOS 10 System Recovery to detect your iPhone.Click “Start” once the device has been detected.

restore iPhone from ios 10 system to ios 9

Step 3.Put iPhone into Recovery Mode
1)First, disconnect the cable. Shut down the iPhone
2)After the shutdown, press the “HOME” button to remain intact, connect your iPhone to Mac or Windows PC and make sure iTunes is running.
3)Release the HOME button,and you can see the “Connect to iTunes screen” on the iPhone,it means you have enter iPhone to recovery mode successfully.

enter iphone into recovery mode

Tips: Run the iTunes software,at this point iTunes should display an alert saying it’s detected an iPhone in recovery mode, and will let you restore your iPhone device.

Othe way enter recovery mode:If you are unable to set the iPhone,iPad into recovery mode,please learn as below tutorial to enter DFU mode.

enter iPhone into DFU mode

Step 4.Download the iOS 9.3.5 Firmware Package for iPhone
In this step,you need to confirm your iPhone model and select the iOS 9.3.5 firmware to download.
To downgrade iPhone from iOS 10 to iOS 9.3.5,iOS 10 System Recovery will offer the latest version of iOS firmware package for your selection.Choose “iOS 9.3.5”,then click “Download” and wait for the download to complete.

download iOS 9.3.5 Firmware to iPhone

How to check and comfirm your iPhone model?Please see as below:

check and comfirm iphone model

Start to Download iOS 9.3.5 Firmware Files for iPhone

downgrade ios 10 to ios 9.3.5

Step 5.Start to Restore iPhone to iOS 9.3.5 from iOS 10 and Return to Normal
As soon as the download completes,iOS 10 System Recovery will start begin the iOS downgrade process without any data loss and restore your iPhone to normal state.In less than 10 minutes,you will get a message prompt that your iPhone is restarting to normal mode,your iPhone now is running iOS 9.3.5 as your like.

restore iphone from ios 10 to ios 9

Extra tips:iOS 10 System Recovery support to fix iPhone stuck issues and restore iPhone system to normal under various of unexpected circumstances.In addition,it also can help you recover deleted data from iPhone after iOS 10 update in three recovery modes.

d_win d_mac

Related Article:

How to free Up Space on iPhone/iPad/iPod

How to Permanently Delete Photos off iPhone/iPad to Free Up Space

How to Erase All Content and Settings on iPhone Permanently

How to Clean Junk Files from iPhone/iPad/iPod

How to Downgrade iPhone from iOS 10 to iOS 9 without Data Loss

Did you get caught up in all of the WWDC 2016 excitement and decided to upgrade your main iPhone, iPad or iPod touch to the newest iOS 10 beta?Many developers are currently enjoying iOS 10 on iOS device,and I suspect that not less than a few non-developers are enjoying it as well.But with the news that an iOS 9.3.4 jailbreak might soon be released,it may be time for some of you currently on iOS 10 to start thinking about downgrading.Here’s how you can downgrade iOS 10 beta back to iOS 9 public release on iPhone, iPad, iPod touch with easy steps below.

downgrade ios 10 to iOS 9

Part 1: Guide on Downgrade from iOS 10 To iOS 9

Note:Before downgrade your iPhone 7/6S/6/6 Plus/SE/5S, iPad Pro, iPad Air/mini, iPod Touch 4 from iOS to to iOS 9,you must to make your iPhone/iPad data backup at first.

Step 1. Download the latest public iOS 9.x firmware file which Apple is still signing. At the time of writing it’s iOS 9.3.4/iOS 9.3.3. Also be sure to download the correct file that is tailored for your iOS device. Once the download is complete,save the file to your desktop for easier access later in the downgrade iOS 10 beta guide.
If you want to downgrade from iOS 10 to iOS 9.3.5,here downloading the iOS 9.3.5 IPSW file for your device.

iphone-Firmware-Files

iOS firmware file for iPad
iOS firmware file for iPod touch

Step 2. Download and install iTunes on your PC or Mac if you haven’t already. Go to apple.com/itunes to learn more.Once installed, launch it.

Step 3. Connect your iPhone, iPad, iPod touch to your computer using an USB cable. Let your computer install the necessary drivers if prompted for them.

Step 4. You’ll see your iOS device pop up at the top left hand corner of iTunes, click on it.

Step 5.See that “Restore iPhone” button at the center of iTunes.Click on it while holding down the left “Option” key (Mac) or the left “Shift” key (Windows).

Step 6.A new pop-up box will come into view,asking you to select an IPSW firmware file.Simply double click on the iOS 9.x firmware file you saved on the desktop in step 1.

Please learn the detailed tutorial:2 Ways Downgrade iOS 10 to iOS 9.3.5

The downgrade iOS 10 beta process will now begin, and it will barely take a few minutes depending the speed of your Internet connection as well. Please make sure you do not touch your computer or iOS device when the downgrade iOS 10 beta process isn’t finish.You absolutely don’t want to mess around with anything at this point.

Once the downgrade iOS 10 beta process is complete you’ll boot straight into the fresh site of iOS 9.x. Also, it should be worth mentioning here that you will lose every single file and data on your iOS device once you downgrade. Lastly, you cannot restore a backup you made on iOS 10 beta on a device that’s running iOS 9.x.

iOS 10 beta is quite buggy at this point, and we will not give it a slight go ahead for use as a daily driver. If you’re planning to use it on a daily routine, then be vary of the issues that you might stumble across, with the top one being battery life.

We recommend iOS users to upgrade to iOS 10 beta once three or four builds are out, ensuring things are much more smoother for you compared to how they are today.

Part 2:Restore iPhone Lost Data after Downgrade from iOS 10 to iOS 9

As you know,downgrade iPhone from iOS 10 to iOS 9 may lead to data loss on iPhone,for rescuing iPhone data,you are suggest to try this iOS Data Recovery,which is a special data recovery for iOS,in order to help to complete the data recovery from iPhone/iPad/iPod after iOS downgrade,restore lost data from iPhone after iOS 10 downgrade,as well as restoring lost data on device after iOS upgrade even though have no a backup of device.All iOS models are supported:iPhone 7,iPhone SE,iPhone 6S(Plus),iPhone 6(Plus),iPhone 5S/5C/5,iPad Air,iPad Pro,iPod Touch 4,etc,.Just click to know more about recover data from iPhone after iOS downgrade.

d_win d_mac

recover iPhone data ios 10 downgrade

Related Article:

How to Download & Install iOS 10 Beta 7 On iPhone

How to Restore Deleted Data on iPhone/iPad in iOS 10

How to Upgrade iOS 9.3.2 to iOS 10 Beta on iPhone and iPad

How to Safely Backup iPhone/iPad before Upgrading to iOS 10