By Selena KomezUpdated on May 16, 2020
Samsung S20 is the best Android smartphones in the current market. You probably have your data and document files saved onto your Samsung 20 (+)/ S20 Ultra. However, when you deleted files on Samsung Galaxy S20 by careless, you can’t recover the deleted data on Samsung S20 if you don’t have made a backup previously. When you deleted accidentally delete data on Samsung Galaxy S20, how to recover data from Galaxy S20 in a simple and secure way?
This post will show you how to recover deleted data from Galaxy S20 and Glalaxy S20+ with Samsung Data Recovery, a PC/Mac program that can help you recover deleted data from Samsung phone, such as Galaxy S10/S9/S8/S7/S6/S5, Galaxy Note 10, Note 9, Note 8, Note 5, Note 4, etc.

Every one will learn – how to recover deleted data from Samsung Galaxy S20 (+) or S20e. Below, we’ll go over the easiest methods to restore Android data you’ve accidentally deleted or lost, with even less effort. Even your Samsung phone is broken or dead, the Broken Android Data Extraction function enables you recover data from broken Samsung phone.
If you have backed up your Samsung S20 with Samsung Cloud or Smart Switch before, you can easily to restore deleted data from the Samsung Cloud/Smart Switch backup. If you’ve enabled “Auto back up” feature or manually backed data up in regular basis, try to restore the Samsung Cloud Backup to restore files to Samsung Galaxy S20 smart phone, but this method won’t enable you to preview the data before recovering.
Let’s learn how to recover deleted data on Samsung S20/S20+ with Samsung Cloud backup:
Step 1. Unlock Samsung S20 and go to home screen, then open Settings app.
Step 2. Tap on Cloud and accounts > Samsung Cloud > Backup and Restore > Restore Data.
Step 3. Select the data you want to recover, for example: Phone, Messages, Contacts, Clock, Calendar, Settings, Apps, Music, Voice Recorder, Documents, Home Screen.
Step 4. Tap Restore start to restore Samsung Cloud’s data to Samsung S20.
Now you could access any recovered data in Samsung Galaxy S20.
Tips: To avoid data loss or deleted on your Samsung phone, we suggest you should back up your important Android data regularly. You can either back up Android data to computer with Samsung Kies, Samsung Smart Switch or third-party Android Backup & Restore software, or back up data to Samsung Cloud or SD card storage.
Above is the guide teach you how to recover Samsung data from backups, if you haven’t created a backup on your Samsung S20 before, you cannot recover deleted data from Samsung Cloud backups. Let’s teach you how to recover deleted data from Samsung Galaxy S20/S20+/S20e without any backups.
When you delete or lost data like a photo, contact or message from your Samsung Galaxy S20, the deleted data are not immediately deleted from the phone memory space but will stay on the phone’s memory space until it be covered by new data. What you need to do is scanning and recovering the deleted files with a professional Android Data Recovery as soon as possible.
This Samsung Galaxy S20/S20+ Data Recovery – Android Data Recovery can help you find the deleted data from your S20/S20+/S20 Ultra and recover, save the recoverable data onto the computer, including photo, gallery pictures, messages, contacts, WhatsApp chat history, call history, videos, or other data.
The Android data recovery provides the preview of the deleted data to ensure that you can get back the data that you need.
Download the Android data recovery and follow the below simple steps to recover deleted photo, message, etc. from Samsung S20.
Step 1: Run the Android Toolkit on PC or Mac
Download the Android Toolkit on any PC (or Mac) firstly, install it.
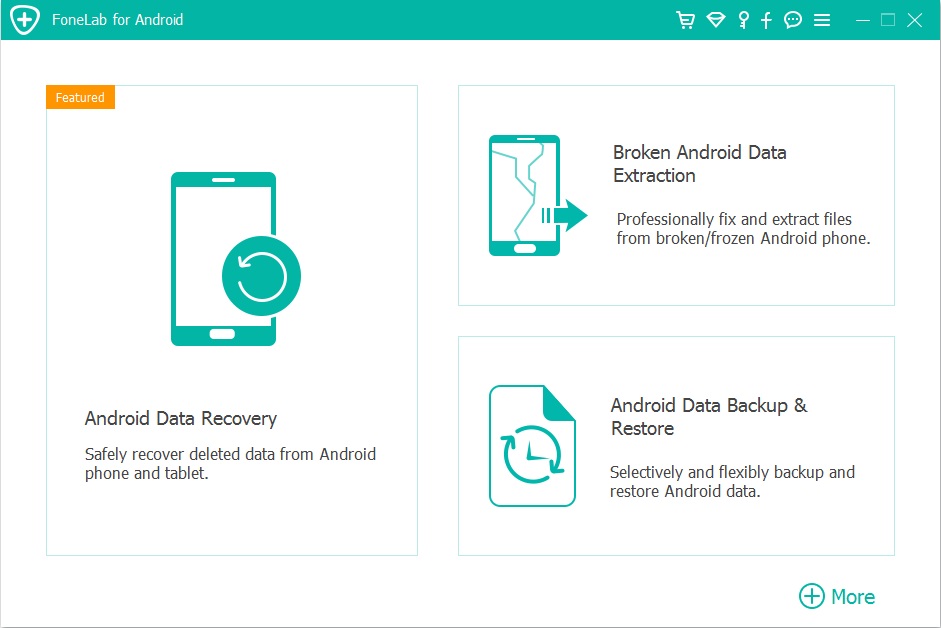
Open up the software, you can see it’s main interface as below screenshot, if you want to recover deleted files on Samsung pone without backups, please choose “Android Data Recovery” mode.
Step 2: Connect Samsung S20 and allow USB Debugging on it
Connect your Samsung Galaxy S20 to the computer with USB cable. Tap “Allow” when prompted on the Samsung phone.
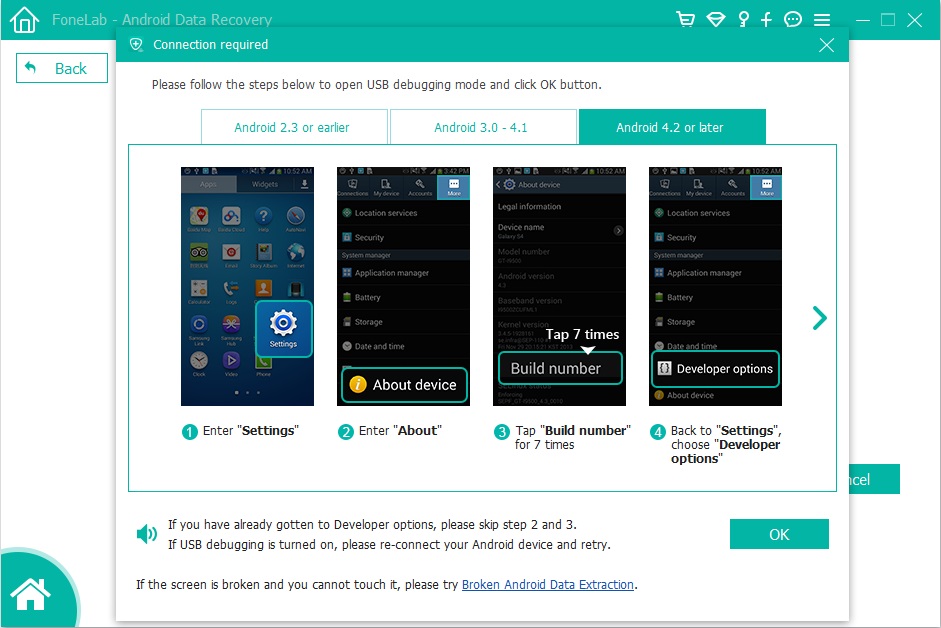
Then you’ll need to have USB debugging mode enabled on your Samsung S20 to grant your access to it. Also see detailed instructions about how to enable USB debugging on Android phone.
For Samsung Galaxy S20, please open Settings > About phone > Build number, tap it for 7 times to enable the Developer options. Then go back to Settings > Developer options, and scroll down the screen until you find the USB debugging switch, toggle it to ON position.
Step 3: Select Data to Scan from Samsung S20
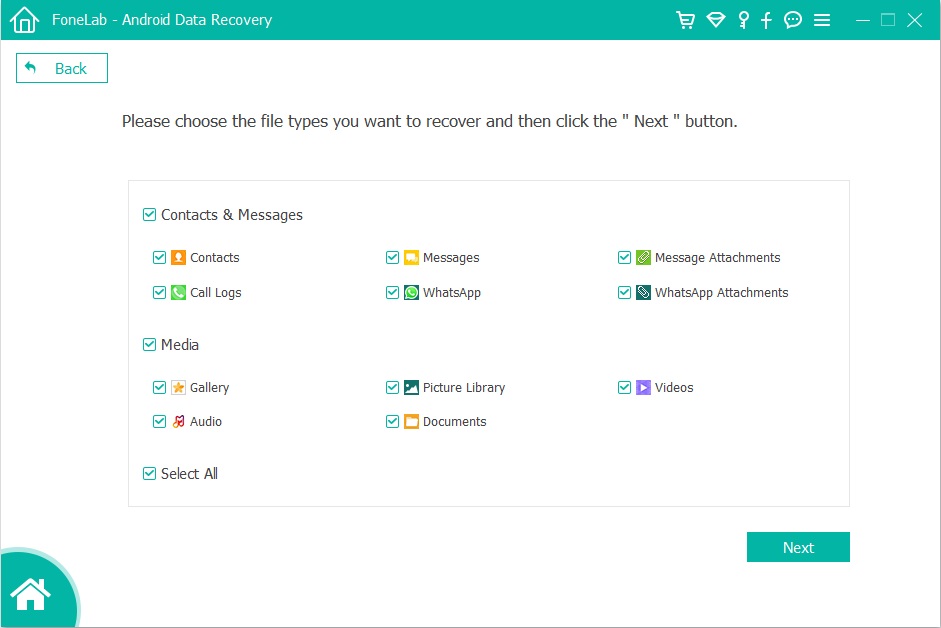
On the next interface, choose what you’d like to scan for the lost files in the Galaxy S20 storage, then click Next button and move on.
Now the tool starts to analyze the phone and then scan it for all your files.
You should be prompted to root the device for a deep analysis of the lost stuff. To do this, press Rooting Tools button and download KingoRoot app on a browser webpage.
Read “How to safely root and unroot an Android Device” for full tutorial.
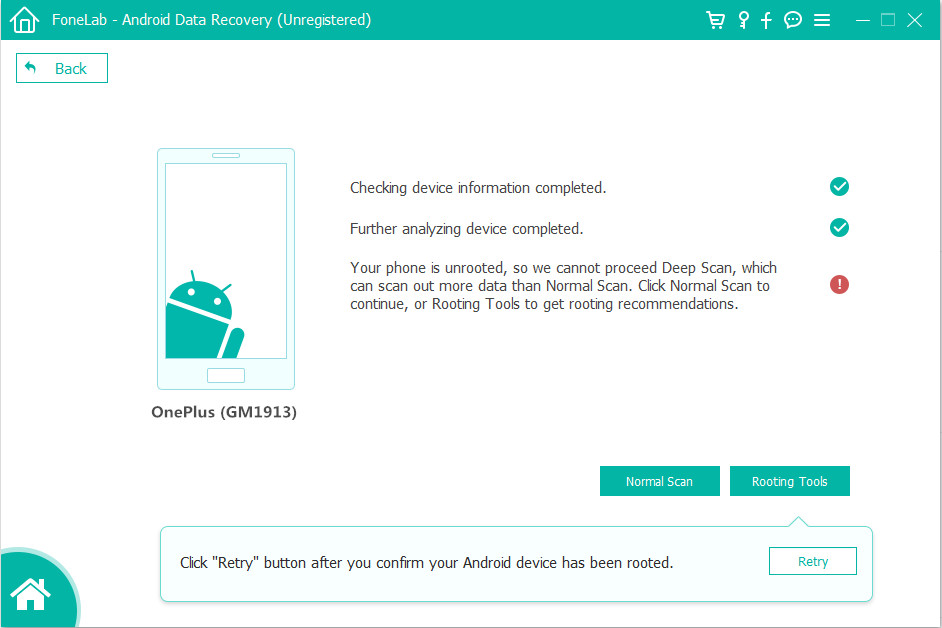
Once rooted, then click “Retry” button, the program continues scanning Samsung S20. This will take some minutes.
Step 4: Preview and Recover Data from Samsung Galaxy S20 memory
When the Android Data Recovery has scanned completes, it will show the data in categories. The deleted data will be shown in red. Select the deleted data that you want to get back and click “Recover” to save them onto to your computer.
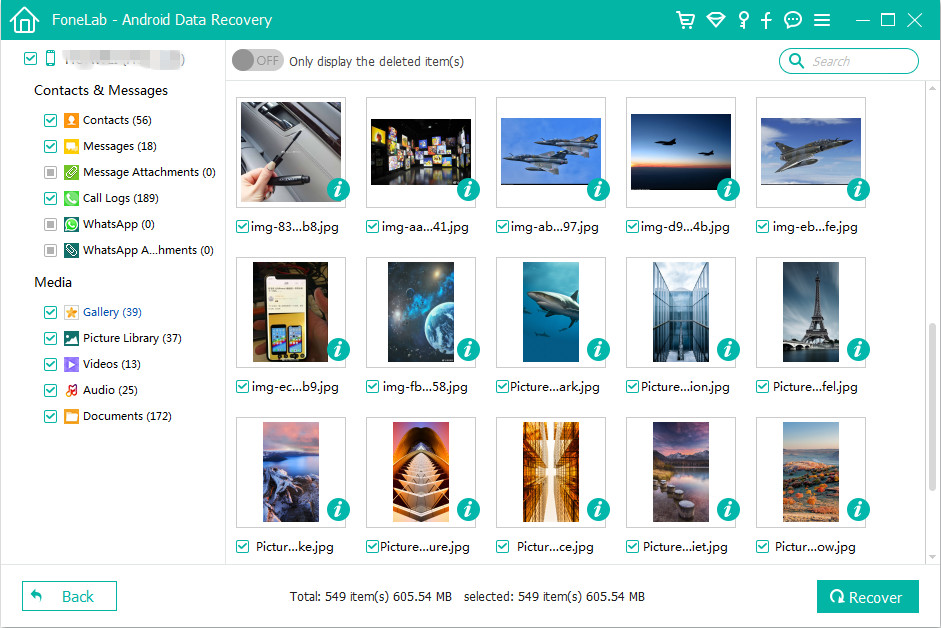
Well done! You have recover the deleted files from Samsung Galaxy S20. If you want to backup and restore Android data, please download the Android Toolkit, which includes Android Data Recovery, Android Data Backup & Restore and Broken Android Data Extraction.
[Read Also: Samsung Galaxy S20 – Google Backup and Restore]
Above four steps, you have recovered the data and contents lost or deleted on Samsung Galaxy S20 & S20 Plus & S20e, if your phone is broken or lost/stolen, you can’t get back your important data, so we recommend you back up important data on your Samsung phone from time to time.
Prompt: you need to log in before you can comment.
No account yet. Please click here to register.
No comment yet. Say something...