Category Archives: iOS Data Recovery

Forget iPhone Locked Screen Password and How to Remove it

Can’t sign in your iPhone and get it stuck at the locked screen?If you’ve forgotten the iPhone password and haven’t set up Touch ID on a modern iPhone, you’ll need to reset your phone to regain access.Unfortunately,it will erase all data and the settings from your device.If you ever made a backup on iPhone previous that you are able to avoid the data loss disaster.How to remove the locked screen on iPhone without password?

Is it possible to access iPhone without password?Actually,iPhone, iPad/iPod touch locked screen password can be removed by yourself without professional skill.What you need is iOS System Recovery program, which enable to remove the locked screen on iPhone/iPad/iPod touth without data loss.Now read on and see how to remove the locked screen and access your iPhone in three ways.

Solution 1:Restore iPhone via iTunes to Remove Locked Screen

1. Make sure that you are running the newest version of iTunes on computer.
2. Connect the locked screen iPhone to the computer, then select your iPhone when it appears in iTunes.
3. Click on Restore iPhone on the Summary panel.

restore iphone ituns

4. A pop-up messages will prompt and ask for your confirm,click on Restore.Then iTunes will download the device software file and restore your device automatically.

confirm iphone restore

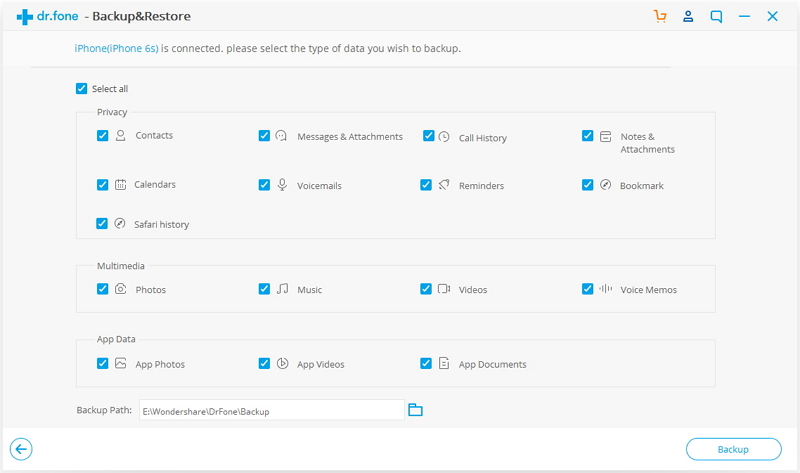
After clicking Restore,iTunes will begin to restore your iPhone to factory settings,all of your data and settings will be erased from iPhone after restoring.We suggest you do a backup for iPhone before the restoring.

Solution 2:Get iPhone into Recovery Mode to Remove Locked Screen

Step 1. Run iTunes on computer.
Step 2. Power off your iPhone.And then connect iPhone to computer via the USB cable.
Step 3. Now press and hold the Home button until you see the iTunes logo (recover mode screen) pop up on your iPhone screen.

recovery mode

Step 4. Once your device is connected to iTunes, you will see a pop-up message appear on iTunes asking you to choose to Restore or Update as below. Select Restore.

Step 5. After that, iTunes will start downloading software for your device. When it’s done, you can set up and use your iPhone without password.

enter recovery mode itunes

Solution 3:Remove iPhone Locked Screen via iOS System Recovery

U.Fone iOS System Recovery is a data repair tool particularly work for restoring iOS system to normal and remove iPhone locked screen without data loss.Additionally,this iOS System repair tool help to fix iPhone stuck in Recovery Mode, black screen,stuck at “connect to iTunes” screen,looping on start and other issues of the device.Moreover,the program not only allows you repair iOS system issues on iPhone, iPad/iPod Touch,but also enable users recover data from iOS devices lost due to deleted by mistake,factory reset,device loss,iOS 10 upgrade/jailbreak,etc,.

d_win d_mac

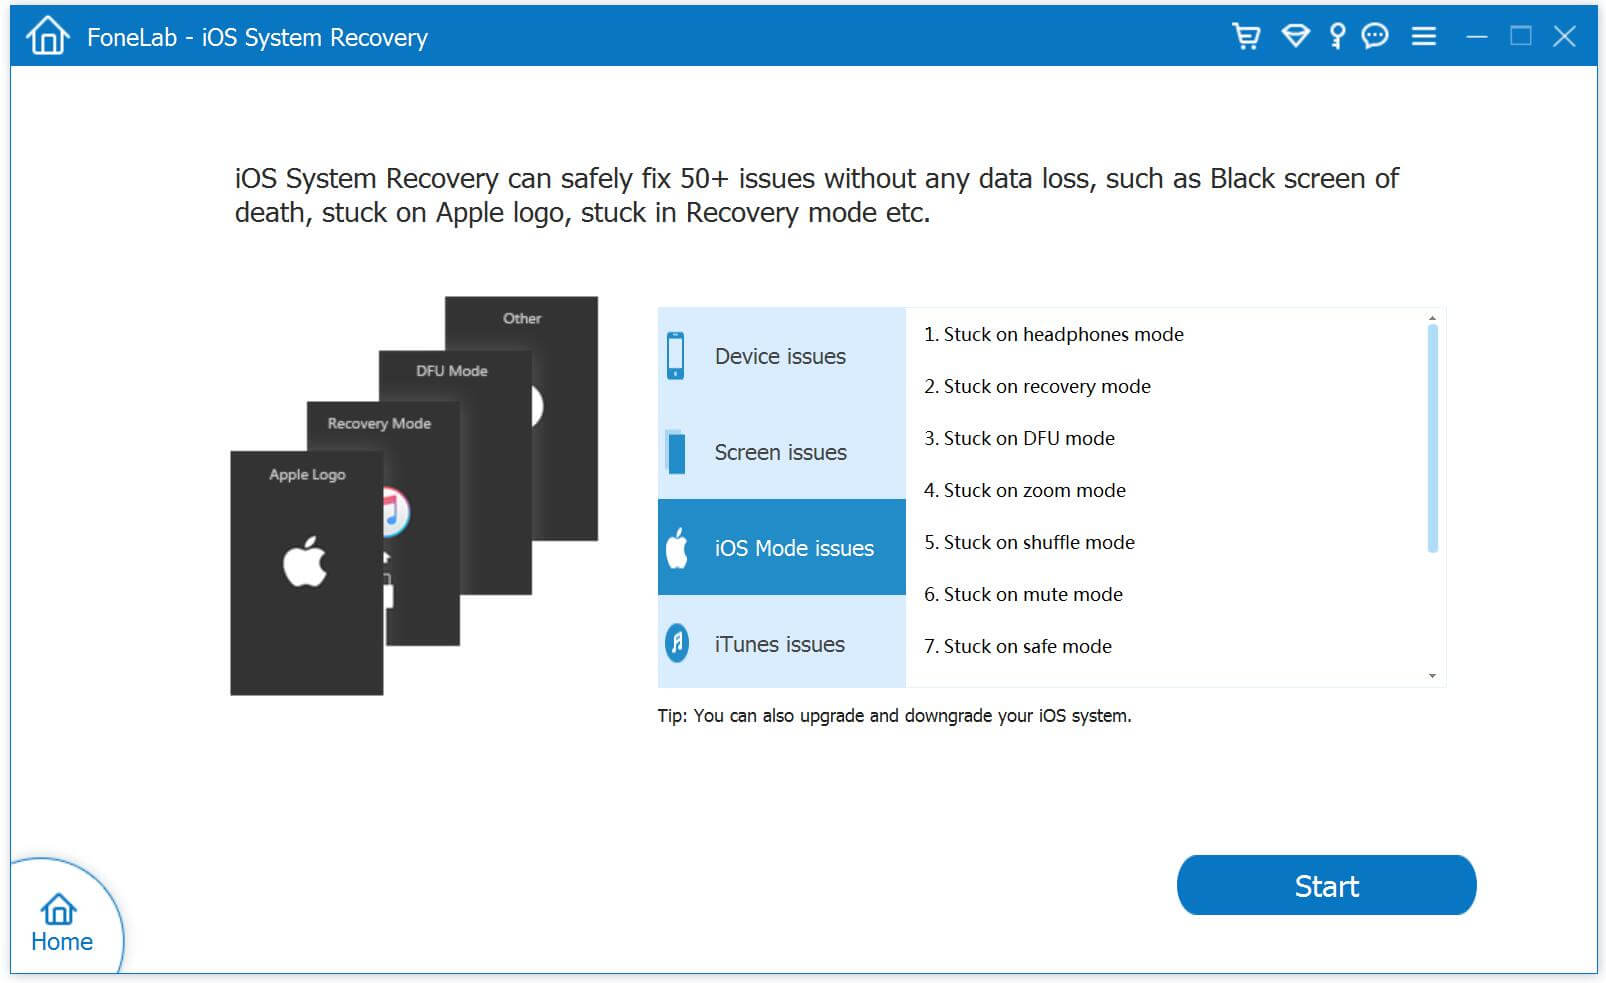
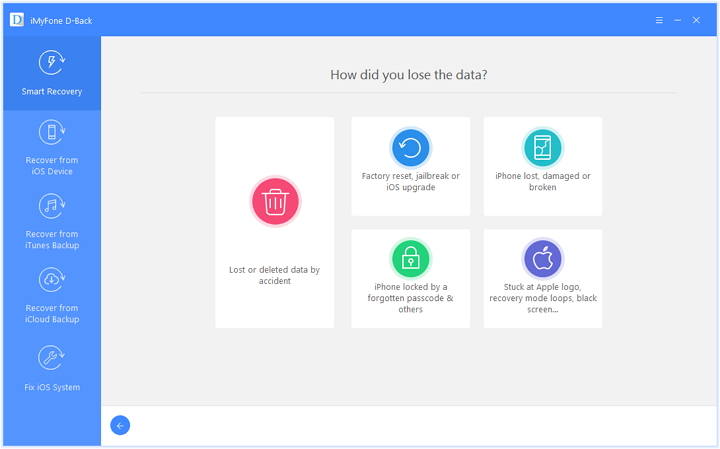
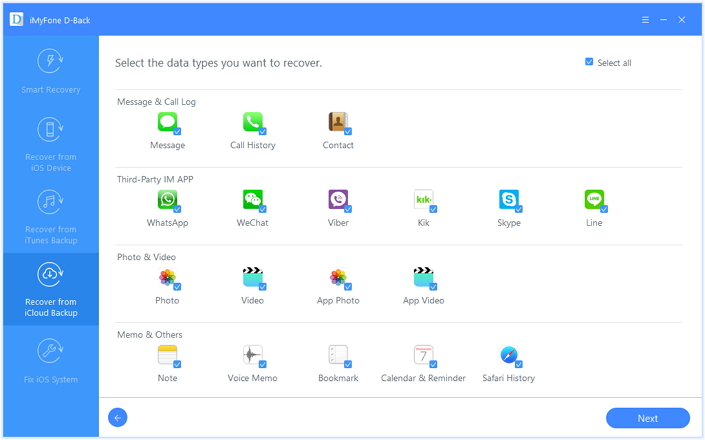
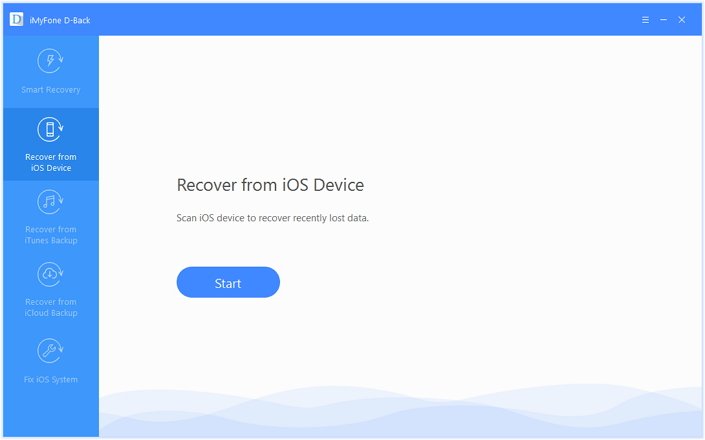
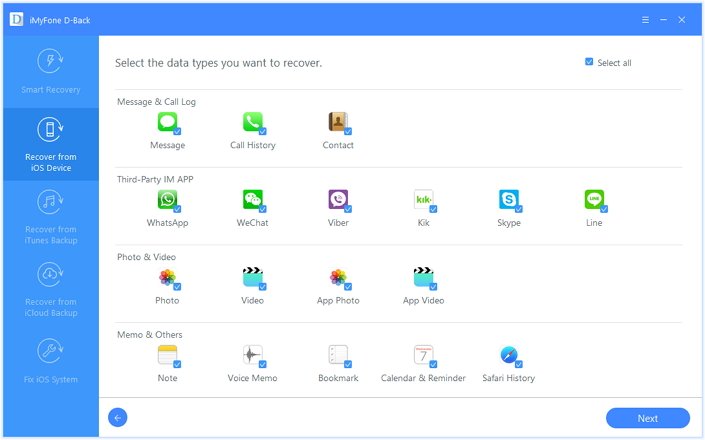
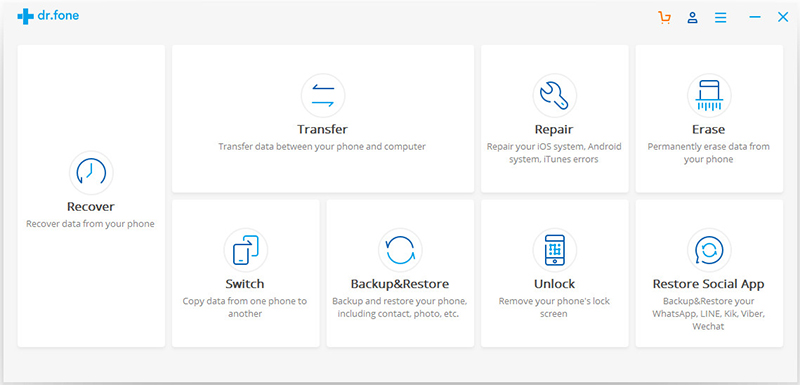
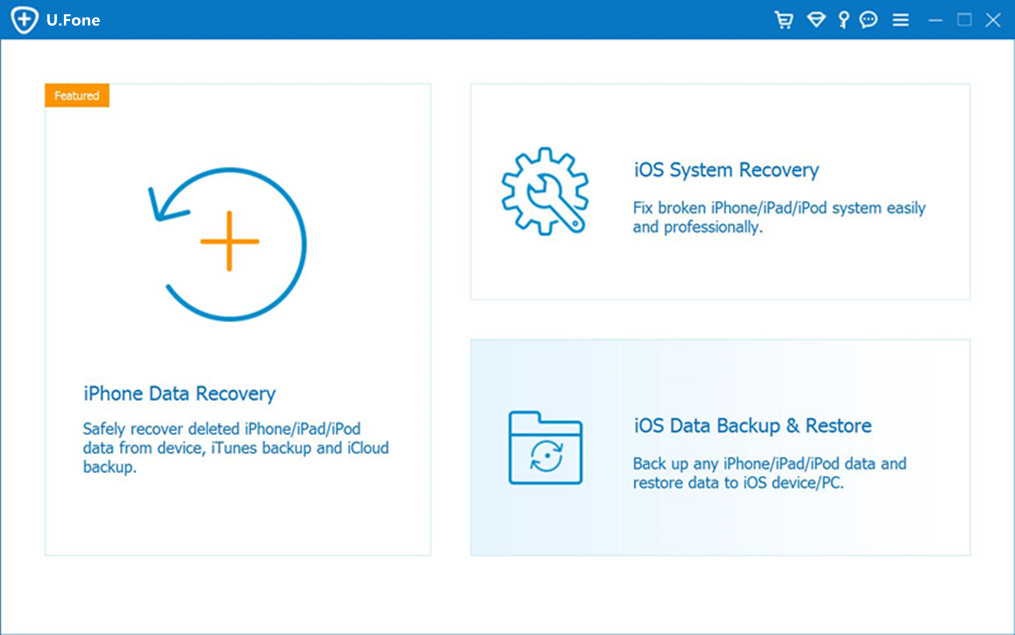
Step 1.Run iOS System Recovery and Select the Recovery Option
Firstly please run the iOS System Recovery and click “More Tools” >”iOS System Recovery” in the program homepage.Connect iPhone with computer,then click “Start” to continue.

remove iphone locked screen

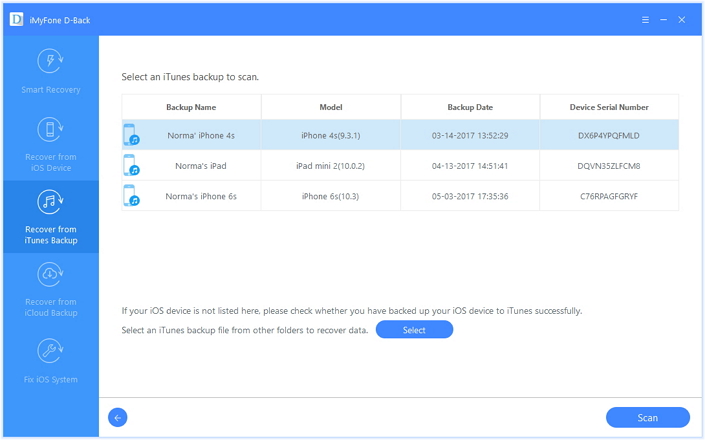
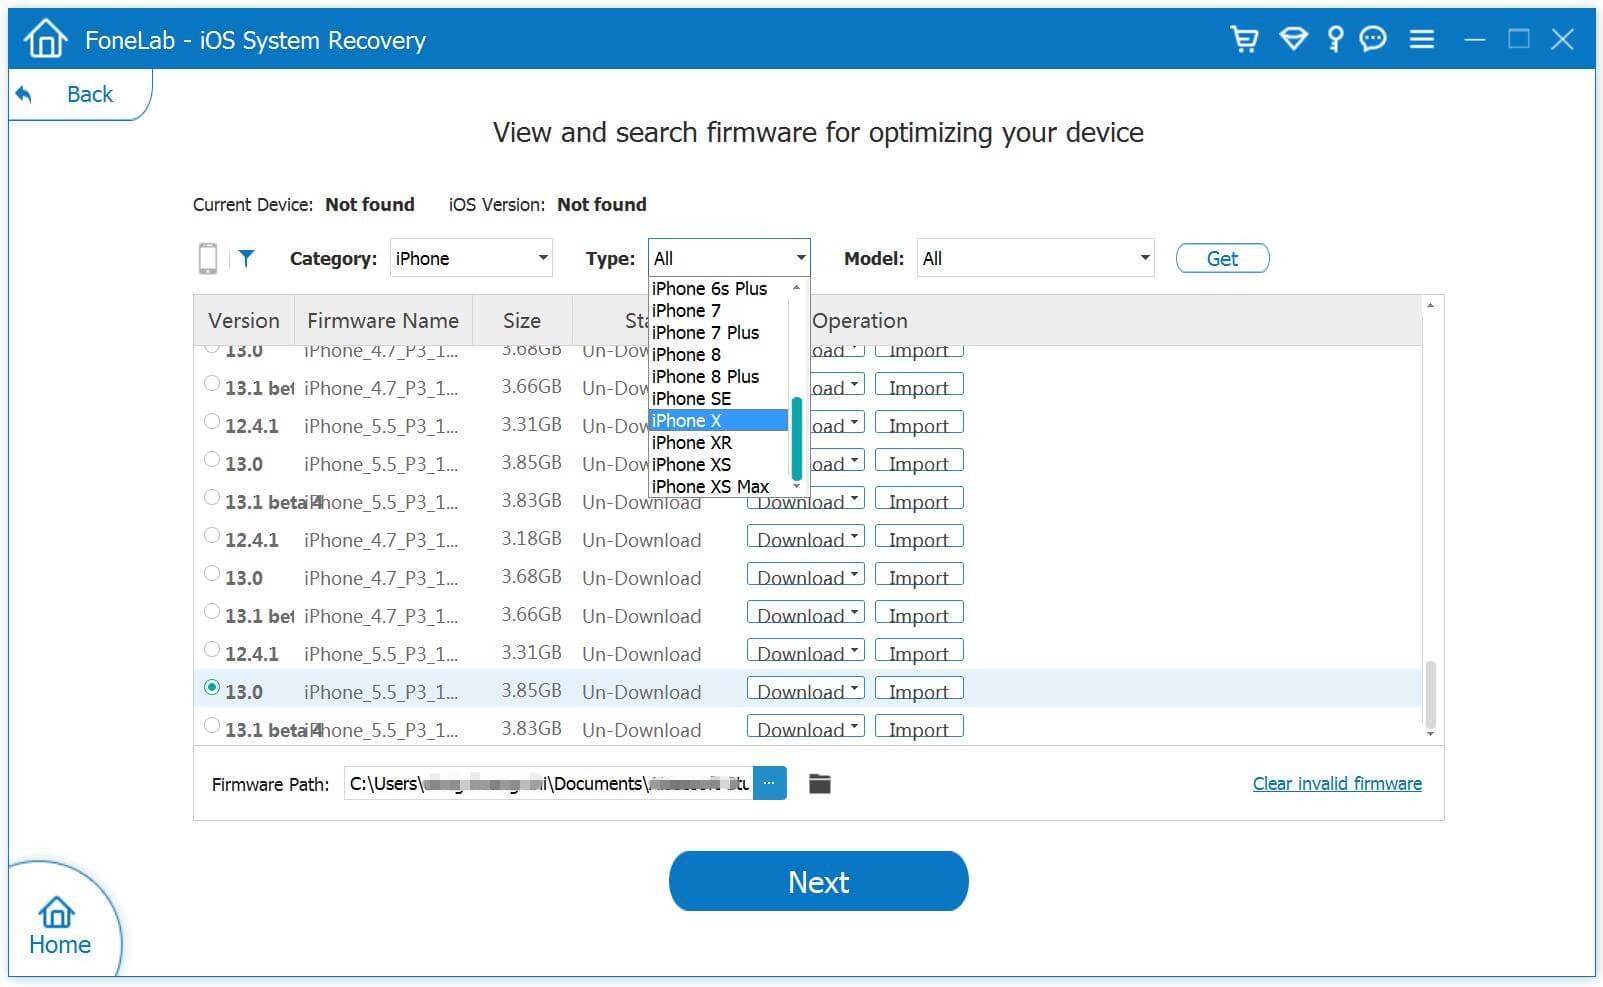
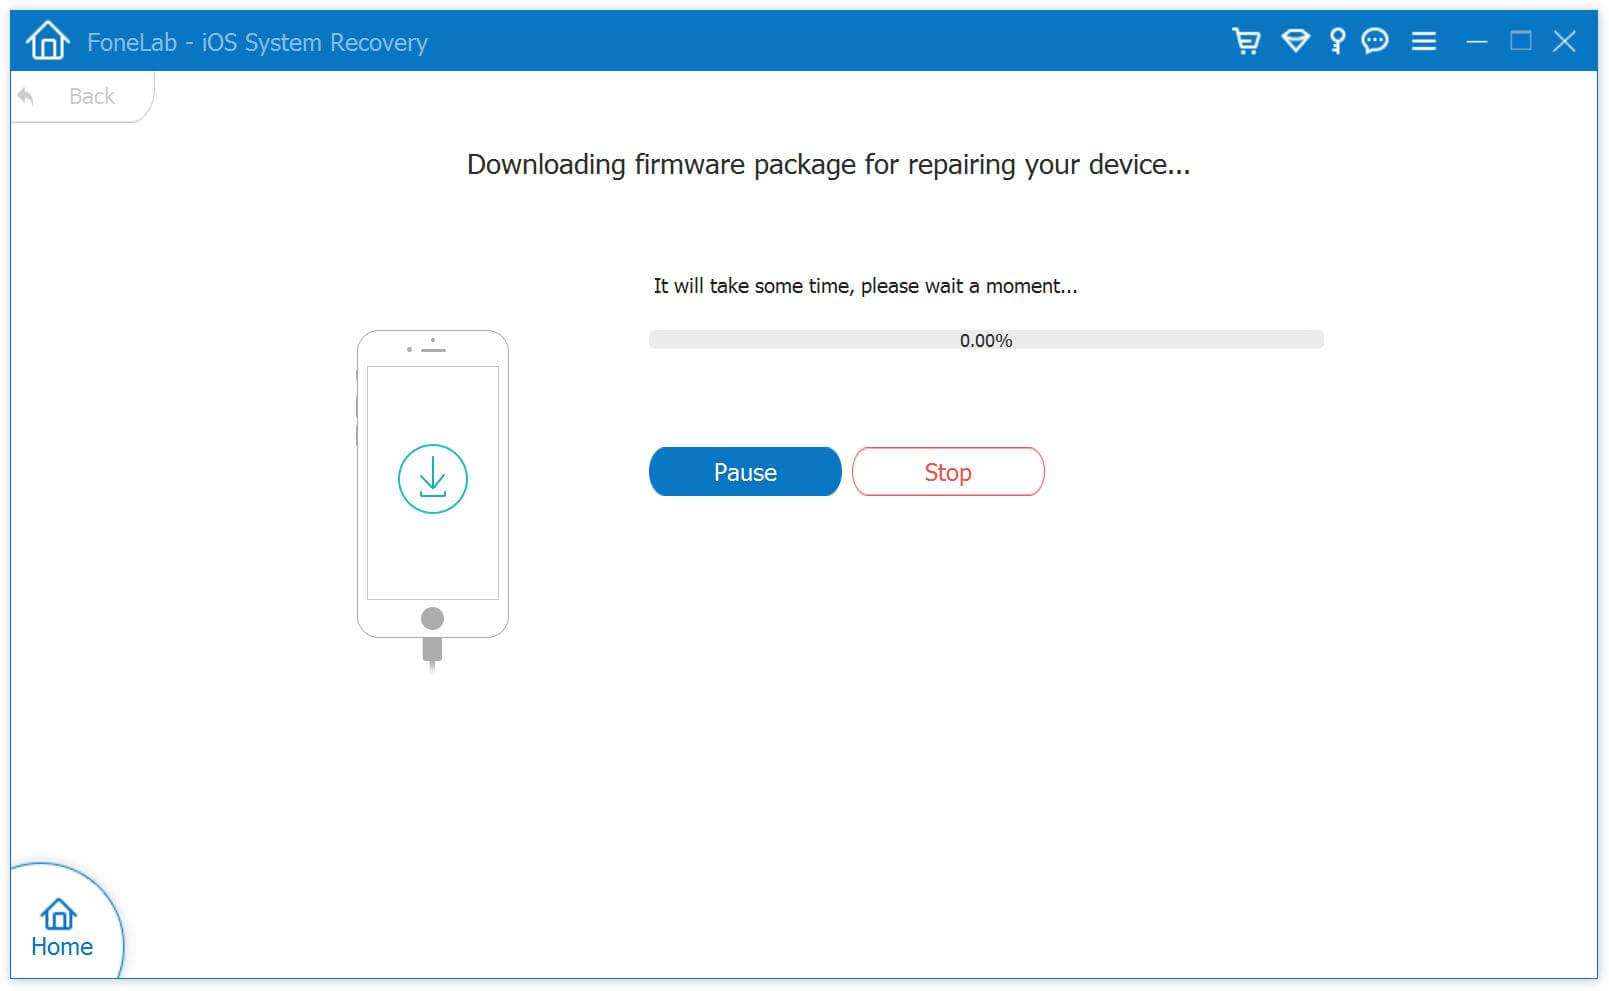
Step 2.Download the Firmware for iPhone
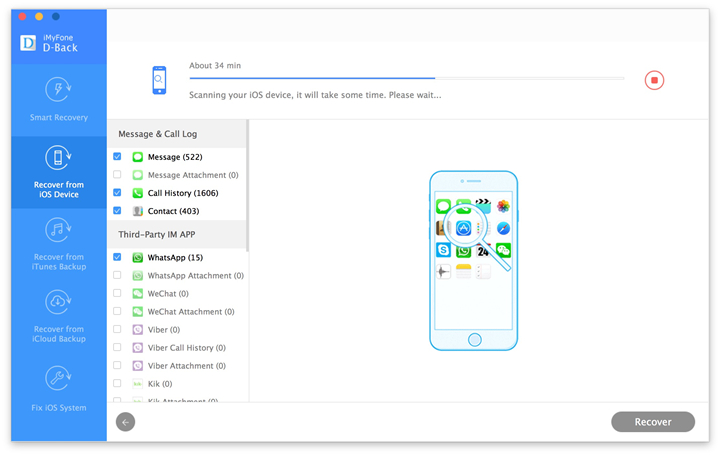
Make sure that your iPhone is connected to the computer and now iOS System Recovery will detect your iPhone soon,offering the latest iOS version for you to download.Then click “Download”,the program will begin to download the firmware for your iPhone.

remove iphone locked screen

remove iphone locked screen

Step 3.Remove iPhone Locked Screen and Set it to Normal
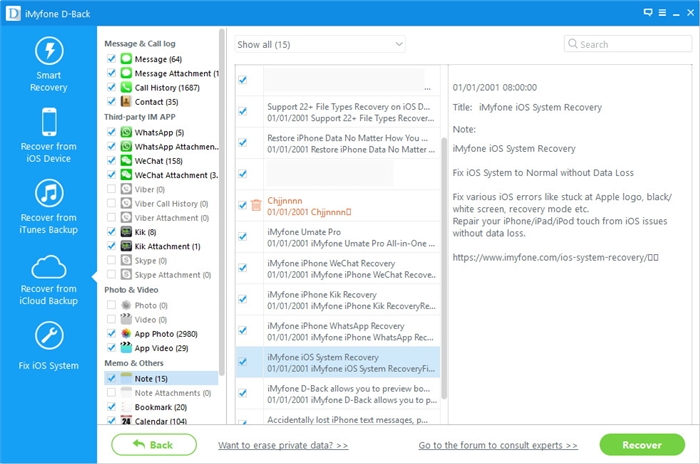
When the firmware downloading process is complete,iOS System Recovery will start to restore your locked iPhone to normal and remove the locked screen on iPhone.

remove iphone locked screen

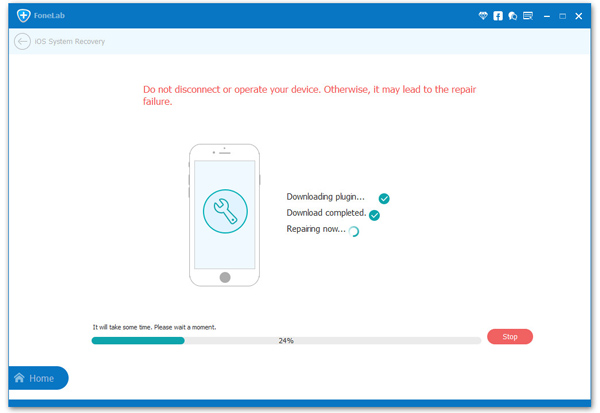
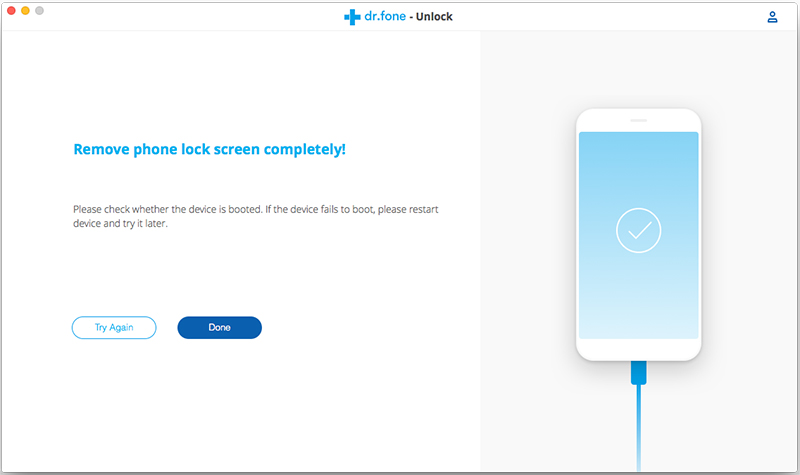
Once the process is finish,your iPhone will be as a new phone without password,you can start using it normally as usual.

Note:
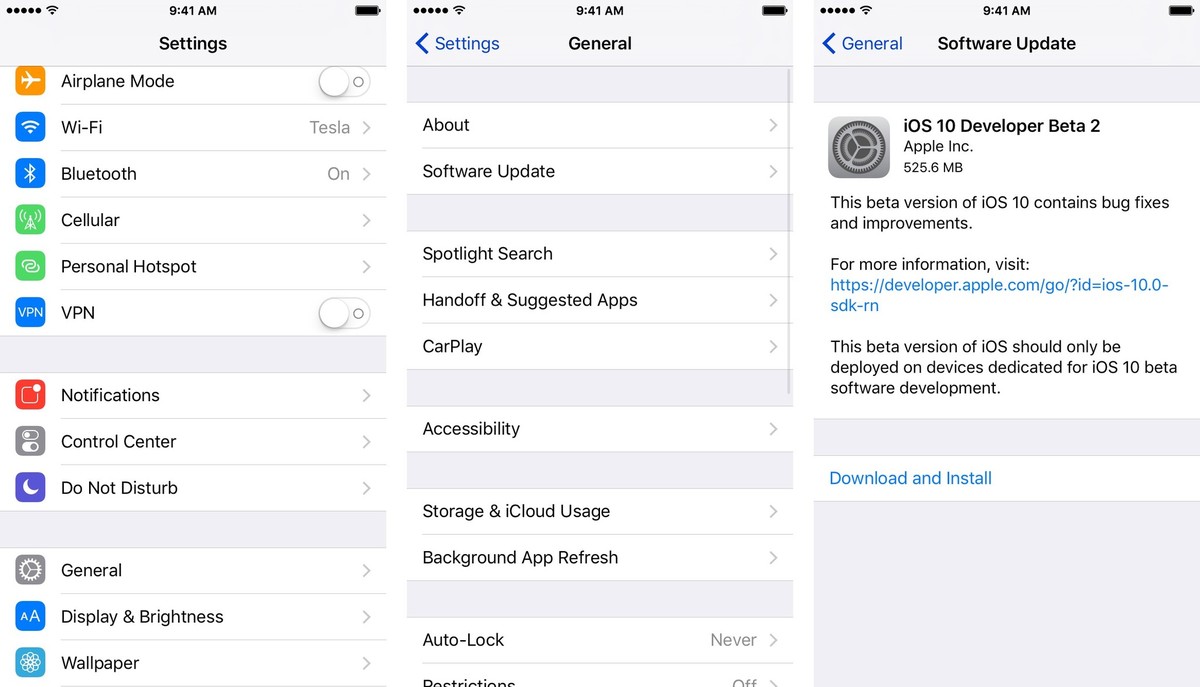
iOS System Recovery will update the latest version for iPhone after restoring.
Your iPhone will be restored to non-jailbroken state after restoring.

d_win d_mac

Solution 4:Bypass iPhone Locked Screen via iPhone Locked Screen Removal

Another solution to bypass locked screen on iPhone is with the help of iOS ToolkitiPhone Locked Screen Removal.It provides you a safe solution to unlock and access your iPhone easily. It empower to bypass locked screen iPhone and access the device without restoring to factory reset or performing Recovery Mode on it. iPhone Locked Screen Removal work for all iOS devices, including iPhone X, iPhone 8, iPhone 7, iPhone 6S/6, etc,.

The steps to access iPhone without locked screen:
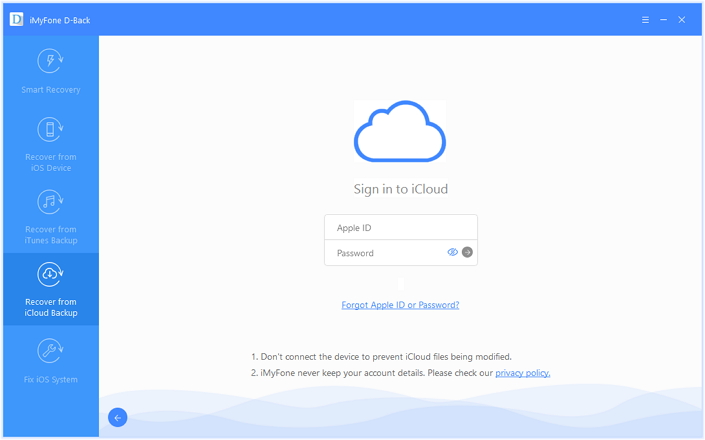
Step 1. Connect the Locked iPhone to the Computer
Step 2. Enter iPhone into the DFU Mode
Step 3. Confirm the Information of iPhone
Step 4. Unlock iPhone without Data Loss

unlock iphone without data loss

Free download iPhone Locked Screen Removal:

d_win d_mac

Related Articles

Unlock iPhone Passcode when Forgot iPhone Screen Lock Passcode

How to Fix Forgot iPhone Screen Lock Password

How to Unlock a Stolen iPhone without knowing the Password

How to Unlock iPhone with Unresponsive Screen

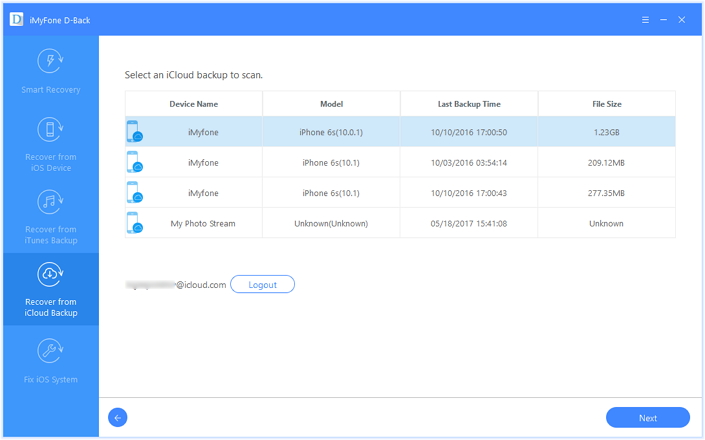
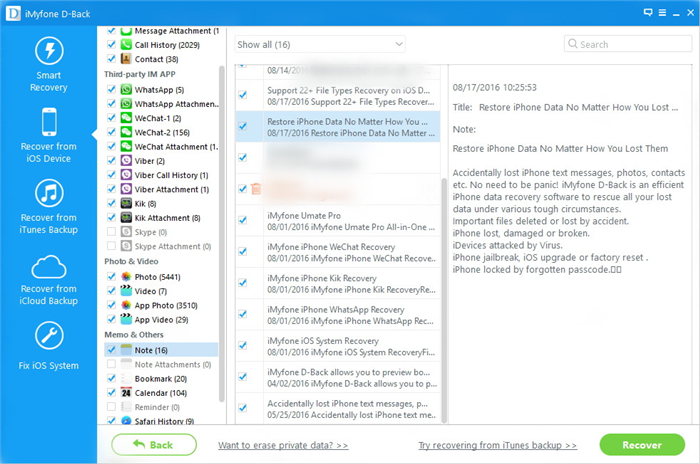
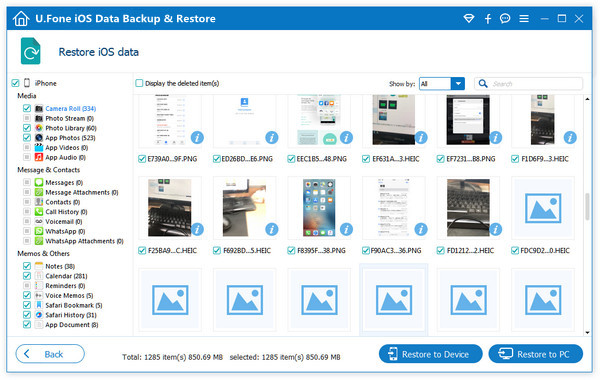
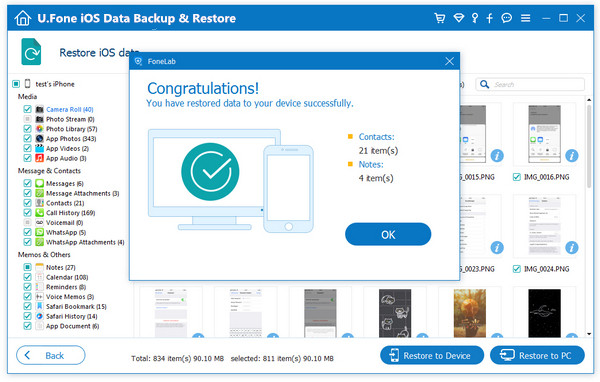
How to Extract Data on Locked iPhone

How to Restore Data on Locked iPhone

How to Factory Reset an Locked iPhone

Remove iPhone Locked Screen

How to Extract and Backup Data from Locked/Disabled iPhone

Your iPhone that won’t turn on? Forget phone screen passcode? Your iPhone with broken screen or can not entering passcode on a broken iPhone screen?Don’t worry,you can recover data from a disable iPhone with locked screen,please keep reading.

How Can I Recover Data from Disabled iPhone 6S?

“My mother forgot the iPhone password.She entered the possible password several times, but now her iPhone 6S is knocked.How to fix the disabled iPhone without losing data?She want to recover the data from locked iPhone.Thanks advance.“-Vivian

recover data from disabled iPhone

Sometimes we will encounter the circumstance that forget iPhone password under unexpected situations.The only way to unlock your iPhone with a lock password,other than entering the password,is to restore your iPhone to factory resettings.However,all data on your iPhone will be erased after the restoring.In order to avoid data loss,you’d better back up your iPhone data when you plan to do it.How to backup data on locked screen iPhone?If you do forget your password for some reason and you’re locked out of your iPhone, this guide below will go over two methods that’ll available to recover data from locked iPhone completely in easy steps.Contacts,photos,videos,SMS,document and more other kinds of iPhone data included.

Part 1: How to Recover Data from Locked/Disable iPhone

The first method we recommend for you is to extra data from locked iPhone via iCloud backup.In this case,you can use iPhone Data Recovery to extract data on locked iPhone from iCloud backup to your computer,Such as contacts,photos,videos,call logs,notes,document and so on.This software is an outstanding data recovery tool,which allows to preview and selectively restore locked iPhone data from iCloud backup as well as iTunes backup.Applicable iPhone device: iPhone X, iPhone 8, iPhone 7,iPhone SE,iPhone 6S/6,iPhone 5S/5C/5.

d_win d_mac

Step 1.Download and Install iPhone Data Recovery Program
Please firstly download and install iPhone Data Recovery then run it on computer.

recover iphone data with icloud backup

Step 2.Select the Recovery Mode and Sign in
Select “Recovery from iCloud Backup File” option and sign in iCloud.

Step 3.Extra File from iCloud Backup
When you sign in iCloud,the program will list your iCloud backups in the interface.You can choose anyone you want and click “Download” to extra previous file from the iCloud backup.

recover iphone data with icloud backup

Step 4.Select and Retrieve Data from iCloud
When the download process is completed,you can preview and click the items to export them to your computer.

recover iphone data with icloud backup

Free download the iOS Data Recovery for Mac and Windows and try to recover data from your disable/locked iPhone:

d_win d_mac

Tips:If your iPhone screen is broken, disable or locked but it can be detected by computer,you can try scan and recover data from locked iPhone directly without iTunes/iCloud backup,or try to backup data from your locked iPhone to computer easily.

Part 2: How to Backup Data from Locked/Disable iPhone

If you had did a iCloud backup of the locked iPhone before you can use the first way to extra data from locked iPhone.How about having no backup for locked iPhone?The second section we are going to introduce to you is to backup data on locked iPhone with iOS Backup & Restore Tool.Which is a perfect data manager tool to directly backup locked iPhone data to computer efficiently.The program is work well for iPhone with iOS 10,iOS 9 or lower.

Free download the iOS Data Backup & Restore tool for Mac and Windows:

d_win d_mac

Step 1.Run Program and Connect iPhone to the computer
To backup locked iPhone,launch the program after installing it,and connect your iPhone to the computer.When your device is detected by the program, you’ll see the window shown as follows.

backup data from locked iphone to computer

Step 2.Choose “iOS Data Backup & Restore” Option
After select the “iOS Data Backup & Restore” mode,you need to select the type of data to backup.Then click “Backup”.

backup locked iphone data with ios backup&restore recovery

Step 3.Backup Data on Locked iPhone
Now the program is backing up the data of the locked iPhone,please don’t disconnect your device with computer.

backup locked iphone data with ios backup&restore recovery

Step 4.Backup Data from Locked/Disable iPhone to Computer
When the backup is completed,you are allow to check all contents of the backup file in categories.Check any of them for exporting/restoring just need click on the button “Restore to device” or “Export to PC” at the right lower corner of the window.

backup data from locked iPhone to mac

Free download the iOS Tool Kit and try to extract data from your disabled iPhone to computer for backup.

d_win d_mac

Part 3: How to Fix a Disabled iPhone to Normal?

After backup data on your locked iPhone,it’s the time to unlock your device now.Apple’s official instructions to restore iPhone to normal and unlock your phone screen by iTunes.

Step 1.Connect the iPhone to your computer.
Step 2.Select iPhone in the iTunes sidebar,and click the “Summary” tab.
Step 3.Click “Check for Update“. iTunes will prompt you if there’s a newer version of the iPhone software available.

Check for Update disabled iPhone

-Click “Restore“.Follow instructions on the screen to complete the restore process.During the process,it will recommend you to back up your iPhone.When the iPhone software has been restored,you can choose to set up iPhone as a new iPhone,or restore your videos, music,app data,and other contents from a backup.

Note:Even though you send the locked iPhone to the Apple service center,you will be told to restore your iPhone to unlock it.That’s to say,you need to erase everything on the locked iPhone.

Worry about data lossing after restore devices by iTunes,you can use a iOS System Recovery to fix ios to normal without data loss.
Learn the guide: How to fix a disabled/locked iPhone

fix a disabled iPhone

Part 4:Access the Locked/Disable iPhone without Data Loss

iOS Toolkit Locked Screen Removal is a reliable program to unlock and access locked or disabled iPhone without data loss.It is a poweful program enable to bypass locked screen without password and let you access your broken iPhone without restoring to factory reset or performing Recovery Mode on it.It is compatible with all iPhone and any iOS system, including iPhone X, iPhone 8, iPhone 7, iPhone 6S/6 and iOS 11.

d_win d_mac

Step 1. Connect your Locked iPhone to the Computer
Step 2. Get iPhone into the DFU Mode
Step 3. Confirm the Information of iPhone
Step 4. Unlock iPhone with Unresponsive Screen without Data Loss

unlock iphone without data loss

You may be want to see the full guide:

How to Access the Locked/Disabled iPhone without Data Loss

Related Article

How to Backup and Restore iPhone/iPad Files after iOS 10 Upgrade

How to Backup and Restore Files on iPhone 7/SE/6S/6/5S/5

How to Backup and Restore Contacts/SMS/WhatsApp Messages on iPhone

How to Extract iTunes Backup for iPhone/iPad

How to Downgrade iPhone from iOS 10 to iOS 9 without Data Loss

Did you get caught up in all of the WWDC 2016 excitement and decided to upgrade your main iPhone, iPad or iPod touch to the newest iOS 10 beta?Many developers are currently enjoying iOS 10 on iOS device,and I suspect that not less than a few non-developers are enjoying it as well.But with the news that an iOS 9.3.4 jailbreak might soon be released,it may be time for some of you currently on iOS 10 to start thinking about downgrading.Here’s how you can downgrade iOS 10 beta back to iOS 9 public release on iPhone, iPad, iPod touch with easy steps below.

downgrade ios 10 to iOS 9

Part 1: Guide on Downgrade from iOS 10 To iOS 9

Note:Before downgrade your iPhone 7/6S/6/6 Plus/SE/5S, iPad Pro, iPad Air/mini, iPod Touch 4 from iOS to to iOS 9,you must to make your iPhone/iPad data backup at first.

Step 1. Download the latest public iOS 9.x firmware file which Apple is still signing. At the time of writing it’s iOS 9.3.4/iOS 9.3.3. Also be sure to download the correct file that is tailored for your iOS device. Once the download is complete,save the file to your desktop for easier access later in the downgrade iOS 10 beta guide.
If you want to downgrade from iOS 10 to iOS 9.3.5,here downloading the iOS 9.3.5 IPSW file for your device.

iphone-Firmware-Files

iOS firmware file for iPad
iOS firmware file for iPod touch

Step 2. Download and install iTunes on your PC or Mac if you haven’t already. Go to apple.com/itunes to learn more.Once installed, launch it.

Step 3. Connect your iPhone, iPad, iPod touch to your computer using an USB cable. Let your computer install the necessary drivers if prompted for them.

Step 4. You’ll see your iOS device pop up at the top left hand corner of iTunes, click on it.

Step 5.See that “Restore iPhone” button at the center of iTunes.Click on it while holding down the left “Option” key (Mac) or the left “Shift” key (Windows).

Step 6.A new pop-up box will come into view,asking you to select an IPSW firmware file.Simply double click on the iOS 9.x firmware file you saved on the desktop in step 1.

Please learn the detailed tutorial:2 Ways Downgrade iOS 10 to iOS 9.3.5

The downgrade iOS 10 beta process will now begin, and it will barely take a few minutes depending the speed of your Internet connection as well. Please make sure you do not touch your computer or iOS device when the downgrade iOS 10 beta process isn’t finish.You absolutely don’t want to mess around with anything at this point.

Once the downgrade iOS 10 beta process is complete you’ll boot straight into the fresh site of iOS 9.x. Also, it should be worth mentioning here that you will lose every single file and data on your iOS device once you downgrade. Lastly, you cannot restore a backup you made on iOS 10 beta on a device that’s running iOS 9.x.

iOS 10 beta is quite buggy at this point, and we will not give it a slight go ahead for use as a daily driver. If you’re planning to use it on a daily routine, then be vary of the issues that you might stumble across, with the top one being battery life.

We recommend iOS users to upgrade to iOS 10 beta once three or four builds are out, ensuring things are much more smoother for you compared to how they are today.

Part 2:Restore iPhone Lost Data after Downgrade from iOS 10 to iOS 9

As you know,downgrade iPhone from iOS 10 to iOS 9 may lead to data loss on iPhone,for rescuing iPhone data,you are suggest to try this iOS Data Recovery,which is a special data recovery for iOS,in order to help to complete the data recovery from iPhone/iPad/iPod after iOS downgrade,restore lost data from iPhone after iOS 10 downgrade,as well as restoring lost data on device after iOS upgrade even though have no a backup of device.All iOS models are supported:iPhone 7,iPhone SE,iPhone 6S(Plus),iPhone 6(Plus),iPhone 5S/5C/5,iPad Air,iPad Pro,iPod Touch 4,etc,.Just click to know more about recover data from iPhone after iOS downgrade.

d_win d_mac

recover iPhone data ios 10 downgrade

Related Article:

How to Download & Install iOS 10 Beta 7 On iPhone

How to Restore Deleted Data on iPhone/iPad in iOS 10

How to Upgrade iOS 9.3.2 to iOS 10 Beta on iPhone and iPad

How to Safely Backup iPhone/iPad before Upgrading to iOS 10

4 Ways to Recover Deleted Note from iPhone with iOS 10

Upon updating iOS 10.3.2 on my iPhone 6s,then I try to open the notes app.I was prompted with an informational screen about the changes,however after clicking “ok”,it only lists the notes that I’ve created in the last two days.Everything prior to that is gone.I still have a copy of all them on my Mac,I want to know how to recover lost notes from iPhone after iOS 10.3.2 update?-GaryNoine

recover iphone note ios 10

iOS 10 Upgrade Lead to Notes Data Loss
Apple announced the latest version of iOS 10.3.2 Since then the company has been pushing a lot of beta releases for the OS. With the official launch set for this fall, till now we have seen seven beta releases for the same and he seventh one being the most recent one.However,iOS 10 still have bugs and now it’s limit to solve completely,the most common program is lost data after upgrading to iOS 10.It’s lucky that you have a backup for iPhone so you can’t retrieve data from backup to iPhone.However,please not be depress if you haven’t backup file of your iPhone.If you also meet similar situation with the with Gary, read the guides below.

How to Check the “Recently Deleted Notes” on iPhone

If your iPhone, iPad running iOS 9, iOS 10 above,there are a “Recently Deleted” Folder in Notes app,so you can check the recently deleted notes in this folder.

Step 1.Tap Notes app on iPhone
Step 2.Tap “Recently Deleted” Folder.Here,you can see all recently notes within 30 days.
Step 3.Click Edit button in the upper right corner of the screen
Step 4.Select the note(s) you want to restore
Step 5.Tap Move To… button to move the recently deleted note(s) to the default Notes.

recover recently deleted notes on iOS 10 devices

Notes:These deleted note(s) will be deleted after 30 days,if you can not find the note(s) you need,please use a iPhone data recover to recover deleted notes from iPhone 7/6S/6/SE/5S with/without backup.

Get Back Lost Note from iPhone iPad with iOS 10.3.2

iOS Data Recovery will help in this situation.It supports to recover deleted notes on iPhone after iOS 10 upgrade,it also allow to restore deleted contacts,SMS,photos,videos,call logs,WhatsApp messages, document and more on iPhone/iPad after iOS update.Three recovery mode is available:directly recover from device,recover from iTunes backup,recover from iCloud backup.Suitable for losing data due to iOS upgrade,iOS jailbreak,device damaged/broken,deleted mistaken and so on.Supports almost all the models of iPhone such as iPhone 7/7 Plus, iPhone SE, iPhone 6S/6(Plus),iPhone 5S/5 on iOS 10/iOS 10.3.2.

You can download it on your computer first. Both Windows and Mac versions are available.

d_win d_mac

Part 1:Restore iPhone Note by Extracting iTunes Backup

The iOS Data Recovery provides the “Smart Recovery” feature for you recover your data quickly and easily.If you don’t know your device lost data under any circumstances,we suggest you click the “Smart Recovery” feature to choose How You Lost Your Data,which will solve your problem and improve the rate of data recovery.

smart iphone data recovery

This recovery mode allows you to scan your iOS device directly to find all the lost files lately, or recover lost data from your inaccessible device.

Step 1.Run iOS 10 Data Recovery and Select Recovery Mode
Run iOS Data Recovery on computer,choose “Recover from iTunes backup” mode among 3 recovery modes.Connect iPhone to computer.

Step 2.Select and Extract the iTunes Backup
Choose an iTunes backup which may contain the deleted notes and let program scan it for the lost file.

extract files from itunes backup

Step 3.Restore iPhone Note from iTunes Backup
When the scan is finished,all the found notes will be displayed in the interface.Simply choose the desired notes from them and tap on “Recover” button to extract them to the computer.

restore iphone deleted notes from itunes backup

You can download the iOS 10 data recovery on your computer first. Both Windows and Mac versions are available.

d_win d_mac

Part 2:Restore Lost iPhone Note by Extracting iCloud Backup

Step 1.Choose the Mode and Log on iCloud Account
Choose “Recover from iCloud Backup File” after launching iOS Data Recovery.Then,sign in your iCloud account.

sign in icloud account to login

Step 2.Select the Files to Retrieve from iCloud Backup
The program can help you selectively recover data from iCloud backups,including photos, App photos, videos, notes, contacts, SMS, iMessages.Just click your desire files and then click “Next”.

select the file types

Step 3.Select the iCloud Backup File and Download
You will see the iCloud backup files that you backed up with this account previously listed.Choose the one you want to recover and click “Download” to download the backup file.

download icloud files

Step 4.Preview and Restore Deleted Note from iCloud Backup
Once backup file downloaded,preview the lost notes data one by one by selecting the “Notes” item,then choose the notes you decide to get back.After that,save to either the computer by click “Recover” button.

recover deleted notes from icloud

d_win d_mac

Part 3:Regain Missing Notes from iOS 10 Devices without Backup

Note:The mode is available for losing data from iPhone and have no backup.This recovery mode is helping you to directly retrieve deleted data from iPhone.

Step 1.Run iOS Data Recovery and Connect iPhone to Computer
Firstly choose “Recover from iOS Device” option in the homepage of program and then connect iPhone to computer.

connect iphone with computer

Step 2.Select Notes
Select the “Notes&Attachments” for scanning.The program will start to scan your iPhone for the deleted notes by clicking “Next” button.

select file to recover

Step 3.Scan Your iPhone for Deleted Note
Click “Scan” to search for your lost data,then the program begins scanning your device automatically for deleted notes.

scan iphone and search deleted data

Step 3.Preview and Recover Deleted Notes from iPhone
After scanning,all your iPhone data will be listed orderly.You are allowed to preview them one by one,which includes notes,contacts, videos,music,photos,text messages,calendars,bookmarks and more.You should choose “Notes” only for previewing to save time.At last,click “Recover” button to get iPhone notes back on computer.

recover deleted notes on iphone

Free download the iOS 10 Data Recovery and try to get your missing notes back.

d_win d_mac

Related Article:

How to Restore Deleted Notes on iPhone 7/SE/6S/6/5S/5

How to Recover Lost Data on iPhone after iOS 10 Upgrade

How to Recover Lost Contacts on iPhone after iOS 10 Upgrade

How to Recover Lost Text Messages on iPhone after iOS 10 Upgrade

How to Recover Lost Photos on iPhone after iOS 10 Upgrade

How to Download & Install iOS 10 Beta 7 On iPhone

Update August 19, 2016: Apple has just released iOS 10 beta 7 for developers. If you already have iOS 10 beta installed, proceed to Settings > General > Software Updates and download away. If you’ve been waiting for beta 7 to get in on iOS 10, keep reading and we’ll walk you through the set up!

ios-10-beta-7

iOS 10 is coming this fall with a ton of new features, several that require lots of third-party developer input. As such, the company is releasing developer betas so that software engineers can get a head start on making great software for you.

Apple’s 2016 software updates- iOS 10, watchOS 3, tvOS 10, and macOS Sierra – are currently available as closed developer previews or as public betas for iPhone,iPad,and Mac.(Sadly, no public beta for the Apple Watch or tvOS this year.) While the betas contain new features, they also contain pre-release bugs that can prevent the normal use of your iPhone, iPad, Apple Watch, Apple TV, or Mac, and are not intended for everyday use on a primary device. That’s why we strongly recommend staying away from the developer previews, and using the public betas with caution. If you depend on your devices, wait for the final release this fall.

How to Download and Install iOS 10 Beta 7 On iPhone

To install the iOS 10 beta,you’ll need to visit Software Update on your iPhone or iPad.

Step 1.Launch Settings from your Home screen,tap on General,then tap on Software Update.
Step 2.Once the update appears,tap on Download and Install.
Step 3.Enter your Passcode.

install-ios-10-1

Step 4.Tap Agree to the Terms and Conditions.
Step 5.Tap Agree again to confirm.

Step Your iPhone or iPad will reboot to install iOS 10. There will be a couple progress bars going across the screen. Sit tight, and let everything finish.

Although there has been no confirmation as to how many betas the company will release before working on finalizing the Gold Master version of the software, Apple released the final beta for iOS 9 around this time last year. If beta 7 isn’t the final version, we’re certainly getting close.

Related Article:

iOS 10 Public Beta Now Available

Apple iOS 9.3.4 is Now Available:What is Included in the Update

iOS 9.3.3 :The Things You Need to Know

How to Backup iPhone/iPad Data before iOS 10 Upgrade

How to Restore Deleted Data on iPhone/iPad with iOS 10

How to Backup and Restore Viber Messages on iPhone

[Summary]: In this article, we will share you a easy and fast method to backup Viber messages from iPhone XS/XR/X/8/7/6S/6, etc. to PC/Mac, as well as restore Viber messages to iPhone and iPad from backups.

What is Viber
Viber-A communication application on mobile device for sending free messages and making free calls on any network.Viber lets you make free phone calls and send text, sticker, photo, voice and video messages for free to anyone who also has the application installed.Viber integrates with the iOS to give you the best experience and performance.It syncs with your contacts, detecting which ones already have Viber. Simply select a contact and talk for free.

viber-logo

The Features of Viber:
-Best quality video and audio calls using 3G/4G or WiFi
-A complete redesign for a new look and feel
-Free text, photo and video messages with location-sharing
-Call non-Viber mobile or landline numbers at low rates with Viber Out
-Support for iPhone/iPad-use your iPhone and iPad at the same time
-Group messaging with up to 100 friends
-Add friends easily by entering their Viber number or scanning their QR code

The Importance of Have a Backup of Viber Messages
Like WhatsApp,Wechat,Line,Viber is one of the most popular instant messaging apps that allows to send free messages,photos,videos to anyone,make call to anyone who also have Viber installed.However,unlike the other apps,Viber doesn’t keep a copy of your chat history in the server or on mobile device.Many people now use Viber quite a lot on iPhone/iPad and the message history means a lot to them.What if mistakenly hit the clear data button on Viber app?Or Just lost all the data when you are selling your phone or buy the new device to replace?Now you will be advise to backup the viber messages on iOS device.

How to Backup iPhone/iPad Viber Chat History

Recently, I find that iOS Viber Backup & Restore Tool – iOS Toolkit – Social App Restore released on the mobile market, I try this program and I’m satisfied with this wonderful tool function that complete the Viber backup and restore task on my iPhone.Now I am ready to introduce it to you all who need to backup/restore Viber chat history.iOS Viber Backup & Restore Tool is work well for backing up Viber chat history from iPhone/iPad to computer perfectly,as well as restoring backed up Viber messages from computer to iOS device completely,including the Viber text,sticker, photo,voice and video messages.iOS Viber Backup & Restore Tool is provided through the Viber app and creates a backup file with your chat history data on iOS device,which is an option to backup and restore your iOS Viber chat history indeed.The supported iOS device:iPhone 7,iPhone SE,iPhone 6S(Plus),iPhone 6(Plus),iPhone 5S/5C/5,iPad Air,iPad Pro,iPad Mini,etc,.It’s applicable to iOS 10,iOS 9 or lower.

d_win d_mac
d_win d_mac

Part 1:How to Have a Backup of iPhone Viber Chat History on Computer

After launching the iOS Viber Backup & Restore Tool on your Computer,choose “More Tools” on the left side and you’ll see the screen as follows.

Step 1.Run Program and Connect iPhone to the Computer
To backup Viber chats history on your iPhone,you should choose “iOS Viber Backup & Restore” option in the main page.Then connect your iPhone to the computer.Once your device is detected,you will see the screen below.

more-tools

viber-backup

Step 2.Begin to Backup iPhone Viber Chats History
Click on the “Backup” button,and the program will start the backup process automatically.Wait until the process is complete.keep your iPhone connected all the time during the whole process.

backup-viber-messages

When the backup process ends,you will see the screenshot below.

viber-backup-finish

If you want to check the backup file and export the content,you can continue reading.

Part 2:How to Selectively Restore Backed up Viber Messages to iPhone from Computer

After launching the iOS Viber Backup & Restore Tool on your Computer,choose “More Tools” on the left side and you’ll see the screen as follows.

Step 1.View iPhone Viber Backup Files
To check the backup file’s content,you should click on the “To view the previous backup file >>” on the first screen under “iOS Viber Backup & Restore” option.

more-tools

viber-backup

Step 2.Extract Backup File for iPhone
Here you will see all backup files of your Viber chats history,choose one you want to check and click on the “View” button.

viber-backup-file

Step 3.Restore or Export Viber Messages from Backup
When the scan stops,you can preview all contents in the backup file,including text chats,call history and viber attachments.You can check any item you want and click “Restore to Device” or “Export to PC” for recovery.

restore-iphone-viber-backup

d_win d_mac
d_win d_mac

Viber Messages Backup and Restore

Related Article:

How to Backup and Restore iOS Kik Messages

How To Backup and Restore iPhone WhatsApp Messages

How to Backup and Restore Contacts/SMS/WhatsApp Messages on iPhone

How to Restore Deleted SMS/iMessages/MMS on iPhone

How to Transfer SMS/MMS/iMessage from iPhone/iPad/iPod to Computer

How to Backup and Restore Kik Messages on iPhone

What is Kik Messenger
Kik Messenger is the totally free, crazy-fast, cross-platform messenger app that connects you to your friends in real-time.Use Kik to chat,share pictures privately, plan outings with groups,and stay connected to the people who matter most to you.You’re going to fall in love with Kik Messenger and here’s why:-Hands-down the fastest,most life-like chat experience for your smartphone.

Can I save my Kik messages to computer?From Kik’s help center,you can find this answer: “There isn’t currently a perfect way to save or backup your Kik chats.You may be able to use your smartphone’s built-in features to ‘screenshot’ of your chats.”Don’t be depressed.If you are looking for a way to backup iPhone/iPad Kik messages to computer,here you have came to the right place.

* How to Export Kik Messages from iPhone to PC

* How to Recover Deleted Kik Chat History on iPhone

For now,you can find a lot of iOS data software on the web that claim to backup and restore Kik messages on iOS device with 100% success rate.Unfortunately, most of them failed to do so. And that is why we wrote a post on this topic because we came across the same situation a while go and spent hours to find a reliable solution.

Backup and Restore iPhone/iPad Kik Messages

Searching an easy way to backup and restore iOS Kik Messages on computer without taking a screenshot?

iOS Kik Backup & Restore Tool – iOS Toolkit – Social App Restore, which offers a good solution for all iPhone and iPad users.It not only enable to backup Kik Messages from iOS device to computer,but also empower users to restore Kik messages from backup file to iOS device.What’s more,iOS Data Exporter also allows you backup and restore WhatsApp messages, Viber messages, contacts, text messages, iMessages, photos, videos and more.This program is available for iPhone XS, iPhone XR, iPhone X, iPhone 8/8 plus, iPhone 7,iPhone SE,iPhone 6S(Plus),iPhone 6(Plus),iPhone 5S/5C/5,iPad Air,iPad Pro,iPad Mini,etc,.It’s applicable to iOS 12 and iOS 11/iOS 11.2.1/iOS 10 or lower.

d_win d_mac
d_win d_mac

Part 1:How to Backup iOS Kik Messages to Computer

Step 1.Run Program and Connect iOS Device to the Computer
Choose “iOS Kik Backup & Restore“option on the “Social App Restore” feature of program.Then connect your iPhone/iPad to the computer.When your device is detected by computer,you will see the screenshot below.

more tools option

Step 2.Begin to Backup iOS Kik Chats
Click on the “Backup” button,and the program will start working automatically.During the whole process,you only need to keep your device connected all the time,and then wait.

backup kik chats

When the backup process is finish,you will see the prompt message below.Which reminding you the backed is completed.

finish kik chats backup

If you need to check the backup file and restore/export the iOS backup Kik chats,continue to read.

Part 2:How to Restore Kik Messages to iOS Device from Backup File

Step 1.Run Program and Connect iOS Device to the Computer
To check the backup file’s content,you can click on the “To view the previous backup file >>” on the first screen after choosing “iOS Kik Backup & Restore” option on the “More Tools” feature of program.Then connect your iPhone/iPad to the computer.Once your device is detected by computer,you will see the screenshot below.

more tools

kik backup restore main

Step 2.Extract iOS Kik Chats File from Backup
Here you will see all backup files of your Kik chats,choose one you want to check and click on the “View” button.

extract kik backup file

Step 3.View and Restore/Export Kik Chats from Backup
When the scan stops,you are allow to preview all contents in the backup file,including Kik text chats and Kik attachments.

restore kik backup to ios

You can check any item you want and click “Restore to Device” or “Export to PC” for recovery.

ios-kik-backups-restore

d_win d_mac
d_win d_mac

In Conclusion,you know how easily it is to backup and restore Kik messages on iPhone/iPad with iOS Kik Backup & Restore Tool.It supports all Apple devices like iPhone, iPad and iPod touch. Besides Kik message recovery, it can use for recovering all kinds of deleted data on iOS device like Whatsapp messages/SMS/MMS/iMessages,contacts or photos.Those tools are shown on the left side bar of the section of iOS Kik Backup & Restore Tool.There are also step-by-step tips on iOS data recovery topics, you can find more tutorial in the homepage.

Related Article:

How To Backup and Restore iPhone WhatsApp Messages

How to Backup and Restore Contacts/SMS/WhatsApp Messages on iPhone

How to Restore Deleted SMS/iMessages/MMS on iPhone

How to Transfer SMS/MMS/iMessage from iPhone/iPad/iPod to Computer

How to Backup Contacts from iPhone to Computer

Backup and Restore Kik Messages

Apple iOS 9.3.4 is Now Available:What is Included in the Update

Apple has recently released iOS 9.3.4, which is a minor update. Apple did not release any new features as part of the software update, but I highly recommend that you upgrade as soon as you can because it contains an “important” security patch.

iOS 9.3.4

Why is iOS 9.3.4 essential? It addresses an issue where “an application may be able to execute arbitrary code with kernel privileges.” The description in the Apple support page says: “A memory corruption issue was addressed through improved memory handling.” MacRumors pointed out that iOS 9.3.4 also fixes the Pangu iOS 9.3.3 jailbreak exploit. And Apple credited Team Pangu for discovering the memory corruption vulnerability.

Apple iOS 9.3.4 follows the release of iOS 9.3.3 from a few weeks ago. iOS 9.3.4 is the fourth update to iOS 9.3 since it was released in March. Some of the new features that were added to iOS 9.3 in March included the Night Shift feature, Touch ID support for Notes, new Health app categories, additional News app personalization features, new Education apps and enhancements to the Music app via CarPlay.

Apple iOS 9.3.4 will most likely be the last iOS update before the release of iOS 10 next month — which is around the same time that the iPhone 7 should be announced. Many of Apple’s stock apps will be overhauled in iOS 10. For example, the lock screen will be more interactive. The response options in the QuickType keyboard will be more contextual based on the type of content being written. There will be a new Memories feature in the Photos app and it will make better use of facial recognition. And the Maps and Messages applications will support third party app integration.

You can download Apple iOS 9.3.4 by opening Settings > General > Software Update from your device. The update is available for iPhone 4s and later, iPad 2 and later and iPod touch (5th generation) and later. You can also connect your device to iTunes and install the update after downloading it through your computer. The download size appears to be somewhere between 20 and 30 megabytes for most devices so you will not likely need to allocate much storage space for the update.

Have you upgraded to iOS 9.3.4? Did you have any issues upon upgrading to iOS 9.3.4? Please leave a comment!

Related Article:

iOS 10 Public Beta Now Available

How to Delete Built-In iOS Apps on iOS 10 Device

iOS 9.3.3 :The Things You Need to Know

Apple Pay:Everything We Should Know

25 Hidden iPhone Features that are Really, Truly Hidden

How to Recover Deleted or Lost Data from iPhone

Summary
U.Fone iPhone Data Recovery tool is a professional data recovery for iPhone users, it can recover photos, contacts, text messages, notes, calendar, WhatsApp, App document, etc.

How to recover deleted data from iPhone? I deleted photos on iPhone X, is it possible to recover deleted photos from iPhone? I never backed up my iPhone to iTunes or iCloud, so I need to use an iPhone data recovery software to recover deleted files on iPhone. Thanks.

After upgrading iPhone to iOS 13.4. 1, the photos, contacts and messages was losing, how to restore lost data from iPhone after iOS 13 update?

My girlfriend deleted some important photos and videos on iPhone 11, I can’t find them even in the Recently Deleted album, how to recover deleted video and photos from iPhone 11?

If your iPhone data has been deleted because you or someone else has accidentally pressed delete
Alternatively, if you may encounter the other data lost situations such as upgrade your iPhone to the newest iOS system, jailbreak iPhone, or your iPhone wa stolen/broken, etc,. Believe it or not there still is a effective way to recover deleted data on iPhone. The article below covers three iPhone data recovery solution. If you want to recover deleted or lost data from iPhone. Read on to discover the best way to retrieve your iPhone data.

U.Fone iPhone Data Recovery is used for recovering deleted file on iPhone/iPad/iPod touch in three iPhone data recovery modes, the iPhone data recovery allows you recover contacts, photos, SMS, WhatsApp messages, videos, call logs, calendars, notes and app documents from iPhone/iPad/iPod. To increase your chances of recovering all the data you need, it is recommended that you stop using your device until the deleted data is recovered. You are allow to recover deleted data directly from iPhone device or from iTunes/iCloud backup files. This reliable data recovery program also can help you fix iOS to normal if your iPhone stuck in recovery/DFU mode, stuck on Apple logo or has a blue/black/red screen of death,etc.

Focus on the Features of iPhone Data Recovery:

  • Recover iPhone text content: Messages, Contacts, Call History, Calendar, Notes, Reminders, Safari Bookmark, Safari history, WhatsApp History, App Documents.
  • Recover iPhone media files: Camera Roll, Photo Library, Photo Stream, Voice memos, Message attachments, WhatsApp Attachments, Voicemail, App Photos, App Videos.
  • Support to Restore Data for Any Circumstances:accidental deletion,restore to factory resetting,formatting,iOS upgrade, iOS jailbreak, or iOS system crash(broken/water damaged),attacked by virus and so on.
  • Three Recovery Mode: Recover Data from iPhone Directly; Restore Data from iTunes Backup; Restore Data from iCloud Backup.
  • iOS System Recovery: Fix iPhone stuck in recovery/DFU mode,stuck on Apple logo or has a blue/black/red screen of death,or other stuck issues.
  • Preview files before recovery.
  • Compatible with All iOS Device: iPhone 11, iPhone XS, iPhone XR, iPhone X, iPhone 8/8 Plus, iPhone 7/7 Plus, iPhone SE/6S/6/5S/5C/5/4S,iPad 4/3/2,the new iPad Pro,iPad Air,iPa Mini,iPod touch,etc,.

Let’s free download the iPhone data recovery and try to recover deleted data from iPhone devices.

d_win d_mac
d_win d_mac

Part 1: How to Recover Deleted Data from iPhone Directly

Step 1.Connect iPhone with Computer and Run Program to Scan
Connect your iPhone with computer and then select “iPhone Data Recovery” after launching the program.

run ios 11 data system recovery

connect device to computer

When your phone is detected,you should click the “Start” button to activate the scanning process.

scan iPhone for lost data

Step 2.Preview and Recover Deleted Data from iPhone
Once the scanning is finish,you are allow to preview the scanned out data one by one in the category.Then mark the files you want to recover and then click “Recover” to save the recovered data to your computer.

recover data from iPhone

Part 2: How to Recover Lost iPhone Data By Extracting iTunes Backup

This solution is helpful even when your iPhone is not in hand or your iPhone is broken/damaged.You only need a previous iTunes backup file for your iPhone on your computer.

Step 1.Run Program and Scan iTunes Backup File
Run the iPhone Data Recovery and select “Recover from iTunes Backup File” mode from the top menu.The program will display all the previous iTunes backup files.Select the backup file you need and then click the “Start Scan” button.The program will begin to scan the selected iTunes backup file for recovery.

scan itunes backup

Step 2.Recover Deleted File from iTunes Backup
After the scanning is complete,the program will scan out all the data from the selected iTunes backup file.You are allow to preview the result and choose the files you need to recover by clicking the “Recover” button.

restore iphone data from itunes backup

Part 3: How to Recover Lost iPhone Data By Extracting iCloud Backup

If you have backed up your iPhone data to iCloud, you can also use the “Recover from iCloud Backup” feature to get your data back,even when your iPhone was lost or stolen.

Step 1.Run the Program and Select the Recovery Mode
Launch the program and then connect your iPhone with computer.Then hit on the “Recover from iCloud Backup File” tab on the top menu.Sign in your iCloud account.

login icloud

Step 2.Download and Scan iCloud Backup
After you’ve logged in your account,you will see all the backup files you have crested with iCloud.Select the backup you need and then click “Download”.When the downloading is complete,you should click the “Scan Downloaded” button.The program will immediately start the scanning process.

choose icloud backup

Step 3.Recover iPhone Data from iCloud Backup
When the scanning is complete,you can then preview the result and choose the files you want to recover.Finally click “Recover” to get the deleted data back.

recover data from icloud

Free download and install it on your PC/Mac below. This free trial version allows you to extract and preview all the iPhone content in details.

d_win d_mac
d_win d_mac

iPhone Data Recovery

iOS Data Recovery

Recover Your iPhone iPad Lost Data
Now, Even without Backups

Compatible with iOS 13 & iPhone 11(Pro)

Recover Lost Data Now

How to Recover Lost Data from iPhone, iTunes and iCloud

Summary
Lost data on your iPhone? Deleted photos on your iPhone 14 Pro? Don’t worry, U.Fone iPhone data recovery will helps you easily to recover photos, SMS, contacts, videos & more from iPhone, iPad, iPod, iTunes and iCloud.

In our daily life, we may often encounter such similar situations that iPhone lost data due to several unexpected circumstances,for example iPhone jailbreak, update iPhone to iOS 16 and case data loss, wrong deletion, get iPhone stolen/broken/damaged, viral infection,restore iPhone to factory resetting,etc. Lost iPhone data is such an unluckly thing and I think you must be anxious when you are facing this trouble. There is always a way out. Here is our strongly recommendation, in order to help your recover iPhone lost data efficiently and satisfactorily.

U.Fone iPhone Data Recovery is a powerful and user-friendly data recovery for iPhone/iPad/iPod.iPhone Data Recovery perfectly help to retrieve lost/deleted contacts,photos,SMS/MMS/iMessaged/WhatsApp messages,videos,call logs,notes,calendars, reminders,safari bookmarks,voice memos, voice mail, document on iPhone/iPad/iPod touch with easy steps.Easy-to-use interface is designed to guide iOS users through the iPhone data recovery procedure in 3 recovery:directly recover from device,recover from iTunes backup,recover from iCloud backup.

Free download the iPhone data recovery to recover your lost iPhone data:

d_win d_mac

Sum Up the Top Features of iPhone Data Recovery:
-Free recover up to 16+ types of files,including contacts, SMS, photos, etc,.
-Recover photos from Camera Roll and Photo Stream.
-Recover WhatsApp Messages and WhatsApp attachment.
-Restore data from iOS devices directly or from iTunes and iCloud backup.
-Support various data loss situations:Recover data on device lost due to iOS upgrade/jailbreak, accidental deletion, device lost or broken,etc,.
-Fix stuck loop:stuck in recovery/DFU mode,stuck on Apple logo,stuck at black/white screen,etc,.
-Import files to iPhone,iPad:Transfer recovered files to iPhone from computer.
-Support all the latest iPhone,iPad and iPod Touch.( iPhone 14, iPhone 13, iPhone 12, iPhone 11, iPhone XS, iPhone XR, iPhone X, iPhone 8/8 Plus, iPhone 7/7 Plus, iPhone SE,iPhone 6S/6,iPhone 5S/5C/5,iPad Pro,iPad Mini,iPad Air)
-Preview function available and flexible recovery.

Part 1:How to Directly Restore Lost Data from iPhone

Step 1.Run iPhone Data Recovery and Select the Recovery Mode
Run iPhone Data Recovery,connect your iPhone to the computer,and click “iPhone Data Recovery” option.

run iPhone data recovery

If you want to directly scan and recover lost files from your iPhone device, please click “Recover from iOS Device”.The main interface is displayed as shown below.

recover data from iPhone

Note: You can connect multiple devices and software will list all the connected devices.

Step 2.Scan and Analyze Data on iPhone
Click “Scan Device” option on the main screen of program.The program begin to analyze the connected iPhone.You can see an “Analyzing device. Please wait…” message with a progress bar moving from 0% to 100 % as shown below.

Once the analysis is complete,the program will list all the content of connected device as shown below.

scan iPhone lost data

Step 3.Select File to Preview and Recover
In this step,you are allow to choose the desired file types from the left hand side tree view,and see the list of items contained within them.The items in red color are the deleted ones whereas the others are blue in color.

select-data-recover

Make a selective operation by making use of the check boxes present in front of the items.Click on ‘Save’ button to save the recovered content.Choose your preferred location and click on ‘OK’ button to save the items.

recover iPhone lost data

Part 2:How to Recover iPhone Data from iTunes Backup File

Step 1.Run iPhone Data Recovery and Select Recovery Mode
Please firstly run iPhone Data Recovery,the main screen of the software is displayed as shown below.Select the “Recover from iTunes Backup” option to restore data from iTunes backup.

restore iTunes data

Note:Scan iTunes backup to recover data of a lost/stolen/damaged iPhone device or if data recovery is not possible from the device.

Step 2.Select the iTunes Backup File to Scan
The program will list entire iTunes backup files listed.Select an iTunes backup from which you want to recover data.

Soon it will list all the iTunes backup files that are available as the scanning goes on as shown below.

Step 3.Select File to Preview and Restore
Choose the desired backup file and preview the data from iTunes backup files,as shown below.Select the files that you want to recover and click “Save”.Provide a desired location to save the data.

recover iphone from iTunes

Part 3:How to Restore iPhone Data from iCloud Backup File

Step 1.Run iPhone Data Recovery and Select Recovery Mode
Select “Recover from iCloud Backup” option from the main interface of the iPhone Data Recovery to restore data from iCloud backup.

restore iPhone data from icloud

Step 2.Enter Apple ID and Password to Log in
Enter the Apple ID and Password to get a list of all available backup files from iCloud.

choose icloud backup

Note:Please take it easy,we make the reassurance for you that your privacy is always well protected by program,it is not disclose or steal possible.

Step 3.Select the Backup File from iCloud
The iPhone Data Recovery program will list all the iCloud backup files.Select which one you want to recover and start scanning process.

select-icloud-backup

Step 4.Preview and Recover Data from iCloud Backup
After finish scanning the backup contents from iCloud,you can preview and select the backup contents,extract and save the selected data by clicking “Save” on computer.

recover data from icloud

Part 4:Import the Recovered Files from Computer to iPhone

The files are retrieved to the PC/Mac, so to switch the recovered data back to iPhone/iPad/iPod, iOS Manager & Transfer is a great partner to cooperate with iPhone Data Recovery.
Learn the guide:
How to Import Files from Computer to iPhone/iPad/iPod

Step 1.Connect iPhone to Computer and Select Import File to iPhone
If you want to backup and restore your iPhone data on Windows/Mac computer, or transfer the restored data from computer to iPhone, please go back to the software main interface, then click “iOS Data Backup & Restore” feature. And connect your iPhone to computer via USB cable. Now select “iOS Data Restore” option to import data to your connected iPhone.

ufone restore backup data to iphone

Step 2.Select the File Type to Transfer from Computer
Click on desired item browser button to transfer the item from your computer to iPhone.For example-if you want to transfer photos from computer to your iPhone,click Browse button in front of the “Photos” box.

ufone-scanning-result-restore

Step 3.Confirm the Files to Transfer
If you have connected multiple iOS devices with computer,the program will prompt you to select the desired device to which you want to transfer the data to.Finally,click on “Transfer to iPhone” to start the transferring process.

ufone-restore-contacts-iphone

ufone-restore-photos-to-pc

After selecting data, choose to tap on “Restore to Device” or “Restore to PC” option.

ufone-restore-notes

The next window you can choose an output folder to save your restore files on the computer if you want to restore backup data to a computer. Click “Restore” and go on.

ufone-restore-pc-path

Just in a short time,the select data will be all transferred to your iPhone from completely.

ufone-restore-photos-to-device

Free download the iPhone Data Recovery and try to recover your iPhone lost or deleted data in three recovery modes:

d_win d_mac

Get Back the iPhone Data Lost in Various Scenarios

Everything on your iPhone is not lost, you can recover files from many common scenarios by this iPhone Data Recovery software.

– Lost data after factory reset
– ios upgrade
– Lost data due to iOS update
– iphone stuck
– Device stuck and not responding
– data lost after jailbreak
– Data missing after jailbreak or ROM flashing
– iphone locked
– Device locked or forgotten password
– iphone unable to sync for backup
– Unable to synchronize backup

Related Article

Top 5 Best iPhone Data Recovery Software Review

How to Recover Lost Data from iPhone 6S/6/5S/5

How to Recover Deleted Data from iPhone 7/SE/6S/6

How to Recover Data from Broken iPhone 7/SE/6S/6

How to Recover Data from Water Damaged iPhone

iPhone Data Recovery


iOS Data Recovery

Recover Your iPhone iPad Lost Data
Now, Even without Backups

Compatible with iOS 16 & iPhone 14 (Pro/Plus)

Recover Lost Data Now