Category Archives: iOS Data Recovery

How to Recover Deleted Photos from iPhone 14/14 Plus/14 Pro/14 Pro Max

Summary
Accidentally deleted photos from your iPhone 14? Want to know how to recover deleted photos from iPhone 14? In this article, we will teach you 3 ways to recover deleted photos form iPhone 14 series, including iPhone 14/14 Plus/14 Pro/14 Pro Max.

“I mistakenly deleted some important photos from the ‘Recently Deleted’ folder in my iPhone 14 Pro’s Photos app. Is it possible to recover these deleted photos?”

Thanks to advances in smartphone technology, taking photos with the camera on your iPhone 14 is easier than ever before. However, accidental deletion of these precious photos can happen with just a single tap on the screen, leaving you in despair if the photos were not backed up. The good news is that there are various ways to recover permanently deleted photos from your iPhone 14, even if you thought they were lost forever. Whether you have a backup or not, you can recover your deleted photos and save them from being lost forever.

If you’re in a situation where you’ve accidentally deleted an important photo from your iPhone 14, don’t worry. In this guide, you’ll discover everything you need to know about recovering your deleted photos from iPhone 14/14 Plus/14 Pro/14 Pro Max, including methods for recovering them with or without a backup.

Part 1. Recover Deleted Photos from Recently Deleted Folder

Fortunately, if you haven’t permanently deleted your photos, you can easily recover them from the Recently Deleted folder within 30 days. Follow these simple steps to retrieve your photos:

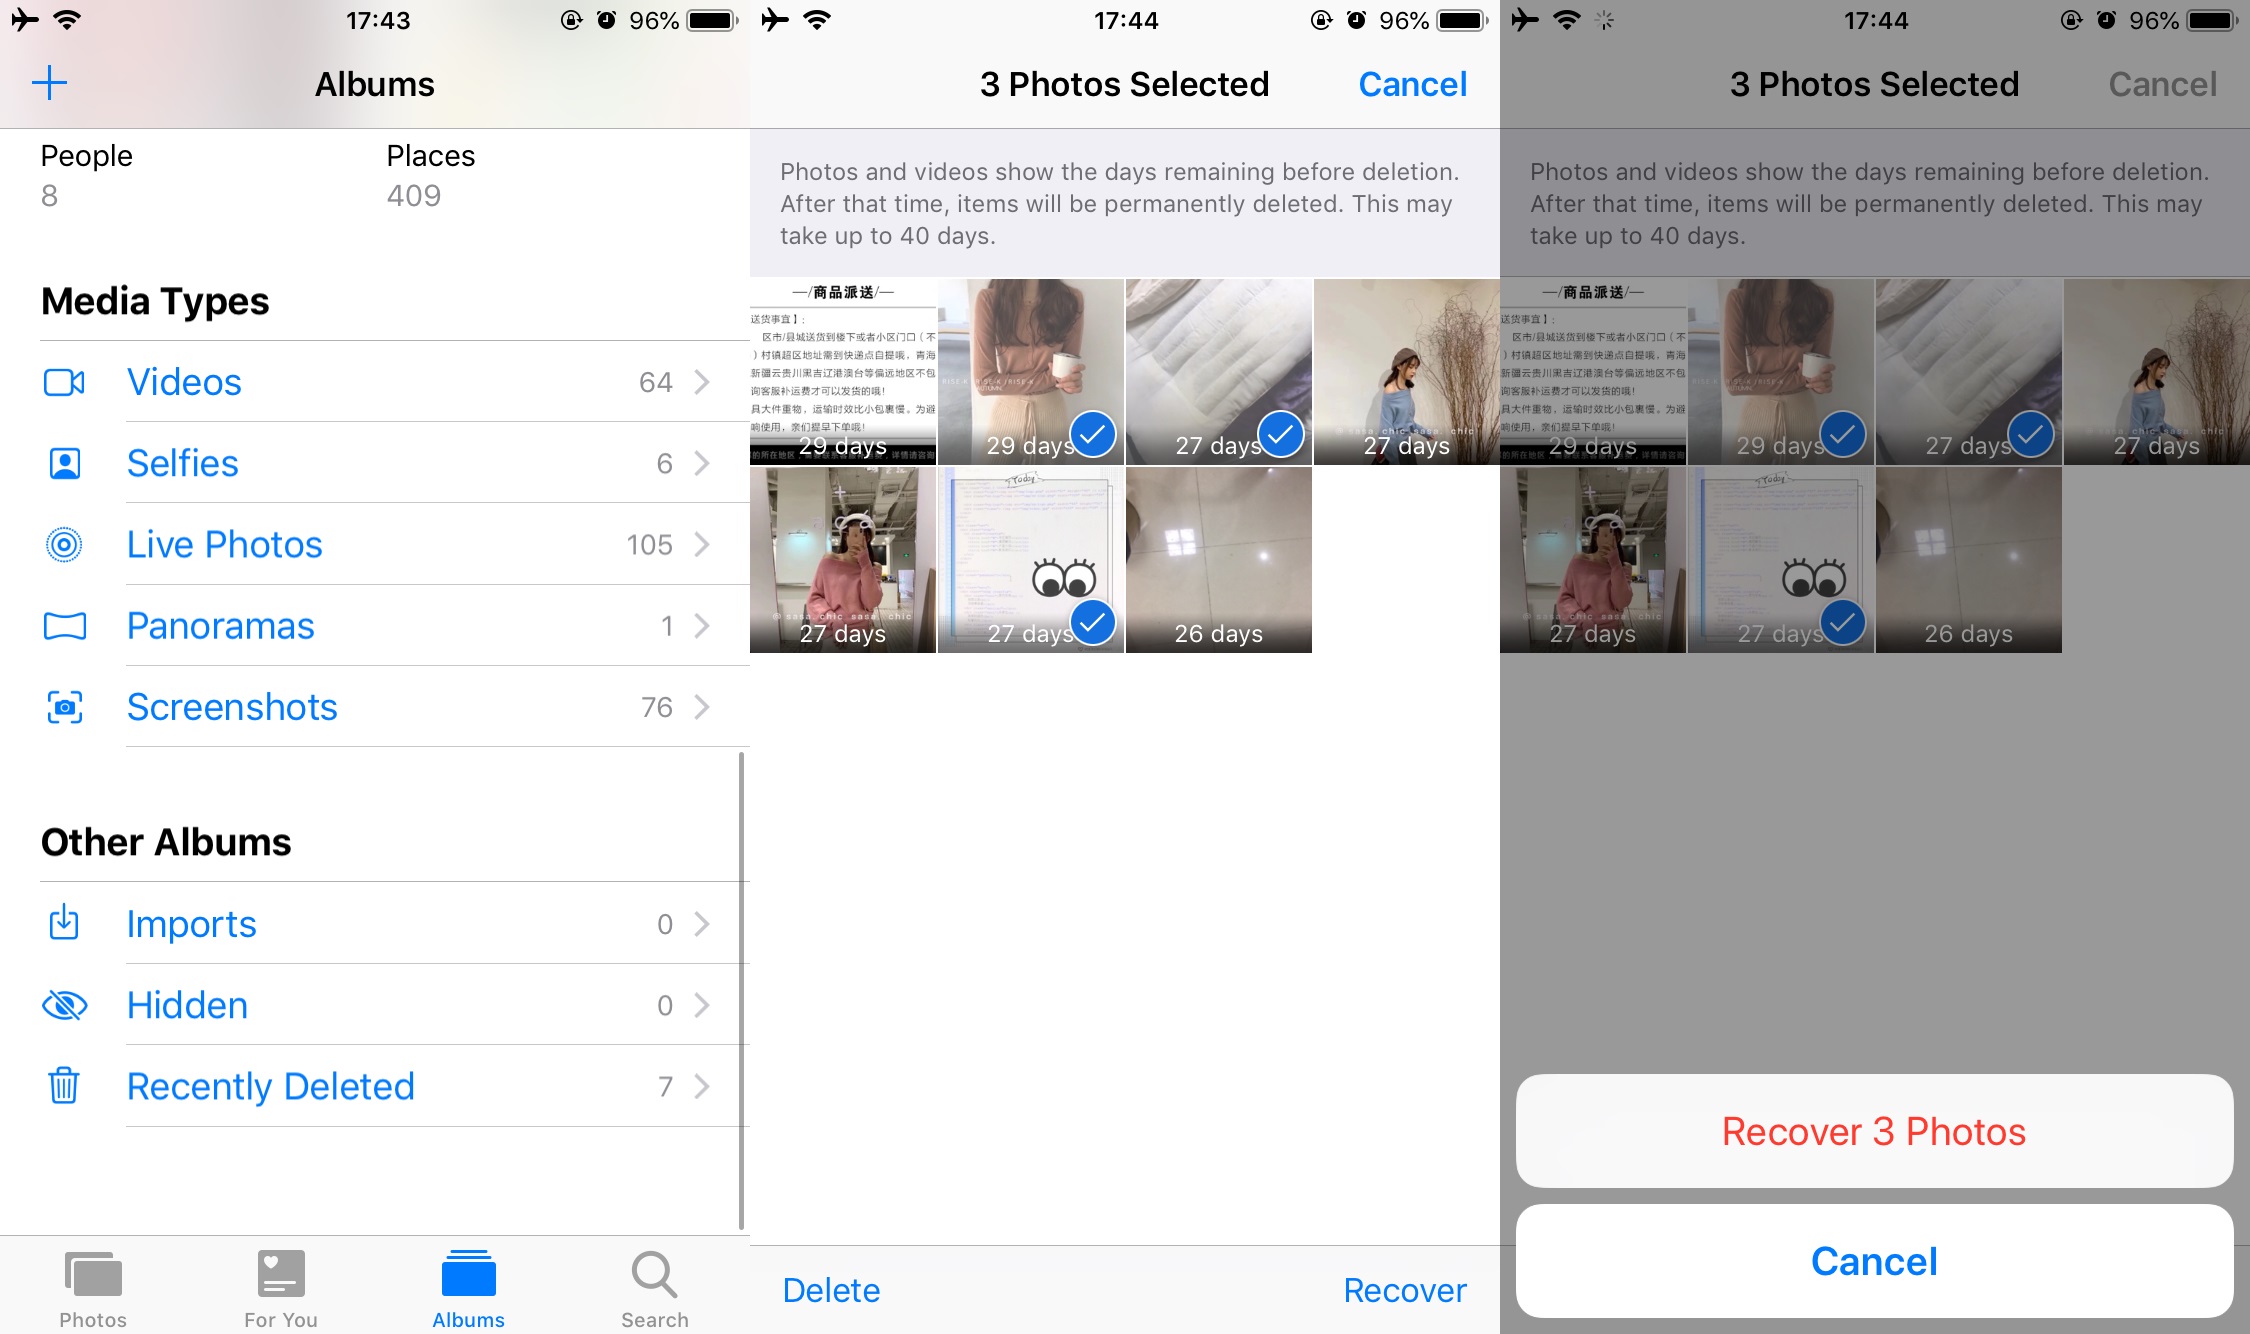
Step 1. Open the Photos app on your iPhone.
Step 2. Tap on the Recently Deleted folder.
Step 3. Select the photos you want to recover by tapping on them, or tap ‘Select’ in the upper-right corner to select all.
Step 4. Tap on ‘Recover All’ or select the individual photos you want to recover, and then tap ‘Recover’ to restore them to your iPhone’s photo gallery.

photo recently deleted

Recovering deleted photos on your iPhone 14 is a straightforward process. However, if it’s been more than 30 days since you deleted the photos, you won’t be able to retrieve them from the ‘Recently Deleted’ feature in the Photos app. In this case, your best option is to use a specialized photo recovery program to recover the deleted photos directly from your iPhone 14’s memory, without the need for a backup.

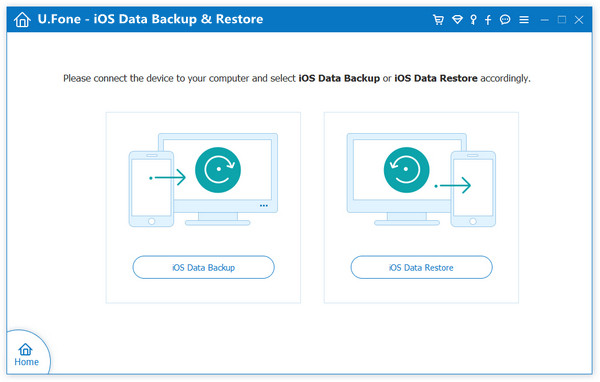
Part 2. Recover Deleted Photos from iPhone 14 without Backup

Among the available tools for recovering deleted photos on iPhone 14, iPhone Data Recovery stands out as an excellent option. Its advanced algorithms enable deep scans of the device’s memory, making it possible to recover not only photos but also other types of data, such as messages, contacts, notes, and call history. In addition, this iPhone photo recovery software provides the ability to retrieve images from iTunes and iCloud backups, making it a versatile tool.

More Features of iPhone Data Recovery

  • Easily recover lost or deleted data from your iPhone, iPad, or iPod touch.
  • Retrieve lost or deleted photos from your iTunes or iCloud backup.
  • Recover lost or deleted photos directly from your iOS device.
  • Save the recovered data directly to your computer for safekeeping.
  • Fix a variety of iOS system issues, including broken iPhones, stuck on the Apple logo, and DFU mode.
  • Compatible with the latest iPhone models (iPhone 14/14 Plus/14 Pro/14 Pro Max) and iOS 16.

d_win d_mac

Guide: How to Recover Deleted Photos from iPhone 14

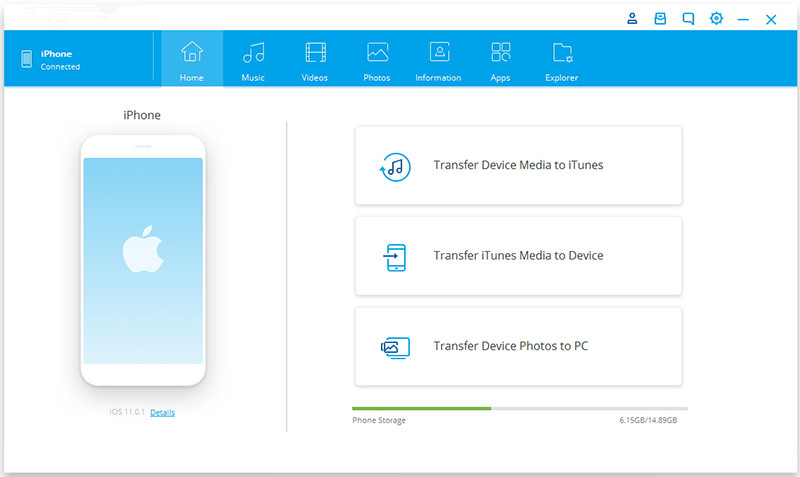
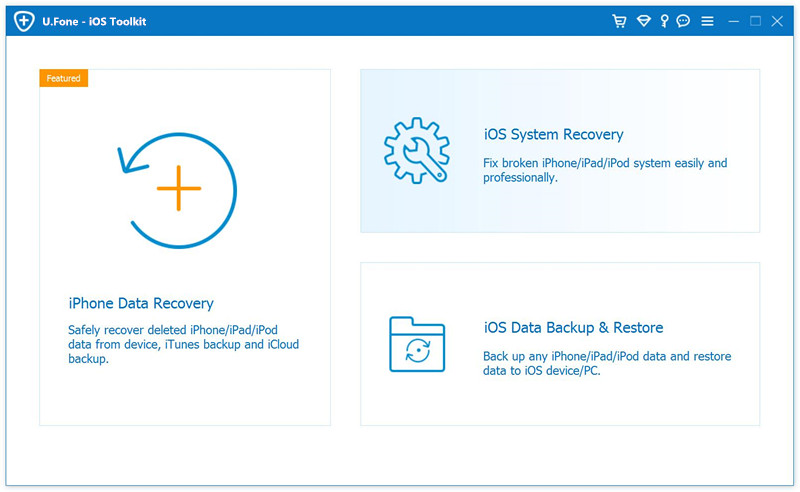
Step 1. Download and Launch the Software
After downloading and installing iPhone Data Recovery on your computer, you can launch the program. The software’s main interface provides you with three primary functions, among which you can select “iPhone Data Recovery” from the list.

launch iphone data recovery

Step 2. Connect Your iPhone to Your Computer
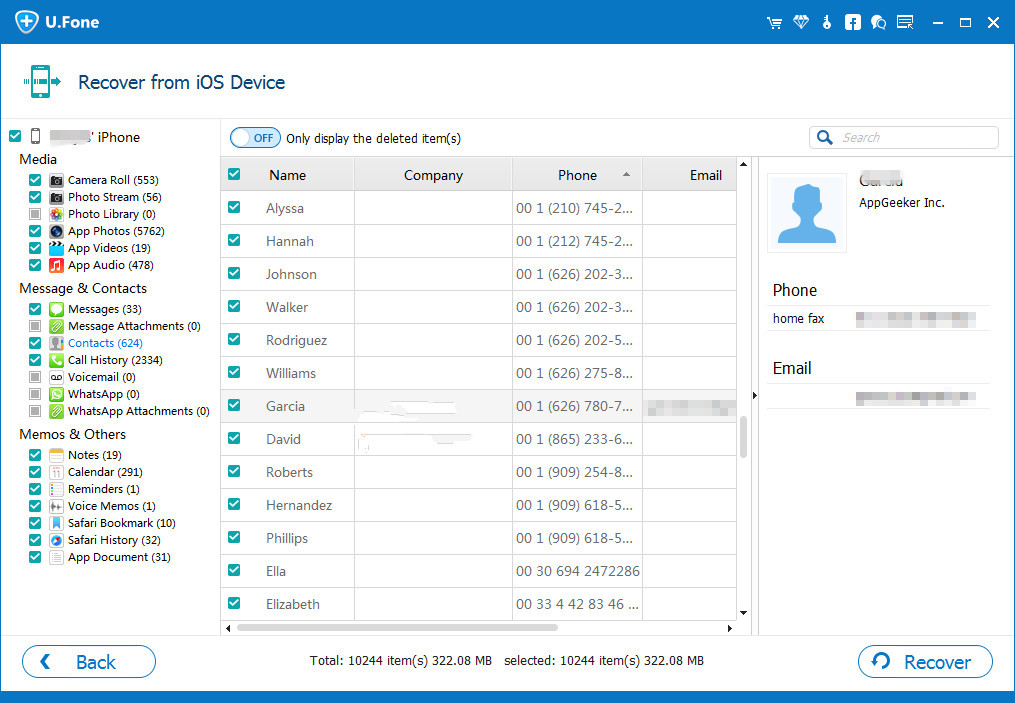
Choose the “Recover from iOS Device” option to retrieve lost photos directly from your iPhone. Then connect your iPhone to your computer with an Apple USB cable.

connect iphone to pc

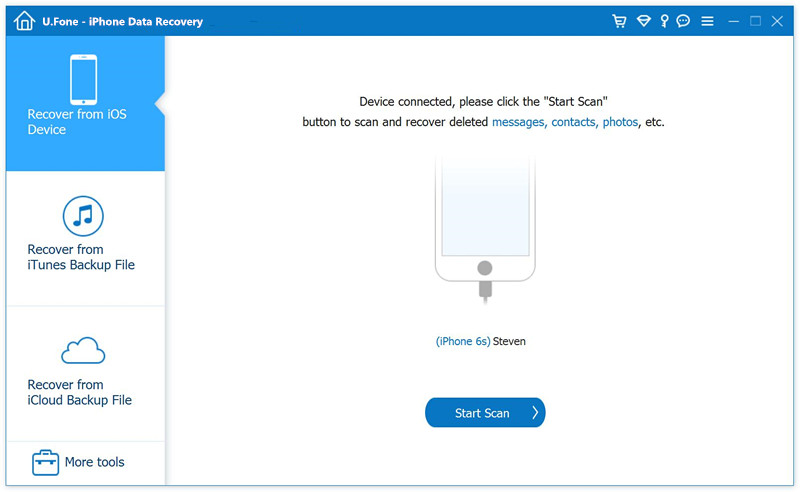
Step 3. Scan and Analyze Data on iPhone
Once your iPhone is connected to the computer, click on the “Start Scan” button to begin scanning for lost data. The program will then proceed to analyze all of the files and data on your iPhone. After the scan is completed, the program will display all of the data and files that were found on your iPhone.

scan app

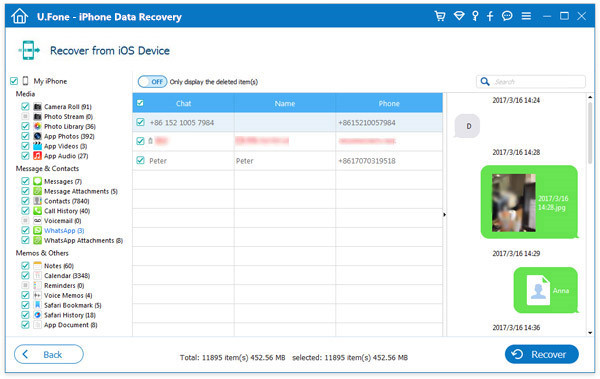
Step 4. Choose and Preview the Desired Photos
Navigate to the left-hand side of the interface and select the specific photo categories you want to recover, such as “Camera Roll”, “Photo Stream”, “Photo Library”, “App Photos”, “App Videos”. Once selected, the recoverable photos and videos will be displayed on the right-hand side of the interface, where you can preview them. Simply choose the ones you want to recover.

select data to recover

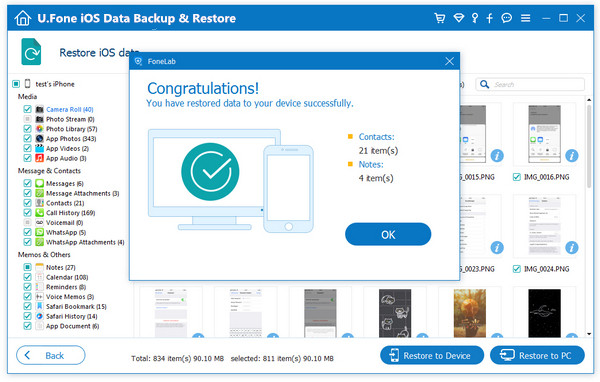
Step 5. Start to Recover Photos on iPhone
Select the photos you want to recover and click on the “Recover” button to start the recovery process. The software will then retrieve the chosen photos and save them to your computer. Be sure to pick a safe location to store the recovered files.

start to recover

d_win d_mac

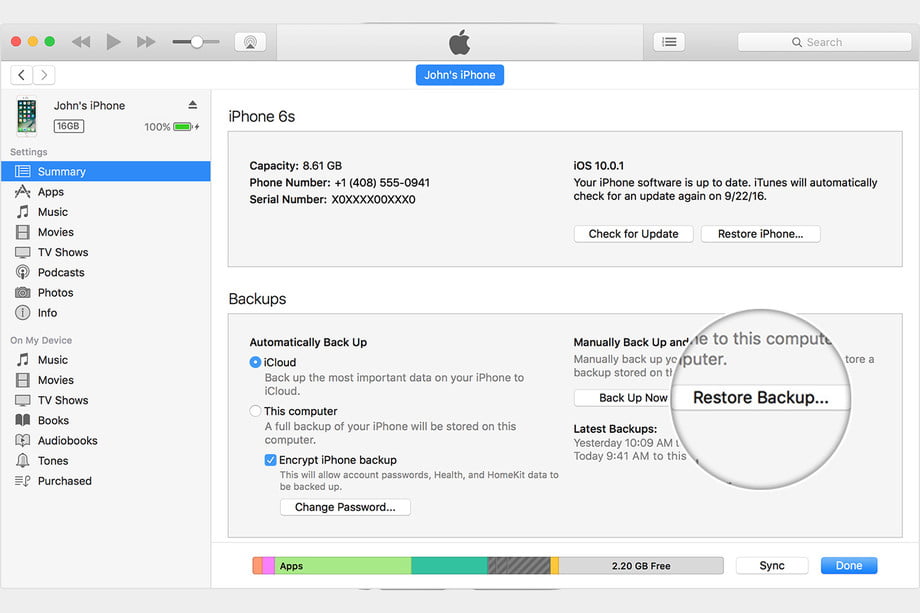
Part 3. Recover Deleted Photos from iPhone 14 via iTunes

A viable option to recover photos from an iTunes backup is to perform a selective restore of the backup. By doing so, you can recover specific photos from the backup without losing any other data on your iPhone. Keep in mind that if you perform a full restore, it will erase all the data on your iPhone and replace it with the backup, including the newly taken photos that you might not want to lose.

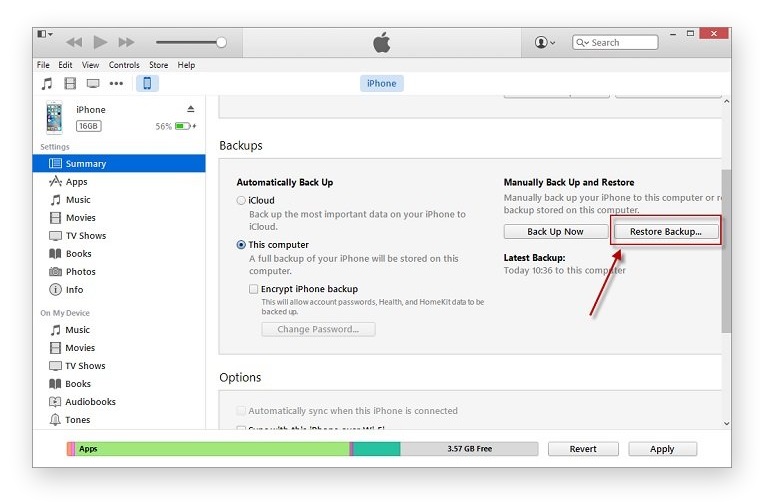
Step 1. Launch iTunes on your computer and connect your iPhone 14 to it using a USB cable.
Step 2. Click on the iPhone icon, then navigate to the “Summary” tab in the Settings section.
Step 3. Under the “Backups” section, click on “Restore Backup” and select the most recent backup.
Step 4. Wait for the backup to restore, and then check if the deleted photos have been recovered on your iPhone.

restore from itunes backup

Conclusion

Losing important photos from your iPhone 14 can be a frustrating experience, but fortunately, there are various ways to recover them. You can try recovering the deleted photos from your Recently Deleted album, iTunes backup, or use third-party data recovery tools such as iPhone Data Recovery. With these methods, you can easily retrieve your lost photos from your iPhone 14/14 Plus/14 Pro/14 Pro Max, regardless of the cause of the loss.

Recover Deleted Photos from iPhone 14

How to Restore iTunes Backup to New iPhone 14/13/12/11

Summary
Read this post then you will learn how to restore backup data from iTunes to your new iPhone models, including iPhone 14, iPhone 13, iPhone 12, iPhone 11 and more. Additionally, we will teach you how to restore lost data from iTunes backup files, and transfer data from old iPhone to new iPhone directly.

I backed up my old iPhone X with iTunes, now I want to restore the backup from iTunes to the new device iPhone 14. How can I restore my backup from iTunes?

Backup and restore is the normal thing for a mobile device, especially for iPhone. When you switch to a new device, it is necessary to transfer data between your old device and the new one. Nowadays, transferring data from an old iPhone to a new iPhone is not a difficult task anymore. Since there is a new feature of iPhone, you can sync data between two iPhone wirelessly with one click. However, wireless transmission is not perfect. Some users complain about the problems with the device-to-device migration, such as the process stuck, data loss. Honest speaking, wireless transfer is not as reliable as wired transfer because wireless transfer will be affected by many factors like Internet connection. In this case, we recommend you select the best solution for the restoration of your backup files, for example, restore iTunes backup to new iPhone 14/13/12/11.

Part 1: Restore iTunes Backup to New iPhone 14/13/12/11

There are more than one way to restore backup from iTunes to iPhone, here are one contain simple steps to restore iTunes backup to new iPhone 14/13/12/11 with Finder/iTunes.

Step 1. On a Mac with macOS Catalina or later, open the Finder. On a Mac with macOS Mojave or earlier, or on a PC, open iTunes.

Step 2. Connect your new iPhone device to the computer with a USB cable. If there is a message prompt you and asks for your device passcode or to Trust This Computer, follow the onscreen steps.

Step 3. Select your iPhone model (iPhone 14/13/12/11) when it appears in the Finder window or iTunes.

restore itunes finder

Step 4. Select “Restore Backup”. Look at the date of each backup and pick the one you want.

Step 5. Click “Restore” and wait for the restore to finish. If asked, enter the password for your encrypted backup. Keep your device connected after it restarts and wait for the sync completes.

enter password for encrypted backup

Part 2: Restore Lost Data from iTunes Backup Files

That’s the way to restore iTunes backup to iPhone officially in part 1. However, how to restore lost data to your new iPhone from iTunes? There are many causes may lead to data loss on your iPhone, like iOS upgrade, iOS jailbreak, device get broken, device water damaged, factory reset on device, etc,. If you lost data from iPhone accidentally, in fact, you are able to get back these lost files from iTunes backup. Here we share the way with you, which is used to restore lost data to your iPhone from iTunes backup files.

iPhone Data Recovery offers you the best solution to restore data on iOS device. It features with three recovery modes to meet all data lost cases, like recover lost data from iTunes backup files, recover lost data from iCloud backup files, recover lost data from device directly. It can help to restore data from iOS device under data loss cases. This powerful tool supports recover up to 19 types of iOS data, including contacts, messages, photos, videos, audio, notes, calendar, WhatsApp messages, and more. Besides, you can preview data before recovery. What’s more, it is compatible with all iOS devices and all iOS systems, like iPhone 14/13/12/11; iOS 17/16/15/14; etc,.

d_win d_mac
d_win d_mac

Tutorial to Restore Lost Data from iTunes Backup Files

Step 1. Run iPhone Data Recovery
To get started with, download, install and run iPhone Data Recovery on your computer. There are three main functions in the home page, including “iPhone Data Recovery”, “iOS System Recovery”, “iOS Data Backup & Restore”. To recover lost data, click the left one “iPhone Data Recovery” option.

iPhone Data Recovery home page

Step 2. Choose iTunes Recovery Mode
There are 4 options for your selection: “Recover from iOS Device”, “Recover from iTunes Backup Files”, “Recover from iCloud Backup File” or “More tools”. To recover lost data from iTunes backup files, click “Recover from iTunes Backup Files”.

choose recovery mode

Tips: Please don’t connect and sync your device with iTunes after you lost data,or the data you sync with iTunes previously will be overwritten.

Step 3. Scan Data from iTunes Backup File
Once the program lead you enter the iTunes recovery mode, then you can choose the backup file which contain the lost data you need and click “Start Scan“. It will begin to scan the backup file witch you choose.

select data from itunes backup

Step 4. Preview and Restore Data from iTunes Backup File
After scanning, all the content in the iTunes backup file will be show you. Preview all data in the backup file, and check the items you want to restore, just click “Recover” to save them on your computer.

recover data from itunes backup

d_win d_mac
d_win d_mac

Part 3: Transfer Data from Old iPhone to New iPhone Directly

That’s the solution to restore lost data from iTunes backup files via iPhone Data Recovery in part 2. In this part, we are going to show you a practical way to transfer data from old iPhone to new iPhone directly. If you switch to a new device, you can take this way for reference. Hope it can help your move files between two devices conveniently.

Phone Switch is an ideal tool for moving data between two devices which run on the same or different OS system. With the help of it, you can easily transfer data from old iPhone to new iPhone directly. All kinds of data are available for transferring, like photos, contacts, messages, videos, call logs, notes, voice memos, etc,. The process is extremely easy, no need any skills. What’s better, this tool supports 6000+ smartphone models on iOS, Android, and Windows. The whole data sync task will be finish in a fast speed, that will save your precious time.

d_win d_mac

How to Transfer Data between iPhone and New iPhone

Before begin the data sync process, please download, install and run Phone Switch on your PC/Mac computer.

Step 1. Select Phone Transfer Function and Connect Devices
In its home page, select “Phone Transfer” function. Connect both of your two iPhone to the computer with USB cable.

phone transfer function

Step 2. Select Files for Transfer
When you connect the devices, it will detect it and set it as the “Source” phone or “Destination” phone. You can change their position by clicking the Flip button. Select the files you want to transfer. There are more than 22 types of files for your selection, like photos, contacts, messages, videos, call logs, notes, voice memos, etc,.

select files to transfer

Step 3. Transfer Data from iPhone to iPhone 14/13/12/11
Finally, simply click on “Start Transfer”. Then Phone Switch will begin to transfer your selected files from Source iPhone to iPhone 14/13/12/11 with fast speed.

transfer files to iphone 14

d_win d_mac

Final Words

Now you have learn how to restore backup data from iTunes to your new iPhone 14/13/12/11. And you get the solution to restore lost data from iTunes backup files, even the method to transfer data from old iPhone to new iPhone directly. You will never worry about losing iPhone data, or restore data from iPhone. If you like our post, you can read more post and get more solutions from our products to help you in life.

Restore iTunes Backup to New iPhone

Backup Contacts, SMS, Photos, Videos, Notes from iPhone 14 to Computer

Summary
Do you want to backup to iPhone 14 to computer? Wanna backup iPhone without iTunes? This passage will introduce an awesome iPhone Backup software, and guide you how to backup contacts, SMS, photos, videos, notes from iPhone 14 to computer easily.

Question 1: “How do I backup my iPhone 14 photos to my computer?” – Nick

Question 2: “How do I back up Contacts from iPhone 14 to PC without iTunes” – Jenny

Question 3: “Can I backup my iPhone text messages to my computer?” – Mike

A restore is helpful to fix some software problems. Do you need to to restore your iPhone 14 data? If yes, you’d better to backup iPhone 14 data to computer in advance. We know that iPhone and Windows do not work well together. To backup data from iPhone to computer, you can use a third-party iPhone Backup Software. In this article, we will introduce an awesome iPhone Backup Software, and teach you how to backup Contacts, SMS, Photos, Videos, Notes from iPhone 14 to computer. You can backup all data from iPhone 14/14 Plus/14 Pro/14 Pro Max to computer without iTunes or iCloud!

Way 1. Backup iPhone 14 to Computer without iTunes

Usually, it will take a long time to create a backup with iTunes and iCloud. Take it easy! A professional iPhone backup tool can help you quickly backup photos, contacts, SMS, videos, notes from iPhone 14 to PC/Mac.

U.Fone iOS ToolkitiOS Data Backup & Restore is your best option. It is an all-round iOS data backup & restore tool, iOS data recovery tool, as well as iOS system recovery tool. This software enables users to easily and quickly backup iPhone/iPad/iPod Touch to computer without iTunes or iCloud. What’s more, it lets you selectively back up any iOS data you want to computer. With it, you can easily backup photos, contacts, SMS, videos, music, text, notes, WhatsApp, app data and more to computer with just a simple clicks.

Highlights:

  • Backup all data and file from iPhone/iPad/iPod to PC/Mac.
  • Backup iPhone 14/13/12/11/X/XR/S/8 to computer without iTunes.
  • Backup iPhone videos, photos, music, SMS, contacts, notes, app data and more to computer.
  • Recover lost/deleted data from iTunes/iCloud/iPhone backup.
  • Restore iPhone without data loss.
  • Restore the backup files to iPhone without iTunes/iCloud.
  • Fixes your iOS system issues like recovery mode, DFU mode, White/Blue/Black screen, etc.

d_win d_mac

How to Backup Photos/Contacts/SMS/Videos/Notes/ from iPhone 14 to Computer

Step 1. Download U.Fone iOS Data Backup & Restore
Start by downloading and installing U.Fone iOS Toolkit on your Windows PC or Mac computer. Launch the program, and select “iOS Data Backup & Restore” mode.

iPhone Backup tool

Step 2. Select iOS Data Backup
After this, you will see two options: iOS Data Backup and iOS Data Restore. Here you need to choose “iOS Data Backup” option.

ios Data Backup & Restore

Step 3. Connect iPhone 14 to Computer
Next, connect your iPhone 14/14 Plus/14 Pro/14 Pro Max to computer via an Apple USB cable. Then it will detect your iPhone 14, and show you two backup modes. Choose “Standard backup” and click “Start” button.

connect iPhone 14 to pc

Tips: If you choose “Encrypted backup”, you need to set a password for it. When you backup and restore your iOS data, you are required a correct password to go on.

Step 4. Select iPhone 14 Backup File Types
In the next window, you will see all file types, including Media, Message & Contacts, Memos & Others.

select iPhone 14 data to backup

You can select any data you want to backup, or just tick “Select All“, then click “Next“.

Step 5. Back Up Data from iPhone 14 to Computer
This tool will start to back up iPhone 14 files to computer without iTunes. During the process, keep your iPhone 14 connected to computer.

backup photos from iPhone 14 to pc

After the backup is completed, you can click “View Now” to view the local backup data. Now all backup files are stored on your computer locally!

view backed up iPhone 14 file

Way 2. Backup iPhone 14 to Computer Using iTunes

iTunes is another good helper to backup iPhone 14 data to computer. Compared to U.Fone iOS Data Backup tool, you can only backup all iPhone data on your computer with iTunes. Follow the steps below:

Step 1. Open iTunes on your Windows PC, sign in with your Apple ID.

Step 2. Connect your iPhone 14 to the computer via USB cable. iTunes will display your iPhone 14, tap on it.

Step 3. Trust your computer on the iPhone 14 screen.

Step 4. In iTunes window, click on your iPhone 14 icon.

Step 5. Tap “Summary” > “Backups” > “This Computer”, tick “Encrypt iPhone backup”.

Step 6. Click on “Back Up Now” and wait for the backup to complete.

backup iphone 14 in itunes

Restrictions: After creating an iTunes backup, you can see the backup file and the exact time and date it was created. However, you cannot check the backup file details and do not have access because Apple usually reformats the file. To backup data from iPhone to computer, we recommend you use a profession iOS backup tool, such as U.Fone iOS Toolkit – iOS Data Backup & Restore. Now try it free!

d_win d_mac

Backup iPhone 14 Contacts, SMS to Computer

How to Backup Data from iPhone 14/14 Pro to Computer

Summary
This post is aim to show you the best solution to backup data from iPhone 14/14 Pro to computer, so that you can keep your personal data safely avoiding losing them in any cases.

There are many causes may lead to data loss in iPhone daily, such as iOS update. Many iPhone users are changing their devices and upgrade iOS to the latest version without hesitation. However, it is common for iPhone users to confront these situations in the phone changing and system upgrading process: iPhone stuck, data removed when repairing, data lost after updating iOS system. iPhone is a good choice for almost everyone today. People like to capture fun loving videos with iPhone, record moment with taking photos, enjoy games or listen to music on their iPhone. It is depressed when you lost data from iPhone no matter for what reason. This post is going to show you a practical way to backup data from iPhone 14/14 Pro to computer, after that you are able to keep all data and without losing them under any cases.

Best Tool to Backup iPhone 14 Data to Computer

U.Fone iOS ToolkitiOS Data Backup & Restore is a popular and professional tool, which ensures you to backup iPhone and restore iPhone easily and quickly. Thanks to this tool, you can backup data from iPhone 14/14 Pro to computer safely, restore iPhone data completely and selectively. It supports up to 12 types of files, including contacts, messages, photos, videos, call history, notes, calendar, reminder, etc,. It is allowed to restore data after losing data under any cases, like iOS upgrade, iOS jailbreak, device broken, factory reset, water damaged, and more. With advance design, this tool is compatible with all iOS models and all iOS system, such as iPhone 14, iPhone 13, iPhone 12; iOS 17, iOS 16, iOS 15, iOS 14.

d_win d_mac

Part 1. How to Backup Data from iPhone 14/14 Pro to Computer

Step 1. Run U.Fone iOS Data Backup & Restore
Firstly, download, install and run U.Fone iOS Toolkit on your computer. Then you will see its main interface.

iOS Toolkit home page

Step 2. Select iOS Data Backup & Restore Function
It offers 3 modes. Here choose “iOS Data Backup & Restore” function, and tap “iOS Data Backup”.

ios Data Backup function

Step 3. Connect iPhone 14 to Computer
Next, connect your iPhone 14/14 Pro to computer with an USB cable. U.Fone iOS Data Backup & Restore will detect your iPhone soon. You will see two backup modes: Standard backup and Encrypted backup. Select “Standard backup” and click “Start” to go on.

connect iPhone 14 to pc

Note: If you choose Encrypted backup, you’ll need to enter password to protect your backup, and it will be needed when you restore the backup back to iPhone.

Step 4. Select Backup File Types
In this step, you are allowed to select backup file types, including photos, App data, messages, contacts, WhatsApp, Safari history and many other data types for backing up iPhone to computer. (You can also click “Select All”), then click “Next”.

select data to backup

Step 5. Back Up Data from iPhone 14
After that, this tool will begin to backup your iPhone 14 to computer with super fast speed.

backup iPhone 14 data

When the backup completes, just click “View Now” to view local backup data, they are now stored on local drive. Meanwhile, you can tap the Trash icon to delete it.

view backed up iPhone 14 data

d_win d_mac

Part 2. How to Restore iPhone 14/14 Pro Data from Computer

Step 1. Run U.Fone iOS Data Backup & Restore and Select Data Restore Function
To begin with, run the program on your computer, and choose “iOS Data Backup & Restore” function in the main interface. Connect your iPhone 14 to computer via an USB cable, then click “iOS Data Restore” option.

iPhone data restore function

Step 2. Select A Backup File
Next, you will see the backup files on the main screen for your selection. Select the one you want and click “View Now” to display the detailed backup data.

select backup file to restore

Step 3. Preview and Choose Backup Data
It will display all backup data on the page in detail.

preview backup data

Click the backup data that you want to restore from the backup. You can preview it and choose the items. Then click “Restore to device” or “Restore to PC”.

Step 4. Restore Data to iPhone 14/14 Pro
To restore iPhone 14 from the backup data, you can choose “Restore to Device”.

restore backup data to iphone 14

Step 5. Restore iPhone 14 Data from the Backup
Finally, it will start restoring files from Backup back to your iPhone without any data loss. Click “OK” to end the restoring process.

restore iPhone 14 data finished

d_win d_mac

Conclusion

To prevent data loss, you should back up your phone regularly. For iPhone users, this article give you the best suggestion to easily backup & restore iPhone 14/14 Pro and other iPhone models. We hope U.Fone iOS Data Backup & Restore can help you successfully get your target!

Backup iPhone 14 Data

iOS Data Backup & Restore: Restore Backed Up Data After Upgrade to iOS 16

Summary
If you updated your iPhone to the latest iOS 16 and lost your data or files, don’t worry. Here you will get a professional iPhone data recovery software and learn how to use it to quickly restore back up data after iOS 16 update.

iOS 16.4 is out. Did you update your iPhone to the latest version? However, the attention that grabs after upgrading to iOS 16 is the data loss situation. This is not a new thing that Apple users met some iOS problems and bugs after upgrading to iOS 16.2/16/15/14. So there is a need to retrieve data from a backup on iOS 16. You come to the right place. Here this article is about iOS data backup and restore tricks. In this article, we will guide you how to restore backed up data after upgrade to iOS 16.

Part 1. Know More About iOS 16 Before Upgrading

About iOS 16

iOS 16 has some fascinating features iPhone users, including new emoji, voice isolation for better cellular calls, live text in videos, Safari website notifications for the lock screen, passkeys and more.

Which iPhone will get iOS 16?

The latest Apple iOS 16.4 is available for the iPhone 8/iPhone X and newer (namely all iOS 16-compatible devices). You can check the full list below:

  • iPhone 14
  • iPhone 14 Plus
  • iPhone 14 Pro
  • iPhone 14 Pro Max
  • iPhone 13
  • iPhone 13 Mini
  • iPhone 13 Pro
  • iPhone 13 Pro Max
  • iPhone 12
  • iPhone 12 Mini
  • iPhone 12 Pro
  • iPhone 12 Pro Max
  • iPhone 11
  • iPhone 11 Pro
  • iPhone 11 Pro Max
  • iPhone X
  • iPhone XR
  • iPhone XS
  • iPhone XS Max
  • iPhone 8
  • iPhone 8 Plus
  • iPhone SE (2nd generation)
  • iPhone SE (3rd generation)

How to Download and Install iOS 16.4?

Kind Reminder:
* Connect your iPhone to a stable Wi-Fi network.
* Clear up enough storage space.
* Make sure your iPhone have enough storage space.

Step 1. Open your iPhone and go to “Settings” > “General” > “Software Update“.

Step 2. Wait a few seconds for the update to appear, then tap on “Download and Install” for iOS 16.4.

ios 16 update

Part 2. Restore Backed Up Data After Upgrade to iOS 16

Generally, Apple offers its user with traditional methods to backup iPhone data, and restore your iPhone from a backup. They come from iCloud and iTunes. But these methods will only work if you have created a backup before the iOS update. What if you don’t have a backup? Is it possible to restore backup on iOS 16 without using iTunes or iCloud? The answer is Yes! Here you meet this professional third-party iOS Data Recovery tool, named U.Fone iOS Toolkit.

U.Fone iOS ToolkitiOS Data Backup & Restore is developed to flexibly backup and restore your iPhone, iPad and iPod Touch, with or without iTunes, iCloud. It allows to fully or selectively restore backup to iOS device without data loss. Specifically, you can restore all data or only specific data, such as photos, videos, SMS, message, text, Notes, music, app data, etc. In addition, it also supports to fix various iOS system issues, and recover lost/deleted iPhone data without backup.

d_win d_mac

Read Also: Backup iPhone/iPad Data before iOS 16/15 Update

How to Restore Data Back to iPhone After iOS 16 Upgrade

U.Fone iOS Toolkit makes it easy to back up all content on iPhone and restore data from backup without iTunes or iCloud. Now read the detailed tutorial to retrieve data from backup to iOS 16 device.

Step 1. Open Software and Go to iOS Data Restore
First, click the Download button above, get this tool installed on your Mac or PC. Start the program and go to “iOS Data Backup & Restore” function.

ios backup tool

Step 2. Connect iOS 16 Device to Computer
Then, use an Apple USB cable to connect your iOS 16 device to computer and click “Trust” the computer. You will see two options, please choose “iOS Data Restore“.

ios data restore

Step 3. Select A Backup
The software will display all backup files on your computer, select the one and click “View Now” to preview it.

ios data restore

Step 4. Preview and Select Backup Data
In the next window, you will see all detailed backup data on the screen.

select backup data

Select any data you wish to restore include contact, photos, app data and more. You can preview it, then tick the desired items.

preview backup data

Step 5. Restore Backed Up to iOS 16 Device
Finally, click on “Restore to Device” button to restore previous backup data to your iPhone.

restore backed up to ios 16

Also, you may click “Restore to PC” (or Mac), and set the Output Folder, then hit “Restore”.

restore backup data to pc

Step 6. Restore Backed Up Completed
Wait a few minutes until it finishes. Once the backup is completed, click “OK” button.

restore backup to ios 16 completed

d_win d_mac

Restore Backed Up After iOS 16 Upgrade

Best iPhone 14 Data Recover Review: Recover Deleted Data from iPhone 14/14 Plus/14 Pro/14 Pro Max

Summary
In this review of the best iPhone 14 recovery tools, we will explore you in-deep on its features and capacity to recover deleted data from your iPhone 14/14 Plus/14 Pro/14 Pro Max.

The iPhone 14 series is the latest offering from Apple, and with its advanced features and capabilities, it has become the go-to device for millions of users worldwide. However, despite its advanced features, iPhone 14 is still vulnerable to data loss, which can happen due to accidental deletion, software malfunction, physical damage, or other reasons. In such cases, a reliable data recovery tool is crucial to retrieve the lost data. In this review, we will be discussing the U.Fone iPhone Data Recovery tool, which claims to be one of the best iPhone 14 data recovery tools in the market.

best iphone data recovery

The Importance of iPhone Data Recovery

iPhone data recovery is an essential process that can help users retrieve lost, deleted or corrupted data from iPhone. It is always a good idea to have a backup of your data, but in case you don’t, data recovery can help you retrieve the lost data. There are several reasons why data recovery is important, some of which include:

Accidental Deletion: It is very easy to accidentally delete data on your iPhone, especially if you are using it frequently. In such cases, iPhone data recovery can help you recover the lost data.

Software Malfunction: Sometimes, the software of an iPhone can malfunction due to various reasons such as software updates, system crashes or viruses, which can cause loss of data. In such cases, data recovery can help you retrieve the lost data.

Physical Damage: If your iPhone is physically damaged due to water or any other physical impact, it can cause loss of data. iPhone data recovery can help you recover the lost data even in such cases.

Stolen or Lost iPhone: If your iPhone is stolen or lost, you may lose all the data on it. However, with the help of data recovery software, you can still retrieve the lost data.

Accidental Formatting: Sometimes, users may accidentally format their iPhone, which can cause the loss of all data. Data recovery can help you recover the lost data even after formatting.

U.Fone iPhone Data Recovery is an excellent tool that offers a wide range of features and capabilities for recovering lost or deleted data from iPhone 14/14 Plus/14 Pro/14 Pro Max. Its ease of use, high success rate, and multiple recovery options make it one of the best iPhone 14 data recovery tools in the market.

U.Fone iPhone Data Recovery Overview

U.Fone iPhone Data Recovery is a professional data recovery tool that is designed to help users recover lost or deleted data from their iPhone 14/14 Plus/14 Pro/14 Pro Max. The tool supports a wide range of data types, including photos, videos, contacts, messages, call logs, notes, and more. It is compatible with both Windows and Mac operating systems and supports the latest iOS 16.

One of the most significant advantages of U.Fone iPhone Data Recovery is its ease of use. The tool has a simple and user-friendly interface that allows even beginners to recover their lost data without any hassle. Another advantage of U.Fone iPhone Data Recovery is its high success rate. The tool uses advanced algorithms and techniques to ensure that it can recover as much data as possible from your iPhone. Whether your data loss is due to accidental deletion, software malfunction, physical damage, or other reasons, U.Fone iPhone Data Recovery can help you retrieve the lost data.

In addition, U.Fone iPhone Data Recovery provides users with several recovery options. You can choose to recover your data directly from your iPhone, from iTunes backup, or from iCloud backup. This flexibility ensures that you can recover your data in any situation.

Key Features of U.Fone iPhone Data Recovery

Support for a Wide Range of Data Types:
With the U.Fone iPhone Data Recovery program, you can recover a diverse range of data types, including but not limited to photos, videos, contacts, messages, call logs, notes, and various other file formats.

Easy to Use:
Recovering lost data is a hassle-free process with the tool’s user-friendly interface, which is designed to be simple and straightforward, even for beginners.

Multiple Recovery Options:
The tool offers multiple data recovery options, allowing users to retrieve their lost data directly from their iPhone or through backups saved on iTunes or iCloud.

Fix Most of Abnormal iOS System Situation:
U.Fone iPhone Data Recovery is capable of resolving various common iPhone issues, such as DFU mode, recovery mode, Apple logo, headphone mode, black/white screen, and more. With its advanced recovery algorithms and techniques, users can easily restore their iPhone to its normal state and regain access to their valuable data.

Compatibility:
This tool is designed to work across all iPhone models, including the latest iPhone 14/14 plus/14 pro/14 pro max, and offers cross-platform compatibility for both Windows and Mac operating systems. Additionally, it is optimized to work seamlessly with the latest iOS 16, ensuring a smooth data recovery process.

Preview and Selective Recovery:
With U.Fone iPhone Data Recovery, users have the convenience of previewing the recoverable data and selecting the specific items they wish to restore. This feature not only saves valuable time but also conserves disk space, resulting in a more efficient data recovery process.

Free Trial:
The tool offers a trial version, affording users the opportunity to evaluate the software’s functionality and determine its suitability for their needs before purchasing the full version.”

d_win d_mac

How to Use iPhone Data Recovery

In this tutorial, we will show you the process of how to recover deleted data from iPhone 14 without backup.

Step 1. Install & Run the Software
Begin by downloading and installing iOS Data Recovery on your Mac or PC. The home page offers three main functions: “iPhone Data Recovery”, “iOS System Recovery”, and “iOS Data Backup & Restore”. To recover deleted data from iPhone 14, select the “iPhone Data Recovery” option on the left.

launch iphone data recovery

Step 2. Select Recovery Mode
Connect your iPhone to the computer using an Apple USB cable. In here, you have four options to choose from: “Recover from iOS Device”, “Recover from iTunes Backup Files”, “Recover from iCloud Backup File”, or “More tools.” To recover lost data from iPhone 14 directly without any backup, select the first option.

connect to pc

Step 3. Scan Data on iPhone 14
Click “Start Scan” to initiate the scanning and analysis of data on your iPhone, which includes both lost and existing data.

start to scan

When analysis is done, the tool will display a list of all data content that has been scanned from your device. This information will be presented on the screen as shown in the image below.

launch ios data recovery
https://www.android-iphone-recovery.com/wp-content/uploads/2017/04/scan-iphone-device.jpg

Step 4. Recover Deleted Data from iPhone 14
After the scan is complete, you can preview and select the data you wish to recover. Then, click the “Recover” button to begin the recovery process. The software will automatically export and save the selected data to your computer’s output folder.

recover iphone

d_win d_mac

Price & Plans

U.Fone iPhone Data Recovery offers different price for Windows and Mac version, the Window version is $69.95, while the Mac version is $79.95. Both allow you to recover you to convert data from your iPhone without any limitations, plus the ability to recover data from iTunes or iCloud backups. It comes with free lifetime upgrades and customer support. While the price may be relatively high compared to some other iPhone data recovery software, the fast recovery speed and ability to recover a wide range of data types make U.Fone iPhone Data Recovery worth considering for anyone in need of data recovery for their iPhone.

FAQ of U.Fone iPhone Data Recovery

Q: What types of data can be recovered with U.Fone iPhone Data Recovery?
A: U.Fone iPhone Data Recovery can recover various types of data, including photos, videos, messages, contacts, call history, notes, and more.

Q: Is U.Fone iPhone Data Recovery safe to use?
A: Yes, U.Fone iPhone Data Recovery is safe to use. It is a trusted and reliable software that has been used by many iPhone users to recover their lost data.

Q: Does U.Fone iPhone Data Recovery support the latest iPhone models?
A: Yes, U.Fone iPhone Data Recovery supports the latest iPhone models, including iPhone 14, 14 plus, 14 Pro, and 14 Pro Max.

Q: Is there a free trial available for U.Fone iPhone Data Recovery?
A: Yes, U.Fone iPhone Data Recovery offers a free trial version that allows you to recover a limited amount of data.

Q: How long does it take to recover data with U.Fone iPhone Data Recovery?
A: The time it takes to recover data with U.Fone iPhone Data Recovery depends on the amount of data that needs to be recovered. However, the software is known for its fast recovery speed.

Conclusion

U.Fone iPhone Data Recovery is an effective and user-friendly software that can help iPhone 14 users recover their lost or deleted data. With its support for different iPhone 14 models, including the latest ones such as iPhone 14 Pro and Pro Max, and its ability to recover various types of data, such as photos, contacts, videos, messages, and more, it is a reliable option for those looking to recover their data. Overall, U.Fone iPhone Data Recovery is a great tool for iPhone 14 users who want to recover their lost or deleted data quickly and efficiently.

Best iPhone 14 Data Recover Review

How to Recover Lost Data After iPadOS 17/iPadOS 16 Update

Summary
Do you feel frustrating when you lost important data on your iPad after iPadOS 17/iPadOS 16 Update? There is no need to panic, this article offers a detailed guide on how to recover lost data and get your iPad back to its original state after updating to iPadOS 17/iPadOS 16.

“I recently updated my iPad to iOS 16, but unfortunately, some of my data, such as photos and contacts, were lost in the process. Is there a way to recover my lost data after iPadOS 16 update? Any help would be greatly appreciated.”

Updating your iPad to the latest version of iPadOS can be exciting and improve your device’s functionality. However, every software update comes with its own set of risks. One of the most significant risks associated with iPadOS 17/iPadOS 16 update is the loss of your valuable data such as photos, videos, messages, contacts, and other important files. This can be very distressing for anyone who values their data. But there’s no need to worry, as there are effective ways to recover lost data after the iPadOS 17/iPadOS 16 update.

In this article, we will explore different methods to recover lost data using iTunes, iCloud, and U.Fone iOS Data Recovery. If you’ve backed up your data before the update, you can easily restore lost data from iPad using iTunes or iCloud. However, if you didn’t back up your data, you can still recover your lost data using U.Fone iOS Data Recovery – a third-party software that is easy to use and reliable. With the right tools and techniques, you can retrieve lost data after iPadOS 17/iPadOS 16 update and keep using your iPad without any worries.

CONTENTS

Method 1. Using iTunes to Recover Lost Data After iPadOS 17/iPadOS 16 Update

iTunes is an Apple software that allows users to manage and sync their iOS devices. One of the features of iTunes is the ability to back up your iPad data. If you have backed up your iPad before the update, you can use iTunes to restore the lost data. Here are the steps.

Step 1. Connect your iPad to your computer and open iTunes.

Step 2. Click on the iPad icon in iTunes and select “Restore iPad.”

Step 3. Choose the backup that contains the lost data and click “Restore.”

Step 4. Wait for the restore process to complete, and your iPad will restart with the recovered data.

restore itunes data

Method 2. Retrieving Lost Data After iPadOS 17/iPadOS 16 Update via iCloud

Another method to recover lost data after iPadOS 17/iPadOS 16 update is by using iCloud. iCloud is Apple’s cloud-based storage service that allows users to backup their data and sync it across all their devices.

Step 1. Go to iCloud.com and sign in with your Apple ID and password.

Step 2. Click on “Settings” and then click on “Restore Files.”

Step 3. Choose the backup that contains the lost data and click “Restore.”

Step 4. Wait for the restore process to complete, and your iPad will download the recovered data.

recover data from icloud

Method 3. Recover Lost Data with U.Fone iOS Data Recovery

If you haven’t backed up your iPad before the update, you can still recover lost data using a third-party tool like U.Fone iOS Data Recovery, which is designed to recover lost or deleted data from iOS devices such as iPhones, iPads, and iPods. It is a reliable and efficient tool that can recover various types of data, including photos, videos, messages, contacts, call logs, notes, and more.

The software provides three modes of data recovery: Recover from iOS Device, Recover from iTunes Backup, and Recover from iCloud Backup. With the Recover from iOS Device mode, you can directly scan your iOS device to recover lost data. The Recover from iTunes Backup mode allows you to extract lost data from your iTunes backup file, and the Recover from iCloud Backup mode enables you to recover lost data from your iCloud backup.

U.Fone iOS Data Recovery is easy to use, and it supports all iOS devices and iOS versions, including the latest iPadOS 17/iPadOS 16 update. The software also has a preview function, which enables you to preview and select the files you want to recover before the recovery process.

Key Features of U.Fone iOS Data Recovery

  • Retrieve data directly from your iPhone, iPad, or iPod touch without requiring a backup.
  • Supports recover various types of data including photos, videos, messages, contacts, call logs, notes, and more.
  • Restore lost iOS data from your iTunes or iCloud backup.
  • Fix various iOS system issues like broken iPhones, Apple logos, DFU mode, and more.
  • Fully compatible with the latest iPhone 14 series and iPadOS 16/iPadOS 17 version.

d_win d_mac

Guides: How to Recover Lost Data after iPadOS 17/iPadOS 16 Update

Step 1. Launch Software and Select Mode
Download and install U.Fone iOS Data Recovery on your computer, launch the software and select “iPhone Data Recovery”

launch ios data recovery

Step 2. Select Recovery Mode
Connect your iPad to the computer using a USB cable, select “Recover from iOS Device”.

connect iphone to pc

Step 3. Scan Data on Device
Choose the type of data you want to recover on your iPad and click “Scan”.

scan lost data

Step 4. Start Recovering Lost Data on iPad
Wait for the scan to complete, and then preview the recoverable data. Select the lost data you want to recover and click “Recover” to start the recovery process.

start to recover

Step 5. Transfer Data from Computer to iPad
All the lost data will be saved on your computer. To restore the recovered data back to your iPad, you can use an iOS Transfer tool to transfer the data back to your device. This will ensure that your recovered data is safely restored to your iOS device and easily accessible again.

iphone transfer tool

d_win d_mac

Conclusion

Losing valuable data after iPadOS 17/iPadOS 16 update can be a nightmare. However, you don’t have to panic because there are ways to recover lost data. If you have backed up your iPad before the update, you can use iTunes or iCloud to restore the lost data. If you haven’t backed up your iPad, you can use U.Fone iOS Data Recovery to recover lost data. It’s important to act quickly and try to recover the lost data as soon as possible to increase your chances of success.

Recover Lost Data After iPadOS 17/iPadOS 16 Update

How to Recover Lost Contacts, SMS and Notes from iPhone 13

Summary
Looking for ways to recover lost contacts, SMS and notes from iPhone 13? in this article, we will explore how to recover lost data from your iPhone 13 using iTunes, iCloud, and U.Fone iPhone Data Recovery.

“My lost all my contacts from my iPhone 13 for some reasons. I need some help to recover the lost contacts as well as my SMS. How to retrieve lost contacts and SMS from my iPhone 13 that weren’t backed up?”

The iPhone 13 is a great smartphone from Apple which is boasting plenty of features and functions that make it a popular choice for users worldwide. However, like any other smartphone, iPhone 13 is not immune to data loss, and you may find yourself in a situation where you have lost important contacts, SMS, and notes, which can be very frustrating and time-consuming. Fortunately, there are several ways to recover lost contacts, SMS, and notes from your iPhone 13. In this article, we will explore how you can recover lost data from your iPhone 13 using iTunes, iCloud, and U.Fone iPhone Data Recovery.

The Most Common Cause of Data Loss in iPhone

1. Accidentally Delete

One of the most frequent causes of data loss on an iPhone is not having a backup and accidentally deleting files. Many iPhone users mistakenly press the wrong buttons on their device, which can result in the loss of important data such as contacts, SMS messages, notes, photos, and videos.

2. IOS Update or IOS Jailbreak

IOS update or jailbreak can also lead to data loss for many users, especially in the event of a failure. Additionally, when the IOS system fails to run properly, the device may experience an IOS system error. This can result in several issues, such as being stuck in recovery mode, the “connect to iTunes” screen, the Apple logo screen, or a black screen. All of these situations can potentially cause data loss on your iPhone.

3. Other Cases of Data Loss

One common cause of data loss on an iPhone is hardware or system failure. Research on data loss shows that over 40% of users lose data due to these types of failures. Hardware or system failure can result in electrical errors, head conflicts, controller errors, and other issues that can lead to the loss of data on your iPhone.

When using iTunes and iCloud to back up iPhone, iTunes and iCloud can help you back up iPhone data to regions and clouds. Here are the ways to recover lost contacts, SMS and notes on iPhone 13.

CONTENTS

Method 1: Recover Lost Contacts, SMS, and Notes from iPhone 13 using iTunes

iTunes is Apple’s official software for managing and transferring data between your iPhone and your computer. If you have synced your iPhone 13 with iTunes before losing your contacts, SMS, or notes, you can use iTunes to recover them. Here is how to do it:

Step 1. Connect your iPhone 13 to your computer using a USB cable.

Step 2. Launch iTunes on your computer and select your iPhone 13.

Step 3. Click on the “Summary” tab in the left pane.

Step 4. Click on the “Restore Backup” button in the “Backups” section.

Step 5. Select the backup file that contains the lost contacts, SMS, or notes you want to recover.

Step 6. Click on the “Restore” button and wait for the process to complete.

restore itunes data

Note: Restoring your iPhone from a backup will overwrite your current data with the data in the backup. So, make sure to back up your current data before restoring your iPhone.

Method 2: Retrieve Lost Contacts, SMS, and Notes from iPhone 13 using iCloud

If you have enabled iCloud Backup on your iPhone 13, you can use iCloud to recover your lost contacts, SMS, and notes. Here is how to do it:

Step 1. Go to the iCloud website (www.icloud.com) on your computer.

Step 2. Sign in to your iCloud account using your Apple ID and password.

Step 3. Click on the “Settings” icon.

Step 4. Scroll down to the “Advanced” section and click on the “Restore Contacts”, “Restore Calendars and Reminders” or “Restore Notes” button depending on which data you want to restore.

Step 5. Select the backup file that contains the lost contacts, SMS, or notes you want to recover.

Step 6. Click on the “Restore” button and wait for the process to complete.

restore itunes data

Method 3: Recover Lost Contacts, SMS, and Notes from iPhone 13 without Backup

If you do not have a backup of your iPhone 13 or if the backups do not contain the lost data, you can use U.Fone iPhone Data Recovery to recover the lost contacts, SMS, and notes.

U.Fone iPhone Data Recovery is a powerful tool that can recover various types of data from an iPhone, such as contacts, SMS, notes, call logs, photos, videos, and other app data. It uses advanced scanning algorithms to detect and recover lost or deleted data from the device’s internal memory, as well as from iTunes and iCloud backups.

U.Fone iPhone Data Recovery has a user-friendly interface that allows even non-technical users to easily recover lost data from their iPhone. It is compatible with both Windows and Mac operating systems and supports all models of iPhones, iPads, and iPods. Except for recovering lost data, U.Fone iPhone Data Recovery also offers other useful features, such as repairing iOS system issues, backing up and restoring iPhone data, and permanently erasing data from an iPhone for privacy protection.

d_win d_mac

Easy Guide to Recover iPhone Lost Contacts, SMS, and Notes from iPhone 13

Step 1. Launch the Software
To begin the process, you’ll need to install and launch the U.Fone iOS Data Recovery software on your computer and select the “iPhone Data Recovery”. Here’s how to get started:

launch ios data recovery

Step 2. Select Recovery Mode
Connect Your iPhone 13 to your computer using a USB cable and select the “Recover from iOS Device” mode. Additionally, if you have a backup of your iPhone data on iTunes or iCloud, you can also use this tool to recover data from those backups.

connect iphone to pc

Step 3. Scan and Analyze Data on Device
Click “Start Scan” to start the scanning and analysis of data on your iPhone, including contacts, SMS, notes, etc.

scan lost data

Step 4. Recover Lost Contacts, SMS, and Notes from iPhone
After the scan is complete, you can preview the recovered contacts, SMS, and notes, and select the items you want to retrieve. Once you’ve made your selections, simply click on the “Recover” button to start the recovery process. U.Fone iPhone Data Recovery will automatically export and save the recovered data to your computer’s output folder.

start to recover

Step 5. Transfer Data from Computer to iPhone
Now the lost data has been successfully recovered and saved to your computer, you can use an iOS Transfer tool to transfer the recovered contacts, SMS, and notes back to your iPhone. With this tool, you can easily restore all the lost data and ensure that it is safely and securely back on your device.

iphone transfer tool

d_win d_mac

Conclusion

Losing important contacts, SMS, and notes from your iPhone 13 can be frustrating, but with U.Fone iPhone Data Recovery, you can easily recover lost data from your iPhone 13. By following the simple steps outlined in this article, you can quickly and efficiently recover lost contacts, SMS, and notes from your iPhone 13, ensuring that your data is always safe and secure.

Recover Lost Contacts, SMS and Notes

Best iPhone 13 Data Recovery Review: Recover Lost Data from iPhone 13/13 Pro/13 Pro Max

Summary
Here we have review all aspects of the best iPhone 13 Data Recovery software, which can be used to recover lost data on all iPhone 13 models with easy steps.

According to the report, there a big part of iPhone users lost essential data ever in the part, maybe you are one of them. You may have lost personal files from iPhone due to iOS update, accidental deletion, iOS jailbreak failure, iPhone lost/stolen, factory reset, etc,. General speaking, you can restore iPhone from backup. However, what if no backup is available? How to recover lost data from iPhone 13 directly? In this case, it’s necessary to get an iPhone data recovery software, which gives you the solution to recover data from iPhone without backup. Everyone has their own standards on what’s the best iPhone data recovery software, for example: Can it recover my iPhone data without backup? How much does it cost for iPhone data recovery?

iphone 13

After a long-term test and collecting customers’ views, we summarized the standards, did a comparison of the most popular apps, and finally picked out this top one. Keep reading and get the best iPhone 13 data recovery to recover lost data from iPhone 13/13 Pro/13 Pro Max. U.Fone iOS Toolkit – iOS Data Recovery is a well-known program, which is developed with excellent functions to assist people recover lost iOS data under different circumstances. Over the years, the program has functioned in a brilliant way and fix various cases of iPhone data loss. In general, this review will fully concentrate on introducing the best iPhone Data Recovery from all aspects in-depth, guiding new users evaluate it before getting started with the program.

What is U.Fone iOS Toolkit – iOS Data Recovery

U.Fone iOS ToolkitiOS Data Recovery is designed for iPhone/iPad users to restore lost data happening in different life situations. As it recover over 19+ file types, you are able to restore all data lost from iPhone, like contacts, messages, photos, videos, call history, apps data, etc,. More importantly, this all-in-one tool supports 3 flexible recovery modes: recover data from device directly, extract data from iTunes backup file, extract data from iCloud backup file. No matter you have a backup or not, you can restore lost iPhone data in simple steps. It fully compatible with all iOS device including iPhone 13, iPhone 14; and all iOS system, like iOS 16. In the past years, iOS Data Recovery has accumulated great reputation, and gave favor to a large amount of users to restore lost data on iPhone 13/13 Pro/13 Pro Max.

d_win d_mac
d_win d_mac

Best iPhone 13 Data Recovery Main Features

3 Selectable Recovery Modes
A powerful feature of iPhone 13 Data Recovery should be its recovery modes, allow you recover lost data from device directly without backup, extract data from iTunes backup, extract data from iCloud backup. Select one depend on your needs, to recover lost data on iPhone 13 with great convenience and high success rate!

Support Various Types of Lost Data
iPhone 13 Data Recovery has ability to detect 19+ types of files, recovering almost all data and files on your iOS device. From the contacts, messages, photos, videos, call history, apps data, and more, the program will detect them smartly before recovery. Besides, it allow display only the deleted items for better data management.

Restore Lost Data Happening in Different Life Situations
With the help of iPhone 13 Data Recovery, you can restore lost data under any situations, like iOS update, accidental deletion, iOS jailbreak failure, iPhone lost/stolen, factory reset, etc,. Your data will be safeguarded by the program without worrying losing them one day suddenly.

Fully Compatible with all iPhone Models and iOS System
With advanced technology, iOS Data Recovery is regularly improved to be compatible with all iPhone models including iPhone 13/13 Pro/13 Pro Max, and newest iPhone 14. Up to now, it is possible for the latest iOS 16 system users to recover iOS data with the help of iOS Data Recovery.

d_win d_mac
d_win d_mac

How Does iOS Data Recovery Work

iOS Data Recovery is designed with three data recovery modes, here we will take the first one to show you the process of how to recover lost data from iPhone 13 without backup.

Step 1. Install iOS Data Recovery
To get started, download, install and run iOS Data Recovery on your Mac or PC. There are three main functions in the home page, including “iPhone Data Recovery”, “iOS System Recovery”, “iOS Data Backup & Restore”. To recover lost data from iPhone 13, click the left one “iPhone Data Recovery” option.

ios data recovery home page

Step 2. Choose Recovery Mode
There are 4 options for your selection: “Recover from iOS Device”, “Recover from iTunes Backup Files”, “Recover from iCloud Backup File” or “More tools”. To recover lost data from iPhone 13 directly without backup, click the first one. Connect your iPhone to the computer via an Apple USB cable.

choose recovery mode

Step 3. Scan Data from iPhone 13
Click “Start Scan”, iOS Data Recovery will start to scan and analyze data on the connected iPhone.

connect iphone

Once the analysis finishes, it will list all data content be scan out of your device and show you on the screen as the picture below.

scan data for recovery

Step 4. Select Data to Recover from iPhone 13
Select your wanted files for recovery by clicking the checkbox in the left panel. Then just click “Recover”. It will begin to recover selected data on your device.

recover lost data from iPhone

Minutes later, all selected data will be recovered and be saved on the computer.

d_win d_mac
d_win d_mac

FAQs of U. Fone iOS Toolkit – iOS Data Recovery

Q1. Is it legal to use U. Fone iOS Toolkit – iOS Data Recovery to restore lost data from iPhone?
A1. This tool is used to recover lost data instead of reading data or saving data from your device. So it is legal completely to get back data using it.

Q2. Is it safe to use iOS Data Recovery?
A2. Surely. Though iOS Data Recovery will detect and access your data, it won’t keep your data at all after the recovery ends. And it is safe to protect your privacy disclosure from happening.

Q3. Can it recover some data lost from iPhone one year ago?
A3. Yes. iOS Data Recovery provides three recovery modes with users, you can recover lost data from iPhone before one year, through recovering data from iPhone without backup, extract data from iTunes backup or extract data from iCloud backup.

Final Words

U. Fone iOS Toolkit – iOS Data Recovery is the best iPhone 13 Data Recovery, help to recover lost data from iPhone 13/13 Pro/13 Pro Max with three data recovery modes. It must be the perfect solution to recover lost data on your iPhone under any situations. Do you feel depressed after losing data? Install the program to try it now!

Best iPhone 13 Data Recovery Review

[Fixed] iPhone Photos Disappeared after iOS 17 Update

Summary
Your photos disappeared from iPhone after iOS 17 update? This guide offers 2 solutions to help you quickly recover disappeared photos on your device with/without backup.

Apple will almost certainly kick off WWDC with a keynote presentation, like the past few years. And as it does every year, it will unveil its new operating systems for release in the fall: iOS 17, iPadOS 17, macOS 14, watchOS 10, and tvOS 17. Since mobile phone become an important tool in our daily life, most of us like to capture and record something important or meaningful through taking photo using phone, instead of camera. iPhone is known for its premium firmware, stable iOS, and creative features and camera is one of the selling points. You could take high-quality pictures with an iPhone. During its life span, it is inevitably to update iOS while every time of iOS updating would bring trouble to users. While some iPhone users enjoy the new features, some are suffering from photos disappear after updating to iOS 17. This page list 2 ways to solve this issue, help to recover disappeared photos from iPhone after iOS 17 update.

Part 1. Recover Lost Photos after iOS 17 Update with iCloud Photo Sync

If your iPhone photos are disappeared after the iOS 17 update, you can go to check whether you have logged in to your iCloud account. If you have logged in, you can log out and then log in again. Also, you need to make sure you have enabled iCloud Photo Library if you’ve used this feature before. The iCloud photos will disappear if the Sync function is off. Here are steps to recover photos with iCloud Sync:

Step 1. Reset iCloud Photos
Firstly, please make sure you have signed into the same iCloud account with other devices that you want to sync photos with.

Go to Settings > Apple ID > iCloud > Photos to turn on iCloud Photos. You may turn it off and wait for a while, then turn it on again and check if it works normally.

Step 2. Tap Download and Keep Originals
In this step you can download all the photos and videos you have synced previously. Before you download the photos, you may make sure it is enough space to restore the photos on your phone. Tap on “Download and Keep Originals”. Then all the photos will be synced with iCloud and your phone.

sync photos from icloud

Part 2. Recover Lost Photos from iPhone Directly after iOS 17 Update

If you have no iCloud backup, you may look for another way to get back your disappeared photos. Thankfully, there’s a good chance of those pictures can be restored by using a third-party file recovery program which calls iPhone Data Recovery. What is iPhone Data Recovery?

U.Fone iOS ToolkitiPhone Data Recovery is a perfect data recovery tool used for recovering lost iOS data for any data loss cases, you can use it to restore disappeared photos from iPhone after iOS 17 update. Besides iOS update, it support to get back lost data due to iOS jailbreak, accidental deletion, factory reset, device broken, etc,. It is enable to recover all types of iOS data, including photos, contacts, messages, call history, apps data, etc,. It is designed with three data recovery modes, recover data from device without backup, extract data from iTunes backup file, extract data from iCloud backup file. Fully compatible with iOS 17 or older, work for all iOS device including iPhone 14.

Functions of iPhone Data Recovery

  • Get back lost iOS data due to any causes
  • Recover any types of lost iOS data
  • Three data recovery modes
  • Fully compatible with all iOS system
  • Work for all iOS devices
  • Require no skills for beginner

d_win d_mac
d_win d_mac

How to Recover Lost Photos from iPhone Directly

Step 1. Launch iPhone Data Recovery
To begin with, download, install and run iPhone Data Recovery on the computer. You will see three main functions in the home page, which are “iPhone Data Recovery”, “iOS System Recovery”, “iOS Data Backup & Restore”. To recover photos from iPhone directly, click “iPhone Data Recovery” option.

iphone data recovery home page

Step 2. Choose Recovery Mode
There are 4 options of recovery mode: “Recover from iOS Device”, “Recover from iTunes Backup File”, “Recover from iCloud Backup File” or “More tools”. To recover disappeared photos from iPhone directly without backup, click “Recover from iOS Device”. Then connect your iPhone to the computer using an Apple USB cable.

choose recovery mode

Step 3. Scan Data from iPhone
When the program detect your phone, click “Start Scan”. iPhone Data Recovery will scan and analyze data on your phone.

connect iphone

Once the analysis ends, it will list all data content be scan out of your device and show you on the screen as the picture below.

scan data

Step 4. Select Photos Items to Recover from iPhone
Click the checkbox in the left panel, to select photos items for recovery, such as “Camera Roll”, “Photo Stream”, “Photo Library”, etc,.

scan out data

After that, click “Recover”. Some minutes later, all selected photos will be recovered to the computer.

recover photos from iphone

d_win d_mac
d_win d_mac

Final Thoughts

Hope the ways we mentioned above will help you get back disappeared photos from iPhone. Both iCloud or iTunes are available for syncing iPhone photos. But if there’s no backup file, it’s also a good way to perform data recovery with the help of a professional data recovery tool, like U.Fone iOS Toolkit – iPhone Data Recovery.

Recover iPhone Photos after iOS 17 Update