Category Archives: Android Solution

Transfer Photos between Computer and Samsung Galaxy S7/S7 Edge

“Last night my best friend Anna send me some interesting photos on computer,I try to transfer the photos to my Samsung Galaxy S7 but failed.What’s going on?Anybody help to solve this problem?Thanks.”-Peter Guan

Samsung Company was the biggest camera mobile producer around the world and it provides mobile phone more than camera in a year.There 3 years,Samsung released several phone series that are powerful and advanced photographing capability,which are favored by most mobile phone users.Anyway,anything is unable to stop young fellows to pursue the funny life for taking photos all the time.Most of us need to share photos with others.The storage of Samsung phone is limited.So it’s inevitable to manage photos on computer timely.This page is showing the solutions about exporting photos from computer to Samsung,sync photos from Samsung to computer,transfer photos between iPhone/iPad/iPod/Android and Samsung.

Transfer Photos between Computer and Samsung Galaxy

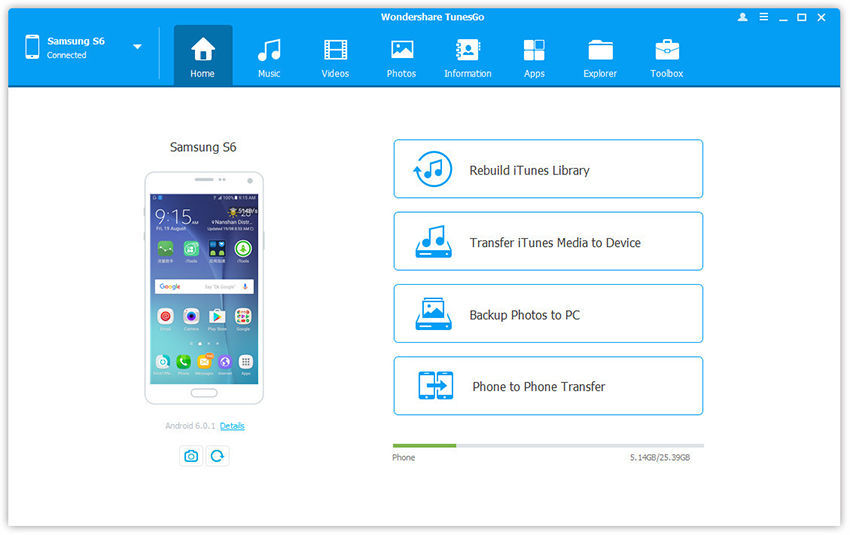
Android Transfer-A phone manager that lets you manage your entire mobile lifestyle in one convenient place,help to organize,enjoy and share photos(albums,photo videos) you take everywhere and everytime.Export photos between Android and computer,quickly and easily create a backup of your entire photo library.Add photos from PC/camera/camcorders to your Android phone,transfer photos between iOS device and Android device.Android Transfer is an Android device management systems are great features to have.Almost all brands of Android device are supported,including Samsung,Motorola,HTC,LG,ZTE,Sony,Google,etc,.

d_win d_mac

Part 1:Transfer Photos from Computer to Samsung Galaxy S7/S7 Edge

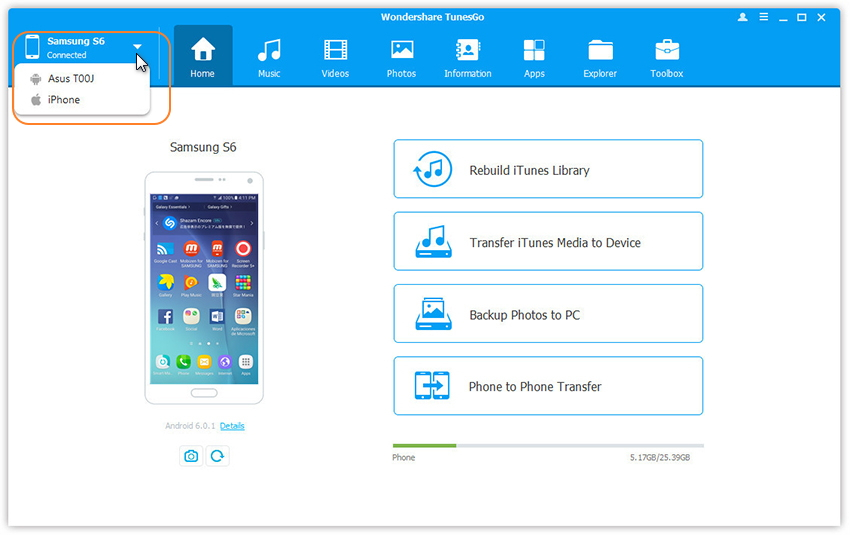
Launch Android Transfer and connect your Samsung Galaxy S7/S7 Edge to PC.Your Samsung device will be detected and displayed in the primary window.

samsung galaxy s7 manager

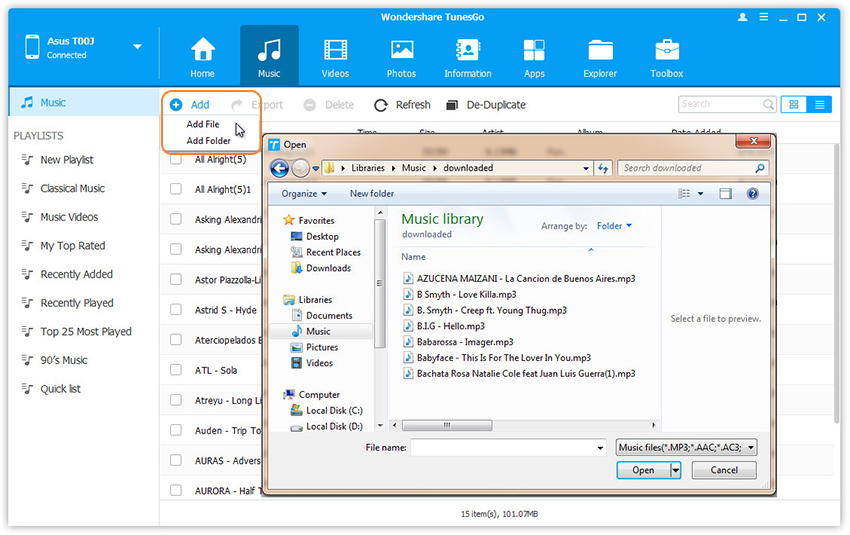
Step 1.Click Photos tab.All the albums will be displayed on the left.Select one to import photos from PC to selected Samsung photo album.
Step 2.Click Add > Add File or Add Folder.

add-photos-from-pc-to-samsung

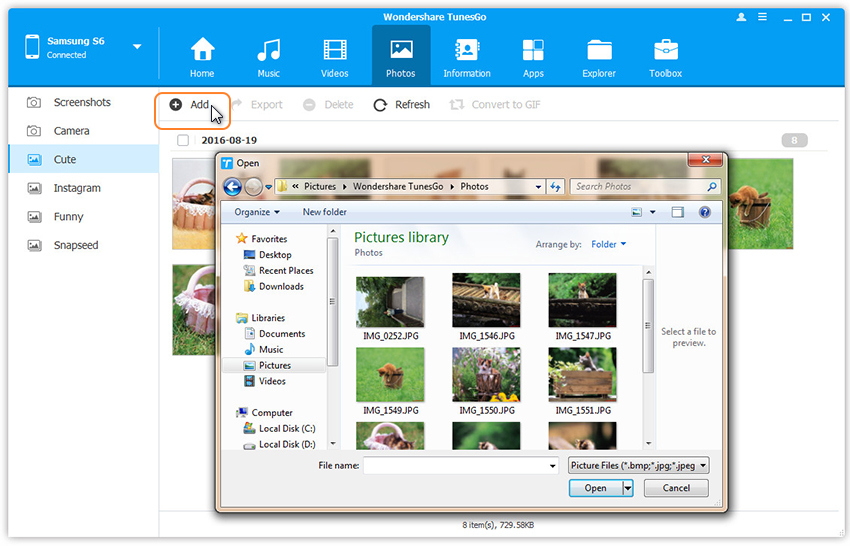
If you only want to select some photos,then click Add File.You can create new albums and add photos in it. Simply right-click the photos category on the left panel, then click New Album.

If you want to transfer all the photos in one folder,then click Add Folder.

Step 3.Select photos or photo folders and add to your Samsung Galaxy S7/S7 Edge.Hold down Shift or Ctrl key to choose multiple photos.

d_win d_mac

Part 2:Transfer Photos from Samsung Galaxy S7/S7 Edge to Computer

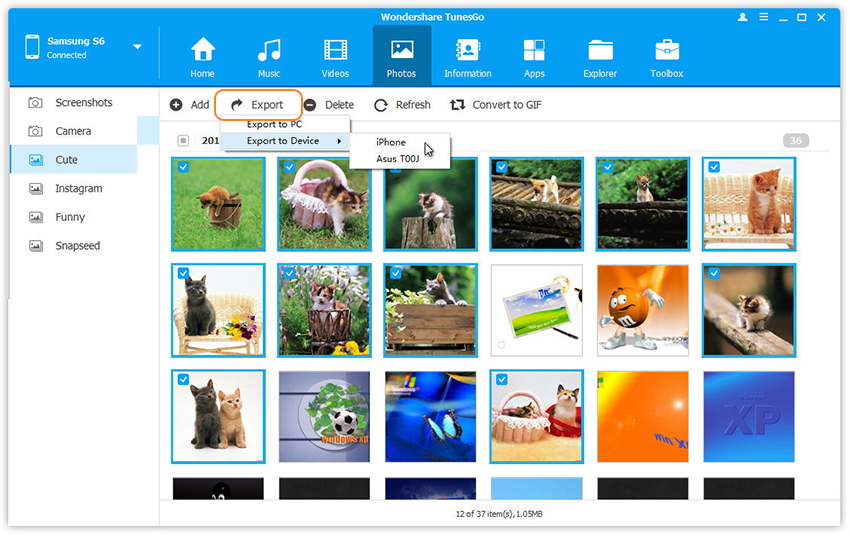
Step 1.In the photo management window,choose your desired photos and click Export > Export to PC.

transfer-photos-from-samsung-to-pc

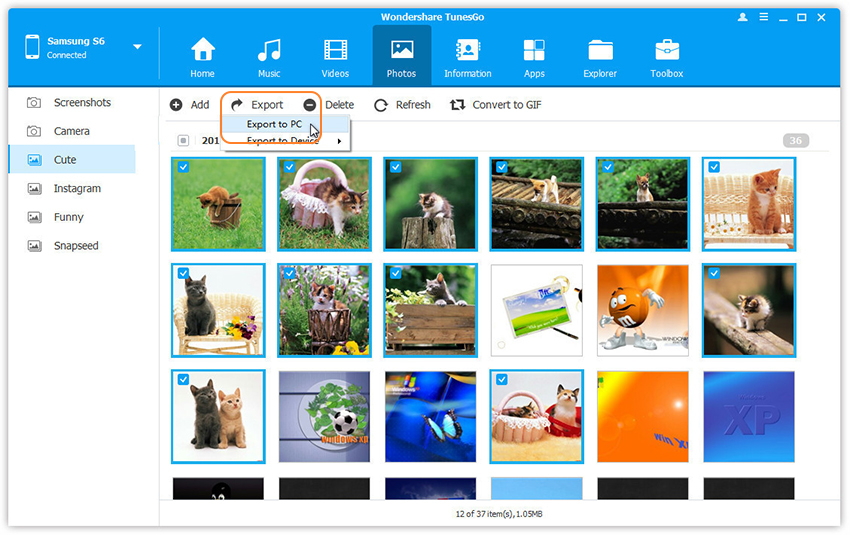
Step 2.It brings up your file browser window. Select a save path to store the photos from your Samsung Galaxy S7/S7 Edge to computer.
You can transfer the whole photo album from Samsung Galaxy S7/S7 Edge to PC.

transfer-photo-from-samsung-to-pc

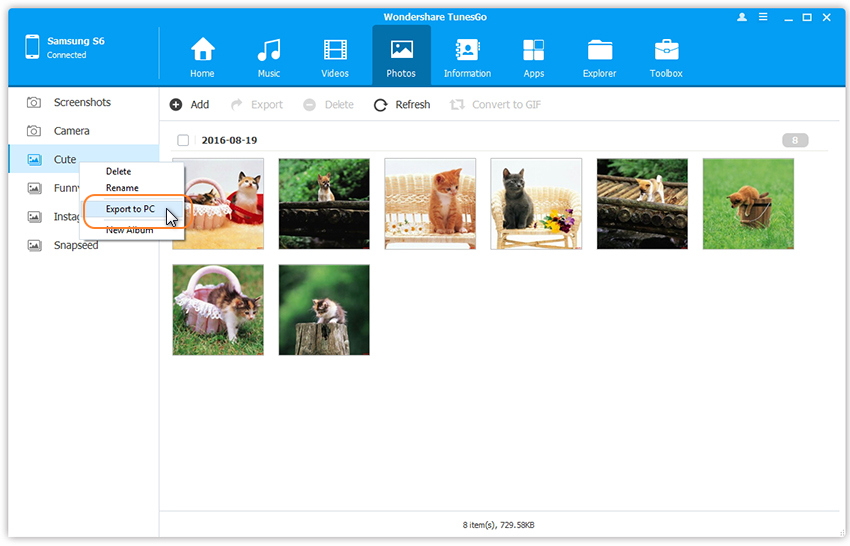
You can also backup all Samsung Galaxy S7/S7 Edge photos to PC in one click.

android-transfer-mian-page

d_win d_mac

Part 3:Transfer Photos Between iPhone/iPad/iPod/Android and Samsung Galaxy S7

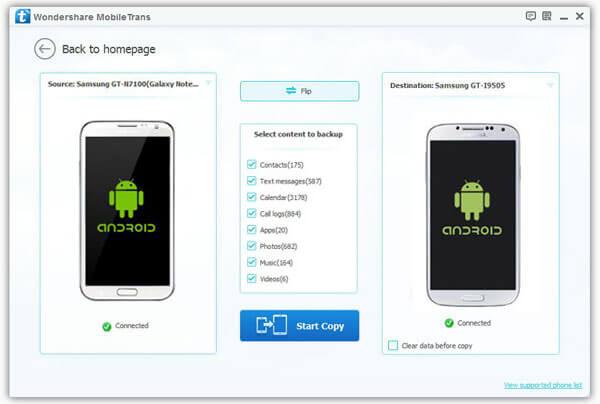
Step 1.Launch Android Transfer and connect both devices to PC.

connect-multiple-devices

Step 2.Select the source device from which you want to transfer photos and albums.

Step 3.Click Photos tab.Choose your wanted photos and click Export.Select another device from the list.For example,you can transfer photos from Samsung Galaxy S7 to iPhone by selecting Export > Export to Device > iPhone directly.

transfer-photos-from-android-to-iphone

You can also transfer the whole photo album from Samsung Galaxy S7/S7 Edge to other devices in one click.

transfer-samsung-photo-album-to-iphone

d_win d_mac

Related Article:

How to Transfer Music from Computer to Samsung Galaxy S6/S7

How to Transfer Videos from Computer to Samsung Galaxy S6/S7

How to Transfer Music from Android to iPhone/iPad/iPod

How to Convert and Play DVD Movies on Samsung

How to Transfer Files between Samsung and Computer


Transfer Music from Computer to Samsung Galaxy S6/S7

“Hi.I’m Linda and I come from U.S,I used my Samsung Galaxy S7 phone for a month,recently I try to sync the songs from computer to my device via Wi-Fi,however it was fail.Now it is available for me to use another method to finish it?Thanks.” – Linda Wang

It is no doubt that music is playing an important role in our life.People enjoy fascinating music via mobile device,such as the Android Samsung phone.They like to download favorite songs on computer and then export it to their device.So it’s unavoidable for people to transfer music files from computer to their Android devices.Absolutely,to transfer songs from computer to Android can be easy via Bluetooth or Wi-Fi. But what if you got abundant music resources to transfer? How can you make the transfer more convenient and efficiently?

Copy Music from Computer to Samsung Galaxy S6/S7

Let Android Transfer do you a favor.As a professional program designed for managing media files on Android device,it can be used to transfer music from computer to Samsung Galaxy S6/S7 in only two easy steps. You are allow to selectively choose your music files and safely export music from computer to Samsung without any data loss.Android Transfer gives you powerful music management,letting you transfer music to and from computer, export and import music to and from iTunes Library, and transfer music between devices directly.In the next part below, we’d like to tell you how to copy music from computer to Samsung phone in details.Supported Samsung Device:Note 7/5/4/3,Samsung Galaxy S7/S6/S5,etc,.Android Transfer is works well for most brands of Android,Samsung,HTC,ZTE,Motorola,Lenovo,LG are included.

d_win d_mac

Part 1:Transfer Music from Computer to Samsung Galaxy S6/S7

Launch Android Transfer and connect your Samsung Phone to PC.Your Samsung device will be detected and displayed in the primary window.

android transfer mian page

Step 1.Select Music File to Transfer
Select Music tab.Once your media loads, click Add > Add File or Add Folder.

sync music from pc to galaxy s6 s7

Step 2.Sync Songs from Computer to Samsung Galaxy S6/S7
This brings up your file browser window, from which you can select songs to export from your computer.And you can also create new playlist by right clicking Music to save the imported songs.You can simply Drag and Drop music files from computer to your Samsung.

d_win d_mac

Part 2:Transfer Music from Old Phone to Samsung Galaxy S6/S7

Android Transfer provide you the powerful music management service,letting you transfer music between old phone and Samsung directly.In the following part,we’d like to show you how to transfer music from old phone to Android device step by step.

d_win d_mac

Step 1.Launch Android Transfer and Connect Devices
Please run Android Transfer on computer and connect your old phone and Samsung to computer.

Step 2.Select the Source Device
Select the source device from which you want to transfer music files.Then click Music tab.

android transfer mian page

Step 3.Select Music to Transfer to Samsung
Choose your wanted songs and click Export. Select another device from the list. For example, you can transfer music from iPhone to Samsung by selecting Export > Export to Samsung directly.

select samsung device to export

You can also transfer the whole music playlist from Samsung to another in one click.

export music to samsung

d_win d_mac

Extra part:You can also transfer music between old phone and Samsung with Phone Transfer.

Phone Transfer allow to transfer music between old phone and Samsung Galaxy S6/S7 with one click,besides music,this simple data transfer tool support to transfer contacts,SMS,photos,videos,apps,call logs,calendars from old phone to Samsung phone completely.Android phone,iPhone,Symbian phone are all applicable to Phone Transfer.

d_win d_mac

Detail tutorial:How to Transfer Data from Android to Samsung Galaxy S6/S7 with Phone Transfer

Step 1.Run Program and Connect Two Device to Computer

Step 2.Select Music File to Transfer

Step 3.Transfer Music from Old Phone to Samsung Galaxy S6/S7

transfer music from old phone to samsung galaxy s6/s7

Part 3:Transfer Music from iTunes to Samsung Galaxy S6/S7

Android Transfer makes it extremely easy to transfer music, videos, playlists and more from iTunes to Samsung Galaxy S6/S7. In the following part, we would like to show you the detailed tutorial.

d_win d_mac

Step 1.Launch Android Transfer and Connect Samsung to PC
Run Android Transfer on computer and then connect Samsung to computer.Click Transfer iTunes Media to Device on the main interface.Or find the Transfer iTunes to Device option under Toolbox > Transfer Tools section.

android transfer mian page

Step 2.Transfer Music from iTunes to Samsung Galaxy S6/S7
Check options and start to copy media from iTunes to Android. All the iTunes files will be scanned and will be shown under different categories like music, movies, podcasts and others. By default, all the file types will be selected but to transfer only the music files, you can uncheck the others. Click Transfer to start transferring.

select music file transfer samsung

transfer music itunes to samsung

Note:There is no worry about duplicate files as Android Transfer enables to automatically detect the duplicates and only transfer the exclusive contents from iTunes to Android device.

d_win d_mac

Part 4: Convert Apple Music and Play on Samsung Galaxy S6/S7

With the helps of Apple Music Converter, you can easily convert Apple music from M4P to MP3 and play on Samsung Galaxy S6/S7 without time limitation. This software is an excellent tool which enables to load a collection of Apple M4P songs(iTunes songs) then convert M4P to MP3. After converting Apple music to the compatible MP3 format, you can enjoy the songs on your Samsung device freely.

Download Apple Music Converter:

d_win d_mac

Features of Apple Music Converter:
-Remove DRM from Apple Music songs and convert Apple Music M4P songs to DRM-free MP3, M4A, etc.
-Convert Apple Music songs at up to 16X speed.
-Enjoy Apple Music tracks in anywhere and at anytime.
-Convert iTunes/Audible audiobooks to MP3/M4A, etc.
-Preserve Audiobook chapter information to M4A output.
-Keep original data to MP3, M4A audio files.

Guide: How to Play Apple Music on Samsung Galaxy S6/S7

Step 1. Run Apple Music Converter on PC or Mac
Firstly please run Apple Music Converter program on PC/Mac.

launch apple music converter

Step 2. Choose Apple Music to Convert
Select the Apple music you want to convert, including music, playlists, Audiobooks, M4P Audio, iTunes movies and TV shows. Click “Download“.

Step 3. Choose MP3 – Output Format to Convert
Select MP3 as the format for the converted music.

Step 4. Convert Apple Music to MP3 for Samsung Galaxy S6/S7
Click “Start Convert” to begin the conversion on the computer.

convert itunes music to mp3 for Samsung galaxy

Step 5. View the Converted Apple Music
When the conversion is finish, you could explore the output files and folders by clicking “Open Output File” button to view the converted music file on the computer.

Step 6. Transfer Converted Apple Music to Samsung Galaxy via Android Transfer
In the last step you should transfer the converted music to your Galaxy S6/S7 via Android Transfer.

Related Article:

How to Transfer Videos from Computer to Samsung Galaxy S6/S7

How to Convert and Play DVD Movies on Samsung

How to Transfer Music from Android to iPhone/iPad/iPod

How to Transfer Files between Samsung and Computer

How to Backup and Restore Samsung Data

How to Root Samsung Galaxy S6/S7/S8/S9

Do you know the information about rooting Android device?If you’ve researched anything about Android on the internet,you’ve probably seen and read about “rooting” one.That’s an operation that Android available didn’t live up to their potential, and root was the answer.Horrible software was the norm,applications that you would never use ran amok and wasted data and battery life, and the experience was bad all around. Rooting is how you get complete access to everything in the operating system, and those permissions allow you to change it all.Modern Androids are quite a bit better than they used to be.So it’s not hard to understand that many of us try to root Android device and are looking for more information on ways.

root samsung galaxy s9,s8,s7

Why Root Samsung Galaxy Phone
There are plenty more benefits that you can experience when you root Samsung Galaxy.This is especially true for non-techies.To persuade you more into giving this process a try, why not read some of the benefits of rooting your device.

1.Save space on your phone. Some apps on your phone can’t be uninstalled, even though you are not using them. This is because they are pre-installed by Samsung or your carrier. Unfortunately, they can take a lot of space in your phone’s storage. Getting rid of them is possible only when you root your device.

2.Have custom ROMs.Why would you like to have custom ROMs on your device? We can give you tons of reasons but the most important one is that it offers better performance and efficiency.Another essential reason is that you can install apps and save it to your SD card. This ability is not possible with stock ROMs.

If you don’t like the outcome, however, you can always unroot it.But we doubt that you would as rooting it could give you endless possibilities.

How to Safely Root Samsung Galaxy Phone

Android Toolkit – Root guarantees help to safely root Samsung Galaxy S6/S7/S8/S9/Note 9 on computer,root Android phone with high security.Your Samsung/Android device will be well protected during the rooting process.Our certified Android technicians can safely perform a number of different maintenance services.Only two easy steps,you can complete the Android device rooting task by yourself.

Main Features of Android Root tool:
-Root your Android phone with 1-click.
-Over 95% success rate on rooting.
-Support Samsung Android phones,such as Samsung Galaxy S7/S6/S5/S4 and Galaxy Note 5/4/3,etc,.
-Fully rootable from Andorid 4.0 to Android 7.0 .
-Work on both Windows and Mac OS X .

d_win d_mac

How to Root Samsung Galaxy Phone

Firstly,please download and run Android Root on your computer then click on “Root” in the main page of program.Select “Android Root” option on it.

android root mian page

Step 1.Connect Samsung Galaxy S6/S7 to the computer
Connect Samsung phone to the computer with an USB cable.You should enabled the USB Debugging mode on your Samsung.Then Android Root will automatically connect your device.

connect samsung galaxy to pc

Once your Samsung is connected,Android Root will offer a proper solution to root your phone.Click on Start to continue.

detect samsung with android root

Note:
1.Please don’t disconnect the device until the whole process is end.
2.The phone will restart sometimes when detecting.
3.It may cost you some time to detect your device.Please be patient.

Step 2.Safely Root Samsung Galaxy S6/S7 on Computer
It will take you a few minutes for the program to detect your Samsung phone.Then it will be ready for you to root your device.Just click on Root Now to safely root your Samsung phone on computer.

ready root samsung

Note:During the rooting process,the phone will pop up a message to prompt whether you would like to root the phone.Tap on Confirm to continue the rooting process.You phone will be complete rooting in minutes.

samsung galaxy rooted

d_win d_mac

Related Article:

How to Root Samsung Galaxy Phone on Computer

How to Root your Android on Computer

How to Enable USB Debugging Mode on Samsung Galaxy

How to Backup and Restore Data on Samsung Galaxy

The Complete Guide to Backup Android Phone

It is really necessary to backup all your data present in your smartphones to some cloud storage or your PC or any external harddisk. You can lose a phone, it can get stolen, but the last thing you want is to lose all your pictures, videos, contacts and messages. These days phones have some really special memories stored in them, so before any accident strikes to your phone. It’s better to backup Android phone.

Having full knowledge on how to backup android phone is very essential, if you are used to changing phones. You can easily backup all your data and restore it on your new phone. A phone is combination of hardware and software. These are the things which can malfunction and stop working anytime. You might have to send your phone for repair or to claim warranty. Most of the times all the data present inside the phone is wiped when you try to fix it. So before any unfortunate thing happens to your phone it’s really good to have a backup of all your data saved somewhere.

Backup Android Phone Complete Guide

In this guide, I will cover almost every method there is to backup Android phone. You can backup data on your PC or your cloud or any external storage.

Google Backup and Restore:

Android users can now easily backup all their data including Contacts, Gmail, Photos and app data on Google Servers. You can sync the data with your google account and access it from which ever device you would like. To backup and sync all your data with your Gmail/Google account.

Goto Settings -> Accounts -> Select your Gmail/Google Account.
Select the data you want to sync (like photos, calendar etc)
Now head to Settings -> Backup & Reset.
Enable Backup my data and select the applications whose data you want to backup.

Backup-Android-Phone-Google

Android 5.0 and above offers new features that allows you to backup even more stuff like WIFI passwords, game progress and settings of your phone. To get it on some other device just log in with your Google account and you will get all your stuff there as well.

Pictures Backup

Although the above mentioned method backups your pictures as well. But there is another tool that is quite helpful and easy to backup all your pictures no matter how many pictures you have on your phone.

Use Google Photos App and sync it with your Google Plus account. It can save full resolution pictures on the cloud storage. and it gives you 1000 GB for free. If you want to save low resolution files then you can upload unlimited number of pictures on your Google Cloud storage associated with your Google plus account. You just have to enable Sync after connecting your account with Google Photos app and your each and every photo will be synced on the cloud and you will never lose a picture again.

Backup-Android-Picture

To Enable it go to Google Photos app and click on Auto Backup and connect your Google plus account with it and select the required checkboxes according to your need. All your pictures will be saved on your google plus account with a private folder only accessible and discoverable by you.

Completely Backup Android on PC

You can also save all your data on your PC using the Android Backup & Restore app.It’s an useful data backup & restore tool which used to perform a complete backup of your Android phone on PC,such as contacts,messages,photos,videos,apps,apps data(WhatsApp,Viber,Kik),etc,.See the link below in which I have personally performed backup Android on my PC using this app.

backup android data to pc

Tutorial:How to Completely Backup Android Data to PC

d_win d_mac

Related Article

How to Transfer Android Data to Computer

How to Backup and Restore Android on Computer

How to Backup and Restore Samsung Data

How to Backup and Restore Samsung Data with Samsung Kies

Backup Android Data to Computer