Category Archives: Android Data Recovery

How to Recover Media File on Android

“Hello.I’m Jack,my birthday video which stored on my Samsung Android phone was deleted accidentally by my little brother.Now I want to recover the deleted video on my Android.But I’ve found no one best method to get it back.Anybody give me some advice?”-Jack Kang

With the development of the information technology, we are stepping into the new media century.Nowadays more and more people like to download and view the videos and audios on mobile device,to watch film or movie anywhere anytime.Expect videos,as well as music,images,apps.Android device comes with internal as well as with expandable memory storage that can be expanded to 16GB, 64GB or even 128 GB.Saving media file on Android device might come across various circumstances in your daily life that may lead to loss of your important media files.

How to Restore Media File from Android

Android Data Recovery is an excellent android data recovery tool that enables you to restore media files from Android,including photos,videos,audios and other files.Not only media file,but also contacts,SMS,call logs,WhatsApp data and documents are allow to restored by Android Data Recovery.To sum up,Android Data Recovery is an almighty recovery tool that help to recover deleted data from Android after losing data under several circumstances:deleted by mistaken,restore device to factory resetting,device broken/damaged,device rooting,Android system update and so on.

d_win d_mac

How to Recover Media File from Android

Step 1.Connect your Android to the Computer
When you download Android Data Recovery on computer,install it and launch it.Then the program will prompt you to connect your Android to the computer via the USB cable.

connect android to pc

Note:If the USB cable is not well connected to the computer while recovering,the process will fail.

Step 2.Enable USB Debugging on Android
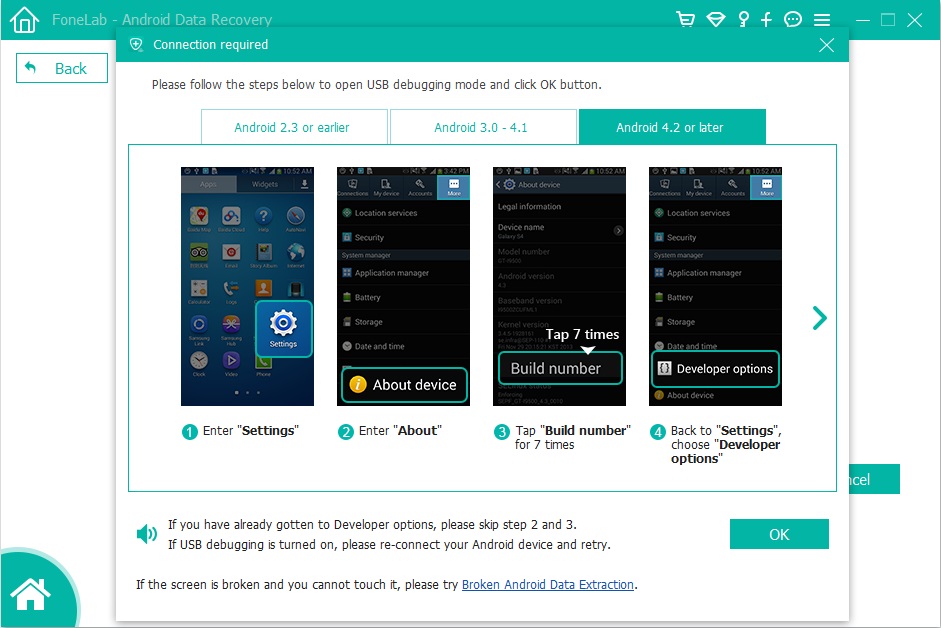
Now you should enable USB debugging on Android as the following interface if you haven’t enabled the USB debugging before.

enable usb debugging on android

Step 3.Select File Types to Scan for Android
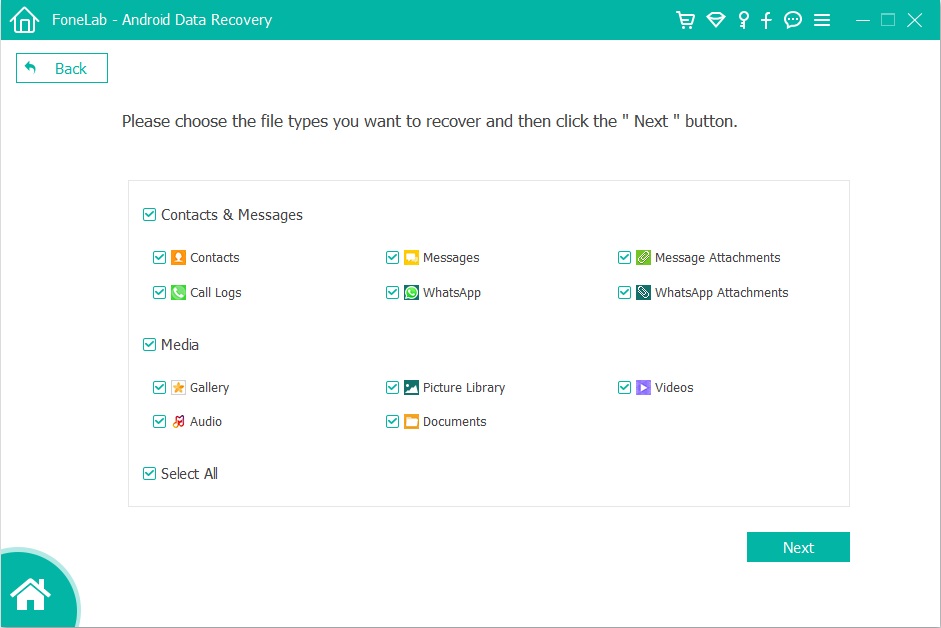
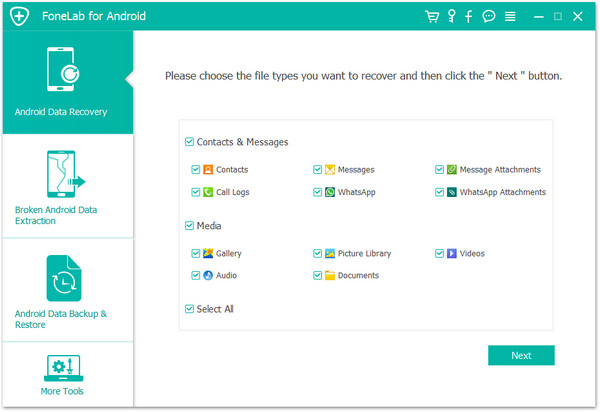
In this step you should choose the files that you exactly want to scan and restore.

select media file to scan from android

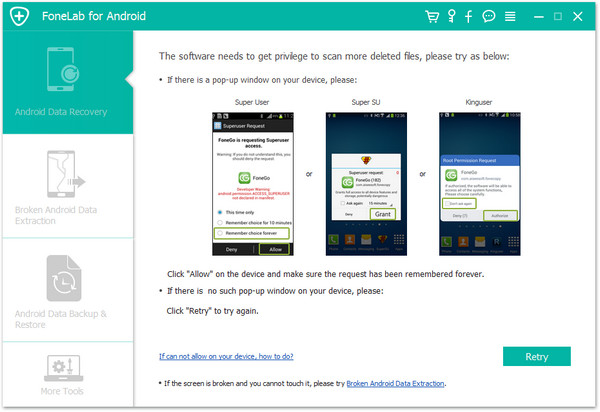
If there is a prompt on your device as follow,tap “Allow” and permit the program to access and scan the selected files on your Android.

allow android data recovery to scan
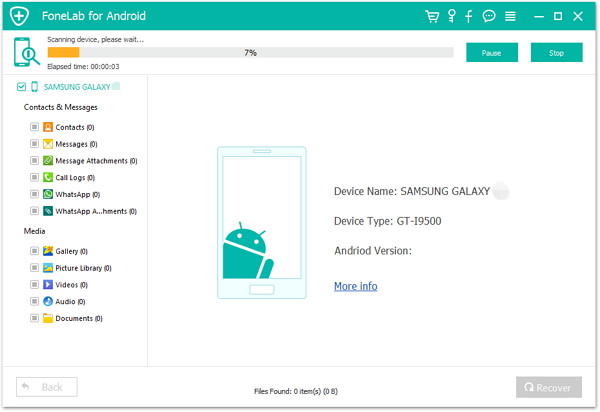
Android Data Recovery start to scan data stored on your Android.

scan data on android

Step 4.Preview and Restore Deleted Media Files from Android
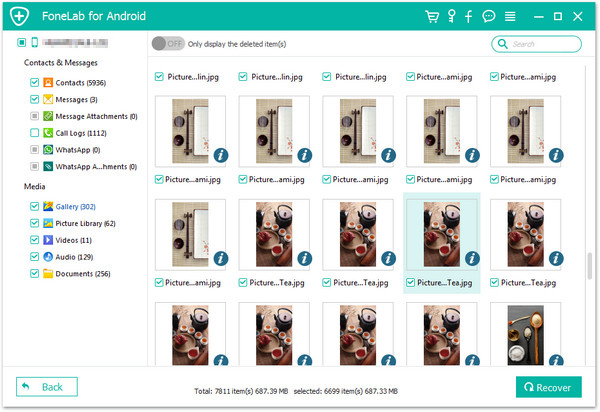
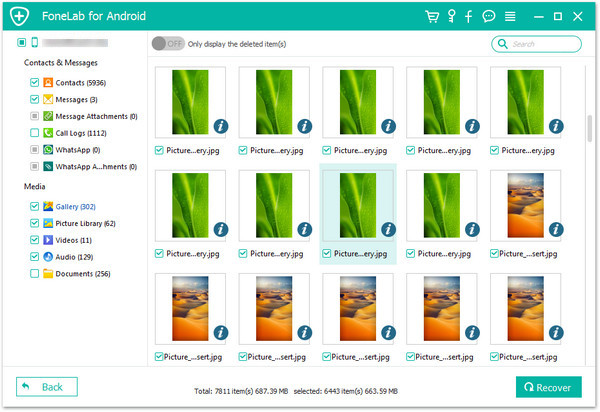
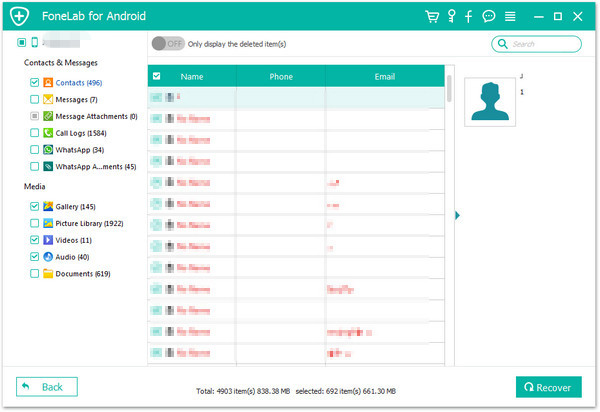
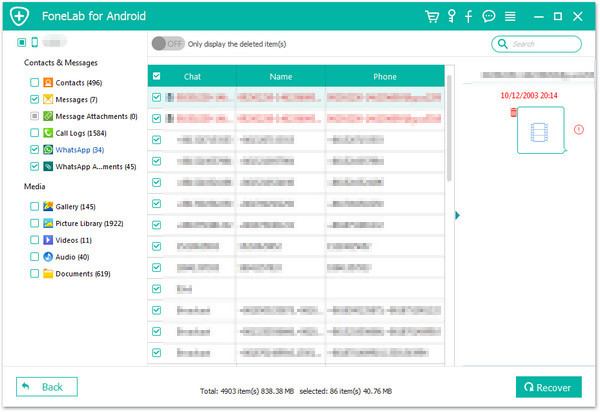
After that,your Android data will be scanned out and listed in categories within few seconds.The Android data will be listed in categories of Messages, Contacts, Videos, Audio, and so on.You are allowed to preview them one by one and choose whatever you want to recover.Once you finish selecting,click “Recover” to have all these chosen data back to your computer with a simple click.

restore deleted media file from android

d_win d_mac

Related Article:

How to Recover Deleted Videos from Android

How to Recover Deleted Photos/Videos from Samsung

How to Recover Deleted Photos/Videos from Samsung Galaxy C5/C7

How to Recover Deleted Photos/Videos from Samsung Galaxy S5/S6/S7

How to Recover Deleted Data from Android

How to Root your Android on Computer

“This is a common question by those who have want to root their phones.How exactly do I root my Android device?”-Hardison Choi

What is Android Rooting
“Rooting” is the act of gaining access to this root Android user account.This is often compared to jailbreaking an iPhone or iPad.Rooting an Android phone allows Android users to get more features of Android and make full use of it,for example play more funny game on device and enjoy the entertainment completely.Rooting helps Android users to flash Android and optimizing the battery and internal storage of device,and so on.As we all know, you should take risk to have Android rooted because it may turn brick if is not operate appropriate,and once you root your device, it means you give up the warranty of your phone.

root-android

How to Root Android with Highly Security

It’s have to remind you that you should backup Android before starting the rooting in case the rooting task is failure.If you lost data on Android when rooting is fails,you are able to restore data from backup on your device.

Here I provide you an available way to root your Android in an absolutely safe solution with rooting tool- Android Root,help to root Android on computer with easy steps,which is rather superior rooting tool that the success rate of rooting will be higher.Almost all brands of Android are compatible with this program,such as Samsung,HTC,Lenovo,Motorola,HTC,LG,ZTE,etc,.You’ll never feel confused and we’ll assist you every step of the way so you never feel stuck in the whole rooting process.

d_win d_mac

How to Root Android on Computer

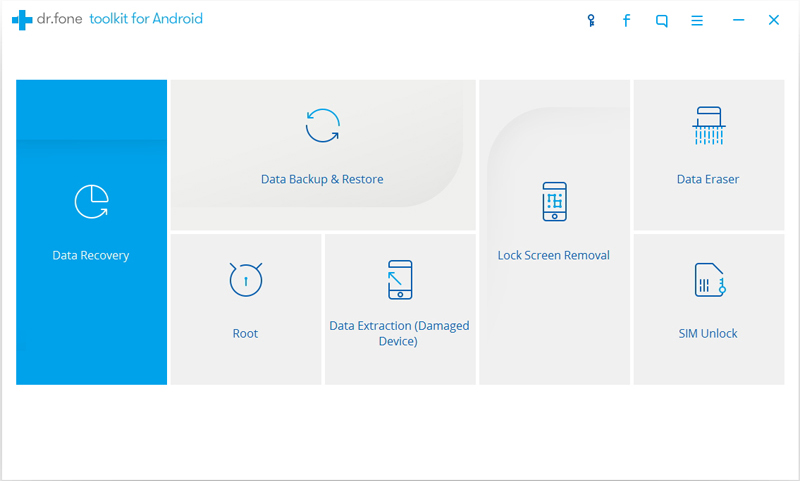
Firstly,launch Android Root on your computer and click on “More Tools” on the left column.Select “Android Root” option on it.

android-root-mian-page

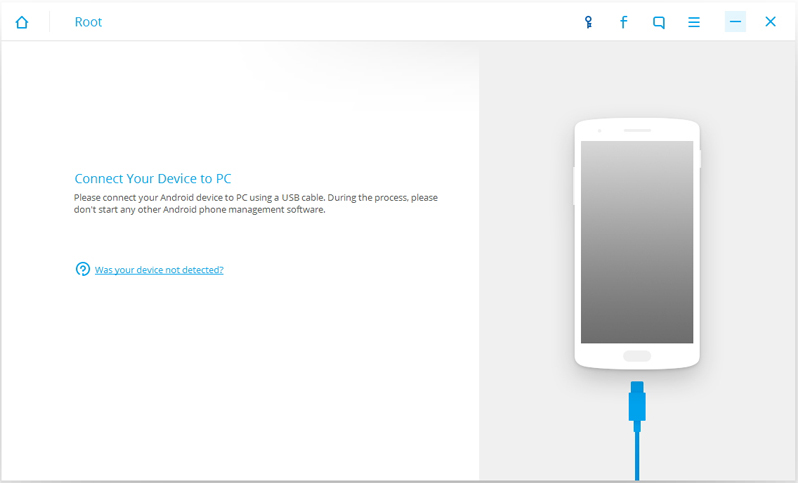
Step 1.Connect Android to the computer
Connect your Android device to the computer with an USB cable.Make sure you have enabled USB Debugging mode on your Android.Then Android Root will automatically connect your Android.

connect-android-to-pc

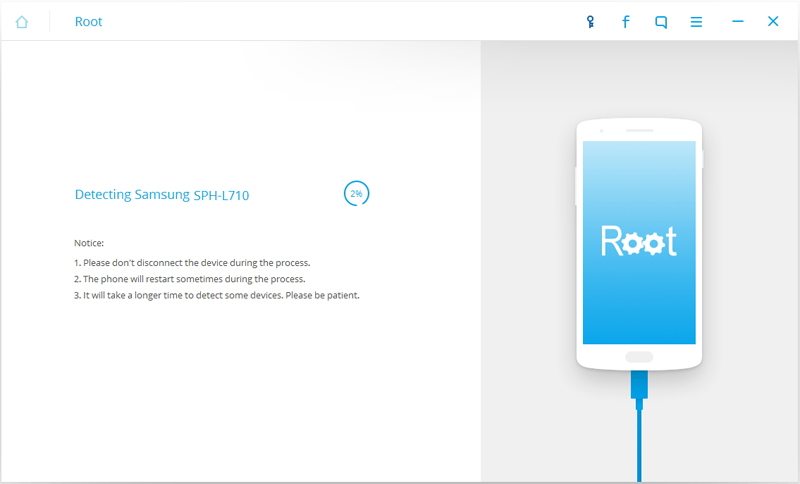
Once your Android is connected successfully,Android Root will find a proper solution to root your phone.Click on Start to continue.

detect-android-with-android-root

Note:
1.Please don’t disconnect the device during the detecting process.
2.The phone will restart sometimes when detecting.
3.It will take a longer time to detect some phones.Please be patient.

Step 2.Root your Android Device
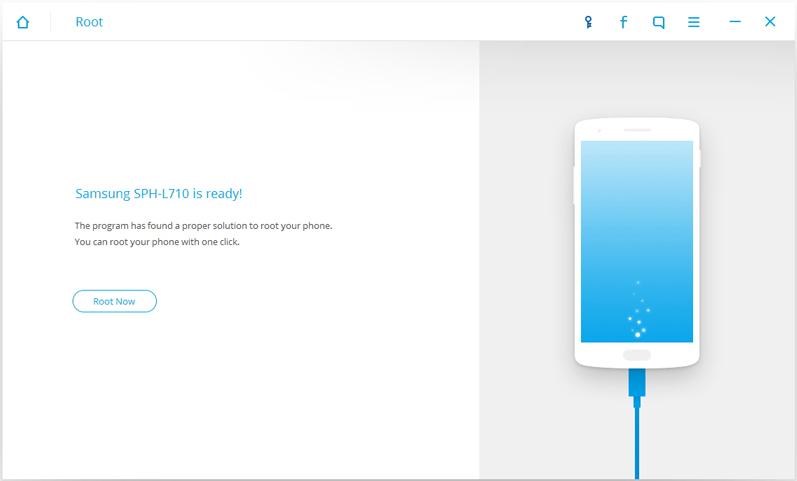
It will cost you a few minutes for the program to detect the Android.Then it will be ready for you to root your Android.Just click on Root Now to root your Android with one click.

ready-root-android

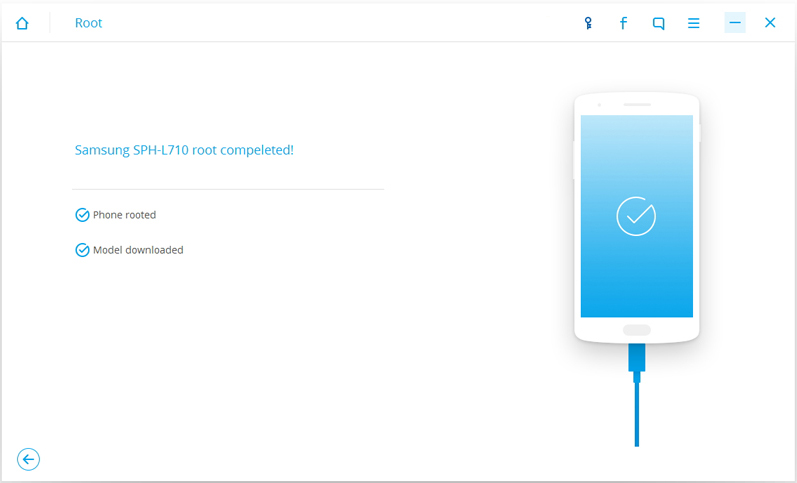
During the rooting process,the phone will pop up a message to ask whether you would like to root the phone.Tap on Confirm to continue the rooting.Just in a few minutes, you phone will be rooted successfully.

android-rooted

d_win d_mac

Read more:

What to Do if Android can’t be Accessed

How to Fix Bricked Android Phone or Tablet

How to Get More Internal Storage from Android

How to Restore Lost Data from Rooting Android

How to Restore Picture from Bricked Samsung

“I’ve got a bricked Samsung Galaxy phone.The owner had it protected with a pattern, and as I am unable to make this pattern with a bricked screen.I am not sure if it’s a hard device brick or not.Now I wanna restore the previous picture from bricked device before I sending it to the repair shop.But how?”-Carmen

Do you suffering the same problem as Carmen?Have no idea about how to restore data from bricked Samsung or other Android phone?Honestly, there are many ways to restore data from bricked device,but the process might be complicated if you just depend on yourself to deal with that.Concerning data recovery on the smart phone,we need to recommend an useful and mighty program to the users who is in need.

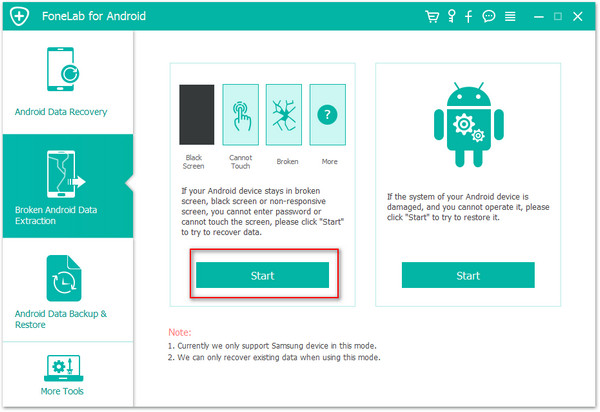
This brilliant program is called Broken Android Data RecoveryAndroid Data Extraction(Damaged Device),which is a safe, professional data recovery software for Android device.It supports not only Samsung products,but also Motorola, ZTE, LG, HTC, Sony, Google, HUAWEI, and more. With Broken Android Data Recovery,you are allow to easily restore picture on bricked Samsung,as well as contacts, photos, videos and so on.What’s more,this program help to restore data from broken/damaged/dead Android device,such as broken screen Android,black screen Android,water damaged Android.

d_win d_mac

How to Recover Picture from Bricked Samsung

Step 1.Launch and Run Broken Android Data Recovery on Computer
Download and install Broken Android Data Recovery on computer.Launch and run it properly and choose “Android Broken Data Recovery” to begin the recovery.

connect-bricked-samsung-to-pc

Select the type of files you want to restore and press “Start” button to enter next step.For picture recovery,you should click “Gallery”.

scan-data-bricked-samsung

Step 2.Choose the Correct Fault Type of Your Bricked Samsung
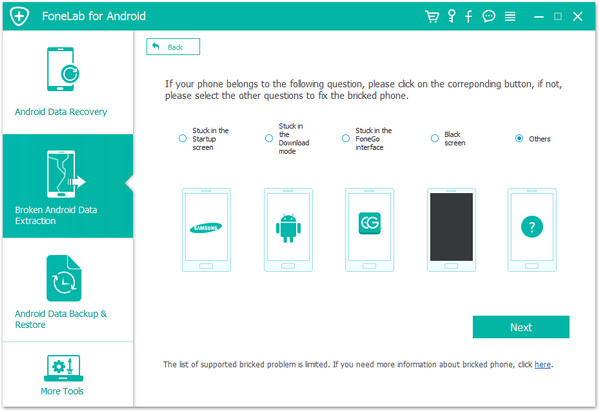
Firstly,there are two fault types.One is “Touch doesn’t work or cannot access the phone” and the other is “Black/broken screen”.Just choose the correspond one which matches your bricked device state.Click “Next” to go on.

Choose-samsung-Broken-Types

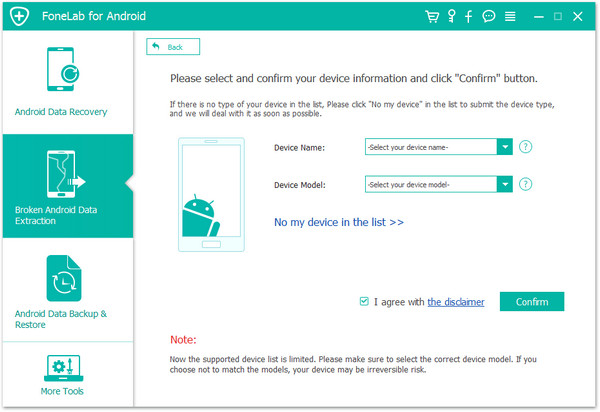
Secondly,you should select “Devise Name” and “Devise Mode” for your phone on the new window.Currently this function only works for some of Samsung devices in Galaxy S, Galaxy Note and Galaxy Tab series.Then click “Next” to enter next step.

select-bricked-samsung-model

Step 3.Enter Download Mode on the Bricked Samsung
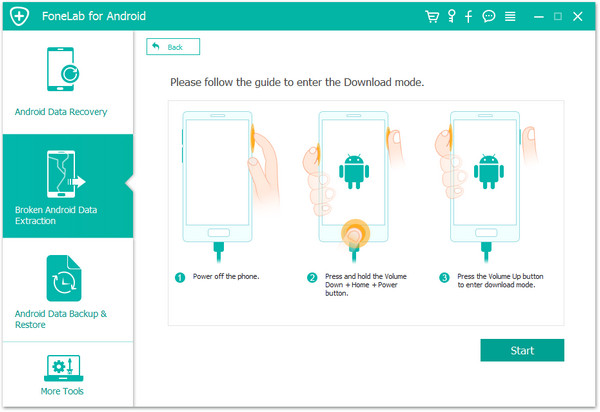
Follow the illustration on the program to enter your phone into the Download Mode.

1. Power off your Samsung phone.
2. Press and hold Volume “-“, “Home” and “Power” button on the phone.
3. Click “Volume +” button to enter download mode.

enter-download-mode-bricked-samsung

Step 4.Analyze and Scan Your Samsung Device
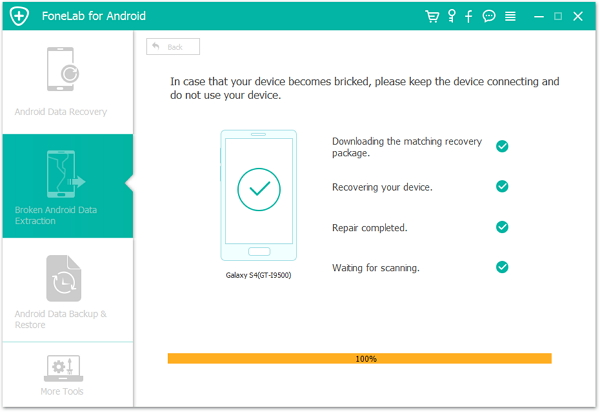
Connect your bricked phone to the computer.And then the program will analyze and scan data on your phone automatically.

download recovery package for bricked samsung

Step 5.Preview and Restore Picture from Samsung
When the scanning completes,all data from your device will display by categories on the screen.You are allow to check and preview them.Select the data in detail you want and click “Recover” to save all of them on the computer.

restore-gallery-bricked-samsung

d_win d_mac

Related Article:

How to Restore Data from Bricked Samsung

How to Restore Data from Broken Samsung

How to Restore Photos from Broken Android

How to Fix Bricked Samsung Phone

How to Restore Photos from Broken Android Phone

Android Phone is Broken
There are so several circumstances that people can break their Android phones,for example accident dropping,water damaged,get broken screen,get black/white screen,get bricked,etc,.Even though the ways are completely different, they are in consensus at the result: My Android is broken.

How to Recover Photos on Broken Android

Before sending your broken Android to repair store or giving it up and upgrade to a new one,you may need to restore data personal data from this broken device.Expect the contacts,SMS are needed to retrieved,the most important data contain your privacy absolutely the photos.

Broken Android Data Recovery has special advanced functionality to restore photos from broken Android in easy steps.With the help of this program,you can effortlessly restore files on broken Android such as photos, videos,audios, contacts, text messages,call logs,WhatsApp messages & attachments, documents.Generally, you are able to recover file from broken Android for example device with broken screen, device with black/white screen, device with touch screen not work, device which can’t enter system,water damaged device and so on.

d_win d_mac

How to Recover Photos on Broken Samsung Phone

Step 1.Run Broken Android Data Recovery on PC or Mac
After downloading,launch the program on your computer.Then, choose “Broken Android Data Extraction” in the homepage of the program.

connect broken android to pc

Step 2.Select the File Types to Restore from Broken Samsung
You’ll be taken to a screen with all kinds of supported file types that you can recover from your broken device.Select the type of files you want to recover. “Select All” is tick by default.Then, click the “Next” button.For photos recovery,click “Gallery”.

scan data broken android

Step 3.Choose a Phone Fault Type
In this step,you should select a phone fault type. Select the option at the left or right side which depend on your Android.

choose android broken types

Step 4.Select the Model of your Android
Please select your device’s name and model.If you are not sure of the mobile phone model you own, hit the “How to confirm the device model” to check it.

select broken android model

Step 5.Enter Broken Android into Download Mode
After you choose the phone name and model, you will be asked to get your Android device into the Download Mode.Just follow the three steps displayed on the window to finish it.

Tips:You should connect your Android device with computer once entering Android into download mode.

enter download mode broken android

Note:After you finished the steps of the guide above and hit the “Start” button, the countdown will display on the phone screen in the program to tell you the process status.

Step 6.Analyze Data on Broken Android
Once entering into download mode for Android,the program will download recovery package your broken Android.

download recovery package for broken android

Step 7.Restore Photos from Broken Android
Upcoming screen shows all files recoverable from the broken device.Preview them one by one and mark down those you need.At last,click “Recover” to save the selected data on your computer.

restore gallery broken android

d_win d_mac

Related Article:

How to Recover Data from Broken Android

How to Recover Pictures from Broken Android Tablets

How to Recover Data from Broken Screen Android Phone

How to Recover Data from Black Screen Android Phone

How to Recover Deleted Files from An

How to Restore Contacts from Broken Screen Samsung

“My Samsung Galaxy S6 was get broken after I slipped it to the floor when I was picking up the call in the supermarket with heavy things on my hand.The phone screen was get broken.Now I can’t power on the Samsung with broken screen.Can anybody help me to restore the contacts from this broken device?Or provide me some available ways to fix it?Thanks a lot.” Franky Zhong

When your Samsung phone get broken,the most urgent thing is that you may lose contacts on your broken Samsung and you are eager to restore contacts on the broken device.The contacts main the connections with your family and friends,even the client.Most people try to get back the contacts stored on the broken screen Samsung in order to keep in touch with others.However,it is really confuse us that is there any available ways to restore the phone numbers from broken screen Samsung device?The answer is absolutely YES.

Extract Contacts from Broken Screen Samsung

Broken Android Data Recovery Android Data Extraction enables you to restore contacts from broken screen Samsung.Broken Android Data Recovery is specially designed for these people to provide timely help,help to retrieve the data from broken Android device,such as broken screen device,black screen device,water damaged device,bricked device.No matter your phone is Samsung, Lenovo,ZTE,Motorola,HTC, LG, Sony,etc,.The recoverable data type including contacts,photos,videos,messages,call logs,audio,WhatsApp messages & attachments,documents.

d_win d_mac

How to Restore Contacts on Broken Screen Samsung

Step 1.Download and Run Program on Computer
Download,install and run Android Data Extraction on your computer.In the main page of program, click on “Scan it” located next to “Android Data Extraction” option.

connect samsung to pc

Step 2.Select Scanned Data on Broken Screen Samsung
In the next window, you will be required to select the type of files to scan for.Since you want to restore contacts, check “Contacts” and then click on “Next” to continue.

scan samsung

Step 3.Select Broken Type of Samsung
A new window will appear requesting you to choose why you can’t access the device.Because the device’s screen is broken, choose “Black/broken screen”.

choose samsung broken types

Step 4.Select the Model of Your Broken Screen Samsung
In the next window, you should select the model of the your broken Samsung device.If you don’t know your device’s model, click on “How to Confirm the device model” to get assistance.

select broken screen samsung model

Step 5.Get Samsung into Download Mode
You will be provided with instructions on how to enter your broken device into “Download Mode.” Simply follow the instructions on the next window. Once the device is in “Download Mode” connect it to your computer using USB cables.

broken screen samsung download mode

Step 6.Download the Recovery Package for Broken Screen Samsung
Android Data Extraction will begin an analysis on your device and downloading the recovery package for it.

download recovery package for broken screen samsung

Step 7.Restore Contacts on Broken Screen Samsung
Once the recovery package has been successfully downloaded,the program will begin to scan your broken Samsung for the contacts stored on the device.

restore contacts broken screen samsung

The contacts on the device will be displayed in the next window when the scanning process is complete.Selectively check the contacts in detail you want to restore and then click on “Recover” to extract it to your computer.Done.

In addition,Broken Android Data Recovery contain the function that allow to restore deleted data from Samsung,if you want to know more about the Android recovery tips,please read more related article in the homepage,thanks.

d_win d_mac

Related Article:

How to Recover Data from Broken Screen Samsung

How to Recover Data from Broken Samsung Phone

How to Recover Data from Broken Screen Android

How to Backup Data before Recalling Samsung Galaxy Note 7

News about Recalling Samsung Galaxy Note 7
Samsung has finally revealed details about its Galaxy Note7 safety recall.As previously reported, all customers are entitled to a replacement, repair or refund. Yes, this includes eBay purchases, postpaid mobile plans and grey market imports.

In the unlikely event that you missed the news, Samsung Galaxy Note7 smartphones have been bursting into flames in an alarming fashion when customers attempt to charge them.So far, there have been less than one hundred reported incidents out of more than one million units sold. Nevertheless, the company has deemed the issue serious enough to prompt a worldwide product recall.

note7-recall

The issue is caused by the Note7’s new 3500mAh battery; specifically an unintended meeting of the battery cells’ terminals which can potentially cause the device to explode. Needless to say, customers have been advised to immediately stop using their phones.

Backup Data on Samsung Galaxy Note 7 before Recalling

After the Note 7 burning accident happened,most of Note 7 users ate attend to recall their device to Samsung company.However,before recalling Note 7 you should do backup job on it to protect your personal data and avoid to leak the privacy to anyone.

Android Data Backup & Restore Tool is your No.1 ideal helper to safely backup everything on Samsung Galaxy Note 7 before recalling,contacts,photos,videos,audios,messages,notes,calendars,application data(WhatsApp,Viber,Line,Kik),call logs are included.What’s more,this useful program allow to restore data on Android device from backup,you can restore all backup files stored on computer to your Samsung or other Android phone.Almost all models of Samsung are applicable to Android Data Backup & Restore Tool.Except Samsung,other Android device are supported too,such as HTC,Motorola,Lenovo,Huawei,Xiaomi,LG,Sony,ZTE.

d_win d_mac

Part 1:Backup Samsung Galaxy Note 7 before Recalling with Samsung Cloud

With the Samsung Note 7,Samsung introduced the Samsung Cloud to you as a way to backup your phone.Auto backup happens every 24 hours, but for it to take place your Note 7 needs to charging with the screen off for 10 minutes.However, you can also do a manual backup with Samsung Cloud prior to returning your Note 7.

Open the Settings on your Note 7 > Cloud and accounts > Samsung Cloud > Back up my data > tap the Back up now button at the bottom of the screen.

Samsung Cloud provides a comprehensive backup of your Note 7 device.In addition to your Samsung account’s Contacts and Calendar, Samsung Cloud will also backup keyboard data, gallery,notes, and internet bookmarks etc. Using Samsung Cloud will also backup your phone logs, clock settings, apps, home screen layout including widgets and wallpapers, messages, music, device settings, including ringtones, and documents.

Part 2:Backup Samsung Galaxy Note 7 before Recalling with Google Account

Open the Settings on your Note 7 > Cloud and accounts > Accounts > Google. Ensure sync is enabled for your contacts, calendar, etc,.

In the Settings again > tap Cloud and accounts > Backup and reset. Under the Google account section, ensure Back up my data is enabled.

Part 3:Backup Samsung Galaxy Note 7 before Recalling with Android Backup & Restore

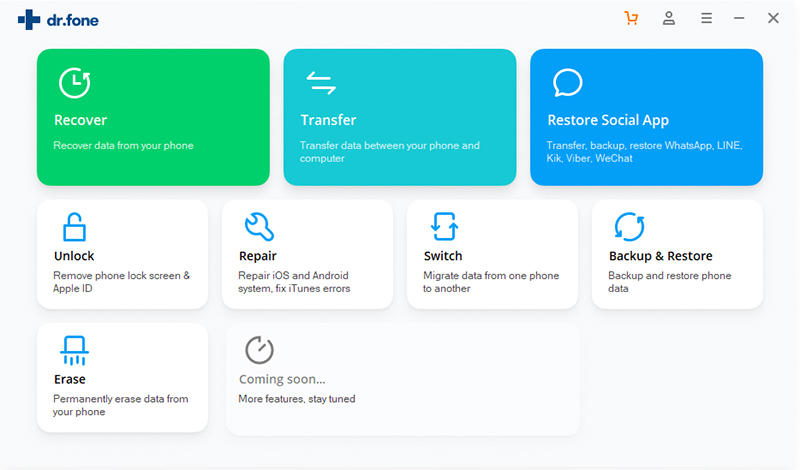
Step 1.Connect Note 7 to Computer and Run Program
Launch Android Data Backup & Restore Tool and from the “More Tools” section,select “Android Data Backup & Restore” option.Then connect the Samsung to your computer using USB cables.The program will detect the device soon.
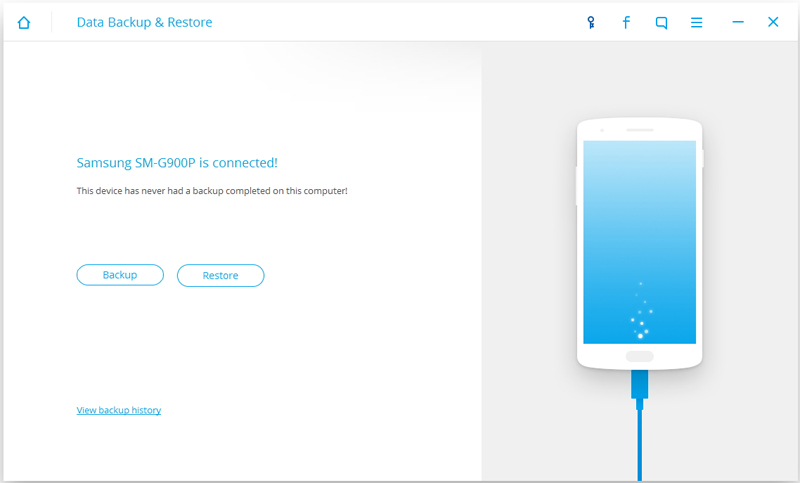
backup note 7 before recalling

backup note 7 before recalling

Note:If you have other Android management program on your computer,make sure none of them is running.

Tips:If you have used this program to back up your device previous,you are allow to view your past backup by clicking on “View backup history”.

Step 2. Select File Types to Backup
Once program has detected your device,click on “Backup” to select the data you want to backup(include in the past backup).Android Data Backup & Restore Tool can be used to back up 9 different file types including messages, call history, calendar, gallery, audio, video, applications and application data.Please note that to backup app data requires your Android device to be rooted.
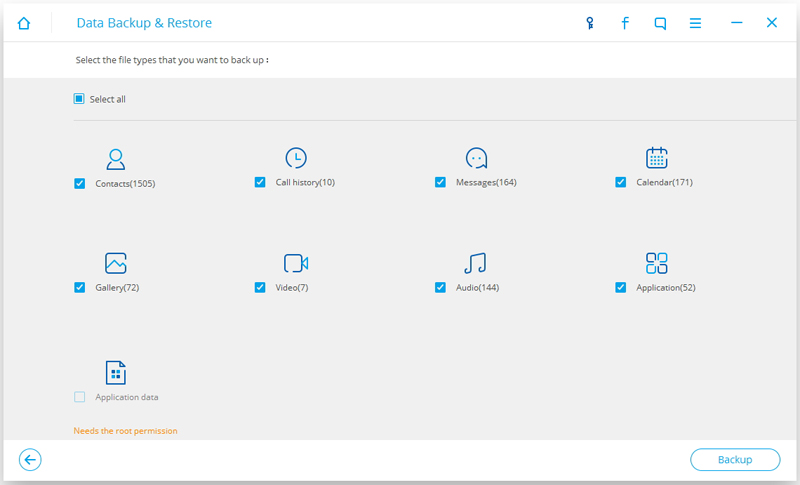
select note 7 data to backup

After you have selected the file which you want to backup,click the button “Backup” to start the process.The entire process will take no more than a few minutes.
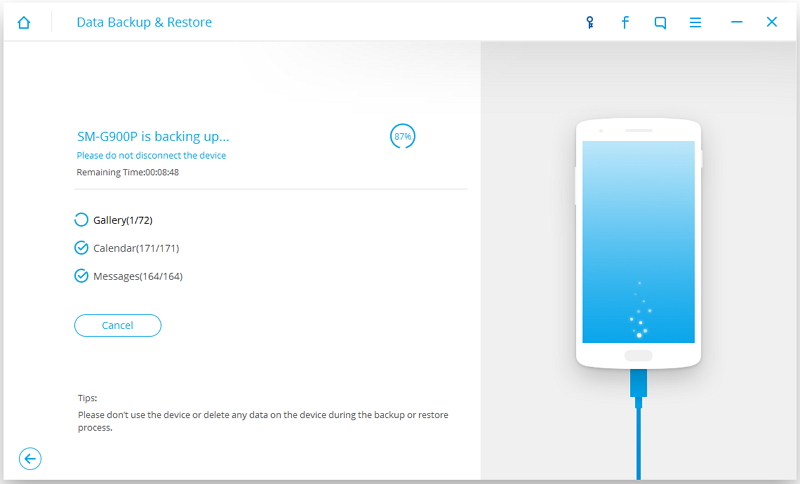
backup note 7 before recalling

When the backup is complete,you can click on “View the backup” on the lower left corner of the window to see the details of the backup file.
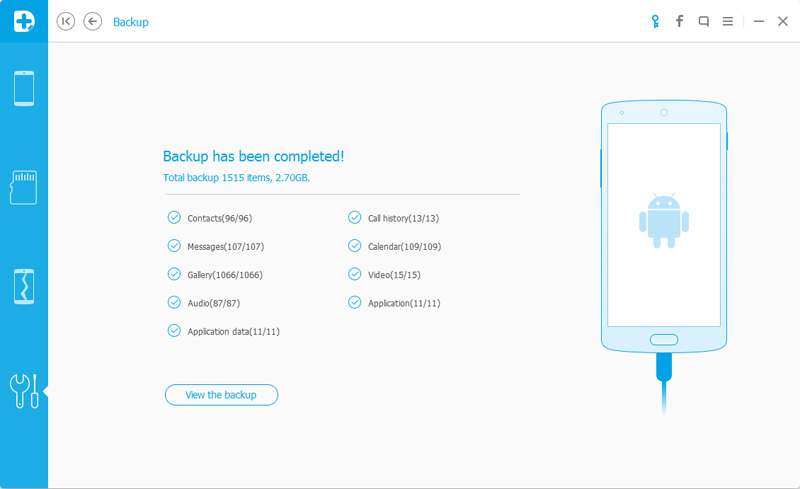
backup note 7 before recalling

Now you can view your backup file by clicking on “View”.
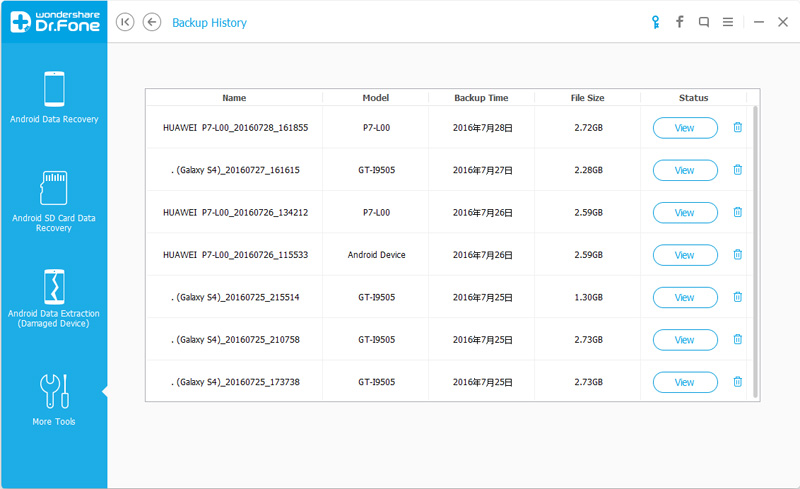
select backup note 7 data to view

d_win d_mac

Part 4:Restore Backup Data to Another Android Device

Step 1.Connect Android Device to Computer and Run Program
Launch Android Data Backup & Restore Tool and from the “More Tools” section,select “Android Data Backup & Restore” option.Then connect the Android device to your computer using USB cables.The program will detect the device soon.

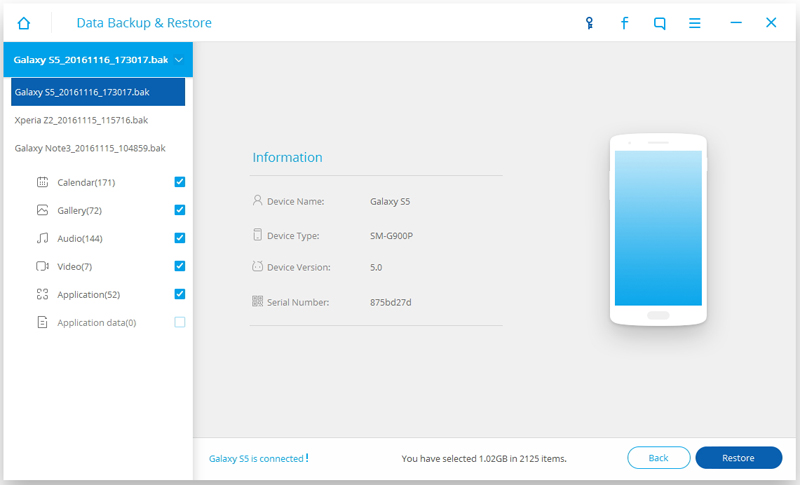
Click on “Restore” and choose from the older backup file on your computer. These backups can either be of this Android device or any other device.

restore data to android from backup

restore data to android from backup

restore data to android from backup

Step 2.Select Backup Data to Restore on Android
You are allow to selected the data you want to restore.Select the different file types on the left and then select the files you want.Click on “Restore” to start.
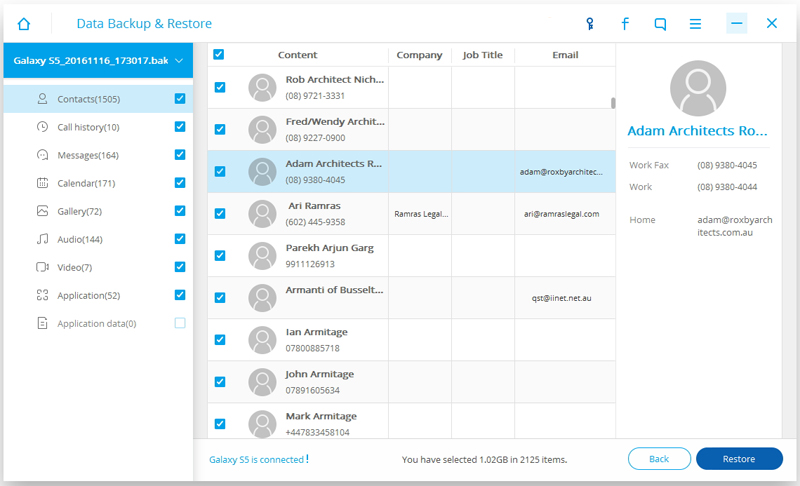
restore data to android from backup

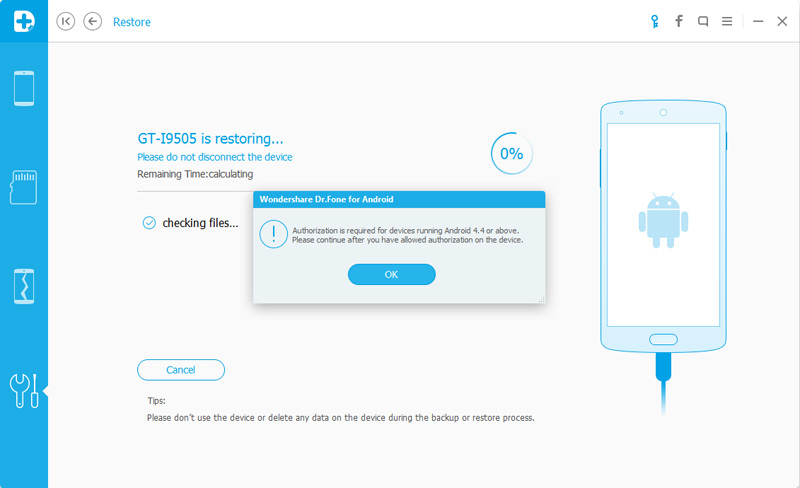
On restoring process,Android Data Backup & Restore Tool will require authorization during the restore process.Allow authorization and then click “OK” to continue.
restore data to android from backup

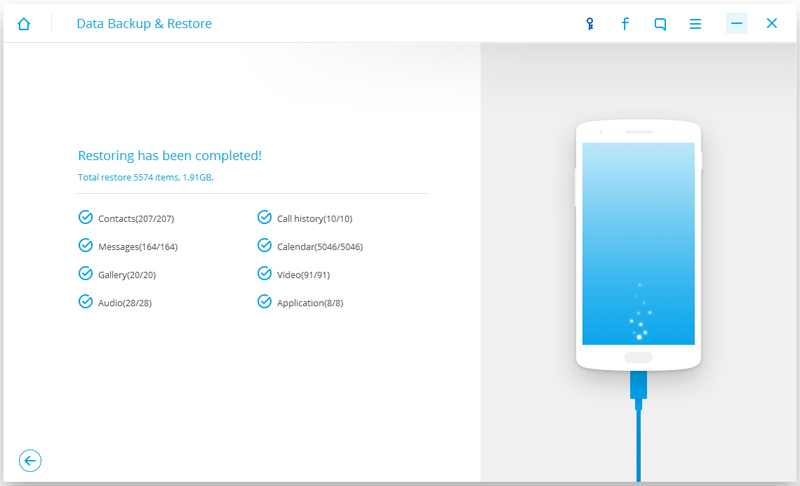
The whole process should last only a few minutes,Android Data Backup & Restore Tool will prompt you that the restore process has been completed along with a detailed account of which types of data have been successfully restored and which ones have not.
restore data to android from backup

d_win d_mac

Part 5:Factory Reset on Samsung Galaxy Note 7 to Erase Data before Recalling

To delete all of your files data and settings from your Samsung Galaxy Note before returning, from the Home screen, touch Apps > Settings > Backup and reset > Factory data reset.

Read the information provided, and then touch Reset device. If you have a security lock set up on the device, you will be prompted to enter the lock information before proceeding. Touch Delete all to delete all information and downloaded applications.

The factory reset process may takes you a few minutes while your Samsung data and settings are all removed.However,I have to remind you that do the factory reset on Samsung is just simply delete data and settings on device instead of permanently erasing data on it.To wipe data from your Samsung device without restoring,you should get help of Android Data Eraser.Please keep on reading.

Part 6:Permanently Erase Data on Samsung Galaxy Note 7 before Recalling

When you finished backed up Samsung Galaxy Note 7 to computer,the next you should do is to permanently erase all data and settings on Samsung Galaxy Note 7 before recalling.As we know,only do factory resetting on device can’t remove data completely from device,the deleted data can be restored by some professional data recovery.To wipe all data from your Samsung surely,here we strongly recommend for you this trustworthy data removal tool-Android Data Eraser,which help to erase existing data,wipe off everything on Android Samsung phone:erase all deleted data from Samsung Galaxy Note 7without recovery,including contacts,messages,photos, videos, call logs, Apps and other private data.It supports all Android devices ever created,such as Samsung, Sony, HTC,LG,Motorola,ZTE, Huawei and so on.

d_win d_mac

Step 1.Run the Android Data Eraser on Computer and Connect Note 7 with it
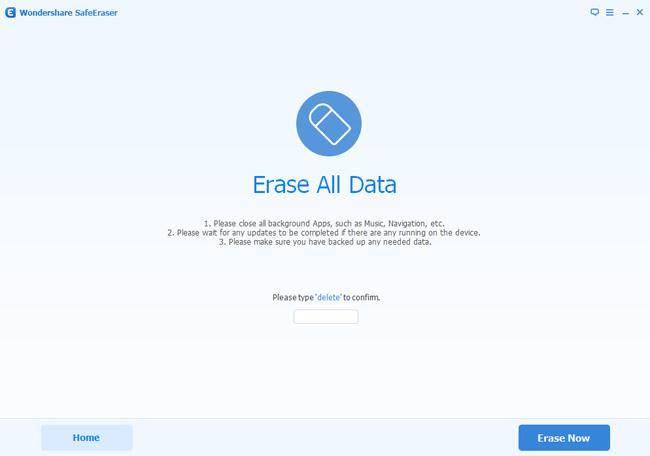
Step 2.Click “Erase All Data” Option
Step 3.Begin to Erase All Data from Samsung Galaxy Note 7
Step 4.Factory Reset on Your Note 7
wipe-note-7-data-before-recalling

Detail tutorial:How to Permanently Remove Data on Samsung Galaxy Note 7 before Recalling

Related Article:

How to Backup and Restore Samsung Galaxy Note 7

How to Backup and Restore Contacts on Samsung Galaxy Note 7

How to Backup and Restore Android on Computer

How to Backup Android Phone or Tablet Data to Computer
How to Unlock the Screen Lock on Samsung Galaxy

How to Unlock the Screen Lock on My Samsung Phone?
Help!What do I do if I forget the screen lock password on my Samsung Galaxy S6?How to unlock my phone’s locked screen remotely on the Find My Mobile web page?

* How to Unlock Samsung Phone with a Broken Screen

* How to Recover Lost Data from Samsung Phone with Broken Screen

Unlock the Screen Lock on Samsung Galaxy

Most of the times that we key in new security details on our phones in order to prevent our personal data on device and avoid leak to anyone.A good number of us tend to forget the passwords, and in most cases, the patterns. With the patterns forgotten and passwords lost, we’re usually locked out, and can’t access our device without password.In this article, we are going to take a look at the solution with detail procedures to unlock Samsung without password.I hope that the three methods is useful for you that perfectly suits your needs.

Method 1: Remove Samsung Locked Screen without Password(No Data Loss)

Android Lock Screen Removal is your ideal choice to unlock Samsung without password in minutes,no more series steps,no more security problems.This helpful program is used to solve Android locked screen problems effectively.Now the latest version currently supports Samsung devices only.It can help Samsung users disable the password and pattern lock issues on Samsung device without data loss,afer remove the phone’s locked screen,you can access your contacts, SMS, pictures, emails or other important data.The program applicable Samsung device including Samsung Galaxy S9/S8/S7/S6/S5/S4/S3,Note 5/4/3,etc.

d_win d_mac

Bypass Samsung Lock Screen Pattern, Password, Pin and Fingerprint Without Data Loss

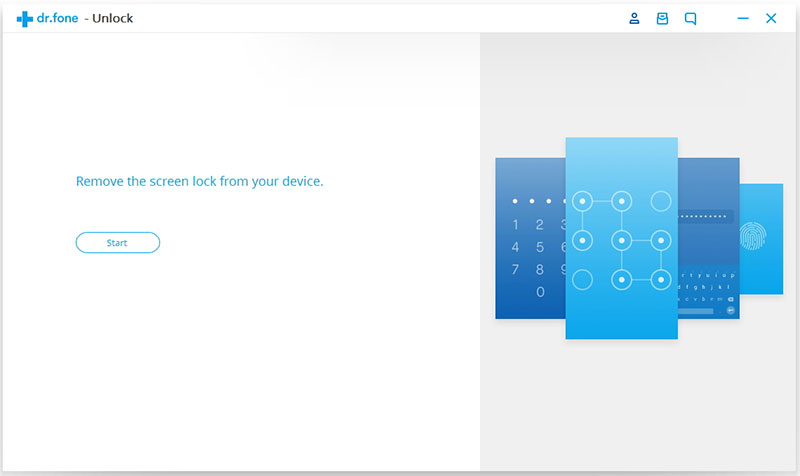
Step 1. Run Android Toolkit on Computer
Download and install Android Lock Screen Removal & Data Recovery program on your computer.Then run the program,and then click “Android Lock Screen Removal” option.

remove samsung locked screen

Step 2. Begin the Removal Process
Click the Start button to start the removal process.

select mode

Step 3. Connect Samsung to the Computer
Once you see the prompts below, connect your Samsung to computer via USB cable. Note that the USB debugging mode on your device should be turned on before.

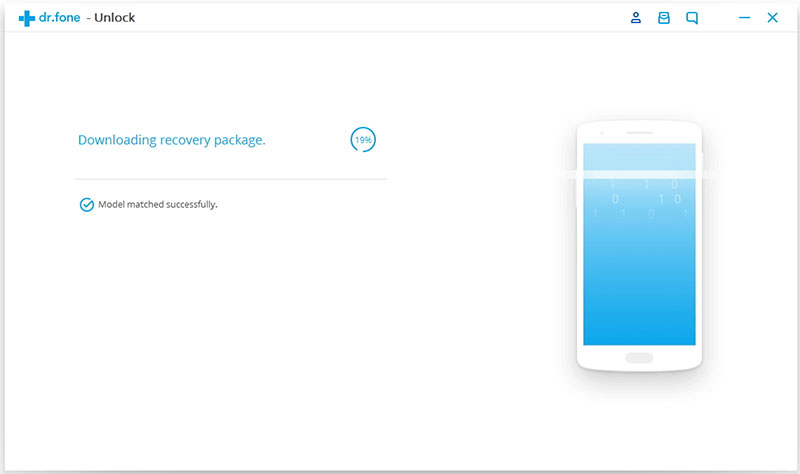
Step 4. Download Recovery Package for Samsung
Android Lock Screen Removal & Data Recovery is downloading recovery package for device and match the phone model after checking the agreements. Then it will begin to restore your device. Please wait until this restoring process is complete.

downloading recovery package for samsung

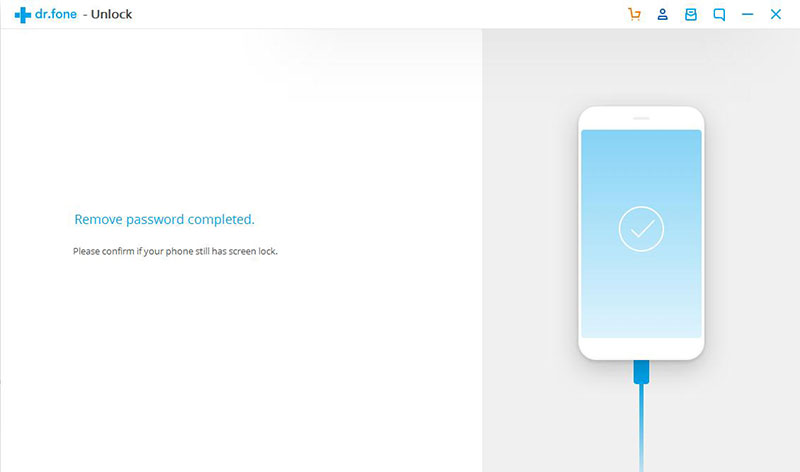
Step 5. Remove Password on Samsung Completed
Now Android Lock Screen Removal & Data Recovery has unlocked your Samsung without password.You can go to your phone and confirm if your device still has a password for the screen lock or not.

remove samsung locked screen

The whole removal task is so easy,isn’t it? In addition,the Android Lock Screen Removal also enables to restore deleted data from Android device after losing data under any circumstances,it allow to restore data from Android SD card/Android memory card as well.

d_win d_mac

Method 2: How to Unlock the Screen Lock on Samsung Phone Remotely

If you forgot your screen lock password,you can also unlock Samsung Galaxy phone locked screen remotely on the Find My Mobile web page.Let’s teach you how to unlock your Samsung phone’s locked screen remotely on your computer.

Step 1.Go to Find My Mobile web page: http://findmymobile.samsung.com and log in with your Samsung account details.

find my mobile page - unlock screen

Step 2.After logging in to your Samsung account successfully, find the “Unlock my screen” option on the main page and click it.

Unlock my screen

Step 3.Step 3.Click “Unlock” button start to unlock your phone screen.

unlock samsung screen

Step 4.Select OK when you receive a Notification on your computer saying your screen is unlocked, you can unlock your Samsung phone screen remotely on computer.

unlock Samsung phone screen remotely

Method 3: Unlock Samsung Screen Locked by Hard Reset(Data Loss)

To bypass Samsung lock screen pattern, Pin, password and fingerprint by yourself at Home,the free way is Factory / Hard Reset your phone.But after performing factory / hard reset the phone,it will will erase all data and personal information from the phone,your phone will back it to its original factory state.Please carefully consider whether to perform hard reset and bypass the security.

Step 1.Turn off your Samsung phone at first.
Step 2.Press and hold Volume UP,Home and Power keys at the same time.

hard reset s7

Step 3.When you see the Samsung logo appear,please release the Power key but continue to hold the Volume Up key and the Home key.
Step 4.When you see the Android System Recovery screen appears,please release all keys.
Step 5.Use the Volume Up/Down keys for navigation and the Power On key for OK.
Step 6.Choose “wipe cache partition

hard reset galaxy s7

Choose “Yes — delete all user data” option

samsung hard reset

Finally,choose “reboot system now” to reboot the Android system and hard reset your phone now.

hard reset samsung s7

Note:During the hard reset process,all of your data will be erased,so we recommend you use the Android Lock Screen Removal to unlock your phone,it will not erase your data.What’s more,this Android Tool Kit also can help you recover lost/deleted data from Android; extract files from Android with broken screen, locked screen and black/blank screen; backup and restore Android data; Unlock Android phone SIM Card in minutes.

Download the Android Toolkit – Android Lock Screen Removal and solve your phone problem at Home now:

d_win d_mac

Related Article:

How to Unlock Android Locked Screen

How to Recover Lost Data from Samsung with Locked screen

Forget Android SIM Card Lock PIN and How to Remove it

How to Set the Smart Lock of Samsung Phone

Forget iPhone Locked Screen Password and How to Remove it

Unlock the Screen Lock on Samsung

Recover Deleted Data after Nexus 9 Android 7.0 Upgrade

Android 7.0 Nougat is Released Now
Google is pushing Android 7.0 Nougat to Android One devices. The update comes just two weeks after the availability of Android N on Nexus devices.Google often pushes the latest Android update first to Nexus range and then seeds the same to compatible Android One devices. This time around, the update has come in just two weeks time.Google had followed similar approach last year with Android 6.0 Marshmallow.GSMArena reports a Cherry Mobile G1 user to have gained access to the update. Android One devices get latest Android a day after Google releases the Nexus factory images.

nexus 9

Android 7.0 Nougat is a significant update over Marshmallow.Android 7.0 Nougat follows on the successful material design first seen with the launch of Marshmallow but adds new design elements to notifications.The single major update with Android 7.0 Nougat is the split-screen multitasking feature.The feature works only with handful of apps but should add support for all apps very soon.The feature is ideal for surfing the web and chatting with your friend on WhatsApp. However, some Google apps lack support for this feature.

Check the lists in the following part to confirm whether Android 7.0 Nougat update is available for your current device.

1.Nexus 6,Nexus 5X,Nexus 6P.
2.General Mobile 4G phone.
3.Nexus 9 Tablet, Pixel C Tablet.

Android 7.0 Nougat has finally started rolling out to devices, and many people are no doubt wondering if it’s a worthwhile upgrade.However,upgrade Nexus to Android 7.0 may lead to delete data when it was failed or met something wrong.Please take it easy.Here we will introduce you powerful Android data recovery software and shows you step by step to use it to restore deleted data on Nexus after Android 7.0 Nougat update.

How to Recover Data after Android 7.0 Nougat Upgrade

Android 7.0 Data Recovery software is a reliable tool that you can use to restore deleted data on Nexus 9 after Android 7.0 Nougat upgrade.It allows you to recover deleted files such as contacts, videos, photos, text messages, documents from Nexus 6,Nexus 5X,Nexus 6P,Nexus 9 Tablet,Pixel C Tablet and general mobile 4G phone after Android system(Android 7.0,Android 6.0) update.Now you can read the detailed guide to learn how to perform the data recovery task.Additionally,this program support to restore Android data after losing data due to Android system upgrade,Android system rooting,restore Android to factory resetting,etc,.

d_win d_mac

Restore Deleted Data after Nexus 9 Android 7.0 Update

Step 1.Install and Launch Android 7.0 Data Recovery
Install and launch Android 7.0 Data Recovery on your computer and then connect your Nexus 9 with the PC via USB cable.

recover nexus 9 data after android 7.0 upgrade

Step 2.Enable USB Debugging on Nexus 9
There are different modes are provided to different Android users using the different operating system.You are allow to select the mode as your Nexus Tablet operating system as bellow.

recover nexus 9 data after android 7.0 upgrade

Step 3.Scan Data on Nexus 9
Once Nexus USB debugging enabling completes,the program will detect your phone automatically.Now you should select file for scanning.After that,you should click “Next” to allow the program to scan your Nexus before recovery.

Note:You should make sure that your Tablet is at least 20 % off battery.

recover nexus 9 data after android 7.0 upgrade

Step 4.Allow Program to Analyze Data on Nexus 9
If you have rooted your phone before,you should allow the program Superuser Authorization on the screen of your phone before the scanning.You should click on “Allow” button when message pop-ups on your Tablet screen.

recover nexus 9 data after android 7.0 upgrade

Now this program will begin to analyze data on Nexus 9.

recover nexus 9 data after android 7.0 upgrade

Step 5.Preview and Restore Deleted Data on Nexus 9 after Upgrading
Preview and recover data from Nexus 9.It will take some time to scan the deleted data on Nexus 9.After that,you are allow to preview the restored data found in the scan result.Finally,select the data and click on “Recover” button to save the selected data to your computer.

recover nexus 9 data after android 7.0 upgrade

d_win d_mac

Related Article:

How to Restore Deleted Data after Nexus 5X Android 7.0 Upgrade

How to Recover Lost Data after Nexus 6 Android 7.0 Update

How to Recover Lost Data after Android 7.0 N Upgrade

How to Recover Data after Android 6.0,Android 7.0 Update

Restore Deleted Data after Nexus 5X Android 7.0 Upgrade

Android 7.0 Nougat is officially available for the Nexus 6, Nexus 5X, Nexus 6P, Nexus 9, Nexus Player and Pixel C (and the General Mobile 4G Android One).If you don’t have a Nexus,you can get a feel for when (or if) your phone will get Nougat based on our expectations.But there are some caveats you need to know about upgrading Nexus phone to Android 7.0,so read on to find out what you need to know.

Delete Data on Nexus 5X after Android 7.0 Upgrade
A lot of people later found that their devices seem to be back to factory settings, the photos, some apps, music, documents and even contacts are deleted and disappeared after updating.Losing data on Nexus 5 after Android 7.0 upgrade become a real headache.How to deal with the data loss problems in this case?

Recover Deleted File on Nexus 5X after Android 7.0 Upgrade

Android 7.0 Data Recovery is available for restoring deleted data on Nexus after Android 7.0 upgrade,such as contacts,photos,videos,messages,call logs,notes,WhatsApp messages,document and so on.In addition,this wonderful program allow to restore deleted data on Android device after Android system upgrade(Android 7.0,Android 6.0),Android rooting,Android device broken/damaged,and more data loss circumstances.Supported devices:Nexus 5X,Nexus 6,Nexus 6P,Nexus 9,etc,.

d_win d_mac

How to Restore Deleted Data from Nexus 5X after Android 7.0

Step 1.Install and Launch Android 7.0 Data Recovery
Install and launch Android 7.0 Data Recovery on your computer and then connect your Nexus 5X with the PC via USB cable.
recover nexus data after android 7.0 upgrade
Step 2.Enable USB Debugging on Nexus 5X
There are different modes are provided to different Android users using the different operating system.You are allow to select the mode as your device operating system as bellow.

recover nexus data after android 7.0 upgrade
Step 3.Scan Data on Nexus
When Nexus USB debugging enabling completes,the program will detect your phone automatically.Now you should select file for scanning.After that,you should click “Next” to allow the program to scan your device before recovery.

Note:You should make sure that your phone is at least 20 % off battery.

recover nexus data after android 7.0 upgrade

Step 4.Allow Program to Analyze Data on Nexus
If you have rooted your phone before,you have to allow the program Superuser Authorization on the screen of your phone before the scanning.You should click on “Allow” button when message pop-ups on your phone screen.

recover nexus data after android 7.0 upgrade

Now this program will begin to analyze data on Nexus 5X.

recover nexus data after android 7.0 upgrade

Step 5.Preview and Restore Deleted Data from Nexus after Upgrading
Preview and recover data from Nexus.The program will take some time to scan the deleted data from Nexus.After that,you are allow to preview the recovered data found in the scan result.Finally,select the data and click on “Recover” button to save the selected data to your computer.

recover nexus data after android 7.0 upgrade

d_win d_mac

Related Article:

How to Recover Lost Data after Nexus 6 Android 7.0 Update

How to Recover Lost Data after Android 7.0 N Upgrade

How to Recover Data after Android 6.0,Android 7.0 Update

How to Recover Data from Samsung after Upgrading to Android 6.0

Recover Lost Data after Nexus 6 Android 7.0 Update

Summary:
Recently When Android 7.0 upgrade is released,more Nexus users must can’t wait to upgrade their phone to the newest Android system.Since the features of Android 7.0 upgrade is highly welcomed by Nexus account,some of them search ways to do the update job by themselves.However,we receive the report that they lost data on Nexus phone after Android 7.0 upgrade.here we’ll offer you the best solution to restore Nexus data after upgrading for reference.

nexus-6

Backup Nexus Data before Android 7.0 Upgrade
You’re strongly recommended to backup data on Nexus before upgrading firstly.After you’ve completing upgrade Nexus 6 to Android 7.0,click “Restart” to restart your phone and get the new system on your phone.Then you can try to restore all your backups from Google Account or Google Cloud back to your Nexus 6.

Restore Nexus Data after Android 7.0 Upgrade

Sometimes,the unexpected circumstance always happen when you are not ready,according to the Nexus account feedback that text messages usually cannot be restored thoroughly from the backup.So how to restore Nexus data completely after upgrading?How to restore Nexus data after upgrading without backup?

If you are wondering the same problem and searching the ways to fix this issue,that you can consider to try Android Data Recovery.It’s an excellent data recovery tool to restore lost data from Nexus 6 after Android 7.0 upgrade.With Android Data Recovery,you are allow to restore Nexus data after upgrading without any data loss even if you haven’t backup,including contacts,photos,videos,messages,notes,call logs and more.In addition,this program support to restore Android phone after losing data due to various of reasons,like deleted mistake,Android rooting,restore Android to factory setting,etc,.

d_win d_mac

How to Restore Lost Data after Nexus 6 Android 7.0 Update

Step 1.Install and Launch Android Data Recovery
Install and launch Android Data Recovery on your computer and then connect your Nexus with the PC via USB cable.

recover nexus data after android 7.0 upgrade

Step 2.Set up Nexus to Enable USB Debugging
There are different modes are provided to different Android users using the different operating system.You can select the mode as your device operating system as bellow.

recover nexus data after android 7.0 upgrade

Step 3.Scan Data on Nexus
Once USB debugging enabling completes,the program will detect your device automatically.Now you should select file for scanning.After that,you should click “Next” to allow the program to scan your device before recovery.For successful scanning, you must make sure that there is at least 20 % off battery for the phone.

recover nexus data after android 7.0 upgrade

Step 4.Allow Program to Analyze your Nexus
If you have rooted your phone before,you have to allow the program Superuser Authorization on the screen of your phone before the scanning.You should click on “Allow” button when message pop-ups on your phone screen.

recover nexus data after android 7.0 upgrade

Now this program will begin to analyze data on Nexus 6.

recover nexus data after android 7.0 upgrade

Step 5.Preview and Restore Lost Data from Nexus after Upgrading
Preview and recover data from Nexus.The program will take some time to scan the lost data from Nexus.After that,you are allow to preview the recovered data found in the scan result.Finally,select the data and click on “Recover” button to save the selected data to your computer.

recover nexus data after android 7.0 upgrade

Note:If you need to transfer the restored data from computer to your Nexus or other device,just click here to transfer data from computer to Android.

d_win d_mac

Related Article:

How to Recover Lost Data after Android 7.0 N Upgrade

How to Recover Data after Android 6.0,Android 7.0 Update

How to Recover Data from Samsung after Upgrading to Android 6.0

How to Recover Data from Android Phone