Backup is essential.Whether your Android smart phone or Android tablet,the backup at the appropriate time come to save the unnecessary trouble.It’s no more worse than you find that you have backed up anything on device after losing data.So here are several ways to make a backup of Android for reference.
You should back up your Android data often as you never know when you might accidentally delete/lost something valuable.It could also happen when you perform updates or clean out your files to save space,device lost/stolen,etc,. Whatever the reason,you should keep your data backed up as frequently as possible.
Part 1:Backup Android Phone or Tablet with USB
I recommend making the first backup of your Android data be a copy of the SD card you keep on your computer. I’ll list the basic steps here, but note that, with Android devices, there may be slight variations in the exact wording or steps.
Step 1.Connect your Android device to your computer (Windows or Mac should both work) via the USB cable.
Step 2.On your Android, pull down the main menu (swipe down from the top of the screen) and select “USB connection.”
Step 3.On the next page, choose USB Mass Storage and hit OK.
Step 4.You’ll see a new drive or “Removable Disk” appear on your computer for the SD card. Open it up,and copy all the files inside to a new location on your computer.I would put the date right into the name of the folder-something like “130815_ANDROID-SD-CARD-BACKUP”-so you can very easily identify it and when it was created.
This first backup copy is all well and easy, and you’ll be thankful you have it if anything goes wrong,but it’s not likely to be updated too often.So for your second backup,I recommend choosing a method that will update more frequently to ensure you have all the most recent photos, texts, settings, and everything else stored on your Android.
But seeing as Android is all about giving users choice, there are a few different options.
Part 2:Backup Android Phone or Tablet with Google
Luckily,Google automatically syncs things like your contacts, calendar appointments, docs, and even app purchases-as long as you give it permission to do so.
If you go into your phone’s settings, you’ll find a section called Backup & Reset. In here you’ll find an option for backing up your data, including Wi-Fi passwords, preferences and app data. All of this will be tied to your Google account, which you can set to automatically restore when you re-install an app.

While Google will preserve a lot of your data, there are other programs help to backup data on Android as well.
Part 3:Backup Android Data to Computer with Phone Transfer
For me,I prefer a more simple,convenient,safe way to backup and restore Android data.Here provides you an useful solution I used Android Transfer,which is a multifunction mobile transfer program for backup and restore data of Android device,including contacts, text messages, videos, music, photos, calendars, call logs,apps.It supports you to backup data efficiently,restore the backed up files to device due to your device is damaged,deleted by mistaken,restore to factory setting,device rooting,etc,.The brands of Android devices including Samsung,HTC,LG,Lenovo,Motorola,Huawei,Xiaomi,ZTE,etc,.Let’s see how it works in detail.


Step 1.Connect Android to Computer and Run Phone Transfer
To begin with,run the Phone Transfer on the computer.Use USB cables to connect your Android to the computer.Then the device will be quickly detected and shown in the primary window.
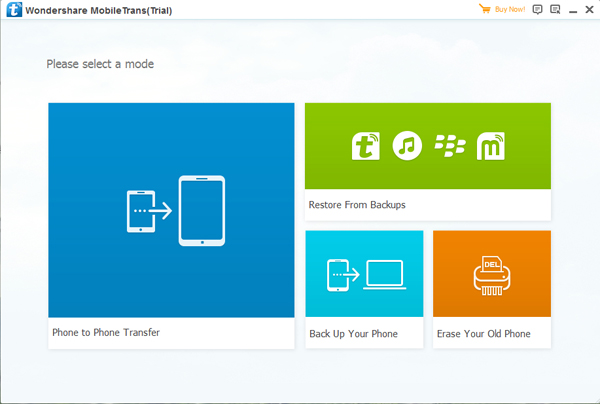
Step 2.Select Android Data to Backup on Computer
Select the “Backup Your Phone” mode in the homepage of program.It will bring up the backup window.By default,all contents you can backup are clicked.You can also just click your wanted ones.
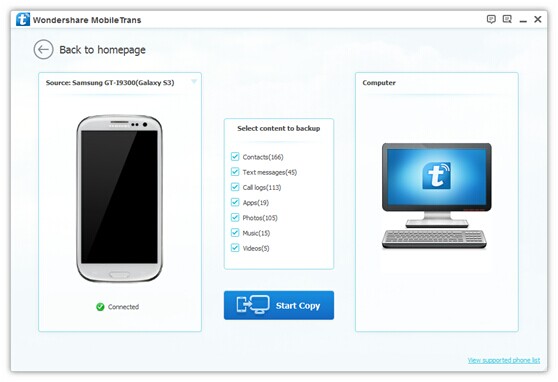
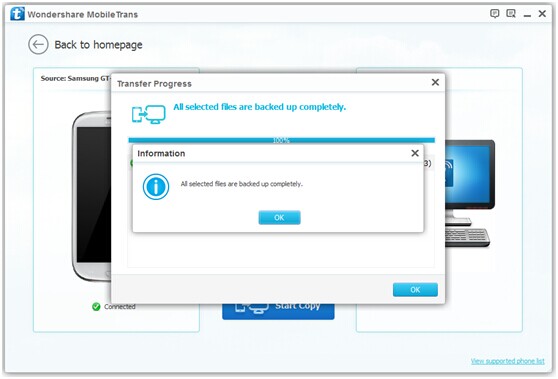
Step 3.Backup Data from Android to Computer
Make sure the ticked files are the ones you’re going to backup.Then,click “Start Copy”.The files transfer begins.Please pay attention not to disconnect device during the whole backup process.
Part 4:Restore Backed up Data from Computer to Android with Phone Transfer
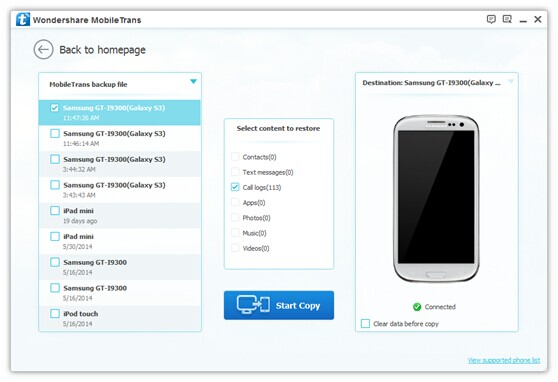
Step 1.Select Phone Transfer Mode
Click “Restore from Backups” in homepage of Phone Transfer.All backups you have made with this program will be listed on the left panel, just select your previous backup files from it,click files you want to restore to your Android.
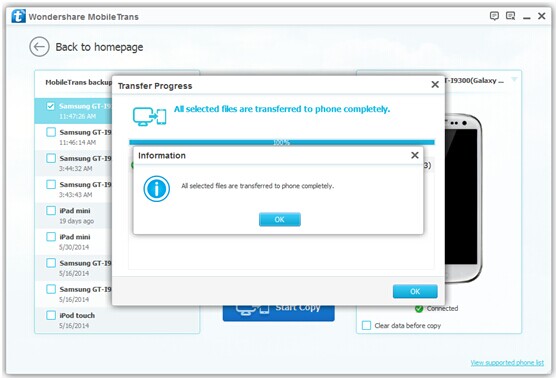
Step 2.Restore Files to Android
Press “Start Copy”button,then all of your selected files will be restored to Android completely.
Phone Transfer enable to backup contacts, text messages,call logs, music,apps, photos, and videos from Android device with a short time.On the other hand,Phone Transfer provide you the function that restore backup on Android without any data loss.
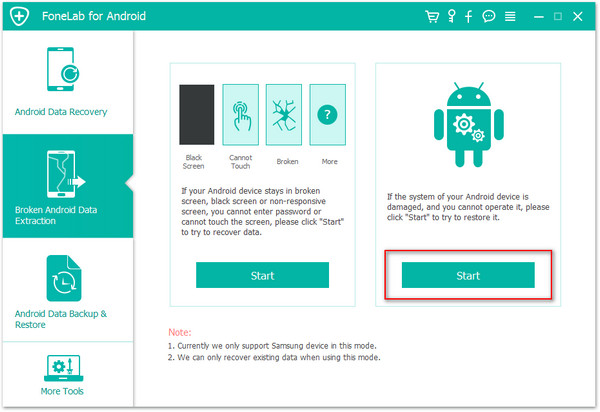
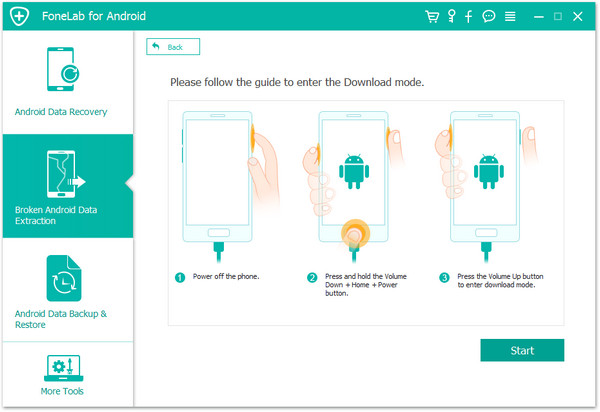
Part 5:Backup Android Data to Computer with Android Data Recovery
Android Data Recovery,another data manager tool here our strongly recommendation,which is an useful tool to backup Android data to computer as well as restore backed up data from computer to Android.The program makes it easy to backup and restore data of Android phone or tablet,such as contacts, text messages, videos, music, photos, calendars, call logs, playlists info and applications.You never need to lost data under any situations accidentally anymore.


Step 1.Connect Android Device to Computer and Run Program
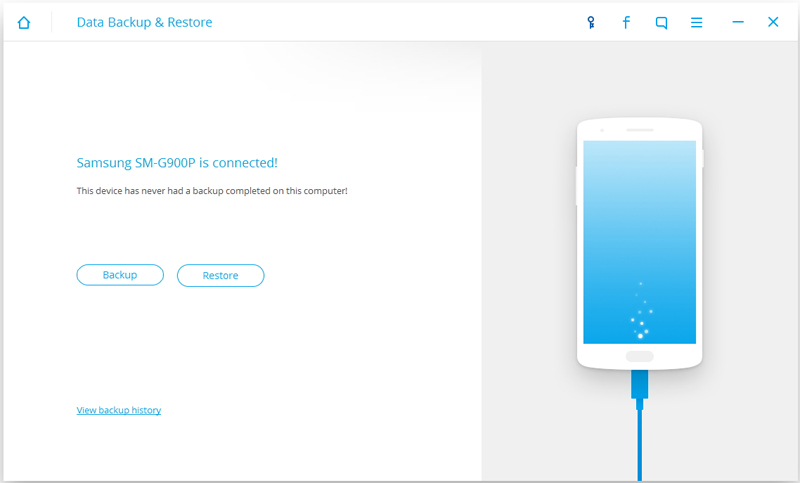
Launch Android Data Recovery and from the “More Tools” section,select “Android Data Backup & Restore” option.Then connect the Android device to your computer using USB cables.The program will detect the device soon.

Note:If you have other Android management program on your computer,make sure none of them is running.
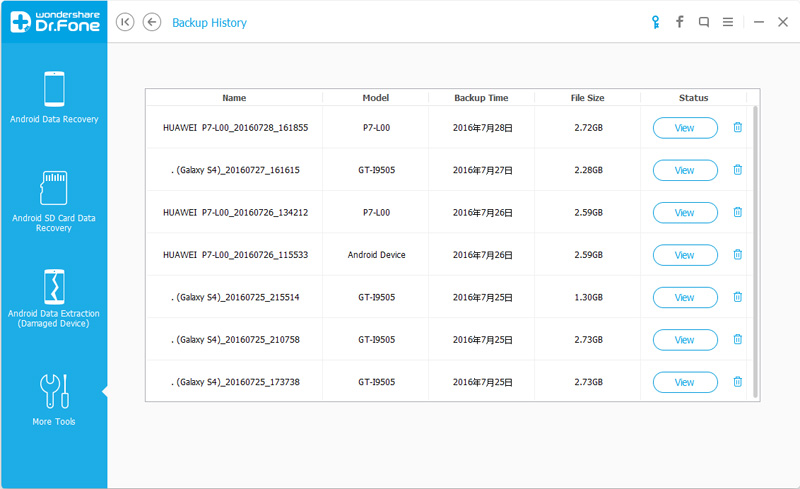
Tips:If you have used this program to back up your device previous,you are allow to view your past backup by clicking on “View backup history”.
Step 2. Select File Types to Backup
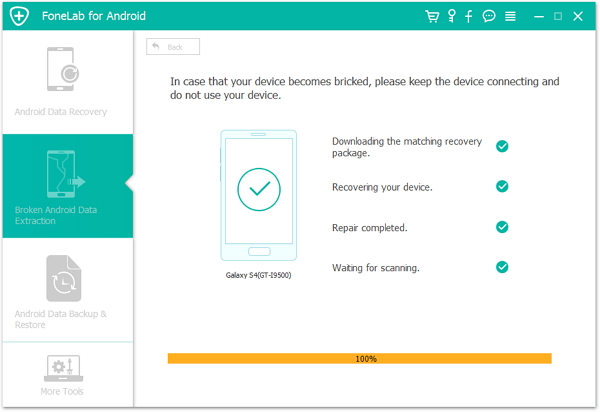
Once program has detected your device,click on “Backup” to select the data you want to backup(include in the past backup).Android Data Recovery can be used to back up 9 different file types including messages, call history, calendar, gallery, audio, video, applications and application data.Please note that to backup app data requires your Android device to be rooted.
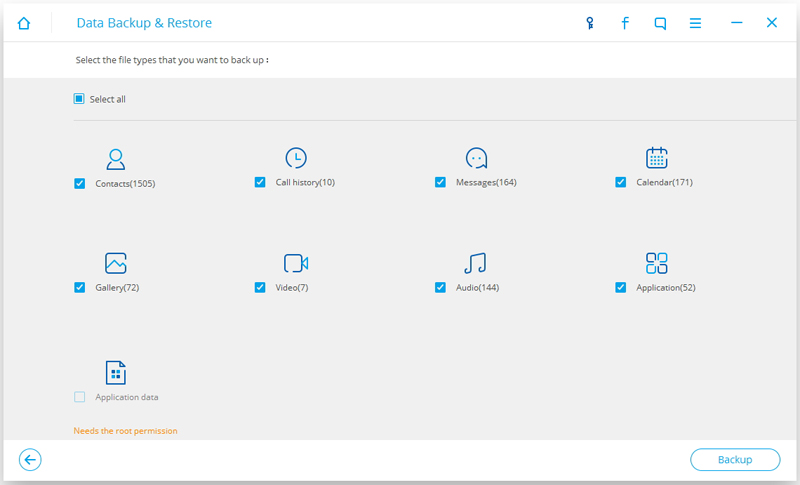
After you have selected the file which you want to backup,click the button “Backup” to start the process.The entire process will take no more than a few minutes.
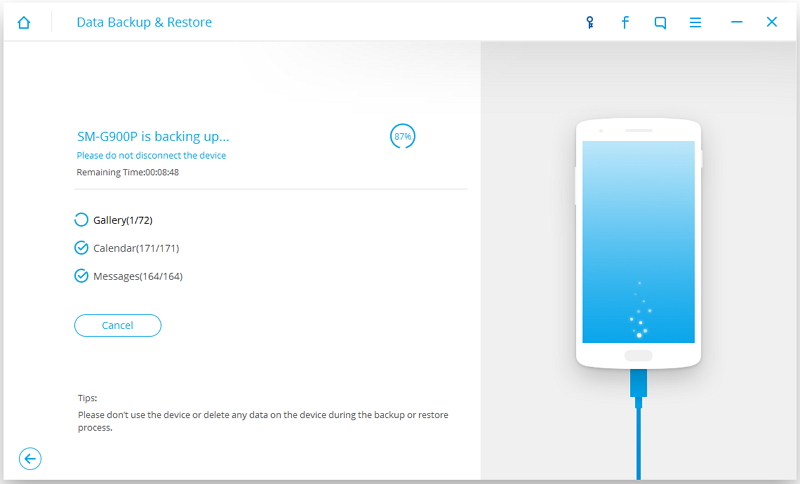
When the backup is complete,you can click on “View the backup” on the lower left corner of the window to see the details of the backup file.
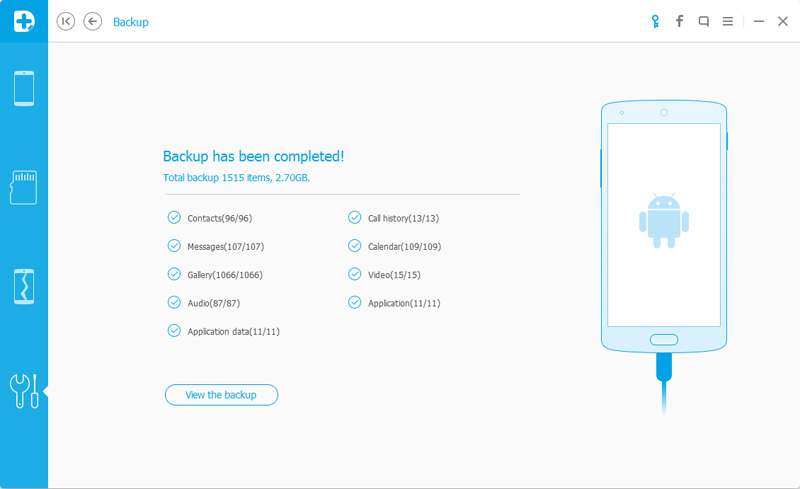
Now you can view your backup file by clicking on “View”.
Part 6:Restore Backed up Data from Computer to Android with Android Data Recovery
Step 1.Connect Android Device to Computer and Run Program
Launch Android Data Recovery and from the “More Tools” section,select “Android Data Backup & Restore” option.Then connect the Android device to your computer using USB cables.The program will detect the device soon.
Click on “Restore” and choose from the older backup file on your computer. These backups can either be of this Android device or any other device.
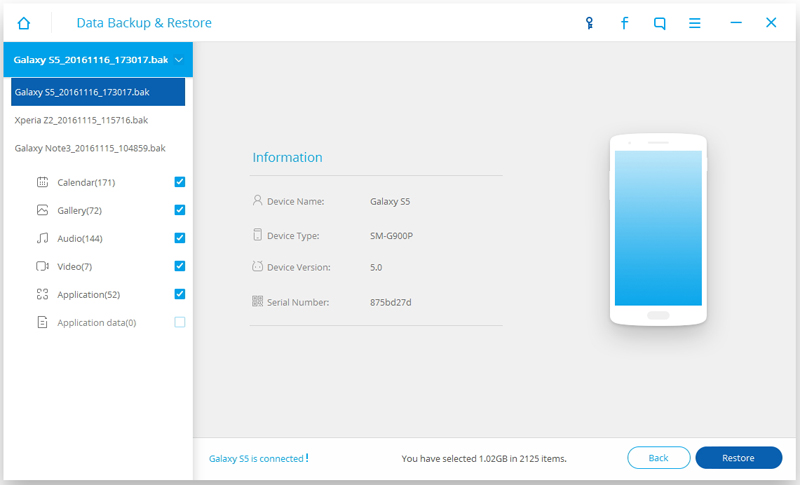
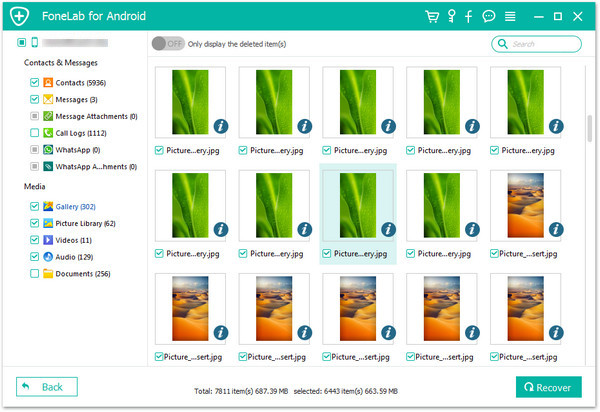
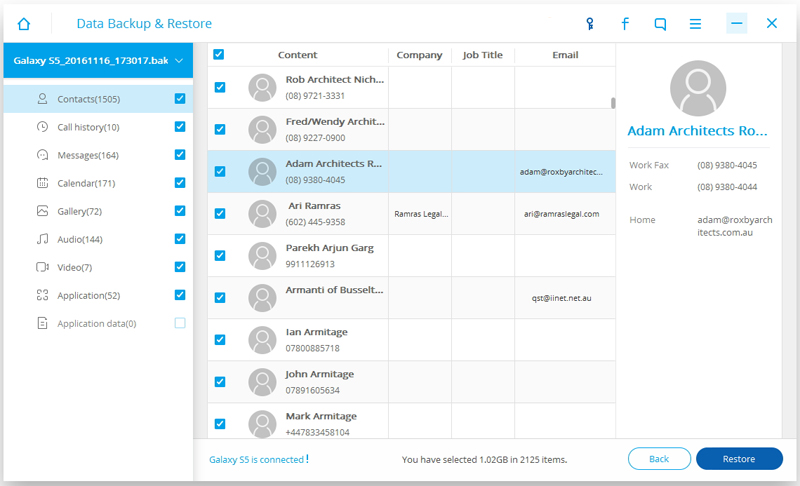
Step 2.Select Backup Data to Restore on Android
You are allow to selected the data you want to restore.Select the different file types on the left and then select the files you want.Click on “Restore” to start.
On restoring process,Android Data Recovery will require authorization during the restore process.Allow authorization and then click “OK” to continue.
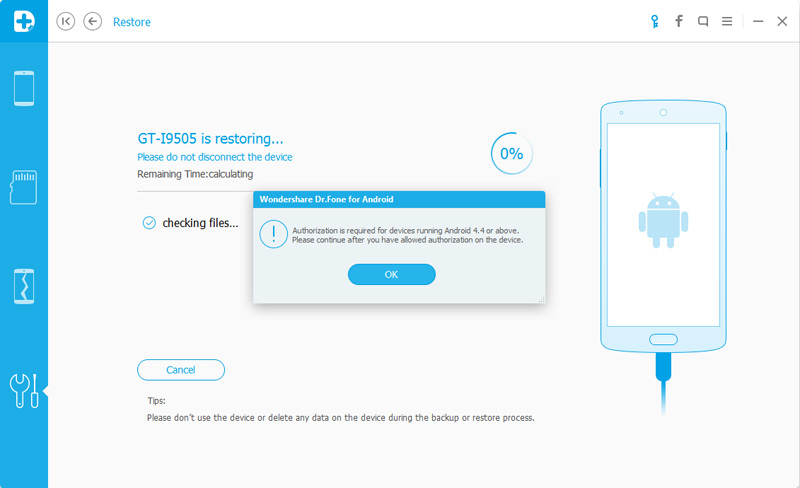
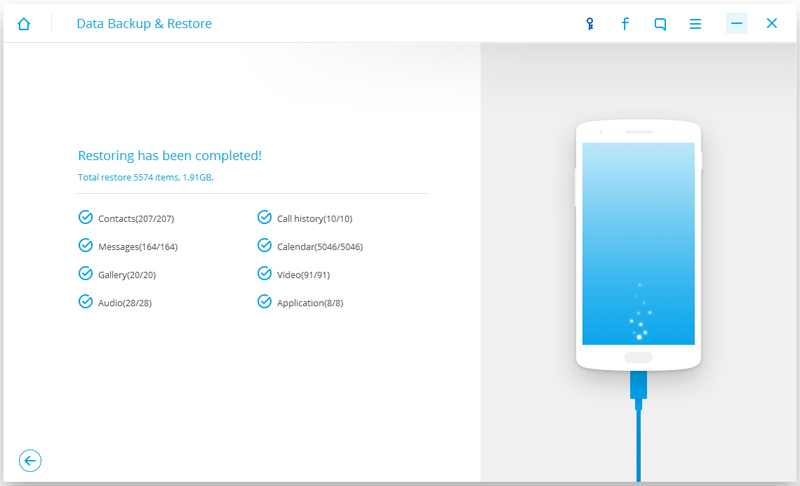
The whole process should last only a few minutes,Android Data Recovery will prompt you that the restore process has been completed along with a detailed account of which types of data have been successfully restored and which ones have not.
Free download the Android Data Recovery:
Related Article:
How to Backup and Restore Samsung
How to Backup and Restore Lenovo
How to Backup and Restore Motorola
How to Backup and Restore LG
How to Backup and Restore Huawei
Backup and Restore Android Data