All posts by DHZ

How to Set Up the New Google Pixel

Google’s new flagship Pixel and Pixel XL smartphones are finally for sale, and new owners will need to know how to use it. In this guide we’ll explain how to setup your Pixel and share a few tips and tricks to make the process easier. Like using Google’s new phone transfer tool and more.

The Pixel is Google’s best smartphone to date, and could be the best Android phone available. Period. It’s that good. Running the latest Android 7.1 Nougat, rocking the best camera in any smartphone, stunning battery life and a premium design. It’s fast, fluid and powerful.

google pixel

Everyone uses their phone different not to mention has different wants, needs or preferences. However, our tips will transfer virtually anything and everything from your old device, including text messages and settings. Then go through some other settings, controls and tips to take advantage of everything this phone offers.

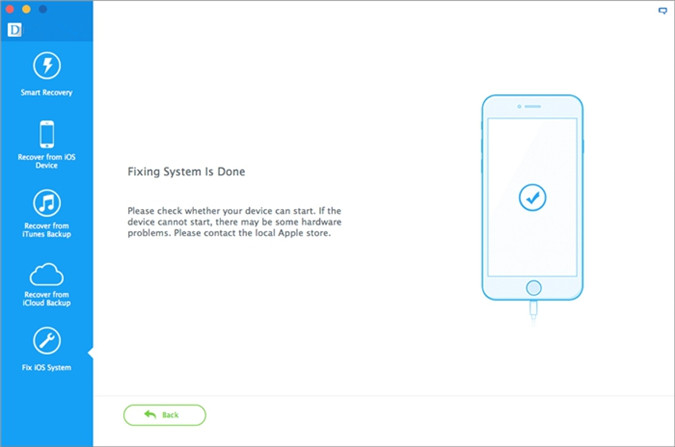
Right out of the box the Pixels run amazing. They are fast, easy to use, and just work. During the first startup you’ll be prompted to do some very important things. Like setup a fingerprint for the scanner and lockscreen measure, sign into your account, or transfer from an old device.

Google’s Pixel will transfer everything from an old Android smartphone, or the iPhone. Both work with the new transfer tool and the USB-to-USB Type-C dongle that’s included in the box. Don’t lose that, it’s what will make switching to your new phone as easy as possible.

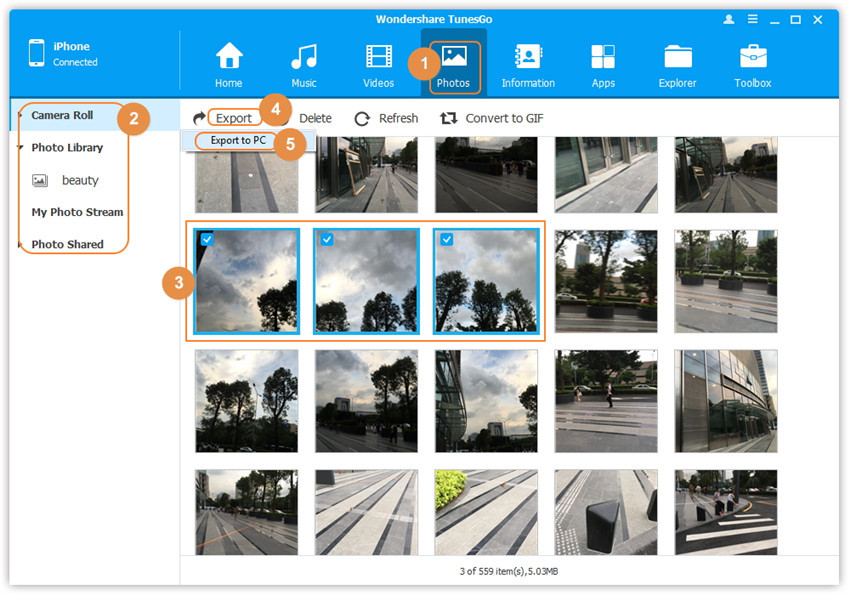
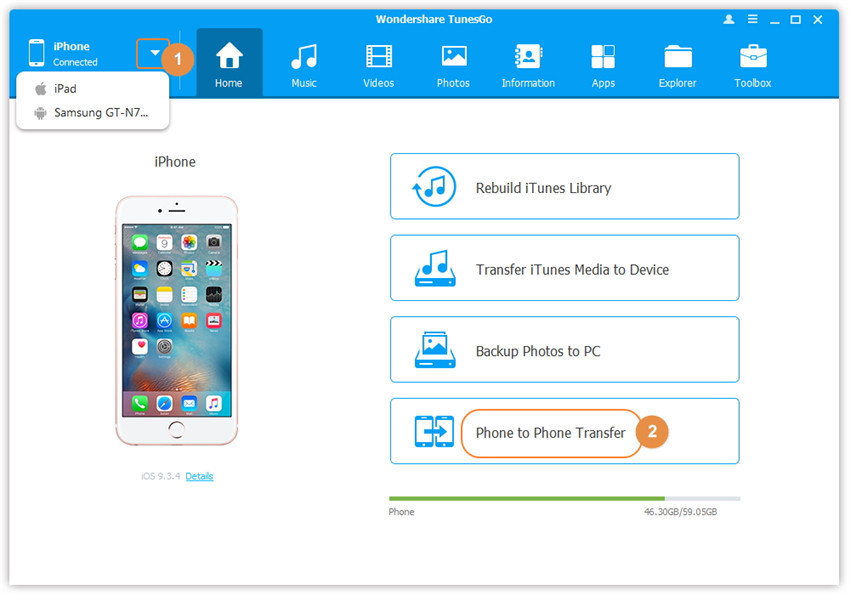
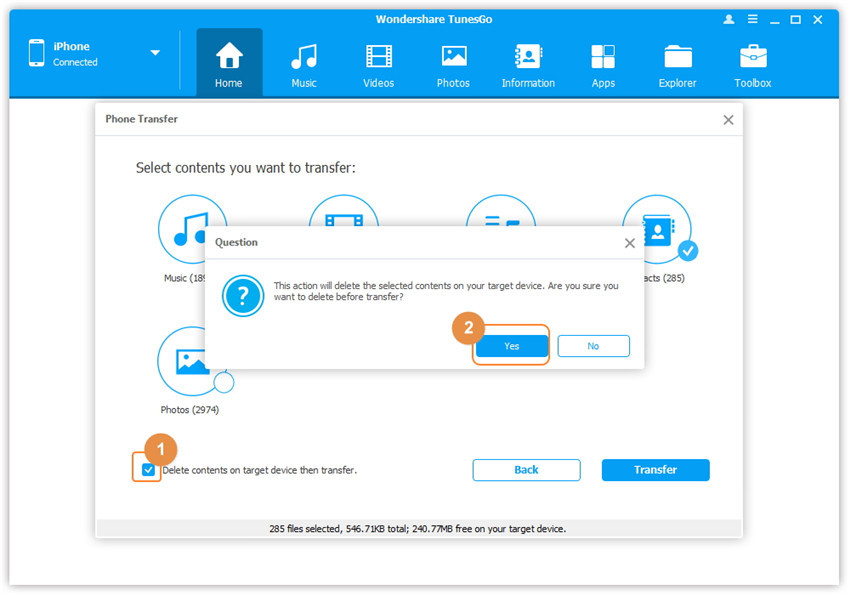
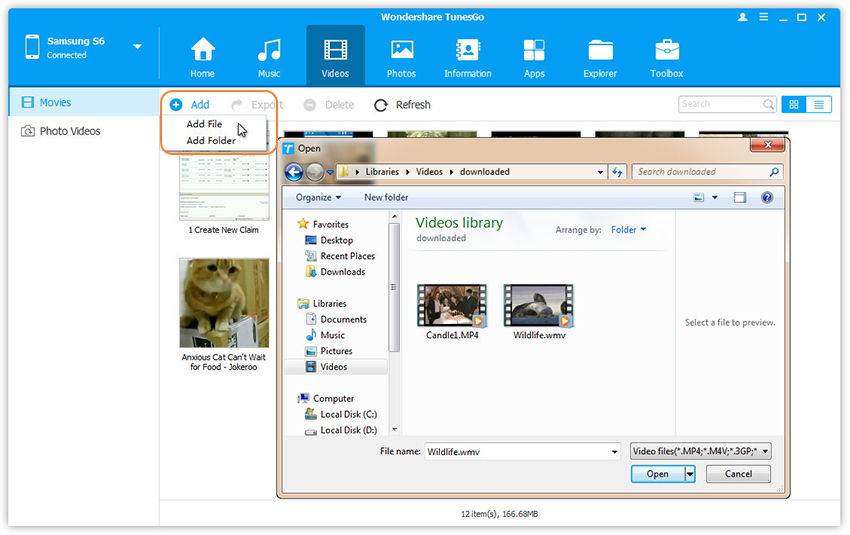
Transfer Data From Old Phone

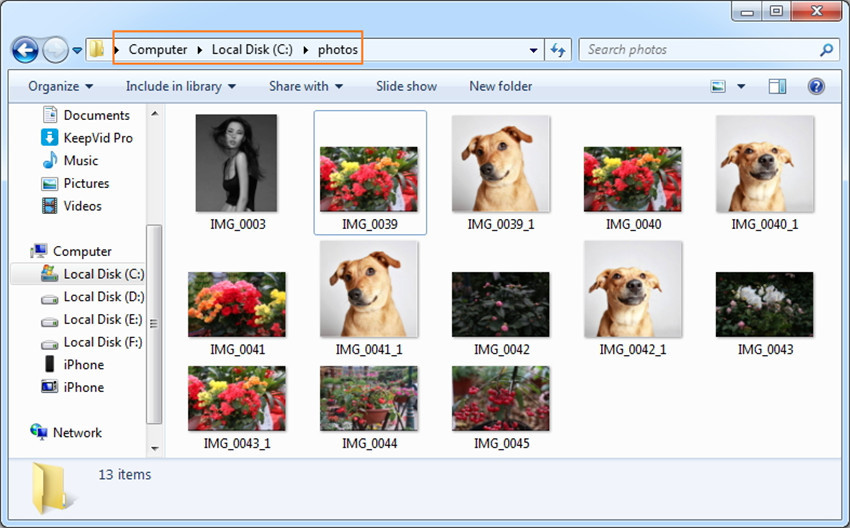
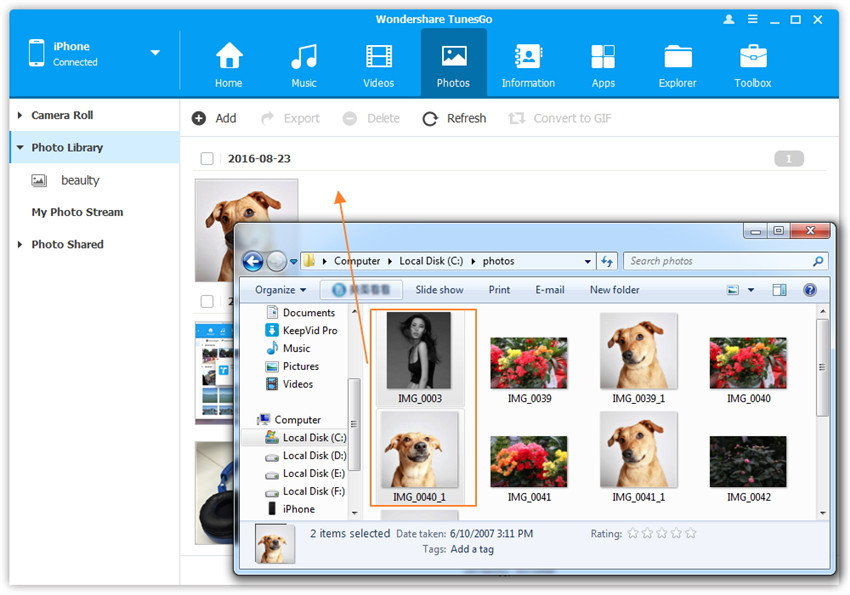
The first thing all owners will want to do is transfer data, apps, settings, contacts, calendar, icon placement, photos or video and even text messages to the Pixel. In the past this has been a difficult and painful process. That isn’t the case anymore, and you’ll be able to switch phones 100% in about 10 minutes.
transfer data to Google Pixel Phone

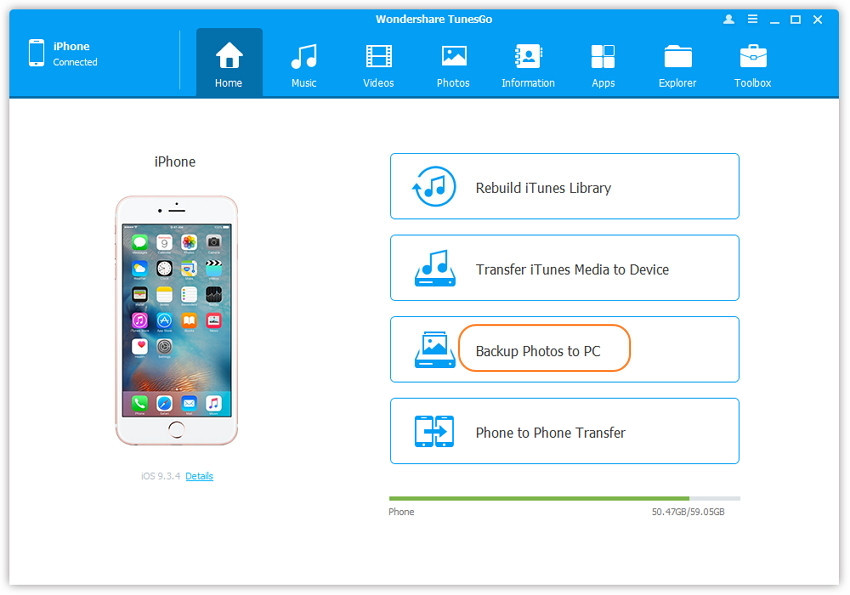
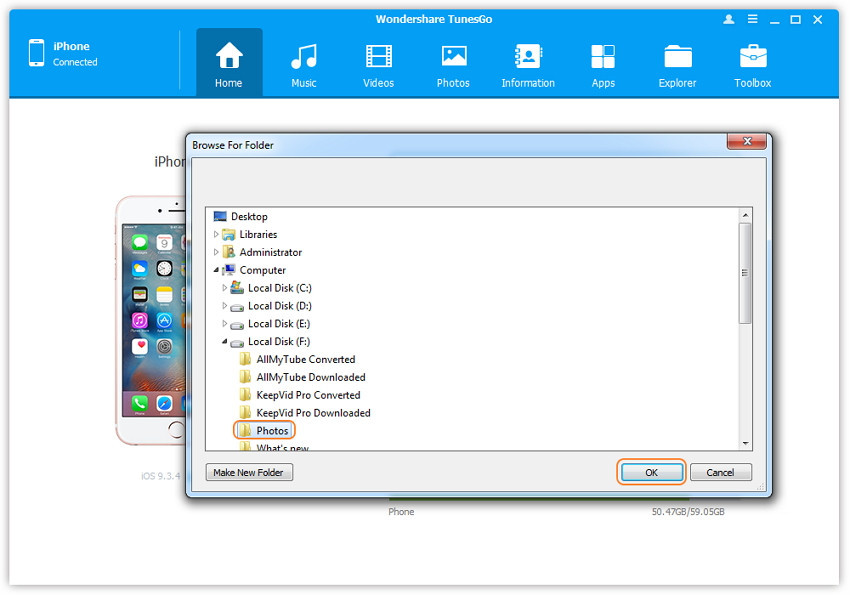
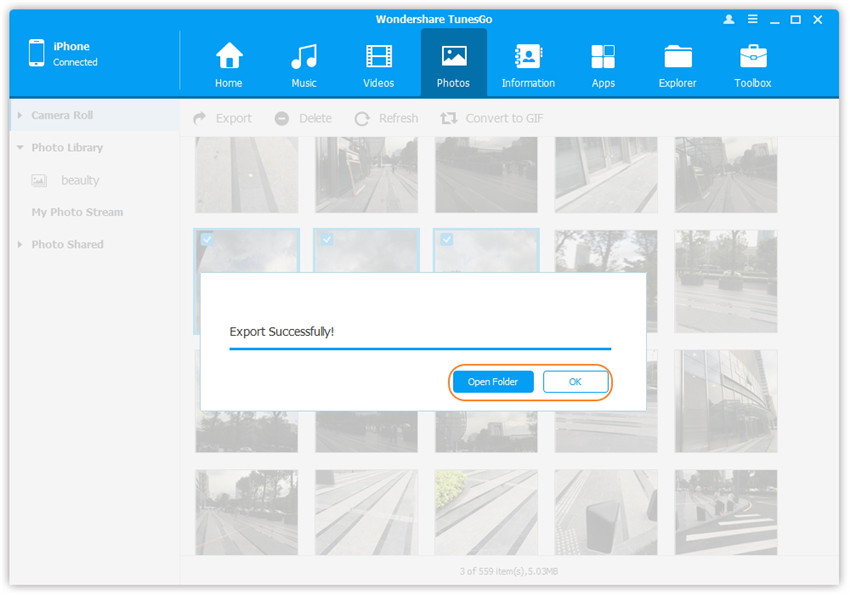
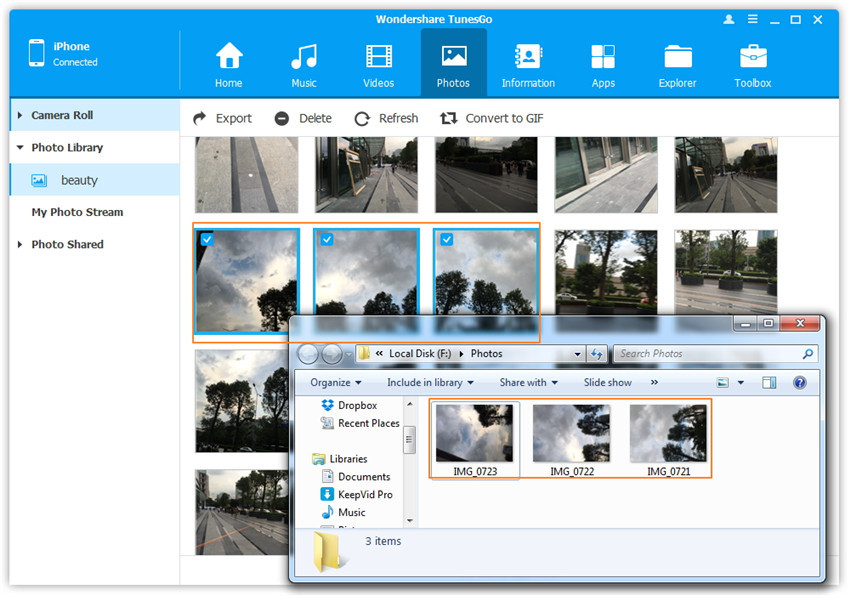
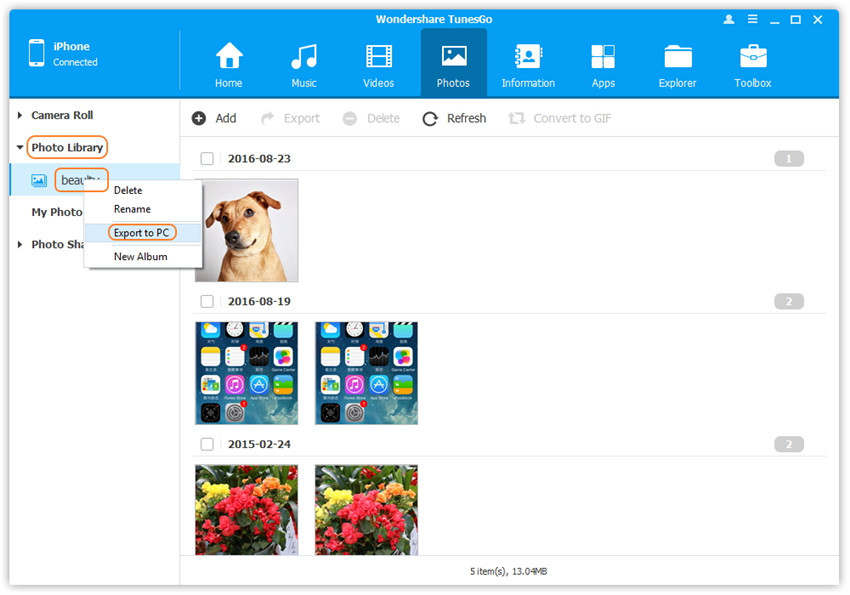
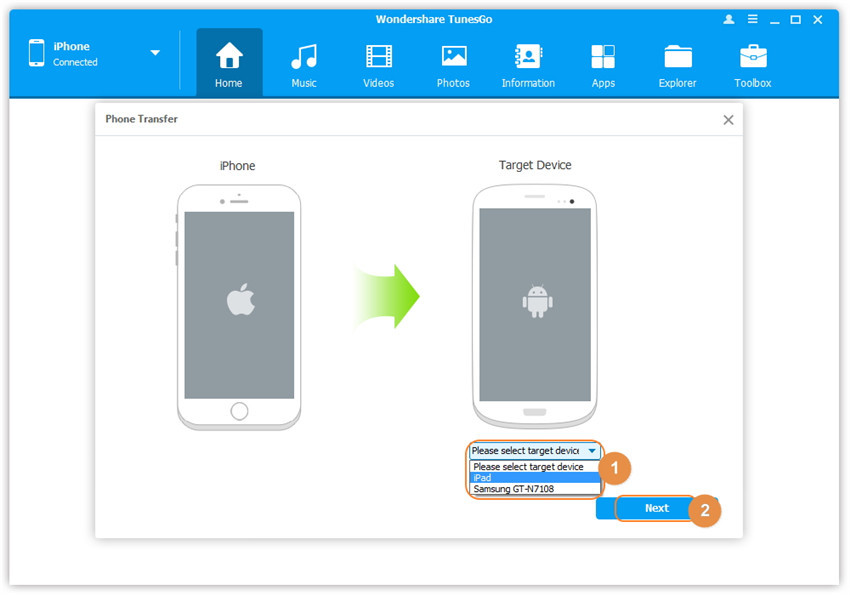
Simply follow the steps on the screen or our images provided. Users will need to plug the USB dongle that’s included in the box into the new Pixel phone. Then the USB cable in the box from the Pixel dongle to your old phone. The adapter goes into the new device.

This will initiate the transfer service instantly, and do literally all the work for you. Almost everything will be transferred. From everything mentioned above to even alarm pre-sets, text messages, app settings or data and more. It’s the complete transfer package similar to Samsung SmartSwitch.

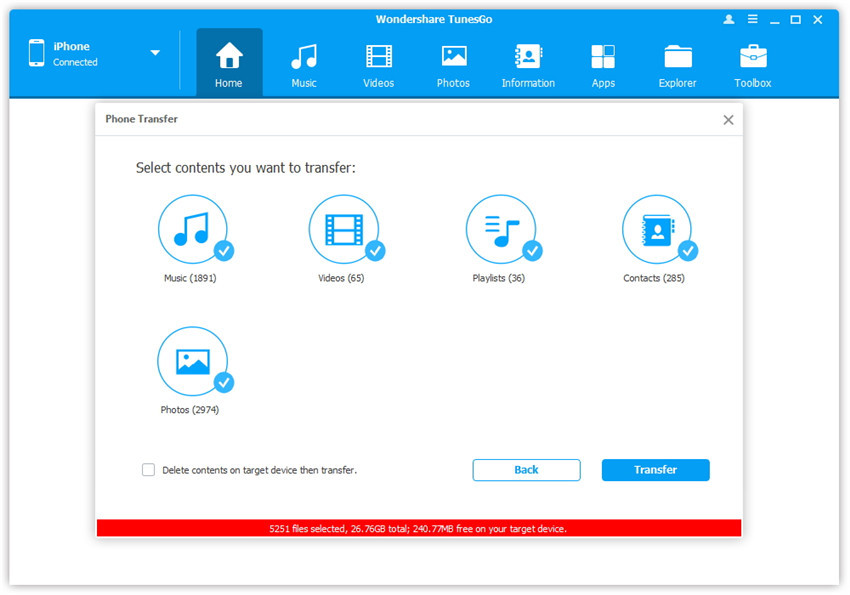
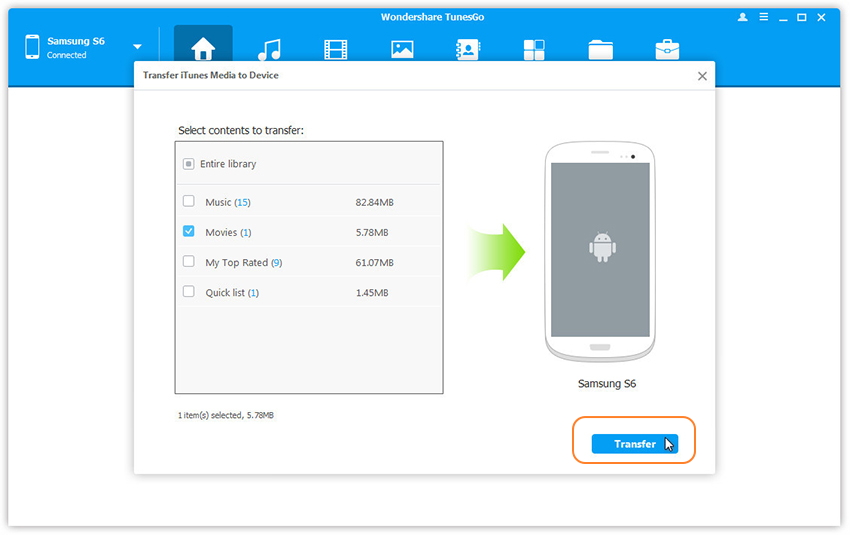
Shown below is the next step, which will tell you what and how much is being transferred, and will let you customize it as well. Clear anything you don’t want to restore to the new device one by one, then hit finish and start the process.

Switching my entire Galaxy S7 Edge and over 9GB of data took under 7 minutes. Extremely fast and easy. However, another 5-15 minutes of app downloads and updates will follow, depending on how many apps you have installed.

transfer samsung data to Google Pixel Phone
Extra tips:How to Transfer Samsung Data to Google Pixel Phone

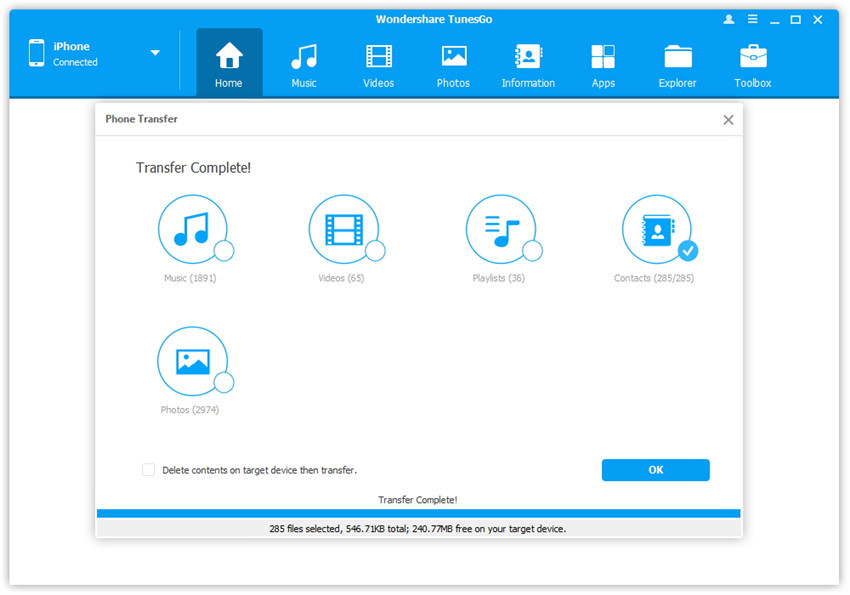
Then the process will keep going and owners can sit and wait, or continue setting up the Pixel while everything transfers. Once it’s finished simply unplug the cable and start using your phone. Google’s transfer tool even restored all my app icons to the homescreen. Convenience at its finest.

set up lock screen
That’s it in terms of setting up your phone. Not all devices are supported, and some homescreens may not transfer. If so, just reorganize the phone and you’re all set.

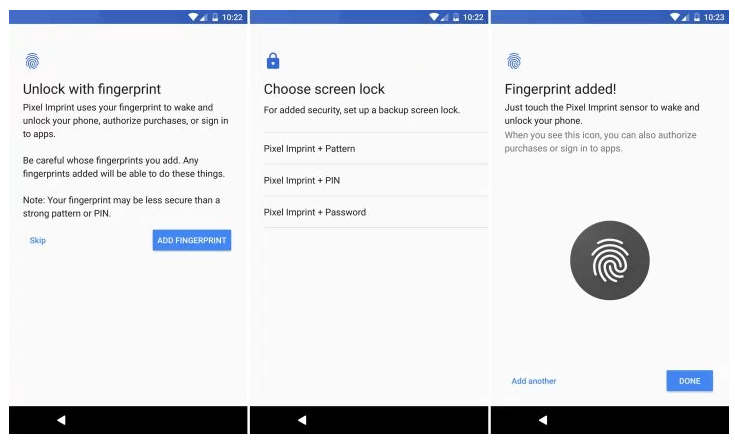
Setup Lockscreen Security

Next up is a step everyone should be familiar with, and is just common sense. Use a lockscreen password, pin, or fingerprint to keep your device safe and secure. The initial setup on the device will prompt you to finish this step, and we’d recommend you do it.

Pixel Imprint on the back of the phone is one of the best fingerprint scanners around. It’s located in an easy to tap spot, and setup is a breeze. It only takes about 20 seconds to do. Start by entering a pin, then tap your finger to the sensor six times to register a print. We’d recommend doing both index fingers for the best setup.

set up Pixel phone

The entire process is fast, easy and secure. Now your device is ready for use and will be protected from prying eyes or in case of theft.

Setup Android Device Manager

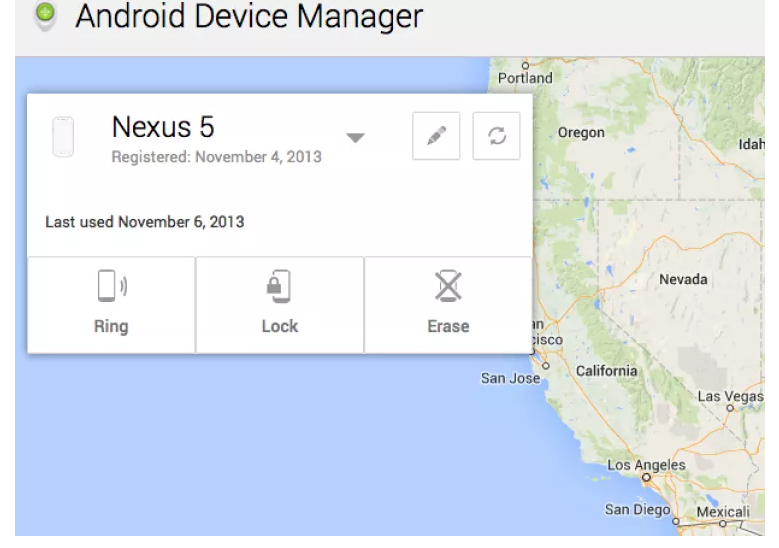
Speaking of loss or theft, the Android Device Manager is your best friend if this happens. It’s a step almost no one takes, but is extremely easy and will save you when something bad happens. Go to the Google Play Store and download the Android Device Manager.

The ADM allows owners to call, lock, or even erase the device if it’s lost, missing, or stolen. It even has an alarm feature to blast the Pixel at full volume if its lost at home. Below is a screenshot of the Android Device Manager on my Nexus 5, but it works the same on all Android smartphones and tablets.

enable google assistant
This is important in case of loss or theft. It typically can track a smartphone to within a few meters, and give you almost its exact location. Perfect for finding a lost device. Thankfully there’s also an “erase” feature if its stolen, so someone can’t access important information.

Alternatively owners can add emergency info or a phone number to call if lost right to the lockscreen. Whether this is medical information, call a family member, or a “call if found” number.

Head to Settings > Users > Emergency Info > then add details or a person to contact.

Enable and Use Google Assistant

Previously known as Google Search or Google Now, the Assistant is one of the key selling points for Pixel. Taking everything Google knows about the web, search, your location, machine learning and artificial intelligence. Then blending that into a personal assistant for every Pixel owner.

android device manager

This is shown during the initial setup as well, or can be accessed by a long-press of the round home button on the bottom middle of the screen. Train it to recognize your voice (even when the screen is off) by saying “Ok, Google” three times. It walks you through setup, then will show you all it has to offer.

Tip* Launch the Google Assistant and say “I’m Feeling Lucky” for a neat surprise. It’s better with more than one person, too.

Buy Extra Cables, Chargers or Accessories

Google’s new Pixel phones don’t use the old and outdated micro-USB port that many old phones have. It uses the new and improved USB Type-C. This is faster, cords can plug in both directions for ease of use, and you can even charge other devices from the Pixel through USB-C.

While there are two cables provided in the box, we’d recommend owners pickup a spare for other rooms of the house, or an office. And maybe even some cases and a USB Type-C car charger.

Get Unlimited Storage and Backups of Photo/Video

Google Photos has evolved into one of the best photo and video storage and viewing solutions on mobile. It automatically (or when connected to WiFi) makes a full resolution or HD copy of every picture you take, and is really smart. Ask it to show you photos from last Halloween, and it intelligently finds and shows them to you.

One perk of being the first Google Pixel phone is truly unlimited backups in full resolution, rather than resized to HD. Simply open Google Photos, go through the quick setup and enjoy it. There’s also a free subscription to Google Play Music and YouTube Red for all owners, just open Google Music and accept it.

Quick Launch the Camera

Next up you’ll want to go through and setup everything. Ringtones, call volume, alert sounds and more. However, you’ll also want to get familiar with your new phone. Head to settings and find the option listed as “Moves” and click that. Here it will show owners that a double tap on the power button will instantly launch the world-class 12.3 megapixel camera. This works if you’re in an app, when the screen is off, and everywhere.
quick launch camera

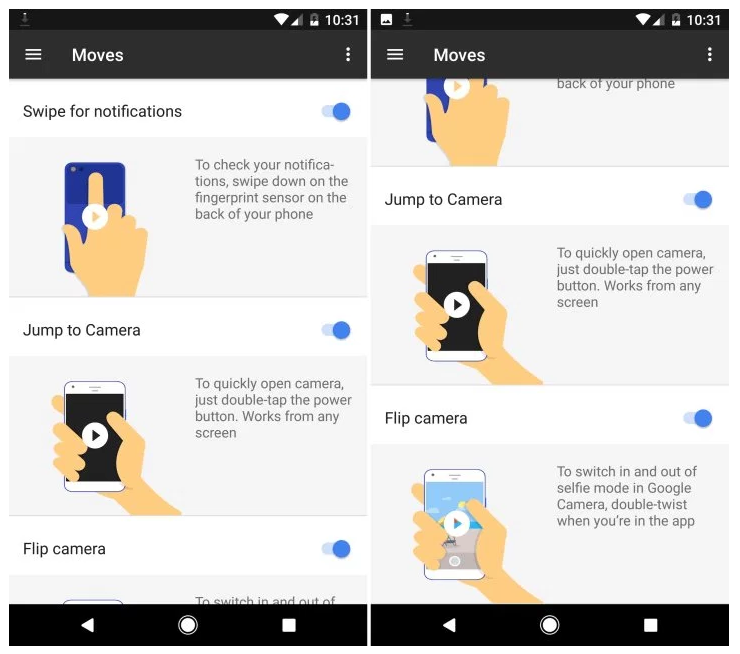
Google also added some other neat gestures like twisting your wrist to switch to the front camera for selfies, or using the fingerprint scanner to access the notification bar one-handed. Give them a try, enable what you want and enjoy.

Setup Do-Not Disturb

One of our favorite features is Do-Not-Disturb. Allowing owners to customize the phone to automatically go silent (or on vibrate) at night. Most don’t know it exists, but love it once they figure it out.

Go into Settings > Sounds > Do Not Disturb and set some rules or or times. Then the phone does everything for you, keeps the phone silent while you sleep, but still sounds an alarm come morning time. There is an option to block visual things like notifications from waking the screen, or the option to allow exceptions so select contacts can still get through. Like a significant other or kids.

Oh, another idea is to setup a feature called “Night Light”. Head into Settings > Display > and select Night Light. This turns the blue LEDs off on the screen at night, and adds a red tint to the display. This prevents eye strain, helps users fall asleep easier, and will make it so the screen isn’t so bright at night. Perfect for laying in bed. Customize it to turn on/off at certain hours of the day, or with the sunrise and sunset. I love this feature. Studies have shown this helps people fall asleep faster at night.

Setup Android Pay

While we’re at it, we’d recommend owners setup Android Pay as well. It works just like Apple Pay, and allows you to swipe your phone to make payments while out and about instead of carrying a wallet. Anywhere that Tap-N-Pay is supported will work with Android Pay.

Find the icon, launch the app, add a credit card and start enjoying mobile payments.

Use App Icon Shortcuts

One of the best features in Android 7.1 Nougat that debuted on the Pixel is Launcher shortcuts. It works similar to the iPhone and 3DTouch, and allows specific actions and tasks to be done easier.

Rather than just pressing the camera icon on your homescreen or app tray, press and hold. You’ll instantly get suggestions to launch the camera and instantly start recording video, or take a selfie. Instead of opening the camera and switching to these options. App shortcuts are brand new to Android and only work with select Google apps for now, but more developers will fully supported this in the near future.

use app icon shortcuts

Try it with the messaging app, dialer, maps, Google Music, calendar, Google Keep, clock or alarms and much more. Allowing Pixel owners to do and get more done faster. You can even add all these shortcuts to a folder on your homescreen.

Other Thoughts

Of course everyone is a little different, and most owners will setup the Pixel to fit their own needs. Our steps above will set you up for success, secure the device, help you find a lost Pixel and teach you a few things about the phone all at once.

We’d also recommend buyers pickup a Pixel screen protector, download a bunch of their favorite apps, and explore the settings menu for everything else. If you have any questions there’s a dedicated 24/7 customer support and help line in settings. Swipe to the right and instantly call, email, or even chat with a customer support representative.

A few other ideas are to set mobile data limits, test out how great the camera is, customize the notification bar by moving icons around as you see fit, or change your wallpaper to one of the many awesome new choices pre-installed on the phone. You’re all set now, so enjoy the Google Pixel.

Read More:

How to Backup & Restore Data on Google Pixel Phone

How to Transfer Music and Videos to Google Pixel Phone

How to Transfer Music between iTunes Library and Google Pixel Phone

How to Transfer Music from Computer to Google Pixel Phone

How to Fix iPhone to Normal after iOS 13 Update

Apple Company release iOS 13 system version software update recently.According to widespread complaints across social media,a lot of iPhone and iPad users ran into installation problems.For some, the update process failed with a subsequent error message asking users to plug their iOS device into a computer for a complete restore of the operating system.Some get this circumstance that device prompt “Connect to iTunes” and can’t get out of the Recovery Mode during/after iOS 13 update,etc,.

Restore iPhone Using IPSW File without Data Loss

Since iOS 13 system hasn’t announced for a long time,it’s not as perfect as imagine,it may be still contain bugs that haven’t been fixed.As we all know, when we install iOS 13 on iPhone or iPad manually with IPSW Firmware Files in iTunes,it will cause data loss.Here we write this article to absolutely fix this bricked issues on iOS devices after iOS 10 update without iTunes(no data loss),hope it will give the best solution for you all to solve these abnormal system problems of iOS 10 devices.

How to Fix iPhone to Normal after iOS 13 Update

To be honest,it’s no more better way to fix iPhone system to normal states by using iOS System Recovery.As its name,this program help to achieve the purpose that download and install IPSW firmware files on iPhone,then restore iPhone system to normal after iOS 13 update under any abnormal states,such as iPhone stuck in Recovery Mode,iPhone stuck on Apple logo, iPhone stuck at black/white screen,iPhone get frozen suddenly,etc,.All models of iOS devices are compatible with iOS System Recovery,including iPhone XS, iPhone XS Max, iPhone XR, iPhone X, iPhone 8, iPhone 7,iPhone SE,iPhone 6S(Plus),iPhone 6(Plus),iPhone 5S/5C/5,iPad Air,iPad Mini,iPad Pro,iPod and so on.

d_win d_mac
d_win d_mac

Easy Steps to Fix iOS 13 to Normal without Data Loss

Step 1.Launch iOS System Recovery and Select “iOS System Recovery” Feature
• The menu displays to the left.Click on the tab appearing at the bottom named “More Tools”.Then click on “iOS System Recovery” to start the function.
• Connect the iPhone to the computer by using USB cable,the program will detect the device soon.
• Click on “Start” button to begin.

iPhone system recovery

fix iPhone system to normal after ios 10 update

Step 2.Download Firmware for iPhone
• To restore from an operating system failure,the latest firmware must be downloaded for iPhone.
• The program detect the model of device,asks for confirmation,and suggests the latest version of firmware to download.
• Click “Download”button.The process completes automatically.

select your iPhone model

download the firmware for iPhone

Step 3.Restoring iPhone System to Normal after iOS 10 Update
• Once the firmware is installed,the program begins fixing operating system for device and return iPhone to normal state in minutes.

restore iPhone system to normal after ios 10 update

Extra tips:This iOS System Recovery tool allow to restore deleted data from iPhone after iOS 13/12 update.

d_win d_mac
d_win d_mac

Related Article:

Restore iPhone System to Normal without Firmware Upgrade to iOS 10

How to fix Bug on iPhone/iPad after iOS 10 Upgrade

How to Fix iPhone Stuck on Apple Logo after iOS 10 Update

How to Fix iPhone Freezes During/After iOS 10 Update

2 Ways to Fix iPhone Stuck in Recovery Mode After iOS 10 Update

How to Fix iOS 10 iPhone Running Slow Issue

How to Transfer Music and Videos to Google Pixel Phone

“I would like to copy the favorite songs to my new Google Pixel phone from the iPhone 6S.But there are too many software are available,which one is the best?” – Lion

“Lately I bought a new Google Pixel phone to take a place of my old device.I synced the videos on my computer from the old phone previous,now I wanna transfer the videos from computer to my Pixel phone.Is there an easy and convenient way?Thanks” -Nick

For most people,entertainment has become an indiscerptible part of life. We would like to enjoy wonderful songs or movies using Android phones when we are traveling,resting even before going to bed.Recently Google Android Company just released the new Pixel phone.Generally,many people search the similar question that how to transfer media files to Google Pixel phone easily.

How to Export Music and Videos to Google Pixel Phone

iOS & Android Manager would be a great helper.As a powerful media files manager designed for Android,it can be used to export videos and music between computer and Google Pixel with simple steps,transfer media files between iOS/Android devices and Google Pixel completely,transfer media files between iTunes library and Google Pixel effectively,freely manage music playlists,delete music on Google Pixel.What’s more,iOS & Android Manager perfectly help to convert media files with supported formats for Google Pixel,the Google Pixel supported formats such as MP3,MP4,WAV,eAAC,etc,.Various of Android devices are compatible with iOS & Android Manager,for example Google Pixel,Google Nexus,Samsung,Sony,ZTE,Motorola,HTC,LG,and more.

d_win d_mac

Part 1:How to Export Media Files from iTunes Library to Google Pixel

Launch iOS & Android Manager and connect your Google Pixel phone to computer.Your Pixel device will be detected and displayed in the primary window very soon.
Step 1.Simply click Transfer iTunes Media to Device on the main interface.Or find the Transfer iTunes to Device option under Toolbox > Transfer Tools section.

itunes-media-to-pixel

Step 2.Check options and start to copy media from iTunes to Google Pixel.All the iTunes files will be scanned and will be shown under different categories like music, movies, podcasts and others.By default,all the file types will be selected but to transfer only the music and videos files,you can uncheck the others.Click Transfer to start transferring.

select-itunes-media-to-pixel

transfer-itunes-media-to-pixel

d_win d_mac

Part 2:How to Transfer Media Files between iOS/Android Devices and Google Pixel

Step 1. Launch iOS & Android Manager and connect both devices to PC.

connect-devices

Step 2. Select the source device from which you want to transfer media files.

Step 3. Simply click Phone to Phone Transfer on the main interface. Or find the Phone Transfer option under Toolbox > Transfer Tools section.

Step 4. Select target device. When your devices are connected and detected by, you’ll get a window as follow. Select the target device from the drop-down list and click Next.

select-phone-transfer-device

Step 5. Transfer data from one device to another. By default, all data on your source device that can be transferred are ticked, namely contacts, photos, playlist, music and videos. You can also tick your wanted data. Then, click Transfer. In the whole transfer process, DO NOT disconnect either device. When the transfer completes, click OK.

transfer media file to pixel phone

Note:
1. Contacts are not supported by Mac version.
2. Windows users can tick the option: Delete contents on target device then transfer, then the selected contents on the target device will be deleted firstly before the transfer. (Only for Windows version)

d_win d_mac

Related Article:

How to Transfer Music between iTunes Library and Google Pixel

How to Transfer Music from Computer to Pixel Phone

How to Transfer Music from Android to iPhone/iPad/iPod

How to Backup & Restore Data on Google Pixel Phone

How to Transfer Photos from Computer to iPod

”I was intend to transfer the photos from iTunes to my iPod,however,I don’t what’s happened,the iTunes just not as worked well as usual.Any others way to solve it?Thanks a lot.”-Victoria

Confused about how to sync photos to iPad?We’ve got you solutions.Do you saved a lot of photos on your computer/iTunes/mobile device or other Internet service account and want to transfer them to your iPod so that preview photos anywhere and sharing them with friends?We are going to share three ways to export photos to iPod with our readers through this article.

How to Freely Export Photos to iPod(touch)

iOS Manager is the best software which enables you to transfer photos between computer and iPod/iPad/iPhone easily in just one click without losing your previous photos,iOS Manager can easily do this tasks for you in minutes.Secondly,iOS Manager support to export photos between iOS devices and Android devices.Thirdly, iOS Manager allow to delete photos on iOS devices,manage photo albums in Photo Library,convert photos/video on iOS devices to GIF.

iOS Manager Features – Transfer & Manage Photos for iPod(touch)
-Easily transfer photos from computer to iPod.
-Easily transfer photos from iPod to computer.
-Easily transfer photos between iPhone,iPad,iPod and Android devices.
-Easily detect and delete duplicates.
-Supports all types of iOS device such as iPhone 7,iPhone SE, iPod touch,iPod nano and iPad Pro.
-Automatically detects the unsupported format of files and converts them to the supports formats according to the devices.

d_win d_mac

Part 1:How to Export Photos from Computer to iPod

Step 1.Launch iOS Manager and connect your iPod with the computer.

iOS manager main page

Method 1:Transfer Photos by Tapping Buttons

Step 2.Add photos from your computer to your iPod
Click Photos icon at the top of the main interface, then select the specific option Photo Library. Please note that Camera Roll, Photo Stream and Photo Shared are not available to add photos.

transfer photos from photo library

Later,click Add and then select Add File or Add Folder to add photos from your computer.If you only want to select some photos,then click Add File, and then hold down Shift or Ctrl key to choose multiple photos; if you want to transfer all the photos in one folder, then click Add Folder. After that, click Open to import the selected photos. Here we only add photos to iPod by clicking Add File for example.

add file to transfer

select photos to transfer to ipod

Method 2:Transfer Photos by Drag and Drop

Step 2. Find photos on your computer.
Find and open the photo folder on your computer which includes the photos that you wish to transfer to iPod.

open the photo folder on pc

Step 3.Export the photos to iPod by Drag and Drop
Click Photos icon on the main interface of iOS Manager,then go to the Photo Library window.Drag and drop the selected photos from your computer to the Photo Library window of iOS Manager.

drap and drop the selected photos

Note:With the two methods above, you can also select to add photos to one of the photo albums under Photo Library.

selected photos from photo albums

d_win d_mac

Part 2:How to Transfer Photos from iPod to Computer

Method 1: Transfer All The Photos With One Click

Step 1.Launch iOS Manager and connect your iPod with the computer

iOS manager main page

Step 2. Backup photos to the computer
If you use Windows PC:
Click Backup Photos to PC icon on the main interface. From the pop-up window, browse and select the destination folder for photos, click OK to start the export.
1-click-backup-photos-to-pc

backup-photos-to-pc

If you use Mac:
Click Backup Photos to Mac icon on the main interface. From the pop-up window, browse and select the destination folder for photos, click Save to start the export.

1-click-backup-photos-to-mac

transfer-photo-to-computer

Step 3. Export Photos to Computer
Click Open Folder to see the exported photos on the selected path of your computer, or click Finish to close the dialog.

finish-transfer-photo-to-computer

Method 2: Selectively Transfer Photos by Tapping Buttons

Step 1. Launch iOS Manager and connect your iPod with the computer. Then click Photos icon at the top of the main interface, you will enter the default photo type: Camera Roll.

transfer ipod photo from camera roll

Situation 1.Transfer Photos from iPod touch to Computer Selectively
Step 2. Export photos from your iPod to the computer.
a. Select a specific photo type: Camera Roll/Photo Library/ Photo Stream/Photo Shared( Camera Roll is the default type), all the photos under this type will be shown on the right panel. Optionally, you can select one specific album under one photo type to enter the album window, then all the photos in this album will be shown on the right panel. Later, check the photos you want to transfer to your computer, and click Export > Export to PC or right-click on the selected photos and then select Export > Export to PC from the drop down list. Here we only make photos under Camera Roll type for example.

export photos from iPod to computer

export-ipod-photo-to-pc

b. Browse and choose the target folder on the computer to export. And click OK to start the export process.

click-ok-to-start-process

Step 3. Export successfully
Click Open Folder to see the exported photos on the computer or click OK to close the dialog.

export-complete

finish-photo-transfer

Situation 2. Transfer All The Photos in One Photo Type from iPod to Computer
Step 2. Select a specific photo type: Camera Roll/Photo Library/ Photo Stream/Photo Shared, right-click on it, and choose Export to PC from the drop down list. After that, browse and select the target folder on your computer to export. Please see the screenshot to transfer all the photos in Photo Library below for reference.
export-photo-library-to-pc

Situation 3. Transfer All The Photos in One Photo Album from iPod to Computer
Step 2. Select a specific photo album under Camera Roll, Photo Library, Photo Stream or Photo Shared, right-click on it, and choose Export to PC from the drop down list. After that, browse and select the target folder on your computer to export. Please see the screenshot to transfer all the photos in the “beauty” album under Photo Library below for reference.

transfer-photos-from-photo-album-to-pc

d_win d_mac

Part 3:How to Transfer Photos between iPod and iPhone/iPad/iPod/Android Devices

Method 1: Transfer All The Photos

Step 1. Launch iOS Manager and connect iPod with the computer
Launch iOS Manager and connect more than one iPhone/iPad/iPod/Android device with the computer, here we name the connected devices: A, B, C.

iOS manager main page

Step 2. Select the source device from which you want to transfer contents
Select the source device A, and click Phone to Phone Transfer option on the main interface. Then a new window will pop up.

phone to phone transfer option

Step 3. Select the target device to which you want to transfer contents
From the pop-up window, select the target device B or C from the drop-down list and click Next.

select target device

Step 4. Transfer contents from one device to another
By default, all the content on your source device A that can be transferred are checked, namely Music and Videos, Playlists, Photos, Contacts( Note: Contacts are not supported by Mac version). You can uncheck the contents which you don’t want to transfer. Then, click Transfer. In the whole transfer process, DO NOT disconnect either of the devices. When the transfer completes, click OK.
start transfer process

transfer complete

Note: Only for Windows version, you’re enabled to tick the option: “Delete contents on target device then transfer” before clicking Transfer button, then the selected contents on the target device will be deleted firstly before the transfer.

delete contents on target device then transfer

Method 2: Transfer Photos Selectively

Step 1. Launch iOS Manager and connect iPod with the computer
Launch iOS Manager and connect more than one iPhone/iPad/iPod/Android device with your computer, here we name the devices: A, B, C.
connect-ipod-other-devices
Step 2. Select and transfer photos between devices
Select the device A from which you want to transfer photos, and click Photos icon at the top of the main interface, then select a specific photo type: Camera Roll/Photo Library/ Photo Stream/Photo Shared( Camera Roll is the default type), all the photos under this type will be shown on the right panel. Optionally, you can select one specific album under the photo type to enter the album window, then all the photos in this album will be shown on the right panel. After that, check the photos which you want to transfer from A to B or C, then click Export > Export to Device > B or C. As for the following screenshot, the selected photos in “beauty” album under Photo Library on the iPod can be transferred to the Samsung Phone or another iPad.

select-photo-transfer-to-devices

Note: Here you can right-click on the selected photos and then select Export to Device > B or C as well.

export-photos-to-devices

d_win d_mac

Related Article:

How to Transfer Videos from Computer to iPhone

How to Transfer Music from Computer to iPhone

How to Transfer Photos from Computer to Mobile Phone

How to Transfer Android Photos and Videos to iPhone

How to Transfer Videos to Samsung Galaxy S7/S7 Edge

Summary:The modern people love to play the media file on their mobile device.It’s natural idea to transfer media files(videos/audios/music/photos) to Samsung device from different sources.In this article, I’m going to show you the 3 most common methods to sync videos to Samsung Galaxy phone.

The Samsung Galaxy S7(S7 Edge) is an multimedia equipped mobile phone that designed and built by Samsung Company,which is famous for the Quad HD super AMOLED display and Dual edge 5.5” for the Galaxy S7 Edge.The Galaxy S7 phone not only surprised the mobile device market,but also enabled you to enjoy ultra high quality movie or video on it.So it’s no doubt that Samsung users often download the movie videos to Galaxy S7 device and gain the interesting experience from it many times.

How to Transfer Videos to Samsung Galaxy S7

As the specially designed for managing and transferring media files to Android devices,this superior program called Android Manager enables to copy videos from computer to Samsung Galaxy S7,export videos from iTunes to Samsung Galaxy S7,transfer videos between iOS/Android device and Samsung Galaxy S7.In addition,Android Manager allows to manage the videos(delete items) on Android devices freely.Not only Samsung device,but also most of Android devices are compatible with Android Manager,such as Google Pixel(Pixel XL),Google Nexus(5X/9),Motorola,HTC(One M8/M9),LG,Huawei,ZTE,and more.

d_win d_mac

Kind Tips: As for the online video downloader, 4kFinder Video Downloader is a time-saving and reliable solution. Copy and paste the video URL to download the video from YouTube or other popular online streaming sites (Facebook, Instagram, Twitter, Bilibili, NicoNico, BBC, Vimeo, VLive, Tumblr) to MP4 at 360p, 720p, 1080p, 1080p HD , 4K, 8K quality.

Part 1:Transfer Videos from Computer to Samsung Galaxy S7

Launch Android Manager and connect your Samsung Galaxy S7 to computer.Your Samsung phone will be detected and displayed in the primary window.

samsung galaxy s7 video transfer

Step 1.Select Videos tab.Once your media loads,click Add > Add File or Add Folder.

add video to samsung galaxy s7

Step 2.This brings up your file browser window,from which you can select videos to import from your computer.All videos imported can be watched with the built-in player.You can simply Drag and Drop videos from computer to Samsung Galaxy S7.

d_win d_mac

Part 2:Transfer Videos from iTunes to Samsung Galaxy S7

Launch Android Manager and connect your Samsung Galaxy S7 to computer.Your Samsung phone will be detected and displayed in the primary window.

Step 1.Simply click Transfer iTunes Media to Device on the main interface.Or find the Transfer iTunes to Device option under Toolbox > Transfer Tools section.

android-manager-mian-page

Step 2.Check options and start to copy videos from iTunes to Samsung Galaxy S7.All the iTunes files will be scanned and will be shown under different categories like music, movies, podcasts and others. By default, all the file types will be selected but to transfer only the video files, you can uncheck the others. Click Transfer to start transferring.

transfer-itunes-videos-to-samsung-galaxy-s7

d_win d_mac

Part 3:Transfer Videos between iOS/Android Device and Samsung Galaxy S7

Step 1.Launch Android Manager and connect both devices to PC.

connect-devices

Step 2.Select the source device from which you want to transfer videos.

Step 3. Click Videos tab.Choose your wanted videos and click Export.Select another device from the list.For example, you can transfer videos from Samsung Galaxy S7 to iPhone by selecting Export > Export to iPhone directly.

transfer-videos-from-galaxy-s7-to-other-device

d_win d_mac

Related Article:

How to Transfer Music from Computer to Samsung Galaxy S6/S7

How to Transfer Videos from Computer to Samsung Galaxy S6/S7

How to Convert and Play DVD Movies on Samsung

How to Transfer Photos between Computer and Samsung Galaxy S7/S7 Edge

How to Transfer Music from Android to iPhone/iPad/iPod

How to Transfer Files between Samsung and Computer

How to Transfer Music from iTunes Library to iPod

Nowadays,people like listening to songs in daily life,enjoy music anywhere and anytime.Most of them download the music on the Internet,such as the Youtube.Some of them sync the songs on the iTunes library.What’s the same things is that all of them are accustomed to transfer the music to their mobile device and share it conveniently.

transfer itunes music to ipod

My best friends Tommy and Kaskade are the fans of electronic music,they always notice the newest popular electronic music everytime.They need to download the songs from iTunes Library to iPod.However,somethings was wrong,they can’t sync the iTunes songs to the iPod as usual,then they fine another way to fix this issue.This page is describing on how to smoothly export music from iTunes Library to iPod.

1 Click Transfer Music from iTunes Library to iPod(touch) without Overwriting your Previous Content

Before starting tutorial about how to sync music to iPod without iTunes, we will make a brief introduction of iOS Data Manager firstly.iOS Manager is meticulously designed for transferring & managing media file on iPod, iPhone and iPad without overwriting the previous data.What’s this program can do for you materially?It help to transfer music between iTunes Library and iPod/iPad/iPhone,transfer music between computer and iPod/iPad/iPhone,transfer music between Android device and iOS device.There is no doubt that iOS Manager provide a full solution to manage music playlists on iPod/iPad/iPhone.

Applicable iOS Device:
-iPod touch 6/5/4,iPod nano,iPod shuffle,iPod classic, iPod mini
-iPhone 7,iPhone 6S(Plus),iPhone 6(Plus),iPhone SE,iPhone 5S/5C/5
-iPad air,iPad pro,iPad mini,etc,.

d_win d_mac

Part 1:How to Export Music from iTunes Library to iPod

Step 1.Launch iOS Manager and connect your iPod with the computer.Then click Transfer iTunes Media to Device icon on the main interface.

ios manager main page

Step 2.iOS Manager will detect all the media files in iTunes and show them by list on the pop-up window.By default,the entire library has been checked.But you can uncheck some items that you won’t transfer to your iPod.

select transfer itunes media to ipod

Step 3.Transfer Music from iTunes Library to iPod
Click Transfer to start transferring selected files to your iPod and then click OK to complete the process.

Note:There is no worry about duplicate files as iOS Manager enables to automatically detect the duplicates and only transfer the exclusive contents from iTunes to iPod.

click transfer button

transfer music to ipod

d_win d_mac

Part 2:How to Sync Music from iPod to iTunes Library

Step 1.Launch iOS Manager and connect your iPod with the computer.

connect ipod with computer

Step 2.Export music from your iPod to iTunes library.
Click Music icon at the top of the interface,then select the specific option Music (Music is the default option).Please note that iTunes U/Audiobooks/Podcasts is available to select here too.Then check the files you want to transfer to iTunes,and click Export > Export to iTunes.

select music transfer to itunes

select-itunes-u-transfer-to-itunes

select podcasts music transfer to itunes

select audiobooks transfer to itunes

Step 3.Export successfully,click OK to finish the export process.

transfer music to itunes complete

d_win d_mac

Part 3:How to Transfer Music between Android Device/iOS Device and iPod

Step 1.Launch iOS Manager and connect your devices with the computer.
Launch iOS Manager and connect the devices(iPhone/iPad/iPod/Android device) with your computer,here we name the devices: A, B, C.

connect devices to pc

Step 2.Select and transfer music between devices.
Select the device A from which you want to transfer music, and click Music icon at the top of the main interface, check the songs which you want to transfer from A to B or C, then click Export > Export to B or Export to C. As for the following screenshot,the music on the iPod can be transferred to the Samsung phone or the iPad.

select device to export

Note:Here you can right-click on the selected music and then select Export >Export to B or Export to C as well.

export music to devices

d_win d_mac

Part 4:How to Convert and Play iTunes Music on iPod

Here is another solution we are strongly recommend for you. A powerful Apple Music Converter for Windows & Mac,which enables to convert Apple music to MP3, M4A, AC3, AU, AC3, FLAC, AIFF or MKA,and remove the DRM encryption from Apple music,you can enjoy Apple Music tracks with more freedom and convenience and play on iPod for free forever.After converting the iTunes DRM-Protected Music to MP3, you are able to play them on any computers or devices such as MP3 player, iPhone, iPod, iPad, PSP, Zune, Windows Phone, Nokia, Sharp and other Android devices.

Click here to download Apple Music Converter:

d_win d_mac

Apple Music Converter Key Features:

-Free load and convert previous purchases Apple music from iTunes to the local computer for playing at any time any place.
-Convert Apple Music, iTunes M4P songs to DRM-free MP3 and keep Apple Music as long as you like
-Play Apple Music on iPhone/iPod/iPad for Free
-Convert iTunes DRM-Protected Music to most popular mobile device
-Supports the latest iTunes 12.6.2

Click to get the steps on play iTunes music on iPod in detail:

How to Play iTunes Music on iPod

Step 1. Run Apple Music Converter on the Computer
To begin with, please run Apple Music Converter program on the computer.

launch apple music converter

Step 2. Select the Apple Music to Convert
Select the Apple music you need to convert, including music, playlists, Audiobooks, M4P Audio, iTunes movies and TV shows. Then click “Download“.

Step 3. Select MP3 Output Format for Converting
Select the format for the converted music, here we suggest you to choose “MP3” format, that is match with iPod.

Step 4. Convert Apple Music to MP3 for iPod
Click “Start Convert” to begin to convert selected music on the computer.

convert itunes music to mp3 for ipod

Step 5. View the Converted Apple Music on the Computer
When the conversion is finish, you could explore the output files and folders by clicking “Open Output File” button to view the converted music file on the computer.

Step 6. Import Converted Apple Music to iPod via iOS Data Manager
In the last step what you should do is to transfer the converted music to your iPod  via iOS Data Manager.

Related Article:

How to Transfer Music from Android to iPhone/iPad/iPod

How to Transfer Music from Computer to iPhone

How to Sync Videos from Computer to iPhone

How to Transfer Android Photos and Videos to iPhone

How to Transfer Photos from Computer to Mobile Phone

How to Transfer iTunes Music to Google Pixel 3A/3/2/1(XL)

[Summary]: Want to play iTunes music includs Apple Music songs on Google Pixel phone? Here we will teach you how to sync music and playlist from iTunes library to Google Pixel 3A/3/2/1(XL); how to transfer music from Pixel phone to iTunes Library; and how to transfer Apple music to Google Pixel, so you can offline playing Apple Music on Pixel phone after you cancel the subscription.

Most people have a myriad of music collection with iTunes,but struggle with the idea of moving it all to mobile device such as the Google Pixel phone.If you’re a newly Google Pixel phone owner and love listening music,then you might be trying to figure out simple ways to transfer music from iTunes to the shiny new Google Pixel smartphone.We’re going to discuss outline the options available way to get Apple Music and iTunes Music on Google Pixel.If you want to do it manually with the possible solutions,you can read this whole tutorial and follow the steps to complete the transfer task on your own.

transfer itunes music to Google pixel-2

* How to Transfer Android File to Pixel

* How to Manage Google Pixel on Computer

Transfer Music from iTunes Library/iOS Device/Android Device to Google Pixel

Android & iOS Manager and iTunes to Android Transfer,both are your best choice to transfer music(songs,playlists) between iTunes library and Google Pixel phone,it also work well for transferring music between iOS device/Android device and Google Pixel phone.What’s more,this program support to transfer music between computer and Android device,freely manage Android music playlists,delete music on Android.Various of Android devices are compatible with Android Manager,for example Google Pixel,Google Nexus,Samsung,Motorola,HTC,LG,Sony,ZTE,etc,.

d_win d_mac
d_win d_mac

Part 1:Export iTunes Library Music to Google Pixel Phone

Launch Android Manager and connect your Google Pixel phone to computer.Your Android device will be detected and displayed in the primary window very soon.
Step 1.Simply click Transfer iTunes Media to Device on the main interface.Or find the Transfer iTunes to Device option under Toolbox > Transfer Tools section.

transfer-itunes-music-to-pixel

Step 2.Check options and start to copy media from iTunes to Google Pixel.All the iTunes files will be scanned and will be shown under different categories like music, movies, podcasts and others.By default,all the file types will be selected but to transfer only the music files,you can uncheck the others.Click Transfer to start transferring.

select-itunes-music-to-pixel

transfer-itunes-music-to-pixel

Part 2:Transfer Music from Google Pixel Phone to iTunes Library

Launch Android Manager and connect your Google Pixel phone to computer.Your Android device will be detected and displayed in the primary window very soon.

android-transfer-mian-page

Step 1.Select Music tab.

Step 2.Once your media loads,choose your wanted songs and click Export > Export to iTunes.

select-music-transfer-from-pixel-to-itunes

You can also transfer the whole music playlist from Google Pixel to iTunes Library in one click.

transfer-pixel-music-to-itunes

Part 3:Transfer Music between iOS Device,Android Device and Google Pixel Phone

Step 1.Launch Android Transfer and connect both iOS device or Android device and Google Pixel phone to PC.

Step 2.Select the source device from which you want to transfer music files.
connect-devices

Step 3.Click Music tab.

Step 4.Choose your wanted songs and click Export.Select another device from the list.For example,you can transfer music from Pixel phone to iPhone by selecting Export > Export to iPhone directly.

select--music-transfer-from-pixel-to-iphone

You can also transfer the whole music playlist from Pixel phone to other devices in one click.

transfer-pixel-music-to-iphone

d_win d_mac
d_win d_mac

Part 4.Transfer Music between iOS Device and Google Pixel via Quick Switch Adapter

Step 1.Connect your old iPhone to your new Pixel with the Quick Switch Adapter.
Turn off iMessage before you remove the SIM on your old iOS device by going to “Settings,” tap “Messages” and set iMessage to off. Then, go to back to “Settings,” tap “FaceTime” and set FaceTime to off.

Note:If you have already removed the SIM, you can request that Apple deregister your phone number with iMessage.

Step 2.Sign in to your Google Account.
If you don’t already have one, you’ll be asked to create one.

Step 3.Transfer data from iPhone to Google Pixel
Once you’ve signed in to your Google Account, choose what you want to move, like your apps, contacts, calendar events, photos, videos, music, SMS messages, iMessages and more.Then the data transfer task will complete soon.

quick switch adapter

Done.

Supported devices include:
-iPhone or iPad running iOS 8 and up

Part 5: How to Sync Apple Music to Google Pixel

We can purchased and downloaded Apple music for playing on iTunes or iOS devices,when you have got a new Google Pixel phone,how you can play Apple music on Google Pixel/XL after canceling the subscription service even though you have downloaded them?As we all know that the Apple Music protected by DRM encryption with M4P formate,in order to playing iTunes M4P playlist on Google Pixel,you must to remove DRM from Apple Music songs and convert to DRM-free MP3 for Android Google Pixel phone.

Apple Music ConverteriTunes M4P to MP3 Converter is a useful Apple Music Removal and Converter,which could helps you remove Apple music with DRM protection and convert them to plain formats like MP3, AAC, WAV, or FLAC. for free playing on any media players like Google Pixel, Samsung Galaxy, MP3 Players, Car Players, iPod, Huawei, iPhone, etc.

Let’s teach you how to remove DRM protection from Apple Music songs/iTunes music and convert them to MP3 for playing on Google Pixel/XL.

d_win d_mac

Step 1.Run Apple Music Converter and Choose Apple Music tracks
First of all,please download, install and launch Apple Music Converter for Windows or Mac on your computer.iTunes will be opened automatically,then select the Apple music songs you want to convert to MP3 and transfer to Google Pixel phone.

convert Apple Music to Google Pixel

Step 2.Select MP3 as Output Format
As we all know that the Google Pixel phone supports playing MP3 audiao format,so you need to convert Apple music to MP3.In the bottom of “Output Settings“,please select MP3 as output format.

select MP3 format for Google Pixel

Step 3.Convert Apple Music to MP3 for Google Pixel
Finally, just click “Convert” button to start convert Apple Music from M4P to MP3,during the conversion process,the program will remove the DRM encryption as well.After it done,you can play all converted Apple Music in MP3 formate on any music players with more freedom and convenience,even you have canceled the Apple Muisc subscription service.

convert Apple Music to MP3 for Google Pixel

Step 6.Transfer Converted Apple Music to Google Pixel
Now all the converted Apple Music converted and saved on the computer as DRM-free MP3,in this step,you need to import converted Apple Music in MP3 to Google Pixel phone.
1.Connect Google Pixel to your computer via a USB cable.
2. Using iOS Android Manager or Android Transfer to transfer the converted Apple Music tracks from your computer to Google Pixel phone directly.
Learn More: How to Transfer Music from Computer to Google Pixel

Related Article:

How to Transfer iPhone Data to Google Pixel Phone

How to Backup & Restore Data on Google Pixel Phone

How to Restore Deleted Data on Google Pixel Phone

How to Transfer Music from Computer to iPhone

How to Transfer Music from Android to iPhone/iPad/iPod

Sync iTunes Music to Google Pixel

How to Restore iPhone in Recovery Mode with/without iTunes

“Hello.I’m Lily.My iPhone was get into the Recovery Mode when I was updated iOS 10 on it,then I opened the iTunes and try to get my iPhone out of the Recovery Mode,but it was failed.What’s wrong?Can someone tell me the true?And please tell me the way to restore iPhone in Recovery Mode without iTunes.Thanks advance.”-Lily Ann

It’s pretty common that iPhone get into Recovery Mode and stuck in the loop.It is a state of iBoot when iPhone users are applying updates,restoring data or performing other operations on device.What’s worse,the phone can not return to normal state unless something is done to solve this problem.When your iPhone stuck in Recovery Mode it can be quite frustrating.It is equally as confused when you don’t know how to get iPhone out of Recovery Mode.There are actually several ways you can get your iPhone out of Recovery Mode.Now we are providing you two solutions available to restore iPhone in Recovery Mode with/without iTunes separately.

Part 1:Restore iPhone in Recovery Mode via iTunes

Follow these simple steps to restore your iPhone in Recovery Mode with iTunes.

Note:Restore iPhone in Recovery Mode with iTunes will lead to data loss on your device,all your personal file will be erased after this operation.Remind you doing backup for your iPhone to protect data.

Extra tips:How to Restore Deleted Data from iPhone after getting out of Recovery Mode with iTunes

Step 1.First,ensure that iTunes is updated on your computer.Please connect the USB cable to your computer but don’t connect it your iPhone just yet.Instead,power off your iPhone.

power off iphone

Step 2.keep holding the home button and connect the USB cable to the iPhone.The Apple Logo will appear and then quickly change to the “Connect to iTunes” logo.

connect iphone to itunes

Step 3.Release the home button now and your iPhone should be into Recovery Mode.iTunes will display a message confirming this.You can then click on “Restore” to restore a previously saved iTunes backup file.

get iphone out of recovery mode via itunes

Part 2:Restore iPhone in Recovery Mode via iOS System Recovery without Data Loss

One of the most effective program to get iPhone out of Recovery Mode without data loss is iOS System Recovery.With this iOS System Recovery program, you are allow to easily restore iPhone to normal state without iTunes in minutes.Mostly importantly, it won’t lost data during the whole repairing process.

d_win d_mac

Focus on the Features of iOS System Recovery:
-Fix with various iOS system issues like Recovery Mode,white Apple logo,black screen, looping on start screen,etc,.
-Only fix your device out of abnormal mode, no data loss at all.
-Work for all models of iPhone, iPad and iPod touch including iPhone 7,iPhone SE.
-Fully compatible with Windows or Mac, iOS 10 or lower.

Step 1.Run iOS System Recovery on Computer and Select Recovery Mode
Launch iOS System Recovery on your computer.In the primary interface window,click “More Tools”,choose “iOS System Recovery” and then connect your iPhone to your computer using USB cable.Your iPhone will be detected soon.Click on “Start” to begin.

iOS System Recovery main page

restore iphone in recovery mode without itunes

Step 2.Download the Firmware for iPhone
In order to fix iPhone stuck in Recovery Mode,you will need to download the latest firmware for restoring.The program will offer the latest iOS version for you to download.Just click on “Download” and the program will download it automatically.

select your iPhone model

download the firmware for iPhone

Step 3.Get iPhone Out of Recovery Mode without iTunes
Once the download is complete,iOS System Recovery will start to repair the iOS system of your iPhone and easily get it out of Recovery Mode without iTunes.

restore iphone in recovery mode without itunes

Then your iPhone will restart in normal mode after iOS System Recovery has completed the process.The whole process will take you less than 10 minutes.

restore iphone in recovery mode without itunes

Pros/Cons:Your iPhone will be updated to the latest iOS version.If your iPhone is jail-broken,it will be updated to before it was jail-broken and the device will be re-locked if it was unlocked before the restoring via iOS System Recovery.

d_win d_mac

Related Article:

How to Enter & Exit iPhone Recovery Mode

How to Restore iPhone System to Normal without Firmware Update to iOS 10

How to Get iPhone 7/SE/6S/6/5S/5 out of Recovery Mode

How to Fix Bricked iPhone after iOS 10,iOS 9 Update

How to Fix iOS 10 System Update Failed

How to Downgrade iPhone or iPad from iOS 10 to iOS 9.3.5

How to Transfer Music from Computer to Google Pixel

[Summary]: Have got an new Google Pixel phone and want to listen to music with it? This article teach you how to import music from PC/Mac to Google Pixel phone, you can also learn how to transfer music from iPhone/iPod/iPad and other Android phone to Google Pixel 3/2/1(XL).

Google Pixel 3 XL and Pixel 3 is the larger of the two flagship phones from Google in 2018. The Google Pixel 3 XL is a moderate upgrade over its predecessor, the Pixel 2 XL. It of course brings Android 9 Pie, which itself has many upgrades, but that software is also coming to all other Google Pixel owners. Google Pixel 3 will come with the new Android 9.0 OS. On the hardware side of things, we expect to see the return of the Pixel Imprint fingerprint sensor and the squeezable Active Edge to activate the Google Assistant. This year, though, the Pixels will finally add wireless charging to the mix — as well as a dock called the Pixel Stand to support that.

You may want to know:

* How to Transfer Data from iPhone to Google Pixel

* How to Convert Apple Music to Google Pixel

Keep Apple Music Free Forever after 3-Months-Free-Trial without Paying

Since the new production of the Google,Google Pixel phone is released around the world. The method for transferring music from computer to the Google Pixel phone has changed.Follow this guide for step-by-step instructions on how to get your music from computer to your phone.

Nowadays people like to enjoy music on their Android phone. They can listen to music on the Android phones and share music with friends, there is a need for you to transfer music from computer to Android phone so that you can listen to your favorite music anywhere and anytime.You might backup your lovely music to computer from iTunes, iCloud or other Internet service account and now want to get the music to your Android phone, for example the Google Pixel 2XL.

How to Add Music from Computer to Google Pixel

There are many music transfer programs available to transfer music between computer and Android phone.To perfectly transfer music from computer to Google Pixel,you are recommend the “Android Transfer”,which help to completely or selectively transfer music from computer to Google Pixel,including the songs,playlists,attachments.Android Transfer is a powerful music management,allows you transfer music to and from computer,export and import music to and from iTunes Library, and transfer music between iOS device/Android device directly.Android Transfer works well for most Android devices,such as Google Pixel, Google Nexus, Samsung Galaxy, Huawei Mate/P, HTC, Lenovo, LG, ZTE, Motorola, etc.

d_win d_mac
d_win d_mac

Part 1:Export Music from Computer to Google Pixel

Launch Android Transfer and connect your Pixel Phone to PC.Your device will be detected and displayed in the primary window.

android-transfer-mian-page

Step 1.Select Music File to Transfer
Select Music tab.Once your media loads, click Add > Add File or Add Folder.

sync-music-from-pc-to-pixel

Step 2.Sync Songs from Computer to Google Pixel Phone
This brings up your file browser window, from which you can select songs to export from your computer.And you can also create new playlist by right clicking Music to save the imported songs.You are allow to simply Drag and Drop music files from computer to your Google Pixel phone.

Part 2:Transfer Music from Google Pixel to Computer

Step 1.Select Music tab.Once your media loads,choose your wanted songs and click Export > Export to PC.
select-music-from-pixel-to-pc

Step 2.This brings up your file browser window,choose a save path to save songs from your Google Pixel device to computer.

You can simply Drag and Drop music files from Pixel phone to computer.

You can also transfer the whole music playlist from Pixel phone to PC in one click.

export-pixel-music-playlist-to-pc

d_win d_mac
d_win d_mac

Part 3:Transfer Music from Another iPhone/Android Phone to Google Pixel

If you are wondering which Android phone is worth buying, the Pixel and Pixel XL can be a very good option. When you finally switch your old iPhone or Android device to the Pixel and Pixel XL, the next important thing is moving your old phone data to the Pixel/Pixel XL effortlessly. No hurry, the best method is here.

This handy tool allows you to transfer all your content such as contacts, call logs, messages, photos, music, videos, etc to Google Pixel/Pixel XL from HTC One, Huawei Mate/P/G/Nexus, Samsung Galaxy S7/S6/Note 5, iPhone 7/6s/6, iPad Pro/mini and more.

Step 1.Launch Android Transfer and connect both iOS device or Android device and Google Pixel phone to PC.

Step 2.Select the source device from which you want to transfer music files.

connect-devices

Step 3.Click Music tab.

Step 4.Choose your wanted songs and click Export.Select another device from the list.For example,you can transfer music from Pixel phone to iPhone by selecting Export > Export to iPhone directly.
select--music-transfer-from-pixel-to-iphone

You can also transfer the whole music playlist from Pixel phone to other devices in one click.

transfer-pixel-music-playlist-to-iphone

d_win d_mac
d_win d_mac

How to Sync Music from iTunes to Pixel Phone

Most of iPhone/iPad users have found that iTunes songs can’t be played by Google Pixel phones directly. Don’t worry. This Android Transfer program can also help you sync songs, playlist,videos from iTunes Library to Google Pixel Android easily.If you have purchased a new Google Pixel phone and have synced your iPhone,iPad music to iTunes before,learn this tutorial to transfer all backed up music and videos from iTunes to Google Pixel,as well as other Android phone,like Samsung Galaxy S9/S8/S7/S6/S5/S4, Note 9/8/5/4/3, HTC, HUAWEI phone, Sony, Motorola, Nexus,etc.

transfer itunes music to google pixel

Related Article

How to Stream Apple Music on Android for Offline Listening?

How to Transfer Music from Computer to Samsung Galaxy

How to Transfer Photos between Computer and Samsung Galaxy

How to Transfer Music from Computer to iPhone

How to Transfer Music from Android to iPhone/iPad/iPod

How to Transfer Files between Samsung and Computer

Transfer Photos between Computer and Samsung Galaxy S7/S7 Edge

“Last night my best friend Anna send me some interesting photos on computer,I try to transfer the photos to my Samsung Galaxy S7 but failed.What’s going on?Anybody help to solve this problem?Thanks.”-Peter Guan

Samsung Company was the biggest camera mobile producer around the world and it provides mobile phone more than camera in a year.There 3 years,Samsung released several phone series that are powerful and advanced photographing capability,which are favored by most mobile phone users.Anyway,anything is unable to stop young fellows to pursue the funny life for taking photos all the time.Most of us need to share photos with others.The storage of Samsung phone is limited.So it’s inevitable to manage photos on computer timely.This page is showing the solutions about exporting photos from computer to Samsung,sync photos from Samsung to computer,transfer photos between iPhone/iPad/iPod/Android and Samsung.

Transfer Photos between Computer and Samsung Galaxy

Android Transfer-A phone manager that lets you manage your entire mobile lifestyle in one convenient place,help to organize,enjoy and share photos(albums,photo videos) you take everywhere and everytime.Export photos between Android and computer,quickly and easily create a backup of your entire photo library.Add photos from PC/camera/camcorders to your Android phone,transfer photos between iOS device and Android device.Android Transfer is an Android device management systems are great features to have.Almost all brands of Android device are supported,including Samsung,Motorola,HTC,LG,ZTE,Sony,Google,etc,.

d_win d_mac

Part 1:Transfer Photos from Computer to Samsung Galaxy S7/S7 Edge

Launch Android Transfer and connect your Samsung Galaxy S7/S7 Edge to PC.Your Samsung device will be detected and displayed in the primary window.

samsung galaxy s7 manager

Step 1.Click Photos tab.All the albums will be displayed on the left.Select one to import photos from PC to selected Samsung photo album.
Step 2.Click Add > Add File or Add Folder.

add-photos-from-pc-to-samsung

If you only want to select some photos,then click Add File.You can create new albums and add photos in it. Simply right-click the photos category on the left panel, then click New Album.

If you want to transfer all the photos in one folder,then click Add Folder.

Step 3.Select photos or photo folders and add to your Samsung Galaxy S7/S7 Edge.Hold down Shift or Ctrl key to choose multiple photos.

d_win d_mac

Part 2:Transfer Photos from Samsung Galaxy S7/S7 Edge to Computer

Step 1.In the photo management window,choose your desired photos and click Export > Export to PC.

transfer-photos-from-samsung-to-pc

Step 2.It brings up your file browser window. Select a save path to store the photos from your Samsung Galaxy S7/S7 Edge to computer.
You can transfer the whole photo album from Samsung Galaxy S7/S7 Edge to PC.

transfer-photo-from-samsung-to-pc

You can also backup all Samsung Galaxy S7/S7 Edge photos to PC in one click.

android-transfer-mian-page

d_win d_mac

Part 3:Transfer Photos Between iPhone/iPad/iPod/Android and Samsung Galaxy S7

Step 1.Launch Android Transfer and connect both devices to PC.

connect-multiple-devices

Step 2.Select the source device from which you want to transfer photos and albums.

Step 3.Click Photos tab.Choose your wanted photos and click Export.Select another device from the list.For example,you can transfer photos from Samsung Galaxy S7 to iPhone by selecting Export > Export to Device > iPhone directly.

transfer-photos-from-android-to-iphone

You can also transfer the whole photo album from Samsung Galaxy S7/S7 Edge to other devices in one click.

transfer-samsung-photo-album-to-iphone

d_win d_mac

Related Article:

How to Transfer Music from Computer to Samsung Galaxy S6/S7

How to Transfer Videos from Computer to Samsung Galaxy S6/S7

How to Transfer Music from Android to iPhone/iPad/iPod

How to Convert and Play DVD Movies on Samsung

How to Transfer Files between Samsung and Computer